

Page 1
Instruction Sheet
LDO101-01 or LDO101-03 Probe
CAUTION
BEFORE ATTACHING THE PROBE FOR THE FIRST TIME: Set the date and time in the
meter before attaching the probe for the first use. If the meter date and time are
changed after the probe is installed, the probe will retain an incorrect time stamp for the
remainder of its service life, even if the meter time and date are later corrected.
Safety
To ensure that the protection provided by this equipment is not impaired, do not use or install
this equipment in any manner other than that specified in this document.
This symbol, if noted on the instrument, references the instruction manual for operation and/or safety information.
Electrical equipment marked with this symbol may not be disposed of in European public disposal systems after 12
August of 2005. In conformity with European local and national regulations (EU Directive 2002/96/EC), European
electrical equipment users must now return old or end-of life equipment to the Producer for disposal at no charge to
the user.
Note: For return for recycling, please contact the equipment producer or supplier for instructions on how to return
end-of-life equipment, producer-supplied electrical accessories, and all auxiliary items for proper disposal.
LDO10189
Overview
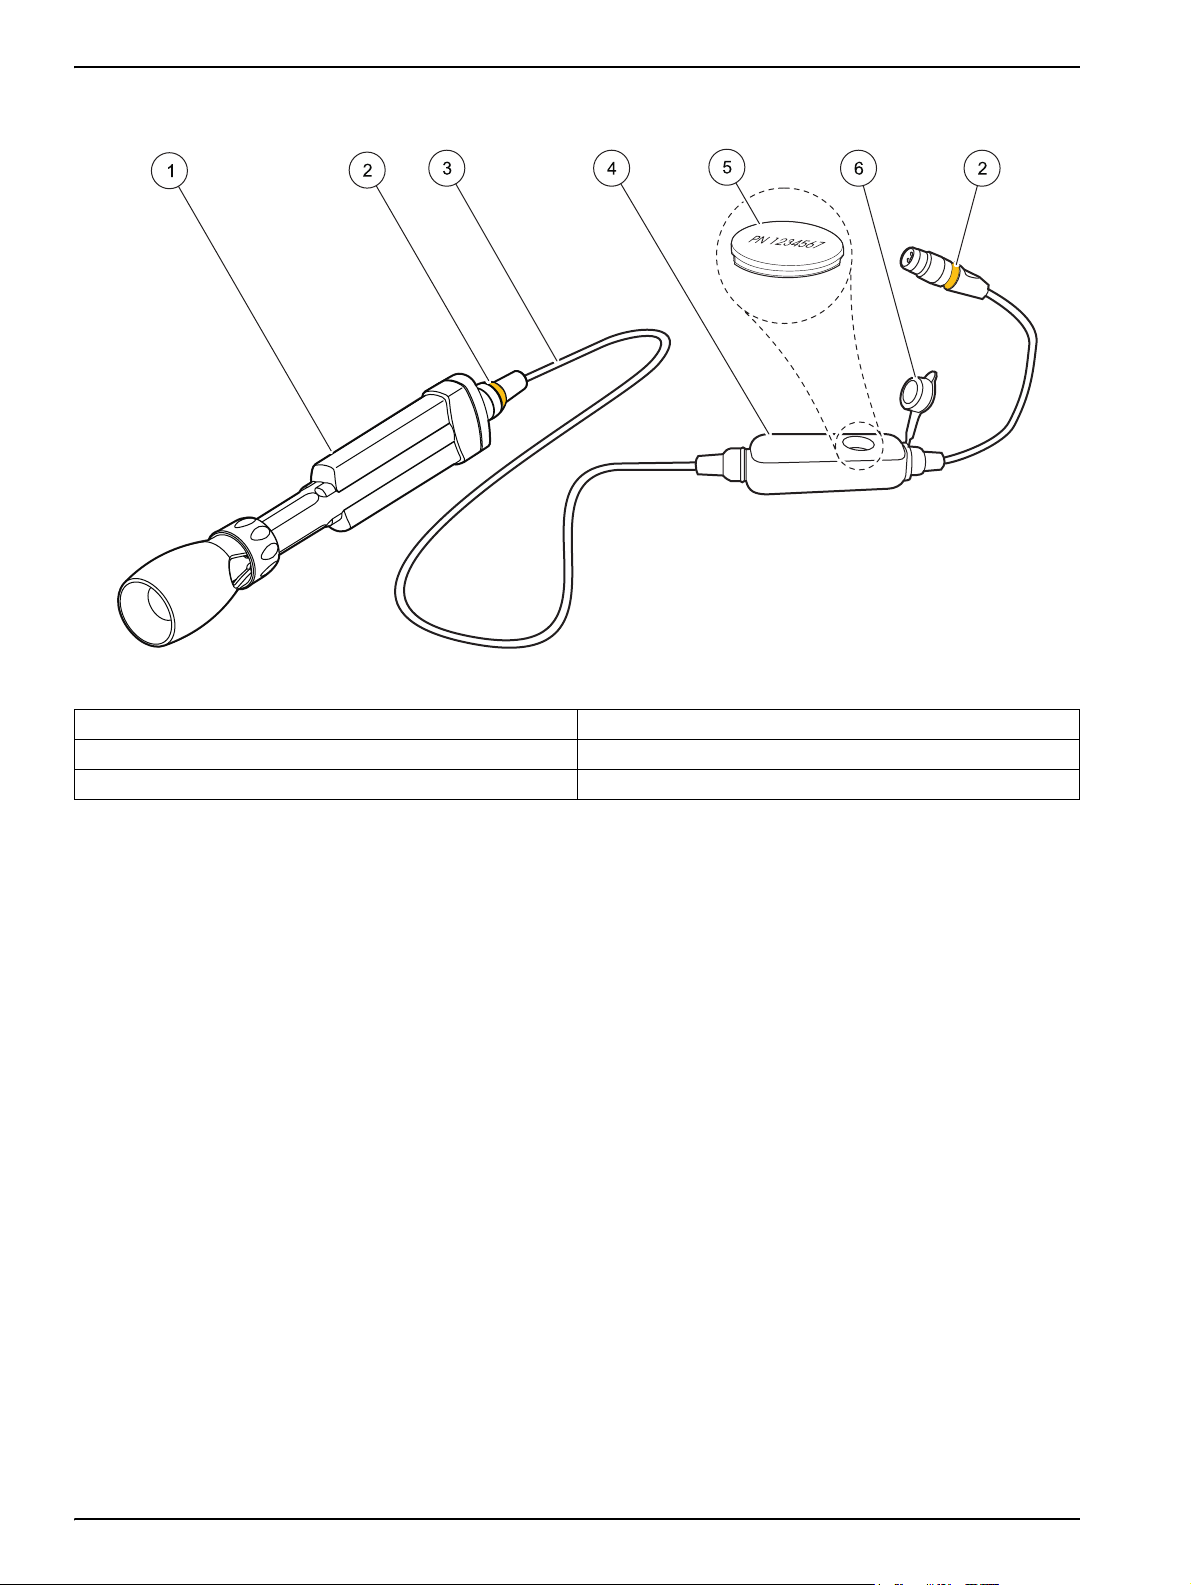
Figure 1 shows the LDO101-01 or LDO101-03 Probe, a luminescent dissolved oxygen (LDO)
electrode. The probe can be equipped with a 1- or 3-meter cable. The probe is designed for
fast, accurate measurement of dissolved oxygen concentration in wastewater, drinking water,
and general applications.
Each electrode is supplied with color-code clips for easy identification. There are two each of
five colors (black, yellow, light green, light blue, and magenta), one for the electrode and one
for the cable connector. Attach a pair of color-code clips to the electrode and cable connector.
Replacement sensor caps (including the iButton) are available (Cat. No. 58112-00).
1
Page 2
LDO101-01 or LDO101-03 Probe
Figure 1 The LDO101-01 or LDO101-03 Probe
1 Probe Body with Shroud 4 Pressure-sensor Module
2 Locations for Color Code Clip Installation 5 iButton
3 1- or 3-meter Cable 6 Cap
1
iButton is a registered trademark of Maxim Integrated Products, Inc.
®1
Removing and Replacing the Shroud
The LDO101 Probe comes fully assembled. Remove the shroud to change the sensor cap
or calibrate the probe. Refer to the Sensor Cap Instruction Sheet for information on
changing the sensor cap (Cat. No. 5811289).
Removing the Shroud
1. Hold the shroud (Figure 2, item 1) and unscrew the locking ring.
2. Slide the shroud and locking ring (Figure 2, item 2) off the probe.
Replacing the Shroud
1. Slide the locking ring (Figure 2, item 2) onto the probe, with the threads toward the
shroud.
2. Slide the shroud (Figure 2, item 1) onto the probe body. Rotate the shroud and move it
up or down the probe body, so that the locking ribs (Figure 2, item 8) on the probe
body are in between the locking ridges in the shroud (Figure 2, item 9).
In the correct position, the relief on the side of the shroud will align with the wide
portion of the probe body (Figure 3). The shroud will move only a few millimeters up
and down the length of the probe prior to tightening the locking ring, and the locking
ring will easily thread onto the shroud.
3. When the shroud is in place, screw on the locking ring and hand-tighten.
2
Page 3

LDO101-01 or LDO101-03 Probe
Figure 2 Sensor End Exploded View
1 Shroud 6 Cap Seal
2 Locking Ring 7 Temperature Sensor
3 Sensor Cap 8 Locking Ribs (4x)
4 O-ring 9 Locking Ridges (8x)
5 Sensor Lens
3
Page 4

LDO101-01 or LDO101-03 Probe
Figure 3 Shroud to Probe Alignment
1 Shroud Relief 2 Wide Portion of Probe Body
Calibration
Each lot of LDO sensor caps is factory-calibrated. For best performance, a one-time
calibration initialization can be performed when a new sensor is installed. Additional
calibrations can be performed but are not required.
Maintenance
For calibration steps, refer to the HQ Portable Meters User Manual. The IntelliCAL™
probes store the current calibration and calibration history in the probe memory. It is not
necessary to recalibrate when moving a calibrated electrode from one meter to another.
Important Note: Do not scrub the sensor cap or the sensor lens.
Important Note: Do not use organic solvent solutions such as acetone or methanol with
the LDO101 sensor cap. These solvents will damage the plastic sensor cap.
General Maintenance
• After use, visually inspect the sensor cap (Figure 2, item 3). Use optical tissue or a
cotton swab with soapy water to clean the sensor cap. Rinse with fresh water.
• Before measuring a new sample, rinse the electrode with deionized water and blot dry
with a paper towel.
• If the cap is sealed properly using the top O-ring seal (Figure 2, item 4), no water
should be present between the sensor cap and the clear plastic sensor lens (Figure 2,
item 5) at the top of the probe. If water is present, remove the cap and thoroughly dry
the inside of the cap and the clear plastic sensor lens. The cap may require
replacement (Cat. No. 58112-00).
Storage
• Between uses, store the probe dry in ambient conditions.
4
Page 5

Specifications
LDO101-01 or LDO101-03 Probe
Specifications are subject to change without notice.
Dissolved Oxygen Range
Dissolved Oxygen Accuracy
% Saturation Resolution 0.1%
% Saturation Accuracy ± 1% of reading
Temperature Range 0–50 ºC
Temperature Resolution 0.1 ºC
Temperature Accuracy ± 0.3 ºC
Pressure Resolution 1 hPa
Pressure Accuracy ± 0.8%
Warranty
0.1–20.0 mg/L (ppm)
1–200% saturation
± 0.1 mg/L for 0–8 mg/L
± 0.2 mg/L for greater than 8 mg/L
Probe is covered by a three-year warranty.
Sensor cap is covered by a one-year warranty.
5
Page 6

FOR TECHNICAL ASSISTANCE, PRICE INFORMATION AND ORDERING:
In the U.S.A. –
Outside the U.S.A. –
On the Worldwide Web – ; E-mail –
Call 800-227-4224
toll-free
Contact the HACH office or distributor serving you.
www.hach.com techhelp@hach.com
HACH COMPANY
WORLD HEADQUARTERS
Telephone: (970) 669-3050
FAX: (970) 669-2932
© Hach Company, 2005–2006. All rights reserved. Printed in the U.S.A. March 2006, Edition 4
 Loading...