

Page 1

DOC022.53.90467
TitraLab Total Hardness content analyzer
USER MANUAL
05/2013, Edition 1
© HACH Company 2013. All rights reserved. Printed in Germany
Page 2

Page 3

Table of Contents
Section 1 Specifications.................................................................................................................... 5
Section 2 General information......................................................................................................... 7
2.1 Safety information........................................................................................................................ 7
2.1.1 Warning labels .................................................................................................................... 7
2.1.2 Safety information for the correct use of the instrument ..................................................... 8
2.1.3 Chemical and biological safety ........................................................................................... 8
2.2 Overview of product..................................................................................................................... 8
2.3 Front and back view..................................................................................................................... 9
Section 3 Installation........................................................................................................................11
3.1 Unpack the instrument............................................................................................................... 11
3.2 Scope of delivery ....................................................................................................................... 11
3.3 Operating environment .............................................................................................................. 13
3.4 Installation.................................................................................................................................. 13
3.4.1 Installation of the burette................................................................................................... 13
3.4.2 Installation of the titration stand ........................................................................................ 15
3.4.2.1 Electrical connection of the magnetic stirrer ............................................................ 16
3.4.3 Installation of tubes ...........................................................................................................17
3.4.3.1 Removal of protective stickers (Uninstalled tubes configuration)............................. 17
3.4.3.2 Connection of feed tubes ......................................................................................... 18
3.4.4 Connection of the electrode.............................................................................................. 19
3.4.4.1 Electrical connection of the electrode ...................................................................... 19
3.4.4.2 Connection of the electrode tubes ........................................................................... 19
3.4.5 Power supply, external...................................................................................................... 19
3.5 Keypad....................................................................................................................................... 20
3.5.1 Optical mouse (Optional) .................................................................................................. 21
3.6 Reagents.................................................................................................................................... 21
Section 4 Operation.......................................................................................................................... 23
4.1 Switch on the instrument............................................................................................................ 23
4.2 Startup ....................................................................................................................................... 23
4.2.1 Language and data output setting .................................................................................... 23
4.2.1.1 Change the language setting ................................................................................... 23
4.2.1.2 Change the data output setting................................................................................ 24
4.2.2 First steps after installation ............................................................................................... 24
4.3 Menu structure........................................................................................................................... 24
4.4 Total Hardness analysis in water samples................................................................................. 25
4.5 Manual component activation .................................................................................................... 26
4.5.1 Burette .............................................................................................................................. 26
4.5.2 Pump................................................................................................................................. 26
4.5.3 Stirrer ................................................................................................................................ 26
4.6 System....................................................................................................................................... 26
4.6.1 Total Hardness units......................................................................................................... 26
4.6.2 Initial addition .................................................................................................................... 27
4.6.3 Data Logger ...................................................................................................................... 27
4.6.3.1 Sample numbers...................................................................................................... 27
4.6.4 Data Output (printer/computer) ......................................................................................... 27
4.6.5 Date/Hour.......................................................................................................................... 28
4.6.6 Display contrast ................................................................................................................28
4.6.7 Language .......................................................................................................................... 28
Section 5 Maintenance ....................................................................................................................29
5.1 Maintenance schedule............................................................................................................... 29
5.2 Power off the instrument............................................................................................................ 29
3
Page 4

Table of Contents
5.3 Clean the burette........................................................................................................................29
5.4 Clean the ISE electrode .............................................................................................................30
5.5 Replace pump cassette..............................................................................................................30
Section 6 Troubleshooting..............................................................................................................33
6.1 Error messages .........................................................................................................................33
6.2 Incorrect results..........................................................................................................................33
Section 7 Replacement parts and accessories .........................................................................35
7.1 Replacement parts .....................................................................................................................35
7.2 Accessories ................................................................................................................................35
Section 8 Contact .............................................................................................................................37
Index ......................................................................................................................................................39
4
Page 5

Section 1 Specifications
These are subject to change without notice!
Performance specifications
Measuring principle Complexometric titration. Potentiometric determination
Application area
Measuring range
Resolution Dependent on the selected units
Electrode Calcium ion selective electrode (combined electrode)
Languages English, Spanish, French and Italian
Data logger 55 data records
Date/time DD-MM-YYYY
Display 128 x 64 pt, backlit liquid crystal display
Keypad
Burette Resolution 0.001 mL
Material of syringe Polypropylene
Volume 10 mL
Tube s White PTFE tubes
Volumetric flow 100 mL/min
Peristaltic pump
Tube Novoprene (internal diameter 2.4 mm)
Measuring electrode
Magnetic stirrer
Computer or printer RJ11 telephone connector
Inputs and outputs
Power supply, external
Determination of Total Hardness (Calcium and Magnesium)
content in water
Min. 0.3 mL or 6 ppm CaCO
Recommended max. 10 mL or 200 ppm CaCO
Maximum titration system capacity of 20 mL or 400 ppm CaCO
7 membrane keys, splash-proof, PET,
lifetime of >6 million key-presses
BNC connector; maximum voltage ±2.2 V, maximum current
1
1 mA.
RCA connector (cinch), maximum voltage 12 V, maximum current
150 mA
Instrument input: 24 V 45-65 Hz, 1 A
External power supply delivered:
Input: 100-240 VAC, ±10 %, 50-60 Hz
Output: 24 VDC, 1.33 A
2
3
3
3
Mouse Mini-DIN connector
Dimensions of measuring instrument and environmental conditions
Enclosure material ABS and enameled steel
Weight Approximately 4 kg
Dimensions 130 x 160 x 300 mm
Working temperature +15 to +40 °C (+60 to +104 °F)
Storage temperature -10 to +50 °C (+14 to +122 °F)
Air humidity <80% relative humidity, non-condensing
Certification
5
Page 6

Specifications
Certification CE
Electrical security According CE, EN 61010
Electromagnetic compatibility According CE, EN 50081-2 and EN 50082-2
Warranty
Warranty 1 year
1
Only for supplied electrode.
2
Only for supplied stirrers.
6
Page 7

Section 2 General information
NOTICE
The manufacturer is not responsible for any damages due to misapplication or misuse of this
product including, without limitation, direct, incidental and consequential damages, and disclaims
such damages to the full extent permitted under applicable law. The user is solely responsible to
identify critical application risks and install appropriate mechanisms to protect processes during a
possible equipment malfunction.
2.1 Safety information
Please read the entire user manual carefully before the equipment is unpacked, set up or
put into operation. Pay attention to all danger and warning statements. Failure to do so
could result in serious injury to the operator or damage to the equipment.
To make sure that the protection provided by this instrument is not impaired, do not use or
install this instrument in any manner other than that specified in these operating
instructions.
DANGER
Indicates a potentially or imminently hazardous situation that, if not avoided, results in death or
serious injury.
Indicates a potentially or imminently hazardous situation that, if not avoided, could result in death
or serious injury.
Indicates a potentially hazardous situation that may result in minor or moderate injury.
Indicates a situation that, if not avoided, could result in damage to the instrument. Information that
requires special emphasis.
Note: Information that supplements points in the main text.
2.1.1 Warning labels
Read all labels and tags attached to the instrument. Failure to do so may result in personal
injury or damage to the instrument. For symbols applied to the instrument, corresponding
warnings are provided in the user manual.
This symbol, if noted on the instrument, references the instruction manual for operation and/or safety
information.
WARNING
CAUTION
NOTICE
This symbol may be found on an enclosure or barrier within the product and indicates a risk of electrical shock
and/or death by electrocution.
7
Page 8

General information
Electrical equipment marked with this symbol may not be disposed of in European domestic or public disposal
systems after 12 August 2005. In conformity with European local and national regulations, European electrical
equipment users must now return old or end-of life equipment to the manufacturer for disposal at no charge to
the user.
Note: For return for recycling, please contact the equipment manufacturer or supplier for instructions on how to
return end-of-life equipment, manufacturer-supplied electrical accessories, and all auxiliary items for proper
disposal.
2.1.2 Safety information for the correct use of the instrument
• This instrument is intended only for indoor use.
• Do not vibrate or jolt the instrument.
• Do not open the instrument. Only authorized and trained personal is allowed to open
the instrument. Follow the following safety information, in addition to any local
guidelines in force.
Guarantee is voided if the instrument is not used in accordance with the guidelines
present in this document.
2.1.3 Chemical and biological safety
Potential danger in the event of contact with chemical/biological materials.
Handling chemical samples, standards and reagents can be dangerous.
Familiarize yourself with the necessary safety procedures and the correct handling of the
chemicals before the work and read and follow all relevant safety data sheets.
This instrument has been developed to meet the requirements of volumetric titration applications.
It is therefore aimed at experienced users who have the knowledge required to operate the
instrument and implement the security instructions enclosed. Remember that this instrument
must not, under any circumstances, be used to perform test on living beings.
Normal operation of this instrument may involve the use of hazardous chemicals or
biologically harmful samples.
• Observe all cautionary information printed on the original solution containers and
safety data sheet prior to their use.
• Dispose of all consumed solutions in accordance with national regulations and laws.
• Select the type of protective equipment suitable to the concentration and quantity of
the dangerous material at the respective work place.
2.2 Overview of product
WARNING
WARNING
Many industrial and domestic water users are concerned about the hardness of their
water. Hardness is caused by compounds of calcium and magnesium and by a variety of
other metals. High levels of hard-water ions such as Ca
deposits in plumbing, appliances, and boilers. Water is an excellent solvent and readily
dissolves minerals it comes in contact with. As water moves through soil and rock, it
dissolves very small amounts of minerals and holds them in solution. Calcium and
magnesium dissolved in water are the two most common minerals that make water "hard".
Originally, the hardness of water was understood to be a measure of the capacity of water
for precipitating soap. Soap is precipitated chiefly by the calcium and magnesium ions
commonly present in water, but may also be precipitated by ions of other polyvalent
8
2+
and Mg2+ can cause scaly
Page 9
metals, such as aluminium, iron, manganese, strontium and zinc, and by hydrogen ions.
Because, all but the first two are usually present in insignificant concentrations in natural
waters, hardness is defined as a characteristic of water, which represents the total
concentration of just the calcium and the magnesium ions expressed as calcium
carbonate.
The TitraLab Total Hardness system can be used for the determination of sum of calcium
and magnesium in multiple types of waters: industrial, boilers, ground, surface, drinking
waters, etc. The system is not intended for effluents and waters having a high
concentration of salts. The lowest concentration that can be determined is 6 ppm
CaCO3 mg/L, for lower concentrations refer to Factor entry at 4.3 Menu structure,
page 24.
TitraLab features an RS 232 C interface to enable communication with a computer or
printer. Another port enables a mouse (optional) to be connected to perform all the
functions of "OK". A convenient titration stand is also integrated and equipped with
stirrers; and pump integrated with the titrator add the reagent.
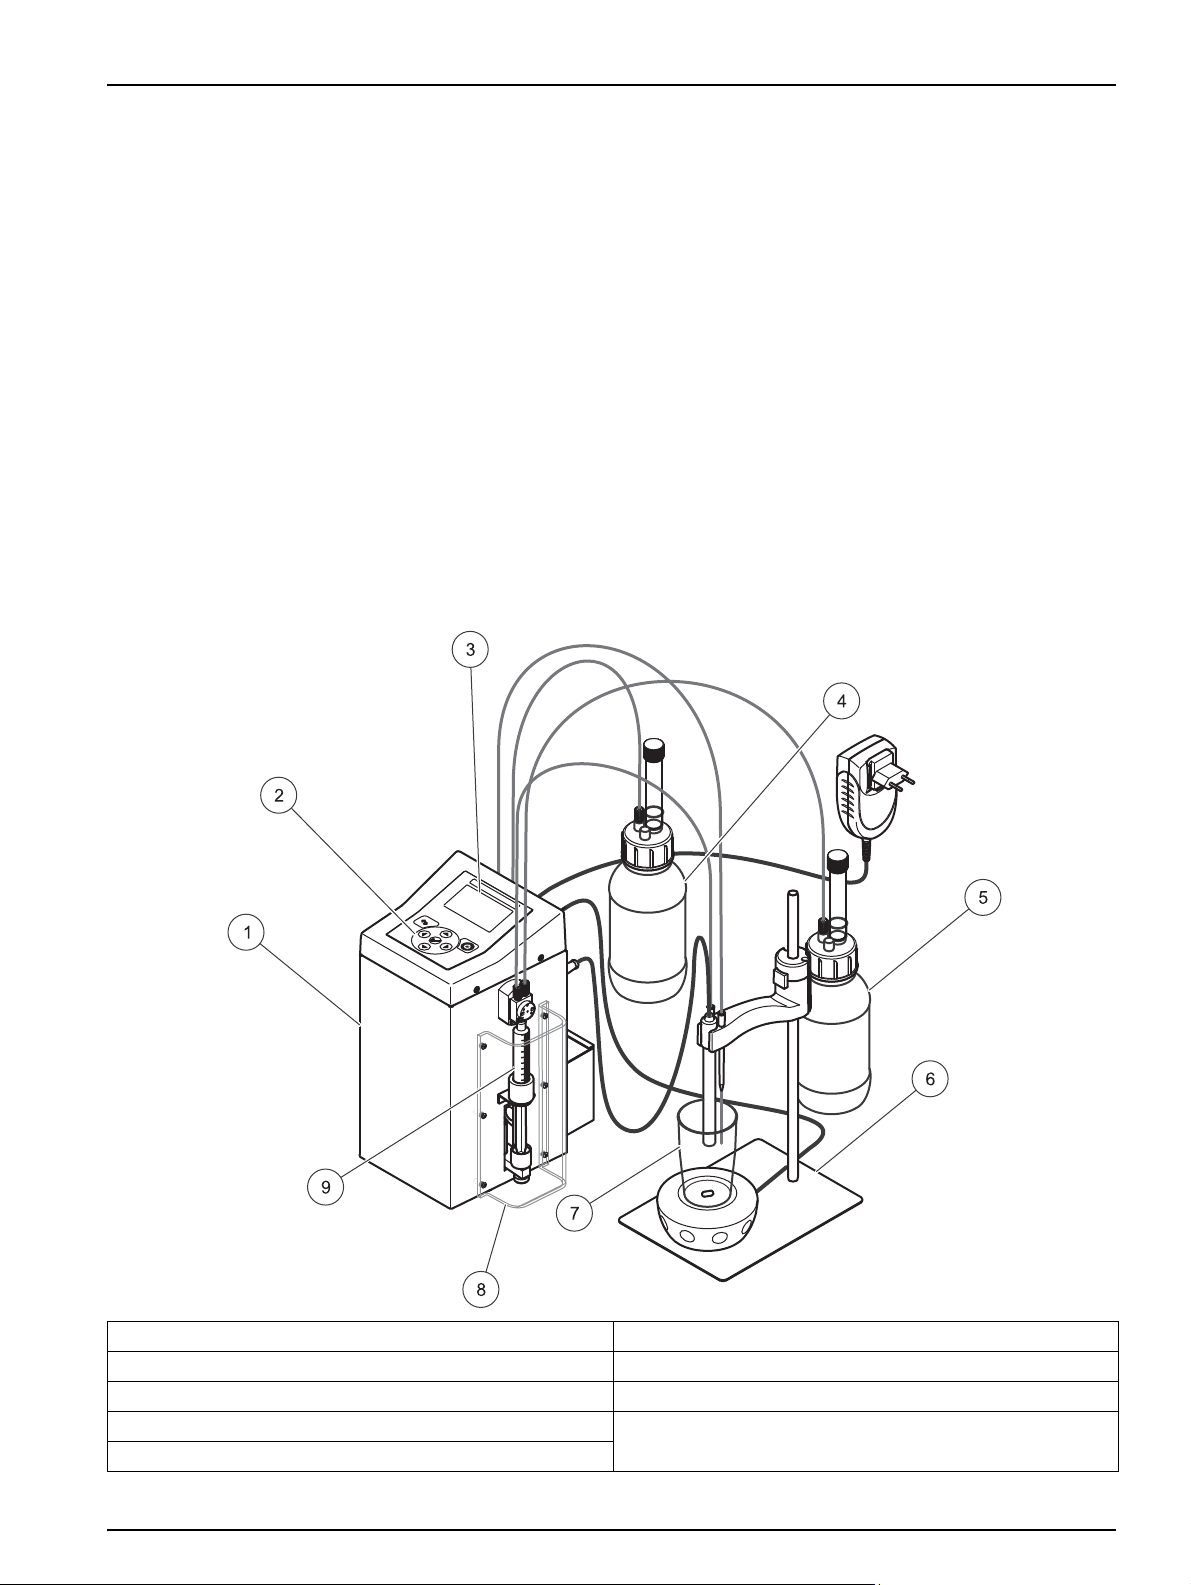
2.3 Front and back view
Figure 1 Front view
General information
1 TitraLab Total Hardness system 6 Titration stand with magnetic stirrer
2 Keypad 7 Titration cell
3 Display 8 Syringe cover
4 Auxiliary reagent 9 Burette
5 Titrant
9
Page 10

General information
Figure 2 Back view
1 Connector for mouse 5 Connector for magnetic stirrer
2 Connector for printer or computer 6 Burette valve, IN socket
3 Electrode connector 7 Burette valve, OUT socket
4 Connector for power supply
10
Page 11

Section 3 Installation
Only qualified personnel should conduct the tasks described in this section of the manual.
Safety of any system incorporating this instrument is responsibility of the assembler of the
system.
Risk of injury to eyes, skin and respiratory
When working with chemicals and/or solvents, always observe the relevant accident prevention
regulations and wear appropriate personal protective clothing for eye, face, hand, body and/or
respiratory protection.
Make sure that the system is only unpacked, assembled, connected and operated by qualified
and trained personnel.
3.1 Unpack the instrument
Unpack all supplied parts carefully, as they are highly sensitive in part to shock and
impact. Read the user manual prior to installation and proceed exactly as described.
DANGER
WARNING
3.2 Scope of delivery
Please check that the order is complete. If anything is missing or damaged, please contact
the manufacturer or retailer.
11
Page 12

Installation
Figure 3 Scope of delivery
1 TitraLab Total Hardness system 8 Combined Calcium (Ca2+) Ion Selective electrode
with cable
2 2x tube with bottle closure (DIN 45 thread) supplied
pre-installed
3 2x tube to attach to electrode, supplied pre-installed 10 Power supply, external
4 Titration stand holder including magnetic stirrer 11 Hardware sleeve
5 10x Titration Beakers, PP, 100 mL 12 Syringe with plunger
6 10x Teflon magnetic stirring bars (20 mm x 6 mm) 13 2x Desiccant cartridge
7 10x white O-rings for burette and pump threads
9 Adapter for power supply
12
Page 13

3.3 Operating environment
The instrument may not be used in dangerous environments.
The manufacturer and its suppliers reject any express or indirect guarantee for use with high-risk
activities.
Protect the instrument from temperature extremes, including heaters, direct sunlight and other
heat sources.
Note the following points so that the instrument will operate perfectly and have a long
service life.
• Place the instrument firmly on an even surface. Do not push any objects under the
instrument.
• The ambient temperature must be +15 to +40°C (+60 to +104°F).
• The relative humidity should be less than 80%; moisture should not condense on the
instrument.
Installation
WARNING
NOTICE
• A minimum clearance of 15 cm (5.9 in.) must be ensured above and on all sides of the
device; this allows the air to circulate and prevents overheating of the electric parts.
The dosage arm of the stepper motor must be able to move freely.
• Do not operate or store the instrument in extremely dusty, humid or wet locations.
• Make sure that no liquids enter the instrument and immediately wipe away any liquids
that contact the instrument.
• Protect the instrument against vibrations, direct sunlight, corrosive gases as well as
strong magnetic and/or electric fields.
• Only use genuine replacement parts and accessories.
• Install the instrument in a levelled place and on a compact surface to minimize the
sound level of the instrument. This will avoid undesired resonances that can increase
the sound level.
• Keep the surface of the instrument and all accessories clean and dry at all times.
Splashes or spills on the instrument should be cleaned up immediately.
The instrument must be serviced by the manufacturer's service department at the
prescribed intervals.
3.4 Installation
3.4.1 Installation of the burette
The burette dispenses the titrant: EDTA 0.010 M TitraVer (P/N 205-53) solution.
The burette comprises the syringe, stepper motor and valve. The stepper motor and valve
are already installed in the TitraLab; the syringe has to be installed by the user.
WARNING
Risk of injury to pinch points and cuts
Make sure that the titrator is never used/operated without the syringe cover.
Do not introduce your fingers on the bottom of the cover while the instrument is connected.
Make sure that the system is only assembled by qualified and trained personnel.
13
Page 14

Installation
NOTICE
Warning against system damage
Make sure that the syringe is never operated without the attachment sleeve.
Only use genuine replacement parts and accessories.
The instrument must be serviced by the manufacturer's service department at the prescribed
intervals.
Note: Make sure that you do not misplace the attachment sleeve for the syringe. It is not provided
with a new syringe.
1. Push the syringe piston into the syringe body.
Slide the attachment sleeve fully onto the syringe so that the narrow end points
toward the piston.
2. Remove the syringe cover by unscrewing it.
3. Point the syringe tip upward, place the syringe into the bracket such that the
attachment sleeve is above the bracket.
4. Hold the attachment sleeve in the bracket and screw the syringe onto the valve from
below.
With the narrow side facing down, carefully press the attachment sleeve into the
bracket.
5. Withdraw the piston from the syringe and place it onto the screw in the dosage arm.
Hold the syringe piston and turn the attachment screw on the dosage arm into the
thread in the piston.
6. Fix the syringe cover with six screws.
WARNING
Risk of injury to eyes, skin and respiratory
During the first days of system use, check the screw joint between the syringe and valve to avoid
leaks and the potential escape of reagents.
When working with chemicals and/or solvents, always observe the relevant accident prevention
regulations and wear appropriate personal protective clothing for eye, face, hand, body and/or
respiratory protection.
14
Page 15

Figure 4 Installation of the burette
Installation
1 Push the piston into the syringe body.
Slide the attachment sleeve onto the syringe.
2 Unscrew the six screws and remove the syringe cover. 5 Screw the piston onto the dosage arm.
3 Insert the syringe into the bracket. 6 Fix the syringe cover with six screws.
4 Screw the syringe tip onto the valve.
Place the attachment sleeve into the bracket.
3.4.2 Installation of the titration stand
The titration stand consists of a holder onto which the electrode, titration cell and magnetic
stirrer are attached. The titration is performed in the titration cell.
1. Place the titration stand on the right side (syringe side) of the titrator (observe the
routing of the cable).
2. Place a magnetic stirring bar into a titration cell.
Place a titration cell over the magnetic stirrer.
3. Place the rubber ring on the stand rod to set the minimum height of the electrode
holder.
4. Press the button to lock the electrode holder and place the electrode holder on the
stand rod. The electrode holder is locked upon release of the button.
5. Remove the cap from the tip of the electrode.
Insert the electrode into the electrode holder.
NOTICE
Warning against system damage
Make sure that the height setting of the electrode holder protects the electrode against damage
from the stirring bar and against contact with the bottom of the titration cell.
Keep the lock button pressed whenever the electrode holder is being moved.
Note: Whenever the electrode is taken from the titration stand or the titration cell is removed from
the titration stand, always place a container beneath the electrode. Otherwise, drips from the sample
or chemicals could contaminate the work area.
15
Page 16

Installation
Figure 5 Installation of the titration stand
1 Place a magnetic stirring rod in a titration cell. Place a
titration cell over the magnetic stirrer.
2 Position a rubber ring on the stand rod to set the
minimum height of the electrode holder. Press the
electrode holder lock button and place the electrode
holder on the stand rod.
3 Insert the electrode and adjust the height of the
3.4.2.1 Electrical connection of the magnetic stirrer
1. Connect the cable of the magnetic stirrer to the STIRRER port on the back of the
TitraLab.
The power is supplied via the TitraLab.
electrode holder.
16
Page 17

Figure 6 Electrical connection of the magnetic stirrer
1 Connect the cable of the magnetic stirrer to the STIRRER port.
Installation
3.4.3 Installation of tubes
WARNING
Risk of injury to eyes, skin and respiratory
During the first days of system use, check the screw joint between the syringe and valve to avoid
leaks and the potential escape of reagents.
When working with chemicals and/or solvents, always observe the relevant accident prevention
regulations and wear appropriate personal protective clothing for eye, face, hand, body and/or
respiratory protection.
Make sure that the tubes are never kinked.
Regularly check the system as well as all tubes and connections for leaks, condition and
cleanliness.
To prevent twisting of the tubes, you should always connect flange tube connections
before those with grommets.
The system is delivered with four tubes; these are supplied pre-installed on the TitraLab
and only need to be connected to the relevant reagent bottles and to the electrode.
3.4.3.1 Removal of protective stickers (Uninstalled tubes configuration)
1. Remove the protective stickers on the burette valve and pump connections.
2. Make sure that the pre-installed white O-rings are not removed.
3. Check that the O-rings are in a horizontal position inside the thread.
17
Page 18

Installation
Figure 7 Position of protective stickers
3.4.3.2 Connection of feed tubes
The system is delivered with two feed tubes with bottle closures (DIN 45 thread). These
feed tubes are supplied pre-installed on the TitraLab and only need to be connected to the
relevant reagent bottles.
1. Connect the tube from the IN socket of the burette valve to the titrant bottle (EDTA
0.010
M TitraVer, P/N 205-53). Screw on the bottle closure to do this.
2. Connect the tube from the IN socket of the pump to the acid bottle (Hardness Buffer
reagent, TRIS 0.1
3. Place a desiccant cartridge into the designated opening in each bottle closure.
Figure 8 Connection of feed tubes
M). Screw on the bottle closure to do this.
18
Page 19

3.4.4 Connection of the electrode
3.4.4.1 Electrical connection of the electrode
1. Connect the electrode cable to the ELECTRODE port on the back of the TitraLab.
The power is supplied via the TitraLab.
3.4.4.2 Connection of the electrode tubes
The sensor holder of the titration stand has two tube guides.
1. Connect the tube from the OUT socket of the pump to the electrode.
2. To do this, push the free end of the tube into guide "1" of the sensor holder until it
reaches the middle of the electrode (1).
3. Connect the tube on the OUT socket of the burette valve to the electrode.
4. To do this, push the free end of the tube into guide "2" of the sensor holder until the
end of the tube is flush with the tip of the electrode (2).
Figure 9 Connection of the electrode
Installation
3.4.5 Power supply, external
Risk of electric shock
Make sure the AC supply voltage is suitable for the power supply and the mains plug style is
suitable for the type of outlet socket.
Only use the original power supply and plug connectors.
Fire and electrical shock hazard.
Take care, when using chemical products and liquids, to avoid dropping them on the power
supply or mains connections.
DANGER
DANGER
19
Page 20

Installation
The power supply is provided with different plug connectors. The correct plug connector
must be attached to the power supply before first use.
Figure 10 Plug connector attachment
1 Slide the plug connector into the power supply 2 Click the plug connector into place
Note: To change the plug connector, press in the catch and slide the plug connector upward.
3.5 Keypad
Navigation key UP
• Used to select between different options on the display.
• Increases numeric values.
• Shows the previous data record in the data log menu.
• Empties the syringe through the discharge tube during manual control.
Navigation key DOWN
• Used to select between different options on the display.
• Reduces numeric values.
• Shows the next data record in the data log menu.
• Fills the syringe through the feed tube during manual control.
ON/OFF key
20
Navigation key LEFT
• Moves the cursor backward for entry of numeric values.
• Scrolls up in menus.
• Empties the syringe through the feed tube during manual control.
Navigation key RIGHT
• Moves the cursor forward for entry of numeric values.
Page 21

Figure 11 Keypad
Installation
• Scrolls down in menus.
RETURN key
• Scrolls back in menus.
• Cancels a manual control.
• Cancels a titration.
OK key (Check mark)
• Confirms the gray-highlighted menu items and scrolls forward in the menu.
• Shows the first data record in the data log.
1 Navigation key UP 5 Navigation key DOWN
2 ON/OFF key 6 Navigation key LEFT
3 Navigation key RIGHT 7 RETURN key
4 OK key (Check mark)
3.5.1 Optical mouse (Optional)
On TitraLab Total Hardness all functions executed with OK can also be performed with an
optical mouse.
1. Connect the mouse cable to the port labeled MOUSE on the back of the TitraLab.
The power is supplied via the TitraLab.
3.6 Reagents
• Titrant reagent: EDTA 0.010 M TitraVer, P/N 205-53
• Buffer reagent: Hardness buffer reagent (TRIS 0.1 M).
21
Page 22

Installation
22
Page 23
Section 4 Operation
4.1 Switch on the instrument
Become familiar with the instrument functions before operation. Learn how to navigate
through the menu and perform the relevant functions.
1. Connect the input connector of the power supply to the POWER IN port on the back of
the TitraLab.
2. Connect the power supply to a power socket.
3. Press ON/OFF below the display to switch on the instrument.
4. The instrument performs a self-test upon each activation.
Note: Wait approximately 20 seconds before switching on again so as not to damage the electronics
and mechanics of the instrument
Figure 12 Switch on the instrument
4.2 Startup
4.2.1 Language and data output setting
The titrator software supports multiple languages. The first time the instrument is switched
on, a language selection list is displayed automatically upon completion of the self-test.
1. Select the required language.
2. Press OK to confirm the selection.
3. Select the type of data output (deactivated, printer, computer) and confirm with OK.
4.2.1.1 Change the language setting
The instrument functions in the selected language until the option is changed.
1. Turn the instrument on.
2. Select SYSTEM > LANGUAGE.
3. Select the required language.
23
Page 24
Operation
4. Press OK to confirm the selection.
4.2.1.2 Change the data output setting
The instrument functions in the selected data output until the option is changed.
1. Turn the instrument on.
2. Select SYSTEM > DATA OUTPUT.
3. Select the required setting.
4. Press OK to confirm the setting.
4.2.2 First steps after installation
Risk of injury to eyes, skin and respiratory
Make sure that the reagent tubes are in the correct position in the titration cell to avoid leaks and
the potential escape of reagents.
1. Prime the burette with titrant (4.5.1 Burette).
2. Prime the pump to add the Hardness Buffer (4.5.2 Pump).
WARNING
3. Check the stirring speed (4.5.3 Stirrer).
4.3 Menu structure
Section 6 Troubleshooting provides a list of all error and warning messages, and also
describes all necessary countermeasures.
MAIN MENU
ANALYZE TOTAL HARDNESS Titration program to determine water Total Hardness
Insert sample: 1 Dispense 50.0 mL of sample in the titration cell.
Start Analysis Start analysis.
MANUAL ACTIVATION Select which element is to be controlled manually; refer to section 4.5, page 26.
Burette Manual control of burette.
Return Empties the burette into the titrant bottle (navigation key LEFT)
Empty Empties the burette into the titration cell (navigation key UP)
Fill Fills the burette with titrant (navigation key DOWN)
Pumps Manual control of pump.
Pump1 Dispensing Start the pump.
Sets the stirring speed.
Stirrer
Select ON/OFF with OK.
Select the stirring speed with UP/DOWN.
24
Page 25
MAIN MENU
SYSTEM System settings; refer to section 4.6, page 26.
Total Hardness units The unit and factor to determine water Total Hardness are adjusted individually.
Units Unit selection.
meq/L CaCO
mmol/L CaCO
ppm CaCO
mg/L CaCO
dGH
°dH
gpg
°e
°Clark
°F
Factor
Data Logger Data log with up to 55 results; refer to section 4.6.3, page 27.
Empty Data-Logger Empties the data log.
Display data Display results with search criteria.
By date: Display results by date.
Continue… Display all results.
Data Output Define the data output; refer to section 4.6.4, page 27.
Deactivated Deactivates the data output.
For Printer Activates data output on the printer.
For Computer Activates data output on the computer.
Date / Hour Entry of date and time.
Display contrast Selection of display contrast.
Language Selection of operating language
SPANISH
ENGLISH
ITALIAN
FRENCH
3
3
3
3
(default)
The factor must be adjusted individually.
Default value F=20.02; Calculated for EDTA 0.010 M; Sample Volume: 50 mL;
Results expressed in mg/L CaCO
For Total Hardness value lower than 6 mg/L CaCO3, it is recommended to analyze
100 mL of sample instead of 50 mL. In this case it is necessary to modify the factor
for calculation to F=10.01
Total Hardness value higher than 380 mg/L CaCO3. It is recommended to analyze
mL of sample instead of 50 mL. In this case add approx. 40 mL of distilled water
10
to the vessel before the analysis and modify the factor calculation to F=100.09
3
Operation
4.4 Total Hardness analysis in water samples
1. Place a magnetic stirring bar in a titration cell and dispense the sample as follows:
• Water: 50.0 mL sample
2. Place the titration cell over the magnetic stirrer.
25
Page 26

Operation
3. Lower the electrode into the titration cell.
Note: Make sure that the electrode cannot be damaged by the stirring bar or come into contact
with the bottom of the titration cell. Make sure that the sensitive part of the ISE electrode is
covered by sample
4. Select ANALYZE TOTAL HARDNESS. "INSERT SAMPLE: 1" is shown on the display.
5. Select OK.
The following steps are carried out automatically by TitraLab:
• Hardness Buffer is dispensed into the titration cell for 7 seconds
• The solution is stirred for 5 seconds
• Titration is then started
6. The result is shown on the display and, depending on the setting, sent to a printer or
computer.
7. Press OK to confirm the result.
To begin another analysis, select OK. "NEXT SAMPLE" is shown on the display.
4.5 Manual component activation
4.5.1 Burette
4.5.2 Pump
4.5.3 Stirrer
1. Select MANUAL ACTIVATION > BURETTE and press OK to confirm.
• Select FILL with the DOWN navigation key to fill the burette.
• Select EMPTY with the UP navigation key to empty the burette into the titration cell.
• Select RETURN with the LEFT navigation key to empty the burette back into the
titrant bottle.
Note: Repeat this procedure multiple times to make sure that the dispensing process functions
correctly.
1. Select MANUAL ACTIVATION > PUMPS and press OK to confirm.
2. Press OK to switch the pump on or off.
Note: Repeat this procedure multiple times to make sure that the dispensing process functions
correctly.
1. Select MANUAL ACTIVATION > STIRRER and press OK to confirm.
2. Press OK to switch the stirrer on or off.
3. Use the navigation keys UP and DOWN to select the stirring speed.
4.6 System
This function can be used to adapt the titrator to specific requirements.
4.6.1 Total Hardness units
The unit and factor for calculation must be adjusted individually.By default the instrument
will calculate the total hardness content in mg/L CaCO3, F=20.02. Valid only if:
• TItrant reagent EDTA 0.010 M TitraVer, P/N 205-53
26
Page 27

mmol/L 1 0.000249 0.4471 0.4281 0.357 0.2497
ppm, mg/L 20.02 1 17.85 17.12 14.25 10
°dH, dGH 2.237 0.05603 1 0.9591 0.7986 0.5603
gpg 2.336 0.05842 1.043 1 0.8327 0.5842
°Clark, °e 2.800 0.07016 1.252 1.201 1 0.7016
°F 4.004 0.1 1.785 1.712 1.425 1
4.6.2 Initial addition
By default 0 mL.
Volume of the addition added at the beginning of the titration. Only recommended when
the expected titrant reagent consumption is higher than 6 mL.
Initial addition recommended = Expected titrant volume - 1 mL.
Operation
• Sample volume: 50 mL
Table 1 Conversion table
mmol/L ppm, mg/L °dH, dGH gpg* °Clark, °e °F
4.6.3 Data Logger
This section describes the functions of the data log.
• Up to 55 results are stored.
• The results can be displayed, printed or sent to a computer.
• When the data log is full, the oldest result is overwritten automatically.
1. Select SYSTEM > DATA LOGGER > DISPLAY DATA and press OK to confirm. A range
of search filters can be used to display the results.
BY DATE: displays the results for a specific date.
CONTINUE: displays all results.
2. To empty the data log, select SYSTEM > DATA LOGGER > EMPTY DATA-LOGGER and
press
OK to confirm.
4.6.3.1 Sample numbers
When a titration program is started, the first sample is assigned the number 1. All
subsequent samples receive sequential numbers until the titration program is closed.
When the program is launched again, the sequential numbers reset to 1.
4.6.4 Data Output (printer/computer)
This function is only displayed if a printer or computer is connected and activated for data
output. Programs, settings and results can be printed or transferred. Following a titration
or calibration, the following data is printed or transferred:
• Type of analysis, date and time, titration result, titrant end volume, duration of titration
and sample number.
1. Select SYSTEM > DATA OUTPUT.
2. Select FOR PRINTER followed by the relevant printer model, such as thermal or dot
matrix. Confirm with
OK.
Select FOR COMPUTER followed by either CAPTURE or TICOM. Confirm with OK.
27
Page 28

Operation
4.6.5 Date/Hour
Entry of date and time.
4.6.6 Display contrast
Increases or decreases the display contrast.
4.6.7 Language
English, Spanish, Italian, French.
28
Page 29

Section 5 Maintenance
WARNING
Risk of injury
Before maintenance or repair work is conducted, thoroughly rinse the instrument with deionized
water and make sure that there are no residual chemicals in the tubes and pumps.
Only use genuine replacement parts and accessories.
The instrument must be serviced by the manufacturer's service department at the prescribed
intervals.
After maintenance tasks or service, the following points have to be checked:
• The housing of the instrument has to be closed correctly using the corresponding
screws.
• Check the syringe cover for fissure or damage, replace if necessary. The syringe
cover has to be attached firmly to the instrument using the corresponding screws.
• Place the instrument firmly on an even surface.
5.1 Maintenance schedule
Maintenance task Every week 6 months 12 months
Replace dry desiccant cartridges content. x
Check all tube connections for leaks and damage. x
Replace burette syringe x
Check valve block x
Burette feed tube x
Burette discharge tube x
Peristaltic pump, pump cassette x
Pump feed tube x
Pump discharge tube x
Bottle closure set x
Check syringe and syringe connection for leaks and
damage
x
5.2 Power off the instrument
At the end of the working day, deactivate the instrument as follows:
• Empty the contents of the burette into the titrant bottle; refer to section 4.5.1, page 26.
• Empty and clean the used titration cells with deionized water
When the instrument is to be deactivated for multiple days or extended periods, perform
the following steps:
• Clean the burette and pumps with deionized water
• Seal the reagent bottles with the original bottle closures
• Empty and clean the used titration cells with deionized water
5.3 Clean the burette
Make sure that there are no crystals or other sediments inside the syringe. If such deposits
are discovered, clean the syringe immediately, as this will otherwise damage the plunger.
29
Page 30

Maintenance
5.4 Clean the ISE electrode
Possible deposits formed on the membrane are removed by immersing the electrode in
distilled water for a few minutes. After that, condition the electrode by immersing it for
30 minutes in a solution of 10 mg/L Calcium. Store the electrode clean and dry with the
protective cap on.
5.5 Replace pump cassette
1. Remove the screws on the right and left of the housing cover (refer to point 1 in
Figure 13).
2. Remove the housing cover.
3. Press the ends of the gripper clamps together (with pliers, for example) and slide the
clamps down and off the connectors.
Remove the tubes from the connectors.
4. Press in the catches on the right and left of the pump cassette.
Remove the pump cassette from the shaft.
5. Slide the gripper clamps onto the tubes of a new pump cassette.
6. Slide the new pump cassette onto the shaft until the catches engage.
7. Slide the tubes onto the connectors.
8. Press the ends of the gripper clamps together (with pliers, for example) and slide the
clamps up onto the connectors.
9. Put the housing cover back on and tighten the screws.
30
Page 31

Figure 13 Replace pump cassette
Maintenance
1 Remove the screws on the right and left of the housing
cover.
2 Remove the housing cover. 4 Press in the catches on the right and left of the pump
3 Press the ends of the gripper clamps together (with
pliers, for example) and slide the clamps down and off
the connectors.
Remove the tubes from the connectors.
cassette.
Remove the pump cassette from the shaft.
31
Page 32

Maintenance
32
Page 33

Section 6 Troubleshooting
6.1 Error messages
Error displayed Cause Resolution
The maximum volume is reached
Maximum volume reached.
Equivalence points not found.
Data logger empty.
All data will be erased. All data in the data log will be erased.
Printing error. Printer is connected but not activated. Switch on the printer.
PC not connected.
Unstable mV reading
before the titration is completed. The
titration is cancelled automatically.
No equivalence points found during
titration.
Total Hardness value below measuring
range.
No results are stored or no results
match the search filter.
Computer is activated but not
connected.
Defective electrode and/or insufficient
immersion.
Empty the titration cell and restart the
titration.
• Check the system with a
calcium standard of known
concentration (for example
40
ppm of total Hardness)
• Verify that, after TRIS addition,
the pH of the sample is between
9.5-10.
• Check the electrode according
to manufacturer
recommendations, maintain
electrode as required. Check if
porous diaphragm is covered by
the sample.
Change the search filter criteria.
Check the computer connection.
Check electrode according to
manufacturer recommendations,
maintain electrode as required. Check
sensitive part of electrode is covered by
sample.
6.2 Incorrect results
Incorrect results Cause Resolution
In case of problems or wrong results it
is always recommended verify that the
titration has finished correctly adding,
The result differs from the expected
value
The selected units and the factor
introduced for them is not correct.
after the analysis, some drops of
Hardness 2 Solution (P/N 425-32). Blue
color indicates that the titration has
finished properly. If not, verify all the
points mentioned in this section.
33
Page 34

Troubleshooting
34
Page 35

Section 7 Replacement parts and accessories
NOTICE
Warning against system damage
Only use genuine replacement parts and accessories.
The instrument must be serviced by the manufacturer's service department at the prescribed intervals. Do not attempt to
service this product yourself, except as noted in the user manual.
7.1 Replacement parts
Description Cat. No
TitraLab Total Hardness system for waters, with 1 x 10 mL syringe and pump. Accessories
included: electrode holder with magnetic stirrer, combined calcium ISE electrode, 10 titration
cells and stirring bars
Calcium (Ca2+) combined ISE electrode with 1m fixed cable and BNC plug LZW9660C.97.002 C
Titration stand with sensors support and magnetic stirrer for TitraLab Total Hardness LZW2332.99
Magnetic stirrer for stand Total Hardness LZW2330.99
10x Teflon magnetic stirring bars, (20 x 6 mm) LZW9339.99
Titration Vessel, PP, 40-100 mL (pack of 50 pcs) 904-490
Plastic syringe, 10 mL LZW2323.99
Attachment sleeve for syringe LZW8743.99
Inlet tube for burette/pump, L = 65 cm, d = 2.5 x 1.5 mm, with R6 racord LZW8705.99
Outlet tubes set for burette.L = 55 cm, d = 2 x 1 mm, with R6 racord LZW8709.99
Pump cassette with neoprene tube, internal diameter 2.4 mm, flow rate 100 mL/min. LZW8691.99
Screw cap DIN 45 LZW8729.99
10x replacement O-rings for tube connections LZW8734.99
Cotton filter cartridge for reagent bottle cap LZW9199.99
Electro-valve for Burette LZW9249.99
LLV2310.97.1102
7.2 Accessories
Description Cat. No
3-button mouse LZW9240.99
Standard PC keyboard, mini-DIN connector. LZW9013.99
RS 232 C cable for connection between titrator and PC, with 9-pin and USB connectors LZW9135USB.99
KyoMouse RS for use with TitraLab (with specific firmware) with connection cable. LZW8204.99
5 rolls thermal paper for KyoMouse, 5 year warranty LZW8205.99
5 rolls thermal paper for KyoMouse, 10 year warranty LZW8206.99
Hardness 2 Test soluiton, 100 mL MDB 42532
EDTA standard solution, 0.010 N 1000 mL 20553
35
Page 36

Replacement parts and accessories
36
Page 37

Section 8 Contact
HACH Company
World Headquarters
P.O. Box 389
Loveland, Colorado
80539-0389 U.S.A.
Tel (800) 227-HACH
(800) -227-4224
(U.S.A. only)
Fax (970) 669-2932
orders@hach.com
www.hach.com
HACH LANGE GMBH
Willstätterstraße 11
D-40549 Düsseldorf
Tel. +49 (0)2 11 52 88-320
Fax +49 (0)2 11 52 88-210
info@hach-lange.de
www.hach-lange.de
HACH LANGE GMBH
Rorschacherstrasse 30a
CH-9424 Rheineck
Tel. +41 (0)848 55 66 99
Fax +41 (0)71 886 91 66
info@hach-lange.ch
www.hach-lange.ch
Repair Service in the
United States:
HACH Company
Ames Service
100 Dayton Avenue
Ames, Iowa 50010
Tel (800) 227-4224
(U.S.A. only)
Fax (515) 232-3835
HACH LANGE LTD
Pacific Way
Salford
GB-Manchester, M50 1DL
Tel. +44 (0)161 872 14 87
Fax +44 (0)161 848 73 24
info@hach-lange.co.uk
www.hach-lange.co.uk
HACH LANGE FRANCE
S.A.S.
8, mail Barthélémy Thimonnier
Lognes
F-77437 Marne-La-Vallée
cedex 2
Tél. +33 (0) 820 20 14 14
Fax +33 (0)1 69 67 34 99
info@hach-lange.fr
www.hach-lange.fr
Repair Service in Canada:
Hach Sales & Service
Canada Ltd.
1313 Border Street, Unit 34
Winnipeg, Manitoba
R3H 0X4
Tel (800) 665-7635
(Canada only)
Tel (204) 632-5598
Fax (204) 694-5134
canada@hach.com
HACH LANGE LTD
Unit 1, Chestnut Road
Western Industrial Estate
IRL-Dublin 12
Tel. +353(0)1 460 2522
Fax +353(0)1 450 9337
info@hach-lange.ie
www.hach-lange.ie
HACH LANGE NV/SA
Motstraat 54
B-2800 Mechelen
Tel. +32 (0)15 42 35 00
Fax +32 (0)15 41 61 20
info@hach-lange.be
www.hach-lange.be
Repair Service in
Latin America, the
Caribbean, the Far East,
Indian Subcontinent, Africa,
Europe, or the Middle East:
Hach Company World
Headquarters,
P.O. Box 389
Loveland, Colorado,
80539-0389 U.S.A.
Tel +001 (970) 669-3050
Fax +001 (970) 669-2932
intl@hach.com
HACH LANGE GMBH
Hütteldorfer Str. 299/Top 6
A-1140 Wien
Tel. +43 (0)1 912 16 92
Fax +43 (0)1 912 16 92-99
info@hach-lange.at
www.hach-lange.at
DR. LANGE NEDERLAND
B.V.
Laan van Westroijen 2a
NL-4003 AZ Tiel
Tel. +31(0)344 63 11 30
Fax +31(0)344 63 11 50
info@hach-lange.nl
www.hach-lange.nl
HACH LANGE APS
Åkandevej 21
DK-2700 Brønshøj
Tel. +45 36 77 29 11
Fax +45 36 77 49 11
info@hach-lange.dk
www.hach-lange.dk
HACH LANGE LDA
Av. do Forte nº8
Fracção M
P-2790-072 Carnaxide
Tel. +351 214 253 420
Fax +351 214 253 429
info@hach-lange.pt
www.hach-lange.pt
HACH LANGE KFT.
Vöröskereszt utca. 8-10.
H-1222 Budapest XXII. ker.
Tel. +36 1 225 7783
Fax +36 1 225 7784
info@hach-lange.hu
www.hach-lange.hu
HACH LANGE AB
Vinthundsvägen 159A
SE-128 62 Sköndal
Tel. +46 (0)8 7 98 05 00
Fax +46 (0)8 7 98 05 30
info@hach-lange.se
www.hach-lange.se
HACH LANGE SP. ZO.O.
ul. Krakowska 119
PL-50-428 Wrocław
Tel. +48 801 022 442
Zamówienia: +48 717 177 707
Doradztwo: +48 717 177 777
Fax +48 717 177 778
info@hach-lange.pl
www.hach-lange.pl
HACH LANGE S.R.L.
Str. Căminului nr. 3,
et. 1, ap. 1, Sector 2
RO-021741 Bucureşti
Tel. +40 (0) 21 205 30 03
Fax +40 (0) 21 205 30 17
info@hach-lange.ro
www.hach-lange.ro
HACH LANGE S.R.L.
Via Rossini, 1/A
I-20020 Lainate (MI)
Tel. +39 02 93 575 400
Fax +39 02 93 575 401
info@hach-lange.it
www.hach-lange.it
HACH LANGE S.R.O.
Zastrčená 1278/8
CZ-141 00 Praha 4 - Chodov
Tel. +420 272 12 45 45
Fax +420 272 12 45 46
info@hach-lange.cz
www.hach-lange.cz
HACH LANGE
8, Kr. Sarafov str.
BG-1164 Sofia
Tel. +359 (0)2 963 44 54
Fax +359 (0)2 866 15 26
info@hach-lange.bg
www.hach-lange.bg
HACH LANGE S.L.U.
Edificio Seminario
C/Larrauri, 1C- 2ª Pl.
E-48160 Derio/Vizcaya
Tel. +34 94 657 33 88
Fax +34 94 657 33 97
info@hach-lange.es
www.hach-lange.es
HACH LANGE S.R.O.
Roľnícka 21
SK-831 07 Bratislava –
Vaj nory
Tel. +421 (0)2 4820 9091
Fax +421 (0)2 4820 9093
info@hach-lange.sk
www.hach-lange.sk
HACH LANGE SU
ANALİZ SİSTEMLERİ
LTD. ŞTİ.
Ilkbahar mah. Galip Erdem
Cad. 616 Sok. No:9
TR-Oran-Çankaya/ANKARA
Tel. +90312 490 83 00
Fax +90312 491 99 03
bilgi@hach-lange.com.tr
www.hach-lange.com.tr
37
Page 38

Contact
HACH LANGE D.O.O.
Fajfarjeva 15
SI-1230 Domžale
Tel. +386 (0)59 051 000
Fax +386 (0)59 051 010
info@hach-lange.si
www.hach-lange.si
HACH LANGE OOO
Finlyandsky prospekt, 4A
Business Zentrum “Petrovsky
fort”, R.803
RU-194044, Sankt-Petersburg
Tel. +7 (812) 458 56 00
Fax. +7 (812) 458 56 00
info.russia@hach-lange.com
www.hach-lange.com
ΗΑCH LANGE E.Π.Ε.
Αυλίδος 27
GR-115 27 Αθήνα
Τηλ . +30 210 7777038
Fax +30 210 7777976
info@hach-lange.gr
www.hach-lange.gr
HACH LANGE D.O.O.
Ivana Severa bb
HR-42 000 Varaždin
Tel. +385 (0) 42 305 086
Fax +385 (0) 42 305 087
info@hach-lange.hr
www.hach-lange.hr
HACH LANGE MAROC
SARLAU
Villa 14 – Rue 2 Casa
Plaisance
Quartier Racine Extension
MA-Casablanca 20000
Tél. +212 (0)522 97 95 75
Fax +212 (0)522 36 89 34
info-maroc@hach-lange.com
www.hach-lange.ma
38
Page 39

Index
B
Burette ..................................................................... 13
D
Data logger ................................................................ 5
E
Error messages ....................................................... 33
F
Flange tube connections .......................................... 17
K
Keypad ..................................................................... 20
M
Magnetic stirrer ........................................................ 16
Maintenance schedule ............................................. 29
P
Product contents ...................................................... 11
S
Safety information ...................................................... 7
Specifications ............................................................. 5
T
Titration stand .......................................................... 15
W
Warning labels ........................................................... 7
Warnings .................................................................. 33
39
Page 40

40
 Loading...