

Page 1
© Hach Company, 2007. All rights reserved. Printed in Germany. For technical assistance or ordering information: visit www.hach.com, call 800-227-4224 or email [email protected] Edition 1 December 2007
Quick Start Guide
For si792 P series 2-wire transmitters DOC016.53.00794
Additional copies are available on www.hach.com
DANGER: Explosion Hazard. This Quick Start Guide is intended for setup of the si792
transmitter in a non-hazardous location. It is not a substitute for reading and following
the instructions in the user manual. Installation in a hazardous location must be
performed by qualified personnel per the applicable control drawing or ATEX certificate
on the prived documentation CD.
DANGER: Electric Shock Hazard. Disconnect power to all wiring before making
connection to the si792 P series transmitters.
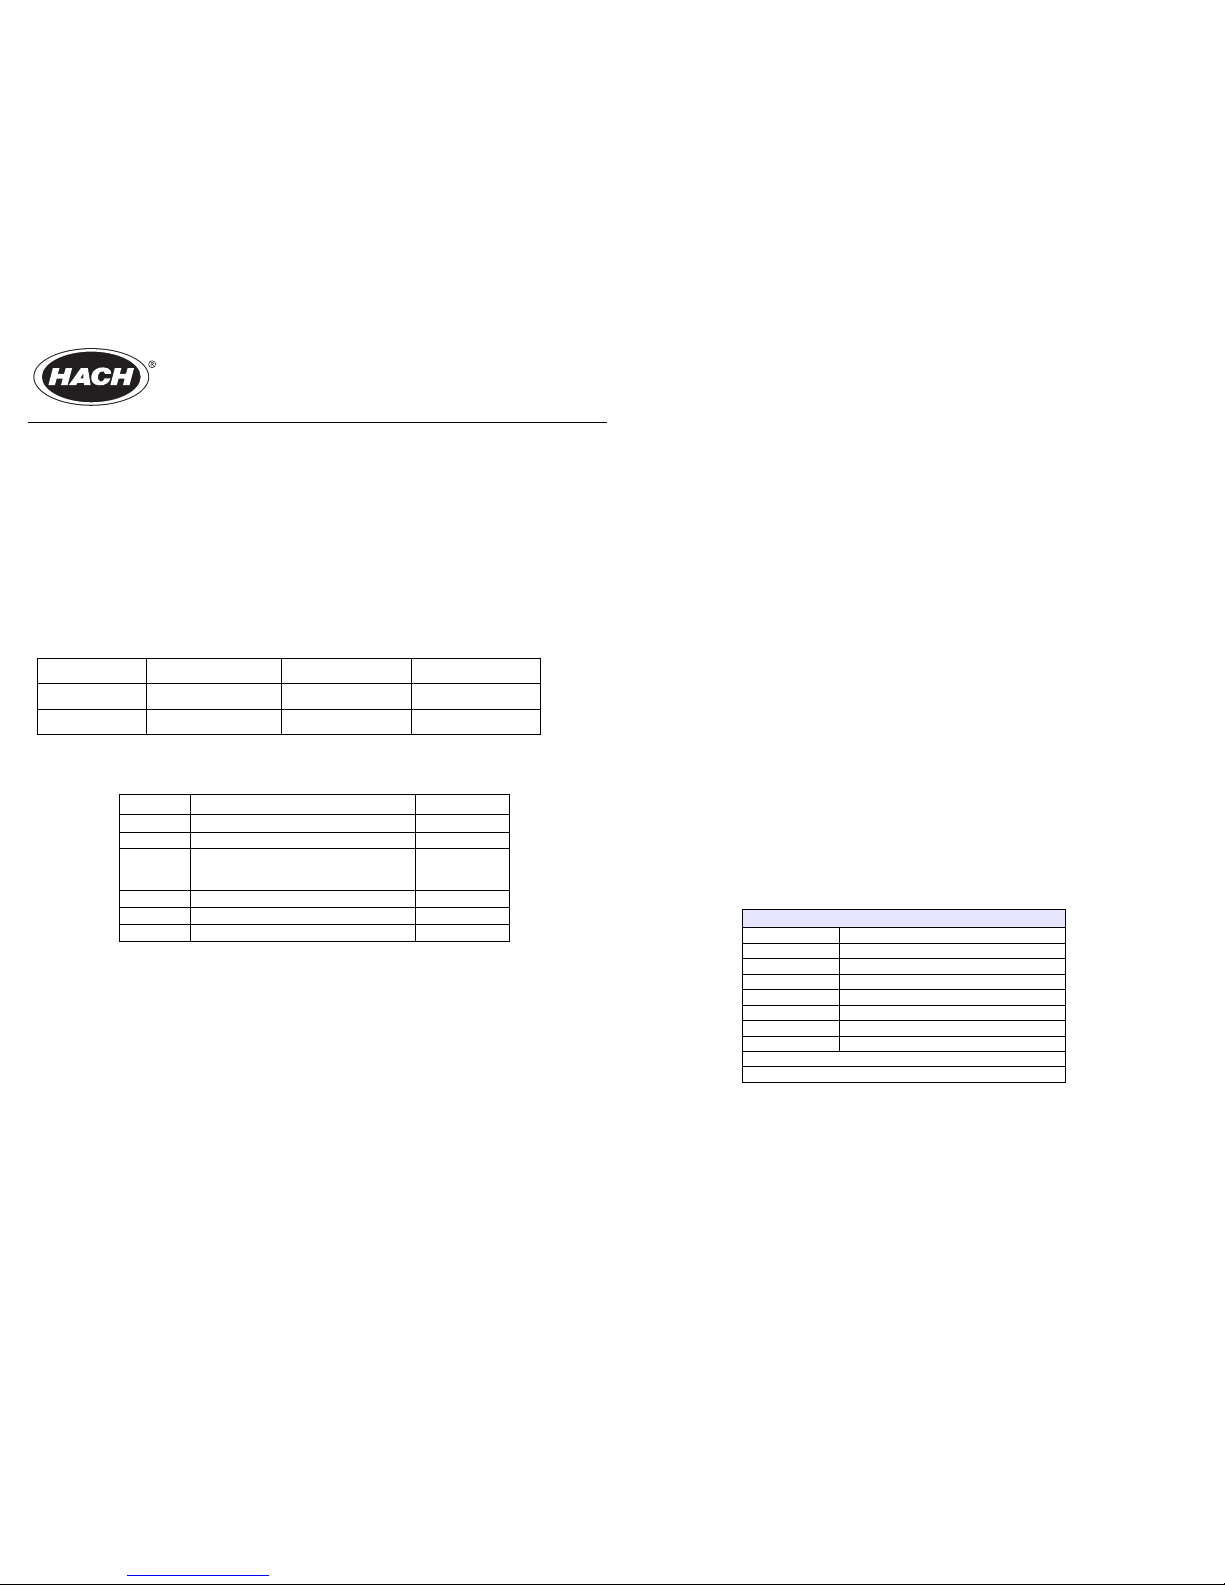
1. Connect the 24 VDC power and communication (Table 1).
2. Connect the sensor wires (Table 2).
Basic transmitter configuration—si792(x) P (4–20 mA/HART) only
Note: Refer to the manual for si792x P-FF (Foundation Fieldbus) and si792x P-PA (Profibus PA)
configuration instructions.
1. To enter the configuration mode, press CONF, configuration code: 1200, ENTER. There are 4
configuration menus:
• output "out.1MNU"
• temperature compensation "tc MNU"
• calibration setup "CAL MNU"
• alarm settings "ALrt MNU"
2. In configuration mode, press the RIGHT ARROW KEY to navigate to a specific configuration menu.
Press
ENTER to access the menu options.
3. Use the
ARROW KEYS to edit values. Press ENTER to save the settings. If a value is outside of
the acceptable range, “Err” will be displayed and the value will not be accepted.
To exit the configuration mode and return to measurement mode, press
CONF, ENTER at any time.
Configure the transmitter for ORP sensors
The transmitter has default settings for use with pH sensors. For use with an ORP sensor:
1. Select the "out.1MNU" configuration menu.
2. Change the sensor type from pH to ORP.
a. Press
CONF, ENTER. Input passcode 1200 and press ENTER.
b Use the
RIGHT ARROW KEY to change from pH to ORP under the "01.UniT" display code.
Press
ENTER.
c Press
CONF, ENTER to exit configuration mode.
Configure the pH buffer
For accurate pH calibration, configure the correct manufacturer of pH buffers. Calibration is rarely
performed at exactly 25 °C, and different pH buffers can exhibit different temperature dependencies.
3. Press
CONF, ENTER. Input passcode 1200 and press ENTER.
4. Select "CAL MNU".
5. Select the appropriate code from Table 3.
Note:If the buffer is not listed in Table 3, select manual entry (MAN). Enter the pH values when
prompted during calibration.
6. Press ENTER. Press CONF, ENTER to exit configuration mode.
Table 1 Terminal assignments
Terminal No. si792(x) P si792x P-FF si792x P-PA
14 (–) (–) (–)
15 (+) (+) (+)
Table 2 Terminal assignments—differential sensors
Terminal No. Assignment Hach wire color
1 Measure electrode (pHD is Reference) red
4 Reference electrode (pHD is Measure) green
5
Cable shield connections (2 shield wires for
Hach pHD, 1 shield wire for Hach LCP)
Note:
Do not connect to earth ground.
shield
8 RTD (resistive temperature device) yellow
17 –6 V white
18 GND black
Table 3 Calibration mode setup menu—CAL mnu
Select pH buffer set
–01–BUF Knick/Mettler-Toledo
–02–BUF Merck Titrisols, Riedel Fixanals
–03–BUF Ciba (94)
–04–BUF NIST technical buffers
–05–BUF NIST standard buffers
–06–BUF HACH buffers
–07–BUF WTW technical buffers
–08–BUF Hamilton Duracal
MAN (manual entry, for buffers not listed in this table)
DAT—Entry of offset and slope of premeasured electrodes
Page 2
© Hach Company, 2007. All rights reserved. Printed in Germany. For technical assistance or ordering information: visit www.hach.com, call 800-227-4224 or email [email protected] Edition 1 December 2007
Quick Start Guide
For si792 P series 2-wire transmitters DOC016.53.00794
7. Calibrate the sensor. The two most common calibration methods are described below. Refer to
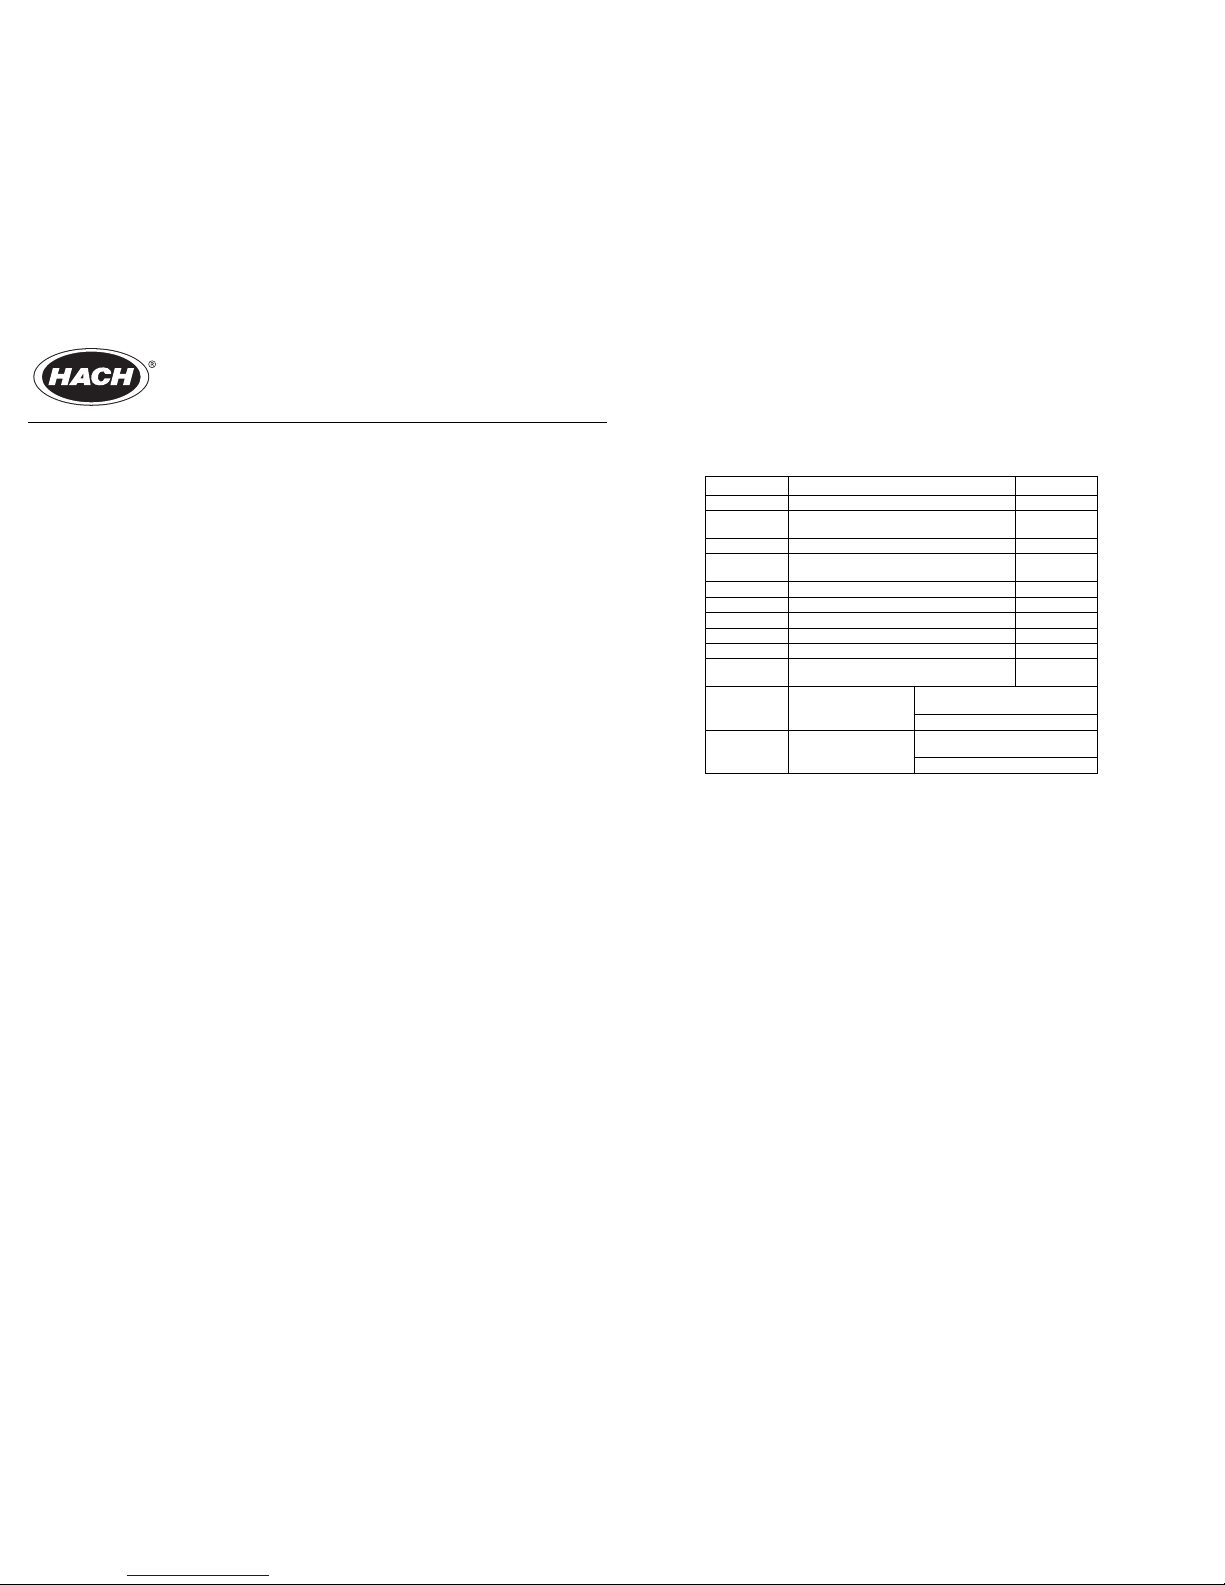
the user manual for other details. Refer to Table 4 for default passcode settings.
Calibration with automatic buffer recognition
Complete the following steps to calibrate the pH probe:
a. Press
CAL, enter passcode: 1100, ENTER. The display will show CAL1.
b Remove the pH and temperature probes from the process. Clean the probes and immerse
in the first buffer solution (any order). Briefly stir the solution with the probes.
c Press
ENTER. Automatic recognition of the buffer solution will begin. The display will first
show the hourglass and no buffer value, then the recognized buffer value followed by the
measured millivolt value. When the measurement is complete, the display will show CAL2.
d When CAL2 is displayed, remove the probes from the first buffer solution and rinse thor-
oughly.
e Complete a one-point calibration or start a two-point calibration:
• One-point calibration: press CAL to end the calibration. The slope (%) and offset (mV) of the
probe (based on 25 °C) will be displayed.
• Two-point calibration: immerse the probes in the second buffer solution. Press ENTER. The
buffer detection will repeat as for the first buffer solution. When complete, the slope (%) and offset (mV) of the probe (based on 25 °C) will be displayed.
f Press ENTER, ENTER to return to the measurement mode. The HOLD mode will remain
active for 20 seconds.
g Remove the probes from the buffer, rinse and return to the process.
Calibration by Comparison
The probe can be calibrated by entering the sample value from measurement in an instrument such as a laboratory or portable meter (one-point calibration). The probe does not need
to be removed from the process during calibration. The sample temperature should correspond to the measured process temperature for accurate results.
a. Press
CAL, enter passcode: 1105, ENTER. The display will briefly show CAL PRD and
then StorE.
b Collect a grab sample for measurement in the lab. Press
ENTER to store the sample value
in the transmitter.
c The cal mode indicator will flash to indicate that calibration is not complete. The transmit-
ter will continue to measure and display the current sample values.
d Measure the grab sample with a laboratory or portable meter.
e Press
CAL, enter passcode: 1105, ENTER to access the product calibration once more.
The display will briefly show CAL PRD and then CALC.
f Edit the displayed value to match the value measured by the laboratory or portable meter
and press
ENTER. The slope and offset will be shown.
g Press
ENTER to end the calibration. The display will show the measured value alternating
with Hold.
h Press
ENTER to return to the measuring mode. The outputs will remain in the hold mode
for approximately 20 seconds.
Note:For comparison calibration via Foundation Fieldbus, see the pH user manual,
DOC026.53.00794. Comparison calibration via Profibus is not available.
Table 4 Default passcode settings
Display Function Default setting
Cal INFO Calibration information 0000
CAL 0-CAL Calibration zero
1001 (not for
si792x P-PA)
CAL CAL Calibration 1100
CAL PROD Product calibration
1105 (not for
si792x P-PA)
CAL RTD Temperature probe adjustment 1015
CFG ERR Error information 0000
CFG CONF Configuration 1200
CFG SNSR MO Sensor monitor 2222
CFG OUT Current source 5555
CFG SPCL ST
Administrator passcode. Use
ARROW keys to
select NO or YES
1989
NO SPCL ST
Do not change
administrator passcode
Press
ENTER to return to the default
passcode
Press
CONF to exit the editor
YES SPCL ST
Change administrator
passcode
Press
ENTER to accept the new
passcode
Press
CONF to exit the editor
 Loading...