

Page 1

52600-18
POCKET TURBIDIMETER™
Analysis System
© Hach Company, 1997, 1998. dd/dp 4/15/97 1ed
All rights reserved. Printed in the U.S.A Rev. 2, 7/98
Page 2

ii
Page 3

CERTIFICATION
Hach Company certifies this instrument was tested thoroughly, inspected
and found to meet its published specifications when it was shipped from
the factory. The Pocket Turbidimeter Instrument has been t est ed and is
certified as indicated to the following instrumentation sta ndards:
Immunity:
EN 50082-1:1997 (Generic Immunity Standard) per 89/336/EEC
EMC: Supporting test records by Hach Compan y, certified compliance
by Hach Comp any.
Required Standard/s include:
EN 61000-4-2 (IEC 1000-4-2) Electro-Static Discharge
EN 61000-4-3 (IEC 1000-4-2) Radiated RF Electro-Magnetic Fields
ENV 50204 Radiated Electro-Magnetic Field from Digital Telephones
Additional Standard/s include:
ENV 50204 “1995” Radiated Electro-Magnetic Field from
Digital Telephones
iii
Page 4

Emissions:
EN 50081-1 (Generic Emission Standard) per 89/336/EEC EMC:
Supporting test reco rds by Intellistor O.A.T.S., certified compl ian ce by
Hach Company.
Required European Standard/s include:
EN 55011 (CISPR 11) Emissions, Class B Limits
Additional Emissions Standard/s include:
CANADIAN INTERFERENCE-CAUSING EQUIPMENT
REGULATION, IECS-003, Class A: Supporting test records by
Intellistor O.A.T.S., certified compliance by Hach Company.
This Class A digital apparatus meets all requirements of the Canadian
Interference-Causi ng Equi pment Regulations.
Cet appareil numérique de la classe A respecte toutes les exigences du
Règlement sur le matériel brouilleur du Canada.
iv
Page 5

FCC PART 15, Class “A” Limits: Supporting test records by Intellistor
O.A.T.S., certified compl ia nce b y Hach Company.
This device co mplies with Part 15 of the FCC Rule s. Operation is subject
to the following two conditions:
(1) This devi ce may not cause harmful interfe re nce , and (2) this device
must accept any interference received, including interference that may
cause undesired operation.
Changes or modifications to this unit not expressly approved by the
party responsible for compliance could void the user’s authority to
operate the equipment.
This equipment has been tested and found to comply with the limits
for a Class A digital device, pursuant to Part 15 of the FCC Rules.
These limits are designed to provide reasonable protection
against harmful interference when the equipment is operated in a
commercial environment.
v
Page 6

This equipment ge nerat es, u ses , and can r adiat e ra dio f reque nc y energy
and, if not installed and used in accordance with the instruction manual,
may cause harmful i nt er fer enc e to radio communications. Operation of
this equipment in a residential area is likely to cause harmful
interference, in which case the user will be required to correct the
interference at his own expense. The following techniques of reducing
the interference problems are applied easily.
1. Remove power from the Pocket Turbidimeter Instrument by removing
one of its batteries to verify th at it is or is not the source of th e
interferen ce.
2. Move the Pocket Turbidimeter Instrument away from the device
receiving the interference.
3. Reposition the receiving antenna for the device receiving
the interference.
4. Try combinations of the above.
vi
Page 7

TABLE OF CONTENTS
CERTIFICATION.................................................................................. iii
SAFETY PRECAUTIONS..................................................................... ix
SPECIFICATIONS................................................................................. xi
OPERATION........................................................................................ 1
General Description.................................................................................. 3
Principle of Operation............................................................................... 5
Battery Installation.................................................................................... 6
Preparing the Pocket Turbidimeter Sample Cell...................................... 9
Oiling the Pocket Turbidimeter Sample Cell.......................................... 11
Indexing the Sample Cell........................................................................ 12
Using StablCal
Instructions for Preparing StablCal Stabilized Formazin Standards ...... 13
Precautions for Use of Standards............................................................ 15
Controlling Ambient Light..................................................................... 16
®
Stabilized Standards..................................................... 13
vii
Page 8

TABLE OF CONTENTS, continued
CALIBRATION .................................................................................... 17
Calibration Helpful Hints........................................................................ 17
CALIBRATION PROCEDURE.......................................................... 19
MEASURING TURBIDITY PROCEDURE...................................... 25
MAINTENANCE.................................................................................. 29
Helpful Hints........................................................................................... 29
Cleaning the Sample Cells and Caps...................................................... 31
GENERAL INFORMATION.............................................................. 37
PARTS AND ACCESSORIES............................................................... 39
WARRANTY ......................................................................................... 41
REPAIR SERVICE................................................................................. 43
viii
Page 9

SAFETY PRECAUTIONS
As part of good laboratory practice, please become familiar with the
reagents used in these procedures. Read all product labels and the MSDS
(Material Safety Data Sheets) before using any chemicals. Please contact
Hach with questions about reagents or procedures.
Use of Hazard Information
If multiple hazards exist, the signal word corresponding to the greatest
hazard shall be used.
DANGER
Indicates an imminently hazardous situation
which, if not avoided, will result in death or serious injury
CAUTION
Indicates a potentially hazardous situation that may result in minor or moderate injury
NOTE
Information that requires special emphasis.
ix
Page 10

Precautionary Labels
Please pay particular attention to labels and tags attached to the
instrument. Pers onal i nj ury or damage to the i ns tr ument c oul d occur if not
observed.
This symbol, if noted on the instrument, references the Instruction
Manual for operational and/or safety information.
Battery In stallation on page 6.
The Pocket Turbidimeter Instrument is a Class 1 LED product. A Class 1
LED product has insufficient energy to be considered an eye hazard.
x
Page 11

SPECIFICATIONS
Range: 0.1 - 400 NTU
Accuracy: ≤5% of reading from 0-400 NTU or ±0.1 NTU (whichever is
®
greater) when calibrated using StablCal
Standards. Accuracy tested at
20-25 °C; accuracy may vary when the instrument is operated at
environmental extremes.
Resolution: 0.1 NTU below 100 NTU; 1 NTU from 100 to 400 NTU
Repeatability: ±5% of reading
Light Source: Infrared LED (Light Emitting Diode), 880 nm
Operating Temperature Range: 0 to 50 °C (instrument only)
Storage Temperature Range: -40 to 60 °C (instrument only)
xi
Page 12

Storage Temperature Range: (StablCal Stabilized formazin only)
Short Term: -40 to 40 °C
Long Term: 5 to 20 °C
Operating Humidity Range RH Non-condensing: 0 to 90% at 30 °C;
0 to 80% at 40 °C; 0 to 70% at 50 °C
This is a Class 1 LED product.
xii
Page 13

OPERATION
W ARNING
Handling chemical samples, standards, and reagents can be dangerous. Review the
necessary Material Safety Data Sheets and become familiar with all safety procedures
before handling any chemicals.
ADVERTÊNCIA
A manipulação de amo str as, pa drõ es e re agent es quím ic os p ode ser pe rigos a. Reveja a s
necessárias Fichas Técnicas de Segurança do Material e familiarizese com os
procedimentos de segurança antes de manipular quaisquer substãncias químicas.
ADVER TENCIA
La manipulación de muestras químicas, patrones y reactivos puede ser peligrosa. Antes
de manipular cualquier productor químico, conviene leer las Fichas Técnicas de
Seguridad y familiarizarse con los procedimientos de seguridad.
ATTENTION
La manipulation des échantillons chimiques, étalons et réactifs peut être dangereuse.
Lire les fiches de données de sécurité des produits nécessaires et se familiariser avec
toutes les procédures de sécurité avant de manipuler tout produit chimique.
W ARNUNG
Da das Arbeiten mit chemik alischen Proben, Standards, Reag enzien und Abfäll en mit
Gefahren verbunden ist, empfiehlt die Hach Comp any dem Benutzer dieser Produkte
dringend, sich vor der Arbeit mit sicheren Verfahrensweisen und dem richtigen
Gebrauch der Chemikalien oder Biogefahrgut vertraut zu machen und alle
entsprechenden Materialsicherheitsdatenblätter aufmerksam zu lesen.
1
Page 14

2
Page 15

General Descri p ti on
The Pocket Turbidimeter Instrument* measures turbidity and provides a
direct readout on the liquid crystal display from 0.0 to 400 NTU.
Designed p rimarily for field use, the Pocket Turbidimeter Ins trument is
convenient, reliable, and easy to use and calibrate. The instrument
operates on four AAA batteries (battery-saving features are incorporated
into the software).
The instrument cap is used as a light shield during calibration and
measurement and provides a dust-free environment for the optics and
sample compartment when not in use.
®
The instrument is supplied with StablCal
(1.0 NTU and 20 NTU), silicone oil, an oiling cloth, four AAA alkaline
batteries, six sample cells with caps, and this instruction manual all
contained in a 30 x 18 x 14 centimeter ( 12 x 7.5 x 5.5 inch) polypropylene
case. See Figure 1 on the next page.
* Patent Pendin g
Stabilized Formazin Standards
3
Page 16
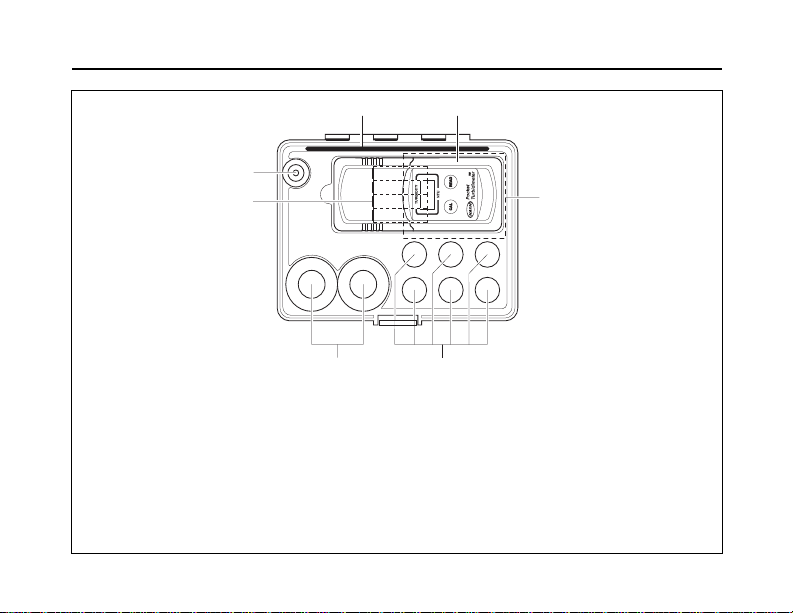
1
7
6
1. Oiling Cloth ............................... ..... ..................................... ..... ..... ...... ..... ............................. 26873-00
2. Pocket Turbidimeter Instrument ..................... ..... ..... ...... ..... ..... ..................................... ..... ... 52600-60
3. Instruction Manual ................................................................................................................ 52600-18
4. Sample Cells with press on caps, 6/pkg............................................................................... 52631-00
5. StablCal
1.0 NTU, 100 mL .................................................................................................................. 26598-42
20 NTU, 100 mL ................................................................................................................... 26601-42
6. Batteries, AAA Alkaline, 4/pkg.............................................................................................. 46743-00
7. Silicone Oil, 15 mL.................................................................................................................. 1269-36
5
2
3
4
Figure 1 Packa g i ng Guid e
4
Page 17

Principle of Operation
The Pocket Turbidimeter Instrument operates on the nephelometric
principle of turbidity measurement. The optical system includes an
infrared LED and dete ctor t o monito r scat tere d light . Variation in t he LED
is automatically compensated, reducing calibration drift.
®
Calibration with StablCal
capability for direct readout in FNU or NTU*. The instrument design is
based on criteria specified in the ISO 7027 Turbidimeter Measurement
Standards.
Note: This product contai ns a Clas s 1 LE D device which prod uce s lig ht at 880
±20 nm. A Class 1 LED re pr esent s no th re at of in jury to users of the pr od uct .
The optical system is comprised of an 880 ± 20 nm light emitting diode
(LED) assembly, a 90° detector to monitor scattered light, and an LED
monitoring detector. The instrument measures turbidity up to 400 units in
FNU/NTU measurement mode using the single 90° detector.
*
1 FNU = 1 NTU
when the instrument is calibrated with formazin o r stabilized formazin.
Stabilized Formazin Standards provides the
5
Page 18

Battery Installation
Caution: This product is designed to us e only alkaline batteri es. Use of other types of
batteries may result in damage to the instrument and injury to the user.
Prudence: Cet appareil est conçu pour utiliser seulement des piles alcalines.
L'utilisation d'autres types de piles peut endommager l'appareil et blesser l'opérateur.
Atenção: Só devem ser utilizadas neste produto pilhas alcalinas. A utilização de outros
tipos de pilhas pode ocasionar danos ao instrumento e ferimentos ao utilizador.
Atencion: Este producto ha sido diseñado para ser untilizado œnicamente con baterías
alcalinas. El uso de otro tipo de baterías puede provocar daños en el aparato y lesiones
al usuario.
Vorsicht: Dieses Produkt darf nur mit Alkalibatterien betrieben werden. Der Gebrauch
anderer Batterien kann das Gerät beschädigen und zu Verlet zun gen des Benutzers
führen.
6
Page 19

Figure 2 provides an exploded view of the battery installation. Loosen the
captive screw to remove the battery compartment cover. Place the four
batteries provided with the instrument in the holder as indicated (the
proper polarities are shown on the battery holder). Replace the battery
compartment cover and tighten the captive screw.
When power is applied, the display will momentarily show
software version. If 88.8 does not appear momentarily on the display,
remove and reinsert one of the batteries. When replacing discharged
batteries, always replace the complete set of four. Rechargeable batteries
are not recommended and cannot be recharged in the instrument.
When the batteries are removed for replacement, all calibration
information is lost. Recalibration is required each time th e batteries are
replaced. See CALIBRATION on page 17.
7
88.8, then th e
Page 20

Figure 2 Battery Installation
8
Page 21

Preparing the Pocket Turbidimeter Sample Cell
The Pocket Turbidimeter sample cell, supplied with a press-on cap, holds
5 mL of sample or standard (see Figure 2). The optical surfaces are the
vertical sides of the lower, rectangular portion of the cell.
Take care to ensure that all the optical surfaces are free of dust, debris,
fingerprints, and scratches. See Cleaning the Sample Cells and Caps on
page 31. Polish the outside optical surfaces of the sample cell with
silicone oil and the oiling cloth provided immediately before use. Doing
so will mask minor imperfections and scratches and remove any dust on
the optical surfaces which could cause inaccurate results. See page 11 for
instructions.
Figure 3 Pocket Turbidimeter Sample Cell
9
Page 22

Note: Do not store formazin or StablCal Stabilized Formazin in the sample cells.
Immediately after use, wash the interior surfaces of t he sample cells wi th a
cotton swab dipped in detergent (Liqui-nox
turbidity-free wat er. Cap the cells immedi ate ly af te r cl eaning to pr event
contamination.
®
or equivalent) and water. Rinse with
10
Page 23

Oiling the Pocket Turbidimeter Sample Cell
1. Thoroughly cl ean and
rinse the Pocket
Turbidimeter sample cell,
following the instruct ions
on page 31.
2. Appl y a small dr op o f
silicone oil to each of the
outside four vertical
rectangular sides of the
cell.
Note: Store the oiling cloth
in a sealed plastic storage
bag to prevent contamination.
11
3. Spread the oil
uniformly on the optical
surfaces of the cell using
the oiling cloth provided.
Wipe off e xcess oil with
the oiling cloth. The cell
should appear nearly dry
with little or no visi ble oil
and no dust particles.
Page 24

Sample Cel l Information
Perform the calibration procedure on page 17 using one sample cell for
both standards or using two sample cells, one for each NTU value.
If two sample cells are us ed in the cal ibrat ion and the sa mple t urbid ity is
expected to be between 0 and 20 NTU, measure the sample turbidity in
the sample cell which contained the low calibration (1.0 NTU) standard.
If two sample cells are us ed in the cal ibrat ion and the sa mple t urbid ity is
expected to be between 20 and 400 NTU, measure the sample turbidity in
the sample cell which c ontained the hig h calibrati on (20.0 NTU) stan dard.
Indexing the Sample Cell
The first time a sample cell is used, make a mark on the upper round
portion of the cell to specify the cell orientation in the sample cell
compartment. Each time the cell is used, insert it in this orientation.
12
Page 25

Using StablCal® Stabilized Standards
Most consistent results will be achieved with the use of StablCal
Stabilized Formazin Standards. The Instructions for Preparing StablCal
Stabilized Formazin Standards below, provide information on how to
accurately prepare StablCal Standards for use.
Instructions for Preparing StablCal Stabilized Formazin Standards
When using bulk standards that have been sitting undisturbed for longer
than a month, start at Step 1. If the standar ds are used on at leas t a we ekl y
interval, start at Step 3.
1. Shake the standard vigorously for 2-3 minutes to resuspend
any particles.
2. Allow the standard to stand undisturbed for 5 minutes.
3. Gently invert the bottle of StablCal 5 to 7 times.
13
Page 26

4. Prepare the sample cell for measurement using traditional preparation
techniques (oiling the sample cell and marking the cell to maintain the
same orientation in the sample cell compartment) to eliminate any
optical variations in the sample cell.
5. Rinse the sample cell at least one time with the standard and discard
the rinse.
6. Immediately fill the bottom optical portion of the sample cell
(approximately 5 mL) with the standard. Cap the sample cell and let it
stand for one minute. The standard is now ready for use in the
calibration procedure.
14
Page 27

Precautions for Use of Standards
• Do not store standards in sample cells!
• Do not transfer the StablCal standard to another container for storage.
• Store between 5 and 20 °C. Avoid prolonged exposure to
temperatures exceeding 25 °C.
• Do not return used standard back into its original container.
• For long term storage, refrigeration at 5 °C is recommended.
• Always allow the standard to come to ambient instrument conditions
before use (not to exceed 25 °C).
15
Page 28

Controlling Ambient Light
The instrument cap also serves as a light shield when taking readings. In
strong ambient light (direct sunlight) the instrument cap may not provide
sufficient protection and slightly higher NTU values may be seen.
If possible, do not take turbidity readings in bright sunlight. If you must
take readings in bright sunlight, take the following measures to minimize
the effects of the light:
1. Block the direct path of the sunlight with an object so the instrument is
in shadow.
2. Block light reflected from below the instrument by cradling the
instrument in your hand while taking a reading. Make sure the
instrument light shield is properly installed and your fingers seal the
edges of the light shield.
–or–
Place the instrument on a dark, non-refl ective surface.
16
Page 29

CALIBRATION
Calibration Helpful Hints
• Complete th e entire calibration procedure within fou r (4) minutes. If
any calibration point is changed and the calibration is not completed
within the allotted time, an instrument “time out” will occur and all
calibration information will be lost.
• Individual calibration points may not be updated, a complete
calibration (dark value, 1.0 NTU, and 20 NTU data points) must be
performed.
• Best calibration of the instrument will result by calibrating in the
same environment as that in which the testing will be performed.
• For best measurement results, hold or place the instrument in a
horizontal to 45° of horizontal position. Do not hold the instrument
perpendicular (90°) during measurement or calibration.
• Do not calibrate with standards other than those sp ecif ied i n this manual.
17
Page 30

• Have both standards prepared (including mixing the bulk standards
and transferring them to the sample cells) prior to beginning the
calibration.
• Use freshly mixed StablCal Standards as directed in Using StablCal
Stabilized Standards on page 13.
• Wash the inside and outside of sample cells before and after use.
Refer to Cleaning the Sample Cells and Caps on page 31.
• Mark the cell orientation to ensure it is inserted into the sample cell
compartment with the same orientation each time it is used. See
Indexing the Sample Cell on page 12.
• Wipe the sample cell with the oiling cloth immediately before use to
eliminate dust particles on the cell.
• See Troubleshooting and Error Codes on page 32 for information
regarding error messages which may occur during calibration.
18
®
Page 31

CALIBRATION PROCEDURE
1. Pour 5-mL of
properly mixed 1.0 NTU
®
StablCal
Standard into
the clean, indexed and
oiled Pocket Turbidimeter sample cell.
Note: The volume contained
within the flat-sided portion of
the turbidimeter sample cell
equals approximately 5 mL.
2. Cap the cell, then
remove dust particles by
wiping the cell with the
oiling cloth immediately
before inserting it into the
sample cell compartment.
Note: If the cell sits for mor e
than 10 minutes befor e use ,
invert once or twice to ensure
the StablCal is pr o perly mixed .
19
3. Place the sample cell
containing the 1.0 NTU
standard into the
instrument sample
cell compartment.
Page 32

CALIBRATION PROCEDURE, continued
Wait 30 seconds.
4. Cover the sample cell
with the light shield and
wait 30 seconds for the
standard to stabilize.
5. Press and hold the
key then press the
CAL
READ
key . Release both keys.
After a short delay, dA
will flash alternating with
the dark v a lue (b ased on
the last calibration or the
instrument default if no
previous calibration
exists).
20
6. If only reviewing the
calibration point, do not
READ; skip to
press
Step 7.
To continue calibration,
press and hold the
READ
key unti l th e rea ding is
stable. Release the
READ
key to accept the new
dark value.
Page 33

CALIBRATION PROCEDURE, continued
7. Press the
CAL key.
After a short delay, the
display shows
C1.0
alternating with the
1.0 NTU value using the
last calibration (or the
instrument default value
if no previous calibration
exists).
8. If the 1 NTU value is
only to be reviewed and
not changed, do not press
READ
; skip to Step 9.
T o continue calibration,
press and hold the
READ
key . When the reading is
stable, release the
READ
key to save the new
1.0 NTU value.
21
9. Pour 5-mL of p roperly
mixed 20 NTU StablCal
Standard into the clean,
indexed and oiled Pock et
Turbidimeter sample cell.
Cap the cell.
Note: The volume contained
within the flat-sided portion of
the turbidimeter sample cell
equals approximately 5 mL.
®
Page 34

CALIBRATION PROCEDURE, continued
Wait 30 seconds.
10.To remove all dust,
wipe the sample cel l
exterior with the oiling
cloth then ins ert it in to th e
sample cell compartment.
Note: If the cell is all owed to
sit for more than 10 minutes
after being filled, invert once
or twice to ensure the
StablCal is properly mixed.
11.Cover the sample cell
with the light shield and
wait 30 seconds for the
standard to stabilize.
22
12.Press the
CAL key.
After a short delay, the
display shows
C20
alternating with the
20 NTU value using
the last calibration (or
the instrument default
value if no previous
calibration exists).
Page 35

CALIBRATION PROCEDURE, continued
13. If the 20 NTU value is
only to be reviewed and
not changed, do not press
READ
; skip to Step 14.
T o continue calibration,
press and hold the
READ
key until the reading is
stable. Rel e ase t he
READ
key to save the new
20 NTU value.
14.Press the
CAL key to
end the calibration. The
instrument displays
CLd
to indicate a new calibration has been entered. If
no data points were
changed, the instrument
displays
OLd to show the
previous calibration has
been retained.
23
Note: When the calibration
is complete , c lea n al l sa mple
cells and caps using a cotton
swab, detergent (Liqui-nox
or equivalent), and water.
Rinse with deionized
water and dry and cap
the cells for storage.
®
Page 36

24
Page 37

MEASURING TURBIDITY PROCEDURE
CAUTION
The Pocket Turbidimeter is not intended for use with flammable sam pl es or tho se co n ta ining
hydrocarbons or concen tra ted acids that might attack th e co mp onents. Conduct compatibil ity tests
prior to analysis if the sample to be monitored is in question.
ATENÇÃO
O Pocket Turbidime ter não se destina a ser utili zado com amostr as i n flamávei s , ou com as que
contêm hidrocarbonetos ou ácidos conce ntrados que possam atacar os componentes do. Efectu e
testes de compatibilidade antes da análise, se houver dúvid as sobre a am o s tra a ser moni to rizada.
PRECAUCIÓN
El Pocket T urbidimeter no se debe utilizar con muestras inflamables o con aquellas que contengan
hidrocarburos o ácidos concentrados que puedan atacar los componentes del . Se aconseja realizar
pruebas de compatibilidad antes de efectuar el análisis si se de sco n oce si la mue s tra que se de sea
controlar los contiene.
PRUDENCE
Le Pocket Turbidimeter n'est pas prévu pour utilisation avec des échantillons inflamm abl e s ou
ceux contenant des hydrocarbures ou des acides concentrés qui pourraient atta que r les
composants. Effectuer des tests de compatibilité avant l'analyse s'il existe un doute sur
l'échantillon à analyser.
VORSICHT
Das Pock et T urbi dimeter darf nic ht für Tests mit brennbaren Proben oder Proben, die
Kohlenwassers t o ffe oder konent rierte Säuren enthalt e n, be nutz werden. Diese Inhaltsstoffe können die
Bauteile des Gerätes angreifen. V or der Analyse fraglicher Proben sind Kompatibilitätstests
durchzuführen.
25
Page 38

MEASURING TURBIDITY, continued
1. Pour 5 mL of sample
into the Pocket
Turbidimeter sample
cell. Cap the cell.
(See Sample Cell
Information on page 12.)
2. Wipe the outside
surfaces of the cell with
the oiling cloth to remove
any liquid.
Take care not to
scratch the cell.
26
3. Apply silicone oil to
the sample cell using the
procedure presented on
page 11. Wipe the cell
again with the oiling
cloth immediately before
inserting it into the
sample cell holder to
remove all dust.
Page 39

MEASURING TURBIDITY, continued
4. Insert the sample cell
into the instrument
sample compartment and
cover the cell with the
instrument cap.
Note: For best results, use
the same sample cell and cell
orientation as that used in the
calibration of the instrument.
5. Pres s and hold the
READ key until the reading
stabilizes (approximately
5 seconds). Release the
READ key and record the
displayed reading.
Note: The value will remain
on the display for
approximately one minute, then
the display will go b lank.
27
Note: If FFF is displayed,
the turbidity is either
>440 NTU or the ambient
light is extremely high. Refer
to the section concerning
Error code FFF in T able 1
on page 35 for additional
information.
Page 40

28
Page 41

MAINTENANCE
Helpful Hints
• Do not allow liquids to enter any part of the Pocket Turbidimeter.
Instrument damage will r esult.
• Store the Pocket Turbidimeter Instrument in a clean, dry
environment. If necessary, use a damp, soft cloth to clean the
exterior of the in strument.
• Do not immerse the instrument.
• If sampling by dipping the sample cell i nto the sample, first remove
the cell from the instrument. Dry the outside of the cell before
reinserting it into the instrument.
• Wipe the outside of the sample cell with the oiling cloth to remove
liquid or dust before inserting it into the instrument.
29
Page 42

• Clean the sample compartment and the sample cell windows with a
cotton swab dampened with isopropyl alcohol or det er gent and tur bidityfree water. Rinse with turbidity-free w ater. Do not use acetone or other
organic solv ents to cle an the sample cel ls; damag e to the cell s will resul t.
• Empty the sample cells before storing them in the carrying case.
• Keep cleaned sample cells capped to prevent contamination.
• If the foam insert insi de the ca rr ying cas e lid be comes wet, al lo w it to
dry before storing the instrument in the closed carrying case.
• If liquids enter the instrument, thoroughly clean and dry before
storing the instrument in a closed carrying case.
• Do not store samples or standards in the plastic sample cells.
30
Page 43

Cleaning the Sample Cells and Caps
Rinse with 1:1 HCl followed by multiple rinses with particle-free water.
or
®
Soak in warm wa ter t o whic h a mi ld d eterge nt (Liq ui- nox
has been added; use a cotton swab to scrub the cells if necessary. Rinse
several times with turbidity-free water.
Cap the cleaned cells to prevent contamination.
Avoid excessive scrubbing of the cells, scratches will result.
Do not use strong organic solvents; they will etch the sample cells.
31
or equivalent)
Page 44

Table 1 Troubleshooting and Error Codes
Error
Code
E01 Invalid interrupt Call Hach Service.
E03 Low battery Replace all four batteries and recalibrate
E04 Light leak during dark
point calibration
Cause Possible Solution
the instrument.
Ensure the light shield (instrument cap)
is properly in-stall ed. Read and fo llow the
instructions in
on page
Redo the entire calibration.*
Call Hach Service.
Controlling Ambient Light
16
.
32
Page 45

Table 1 Troubleshooting and Error Codes (continued)
Error
Code
E05 First calibration point
(1.0 NTU) too low
E06 First calibration point
(1.0 NTU) too high
Cause Possible Solution
During a calibration: Verify the proper
standard is being used and reread the
standard. Continue with the calibration.
Outside of calibration mode: Verify standards, then redo the entire calibration.*
Call Hach Service.
During a calibration: Verify the proper
standard is being used and reread the
standard. Continue with the calibration.
Outside of calibration mode:
V erify standards, then redo the e ntire c alibration.*
Call Hach Service.
33
Page 46

Table 1 Troubleshooting and Error Codes (continued)
Error
Code
E07 Second calibration point
(20 NTU) too low
E08 Second calibration point
(20 NTU) too high
Cause Possible Solution
During a calibration: Verify the proper
standard is being used and reread the
standard. Continue with the calibration.
Outside of calibration mode:
V erify standards, then redo the e ntire c alibration.*
Call Hach Service.
During a calibration: Verify the proper
standard is being used and reread the
standard. Continue with the calibration.
Outside of calibration mode:
Verify standards, then re-do the entire
calibration.*
Call Hach Service.
34
Page 47

Table 1 Troubleshooting and Error Codes (continued)
Error
Code
E09 Calibration error or
instrument is not calibrated.
FFF Turbidity is >440 NTU
Extremely high ambient
light
Cause Possible Solution
Redo the calibration.*
Call Hach Service.
Dilute the sample with turbidity-free
water to within the range of the instrument and reread the sample.
Make sure the instrume nt cap is prop erly
installed as a light shield. Read and follow the instructions in
ent Light
on page 16.
Controlling Ambi-
35
Page 48

* If a valid previous calibration exists, that calibration may be recalled to replace a new
calibration which is incorrect. If E04 through E09 is flashing on the display when the calibration routine is complete, press the
OLd will appear on the display to denote retention of the previous calibration.
If OLd does not appear and the error code recurs, the previous calibration is invalid or
does not exist. Recalibrate the instrument.
READ key within approximately one minute.
36
Page 49

GENERAL INFORMATION
At Hach Company, customer service is an
important part of every product we make.
With that in mind, we have compiled the
following information for your convenience.
37
Page 50

38
Page 51

PARTS AND ACCESSORIES
Replacement Parts
Description Cat No.
Batteries, AAA alkaline, pkg/4 .............................................................. 46743-00
Instrument Cap/Light Shield, each......................................................... 52632-00
Instrument manual, each............................................ ..... ........................ 52600-18
Oiling Cloth for sample cell preparation................................................ 26873-00
Sample Cell with press-on cap, 5-mL, 6/pkg......................................... 52631-00
Silicone Oil, 15 mL .................................................................................. 1269-36
Swabs, cotton, presterilized, 100/pkg......................................................25543-00
Replacement Reagents
®
StablCal
StablCal
Standard, 1.0 NTU, 100 mL.................................................. 26598-42
®
Standard, 20 NTU, 100 mL................................................... 26601-42
Optional Reagents
Liqui-nox Laboratory Detergent, 1 qt. (1.946 L) ................................... 20881-53
HCl, 1:1, 500 mL........................................................................................ 884-49
Deionized water, 500 mL ........................................................................... 272-49
39
Page 52

40
Page 53

WARRANTY
Hach warrants the Pocket Turbidimeter Instrument against defective
materials o r workmanship for two years from the date of shipment.
HACH WARRANTS TO THE ORIGINAL BUYER THAT HACH
PRODUCTS WILL CONFORM TO ANY EXPRESS WRITTEN
WARRANTY GIVEN BY HACH TO THE BUYER. EXCEPT AS
EXPRESSLY SET FORTH IN THE PRECEDING SENTENCE,
HACH MAKES NO WARRANTY OF ANY KIND WHATSOEVER
WITH RESPECT TO ANY PRODUCTS. HACH EXPRESSLY
DISCLAIMS ANY WARRANTIES IMPLIED BY LAW,
INCLUDING BUT NOT LIMITED TO ANY WARRANTY OF
MERCHANT-ABILITY OR FITNESS FOR A PARTICULAR
PURPOSE.
41
Page 54

WARRANTY, continued
LIMITATION OF REMEDIES: Hach shall, at its option, replace or
repair nonconforming products or refund all amounts paid by the buyer.
THIS IS THE EXCLUSIVE REMEDY FOR ANY BREACH OF
WARRANTY.
LIMITATION OF DAMAGES: IN NO EVENT SHALL HACH BE
LIABLE FOR ANY INCIDENTAL OR CONSEQUENTIAL
DAMAGE S OF ANY KIND FOR BREACH OF ANY WARRANTY,
NEGLIGENCE, ON THE BASIS OF STRICT LIABILITY, OR
OTHERWISE.
Catalog descriptions, pictures and specifications, although accurate to the
best of our knowledge, are not a guarantee or warranty.
For a complete description of Hach Company’s warranty policy, request a
copy of our Terms and Conditions of Sale for U.S. Sales from our
Customer Service Department.
42
Page 55

REPAIR SERVICE
Authorization must be obtained from Hach Company before sending any
item for repair. Please contact the Hach Factory Service Center serving
your location.
In the United States:
Hach Company
100 Dayton Ave.
P.O. Box 907 Ames, Iowa 50010
Toll-free: 800-227-4224 (U.S.A. only)
FAX: (515) 232-1276
In Latin America, the Caribbean, the Far
East, the Indian Subcontinent Africa (excluding Mediterranean Africa) or the Pacific
Basin:
Hach Company World Headquarters
P.O. Box 389
Loveland, Colorado, 80539-0389 U. S. A .
Telephone (970) 669-3050
FAX (970) 669-2932
In Canada:
Hach Sales & Service Canada, Ltd.
1313 Border Street, Unit 34
Winnipeg, Manitoba R3H 0X4
Toll-free: 800-665-7635 (Canada only)
Telephone: (204) 632-5598
FAX: (204) 694-5134
In Europe, the Middle East, or Mediterranean Africa: Hach Europe, S.A./N.V.
Chaussée de Namur, 1
B-5150 Floriffoux (Namur), Belgium
Telephone (32)(81)44.53.81.
FAX: (32)(81)44.13.00
43
Page 56

 Loading...