

Page 1
DOC022.53.80017
HQd Portable Meter
10/2017, Edition 6
User Manual
Page 2

Page 3

Table of Contents
Specifications.................................................................................................................................................................................. 5
General information..................................................................................................................................................................... 5
Safety information.............................................................................................................................................................................. 5
Use of hazard information.................................................................................................................................................................. 6
Precautionary labels.......................................................................................................................................................................... 6
Product overview............................................................................................................................................................................... 6
Product components.......................................................................................................................................................................... 6
Installation......................................................................................................................................................................................... 7
Install the batteries............................................................................................................................................................................. 7
Connect to AC power......................................................................................................................................................................... 8
User interface and navigation............................................................................................................................................... 9
User interface..................................................................................................................................................................................... 9
Display description............................................................................................................................................................................. 9
Navigation........................................................................................................................................................................................ 11
Startup............................................................................................................................................................................................... 11
Turn the meter on and off................................................................................................................................................................ 11
Change the language....................................................................................................................................................................... 11
Change the date and time................................................................................................................................................................ 11
Connect a probe.............................................................................................................................................................................. 12
Standard operation.................................................................................................................................................................... 12
About calibration.............................................................................................................................................................................. 12
About sample measurements.......................................................................................................................................................... 13
About check standards.................................................................................................................................................................... 13
Use a sample ID.............................................................................................................................................................................. 13
Use an operator ID........................................................................................................................................................................... 13
Data management....................................................................................................................................................................... 13
About stored data............................................................................................................................................................................. 13
View stored data.............................................................................................................................................................................. 14
View stored probe data............................................................................................................................................................. 14
1
Page 4

Print stored data............................................................................................................................................................................... 14
Change the report options........................................................................................................................................................ 15
Send data to a USB storage device................................................................................................................................................. 15
Open data files on a PC................................................................................................................................................................... 16
Data file description......................................................................................................................................................................... 16
Remove column headers................................................................................................................................................................. 18
Send data directly to a computer..................................................................................................................................................... 18
Advanced operation.................................................................................................................................................................. 18
Security options............................................................................................................................................................................... 18
Turn Security Options on.......................................................................................................................................................... 18
Full access options menu......................................................................................................................................................... 19
Restricted operator access options menu................................................................................................................................ 19
Set the display options..................................................................................................................................................................... 20
Set the sound options...................................................................................................................................................................... 20
Set the probe calibration reminder............................................................................................................................................ 21
Change the temperature units......................................................................................................................................................... 21
Set the measurement mode............................................................................................................................................................. 21
Set auto measurement intervals............................................................................................................................................... 21
Start interval measurements..................................................................................................................................................... 21
Prevent data log overflow in interval mode............................................................................................................................... 22
View instrument information............................................................................................................................................................. 22
Update the meter software............................................................................................................................................................... 22
Download software updates..................................................................................................................................................... 23
Transfer method settings................................................................................................................................................................. 23
Bi-directional Communication between the meter and a PC........................................................................................................... 23
About meter control.................................................................................................................................................................. 23
About meter configuration......................................................................................................................................................... 24
Maintenance................................................................................................................................................................................... 24
Clean the meter............................................................................................................................................................................... 24
Replace the batteries....................................................................................................................................................................... 24
Troubleshooting.......................................................................................................................................................................... 25
Table of Contents
2
Page 5

Replacement parts and accessories............................................................................................................................... 26
Examples of printed reports.................................................................................................................................................28
Table of Contents
3
Page 6

Table of Contents
4
Page 7
Specifications
Specifications are subject to change without notice.
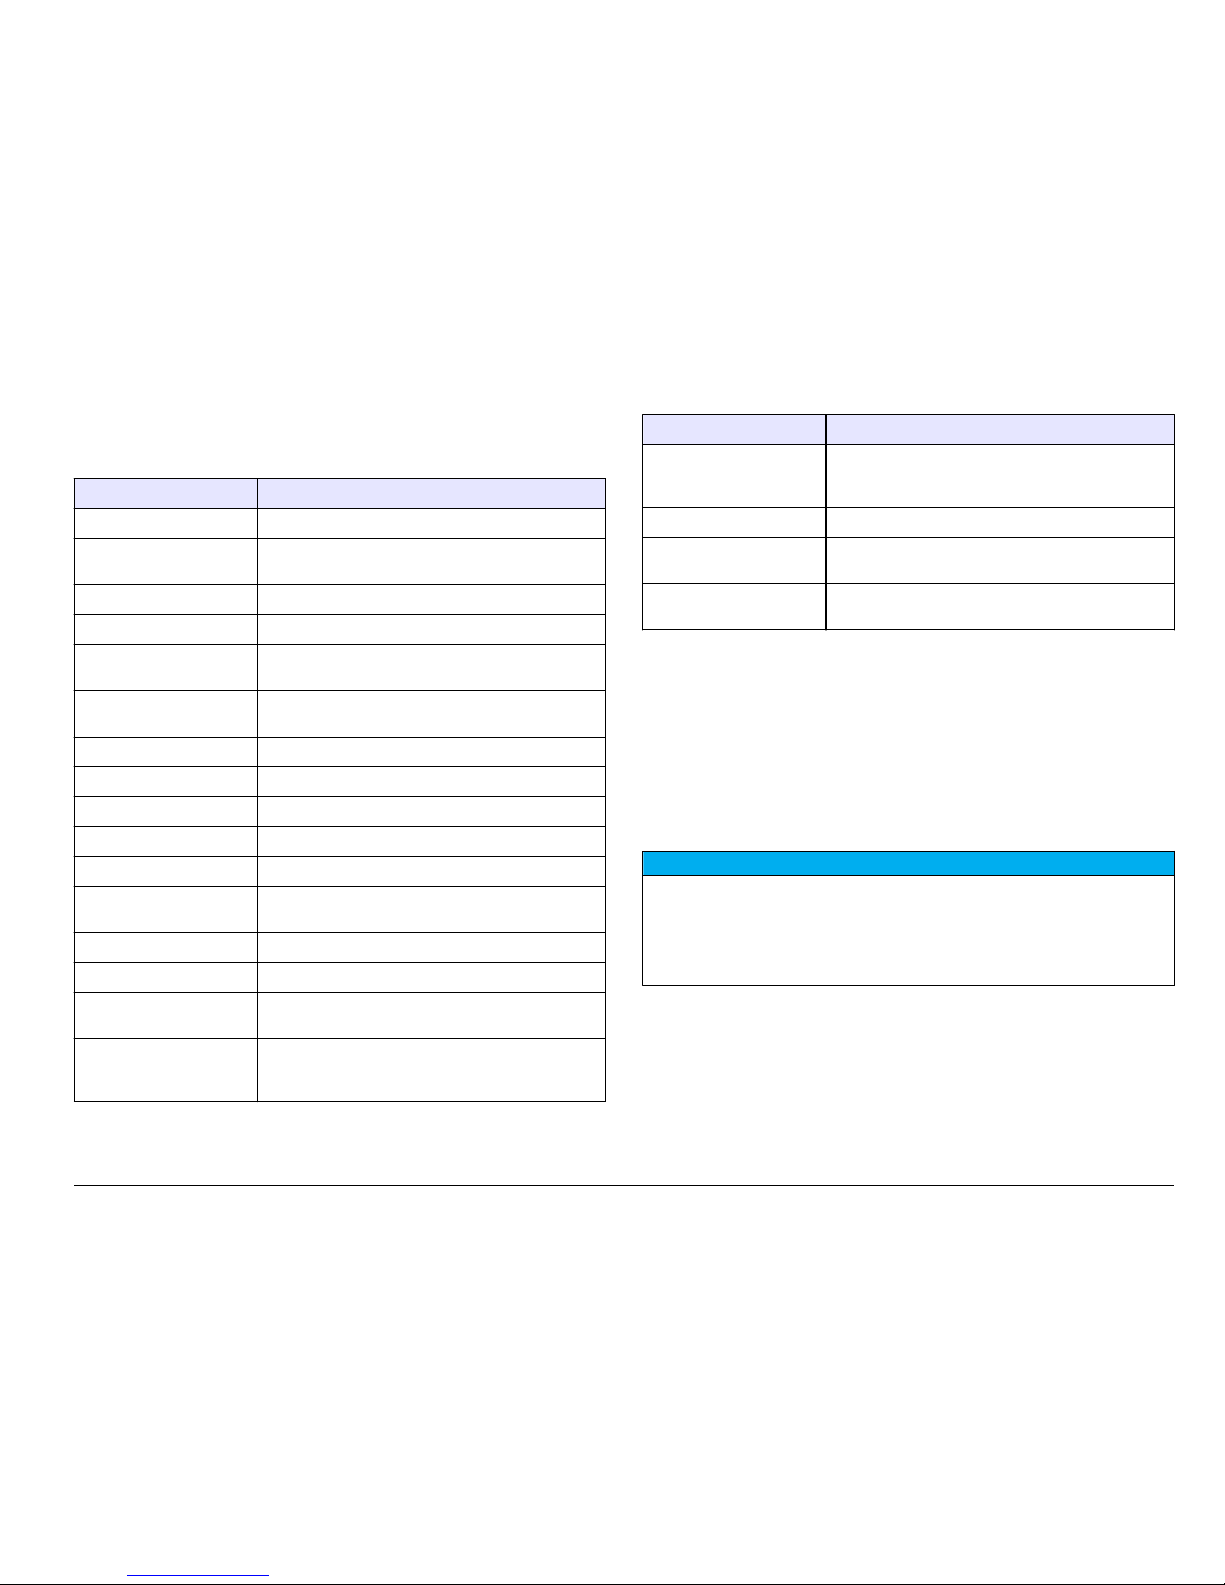
Specification Details
Dimensions 19.7 x 9.5 cm (7.75 x 3.75 in.)
Weight 335 g (0.75 lb) without batteries; 430 g (0.95 lb) with
four AA alkaline batteries
Meter enclosure IP67, waterproof to 1 meter for 30 minutes
Battery enclosure Water resistant to 0.6 m (2 ft) for 15 seconds
Power requirements
(internal)
AA Alkaline or rechargeable Nickel Metal Hydride
(NiMH) batteries (4); battery life: up to 200 hours
Power requirements
(external)
Class II, external power adapter: 100–240 VAC,
50/60 Hz input; 4.5 to 7.5 VDC (7 VA) output
Meter protection class Class I
Storage temperature –20 to +60 °C (–4 to +140 °F)
Operating temperature 0 to +60 °C (32 to 140 °F)
Operating humidity 90% (non-condensing)
5-pin input connector M12 connector for IntelliCAL™ probes
8-pin input connector The 8-pin connector enables USB and external AC
power connectivity
USB/DC adapter Peripheral and host
Data memory (internal) 500 results
Data storage Automatic in Press to Read mode and Interval
Mode. Manual in Continuous Read Mode.
Data export USB connection to PC or USB storage device
(limited to the storage device capacity). Transfer
entire data log or as readings are taken.
Specification Details
Connections Integrated USB type A (for USB flash memory
device, printer, keyboard) and Integrated USB type
B (for PC)
Temperature correction Off, automatic and manual (parameter dependent)
Measurement display lock Continuous measurement, Interval or Press to Read
mode. Averaging function for LDO probes.
Keyboard External PC keyboard connector via USB/DC
adapter
General information
In no event will the manufacturer be liable for direct, indirect, special,
incidental or consequential damages resulting from any defect or
omission in this manual. The manufacturer reserves the right to make
changes in this manual and the products it describes at any time, without
notice or obligation. Revised editions are found on the manufacturer’s
website.
Safety information
N O T I C E
The manufacturer is not responsible for any damages due to misapplication or
misuse of this product including, without limitation, direct, incidental and
consequential damages, and disclaims such damages to the full extent permitted
under applicable law. The user is solely responsible to identify critical application
risks and install appropriate mechanisms to protect processes during a possible
equipment malfunction.
Please read this entire manual before unpacking, setting up or operating
this equipment. Pay attention to all danger and caution statements.
Failure to do so could result in serious injury to the operator or damage
to the equipment.
Make sure that the protection provided by this equipment is not impaired.
Do not use or install this equipment in any manner other than that
specified in this manual.
English
5
Page 8
Use of hazard information
D A N G E R
Indicates a potentially or imminently hazardous situation which, if not avoided, will
result in death or serious injury.
W A R N I N G
Indicates a potentially or imminently hazardous situation which, if not avoided,
could result in death or serious injury.
C A U T I O N
Indicates a potentially hazardous situation that may result in minor or moderate
injury.
N O T I C E
Indicates a situation which, if not avoided, may cause damage to the instrument.
Information that requires special emphasis.
Precautionary labels
Read all labels and tags attached to the instrument. Personal injury or
damage to the instrument could occur if not observed. A symbol on the
instrument is referenced in the manual with a precautionary statement.
This symbol, if noted on the instrument, references the instruction
manual for operation and/or safety information.
This symbol indicates that the marked item can be hot and should not
be touched without care.
Electrical equipment marked with this symbol may not be disposed of
in European domestic or public disposal systems. Return old or endof-life equipment to the manufacturer for disposal at no charge to the
user.
Product overview
The HQd series portable meters are used with digital IntelliCAL™ probes
to measure various parameters in water. The meter automatically
recognizes the type of probe that is connected to the meter.
Measurement data can be stored and transferred to a printer, PC or USB
storage device.
The HQd series meters are available in 4 models:
• HQ11d—pH/mV/ORP
• HQ14d—conductivity, salinity, total dissolved solids (TDS), resistivity
• HQ30d—all IntelliCAL probes, 1 probe connector
• HQ40d—all IntelliCAL probes, 2 probe connectors
Features common to all models:
• Automatic probe and parameter recognition
• Instrument guided calibration procedures
• Calibration data stored in the probe
• Probe specific method settings for regulatory compliance and Good
Laboratory Practice (GLP)
• Security Options
• Real-time data logging via USB connection
• USB connectivity to PC/printer/USB storage device/keyboard
• Bi-directional communication with PC-based systems via a virtual
serial port connection
• Sample ID and Operator ID for data traceability
• Adjustable automatic shut-off
Product components
Refer to Figure 1 and Figure 2 to make sure that all components have
been received. If any items are missing or damaged, contact the
manufacturer or a sales representative immediately.
6
English
Page 9

Figure 1 Meter components (HQ40d model)
1 Meter 4 AC-DC power supply
2 AA batteries (pk/4) 5 USB/DC adapter
3 AC power cord
Figure 2 Meter components (HQ11d, HQ14d and HQ30d models)
1 Meter 2 AA batteries (pk/4)
Installation
C A U T I O N
Multiple hazards. Only qualified personnel must conduct the tasks
described in this section of the document.
Install the batteries
W A R N I N G
Explosion hazard. Incorrect battery installation can cause the release of explosive
gases. Be sure that the batteries are of the same approved chemical type and
are inserted in the correct orientation. Do not mix new and used batteries.
N O T I C E
The battery compartment is not waterproof. If the battery compartment becomes
wet, remove and dry the batteries and dry the interior of the compartment. Check
the battery contacts for corrosion and clean them if necessary.
N O T I C E
When using nickel metal hydride (NiMH) batteries, the battery icon will not
indicate a full charge after freshly charged batteries have been inserted (NiMH
batteries are 1.2 V versus 1.5 V for alkaline batteries). Even though the icon does
not indicate complete charge, 2300 mAH NiMH batteries will achieve 90% of
instrument operation lifetime (before recharge) versus new alkaline batteries.
N O T I C E
To avoid potential damage to the meter from battery leakage, remove the meter
batteries prior to extended periods of non-use.
The meter can be powered with AA alkaline or rechargeable NiMH
batteries. To conserve battery life, the meter will power off after
5 minutes of inactivity. This time can be changed in the Display Options
menu.
For battery installation refer to Figure 3.
English
7
Page 10
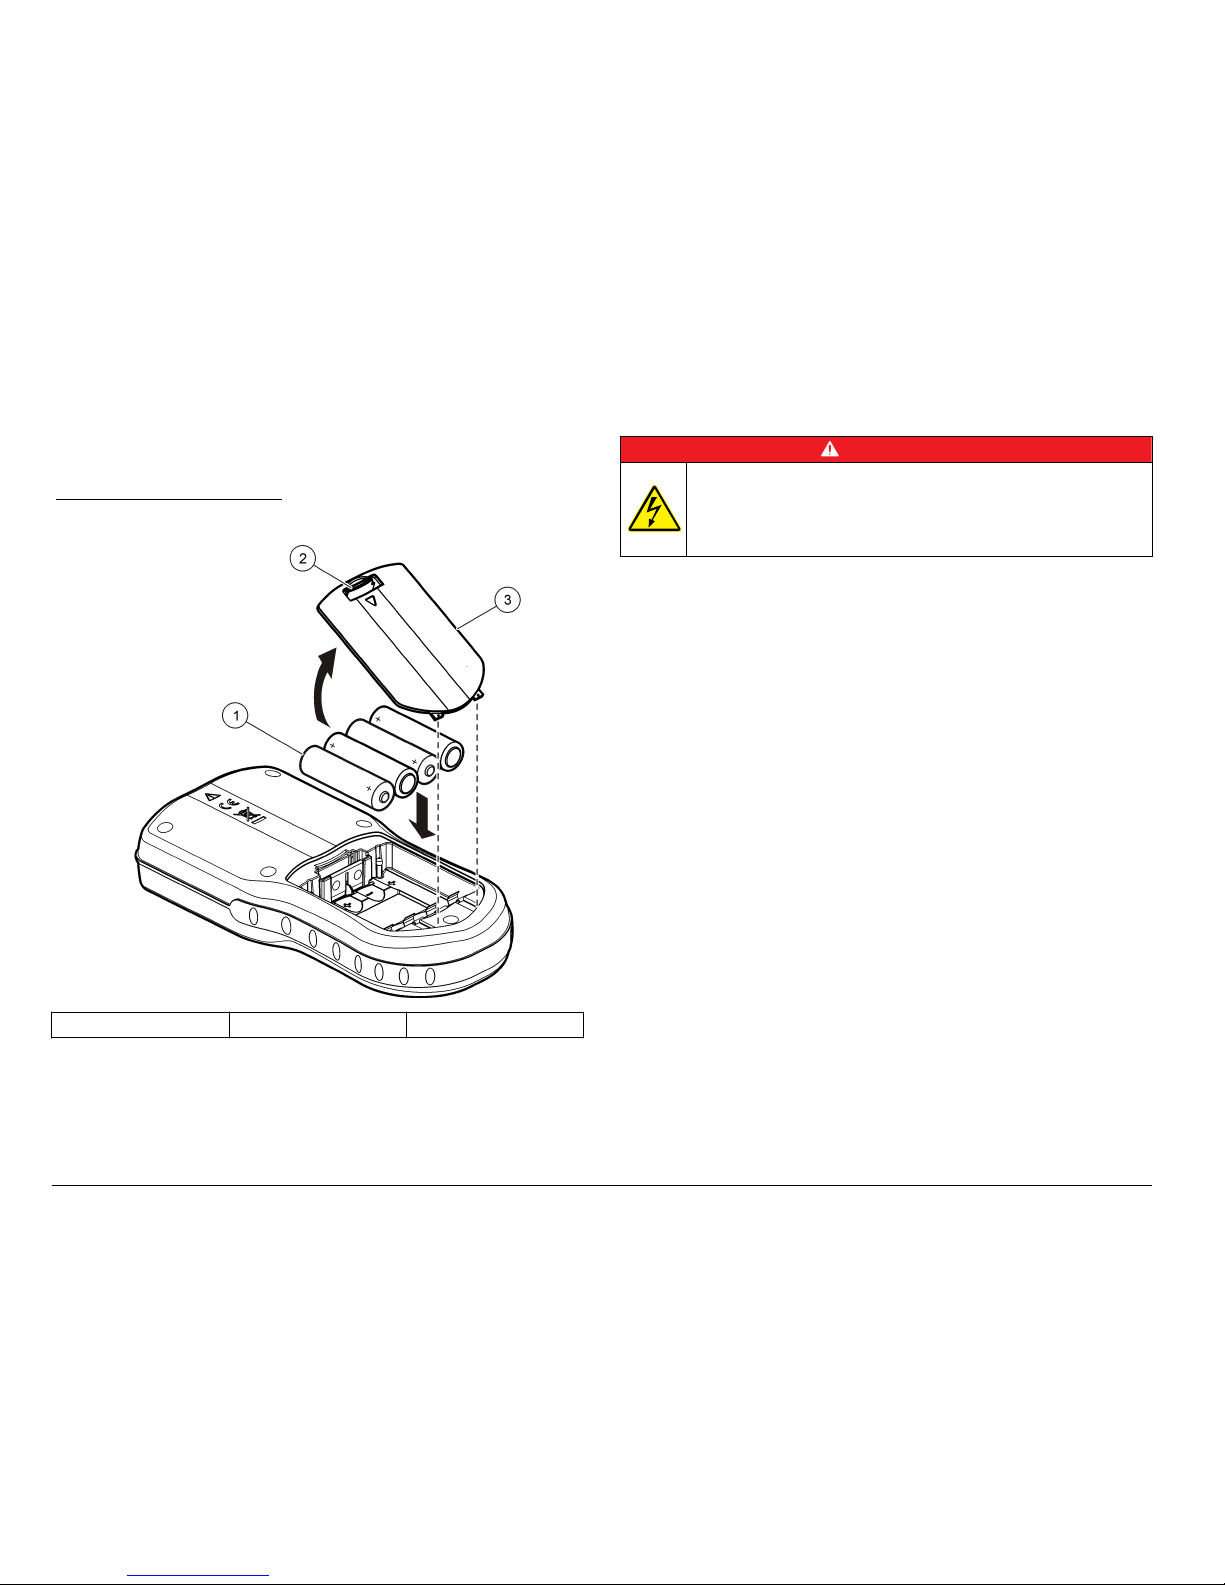
1. Pull the release tab on the battery cover and the remove the cover.
2. Install 4 AA alkaline or 4 AA nickel metal hydride (NiMH) batteries.
Make sure that the batteries are installed in the correct polarity.
3. Replace the battery cover.
Figure 3 Battery installation
1 Batteries 2 Release tab 3 Battery cover
Connect to AC power
D A N G E R
Electrocution Hazard. AC power outlets in wet or potentially wet
locations MUST ALWAYS be provided with a Ground Fault Circuit
Interrupting (GFCI/GFI) circuit breaker. The AC-DC power adapter for
this product is not sealed and must not be used on wet benches or in
wet locations without GFCI protection.
The meter can be powered by AC power with an AC power adapter kit.
The kit includes an AC-DC power supply, USB/DC adapter and AC
power cord.
1. Turn the meter off.
2. Plug the AC power cord into the AC-DC power supply (Figure 4).
3. Connect the AC-DC power supply to the USB/DC adapter.
4. Connect the USB/DC adapter to the meter.
5. Plug the AC power cord into an AC receptacle.
6. Turn the meter on.
8 English
Page 11
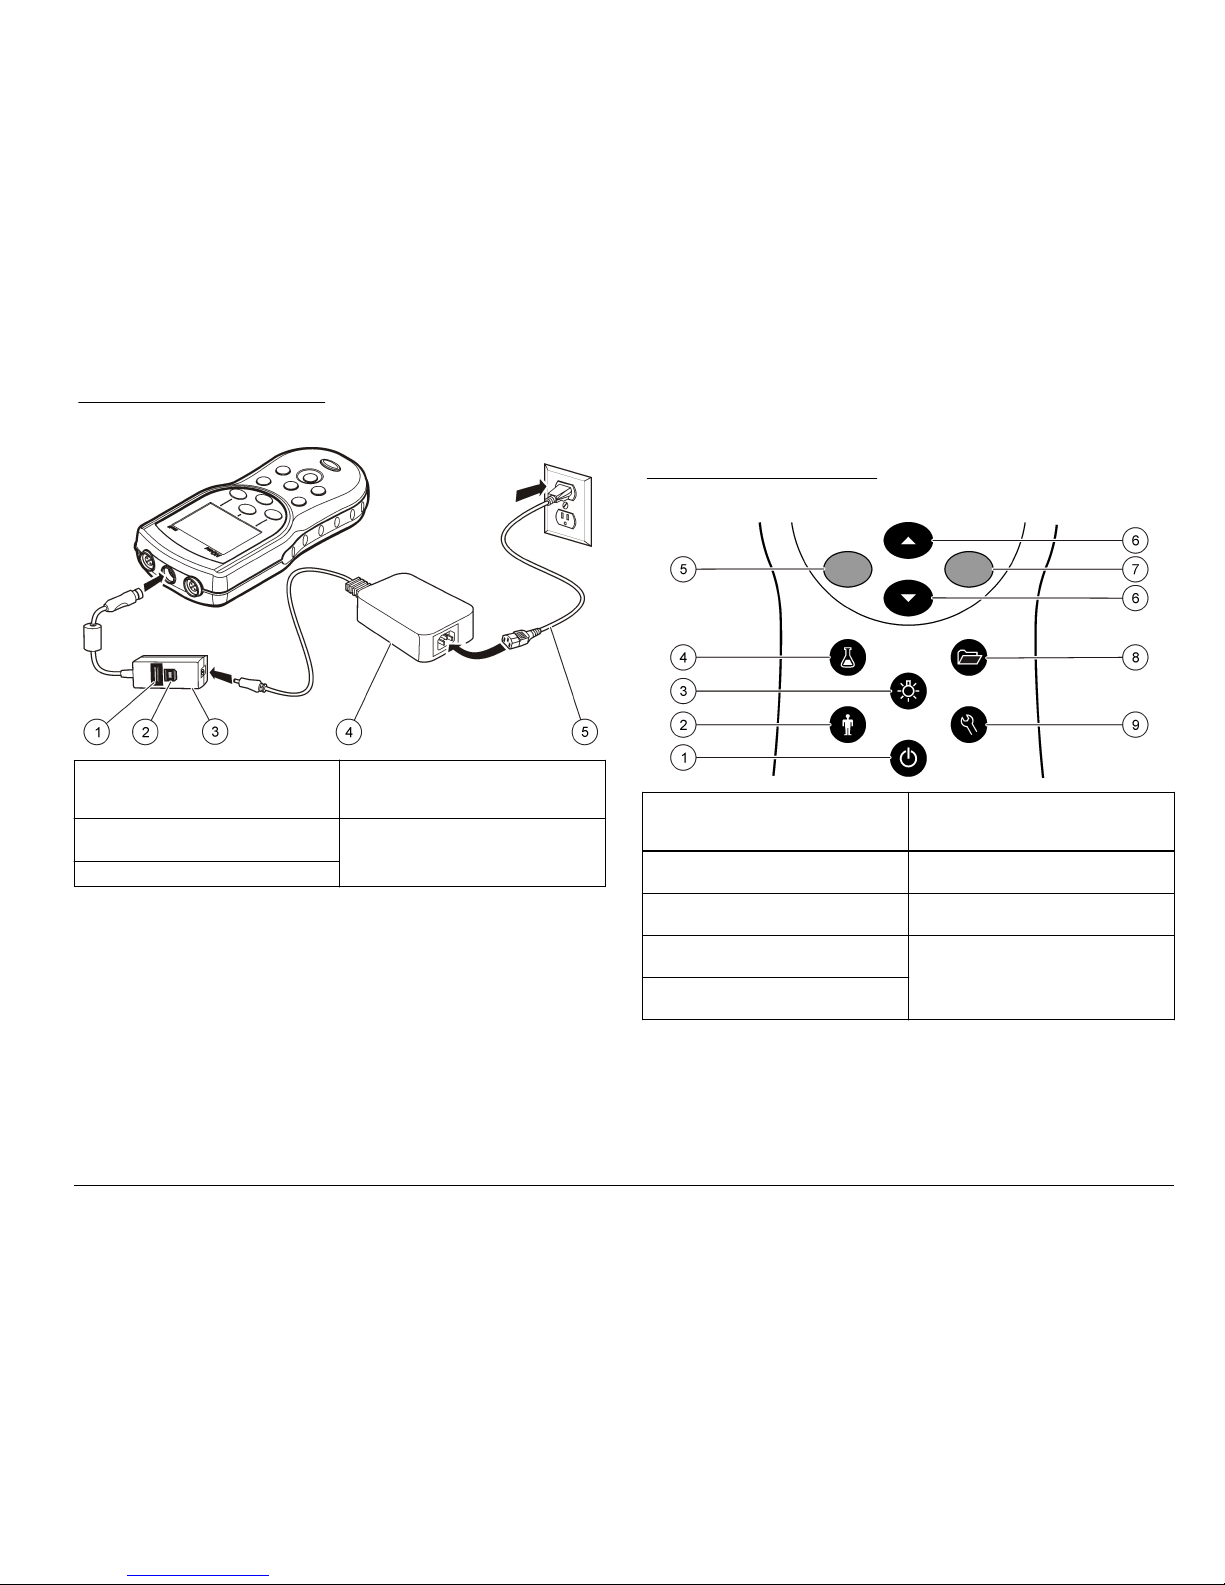
Figure 4 AC power connection
1 USB storage device/printer/Qwerty
keyboard connection (USB
peripheral)
4 AC-DC power supply
2 Personal computer connection
(USB host)
5 AC power cord
3 USB/DC adapter
User interface and navigation
User interface
Figure 5 Keypad description
1 ON/OFF: turn on or turn off the
meter
6 UP and DOWN key: scroll through
menus, enter numbers and letters
or change the reading screen view
2 OPERATOR ID: associate data with
an individual
7 GREEN/RIGHT key: reads, selects,
confirms or stores data
3 BACKLIGHT: illuminate the display
screen
8 DATA LOG: recall or transfer stored
data
4 SAMPLE ID: associate data with a
sample location
9 METER OPTIONS: change
settings, run check standards, view
meter information
5 BLUE/LEFT key: calibrates, cancels
or exits the current menu
Display description
Measurement screen
The meter display shows the concentration, units, temperature,
calibration status, operator ID, sample ID, date and time (Figure 6).
English
9
Page 12

Figure 6 Single screen display
1 Calibration status indicator 9 Time
2 Main measurement value and unit 10 Date
3 IntelliCAL probe type and port
indicator
11 Read (OK, Select)
4 Battery status 12 Display size icon
5 Power source 13 Calibrate (Cancel, Exit)
6 Sample temperature (ºC or ºF) 14 Sample and operator identification
7 Secondary measurement unit 15 Stability or display lock indicator
8 Tertiary units (for some probes)
Big-screen mode
The font size of the sample reading can be increased or decreased with
the key (Figure 7).
Note:
When two probes are connected, push and hold the key to select the
big-screen mode. The big-screen mode can also be selected in the Display Options
menu (Refer to Set the display options on page 20).
Figure 7 Single-screen display—big-screen mode
1 Calibration status indicator 5 Main measurement unit
2 IntelliCAL probe type and port
indicator
6 Display size icon
3 Power source or battery status 7 Sample temperature (ºC or ºF)
4 Main measurement value 8 Stability or display lock indicator
Dual-screen mode (HQ40d model only)
When two probes are connected to the HQ40d meter, the display can
show the reading from both probes simultaneously or show just one
probe (Figure 8).
Note: For probe calibration, change the screen mode to the single screen mode.
To change the screen mode to single or dual screen, use the
and
keys. In dual screen mode, the key will select the probe on the
left and the key will select the probe on the right.
10
English
Page 13

Figure 8 Dual-screen display
1 Probe that is connected to port on
left
3 Measurement information for probe
on left
2 Probe that is connected to port on
right
4 Measurement information for probe
on right
Navigation
The meter contains menus to change various options. Use the
and
keys to highlight different options. Push the GREEN/RIGHT key to
select an option. There are two ways to change options:
1. Select an option from a list: Use the and keys to select an
option. If check boxes are shown, more than one option can be
selected. Push the BLUE/LEFT key under Select.
Note: To deselect check boxes, push the BLUE/LEFT key under Deselect.
2. Enter an option value using the arrow keys:
Push the and keys to enter or change a value.
3. Push the GREEN/RIGHT key to advance to the next space.
4. Push the GREEN/RIGHT key under OK to accept the value.
Startup
Turn the meter on and off
Push the key to turn on or turn off the meter. If the meter does not
turn on, make sure that the batteries are properly installed or that the AC
power supply is properly connected to an electrical outlet.
Change the language
The display language is selected when the meter is powered on for the
first time. The language can also be changed from the Meter Options
menu.
Access to the language menu can be restricted with the Security
Options. Refer to Security options on page 18.
1. Push the key and select Language.
2. Select a language from the list.
Note: While turning the meter on, the language can also be changed when the
power key is pushed and held.
Change the date and time
The date and time can be changed from the Date & Time menu.
English 11
Page 14

1. Push the key and select Date & Time.
2. Update the time and date information:
Option Description
Format Select one of the formats below for the date and time. Use the
and keys to select from the format options.
dd-mm-yyyy 24h
dd-mm-yyyy 12h
mm/dd/yyyy 24h
mm/dd/yyyy 12h
dd-mmm-yyyy 24h
dd-mmm-yyyy 12h
yyyy-mm-dd 24h
yyyy-mm-dd 12h
Date Use the and keys to enter the current date.
Time Use the and keys to enter the current time.
The current date and time will be shown on the display.
Connect a probe after the date and time setup, so that the meter is ready
to take a measurement.
Connect a probe
1. Make sure that the display shows the current time and date.
Note: The time stamp for a probe is set when the probe is first connected to
the meter. This time stamp makes it possible to record the probe history and
record the time when measurements are made.
2. Plug the probe into the meter (Figure 9).
3. Push and turn the locking nut to tighten.
Figure 9 Probe connection
1 Probe connection port
(HQ40d only)
2 USB/DC adapter port 3 Probe connection port
Standard operation
About calibration
Each probe uses a different type of calibration solution. Make sure to
calibrate the probes frequently to maintain the highest level of accuracy.
Note: For step-by-step instructions, refer to the documents that are included with
each probe.
The calibration icon
can indicate that:
• the calibration timer has expired
• the LDO sensor cap should be replaced
12
English
Page 15

• the calibration is out of range
• the calibration results are outside acceptance criteria settings
About sample measurements
Each probe has specific preparation steps and procedures for taking
sample measurements. For step-by-step instructions, refer to the
documents that are included with the probe.
About check standards
Run Check Standards verifies equipment accuracy by measuring a
solution of a known value. The meter will indicate if the Check Standard
passed or failed. If the Check Standard fails, the calibration icon is
shown until the probe is calibrated.
The meter can be set to automatically show a reminder for check
standard measurement at a specified interval with a specified
acceptance criteria. The reminder, value of the check standard, and
acceptance criteria can be changed. For step-by-step instructions, refer
to the documents that are included with the probe.
Use a sample ID
The sample ID tag is used to associate measurements with a particular
sample location. If assigned, stored data will include the sample ID.
1. Push the key.
2. Select, create or delete a sample ID:
Option Description
Current ID Select an ID from a list. The current ID will be
associated with sample data until a different ID is
selected.
Create a New SampleIDEnter a name for a new sample ID.
Delete Sample ID Delete an existing sample ID.
Use an operator ID
The operator ID tag associates measurements with an individual
operator. All stored data will include the operator ID.
1. Push the key.
2. Select, create or delete an operator ID:
Option Description
Current ID Select an ID from a list. The current ID will be
associated with sample data until a different ID is
selected.
Create a New
Operator ID
Enter a name for a new operator ID (maximum
10 names can be entered).
Delete Operator ID Delete an existing operator ID.
Data management
About stored data
The following types of data are stored in the data log:
• Sample measurements: stored automatically each time a sample is
measured in the Press to Read or Interval Mode. When the
continuous measurement mode is used, data is stored only when
Store is selected.
• Calibrations: stored only when Store is selected at the end of a
calibration. Calibration data is also stored in the IntelliCAL (R) probe.
• Check standard measurements: stored automatically each time a
check standard is measured (in the Press to Read or Interval Mode).
When the data log becomes full (500 data points), the oldest data point
is deleted when a new data point is added. The entire data log can be
deleted to remove data that has already been sent to a printer or PC
(
key > Delete Data Log). To prevent deletion of the data log by a
user, use the Security Options menu.
English
13
Page 16

View stored data
The data log contains sample, calibration and check standard data. The
most recent data point in the data log is tagged as Data Point 001.
1. Push the key.
2. Select View Data Log to view the stored data. The most recent data
point is shown. The top of the screen shows whether the data is from
a sample reading, a calibration or a check standard. Push the
key to view the next most recent data point.
Option Description
Reading Log Reading Log—shows sample measurements including
the time, date, operator and sample ID. Select Details to
view the associated calibration data.
Calibration Log Calibration Log—shows calibration data. Select Details
to view additional information about the calibration.
Check Standard
Log
Check Standard Log—shows check standard
measurements. Select Details to view the calibration
data that was associated with the measurement.
View stored probe data
Make sure that a probe is connected to the meter. If two probes are
connected, select the appropriate probe when prompted.
1. To view the calibration data that is stored in a probe, push the
key and select View Probe Data. The current calibration and
calibration history for the probe can be viewed.
Option Description
View Current
Calibration
The current calibration information shows the calibration
details for the most recent calibration. If the probe has
not been calibrated by the user, the factory calibration
data is shown.
View Calibration
History
The calibration history shows a list of the times when the
probe was calibrated. Select a date and time to view a
summary of the calibration data.
Print stored data
The meter must connect to AC power to start the USB connection. Make
sure that the connection to AC power is made before the meter is
powered on.
All data can be sent to a printer. Compatible printers should support a
minimum of 72 columns of data, be capable of printing up to
500 continuous data-stream events in 1, 2 and 3 lines of text and fully
support code page 437 and code page 850.
1. Turn off the meter. Make sure that the meter is connected to AC
power. Refer to Connect to AC power on page 8.
2. Connect the printer to the meter with a USB cable type A. Refer to
Figure 10.
3. Turn on the meter.
4. Push the key.
5. Select Send Data Log. Wait for the display to show “Transfer
Complete” and wait for the printer to stop printing. Disconnect the
printer.
14 English
Page 17

Figure 10 Connection to the printer
1 Meter 7 USB cable
2 AC-DC power supply 8 USB/DC adapter
3 AC power cord 9 Port for probe connection
4 AC power outlet 10 Port for USB/DC adapter
5 Power supply for printer (optional) 11 Port for probe connection
6 Printer, FCC Part 15B, Class B
compliant
Change the report options
Printed reports for sample data can contain 1, 2 or 3 lines of information.
Refer to Examples of printed reports on page 28 for further
information.
1. Push the key. Select Report Options.
2. Select Report Type and select one of the options.
Option Description
Basic report One line of data.
Advanced report Two lines of data. The first line contains the same
information as in the basic report.
Total report Three lines of data. The first two lines contain the same
information as in the advanced report.
Send data to a USB storage device
N O T I C E
The transfer of a large number of data points will take some time. DO NOT
disconnect the USB storage device until the transfer is complete.
Data can be transferred to a USB storage device for storage or transfer
to a computer.
1. Turn off the meter. Make sure that the meter is connected to AC
power.
2. Plug the USB storage device into the meter before the meter is
powered on.
3. Turn on the meter.
4. Push the key.
5. Select Send Data Log. Wait for the display to show “Transfer
Complete” and for any lights on the USB storage device to stop
flashing. Then remove the USB device.
Note: If the data transfer is slow, reformat the USB storage device to use the
file allocation table (FAT) format for the next use.
English
15
Page 18

Open data files on a PC
Data that has been downloaded to a USB storage device can be
transferred to a computer. The data is sent in a text (.txt) file format.
1. Plug the USB storage device into the computer.
2. Find the data file. The file will have the following format: “Meter Serial
Number-Data File Type-Date Time”. Example: 9999NN000000SENDDATA-0603131624.TXT
3. Save the data file to a location on the computer.
4. Open a spreadsheet program such as Microsoft® Excel
®
spreadsheet software.
5. Open the data file from the spreadsheet program. Select the
delimited option with comma as the delimiter.
The data will be shown in the spreadsheet program.
Note: If an application is used that is not compatible with column headings, the
headings can be omitted. Refer to Remove column headers on page 18.
Data file description
Data that is saved to a USB storage device and then opened in a
spreadsheet application will have multiple columns of data. A description
for each of the columns is shown in Table 1.
Table 1 Spreadsheet column descriptions
Column header name Data description and example values
Type Type of data: RD = Reading; CL = Calibration; CK =
Check Standard; CH = Calibration History; IC =
Current Calibration
Parameter Type Parameter: LDO, pH, CD (conductivity), ORP,
ISE
Date Date of reading: stored in user-defined date format
Time Time of reading: stored in user-defined format
Operator ID Operator ID that was used when the data was
recorded. Shows “- - -” if no operator ID is used.
Table 1 Spreadsheet column descriptions (continued)
Column header name Data description and example values
Probe Model Model number of probe, for example pHC101,
CDC401, LDO101
Probe SN Probe serial number
If two probes are connected to the HQ40d meter, the
serial number shows “<“ or “>” to identify the port (left
or right) the probe was connected to during the
reading.
Method name User-defined name of the probe settings that were
used for the reading.
Sample ID Sample ID that was used when the data was
recorded. Shows "Sample ID" if the default sample ID
is used.
Primary Reading Value Measured value. Shows “—" if the value was out of
range.
Primary Reading Units Measurement units, for example pH or µS/cm
Supp Reading 1 First supplemental reading (example: temperature), if
applicable
Supp Units 1 Units for first supplemental reading, if applicable.
Supp Reading 2 Second supplemental reading (example: “mV” for pH),
if applicable
Supp Units 2 Units for second supplemental reading, if applicable
Supp Reading 3 Third supplemental reading, if applicable
Supp Units 3 Units for third supplemental reading, if applicable.
Reading Setting 1–4 Any settings that affect the reading, for example
“NaCl/Non-Linear”
Any settings that affect
the reading, for example
“NaCl/Non-Linear”
Reading Message 1–4 Any message that was shown
during the measurement, for example “Out of limits”.
16 English
Page 19

Table 1 Spreadsheet column descriptions (continued)
Column header name Data description and example values
Check Std Value Value of the check standard that was used to verify
accuracy, for example: 7.00 pH–25 ºC (pH, tempcompensated); 7.01 pH (pH, custom)
Check Std Units Check standard units, for example μS/cm.
Note: pH is not displayed here as it is included in the previous
column.
Check Std Graph Bar-graph showing the measurement in relation to the
acceptance limits. Example: “6.901 <—|—> 7.101”.
Check Std Status Status of the check standard reading. Example:
“Reading within limits”, “Reading outside limits”
Calibration Status
Status of the calibration that is in use. = current
calibration is valid; = calibration has expired.
Cal Date Date of calibration reading: stored in user-defined date
format
Cal Time Time of calibration reading: stored in user-defined
time format
Cal Operator ID The operator ID specified when the probe was
calibrated. Shows “- - -” if undefined.
Cal Slope Name Slope (pH or LDO) or cell constant (conductivity)
Cal Slope The slope value for the calibration
Cal Slope Aux Used by pH to give the percent of nominal slope
Cal Slope Units Units of the calibration slope. Example: “mV/pH” for
pH
Cal Offset Calibration offset value
Cal Offset Units Calibration offset units. Example: “mV” for pH.
Cal r² Calibration correlation coefficient without a unit (may
be blank)
Table 1 Spreadsheet column descriptions (continued)
Column header name Data description and example values
Cal Number of Std’s Number of standards used during calibration, for
example 5. May be blank depending on record type,
parameter type, and method settings.
Cal Std 1 Known value of the first calibration standard
Cal Std 1 Units Units of the first calibration standard
Cal Std 1 Primary Value Measured value of the first calibration standard
Cal Std 1 Primary Units Associated units for the calibration measurement
Cal Std 1 Supp Value Value of supplemental measurement, for example
temperature
Cal Std 2–7 Known value of additional calibration standards, if
used
Cal Std 2–7 Units Units of additional calibration standards, if used
Cal Std 2–7 Primary
Value
Measured values of additional calibration standards, if
used
Cal Std 2–7 Primary
Units
Associated units for additional calibration
measurements, if used
Cal Std 2–7 Supp Value Value of supplemental measurement, for example
temperature
Cal Std Supp Units Units applicable to all secondary calibration readings.
Example: “ºC” or “ºF” for temperature
Cal Message 1–4 Any messages about the calibration
Date/Time POSIX Date and time of reading stored in POSIX format
(number of seconds from January 1, 1970) Example:
1149234913
Cal Date/Time POSIX Date and time of calibration stored in POSIX format
(number of seconds from January 1, 1970). Example:
1111320348
Meter SN Meter serial number used to take the measurement
English 17
Page 20

Remove column headers
When transferred data is viewed in a spreadsheet program, the first row
of data contains headings to identify the type of data in each column. If
an application or post-processing method is used that is incompatible
with the headers, the column headers can be omitted.
1. Push the key.
2. Select Column Headers.
3. Set the column headers to off.
Send data directly to a computer
Data can be transferred from any HQd series meter directly to a
computer when the HQ40d PC Application is installed. The data can be
sent in real time during data collection, or the entire data log can be
transferred.
To download the most current version of the software, refer to the
applicable product page on the manufacturer's website.
1. Install the HQ40d PC Application on the computer.
2. Turn off the meter. Make sure that the meter is connected to AC
power.
3. Connect the PC to the meter with a USB type B cable.
4. Turn on the meter.
5. Open the HQ40d PC Application on the computer. Click on the green
triangle in the menu bar to start a connection.
6. Collect the data in real time or transfer the data from the data log:
• Real time—when a data point is stored in the meter, the result is
sent simultaneously to the PC Application (refer to Set the
measurement mode on page 21).
• Data log—push the key and select Send Data Log. Wait for
the display to show “Transfer Complete.” The data is sent as a
comma separated values (.csv) file.
The data is shown in the HQ40d PC Application window.
Advanced operation
Security options
The Security Options menu is used to protect the meter setup and
method settings from unwanted changes. This menu is available in the
Full Access Options menu.
The Setup Measurement Mode, Date and Time, Temperature Units,
Language, Probe settings, Delete data log and Security Options screens
are disabled in the Operator Access Options menu. All menu options are
enabled in the Full Access Options menu.
Note: The Full Access Options menu is shown when the key is pushed when
Security Options is OFF, whether or not a password has been set.
When the meter is powered on for the first time and Security Options is
selected, the display prompts the user to set a password. Until the meter
is shut off, pushing the key will still display the Full Access Options
menu, even after Security Options is turned on and a password has
been set. After the meter is shut off and powered on again with Security
Options on, the Operator Access Options menu is displayed until a valid
password is entered.
Store the password in a safe and accessible place. If the specified
password is forgotten and Security Options is turned on, the operator is
locked out of the restricted menus. Contact technical support if the
password is lost.
Turn Security Options on
The Security Options and the Set Password options are used together to
prevent access to restricted menus.
18 English
Page 21

1. Push the key and select Security Options.
2. Change the settings as needed to allow or prevent menu access.
Option Description
Security
Options
When Security Options is on, and a password has been
specified, the password is required to enable the Full
Access Options menu. If the meter is turned off while
Security Options is on, the password is required to enable
the Full Access Options menu again when the meter is
turned on.
Set Password Set a password that must be entered to enable the Full
Access Options menu. The requirement for password entry
is controlled by setting Security Options on or off.
Full access options menu
The Full Access Options menu is displayed when Security Options is
OFF or when Security Options is ON and a valid password is entered
(Table 2). These options do not need to be changed if the factory default
settings are used.
Table 2 Full Access Options
Option Description
(Probe model) settings Settings such as measurement options, calibration
options, check standard options, units and resolution.
Refer to the probe documentation for more information.
Note: A probe must be connected to the meter.
Run check standard Measure standard solution (available for pH,
conductivity, ORP and ISE probes)
Measurement mode Press to Read
Interval: Duration and Interval
Continuous
Instrument information Probe information
Meter information
Table 2 Full Access Options (continued)
Option Description
Security options ON or OFF
Set password
Display options Contrast
Auto shutoff
Backlight
Mode
Sounds Key press
Stability alert
Calibration reminder
Date and time Format
Date
Time
Temperature units Set temperature units
Language Select language
Restricted operator access options menu
The Operator Access Options menu is shown at meter startup when
Security Options is ON (Table 3). When a valid password is entered, the
menu changes to Full Access Options.
English
19
Page 22

Table 3 Operator access options
Option Description
(Probe model) settings Only methods (if methods exist) can be selected. Refer
to the probe documentation.
Note: A probe must be connected to the meter.
Run check standard Measure standard solution (available for pH,
conductivity, ORP and ISE probes)
Note: A probe must be connected to use this option.
Instrument information Probe information
Meter information
Access password Enter password
Display options Contrast
Auto shutoff
Backlight
Mode
Sounds Key press
Stability alert
Calibration reminder
Set the display options
Use Display Options to change the display contrast, battery saving autoshutoff options, the backlight option or the detailed or big reading screen
mode.
1. Push the key and select Display Options.
2. Select which display option to change.
Option Description
Contrast Adjust the contrast of the display. The lightest setting is 0 and
the darkest setting is 9.
Option Description
Autoshutoff
To maximize battery life, set a time period after which the
meter will automatically power off if no key is pushed (1, 2, 5,
10, 30 min, 1 h, 2 h or never). Auto-shutoff is not active when
the meter is connected to AC power or in the Interval Reading
Mode.
Backlight The display backlight is turned off when the key is pushed.
Is it possible to set a time period after which the backlight will
automatically power off if no key is pushed.
Mode Select Detailed or Big screen size. Detailed will show more
information with smaller numbers and text. Big will show less
information with larger numbers and text.
Note: The screen size can also be selected from the measure
mode (refer to Display description on page 9).
Set the sound options
The meter can make an audible sound when a key is pushed, when
stability is reached or when the calibration reminder is due. The meter
also makes an audible sound when it begins transferring data to a USB
storage device and again when the data transfer is complete.
1. Push the key and select Sound.
2. Choose which events will produce an audible sound. Multiple items
can be selected.
Option Description
Key Press The meter will make an audible sound whenever a key is
pushed.
Stability Alert The meter will make an audible sound whenever
measurement stability is reached.
Cal reminder The meter will make an audible sound when calibration is
due.
Note: Refer to Set the probe calibration reminder
on page 21 to set the calibration reminder to on or off.
20 English
Page 23

Set the probe calibration reminder
Make sure that a probe is connected to the meter.
1. Push the key and select the probe settings.
2. Select Modify Current Settings.
3. Select Calibration Options.
4. Select Calibration Reminder.
Option Description
Calibration
reminder
Reminder repeat: Off, 2 h, 4 h, 8 h, 2 d, 5 d, 7d
Expires: Immediately, Reminder + 30 min, Reminder + 1 hr,
Reminder + 2 hr, Continue Reading
The meter can be set to make an audible sound when
calibration is due. Calibration expires after a specified time
set by the user.
Note: The meter cannot be used to read samples after
calibration has expired unless Continue Reading is
selected.
Change the temperature units
To select degrees Celsius or Fahrenheit:
1. Push the key and select Temperature Units.
2. Select the Celsius or Fahrenheit option.
Set the measurement mode
One of three modes can be used to specify when measurements are
taken and how the data is stored. When a data point is stored, the result
is sent simultaneously to any device (PC/printer/ USB storage device)
that is connected to the meter.
1. Push the key and select Measurement Mode.
2. Select Mode.
3. Select one of the measurement modes.
Option Description
Press to Read The sample is measured only when the GREEN/RIGHT key
under Read is pushed. Data is stored in the data log
automatically when the stability criteria are met.
Interval The sample is measured at regular intervals for a specified
duration (refer to Set auto measurement intervals
on page 21). Data is stored in the data log automatically.
Continuous The sample is measured continuously. Data is stored in the
data log only when the GREEN/RIGHT key under Store is
pushed.
Set auto measurement intervals
When the measurement mode is set to Interval, the time intervals and
duration must be specified. Measurements are stored at the user-defined
intervals whether or not stability criteria are met.
Note: Use of an external USB storage device or direct printer connection while in
Interval Measurement mode prevents data from being over-written in the data log.
Data points are over-written on a First In/First Out basis. Refer to Prevent data log
overflow in interval mode on page 22.
1. Push the key and select Measurement Mode.
2. Select Mode.
3. Select Interval as the Measurement Mode.
4. Select Duration and select the total time that measurements will be
taken for (15 min, 30 min, 1 h, 4 h, 8 h, 24 h, 48 h or no limit).
5. Select Interval and select how often measurements will be taken
(every 10 s, 30 s, 1 min, 5 min, 15 min or 30 min).
Start interval measurements
During interval measurements, the meter goes into a standby state
between readings to conserve power. The auto-shutoff option is
disabled. Measurements stop when the selected interval duration has
passed. The auto-shutoff option then becomes active.
English
21
Page 24

Interval measurements are suspended for calibrations, check standard
measurements or when the key is pushed. Interval measurements
resume when returning to the measurement screen.
1. From the Main Measurement screen, select Start to begin interval
measurements. The screen will show “Recording” and the remaining
time of the duration. The sample number automatically advances
when each reading is taken.
2. To stop interval measurements, select Stop.
3. To repeat the interval measurement after it has been stopped or
completed, select Start.
Prevent data log overflow in interval mode
When measurements are taken at specified intervals (Table 4), each
result is automatically stored. The meter can store up to 500 data
records. When 500 records have been stored, data is replaced on a firstin, first-out basis. To prevent loss of data, connect the meter to a
PC/printer/USB storage device.
Note: Stop interval measurements before changes are made to a method or to
meter settings.
Table 4 Recommended interval/duration pairs
Interval Duration
10 seconds 1 hour
30 seconds 4 hours
1 minute 8 hours
5 minutes 24 hours
Note: When 2 probes are connected to the meter, use the next lowest
recommended duration time. For example, for a 30-second interval, set the
duration to 1 hour to prevent data log overload with 2 probes.
View instrument information
The instrument information menu shows specific information such as the
serial number for the meter or IntelliCAL (R) probe(s).
1. Push the key and select Instrument Information.
2. Select (Probe model) Information or Meter Information.
Option Description
Probe
information
The Probe Information screen shows the probe model
number, serial number, software version and date of first
use. For LDO and LBOD probes, the lot code for the
sensor cap and the remaining time before sensor cap
replacement is shown.
Note: A probe must be connected to the meter.
Meter
information
The Meter Information screen shows the meter model
number, serial number, software version and memory
information. The amount of memory used and the number
of available user method settings, operator IDs and sample
IDs is shown.
Update the meter software
A USB storage device that contains software update files is used to
update the meter software.
Note: The meter must be turned off and then on again before the software update
will begin. The software update initiates upon meter startup after the USB device is
correctly inserted.
N O T I C E
Do not remove the USB device until the “Update complete” message is shown.
The meter can become damaged if the USB device is removed before the update
process is complete.
1. Save stored data from the data log to a USB storage device or to a
PC. Refer to Send data to a USB storage device on page 15 and
Send data directly to a computer on page 18.
2. Turn off the meter.
3. Connect the USB/DC adapter, AC-DC power supply and cord (
Figure 4 on page 9).
22
English
Page 25

4. Insert the USB storage device that contains the software update files
into the USB/DC adapter.
5. Turn on the meter.
The update process starts. The display will show “Updating meter to
<firmware version>”. After an interval, the display changes to
“Updating files, please wait...” In addition, the display will show a
rotating flask and emit a periodic audio signal during the update
process.
Note: A large capacity USB storage device increases the time required for
completion of the update process, even if most of the device memory is empty.
6. Wait for the meter to finish the software update. When the update
process is complete, the message “Update complete. Remove USB
device” is shown. The meter will turn off after the USB device has
been removed.
7. Repeat steps 1 through 6 to update the software in other HQd
meters as necessary.
Download software updates
To download the most current version of the software, refer to the
applicable product page on the manufacturer's website.
1. Transfer the update files to a USB storage device.
2. Follow the instructions in Update the meter software on page 22 to
update the software in the meter.
Transfer method settings
Probe settings that have been changed by the user for measurements,
calibrations or check standards (Meter Options > (Probe Model) Settings
> Modify Current Settings) can be copied to a USB storage device. The
USB device can then be used to transfer the method settings to other
HQd meters that accept the same probes.
N O T I C E
Make sure the USB storage device does not contain HQd meter software update
files to prevent unintentional updates.
1. Turn off the meter.
2. Connect the meter to AC power (Figure 4 on page 9).
3. Plug the USB storage device into the USB/DC adapter before the
meter is powered on.
4. Turn on the meter.
5. Push the key and select Transfer Methods. If the USB device
already contains a method settings file, an option to export or import
methods is shown. Select Export Methods.
6. In the Select Methods to Export screen, select one or more methods
to copy to the USB device. A check mark is shown next to each
selected method.
7. Select OK. The settings are copied to the USB storage device. When
complete, the Transfer Summary screen is shown.
8. Connect the AC power and USB device to a meter that will receive
the method settings. Turn the meter on.
9. Push the key and select Transfer Methods. If the USB device
already contains a method settings file, an option to export or import
methods is shown. Select Import Methods.
10. In the Select Methods to Import screen, select one or more methods
to transfer to the meter. A check mark is shown next to each selected
method.
11. Select OK. The user method settings are transferred from the USB
storage device to the meter. When complete, the Transfer Summary
screen is shown. Select details to view additional information about
the transfer.
12. Disconnect the USB storage device from the meter.
Bi-directional Communication between the meter and
a PC
For measurement automation the meter can be used to implement a
command set for meter remote control or automated data transfer. The
command set can be used to perform minimal configuration and to
control the meter. To set up the meter for communication and control,
refer to About meter configuration on page 24. For additional
information and the command set contact Technical Support.
About meter control
The virtual serial connection can be used to control meter functions from
a PC. For example, the functions include starting a measurement cycle,
English
23
Page 26

turning off the meter and sending the entire measurement (including
calibrations) to the PC or other information management system.
About meter configuration
To use the meter communication and control from the PC, an INF file
must be installed.
1. The meter software must be version 2.0.0.710 or higher.
To download the most current version of the software, refer to the
applicable product page on the manufacturer's website.
2. Open the Zip file.
3. Copy the INF file from the software upgrade package to a convenient
location on the PC.
Note: The INF file must be installed to use the meter manual control from a
PC.
4. Turn on the meter.
5. Push the key and select Instrument Information.
6. Select USB Device Type and then select Virtual Serial to use the
virtual serial port on the meter.
7. Push OK. The meter will automatically restart to complete the setting
change.
8. Connect the meter with the USB cable to the PC and turn on the
meter.
Windows XP starts the "Found New Hardware Wizard".
9. Select "No, not at this time" to the query "Can Windows connect to
Windows Update to search for software?"
10. Click Next. The next wizard screen will prompt.
11. Select "Install from a list or specific location (Advanced)" to the query
"What do you want the wizard to do?"
12. Click Next. The next wizard screen will prompt.
13. Select the option "Search for the best driver in these locations."
14. Uncheck the "Search removable media (floppy, CD-ROM)" option
and select the "Include this location in the search:" and click the
"Browse" button.
15. Select the INF folder or location and click OK.
16. Click Next. The new software will be installed.
17. Click Finish to complete the Found New Hardware Wizard for: HQd
Meter - Virtual Serial Port.
18. To make sure that the installation succeeded, go to Computer
Management>Device Manager>Ports. The new installed port is listed
as HQd Meter - Virtual Serial Port (COM#).
19. The meter is now ready for communication with PC-based systems
using the Virtual Serial port. A program interface must be developed
by the user for the command set used to control the meter functions
from the PC. Contact Technical Support for more information and
command set documentation.
Maintenance
C A U T I O N
Multiple hazards. Only qualified personnel must conduct the tasks
described in this section of the document.
Clean the meter
The meter is designed to be maintenance-free and does not require
regular cleaning for normal operation. Exterior surfaces of the meter may
be cleaned as necessary.
1. Wipe the surface of the meter with a damp cloth.
2. Use a cotton-tipped applicator to clean or dry the connectors.
Replace the batteries
W A R N I N G
Explosion hazard. Incorrect battery installation can cause the release of explosive
gases. Be sure that the batteries are of the same approved chemical type and
are inserted in the correct orientation. Do not mix new and used batteries.
For battery replacement, refer to Figure 11. Make sure that the cover is
tightly closed to maintain the IP67 enclosure rating.
24
English
Page 27

1. Pull the release tab on the battery cover and the remove the cover.
2. Remove the batteries.
3. Install 4 AA alkaline or 4 AA nickel metal hydride (NiMH) batteries.
Make sure that the batteries are installed in the correct polarity.
4. Replace the battery cover.
Figure 11 Battery replacement
1 Batteries 2 Release tab 3 Battery cover
Troubleshooting
Refer to the following table for common problem messages or
symptoms, possible causes and corrective actions.
Error/Warning Description Solution
Connect a Probe Probe disconnected
or connected
improperly
Tighten the locking nut on the
probe connector.
Disconnect the probe and then
connect the probe again
Software not
updated to most
current version
To download the most current
version of the software, refer to
the applicable product page on
the manufacturer's website.
Problem with probe Connect a different IntelliCAL
probe to verify if problem is with
probe or meter
Probe Not Supported Probe disconnected
or connected
improperly
Tighten the locking nut on the
probe connector.
Disconnect the probe and then
connect the probe again.
Software not
updated to most
current version
To download the most current
version of the software, refer to
the applicable product page on
the manufacturer's website.
Problem with probe Connect a different IntelliCAL
probe to the meter to verify if
problem is with the meter or the
probe.
HQd meter does not
support IntelliCAL
probe
Contact Technical Support.
Bootloader
X.X.XX.XX error
Software not
updated to most
current version.
To download the most current
version of the software, refer to
the applicable product page on
the manufacturer's website.
English 25
Page 28

Error/Warning Description Solution
0 days remaining
message (For LDO
and LBOD only)
LDO or LBOD
sensor cap used for
365 days
Replace the LDO or LBOD
sensor cap and iButton®.
There are 0 days
remaining in the life
of the LDO sensor
cap.
Replace the LDO sensor cap.
Calibration will be allowed.
However, the calibration icon
and question mark will appear on
the measurement screen even if
the calibration has passed.
Meter set to
incorrect date and
time
1. Disconnect the probe from
the meter.
2. Remove the meter batteries.
3. Install the meter batteries
properly. Follow the polarity
makings.
4. Set correct date and time in
the meter.
5. Connect the probe and verify
that message has been
removed.
Software not
updated to most
current version
To download the most current
version of the software, refer to
the applicable product page on
the manufacturer's website.
Meter not configured Software error(s) If the meter starts up correctly,
back up the Data Log and
Method files.
To download the most current
version of the software, refer to
the applicable product page on
the manufacturer's website.
Error/Warning Description Solution
Meter will not power
on or powers on
intermittently
Batteries are not
installed correctly
Examine battery orientation to
make sure the batteries follow
the polarity markings. Test again.
Clean the battery terminals, then
install new batteries.
Connect AC power adapter and
test again.
Software not
updated to most
current version
To download the most current
version of the software, refer to
the applicable product page on
the manufacturer's website.
Damaged meter Contact Technical Support.
Unable to access
Full Access Options
screen
Correct password
has not been
entered
Contact Technical Support.
Unable to access
Full or Operator
Access Options
screen
Software not
updated to most
current version
To download the most current
version of the software, refer to
the applicable product page on
the manufacturer's website.
Replacement parts and accessories
Note: Product and Article numbers may vary for some selling regions. Contact the
appropriate distributor or refer to the company website for contact information.
Replacement parts
Description Item no.
AC Power/USB Adapter Kit, 115 VAC 5826300
AC Power/USB Adapter Kit, 230 VAC 5834100
Batteries, Alkaline AA 1938004
Battery cover 9245500
Battery Contact, dual fixed 5188400
26 English
Page 29

Replacement parts (continued)
Description Item no.
Battery Contact, dual spring 5188800
Cable, USB 6 ft (1.8 m), Type A male, Type B male 5924000
Field Kit (includes Protective Glove Kit for meter and five
120-mL sample cups)
5825800
Field Case for 2 probes with up to 5 m cables (10 m total).
Includes empty case, insert for meter and probe storage,
4 containers for sample collection.
8505500
Field Case for 3 probes with up to 5 m cables (15 m total).
Includes empty case, insert for meter and probe storage,
4 containers for sample collection.
8505501
Field Case for 2 probes with greater than 5 m cables (30 m
total). Includes empty case, insert for meter with protective
glove.
8505600
Keyboard (QWERTY), USB type LZV582
Printer, USB Thermal Printer Kit, DPU-S445, 100 - 240 V
AC
US:
LQV161.53.10000
EU:
LQV161.99.10000
Printer Paper for DPU-S445, thermal, 5/pk 5836000
Probe Clips, color coded (5 colors, 2 clips of each color),
10/pk
5818400
Probe Depth Marker (rugged cables) 5828610
Probe Holder, standard (fits on protective glove) 5829400
Protective Glove Kit for meter 5828700
Universal Probe Stand for standard IntelliCAL Probes 8508850
English 27
Page 30

Examples of printed reports
Printed reports contain a report header and all stored data for samples, check standards and calibrations.
Report header
The first line of a report shows the report header (Figure 12).
Figure 12 Report header
1 Meter serial number
1
3 Date and time, 24 h (YYMMDDhhmm)
2 Report label 4 File type extension
Data reports
Sample data can be printed in a basic, advanced or total report format.
• Total report—refer to Figure 13.
• Advanced report—refer to Figure 14.
• Basic report—refer to Figure 15.
1
The probe serial number is shown on calibration history and current calibration reports.
28 English
Page 31

Figure 13 Basic report for sample data—1 line
1 Data type (RD=reading) 6 Units
2 Parameter (pH, LDO, etc.) 7 Sample ID: user-defined; shows “SAMPLE ID” if undefined
3 Time (hh:mm:ss in 24 h or user-defined format) 8 Sample ID counter
4 Date (DD-MM-YY or user-defined format) 9 Operator ID: user-defined; shows “- - -” if undefined
5 Measured value
Figure 14 Advanced report for sample data—2 lines
1 Probe model 4 Additional units: shows all additional units associated with the reading.
2 Error message (if applicable) 5 Probe settings: shows the highest-priority setting associated with the reading
3 Probe serial number (a “<“ or “>” on the HQ40d meter indicates the probe
position)
English 29
Page 32

Figure 15 Total report for sample data—3 lines
1 Method name for probe settings 4 Calibration slope/ratio/constant
2 Time of calibration, prefaced by “CAL” and displayed as hh:mm in 24 h (or user-
defined) format
5 Offset—contents vary depending on type of parameter and user settings. May
be blank.
3 Date of calibration (DD-MM-YY or user-defined format) 6 Operator ID: user-defined; shows “- - -” if undefined
Check standard reports
Check standard data is printed with 1 line of information (Figure 16)
Figure 16 Check standard report
1 Report type (ST = check standard) 5 Measured value
2 Report type (ST = check standard) 6 Units
3 Time (hh:mm:ss in 24 h or user-defined format) 7 Check standard status: Pass/Fail based on the acceptance criteria
4 Date (DD-MM-YY or user-defined format) 8 Operator ID: user-defined; shows “- - -” if undefined
Calibration reports
Calibration data is printed when the data log is sent to the printer or when probe data is sent to the printer. Calibration data is printed with 2 lines of
information (Figure 17).
30
English
Page 33

Figure 17 Calibration report
1 Report type (CL = calibration, IC = current calibration) 7 Probe serial number (a “<“ or “>” on the HQ440d meter indicates the probe
position)
2 Parameter (pH, LDO, etc.) 8 Calibration slope/ratio/constant
3 Method name for probe settings 9 Offset—contents vary depending on type of parameter and user settings. May
be blank.
4 Time of calibration, prefaced by “CAL” and displayed as hh:mm in 24 h (or user-
defined) format
10 r²: contents vary depending on type of parameter being read, configuration of
specific method and number of calibration standards used. May be blank.
5 Probe model 11 Operator ID: user-defined; shows “- - -” if undefined
6 Date of calibration (DD-MM-YY or user-defined format)
The calibration history can be printed from the probe data menu. Refer to Figure 18.
English 31
Page 34

Figure 18 Calibration history report
1 Report type (CH=calibration history) 5 Date of calibration (DD-MM-YY or user-defined format)
2 Parameter (pH, LDO, etc.) 6 Probe serial number (a “<“ or “>” on the HQ40d meter indicates the probe
position).
3 Time of calibration, prefaced by “CAL” and displayed as hh:mm in 24 h (or user-
defined) format
7 Calibration slope/ratio/constant
4 Probe model 8 Offset—contents vary depending on type of parameter and user settings. May
be blank.
32 English
Page 35

Page 36

HACH COMPANY World Headquarters
P.O. Box 389, Loveland, CO 80539-0389 U.S.A.
Tel. (970) 669-3050
(800) 227-4224 (U.S.A. only)
Fax (970) 669-2932
orders@hach.com
www.hach.com
HACH LANGE GMBH
Willstätterstraße 11
D-40549 Düsseldorf, Germany
Tel. +49 (0) 2 11 52 88-320
Fax +49 (0) 2 11 52 88-210
info-de@hach.com
www.de.hach.com
HACH LANGE Sàrl
6, route de Compois
1222 Vésenaz
SWITZERLAND
Tel. +41 22 594 6400
Fax +41 22 594 6499
©
Hach Company/Hach Lange GmbH, 2010, 2013, 2017. All rights reserved.
*DOC022.53.80017*
 Loading...