

Page 1
FR
2-4 / 22-28
EN
DE
ES
RU
CN
NL
5-7 / 22-28
8-10 / 22-28
11-13 / 22-28
14-16 / 22-28
16-18 / 22-28
19-21 / 22-28
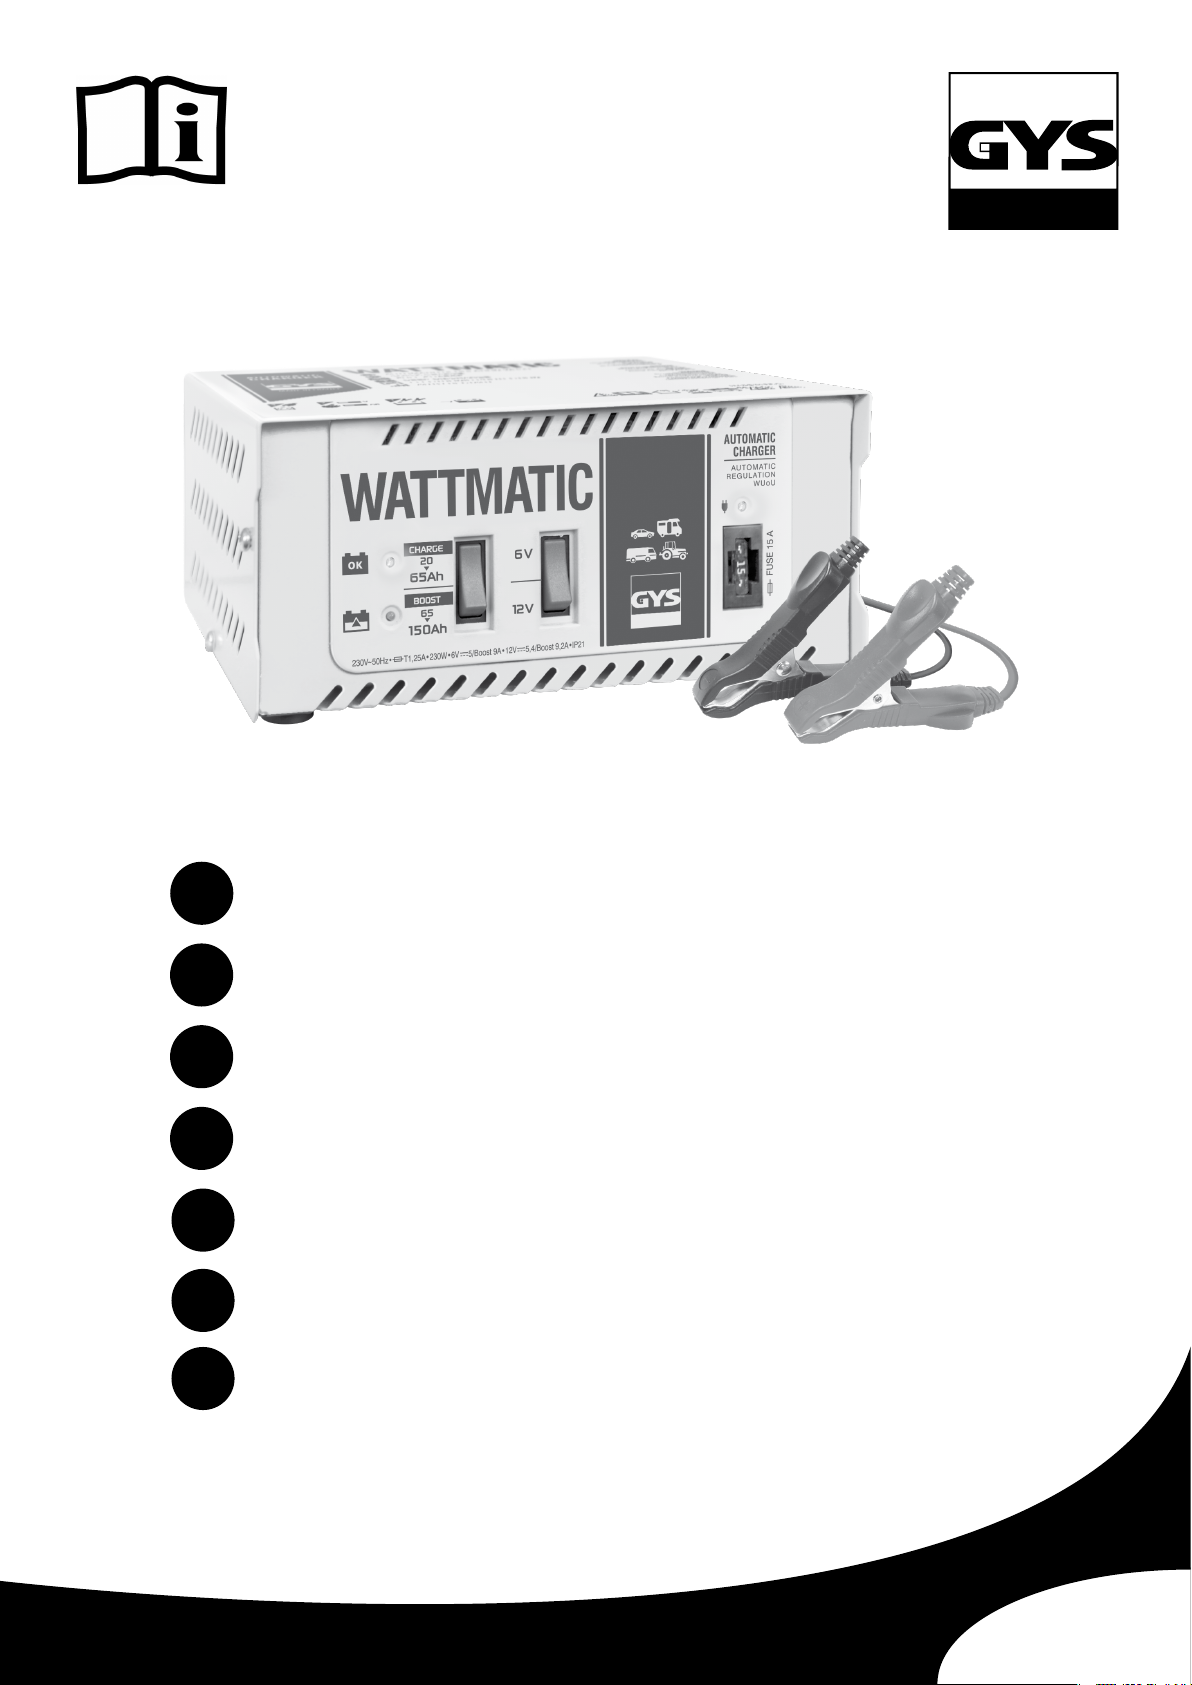
Chargeur de batterie automatique
Automatic battery charger
Automatisches Ladegerät
Cargador de batería automático
Автоматическое зарядное устройство
全自动电池充电器
Automatische acculader
Wattmatic 100
Wattmatic 140
Wattmatic 170
12068ind5_V1_17/11/2015
www.gys.fr
Page 2

Notice originale
WATTMATIC 100.140.170
CONSEILS ET AVERTISSEMENTS
▪ Gaz explosif, éviter les ammes et les étincelles. Pendant la charge, la batterie doit être placée
dans un emplacement bien aéré.
▪ Protéger contre la pluie et l’humidité.
▪ Votre chargeur doit être raccordé à un socle de prise de courant relié à la terre.
▪ Si le câble d’alimentation est endommagé, il doit être remplacé par le fabricant, son service aprèsvente ou une personne de qualication similaire, an d’éviter un danger.
▪ A n’utiliser en aucun cas pour charger des piles ou des batteries non-rechargeables.
▪ La borne de la batterie non reliée au châssis doit être connectée la première. L’autre connexion doit
être effectuée sur le châssis loin de la batterie et de la canalisation de combustible.
▪ Après l’opération de charge, débrancher le chargeur du réseau, puis retirer la connexion du châssis
et la connexion de la batterie, dans l’ordre indiqué.
▪ L’appareil doit être placé de façon telle que la che de prise de courant soit accessible.
▪ Cet appareil peut être utilisé par des enfants âgés d’au moins 8 ans et par des personnes ayant des
capacités physiques, sensorielles ou mentales réduites ou dénuées d’expérience ou de connaissance,
s’ils (si elles) sont correctement surveillé(e)s ou si des instructions relatives à l’utilisation de l’appareil
en toute sécurité leur ont été données et si les risques encourus ont été appréhendés. Les enfants
ne doivent pas jouer avec l’appareil. Le nettoyage et l’entretien par l’usager ne doivent pas être
effectués par des enfants sans surveillance.
▪ Produit faisant l’objet d’une collecte sélective. Ne pas jeter dans une poubelle domestique.
▪ Ne pas mettre en court-circuit les pinces pendant la charge.
▪ Risque de projections acides
▪ L’utilisateur doit se conformer à l’utilisation et à l’entretien spécié dans ce manuel an de se prémunir, ainsi que son entourage, contre tout risque lié à l’utilisation de ce chargeur.
FR
DESCRIPTION GÉNÉRALE
Nous vous félicitons pour votre choix car cet appareil a été conçu avec le plus grand soin. Pour en
tirer le maximum de satisfaction, nous vous conseillons de lire avec attention ce manuel d’instruction. Conserver le pour pouvoir la relire plus tard si nécessaire.
WATTMATIC est un chargeur automatique conçu pour la recharge des batteries de démarrage au
plomb à électrolyte liquide ou gel:
- de 15 AH à 100 Ah en 6V ou 12V pour le WATTMATIC 100 (3 ou 6 éléments de 2V),
- de 20 Ah à 150 Ah en 6V ou 12V pour le WATTMATIC 140 (3 ou 6 éléments de 2V),
- de 25 Ah à 180 Ah en 6V ou 12V pour le WATTMATIC 170 (3 ou 6 éléments de 2V).
Courbe de charge : WUoU. Cette courbe assure une charge à 100% et maintient le niveau de charge
grâce au Floating.
BRANCHEMENT EN MODE CHARGEUR
Précautions préalables
• Choisir un local abrité et sufsamment aéré ou spécialement aménagé.
• Enlever les bouchons de la batterie (si celle–ci en est munie) et assurez-vous que le niveau de
liquide (électrolyte) est correct. Sinon ajouter de l’eau distillée. Nettoyer soigneusement les bornes
et les cosses de la batterie.
• Vérier que la capacité (en Ampère-heure) et la tension (en Volt) de la batterie sont compatibles
avec votre chargeur.
Raccordement et débranchement
• Relier les pinces (+ rouge et – noire) aux bornes + et – de la batterie en assurant un bon contact
2
Page 3

Notice originale
WATTMATIC 100.140.170
FR
et en respectant l’ordre suivant :
▪ Connecter en premier la borne qui n’est pas reliée au châssis du véhicule.
▪ Relier ensuite la borne sur le châssis, sur un point éloigné de la batterie et de toute canalisation
de combustible.
▪ En dernier, connecter l’alimentation du chargeur à l’alimentation secteur 230V 50/60Hz.
▪ Vérier que le témoin s’allume.
• Après la charge, débrancher le chargeur de batterie de l’alimentation réseau puis retirer la connexion
du châssis et enn la connexion de la batterie, dans cet ordre.
Surveillance du déroulement de la charge
• Les 2 voyants orange et vert indiquent l’état de charge de la batterie :
▪ Le voyant orange s’allume lors de la connexion de la batterie et indique que la charge est en cours.
▪ Le voyant vert s’allume lorsque la batterie est chargée.
Si l’appareil reste plus de 24h en charge (voyant orange allumé), arrêtez la charge (cf partie batteries sulfatées).
PROTECTIONS
Votre appareil a été conçu avec un maximum de protections :
• Les pinces de charge sont isolées.
• L’inversion de polarité ne cause aucun danger. La protection est assurée par un fusible automobile
qu’il faut remplacer en cas d’erreur. Respecter le calibre du fusible indiqué sur l’appareil.
• Votre appareil est protégé contre les surintensités qui peuvent être créées par des batteries défectueuses ou de fausses manœuvres.
• Protection thermique : le transformateur de votre appareil est protégé par un thermostat (refroidissement : environ ¼ d’heure).
Références des fusibles utilisées sur le produit :
Type PN
Wattmatic 100 10A – Automotive Small Blade Type 054530
Wattmatic 140 15A – Automotive Small Blade Type 054493
Wattmatic 170 20A – Automotive Small Blade Type 054509
BATTERIES SULFATÉES, DÉMARRAGE, ALIMENTATION
• Ces chargeurs WATTMATIC ne détectent pas les batteries sulfatées. Si le chargeur reste en
charge (voyant orange allumé) plus de 24h, votre batterie est profondément endommagée. Interrompez la charge.
• Ne jamais laisser votre appareil branché sur votre voiture pendant un démarrage. Cela peut casser le fusible.
• Ne pas utiliser votre chargeur comme une alimentation auxiliaire. Il est interdit de consommer
du courant depuis la batterie pendant que le chargeur est branché.
ENTRETIEN
▪ Nettoyer la coque extérieure à l’aide d’un chiffon doux et sec.
▪ Vérier les pinces et le cordon secteur tous les ans.
▪ Une fois par an, ouvrir l’appareil et nettoyer l’intérieur des poussières à l’aide d’une soufette.
▪ L’appareil doit être déconnecté de sa source d’alimentation électrique pendant la charge d’entretien
et lors du remplacement de pièces.
3
Page 4
Notice originale
WATTMATIC 100.140.170
ATTESTATION DE CONFORMITÉ
La société GYS atteste que les chargeurs décrits dans ce manuel sont fabriqués conformément aux
exigences des directives européennes suivantes :
▪ Directive Basse Tension : 2006/95/CE du 12/12/06.
▪ Directive CEM : 2004/108/CE du 15/12/2004- 03/05/1989.
▪ Directive Exposition au Bruit 2003/10/CE : Ce chargeur présente un niveau de bruit
inférieur à 70dB(A).
Ils sont pour cela conformes aux normes harmonisées :
▪ EN 60335-1 / EN 60335-2-29 / EN 62233 / CEI EN 60529 / EN 50581
▪ EN 55014-1 / EN 55014-2
▪ CEI 61000-3-2 / CEI 61000-3-3
Date de marquage CE : 2015.
La déclaration de conformité est disponible et téléchargeable sur notre site internet à l’adresse suivante : www.gys.fr
FR
Société GYS SAS (FRANCE)
134 BD des Loges
BP 4159 - F53941 Saint Berthevin
GYS China
15# Worskhop, No.6666, SongZe Avenue,
Qingpu District, Shanghai 201700 – PRC
Nicolas BOUYGUES
Président Directeur Général/ CEO
4
Page 5
Translation of the original instructions
WATTMATIC 100.140.170
WARNINGS
▪ Explosive gas, avoid ame and sparks. During the charge, the battery must be placed in a well
ventilated place.
▪ Protect against rain and moisture.
▪ Your charger must be plugged in an outlet linked to the ground.
▪ if the electricity supply cable is damaged, it must be replaced by the manufacturer, its after sales
service, or a person with the same qualications to avoid any dangers.
▪ Do not use in any cases to charge small batteries or for non rechargeable batteries.
▪ The battery terminal which is not connected to the frame must be connected rst. The other
connection must be done on the frame far from the battery and from the fuel canalization.
▪ After charging, plug off the charger from the outlet, then plug off the clamp from the frame and
the battery in the indicated order.
▪ The charger must be placed in such a way that the socket outlet is always accessible.
▪ The charger must not be used as toy by young children, or used by young children or disabled
persons without any supervision.
▪ This product is to be recycled by selective collection. Do not throw in domestic garbage.
▪ Do not make the clamps enter in short circuit during the charge.
▪ Acids Risk of projections
▪ The user must comply with the use and maintenance specied in this manual to protect themselves and those around him, against any risks related to the use of this charger.
EN
GENERAL DESCRIPTION
Congratulations for the selection of this product, which has been designed with great care. To get
the best use of it, please read carefully the following instructions. Keep this instruction manual safe,
you may want to read it again later.
WATTMATIC is designed to charge starting liquid or gel electrolyte lead-acid batteries :
- from 15 Ah to 100 Ah in 6V or 12V for the WATTMATIC 100 (3 or 6 2V elements)
- from 20 Ah to 150 Ah in 6V or 12V for the WATTMATIC 140 (3 or 6 2V elements)
- from 25 Ah to 180 Ah in 6V or 12V for the WATTMATIC 170 (3 or 6 2V elements)
Load curve: WUoU. This curve ensures a 100% charge and maintains the level of charge thanks to
Floating.
CONNECTION IN CHARGER FUNCTION
Preliminary precautions
• For indoor use, with good ventilation.
• Remove the battery caps if there is, and check the level of liquid. If it is not correct; lled up with
distilled water. Clean well the battery terminals.
• Check if the battery capacity and voltage are compatible with your charger.
Connection and disconnection
• Connect the clamps (+ red, - black) to + and - battery terminals, making sure you get a good
electric contact, respecting the following order.
▪ Connect rst the battery terminal not connected to the chassis of the vehicle.
▪ Then connect the other connection to the chassis remote from the battery and any fuel line.
▪ At last, plug in your charger to 230 V 50/60 Hz mains supply.
5
Page 6
Translation of the original instructions
WATTMATIC 100.140.170
EN
▪ Check that the light switches on.
▪ After charging, disconnected the battery charger from mains supply. Then remove the chassis
connection and the battery connection, in this order.
Control of the charge process
• The 2 lights orange and green show the state of the battery charge :
▪ The orange indicator lights when the connection to the battery is done and shows that the charge
is in process.
▪ The green indicator lights when the battery is charged.
If the device stays more than 24 h in charge (orange light on), stop the charge (refer to the sulfated
battery paragraph).
PROTECTIONS
Your product has been developed with a maximum of protections.
• The clamps of the battery are isolated.
• The polarity reversal will not cause danger. The protection is insured by an automotive fuse, which
must be changed in case of polarity error. Respect the rating of the fuse, which is indicated on the
charger.
• Your charger is protected against over current that can occur with faulty batteries or false use of
the product.
• Thermal protection: the transformer of the product is protected by a thermal switch (cooling:
about ¼ h).
References fuses used on the product:
Type PN
Wattmatic 100 10A – Automotive Small Blade Type 054530
Wattmatic 140 15A – Automotive Small Blade Type 054493
Wattmatic 170 20A – Automotive Small Blade Type 054509
SULFATED BATTERIES - START - POWER SUPPLY
• The Wattmatic don’t detect the sulfated batteries. If the charger stays in charge (orange indicator
on) more than 24h, your battery is deeply damaged. Stop the charge.
• Do not leave your charger plugged on your car when you start it. It can break the fuse.·
• Do not use your charger like an auxiliary power supply. It is forbidden to pull up current from the
battery when the battery is connected to the charger.
MAINTENANCE
▪ Clean the outer shell using a soft dry cloth.
▪ Check the power cord clamps and every year.
▪ Once a year, open the unit and clean the inside of the dust using a blower.
▪ The device must be disconnected from its power source during the maintenance charge and when
replacing parts
.
6
Page 7
Translation of the original instructions
WATTMATIC 100.140.170
DECLARATION OF CONFORMITY
The company GYS certies that the products described on this manual are manufactured in compliance with the requirements of the following European directives :
▪ Low Voltage Directive : 2006/95/CE du 12/12/06
▪ EMC Directive : 2004/108/CE du 15/12/2004- 03/05/1989.
▪ Exposure to Noise Directive 2003/10 / EC: This charger has a noise level below 70dB (A).
They therefore comply with the following harmonized standards :
▪ EN 60335-1 / EN 60335-2-29 / EN 62233 / CEI EN 60529 / EN 50581
▪ EN 55014-1 / EN 55014-2
▪ CEI 61000-3-2 / CEI 61000-3-3
The appliance is CE marked: 2015.
The declaration of conformity is available for download on our website at the following address:
www.gys.fr
EN
Société GYS SAS (FRANCE)
134 BD des Loges
BP 4159 - F53941 Saint Berthevin
GYS China
15# Worskhop, No.6666, SongZe Avenue,
Qingpu District, Shanghai 201700 – PRC
Nicolas BOUYGUES
Président Directeur Général/ CEO
7
Page 8
Übersetzung der Originalbetriebsanleitung
WATTMATIC 100.140.170
HINWEISE UND WARNUNGEN
• Versuchen Sie auf keinen Fall nicht auadbare Batterien zu laden.
• Nutzen Sie Ihr Batterieladegerät nur in gut belüfteten Bereichen und vermeiden Sie jeglichen
Funkenug.
• Anschlussreihenfolge unbedingt beachten.
• Das Gerät soll so aufgestellt werden, dass der Netzstecker leicht erreichbar ist.
• Überprüfen Sie das Gerät regelmäßig auf Schäden, besonders das Netzkabel, den Stecker und das
Gehäuse. Ist das Ladegerät beschädigt, soll es vor der Reparatur nicht mehr benutzt werden.
• Falls die Netzanschlussleitung Beschädigungen aufweist bringen Sie das Gerät zur Reparatur in
den Fachhandel.
• Öffnen Sie nicht das Gerät. Achtung: Änderungen und Eingriffe am Gerät von nicht autorisierten
Personen setzen Garantie und Konformitätserklärung der Firma GYS außer Kraft.
• Produkt für selektives Einsammeln. Werfen Sie diese Geräte nicht in die häusliche Mülltonne.
• Acids Gefahr Projektionen
• Der Benutzer muss bei der Verwendung und Wartung in diesem Handbuch angegebenen
entsprechen, sich selbst und die um ihn herum, gegen alle Risiken für die Nutzung dieser Lade
Zusammenhang zu schützen.
DE
GERÄTEBESCHREIBUNG
Mit dem Kauf dieses Produktes haben Sie sich für ein Markengerät der Firma GYS entschieden.
Lesen Sie bitte für den optimalen Einsatz des Gerätes sorgfältig die Gebrauchsanweisung. Bewahren
Sie die Gebrauchsanweisung gut auf, falls Sie sie später nochmals lesen wollen.
Die WATTMATIC/SPRINTMATIC Batterieladegeräte wurden konzipiert, um Bleibatterien mit üssigem oder Gel- Elektrolyt aufzuladen:
- von 15Ah bis 100Ah bei 6V oder 12V für WATTMATIC 100 (3 oder 6 x 2V Elemente)
- von 20Ah bis 150Ah bei 6V oder 12V für WATTMATIC 140 (3 oder 6 x 2V Elemente)
- von 25Ah bis 180Ah bei 6V oder 12V für WATTMATIC 170 (3 oder 6 x 2V Elemente)
Vollladung
100% Ladung wird bei intakter Batterie erzielt. Nach Erreichen der Vollladung selbsttätige Erhaltung
des Ladezustandes.
ANSCHLUSS BEI LADEFUNKTION
Vorrangige Vorsichtsmaßnahmen
• Nur im Innenraum und bei guter Belüftung anwenden.
• Falls vorhanden entfernen Sie die Batteriezellendeckel und prüfen sie den Flüssigkeitsstand. Falls
nötig mit destilliertem Wasser auffüllen. Reinigen sie die Batteriepole.
• Vergewissern Sie sich, dass die Batteriespannung und -Kapazität mit den Eigenschaften des Ladegerätes übereinstimmen.
Anschluss und Trennung
• Verbinden Sie die Anschlussklemmen (+ rot, - schwarz) mit dem Plus- (+) und dem Minuspol (-)
der Batterie, unter Beachtung der folgenden Vorgehensweise:
▪ Verbinden Sie zuerst die Anschlussklemme, die nicht mit dem PKW-Gehäuse verbunden ist.
▪ Verbinden Sie dann die andere Anschlussklemme mit dem PKW-Gehäuse, weit entfernt von der
Batterie oder einer Brennstofeitung.
▪ Prüfen Sie, dass die Netzanzeige aueuchtet.
▪ Zum Schluss verbinden Sie das Ladegerät mit dem 230V-Netz.
• Nach der Ladung trennen Sie erst das Ladegerät vom Netz. Dann trennen Sie die Anschlussklemme
vom PKW Gehäuse und anschließend die Batterie Anschlussklemme.
8
Page 9
Übersetzung der Originalbetriebsanleitung
WATTMATIC 100.140.170
DE
Überwachen des Ladeprozesses
• Orange und grünes Licht zeigen den Ladezustand an:
▪ Orange Licht leuchtet auf, sobald die Batterie angeschlossen ist und zeigt den Ladevorgang an.
▪ Grünes Licht leuchtet auf, sobald die Batterie aufgeladen ist.
• Nach einer Ladedauer von 24 Stunden (orange Licht leuchtet auf) ist Ihre Batterie nicht mehr
ladefähig und die Ladung muß gestoppt werden!
SCHUTZFUNKTIONEN
Ihr Produkt wurde mit einer Vielzahl an Schutzfunktionen ausgelegt.
• Die Batterie-Anschlussklemmen sind isoliert aufgebaut.
• Eine Verpolung verursacht keine Gefahr. Der Schutz wird durch eine Schmelzsicherung gewährleistet, die man im Fehlerfall ersetzen muss. Die angegebene Stärke der Sicherung muss beim
Austausch berücksichtigt werden.
• Die Sicherung schützt vor Überstrom auf Grund von schlechten Batterien oder falscher Anwendung
des Produktes.
• Überhitzungsschutz : Der Transformator dieses Produktes besitzt einen Thermoschalter (Abkühlphase: ca. ¼ Stunde).
Referenzen Sicherungen auf dem Produkt verwendet:
Type PN
Wattmatic 100 10A – Automotive Small Blade Type 054530
Wattmatic 140 15A – Automotive Small Blade Type 054493
Wattmatic 170 20A – Automotive Small Blade Type 054509
SULFATIERTE BATTERIEN - START - STROMVERSORGUNG
• Wattmatic können die sulfatierte Batterie nicht erkennen. Nach einer Ladedauer von 24 Stunden
(orange Licht leuchtet auf) ist Ihre Batterie nicht mehr ladefähig und die Ladung muß gestoppt
werden!
• Wenn Sie den Motor starten darf die Batterie nicht mehr am Ladegerät angeschlossen sein. Dies
kann die Sicherung auslösen.
Die Verwendung des Ladegerätes als Stromversorgung ist nicht zulässig.
WARTUNG
▪ Reinigen Sie die Außenhülle mit einem weichen trockenen Tuch.
▪ Überprüfen Sie die Netzkabel Klemmen und jedes Jahr.
▪ Einmal im Jahr öffnen Sie das Gerät und reinigen Sie die Innenseite der Staub mit einem Gebläse.
▪ Das Gerät muss von der Stromversorgung während der Erhaltungsladung getrennt und beim
Austausch von Teilen.
9
Page 10

Übersetzung der Originalbetriebsanleitung
WATTMATIC 100.140.170
KONFORMITÄTSERKLÄRUNG
GYS erklärt, dass die Ladegeräte:
in Übereinstimmung mit den Anforderungen der folgenden Vorschriften hergestellt wurden :
▪ Niederspannungs-Richtlinie 2006/95/CE von 12/12/06
▪ CEM Richtlinien : 2004/108/CE von 15/12/2004
▪ Einwirkung von Lärm-Richtlinie 2003/10 / EG: Dieses Ladegerät verfügt über einen
Lärmpegel unter 70 dB (A).
Und deshalb im Einvernehmen mit den harmonisierten Normen sind :
▪ EN 60335-1 / EN 60335-2-29 / EN 62233 / CEI EN 60529 / EN 50581
▪ EN 55014-1 / EN 55014-2
▪ CEI 61000-3-2 / CEI 61000-3-3
CE Kennzeichnung : 2015.
Die Konformitätserklärung steht zum Download auf unserer Website unter der folgenden Adresse
zur Verfügung:
www.gys.fr
DE
Société GYS SAS (FRANCE)
134 BD des Loges
BP 4159 - F53941 Saint Berthevin
GYS China
15# Worskhop, No.6666, SongZe Avenue,
Qingpu District, Shanghai 201700 – PRC
Nicolas BOUYGUES
Président Directeur Général/ CEO
10
Page 11

Traducción de las instrucciones originales
WATTMATIC 100.140.170
AVISOS
▪ Gas explosivo, evitar las llamas y las chispas. Durante la carga, es imprescindible que la batería
esté situada en un lugar bien ventilado.
▪ Proteger contra la lluvia y la humedad.
▪ Su cargador debe estar conectado a una toma de tierra.
▪ Si el cable de alimentación está dañado, tiene que ser remplazado por el fabricante, su departamento post venta o una persona con competencia similar, para evitar cualquier peligro.
▪ En ningún caso se puede utilizar para cargar pilas o baterías no-recargables.
▪ El terminal de la batería que no está conectado al chasis tiene que estar conectado el primero.
La otra conexión tiene que efectuarse sobre el chasis, a lo lejos de la batería y de la canalización de
combustible.
▪ Después de la carga, desconectar el cargador de la red eléctrica, luego quitar la conexión del chasis y la conexión de la batería, en el orden indicado.
▪ El aparato tiene que colocarse de tal manera que la toma de tierra esté accesible.
▪ No se puede utilizar el aparato como juego para niños o no puede ser utilizado por jóvenes o personas minusválidas sin vigilancia.
▪ Este aparato es objeto de una recogida selectiva. No echar en un contenedor domestico.
▪ No poner las pinzas en cortocircuito durante la carga.
▪ Acids Riesgo de proyecciones
▪ El usuario debe cumplir con el uso y el mantenimiento especicado en este manual para protegerse y proteger a los que le rodean, contra los riesgos relacionados con el uso de este cargador.
ES
DESCRIPCION GÉNÉRAL
Les felicitamos por su selección porque este aparato fue concebido con mucho cuidado. Para conseguir una satisfacción máxima, por favor lea atentamente las indicaciones siguientes. También le
aconsejamos que las conserve para poder leerlas de nuevo si es necesario.
Los cargadores WATTMATIC están dedicados a la carga de baterías de arranque al plomo con electrolito líquido o gel :
- desde 15 Ah hasta 100 Ah en 6V o 12V para el WATTMATIC 100 (3 o 6 elementos de 2V),
- desde 20 Ah hasta 150 Ah en 6V o 12V para el WATTMATIC 140 (3 o 6 elementos de 2V),
- desde 25 Ah hasta 180 Ah en 6V o 12V para el WATTMATIC 170 (3 o 6 elementos de 2V),
Curva de carga: WUoU. Esta curva asegura un cargo del 100% y mantiene el nivel de carga gracias
a otante.
CONEXION EN MODO CARGADOR
Previas precauciones
• Escoger un local protegido de las inclemencias del exterior y sucientemente ventilado
• Quitar los tapones de la batería (si los lleva) y asegurarse que el nivel de líquido es correcto (añadir
agua destilada si necesario). Bien limpiar los terminales de la batería.
• Comprobar que la capacidad y tensión de la batería son compatibles con el cargador.
Conexión y desconexión
• Colocar las pinzas (+ roja y – negra) a los terminales + y – de la batería asegurándose el buen
contacto y respectando el orden siguiente :
▪ Conectar en primer lugar el terminal que no está en contacto con el chasis del vehiculo.
▪ Luego, conectar el terminal al chasis, a un punto distante de la batería y de toda canalización de
combustible.
▪ Por n, conectar el cargador a la red eléctrica (230V, 50/60 Hz).
• Comprobar que el indicador de tensión se enciende
11
Page 12

Traducción de las instrucciones originales
WATTMATIC 100.140.170
ES
• Cuando la batería está cargada, desconectar el cable de alimentación, luego quitar la conexión del
chasis (-) y por n la conexión de la batería (+), en este orden.
Vigilancia de la carga
• Los 2 indicadores (LED naranja y verde) indican la carga de la batería :
▪ La LED naranja se enciende a la conexión de la batería e indica que está cargando.
▪ La LED verde se enciende cuando la batería está cargada.
Si el aparato queda cargando más de 24h (LED naranja encendida), parar la carga (Cf. baterías
sulfatadas).
PROTECCIONES
Este aparato fue concebido con un máximo de protecciones:
• Las pinzas del cargador son aisladas.
• La inversión de polaridad no causa ningún peligro. La protección está asegurada por un fusible en
la cara frontal. En caso de cambio, respetar la intensidad indicada.
• El cargador es protegido, por un fusible en la cara frontal, contra sobreintensidad que puede ocurrir con baterías averiadas y mal uso del aparato.
• Protección térmica : el transformador es protegido por un termostato (enfriamiento : ¼ h).
Referencias fusibles utilizados en el producto:
Type PN
Wattmatic 100 10A – Automotive Small Blade Type 054530
Wattmatic 140 15A – Automotive Small Blade Type 054493
Wattmatic 170 20A – Automotive Small Blade Type 054509
BATERIAS SULFATADAS, ARRANQUE, ALIMENTACION
• Los cargadores WATTMATIC no detectan las baterías sulfatadas. Si el aparato queda cargando
más de 24H (LED naranja encendida), su batería es profundamente averiada. Interrumpir la carga.
• Nunca dejar el aparato conectado al vehículo durante un arranque. Eso puede romper el fusible.
• Nunca deberá utilizarse el cargador como una fuente auxiliar de energía. No debe en ningún caso
intentar obtener corriente de la batería mientras el cargador esté conectado.
MANTENIMIENTO
Limpie la carcasa exterior con un paño suave y seco.
▪ Compruebe las abrazaderas del cable de alimentación y todos los años.
▪ Una vez al año, abra la unidad y limpie el interior del polvo utilizando un soplador.
▪ El dispositivo debe estar desconectado de su fuente de energía durante la carga de mantenimiento
y cuando la sustitución de piezas.
12
Page 13

Traducción de las instrucciones originales
WATTMATIC 100.140.170
DECLARACION DE CONFORMIDAD
La empresa GYS atesta que los aparatos descritos en este manual son fabricados en conformidad
con las directivas europeas siguientes :
▪ Directiva Baja Tensión 2006/95/CE del 12/12/2006.
▪ Directive CEM : 2004/108/CE du 15/12/2004- 03/05/1989.
▪ La exposición a la Directiva sobre el ruido 2003/10 / CE: Este cargador tiene un nivel
de ruido por debajo de 70 dB (A).
Esta conformidad está establecida por el respeto a las normas :
▪ EN 60335-1 / EN 60335-2-29 / EN 62233 / CEI EN 60529 / EN 50581
▪ EN 55014-1 / EN 55014-2
▪ CEI 61000-3-2 / CEI 61000-3-3
El marcado CE fue jado en 2015.
La declaración de conformidad está disponible para su descarga en nuestro sitio web en la siguiente
dirección : www.gys.fr
ES
Société GYS SAS (FRANCE)
134 BD des Loges
BP 4159 - F53941 Saint Berthevin
GYS China
15# Worskhop, No.6666, SongZe Avenue,
Qingpu District, Shanghai 201700 – PRC
Nicolas BOUYGUES
Président Directeur Général/ CEO
13
Page 14

Перевод оригинальных инструкций
WATTMATIC 100.140.170
СОВЕТЫ И ПРЕДОСТЕРЕЖЕНИЯ
• Не пытайтесь зарядить одноразовые батарейки и неперезаряжаемые аккумуляторы.
• Используйте Ваше зарядное устройство в проветриваемом помещении и избегайте искр
вблизи аппарата.
• Строго соблюдайте указанный порядок подсоединения.
• Аппарат должен быть расположен так, чтобы розетка электросети была доступна.
• Регулярно проверяйте зарядное устройство, в особенности провод, вилку и металлический
корпус, для выявления повреждений. Если зарядное устройство повреждено, его нельзя
использовать, пока оно не отремонтировано.
• В случае повреждения провода питания он должен быть заменен производителем, его
сервисной службой или лицом с подобной квалификацией с тем, чтобы устранить возможный
риск.
• Не вскрывайте аппарат. Любое изменение, произведенное лицом, не являющимся техником
компании GYS влечет за собой аннулирование гарантии и ответственности компании GYS.
Это изделие подлежит специальной переработке. Не выбрасывайте его в общий мусоропровод.
• Кислоты Риск прогнозов
• Пользователь должен соблюдать при использовании и обслуживании, указанных в данном
руководстве, чтобы защитить себя и тех, кто вокруг него, против каких-либо рисков, связанных
с использованием этого зарядного устройства.
RU
ОПИСАНИЕ
Мы благодарим вас за выбор изделия нашей марки, изготовленное с большой заботой. Для
того, чтобы получить максимум удовлетворения от его работы, ознакомьтесь внимательно с
данной инструкцией. Сохраните ее, чтобы перечитать при надобности.
Зарядные устройства WATTMATIC предназначены для зарядки аккумуляторных батарей с
жидким или гелевым электоролитом, с номинальным напряжением 6 и 12В, и ёмкостью :
- от 15 до 100A/час для WATTMATIC 100
- от 20 до 150A/час для WATTMATIC 140
- от 25 до 180A/час для WATTMATIC 170
Кривая нагрузки: WUoU. Эта кривая обеспечивает 100% заряда и поддерживает уровень
заряда, благодаря плавающей.
ПОДГОТОВКА АППАРАТА К ЗАРЯДКЕ
Меры предосторожности
• Выберите крытое и хорошо проветриваемое помещение или помещение, специально для
этого оборудованное.
• Отвинтите пробки аккумулятора (если они имеются) и убедитесь, что уровень электролитного
раствора достаточен. В противном случае добавьте дистиллированной воды. Тщательно
очистите клеммы и наконечники аккумулятора.
• Проверьте, чтобы ёмкость (в Aмпер-часах) и напряжение (в Вольтах) аккумулятора
соответствовали зарядному устройству.
Подключение и отключение
• Подсоедините зажимы зарядного устройства (+ красный и – черный) к клеммам + и –
аккумулятора, убедившись в правильном контакте и соблюдая следующий порядок :
▪ Сперва подсоедините клемму, которая не соединена с корпусом автомобиля.
▪ Затем подсоедините клемму к корпусу автомобиля в точке, отдаленной от аккумулятора и от
трубопровода топливной системы.
- Для Wattmatic проверьте, что лампочка сетевого питания загорается
14
Page 15

Перевод оригинальных инструкций
WATTMATIC 100.140.170
RU
▪ Наконец, подсоедините провод питания зарядного устройства к сети 230В 50/60Гц.
• После зарядки отключите зарядное устройство от сети, затем отсоедините подключение к
корпусу, и наконец, подключение к аккумулятору, в этом порядке.
Наблюдение за процессом зарядки
• Две лампочки, оранжевая и зеленая, указывают состояние заряда аккумулятора :
▪ Оранжевая лампочка включается во время подсоединения аккумулятора и показывает, что
идет зарядка.
▪ Зеленая лампочка включается когда аккумулятор заряжен.
Если процесс зарядки продолжается более 24 часов (горит оранжевая лампочка), остановите
заряд (см. параграф про сульфатированные аккумуляторы).
ЗАЩИТЫ
Ваш аппарат максимально защищен :
• Клеммы зарядки изолированы.
• Инверсия полярности не представляет опасности. Защита обеспечивается с помощью
предохранителя, который надо заменить в случае ошибки. Соблюдайте указанный на аппарате
калибр предохранителя.
• Ваш аппарат защищен против перегрузки, которая может быть вызвана дефектным
аккумуляторам или ошибочным подключением.
• Термозащита : трансформатор Вашего аппарата защищен термореле (охлаждение : примерно
¼ часа).
Отзывы предохранители, используемые на продукте :
Type PN
Wattmatic 100 10A – Automotive Small Blade Type 054530
Wattmatic 140 15A – Automotive Small Blade Type 054493
Wattmatic 170 20A – Automotive Small Blade Type 054509
ОБСЛУЖИВАНИЕ
▪ Очистите внешнюю оболочку, используя мягкую сухую ткань.
▪ Проверьте зажимы шнура питания и каждый год.
▪ После того, как год, открыть блок и очистите внутреннюю часть пыли с помощью вентилятора.
▪ Устройство должно быть отключено от источника питания во время зарядки технического
обслуживания и при замене деталей.
СУЛЬФАТИРОВАННЫЕ АККУМУЛЯТОРЫ, ЗАПУСК, ПИТАНИЕ
• Ваш аппарат не имеет функции определения сульфатированных аккумуляторов. Если
зарядное устройство продолжает заряжать (горит оранжевая лампочка) более 24 часов, это
означает, что Ваш аккумулятор сильно поврежден. Прекратите зарядку.
• Никогда не оставляйте Ваш аппарат подключенным к автомобилю во время завода
автомобиля. Может испортиться предохранитель.
• Не используйте Ваше зарядное устройство как вспомогательный источник питания.
Потреблять ток от аккумулятора при подсоединенном зарядном устройстве запрещено.
15
Page 16

Перевод оригинальных инструкций
WATTMATIC 100.140.170
СЕРТИФИКАТ СООТВЕТСТВИЯ
Компания GYS подтверждает, что зарядные устройства, описанные в данной инструкции
произведены в соответствии с требованиями следующих директив Евросоюза :
▪ Директива по Низкому Напряжению 2006/95/CE – 12/12/2006
▪ Директива CEM : 2004/108/CE – 15/12/2004,
▪ Воздействие шума Директивы 2003/10 / EC: Это зарядное устройство имеет
уровень шума 70 дБ ниже (А).
Для этого они соответствуют гармонизированным нормам :
▪ EN 60335-1 / EN 60335-2-29 / EN 62233 / CEI EN 60529 / EN 50581
▪ EN 55014-1 / EN 55014-2
▪ CEI 61000-3-2 / CEI 61000-3-3
Дата нанесения маркировки CE/GS : 2015.
Декларация о соответствии доступна для скачивания на нашем сайте по следующему адресу:
www.gys.fr
RU
Société GYS SAS (FRANCE)
134 BD des Loges
BP 4159 - F53941 Saint Berthevin
GYS China
15# Worskhop, No.6666, SongZe Avenue,
Qingpu District, Shanghai 201700 – PRC
Nicolas BOUYGUES
Président Directeur Général/ CEO
16
Page 17

的原始指令翻译
WATTMATIC 100.140.170
建议和提醒
CN
- 在通风处使用充电器并保证周围没有火花产生。
- 注意防水防潮
- 充电器必须插入可靠接地的插座。
- 如果电源线有损坏,需要由生产商的售后维修部分或是专业人士进行更换,来避免可能产生的危
险。
- 不能用于给不可充电的电池充电。
- 连接电池连接柱时应先连接的是不和车身底盘连接的端子,然后在远离电池和燃料管的地方连接和
车身底盘相连的端子。
- 充电后,先切断充电器电源,然后断开车身底盘端子连接线,最后是电池连接线。一定严格按照此
顺序进行。
- 充电器需放置在可以方便接入电源处。
- 机器要妥善放置,不能让儿童误当玩具,或者让儿童或残疾人在无人监管情况下使用。
- 废用的机器需进行分类回收,不能直接扔进家里的垃圾桶。
- 在充电过程中要防止充电夹短路
- 预测酸风险
- 用户必须遵守本手册中规定的使用和维护,以保护自己和他周围的人,对涉及到使用这种充电器的
任何风险。
综述
感谢并恭喜您选择了这款我们精心设计生产的机器。为了获得更好的使用效果,我们建议您在使用
前仔细阅读这份说明书并保存好以备日后需要时再次查阅。
WATTMATIC 系列充电器设计用于给液态、胶状体电解质铅酸电池充电:
WATTMATIC100适用于给电压为6V或12V(3个或6个2V单元 ; 容量为15到100Ah的电池充电
WATTMATIC140适用于给电压为6V或12V(3个或6个2V单元 ; 容量为20到150Ah的电池充电
WATTMATIC170适用于给电压为6V或12V(3个或6个2V单元 ; 容量为25到180Ah的电池充电
负荷曲线:WUoU。该曲线保证了100%的充电和维护费用得益于水平浮动。
充电连接
准备措施
•室内使用、保持通风良好。
•如果电池有管塞,先取走塞子,检查确认电解液量是否合适,如果不合适,添加蒸馏水。清洁好
电池端子。
•确认所需充电电池的容量和电压与充电器所能满足范围相符。
连接和断开
•将两个充电夹按以下的步骤正确地接在电池连接柱上。
- 首先连接不和车身底盘相连的端子。
- 再在远离电池及燃料管的地方将其连接到与底盘相连的端子上。
- 最后,将充电器接在230V 50/60Hz的电源上。
- 确认充电状态指示灯已亮。。
•充电后,切断充电器电源然后断开车身底盘端子连接线,最后是电池连接线。
充电过程的监管
•橙色和绿色灯指示电池的充电状态:
- 连接电池后橙色灯亮表示充电正在进行。
- 绿灯亮表示充电已完成。
如果橙色灯一直亮,机器已充电超过24小时,停止充电(参考硫化蓄电池部分)
17
Page 18

的原始指令翻译
WATTMATIC 100.140.170
防护
CN
我们给机器加设了最大程度的防护措施:
•绝缘夹的配置
•外置插片保险丝可以防范反接造成的危险。这也正是机器外壳上保险丝的重要性所在。
•机器有针对不合格电池或错误操作可能导致的过流的保护
•热保护:变压器上配置有温度保护器(冷却:大约0.25小时)
在产品上使用的保险丝参考:
Type PN
Wattmatic 100 10A – Automotive Small Blade Type 054530
Wattmatic 140 15A – Automotive Small Blade Type 054493
Wattmatic 170 20A – Automotive Small Blade Type 054509
硫化的电池、启动、电源
• Wattmatic系列电池不能检测硫化电池电量。当电池持续充电24小时以上,电池会被完全损坏,充
电满24小时要立即停止充电。
• 启动车时不要把充电器接在车辆电池上,这会烧断保险丝。
•不要把充电器当作辅助电源使用。边充电边使用电池是不容许的
保养
- 清洁用干的软布擦拭外壳。
- 检查电源线夹具,每一年。
- 每年一次,打开设备和清洁的使用吹风机的尘埃里。
- 设备必须从电源在维护费用断开和更换零件时
声明
GYS公司声明本份说明书上所述产品 其生产符合以下欧盟指令:
▪ LVD指令: 2006/95/CE - 12/12/06.
▪ EMC 指令: 2004/108/CE 15/12/2004- 03/05/1989.
▪ 暴露于噪音指令2003/10/ EC:该充电器具有以下70分贝噪音水平(A)。
因此它们符合以下标准:
▪ EN 60335-1 / EN 60335-2-29 / EN 62233 / CEI EN 60529 / EN 50581
▪ EN 55014-1 / EN 55014-2
▪ CEI 61000-3-2 / CEI 61000-3-3
CE标准认证时间: 2015.
符合性声明是可供下载在我们的网站,地址如下:www.gys.fr
Société GYS SAS (FRANCE)
134 BD des Loges
BP 4159 - F53941 Saint Berthevin
GYS China
15# Worskhop, No.6666, SongZe Avenue,
Qingpu District, Shanghai 201700 – PRC
18
Nicolas BOUYGUES
Président Directeur Général/ CEO
Page 19

vertaling van de oorspronkelijke gebruiksaanwijzing
WATTMATIC 100.140.170
ADVIES EN WAARSCHUWINGEN
Explosieve gas, vermijd vuur en vonken. Tijdens laden, moet de accu in een goed geventileerde
ruimte zijn.
▪ Bescherm tegen regen en vocht.
▪ Uw acculader moet aangesloten worden aan een netspanning met geaarde stopcontact.
▪ Als de voedingskabel beschadigd is, dient deze vervangen te worden door de fabrikant, zijn reparatie dienst of een gekwaliceerde technicus, om gevaar te vermijden.
Niet geschikt voor het opladen van batterijen of niet oplaadbare accu’s.
▪ De aansluitklem van de accu dat niet aangesloten op een chassis is moet eerst vastgebonden worden. De andere connectie moet plaats vinden op de chassis, ver van de accu en kanalisering van de
brandstof.
▪ Na het laden, koppel de acculader van de netspanning los, daarna koppel eerst de connectie van
de chassis los en na dit van de accu.
▪ Het toestel dient zodanig aangesloten worden dat het mogelijk is deze, indien nodig, meteen uit
te kunnen schakelen.
▪ Het toestel mag niet als speelgoed door jonge kinderen gebruikt worden.
▪ Afzonderlijke inzameling vereist. Gooi het niet in het huishoudelijk afval.
Vermijd kortsluiting van de klemmen tijdens het laden.
▪ Zuren Gevaar voor projecties
▪ De gebruiker moet voldoen aan het gebruik en onderhoud in deze handleiding om zichzelf en de
mensen om hem heen, tegen de risico’s verbonden aan het gebruik van deze lader te beschermen.
NL
ALGEMENE OMSCHRIJVING
Hartelijk gefeliciteerd met uw keuze, dit toestel is ontwikkeld met de grootste zorg. Om er een
maximale voldoening uit te halen, lees aandachtig wat hierop volgt. Bewaar deze als naslagwerk.
WATTMATIC is ontwikkeld voor het laden van de vloeibaar- en gel elektrolyt lood-zuur opstart accu’s:
- van 15 AH tot 100 Ah in 6V of 12V voor de WATTMATIC 100 (3 of 6 elementen van 2V),
- van 20 Ah tot 150 Ah in 6V ou 12V voor de WATTMATIC 140 (3 of 6 elementen van 2V),
- van 25 Ah tot 180 Ah in 6V of 12V voor de WATTMATIC 170 (3 of 6 elementen van 2V).
Belastingscurve: WUoU. Deze curve zorgt voor een 100% lading en handhaaft het niveau van de
lading dankzij Drijvende.
AANSLUITEN IN LADEN MODUS
Voorafgaande maatregelen
• Kies een beschutte, voldoende geventileerde of speciaal aangepaste ruimte.
• Verwijder (indien aanwezig) de doppen van de accu en zorg ervoor dat het vloeistof niveau
(elektrolyt) correct is. Anders voeg gedestilleerd water toe. Reinig voorzichtig de accupolen en de
accuklemmen.
• Controleer of de capaciteit (in ampère-uren) en spanning (in volt) van de accu compatibel zijn met
uw lader.
Aansluiten en loskoppelen
• Sluit de klemmen (+ rood en - zwart) op + en - polen van de accu, zodat een goed contact is, en
volgt de volgende volgorde:
▪ Sluit eerst de aansluiting die niet met het chassis verbonden is.
▪ Sluit daarna de pool aan het chassis, op een punt die niet in de buurt van de accu en een brandstoeiding is.
▪ Sluit de acculader als laatst aan een 230V 50/60Hz voeding.
- Controleer of het contact lampjes aan gaat
19
Page 20

vertaling van de oorspronkelijke gebruiksaanwijzing
WATTMATIC 100.140.170
NL
• Na het opladen, haal eerst de lader uit het stopcontact, verwijder vervolgens de chassis-verbinding
en aan het einde de accu-verbinding.
Toezicht op het laden
• Twee oranje lampjes geven het laadniveau van de accu aan:
▪ Bij het aansluiten van de accu, gaat het oranje lampje branden en geeft aan dat het laden gaande
is.
▪ Groene lampje brandt als de accu opgeladen is.
Als het toestel meer dan 24 uur aan het laden is (oranje lampje staat aan), stop met laden (zie deel
gesulfateerde accu’s).
BEVEILIGINGEN
Dit apparaat is ontworpen met de maximum beveiligingen:
• De laadklemmen zijn geïsoleerd.
• Polariteitomwisseling zal geen gevaar veroorzaken. Beveiliging wordt door een zekering verzekert
die vervangen moet worden in geval van een fout. Gebruik de geschikte zekering maat die op de
lader aangegeven staat.
• Uw apparaat is beveiligd tegen overstroom die door defecte accu of verkeerd gebruik gecreëerd
kan worden.
• De transformator van uw apparaat is uitgerust met een thermostaat (afkoelen: ongeveer ¼ uur).
Referenties zekeringen gebruikt op het product:
Type PN
Wattmatic 100 10A – Automotive Small Blade Type 054530
Wattmatic 140 15A – Automotive Small Blade Type 054493
Wattmatic 170 20A – Automotive Small Blade Type 054509
GESULFATEERDE ACCU’S, OPSTARTEN, VOEDING
• De WATTMATIC kan de gesulfateerde accu niet erkennen. Als het toestel meer dan 24 uur aan het
laden is (oranje lampje staat aan), uw accu is zwaar beschadigd. Stop met laden.
• Tijdens het opstarten van de motor, laat de lader niet op de accu aangesloten. Dit kan het smelten
van de zekering veroorzaken.
• Gebruik uw lader niet als stroom voorziening. Het is verboden om de stroom van de accu te gebruiken wanneer de lader is aangesloten.
ONDERHOUD
▪ Reinig de buitenste schil met een zachte, droge doek.
▪ Controleer het netsnoer klemmen en elk jaar.
▪ Eenmaal per jaar, opent het apparaat en reinig de binnenkant van de stof met een blower.
▪ Het apparaat moet worden losgekoppeld van de stroomvoorziening tijdens de onderhoudskosten
en bij het vervangen van onderdelen.
20
Page 21

vertaling van de oorspronkelijke gebruiksaanwijzing
WATTMATIC 100.140.170
CERTIFICAAT VAN OVEREENSTEMMING
GYS verklaart dat de in deze handleiding beschreven laders vervaardigd is in overeenstemming met
de eisen van de volgende Europese richtlijnen :
▪ Lage spanning richtlijn: 2006/95 / CE van 12/12/2006
▪ EMC-richtlijn: 2004/108/CE van 15/12/2004 – 03/05/1989.
▪ Blootstelling aan lawaai Richtlijn 2003/10 / EG: Deze lader heeft een geluidsniveau
onder de 70 dB (A).
Daardoor zijn ze in overeenstemming met de geharmoniseerde normen :
▪ EN 60335-1 / EN 60335-2-29 / EN 62233 / CEI EN 60529 / EN 50581
▪ EN 55014-1 / EN 55014-2
▪ CEI 61000-3-2 / CEI 61000-3-3
Datum CE markering: 2015.
De verklaring van overeenstemming is beschikbaar voor download op onze website op het volgende
adres: www.gys.fr
NL
Société GYS SAS (FRANCE)
134 BD des Loges
BP 4159 - F53941 Saint Berthevin
GYS China
15# Worskhop, No.6666, SongZe Avenue,
Qingpu District, Shanghai 201700 – PRC
Nicolas BOUYGUES
Président Directeur Général/ CEO
21
Page 22

WATTMATIC 100.140.170
CONDITIONS DE GARANTIE FRANCE
La garantie couvre tous défauts ou vices de fabrication pendant 1 an, à compter de la date d’achat
(pièces et main d’oeuvre).
La garantie ne couvre pas :
• Toutes autres avaries dues au transport.
• L’usure normale des pièces (Ex. : câbles, pinces, etc.).
• Les incidents dus à un mauvais usage (erreur d’alimentation, chute, démontage).
• Les pannes liées à l’environnement (pollution, rouille, poussière).
En cas de panne, retourner l’appareil à votre distributeur, en y joignant :
- un justicatif d’achat daté (ticket de sortie de caisse, facture….)
- une note explicative de la panne.
HERSTELLERGARANTIE
Die Garantieleistung des Herstellers erfolgt ausschließlich bei Fabrikations- oder Materialfehlern,
die binnen 12 Monate nach Kauf angezeigt werden (Nachweis Kaufbeleg). Nach Anerkenntnis des
Garantieanspruchs durch den Hersteller bzw. seines Beauftragten erfolgen eine für den Käufer
kostenlose Reparatur und ein kostenloser Ersatz von Ersatzteilen. Der Garantiezeitraum bleibt
aufgrund erfolgter Garantieleistungen unverändert.
Ausschluss :
Die Garantieleistung erfolgt nicht bei Defekten, die durch unsachgemäßen Gebrauch, Sturz oder
harte Stöße sowie durch nicht autorisierte Reparaturen oder durch Transportschäden, die infolge
des Einsendens zur Reparatur, hervorgerufen worden sind. Keine Garantie wird für Verschleißteile (z.
B. Kabel, Klemmen, Vorsatzscheiben etc.) sowie bei Gebrauchsspuren übernommen.
Das betreffende Gerät bitte immer mit Kaufbeleg und kurzer Fehlerbeschreibung ausschließlich über
den Fachhandel einschicken. Die Reparatur erfolgt erst nach Erhalt einer schriftlichen Akzeptanz
(Unterschrift) des zuvor vorgelegten Kostenvoranschlags durch den Besteller. Im Fall einer
Garantieleistung trägt GYS ausschließlich die Kosten für den Rückversand an den Fachhändler.
Kontakt KD :
GYS GmbH
Professor-Wieler-Straße 11
52070 Aachen
Tel: +49-241-189-23-71-21
Fax: +49-241-189-23-71-8
22
Page 23

5
WATTMATIC 100.140.170
6
4
1
2
3
4
1 2 3
FR EN CN DE ES RU NL
Sélection de
la capacité
batterie
Sélection, de la
tension batterie
Fusible de
protection
Témoin orange
de charge en
cours
Battery capacity
selector
Battery voltage
selector
Protection fuse
Orange indicator for battery
charging
待充电电池容量
选择
待充电池电压
选择
保险丝
橙色灯表示充电
进行中
Auswahl der
Batteriekapazität
Auswahl der Batteriespannung
Schmelzsicherung Fusible de
Orange Ladeleuchte
Selección de la
capacidad de la
batería
Selección de la
tensión de batería
protección
Indicador naranja
de aparato en
carga.
Выбор емкости
аккумулятора
Выбор пряжения
умулятора
Предохранитель Beveiliging
Оранжевая
лампочка, горит в
процессе зарядки
Selectie van de
accucapaciteit
Selectie van de
accuspanning
zekering
Oranje LED
lampje van het
laden
Témoin vert
de charge
5
terminée
Témoin de présence secteur
6
Green indicator
for charged
battery
Power indicator
绿色灯表示充电
已完成
电源指示键
Grüne Leuchte bei
Vollauadung
Netzanzeige Indicador de
Indicador verde
de bateria
cargada.
tensión de la red
Зеленая лампочка,
горит когда
аккумулятор заряжен
Световый индикатор Netspanning
Groen LED
lampje van het
eind laden
lampje
23
Page 24

WATTMATIC 100.140.170
SCHÉMA ÉLÉCTRIQUE /CIRCUIT DIAGRAM /SCHALTPLAN/ DIAGRAMA ELECTRICO/
ЭЛЕКТРИЧЕСКАЯ СХЕМА
PCB Transformer
WATTMATIC 100 B0054IND1 53133IND1 —
WATTMATIC 140 B0010IND1 B2023
WATTMATIC 170 B0010IND1 B2024
PCB
thermostat
90°C
12066
90°C
12066
Transformer
thermostat
130°C
51348
135°C
C13786
125°C
C13733
Primary
fuse
51371
1.25A
51371
1.25A
51374
1.6A
Secondary
fuse
C13712
10A
C13711
15A
51379
20A
Cable
B0044
1.5mm2 ;L=1.5M
B0011
2.5mm2 ;L=1.5M
B0082
2.5mm2 ;L=2M
24
Page 25

WATTMATIC 100.140.170
ICONES / SYMBOLS / ZEICHENERKLÄRUNG / ICONOS / CИMBOЛЬL
- Appareil conforme aux directives européennes.
- The device complies with European Directive.
- Gerät entspricht europäischen Richtlinien.
- El aparato está conforme a las normas europeas.
- Устройство соответствует европейским нормам.
- Het apparaat is in overeenstemming met met de Europese richtlijnen
- 产品符合欧洲安全标准
- Marque de conformité EAC (Communauté économique Eurasienne)
- Conformity mark EAC (Eurasian Economic Commission)
- EAC-Konformitätszeichen (Eurasische Wirtschaftsgemeinschaft)
- Marca de conformidad EAC (Comunidad económica euroasiática)
- Маркировка соответствия EAC (Евразийское экономическое
сообщество)
- EAC (Euraziatische Economische Gemeenschap) merkteken van overeenstemming
- 马凯日即符合EAC(欧亚经济委员会)
- Attention ! Lire le manuel d’instruction avant utilisation.
- Caution ! Read the user manual.
- Achtung! Lesen Sie die Betriebsanleitung.
- Cuidado, leer las instrucciones de utilización.
- Внимание ! Читайте инструкцию по использованию.
- Let op! Voor gebruik lees aandachtig de handleiding
- 注意!在使用前认真阅读说明书
- Produit faisant l’objet d’une collecte sélective - Ne pas jeter dans une poubelle domestique.
- Separate collection required, Do not throw in a domestic dustbin.
- Für die Entsorgung Ihres Gerätes gelten besondere Bestimmungen (Sondermüll). Es darf nicht mit dem Hausmüll entsorgt werden.
- Este aparato es objeto de una recolección selectiva. No debe ser tirado en
un cubo doméstico.
- Продукт требует специальной утилизации. Не выбрасывать с
бытовыми отходами.
- Afzonderlijke inzameling vereist. Gooi het niet in het huishoudelijk afval.
- 该产品属于选择性可回收品-请不要扔到家庭垃圾箱,内含铅酸蓄电池
- Assurer une aération sufsante pendant la charge.
- During the charge the battery must be placed in a well ventilated area
- Sorgen Sie für ausreichende Belüftung während des Ladevorgangs
- Asegurar una ventilación suciente durante la carga
- Обеспечивать необходимую вентиляцию во время заряда
- Tijdens laden zorg voor voldoende ventilatie.
- 选择阴凉和通风良好的房间存放。
- Eviter les ammes et les étincelles.
- Avoid ames and sparks
- Vermeiden Sie stets Feuer und Funkenug
- Evitar las llamas y las chispas
- избегайте пламени и искр
- Vermijd vuur en vonken.
- 警告:内含可爆炸性气体,请远离火焰和火花
25
Page 26

WATTMATIC 100.140.170
- Attention! gaz explosifs. Risque de projections acides.
- Warning! contains explosive gas
- Achtung, Gase können Explosionen verursachen.
- Atención :contiene gases explosivos
- Внимание: взрывоопасные газы.
- Let op! explosief gas. Gevaar voor zuren projecties
- 警告!含有爆炸性气体
- Déconnecter l’alimentation avant de brancher ou de débrancher les
connexions sur la batterie
- Disconnect the power supply before connecting the device to/from the
battery
- Der Netzstecker muss vor dem An-bzw. Abklemmen der Batterie gezogen
sein
- Desconecte la fuente de alimentación antes de conectar el dispositivo de la
batería
- Koppel de stroomvoorziening voordat u het apparaat aan / uit de accu
- 从电池的设备连接到/前断开电源
- Fusible
- Fuse
- Sicherung
- Fusible
- Плавкий предохранитель
- 熔
- Smeltbare
- Régulation automatique WUoU
- Automatic regulation WUoU
- Automatische Regelung WUoU
- WUoU automática regulación
- Автоматическое регулирование WUoU
- Automatische regeling WUoU
- 自动调节WUoU
- Charge rapide
- Quick charge
- Schnellladung
- Carga rápida
- Быстрая зарядка
- Snel opladen
- 快速充电
26
100%
- Charge complète
- Full charge
- Volle Ladung
- Carga completa
- Полный заряд
- Volledige lading
- 完全充电
Page 27

WATTMATIC 100.140.170
- Décharge profonde
- Deep discharge
- Tiefentladung
- Descarga profunda
- Глубокая разрядка
- Ontlading
- 深度放电
- Protection électronique
- Electronic protection
- Elektronischer Schutz
- Protección electrónica
- Электронная защита
- Elektronische beveiliging
- 电子保护
- Redémarrage automatique
- Auto restart
- Automatischer Neustart
- Reinicio automático
- Автоматический перезапуск
- Automatische herstart
- 自动重启
- Batterie chargée
- Charged battery
- Aufgeladene Batterie
- Batería cargada
- Заряженный аккумулятор
- Opgeladen batterij
- 充满电的电池
- Batterie en charge
- Battery charging
- Batterieladung
- Bateria cargando
- зарядка батареи
- Batterij opladen
- 电池充电
27
Page 28

28
 Loading...