

Page 1
PAGES : 2-8 / 36-40
www.gys.fr
PAGES : 9-15 / 36-40
SEITEN : 16-22 / 36-40
PAGINAS : 23-29 / 36-40
СТР : 30-40
73515-V15-02/09/2013
Page 2
DESCRIPTION
Merci de votre choix ! Afin de tirer le maximum de satisfaction de votre poste, veuillez lire avec attention ce qui suit
avant utilisation.
Le TIG 168/200 HF DC est un poste de soudure Inverter, portable, monophasé (triphasé pour le 250 DC), ventilé,
pour soudage à l'électrode réfractaire (TIG) en courant continu (DC). Le soudage TIG DC requiert une protection
gazeuse (Argon). En mode MMA, il permet de souder tout type d’électrode : rutile, basique, inox et fonte. Ils
fonctionnent sur une alimentation électrique, monophasée 230V pour le TIG 137/168, monophasée comprise entre
85V et 265V pour le TIG 200FV. Ils sont protégés pour le fonctionnement sur groupes électrogènes. Le TIG 200
peut être équipé d’une commande à distance manuelle ou pédale.
ALIMENTATION-MISE EN MARCHE
• Le TIG 168/200 est livré avec une prise 16A de type CEE7/7. Le TIG 250 est livré avec une prise
triphasée 5 pôles type EN 60309-1
400V 16A
. Le TIG 168 doit être relié à une prise 230 V (50 - 60 Hz) AVEC terre. Le
TIG 200FV dispose d’un système « Flexible Voltage », il s’alimente sur une installation électrique AVEC terre
comprise entre 110V et 240V (50 - 60 Hz).
Hz).
triphasée AVEC terre.
Le courant effectif absorbé (I1eff) est indiqué sur l'appareil, pour les conditions
Le TIG 250
, il s’alimente sur une installation électrique
400V
(50 - 60
d'utilisation maximales. Vérifier que l'alimentation et ses protections (fusible et/ou disjoncteur) sont compatibles
avec le courant nécessaire en utilisation. Dans certains pays, il peut être nécessaire de changer la prise pour
permettre une utilisation aux conditions maximales. Utiliser de préférence une prise 25 A pour le TIG 168 en
utilisation intensive
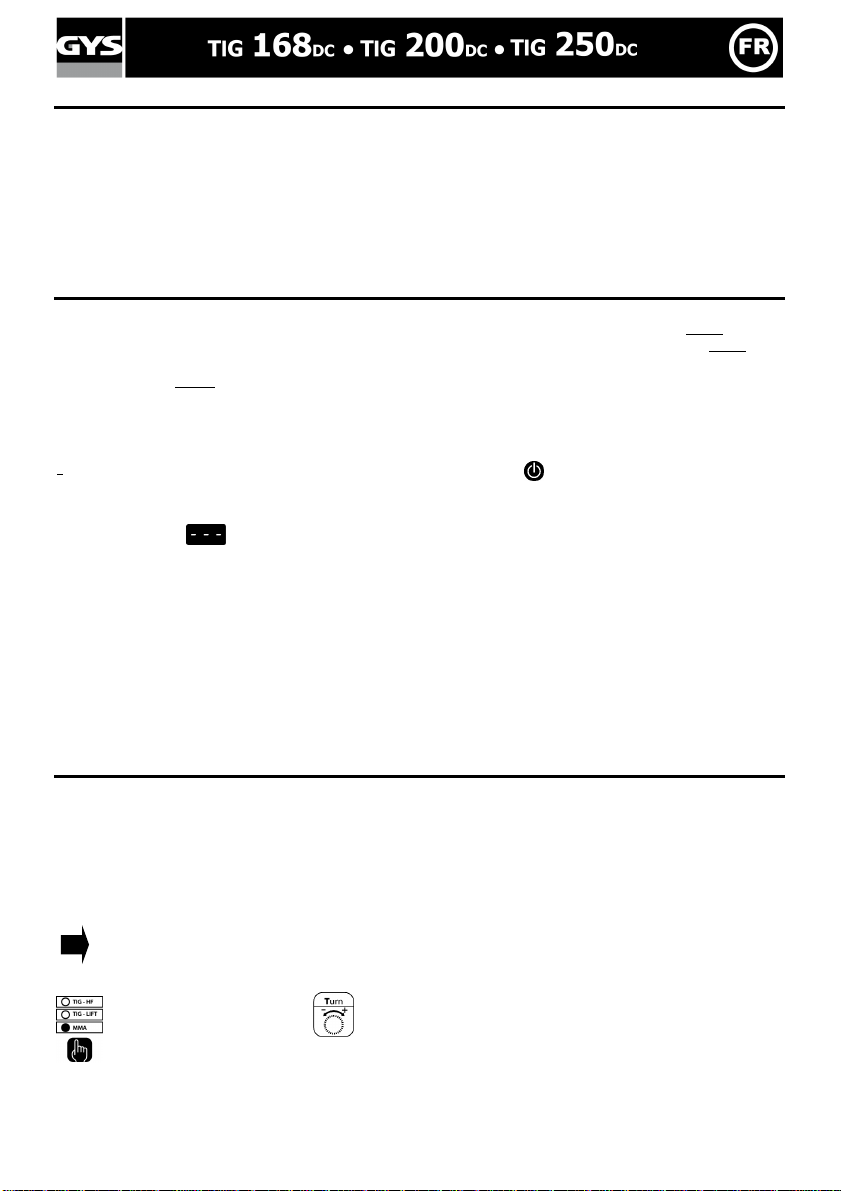
• La mise en marche s’effectue par un appui sur le bouton de veille . Pour le TIG 250, en tournant le
commutateur.
• L’appareil se met en protection si la tension d'alimentation est supérieure à 265V. Pour indiquer ce défaut,
l'afficheur indique . . Une fois en protection, débrancher l'appareil et rebrancher-le sur une prise délivrant une
tension correcte.
• Comportement du ventilateur : En mode MMA, le ventilateur fonctionne en permanence. En mode TIG, le
ventilateur fonctionne uniquement en phase de soudage, puis s'arrête après refroidissement.
• Ces appareils sont de Classe A. Ils sont conçus pour un emploi dans un environnement industriel ou
professionnel. Dans un environnement différent, il peut être difficile d’assurer la compatibilité électromagnétique,
à cause de perturbations conduites aussi bien que rayonnées. Ne pas utiliser dans un environnement comportant
des poussières métalliques conductrices.
• A partir du 1er décembre 2010, modification norme EN 60974-10 applicable pour les TIG 168: Attention, ces
matériels ne respectent pas la CEI 61000-3-12. S’ils sont destinés à être connectés au système public
d’alimentation basse tension, il est de la responsabilité de l’utilisateur de s’assurer qu’ils peuvent y être reliés.
Consulter si nécessaire l’opérateur de votre réseau de distribution électrique.
SOUDAGE A L'ÉLECTRODE ENROBEE (mode MMA)
Branchement et conseils
• Brancher les câbles porte-électrode et pince de masse dans les connecteurs de raccordement.
• Respecter les polarités et intensités de soudage indiquées sur les boîtes d'électrodes
• Enlever l’électrode du porte-électrode lorsque le poste n'est pas utilisé
Aides au soudage intégrés
Votre appareil est muni de 3 fonctionnalités spécifiques aux Inverters :
Le Hot Start procure une surintensité réglable* en début de soudage
L’Arc Force délivre une surintensité qui évite le collage lorsque l’électrode rentre dans le bain.
L'Anti-Sticking vous permet de décoller facilement votre électrode sans la faire rougir en cas de collage.
Sélection du procédé et réglage intensité
1- Sélectionner le mode MMA 2- Sélectionner le courant désiré grâce au potentiomètre
Nb. pour le TIG 200, l’intensité de soudage varie selon la tension de votre alimentation électrique : en 110 V, l’intensité peut être réglée de 10 à 120A
- en 230V, l’intensité peut être réglée de 10 à 200A
2/40
Page 3
Hot start ajustable
Le Hot Start est réglable de 0 à 60 % dans la limite de 160A pour le TIG 168 HF DC.
dans la limite de 200A en 230V, 120A en 110V pour le TIG 200 DC.
1- Cliquer et maintenir appuyé.
dans la limite de 250A pour le TIG 250 DC
2- Sélectionner le Hot Start souhaité.
N.b.: l'inscription "HI" indique que le Hot Start est au maximum.
Arc Force ajustable (sur TIG 200 / TIG 250 uniquement)
L’Arc Force est réglable de 0 à 100 % (dans la limite de 200A en 230V ou 120A en 110V pour le TIG 200 DC).
1- Cliquer et maintenir appuyé
2- Sélectionner l’Arc Force souhaité.
SOUDAGE TIG
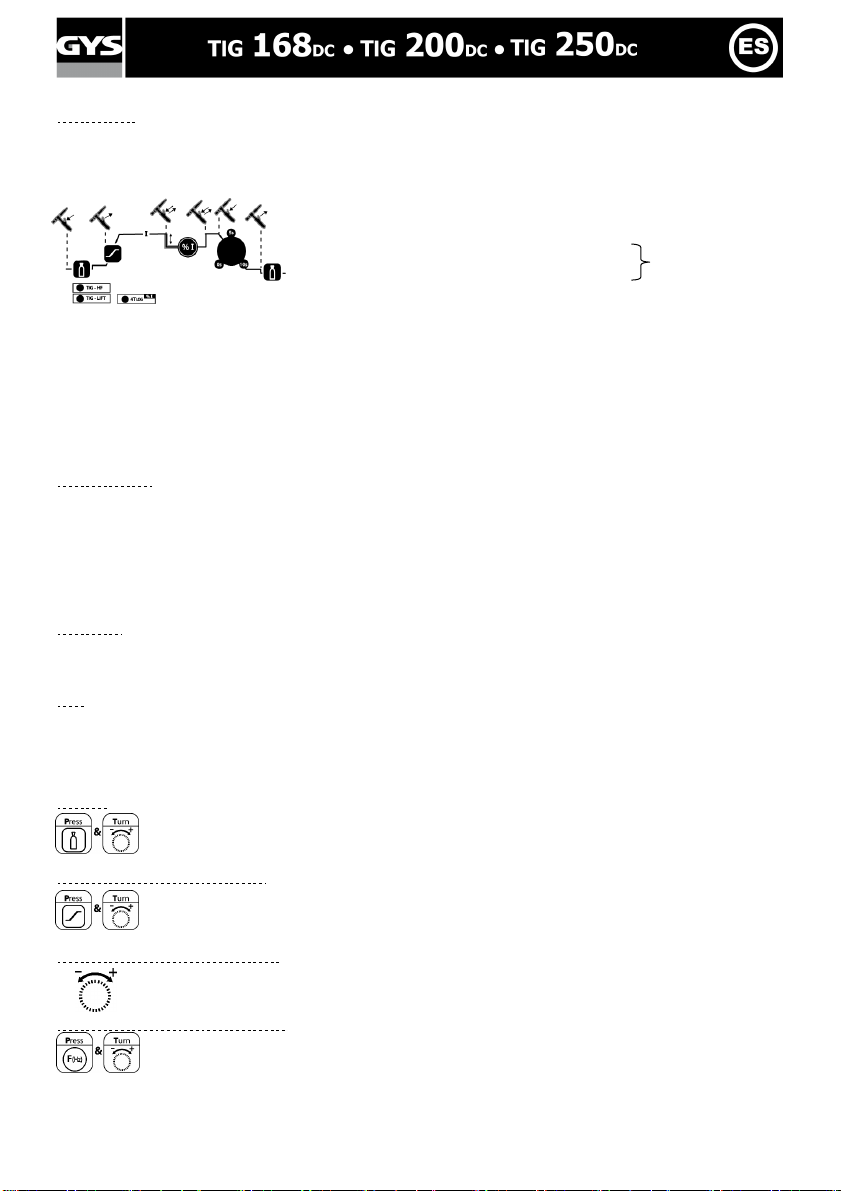
Choix du type d'amorçage
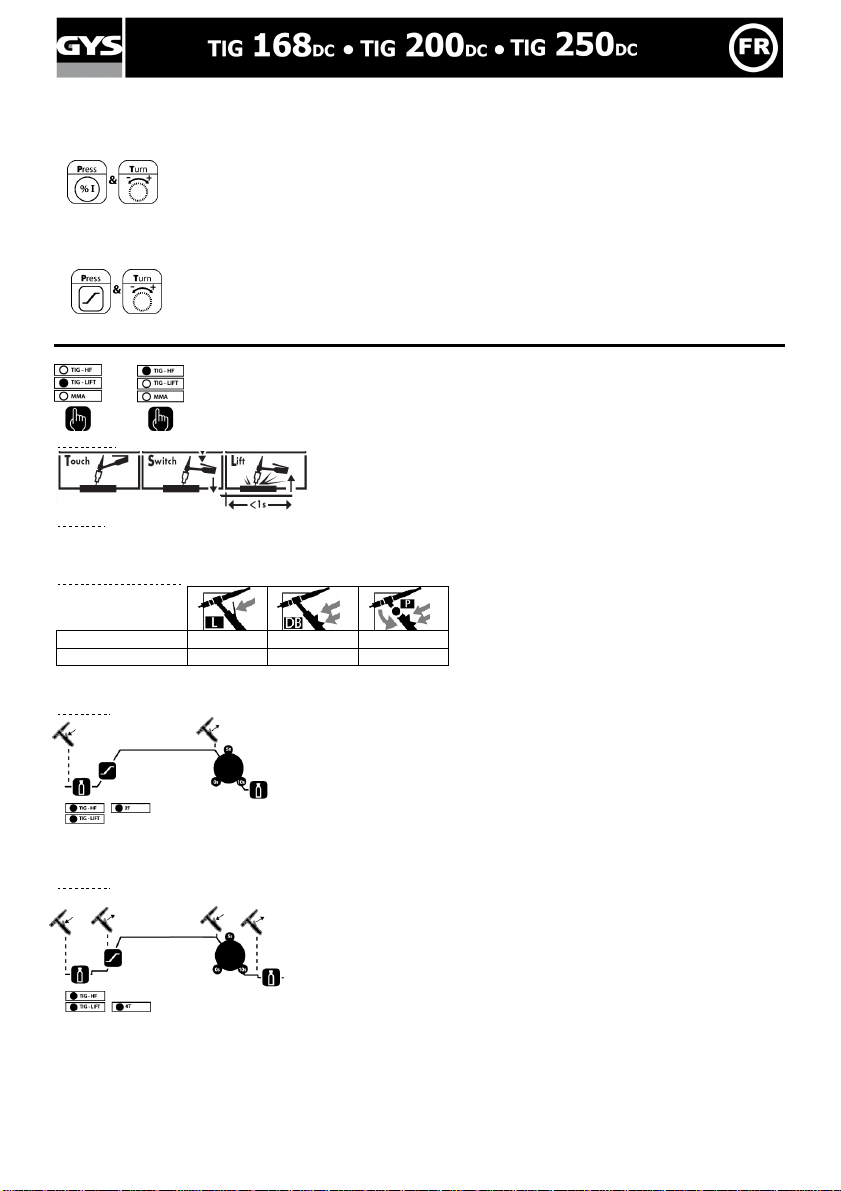
1- Sélectionner votre amorçage LIFT ou HF
TIG LIFT: Amorçage par contact (pour les milieux sensibles aux perturbations HF)
1- Toucher l’électrode sur la pièce à souder
2- Appuyer sur la gâchette
3- Relever l’électrode.
TIG HF: amorçage haute fréquence sans contact
Comportement Gâchette
Torches compatibles
TIG 168
TIG 200/250
Nb. : Les TIG 200 / 250 DC détectent automatiquement la torche qui leur est connectée.
Mode 2T
1- Appui et maintien gâchette: Prégaz, montée en courant, soudage
2- Relâchement gâchette: évanouissement, post gaz.
Nb : pour les torches double bouton et double boutons potentiomètre => bouton « haut/courant chaud » et
potentiomètre actifs, bouton « bas/courant froid » inactive.
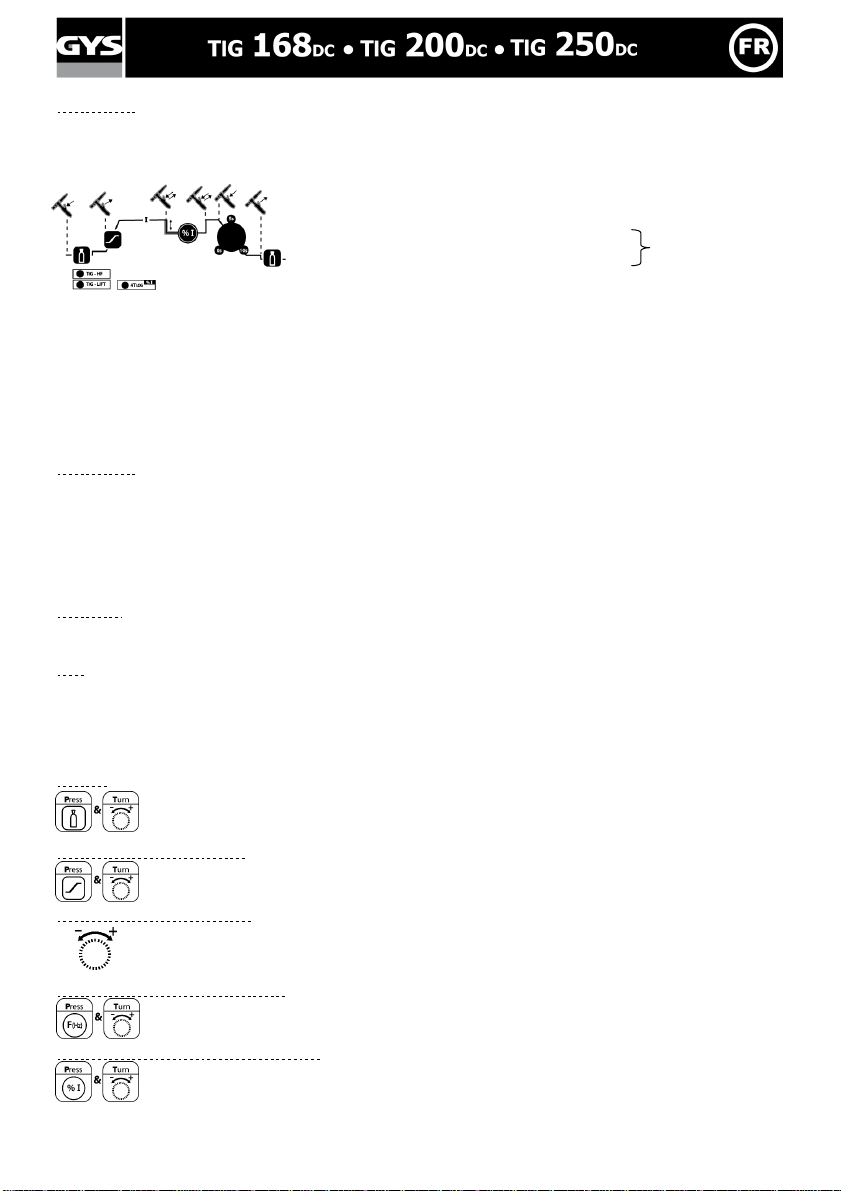
Mode 4T
Nb : pour les torches double bouton et double boutons potentiomètre => bouton « haut/courant chaud » et
potentiomètre actifs, bouton « bas/courant froid » inactif.
3/40
1- Appui gâchette : Pré-GAZ, suivi de l'amorçage. Pour faciliter le
positionnement de l’électrode, un courant faible de 10A est fourni, agissant
comme un faisceau lumineux. ( = Adjust Ideal Position).
2- Relâchement gâchette : montée du courant jusqu'à la consigne affichée,
soudage
3- Appui gâchette : évanouissement jusqu'à 10A (pour une bonne fermeture
du cratère)
4- Relâchement gâchette : arrêt du courant puis post gaz.
Page 4
Mode 4T Log
Ce mode fonctionne comme le mode 4T mais lorsque vous êtes en phase de soudure une impulsion brève sur la
gâchette permet de passer à un courant froid préalablement réglé (20% à 70% du courant chaud de soudage).
1- Appui gâchette : Pré-GAZ, suivi de l'amorçage. Pour faciliter le
positionnement de l’électrode, un courant faible de 10A est fourni, agissant
comme un faisceau lumineux. ( = Adjust Ideal Position).
2- Relâchement gâchette : montée du courant jusqu'au courant "chaud" de
soudage (consigne affichée)
impulsion brève : passage au courant froid (% I).
impulsion brève : retour au courant "chaud".
à répéter
à souhait
3- Appui gâchette : évanouissement jusqu'à 10A (pour une bonne fermeture
du cratère).
Nb : Pour les torches double boutons et double boutons+potentiomètre => bouton « haut/courant chaud » et « bas/
4- Relâchement gâchette : arrêt du courant puis post gaz.
courant froid » + potentiomètre actifs.
Pour ce mode il peut être pratique d’utiliser l’option torche double bouton ou double boutons + potentiomètre. Le
bouton « haut » garde la même fonctionnalité que la torche simple bouton ou à lamelle. Le bouton « bas » permet,
lorsqu’il est maintenu appuyé, de basculer sur le courant froid. Le potentiomètre de la torche, lorsqu’il est présent
permet de régler le courant de soudage (chaud et froid) de 50% à 100% de la valeur affichée.
Options de soudage
Pulsé (Pulse)
Non disponible en 4T LOG
Les impulsions (pulse) correspondent aux augmentations et aux baisses alternées du courant (courant chaud,
courant froid). Le mode pulse permet d'assembler les pièces tout en limitant l'élévation en température.
En mode pulsé, vous pouvez régler :
- le courant froid (20% à 70% du courant de soudage)
- la fréquence de soudage (de 0.2 Hz à 20Hz).
Nb: la durée du temps chaud et la durée du temps froid sont identiques
Easy Pulse
Mode pulsé simplifié. Vous réglez juste le courant moyen autour duquel la pulsation va se former.
L'Easy pulse détermine la fréquence et le courant de soudage chaud et froid.
Spot
Ce mode n'est accessible qu'en TIG HF 2T.
Il permet de préparer les pièces en faisant du pointage.
Une fois celles-ci maintenues, vous pouvez passer en soudage TIG afin de réaliser le cordon dans sa totalité.
Réglage des paramètres
Pré Gaz (0 à 2 sec.)
Le prégaz permet, avant amorçage, de purger la torche et la zone proche du début de cordon de
soudage. Il améliore aussi la régularité de l'amorçage.
Montée du courant (Up Slope) (0 à 5 sec.)
Conseil :Plus la torche est longue et plus il faudra augmenter cette durée. (0,15/m de torche)
Temps nécessaire pour évoluer du courant minimal au courant de soudage.
Réglage du courant de soudage
La valeur du courant de soudage dépend de l'épaisseur, de la nature du métal ainsi que de la
configuration de soudage.
Réglage de la fréquence de pulsation (de 0,2 à 20Hz)
Conseil : Prendre pour base 30A / mm et ajuster en fonction de la pièce à souder,
La fréquence de pulsation est le nombre de cycles (1/2cycle courant chaud 1/2 cycle courant froid)
Réglage du courant froid (intensité basse) (de 20% à 70% du courant chaud)
effectués par seconde.
Il s'agit du pourcentage du courant chaud, plus le courant froid est bas moins la pièce s'echauffera
pendant le soudage.
4/40
Page 5

Réglage de l'évanouisseur (Down slope) (0 à 10 sec)
Amorçage
Gachette
Processus TIG
L
Temps nécessaire pour évoluer du courant de soudage jusqu'au courant minimum. Evite les fissures et
Réglage du Post GAZ (3 à 20 sec)
les cratères de fin de soudure.
Ce paramètre définit le temps durant lequel le gaz continue à s'écouler après extinction de l'arc. Il
Conseil : Augmenter la durée si la soudure à l'air sombre.
permet de protéger la pièce ainsi que l'électrode contre les oxydations.
(Pour base : 25A=4sec. - 50A=8sec - 75A=9sec - 100A=10sec - 125A=11sec- 150A=13sec- 200A=15sec-
250A=25sec)
Nb: A tout moment vous pouvez vérifier vos réglages en appuyant simplement sur le bouton du paramètre, sans
tourner la molette.
Fonctions disponibles par procédé de soudage
En fonction des modes, certains boutons sont inactifs, cf tableau ci-dessous:
HF TIG Lift 2T 4T 4T log
TIG Normal
TIG Pulse
TIG Easy Pulse
SPOT
Mémorisation et rappel des mémoires
Pré-gaz
(I moyen)
(I)
(I)
(uniquement
en 4T log)
Post-gaz
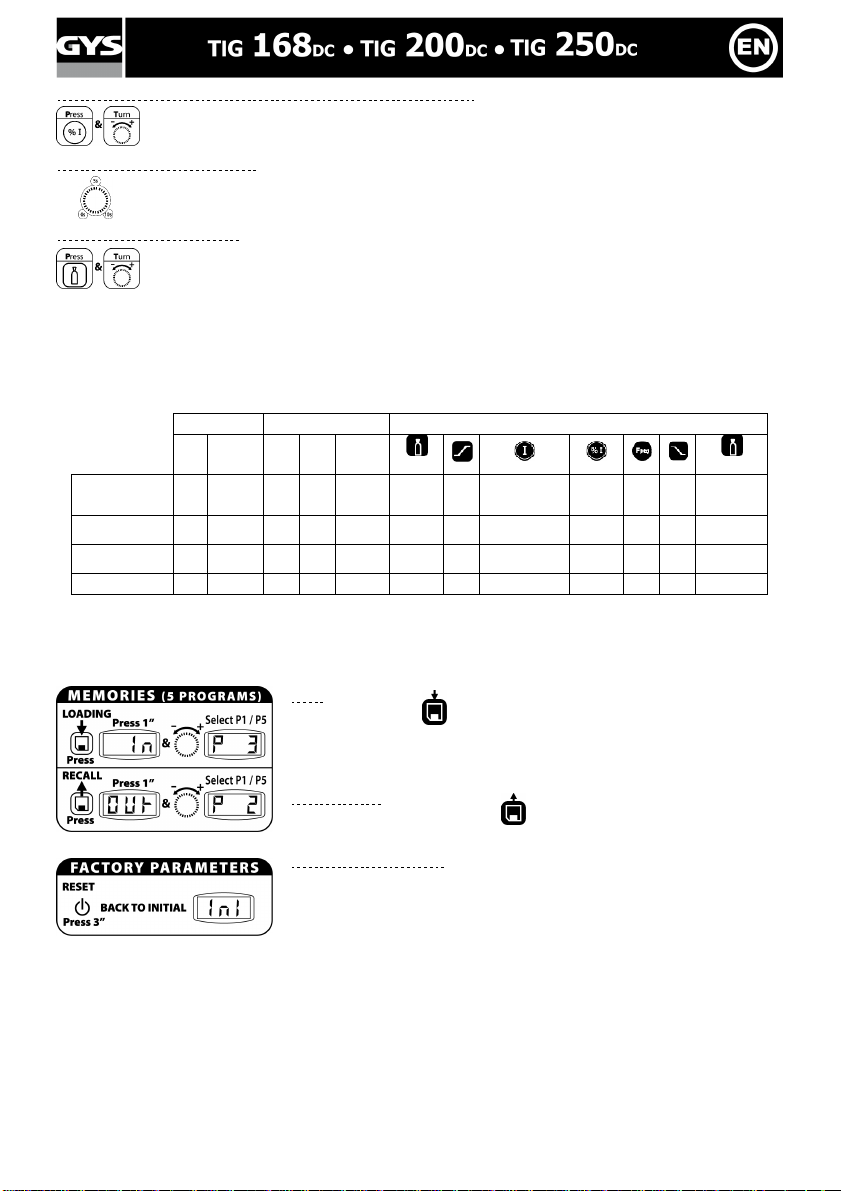
Vous disposez de 5 mémoires pour stocker et rappeler vos paramètres TIG. En plus de ces mémoires, TIG 168/200
mémorise vos derniers réglages activés et les réactive à chaque redémarrage du poste.
Mémorisation
1- Appuyer sur le bouton
2- "In" pendant 1 seconde.
Tant que l'affichage indique "In" l'action peut être annulée
3- Au delà d'une seconde l'afficheur indique un numéro de programme (P1
à P5), tout en maintenant le bouton appuyé tourner la molette pour definir
l'emplacement mémoire adéquat, lâcher le bouton vos paramètres sont
mémorisés
Rappel d'une configuration
Procéder de la même façon mais en appuyant sur
Retour réglage usine
1- Presser 3 secondes sur le bouton reset.
2- L'afficheur affiche Ini
Toutes les sauvegardes sont supprimées (les paramètres usine sont
Combinaisons conseillées / affutage électrode
Courant (A) ∅∅∅∅ Electrode (mm)
restaurés sur les 5 programmes+ paramètre de démarrage).
= ∅∅∅∅ fil (métal d’apport)
∅∅∅∅ Buse
(mm)
Débit
(Argon l/mn)
0,5-5 10-130 1,6 9,8 6-7
4-6,5 130-200 2,4 11 7-8
Pour un fonctionnement optimal vous devez utiliser une électrode affûtée de la manière suivante :
> 6.5 > 200A 3,2 12,7 8-9
L = 3 x d pour un courant faible.
d
l
L = d pour un courant fort.
5/40
Page 6
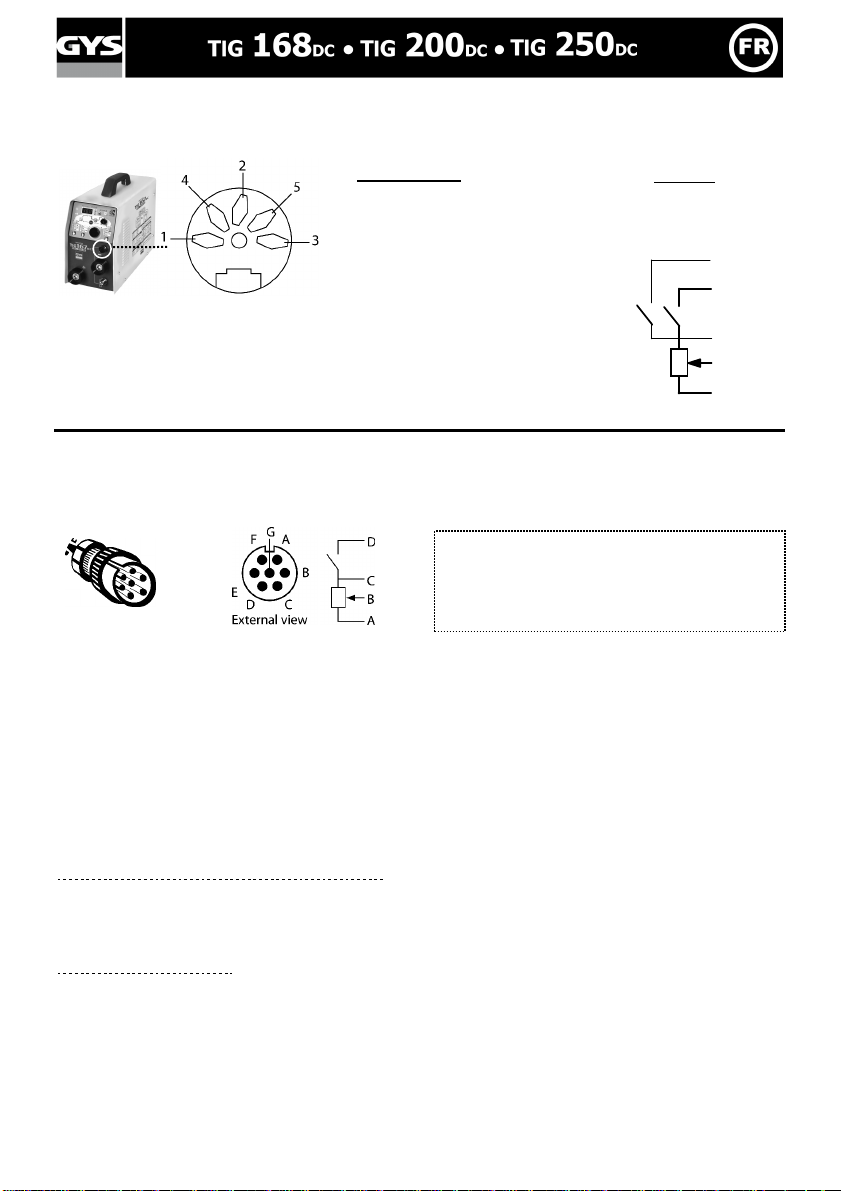
Connecteur de commande gâchette
Le connecteur de commande gâchette est conçu de la manière suivante :
COMMANDE A DISTANCE (TIG 200FV et TIG 250 DC uniquement)
La commande à distance fonctionne en mode TIG et en MMA.
Connectique
Les TIG 200 FV et TIG 250 DC sont équipés d’une prise femelle pour commande à distance. La prise mâle spécifique
7 points (option ref.045699) permet d’y raccorder votre commande à distance manuelle (RC) ou à pédale (PEd).
Pour le câblage suivre le schéma ci-dessous.
Ref.045699
Branchement
1- Allumer le poste
2- Brancher la pédale ou la télécommande sur la face avant de l’appareil.
3- L’afficheur clignote en affichant « No » (Rien),
4- Sélectionner votre type de commande en tournant la molette de réglage d’intensité :
No (Rien) « RC » (Remote Control/commande à distance) PEd (Pédale)
5- Après 2 secondes d’inactivité de la molette, l’afficheur se fige sur la valeur puis réaffiche l’intensité de soudage
Nb : En cas d’erreur, débrancher votre commande à distance, le poste vous indique que plus rien
n’est connecté : « No ». Puis rebrancher votre commande et refaites la sélection.
Remarque : Ce choix sera demandé à chaque mise en route.
Fonctionnement
Commande à Distance.manuelle (option ref.045675)
La commande à distance manuelle permet de faire varier le courant de l’intensité mini (DC : 10A / MMA : 10) à
l’intensité définie par l’utilisateur (afficheur).
Dans cette configuration, tous les modes et fonctionnalités du poste sont accessibles et paramétrables.
Pédale (option ref.045682) :
Dans tous les modes sauf en mode « Spot », la commande à pédale permet de faire varier le courant de l’intensité
mini (DC : 10A / MMA : 10A) à l’intensité définie par l’utilisateur (afficheur).
En TIG le poste fonctionne uniquement en soudage 2 temps (mode 2T). De plus, la montée et l’évanouissement du
courant ne sont plus gérés par le poste (fonctions inactives) mais par l’utilisateur via la pédale.
En mode spot, la commande à pédale remplace la gâchette de la torche (la position de la pédale n’a pas d’effet sur
le courant)
TIG 200 / 250
Commun BP + Potentio.
Bouton courant froid
Bouton de soudage torche
Curseur / potentiomètre
+5V potentiomètre 10 KΩ
D : Contact du switch
C : Masse
B : Curseur
A : + 5V
Nb : la valeur du potentiomètre doit être de 10 KΩ
Commun
TIG 168
Bouton courant froid
Bouton de soudage torche
2
3
1
4
5
6/40
Page 7
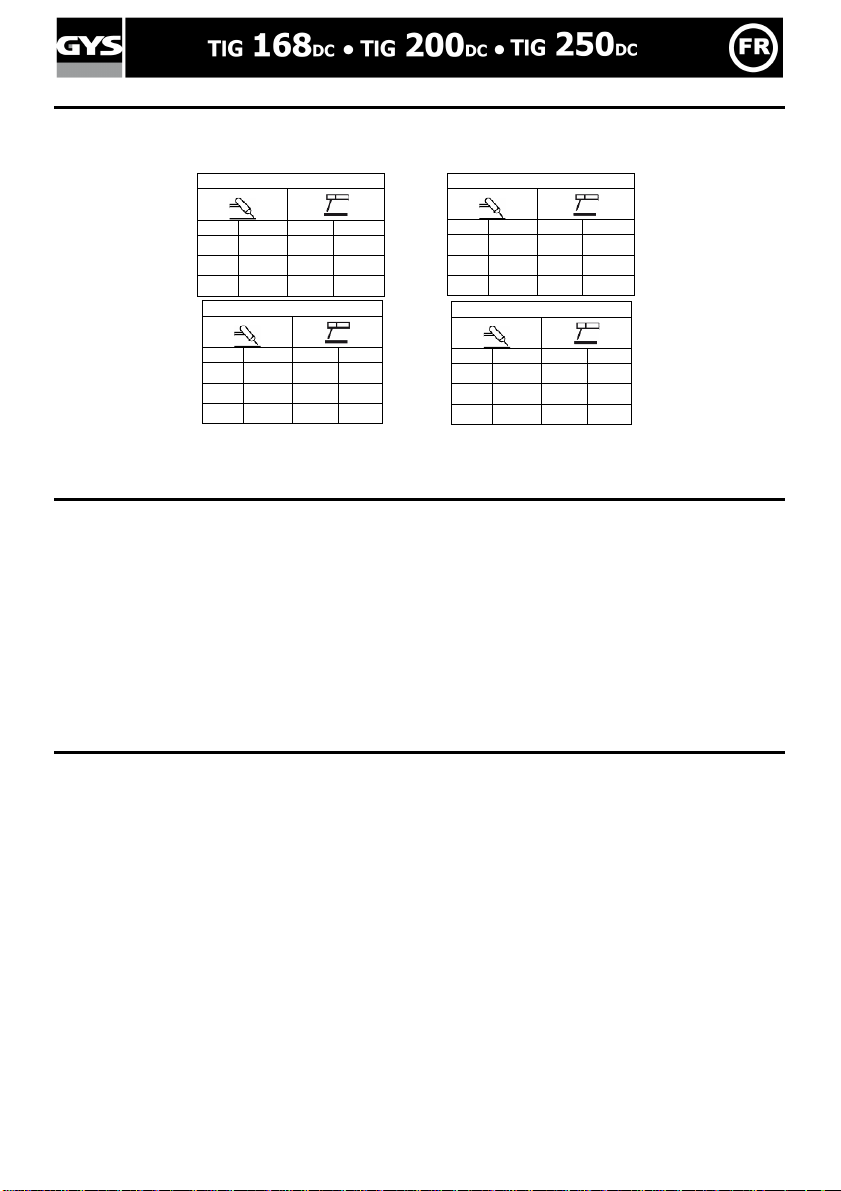
FACTEUR DE MARCHE
• Les postes décrits ont une caractéristique de sortie de type "courant constant". Les facteurs de marche selon la
norme EN60974-1 (@ 40°C sur un cycle de 10 min.) sont indiqués dans le tableau suivant :
X% @ I max X% @ I max
100% 90A 100% 70A
TIG 168
21% 160A 15% 160A
60% 100A 60% 80A
TIG 200 (110V)
X% @ I max X% @ I max
26% 180A 30% 120A
60% 115A 60% 90A
100% 100A 100% 80A
TIG 200 (230V)
X% @ I max X% @ I max
30% 200A 20% 200A
60% 140A 60% 125A
100% 125A 100% 110A
TIG 250
X% @ I max X% @ I max
33% 250A 24% 250A
60% 170A 60% 160A
100% 160A 100% 150A
Note : les essais d’échauffement ont été effectués à température ambiante et les facteurs de marche à 40 °C ont été
déterminés par simulation.
ENTRETIEN/ CONSEILS
• L'entretien ne doit être effectué que par une personne qualifiée.
• Couper l'alimentation en débranchant la prise, et attendre l’arrêt du ventilateur avant de travailler sur l'appareil. A
l’intérieur, les tensions et intensités sont élevées et dangereuses.
• Régulièrement, enlever le capot et dépoussiérer à la soufflette. En profiter pour faire vérifier la tenue des
connexions électriques avec un outil isolé par un personnel qualifié.
• Contrôler régulièrement l'état du cordon d'alimentation. Si le câble d'alimentation est endommagé, il doit être
remplacé par le fabricant, son service après vente ou une personne de qualification similaire, afin d'éviter un
danger
• Laisser les ouïes de l'appareil libres pour l’entrée et la sortie d’air.
SÉCURITÉ
Le soudage à l'arc peut être dangereux et causer des blessures graves voire mortelles. Protégez vous
et protégez les autres.
Respecter les instruction de sécurité suivantes
:
Rayonnements Protéger vous à l’aide d’un masque muni de filtres conformes EN 169 ou
de l’arc : EN 379.
Pluie, vapeur d’eau, Utiliser votre poste dans une atmosphère propre (degré de pollution ≤ 3), à plat
humidité: et à plus d’un mètre de la pièce à souder. Ne pas utiliser sous la pluie ou la neige.
Choc électrique : Cet appareil ne doit être utilisé que sur une alimentation monophasée à 3 fils avec neutre
relié à la terre. Ne pas toucher les pièces sous tension.
Vérifier que le réseau d'alimentation est adapté au poste.
Chutes : Ne pas faire transiter le poste au-dessus de personnes ou d’objets.
Brûlures : Porter des vêtements de travail en tissu ignifugé (coton, bleu ou jeans).
Travailler avec des gants de protection et un tablier ignifugé.
Protéger les autres en installant des paravents ininflammables, ou les prévenir de ne pas
Risques de feu : Supprimer tous les produits inflammables de l'espace de travail. Ne pas travailler en
Fumées : Ne pas inhaler les gaz et fumées de soudage. Utiliser dans un environnement
Précautions Toute opération de soudage :
regarder l'arc et garder des distances suffisantes.
présence de gaz inflammable.
correctement ventilé, avec extraction artificielle si soudage en intérieur.
supplémentaires : - dans des lieux comportant des risques accrus de choc électrique,
- dans des lieux fermés,
7/40
Page 8

- en présence de matériau inflammable ou comportant des risques d'explosion,
refroidissement, environ 2 min. Le
doit toujours être soumise à l'approbation préalable d'un "responsable expert", et
effectuée en présence de personnes formées pour intervenir en cas d'urgence.
Les moyens techniques de protections décrits dans la Spécification Technique CEI/IEC
62081 doivent être appliquées.
Le soudage en position surélevée est interdit, sauf en cas d'utilisation de plates-formes de
sécurité.
Les porteurs de stimulateurs cardiaques doivent consulter un médecin avant d'utiliser ces appareils.
Ne pas utiliser le poste pour dégeler des canalisations.
En soudage TIG, manipuler la bouteille de gaz avec précaution, des risques existent si la bouteille ou
la soupape de la bouteille sont endommagées.
ANOMALIES/CAUSES/REMEDES
Anomalies Causes Remèdes
L’appareil ne délivre pas de
courant et le voyant jaune de
défaut thermique est allumé.
L’afficheur est allumé mais
l’appareil ne délivre pas de
courant.
Lors de la mise en route,
l’afficheur indique
La protection thermique du poste s’est
déclenchée.
Le câble de pince de masse ou porte
électrode n’est pas connecté au poste.
La tension n’est pas dans la fourchette
230 V +/- 15% pour le TIG 168, ou 85265V pour le TIG 200 FV, ou 400V (+/-
Attendre la fin de la période de
voyant s’éteint.
Vérifier les branchements.
Faire vérifier l’installation
électrique.
15%) pour le TIG 250.
Utiliser une électrode en tungstène
Arc instable
Défaut provenant de l'électrode en
tungstène
de taille appropriée
Utiliser une électrode en tungstène
correctement préparée
Débit de gaz trop important Réduire le débit de gaz
Protéger la zone de soudage contre
les courants d'air
Augmenter la durée du post gaz
Contrôler et serrer tous les
L'électrode en tungstène s'oxyde
et se ternit en fin de soudage
Zone de soudage.
Défaut provenant du Post gaz.
raccords de gaz
L'électrode fond Erreur de polarité
Vérifier que la pince de masse est
bien reliée au +
Vérifier que toutes les phases sont
« PH » s’affiche à l’écran Problème de détection des phases
présentes. Le défaut se réinitialise
en redémarrant le produit
GARANTIE FRANCE
• La garantie couvre tout défaut ou vice de fabrication pendant 1 an, à compter de la date d’achat (pièces et main
d’œuvre).
• La garantie ne couvre pas les erreurs de tension, incidents dus à un mauvais usage, chute, démontage ou toute
autre avarie due au transport.
• La garantie ne couvre pas l’usure normale des pièces (Ex. : câbles, pinces, etc.).
En cas de panne, retournez l’appareil à la société GYS (port dû refusé), en y joignant :
• Le justificatif d’achat datée (facture, ticket …)
• Une note explicative de la panne.
Après la garantie, notre SAV assure les réparations après acceptation d’un devis.
Contact SAV :
Société Gys-134 Bd des Loges
BP 4159-53941 Saint-Berthevin Cedex
Fax: +33 (0)2 43 01 23 75
Tél: +33 (0)2 43 01 23 68
8/40
Page 9
DESCRIPTION
Congratulations for choosing this product, which has been designed with great care. Please read the following
instructions carefully and keep this instruction manual for future reference.
The TIG 168/200 HF are portable, single phase (three phase for the TIG 250), ventilated Inverter welding units to
be used with non-consumable electrodes (TIG) in direct current (DC). TIG DC welding requires a gaseous protection
(Argon). In MMA mode, it allows you to weld with any kind of electrode : rutile, basic, stainless steel or cast iron.
The TIG 168 work with a single phase 230V input. The TIG 200 FV works on a single phase input between 85V to
265V. They are all protected for a use on electric generators. The TIG 200 can be equipped with a remote control or
foot pedal (This option is supplied separately).
POWER SUPPLY – STARTING UP
• TIG 168 and 200 are delivered with a 16A plug (type CEE7/7). The TIG 250 is supplied with a 400V/16A three-
phase plug as recommended by the EN 60309-1 European standard.
• TIG 168 must be connected to a 230V (50-60Hz) EARTHED power supply. The 200FV integrates a « Flexible
Voltage » system and can be used on a power supply variable between 85V and 265V (50 – 60 Hz) WITH earth.
The TIG 250 must be used on a 3-phase 400V (50/60 Hz) power supply WITH earth
• The absorbed current (I1eff) is indicated on the device at maximum usage. Check that the power supply and its
protection (fuse and/or circuit breaker) are compatible with the current needed for use. In some countries, it
might be necessary to change the plug to allow maximum performance. For intensive use, a 25 A plug for TIG
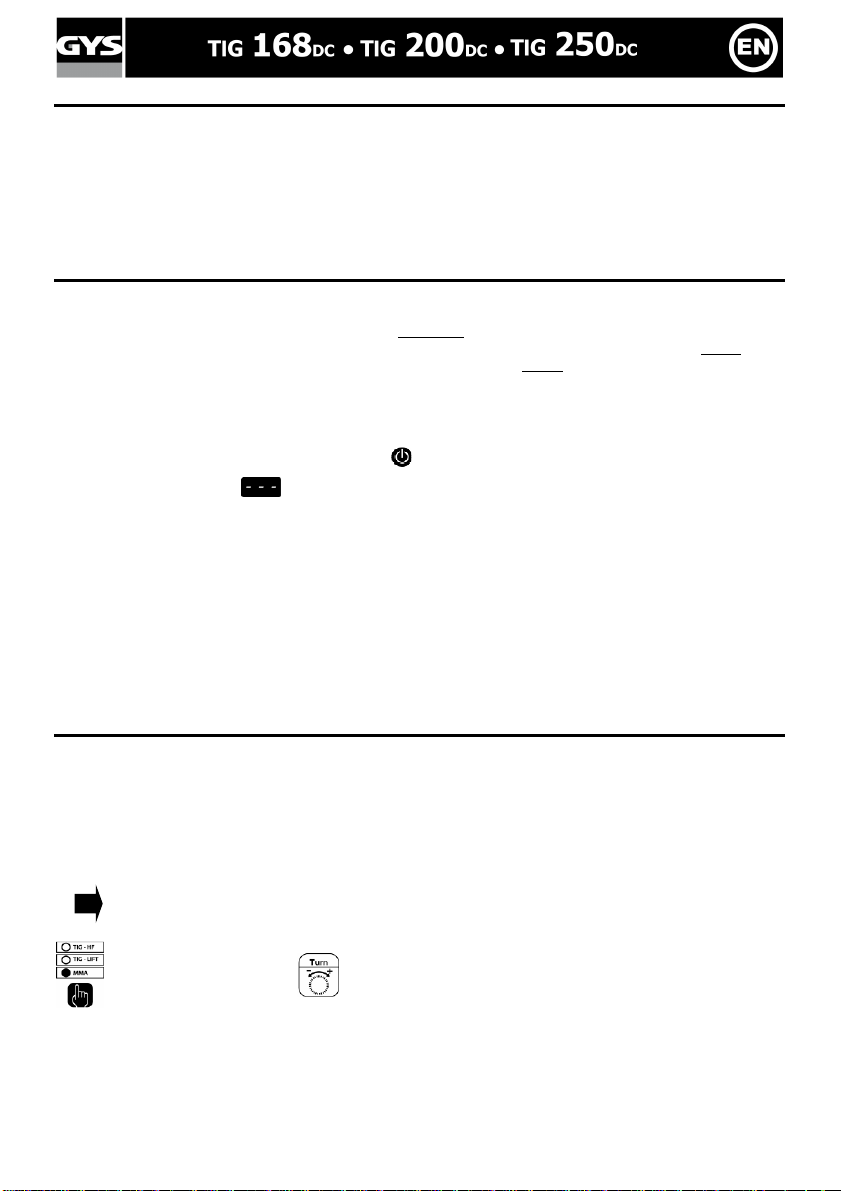
168 may be required.
• To start the machine up, press the Standby Button . For the TIG 250, turn the on/off switch.
• NB: If the screen displays . this indicates that the device has entered protection mode. This will occur if the
power supply voltage is excessively high (over 265V). If the machine switches on in protection mode, unplug the
device and plug it into a socket delivering the correct voltage.
• Behaviour of the ventilator : in MMA mode, the ventilator will stay on permanently. In TIG mode, the ventilator
only works during welding, and will stop after cooling.
• These are Class A devices. They are designed to be used in an industrial or professional environment. In a
different environment it can be difficult to ensure electromagnetic compatibility, due to conducted disturbances as
well as radiation.
• From 1st December 2010, the new standard EN 60974-10 will be applicable for TIG 168 : Warning: these
materials do not comply with IEC 61000-3-12. If they are to be connected to a low-voltage mains supply, it is the
responsibility of the user to ensure they can be connected. If necessary consult the operator of your electrical
distribution system
MMA WELDING (ELECTRODE)
Getting Started
• Connect the electrode holder and earth clamp to the corresponding sockets.
• Ensure that the welding polarities and intensities indicated on the electrode packaging are observed.
• Remove the electrode from the electrode holder when the machine is not in use.
Welding Features:
Your device is equipped with 3 specific functions :
Hot Start gives an adjustable* overcurrent at the beginning of the welding.
Arc Force delivers an overcurrent which avoids sticking when the electrode enters the weld pool.
Anti-Sticking allows easy removal of the electrode in case of sticking.
Selection of process and current setting
1-
Select MMA mode
2- Select the desired current using the potentiometer.
Nb. For the TIG 200FV, the welding current will vary depending on the power supply voltage used:
- on 110V, the current can be set from 10 to 120A.
- on 230V, the current can be set from 10 to 200A.
9/40
Page 10

Adjustable* Hot Start
The 168 HF DC up to 160 A. The TIG 200FV has a limit of 200 A on 230V, and 120 A on 110V. The TIG 250DC
has a limit of 250 A.
1- Press and hold the “Hot Start” button.
2- Select the wanted Hot Start.
Adjustable Arc Force (
n.b. : the display "HI" indicates that the Hot Start is at the maximum setting.
TIG 200 / TIG 250 only)
The Arc Force is adjustable between 0 and 100% ( within the limit of 200A on 230V, 120A on 110V for the TIG
200FV) .
1- Press and hold the “Arc Force” button
2- Select the required setting
TIG WELDING
Select Start Function
TIG LIFT:
Select LIFT or HF function.
Contact start
(for the environments sensitive to HF disturbances)
1- Touch the work-piece with the electrode
2- Press the trigger on the torch
3- Lift the electrode.
HF TIG : high frequency start without contact
Trigger behaviour
Compatible Torches
TIG 168
TIG 200/250
Nb: The TIG 200 /250 automatically detects the type of torch that is connected. (Suitable for various kinds of TIG
torches: trigger, single command, dual command, dual potentiometer)
2T mode
3- Press and hold the trigger : pre-gas, up slope, welding
4- Release trigger : down slope, post-gas
NB: For dual control torches and dual potentiometer command “up / warm current” and potentiometer active,
command "low / cold current" inactive
4T mode
1- Press trigger : pre-gas, followed by start. In order to make
positionning the electrode easier, a low 10 Amp current is supplied,
acting like a light beam. (=Adjust to Ideal Position)
2- Release trigger : up slope until the displayed instruction, welding
3- Press trigger : down slope until 10A (for a good closure of the crater)
NB: For dual control torches and dual potentiometer command “up / warm current” and potentiometer active,
command "low / cold current" inactive
4- Release trigger : stops the current, post-gas
.
10/40
Page 11
4T Log mode
This mode is the same as the 4T mode but when in welding phase, a short impulse on the trigger allows a shift to a
previously set cold current (20% at 70% of hot welding current).
1- Press trigger : pre-gas, followed by start. In order to make
positionning the electrode easier, a low 10 Amp current is supplied,
acting like a light beam. (=Adjust to Ideal Position)
2- Release trigger : up slope to displayed instruction, welding
short impulse : shift to cold current (%I)
short impulse : back to the "hot" current.
Repeat
as required
3- Press trigger : down slope to low current (for good closure of the
crater)
4- Release trigger : stops the current, post-gas.
Nb: For dual control torches and dual potentiometer command “up / warm current” and command" low / cold
current " + active potentiometer. For this mode it may be convenient to use the dual torch option or dual command
+ potentiometer. The "up" command keeps the same function as the simple torch command or slip. The "down"
command can, when pressed, switch to the cold current. The potentiometer of the torch, where available, allows
control of the welding current (warm and cold) from 50% to 100% of the value displayed.
Welding options
Pulse
NB : Not available in 4T Log.
The pulses correspond to alternative increases and decreases of current (hot current, cold current). The Pulse mode
is used to weld pieces whilst minimising the increase in temperature.
Pulse Mode Settings :
- Cold current (20% at 70% of welding current)
- Welding frequency (from 0.2 to 20Hz)
n.b. : hot and cold current times are the same.
Easy Pulse
Simplified pulse mode. You only set the medium current around which the pulsation will oscillate.
Easy mode determines the welding frequency and hot/cold current.
Spot
This mode is only available in TIG HF 2T.
This function allows spot-welding of work-piece to fix it in place before completing the full weld in TIG mode.
Parameters setting
Pre-gas (0 to 2 sec.)
The pre-gas provides protection for the area where the welding pool will be formed. It also improves
stability when the welding arc is created.
Up slope (0 to 5 sec.)
Advice : the longer the torch lead, the longer the time needed (0.15s/Meter of lead)
Time needed to go from minimum current to welding current.
Welding current setting
The value of the welding current needed depends on the thickness and the type of metal, as well as on
the welding configuration.
Advice : Take 30A/mm as a default setting for DC or 40A/mm for AC and adjust according to the piece
to weld.
Pulse frequency setting (from 0.2 to 20Hz)
The pulse frequency is the number of cycles (½ cycle of hot current, ½ cycle of cold current) made in
a second.
11/40
Page 12
Cold current setting (low intensity) (from 20 to 70% of hot current)
Starting
Trigger
TIG process
SPOT
Selected as a percentage of hot current : the colder the current, the cooler the welding piece will stay
Down slope setting (0 to 10 sec)
during the welding process.
Time needed to shift from welding current to minimum current. Avoids cracks and craters at the end of
Post-gas setting (3 to 20 sec)
welding.
This parameter determines the length of time in which gas is released after the arc has stopped. It
protects the weld pool and the electrode against oxidization whilst the metal is cooling after welding.
Advice : Increase the time if the welding appears dark.
(For default setting : 25A=4sec. – 50A=8sec. – 75A=9sec. – 100A=10sec. – 125A=11sec. –
150A=13sec. - 200A=15sec-250A=25sec).
n.b. : You can check your settings at any time by pressing the parameter button, without turning the wheel.
Functions available according to welding mode
According to welding mode selected, some buttons will not work, please see table below :
Normal TIG
Pulse TIG
Easy Pulse TIG
HF TIG Lift 2T 4T 4T log
Pre-gas
(I)
(I)
(average I)
(only in
4T log)
Post-gas
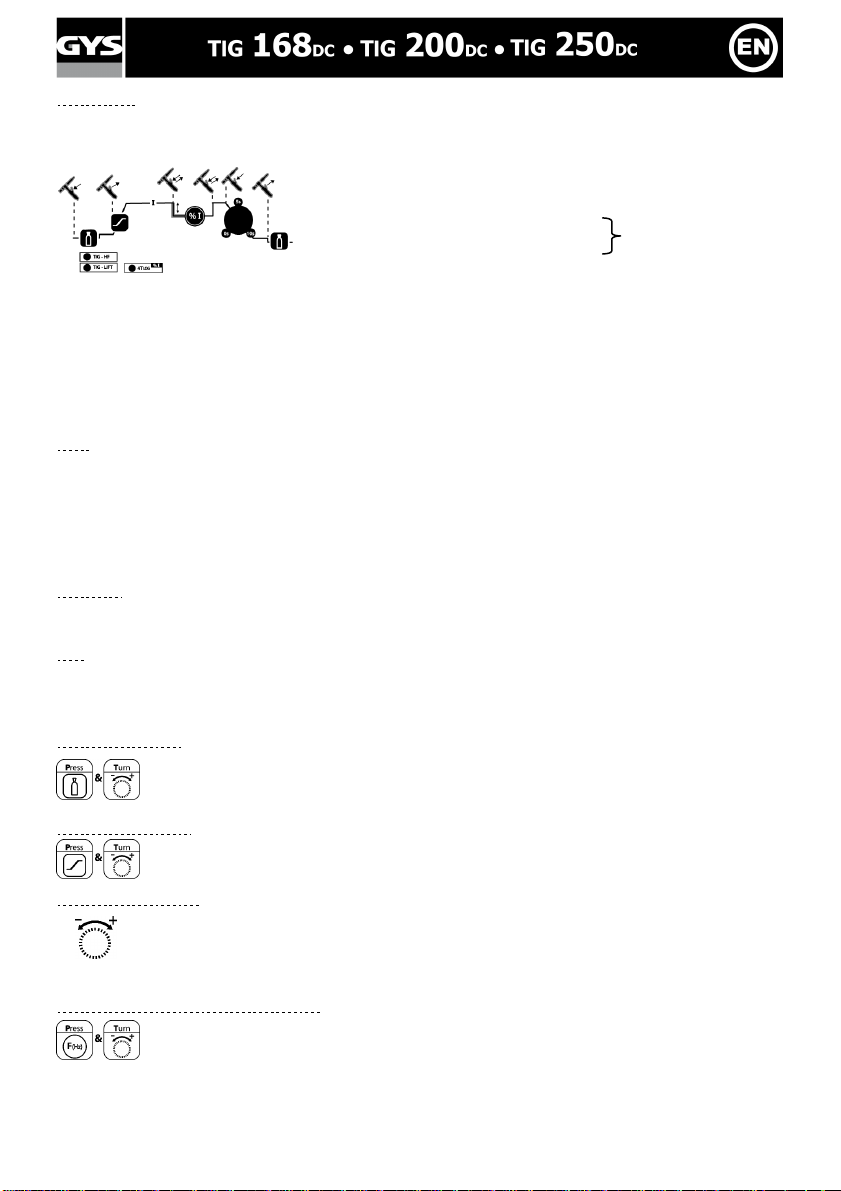
Memory settings: saving and recall
There are 5 memory slots to save and recall TIG parameters. As well as these, the 168/200 stores the last used
settings, and activates them when the machine is restarted.
Input
1- Press the button and hold for 1 second until "In" is displayed.
As long as the display indicates "In", the action can be cancelled.
2- After one second, the display indicates a program number (P1 to P5),
keeping the button pressed, turn the wheel to select the desired memory
location. Release the button to store the parameters.
Recall a set-up
Proceed as above by pressing the button
Reset factory parameters
1- Press the reset button for 3 seconds.
2- The display indicates "Ini".
All saved memory settings have been deleted (the factory parameters are set
on all 5 programs + start parameters).
12/40
Page 13

Recommended combinations / Electrode grinding
L
3
1
4
5
2
Current (A) Ø Electrode (mm)
Ø Nozzle (mm) Flow rate (Argon L/mn)
= Ø wire (filler metal)
0,5-5 10-130 1,6 9,8 6-7
4-6,5 130-200 2,4 11 7-8
> 6.5 > 200A 3,2 12,7 8-9
To optimise the welding process, it is recommended to grind the electrode prior to welding as described in the
diagram below :
d
l
L = 3 x d for a low current
L = d for a high current
Trigger command connector
The trigger command socket is laid out in the following way:
TIG 200/ 250
Switch GND + Potentiometer
Cold current button
Welding torch button
Cursor / potentiometer
+5V potentiometer 10 KΩ
TIG 168
Switch GND
Cold current button
Welding torch button
DUTY CYCLE
The welding unit describes an output characteristic of a "constant current". The duty cycles following the norm
EN60974-1 (at 40°C on a 10mn cycle) are indicated in the table below :
X% @ I max X% @ I max
100% 90A 100% 70A
TIG 168
21% 160A 15% 160A
60% 100A 60% 80A
TIG 200 (110V)
X% @ I max X% @ I max
26% 180A 30% 120A
60% 115A 60% 90A
100% 100A 100% 80A
TIG 200 (230V)
X% @ I max X% @ I max
30% 200A 20% 200A
60% 140A 60% 125A
100% 125A 100% 110A
TIG 250
X% @ I max X% @ I max
33% 250A 24% 250A
60% 170A 60% 160A
100% 160A 100% 150A
Note : The machines’ duty cycle has been tested at room temperature (40°C) and has been determined by
simulation.
13/40
Page 14

REMOTE CONTROL (TIG 200 and TIG 250 only)
The remote control operates in TIG and MMA mode.
Connector technology
The TIG 200 and TIG 250 DC is equipped with a female socket for a remote control. The specific 7 point male plug
(GYS product ref.045699) enables connection to a manual remote control (RC) or foot pedal (PEd).
For the cabling lay out, see the diagram below.
Ref.045699
D : Switch contact
C : Earth
B : Cursor
A : + 5V
Nb : The Potentiometer value must be 10 KΩ
Connecting remote/pedal
1- Power up the machine
2- Plug the pedal/remote control to the connecting socket on the machine.
3- The screen will flash and display « No » (Nothing),
4- Select the type of control by turning the intensity adjustment knob:
« No » (Nothing) / « RC » (Remote Control) / « PEd » (Pedal)
5- Turn the knob until the desired selecton is reached, and after 2 seconds the display will freeze on the chosen
selection.
NB: In case of error, unplug the remote control, ( « No » will be displayed) and re-start the connection process.
Remark: You will be asked to specify the remote connected each time the machine is powered up.
Functions
Manual remote control: (
GYS product ref.045675)
The remote control enables the variation of current from minimum intensity (DC : 10A / MMA : 10A) to an intensity
defined by the user.
In this configuration, all modes and functions of the machine are accessible and can be set.
Pedal (
GYS product ref.045682)
:
In all modes excluding « Spot » mode, the pedal control enables variation of the current from the minimum intensity
(DC : 10A / MMA : 10) to an intensity definied by the user.
In TIG mode, the machine will only operate in two-stage welding (2T mode). The upslope and downslope are not
automatic, and are controlled by the User with the foot pedal.
In « Spot » mode, the pedal control replaces the torch trigger (the pedal position has no effect on the current).
MAINTENANCE / ADVICE
• Maintenance should only be carried out by a qualified person.
• Ensure the machine is unplugged, and that the ventilator inside has stopped before carrying out maintenance
work. (DANGER High Voltage and Currents).
• GYS recommends removing the steel cover 2 or 3 times a year to remove any excess dust. Take this opportunity
to have the electrical connections checked by a qualified person with an insulated tool.
• Regularly check the condition of the power supply cord. If damaged, it will need to be replaced by the
manufacturer, its’ after sales service or a qualified person.
• Ensure the ventilation holes of the device are not blocked to allow adequate air circulation.
SAFETY
Arc welding can be dangerous and can cause serious and even fatal injuries.
Protect yourself and others.
Ensure the following safety precautions are taken:
Arc radiation Protect yourself with a helmet fitted with filters in compliance with EN169 or EN 379.
Rain, steam, damp Use your welding unit in a clean/dry environment (pollution factor ≤ 3), on a flat surface,
Electric shock This device must only be used with an earthed power supply. Do not touch high voltage
Falls Ensure the unit is placed in a stable position to prevent the machine from falling onto
and more than one meter from the welding work-piece. Do not use in rain or snow.
parts. Check that the power supply is suitable for this unit.
people/objects.
14/40
Page 15

Burns Wear protective (fire-proof) clothing (cotton, overalls or jeans).
Symptom
Wear protective gloves and a fire-proof apron.
Ensure other people keep a safe distance from the work area and do not look directly at
the welding arc.
Fire risks Remove all flammable products from the work area. Do not work in presence of
Fumes Do not inhale welding gases and fumes. Use the device in a well ventilated environment,
Additional Any welding operation undertaken in.....
Precautions
Protect others by installing fire-proof protection walls.
flammable gases.
with artificial extraction if welding indoors.
- rooms where there is an increased risk of electric shocks,
- Poorly ventilated rooms,
- In the presence of flammable or explosive material,
......should always be approved by a "responsible expert", and made in presence of
people trained to intervene in case of emergency.
Technical protection as described in the Technical Specification CEI/IEC 62081 must be
implemented.
Welding in raised positions is forbidden, except in case of safety platforms use.
People wearing Pacemakers are advised to see their doctor before using this device.
Do not use the welding unit to unfreeze pipes.
Handle gas bottles with care - there is increased danger if the bottle or its valve are damaged.
TROUBLESHOOTING
The device does not deliver any
current and the yellow thermal
default light is on.
The display is on but the device does
not deliver any current.
Thermal protection is on.
The earth clamp or electrode holder
is not properly connected to the unit.
Causes Remedies
Wait for the end of the cooling
period, approx. 2mn. The light
turns off.
Check the connections
The voltage is not within range
When starting up, the display
indicates
TIG 168 = 230V +/- 15%.
TIG 200 = 85V - 265V
Check the electrical installation.
TIG 250 = 400V (+/- 15%)
Ensure the correct size of Electrode is
Failure of the tungsten electrode
Unstable arc
Gas flow is too high
The tungsten electrode oxidizes and
tarnishes the end of the weld.
Unprotected welding zone
Fault from post-gas
The electrode melts Polarity error
"PH" is displayed on screen Phase detection problem
being used.
Use a well prepared tungsten
electrode
With weak currents, increase the
frequency
Protect welding zone against air flow
(Post-gas) whilst cooling.
Increase post-gas duration
Check and tighten all gas connections
Check that the earth clamp is
properly connected to +ve
Check that all phases are connected.
Reset the machine to reset the fault.
15/40
Page 16

BESCHREIBUNG
Wir freuen uns, dass Sie sich für ein Markengerät der Firma GYS entschieden haben und danken Ihnen für das
entgegengebrachte Vertrauen. Bitte lesen Sie sorgfältig vor dem Erstgebrauch diese Betriebsanleitung.
Der TIG 168/200 HF ist ein tragbarer, einphasiger (oder dreiphasiger für das TIG 250), luftgekühlter WIGSchweißinverter zum Gleichstromschweißen. Beim WIG- Schweißen wird Argon als Schutzgas verwendet. Beim EHand-Schweißen (MMA) können Rutil-, Edelstahl-, Stahl- und basische Elektroden verwendet werden.
Die TIG 168 DC ist für 230V einphasigen Netzanschluss konzipiert. Die TIG 200FV ist mit FV Technologie
ausgestattet. Netzanschluss zwischen 85 und 265V (50-60Hz). Diese Geräte sind generatortauglich und gegen
Überspannung geschützt. Die TIG 200FV Geräte können mit einem Hand- oder Fussfernregler ausgestattet werden.
STROMVERSORGUNG-INBETRIEBNAHME
• Dieses Gerät wird mit einem 16 A CEE7/7–Stecker [Anschluss: 230 V (50-60 Hz) + Erde], oder 16A 3-ph Typ EN
60309-1 Stecker geliefert (für TIG 250).
• TIG 168 muss an 230V (50-60Hz) Netzspannung mit korrektem Schutzleiter angeschlossen werden. TIG 200FV
verfügt über die «Flexible Voltage» Technologie, die den Anschluss des Gerätes an jedes Stromnetz von 85V bis
265V (50-60Hz) ermöglicht. Das TIG 250 muss an 400V (50/6 Hz) Netzspannung MIT ERDUNG angeschlossen
werden.
• Der aufgenommene Strom (I1eff) wird am Gerät angezeigt. Überprüfen Sie, ob die Stromversorgung und die
Schutzeinrichtungen (Sicherungen und/oder Stromunterbrechung) mit dem Strom, den Sie beim Schweißen
benötigen, übereinstimmen. In einigen Ländern ist es notwendig einen anderen Stecker zu verwenden
(vorzugsweise 25 A Stecker), um bei maximaler Belastung arbeiten zu können. Beim intensiven Anwendung,
benutzen Sie bitte für TIG 168HF 25A Netzabsicherung (CEE 6h Netzstecker 3P + N + Erde)
• Zum Starten drücken Sie auf die Standby- Taste , oder drehen Sie den Ein/Aus-Schalter für das TIG 250.
• Steigt die Spannung über 265 V, schaltet sich das Gerät zum Schutz selbstständig aus. Dieser Fehler wird mit
angezeigt. Bei dieser Anzeige müssen Sie den Stecker aus der Steckdose ziehen. Zum Anschluss des GYS
Gerätes muss eine Versorgungsspannung von 230 V vorhanden sein.
• Im MMA- Modus läuft der Ventilator ununterbrochen. Im TIG- Modus startet der Ventilator nur in der
Schweißphase und stoppt wenn das Gerät abgekühlt ist.
• Diese A-Klasse Geräte sind für den industriellen und/ oder professionellen Gebrauch geeignet und entsprechen der
Norm CISPR 11. In einem anderen Umfeld ist die elektromagnetische Verträglichkeit schwieriger zu gewährleisten.
Verwenden Sie das Gerät nicht in Räumen, in denen sich in der Luft metallische Staubpartikel befinden, die
Elektrizität leiten können.
• ACHTUNG! Für TIG 168 DC : Änderung der Norm EN 60974-10 ab 01. Dezember 2010! Diese Geräte entsprechen
nicht mehr der Richtlinie CEI 61000-3-12. Es liegt in Ihrer Verantwortung zu überprüfen, ob die Geräte für den
Stromanschluss geeignet sind, bevor Sie sie an das Stromnetz anschließen. Bei Fragen wenden Sie sich bitte an
den zuständigen Stromnetzbetreiber.
ELEKTRODEN-SCHWEISSEN (MMA)
Anschluss und Hinweise
• Schließen Sie die Kabel für Elektrodenhalter und Erdklemme an die entsprechenden Anschlussbuchsen an.
• Beachten Sie die Schweißpolaritäten und angegebenen Stärken auf den Elektrodenpackungen.
• Entfernen Sie die Elektrode aus dem Elektrodenhalter, wenn das Schweißgerät nicht in Gebrauch ist.
Integrierte Schweißhilfen
Das Gerät ist mit drei spezifischen Funktionen zur Verbesserung der Schweißeigenschaften ausgerüstet:
Hot Start: Einstellbarer* erhöhter Strom beim Zünden der Elektrode.
Arc Force: Erhöht kurzzeitig den Schweißstrom. Ein mögliches Festbrennen (Sticking) der Elektrode am
Werkstück während des Eintauchens ins Schweißbad wird verhindert.
Anti-Sticking: Schaltet den Schweißstrom ab. Ein mögliches Ausglühen der Elektrode während des oben
Auswahl der Zündungsart und Schweißstromeinstellung
Elektrodenschweißmodus MMA auswählen
genannten, möglichen Festbrennens wird vermieden.
Am Potentiometer den gewünschten
Strom einstellen
Hinweis: Für TIG 200FV variiert der Schweißstrom je nach Netzstromspannung:
- im 110V Modus kann die Spannung zwischen 10 und 120A eingestellt werden
- im 230V Modus kann die Spannung zwischen 10 und 200A eingestellt werden
16/40
Page 17

Hot Start einstellbar
Der Hot Start am 168 HF ist von 0 bis 60% bzw. bis max. 160A einstellbar.
Der Hot Start am TIG 200 FV ist von 0 bis 60% bzw. bis max. 200A (im 230V) oder 120A (im 110V) einstellbar.
Der Hot Start am 250 DC ist von 0 bis 60% bzw. bis max. 250A einstellbar.
1- drücken und gedrückt halten,
2- gewünschten Hot Start Strom wählen.
Wenn auf dem Display “HI” erscheint, ist der maximale Hot Start Strom erreicht.
Arc Force einstellbar (Nur für TIG 200/ TIG 250)
Die Funktion Arc Force ist von 0 bis 100% bis max. 200A (im 230V einstellbar)
1- drücken und gedrückt halten,
2- gewünschten Arc Force wählen.
WIG SCHWEISSEN
Auswahl für den Start
Zwischen Kontaktzündung (LIFT) oder HF Start auswählen.
WIG Lift : Kontakt Start (wenn man mögliche HF-Störungen vermutet)
1- Das Werkstück mit der Elektrode berühren
2- Taster drücken
3- Brenner hochheben.
HF WIG: Die Hochfrequenz wird mit Drücken des Brennertaster aktiv. Berühren des Werkstücks mit der Elektrode ist
nicht nötig.
Brennertaster
Kompatible Brenner
TIG 168
TIG 200/250
2Takt-Modus
1- Brennertaster drücken und gedrückt halten: Gasvorströmung ->
Stromanstieg -> Schweißen
2- Brennertaster loslassen: Stromabsenkung -> Gasnachströmung.
Sonderbrenner: Start/Stopp Taste => Stromreglung über Brennerpoti aktiv
Zweitstrom (%- Schweißstrom) Taster inaktiv.
4Takt Modus
1- Brennertaster drücken: Gasvorströmzeit beim Starten. Um die
Positionierung der Elektrode zu erleichtern, wird ein Strom von 10A initiert,
der wie ein Richtstrahl funktioniert. (= Adjust Ideal Position)
2- Brennertaster loslassen: Stromanstieg bis festgelegter Wert in der
Anzeige erscheint -> Schweißstart.
3- Brennertaster drücken: Stromabsenkung auf 10A (für einen sauberen
Abschluss der Schweißnaht ohne Kraterbildung).
4- Brennertaster loslassen: Stoppt den Strom und die Gasnachströmung.
Sonderbrenner: Start/Stopp Taste => Stromreglung über Brennerpoti aktiv
Zweitstrom (%- Schweißstrom) Taster inaktiv.
17/40
Page 18

4Takt Log Modus
Dieser Modus hat die gleiche Funktion wie der 4Takt-Modus, mit dem Unterschied, dass ein kurzes Drücken des
unteren Brennerwippschalters ein Umschalten auf einen vorher eingestellten, zweiten, niedrigeren Schweißstrom
(20% bis 70 % des Schweißstroms) zur Folge hat.
1- oberen Brennerwippschalter drücken: Gasvorströmung beim Starten. Um
die Positionierung der Elektrode zu erleichtern, wird ein Strom von 10A
initiert, der wie ein Richtstrahl funktioniert. (= Adjust Ideal Position).
3- oberen Brennerwippschalter loslassen: Erhöhung des Stromes auf einen
eingestellten Schweißstrom (Wert wird im Display angezeigt)
kurzes Antippen: Wechsel zum zweiten Schweißstrom (%I)
kurzes Antippen: zurück zum ersten Schweißstrom (beliebig wiederholbar)
4- unteren Brennerwippschalter drücken: Stromabsenkung auf 10A (für
einen sauberen Abschluss der Schweißnaht ohne Kraterbildung)
5- unteren Brennerwippschalter loslassen: Stoppt Strom und
Gasnachströmung
Sonderbrenner: Start/Stopp Taste => Stromreglung über Brennerpoti aktiv
Zweitstrom (%- Schweißstrom) Taster aktiv.
In diesem Modus kann es nützlich sein, Brenner mit zwei Tasten Funktion und zweifachen Stromreglung einzusetzen.
Die Start/Stopp Taste behält dieselbe Funktion wie bei 2Takt und 4Takt Brennertaste. Die Zweitstrom Taste
ermöglicht, wenn sie gedrückt ist, das Wechseln auf Absenkstrom (%I nur im 4Takt Log Betrieb). Mit dem Strompoti
ändert man den Absenkstrom zwischen 50% und 100% des eingestellten Schweißstroms.
Schweißoptionen
Pulse
Nicht verfügbar im 4Takt Log Modus.
Beim Puls-Modus wechselt der Schweißstrom zwischen einem hohen und einem niedrigen, einstellbaren Wert. Beim
Verschweißen der Werkstoffe im Puls-Modus wird der Temperaturanstieg begrenzt.
Folgende Einstellungen sind im Puls-Modus möglich:
- Zweitstrom (20% bis 70% des Schweißstroms)
- Schweißfrequenz (von 0.2 bis 20Hz)
Hinweis: Schweißstrom und Zweitstromzeiten sind gleich.
Easy Pulse
Vereinfachter Puls-Modus. Den mittleren Strom einstellen, um den der Puls oszilliert (pendelt).
Die Funktion Easy Pulse regelt die Schweißfrequenz sowie den Schweiß- und Zweitstrom.
Punktschweißen-Spot
Diese Option ist nur im Zweitaktmodus möglich.
Mit dieser Funktion können Werkstücke geheftet werden, um sie zum Schweißen vorzubereiten.
Parametereinstellung
Gasvorströmung (0 bis 2 sec.)
Die Funktion Gasvorströmung erlaubt vor dem Schweißen ein “Freibrennen” (Reinigen) des Brenners
und des Werkstücks am Beginn der Schweißnaht. Die Festigkeit am Beginn der Schweißnaht wird
ebenfalls verbessert.
Hinweis: Je länger das Schlauchpaket ist, desto länger sollte auch die einstellbare Zeit sein (0,15 s /
Meter Schlauch)
Stromanstieg (0 bis 5 sec.)
Benötigte Zeit vom Start des Stroms bis zum Erreichen des Schweißstroms.
Einstellung des Schweißstroms
Der Wert des Schweißstroms ist von der Dicke und Art des Materials als auch von der
Schweißeinstellung abhängig.
Beachten Sie: Verwenden Sie 30A/mm als Richtwert und passen Sie diesen Wert dem Werkstück an.
Pulsfrequenz Einstellung (von 0.2 bis 20Hz)
Die Pulsfrequenz bezeichnet die Anzahl der Wechsel zwischen Schweißstrom und Zweitstrom (½ Zyklus
Schweißstrom, ½ Zyklus Zweitstrom) pro Sekunde.
18/40
Page 19

Zweitstrom Einstellung (von 20 bis 70% des Schweißstroms)
Start Brennertaster
WIG Modus
SPOT
Die Prozentzahl des Zweitstroms gibt folgendes an: je niedriger der Prozentwert ist, desto weniger
erhitzt sich das Werkstück während des Schweißens.
Stromabsenkung Einstellung (0 bis 10 sec)
Benötigte Zeit zum Absenken des Schweißstroms auf den niedrigsten Stromwert. Vermeidet
Kraterbildung und Risse am Ende der Schweißnaht.
Gasnachströmzeit Einstellung (3 bis 20 sec)
Diese Funktion legt die Nachströmzeit des Gases fest, nachdem der Lichtbogen abgeschaltet wurde. Sie
schützt Werkstück und Elektrode vor einer möglichen Oxidation.
Beachten Sie: Erhöhen Sie die Zeit, wenn die Schweißnaht dunkel aussieht. (Basiswerte : 25A=4sec. –
50A=8sec. – 75A=9sec. – 100A=10sec. – 125A=11sec. – 150A=13sec. - 200A=15sec-250A=25sec).
N.B. : Sie können jederzeit die Einstellung überprüfen, indem Sie auf den Parameterknopf drücken, ohne ihn zu
drehen.
Verfügbare Funktionen bei verschiedenen Schweißmodi
Unter verschiedenen Modi sind einige Funktionen nicht verfügbar. Bitte beachten Sie daher die folgende Tabelle:
HF
WIG Modus
Pulse TIG
Easy Pulse
TIG
WIG
2T 4T 4T log
Lift
Gasvor-
ström-
zeit
(I)
(I)
(Durchschnitt
I)
(nur in
4T log)
Gasnachströmzeit
Speicherung und Abruf der Schweißprogramme
Es gibt 5 Speicherplätze, um WIG Parameter zu speichern und abzurufen. Die zuletzt eingestellten Parameter stehen
beim Wiedereinschalten des 168 automatisch zur Verfügung.
Speicherung
1- Drücken Sie auf den folgenden Knopf
2- "In" erscheint für eine Sekunde.
So lange "In" auf dem Display angezeigt wird, kann der Vorgang
abgebrochen werden.
3- Nach einer Sekunde erscheint auf dem Display eine Programmnummer
von P1 bis P5. Halten Sie den Knopf gedrückt und stellen Sie am
Einstellrad den gewünschten Programmspeicherplatz ein.
Programmabruf
1- Drücken Sie auf den folgenden Knopf
2- Halten Sie den Knopf gedrückt und stellen Sie am Einstellrad die
gewünschte, abzurufende Programmnummer ein.
Wiedererstellung der Werkeinstellungen
1- Drücken Sie für 3 Sekunden den Einschaltknopf.
2- "Ini" erscheint auf dem Display.
Alle Speicherplätze werden gelöscht.
19/40
Page 20

Empfohlene Schweißeinstellungen/ Elektrode schleifen
3
1
4
5
2
Strom (A) Ø Elektrode (mm)
0,5-5 10-130 1,6 9,8 6-7
4-6,5 130-200 2,4 11 7-8
= Ø Zusatzdraht
Ø Düse (mm) Gasströmung (Argon
L/mn)
> 6.5 > 200A 3,2 12,7 8-9
Um einen optimalen Schweißverlauf zu gewährleisten, nutzen Sie nur Elektroden, welche nach folgendem Vorbild
geschliffen wurden:
d
L
l
L = 3 x d für niedrigen Schweißstrom
L = d für hohen Schweißstrom
Brennertasteranschluss
Der Brennertasteranschluss sieht wie folgt aus:
TIG 200 / 250
GND- Brennertaste + Potentiometer
Zweitstrom Taste
Brennertaste
Potentiometerschleifer
+5V Potentiometer. Potiwert
10 KΩ
TIG 168
GND- Brennertaste
Zweitstrom Taste
Brennertaste
EINSCHALTDAUER
Das GYS Schweißgerät entspricht in seiner Charakteristik einer Konstantstromquelle. Die Einschaltdauer entspricht
wie unten beschrieben der Norm EN60974-1 (bei 40°C und einem 10mn Zyklus):
X% @ I max X% @ I max
100% 90A 100% 70A
TIG 168
21% 160A 15% 160A
60% 100A 60% 80A
TIG 200 (110V)
X% @ I max X% @ I max
26% 180A 30% 120A
60% 115A 60% 90A
100% 100A 100% 80A
TIG 200 (230V)
X% @ I max X% @ I max
30% 200A 20% 200A
60% 140A 60% 125A
100% 125A 100% 110A
TIG 250
X% @ I max X% @ I max
33% 250A 24% 250A
60% 170A 60% 160A
100% 160A 100% 150A
N.B.: Der Überhitzungstest wurde bei Raumtemperatur durchgeführt und die Einschaltdauer bei 40°C durch
Simulation ermittelt.
ANSCHLUSS FÜR FUSSFERNSTEUERUNG (NUR FÜR TIG 200 UND TIG 250)
Die Fernregelung funktioniert im WIG- und im E-Hand-Modus.
Die TIG200DC und TIG 250DC verfügen über einen Anschluss für eine Fussfernregelung. Der passende 7-polige
Stecker (Zubehör Art.-Nr. 045699) ermöglicht Ihnen den Anschluss einer Fernbedienung (RC) oder Fußfernregelung
(PED). Verkabelung siehe Zeichnung:
20/40
Page 21

Ref.045699
D : Start/Stop Kontakt
C : Masse
B : Regelung
A : + 5V
NB : Der Wert des Poti muss 10 KΩ sein
Anschluss:
1- Gerät anschalten
2- Fussfernreglung oder Handfernbedienung an das Gerät anschliessen
3- Die digitale Anzeige zeigt « NO » an
4- Mit dem Stromsregler wählen Sie den Typ der Fernsteuerung aus:
No « RC » (Handfernbedienung / Remote Control) PEd (Fussfernsteuerung)
5- Nach 2 Sekunden blinkt die digitale Anzeige nicht mehr. Die Stromstärke in Ampere wird angezeigt.
Im Falle eines Fehlers die Fernsteuerung trennen. Mit „No“ zeigt das Gerät an, dass nichts angeschlossen ist.
Bemerkung : Diese Anzeige erscheint bei jedem Neustart
Fernsteuerungsbetrieb
Hand Fernbedienung (
Zubehör Art.-Nr. 045675)
Die Fernbedienung ermöglicht die Fernsteuerung des Schweißstroms ab der minimalen Stromstärke (DC : 10 A /
MMA : 10A) bis zu der durch den Anwender eingestellten maximalen Stromstärke. In dieser Einstellung sind alle Modi
und Funktionen des Gerätes verfügbar und können reguliert werden.
Fussfernregler (
Zubehör Art.-Nr. 045682)
:
In diesem Modus können per Fernsteuerung alle Funktionen ( außer bei « SPOT » die Stärke des Schweißstroms)
eingestellt werden. Dies gilt ab (DC : 10A / MMA : 10A) bis zur maxi malen durch den Anwender eingestellten und
angezeigten Stromstärke.
Im WIG-Modus arbeitet das Gerät nur in 2 Takt-Modus. Zudem werden Stromanstieg und Stromabsenkung nicht
mehr durch das Gerät reguliert, sondern durch den Fussfernregler. Im « SPOT » Modus ersetzt die
Fussfernsteuerung den Taster des Brenners (die Position der Fussfernsteuerung beinflusst nicht den Schweissstrom).
INSTANDHALTUNG / RATSCHLÄGE
• Die Instandhaltungsarbeiten sollten nur von qualifiziertem Fachpersonal durchgeführt werden.
• Trennen Sie die Stromversorgung des GYS Geräts und warten Sie bis der Ventilator sich nicht mehr dreht.
Im Gerät sind die Spannungen sehr hoch und deshalb gefährlich.
• Nehmen Sie regelmäßig das Gehäuse ab und reinigen Sie das Innere des Gerätes mit Pressluft. Lassen Sie
regelmäßig Prüfungen des GYS Geräts auf seine elektrische Betriebssicherheit von qualifiziertem Fachpersonal
durchführen.
• Prüfen Sie regelmäßig den Zustand der Netzzuleitung. Wenn sie beschädigt ist, muss sie durch den
Hersteller, seinen Reparaturservice oder eine qualifizierte Person ausgetauscht werden, um Gefahren zu
vermeiden.
• Lüftungsschlitze nicht bedecken.
Unfallprävention
Lichtbogenschweißen kann gefährlich sein und zu schweren - unter Umständen auch tödlichen - Verletzungen
führen. Schützen Sie daher sich selbst und andere. Beachten Sie unbedingt die folgenden Sicherheitshinweise:
Lichtbogenstrahlung:
Gesichtshaut und Augen sind durch ausreichend dimensionierte EN 175 konforme
Schutzschirme mit Spezialschutzgläsern nach EN 169 / 379 vor der intensiven
Ultraviolettstrahlung zu schützen.
Auch in der Nähe des Lichtbogens befindliche Personen oder Helfer müssen auf Gefahren
Umgebung:
Feuchtigkeit:
Stromversorgung:
hingewiesen und mit den nötigen Schutzmitteln ausgerüstet werden.
Benutzen Sie das Gerät nur in sauberer und gegen Nässeeinwirkung geschützter
Umgebung.
Nicht bei erhöhter Feuchtigkeit (Regen/Schnee) benutzen
.
Dieses Gerät kann nur an einer einphasigen Stromversorgung mit 3 Adern (Phase,
Nullleiter und Erde) verwendet werden. Keine Spannungsführenden Teile berühren. Nur
Transport:
21/40
am 230 V-Netz betreiben.
Unterschätzen Sie nicht das Gewicht der Anlage. Bewegen Sie das Gerät nicht über
Personen oder Sachen hinweg, und lassen Sie es nicht herunterfallen oder hart aufsetzen.
Page 22

Verbrennungsgefahr:
Schützen Sie sich durch geeignete trockene Schweißerkleidung (Schürze, Handschuhe,
Kopfbedeckung sowie feste Schuhe). Tragen Sie auch die Schutzbrille, wenn Sie Schlacke
abklopfen. Schützen Sie andere durch nicht entzündbare Trennwände. Nicht in den
Lichtbogen schauen und ausreichende Distanz halten.
Brandgefahr:
Rauch:
Weiteren
Vorsichstmaßnahmen:
Alle entflammbaren Produkte vom Schweißplatz entfernen. Nicht in der Nähe von
brennbaren Stoffen und Gasen arbeiten.
Metalldämpfe sind giftig! Bei Anwendung im Innenbereich für ausreichende Belüftung
sorgen.
Jegliche Schweißarbeiten:
- im Bereich mit erhöhten elektrischen Risiken
- in abgeschlossenen Räumen
- in der Umgebung von entflammbaren oder explosiven Produkten
nur in Anwesenheit von qualifiziertem Rettungspersonal durchführen. Vorsichtsmaßnahmen in Übereinstimmung mit "IEC 62081" sind notwendig. Schweißarbeiten in
erhöhten Stellungensind nur mittels Gerüstbau erlaubt.
Vorsicht: Den Inverter nie ohne Schutzleiter verwenden!
STÖRUNGEN / GRÜNDE / LÖSUNGEN
Störungen Gründe Lösungen
Das Gerät liefert keinen Schweißstrom und die
gelbe Überhitzungslampe leuchtet .
Die Anzeige ist an, das Gerät liefert jedoch
keinen Schweißstrom.
Beim Start zeigt das Display folgendes Bild Die Spannung ist nicht im Bereich
Unstabiler Lichtbogen. Schlechte Wolfram-Elektrode. Benutzen Sie eine Wolfram-Elektrode von
Die Wolfram-Elektrode oxidiert und verfärbt
sich am Ende des Schweißvorgangs dunkel.
Die Elektrode glüht Polarität Fehler
Das Display zeigt 'PH' an Phasenerkennungfehler Bitte prüfen Sie ob alle Phasen
Der Überhitzungsschutz wurde
ausgelöst.
Masseklemme oder
Elektrodenhalter- Kabel sind nicht
korrekt mit dem Gerät verbunden.
von 230V +/- 15%. für TIG 168;
85V-265V für TIG 200FV; 400V (+/15%) für TIG 250.
Zu hohe Gasströmung. Reduzieren Sie den Gasstrom.
Schweißumgebung. Schützen Sie die Schweißumgebung vor
Zu geringe Nachströmzeit. Erhöhen Sie die Nachströmzeit.
Warten Sie ca. 2mn, bis der Kühlvorgang
abgeschlossen ist. Das Licht erlischt
danach .
Überprüfen Sie die Anschlüsse.
Überprüfen Sie die Netzspannung.
angemessener Länge.
Benutzen Sie eine sauber angeschliffene
Elektrode.
Wind oder Luftzug.
Kontrollieren Sie die Gasverbindungen.
Überprüfen Sie, ob Massekabel wirklich an +
Buchse angeschlossen ist.
angeschlossen sind. Starten Sie die
Maschine neu, um diese zurückzusetzen.
GARANTIE
Die Garantieleistung des Herstellers erfolgt ausschließlich bei Fabrikations- oder Materialfehlern, die binnen 12
Monate nach Kauf angezeigt werden (Nachweis Kaufbeleg). Nach Anerkenntnis des Garantieanspruchs durch den
Hersteller bzw. seines Beauftragten erfolgen eine für den Käufer kostenlose Reparatur und ein kostenloser Ersatz
von Ersatzteilen. Der Garantiezeitraum bleibt aufgrund erfolgter Garantieleistungen unverändert.
Ausschluss:
Die Garantieleistung erfolgt nicht bei Defekten, die durch unsachgemäßen Gebrauch, Sturz oder harte Stöße sowie
durch nicht autorisierte Reparaturen oder durch Transportschäden, die in Folge des Einsendens zur Reparatur,
hervorgerufen worden sind. Keine Garantie wird für Verschleißteile (z.B. Kabel, Klemmen, Vorsatzscheiben etc.)
sowie bei Gebrauchsspuren übernommen.
Das betreffende Gerät bitte immer mit Kaufbeleg und kurzer Fehlerbeschreibung ausschließlich über den Fachhandel
einschicken. Die Reparatur erfolgt erst nach Erhalt einer schriftlichen Akzeptanz (Unterschrift) des zuvor vorgelegten
Kostenvoranschlags durch den Besteller. Im Fall einer Garantieleistung trägt GYS ausschließlich die Kosten für den
Rückversand an den Fachhändler.
22/40
Page 23

DESCRIPCION
¡ Gracias por su elección ! Para sacar lo máximo de satisfacción de su aparato, lea atentamente lo que sigue antes el
uso.
El TIG 168/200 HF DC es un aparato de soldadura Inverter, portátil, monofásico (o trifásico para el TIG 250) y
ventilado para la soldadura al electrodo refractario (TIG) en corriente continua (DC). La soldadura TIG DC necesita
una protección gaseosa (argón). En modo MMA, permite soldar toto tipo de electrodo : rutilo, básico, acero
inoxidable y hierro colado. El TIG 200 puede ser dotado de un mando a distancia manual o a pedal. Funciona con
una red eléctrica monofásica 230V para el TIG 168, monofásica incluida entre 85V y 265V para el TIG 200. Están
protegidos para el funcionamiento con grupos electrógenos.
ALIMENTACION – PUESTA EN MARCHA
• Este aparato es entregado con un enchufe 16A de tipo CEE7/7. El TIG 250 se vende con un enchufe 400V 16A
trifásico 5 polos tipo EN 60309-1.
• TIG 168/200 : debe ser conectado a una toma 230V (50-60Hz) CON tierra. El TIG 200 dispone de un sistema
« Flexible Voltage », funciona con una instalación eléctrica CON tierra comprendida entre 85V y 265V (50 - 60
Hz). El TIG 250 debe conectarse a una toma 400V (50/60 Hz) CON tierra
• La corriente efectiva absorbida (I1eff) está indicada sobre el aparato, para las condiciones de uso máximas.
Verificar que la alimentación y sus protecciones (fusible y/o disyuntor) son compatibles con la corriente necesita
durante el uso. En algunos paises, puede ser necesito de cambiar el enchufe para permitir un uso en condiciones
máximas. Preferir un enchufe de 25 A con el TIG 168 para un uso intensivo.
• La puesta en marcha se hace con una pulsación sobre el botón de espera , o por rotación del conmutador para
el TIG 250.
• El aparato se pone en protección si la tensión de alimentación es superior a 265V. Para indicar este defecto, la
pantalla indica . Cuando en protección, desenchufar el aparato y conectarlo de nuevo a una toma liberando
una tensión correcta
• Comportamiento del ventilador : en modo MMA el ventilador funciona permanentemente. En modo TIG, funciona
únicamente en fase de soldadura y se para después la refrigeración.
• Estos aparatos son de Clase A. Son concebidos para un uso en un ambiente industrial o profesional. En un
entorno distinto, puede ser difícil asegurar la compatibilidad electromagnética, a causa de perturbaciones
conducidas tan bien como radiadas. No utilizar en un entorno con polvos metálicos conductores.
• A partir del 1er de diciembre de 2010, se modifica la norma EN 60974-10 aplicable para los TIG 168. Atención :
estos equipos no respetan la CEI 61000-3-12. Si se dedican a conectarse al sistema público de alimentación de
baja tensión, es de la responsabilidad del usuario de asegurarse que pueden conectarse a éste. Si es necesario,
consultar al operador de su red de alimentación eléctrica
SOLDADURA AL ELECTRODO CUBIERTO (modo MMA)
Conexiones y Consejos
• Enchufar los cables porta-electrodo y pinza de masa en los conectadores de enlace,
• Respetar las polaridades e intensidades de soldadura indicadas sobre las cajas de electrodos,
• Sacar el electrodo del porta-electrodo cuando el aparato no es utilizado.
Ayudas a la soldadura integradas
Su aparato es dotado de 3 funciones específicas a los Inverters :
El Hot Start libera una sobreintensidad ajustable* en principio de soldadura
El Arc Force libera una sobreintensidad para evitar la pegadura cuando el electrodo entra en el baño,
Selección del proceso y reglaje de intensidad
El Anti-Sticking permite facilmente despegar su electrodo sin ponerlo al rojo en caso de pegadura.
1- Selección del modo MMA 2- Selección de la corriente deseada gracias al potentiometro
Nb. para el TIG 200FV : la intensidad de soldadura varia según la tensión de su alimentación eléctrica
: - en 110V, la intensidad puede ajustarse de 10 a 120A
- en 230V, la intensidad puede ajustarse de 10 a 200A
23/40
Page 24

Hot start ajustable*
El Hot Start del TIG 168 HF DC es ajustable de 0 a 60 % en la límite de 160 A.
El Hot Start del TIG 200 DC es ajustable de 0 a 60 % en la límite de 200 A en 230 V y 120 A en 110 V.
El Hot Start del TIG 250 DC es ajustable de 0 a 60 % en la límite de 250 A.
1- Clicar y mantener pulsado,
2- Seleccionar el Hot Start deseado,
n.b.: la inscripción "HI" indica que el Hot Start está a su máximo.
Arc Force ajustable (unicamente en el TIG 200/ TIG 250)
El Arc Force es ajustable de de 0 a 100 %( TIG 200 DC en el límite de 200A en 230V y 120A en 110V) .
1- Hacer clic y mantener pulsado
2- Elegir el Arc Force deseado.
SOLDADURA TIG
Elección del tipo de arranque
1- Seleccionar su arranque LIFT o HF
TIG LIFT: Arranque por contacto (para los medios sensibles a las perturbaciones HF)
1- Tocar la pieza que soldar con el electrodo,
2- Pulsar el gatillo,
3- Levantar el electrodo.
TIG HF: arranque alta frecuencia sin contacto
Comportamiento gatillo
Antorchas compatibles
TIG 168
TIG 200/250
Nb: Los TIG 200 /250 DC detectan automáticamente la antorcha que está conectada.
Modo 2T
1- Pulsar y mantener el gatillo : Pregas, subida en corriente, soldadura,
Nb: Para las antorchas de doble mando y de doble mando potenciómetro => mando « alto/corriente caliente » y
potenciómetros activos, mando « bajo/corriente fría » inactivo.
Modo 4T
Nb: Para las antorchas de doble mando y de doble mando potenciómetro => mando « alto/corriente caliente » y
potenciómetros activos, mando « bajo/corriente fría » inactivo.
24/40
2- Aflojar el gatillo : desvanecimiento, post-gas.
1- Pulsar el gatillo : Pre-gas, seguido del arranque. Para facilitar el
posicionamiento del electrodo, una corriente baja de 10A está producida,
actuando tal un haz luminoso. (=Adjust Ideal Position)
2- Aflojar el gatillo : subida en corriente hasta la consigna fijada, soldadura,
3- Pulsar el gatillo : desvanecimiento hasta 10A (para un buen cierre del
cráter),
4- Aflojar el gatillo : parada del corriente y post-gas.
Page 25
Modo 4T Log
Este modo funciona como el modo 4T pero cuando usted está en fase de soldaura, una pulsación breve sobre el
gatillo permite pasar a una corriente fría previamente regulada (20% a 70% de la corriente caliente de soldadura).
1- Pulsar el gatillo : Pre-gas, seguido del arranque. Para facilitar el
posicionamiento del electrodo, una corriente baja de 10A está producida,
actuando tal un haz luminoso. (=Adjust Ideal Position)
2- Aflojar el gatillo : subida de la corriente hasta la corriente "caliente" de
soldadura (consigna fijada),
Pulsación breve : paso a la corriente fría(% I),
Pulsación breve : retorno a la corriente "caliente",
3- Pulsación gatillo : desvanecimiento hasta 10A (para un buen cierre del
Repetir a
medida del
deseo
cráter),
4- Aflojar el gatillo : parada de la corriente y post-gas.
Nb: Para las antorchas doble mando y doble mando potenciómetro => mandos « alto/corriente caliente » y « bajo/
corriente fría » + potenciómetro activos.
Para este modo, puede ser practico utilizar la opción antorcha doble mando o doble mando + potenciómetro. El
mando « alto » guarda la misma funcionalidad que la antorcha simplemente mando o con pulsador. El mando “bajo”
permite, cuando queda apretado, volver a la corriente fría. El potenciómetro de la antorcha, cuando es presente
permite ajustar la corriente de soldadura (caliente y fría) de 50% a 100% del valor anunciado.
Opciones de soldadura
Pulsado (Pulse)
No disponible en 4T LOG
Las impulsiones (pulse) corresponden a las aumentaciones y bajadas alternas de la corriente (corriente caliente,
corriente fría). El modo pulse permite juntar piezas limitando la elevación de temperatura.
En modo pulsado, puede regular :
- la corriente fría (20% a 70% de la corriente de soldadura),
- la frecuencia de soldadura (de 0.2 Hz a 20Hz).
Nb: la duración de tiempo caliente y la duración del tiempo frío son las mismas.
Easy Pulse
Mode pulsado simplificado. Usted sólo tiene que regular la corriente media alrededor de la cual la pulsación va a
formarse.
El Easy pulse determina la frecuencia y la corriente de soldadura caliente y fría.
Spot
Este modo sólo es accesible en TIG HF 2T.
Permite preparar las piezas haciendo puntos de soldadura.
Una vez estas piezas mantenidas, puede pasar en soldadura TIG para realizar el cordón en su totali dad.
Reglajes de los parametros
Pre-gas (0 a 2 sec.)
El pre-gas permite, antes el arranque, purgar la antorcha y la zona cerca del principio del cordón de
soldadura. También mejora la regularidad del arranque.
Subida de la corriente (Up Slope) (0 a 5 sec.)
Consejo : cuanto más largo la antorcha, más habrá que aumentar esta duración (0,15s/m de antorcha)
Tiempo necesito para pasar de la corriente minimal a la corriente de soldadura.
Reglaje de la corriente de soldadura
el valor de la corriente de soldadura depende del espesor, del tipo de metal y de la configuración de
soldadura.
Consejo : tomar como base 30A/mm y ajustar en función de la pieza que soldar.
Reglaje de la frecuencia de pulsación (de 0,2 a 20Hz)
La frecuencia de pulsación es el nombre de ciclos (1/2 ciclo corriente caliente, ½ ciclo corriente fría)
por segundo.
25/40
Page 26

Reglaje de la corriente fría (intensidad baja) (de 20% a 70% de la corriente caliente)
Arranque
Gatillo Proceso TIG
∅∅∅∅
∅∅∅∅
L
Es el porcentaje de corriente caliente. Cuanto más la corriente fría está baja, menos la pieza va a
Reglaje del desvanecimiento (Down slope) (0 a 10 sec)
calentar durante la soldadura.
Tiempo necesito para pasar de la corriente de soldadura hasta la corriente mínima. Evita las fisuras y
Reglaje del post-gas (3 a 20 sec)
los crateres de fin de soldadura.
Este parametro define el tiempo durante lo cual el gas sigue fluyendo después la extinción del arco.
Permite proteger la pieza y el electrodo contra las oxidaciones.
Consejo : aumentar la duración si la soldadura parece oscura.
(Para base : 25A=4sec. - 50A=8sec - 75A=9sec - 100A=10sec - 125A=11sec- 150A=13sec. -200A=15sec250A=25sec )
Nb: A todo momento, puede verificar sus reglajes simple pulsando el botón del parametro, sin girar la rueda.
Funciones disponibles para cada uno proceso de soldadura
En función de los modos, algunos botones son inactivos, ver la tabla más abajo :
HF TIG Lift 2T 4T 4T log
TIG Normal
TIG Pulse
TIG Easy Pulse
SPOT
Fijación y llamada de las memorias
Pre-gas
(I medio)
(I)
(I)
(únicamente
en 4T log)
Disponer de 5 memorias para salvaguardar y llamar sus parametros TIG. Además de estas memorias, 168
mermoriza sus últimos reglajes activados y activalos de nuevo a cada uno reanudación del aparato.
Memorización
1- Pulsar el botón ,
2- "In" durante 1 segundo,
Mientras la pantalla indica "In", la acción puede ser anulada,
3- Después 1 segundo, la pantalla indica un número de programa (P1 a P5).
Manteniendo el botón pulsado, girar la rueda para definir la memoria
necesita y aflojar el botón : sus parametros son memorizados.
LLamada de una configuración
Proceder de la misma manera pero pulsando el botón.
LLamada del reglaje de fábrica
1- Pulsar 3 segundos el botón RESET,
2- La pantalla indica InI.
Todas las salvaguardas son suprimidas (los parametros de fábricas son
vueltos sobre los 5 programas + parametro de arranque).
Combinaciones aconsejadas / afiladura del electrodo
Corriente (A)
Electrodo (mm)
= ∅∅∅∅ alambre (metal de
aportación)
Boquilla
(mm)
Caudal
(Argon l/min)
0,5-5 10-130 1,6 9,8 6-7
4-6,5 130-200 2,4 11 7-8
Para un funcionamiento optimal, debe utilizar un electrodo afiladurado de la manera siguiente :
26/40
> 6.5 > 200A 3,2 12,7 8-9
d
l
L = 3 x d para una corriente floja,
L = d para una corriente fuerte.
Post-gas
Page 27

Conectador de mando gatillo
3
1
4
5
2
El conectador de mando gatillo es concebido de la manera siguiente :
TIG 200 / 250
común botón pulsador +
potenciómetro
Botón corriente fría
Botón de soldadura antorcha
Cursor / potenciómetro
+5V potenciómetro 10 KΩ
TIG 168
Común
Botón corriente fría
Botón de soldadura antorcha
FACTOR DE MARCHA
• El aparato describe una característica de salida de tipo "corriente constante". Los factores de marcha según la
norma EN60974-1 (a 40°C sobre un ciclo de 10min.) son indicados en la tabla siguiente :
X% @ I max X% @ I max
100% 90A 100% 70A
TIG 168
21% 160A 15% 160A
60% 100A 60% 80A
TIG 200 (110V)
X% @ I max X% @ I max
26% 180A 30% 120A
60% 115A 60% 90A
100% 100A 100% 80A
TIG 200 (230V)
X% @ I max X% @ I max
30% 200A 20% 200A
60% 140A 60% 125A
100% 125A 100% 110A
TIG 250
X% @ I max X% @ I max
33% 250A 24% 250A
60% 170A 60% 160A
100% 160A 100% 150A
Nota : las pruebas de calentamiento han sido hechos a temperatura ambiente y los factores de marcha a 40°C han
sido determninados por simulación.
MANDO A DISTANCIA ( TIG 200 y TIG 250 UNICAMENTE)
El mando a distancia funciona en modo TIG y en MMA.
Sistemas de conexión
Los TIG 200 y TIG 250DC llevan una toma hembra para el mando a distancia. La toma macho específica 7 puntos
(opción ref.045699) permite conectar su mando a distancia manual (RC) o a pedal (PEd).
Para el cableado, seguir el esquema abajo descrito.
Ref.045699
D : Contacto del switch
C : Masa
B : Cursor
A : + 5V
Nb : el valor del potenciómetro debe ser de 10 KΩ
Conexión
1- Encender el aparato
2- Conectar el pedal o el mando a distancia en la cara frontal del aparato.
3- El visualizador parpadea enseñando « No » (Nada),
4- Seleccionar su tipo de mando girando el conmutador de ajuste de intensidad:
No (Nada) « RC » (Remote Control/mando a distancia) PEd (Pedal)
5- Después de 2 segundos de reposo del conmutador, el visualizador marca el valor y luego la intensidad de
soldadura
27/40
Page 28

Nb: En cas de error, desconectar su mando a distancia, el aparato indica que ahora nada está conectado: « No ».
Después, conectar de nuevo el mando y rehacer la selección.
Comentario: Esta elección tendrá que repetirse cada vez que se enchufará el aparato.
Funcionamiento
Mando a distancia manual. (
opción ref.045675)
:
El mando a distancia permite hacer variar la corriente de una intensidad mínima (DC: 5A / AC: 10 / MMA: 10) a una
intensidad definida por el usuario (pantalla).
En esta configuración, todos los modos y funcionalidades del aparato son accesibles y parametrizables.
Pedal (
opción ref.045682)
:
En cualquier modo, excepto en el modo « Spot », el pedal de mando permite hacer variar la corriente de una
intensidad mínima (DC: 5A / AC: 10 / MMA: 10) a una intensidad definida por el usuario (pantalla).
En TIG, el aparato sólo funciona en soldadura 2 tiempos (modo 2T). Además, la subida y el desvanecimiento de la
corriente no son administrados por el aparato (funciones inactivas) sino por el usuario por medio del pedal.
En modo spot, el pedal de mando remplaza el gatillo de la antorcha (la posición del pedal no tiene efecto en la
corriente)
MANTENIMIENTO / CONSEJOS
• El mantenimiento sólo debe ser efectuado por una persona calificada.
• Cortar la alimentación desconectando el enchufe y esperar la parada del ventilador antes de trabajar sobre el
aparato. Al interior, las tensiones e intensidades son elevadas y peligrosas.
• Regularmente quitar el capot y desempolvar con aire comprimido. Sacar provecho de eso para hacer verificar las
conexiones eléctricas con un instrumento aislado por una persona calificada.
• Regularmente controlar el estado del cordón de alimentación. Si el cable de alimentación es dañado, debe ser
reemplazado por el fabricante, su servicio postventa o por una persona de misma calificación, para evitar todo
peligro.
• Dejar las aberturas para la aeración libres para la entrada y la salida de aire.
SEGURIDAD
La soldadura al arco puede ser peligrosa y causar heridas graves hasta mortales. Protejase y proteja
los otros.
Respetar las instrucciones de seguridad siguientes
:
Radiación del arco : Protejase con una careta equipada de filtros conformes a las normas EN 169 o EN 379.
LLuvia, vapor de agua, Utilizar su aparato en una atmósfera limpia (graduación de contaminación ≤ 3),
humedad : plano y a más de un metro de la pieza que soldar. Nunca utilizarlo en caso de lluvia o de
Choque eléctrico : Este aparato sólo debe ser utilizado sobre una alimentación mofofásica con 3 alambres y
nieve.
neutro conectado a la tierra. Nunca tocar las piezas bajo tensión.
Verificar que la red de alimentación es adaptada al aparato.
Caídas : Nunca mover el aparato sobre personas o objetos.
Quemaduras : Llevar trajes de trabajo en cotón ignifugado (cotón, mono o jeans).
Trabajar con guantes de protección y delantal ignifugado.
Proteger los otros instalando pantallas ininflamables o preveniendolos de nunca mirar el
Riesgos de fuego : Suprimir todos los productos inflamables del espacio de trabajo. Nunca trabajar en
Humos : Nunca inhalar gases o humos de soldadura. Utilizar en en entorno suficientemente
arco y guardar distancias suficientes.
presencia de gas inflamable.
ventilado, con extracción artificial si la soldadura se hace en el interior.
28/40
Page 29

Precauciones Toda operación de soldadura :
suplementarias : - en lugares con riesgos aumentados de choque eléctrico,
- en lugares cerrados,
- en presencia de material inflamable o con riesgos de explosión,
Siempre debe ser supuesta a la autorisación previa de un "responsable experto" y hecha
en presencia de personas formadas para intervenir en caso de urgencia.
Los medios técnicos de protecciones describidos en la Especificación Técnica CEI/IEC
62081 deben ser aplicados.
La soldadura en posición sobrealzada es prohibida, aún en caso de utilización de
plataformas de seguridad.
Las personas llevando Pacemakers deben consultar su médico antes de utilizar estos aparatos.
Nunca utilizar el aparato para deshelar una cañería.
En soldadura TIG, manipular la bombona de gas con precaución. Hay riesgos si la bombona o la
valvula de la bombona son dañadas.
AVERIAS / CAUSAS / REMEDIOS
Averías Causas Remedios
El aparato no libera ninguna
corriente y el indicador luminoso
amarillo de defecto térmico se
encende.
La pantalla está encendida pero
el aparato no libera ninguna
corriente.
La protección térmica del aparato
se ha puesta en marcha.
El cable de pinza de masa o
porta-electrodo no está
conectado al aparato.
Esperar la fin de refrigeración,
aproximadamente 2min. El indicador se
apaga.
Verificar las conexiones.
La tensión no está entre 230 V
Durante la puesta en marcha, la
pantalla indica
+/- 15% para el TIG 168, 85-265
V para el TIG 200 FV, o 400V
Hacer verificar la instalación eléctrica.
(+/- 15%) para el TIG 250.
Utilizar un electrodo tungsteno de
Defecto proveniendo del
Arco inestable.
electrodo tungsteno.
Caudal de gas demasiado
importante.
Zona de soldadura.
El electrodo tungsteno se oxida y
se empaña en fin de soldadura.
Defecto proveniendo del post-
gas.
El electrodo funde Error de polaridad
la pantalla indica 'PH'
problema de detección de las
fases.
dimensión apropiada.
Utilizar un electrodo tungsteno
correctamente preparado.
Reducir el caudal de gas.
Proteger la zona de soldadura contra las
corrientes de aire.
Aumentar la duración del post-gas.
Controlar y apretar todos los
conectadores de gas.
Comprobar que la pinza de masa está
bien conectada al +
Comprobar que todas las fases son
presentes. Se reinicializa el defecto al
reactivar el producto
29/40
Page 30

ОПИСАНИЕ
Спасибо за ваш выбор ! Чтобы вы были максимально удовлетворены использованием вашего аппарата,
пожалуйста, внимательно прочтите инструкцию.
TIG 168/200 DC - это Инвертерный сварочный аппарат, переносной, однофазный или трёхфазной (аппарат
TIG 250), с вентилятором для сварки тугоплавким электродом (TIG) при постоянном токе (DC). Сварка TIG DC
должна происходить в среде газа (Аргон). В режиме MMA он позволяет варить все типы электродов :
рутиловые, обычные, из нержавейки и чугуна. Модель 200 имеет интегрированную систему водного
охлаждения. Аппараты TIG 200/200FV могут быть оснащены педальным или ручным дистанционным
управлением. Аппараты работают от электрической сети: однофазной на 230В для TIG 168 и однофазной от
85 до 265В для TIG 200FV. Аппараты защищены для работы от электрогенераторов.
ПИТАНИЕ - ВКЛЮЧЕНИЕ
• Аппарат TIG 168/200 имеет вилку 16A типа CEE7/7. TIG 250 поставляется с трехфазной вилкой 400В 16А 5
контактов типа EN 60309-1. Tig 168 необходимо включать в розетку 230 В (50 - 60 Гц) C ЗАЗЕМЛЕНИЕМ.
Аппарат TIG 200FV оснащен системой «Flexible Voltage» и может быть запитан от розетки С
ЗАЗЕМЛЕНИЕМ на 110В-240В (50-60Гц). Аппарат TIG 250 необходимо включать в розетку С
ЗАЗЕМЛЕНИЕМ на 400В (50-60Гц). Потребляемый эффективный переменный ток (I1эфф) указан на
аппарате для максимальных условий использования. Проверьте, что питание и защиты (предохранитель
и/или автомат) совместимы с током, необходимым для работы аппарата. В некоторых странах необходимо
поменять розетку для того, чтобы аппарат смог работать при максимальных условиях. Для интенсивного
использования аппарата TIG 168 желательно использовать розетку на 25А.
• Аппарат включается нажатием на кнопку Аппарат TIG 250 включается поворотом переключателя.
• Если напряжение питания превышает 265 В, то у аппарата срабатывает защита. Об этом сообщает
обозначение на табло. После того, как сработала защита необходимо отключить аппарат и
подключить его к розетке с подходящим напряжением.
• Работа вентилятора : В режиме MMA вентилятор работает постоянно. В режиме TIG вентилятор работает
только во время сварки, затем он останавливается после охлаждения.
• Эти аппараты относятся к Классу A. Они созданы для использования в промышленной и
профессиональной среде. В любой другой среде ему будет сложно обеспечить электромагнитную
совместимость из-за кондуктивных и индуктивных помех. Не использовать в среде содержащей
металлическую пыль-проводник.
• Начиная с 1 Декабря 2010, изменения нормы EN 60974-10 будут применяться к TIG 168 : Внимание! Это
оборудование не соответствует CEI 61000-3-12. Аппараты должны быть подключены к общественной
системе питания низкого напряжения, пользователь должен удостовериться, что аппарат может быть
подключен в сеть. При необходимости проконсультируйтесь у вашего энергосистемного оператора.
СВАРКА ЭЛЕКТРОДОМ С ПОКРЫТИЕМ (РЕЖИМ MMA)
Подключение и советы
• Подключить кабели держателя электрода и зажима массы к коннекторам.
• Необходимо соблюсти полярность и сварочный ток, указанные на коробках с электродами.
• Когда аппарат не используется, то надо снять электрод с держателя.
Вспомогательные сварочные функции
Ваш аппарат имеет 3 свойственные для Инверторов функции:
Le Hot Start дает высокий регулируемый сварочный ток в начале сварки
L’Arc Force дает высокий ток для устранения залипания электрода в сварной ванне
L'Anti-Sticking позволяет легко отлепить электрод не нагревая его до красноты в случае залипания
Выбор режима и регулировка сварочного тока
1- Выбирете режим MMA 2- Выбирете нужный вам ток используя потенциометр
Примечение для TIG 200FV : интенсивность сварки изменяется в соответствии с
напряжением вашей электрической установки:
- при 110В, интенсивность может регулироваться от 10 до 120A
- при 230В, интенсивность может регулироваться от 10 до 200A
30/40
Page 31

Регулируемый* Hot start
Hot Start аппарата TIG 168 HF регулируется от 0 до 60 % в пределах 160 A
Hot Start аппарата TIG 200 DC регулируется от 0 до 60 % в пределах 200 A при 230В и 120A при 110В
Hot Start аппарата TIG 250 DC регулируется от 0 до 60 % в пределах 250 A
1- Нажать и так держать
2- Выбрать нужный Hot Start
N.B.: надпись "HI" означает, что Hot Start на максимуме
Настройка Arc Force (
Arc Force регулируется от 0 до 100 % (Tig 200 в пределах
ТОЛЬКО ДЛЯ TIG 200/ TIG 250)
200 A при 230В и 120A при 110В).
1- Нажать и удерживать
2- Выбрать желаемый Arc Force
СВАРКА TIG
Выбор способа розжига
1- Выбирете рожзиг LIFT или HF
TIG LIFT: Розжиг контактом (для среды чувствительным к помехам HF)
1- Коснитесь электродом свариваемой детали
2- Нажмите на курок
3- Приподнимите электрод
TIG HF: безконтактный розжиг при высокой частоте
Работа курка
TIG 168
TIG 200/250
Аппараты TIG 200 / 250 DC определяют автоматически подключенную к ним горелку.
2-х тактный
1- Нажать и держать курок: подача газа, увеличение тока, сварка
Примечание: для горелок с двойным управлением и с двойным управлением и потенциометром => режим
«высокий/ток горячий» и включенный потенциометр, режим «низкий/холодный ток» отключен.
4-х тактный
Примечание: для горелок с двойным управлением и с двойным управлением и потенциометром => режим
«высокий/ток горячий» и включенный потенциометр, режим «низкий/холодный ток» отключен.
31/40
2- Отпустить курок: снижение тока, продувка газа
1- Нажать на курок: подача газа, начало рожзига. Для упрощения
позиционирования электрода подается слабый ток 10А который действует
как световой пучок (= Ajust Ideal Position)
2- Отпустить курок: увеличение тока до указанного уровня, сварка
3- Нажать на курок : снижение тока до 10A (чтобы хорошо заварить
кратер)
4- Отпустить курок : прекращение подачи тока, затем продувка газа.
Page 32

4-х тактный Log
Повторять
Этот режим работает как и 4-ч тактный, но при сварке короткое нажатие на курок позволяет пропустить
предварительно отрегулированный слабый (от 20% до 70% высокого сварочного тока).
1- Нажать на курок : Подача газа, затем розжиг. Для упрощения
позиционирования электрода подается слабый ток 10А который действует
как световой пучок (= Ajust Ideal Position)
2- Отпустить курок : увеличение до сильного сварочного тока (уровень
указан)
короткое нажатие : переход к слабому току (% I).
короткое нажатие: возвращение к сильному току.
угодно раз
3- Нажать на курок : снижение тока до 10A (чтобы хорошо заварить
кратер).
4- Отпустить курок : прекращение подачи тока, продувка газа.
Примечание: для горелок с двойным управлением и с двойным управлением и потенциометром => режим
«высокий/ток горячий» и «низкий/холодный ток» + включенный потенциометр.
Для этого режима мы советум использовать горелку с двойным управлением или с двойным управлением и
потенциометром. Режим «высокий» сохраняет теже функции, что и и горелка с простым управлением или с
курком-пластиной. Режим «низкий» позволяет, в случае если он включен, переключиться на холодный ток.
Потенциометр горелки, при его наличии, позволяет отрегулировать сварочый ток (горячий и холодный) от
50% до 100% от указанного значения.
Варианты сварки
3.1 Импульсный (Pulse)
Функция отсутствует в 4-тактном режиме LOG
Импульсы (pulse) соответствуют переменным увеличениям и снижениям тока (сильный ток, слабый ток).
Импульсный режим позволяет соединять детали, ограничивая увеличение температуры.
В импульсном режиме вы можете регулировать :
- слабый ток (от 20% до 70% сварочного тока)
- частоту сварки (от 0.2 Гц до 20Гц).
NB: продолжительность сильного и слабого тока одинаковы
3.2 Easy Pulse
Упрощенный импульсный режим. Вы можете отрегулировать только средний ток, вокруг которого будут
происходить импульсы.
Easy pulse определяет частоту и сильный и слабый сварочный ток.
3.3 Spot
Этот режим доступен только при работе в 2-тактном режиме TIG HF.
Он позволяет прихватить детали.
Как только они прихвачены, вы можете перейти в режим TIG и сварить шов полностью.
Регулировка параметров
Подача газа (от 0 до 2 сек.)
Подача газа перед розжигом позволяет продуть горелку и близлежащую к началу сварного шва
зону. Это также улучшает равномерность розжига.
Увеличение тока (Up Slope) (от 0 до 5 сек.)
Наш совет : чем длиннее горелка, тем дольше должна быть подача (0,15/м горелки)
Время необходимое для того, чтобы перейти от минимального тока к сварочному току.
Регулировка сварочного тока
Значение сварочного тока зависит от толщины, типа металла, а также от заданных параметров
сварки.
Регулировка частоты импульсов (от 0,2 до 20Гц)
Наш совет : Взять за основу 30A/мм и настроить в зависимости от свариваемой детали
Частота импульсов - это количество циклов (1/2 цикла сильный ток 1/2 цикла слабый ток) за
секунду.
Регулировка слабого тока (низкий сварочный ток) (от 20% до 70% сильного тока)
Это процент сильного тока, чем ниже слабый ток, тем меньше будет нагреваться деталь во
Регулировка снижения тока (Down slope) (от 0 до 10 сек)
время сварки.
Время необходимое для снижения сварочного тока до минимального тока. Позволяет избежать
32/40
трещин и кратеров в конце сварки.
сколько
Page 33

Регулировка Продувки газа (от 3 до 20 сек)
Розжиг
Куроковой режим
Процесс
TIG
Подача
∅∅∅∅
∅∅∅∅
L
Этот параметр определяет время, в течение которого газ продолжает подаваться после
затухания дуги. Таким образом деталь и электрод защищены от окисления.
Наш совет : Увеличить это время если у шва темный цвет.
(За основу : 25A=4сек. - 50A=8сек - 75A=9сек - 100A=10сек - 125A=11сек- 150A=13сек – 200А=15сек –
250А=25сек)
Nb: В любой момент вы можете проверить регулировку нажатием на кнопку параметров, не поворачивая
тумблер.
Функции, доступные в зависимости от способа сварки
В зависимости от режимов некоторые кнопки не действуют, см таблицу ниже:
TIG Normal
TIG Pulse
TIG Easy Pulse
SPOT
HF TIG Lift 2T 4T 4T log
газа
(средний I)
(I)
(I)
(только в
режиме
4T log)
Продувка
газа
Ввод в память и вызов информации
У вас имеется 5 ячеек памяти для ввода в память и вызова ваших параметров TIG. Помимо этих ячеек, TIG
168 HF DC запоминает ваши последние используемые регулировки и реактивирует их при каждом новом
включении аппарата.
Ввод в память
1- Нажмите на кнопку
2- n" в течение 1 секунды.
Пока на экране указано "In" операцию можно аннулировать.
3- стя секунду на экранчике указывается номер программы (от P1 до P5).
Дерда кнопку нажатой, поверните тумблер, чтобы найти подходящую ячейку
памяти, затем отпустите кнопку. Ваши параметры введены в память.
Вызов данных
Действовать таким же образом, но нажимая на
Вернуться к заводским натстройкам
1- ать в течение 3 секунд на кнопку «reset».
2- экране появляется «Ini»
Все введенные вами данные стираются (заводские параметры
восстанавливаются по 5 программам + параметры включения)
Советуемые комбинации / затачивание электрода
Ток (A)
= ∅∅∅∅ проволока (присад. металл)
Электрод (мм)
Сопло
(мм)
Подача газа
(Аргон л/мин)
0,5-5 10-130 1,6 9,8 6-7
4-6,5 130-200 2,4 11 7-8
> 6.5 > 200A 3,2 12,7 8-9
Для оптимального функционирования вы должны использовать заточенный электрод следующим образом:
d
l
L = 3 x d для слабого тока.
L = d для сильного тока.
33/40
Page 34

Коннектор для куркового управления
3
1
4
5
2
Коннектор для куркового управления
работает следующим образом :
TIG 200 / 250
общий Пусковой Кнопки +
Потенциометр
кнопка холодного тока
кнопка сварки горелкой
Курсор / потенциометр
+5В потенциометр 10 KΩ
TIG 168
общий
кнопка холодного тока
кнопка сварки горелкой
ПВ (ОТНОСИТЕЛЬНАЯ ПРОДОЛЖИТЕЛЬНОСТЬ ВКЛЮЧЕНИЯ)
• Описываемый аппарат имеет выходные характеристики типа "постоянный ток". ПВ%, следуя норме
EN60974-1 (@ 40°C в течение 10-минутного цикла) указаны в таблице :
X% @ I max X% @ I max
21% 160A 15% 160A
60% 100A 60% 80A
100% 90A 100% 70A
X% @ I max X% @ I max
TIG 168
TIG 200 (110V)
26% 180A 30% 120A
60% 115A 60% 90A
100% 100A 100% 80A
Примечание : испытания на нагрев проводились при комнатной температуре и ПВ% при 40 °C были
определены моделированием.
ДИСТАНЦИОННОЕ УПРАВЛЕНИЕ (ТОЛЬКО ДЛЯ TIG 200 И TIG 250)
Дистанционное управление работает в режимах TIG и MMA.
TIG 200 (230V)
X% @ I max X% @ I max
30% 200A 20% 200A
60% 140A 60% 125A
100% 125A 100% 110A
TIG 250
X% @ I max X% @ I max
33% 250A 24% 250A
60% 170A 60% 160A
100% 160A 100% 150A
ТЕХНИКА ЭЛЕКТРИЧЕСКИХ ПОДСОЕДИНЕНИЙ
Аппараты TIG 200 и TIG 250 DC оснащены разъёмами гнездового типа для дистанционного управления.
Специфический штепсель с 7 штырями (опция арт.045699) позволяет подключить ручное дистанционное
управление (RC) или ножное (PEd).
Для монтажа следуйте следующей схеме:
Ref.045699
Подключение
D : Контакт переключателя
C : Масса
B : Скользящий контакт (движок)
A : + 5В
Nb: величина на потенциометре должна быть
10KΩ
1- Включите аппарат
2- Подключите педаль или дистанционное управление к передней панели аппарата.
3- На табло мигает « No » (Ничего),
4- Выберите свой тип управления, поворачивая рукоятку регулировки силы тока :
No (Ничего) « RC » (Ручное управление) PEd (Педаль)
5- через 2 секунды неподвижности рукоятки, на табло фиксируется выбранный тип управления и затем
сновапоявляется величина сварочного тока
34/40
Page 35

Nb : если вы ошиблись, отключите дистанционное управление, аппарат покажет, что больше ничего не
подключено: « No ». Затем, подключите заново дистанционное управление и выберите нужный тип
управления.
Примечание: Этот выбор надо будет делать при каждом включении аппарата.
Функционирование
Ручное дистанционное управление (
опция арт.045675)
Дистанционное управление позволяет изменять мощность сварочного тока от минимальных значений (DC : 5A
/ AC : 10 / MMA : 10A) до тока, выбранного пользователем (табло).
В этой конфигурации, все режимы и функции остаются доступными и регулируемыми.
Педаль (
опция арт.045682)
:
Во всех режимах кроме « Spot », управление педалью позволяет изменять мощность сварочного тока от
минимальных значений (DC : 5A / AC : 10A / MMA : 10A) до тока, выбранного пользователем (табло).
В режиме TIG аппарат работает только в 2х-тактном режиме (режим 2T). К тому же увеличение и затухание
тока не регулируются аппаратом (недействующие функции), а пользователем с помощью педали.
В режиме spot управление педалью заменяет гашетку горелки (положение педали не влияет на ток).
УХОД ЗА АППАРАТОМ / СОВЕТЫ
• Уход за аппаратом должен производиться только компетентным специалистом.
• Отключить питание, выключив из розетки, и подождать остановки вентилятора перед тем, как работать
над аппаратом. Внутри аппарата напряжение и сила тока велики и опасны.
• Необходимо регулярно снимать корпус и сдувать пыль. Воспользуйтесь этим, чтобы проверить у
компетентного специалиста крепление контактных соединений с помощью инструмента с изоляционным
покрытием.
• Регулярно контролировать состояние провода питания. Если провод поврежден, то его надо заменить у
производителя, у сервисной службы или у квалифицированного специалиста, чтобы устранить опасность.
• Выходные отверстия аппарата не должны быть заслонены для свободного прохождения воздуха.
БЕЗОПАСНОСТЬ
Дуговая сварка может быть опасной и причинять тяжелые, или даже смертельные ранения.
Защитите себя и окружающих. Соблюдайте следующие инструкции по безопасности
Излучение дуги : Защититесь с помощью маски сварщика с фильтрами, соответствующими нормам
Дождь, водяной пар, Пользуйтесь вашим аппаратом в чистой среде (степень загрязнения ≤ 3),
EN 169 или EN 379.
:
влага : ровно поставив его на расстоянии свыше метра от свариваемой детали. Не
Удар током : Этот аппарат должен быть подключен только к однофазной розетке с 3 проводами,
использовать под дождем или снегом.
причем нулевой провод должен быть соединен с заземлением. Ни в коем случае не
трогать детали под напряжением.
Проверить, что сеть питания подходит для аппарата.
Падения : Не переносить аппарат над людьми или предметами.
Ожоги : Носить рабочую одежду из огнеупорной ткани (хлопка, спецовки или джинсовой
ткани). Работать в защитных рукавицах и фартуке из огнеупорной ткани. Защитить
окружающих, установив огнестойкие защитные экраны или предупредив их не
Опасность пожара : Устранить все возгарающиеся предметы из рабочего пространства. Не работать в
Испарения : Не вдыхать газы и испарения при сварке. Если варите в помещении, использовать
Дополнительные Любая сварка :
смотреть на дугу и соблюдать достаточную дистанцию.
присутствии воспламеняющегося газа.
аппарат в хорошо проветриваемом месте с вытяжкой.
меры - в местах с повышенной опасностью электрического удара,
предосторожности: - в закрытых помещениях,
- в присутствие возгараемых или взрывоопасных веществ,
всегда должна быть одобрена "ответственным специалистом" и выполняться в
присутствие людей, способных оказать первую помощь.
Необходимо использовать Технические средства защиты, описанные в Технической
35/40
Спецификации CEI/IEC 62081.
Page 36

Сварка в высоко расположенной зоне запрещена, кроме как на обезопасенных
1
21492 21480 21485
2
97124C 97101C
97192C
3
73094+
73094+
73095
4
73096+
73096+
73097
5
51126 51127 51127
6
51461 51461 51461
7
51032 51032 51021
8
51008 51010 51010
9
97174C 97102 97195C
10
5
1912 5
1912 51912+ 51944
рабочих площадках.
Люди, имеющие кардиостимуляторы, должны спросить совета врача перед тем,
как использовать эти аппараты.
Аппарат нельзя использовать для оттаивания канализаций.
В режиме TIG, перемещайте газовый баллон, соблюдая все меры предосторожности, т.к.
существует опасность, если баллон или вентиль баллона повреждены.
ДЕФЕКТЫ / ПРИЧИНЫ / УСТРАНЕНИЕ
Аппарат не выдает тока, и горит
желтая лампочка температурного
дефекта.
Экран горит, но аппарат не выдает
тока.
Во время включения экран показывает
Дефекты Причины Устранение
Нестабильная дуга.
Вольфрамовый электрод окисляется
и тускнеет в конце сварки.
Электрод плавится Ошибка полярности Проверьте, что зажим массы подключен к +
«PH» появляется на дисплее Проблема определения фазы
Включилась температурная за-щита
аппарата.
Кабель зажима массы или
держателя электрода не подключён
к аппарату.
Напряжение вне предела 230 В +/15% для TIG 168, и 85 В – 265В для
TIG 200 FV, или 400В (+/- 15%) для
TIG 250
Дефект вольфрамового электрода
Слишком сильная подача газа Снизить подачу газа
Зона сварки. Защитить зону сварки от сквозняков.
Дефект продувки газа в конце
сварки.
Подождать, когда закончиться время
охлаждения, примерно 2 мин. Лампочка
погаснет.
Проверить подключения.
Проверить электрическую про-водку.
Использовать вольфрамовый электрод
подходящего размера
Использовать правильно подгото-вленный
вольфрамовый электрод
Увеличить длительность продувки газа
Проверить и завинтить все соединения
газового баллона
Проверьте присутствие всех фаз. Затем
перезапустите аппарат для перепроверки.
PIÈCES DE RECHANGE / SPARE PARTS /ERSATZTEILE/ PIEZAS DE RECAMBIO/ ЗАПАСНЫЕ ДЕТАЛИ
10
3
4
5
6
6
2
9
1
8
7
N°
Cordon secteur Power supply cord Netzzuleitung Cordón de alimentación
Сетевой шнур
Carte électronique Principale Main Electronic Board Hauptplatine Tarjeta
electrónica principal Основная электронная плата
Bouton potentionmètre Potentiometer Button Potentiometerknopf Botón
potentiometro Кнопка потенциометра
Bouton codeur incrémental Encoder Button Einstelldrehknopf
Botón de incrementación Кнопка дифференциального шифратора
Connecteur gachette Trigger connector Brennerbuchse Conectador gatillo
Коннектор курка
Douilles Connectors Schweißkabelbuchse T50 Conectadores Коннекторы
Ventilateur Fan Ventilator 92 x 92 Ventilador Вентилятор
Grille ventilateur Fan frame Ventilatorgrill Rejilla ventilador Решетка
вентилятора
Carte d'affichage Display board Anzeigefeld Pantallia Дисплей
Clavier Keyboard Tastenfeld Teclado Кнопочное устройство
36/40
Désignation Ref.168 Ref.200 Ref.250
73095
73097
73095
73097
Page 37

DECLARATION DE CONFORMITE
Gys atteste que les postes de soudure TIG 168/200/250 sont fabriqués conformément aux exigences des
directives Basse tension 2006/95/CE du 12/12/2006, et aux directives CEM 2004/108/CE du 15/12/2004.
Cette conformité est établie par le respect des normes harmonisées EN60974-1 de 2005, EN 50445 de 2008,
EN 60974-10 de 2007.
Le marquage CE a été apposé en 2010.
DECLARATION OF CONFORMITY
The equipment described in this manual conforms to the standards of low voltage 2006/95/CE of 12/12/2006,
and the standards of CEM 2004/108/CE of the 15/12/2004.
This conformity respects the standards EN60974-1 of 2005, EN 50445 de 2008, EN60974-10 of 2007.
CE marking was added in 2010.
KONFORMITÄTSERKLÄRUNG
GYS erklärt, dass beschriebene Geräte in Übereinstimmung mit den Anforderungen der folgenden europäischen
Bestimmungen: Niederspannungsrichtlinie 2006/95/CE –12.12.2006 und EMV- Richtlinien 2004/108/CE –
15.12.2004 elektromagnetische Verträglichkeit- hergestellt wurden. Diese Geräte stimmen mit den
harmonisierten Normen EN60974-1 von 2005, EN 50445 von 2008, EN60974-10 von 2007 überein.
CE Kennzeichnung: 2010
DECLARACION DE CONFORMIDAD
GYS atesta que los aparatos de soldadura TIG 168/200/250 están fabricados en conformidad con las directivas
baja tensión 2006/95/CE del 12/12/2006, y las directivas compatibilidad electromecánica 2004/108/CE del
15/12/2004. Esta conformidad está establecida por el respeto a las normas EN 60974-1 de 2005, EN 50445 de
2008, EN 60974-10 de 2007.
El marcado CE fue fijado en 2010.
ДЕКЛАРАЦИЯ СООТВЕТСТВИЯ
Gys заявляет, что сварочные аппараты TIG 168-200-250 произведены в соответствии с директивами
Евросоюза 2006/95/CE о низком напряжении от 12/12/2006, а также с директивами CEМ 2004/108/CE от
15/12/2004.
Данное соответствие установлено в соответствии с согласованными нормами EN60974-1 2005 г, EN
50445 2008 г, EN 60974-10 2007 г.
Маркировка ЕС нанесенна в 2010 г.
01/07/10 Nicolas BOUYGUES
Société GYS Managing Director
134 bd des loges
53941 Saint Berthevin
ICONES/SYMBOLS/ ZEICHENERKLÄRUNG/ ICONOS/ ГРАФИЧЕСКИЕ СИМВОЛЫ
A
Ampères Amps Ampere Amperios Ампер
V
Volt Volt Volt Voltios Вольт
Hz
Hertz Hertz Hertz Hertz Герц
Soudage à l’électrode enrobée (MMA – Manual Metal Arc Electrode welding (MMA – Manual Metal Arc)
Schweißen mit umhüllter Elektrode (E-Handschweißen) Soldadura con electrodos refractarios (TIG – Tungsten
Inert Gas) Ручная дуговая сварка (MMA – Manual Metal Arc)
Soudage TIG (Tungsten Inert Gaz) TIG welding (Tungsten Inert Gas) TIG (WIG) Schweißen (Tungsten
Inert Gas) Soldadura TIG (Tungsten Inert Gaz) Сварка TIG (Tungsten Inert Gaz)
Convient au soudage dans un environnement avec risque accru de choc électrique. La source de courant ellemême ne doit toutefois pas être placée dans de tels locaux. Adapted for welding in environments with increased
risk of electrical shock. However, the welding machine should not be placed in such places. Geeignet für
Schweißarbeiten im Bereich mit erhöhten elektrischen Risiken. Trotzdem sollte die Schweißquelle nicht unbedingt
in solchen Bereichen betrieben werden. Adaptado a la soldadura en un entorno que comprende riesgos de
choque eléctrico. La fuente de corriente ella misma no debe estar situada dentro de tal locales. Подходит для
сварки в среде с повышенной опасностью удара электрическим током. Тем не менее не следует ставить
источник тока в такие помещения.
IP23
37/40
Protégé contre l’accès aux parties dangereuses des corps solides de diam >12,5mm et chute d'eau (30%
horizontal) Protected against access to dangerous parts by any solid body which is Ø > 12,5mm and against
rain-fall (30% horizontal) Gegen Eindringen von Körpern mit einem Durchmesser> 12,5mm und gegen
Sprühwasser geschützt (Einfallwinkel 30% horizontal) Protegido contra el acceso a las partidas peligrosas de
cuerpos solidos de diametro >12.5mm y las caídas de agua (30% horizontal) Защищен против доступа
твердых тел диаметром >12,5мм к опасным частям и от воды (30% горизонт.)
Page 38

Courant de soudage continu Welding direct current Gleichschweissstrom La corriente de soldadura es
Uo
U1
I1max
I1eff
EN60974
continua Сварка на постоянном токе
Alimentation électrique monophasée 50 ou 60Hz Single phase power supply 50 or 60Hz Einphasige
Netzversorgung mit 50 oder 60Hz Alimentación eléctrica monofásica 50 o 60 Hz Однофазное напряжение
50 или 60Гц
Tension assignée à vide Rated no-load voltage Leerlaufspannung Tensión asignada de vacío
Напряжение холостого хода
Tension assignée d’alimentation rated supply voltage Netzspannung Tensión de la red Напряжение
сети
Courant d’alimentation assigné maximal (valeur efficace) Rated maximum supply current (effective value)
Maximaler Versorgungsstrom (Effektivwert) Corriente maxima de alimentacion de la red Максимальный
сетевой ток (эффективная мощность)
Courant d’alimentation effectif maximal Maximum effective supply current Maximaler tatsächlicher
Versorgungsstrom Corriente de alimentación efectiva maxima Максимальный эффективный сетевой ток
L’appareil respecte la norme EN60974-1 The device complies with EN60974-1 standard relative to welding
-1
units Das Gerät entspricht der Norm EN60974-1 für Schweißgeräte El aparato está conforme a la norma
EN60974-1 referente a los aparatos de soldadura Аппарат соответствует европейской норме EN60974-1
Convertisseur monophasé transformateur-redresseur Single phase inverter, transformer-rectifier
X …%
I2 …%
U2 …%
Einphasiger statischer Frequenzumformer/ Trafo/ Gleichrichter Convertidor monofásico transformadorrectificador Однофазный инвертор, с трансформацией и выпрямлением.
X : Facteur de marche à …% X : duty cycle at …% X : Einschaltdauer ...% X : Factor de
funcionamiento de …% X : Продолжительность включения …%
I2 : courant de soudage conventionnnel correspondant I2 : corresponding conventional welding
current I2 : entsprechender Schweißstrom I2 : Corrientes correspondientes I2 : Токи,
соответствующие Х*
U2 : Tensions conventionnelles en charges correspondantes U2 : conventional voltages in
corresponding load U2 : entsprechende Arbeitsspannung U2 : Tensiones convencionales en carga
U2 : соответствующие сварочные напряжения*
Ventillé Ventilated Lüfter Ventilado Содержит встроенный вентилятор
Appareil conforme aux directives européennes The device complies with European Directive Gerät entspricht
europäischen Richtlinien El aparato está conforme a las normas europeas. Устройство соответствует
европейским нормам
Conforme aux normes GOST (Russie)
Conforms to standards GOST / PCT (Russia) in Ubereinstimmung mit der Norm GOST/PCT
Conforme a la normas GOST (PCT) (Rusia) Продукт соответствует стандарту России (РСТ)
L’arc électrique produit des rayons dangereux pour les yeux et la peau (protégez-vous !) The electric arc
produces dangerous rays for eyes and skin (protect yourself !) Der elektrische Lichtbogen verursacht Strahlungen
auf Augen und Haut (schützen Sie sich !) El arco produce rayos peligrosos para los ojos y la piel (¡ Protegase !)
Электрическая дуга производит опасные лучи для глаз и кожи (защитите себя!)
Attention, souder peut déclencher un feu ou une explosion. Caution, welding can result in fire or explosion.
Achtung : Schweißen kann Feuer oder Explosion verursachen Cuidado, soldar puede iniciar un fuego o una
explosión. Внимание! Сварка может вызвать пожар или взрыв.
Mise en veille/mise en marche standby/On Standby / Einschalten standby/ puesta en marcha
Включить/Режим ожидания
Le dispositif de déconnexion de sécurité est constitué par la prise secteur en coordination avec l'installation
électrique domestique. L'utilisateur doit s'assurer de l'accessibilité de la prise. . The mains disconnection mean is
the mains plug in combination with the house installation. Accessibility of the plug must be guaranteed by user.
Die Stromunterbrechung erfolgt durch Trennen des Netzsteckers vom häuslichen Stromnetz. Der Gerätanwender
sollte den freien Zugang zum Netzstecker immer gewährleisten El dispositivo de desconección de seguridad se
constituye de la toma de la red electrica en coordinación con la instalación eléctrica doméstica. El usuario debe
asegurarse de la accesibilidad del enchufe. Система отключения безопасности включается через сетевую
штепсельную розетку соответствующую домашней электрической установке. Пользователь должен
убедиться, что розетка доступна
Attention ! Lire le manuel d’instruction avant utilisation Caution ! Read the user manual Achtung : Lesen
Sie die Betriebsanleitung Cuidado, leer las instrucciones de utilización. Внимание ! Читайте инструкцию по
использованию
Produit faisant l'objet d'une collecte sélective- Ne pas jeter dans une poubelle domestique ! Separate
collection required – Do not dispose of in domestic waste bins Produkt für selektives Einsammeln. Werfen Sie
diese Geräte nicht in die häusliche Mülltonne. Este aparato es objeto de una recolección selectiva. No debe ser
tirado en en cubo doméstico. Продукт требует специальной утилизации. Не выбрасывать с бытовыми
отходами.
38/40
Page 39

SCHEMA ELECTRIQUE / CIRCUIT DIAGRAM / SCHALTPLAN
TIG 168
TIG 200 DC HF FV
TIG 250 DC TRI
39/40
Page 40

FACADE ET BRANCHEMENT / FRONT AND CONNECTIONS / FRONTSEITE UND ANSCHLÜSSE / CARA
1
2
3
4
5
6
7
8
9
Schweißstrom / Hot Start MMA
10
11
12
13
14
15
16
17
18
19
20
3
13 14 15
11,4 kg 17,3 kg
TIG
168
10 kg 14,3 kg
TIG
200
19 kg
TIG
250
DELANTERA Y CONEXIONES / ПЕРЕДНЯЯ ПАНЕЛЬ И ПОДКЛЮЧЕНИЕ
1
5
7
6
2
8
4
9
20
10
11
16
18
19
17
Connecteur de raccordement:
TIG : Connecteur de puissance
MMA: porte-électrode ou pince de masse
Connecting socket :
TIG : power connection
MMA : electrode holder or earth clamp
“-“Anschlussbuchse:
WIG: Brenner
MMA: Elektrodenhalter oder Masseklemme
Conectador de enlace :
TIG : conectador de potencia
MMA : porta-electrodo o pinza de masa
Коннектор:
TIG : Коннектор мощности
MMA: для держателя электрода или
зажима массы
Connecteur de raccordement:
TIG : Pince de masse torche
MMA: porte-électrode ou pince de masse
Connecting socket :
TIG : torch earth clamp
MMA : electrode holder or earth clamp
“+”Anschlussbuchse:
WIG : Brennermasseklemme
MMA: Elektrodenhalter oder
Masseklemme
Conectador de enlace:
TIG : Pinza de masa antorcha
MMA : porta-electrodo o pinza de masa.
Коннектор:
TIG : для зажима массы горелки
MMA: для держателя электрода или
зажима массы
TIG : connecteur gâchette torche
TIG : torch trigger socket WIG :
Brenneranschlussbuchse TIG :
conectador gatillo antorcha TIG :
коннектор курка горелки
Raccord gaz Gas connection
Gasanschluss Conectador gas
Подключение газа
Connecteur commande à distance (TIG
200)
Remote control connector (TIG
200) Fernsteuerunganschluss (TIG
200) Conector mando a distancia (TIG
200) Коннектор дистанционного
управления (TIG 200)
12
Bouton de mise en marche/ veille
Standby button Standby Taste
Botón de espera Кнопка
включить/выключить
Afficheur + indicateur d’unités
Display + unit indicators
Digitale Anzeige Pantalla +
indicador de unidades Дисплей +
индикатор единиц
Bouton de sauvegarde des paramètres
TIG TIG parameters save button
WIG Parameter Speichertaste Botón
de salvaguarda de los parametros TIG
Кнопка сохранения параметров TIG
Bouton de rappel des paramètres TIG
TIG parameters recall button WIG
Parameter Abruftaste Botón de llamada
de los parametros TIG Кнопка
напоминания параметров TIG
Voyant de defaut thermique
Thermal default light Thermische
Warnleuchte Indicador luminoso de
defecto térmico Лампочка
термического дефекта
Bouton de réglage du Pré-GAZ TIG
TIG - Pre-gas setting button WIG –
Gasvorströmung- Einstelltaste Botón de
reglaje del Pre-gas TIG Кнопка
регулировки подачи газа TIG
Bouton de réglage du temps de monté
du courant-TIG TIG – Current
increasing time setting button WIG –
Stromanstieg-Einstelltaste Botón de
reglaje del tiempo de subida de la
corriente - TIG Кнопка регулировки
времени увеличения тока TIG
Bouton de réglage de la fréquence-TIG
pulse Pulse TIG – Frequency setting
button Puls WIG – Frequenz
Einstelltaste
frecuencia - TIG pulse Кнопка
регулировки частоты TIG pulse
Bouton de réglage du courant froid
TIG/ Hotstart MMA Cold current TIG /
Hot Start MMA setting button Zweiter
Botón de reglaje de la
Einstelltaste Botón de reglaje de la
corriente fría TIG/ Hotstart MMA
Кнопка регулировки слабого тока TIG/
Hotstart MMA
Potentiomètre de réglage du temps
évanouisseur TIG TIG – Down slope
time setting potentiometer WIG –
Stromabsenkung Einstellpotentiometer
Potentiometro de reglaje del tiempo de
desvanecimiento TIG Потенциометр
регулировки времени снижения тока
TIG
Bouton de réglage du temps de PostGAZ TIG TIG – Post-gas time setting
button WIG – GasnachströmungEinstelltaste Botón de reglaje del
tiempo de Post-GAZ TIG Кнопка
регулировки времени продувки газа TIG
Bouton de choix du procédé de
soudage Welding mode choice button
Wahltaste für Schweißmodus Botón
de elección del proceso de soldadura
Кнопка выбора способа сварки
Bouton de choix du comportement de
la gâchette TIG TIG trigger behaviour
choice button WIG Taktwahltaste
Botón de elección del comportamiento del
gatillo TIG Кнопка выбора куркового
регулирования TIG
Molette multifonctions de réglage des
paramètres
multifunction knob
Drehknopf Rueda multifuncional de
reglaje de los parametros
Многофункциональный тумблер для
регулировки параметров
Bouton de choix des options de
soudage TIG TIG welding options
choice button WIG Schweißwahltaste
Botón de elección de las opciones de
soldadura TIG Кнопка выбора
вариантов сварки TIG
Parameters setting
Parameterwahl-
40/40
7,8 kg
 Loading...