

Page 1

FR 02-09 / 58-62
EN 10-17 / 58-62
DE 18-25 / 58-62
ES 26-33 / 58-62
RU 34-41 / 58-62
NL 42-49 / 58-62
IT 50-57 / 58-62
WIRELESS
BATTERY TESTER
BTW 6/12 V
TESTEUR DE BATTERIE
BATTERY TESTER
BATTERIE-TESTER
PROBADOR DE BATERÍA
ТЕСТЕР БАТАРЕЙ
ACCU TESTER
TESTER DI BATTERIA
www.gys.fr
V1 - 04/09/2024
Page 2

Manuel
d’utilisation
PRÉSENTATION DU PRODUIT
Notice originale
• Test batterie
BTW 6/12 V
- Test état de santé de la batterie
- Batterie de test CCA
- Test résistance interne de la
batterie
- Test tension batterie et état de
charge
• Surveillance de la forme d’onde
• Test de démarrage
• Test de l’alternateur.
CARACTÉRISTIQUES TECHNIQUES
Tension d’entrée : CC 4.5 V-16 V
Température de fonctionnement : -40-80°C
(-40-170°F)
Boîtier : IP65
Fonction : Protection intégrée contre les
courts-circuits et les inversions de polarité.
RACCORDEMENT
Brancher la pince rouge à la borne positive
de la batterie et la pince noire à la borne
négative de la batterie. La LED du testeur
devient rouge.
2
Page 3

Manuel
d’utilisation
FONCTIONNEMENT DE L’APPLICATION
Télécharger l’application via le QR code
situé en 1ère page de cette notice puis
ouvrir l’application.
Notice originale
BTW 6/12 V
Connexion au Bluetooth
Lors de la 1ère utilisation, cliquer sur
dans le coin supérieur gauche de l’écran,
le logo est gris, indiquant qu’aucun appareil
n’est connecté.
Toucher «BTW 6V/12V» pour se connecter.
Le logo devient bleu, indiquant que
l’appareil est connecté. La LED sur le
testeur devient bleue également.
FR
3
Page 4

Manuel
d’utilisation
Notice originale
BTW 6/12 V
Connexion automatique :
Une fois la 1ère
connexion eectuée, la connexion devient
automatique dès l’ouverture de l’application
et à partir du moment où le testeur est branché sur une batterie (> 4.5 V).
Créer une nouvelle batterie
Appuyer sur le bouton en haut à droite
de l’écran.
La fenêtre
Gestion de la Batterie
s’ouvre.
Elle répertorie toutes les batteries déjà créées.
Toucher pour ajouter une
nouvelle batterie.
1. Entrer le nom, la
tension nominale et la
1
2
3
4
position de la batterie.
2.
Type de batterie :
batterie de moto,
batterie ordinaire,
batterie plate AGM,
batterie d’enroulement
AGM, batterie GEL.
Le modèle, le type,
la norme, la capacité de la batterie
et le courant de
démarrage sont généralement indiqués
sur l’étiquette de la
batterie.
4
3.
Norme de batterie :
Vérier la norme de
la batterie.
4.
Entrer la valeur
de courant CCA
comprise entre 10 et
2000.
Page 5

Manuel
d’utilisation
5.
Enn cliquer sur .
Notice originale
BTW 6/12 V
Sélectionner la batterie à tester
Toucher la batterie à tester pour la sélectionner. L’icône permet de savoir quelle
batterie est sélectionnée
TEST BATTERIE
Toucher l’onglet et lancer le test de
la batterie en appuyant sur «TEST».
Avant d’eectuer un test standard,
assurez-vous que le moteur est éteint.
Le Test Batterie est constitué de 4 tests :
1. Test état de santé de la batterie
2. Batterie de test CCA
3. Test résistance interne de la batterie
4. Test tension batterie et état de charge
FR
5
Page 6

Manuel
d’utilisation
2
Notice originale
BTW 6/12 V
1
3
FORME D’ONDE
4
Surveillance de la forme d’onde de la tension de la batterie.
Toucher l’onglet
et lancer le test de
la batterie en appuyant sur
6
.
Page 7

Manuel
d’utilisation
Notice originale
BTW 6/12 V
TEST DE DÉMARRAGE
Toucher l’onglet et lancer le test de
la batterie en appuyant sur .
Suivre les indications pour obtenir le résultat.
Le moteur de la voiture doit être
démarré pendant le test.
FR
7
Page 8

Manuel
d’utilisation
TEST DE L’ALTERNATEUR
Notice originale
BTW 6/12 V
Test du système de charge de la batterie.
Ne pas éteindre le moteur pendant le
test de charge.
Partager le rapport de test de la batterie
À tout moment lors d’un test,
toucher pour accéder à la
fenêtre de partage.
Il est alors possible de partager le test réalisé par mail :
- sous forme de capture
d’écran.
- sous forme de texte.
Possibilité de partager tous les tests réalisés en
touchant «Setting» puis «Share Report».
8
Page 9

Manuel
d’utilisation
Notice originale
BTW 6/12 V
CONDITION DE GARANTIE
La garantie couvre les défauts de fabrication
pendant 2 ans à compter de la date d’achat
(pièces et main d’œuvre).
La garantie ne couvre pas :
• Dommages de transport.
• Usure normale des pièces (ex. : câbles,
colliers, etc..).
• Les dommages dus à une mauvaise
utilisation (erreur d’alimentation, chute de
matériel, démontage).
• Défaillances liées à l’environnement (pollution, rouille, poussière).
En cas de panne, retourner l’appareil à
votre distributeur avec :
- La preuve d’achat (ticket de caisse etc...)
- Une description du défaut signalé
FR
9
Page 10
Operating
manual
PRODUCT OVERVIEW
Translation of the original
instructions
BTW 6/12 V
• Battery test
- Battery health test
- Battery CCA test
- Battery internal resistance test
- Battery voltage and state-ofcharge test
• Waveform monitoring
• Start-up test
• Alternator test.
TECHNICAL SPECIFICATIONS
Input voltage: CC 4.5 V-16 V
Operating temperature: -40-80°C (-40170°F)
Casing: IP65
Function: This unit has integrated short circuit and reverse polarity protection.
CONNECTION
Connect the red clamp to the positive battery terminal and the black clamp to the
negative battery terminal. The LED on the
tester will turn red.
10
Page 11

Operating
manual
OPERATION OF THE APPLICATION
Download the software via the QR code
located on the rst page of this manual,
and open the application.
Translation of the original
instructions
BTW 6/12 V
Connecting to Bluetooth
On rst use, click on in the upper left corner of the screen; the icon is grey, which
indicates that no device is connected
Touch «BTW 6V/12V» to connect.
The logo will turn blue, indicating that
the device is connected. The LED on the
tester will also turn blue.
EN
11
Page 12

Operating
manual
Translation of the original
instructions
BTW 6/12 V
Automatic connection:
After the initial
connection is successful, the link is made
automatically as soon as the application
is opened and the tester is connected to a
battery (>4.5 V).
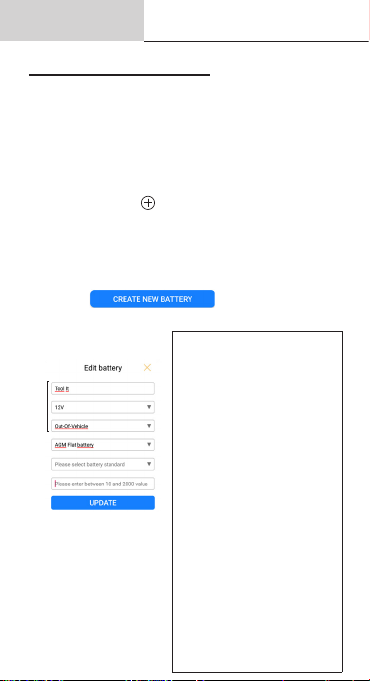
Setting up a dierent battery
Press the button on the top right of the
screen.
The
Battery Management
window will open.
It will list all the batteries that have already
been added.
Touch to create a new battery.
1. Enter the name,
voltage rating, and
1
2
3
4
location of the battery.
2.
Battery type:
motorbike battery,
regular lead-acid bat-
tery, AGM at battery,
AGM spiral battery,
GEL battery.
The model, type,
standard, capacity,
and starting current
are usually indicated
on the battery label.
3.
Battery standard:
Check the battery
standard.
4.
Enter the CCA current value between
12
10 and 2000.
Page 13

Operating
manual
5.
Then click on to nish.
Translation of the original
instructions
BTW 6/12 V
Selecting the battery to be tested
Tap the battery that you want to test from
the list. The
icon shows which battery is
currently selected
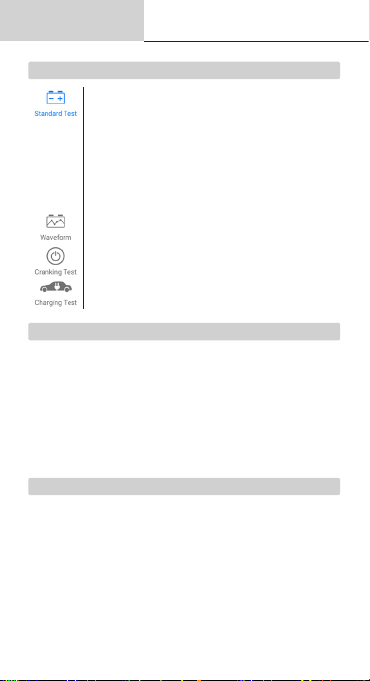
BATTERY TEST
Touch the icon and start the battery
test by pressing «TEST».
Before performing a test, ensure that
the engine is switched o.
The Battery Test consists of 4 dierent
checks:
1. Battery health test
2. Battery CCA test
3. Battery internal resistance test
4. Battery voltage and state-of-charge test
EN
13
Page 14

Operating
manual
Translation of the original
instructions
2
BTW 6/12 V
1
3
WAVEFORM
Monitoring the battery voltage waveform.
Touch the
test by pressing
icon and start the battery
.
14
4
Page 15

Operating
manual
Translation of the original
instructions
BTW 6/12 V
START-UP TEST
Touch the icon and start the battery
test by pressing .
Follow the instructions to get the results.
The car’s engine must be
started during testing.
EN
15
Page 16

Operating
manual
ALTERNATOR TEST
Translation of the original
instructions
Testing the battery charging system.
Do not switch o the engine during
the load test.
Share the battery test report
At any time during a test,
touch to access the sharing window.
The results of the test can
then be shared by email:
- as a screenshot.
- in text format.
You can share all test reports by selecting
«Setting» and then «Share Report».
BTW 6/12 V
16
Page 17

Operating
manual
WARRANTY CONDITIONS
Translation of the original
instructions
BTW 6/12 V
The warranty covers any defects or manufacturing faults for two years from the date of
purchase (parts and labour).
The warranty does not cover:
• Transport damage.
• Normal wear and tear of parts (e.g. :
cables, clamps, etc).
• Damage due to misuse (incorrect power
supply, damage caused by dropping equipment, dismantling).
• Environmental failures (pollution, rust,
dust).
In the event of a failure, please return the
appliance to your distributor with:
- Proof of purchase (receipt, etc.)
- A description of the reported fault
EN
17
Page 18

Betriebsanleitung
PRODUKTPRÄSENTATION
Übersetzung der
Originalbetriebsanleitung
BTW 6/12 V
• Test Batterie
- Test Funktionszustand der
Batterie
- CCA-Testbatterie
- Test interner Widerstand der
Batterie
- Test Batteriespannung und
Ladezustand
• Überwachung der Wellenform
• Starttest
• Lichtmaschinentest.
TECHNISCHE EIGENSCHAFTEN
Eingangsspannung: CC 4,5 V-16 V
Betriebstemperatur: -40-80 °C (-40-170 °F)
Gehäuse: IP65
Funktion: Geschützt gegen Kurzschluss
und Verpolung.
ANSCHLUSS
Verbinden Sie die rote Klemme mit dem positiven Anschluss der Batterie, und die schwarze Klemme mit dem negativen Anschluss der
Batterie. Die LED des Testgeräts wird rot.
18
Page 19

Betriebsanleitung
BETRIEB DER ANWENDUNG
Laden Sie die App über den QR-Code auf
der ersten Seite dieser Anleitung herunter
und önen Sie dann die App.
Übersetzung der
Originalbetriebsanleitung
BTW 6/12 V
Bluetooth-Anschluss
Klicken Sie bei der ersten Verwendung auf
oben rechts im Bildschirm. Das Logo bleibt
grau solange kein Gerät verbunden ist.
Berühren Sie „BTW 6V/12V“ für die Verbindung.
Das Logo wird blau sobald das Gerät verbunden ist. Ebenso wird die LED auf dem
Testgerät blau.
Automatische Verbindung:
Nach der 1. Ver-
bindung wird die Verbindung automatisch
hergestellt, sobald die Anwendung geönet
wird und das Testgerät an eine Batterie (>
4,5 V) angeschlossen ist.
DE
19
Page 20

Betriebsanleitung
Übersetzung der
Originalbetriebsanleitung
BTW 6/12 V
Eine neue Batterie erstellen
Drücken Sie auf die Taste oben rechts im
Bildschirm.
Das Fenster
Verwaltung der Batter
ie önet
sich.
Darin werden alle schon erstellten Batterien
aufgelistet.
Berühren Sie , um eine
neue Batterie hinzuzufügen.
1. Geben Sie den
Namen, die Nennspannung und die Posi-
1
2
3
4
tion der Batterie ein.
2.
Batterietyp:
Motorbatterie,
gewöhnliche Batterie,
AGM-Flachbatterie,
Spiralbatterie,
GEL-Batterie.
Modell und Typ,
Standard, Batteriekapazität und
Startstrom sind in
der Regel auf dem
Etikett der Batterie
angegeben.
3.
Batterie-Standard:
Batterie-Standard
prüfen.
4.
Geben Sie den
CCA-Stromwert
zwischen 10 und
2000 ein.
5.
Dann klicken Sie auf .
20
Page 21

Betriebsanleitung
Übersetzung der
Originalbetriebsanleitung
BTW 6/12 V
Auswahl der zu testenden Batterie
Berühren Sie die zu testende Batterie, um
sie auszuwählen. Das Symbol zeigt an,
welche Batterie ausgewählt ist
BATTERIETEST
Berühren Sie die Registerkarte und
starten Sie den Test der Batterie, indem Sie
auf „TEST“ drücken.
Bevor Sie einen Standardtest
durchführen, vergewissern Sie sich,
dass der Motor ausgeschaltet ist.
Der Batterietest besteht aus 4 Tests:
1. Test Funktionszustand der Batterie
2. CCA-Testbatterie
3. Test interner Widerstand der Batterie
4. Test Batteriespannung und Ladezustand
DE
21
Page 22

Betriebsanleitung
2
Übersetzung der
Originalbetriebsanleitung
1
BTW 6/12 V
3
WELLENFORM
4
Überwachung der Wellenform der Batteriespannung.
Berühren Sie die Registerkarte
starten Sie den Test der Batterie, indem Sie
auf
drücken.
22
und
Page 23

Betriebsanleitung
STARTTEST
Übersetzung der
Originalbetriebsanleitung
BTW 6/12 V
Berühren Sie die Registerkarte und
starten Sie den Test der Batterie, indem Sie
auf drücken.
Befolgen Sie die Anweisung, um zum Ergebnis zu kommen.
Der Fahrzeugmotor muss während
des Tests gestartet sein.
DE
23
Page 24

Betriebsanleitung
LICHTMASCHINENTEST
Übersetzung der
Originalbetriebsanleitung
Test Ladesystem der Batterie.
Den Motor während des Ladetests
nicht ausschalten.
Weitergabe des Batterietestberichts
Bei einem Test ständig
berühren, um das Freigabefenster aufzurufen.
Der ausgeführte Test kann
auch per E-Mail weitergegeben werden:
- mit Bildschirmerfassung.
- in Textform.
Tests können geteilt werden, indem Sie auf
„Setting“ und dann auf „Share Report“ tippen.
BTW 6/12 V
24
Page 25

Betriebsanleitung
GARANTIEBEDINGUNG
Übersetzung der
Originalbetriebsanleitung
BTW 6/12 V
Die Garantie deckt Herstellungsfehler für
2 Jahre ab dem Kaufdatum ab (Teile und
Arbeit).
Die Garantieleistung erfolgt nicht bei Defekten, die durch:
• Transportschäden.
• Normalen Verschleiß von Teilen (Bsp. :
Kabel, Schellen usw.) entstehen.
• Schäden durch unsachgemäßen Gebrauch (fehlerhafte Stromversorgung, Sturz
von Material, Demontage).
• Versagen aufgrund der Umgebung (Verschmutzung, Rost, Staub).
Bei einem Ausfall schicken Sie das Gerät
an Ihren Händler zurück und legen Folgendes bei:
- Den Kaufbeleg (Quittung, usw.)
- Beschreibung des gemeldeten Defekts
DE
25
Page 26

Manual de uso
PRESENTACIÓN DEL PRODUCTO
Traducción de las
instrucciones originales
BTW 6/12 V
• Prueba de la batería
- Prueba de estado de la batería
- Batería de prueba CCA
- Prueba de resistencia de la
batería interna
- Prueba de tensión y estado de
carga de la batería
• Control de la forma de onda
• Prueba de arranque
• Prueba del alternador.
CARACTERÍSTICAS TÉCNICAS
Tensión de entrada : CC 4.5 V-16 V
Temperatura de funcionamiento : -40-80°C
(-40-170°F)
Carcasa : IP65
Función : Protección integrada contra cortocircuitos y polaridad inversa.
CONEXIÓN
Conecte el clip rojo al terminal positivo de
la batería y el clip negro al terminal negativo de la batería. El LED del comprobador
se pone en rojo.
26
Page 27

Manual de uso
Traducción de las
instrucciones originales
BTW 6/12 V
FUNCIONAMIENTO DE LA APLICACIÓN
Descargue la aplicación a través del código QR que aparece en la primera página
de este folleto y luego abra la aplicación.
Conexión Bluetooth
Cuando se utiliza por primera vez, se pulsa
en la esquina superior izquierda de la
pantalla, el logotipo es gris, lo que indica
que no hay ningún dispositivo conectado.
Toque «BTW 6V/12V» para iniciar la sesión.
El logotipo se vuelve azul, lo que indica
que el dispositivo está conectado. El LED
del el probador también se vuelve azul.
ES
27
Page 28

Manual de uso
Traducción de las
instrucciones originales
BTW 6/12 V
Conexión automática :
Una vez realizada la
primera conexión, ésta se vuelve automática
en cuanto se abre la aplicación y se conecta
el comprobador a una batería (> 4,5 V).
Crear una nueva batería
Pulse el botón situado en la parte superior derecha de la pantalla.
Se abre la
ventana de gestión de
la batería.
Enumera todas las pilas ya creadas.
Toca para añadir una
nueva batería.
1. Introduzca el
nombre, la tensión
nominal y la posición
1
2
3
4
de la batería.
2.
Tipo de batería :
batería de moto,
batería ordinaria,
batería plana AGM,
batería de bobinado
AGM, batería GEL.
El modelo, el tipo,
la norma, la capacidad de la batería y la
corriente de arranque
suelen estar indicadas en la etiqueta de
la batería.
3.
Estándar de la batería: Compruebe el
nivel de la batería.
4.
Introduzca el valor
de la corriente CCA
entre 10 y 2000.
28
Page 29

Manual de uso
5.
Por último, haga clic en
Traducción de las
instrucciones originales
BTW 6/12 V
.
Seleccione la batería que se va a comprobar
Toque la batería a probar para seleccionarla. El icono muestra qué batería está
seleccionada.
PRUEBA DE LA BATERÍA
Toque la pestaña e inicie la prueba
de la batería pulsando «TEST».
Antes de realizar una prueba estándar,
asegúrese de que el motor está apagado.
La prueba de la batería consta de 4 pruebas:
1. Prueba de estado de la batería
2. Batería de prueba CCA
3. Prueba de resistencia de la batería
interna
4. Prueba de tensión y estado de carga
de la batería
ES
29
Page 30

Manual de uso
Traducción de las
instrucciones originales
2
BTW 6/12 V
1
3
FORMA DE ONDA
4
Monitorización de la forma de onda de la
tensión de la batería.
Toca la pestaña
batería pulsando
e inicia el test de
.
30
Page 31

Manual de uso
PRUEBA DE ARRANQUE
Traducción de las
instrucciones originales
BTW 6/12 V
Toca la pestaña e inicia el testde
batería pulsando .
Siga las instrucciones para obtener el
resultado.
El motor del coche debe ser
se inició durante la prueba.
ES
31
Page 32

Manual de uso
PRUEBA DEL ALTERNADOR
Traducción de las
instrucciones originales
BTW 6/12 V
Prueba del sistema de carga de la batería
No apague el motor durante la prueba
de carga.
Compartir el informe de la prueba de la
batería
En cualquier momento durante una prueba, toque
para acceder a la ventana
de compartición.
A continuación, es posible
compartir la prueba por correo electrónico:
- como captura de pantalla.
- en forma de texto.
Posibilidad de compartir todas las pruebas
realizadas tocando «Setting» y luego «Share
Report».
32
Page 33

Manual de uso
CONDICIONES DE LA GARANTÍA
Traducción de las
instrucciones originales
BTW 6/12 V
La garantía cubre los defectos de fabricación durante 2 años a partir de la fecha de
compra (piezas y mano de obra).
La garantía no cubre :
• Daños de transporte.
• El desgaste normal de las piezas (por
ejemplo : cables, abrazaderas, etc.).
• Daños por mal uso (alimentación incorrecta, caída del equipo, desmontaje).
• Fallos ambientales (contaminación, óxido,
polvo).
En caso de avería, devuelva el aparato a
su distribuidor con :
- Prueba de compra (recibo, etc.)
- Una descripción del defecto denunciado
ES
33
Page 34

Инструкция по
применению
ОПИСАНИЕ АППАРАТА
Перевод оригинальных
инструкций
• Тест аккумулятора
- Тест работоспособности
аккумулятора
- Тест аккумулятора CCA
- Тест для проверки
внутреннего сопротивления
аккумулятора.
- Тест напряжения и
состояния заряда
аккумулятора
• Контроль формы волны
• Тест запуска
• Проверка генератора.
ТЕХНИЧЕСКИЕ ХАРАКТЕРИСТИКИ
Входное напряжение : ПОСТОЯННЫЙ
ТОК 4,5 В-16 В
Рабочая температура -40-80°C (-40-170°F)
Аппарат IP65
Функция Встроенная защита от короткого
замыкания и обратной полярности.
ПОДКЛЮЧЕНИЕ
Подключите красный зажим к положительной клемме аккумулятора, а черный
зажим - к отрицательной клемме аккумулятора. Светодиод на тестере загорается
красным.
34
BTW 6/12 V
Page 35

Инструкция по
применению
КАК РАБОТАЕТ ПРИЛОЖЕНИЕ
Загрузите приложение с помощью QRкода на первой странице этого буклета,
а затем откройте приложение
Перевод оригинальных
инструкций
BTW 6/12 V
Соединение Bluetooth
При первом использовании нажмите на
в левом верхнем углу экрана, логотип будет серым, что указывает на отсутствие
подключенного устройства.
Нажмите «BTW 6V/12V», чтобы войти в
систему.
Логотип становится синим, указывая на
то, что устройство подключено Светодиод на тестере также становится синим.
RU
35
Page 36

Инструкция по
применению
Перевод оригинальных
инструкций
BTW 6/12 V
Автоматическое подключение :
После
первого подключения соединение становится автоматическим, как только открывается приложение и тестер подключается к батарее (> 4,5 В).
Создайте «новый аккумулятор»
Нажмите кнопку в правом верхнем
углу экрана.
аккумул
Откроется о
кно управления
ятора. В нем перечислены все
уже созданные батареи.
Нажмите , чтобы добавить новый аккумулятор.
1.
Введите название,
номинальное напря-
1
2
3
4
жение и положение
аккумулятора.
2.
Тип аккумулятора :
аккумулятор мотоцикла, обычный аккумулятор, AGM аккумулятор,
Модель, тип,
стандарт, емкость
аккумулятора и
пусковой ток обычно указываются на
этикетке аккумулятора.
AGM обмоточный
аккумулятор, GEL аккумулятор .
3.
Стандарт аккумулятора : Проверьте стандарт аккумулятора
36
Page 37

Инструкция по
применению
Перевод оригинальных
инструкций
4.
Введите значение
BTW 6/12 V
тока CCA в диапазоне
от 10 до 2000.
5.
Наконец, нажмите на кнопку
.
Выберите аккумулятор для проверки
Нажмите на тестируемый аккумулятор, чтобы его выбрать. Значок показывает, какой аккумулятор выбран
ТЕСТ АККУМУЛЯТОРА
Нажмите на вкладку и запустите
проверку аккумулятора, нажав «TEST».
Перед выполнением стандартного
теста убедитесь, что двигатель
выключен.
RU
37
Page 38

Инструкция по
применению
Перевод оригинальных
инструкций
BTW 6/12 V
Тест батареи состоит из 4 тестов:
1. Тест работоспособности аккумулятора
2. Тест аккумулятора CCA
3. Тест для проверки внутреннего со-
противления аккумулятора.
4. Тест напряжения и состояния заряда
аккумулятора
1
2
3
ФОРМА ВОЛНЫ
4
Контроль формы волны напряжения аккумулятора.
Нажмите на вкладку и запустите проверку аккумулятора, нажав
38
.
Page 39

Инструкция по
применению
Перевод оригинальных
инструкций
BTW 6/12 V
ТЕСТ ЗАПУСКА
Нажмите на вкладку и запустите
проверку аккумулятора, нажав .
Следуйте инструкциям для получения результата.
Двигатель автомобиля должен
быть заведен во время теста.
RU
39
Page 40

Инструкция по
применению
ТЕСТИРОВАНИЕ ГЕНЕРАТОРА
Перевод оригинальных
инструкций
BTW 6/12 V
Проверка системы зарядки аккумулятора.
Не выключайте двигатель во время
теста нагрузки.
Предоставьте отчет о тестировании
батареи
В любой момент во время
теста нажмите , чтобы
открыть окно совместного
доступа.
Затем можно поделиться
тестом по электронной
почте:
- в виде скриншота.
- в текстовом виде.
Возможность поделиться всеми проведенными тестами, нажав «Настройка», затем
«Поделиться отчетом».
40
Page 41

Инструкция по
применению
УСЛОВИЕ ГАРАНТИИ
Перевод оригинальных
инструкций
BTW 6/12 V
Гарантия распространяется на любой заводской дефект или брак в течение 2х лет
с даты покупки изделия (запчасти и рабочая сила).
Гарантия не распространяется на:
• Транспортные повреждения.
• Нормальный износ деталей (напр. : кабели, зажимы и т.д.)
• Повреждение в результате неправильного использования (неправильное
электропитание, падение оборудования,
демонтаж).
• Неисправности, связанные с окружающей средой (загрязнение, ржавчина,
пыль).
В случае поломки верните прибор дистрибьютору с :
- Доказательство покупки (чек и т.д.)
- Описание заявленного дефекта
RU
41
Page 42

Gebruikershandleiding
PRESENTATIE VAN HET PRODUCT
Vertaling van de originele
handleiding
BTW 6/12 V
• Test accu
- Test van de staat van de accu
- CCA test
- Test van de interne weerstand
van de accu
- Test van de accu-spanning en
de laadstatus
• Controle wave form
• Test startcapaciteit
• Dynamo test.
TECHNISCHE EIGENSCHAPPEN
Ingaande spanning : CC 4.5 V-16 V
Gebruikstemperatuur : -40~80°C (-40170°F)
Behuizing : IP65
Functie : Geïntegreerde beveiliging tegen
kortsluiting en polariteitsomwisseling.
AANSLUITING
Sluit de rode klem aan op de positieve (+)
pool van de accu, en de zwarte klem op
de negatieve (-) pool van de accu. Het
LED-lampje van de tester licht rood op.
42
Page 43

Gebruikershandleiding
FUNCTIONEREN VAN DE APP
Download de app via de QR code op de
eerste pagina van deze handleiding, en
open vervolgens de app.
Vertaling van de originele
handleiding
BTW 6/12 V
Bluetooth verbinding tot stand brengen
Klik, tijdens het eerste gebruik op links
bovenin het scherm, het logo is grijs, wat
aangeeft dat er geen enkel apparaat geconnecteerd is.
Druk op «BTW 6V/12V» om een verbinding
tot stand te brengen.
Het logo wordt blauw, wat aangeeft dat
het apparaat geconnecteerd is. Het
LED-lampje op de tester wordt eveneens
blauw.
NL
43
Page 44
Gebruikershandleiding
Vertaling van de originele
handleiding
Automatische verbinding : Nadat u de eerste
keer de connectie tot stand heeft gebracht zal
deze automatisch opstarten na het openen
van de app, en vanaf het moment waarop de
tester is aangesloten op een accu (> 4.5 V).
Een nieuwe accu creëren
Druk op de knop rechts boven in het scherm.
Het venster
Beheer van de Accu wo
rdt geopend.
Deze toont een lijst van alle reeds gecreëerde
accu’s.
Druk op om een nieuwe
accu toe te voegen.
1. Geef de naam, de
nominale spanning
en de positie van de
1
2
3
4
accu in.
2.
Type accu :
motor accu’s,
normale loodzuur
accu’s, AGM accu’s
en AGM Spiraal Cell
accu’s, Gel accu’s.
Het model, het type,
de norm, de accu-capaciteit en de opstartstroom worden
over het algemeen
vermeld op het etiket
van de accu.
44
3.
Norm van de accu :
Verieer de norm van
de accu.
4.
Geef de waarde
van de CCA stroom
in, tussen 10 en 2000.
BTW 6/12 V
Page 45

Gebruikershandleiding
5.
Klik dan op .
Vertaling van de originele
handleiding
BTW 6/12 V
Kies de accu die u wilt testen
Druk op de te testen accu om uw keuze te
bevestigen. Het icoon toont aan welke
accu is gekozen
ACCU TEST
Druk op de tab en start de accu-test
met een druk op «TEST».
Voordat er een standaard test uitgevoerd wordt moet u zich ervan verzekeren dat de motor uitstaat.
De Accu Test bestaat uit 4 testen :
1. Test van de staat van de accu
2. CCA test
3. Test van de interne weerstand van de
accu
4. Test van de accu-spanning en de
laadstatus
NL
45
Page 46

Gebruikershandleiding
Vertaling van de originele
handleiding
2
BTW 6/12 V
1
3
WAVE FORM
Controle van de wave form van de accu-spanning.
Druk op de tab
met een druk op
en start de accu-test
.
46
4
Page 47

Gebruikershandleiding
TEST STARTCAPACITEIT
Vertaling van de originele
handleiding
BTW 6/12 V
Druk op de tab en start de accu-test
met een druk op .
Volg de aanwijzingen om de resultaten te
verkrijgen.
De motor van het voertuig moet worden gestart tijdens de test.
NL
47
Page 48

Gebruikershandleiding
DYNAMO TEST
Vertaling van de originele
handleiding
Test van het laad-systeem van de accu.
Schakel de motor niet uit tijdens de
laadtest.
BTW 6/12 V
Het testrapport delen.
U kunt op ieder moment
tijdens het uitvoeren van
een test drukken op om
toegang te krijgen tot het
deelscherm.
Het is dan mogelijk om de
gerealiseerde test per mail te
versturen :
- in de vorm van een
screenshot.
- in de vorm van tekst.
Mogelijkheid om alle gerealiseerde testen te
versturen door te drukken op «Setting» en vervolgens «Share Report».
48
Page 49

Gebruikershandleiding
GARANTIE VOORWAARDEN
Vertaling van de originele
handleiding
BTW 6/12 V
De garantie dekt alle fabricage-fouten gedurende 2 jaar, vanaf de datum van aankoop
(onderdelen en arbeidsloon).
De garantie dekt niet :
• Schade tijdens het transport.
• Normale slijtage van de onderdelen (bv: :
kabels, klemmen enz...)
• Schade die is veroorzaakt door verkeerd
gebruik (verkeerde voeding, vallen, demonteren van onderdelen).
• Defecten ontstaan door invloeden van de
omgeving (vervuiling, roest, stof).
In geval van uitval of storing kunt u het apparaat terugbrengen naar uw distributeur,
samen met:
- Het aankoopbewijs (kassabon enz...)
- Een omschrijving van de storing
NL
49
Page 50

Manuale
di utilizzo
PRESENTAZIONE DEL PRODOTTO
Traduzione delle istruzioni
originali
BTW 6/12 V
• Test batteria
- Test sullo stato di salute della
batteria
- Batteria di test CCA
- Test di resistenza della batteria
interna
- Test della tensione e dello stato
di carica della batteria
• Monitoraggio della forma d’onda
• Test di avviamento
• Test dell’alternatore.
CARATTERISTICHE TECNICHE
Tension d’entrée : CC 4.5 V-16 V
Temperatura di funzionamento: -40-80°C
(-40-170°F)
Custodia: IP65
Funzione : Protezione integrata contro corto-circuito e inversione di polarità.
COLLEGAMENTO
Collegare il morsetto rosso al polo positivo
della batteria e il morsetto nero al polo
negativo della batteria. Il LED del tester
diventa rosso.
50
Page 51

Manuale
di utilizzo
COME FUNZIONA L’APPLICAZIONE
Scaricate l’applicazione tramite il codice
QR sulla prima pagina di questo manuale
e poi aprite l’applicazione.
Traduzione delle istruzioni
originali
BTW 6/12 V
Connessione Bluetooth
Al primo utilizzo, fare clic su nell’angolo
in alto a sinistra dello schermo, il logo è
grigio, a indicare che non è collegato alcun
dispositivo.
Toccare «BTW 6V/12V» per accedere.
Il logo diventa blu, a indicare che
il dispositivo è connesso. Il LED sul
tester diventa anche blu.
IT
51
Page 52

Manuale
di utilizzo
Traduzione delle istruzioni
originali
BTW 6/12 V
Connessione automatica :
Una volta eettuato il primo collegamento, la connessione
diventa automatica non appena si apre l’applicazione e si collega il tester a una batteria
(> 4,5 V).
Creare una nuova batteria
Premere il pulsante in alto a destra dello
schermo.
Si apre la
nestra Gestione batt
eria.
Elenca tutte le batterie già create.
Toccare per aggiungere una nuova batteria.
1. Inserire il nome,
la tensione nominale
e la posizione della
1
2
3
4
batteria.
2.
Tipo di batteria :
batteria per moto,
batteria ordinaria, batteria piatta AGM, batteria avvolgente AGM,
batteria GEL.
Il modello, il tipo,
la norma, la capacità
della batteria e la
corrente di avviamento sono solitamente
indicati sull’etichetta
della batteria.
52
3.
Norma della batteria: Vericare la norma della batteria.
4.
Inserire il valore
della corrente CCA
tra 10 e 2000.
Page 53

Manuale
di utilizzo
5.
Inne, cliccate su .
Traduzione delle istruzioni
originali
BTW 6/12 V
Selezionare la batteria da testare
Toccare la batteria da testare per selezionarla. L’icona indica la batteria selezionata
TEST DELLA BATTERIA
Toccare la scheda e avviare il test
della batteria premendo «TEST».
Prima di eseguire un test standard,
accertarsi che il motore sia spento.
Il test della batteria è composto da 4 prove:
1. Test sullo stato di salute della batteria
2. Batteria di test CCA
3. Test di resistenza della batteria interna
4. Test della tensione e dello stato di carica della batteria
IT
53
Page 54

Manuale
di utilizzo
Traduzione delle istruzioni
originali
2
BTW 6/12 V
1
3
FORMA D’ONDA
4
Monitoraggio della forma d’onda della tensione della batteria.
Toccare la scheda
e avviare il test
della batteria premendo
54
.
Page 55

Manuale
di utilizzo
Traduzione delle istruzioni
originali
BTW 6/12 V
TEST DI AVVIAMENTO
Toccare la scheda e avviare il test
della batteria premendo .
Seguire le istruzioni per ottenere il risultato.
Il motore dell’auto deve essere
avviato durante il test.
IT
55
Page 56

Manuale
di utilizzo
TEST DELL’ALTERNATORE
Traduzione delle istruzioni
originali
BTW 6/12 V
Prova del sistema di carica della batteria.
Non spegnere il motore durante la
prova di carico.
Condividere il rapporto del test della
batteria
In qualsiasi momento
durante un test, toccare
per accedere alla nestra di
condivisione.
È quindi possibile condividere
il test realizzato via e-mail:
- sotto forma di screenshot.
- in forma di testo.
Possibilità di condividere tutti i test eseguiti
toccando «Setting» e poi «Share Report».
56
Page 57

Manuale
di utilizzo
CONDIZIONI DI GARANZIA
Traduzione delle istruzioni
originali
BTW 6/12 V
La garanzia copre i difetti di fabbricazione
per 2 anni dalla data di acquisto (parti e manodopera).
La garanzia non copre:
• Danni da trasporto.
• Usura normale del pezzo (es. : cavi, morsetti, ecc.).
• I danni dovuti a una cattiva utilizzo (errore
di alimentazione, caduta dell’apparecchio,
smontaggio).
• Guasti ambientali (inquinamento, ruggine,
polvere).
In caso di guasto, restituire l’apparecchio al
distributore con :
- Prova d’acquisto (scontrino, ecc.)
- Descrizione del difetto segnalato
IT
57
Page 58

Pictogrammes
BTW 6/12 V
SYMBOLS / ZEICHENERKLÄRUNG /
ICONOS / СИМВОЛЫ / PICTOGRAMMEN /
ICONE / ÍCONES
FR
Matériel conforme aux Directives
européennes. La déclaration UE de
conformité est disponible sur notre site (voir à
la page de couverture).
UK
Device complies with europeans directives.
The EU declaration of conformity is available
on our website (see cover page).
DE
Gerät entspricht europäischen Richtlinien.
Die Konformitätserklärung nden Sie auf
unsere Webseite.
ES
Aparato conforme a las directivas europeas.
La declaración de conformidad está disponible
en nuestra página web.
RU
Устройство соответствует директивам
Евросоюза. Декларация ЕС о соответствии
доступна для просмотра на нашем сайте
(ссылка на обложке).
NL
Appara(a)t(en) conform de
Europese richtlijnen. Het certicaat van
overeenstemming is beschikbaar op onze
internet site.
IT
Dispositivo(i) conforme(i) alle direttive
europee. La dichiarazione di conformità è
disponibile sul nostro sito internet.
58
Page 59

Pictogrammes
FR
Matériel conforme aux exigences
britanniques. La déclaration de conformité
britannique est disponible sur notre site (voir
à la page de couverture).
EN
Equipment in compliance with British
requirements. The British Declaration of
Conformity is available on our website (see
home page).
DE
Das Gerät entspricht den britischen
Richtlinien und Normen. Die
Konformitätserklärung für Grossbritannien
ist auf unserer Internetseite verfügbar (siehe
Titelseite).
ES
Equipo conforme a los requisitos
británicos. La Declaración de Conformidad
Británica está disponible en nuestra página
web (véase la portada).
RU
Устройство соответствует директивам
Великобритании. Заявление о
соответствии для Великобритании
доступно на нашем веб-сайте (см. главную
страницу).
NL
Materiaal conform aan de Britse eisen.
De Britse verklaring van overeenkomt
is beschikbaar op onze website (zie
omslagpagina).
IT
Materiale conforme alla esigenze
britanniche. La dichiarazione di conformità
britannica è disponibile sul nostro sito
(vedere pagina di copertina).
BTW 6/12 V
59
Page 60

Pictogrammes
FR
Marque de conformité EAC
(Communauté économique Eurasienne).
EN
EAC conformity mark (Eurasian Economic
Community).
DE
EAC-Konformitätszeichen (Eurasische
Wirtschaftsgemeinschaft).
ES
Marca de conformidad EAC (Comunidad
económica Euroasiática)
RU
Знак соответствия EAC (Евразийское
экономическое сообщество).
NL
EAC (Euraziatische Economische Unie)
certicaat van overeenstemming.
IT
Marca di conformità EAC (Comunità
economica Eurasiatica).
BTW 6/12 V
60
Page 61

Pictogrammes
FR
Ce matériel faisant l’objet d’une collecte
sélective selon la directive européenne
2012/19/UE. Ne pas jeter dans une
poubelle domestique !
EN
This hardware is subject to waste
collection according to the European
directives 2012/19/EU. Do not throw out in a
domestic bin !
DE
Für die Entsorgung Ihres Gerätes gelten
besondere Bestimmungen (sondermüll)
gemäß europäische Bestimmung 2012/19/
EU. Es darf nicht mit dem Hausmüll
entsorgt werden!
ES
Este material requiere una recogida
de basuras selectiva según la directiva
europea 2012/19/UE. ¡No tirar este
producto a la basura doméstica!
RU
Это оборудование подлежит
переработке согласно директиве
Евросоюза 2012/19/UE. Не выбрасывать
в общий мусоросборник!
NL
Afzonderlijke inzameling vereist volgens
de Europese richtlijn 2012/19/UE. Gooi het
apparaat niet bij het huishoudelijk afval !
IT
Questo materiale è soggetto alla raccolta
dierenziata seguendo la direttiva europea
2012/19/UE. Non smaltire coni riuti
domestici!
BTW 6/12 V
61
Page 62

GYS France
Siège social / Headquarter
1, rue de la Croix des Landes -
CS 54159
53941 Saint-berthevin Cedex
France
www.gys.fr
+33 2 43 01 23 60
service.client@gys.fr
 Loading...