

Page 1
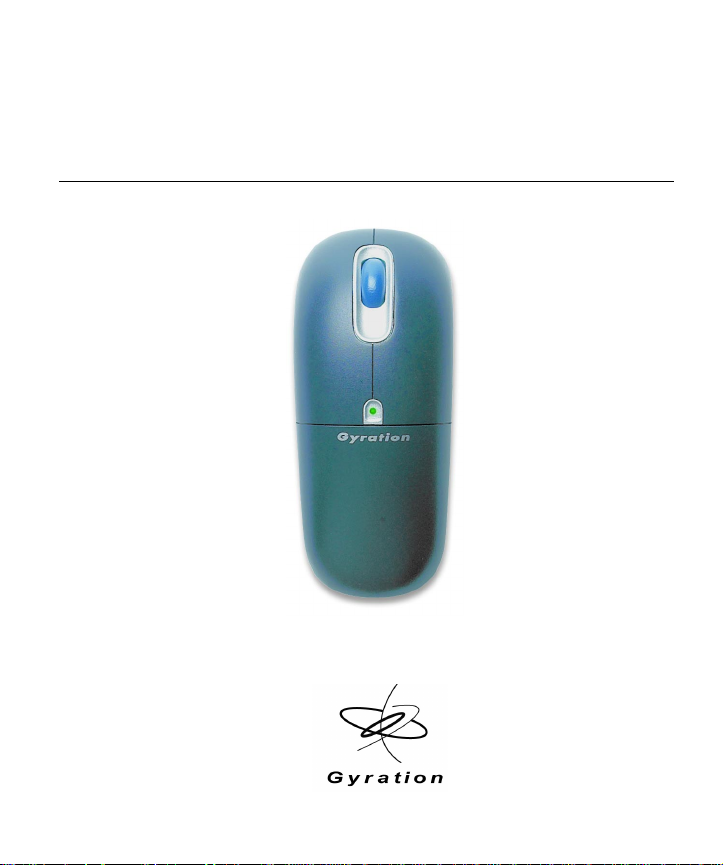
Gyration
™
Ultra Cordless Optical Mouse
User Manual
Page 2

PRODUCT SPECIFICATIONS
Spec Ultra Cordless Optical Mouse RF Receiver
System
Requirements
Size 4.8"L x 2.0"W x 1.8"H (12.2cm x 5.1cm x
Weight 5.3 oz (150g) with battery pack 2.16 ounces
Operating
Range
Radio 49 MHz (U.S.) with 8 channels and
Batteries NiMH Battery Pack (Note: An
Connector N/A USB with 5' (1.5m)
Operating Temp +10 to 40 C (+50 to +104 F)
Storage Temp -30 to +70 C (-86 to +158 F)
IBM compatible PCs running Windows 98 (Second Edition),
2000, ME, XP, or higher
Available USB port
CD ROM drive (for GyroTools installation on Windows only*)
Microsoft or Mac compatible mouse driver (no additional
drivers to install)
4.5cm)
Ultra - Up to 30 feet (9.144m) typical with
no line-of-sight requirement
Ultra Professional - Up to 100 feet
(30.5m) typical with no line-of-sight
requirement
36,800 security addresses
additional NiMH battery is included in
the Ultra Professional model only.)
3 AAA batteries (Note: An AAA
battery clip is included in the Ultra
Professional model only.)
3.15"L x 2.85"W x
.73"H (8cm x
7.2cm x 1.8cm)
(67.2g)
N/A
N/A
N/A
cable
*The E-Mail tool in GyroTools is not supported under Windows 98 (Sec ond Ed ition).
Page 3

TABLE OF CONTENTS
Ultra Mouse .........................................................................1
Key Features ................................ .. ... ..............................1
Installing and Charging the Batteries ..................................1
Setting Up and Synchronizing ............................................4
Determining the Channel................................................ .. .5
Changing the Channel......................................... ... .. .........5
Powering On and Off........................................................ 6
Using on the Desktop....................................................... 7
Using in the Air............................................................... 7
Fine-Tuning Cursor Control............................................... 8
GyroTools Software ..........................................................9
RF Receiver .......................................................................11
Learn Button ................................................................. 11
Status Light................................................................... 11
Keyboard LEDs .............................................................. 12
Installing 3 or More Devices............................................. 12
Troubleshooting Tips .........................................................14
Regulatory Information .....................................................15
FCC Statement .............................................................. 15
Canadian Radio Interference Regulations........................... 16
Contacting Gyration...........................................................17
Warranty Information .......................................................18
i
Page 4
Gyration Ultra Cordless Optical Mouse
Welcome to a world of unprecedented freedom in surfing,
gaming, and mobile computing! Gyration’s Gyro technology
delivers the ultimate PC remote control device: the Ultra
Mouse. Gyration's patented motion-sensing and radio frequency technologies provide accurate and effortless cursor
control from anywhere in the room. Since the Ultra Mouse
works on a desktop as well as in the air, sit back and relax.
You have the power to control your multimedia and internet
commands in the palm of your hand.
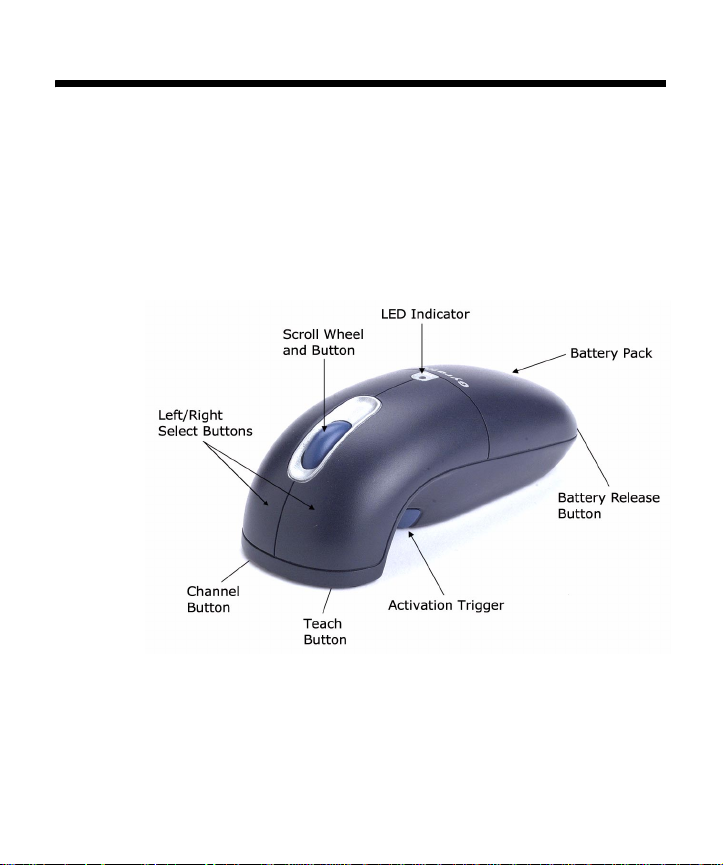
Key Features
Installing and Charging the Batteries
Important: The Ultra Mouse must be charged for nine (9) hours prior to
its first use.
1
Page 5

The Ultra Mouse comes with a NiMH battery pack already
installed, but you will need to remove the plastic tab located
inside the battery compartment. This clear plastic tab prevents the battery from discharging until you are ready to use
your mouse. To remove the tab and charge your batteries:
1. Press the Battery Release button at the bottom of the
mouse and lift the NiMH battery pack off.
2. Remove and discard the plastic tab.
3. Replace the battery pack by snapping it into place on the
mouse.
4. Connect the power adapter to the charging cradle and
plug it into a power source.
5. Place the mouse in the charging cradle. The cradle’s LED
Indicator light, located at the bottom of the unit, will
turn solid green and the LED Indicator light on the
mouse will faintly flash green while its batteries are
charging.
6. Once the batteries are fully charged, the LED Indicator
light on the mouse will maintain a steady glow and will be
ready for use.
Battery Tips
For optimal battery life, avoid using the mouse on dark-
colored surfaces.
When the battery drops to twenty percent (20%) of its
full charge, the LED Indicator light on the mouse will blink
intermittently when in use. To optimize the performance
of your NiMH battery, it is best to recharge it after every
day of use.
If a full charge is not required, you can remove the mouse
from the charging cradle at anytime. You do not need to
wait for the LED Indicator light to stop flashing.
To conserve power, the mouse enters a “Sleep Mode”
when it is left on for more than 24 hours. To awake from
Sleep Mode, click any button.
2
Page 6
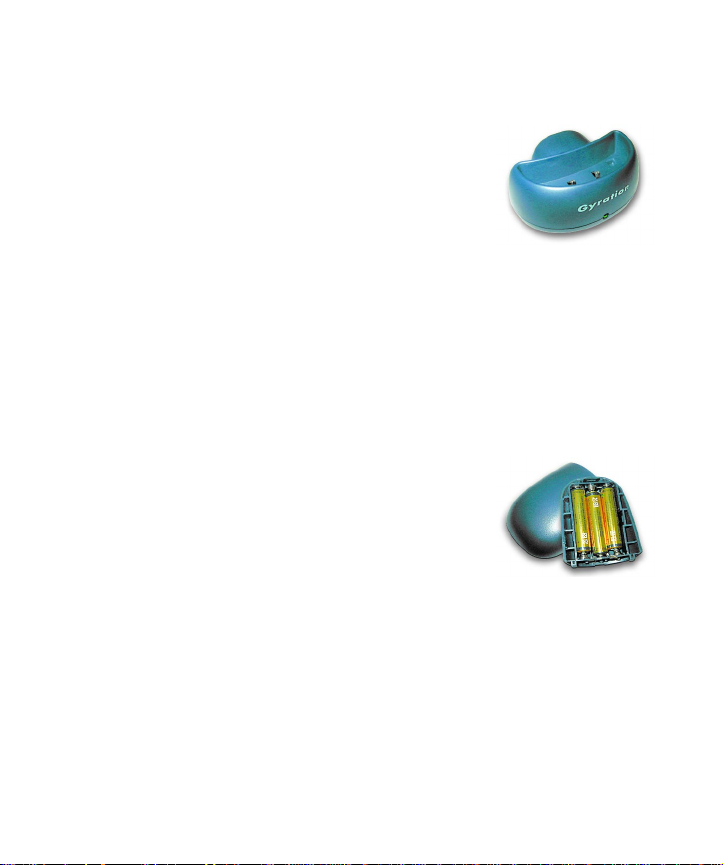
Using the In-Line Battery Charger
The In-Line Battery Charger is included with the Ultra Professional model or available for purchase as an add-on accessory.
To charge the NiMH battery pack
using the in-line battery charger:
1. Connect the power adapter to the
in-line battery charger and plug it
into a power source.
2. Place the battery pack in the
charger and the LED Indicator
light will turn solid green.
3. To eliminate the need of one additional adapter, install
the smaller connector of the charger cable into the back
of the in-line charger and install the larger connector into
the front of the charging cradle.
Using the Alkaline Battery Clip
The Alkaline Battery Clip is included with the Ultra Professional
model or available for purchase as an add-on accessory.
A standard alkaline battery clip may
also be used with your mouse:
1. Insert three AAA batteries into
the battery clip.
2. Snap the battery clip into place
on the mouse.
3. Install the in-line battery charger
cable.
If the alkaline battery clip is installed, the mouse enters Slee p
Mode when it is left on four or more hours. To awake from
Sleep Mode, click any button.
Note: The AAA batteries are not recharged when the unit is placed in
the charging cradle.
3
Page 7

Setting Up and Synchronizing the Ultra Mouse and the Gyration RF Receiver
When installing the Ultra Mouse for the first time or when adding additional Gyration devices to the system, it is necessary
to perform a Teach/Learn sequence to synchronize the
devices. T o set up and synchronize the Ultra Mouse and the RF
Receiver:
1. Ensure the mouse is fully charged.
2. Connect the receiver cable into an available USB port and
power on your computer. Your operating system should
detect the new hardware device and initiate the installation procedure. Continue to follow the standard USB
device installation screens until installation i s complete.
3. Press and hold the Learn button on the receiver for two
seconds and then release it. The Status light will blink
slowly, indicating the receiver is now in “Learn Mode.”
4. Press and release the Teach button located on the bottom of the mouse handset. The Status light on the
receiver will blink rapidly for four seconds, then begin to
blink slowly.
Note: At this time, press the Teach button on any additional devices
(such as a keyboard, a second Ultra Mouse, or a GyroRemote).
5. To exit Learn Mode, press the Learn button on the
receiver for two seconds. Otherwise, Learn Mode will
automatically time out after five minutes.
If more than one Gyration device is being installed on the
same system, place the receiver into Learn Mode (ste p 3
above) and then press the Teach button on each device before
exiting Learn Mode. However, do not press the Learn button
on the receiver for each device to be added (see “Installing 3
or More Devices” on page 12).
When the receiver is put into Learn Mode, it erases its memory of previously learned devices and looks for new devices.
4
Page 8

Therefore when adding a new device to a system, it is necessary to put the receiver into Learn Mode and then press the
Teach button on all the devices that will be used on the system.
After the Teach/Learn sequence is performed, the receiver
and device(s) will remain synchronized after powering down
and/or changing channels. It is only necessary to perform the
Teach/Learn sequence when setting a device up for the first
time or when adding additional devices to the system.
Determining Which Channel the Ultra Mouse is Using
The Ultra Mouse has eight individual channels available to it.
To determine which channel a device is currently using:
1. Press and quickly release the Channel button on the bottom of the mouse handset.
2. Count the number of times the green LED on top of the
handset (or the red LED on the bottom of the handset)
flashes. The number of flashes indicates th e channel the
mouse is using.
Note: If the mouse’s channel is changed when the computer is pow-
ered down or the receiver is not connected, the devices will
become unsynchronized. When the system is running, click
and release the Channel button as described above to confirm
the channel. The mouse broadcasts a message across all eight
channels that informs the receiver what channel it is currently
operating on. The receiver then automatically restores synchronization.
Changing the Channel the Ultra Mouse is Using
When two devices are being used in the same proximity, each
device should be set to operate on a unique channel. For the
best reception, space the channels apart by one or more channels. For example, setting the channels to “2” and “4” is recommended over setting the channels to “2” and “3”.
5
Page 9

If you are installing three or more devices on a single r eceiver,
see “Installing 3 or More Devices” on page 12. Remember if a
Teach/Learn sequence has already been performed, it is not
necessary to re-synchronize the devices after a channel
change.
To change the channel:
1. Press and hold the Channel button on the bottom of the
mouse handset for two seconds.
2. When you release the Channel button, the mouse will
change to the next sequential channel and the green LED
on the top of the handset (and the red LED on the bottom
of the handset) will flash. The number of flashes indicates
the new channel the mouse is using.
Powering the Ultra Mouse On and Off
To power on:
Simultaneously press and release the Channel and
Teach buttons on the bottom of the mouse for three
seconds. It will confirm it is powering on by flashing its
LED Indicator for one second.
To power off:
Simultaneously press and release the Channel and
Teach buttons on the bottom of the mouse. It will
immediately power off and be unresponsive to button
clicks. It will confirm it is powering off by flashing its LED
Indicator three times.
Note: Powering off the mouse prevents battery drain when traveling.
It is necessary to power the unit off when traveling on commercial airlines due to FCC regulations regarding radio-emitting devices.
6
Page 10

Using the Ultra Mouse on the Desktop
The Ultra Mouse provides
great flexibility in how you
control your computer, and
its optical sensor allows for
precise tracking on virtually
any surface. However for
optimal performance, avoid
mirrored surfaces. To use on the desktop:
1. Set up and synchronize the mouse with the receiver (see
“Setting Up and Synchronizing the Ultra Mouse and the
Gyration RF Receiver” on page 4).
2. Remove the mouse from the charging cradle and place it
on a flat surface. The LED light on the receiver base will
flicker rapidly when communicating with the mouse handset.
3. Use the mous e like a standard desktop mouse. For optimal battery life, avoid using it on dark-colored surfaces.
In addition to its optical sensor, the Ultra Mouse uses an
advanced reflective sensor that detects when the mouse is
being lifted off the desktop. To conserve battery life, this sensor powers on the gyroscope and shuts down the optical sensor each time the mouse is picked up from the desktop.
highly reflective glass or
Using the Ultra Mouse in the Air
The Ultra mouse has no lineof-sight requirements so it is
not necessary to point the
device at the computer,
receiver, or monitor. Just
find a comfortable, relaxed
position and move the cursor
with easy wrist movements.
7
Page 11

1. Set up and synchronize the mouse with the receiver (see
“Setting Up and Synchronizing the Ultra Mouse and the
Gyration RF Receiver” on page 4).
2. Hold the mouse in a comfortable, relaxed position with
your index finger on the Activation Trigger and your
thumb at the base of the Scroll Wheel (see illustration).
3. Press and hold the Activation Trigger with your index
finger. While holding the trigger, flex your wrist up, down,
and sideways (in a manner similar to using a flashlight).
The mouse cursor tracks the motions of your hand.
Remember, it is not necessary to point the mouse at your
computer, receiver, or monitor.
4. Use your thumb to pres s the left/right mouse buttons or
to operate the scroll wheel.
Tip: Double-click the Activation Trigger to keep the cursor continu-
ously active. To stop the cursor movement, click the trigger
once.
Tip: Move the cursor over a target and release the Activation Trig-
ger before clicking the left or right mouse buttons. This
“parks” the cursor and allows you to click more accurately.
Fine-Tuning Cursor Control
Since the Ultra Mouse uses standard Windows or Mac mouse
drivers, there are no additional drivers to install. Any settings
that are available to a standard desktop mouse (such as cursor tracking speeds and mouse double-click speeds) are also
available to the Ultra Mouse.
Multiple factors will determine how you adjust your mouse to
suit your personal preference including screen resolution and
driver version. While becoming fa miliar with your mouse and
getting a feel for the “in air” method of cursor control, Gyration recommends adjusting your mouse driver to the following
settings:
Pointer Speed – Average. Some new users prefer this
setting to be slightly slower than average. Advanced
users will increase the speed so that less wrist movement
gives them more screen coverage with the cursor.
8
Page 12

Acceleration – Low or Off.
Note: Refer to your operating system’s documentation for additional
information on customizing your mouse properties.
GyroTools Software
GyroTools is a suite of software tools that enhance the functionality of the Ultra Mouse. Assign your favorite tools to buttons on the Ultra Mouse, and put advanced presentation
techniques at your fingertips.
1. To install the GyroTools software, insert the GyroTools
disk into your CD drive and follow the on-screen instructions. If the program does not start af ter a few mome nts,
go to My Computer (located on your desktop), click to
your CD drive, and open SETUP.EXE.
Note: Once GyroTools has been installed, com p lete operating
instructions are available by accessing the on-line he lp.
2. Once the installation is complete, click on the GyroTools
icon in the Start menu to launch the GyroTools application.
3. Tools can be assigned to a double right-click, a right-click
and hold, or a right-click followed by left-click. Tools can
also be assigned to the scroll wheel (i.e., double scrollclick, scroll-click and hold, scroll-click followed by leftclick). There are other methods to activate tools such as
screen hotspots, swipes, and scheduled events.
4. To assign tools using the Drag and Drop Toolbox:
a. Select the tool group (such as General, Internet, or
Media located at the bottom of the GyroTools window) that contains the tool(s) you want to assign.
b. Left-click and hold the desired tool.
9
Page 13

c. Drag the tool onto the icon square next to the button
that you wish to assign the tool to and release the
button.
5. To assign tools using the Menu-Driven Method:
a. Right-click the icon square next to the thumb button
that you wish to assign.
b. Sele ct the New Tool or Replace Tool menu com-
mand.
c. Select the tool group (such as General, Internet, or
Media located at the bottom of the GyroTools win-
dow) that contains the tool(s) you want to assign.
d. Select the desired tool from the menu.
e. Once the tool is selected, you can define the tool’s
properties (such as color, border, and other parameters).
6. Once a tool has been assigned to a button, simply press
the button sequence to invoke the tool.
7. When finish ed using the tool, right-click and the pointer
returns to cursor mode.
10
Page 14

Gyration RF Receiver
Learn Button
Pressing the Learn button for two seconds puts the receiver
into Learn Mode allowing you to synchronize one or more
devices with the receiver. After the devices have been
synchronized, pressing the Learn button again for two
seconds takes the receiver out of Learn Mode. If the receiver
is not manually taken out of Learn Mode, it will automatically
return to Normal Mode after five minutes.
Status Light
The Status light displays useful information about the modes
of operation and the connection between the receiver and
transmitter(s). Its various states are:
Remains off when the receiver is operating in Normal
11
Page 15

Mode and no devices are transmitting.
Blinks slowly (one blink per second) when the receiver
is in Learn Mode and is awaiting a Teach instruction from
a device.
Flickers rapidly when the receiver is operating in
Normal Mode and a synchronized device is transmitting. If
there is radio interference, the flickering light will be
inconsistent.
Blinks rapidly for a four-second burst when it is in
Learn Mode processing a Teach instruction, and
synchronizing the receiver with the device.
Keyboard LEDs
These LEDs indicate whether your computer has the Num
Lock, Caps Lock, and/or Scroll Lock features activated.
Num Lock: Used to toggle a combination number/cursor
keypad between numeric keys and cursor keys.
Caps Lock: When activated, causes all alphabetic
characters to be uppercase but has no effect on other
keys.
Scroll Lock: Used to toggle between scrolling and non-
scrolling mode (on PC keyboards). When activated, the
arrow keys scroll the screen regardless of the current
cursor location.
Installing 3 or More Devices
The RF receiver can be taught to recognize up to eight devices
(such as mice, remotes, and keyboards) on a system, but only
two of those devices may be used simultaneously.
When setting up a system with a single receiver and three or
more devices, the following guidelines must be followed:
Select two channels that are free of outside interference
and install all devices on either of those two channels.
When possible, it is recommended that the two chosen
12
Page 16

channels be separated by at least one unused channel.
For example, setting the channels to “2” and “4” is
recommended over setting the channels to “2” and “3”.
Any of the devices installed on one channel may be used
simultaneously with any of the devices on the other
channel. Two devices that share a channel may be used
alternately. When installing the devices try to determine
which devices will be used simultaneously and set them
on opposite channels.
Example: Mouse One is used by a presenter for cursor control, and
Mouse Two and a keyboard are used by an assistant to input
data. Mouse One is set at channel 3. Mouse Two is also set at
channel 3 and the keyboard is set at channel 5.
With this configuration, Mouse One and the keyboard can be
used simultaneously. Or, Mouse Two and the keyboard can be
used simultaneously. However since Mouse One and Mouse
Two share the same channel, they can only be used alternately.
A low-power consumer device (i.e., Ultra Mouse with 30-
ft. range) should not be used simultaneously with a highpower professional device (i.e., RF Keyboard with 100-ft.
range). One or both devices may not work properly if
data is being transmitted by the two units at the same
time. For optimal simultaneous performance, it is
recommended that you use two low-powered devices or
two high-powered devices. If you wish to use both a
high- and low-power device simultaneously, it is
recommended that you alternate usage between the
devices.
13
Page 17

Ultra Mouse Troubleshooting Tips
Symptom Reason Solution
Mouse LED comes on
when activate button
is pressed, but
receiver is unresponsive
When using in air, cursor is visible but shows
no movement
Cursor movement is
choppy or erratic
When pressing the
activate button, the
LED on the mouse is
flashing
When pressing the
activation trigger, the
LED on the mouse is
off
Cursor moves too fast
or too slow
Cursor drifts on the
screen
Mouse LED does not
flash in charging cradle
and mouse does not
charge
Inadequate battery life Mouse used on dark-
Mouse and Receiver
not synchronized
Gyro not activated Squeeze or double-click trigger on
Radio interference Change the device’s channel set-
Batteries are low
Batteries are dead
Mouse is off Power it on (see “Powering the
Speed or acceleration not set properly
Sensor may require
recalibration
Dirty contacts Clean the contacts on bottom of
Improper battery
installed
End-of-life battery Replace battery.
colored surface
Perform a Teach/Learn sequence
(see “Setting Up and Synchroniz-
ing the Ultra Mouse and the Gyration RF Receiver” on page 4).
bottom of mouse.
ting (see “Changing the Channel
the Ultra Mouse is Using” on
page 5).
Move receiver away from other
electronic devices (e.g. monitor,
speakers, radio, etc.).
Raise receiver antenna and/or
uncoil USB Receiver cable.
Recharge battery pack or replace
(see “Installing and Charging the
Batteries” on page 1).
Ultra Mouse On and Off” on
page 6).
Change the cursor tracking speed
in the mouse control panel.
Place the mouse on the desk for 4
or more seconds to steady the cu rsor.
mouse.
Make sure that the AAA battery
pack is not installed.
Use mouse on light-colored surface to minimize battery drain.
14
Page 18

Regulatory Information
Attention! This device emits radio frequencies and has not
been certified by the FAA for use onboard aircraft. Do not use
this device at any time onboard civil aircraft. To minimize the
possibility of interference, power off the Ultr a Mouse to ensure
the device remains off during flight.
FCC Statement
The Ultra Cordless Optical Mouse and RF Receiver have been
tested and found to comply with the limits for a Class B digital
device, pursuant to Part 15 of the FCC Rules. These limits are
designed to provide reasonable protection against harmful
interference in a residential installation. This equipment
generates, uses and radiates radio frequency energy and, if
not installed and used in accordance with the instructions,
may cause harmful interference to radio communications.
However, there is no guarantee that interference will not occur
in a particular installation. If this equipment does cause
harmful interference to radio or television reception, which
can be determined by turning the equipment off and on, the
user is encouraged to try to correct the inter ference by one or
more of the following measures:
1. Reorient or relocate the receiving antenna (television,
radio, etc.).
2. Increase the separation between the equipment and
receiver.
3. Connect the equipment to an outlet on a circuit different
from that to which the receiver is connected.
4. Consult the dealer or an experienced radio/TV technician
for additional help.
Caution: Changes or modifications not expressly approved by
the party responsible for compliance could void the user's
authority to operate the equipment. Contact Gyration, Inc.,
12930 Saratoga Avenue, Bldg. C, Saratoga CA 95070.
Technical Support: 408-973-7086. These devices comply with
Part 15 of the FCC Rules.
15
Page 19

The Compact Keyboard operates in the frequency band of
49.825 to 49.895 MHz with RF output power of less than 30
MicroWatts EIRP (Effective Isotropic Radiated Power).
Warning: Using these products in any way other than as
described in this manual or altering the antenna in any way
may violate FCC rules. FCC ID: JJ4-GP221-001 Compact
Keyboard; Receiver: AS00262-001
DECLARATION OF CONFORMITY
We GYRATION, INC.
12930 Saratoga Avenue, Suite C
Saratoga, CA 95070
Phone 408-255-3016
Declare under our sole responsibility that the product
USB MINI DUAL RECEIVER
PART NO. AS00262-001
Complies with Part 15 of the FCC Rules
Operation is subject to the following two conditions:
1. these devices may not cause harmful interference, and
2. these devices must accept any interference received,
including interference that may cause undesired
operation.
Canadian Radio Interference Regulations
This Class B digital apparatus meets all requirements of the
Canadian Interference Causing Equipment Regulations.
Cet appareil numérique de la classe B respecte toutes les
exigences du Règelement sur le matériel brouil-leur du
Canada.
16
Page 20

Contacting Gyration
If you have any questions on your new Gyration product,
please contact us.
Main Office
Gyration, Inc.
Phone: 408-255-3016
Fax: 408-255-9075
Sales
Phone: 800-316-5432 (Toll-free in US and Canada)
Fax: 408-387-5130
E-mail: sales@gyration.com
Technical Support
Phone: 408-973-7086
Fax: 408-973-7669
E-mail: support@gyration.com
Product Support: www.gyration.com/support.htm
World Wide Web
www.gyration.com
Technical Support-UK
Phone: 0870 442 8669
E-mail: uksupport@gyration.com
Technical Support-Germany
Phone:0 61 81 / 94 36 33 70
E-mail: support@gyration.de
17
Page 21

Warranty Information
Gyration products come with a two-year hardware warranty.
Gyration, Inc., (Gyration) warrants products against defects in
material and workmanship for a period of two years from the
date of purchase from Gyration or an authorized Gyration
agent. This warranty applies only to the original purchaser and
is not transferable. This warranty does not cover any
incompatibilities due to the user's computer, hardware,
software or any other related system configuration in which
the product interfaces. Proof of purchase will be required
before any warranty consideration by Gyration occurs. This
warranty does not cover any damage caused by negligence,
non-authorized modifications, or parts installed without prior
written permission from Gyration. This warranty does not
apply if the product has been damaged by accident, abuse,
misuse, or misapplication, nor as a result of service to the
product by anyone other than by Gyration.
Gyration is not responsible for any lost profits, lost
savings or other incidental or consequential damages
arising out of the use of, or inability to use, this
product. This includes damage to property and, to the
extent permitted by law, damages for personal injury.
This warranty is in lieu of all other warranties including
implied warranties of merchantability and fitness for a
particular purpose.
Some states do not allow limitation of implied warranties, or
exclusion or limitation of incidental or conseque ntial damage s,
so the above limitations may not apply to you. This warranty
gives you specific legal rights. You may have other rights
which may vary from state to state. This warr anty applies only
to these products, and is governed by the la ws of the S tate of
California.
Trademark Information
© 2003 Gyration, Inc. All rights reserved. Gyration and the Gyration
logo are trademarks of Gyration, Inc. in the United States and other
countries. All other trade names mentioned are the property of their
respective companies. US Patent Numbers: 5,440,326; 5,898,421;
5,825,350 and other pending patents.
18
Page 22

Gyration Ultra Cordless Optical Mouse
User Manual
DL00049-001 Rev B
Gyration, Inc.
408.255.3016
www.gyration.com
 Loading...