

Page 1

GyroMouse Pro,
GyroMouse Presenter
& GyroTools
User Guide
Page 2

Table of Contents
ABOUT GYROMOUSE™ . . . . . . . . . . . . . . . . . . . . . . . . . . . . . . . . . . 1
INSTALLING G YROMOUSE . . . . . . . . . . . . . . . . . . . . . . . . . . . . . . . 1
USING GYROMOUSE . . . . . . . . . . . . . . . . . . . . . . . . . . . . . . . . . . . 2
Select Buttons . . . . . . . . . . . . . . . . . . . . . . . . . . . . . . . . . . . . . . . . 2
Channel Select & On/Off Button . . . . . . . . . . . . . . . . . . . . . . . . . . . . 2
Activate Button . . . . . . . . . . . . . . . . . . . . . . . . . . . . . . . . . . . . . . . 2
USING GYROMOUSE ON THE DESKTOP . . . . . . . . . . . . . . . . . . . . . . 2
USING GYROMOUSE IN THE AIR . . . . . . . . . . . . . . . . . . . . . . . . . . . 3
To use GyroMouse in the air: . . . . . . . . . . . . . . . . . . . . . . . . . . . . . . 3
CARE AND MAINTENANCE . . . . . . . . . . . . . . . . . . . . . . . . . . . . . . . 3
Installing or Removing the Batteries . . . . . . . . . . . . . . . . . . . . . . . . . 4
Resetting the GyroMouse . . . . . . . . . . . . . . . . . . . . . . . . . . . . . . . . . 4
SPECIAL FEATURES . . . . . . . . . . . . . . . . . . . . . . . . . . . . . . . . . . . . 4
Power Saving Modes . . . . . . . . . . . . . . . . . . . . . . . . . . . . . . . . . . . . 4
On-The-Fly RF Channel Changing . . . . . . . . . . . . . . . . . . . . . . . . . . . 4
Multiple GyroMouse Transmission Security . . . . . . . . . . . . . . . . . . . . 4
Trickle and Rapid Charge Modes . . . . . . . . . . . . . . . . . . . . . . . . . . . . 4
INSTALLING AND USING THE STANDBY BATTERY KIT . . . . . . . . . . . . 5
GYROTOOLS USER'S GUIDE . . . . . . . . . . . . . . . . . . . . . . . . . . . . . . 5
Installing GyroTools . . . . . . . . . . . . . . . . . . . . . . . . . . . . . . . . . . . . 5
Overview . . . . . . . . . . . . . . . . . . . . . . . . . . . . . . . . . . . . . . . . . . . . 5
Configuring GyroTools . . . . . . . . . . . . . . . . . . . . . . . . . . . . . . . . . . . 6
Operating GyroTools . . . . . . . . . . . . . . . . . . . . . . . . . . . . . . . . . . . . 6
Toolbar . . . . . . . . . . . . . . . . . . . . . . . . . . . . . . . . . . . . . . . . . . . . . 6
Preferences . . . . . . . . . . . . . . . . . . . . . . . . . . . . . . . . . . . . . . . . . . 6
TROUBLESHOOTING GUIDE . . . . . . . . . . . . . . . . . . . . . . . . . . . . . . 7
REGULATORY INFORMATION . . . . . . . . . . . . . . . . . . . . . . . . . . . . . 8
Canadian Radio Interference Regulations . . . . . . . . . . . . . . . . . . . . . 8
CONTACTING GYRATION . . . . . . . . . . . . . . . . . . . . . . . . . . . . . . . . 8
WARRANTY INFORMATION . . . . . . . . . . . . . . . . . . . . . . . . . . . . . . . 8
1
Page 3
ABOUT GYROMOUSE™
Thank you for purchasing GyroMouse, the only cordless mouse you can use on and off the desktop. GyroMou se
uses GyroPoint Technology™, based on a solid-state sensor that detects your natural hand motions to precisely
control the cursor on t he screen! GyroMouse del ivers prec ise control o ver pres entations and interac tive med ia on
your PC up to 40 feet (Pro version) or 100 feet (Presenter version) away .
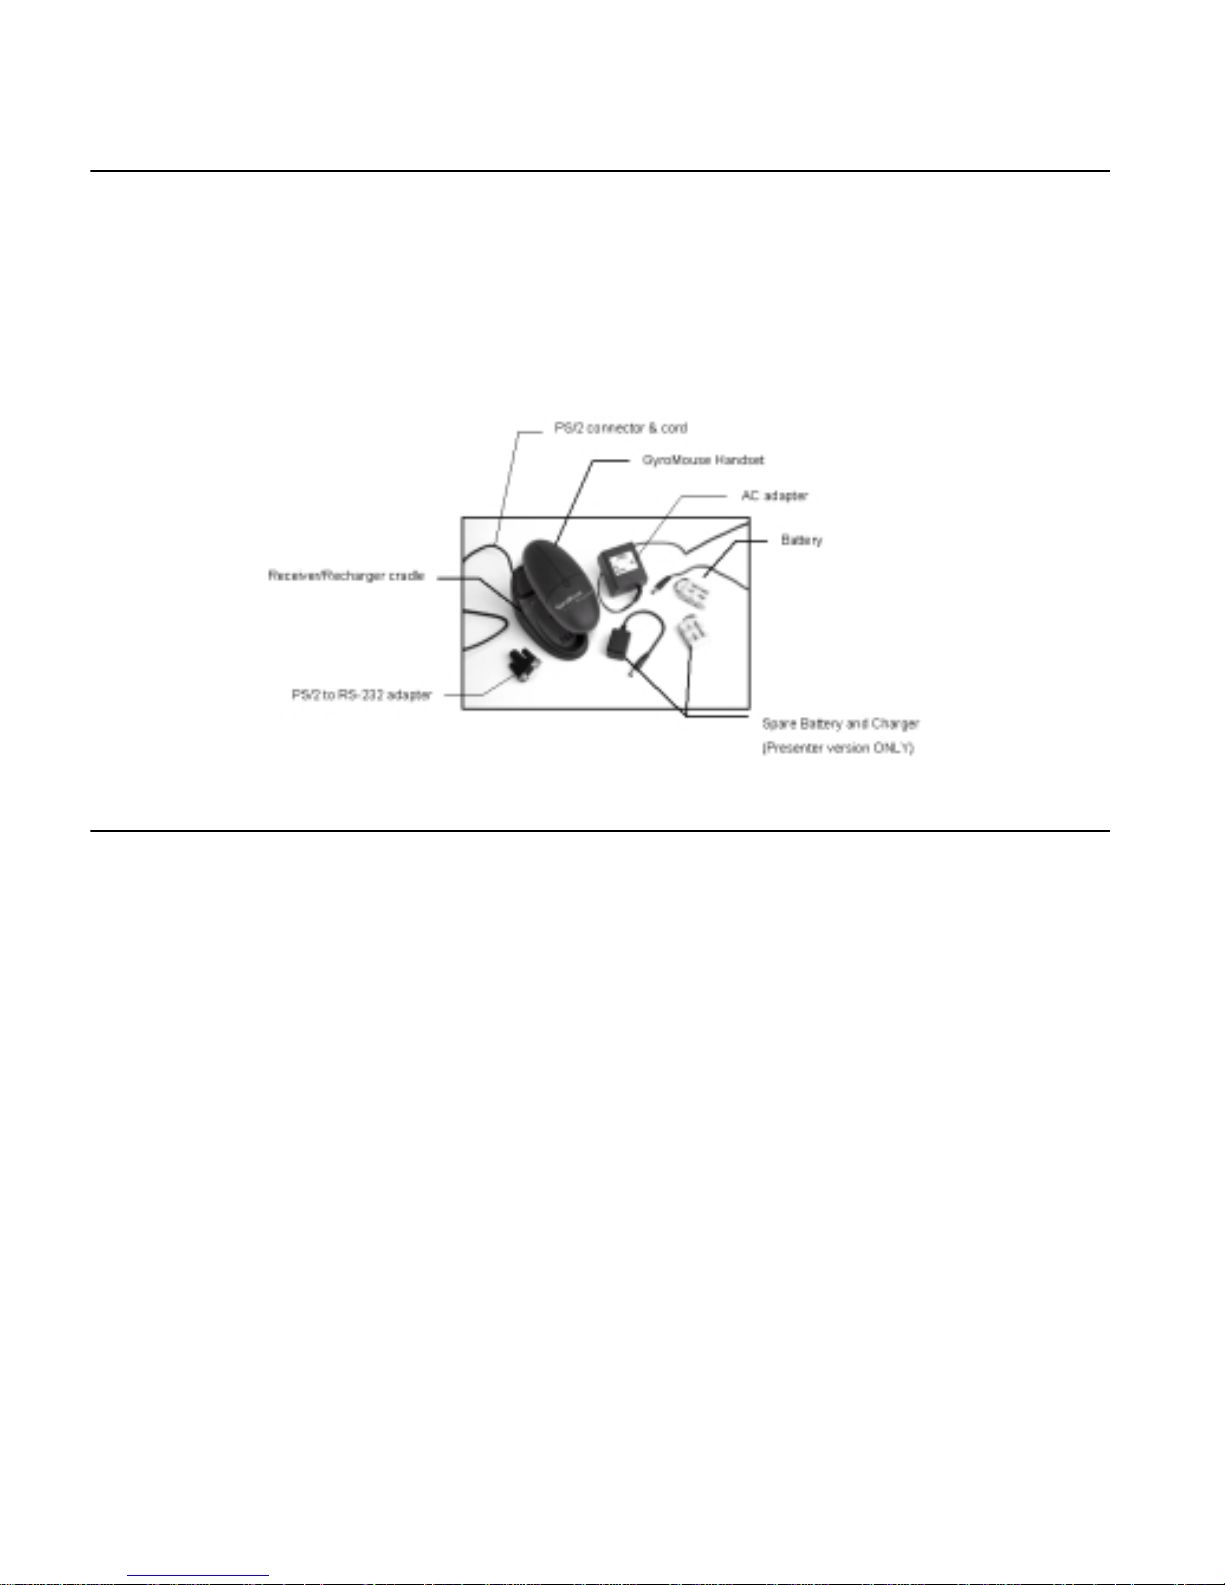
This guide instruct s you on how t o install and use GyroMouse in easy-to-follow ste ps. Please refer to the figu r e
below to familiarize yourself with the GyroMouse and its parts:
INSTALLING GYROMOUSE
Installing GyroMouse is quick and simple. Please refer to the illustration on the preceding page:
1. Make sure you have a Microsoft, Logitech or compatible mouse driver installed on your computer. Refer to
your operating system’s documentation for details about driver verification and installation.
2. Plug the AC adapter into a power outlet and insert power plug into the back of the receiver. Do this before
connecting receiver to computer.
3. Install NiMH battery into GyroMouse handset (see “Installing or Removing the Batteries” on page 4).
4. Allow GyroMouse to charge in cradle for 14 hours.
5. Turn off your computer.
6. Connect the GyroMouse receiver cable into the PS/2 mouse port on your computer. If your comput er system uses an RS-232 serial port, use the PS/2 to RS-232 adapter that is provided to make the proper connection.
7. Power on computer
Note - Receiver must be at least 12 inches from any significant electromagnetic source (e.g., monitor).
1
Page 4
USING GYROMOUSE
GyroMouse is simple to use. On the desktop, it works like an ordinary mouse. In the air, the cursor is controlled
using subtle movements of your wrist.
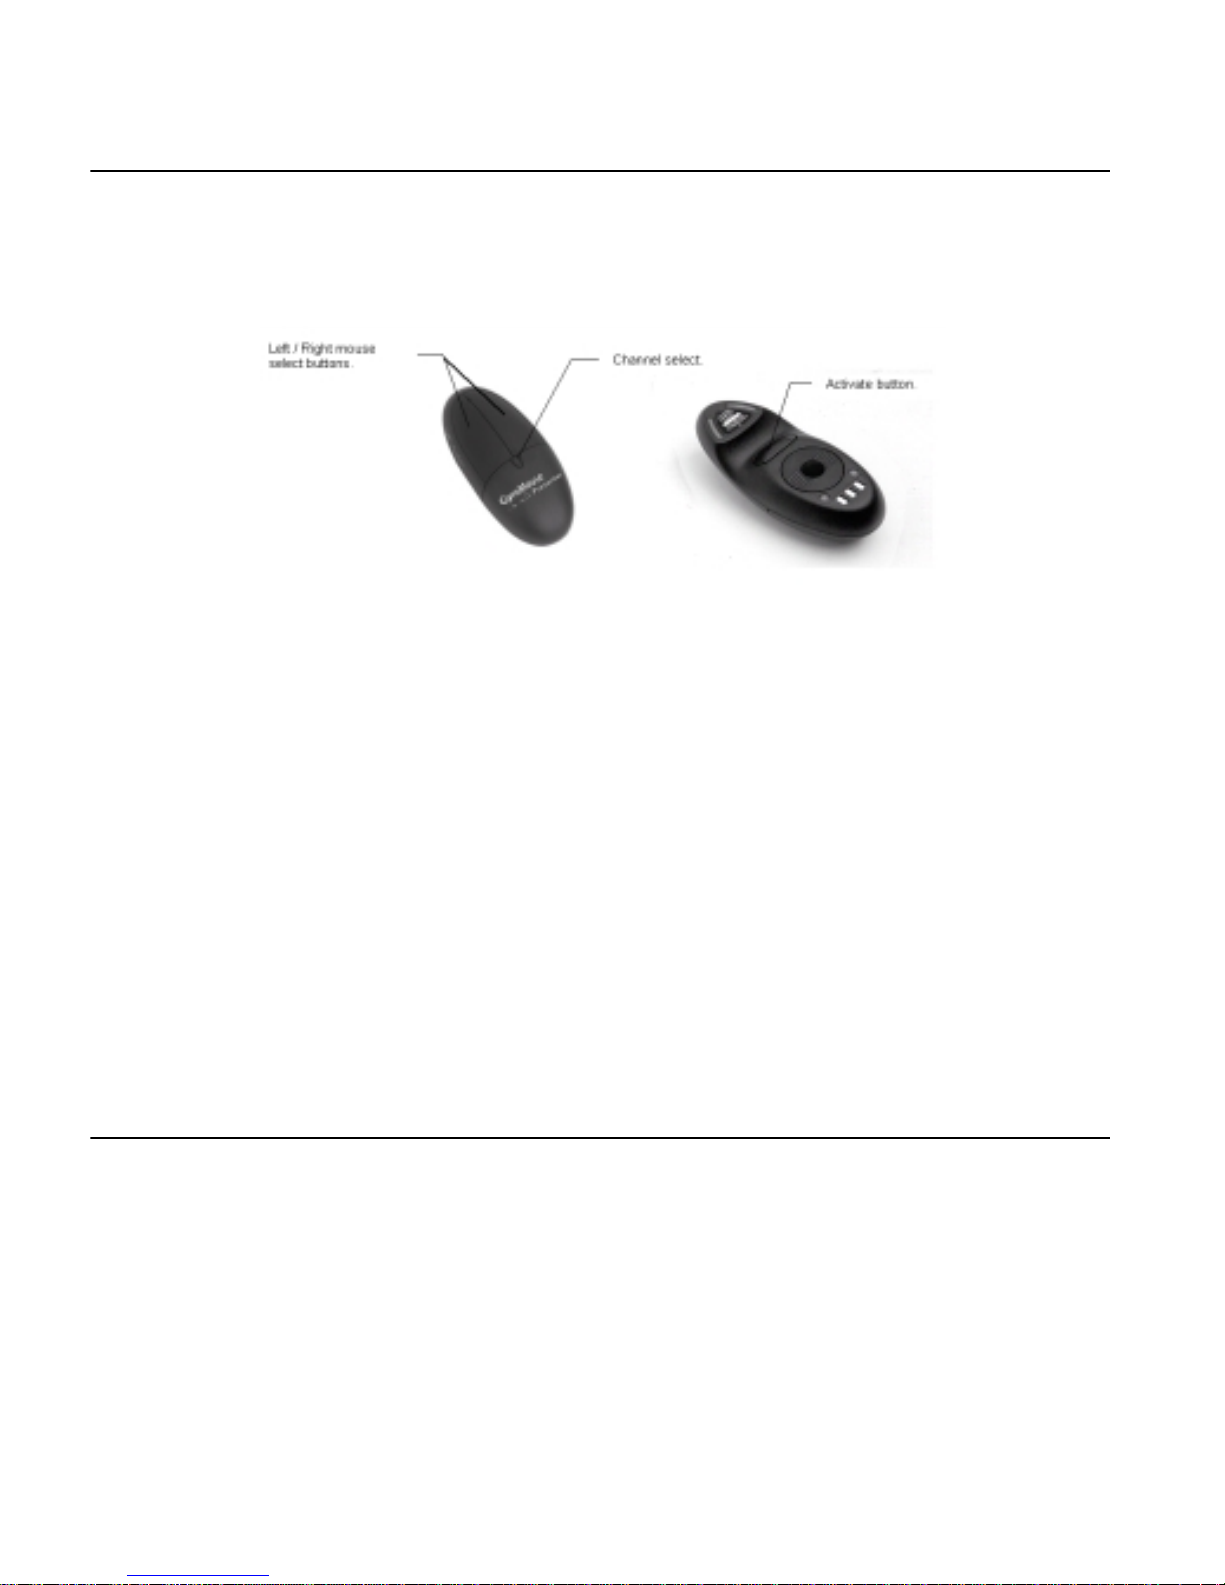
Familiarize yourself with the GyroMouse controls below:
Note - GyroMouse must be placed on the receiver/recharger cradle before initial use. If it was not,
place GyroMouse in the cradle to allow the system to synchronize properly.
Select Buttons
The Select buttons (see picture above) function like the left/right buttons on a standard two-button mouse.
Pressing either select button will also turn the GyroMouse back on if it has been in “sleep” mode. See also Channel Select below.
Channel Select & On/Off Button
The Channel Select button has two functions: radio channel selection and GyroMouse power switch on/off.
• Change RF Channel - Click this button rapidly to change RF channels if you experience inconsistent or
erratic mouse behavior due to possible radio interference
• Turn Off - While holding the Channel Select button, click the Activate button (until the green LED shuts
off).
• Turn On - Click any button to reactivate
Activate Button
The Activate button (located on the underside of the GyroMouse) enables the internal gyroscope to control the
movement of the mou s e cu r sor wh en using it in the a ir. See “USING GYROMOUSE IN THE AIR” on page 3.
USING GYROMOUSE ON THE DESKTOP
Important-Make sure GyroMouse has been charged at least 14 hours before using.
1. Start your computer with your GyroMouse properly connec ted .
2. Remove the fully charged GyroMouse from the receiver/rech arge r cr ad le and place it on a flat surface or
mouse pad. The LED light on the receiver base flickers rapidly when communicating with the GyroMouse
handset.
3. Use GyroMouse like a standard desktop mouse.
2
Page 5

USING GYROMOUSE IN THE AIR
GyroMouse provides you great flexibility in how you control your computer. Using GyroMouse by holding it in the
air is ideal for presentations, surfing the Internet, interactive 3D games, to mention just a few possibilities.
To use GyroMouse in the air:
1. Remove GyroMouse from its receiver/recharger cradle and hold it in a comfortable, relaxed position with your index finger on the Activate Button and your
thumb on the Select Buttons, as shown in the figure.
2. Click on any button to turn on GyroMouse. The LED (light) on the handset glows
green to indicate adequate battery charge.
3. Press and hold the Activate Button with your index finger to move the cursor.
4. While holding the Activate Button, move your wrist up, down, sideways, in a
manner similar to using a flashlight. The mouse cursor moves in the direction
desired.
5. Use your thumb to press the left/right mouse (select) buttons.
6. Double-click the Activate Button to keep the cursor continuously active. To stop the cursor, click the Acti-
vate Button on ce .
Tips - If your cursor movement is slower or faster than you desire, your cursor track-
ing and mouse click speeds can be customized using the Mouse Control Panel under
Windows 3.1, 95, 98, 2000, ME, NT, XP or Mac OS 8 and above.
GyroMouse responds to angular moveme nts in mid-air. You do not have to move your
entire arm; small and subtle wrist movements will control the cursor.
GyroMouse is not line-of-sight, so you do not have to point it at the receiver or
screen. Just hold it in a comfortable position!
Practice using GyroMouse in the air by opening a document in your favorite word processor. Navigate the cursor to the down-page scrolling arrow in the document window. Park the c urs or on the sc roll ing arro w by rele asing th e Activate button. You can
now scroll down pages without the cursor shifting its position.
CARE AND MAINTENANCE
Your GyroMouse is built for years of lasting performance. Below is a list of items that should help ensure that you
get maximum life and service from your GyroMouse.
To Charge Battery , place the GyroMouse back in the Recharging cradle after each use. The LED should initially
flash slowly—this indicates a “quick charge” mode. After 5 hours the LED will glow green indicating a “deep
charge” mode. A fully-charged NiMH battery will discharge in about three weeks of non-use if not on the charge
cradle.
Inspect and clean the mouse track ball and rollers, as needed. Dust and dirt will accumulate on the mouse
track ball over time. Use your thumbs to twist off the trac k ball cover. R emove the mouse ball and clean it with a
cotton-tip swab and diluted rubbing alcohol.
Important - The batteries included with your GyroMouse must be handled with care and disposed of
properly. Contact your local recycling center for more information on proper disposal.
3
Page 6

Installing or Removing the Batteries
1. From the top of the mouse, slide the battery cover open by pushing firmly
with your thumbs as shown.
2. Connect the battery to the mouse. Carefully align the slots on the battery
connector with the battery socket on the mouse. Insert battery connector
until it snaps into place. The battery connection is a one-way fit only: DO
NOT FORCE.
3. Place battery pack in compartment, replace the cover as shown. Make sure
wires do not interfere with the battery cover when closing.
4. Charge the battery overnight by placing GyroMouse on the receiver/
recharger cradle before its first use. The LED on the mouse slowly flashes
to indicate it is charging. When fully charged, the LED glows a solid green
and GyroMouse is ready for use.
Resetting the GyroMouse
Tech Tip - If your GyroMouse is connected properly (there is a cursor on the
screen) but is not working, try resetting your unit.
1. Open the battery door and unplug your battery.
2. Wait for 60 seconds.
3. Plug the battery back in
4. Set GyroMouse in its Receiver/Recharger Cradle for 5 seconds.
SPECIAL FEATURES
Power Saving Modes
GyroMouse enters a power-saving standby mode if it has remained motionless for 5 minutes. R eactiv ate by clicking any button or by moving it on the desktop. After 30 minutes GyroMouse powers down into a “sleep” mode.
Click any button to wake GyroMouse.
On-The-Fly RF Channel Changing
Your GyroMouse is a radio-controlled device and can be susceptible to various forms of electromagnetic interference. If GyroMouse is unresponsive to your movements-either on the desktop or in the air-change the RF channel by clicking on the Channel Select button and waiting for 3 seconds, then try using it again.
Multiple GyroMouse Trans mission Security
GyroMouse is designed to w ork inside a multi-GyroMouse environment: each uni t has a uniqu e 16 -digit address
to avoid incidental control from a neighboring unit. If another GyroMouse appears to be controlling your cursor,
re-dock the handset to the receiver cradle until the LED starts to flash. This sets a new 16-digit address for your
unit.
Trickle and Rapid Charge Mode s
GyroMouse NiMH batteries can hold a charge for approximately 13 hours of continuous use. However, it is recommended that you place GyroMouse in it s recei ver/recharger cradle whenever you leave your desk for any
length of time. If the GyroMouse is not in low-battery mode (LED on GyroMouse is on and not blinking)
1. Trickle charge mode begins immediately upon placing the GyroMouse handset in the receiver/charger. This
initial trickle charge lasts for 1 hour.
4
Page 7

2. After trickle charging for 1 ho ur, the un it ente rs r apid charge mode. The unit s tays in rap id charg e mode for
4 hours.
3. After 4 hours of rapid charging, the unit returns to trickle charge mode.
If the GyroMouse battery is extremely low on charge (LED on GyroMouse is blinking or off), rapid charge mode
begins immediately after placing GyroMo use on th e receiver /re cha rge r cradle.
INSTALLING AND USING THE STANDBY BATTERY KIT
Note: The Standby Battery Kit is included in the GyroMouse Presenter version only, or can be ordered separately at www.gyration.com (P/N GP4011)
The standby battery kit allows you to maintain a full charge on
a spare battery. To install and use the standby battery kit:
1. Turn off your computer.
2. Unplug the power plug from the bac k of the GyroMouse Receiver.
3. Plug the power plug of the Battery Charger unit into the back of the Receiver.
4. Plug the original power plug from the AC Adapter wall supply into the socket in the back of the Battery
Charger.
5. Plug the spare battery into the battery connector on the Battery Charger.
6. Turn on computer then re-dock your GyroMouse int o the Receiver cradle for 3 seconds.
The Standby Battery Kit will continuously trickle charge your spare battery.
GYROTOOLS USER'S GUIDE
Installing GyroTools
This procedure assumes your 3.5 inch floppy disk drive is Drive A. If not, substitute the appropriate drive letter
1. Insert the GyroTools disk into Drive A.
2. Choose Run from the Windows Start Menu.
3. Type “A:\setup” then click OK
4. Follow the on-screen instructions to complete the installation.
Overview
GyroTools features over 75 presentat ion tools, which can be assigned to these five GyroMouse events:
• Pressing and holding the right mouse button down.
• Double-clicking the right mouse button.
• Clicking the right and left buttons in quick succession (click right, then click left).
• “Gesturing” your GyroMouse vertically (flick your wrist up and down while in In-Air Mode, or rolling the
GyroMouse up and down while in Desk Mode).
• “Gesturing” your GyroMouse horizontally (flick your wrist left and right while in In-Air Mode, or rolling the
GyroMouse left and right while in Desk Mode).
Note: Tools can also be assigned to non-GyroMouse events, (e.g. keystroke combinations, screen “hot spots,”
etc.) by selecting Ot her Events from the View Menu.
5
Page 8

Configuring GyroTools
GyroMouse events are represented by buttons on the GyroTools configuration screen. There is a default conf i gu ration provided for you, which you may customize to your preference.
Right-clicking on these buttons will display a menu, which allows you to:
• Assign a tool to an event.
• Edit a tool’s properties.
• Assign a toolbar (which can contain many tools) to an event.
• Cut, copy and paste tools.
Operating GyroTools
A Tool assigned to an event will start when that event occurs. For example, using the default configuration:
• The scroll wheel function will begin when you gesture the GyroMouse vertically, allowing you to scroll up
and down in the active window.
• The pen tool will appear when you click and hold the right button, allowing you to draw on the screen.
Most tools stop autom at ica l ly. Tools requirin g u se r inte racti on , su ch a s the Pen tool, a re stopped by clicking the
right mouse button.
For detailed instructions on how to use the tools, consult the on-line help.
Toolbar
Toolbars allow you to display a toolbar from which you can select a tool.
Properties - The properties screen allows you to assign tools to the toolbar buttons.
Tabs & Buttons - Select the number of buttons and tabs for the toolbar.
Tools - Assign tools to the toolbar buttons.
Location - Specify where the toolbar is displayed.
Auto Select - When checked, the toolbar will automatically activate the tool beneath the cursor if it has been
stationary for more than half a second.
Preferences
The Preferences dialog box is displayed by selecting Preferences from the File menu. This dialog box allows you
to modify the following options:
Traybar Application - Select this option to have the application behave as a traybar application. The icon will
reside in the Windows system tray instead of the taskbar. The application can only be closed by right clicking on
the icon in the tray and selecting close.
Start Minimized - When selected, the application will start in a minimized state.
Automatically edit properties of new tools - When selected, a tools prop erti e s wi n dow will be displayed
immediately after a new tool has been assigned to an event.
Show tool tips - When selected, tool tips will be displayed when the mouse hovers above a button.
6
Page 9

TROUBLESHOOTING GUIDE
Problem Reason Solution
GyroMouse must be reset See Resetting the GyroM ouse on page 4.
GyroMouse is not activated. (In-air use
only.)
GyroMouse and receiver addresses are not
synchronizing
Radio interference (Receiver light is not flick-
ering consistently)
Cursor is visible but
shows no movement
Receiver needs to be reset Turn off PC. Unplug AC adapter from the
Batteries are dead or v ery low (Handset LED
is blinking or OFF)
Cursor moves erratically in mid-air
Cursor moves erratically in desktop mode
Cursor moves too fast
or too slow
Cursor not visible on
the screen
Radio interference (Receiver LED is not flickering consistently)
Mouse ball is dirty Clean the mouse ball (see maintenance sec-
Cursor speed set too fast or slow Adjust the cursor sensitivity in the Mouse Con-
GyroMouse is not installed properly Turn off your PC and make sure all cables are
AC adapter is not connected Make sure the AC adapter is plugged into the
Mouse driver is not installed properly Check for a correct Microsoft or Logitech
Receiver unit needs to be reset. T urn off PC. Unplug AC adapter from the
Radio interference (Receiver LED is not flickering consistently)
GyroMouse and Receiver Address are not
synchronizing
Double-click or hold down Activate button.
Place GyroMouse on receiver to re-s ynchronize, then remove and use.
Change channels until you f ind a s uitab le one.
Use the Channel Select button to toggle
through available channels. Move the receiver
away from other electronic sources (radios,
monitors, etc.)
receiver and wait 5 seconds. Plug the AC
adapter back into the receiver. Power on PC
Recharge the batteries by placing the mouse
back on the receiver for at least four hours. If
you own Standby Battery Kit (GP4011) replace
with spare battery.
Change channels. Use the Channel Select button to toggle through available channels. Move
the receiver away from other el ec t ronic
sources (radios, monitors, etc.). Re-dock onto
the receiver cradle to get a new address
tion of this User's Guide)
trol Panel.
attached firmly and GyroMouse is connected
to the correct mouse port
receiver and into a live wall outlet. Plug the AC
adapter power plug into the receiver only
when the computer is off.
mouse driver (PS/2 driver for PS/2 connection
or Serial driver for serial port connection).
Check your operating sys t em: it must be Windows 3.x/95/98/2000/ME/NT/XP or Mac OS8
or above (USB adapter required)
receiver and wait 5 seconds. Plug the AC
adapter back into the receiver. Power on PC
Use the Channel Select button to toggle
through available channels. Move the receiver
away from other electronic sources (radios,
monitors, etc.). Re-dock onto the receiver cr adle to get a new address
Place GyroMouse on receiver to re-s ynchronize, then remove and use.
7
Page 10

REGULATORY IN FORMATION
ATTENTION! THIS DEVICE EMITS RADIO FREQUENCIES AND HAS NOT BEEN CERTIFIED BY THE FAA FOR USE
ONBOARD AIRCRAFT. DO NOT USE THIS DEVICE AT ANY TIME ONBOARD CIVIL AIRCRAFT. TO MINIMIZE THE
POSSIBILITY OF INTERFERENCE, DISCONNECT THE BATTERY TO ENSURE THAT GYROMOUSE REMAINS OFF
DURING FLIGHT.
FCC Statement
This equipment has been tested and found to comply with the limits for a Class B digital device, pursuant to Part
15 of the FCC Rules. These limits are designed to provide reasonable protection against harmful interference in a
residential installation. This equipment generates, uses and radiates radio frequency energy and, if not installed
and used in accordance with the instructions, may cause harmful interference to radio communications. However, there is no guarantee that interference will not occur in a particular installation. If this equipment does
cause harmful interference to radio or television reception, which can be determined by turning the equipment
off and on, the user is encouraged to try to correc t t he i nterference by one or more of the following measures:
1. Reorient or relocate the receiving antenna (television, radio, etc.).
2. Increase the separation between the equipment and receiver.
3. Connect the equipment to an outlet on a circuit different from that to which the receiver is connected.
4. Consult the dealer or an experienced radio/TV technician for additional help.
Caution: Changes or modifications not expressly approved by the party responsible for compliance could void
the user's authority to operate the equipment. Contact Gyration, Inc., 12930 Saratoga Avenue, Bldg. C,
Saratoga CA 95070. Technical Support tel: 408 973-7086. This device complies with Part 15 of the FCC Rules.
Operation is subject to the following two conditions: (1) this device may not cause harmful interference, and (2)
this device must acce pt a ny inte rf e ren ce r ec eive d, in cl u din g i n terference that may cause un d esired operation.
Warning: Using this product in any way other than as described in this manual or altering the antenna in any way
may violate FCC rules. FCC ID JJ4-GP9450-H (Handset) FCC ID JJ4-GP9450-R (Receiver)
Canadian Radio Interference Reg u latio ns
This Class B digital apparatus meets all requirements of the Canadian Interference Causing Equipment Regulations. Cet appareil numérique de la classe B respecte toutes les exigences du Règelement sur le matériel brouilleur du Canada.
CONTACTING GYRATION
If you have any questions on your new Gyration product, please use any of the phone/F AX numbers or addresses
below:
Main Office
Gyration, Inc.
12930 Saratoga Avenue, Bldg. C
Saratoga CA 95070
USA
Phone: 408-255-3016 Fax: 408-255-9075
Sales
Phone: 800-316-5432 (To ll- free in US and Canada) Fax: 408-351-4433 Email: sales@gyration.com
Technical Support
Phone: 408-973-7086 Email: support@gyration.com
World Wide Web
www.gyration.com
WARRANTY INFORMATION
Your GyroMouse comes with a one-year hardware warranty. Gyration, Inc., (Gyration) warrants the GyroMouse
against defects in material and workmanship for a period of one year from the date of purchase from Gyration or
an authorized Gyration agent. This warranty applies only to the original purchaser of the GyroMouse and is not
8
Page 11

transferable. This warranty does not cover any incompatibilities due to the user's computer, hardware, software
or any other related system configuration in which GyroMouse interfaces. Proof of purchase will be required
before any warranty consideration by Gyration occurs.
This warranty does not cover any damage caused by negligence, non-authorized modifications, or parts installed
without prior written permission from Gyration.
This warranty does not apply if the product has been damaged by accident, abuse, misuse, or misapplication,
nor as a result of service to the product by anyone other than by Gyration.
GYRATION IS NOT RESPONSIBLE FOR ANY LOST PROFITS, LOST SAVINGS OR OTHER INCIDENTAL OR CONSEQUENTIAL DAMAGES ARISING OUT OF THE USE OF, OR INABILITY TO USE, THIS PRODUCT. THIS INCLUDES
DAMAGE TO PROPERTY AND, TO THE EXTENT PERMITTED BY LAW, DAMAGES FOR PERSONAL INJURY. THIS
WARRANTY IS IN LIEU OF ALL OTHER WARRANTIES INCLUDING IMPLIED WARRANTIES OF MERCHANTABILITY
AND FITNESS FOR A PARTICULAR PURPOSE.
Some states do not allow limitation of implied warranties, or exclusion or limitation of incidental or consequential
damages, so the above limitations may not apply to you. This warranty gives you specific legal rights. You may
have other rights which may vary from state to state.
This warranty applies only to this product, and is governed by the laws of the State of California.
9
Page 12

GyroMouse Pro,
GyroMouse Presenter
and GyroTools
User’s Guide
PA00106-001 Rev. D
Gyration, Inc.
12930 Saratoga Avenue, Bldg. C
Saratoga, CA 95070
1.800.316.5432
www.gyration.com
 Loading...