

Page 1
GYR3101US
UNIVERSAL MEDIA CENTER
AND PC REMOTE CONTROL
United States Version
Page 2

Table Of Contents
Introduction . . . . . . . . . . . . . . . . . . . . . . . . . . . . . . . . . . . . . . . . . . . . . . . . . . . 1
Battery Installation and Information . . . . . . . . . . . . . . . . . . . . . . . . . . . . . . . . . 1
Battery Saver . . . . . . . . . . . . . . . . . . . . . . . . . . . . . . . . . . . . . . . . . . . . . . . . . . 1
Gyro Operation. . . . . . . . . . . . . . . . . . . . . . . . . . . . . . . . . . . . . . . . . . . . . . . . . 2
Product Diagram . . . . . . . . . . . . . . . . . . . . . . . . . . . . . . . . . . . . . . . . . . . . . . . 3
Button Cluster Locations . . . . . . . . . . . . . . . . . . . . . . . . . . . . . . . . . . . . . . . . . . 3
RCU Mode Selection . . . . . . . . . . . . . . . . . . . . . . . . . . . . . . . . . . . . . . . . . . . . . 4
Transport Control . . . . . . . . . . . . . . . . . . . . . . . . . . . . . . . . . . . . . . . . . . . . . .5-6
Menu Navigation . . . . . . . . . . . . . . . . . . . . . . . . . . . . . . . . . . . . . . . . . . . . . .7-8
Gyro Activation/Select . . . . . . . . . . . . . . . . . . . . . . . . . . . . . . . . . . . . . . . . . . . 8
Channel/Volume Control & Media Center Green Button . . . . . . . . . . . . . . . . .9-10
MCE Shortcut Buttons . . . . . . . . . . . . . . . . . . . . . . . . . . . . . . . . . . . . . . . . . . . 11
Numeric Keypad. . . . . . . . . . . . . . . . . . . . . . . . . . . . . . . . . . . . . . . . . . . . . . . 11
RF Sync, Setup, DVD Menu, Input . . . . . . . . . . . . . . . . . . . . . . . . . . . . . . . . . . 12
Backlighting. . . . . . . . . . . . . . . . . . . . . . . . . . . . . . . . . . . . . . . . . . . . . . . . . . 12
ON/OFF Switch. . . . . . . . . . . . . . . . . . . . . . . . . . . . . . . . . . . . . . . . . . . . . . . . 12
Receiver Installation . . . . . . . . . . . . . . . . . . . . . . . . . . . . . . . . . . . . . . . . . . . . 13
Setting Up and Synchronizing the Remote and the Transceiver . . . . . . . . . . . . . 14
Programming the Remote. . . . . . . . . . . . . . . . . . . . . . . . . . . . . . . . . . . . . . . . 14
Find Out If You Need to Program the Remote. . . . . . . . . . . . . . . . . . . . . . . . . . 14
Programming Methods . . . . . . . . . . . . . . . . . . . . . . . . . . . . . . . . . . . . . . . .15-16
Using Automatic Code Search . . . . . . . . . . . . . . . . . . . . . . . . . . . . . . . . . . . . . 15
Using Direct Entry. . . . . . . . . . . . . . . . . . . . . . . . . . . . . . . . . . . . . . . . . . . . . . 16
Using the Remote to Control Your Components. . . . . . . . . . . . . . . . . . . . . . . . . 16
Volume Punch Through . . . . . . . . . . . . . . . . . . . . . . . . . . . . . . . . . . . . . . . . . . 16
Learning . . . . . . . . . . . . . . . . . . . . . . . . . . . . . . . . . . . . . . . . . . . . . . . . . .17-18
Learning Tips . . . . . . . . . . . . . . . . . . . . . . . . . . . . . . . . . . . . . . . . . . . . . . . . . 17
Code Learning . . . . . . . . . . . . . . . . . . . . . . . . . . . . . . . . . . . . . . . . . . . . . . . . 17
Learning Commands. . . . . . . . . . . . . . . . . . . . . . . . . . . . . . . . . . . . . . . . . .17-18
Clearing an Individual Learned Function . . . . . . . . . . . . . . . . . . . . . . . . . . . . . 19
Deleting All Learned Functions. . . . . . . . . . . . . . . . . . . . . . . . . . . . . . . . . . . . . 20
Troubleshooting . . . . . . . . . . . . . . . . . . . . . . . . . . . . . . . . . . . . . . . . . . . . .20-21
Remote Code List . . . . . . . . . . . . . . . . . . . . . . . . . . . . . . . . . . . . . . . . . . . .22-50
Page 3

Introduction
This users’ manual describes the operation of the Gyration Universal 4-in-1 (3 IR devices
+ 1 RF device) Media Center and PC Remote Control Unit (RCU). The RCU contains an
embedded micro gyro for motion sensing and in-air control of floating cursor. This RCU
features IR code database and IR learning capabilities to universally control standard home
theater devices such as TVs, VCRs, Digital Video Recorders (DVR), DVD players, CD players,
cable/SAT boxes, etc.
The RCU is also equipped with a 2.4 GHz RF transceiver to send cursor movement
information and other commands to the PC via a USB transceiver. The radio frequency (RF)
transceiver delivers a range of up to 100 feet with no line-of-sight requirement. The 800
possible channels of the RF transceiver provide high resistance to interference from other
radio devices.
Battery Installation and Information
The Media Center and PC RCU requires two AA Alkaline batteries. To install the batteries:
1. Remove the battery compartment cover.
2. Insert the batteries, matching the batteries to the (+) and (-) marks inside the battery
compartment.
3. Replace the battery compartment cover and snap it into place.
Note: Reprogramming may be required after batteries are replaced.
Battery Saver
The RCU saves battery power by automatically going into a low-power state if no button is
pressed after a few seconds. See the Gyro section for gyro battery saver mode.
Product Registration Information
Keep your sales receipt to obtain warranty parts and service and for proof of purchase.
Attach it here and record the serial number in case you need it. The serial number is located
on the product.
Model Number _______________________________
Serial Number ______________________ Purchase Date _____________
Dealer/Address/Phone ________________________________________
1
Page 4
Gyro Operation
The RCU provides in-air control of the PC’s
cursor via patented gyroscopic motion
sensing technology. This means mouse-like
cursor control, from anywhere in the
room, without the need of a flat surface.
There is no line-of-sight requirement
so you don’t have to point the RCU at the PC
you are controlling. Remember the
following things when using the in-air cursor
control feature of the RCU:
• Use your thumb to press the gyro and
mouse buttons.
• Click the center button to activate the
gyro motion-sensing control. Single click
and hold to move the cursor and release
it to “park” the cursor where you want it.
Double click the center button and release it
for continuous cursor movement similar to a
standard mouse.
• The right and left buttons function like
standard mouse right-click and left-click
buttons.
• Move the cursor by flexing your wrist, not
your arm or body, much as you would with
a flashlight; side to side and up and down.
Placing your arm on an armrest or on your
lap will make this motion more comfortable.
• The RF Transmit LED indicates when gyro
motion or other information is being sent
independent of which mode is selected on
the RCU.
2
Page 5
Product Diagram
Remote Control Unit
mode selection
and power
Transport control
Menu navigation
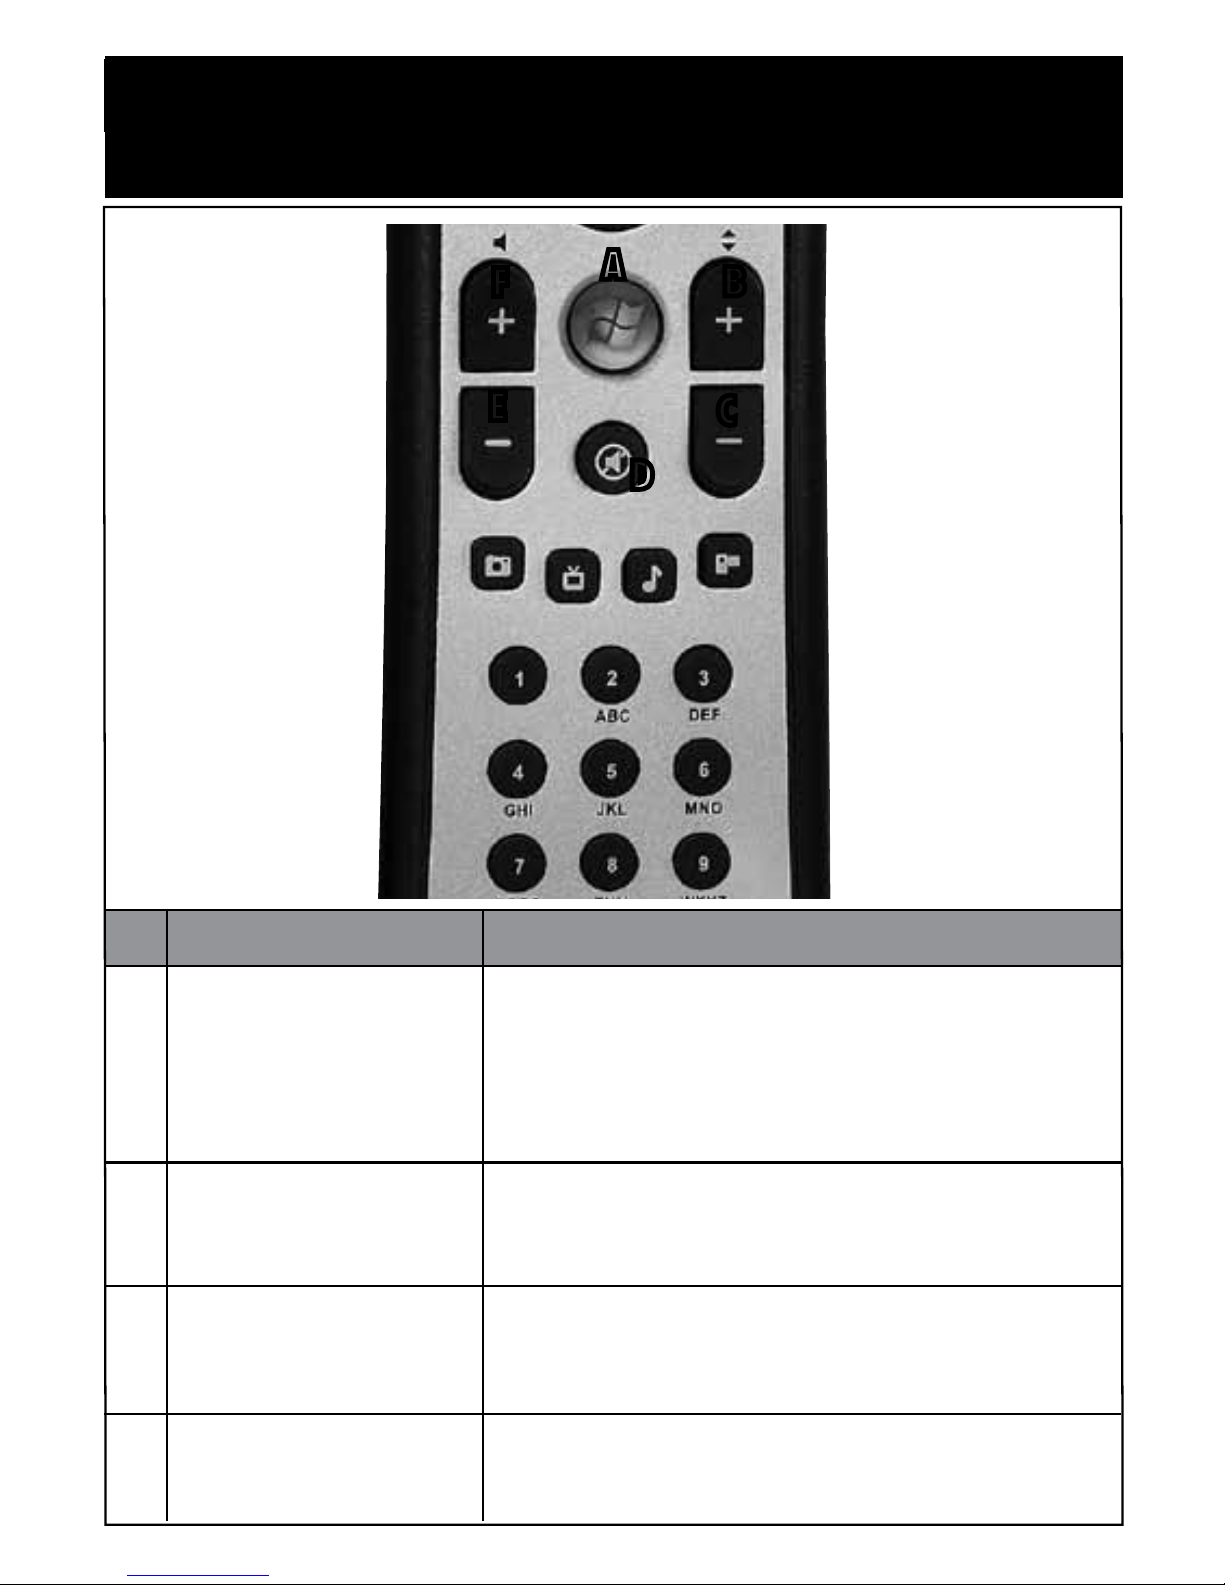
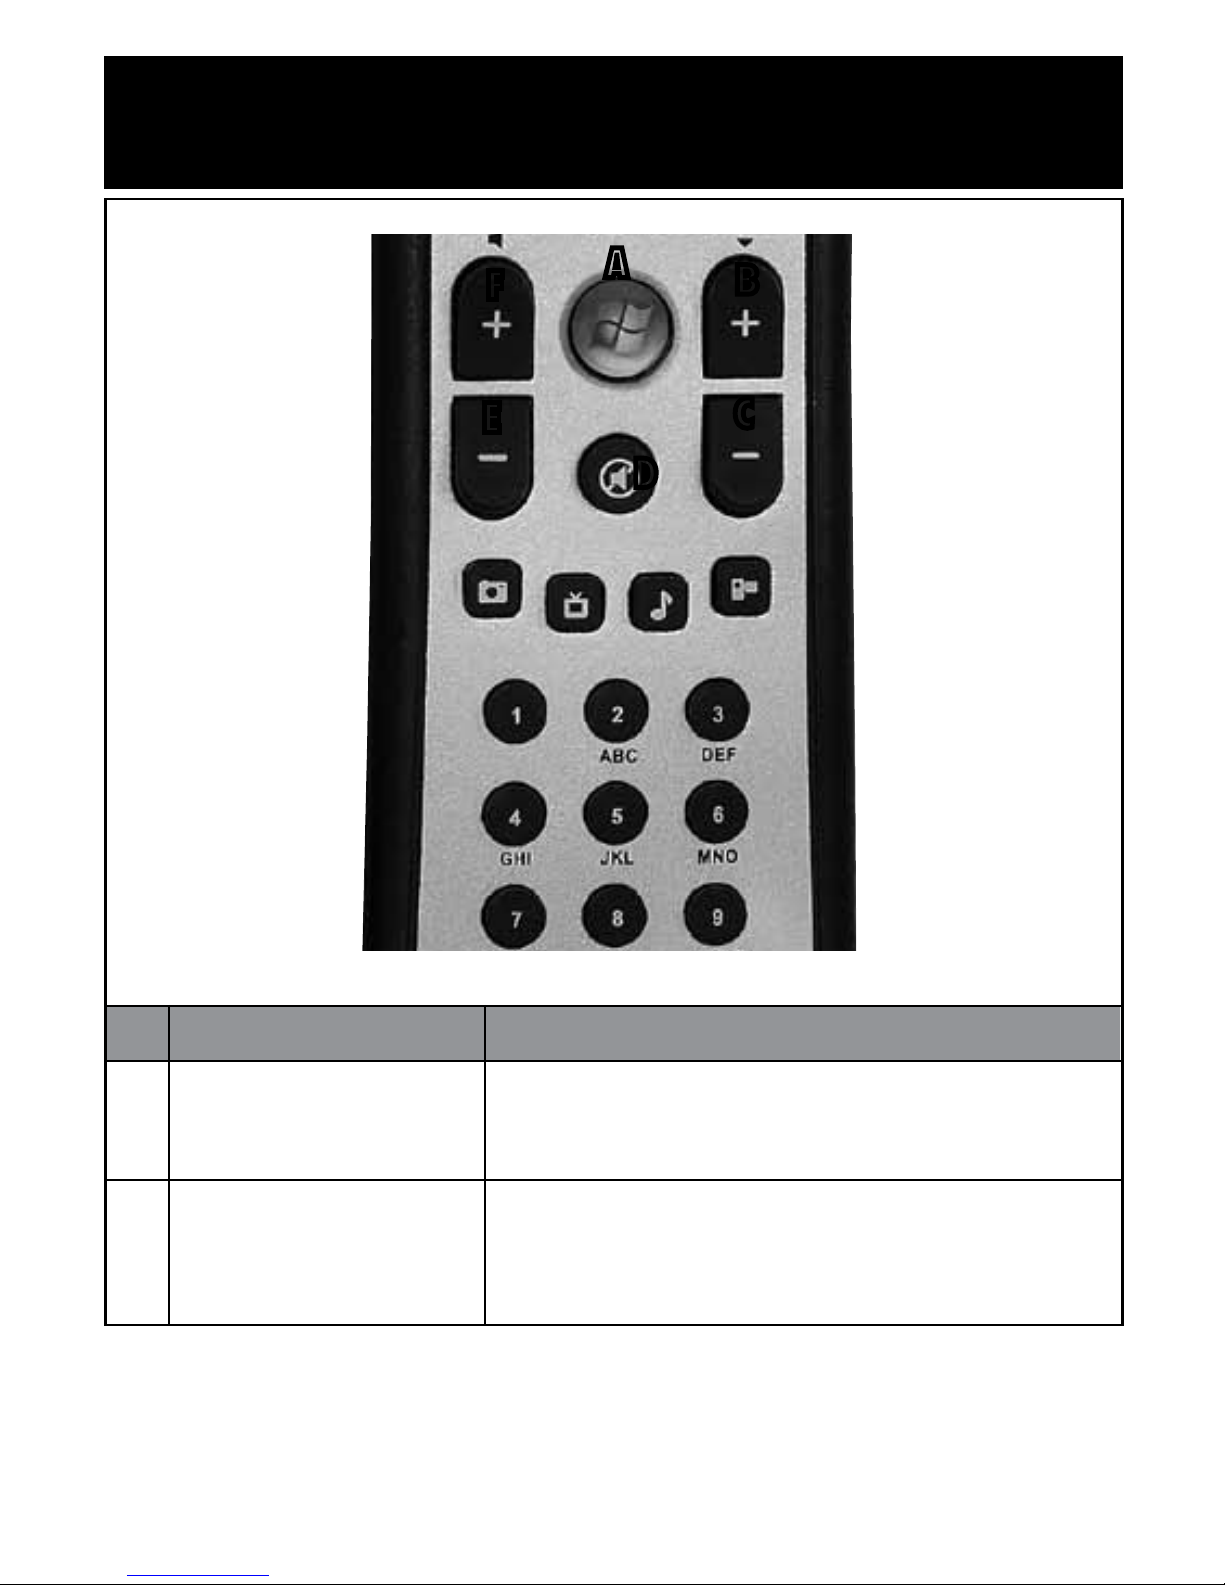
Gyro button cluster
Volume and Channel
control, (MCE Green
Button), Mute
Media Center shortcuts
Alphanumeric keypad
Setup and Device
Control
Selects device mode
(PC, TV,
CAB/SAT, AUX). Powers
on/off selected device.
AV control for selected transport
or Windows Media Player,
Windows Media Center, DVR, etc.
Menu navigation: up, down, left,
right, OK. Includes LIVE TV,
GUIDE, BACK and MORE.
Center button activates gyro for
in-air cursor control. Outer
buttons function like standard
left and right mouse buttons.
Volume up/down, channel
up/down, Media Center (The
Green Button) and volume mute.
Shortcuts buttons include:
MY TV, MY PICTURES, MY
MUSIC, MY VIDEOS.
0-9 keys with alpha characters,
plus*, , CLEAR and ENTER
CONNECT, SETUP, LAST,
DVD, MENU, INPUT
Button Cluster Locations
A
B
C
D
E
F
G
H
Button Cluster Function
A
B
C
D
E
F
G
H
3
Page 6
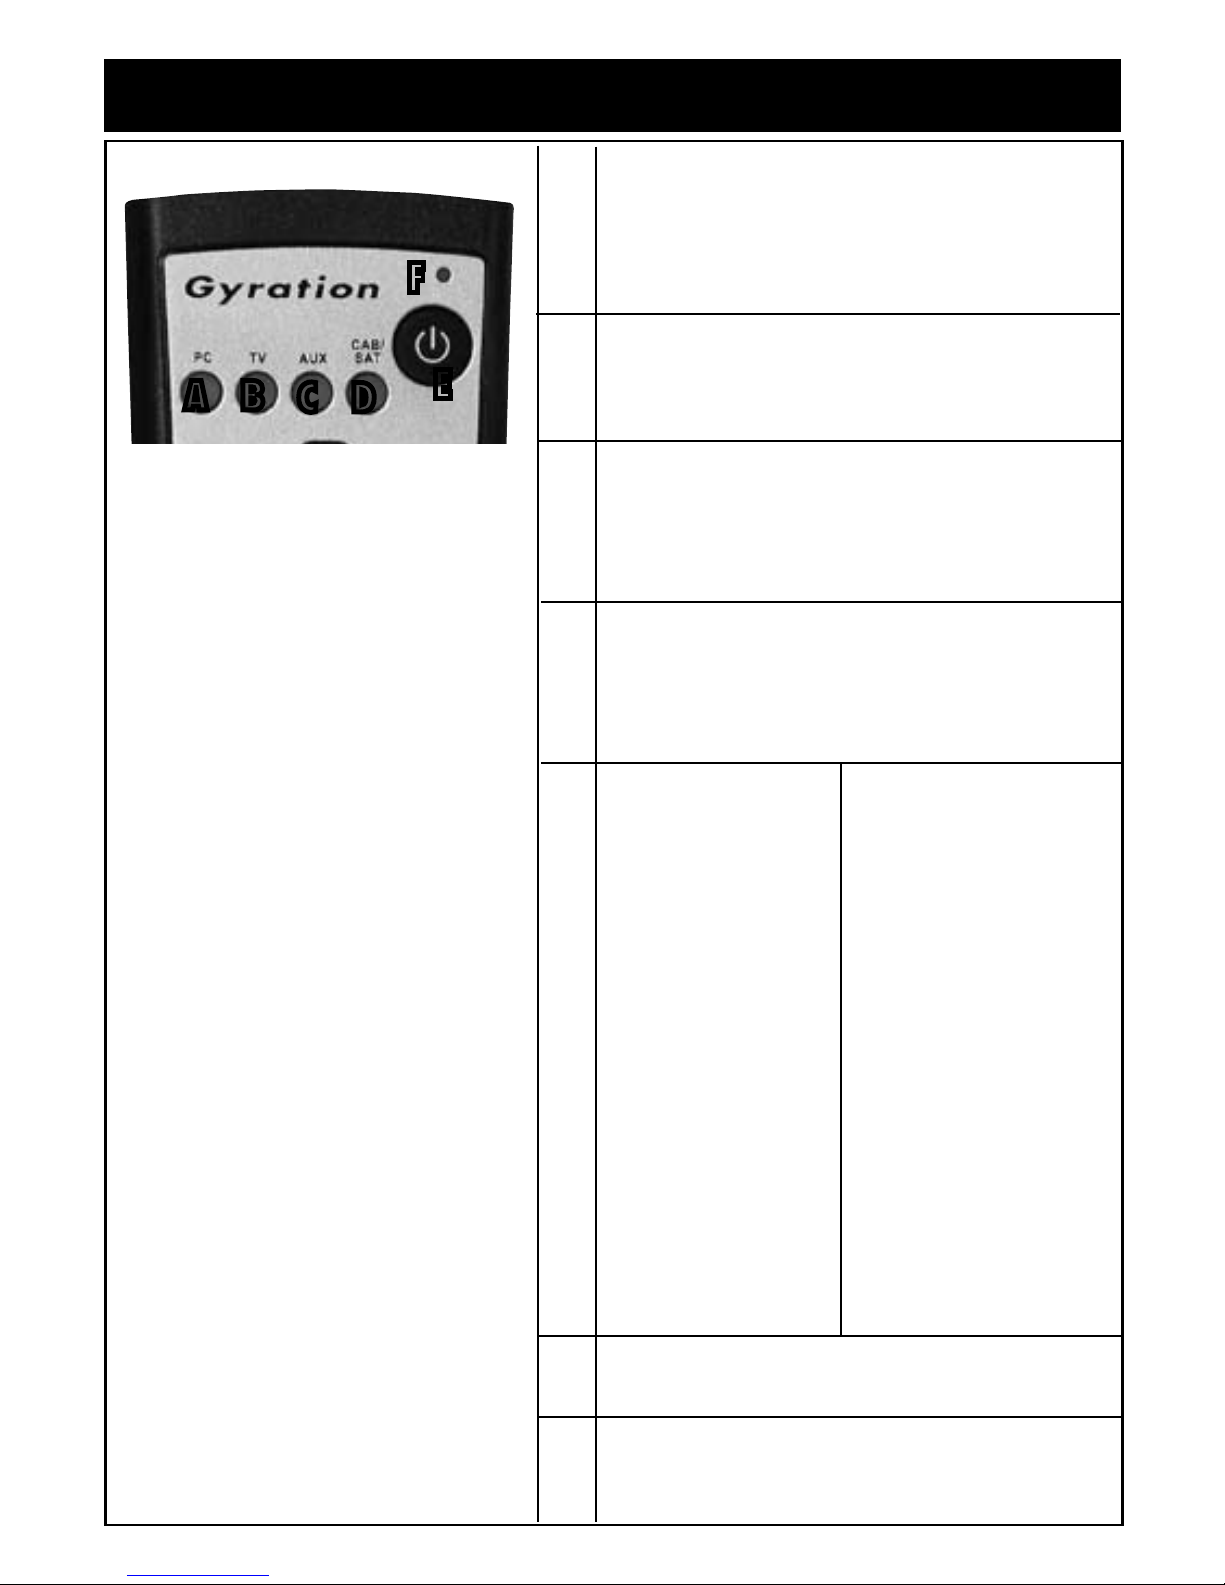
RCU Mode Selection
Puts RCU into PC control mode for
communicating with Media Center PC via
RF protocol.
Puts RCU into TV control mode for
communicating with TV via IR protocol.
Puts RCU into AUX control mode for
communicating with additional learned
device via IR protocol.
Puts RCU into CAB/SAT control mode for
communicating with cable or satellite set-top
box via IR protocol.
Transmit LED indicator for RF transmission
A
B
C
D
E
F
PC, TV, AUX or
CAB/SAT mode:
Powers on/off the
selected device.
PC Mode:
Issues a standby
command. If the
system is active, the
first button press puts
it into standby mode
and the second button
press issues a power
down command. If
the system is already
in standby mode, a
button press may
awaken*.
*See ON/OFF Switch section for details.
4
A B
C D
E
F
Page 7
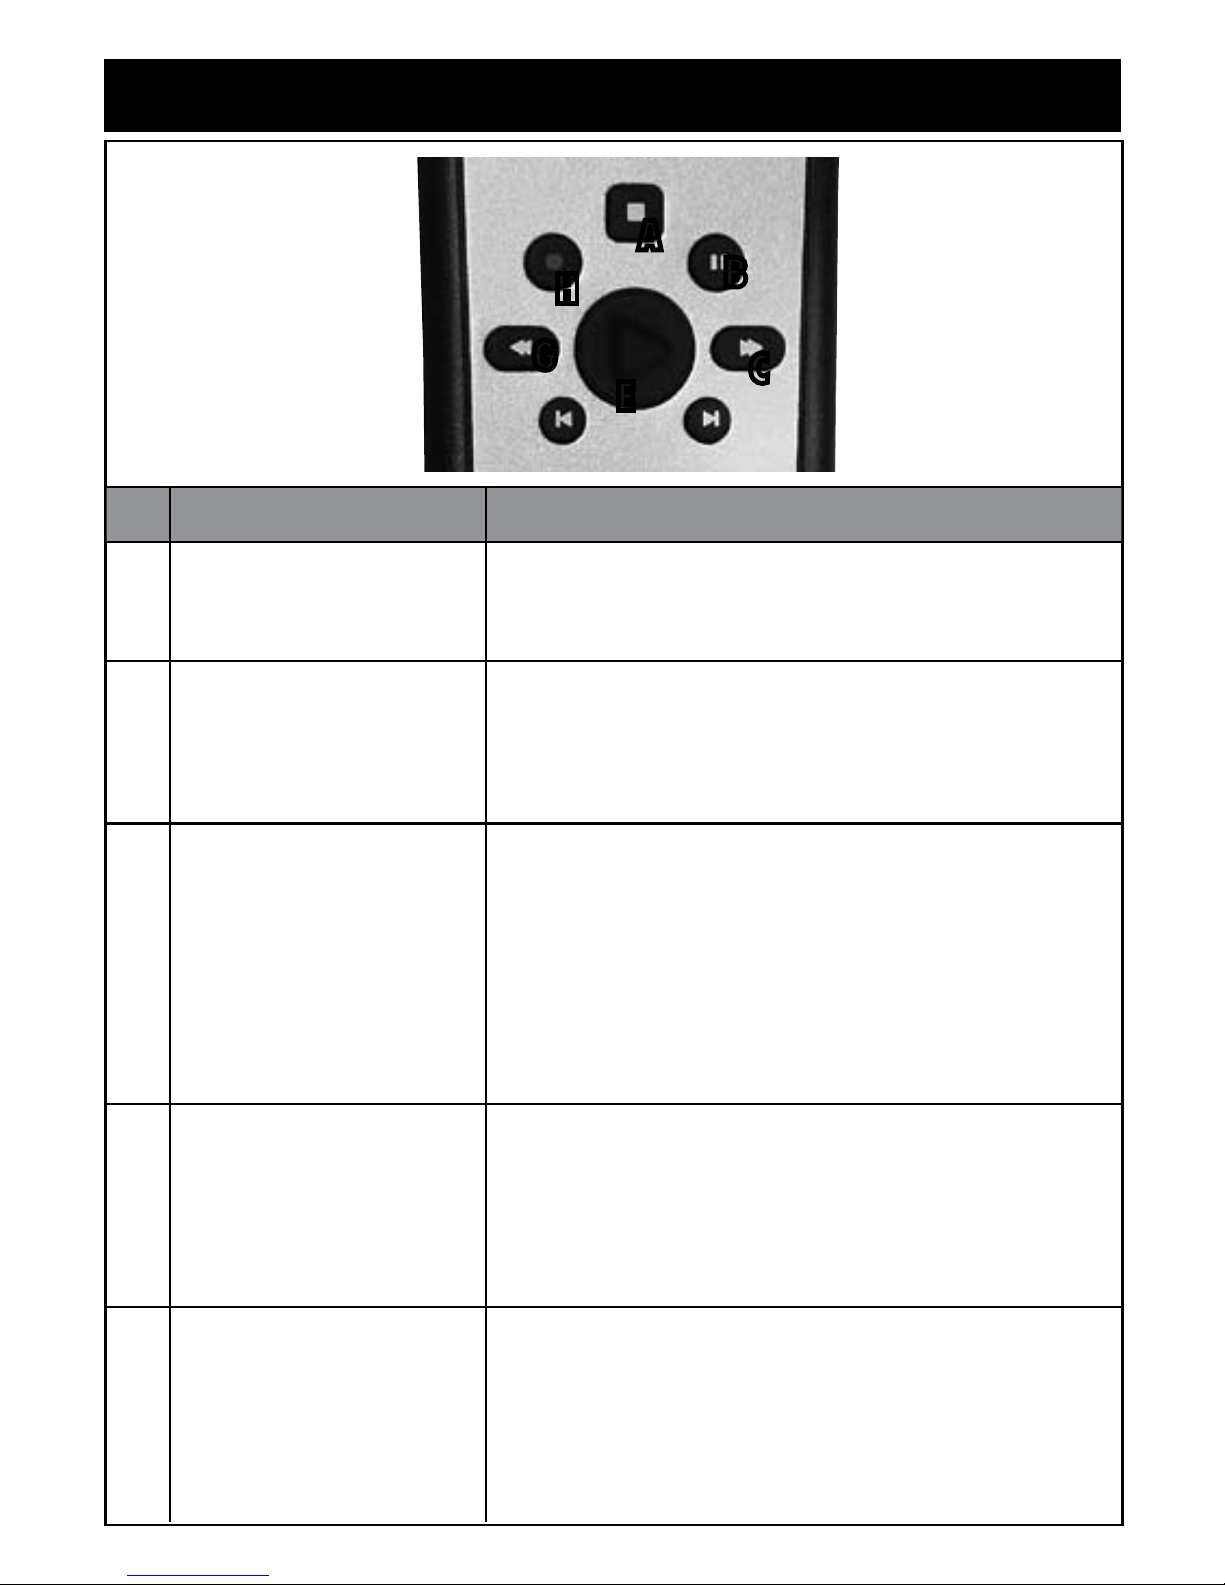
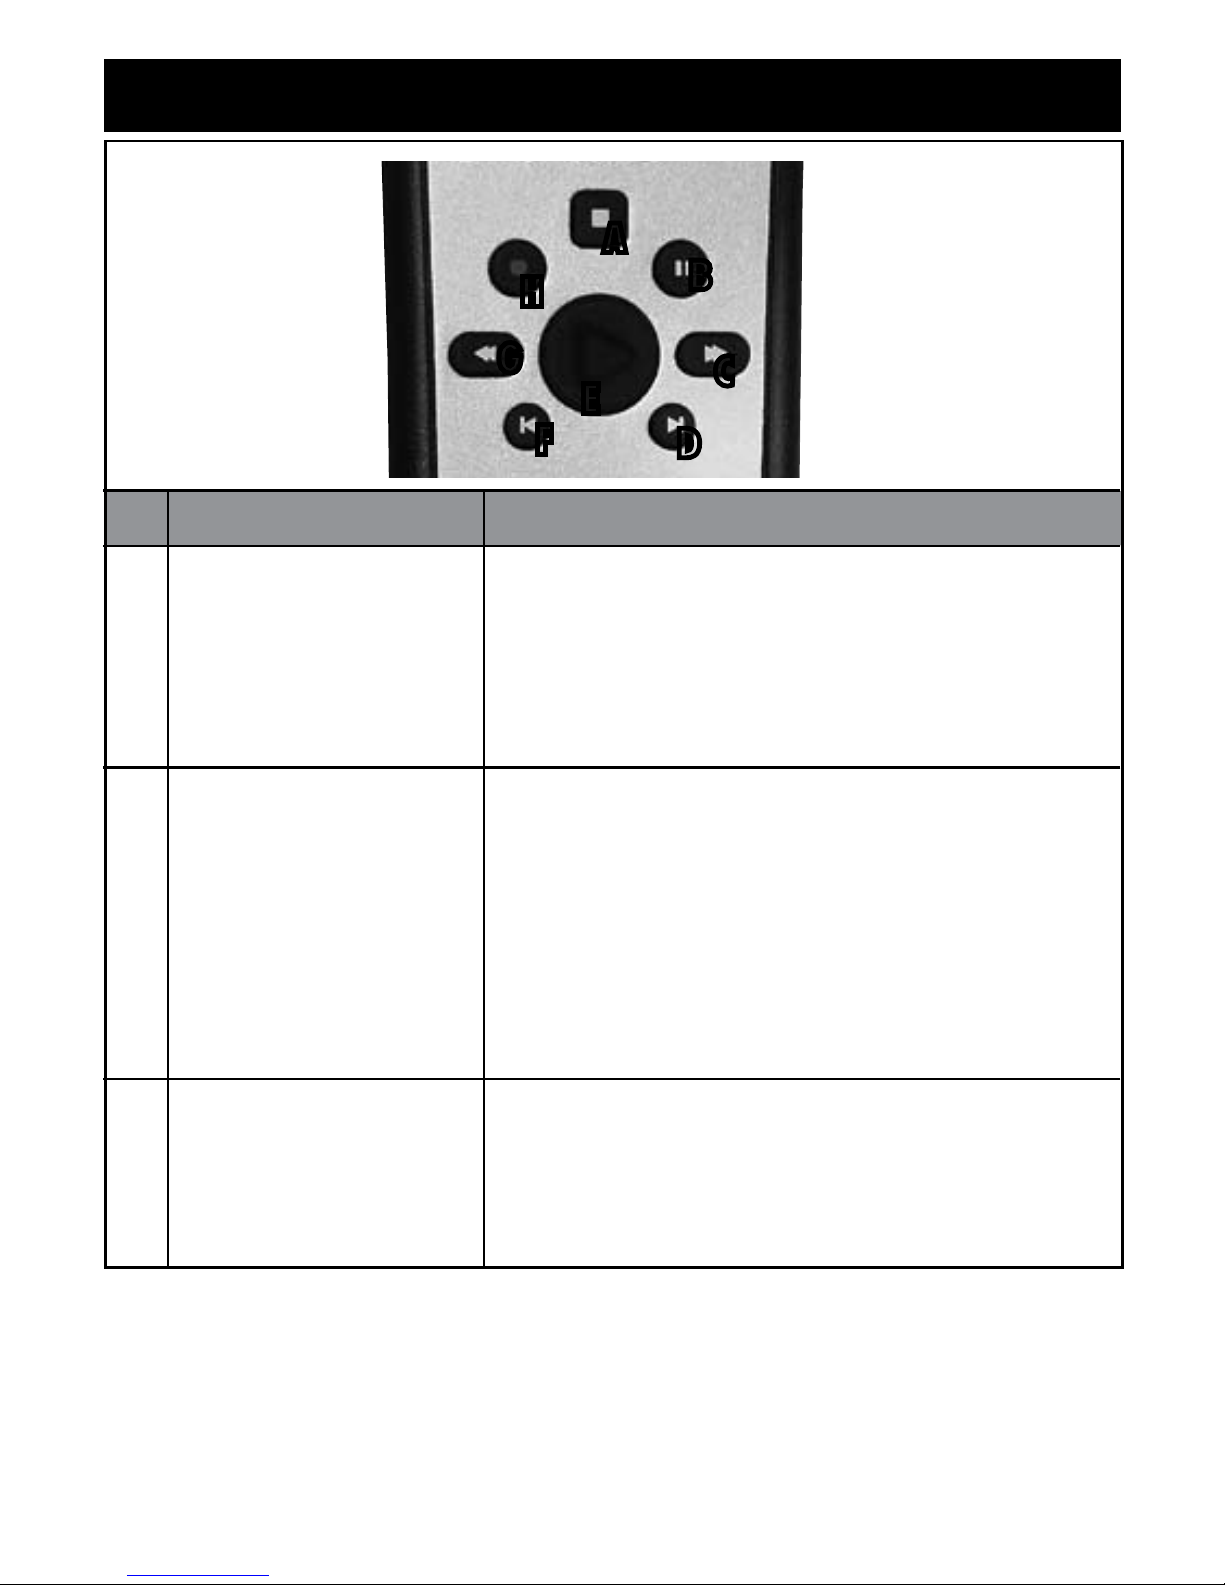
Transport Control
Puts selected device into
Stop mode, if supported
Puts selected device into
Pause mode, if supported
Puts selected device into
Fast Forward mode, if
supported
Skip command, if
supported by selected
device
Puts selected device into
Play mode, if supported
A
B
C
D
E
Stops media playback and positions pointer to start
of media
First button press pauses the media at present position.
Subsequent button presses toggles between pause and
playback at present position pointer.
First press speeds up the time base of the media
stream to the first FF value (3X). If media is a slide
show, skips to next picture.
Subsequent button presses cycle through the FF speed
values looping through 0 (normal speed) 3X, 20X,
60X. If slide show, skips to next picture.
Skips ahead an increment:
CD and Playlists skip to next song. DVD skips to next
chapter. Slide show skips to next picture. DVR skips
29 seconds.
Start (if paused, continue) playback of media at
present position pointer. Used by Media Center for
Media Center media, DVR, CD/DVD, playlists and
slide shows.
PC, TV, AUX or CAB/SAT mode
PC Mode
D
F
5
A
B
C
E
G
H
Page 8
Transport Control
Replay command, if
supported by selected
device
Puts selected device
into Rewind mode, if
supported
Puts selected device into
Record mode, if supported
F
G
H
Move the position pointer back an increment:
CD and Playlist: skips back to previous song. DVD:
skips back to previous chapter. Slide show: skips back
to previous picture. DVR skips back 7 seconds
First press speeds up the time base and reverses
direction of the media stream to the first rewind value
(3X). If media is a slide show, skips to previous picture.
Second press cycles through the RWD speed values
looping through 0 (normal speed) 3X, 20X, 60X. If
media is a slide show, skips to previous picture
Records the TV show to disk. Starts recording at the
beginning of the show as defined by on-screen TV
program guide (if the pause buffer enables it)
PC, TV, AUX or CAB/SAT mode
PC Mode
A
B
C
D
E
F
G
H
6
Page 9
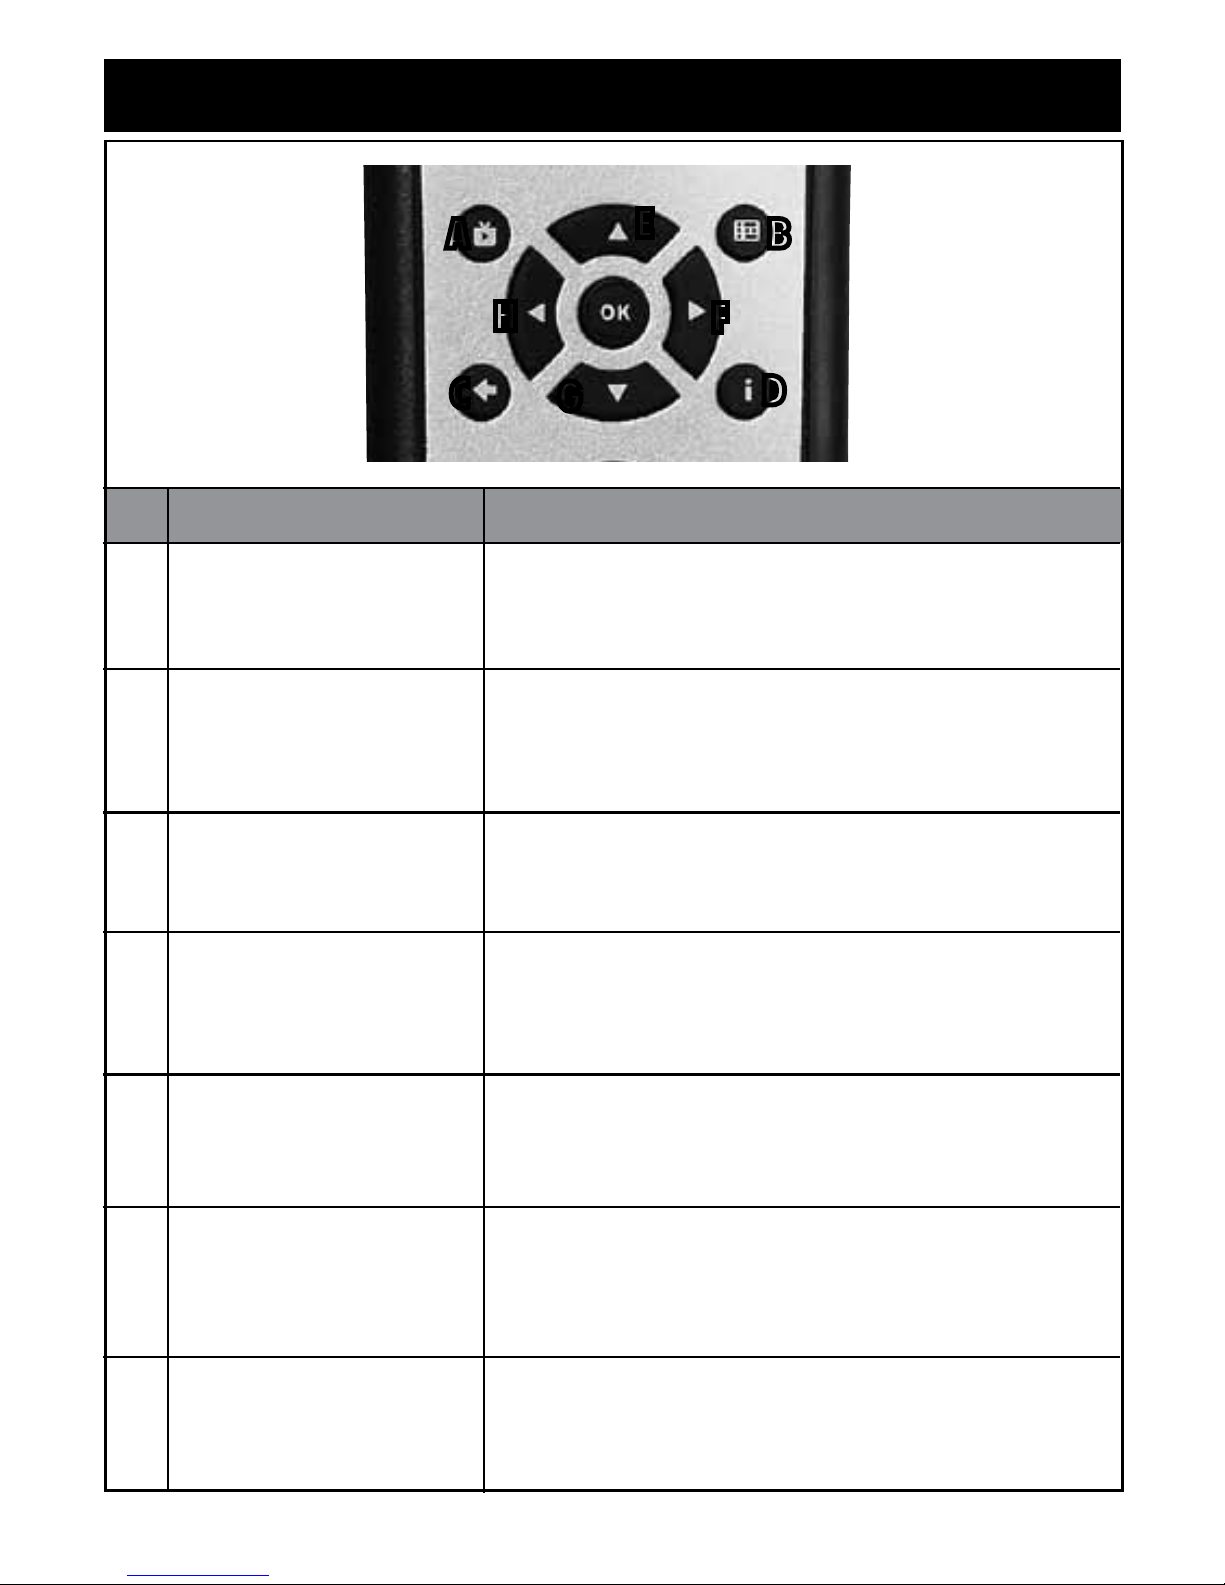
Menu Navigation
No action, or as defined
by selected device
No action, or as defined
by selected device
No action, or as defined
by selected device
No action, or as defined
by selected device
Menu Navigation Up
Menu Navigation Right
Menu Navigation Down
A
B
C
D
E
F
G
Brings live TV to the front to the last channel user was
watching.
Invokes the on-screen TV program guide via Media Center
Goes back one location of the user interface back stack
Provide information if available for the focus point
Moves the focus point up one location, if at top of the
screen takes no action
Moves focus point right one position, if at rightmost
position takes no action
Moves the focus point down one location, if at bottom of
the screen takes no action
TV, AUX or CAB/SAT mode
PC Mode
A B
C
D
E
F
G
H
7
Page 10
Menu Navigation
Menu Navigation Left
Performs action indicated
by focus point
H
I
Moves focus point left one position, if at leftmost position
goes back 1 page in the user interface stack
Performs action indicated by focus point
TV, AUX or CAB/SAT mode
PC Mode
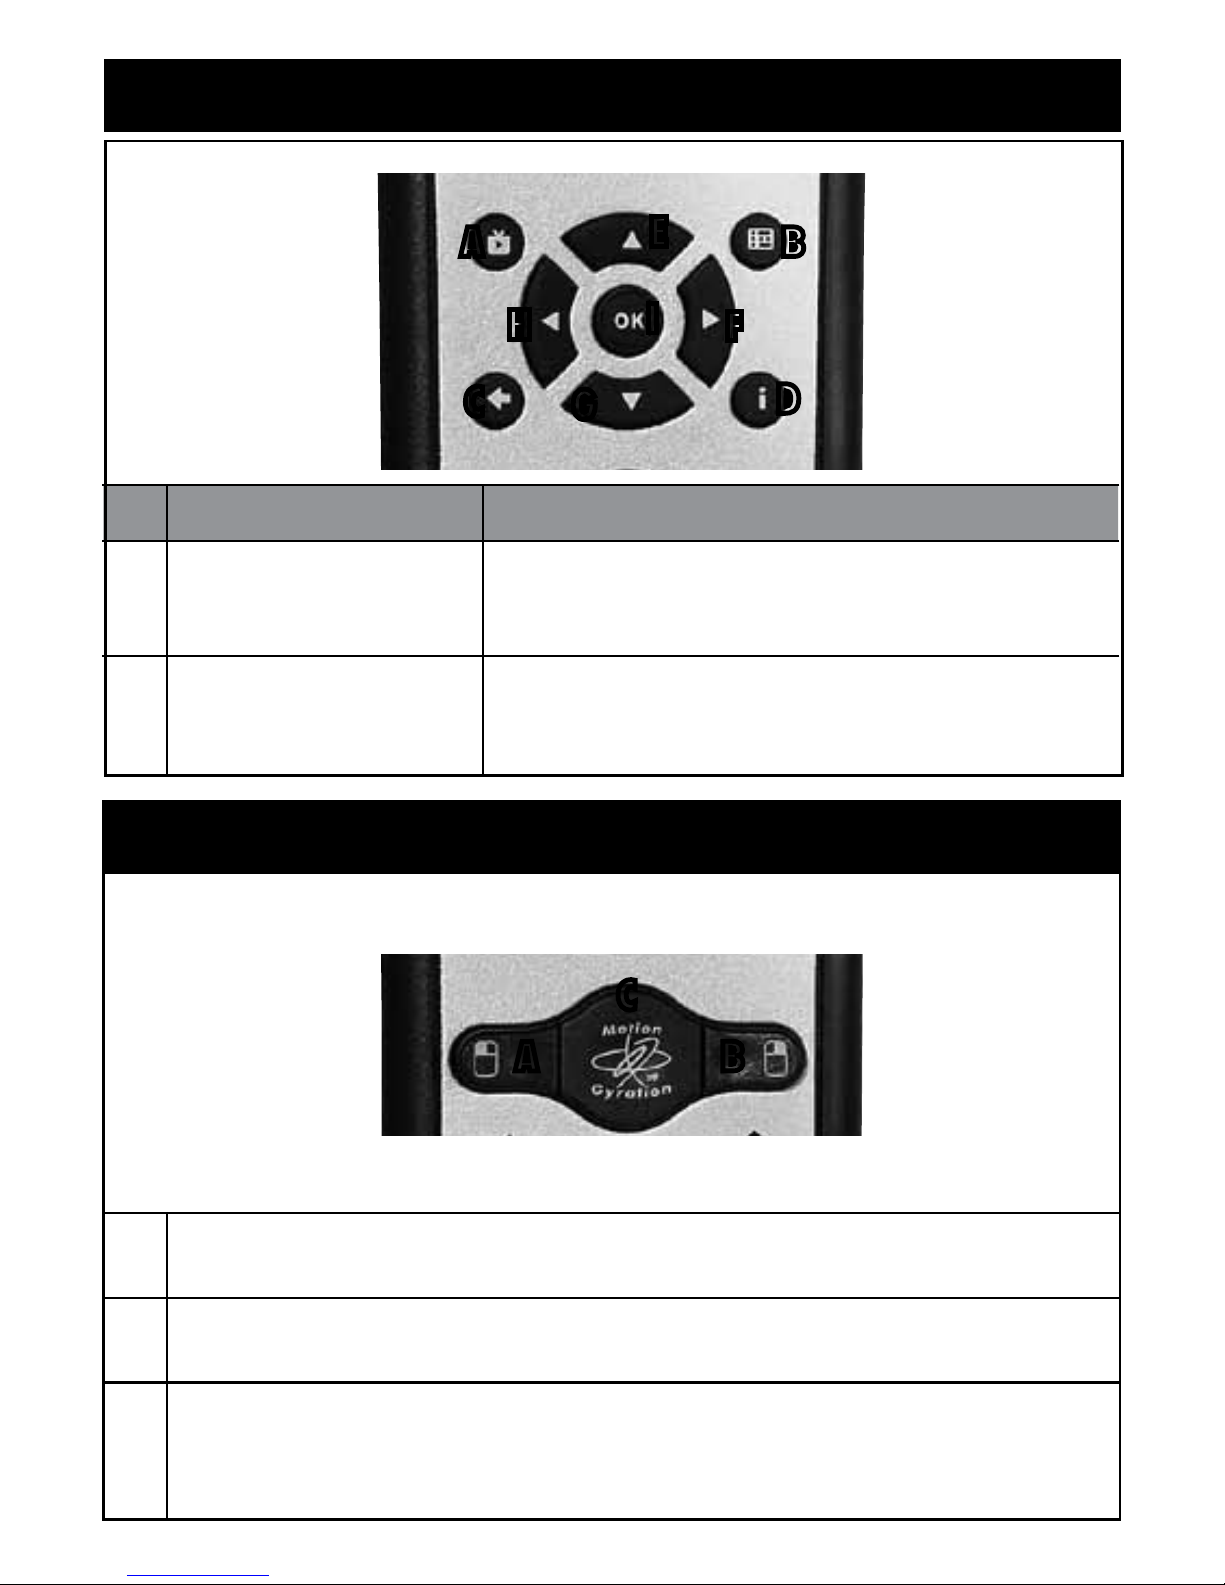
Simulates a left-mouse button-click
Simulates a right-mouse button-click
Activates gyroscope for motion-sensing cursor control, motion-sensing menu
navigation, or other motion-sensing features
A
B
C
A
B
C
Gyro Activation/Select
A B
C
D
E
F
G
H
I
8
Page 11
Go to Media Center
Home page, launch
Media Center if not
running already
Increment the current
channel by 1
Decrement the current
channel by 1
Mute selected device, if
applicable
A
B
C
D
Go to Media Center Home page, launch Media Center if
not running already
Increment the current channel by 1. If in a list view,
move forward a page in the list.
Decrement the current channel by 1. If in a list view,
move back a page in the list.
Mute the entire PC volume, toggle mute state
PC, TV, AUX or CAB/SAT mode
PC Mode
A
B
C
D
E
F
Channel/Volume Control & Media
Center Green Button
9
Page 12
Decrement the current
volume by 1 unit
Increment the current
volume by 1 unit
E
F
Decrement the current volume by 1 unit. If muted,
un-mute the volume first.
Increment the current PC volume by 1 unit. If muted,
un-mute the volume first.
PC, TV, AUX or CAB/SAT mode
PC Mode
Channel/Volume Control & Media
Center Green Button
10
A
B
C
D
E
F
Page 13
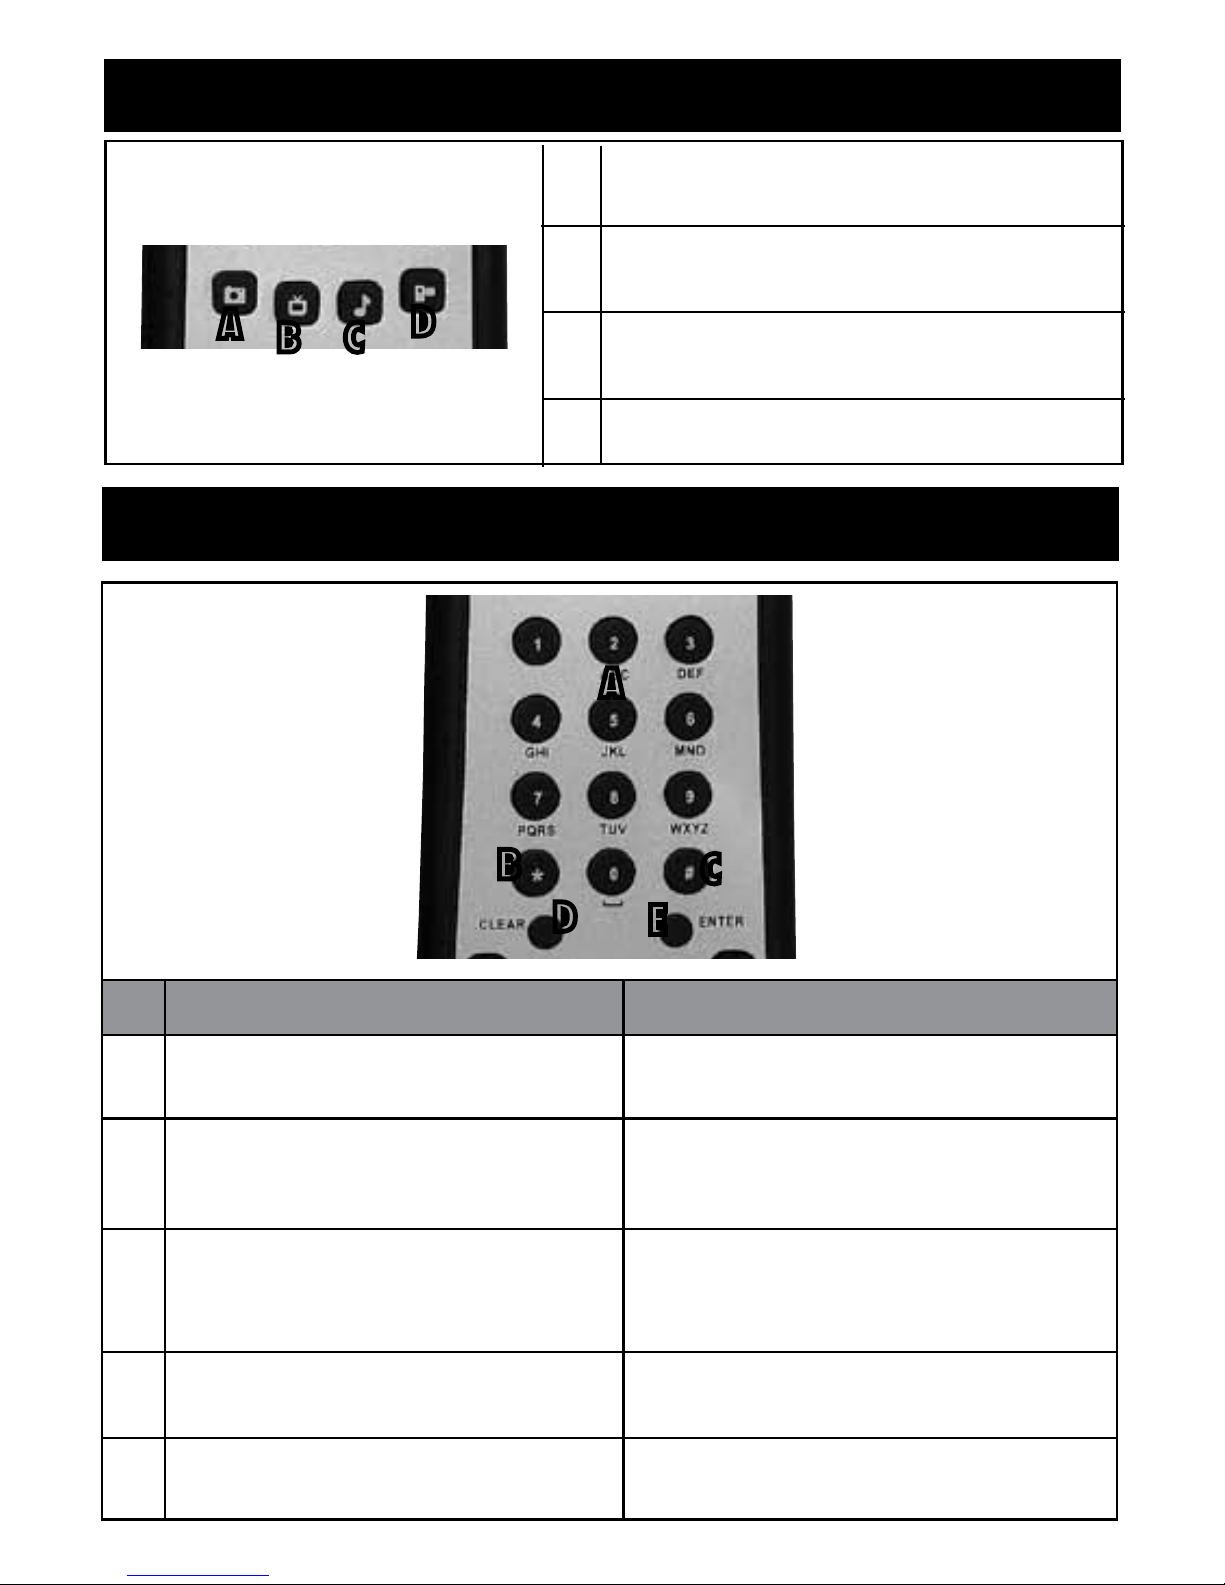
MCE Shortcut Buttons
Acts as a shortcut to the “My Pictures” page
Acts as a shortcut to the “TV Home” page
Acts as a shortcut to the “Music” page
Acts as a shortcut to the “My Videos” page
A
B
C
D
Numeric Keypad
Standard 1-9, alphanumeric
Inserts a * symbol, if supported by the
selected device
Inserts a # symbol, if supported by the
selected device
Clear, if supported by the selected device
Enter, if supported by the selected device
A
B
C
D
E
Standard 1-9, alphanumeric
*
#
Clear
Enter
PC, TV, AUX or CAB/SAT mode
PC Mode
A
B C
D
A
B
C
D
E
11
Page 14
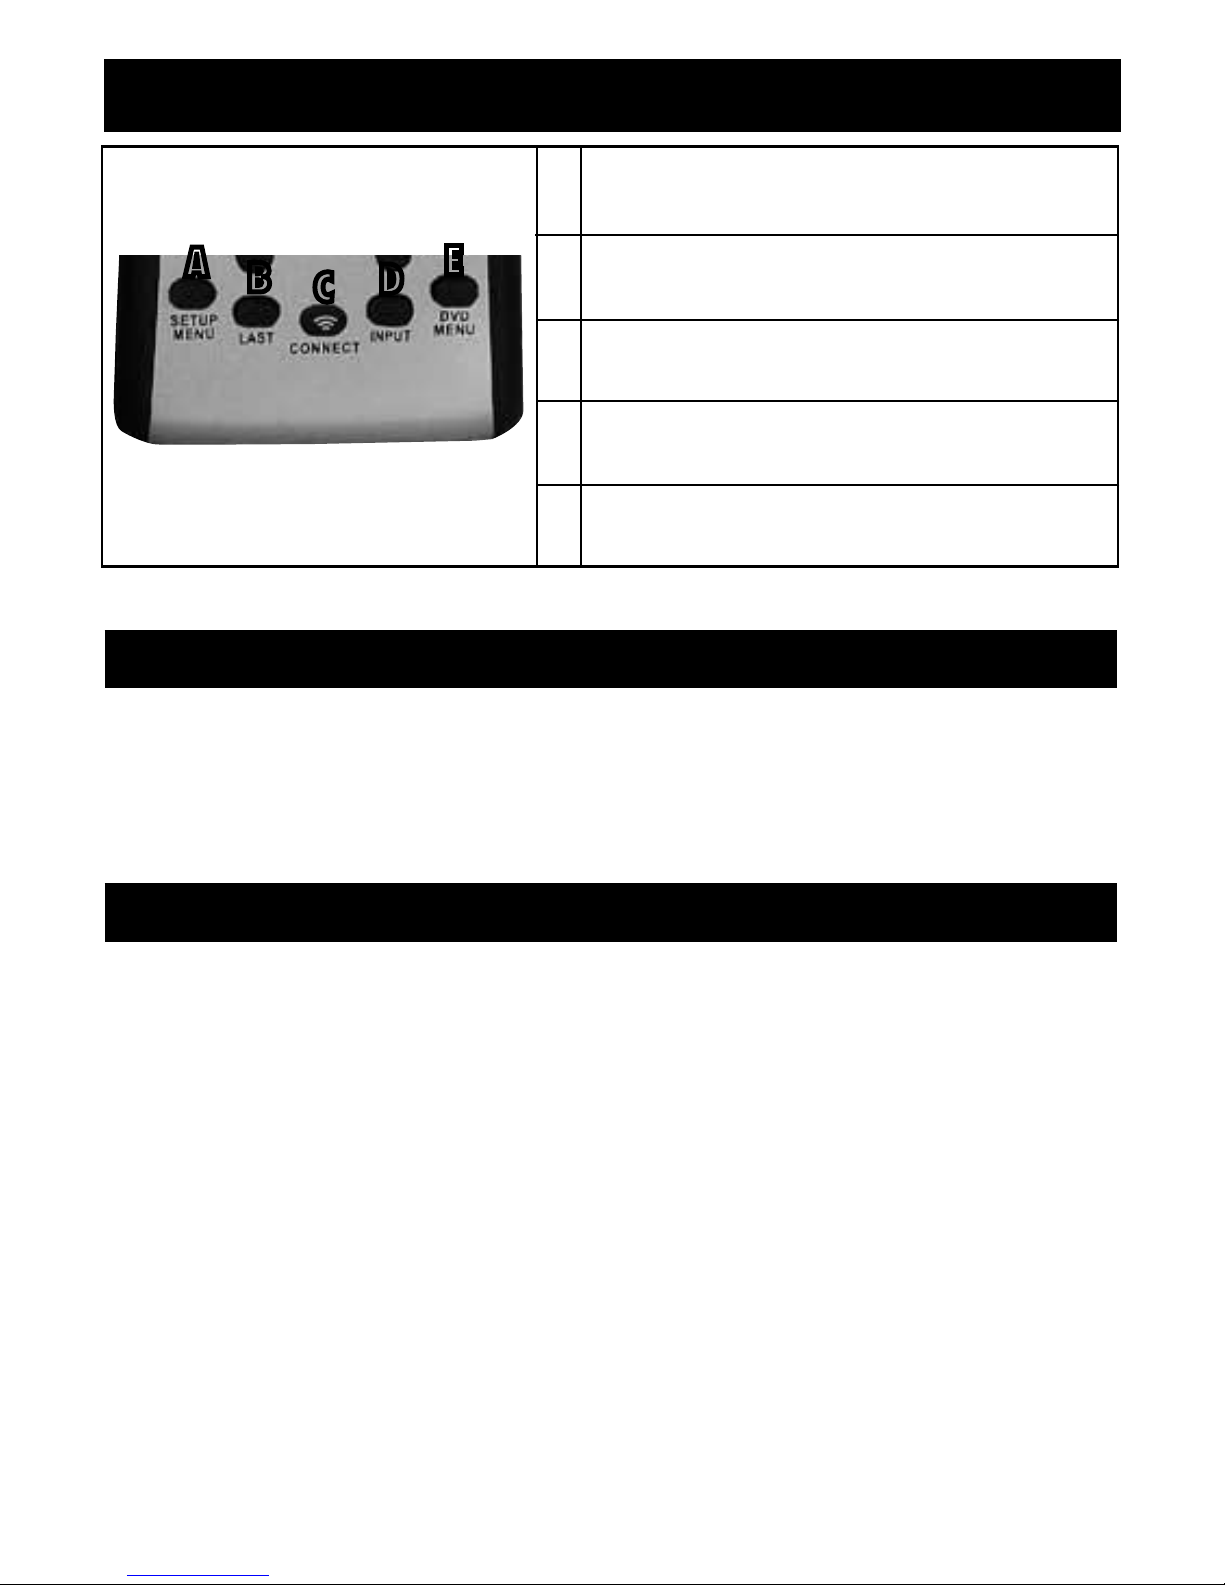
RF Sync, Setup, DVD Menu, Input
Accesses the TV or other IR device’s setup menu
Toggles between previously viewed channels
Synchronizes the RF remote with the RF receiver
Toggles between TV inputs
Brings up the Media Center DVD menu
A
B
C
D
E
Backlighting
The RCU Mode Selection buttons are backlit. One of these buttons lights up whenever
a button is pressed on the remote to indicate which Control Mode the remote is in; PC,
TV, AUX, or CAB/SAT. If the backlighting seems dim, the batteries may need to be
replaced. There is no backlighting on any other buttons.
ON/OFF Switch
This switch turns the selected device on or off. The device is selected with the RCU Mode
Switches; PC, TV, AUX and CAB/SAT.
In the PC mode, this button issues a standard Windows SLEEP command. Various options
for this command can be set up in Windows. Go to START/CONTROL PANEL/POWER
OPTIONS/ADVANCED and then set a function for the SLEEP command.
In the default configuration this button is setup to give a STANDBY command. In this
configuration, if the PC is already on, the first button pressed puts the PC into standby
mode. If the PC is in standby mode, pressing the STANDBY button on the RCU may wake
up the PC. For the wake function to work properly, your PC must comply to the ACPI
(Advanced Configuration & Power Interface) standard. See your PC Owners Manual for
more details.
A
B
C
D
E
12
Page 15
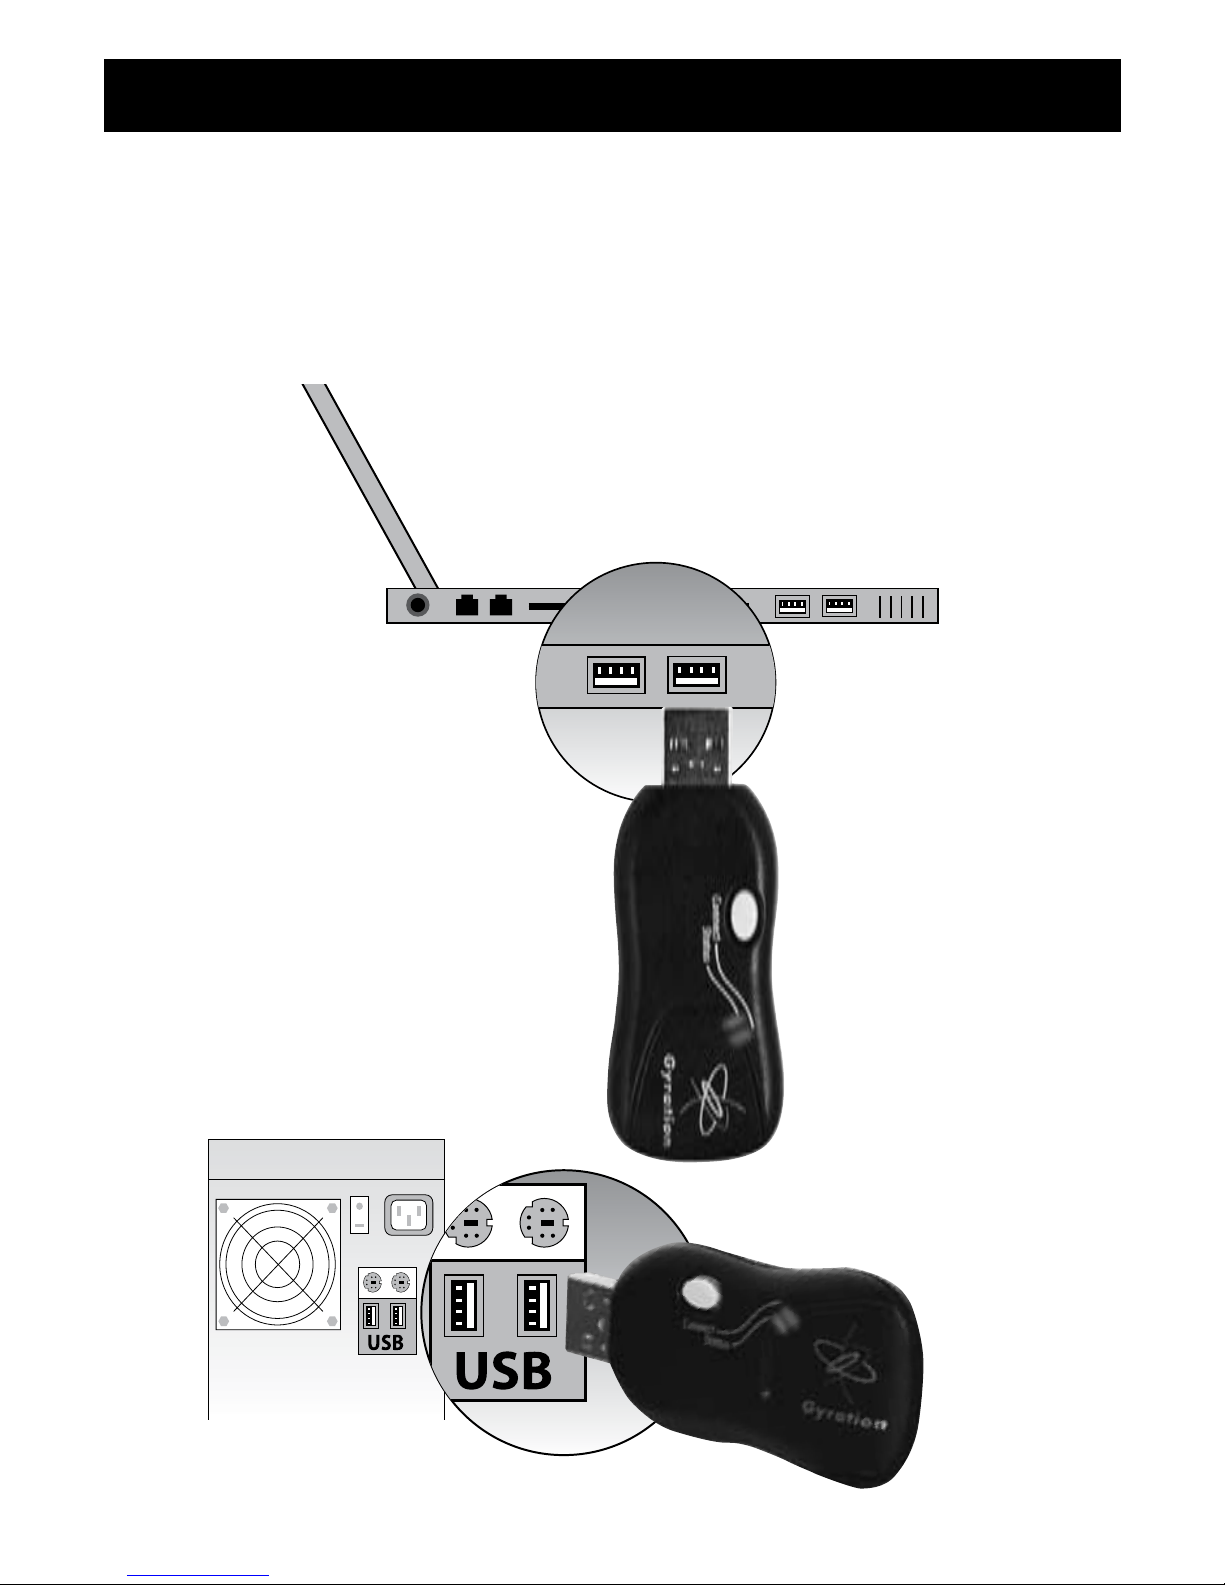
Receiver Installation
The RCU requires a USB RF transceiver be plugged into a USB port in the PC in order to
access RF and gyro functions. The USB extension cable can be used to maximize the range
of the RCU by placing the USB RF transceiver away from other electrical components. A
USB RF transceiver does not need to be plugged in to use the IR remote functions. See the
diagram below.
13
Page 16

Setting Up and Synchronizing the
Remote and the Transceiver
After inserting the batteries in the remote control unit,
1. Plug the USB RF transceiver into the PC if it hasn’t already been done. See the previous
section of this document.
2. Press and release the connect button on the USB transceiver. The CONNECT light on the
transceiver will flash.
3. Press the CONNECT button at the bottom of the remote control unit. The CONNECT
light on the USB transceiver will stop flashing. Your RCU is now connected to your PC
and Windows Media Center. The green STATUS light on the USB transceiver indicates
when RF signals are being received from the RCU.
The RCU can be programmed to operate many brands of remote-controllable components
such as TVs, VCRs, CD players, DVD players, cable boxes, satellite receivers and other
components via the IR functions of the RCU.
The AUX button can be programmed to operate most brands of remote-controllable
components: satellite receivers, cable boxes, CDs DVDs, VCRs, DVRs, and other components
via the IR functions of the RCU.
To determine whether the universal remote needs to be programmed to operate one of the
components connected to your PC, such as TV, do the following:
1. Turn on the component (in this example, a TV).
2. Point the remote at the TV.
3. Press the corresponding component button (in this example, TV).
4. Press ON•OFF to see if the TV responds. If the TV doesn’t respond, you must program
the remote to operate it.
14
Page 17

Programming Methods
There are two ways to program the remote control to operate other components: Automatic
Code Search and Direct Entry.
Using Automatic Code Search
The following instructions can be used to program the RCU to operate each of your
components. If you want to stop the automatic code search without programming any of
your components, press and hold CLEAR (*) until the indicator on the RCU turns off.
1. Turn on the component you want to operate (TV, DVD player, etc.)
2. Press and hold the component button you want to program (TV, AUX, etc.). While
holding the component button, press and hold ON/OFF button until the component
button on the RCU turns on, then release both buttons.
3. Point the remote at the component.
4. Press and release PLAY, then wait 5 seconds or until the component button stops
flashing. At this point the RCU is searching for the correct code to program. If, after 5
seconds, the component you want to operate does not turn off, press PLAY again to tell
the RCU to search the next set of codes. Continue pressing and releasing PLAY until
the component turns off or you have searched through all of the codes. The component
buttons flash when all codes have been searched, the component button turns off, and
the RCU exits the Automatic Code Search mode.
If the component you want to control does turn off:
1. Press and release REVERSE, then wait 2 seconds. Repeat this step until the component
turns back on.
2. To finish, press and hold STOP until the component button on the RCU turns off. The RCU
will automatically exit the Automatic Code Search mode.
Using Direct Entry
1. Turn on the device you want to operate (TV, DVD player, etc.)
2. Look up the brand and code number(s) for the device in the Remote Code List at the end
of this booklet.
3. Press and hold the device button you want to program on the RCU.
4. Enter the 4-digit code from the Remote Code List. If all the mode buttons flash, you
have either entered an invalid code or the button isn’t programmable.
15
Page 18

Programming Methods
Using Direct Entry
5. Release the device button, point the RCU at the device, and then press the ON/OFF
button to see if the device responds to the command. If it doesn’t, try pressing the
component button and then ON/OFF again.
• If you get no response, repeat these steps using the next code listed for
your brand, until the device responds to the remote commands.
• If you try all the codes for your device brand and none work, try the
automatic code search method. If automatic code search doesn’t find the
code, the remote is not compatible with your component.
Because the RCU controls more than one component, you must first “tell” it which
component you wish to operate. For example, if you wish to operate the TV, you must first
press the TV mode button on the RCU to put it in the TV mode.
The RCU stays in the chosen mode until you change it. If the RCU is in the TV mode, you
must change the mode in order to operate other components. For example, if you are in
the TV mode and you wish to turn off the Cable Box, you must first press the CAB/SAT
button then the On/Off button. Return to the TV mode by pressing the TV mode button.
Volume Punch Through allows the VOL+, VOL-, and MUTE keys, when pressed in the TV,
AUX, or CAB/SAT modes, to “punch through” to the TV or other device audio, whichever
was accessed last. The Volume Punch Through occurs automatically and allows you to
control the volume without exiting the current mode.
16
Page 19

Learning
The RCU has the ability to learn the commands of
other remote control units, such as TV remotes or
VCR remotes. This allows the most-used commands
on those remotes to be combined on the RCU. These
original remote control units are also known as
source remotes. Learning is not active in the
PC mode.
Learning Tips
1. All learned functions for a mode can be erased if
you program a different device to that mode.
2. Perform the learning process in low-light areas
because too much ambient light might cause
interference with the infrared (IR) signals of the
remotes.
3. Use fresh batteries in both the Media Center and
PC RCU and the original remote.
Code Learning
Codes from the Remote Code List include basic
functionality for each component they control. Once
you have programmed in the code for your specific
component (using either the Automatic Code Search
or Direct Entry method), you can customize the
RCU to perform certain functions from your original
remote(s) that were not embedded in the preset
code. The RCU has the ability to learn and store
commands from your original remote(s) under the
mode(s) of your choice.
Learning Commands
For the following section, the TV remote control unit
will be used as an example. Learning from other
types of remotes will be done in a similar way.
Remotes should
not be
more than
2” apart
17
Page 20

Learning
Learning Commands
1) First press and hold the mode button on the RCU for the component remote you
are learning from (the TV button on the RCU, for example) then press and hold the
RECORD button on the RCU.
2) Keep pressing both buttons until the device mode button light turns off, flashes, and
turns off. Release both buttons.
3) On the RCU, press and release the button where you want to store the new function (the
component button turns off and then back on; a short flash).
Note: If you press an invalid button on the remote, the device mode button flashes 4 times
to alert you. You’ll have to repeat step 3.
4) Position the source remote facing the bottom of the RCU no more than 2 inches apart.
Press and hold the button of the source remote that has the functionality you are
recording. Keep pressing the button until the RCU device mode button light turns off and
back on (the source function has been saved to the TV mode on the RCU).
Note: If all device mode buttons flash 4 times, the function wasn’t learned. Try again
starting with Step 3.
5) The RCU remains in the “learning mode” so you can continue adding functions to
different buttons by repeating steps 3 and 4.
6) Press CLEAR to exit the learning mode.
18
Page 21

Clearing an Individual Learned Function
To delete a learned button function, use the procedure below.
1. Press and hold the component mode button (the component button lights). Then press
and hold the CLEAR button for 3 seconds. Hold both buttons depressed until the
component mode button flashes.
2. Release both buttons. The component mode button turns on indicating that the RCU is
now in the Clear Learned Function mode for that component.
3. Press and release the button where learning is to be cleared. The component mode
button blinks off then back on indicating that the function was cleared successfully.
4. Repeat Steps 1 through 3 until all the buttons’ learned functions have been cleared.
Note: If an invalid button is pressed, the component mode button flashes 4 times, the
selected component button stays on, and the RCU remains in Clear Learned Function
mode. Repeat Step 3 to continue the clearing process.
5. Press the CLEAR button to return the RCU to normal operation.
19
Page 22

Deleting All Learned Functions
To delete all learned functions as once, use the procedure below.
1. Press and hold the CLEAR button (the current component button lights). Then press and
hold the ON/OFF button (component button light turns off for 3 seconds, flashes, turns
on and off) while continuing to hold the CLEAR button.
2. Release both buttons (current component button turns on).
3. Press any component button to delete all learned functions in all modes. The RCU
automatically exits this clearing mode.
Note: Pressing the CLEAR button while in this mode will not delete the learning functions,
but it will exit this delete mode.
Troubleshooting
If the IR functions on your RCU don’t work properly...
• Something might be between the RCU and the remote sensor on the component. Make
sure there is a clear path.
• The RCU may not be aimed directly at the component (TV or VCR) that you’re trying to
operate.
• The RCU might not be in the correct mode for operating that component. Try pressing
the corresponding mode switch (TV, AUX, etc.) then try operating the component with
the RCU.
• The batteries in the RCU might be weak, dead, or installed incorrectly. If batteries are
weak, the backlighting will be weak on the device mode buttons. In this case, put
new batteries in the remote. (Note: if you remove the batteries, you may have to
reprogram the remote to operate other components.)
• When using the Learning feature, do the learning process in low light areas to prevent
natural light and fluorescent light from interfering with the infrared signals.
20
Page 23

Troubleshooting
If the RF or gyro functions on your RCU don’t work properly...
• If the RCU does not appear to be working at all, it may not be connected or synchronized
with the USB RF transceiver. Repeat the Setting Up and Synchronizing the Remote and
the Transceiver procedure above.
• If, when using the RCU as an in-air cursor control, the cursor is visible on the screen, but
shows no movement, the gyro may not be activated. See the Gyro Operation section
above to activate the gyro and in-air cursor control.
• If the cursor movement is choppy or erratic, there may be radio interference. Move the
USB transceiver away from other electronic devices such as monitor speaker or radios.
• The batteries in the RCU might be weak, dead, or installed incorrectly. If batteries are
weak, the backlighting will be weak on the device mode buttons. In this case, put
new batteries in the remote. (Note: if you remove the batteries, you may have to
reprogram the remote to operate other components.)
21
Page 24

TV
Brand
Code
Digital TV
Zenith 1261
HDTV
Apex 1278
Daewoo 1284
JVC 1254 1422
Mitsubishi 1268 1271
Panasonic 1272 1283 1476
Philips 1274 1275 1276 1279
Samsung 1330
Sharp 1285
Sony 1201 1274 1421 1468 1472
Thomson 1419
Toshiba 1420
Zenith 1286 1287
HDTV Monitor
Brillian 1469
Panasonic 1470
Sears 1469
Zenith 1261
HDTV Projection Monitor
Panasonic 1257 1273 1471
Pioneer 1280
HDTV Projection TV
Sony 1274
HT Projector
Sony 1262 1265
LCD HDTV
Samsung 1362
Zenith 1281
LCD TV
Benq 1228
Remote Code List
22
Page 25

Remote Code List
TV
Brand
Code
LCD TV
ESA 1220
NET-TV 1230
Panasonic 1205 1206
Philips 1207 1219
Polaroid 1209 1216 1217
RCA 1346
Samsung 1202 1204 1212 1213
Sharp 1200
Sony 1201
Sylvania 1220
Toshiba 1203 1211
Viewsonic 1208 1210 1214 1221 1222 1223 1224
1225 1226 1227
LCD TV/PC Monitor
Sampo 1473
LCD TV/Tuner Combo
Polaroid 1209
Plasma Display
Acer 1239
Pioneer 1244
Samsung 1202 1231 1245
Toshiba 1236 1237
Viewsonic 1246
Plasma TV
Gateway 1240
Magnavox 1474 1475
Viewsonic 1238
Plasma TV Monitor
Fujitsu 1232 1233 1234 1235
Hitachi 1241 1478
NEC 1242
23
Page 26

Remote Code List
TV
Brand
Code
Plasma TV Monitor
Panasonic 1243
Pioneer 1277
Samsung 1270
Sony 1477
Zenith 1247
Projection HDTV
Sharp 1264 1282
Projection Monitor
Pioneer 1258
Projection TV
Hitachi 1251 1256 1259 1260
JVC 1254 1255
Mitsubishi 1248
Panasonic 1257 1329 1334
Samsung 1252 1270 1480
Sharp 1270
Sony 1201 1263
Toshiba 1249 1253 1479
Zenith 1266
TV
Abex 1147
Admiral 1004 1148
Advent 1410
Adventura 1149
Aiko 1018
Aiwa 1425 1435
Akai 1005
Alleron 1045
Amtron 1039
Anam National 1006 1039 1163 1164 1165
AOC 1007 1008 1009 1010 1150 1151 1166
24
Page 27

Remote Code List
TV
Brand
Code
TV
Apex 1296 1341 1423 1426
Audiovox 1039
Belcor 1007
Bell & Howell 1004 1047 1068
Benq 1427
Bradford 1039
Brockwood 1007
Broksonic 1203 1250
Candle 1007 1009 1011 1149
Carver 1418
Celebrity 1005
Centurion 1012
Citizen 1007 1009 1011 1018 1039 1068 1095 1146 1173
Colortyme 1007 1009 1013
Concerto 1007 1009
Contec/Cony 1014 1015 1016 1039
Craig 1039
Crosley 1418
Crown 1039 1058
CTX 1336
Curtis Mathes 1003 1007 1009 1017 1047 1068 1095 1146 1173
1180 1185 1187 1188 1418
CXC 1039
Daewoo 1007 1008 1009 1018 1019 1020 1112 1146 1161
1290 1332 1428 1429
Daytron 1007 1009 1146
Dell 1001 1002
Dimensia 1003 1187 1188
Dumont 1007 1131
Durabrand 1327
Electroband 1005
25
Page 28

Remote Code List
TV
Brand
Code
TV
Electrograph 1412
Electrohome 1005 1006 1007 1009 1021 1022 1023
Emerson 1007 1009 1014 1024 1025 1026 1027 1028 1029
1030 1031 1032 1033 1034 1035 1036 1037 1038
1039 1040 1041 1042 1043 1044 1045 1047 1068
1110 1146 1152 1153 1162 1181 1189 1197 1415
1416 1417 1429
Envision 1007 1009
Epson 1409
Fisher 1046 1047 1048 1068 1154 1337
Fujitsu 1045
Funai 1039 1045
Futuretech 1039
Gateway 1412
GE 1003 1006 1007 1009 1023 1049 1050 1051 1078
1141 1142 1143 1155 1174 1187 1188 1191 1296
1317 1430
Gibralter 1007 1053 1131
Goldstar 1007 1008 1009 1014 1021 1052 1053 1054 1135
1136 1146 1147
Grunpy 1039 1045
Hallmark 1007 1009
Harvard 1039
Hitachi 1007 1009 1014 1015 1016 1055 1056 1057 1118
1119 1120 1121 1122 1123 1124 1125 1126 1127
1128 1129 1130 1153 1167 1179 1182 1193 1194
1195 1196 1197 1256 1269 1292 1359 1363 1365
1370 1401 1424 1431
IMA 1039
Infinity 1058 1418
Janeil 1149
26
Page 29

Remote Code List
TV
Brand
Code
TV
JBL 1058 1418
JC Penney 1003 1007 1008 1009 1011 1015 1023 1049 1050
1053 1054 1066 1067 1078 1094 1095 1113 1146
1147 1155 1187 1188 1191
JCB 1005
Jensen 1007 1009 1218 1407 1408 1432
JVC 1014 1015 1016 1050 1056 1059 1060 1061 1137
1138 1156 1181 1199 1254 1293 1324 1345 1352
1369 1378 1393 1397 1400 1433 1434
Kawasho 1005 1007 1009
Kenwood 1007 1009 1021
Kloss Novabeam 1039 1062 1063 1149
Konka 1413 1414
KTV 1039 1064 1146 1152
LG 1008
Loewe 1058
Logik 1004
Luxman 1007 1009
LXI 1003 1009 1047 1058 1065 1066 1067 1068 1155
1171 1187 1188 1191 1418
Maganvox 1300 1399 1437
Magnavox 1007 1009 1011 1021 1058 1062 1063 1069 1070
1071 1079 1115 1116 1117 1186 1198 1301 1302
1418 1436 1437 1438 1439
Majestic 1004
Marantz 1007 1009 1055 1058 1072 1418
Maxent 1412
Megatron 1009 1055
Memorex 1004 1008 1009 1047 1068 1440 1441
MGA 1007 1008 1009 1021 1023 1048 1073 1074
Midland 1050 1051 1131 1146 1147 1155 1191
27
Page 30

Remote Code List
TV
Brand
Code
TV
Minutz 1049
Mitsubishi 1007 1008 1009 1021 1023 1048 1073 1074 1075
1111 1319 1328 1358
Montgomery Ward
1004
Motorola 1006 1148
MTC 1007 1008 1009 1095
Multitech 1039
Multivision 1076
NAD 1009 1065 1066 1067 1157 1179
NEC 1006 1007 1008 1009 1013
NetTV 1412
Nikko 1009 1018
Norcent 1215 1406
NTC 1018
Onwa 1039
Optimus 1157 1179
Optonica 1086 1148
Orion 1036 1162 1327
Panasonic 1006 1050 1058 1145 1175 1184 1294 1312 1314
1334 1335 1344 1350 1351 1367 1377 1380 1382
1384 1385 1386 1404 1442 1454
Philco 1006 1007 1008 1009 1011 1014 1021 1058 1062
1063 1069 1071 1418 1441
Philips 1006 1007 1011 1014 1021 1058 1062 1063 1069
1077 1078 1079 1080 1229 1295 1299 1301 1302
1316 1325 1355 1356 1357 1360 1361 1364 1368
1373 1374 1375 1376 1379 1395 1418 1443 1444
1445 1446 1447 1450 1451 1452 1453
Philips 1295 1300 1301 1316 1437 1438 1445 1446 1447
Magnavox 1448 1449 1450 1451 1452 1453
Pilot 1007 1146
28
Page 31

Remote Code
List
TV
Brand
Code
TV
Pioneer 1007 1009 1081 1082 1083 1153 1157 1179 1197
1372
Portland 1007 1008 1009 1018 1146
Price Club 1095
Prima 1467
Prism 1050
Proscan 1003 1155 1187 1188 1191
Proton 1007 1009 1014 1084
Pulsar 1007 1131
Quasar 1006 1050 1064 1085 1175 1294 1394 1454 1455
Radio Shack 1047 1068 1187 1188
Radio Shack/ 1003 1007 1009 1014 1039 1047 1068 1086 1146
Realistic 1147
RCA 1000 1003 1006 1007 1008 1009 1010 1021 1087
1088 1089 1090 1091 1092 1093 1114 1153 1155
1158 1159 1161 1168 1176 1180 1183 1185 1187
1188 1190 1191 1197 1289 1298 1303 1310 1317
1326 1332 1333 1342 1371 1390 1391 1392
Realistic 1047 1068 1187 1188
Runco 1131
Sampo 1007 1009 1146 1147 1338 1412
Samsung 1007 1008 1009 1014 1017 1021 1094 1095 1096
1146 1147 1169 1192 1252 1270 1308 1326 1330
1331 1353 1362 1366 1387
Sansui 1162 1327 1348
Sanyo 1007 1046 1047 1068 1074 1097 1098 1144 1154
Scotch 1009
Scott 1007 1009 1014 1025 1036 1039 1045
Sears 1003 1007 1009 1015 1016 1021 1045 1046 1047
1048 1060 1065 1066 1067 1068 1099 1100 1154
1155 1160 1187 1188 1191 1418
29
Page 32

VCR Code
Remote Code
List
Tuner Code
TV
Brand
Code
TV
Sharp 1007 1009 1014 1027 1030 1086 1101 1102 1103
1109 1146 1148 1318 1323 1391 1398 1402 1456
Shogun 1007
Signature 1004 1104
Simpson 1011
Sony 1005 1170 1177 1178 1201 1263 1304 1306 1315
1457 1458 1459 1460
Soundesign 1007 1009 1011 1039 1045
Squareview 1160
SSS 1007 1039
Starlite 1039
Supre-Macy 1149
Supreme 1005
Sylvania 1007 1009 1011 1021 1058 1062 1063 1069 1070
1071 1079 1105 1140 1220 1311 1343 1347 1381
1383 1418 1447 1461 1462
Symphonic 1034 1039 1160 1220 1463
Tandy 1148
Tatung 1006
Technics 1050
Techwood 1007 1009 1050
Teknika 1004 1007 1008 1009 1011 1014 1015 1016 1018
1039 1045 1070 1095 1145 1146 1175 1184 1418
Telecaption 1106
TMK 1007 1009
Toshiba 1047 1065 1066 1067 1068 1095 1099 1106 1107
1139 1140 1249 1253 1297 1305 1307 1309 1313
1321 1322 1339 1340 1349 1388 1396 1405 1411
1464 1465 1466
Totevision 1146
Universal 1049 1078
30
Page 33

Remote Code
List
TV
Brand
Code
TV
Victor 1060 1156
Vidikron 1418
Vidtech 1007 1008 1009
Viewsonic 1412
Viking 1149
Wards 1003 1004 1007 1008 1009 1021 1025 1034 1045
1049 1058 1062 1063 1069 1070 1078 1079 1086
1108 1187 1188 1418
White Westinghouse
1429
Yamaha 1007 1008 1009 1021
Zenith 1004 1007 1131 1132 1133 1134 1172 1251 1261
1286 1288 1291 1320 1354 1389 1403
TV/DVD Combo
Apex 1341
Broksonic 1203
JVC 1345 1378
Panasonic 1377
Philips 1229 1376 1379
RCA 1342 1346
Sansui 1348
Sylvania 1343
Toshiba 1203 1339 1340
TV/DVD/Tuner Combo
Panasonic 1344
TV/DVD/VCR Combo
Panasonic 1382
RCA 1333
Samsung 1331
Sylvania 1347 1381 1383
Toshiba 1349
31
Page 34

Remote Code
List
TV
Brand
Code
TV
Code
DVD
Code
Tuner
Code
TV-DVD
Brand
32
TV/DVD/VCR Tuner Combo
Panasonic 1350 1380
TV/VCR Combo
Broksonic 1250
Daewoo 1290
Emerson 1415
GE 1317
Hitachi 1269 1401
JVC 1254 1293 1393 1397 1400
Maganvox 1399
Magnavox 1302
Panasonic 1384 1404
Philips 1302
Quasar 1294 1394
RCA 1298 1310 1326 1390 1391 1392
Samsung 1326 1387
Sharp 1323 1391 1398 1402
Sylvania 1311
Toshiba 1297 1322 1388 1396 1405
Zenith 1291 1389 1403
TV/VCR/Tuner Combo
Panasonic 1294 1314 1385 1386
Philips 1395
TV-DVR
Panasonic 1267
TV/DVD Combo
Apex 1341 3151
Broksonic 1203 3160
JVC 1345 3156
1378 3185
Page 35

Remote Code
List
TV
Code
DVD
Code
Tuner
Code
TV-DVD
Brand
TV
Code
DVD
Code
Tuner
Code
TV-VCR-TuneR
Brand
TV/DVD Combo
Panasonic 1377 3184
Philips 1229 3147
1376 3158
1379 3186
RCA 1342 3152
1346 3157
Sansui 1348 3160
Sylvania 1343 3153
Toshiba 1203 3149
1339 3150
1340 3155
TV/DVD Tuner Combo
Panasonic 1344 3154 4124
TV/VCR Combo
Broksonic 1250 2095
Daewoo 1290 2096
GE 1317 2024
Hitachi 1269 2085
1401 2097
JVC 1254 2077
1422 2072
1293 2013
1393 2075
1397 2080
1400 2083
Magnavox 1302 2020
1399 2082
Panasonic 1384 2067
1404 2089
33
Page 36

Remote Code
List
TV
Code
DVD
Code
Tuner
Code
TV-VCR-TuneR
Brand
TV/VCR Combo
Philips 1302 2018
1302 2020
Quasar 1294 2014
1394 2076
RCA 1298 2017
1310 2017
1326 2060
1390 2098
1391 2073
1392 2074
1387 2069
Samsung 1326 2060
1387 2069
Sharp 1323 2061
1391 2073
1398 2081
1402 2087
Sylvania 1311 2021
Toshiba 1297 2016
1322 2025
1388 2070
1396 2079
1396 2084
1405 2090
Zenith 1291 2012
1389 2071
1389 2086
1403 2088
34
Page 37

Remote Code
List
TV
Code
DVD
Code
Tuner
Code
TV-VCR-TuneR
Brand
35
TV/VCR Tuner Combo
Panasonic 1294 2014 4125
1294 2068 4123
1294 2023 4121
1294 2019 4123
1314 2022 4122
1385 2019 4150
1386 2014 4151
1314 2022 4182
Philips 1395 2078 4152
TV/DVD/VCR Combo
Panasonic 1382 3188 2092
RCA 1333 3165 2102
Samsung 1331 3166 2103
Sylvania 1347 3163 2101
1381 3187 2091
1383 3189 2093
Toshiba 1349 3161 2105
1349 3161 2106
TV/DVD/VCR Tuner Combo
Panasonic 1350 3162 2107 4126
1380 3239 2108 4153
Satellite DVR
DISH Network 5022
Hughes 5029
Philips 5021 5029
RCA 5017 5029
TV
Code
DVD
Code
Tuner
Code
TV-DVD-VCR
TuneR
Brand
SATeLLITe
Brand
Code
VCR
Code
Page 38

Remote Code
List
SATeLLITe
Brand
Code
CAbLe
Brand
Code
Satellite DVR
Samsung 5029
Sony 5016 5020
Zenith 5018
Satellite
DIRECTV 5015
Express Vu 5004
GE 5001 5002 5019
Hughes 5007
JVC 5003
Mitsubishi 5007
Panasonic 5008 5011
Philips 5014
Pioneer 5027
Proscan 5001 5002
RCA 5000 5001 5002 5024 5025 5028
Samsung 5010 5026
Sony 5009 5023
Star Choice 5005
Toshiba 5012
Zenith 5013
HDTV Tuner
Panasonic 5029
RCA 5006
DTV Decoder
Sharp 5006
Cable Box
ABC 5036
Adelphia 5042
Cable Vision 5043
36
Page 39

Remote Code
List
VCR
Brand
Code
CAbLe
Brand
Code
Cable Box
Comcast 5041 5044 5045
Contec 5035
COX 5031
GE 5036
Gemini 5034
General Instruments 5033 5036 5044
Hamlin 5032
Hitachi 5036
Jerrold 5033 5036
Motorola 5040 5045 5031
Philips 5034
Proscan 5036
RCA 5033
Rembrandt 5036
Scientific Atlanta 5037 5038 5042
Signature 5036
Sony 5043
Time Warner 5030
View Star 5035
Cable
Comcast 5039
Cable-DVR
Motorola 5041
DVD/VCR Combo
Broksonic 2034
Daewoo 2054
Emerson 2099
Go Video 2047 2048 2055 2056
Hitachi 2049 2052
37
Page 40

Remote Code
List
VCR
Brand
Code
DVD/VCR Combo
JVC 2031 2039 2040
Magnavox 2053
Panasonic 2035 2057
Philips 2038
Polaroid 2059
RCA 2030 2051
Samsung 2029 2032 2033 2044 2050
Sanyo 2100
Sharp 2042 2058
Sony 2028 2043
Toshiba 2036 2037 2041
Zenith 2045 2046
TV/DVD/VCR Combo
Panasonic 2092
RCA 2102
Samsung 2103
Sharp 2104
Sylvania 2091 2093 2101
Toshiba 2105 2106
TV/DVD/VCR/Tuner Combo
Panasonic 2107 2108
TV/VCR Combo
Aiwa 2094
Broksonic 2095
Daewoo 2096
GE 2024
Hitachi 2085 2097
JVC 2013 2072 2075 2077 2080 2083
Maganvox 2082
Magnavox 2020
Panasonic 2067 2089
38
Page 41

Remote Code
List
VCR
Brand
Code
TV/VCR Combo
Philips 2018 2020
Quasar 2014 2076
RCA 2017 2069 2073 2074 2098
Samsung 2060 2069
Sharp 2061 2073 2081 2087
Sylvania 2021
Toshiba 2016 2025 2070 2079 2084 2090
Zenith 2012 2071 2086 2088
TV/VCR/Tuner Combo
Panasonic 2014 2019 2022 2023 2068
Philips 2078
VCR
Aiwa 2094
Broksonic 2034 2095
Daewoo 2054 2096
Emerson 2099
GE 2024
Go Video 2047 2048 2055 2056 2065
Hitachi 2002 2010 2049 2052 2063 2064 2085 2097
JVC 2013 2031 2039 2040 2072 2075 2077 2080
2083
Maganvox 2082
Magnavox 2001 2020 2026 2053
Memorex 2027
Mitsubishi 2066
Panasonic 2014 2019 2022 2023 2035 2057 2067 2068
2089 2092 2107 2108
Philips 2009 2018 2020 2038 2078
Philips Magnavox 2015
Polaroid 2059
Quasar 2003 2005 2014 2076
39
Page 42

Remote Code
List
VCR
Brand
Code
VCR
RCA 2000 2004 2017 2030 2051 2069 2073 2074
2098 2102
Samsung 2029 2032 2033 2044 2050 2060 2069 2103
Sanyo 2100
Sharp 2042 2058 2061 2073 2081 2087 2104
Sony 2007 2008 2028 2043
Sylvania 2021 2091 2093 2101
Toshiba 2006 2011 2016 2025 2036 2037 2041 2062
2070 2079 2084 2090 2105 2106
Zenith 2012 2045 2046 2071 2086 2088
DVD/VCR Combo
Broksonic 2034 3127
Daewoo 2054 3142
Emerson 2099 3147
Go Video 2047 3139
2048 3138
2055 3143
DVD/VCR Combo 2056 3144
Hitachi 2049 3140
2052 3140
JVC 2031 3124
2039 3132
2040 3133
Magnavox 2053 3131
Panasonic 2035 3128
2057 3145
Philips 2038 3131
Polaroid 2059 3146
DVD
Code
VCR
Code
DVD-VCR
Brand
40
Page 43

Remote Code
List
DVD
Code
VCR
Code
DVD-VCR
Brand
Code
DVD
Brand
DVD/VCR Combo
RCA 2030 3123
2051 3136
Samsung 2029 3122
2032 3125
2033 3126
2044 3137
2050 3141
Sanyo 2100 3148
Sharp 2042 3134
2058 3134
2104 3164
Sony 2028 3121
2043 3135
Toshiba 2036 3129
2037 3140
2041 3043
Zenith 2045 3138
2046 3138
DVD
Aiwa 3002
Apex 3008 3009 3010 3046 3071 3151
BOSE 3011 3159
Broksonic 3127 3160
Clarion 3012
Classic 3013
Daewoo 3075 3142
Denon 3050 3094 3100 3179 3208 3214 3217 3226
3231
Emerson 3014 3015 3147
41
Page 44

Remote Code
List
DVD
Brand
Code
DVD
Fisher 3016
Funai 3015
GE 3017 3067
Go Video 3138 3139 3143 3144
GPX 3018
Harman/Kardon 3106
Hitachi 3019 3034 3140 3215 3229
JBL 3070
JVC 3056 3064 3076 3079 3083 3103 3104 3124
3132 3133 3156 3177 3185 3199 3220 3232
Kenwood 3021 3050 3218 3224 3225 3234 3235
Konka 3003
Koss 3006 3085 3174
Lasonic 3022
Magnavox 3043 3081 3131 3204
Marantz 3105
Memorex 3023
Mintek 3024
Mitsubishi 3000 3069 3089 3095
NAD 3014 3025
Nakamichi 3026
Norcent 3027
Onkyo 3028 3175 3180
Oritron 3032
Panasonic 3029 3050 3051 3059 3128 3145 3154 3162
3169 3172 3184 3188 3193 3196 3205 3239
Philips 3030 3043 3063 3065 3092 3096 3131 3147
3158 3178 3186 3201 3209 3212 3213 3222
Pioneer 3031 3058 3080 3093 3099 3108 3176 3191
3198 3211 3219 3221
Polaroid 3146
42
Page 45

Remote Code
List
DVD
Brand
Code
DVD
Proscan 3090 3107
Qwestar 3032
RCA 3052 3061 3062 3067 3123 3136 3152 3157
3165 3202
Sampo 3033
Samsung 3034 3072 3122 3125 3126 3137 3141 3166
3194 3200 3207 3216 3228 3230
Sansui 3035 3160
Sanyo 3004 3148
Sharp 3036 3037 3134 3164 3203
Sherwood 3038
Sony 3001 3039 3047 3048 3049 3053 3054 3055
3057 3060 3073 3074 3077 3086 3088 3091
3097 3098 3101 3102 3121 3135 3168 3170
3171 3173 3227
Sylvania 3015 3153 3163 3187 3189
Teac 3040
Technics 3050
Techwood 3041
Toshiba 3042 3043 3066 3068 3078 3087 3129 3130
3149 3150 3155 3161 3181 3192 3197 3206
3238
Venturer 3007
Yamaha 3050 3190 3195 3210 3223 3233 3236
Zenith 3014 3044 3138 3206
DVD Recorder
Irradio 3020
Panasonic 3112 3114 3118
Philips 3110 3113 3117 3119
Pioneer 3115 3116
RCA 3109
43
Page 46

Remote Code List
Device Type Brand
Count
Code
DVD
Brand
Code
DVD Recorder
Sony 3111
Yamaha 3120
DVD/LD
Pioneer 3031 3058
DVD/VCR Combo
Broksonic 3127
Daewoo 3142
Emerson 3147
Go Video 3138 3139 3143 3144
Hitachi 3140
JVC 3124 3132 3133
Magnavox 3131
Panasonic 3128 3145
Philips 3131
Polaroid 3146
RCA 3123 3136
Samsung 3122 3125 3126 3137 3141
Sanyo 3148
Sharp 3134
Sony 3121 3135
Toshiba 3043 3129 3130
Zenith 3138
DVD-DVR
RCA 3182
Toshiba 3183
HTIB
BOSE 3159
Denon 3179
JBL 3005 3070
JVC 3103 3104 3177
Koss 3006 3174
44
Page 47

Remote Code List
DVD
Brand
Code
HTIB
Onkyo 3175 3180
Panasonic 3169 3172
Philips 3178
Pioneer 3108 3176
RCA 3109
Sony 3102 3167 3168 3170 3171 3173
Toshiba 3181
Venturer 3007
Network DVD
Go Video 3237
Portable DVD
Audiovox 3084
CyberHome 3045
Panasonic 3050 3082
Receiver
JBL 3070
TV/DVD Combo
Apex 3151
Broksonic 3160
JVC 3156 3185
Panasonic 3184
Philips 3147 3158 3186
RCA 3152 3157
Sansui 3160
Sylvania 3153
Toshiba 3149 3150 3155
TV/DVD/Tuner Combo
Panasonic 3154
TV/DVD/VCR Combo
Panasonic 3188
RCA 3165
45
Page 48

Remote Code List
DVD
Brand
Code
TV/DVD/VCR Combo
Samsung 3166
Sharp 3164
Sylvania 3163 3187 3189
Toshiba 3161
TV/DVD/VCR/Tuner Combo
Panasonic 3162 3239
Amplifier
Yamaha 4012 4015 4017
Audio System
Philips 4155
Pioneer 4154
RCA & Dimensia 4000
Car Receiver/Tuner
Pioneer 4030
HTIB
BOSE 4131
Denon 4143
JBL 4020 4146
JVC 4028 4141 4149 4171
Koss 4128 4138
Onkyo 4139 4144
Panasonic 4132 4136
Philips 4142
Pioneer 4035 4140
RCA 4060
Sony 4129 4130 4133 4135 4137 4147
Toshiba 4145
Venturer 4134
LCD TV
AuDIO
Brand
Code
46
Page 49

Remote Code List
AuDIO
Brand
Code
LCD TV
Viewsonic 4000
LCD TV/Tuner Combo
Polaroid 4148
Receiver
JBL 4020
Receiver/Amplifier
Yamaha 4015 4017
Receiver/Tuner
Aiwa 4001 4069 4076 4117 4120
BOSE 4127 4131
Denon 4010 4022 4023 4056 4061 4062 4072 4077
4078 4090 4091 4093 4095 4100 4101 4103
4107 4143 4156 4158 4170 4174 4175 4177
4178
Harman Kardon 4172
Harman Kardon 4006 4098 4118
JBL 4006 4020
JVC 4000 4025 4026 4027 4028 4058 4059 4083
4094 4110 4112 4141 4149 4167 4171
Kenwood 4002 4042 4043 4044 4047 4054 4057 4071
4074 4086 4096 4162 4165 4173
Marantz 4119
Mitsubishi 4106 4161 4176
Onkyo 4007 4048 4049 4051 4055 4065 4068 4070
4084 4088 4092 4097 4104 4105 4108 4109
4139 4144 4163 4164 4166 4168 4169 4181
Optimus 4011
Panasonic 4008 4081 4121 4132 4136 4160
Philips 4142 4155
47
Page 50

Remote Code List
AuDIO
Brand
Code
Receiver/Tuner
Pioneer 4005 4029 4035 4037 4040 4050 4052 4067
4073 4075 4085 4087 4099 4140 4154 4180
RCA 4003 4060
Sherwood 4009
Sony 4004 4014 4031 4032 4033 4034 4036 4038
4039 4041 4046 4063 4113 4114 4115 4116
4130 4137 4147 4179
Technics 4008 4013 4016 4018 4019 4064 4066 4079
4082 4089 4157
Toshiba 4145
Wards 4005
Yamaha 4005 4021 4024 4045 4053 4080 4102 4111
4159
Tuner
Koss 4128 4138
Panasonic 4122 4123 4124 4125 4126 4150 4151 4153
4182
Philips 4152
Polaroid 4148
Sony 4133 4135
Venturer 4134
Tuner/CD Combo
BOSE 4127
TV/DVD/ Tuner Combo
Panasonic 4124
TV/DVD/VCR/Tuner Combo
Panasonic 4126 4153
TV/VCR/Tuner Combo
Panasonic 4121 4122 4123 4125 4150 4151 4182
Philips 4152
48
Page 51

Remote Code List
HTIb
Brand
Audio
Code
DVD
Code
HDTV TuneR
Brand
Code
HTIB
BOSE 4131 3159
Denon 4143 3179
JBL 4020 3070
4146 3005
JVC 4028 3104
4141 3177
4149 3103
Koss 4128 3006
4138 3174
Onkyo 4139 3175
4144 3180
Panasonic 4132 3169
4136 3172
Philips 4142 3178
Pioneer 4035 3108
4140 3176
RCA 4060 3109
Sony 4129 3167
4130 3168
4133 3170
4135 3171
4137 3173
4147 3102
Toshiba 4145 3181
Venturer 4134 3007
HDTV Tuner
Panasonic 7000
RCA 7001 7002
49
Page 52

Remote Code List
DVR
Brand
Code
Digital Network Recorder
Sony 3244
DVR
Panasonic 3242
Philips 3240
RCA 3243
Replay TV 3241
Tivo 3243
PVR
Replay TV 3246
Tivo 3245
50
Page 53

51
Notes
Page 54

Notes
52
Page 55

Notes
53
Page 56

US Patent Numbers: 5,440,326; 5,898,421; 5,825,350 and other pending patents GYR3101US
© 2006 GYRATION INC • 12950 Saratoga Ave. • Saratoga, CA 95070 USA • www.gyration.com
Made in China.
 Loading...