

Page 1

Quick Start Guide
Rev. A
Page 2
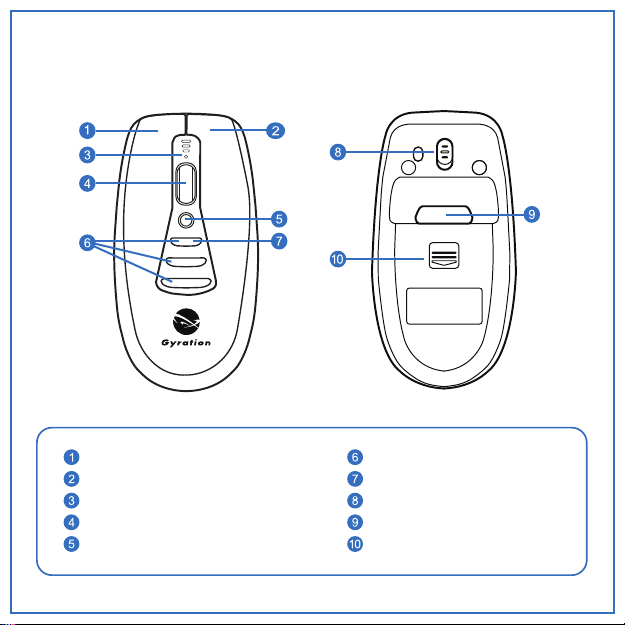
Air Mouse® Voice
Mouse Click (Left)
Mouse Click (Right)
LED Indicator & Microphone
Document Scroll Wheel
Microphone Activation Key
Assignable Buttons (3)
MotionTools ‘Swipe’ Button
On/Off Switch
In-Air Activation Trigger
Battery Bay Door
Page 3
Getting Started
1 Conrming Compatibility
Air Mouse® Voice is designed for
®
Windows
support Bluetooth
wireless capability. Confirm that your
system supports Bluetooth LE.
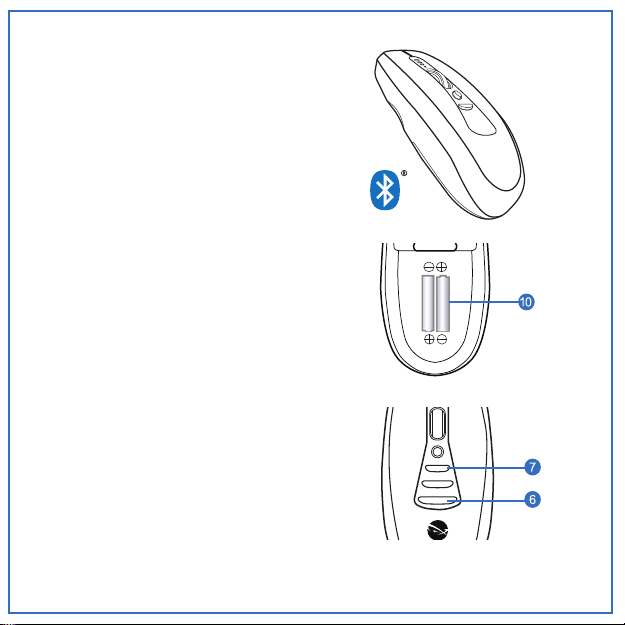
2 Inserting the Batteries
Removing the mouse battery door (10),
insert the AAA batteries (supplied),
aligning them with the positive and
negative legends in the battery bay.
3 Pairing With Your Computer
With your computer in Bluetooth pairing
mode, power up the Air Mouse
via the On/Off Switch (8) located on the
underside of the mouse. Press and hold
the top (7) and bottom (6) assignable
mouse buttons simultaneously. When
your computer has located ‘Air Mouse
Voice’, follow the steps prompted by your
system to complete the pairing process.
or OS X® computers that
®
Low Energy (LE)
®
Voice
Page 4

4 Installing MotionTools
®
Download MotionTools Software at
www.gyration.com/amvdownload,
choosing either Windows
®
X
version. While not required for
®
or OS
basic desktop and In Air operation,
MotionTools unlocks the real
power of your Air Mouse
®
Voice:
Assignable Keys, Gestures and
Voice Commands.
5 Testing Basic Operation
Your Air Mouse® Voice operates
effectively in three distinct modes:
Desktop, In Air and Voice. To test
each of the modes, follow the
simple steps below:
Desktop Mode With installation
steps 1,2 and 3 above completed,
your Air Mouse
®
Voice should now
be functioning normally: providing
Desktop and In Air cursor control,
mouse Left and Right Click, and
Scroll Wheel functions. To adjust
cursor sensitivity, use the Windows
Control Panel or OS X
®
System
Preferences utility.
In Air Mode Picking up your Air
®
Mouse
Voice, depress and hold the
In Air Activation Trigger (9) on the
underside of the mouse. You now
have handheld control of the cursor,
guiding its direction with simple
wrist movements. Mouse Left Click
and Right Click buttons also control
Previous and Next Slide functions
in PowerPoint
presentations.
®
and Keynote®
Voice Mode With MotionTools
Software running, pick up your
Air Mouse
®
Voice, depress the
Microphone Activation Key
and, speaking clearly into the
microphone at the top of the
mouse, say the words “Stamp
Tool,” releasing the Key. A stamp
icon should appear on your screen,
confirming proper Voice Mode
operation. Press any of the three
assignable mouse buttons to
remove the icon.
®
Page 5
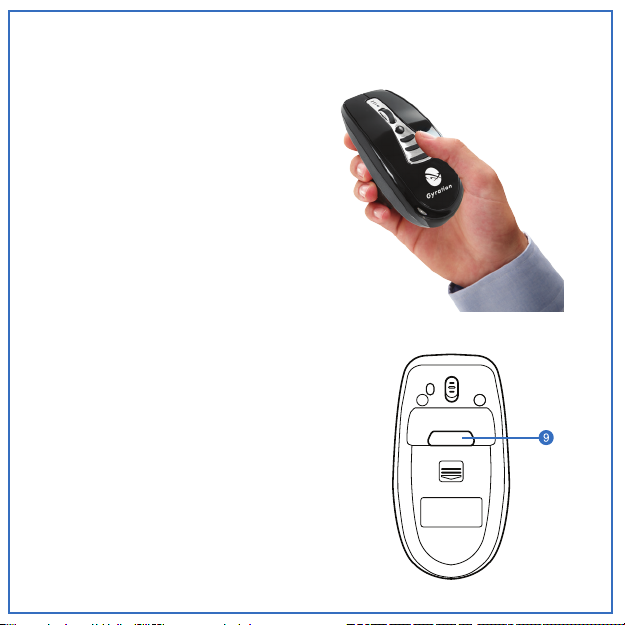
Using In the Air
1 The In-Air Activation Trigger
Picking up your Air Mouse® Voice, press
and hold the In-Air Activation Trigger
(9) located on the underside of the
mouse. Depressing the trigger activates
the mouse gyroscope and In-Air Mode.
As you move your wrist, the cursor will
mimic your movement. The faster your
wrist moves, the faster your cursor will
move. Avoid moving your whole arm as
cursor movement will be very slow.
If you wish to activate continuous In Air
Mode, double-click the trigger. This will
keep the gyroscope active but may make
it difficult to target smaller icons.To exit
continuous In Air Mode, double click
again or set it down on the desk.
2 Mouse Click & Scroll Wheel
While Air Mouse® Voice is in In Air
Mode, Left Click, Right Click and
Document Scroll Wheel controls are
functional. To use its Assignable Buttons
and Microphone Activation Key, your
MotionTools Software must be active.
Page 6

Introduction to MotionTools
MotionTools® Software is a software utility that helps you control your computer
from across the room, giving you access to programs and visual effects by translating mouse events into screen actions. MotionTools, available for both Windows
and OS X systems, is included with your Air Mouse
downloaded from www.gyration.com.
MotionTools, which is NOT required for basic Desktop and In Air operation,
must be active to configure and use Air Mouse
hand gestures and voice commands.
®
Voice purchase and can be
®
Voice assignable buttons,
®
Page 7

MotionTools Conguration Screen
Screen Controls
Buttons: Assign actions, effects and tools to
3 configurable buttons.
Gestures: Assign actions, effects and tools to
hand gestures.
Settings: Change settings, control mouse
speed and add or delete user profiles.
Context Tabs: Advanced area for setting
different buttons and gestures depending on
what type of program is being used.
Binding Area: Shows the current action,
effect or tool assigned to a button or gesture.
Items can be customized by dragging them
from the Action List to the button or gesture
you would like to assign.
Action List: List of actions and effects assignable to mouse buttons and hand gestures.
Prole: Save and switch active user profiles
.
Page 8

Using Your Voice
To use your Air Mouse® in Voice Mode, confirm that MotionTools Software is active,
then simply press the Microphone Activation Key (5) and, speaking clearly into the
microphone (3), command the action you would like to take, releasing the Activation
Key. The most popular voice commands include:
Display Commands
► Zoom In
► Spotlight
► Hide Screen
► Countdown Timer
Graphics Tools
► Laser Pointer
► Draw
► Highlighter
► Stamp Tool
Applications
► MotionTools
► Web Browser
► Email
► Search
► Multimedia
For help using MotionTools Software with your Air Mouse Voice, click the “?” in
the upper right corner of the MotionTools screen. A short video tutorial is also
available at “www.gyration.com/motion-tools-video.
Computer Control
► Keyboard
► Air Volume
► Increase Volume
► Decrease Volume
► Mute
Application Control
► Close Application
► Show Desktop
Editing
► Copy Text
► Cut Text
► Paste Text
”
LED & Microphone
Microphone Activation Key
Swipe
Button
Page 9

Assigning Actions to Buttons
There are three buttons on your mouse that can be customized to perform
an action, effect or bring up a tool. Let’s say you wanted to use the Zoom In
command with one of the buttons. The zoom effect is listed under display in
the action list. If it is not currently open, click on the arrow next to “Display”
to open the list. Click and drag “Zoom In” from the action list to the button
you want to assign. When you release the button, it will now show the “Zoom
In” icon.
Some actions and effects have customizable parameters. When you assign
one of these items, it will instantly ask for your preferences. Set your desired
preference and click the green check mark to save those settings. You can
change the preference with these items by clicking on the
items have a preference setting. If you want to change a setting, just drag a
new action onto that button. If you would like to clear that action, hit the
icon to delete that action.
icon. Not all
Assigning Actions to Gestures
In addition to the buttons, you can also customize what happens when you
swipe with the remote. Swiping is done by pressing and holding the Swipe
Button (7) until a circle appears on the screen. Then, moving the mouse to
one of the cardinal directions shown (up, down, left or right), release the button to bring up the action you’ve configured for that direction. To change an
action assigned to a gesture, click the “Gestures” tab on the left, then drag
and drop your intended action to the gesture icon showing that direction.
Page 10

Saving Your Settings: Your Prole
You can have multiple profiles, either for different users or for different applications.
For example, if two people share a computer, they might each have a profile that is
customized to their preferences. To create a new profile, just click the
To delete a profile, simply select it from the profile list and click the
The speed of the mouse is controlled by your operating system. Clicking on the
“Change Mouse Properties” button will open these controls. The mouse speed setting applies to both Desktop and In Air operation. In the air, in addition to operating
system speed, your mouse uses movement speed to determine the sensitivity.
The faster you move,
the faster the cursor will
move. Moving your wrist
quickly, the mouse will fly
across the screen; but for
making small adjustments
near icons and targets,
the mouse will allow pixel
accurate selection.
By default, MotionTools launches when your computer starts up or re-boots. To
disable this feature, simply un-click the ‘Launch on Startup” checkbox and save
your settings. Without MotionTools running, however, while you can still use your
Air Mouse
any of MotionTools’ wide array of actions, screen effects, button assignments, hand
gesture controls or voice commands.
®
Voice on the desktop and handheld in the air; you won’t have access to
button.
button.
Page 11

Using Context-Sensitive Tool Sets
MotionTools is a powerful utility designed to grow as your needs do. When you first
open the software, the General tool set is loaded by default. As you become more
proficient, you may wish to utilize MotionTools’ Context Switching option.
With Context Switching, your active tool set (screen effects, button assignments,
gesture definitions and voice commands) changes automatically as you change your
computer application. For example, when you use PowerPoint, Air Mouse
automatically updated with its Presentation Tool Set. Switching to your Web browser, your Air Mouse
®
Voice reconfigures ‘on the fly’ to use your Internet tool set.
Context Switching supports four types of computer applications:
To use Context Switching, you will need to define a tool set for each application type
you wish to include. Simply select the application tab (above), and begin adding
effects, assigning them to buttons or gestures. As you add actions to a tool set, a
green dot will appear on the context tab to show that actions have been defined.
When you’re using a computer application for which no context tool set has been
defined, MotionTools will default to the General tool set.
®
Voice is
Page 12

Warranty
SMK-Link Electronics Corporation (SMK-Link) warrants to the original end-user
purchaser of the Product (“you”) that the Product, excluding batteries, will be free
from defects in materials and workmanship under normal use and service for
two-years from date of purchase. If the Product becomes defective in materials or
workmanship during the warranty period, SMK-Link will, at its option, either repair
or replace it. The replacement unit may be a more current or upgraded model if
the originally purchased model is not available. Any Product repaired or replaced
under the terms of the warranty is covered for the remainder of the original
warranty period or ninety (90) days from the date of return shipment, whichever
is longer.
This warranty does not cover Products which have been subjected to misuse,
accident, physical damage, improper installation, abnormal operation or handling,
neglect, inundation or re or when Product regulatory label has been removed,
altered or rendered illegible; nor does it cover accessory or consumable items.
SMK-Link shall not be liable for any indirect special, incidental, or consequential
damages. SMK-Link’s total liability for damages for any cause related to, or
arising out of, the use or inability to use the Product shall not exceed the original
price paid for the Product even if SMK-Link has been informed of such possibility.
If your Product requires service under warranty, you must rst contact SMK-Link
product support to receive an RMA number. Shipping of defective units back to
SMK-Link is at your expense. The contact information can be found on the SMKLink website: www.smklink.com.
The warranty does not affect your statutory rights and you may have other rights
which vary from state to state and country to country. This warranty is understood
to be the complete and exclusive agreement between the parties, superseding
all prior agreements, oral or written, and all other communications between the
parties relating to the matter of this warranty.
The above warranty does not apply to Products sold in Australia. Products sold
in Australia by an authorized reseller will contain an Australia specic warranty
statement.
Page 13

FCC Statement
This device complies with Part 15 of the FCC Rules. Operation is subject to the
following two conditions:
(1) This device may not cause harmful interference and
(2) this device must accept any interference received, including interference that
may cause undesired operation.
This equipment has been tested and found to comply with the limits for a class B
digital device, pursuant to part 15 of the FCC Rules. These limits are designed to
provide reasonable protection against harmful interference in a residential installation. This equipment generates, uses and can radiate radio frequency energy and
if not installed and used in accordance with the instructions, may cause harmful
interference to radio communications.
However, there is no guarantee that interference will not occur in a particular
installation. If this equipment does cause harmful interference to radio or television
reception, which can be determined by turning the equipment off and on, the user
is encouraged to try to correct the interference by one or more of the following
measures:
* Reorient or relocate the receiving antenna.
* Increase the separation between the equipment and receiver.
* Connect the equipment into an outlet on a circuit different from that to which the
receiver is connected.
* Consult the dealer or an experienced radio/TV technician for help.
In order to maintain compliance with FCC regulations, shielded cables must be used
with this equipment. Operation with non-approved equipment or unshielded cables is
likely to result in interference to radio and TV reception.
The user is cautioned that changes and modications made to the equipment
without the approval of manufacturer could void the user’s authority to operate this
equipment.
Page 14

CE Declaration of Conformity
This equipment has been tested and found to comply with the limits of the European
Council Directive 2014/53/EU. A complete Declaration of Conformity can be found
at www.SMK-Link.com.
Industry Canada
This device complies with Industry Canada licence-exempt RSS standard(s).
Operation is subject to the following two conditions: (1) this device may not cause
interference, and (2) this device must accept any interference, including interference
that may cause undesired operation of the device.
Le présent appareil est conforme aux CNR d’Industrie Canada applicables aux
appareils radio exempts de licence. L’exploitation est autorisée aux deux conditions
suivantes : (1) l’appareil ne doit pas produire de brouillage, et (2 l’utilisateur de
l’appareil doit accepter tout brouillage radioélectrique subi, même si le brouillage est
susceptible d’en compromettre le fonctionnement.
Page 15

Thank You
Congratulations on your purchase of the Air Mouse Voice. We thank you for choosing
Gyration to meet your wireless needs and look forward to serving you in the future.
To learn about new Gyration products as they become available, and to ensure the
best possible customer support, please register your product at www.Gyration.com.
Product Support
SMK-Link Electronics Corporation
3601-B Calle Tecate, Camarillo, CA 93012
TEL: (888) 696-3500 | (805) 987-6662 | FAX: (805) 987-6665
Email: gsupport@smkusa.com
www.gyration.com
©2016 SMK-Link Electronics Inc. SMK-Link, the SMK-Link logo, Gyration, the Gyration logo
and Air Mouse and the are registered trademarks of SMK-Link Electronics, Inc. Windows,
and PowerPoint are registered trademarks of Microsoft Corporation in the United States and
other countries. Apple, OS X and Keynote are registered trademarks of Apple Inc. All other
registrations and trademarks are properties of their respective owners.
Page 16

www.gyration.com
 Loading...