

Page 1

Gyration Air Mouse
Quick Start Guide
www.gyration.com
Page 2

Overview
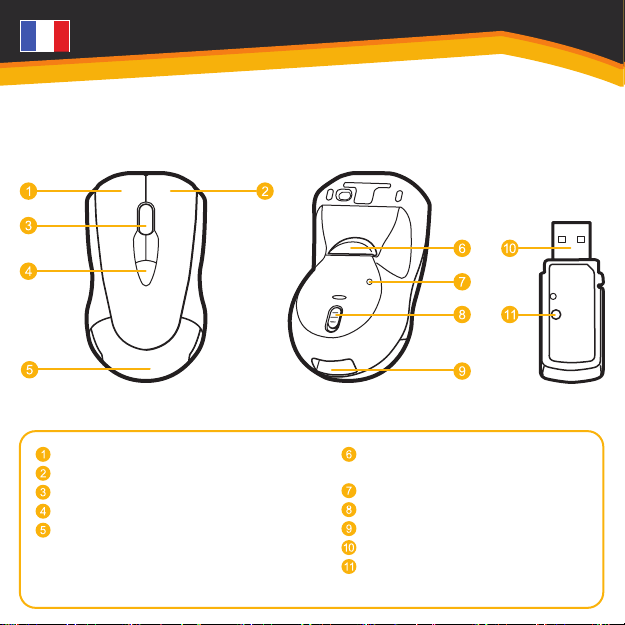
Left Mouse Button
Right Mouse Button
Scroll Wheel
Programmable Mouse Buttons (3)
Battery Compartment Cover
In-Air Activation Trigger
Mouse Connect Button
On / Off Switch
USB Receiver Storage
2.4 GHz USB Receiver
USB Receiver Connect Button
Page 3
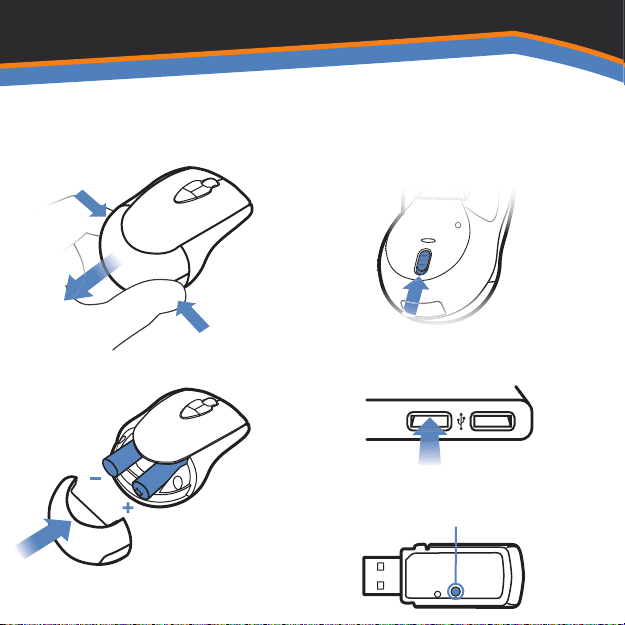
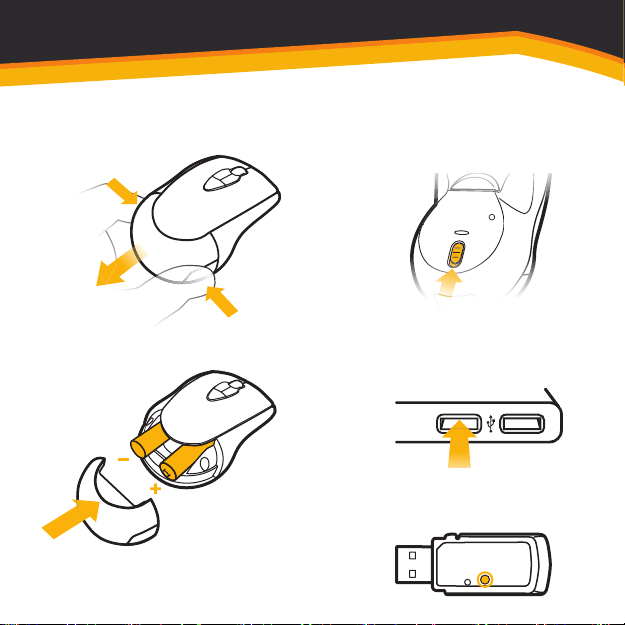
Getting Started
1 Remove Batter Compartment Cover.
4 Slide Switch to On.
2 Insert 2 AAA Batteries as shown.
3 Replace Battery Compartment Cover.
5 Insert the USB receiver into an
available USB port on your computer.
6 Press the connect button on the USB
receiver.
Page 4
7 Press the connect button on the
Mouse.
8 The computer will automatically detect
and configure the Air Mouse.
9 Download MotionTools from
www.gyration.com/motiontools
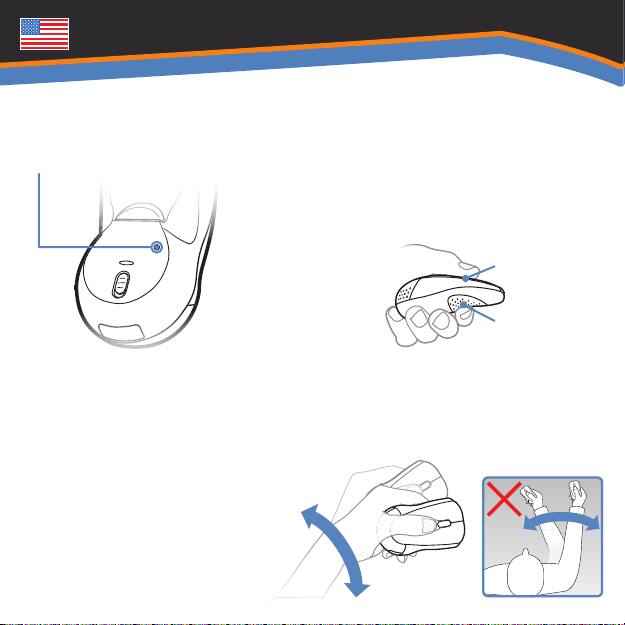
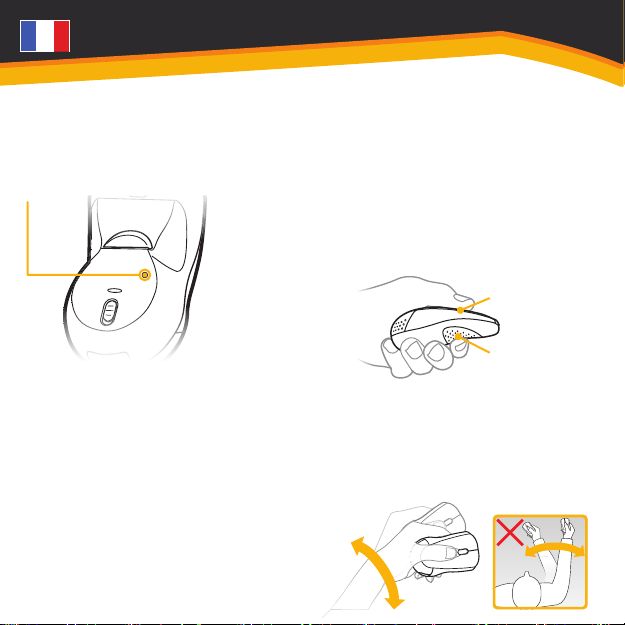
In-Air Operation
10 Hold the mouse using a comfortable
handshake position. Use your index
finger to access the in-air activation
trigger and your thumb to access the
top mouse buttons.
Top Buttons
Trigger
11 Press and hold the in-air activation
trigger and move the cursor by flexing
only your wrist while keeping your arm
and body stationary.
Page 5

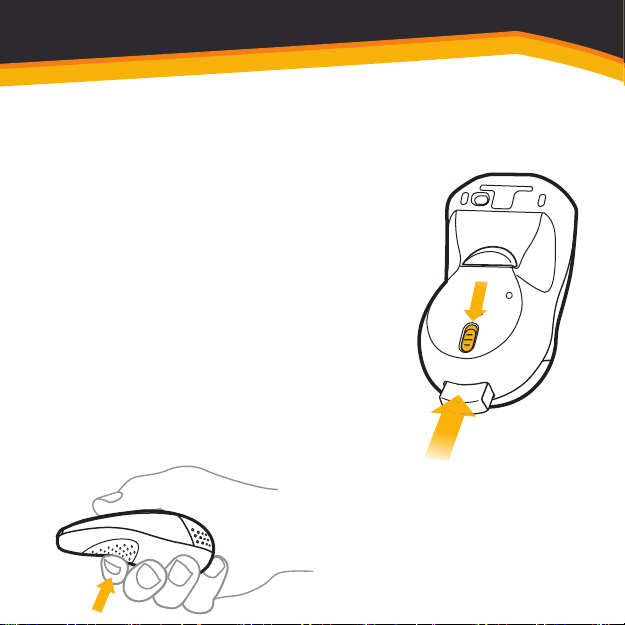
Storing the
Air Mouse
12 Tip: Click and hold the in-air activation
trigger then move the cursor over a
target and release the trigger before
clicking. This parks the cursor over
the target and allows you to click more
accurately.
13 Double-clicking the in-air activation
trigger puts the Air Mouse in motion
mode where you can move the cursor
without holding the trigger.
14 Slide switch to Off.
15 Insert the USB Receiver into the USB
storage compartment. Push gently until
it clicks in place. Push gently again to
release.
Page 6

Gyration – www.gyration.com
Regulatory Information
Notice to Users:
This equipment has been tested and found to comply with the limits
for Class B digital device, pursuant to Part 15 of the FCC rules. These
limits are designed to provide reasonable protection against harmful
interference in a residential installation. This equipment generates, uses
and can radiate radio frequency energy and, if not installed and used in
accordance with the instructions, may cause harmful interference to radio
communications. However, there is no guarantee that interference will
not occur in a particular installation. If the equipment does cause harmful
interference to radio or television reception, which can be determined
by turning the equipment off and on, the user is encouraged to try to
correct the interference by one or more of the following measures:
• Reorient or relocate the receiving antenna.
• Increase the separation between the equipment and the receiver.
• Connect the equipment into an outlet on a circuit different
from that which the receiver is connected.
• Consult the dealer or an experienced radio/TC technician for help.
The user is cautioned that changes and modications made
to the equipment without the approval of manufacturer could
void the user’s authority to operate this equipment.
Page 7

FCC Statement:
This device complies with part 15 of the FCC Rules. Operation is subject
to the following two conditions: (1) This device may not cause harmful
interference, and (2) this device must accept any interference received,
including interference that may cause undesired operation. Changes
or modications not expressly approved by the party responsible for
compliance could void the user’s authority to operate the equipment.
The antenna(s) used for this transmitter must not be co-located or
operating in conjunction with any other antenna or transmitter.
CE
This equipment has been tested and found to comply with the
limits of the European Council Directive on the approximation
of the law of the member states relating to electromagnetic
compatibility (89/336/EEC) according to EN 55022 Class B.
Industry Canada Equipment Notice
Under Industry Canada regulations, this radio transmitter may only
operate using an antenna of a type and maximum (or lesser) gain
approved for the transmitter by Industry Canada. To reduce potential
radio interference to other users, the antenna type and its gain should
be so chosen that the equivalent isotropically radiated power (e.i.r.p.)
is not more than that necessary for successful communication.
Page 8

This device complies with Industry Canada licence-exempt RSS standard(s).
Operation is subject to the following two conditions: (1) this device may
not cause interference, and (2) this device must accept any interference,
including interference that may cause undesired operation of the device.
Page 9

Warranty Information
LIMITED TWO YEAR WARRANTY
We warrant to the original purchaser that this product (hardware or software)
shall be free from defects in material and workmanship for a period of two
years from the date of purchase (“warranty period”). Proof of purchase in
the form of a legible sales receipt indicating that the product is within the
warranty period must be presented for warranty service. If this product
is determined to be defective during the warranty period, we will either
repair or replace the product with a current equivalent, at our option.
For further information contact:
Gyration
www.gyration.com
North America: 1 888 340-0033
This repair/ replacement is our sole obligation under this warranty. We will
repair/replacement
not be responsible for any incidental or consequential damages or for any
loss arising in connection with the use or inability to use this product. Some
states/provinces
states/ provinces do not allow the exclusion or limitation of incidental or
consequential damages, so the above limitation or exclusion may not apply
to you. This warranty excludes defects or damage due to misuse, abuse,
or neglect. This warranty gives you specic legal rights, and you may also
have other rights, which vary from state to state/province to province.
Page 10

Class 1 Laser Product
This optical device complies with International Standard IEC 60825-1 (also
known as EN 60825-1:2001) Class 1 Laser Product Invisible and also
complies with 21 CFR 1040 Laser Notice 50. Low risk to eyes, no risk to skin.
Class 1 products are dened to be safe under all
conditions including optical instruments.
Caution: Use of controls or adjustments or performance of procedures other
than those herein specied may result in hazardous radiation exposure.
Page 11
Gyration Air Mouse
Guide de démarrage rapide
www.gyration.com
Page 12
Présentation
Touche gauche de la souris
Touche droite de la souris
Molette de défilement
Touches programmables de la souris (3)
Couvercle du compartiment des batteries
Mécanisme de déclenchement
d’activation dans l’espace
Touche de connexion de la souris
Commutateur Act./Désact.
Stockage de l’émetteur-récepteur USB
Émetteur-récepteur USB 2,4 GHz
Touche de connexion de
I’émetteurrécepteur USB
Page 13
Mise en route
1 Retirez le couvercle du compartiment
des batteries.
4 Placez le commutateur sur Activer.
2 Insérez les batteries 2 AAA comme
illustré.
3 Remettez le couvercle du compartiment
des batteries.
5 Insérez l’émetteur-récepteur USB
dans un port USB disponible sur votre
ordinateur.
6 Appuyez sur la touche de connexion de
l’émetteur-récepteur USB.
Page 14
7 Appuyez sur la touche de connexion de
la souris.
Fonctionnement
dans l’espace
10 Tenez la souris tout en gardant la
main confortable en position verticale.
Utilisez votre index pour accéder
au mécanisme de déclenchement
d’activation dans l’espace et votre
pouce pour accéder aux touches
supérieures de la souris.
Top Buttons
Trigger
8 L’ordinateur détectera automatiquement
l’Air-Mouse et la configurera.
9 Téléchargement MotionTools
www.gyration.com/motiontools
11 Appuyez sur le mécanisme de
déclenchement d’activation dans
l’espace et maintenez la touche
enfoncée. Déplacez alors le curseur
en flexant le poignet tout en gardant le
bras et le corps stationnaires.
Page 15
12 Astuce :Appuyez sur le mécanisme
de déclenchement d’activation dans
l’espace et maintenez la touche
enfoncée. Déplacez alors le curseur
sur une cible et relâchez le mécanisme
de déclenchement avant de cliauer.
Cela stationne le curseur sur la Cible
pour vous permettre de cliquer plus
précisément.
13 Double-cliquer sur le mécanisme
de déclenchement d’activation
dans l’espace active le mode de
déplacement de l’Air-Mouse vous
permettant ainsi de déplacer le curseur
sans avoir à maintenir le mécanisme
de déclenchement.
Stockage de
l’Air-Mouse
14 Placez le commutateur sur Désactiver.
15 Insérez l’émetteur-récepteur USB dans
le compartiment de stockage USB.
Poussez doucement dessus jusqu’à
ce qu’il s’enclenche. Repoussez
doucement dessus pour le libérer.
Page 16

Gyration – www.gyration.com
Informations réglementaires
Avis aux utilisateurs :
Cet équipement a été testé, et sa conformité a été établie, par rapport
aux limites applicables à un dispositif de classe B, conformément
à l’alinéa 15 de la réglementation FCC. Ces limites sont conçues
pour offrir une protection suffisante contre les interférences nuisibles
d’une installation résidentielle. Cet équipement génère, utilise et peut
émettre une énergie de radiofréquence et, s’il n’est pas installé et
utilisé conformément aux instructions, peut causer des interférences
néfastes aux communications radio. Il n’existe cependant aucune
garantie que de telles interférences ne se produiront pas dans le
cadre d’une installation particulière. Si cet équipement provoque
effectivement des interférences néfastes à la réception radio
ou télévisée, ce qui peut être établi en allumant et en éteignant
l’équipement, nous encourageons l’utilisateur à tenter de corriger
cette interférence grâce à une ou plusieurs des mesures suivantes :
• Réorienter ou repositionner l’antenne réceptrice.
• Augmenter la distance entre l’équipement et le récepteur.
• Brancher l’équipement dans une prise appartenant à un circuit
différent de celui sur lequel le récepteur est branché.
• Consulter le revendeur ou un technicien en radio et / ou
télécommunications expérimenté pour obtenir de l’aide. Ce produit
fonctionne à l’aide d’une radiofréquence de sorte que son utilisation
dans un avion peut faire l’objet de restrictions suite aux interférences.
Page 17

Déclaration de la FCC :
Cet appareil est conforme à l’alinéa 15 des réglementations de la
FCC. Son fonctionnement est sujet aux deux conditions suivantes
: (1) Cet appareil ne doit pas causer d’interférences dangereuses
et (2) cet appareil doit accepter toutes interférences reçues, y
compris celles capables de causer son mal fonctionnement. Les
changements ou modifications non explicitement approuvés par
le parti en charge de la conformité peuvent annuler les droits
d’utilisateur associés à l’équipement. Les antennes destinées
à ce transmetteur ne peuvent pas être placées ou fonctionner
en conjonction avec tout autre transmetteur ou antenne.
CE
Cet équipement a fait l’objet de tests ayant établi sa conformité
aux limites de la directive du Conseil européen portant sur
l’approximation de la législation des États-membres relative à
la compatibilité électromagnétique (89/336/CEE) conforme à
la norme EN 55022 applicable aux dispositifs de classe B.
Avis relatif à la certification de l’équipement par Industrie Canada
La certification Industrie Canada identifie les équipements certifiés.
Ladite certification signifie que l’équipement est conforme à certaines
spécifications de fonctionnement, de sécurité et de protection du réseau
de télécommunications, telles que prescrites par le(s) documents
techniques relatifs aux équipements utilisateur. Le département ne
garantit pas que le fonctionnement de l’équipement donnera satisfaction
à l’utilisateur. Avant d’installer cet équipement, les utilisateurs doivent
Page 18

s’assurer que sa connexion aux installations de l’opérateur de
télécommunications local est permise. L’équipement doit également
être installé selon une méthode de connexion acceptable. Le client
doit être averti que le respect des conditions ci-dessus n’empêche pas
nécessairement une dégradation du fonctionnement dans certaines
situations. Les réparations effectuées sur un équipement certifié doivent
être coordonnées par un représentant désigné par le fournisseur. Toute
réparation ou modification effectuée par l’utilisateur de cet équipement,
ou encore les dysfonctionnements de l’équipement, peut motiver
une demande de l’opérateur de télécommunications à l’utilisateur de
déconnecter l’équipement. Les utilisateurs doivent s’assurer, pour leur
propre protection, que les connecteurs électriques de mise à la terre du
service public d’alimentation, des lignes téléphoniques et du système de
conduites d’eau métalliques sont le cas échéant connectées les unes
aux autres. Cette disposition peut s’avérer particulièrement importante
en zone rurale. Mise en garde : les utilisateurs ne doivent pas essayer
de réaliser eux-mêmes ces connexions mais devraient selon le cas
contacter les services d’inspection électrique ou un électricien compétent.
Page 19

Informations de garantie
GARANTIE LIMITÉE DE DEUX ANS
Nous garantissons à l’acheteur initial que le présent produit (matériel ou
logiciel) demeurera exempt de défauts matériels et de fabrication pour
une période de deux ans à compter de la date d’achat (« période de
garantie »). Une preuve d’achat sous forme d’un ticket de caisse lisible
indiquant que le produit est couvert par la garantie doit être présentée
pour bénécier du service de garantie. S’il est démontré que le présent
produit est défectueux pendant la période de garantie, nous réparerons ou
remplacerons selon notre convenance le produit par un produit équivalent
actuel. Pour une réparation ou un remplacement par un produit équivalent
rapide et sans frais, renvoyez le produit défectueux accompagné de
la preuve d’achat et correctement affranchi à l’adresse adéquate.
Pour plus de détails, contactez :
Gyration
www.gyration.com
North America: 1 888 340-0033
Ladite réparation ou ledit remplacement constitue notre seule obligation
en vertu de la présente garantie. Nous ne serons pas tenus responsables
de quelconques dommages indirects ou connexes, ou de quelconques
pertes nées de l’utilisation du produit ou de l’incapacité de l’utiliser.
Certains États ou régions n’autorisent pas l’exclusion ou la limitation des
dommages indirects ou connexes, de sorte que la limitation ou l’exclusion
ci-dessus peut ne pas vous être applicable. La présente garantie exclut
les défauts ou les dommages dus à une mauvaise utilisation, à
Page 20

Produit laser de classe 1
Cet appareil optique est conforme à la norme internationale IEC 60825-1
(aussi connue sous le nom de EN 60825-1:2001) Produit laser invisible
de classe 1. Il est également conforme à la norme 21 CFR 1040 Laser
Notice 50. Danger léger pour les yeux, aucun danger pour la peau.
Les produits, notamment les instruments optiques, de Classe 1 sont dénis
comme des produits ne présentant aucun risque dans toutes les conditions.
Mise en garde : l’utilisation de commandes, réglages ou procédures autres
que ceux indiqués ici peut entraîner des risques d’exposition à la radiation.
Page 21

Gyration Air Mouse
Kurzeinführung
www.gyration.com
Page 22

Übersicht
Linke Maustaste
Rechte Maustaste
Mausrad
Programmierbare Maustasten (3)
Abdeckung für Batteriefach
In-Air-Aktivierungstaste
Mausverbindungstaste
Einschalttaste (On10ff)
USB-Empfängerspeicher
USB-Empfänger (2,4 GHz)
Verbindungstaste USB-Empfänger
Page 23

Start
1 Nehmen Sie die Abdeckung des
Batteriefachs ab.
4 Bringen Sie die Einschalttaste auf
Position “On”.
2 Legen Sie 2 AAA-Batterien wie auf der
Abbildung gezeigt ein.
3 Setzen Sie die Abdeckung wieder auf
das Batteriefach auf.
5 Setzen Sie den USB-Empfänger in
einen freien USB-Port am PC ein.
6 Drücken Sie die Verbindungstaste am
USB-Empfänger.
Page 24

7 Drücken Sie die Verbindungstaste an
der Maus.
Arbeit mit der
In-Air-Maus
10 Halten Sie die Maus in einer
bequemen Handposition (ähnlich
wie beim Händeschütteln). Legen
Sie den Zeigefinger auf den In-AirAktivierungsschalter und den Daumen
auf die Tasten auf der Mausoberfläche.
Top Buttons
Trigger
8 Der PC erkennt und konfiguriert die Air
Mouse automatisch.
9 MotionTools download
www.gyration.com/motiontools
11 Drücken Sie den In-Air-
Aktivierungsschalter, halten Sie ihn
gedrückt und bewegen Sie den Cursor
durch Bewegung ausschließlich des
Handgelenks.
Page 25

12 Tipp: Drücken Sie den In-Air-
Aktivierungsschalter, halten Sie ihn
gedrückt, führen Sie danach den
Cursor auf ein Ziel, lassen Sie diesen
Schalter los und drücken Sie erst
dann eine Maustaste. Hierdurch wird
der Cursor auf dem Ziel fixiert; dies
ermöglicht exakteres Anklicken.
13 Durch zweimaliges Drücken
des In-Air-Aktivierungsschalters
wird der Bewegungsmodus
eingeschaltet; hier können Sie den
Cursor ohne Gedrückthalten des
Aktivierungsschalters bewegen.
Lagern der Air Mouse
14 Schalten Sie die Maus aus
(Stellung “Off”).
15 Legen Sie den USB-Empfänger in das
dafür vorgesehene Fach. Drücken
Sie vorsichtig, bis er einrastet. Nach
erneutem vorsichtigem Drücken
können Sie den Empfänger wieder
herausnehmen.
Page 26

Gyration – www.gyration.com
Zulassungsinformationen
Hinweise für Benutzer:
Dieses Gerät ist geprüft und verfügt über die Begrenzungen eines digitalen
Gerätes der Klasse B, entsprechend Abschnitt 15 der FCC-Richtlinien. Diese
Begrenzungen verhindern störende Auswirkungen auf andere Instrumente in
Wohngebieten. Dieses Gerät erzeugt, verwendet und strahlt unter Umständen
Hochfrequenzenergien ab und kann, wenn es nicht unter Einhaltung
der Anweisungen im Benutzerhandbuch installiert und verwendet wird,
Störungen des Rundfunks oder des Funkverkehrs verursachen. Es kann
jedoch nicht garantiert werden, dass bei einer bestimmten Installation
nicht doch Störungen auftreten. Wenn das Gerät den Rundfunk- oder
Fernsehempfang stört, was sich durch Aus- und wieder Einschalten des
Gerätes feststellen lässt, sollte der Benutzer versuchen, die Störungen
mit Hilfe einer oder mehrerer der folgenden Maßnahmen zu beheben:
• Die Empfangsantenne neu ausrichten.
• Den Abstand zwischen dem Gerät und dem Empfänger vergrößern.
• Das System an eine andere Steckdose anschließen, sodass System und
Empfänger über verschiedene Stromkreise versorgt werden.
• Wenden Sie sich bei Problemen an den Händler oder an einen
erfahrenen Rundfunk- und Fernsehtechniker. Dieses Produkt verwendet
bei Betrieb Hochfrequenz, die Verwendung in Flugzeugen kann daher
aufgrund möglicher Störungen eingeschränkt sein.
Page 27

FCC-Erklärung:
Dieses Gerät ist in Übereinstimmung mit Teil 15 der FCC-Richtlinien.
Die folgenden beiden Bedingungen müssen beim Betrieb berücksichtigt
werden: (1) Dieses Gerät darf keine schädlichen Störungen erzeugen,
und (2) dieses Gerät muss alle Störungen empfangen, einschließlich
Störungen, die unerwünschtes Betriebsverhalten hervorrufen. Werden
Änderungen oder Modikationen vorgenmommen, welche nicht
ausdrücklich von der für die Übereinstimmung verantwortlichen Person
oder Einrichtung gebilligt sind, wird die Benutzervollmacht für den Betrieb
des Geräts möglicherweise ungültig. Die Antenne(n), die für dieses
Sendegerät verwendet werden, dürfen nicht mit anderen Antennen
oder Sendegeräten zusammengelegt oder betrieben werden.
CE
Dieses Gerät wurde geprüft und erfüllt die Grenzwerte der
Richtlinie des Rates zur Angleichung der Rechtsvorschriften
der Mitgliedstaaten über die elektromagnetische
Verträglichkeit gemäß EN 55022 Klasse B.
Industry Canada-Produktzulassung
Mit der Industry Canada-Produktzulassung werden zugelassene
Geräte gekennzeichnet. Diese Zulassung bedeutet, dass das Gerät
bestimmte Anforderungen zum Schutz, Betrieb und zur Sicherheit von
Telekommunikationsnetzen entsprechend den Angaben in dem/den
technischen Dokument(en) für Endgeräte, erfüllt. Das Ministerium
übernimmt keine Garantie dafür, dass das Gerät zur Zufriedenheit
Page 28

des Benutzers funktioniert. Vor dem Installieren des Geräts sollte der
Benutzer sicherstellen, dass der Anschluss an die Einrichtungen des
örtlichen Telekommunikationsunternehmens zulässig ist. Außerdem
muss das Gerät mit einer zulässigen Anschlussmethode angeschlossen
werden. Der Kunde sollte darüber informiert sein, dass die Einhaltung der
obengenannten Anforderungen nicht die Beeinträchtigung des Betriebs in
bestimmten Situationen verhindern kann. Reparaturen von zugelassenen
Geräten sollten von einem durch den Lieferanten bestimmten Vertreter
koordiniert werden. Alle vom Benutzer an diesem Gerät vorgenommenen
Reparaturen oder Änderungen oder Gerätefehlfunktionen können das
Telekommunikationsunternehmen gegebenenfalls veranlassen, den
Benutzer zum Trennen des Geräts vom Anschluss aufzufordern. Benutzer
sollten zu ihrem eigenen Schutz sicherstellen, dass die elektrischen
Erdungsleitungen des Netzteils, der Telefonleitungen und des internen
Metallwasserrohrsystems, sofern vorhanden, miteinander verbunden
sind. Dieser Schutz ist möglicherweise besonders wichtig in ländlichen
Gebieten. Vorsicht: Benutzer sollten nicht versuchen, solche Anschlüsse
selbst herzustellen, sondern sich an die für elektrische Betriebssicherheit
zuständige Behörde oder einen erfahrenen Elektriker wenden
Page 29

Garantieangaben
BEGRENZTE ZWEIJAHRESGARANTIE
Wir garantieren dem ursprünglichen Käufer während eines Zeitraums von
zwei Jahren ab Kaufdatum („Garantiezeitraum“), dass dieses Produkt
(Hardware oder Software) frei von Material- und Verarbeitungsfehlern
ist. Für die Garantieleistung muss ein Kaufbeleg in Form eines lesbaren
Kassenzettels vorgelegt werden, aus dem hervorgeht, dass sich das
Produkt innerhalb des Garantiezeitraums bendet. Wenn festgestellt wird,
dass das Produkt defekt ist und sich innerhalb des Garantiezeitraums
bendet, werden wir das Gerät nach eigenem Ermessen entweder
reparieren oder durch ein aktuelles gleichwertiges Gerät ersetzen.
Um eine umgehende kostenlose Reparatur oder einen gleichwertigen
Ersatz zu erhalten, senden Sie das defekte Gerät zusammen mit
einem Kaufbeleg ausreichend freigemacht an die korrekte Adresse.
Weitere Informationen erhalten Sie unter der folgenden Adresse:
Gyration
www.gyration.com
North America: 1 888 340-0033
Diese Reparatur/Austausch ist unsere einzige Picht im Rahmen dieser
Garantie. Wir haften für keine Folgeschäden oder für Schadenersatz
für Aufwendungen bei Vertragserfüllung oder für Einbußen, die im
Zusammenhang mit der Verwendung oder der Unfähigkeit zur Verwendung
dieses Produkts entstehen. In manchen Staaten/Provinzen sind der
Haftungsausschluss oder die Haftungseinschränkung für Folgeschäden
oder Schadenersatz für Aufwendungen bei Vertragserfüllung
Page 30

nicht zulässig, sodass die oben genannte Haftungsbeschränkung
oder Haftungsausschluss für sie möglicherweise keine Gültigkeit
besitzen. Diese Garantie gilt nicht für Defekte oder Schäden durch
Fehlbedienung, Missbrauch oder Fahrlässigkeit. Aufgrund dieser
Garantie stehen Ihnen bestimmte rechtsgültige Ansprüche zu, und
Sie verfügen möglicherweise über weitere Rechte, die sich von
Staat zu Staat bzw. Provinz zu Provinz unterscheiden können.
Page 31

Laserprodukt der Klasse 1
Dieses optische Gerät entspricht der internationalen Klassizierungsnorm IEC
60825-1 (auch als EN 60825-1:2001 bezeichnet), Laserprodukt der Klasse 1,
sowie 21 CFR 1040 Laser Notice 50. Geringes Risiko für Augen, kein Risiko
für Haut.
Die Produkte der Klasse 1 gelten unter allen Umständen als sicher einschließlich optische Instrumente.
Vorsicht: Die Verwendung von Steuerungen, oder Einstellungen oder die
Durchführung von anderen hierin nicht genannten Verfahren kann zu riskanter Strahlenaussetzung führen..
Page 32

Gyration Air Mouse
Guía de inicio rápido
www.gyration.com
Page 33

Visión general
Botón izquierdo del ratón
Botón derecho del ratón
Rueda del ratón
Botón programable del ratón (3)
Cubierta del compartimento de la pila
Desencadenador de activación
en el aire
Botón de conexión del ratón
Interruptor de encendidolapagado
Almacenamiento del receptor USB
Receptor USB de 2,4 GHz
Botón de conexión del receptor USB
Page 34

Inicio
1 Retire la cubierta del
compartimento para pilas.
4 Deslice el interruptor a la
posición de encendido.
2 Inserte 2 pilas AAA como se muestra.
3 Reemplace la cubierta del
compartimento para pilas.
5 Inserte el receptor USB en un puerto
USB disponible de su ordenador.
6 Pulse el botón de conexión
en el receptor USB.
Page 35

7 Pulse el botón de conexión en el ratón.
Funcionamiento
en el aire
10 Agarre el ratón colocando la mano en
una posición vertical cómodaUtilice
el dedo índice para acceder al
desencadenador de activación en el
aire y el dedo pulgar para acceder a
los botones superiores del ratón.
Top Buttons
Trigger
8 El ordenador detectará y
configurará automáticamente
el ratón a mano alzada.
9 Télécharger MotionTools de
www.gyration.com/motiontools
11 Pulse y mantenga pulsado el
desencadenador de activación
en el aire y mueva el cursor
flexionando solo la muñeca y sin
mover el brazo o el cuerpo.
Page 36

12 Sugerencia: haga clic y mantenga
pulsado el desencadenador de
activación en el aire y, a continuación,
dirija el cursor sobre un objetivo
y suelte el desencadenador antes
de hacer clic. Esto estaciona el
cursor sobre el objetivo y le permite
hacer clic con más precisión.
13 Al hacer doble clic con el
desencadenador de activación en
el aire, el ratón a mano alzada se
pone en el modo de movimiento,
durante el cual podrá mover el
cursor sin necesidad de mantener
pulsado el cadenador.
Almacenamiento del
ratón a mano alzada
14 Deslice el interruptor a la
posición para de apagado.
15 Inserte el receptor USB en el
compartimento de almacenamiento
USB. Presione ligeramente hasta
que encaje en su lugar. Presione
ligeramente de nuevo para liberarlo.
Page 37

Gyration – www.gyration.com
Información sobre normativas
Aviso a los usuarios:
Este equipo se ha probado, y se ha demostrado que cumple los límites de
un dispositivo digital de clase B, según la Parte 15 de la normativa de la
FCC. Estos límites se han creado para ofrecer una protección razonable
ante las interferencias perjudiciales de una instalación doméstica. Este
equipo genera, utiliza y puede radiar energía de radiofrecuencia y, si no
se instala y utiliza de acuerdo con las instrucciones, puede ocasionar
interferencias perjudiciales para las comunicaciones por radio. Sin
embargo, no se ofrecen garantías de que estas interferencias no se
produzcan en una instalación particular. Si el equipo no causa interferencias
perjudiciales para la recepción de radio o televisión (se puede determinar
encendiendo y apagando el equipo), se insta al usuario a intentar
corregir la interferencia tomando algunas de las medidas siguientes:
• Reorientar o reubicar la antena receptora.
• Aumentar la separación entre el equipo y el receptor.
• Enchufar el equipo en la toma eléctrica de un circuito distinto al circuito
en el que esté enchufado el receptor.
• Consultar al distribuidor o a un técnico experimentado o certicado de
radio para obtener ayuda. Este producto funciona por radiofrecuencia,
de modo que su uso en un avión puede estar restringido debido a las
interferencias.
Page 38

Declaración de la FCC:
Este dispositivo cumple con la parte 15 de las Normativas de la FCC.
Su funcionamiento está sujeto a las dos condiciones siguientes: (1) Este
dispositivo puede no causar interferencia peligrosa, y (2) este dispositivo
debe aceptar cualquier interferencia recibida, incluida la interferencia que
pueda causar funcionamiento no deseado. Cambios o modicaciones
no aprobadas expresamente por la parte responsable del cumplimiento
podría invalidar la autoridad del usuario para operar el equipo. La antena
o antenas utilizadas para este transmisor deben estar ubicadas en su
cercanía o funcionar junto con cualquier otra antena o transmisor.
CE
Este equipo se ha probado y cumple los límites de la Directiva del
Parlamento Europeo en cuanto a la aproximación de la ley de los
estados miembros en relación con la compatibilidad electromagnética
(89/336/EEC) de acuerdo con la normativa EN 55022 Clase B.
Aviso sobre el equipo de Industry Canada
La certicación de Industry Canada identica el equipo certicado. Esta
certicación representa que el equipo cumple determinados requisitos
operativos, de seguridad y de protección de redes de telecomunicaciones,
conforme a lo recomendado en los correspondientes documentos técnicos
del equipo terminal. El Departamento no garantiza que el funcionamiento
del equipo satisfaga al usuario. Antes de instalar este equipo, los usuarios
deberían asegurarse de que es posible conectarse a los servicios de la
compañía de telecomunicaciones local. El equipo también debe estar
instalado con un método de conexión aceptable. El cliente debería saber
Page 39

que es posible que, aunque se cumplan las condiciones anteriores, no
se evite la degradación del servicio en determinadas situaciones. Las
reparaciones del equipo certicado se deberían coordinar a través de
un representante designado por el proveedor. Cualquier reparación o
alteración que realice el usuario en este equipo, o el mal funcionamiento
del equipo pueden ser motivo suciente para que la compañía de
telecomunicaciones solicite al usuario que desconecte el equipo. Los
usuarios se deberían asegurar, por cuestiones de protección propia, de
que los conectores de tierra, líneas telefónicas y sistema de tuberías
metálicas del agua internas, si las hay, estén conectados juntos. Esta
disposición puede ser particularmente importante en las zonas rurales.
Precaución: los usuarios no deberían intentar realizar dichas conexiones
por sí mismos, sino que deberían ponerse en contacto con una autoridad
de inspección eléctrica o con un electricista, según convenga.
Información de la garantía
GARANTÍA LIMITADA DE DOS AÑOS
Garantizamos al comprador original que este producto (hardware o software)
no tendrá defectos materiales ni defectos de mano de obra durante un
período de dos años a partir de la fecha de adquisición (“período de
garantía”). Se debe presentar el comprobante de compra (recibo de compra
legible) en el que se indica que el producto está dentro del período de
garantía para que se preste el servicio de garantía. Si durante el período
de garantía se determina que este producto es defectuoso, repararemos
o sustituiremos el producto por otro equivalente actual, a nuestra elección.
Para que la sustitución/reparación gratuita del producto equivalente sea
rápida, devuelva el producto defectuoso junto con el comprobante de compra
Page 40

(envío por correo de franqueo pagado) a la dirección correspondiente.
Para obtener más información póngase en contacto con:
Gyration
www.gyration.com
North America: 1 888 340-0033
Esta reparación/sustitución es la única obligación por nuestra parte bajo
esta garantía. No nos haremos responsables de ningún daño fortuito o
consecuente ni por ninguna pérdida que se produzca en relación al uso
de este producto. Algunos estados o distritos no permiten la exclusión
o limitación de responsabilidad por daños fortuitos o consecuentes, de
manera que es posible que la limitación o exclusión anteriores no se
aplique al cliente. Esta garantía excluye los defectos o daños debidos al
mal uso, abuso o negligencia. Esta garantía otorga al cliente derechos
legales especícos, y el cliente también puede tener otros derechos,
que varían en función del estado o distrito en el que se encuentre.
Page 41

Producto láser de clase 1
Este dispositivo óptico cumple con la norma internacional CEI 608251 (también conocida como EN 60825-1:2001), Producto láser invisible
de clase 1, y cumple también con la norma 21 CFR 1040 Laser
Notice 50. Bajo riesgo para los ojos, ningún riesgo para la piel.
Los productos de Clase 1 han sido denidos como seguros en
todas las condiciones, incluidos los instrumentos ópticos.
Precaución: el uso de controles o de ajustes o el rendimiento de
procedimientos diferentes a los especicados en este documento
puede resultar en una exposición peligrosa a la radiación
Page 42

Gyration Air Mouse
Snelstartgids
www.gyration.com
Page 43

Overzicht
Linkermuisknop
Rechtermuisknop
Scrollwiel
Programmeerbare muisknoppen (3)
Deksel batterijcompartiment
Trigger voor in-air activering
Ansluitknopvo or muis
Aan / Uit schakelaar
Opslag USB-ontvanger
2,4 GHz USB-ontvanger
Aansluitknop USB-ontvanger
Page 44

Aan de slag
1 Verwijder de deksel van het
batterijcompartiment.
4 Zet de schakelaar op Aan.
2 Plaats 2 AAA batterijen
zoals in het voorbeeld.
3 Sluit de deksel van het
batterijcompartiment.
5 Plaats de USB-ontvanger
in een beschikbare USBpoort op uw computer.
6 Druk op de verbindingsknop
op de USB-ontvanger.
Page 45

7 Druk op de verbindingsknop
op de muis.
In-Air werking
10 Houd de muis op een ontspannen
manier in de palm van uw hand.
Gebruik uw wijsvinger om de
trigger van de in-air activering
te bedienen en uw duim voor
de bovenste muisknoppen.
Top Buttons
Trigger
8 De computerz al de Air Mouse
automatisch vinden en configureren.
9 MotionTools download
www.gyration.com/motiontools
11 Druk de trigger voor de in-air
activering in en houd deze vast.
Verplaats de cursor door het
bewegen van uw pols, maar houd
uw arm en bovenlichaam stil.
Page 46

12 Tip: Klik en houd de trigger voor
de in-air activering vast, verplaats
daarna de cursor over een doel en
laat de trigger los voordat u klikt.
Hiermee parkeert u de cursor op het
doel en kunt u gerichter klikken.
13 Door het dubbelklikken van de trigger
voor de in-air activering brengt u de
Air Mouse in bewegingsrnodus. Hierin
kunt u de cursor verplaatsen zonder
de trigger ingedrukt te houden.
Het bewaren van
de Air Mouse
14 Zet de schakelaar op uit.
15 Plaats de USB-ontvanger in het USB-
opslagcompartiment. Duw zachtjes
totdat hij op zijn plaats klikt. Duw
opnieuw zachtjes om los te maken.
Page 47

Gyration – www.gyration.com
Kennisgevingen
Opmerking voor gebruikers:
Deze apparatuur is getest en in overeenstemming bevonden met de
beperkingen voor een digitaal apparaat van Klasse B, conform Deel 15
van de FCC-richtlijnen. Deze grenswaarden bestaan om een redelijke
bescherming te bieden tegen schadelijke storing in een particuliere installatie.
Door deze apparatuur wordt radiofrequentie-energie gegenereerd, gebruikt
en mogelijk uitgestraald. De apparatuur dient volgens de aanwijzingen van
de fabrikant te worden geïnstalleerd en gebruikt, anders zou het schadelijke
storing voor radiocommunicatie kunnen veroorzaken. Er is echter geen
garantie dat in een bepaalde installatie geen storing zal optreden. Mocht
het apparaat storing in radio- of televisieontvangst veroorzaken, hetgeen
kan worden vastgesteld wanneer de apparatuur uit en aan wordt gezet,
kunt u met de volgende maatregelen trachten de storing te verhelpen:
• Verander de positie van de ontvangstantenne.
• Zet de apparatuur en het ontvangende
apparaat verder bij elkaar vandaan.
• Sluit de apparatuur niet aan op hetzelfde stopcontact
als het ontvangende apparaat.
• Bel de dealer of een ervaren radio-/tv-technicus voor hulp. Dit product
maakt gebruik van een radiofrequentie. Om deze reden kan het gebruik
ervan in een vliegtuig worden beperkt vanwege de kans op storing.
Page 48

FCC-verklaring:
Dit apparaat voldoet aan deel 15 van de FCC-voorschriften. Het gebruik
van dit product is toegestaan onder de volgende twee voorwaarden: 1) Dit
apparaat mag geen schadelijke storing veroorzaken, en 2) dit apparaat
moet elke storing van buitenaf accepteren, met inbegrip van storingen
die nadelige gevolgen voor de werking van het apparaat kunnen hebben.
Alle wijzigingen of aanpassingen die niet zijn goedgekeurd door de
partij die verantwoordelijk is voor de naleving, kunnen de bevoegdheid
van de gebruiker om het apparaat te bedienen nietig verklaren. Deze
zender dient niet samen met een antenne of zender te worden gebruikt
of in de buurt van een andere antenne of zender te worden geplaatst.
CE
Deze apparatuur is getest en in overeenstemming bevonden met
de grenswaarden van de richtlijn van de Europese Raad die zijn
opgezet door de lidstaten met betrekking tot elektromagnetische
compatibiliteit (89/336/EEC) conform EN 55022 Klasse B.
Opmerking met betrekking tot Industry Canada-apparatuur
De Industry Canada-markering duidt gecerticeerde apparatuur aan.
Deze certicatie houdt in dat de apparatuur voldoet aan bepaalde
beschermende, operationele en veiligheidsrichtlijnen met betrekking tot
telecommunicatienetwerken, zoals uiteengezet in de overeenkomstige
Terminal Equipment Technical Documents. Het Ministerie kan niet garanderen
dat de apparatuur naar de volledige tevredenheid van de gebruiker zal
functioneren. Alvorens deze apparatuur te installeren, moeten gebruikers
Page 49

controleren of het toegestaan is om deze apparatuur aan te sluiten op
de faciliteiten van het lokale telecommunicatiebedrijf. De apparatuur
dient tevens te worden geïnstalleerd op basis van een acceptabele
aansluitingsmethode. De klant dient er rekening mee te houden dat het
naleven van de bovenstaande voorwaarden niet per denitie in alle situaties
een verslechtering van de dienst voorkomt. Reparatie van gecerticeerde
apparatuur dient te worden gecoördineerd door een vertegenwoordiger
die speciaal door de leverancier is aangesteld. Reparaties of wijzigingen
die door de gebruiker op deze apparatuur zijn uitgevoerd, evenals
storingen van de apparatuur kunnen voor het telecommunicatiebedrijf
aanleiding vormen om de gebruiker te verzoeken om de apparatuur af te
sluiten. Gebruikers dienen er voor hun eigen veiligheid voor te zorgen dat
elektrische aardeverbindingen van de apparatuur, telefoonlijnen en metalen
waterleidingen, indien aanwezig, met elkaar worden verbonden. Deze
maatregel verdient met name in landelijke gebieden de aanbeveling.
Waarschuwing: Gebruikers dienen niet zelf te trachten elektrische
aardeverbindingen tot stand te brengen, maar in plaats daarvan de
assistentie van een inspecterende instelling of een elektriciën in te roepen.
Page 50

Garantie-informatie
BEPERKTE TWEEJARIGE GARANTIE
We garanderen de oorspronkelijke koper dat dit product (hardware of
software) vrij zal zijn van materiaal- en constructiefouten gedurende
een periode van twee jaar vanaf de aankoopdatum (“garantieperiode”).
Om in aanmerking te komen voor reparatie of vervanging op basis
van de garantie dient een aankoopbewijs te worden overhandigd in
de vorm van een leesbare verkoopbon waaraan af te lezen is dat de
garantieperiode op het product van toepassing is.Indien wordt vastgesteld
dat dit product een defect bevat, zullen we het product naar eigen
inzicht repareren of vervangen door een vergelijkbaar product.
Neem voor meer informatie contact op met:
Gyration
www.gyration.com
North America: 1 888 340-0033
Deze reparatie/vervanging is onze enige verplichting op basis van deze
garantievoorwaarden. We zijn niet verantwoordelijk voor incidentele of
gevolgschade of voor enig verlies dat wordt veroorzaakt door het gebruik van
dit product of het onvermogen om dit product te gebruiken. Sommige staten/
provincies staan de uitsluiting of beperking van incidentele of gevolgschade
niet toe. Om deze reden is de bovenstaande beperking of uitsluiting mogelijk
niet op u van toepassing. Deze garantie is niet van toepassing op defecten
of schade die het gevolg zijn van een verkeerd gebruik, vandalisme of
verwaarlozing. Deze garantie geeft u speciale juridische rechten. Mogelijk
hebt u andere rechten; deze kunnen per staat of provincie verschillen.
Page 51

Laserproduct klasse 1
Dit optische apparaat voldoet aan indernationale norm IEC
60825-1 (ook bekend als EN 60825-1:2001) Laserproduct
klasse 1 onzichtbaar en voldoet tevens aan 21 CFR 1040 Laser
Notice 50. Laag risico voor ogen, geen risico voor huid.
Klasse 1-producten zijn gedenieerd om onder alle omstandigheden
veilig te zijn, inclusief optische instrumenten.
Waarschuwing: het gebruik van regeleenheden of het aanpassen
van prestatie of procedures anders dan hierin gespeciceerd,
kan resulteren in blootstelling aan schadelijke straling.
Page 52

www.gyration.com
North America: 1 888 340-0033
DL03508-002
 Loading...