

Page 1

EC Declaration of Conformity
We
GOOD WILL INSTRUMENT CO., LTD.
No. 7-1, Jhongsing Rd., Tucheng City, Taipei County 236, Taiwan.
GOOD WILL INSTRUMENT (SUZHOU) CO., LTD.
No. 69 Lushan Road, Suzhou New District Jiangsu, China.
declare that the below mentioned product
PEL-300
is herewith confirmed to comply with the requirements set out in the Council Directive on the
approximation of the Law of Member States relating to Electromagnetic Compatibility
(89/336/EEC
93/68/EEC
For the evaluation regarding the Electromagnetic Compatibility and Low Voltage Equipment
Directive, the following standards are applied:
Conducted Emission Electrostatic Discharge IEC 1000-4-2 (1995)
Radiated Emission
Current Harmonics EN 61000-3-2 (1995) Electrical Fast Transients IEC 1000-4-4 (1995)
Voltage Fluctuations EN 61000-3-3 (1995) Surge Immunity IEC 1000-4-5 (1995)
------------------ ---------- ---------- Conducted Susceptibility EN 61000-4-6 (1996)
------------------ ---------- ----------
------------------ ---------- ---------- Voltage Dip/Interruption EN 61000-4-11 (1994)
,92/31/EEC,93/68/EEC)and Low Voltage Equipment Directive (73/23/EEC,
).
EN 61326-1:Electrical equipment for measurement, control and laboratory use––EMC requirements
(1997+A1:1998)
EN 55022 class B (1994)
Radiated Immunity IEC 1000-4-3 (1995)
Power Frequency Magnetic field
EN 61000-4-8 (1993)
Low Voltage Equipment Directive 73/23/EEC & amended by 93/68/EEC
IEC/EN 61010-1:2001
1
Page 2

CONTENTS
1. INTRODUCTION............................................................................................................................................1
1-1 Features................................................................................................................................................1
2. SPECIFICATIONS..........................................................................................................................................2
3. OPERATION..................................................................................................................................................5
3-1 Front and rear panels............................................................................................................................5
3-2 Operations ............................................................................................................................................9
(1). Constant Voltage Mode...................................................................................................................10
(2). Constant Current Mode ...................................................................................................................10
(3). Constant Resistance Mode..............................................................................................................11
(4). Setting of maximum input power......................................................................................................11
(5). Setting of operational frequency......................................................................................................12
(6). Setting of operational duty...............................................................................................................12
(7). Setting of dynamic mode.................................................................................................................13
(8). Setting of LOAD ON/OFF................................................................................................................13
(9). Setting of STEP...............................................................................................................................14
(10).Setting of MEMORY ........................................................................................................................14
(11).Setting the duration of execution .....................................................................................................16
(12).Setting of repeated executions ........................................................................................................17
(13).Setting of auto execution.................................................................................................................18
4. CALIBRATION PROCEDURES...................................................................................................................19
4-1 Adjusting the reference voltage of C.V. MODE ...................................................................................19
4-2 Adjusting the reference voltage in 10Ω∼1kΩ range of C.R. MODE.....................................................20
4-3 Calibrating the D/A in 10Ω range of C.R. MODE.................................................................................20
4-4 Calibrating the OFFSET of C.R. MODE..............................................................................................21
4-5 Calibrating the D/A of C.V. MODE ............................................................................................
4-6 Calibrating the D/A, A/D in 6A range of C.C. MODE...........................................................................22
4-7 Calibrating the D/A in 6A range of W SET ..........................................................................................23
..........22
2
Page 3

4-8 Calibrating the D/A, A/D in 0.6A range of C.C. MODE ........................................................................24
4-9 Calibrating the D/A in 0.6A range of W SET........................................................................................24
4-10 Calibrating the D/A, A/D in 60A range of C.C. MODE .........................................................................25
4-11 Calibrating the D/A in 60A range of W SET.........................................................................................26
4-12 Calibrating the reference voltage in 1Ω range of C.R. MODE .............................................................26
4-13 Calibrating the D/A in 1kΩ range of C.R. MODE .................................................................................27
4-14 Calibrating the D/A in 100Ω range of C.R. MODE...............................................................................28
4-15 Calibrating the D/A in 1Ω range of C.R. MODE...................................................................................29
4-16 Calibrating the100Hz∼1kHz range of SW MODE ................................................................................30
4-17 Calibrating the D/A in 10Hz∼100Hz range of SW MODE ....................................................................31
4-18 Calibrating the D/A in 1Hz∼10Hz range of SW MODE ........................................................................32
4-19 D/A Calibrating the SENSE current offset of C.C., C.R. MODE ..........................................................33
5. APPLICATION..............................................................................................................................................34
5-1 The Table of the error message ..........................................................................................................34
5-2 Test Lead ............................................................................................................................................35
6. Safety summary....................................................................................................................36
3
Page 4

1. INTRODUCTION
1-1 Features
Simple operation with smart push buttons
High resolution (20mV, 0.2mA, 0.33mΩ)
With voltage, current and power overload prevention functions
Easy access to maximum 100 files
Voltage range: 3 ~ 60V
Current range: 6mA ~ 60A
Maximum power: 300W
Operational modes: constant voltage (CV), constant current (CC), and constant
resistance (CR)
With self-testing and auto software calibration functions
Meet UL CSA IEC requirement
1
Page 5
2. SPECIFICATIONS
Functions Modes Ranges
Constant Voltage
(CV) Mode
Constant Current
(CC) Mode
Constant Current
(CC) Mode
Dynamic
Status
Voltage Range 3 ~ 60V
Current Range 6mA ~ 60AOperational Limits
Power Range 1 ~ 300W
Applicable Range 3 ~ 60 V
Accuracy ±(0.1% + 40mV)
Resolution 20mV
Step 20mV ~ 6V
Applicable Range 6mA ~ 60V
6A ~ 60A ±(0.5% + 100mA)
0.6A ~ 6A ±(0.1% + 10mA)Accuracy
6mA ~ 0.6A ±(0.1% + 1mA)
6A ~ 60A 20mA
0.6A ~ 6A 2mAResolution
6mA ~ 0.6A 0.2mA
6A ~ 60A 20mA ~ 6A
Step
Frequency
Cycle
Range 1Hz ~ 1kHz
Accuracy ±5%
Resolution
Range 10% ~ 90%
Accuracy ±10%
Resolution 1%
0.6A ~ 6A 2mA ~ 6A
6mA ~ 0.6A 0.2mA ~ 6A
100Hz ~ 1kHz 5Hz
10Hz ~ 100Hz 0.5Hz
1Hz ~ 10Hz 0.05Hz
2
Page 6

Functions Modes Ranges
Applicable Range 50mΩ ~ 1kΩ
100Ω ~ 1kΩ±(5% + 1Ω)
Accuracy
Constant Resistance
(CR) Mode
Voltage Readback
Current Readback
Memory Number of Data Saving 0 ~ 99
Resolution
Step
Applicable Range 1 ~ 300W
Accuracy ±(2% + 4W)Power Setting
Resolution 0.1W
Accuracy ±(0.1% + 60mV)
Resolution 20mV
Resolution
10Ω ~ 100Ω±(5% + 100mΩ)
1Ω ~ 10Ω±(5% + 10mΩ)
50mΩ ~ 1Ω±(5% + 1mΩ)
100Ω ~ 1kΩ 330mΩ
10Ω ~ 100Ω 33mΩ
1Ω ~ 10Ω 3.3mΩ
50mΩ ~ 1Ω 0.33mΩ
100Ω ~ 1kΩ 330mΩ ~ 100Ω
10Ω ~ 100Ω 33mΩ ~ 100Ω
1Ω ~ 10Ω 3.3mΩ ~ 10Ω
50mΩ ~ 1Ω 0.33mΩ ~ 1Ω
6A ~ 60A ±(0.5% + 100mA)
0.6A ~ 6A ±(0.1% + 10mA)Accuracy
6mA ~ 0.6A ±(0.1% + 1mA)
6A ~ 60A 20mA
0.6A ~ 6A 2mA
6mA ~ 0.6A 0.2mA
3
Page 7
Functions Modes Ranges
Timer
Temperature
Humidity
Power Source AC 100V, 120V, 220V, 240V ± 10% 50/60 Hz
Replace Fuse Type
Rated Input
In door
Operation Environment
Accessories User‘s Manual x 1; Power Cord x 1
Dimensions 255mm(D) x 145mm(H) x 346mm(W)
Weight 9kg (approx.)
Altitude up to 2,000m
Installation Category II
Pollution Degree 2
Time Setting 1 sec. ~ 999 min. 59 sec.
Resolution 1 sec.
Dynamic Operation 0°C ~ 40°C
Storage -10°C ~ 70°C
Dynamic Operation 80% (Max.)
Storage 70% (Max.)
110V/120V T 0.5A 250V
220V/240V T 0.2A 250V
Watts 40W
VA 50VA
4
Page 8
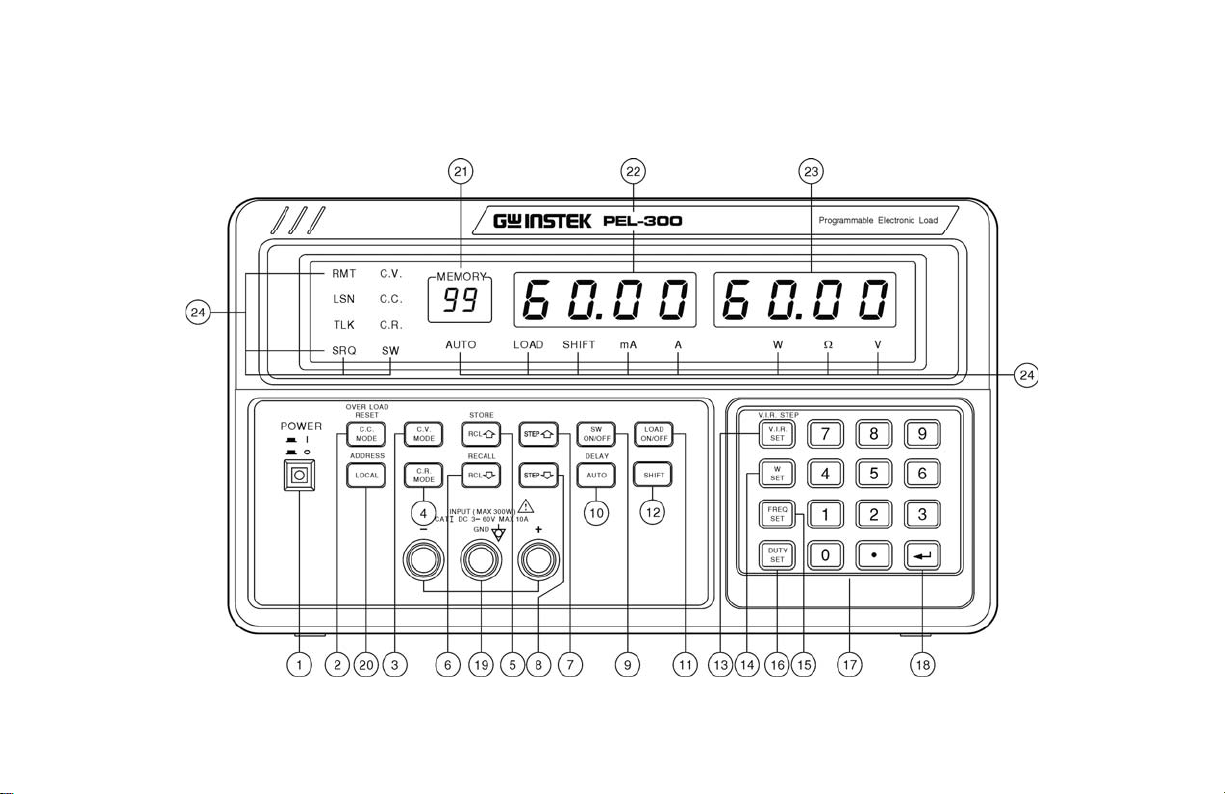
3. OPERATION
3-1 Front and rear panels
Graph 3-1 Front Panel
5
Page 9

Graph 3-2 Rear Panel
6
Page 10

1
POWER :
2
C.C. MODE : To set operation in constant current mode.
3
C.V. MODE : To set operation in constant voltage mode.
4
C.R. MODE : To set operation in constant resistance mode.
5
RCL V : To recall the previous batch of memorized data.
6
RCL W : To recall the next batch of memorized data.
7
STEP V : To add a STEP value to the values of pre-set voltage, current and resistance.
8
STEP W : To subtract a STEP value from the values of pre-set voltage, current and resistance.
9
SW ON/OFF : To switch on/off dynamic operational mode.
10
AUTO : To execute automatically based on pre-set data (under LOAD ON status ONLY).
11
LOAD ON/OFF : Turn on/off LOAD function.
12
SHIFT : To shift and proceed secondary functions.
“▃” -- power is on; “▉” -- power is off.
(1) SHIFT + C.C. MODE(Over Load Reset): To cancel overload protection.
(2) SHIFT + LOCAL(ADDR): To set location of GPIB.
(3) SHIFT + RCL V (STO): To save current data in memory.
(4) SHIFT + RCL W(RCL): To recall data from memory, or to retrieve the number of starting batch and ending
batch, and the times of execution of the memory that will be applied.
(5)SHIFT + AUTO (DLY): To set the time of execution.
(6)SHIFT + V.I.R. SET(V.I.R. STEP): To set the step value of voltage, current, and resistance.
7
Page 11

13
V.I.R. SET : To set the values of input voltage, current, and resistance.
14
W SET : To set the maximum of input power.
15
FREQ. SET : To set the frequency in dynamic operational mode.
16
DUTY SET : To set DUTY under dynamic operational mode.
17
0 ∼ 9 : The buttons for input numbers.
18
↵ : To complete data inputting.
19
DC INPUT : The input terminal of the electronic load (Max.10A ).
20
LOCAL : Not used
21
MEMORY : To display different sets of data memorized.
22
DISPLAY A : To display current applied.
23
DISPLAY V : To display voltage applied.
24
DISPLAY : To display unit, status, and mode.
25
DC INPUT : The input terminal of the electronic load (Max. 60A).
26
Ventilator : To exhaust hot air.
27
AC SOCKET : Its circuit includes a fuse, a distributor, and a filter.
8
Page 12

3-2 Operations
Graph 3-3
PEL - 300
ELECTRONIC LOAD
++
DC
POWER SUPPLY
--
9
Page 13

(1) Constant Voltage Mode:
n Connect the instrument according to Graph 3-3.
o Turn the power switch to “ON” position, then press C.V. MODE button (the light of C.V. MODE will be
on).
p Press LOAD ON/OFF button (the light of LOAD will be on), the displays will indicate the value of
external voltage and current.
Example:
To set input voltage at 20V in constant voltage mode
STEP 1. Press C.V. MODE
STEP 2. Press V.I.R. SET
STEP 3. Press 20 (unit is specified as “V” )
STEP 4. Press ↵
(2). Constant Current Mode:
n Connect the instrument according to Graph 3-3.
o Turn the power switch to “ON” position, then press C.C. MODE button (the light of C.C. MODE is on).
p Press LOAD ON/OFF button (the light of LOAD is on), the displays will indicate the value of external
voltage and current.
Example:
To set input current at 1.248A in constant current mode
STEP 1. Press C.C. MODE
STEP 2. Press V.I.R. SET
STEP 3. Press 1.248 (unit is specified as “A” )
STEP 4. Press ↵
10
Page 14

(3). Constant Resistance Mode:
n Connect the instrument according to Graph 3-3.
o Turn the power switch to “ON” position, then press C.R. MODE button (the light of C.R. MODE is on).
p Press LOAD ON/OFF button (the light of LOAD is on), the displays will indicate the value of external
voltage and current.
Example:
To set input resistance at 500Ω in constant resistance mode
STEP 1. Press C.R. MODE
STEP 2. Press V.I.R. SET
STEP 3. Press 500 (unit is specified as “Ω” )
STEP 4. Press ↵
(4). Setting of maximum input power:
n Select C.V. MODE, C.C. MODE or C.R. MODE.
o When the light of the selected mode is on, press W SET button. Input desired W value after the
display indicating the original W value.
p Press LOAD ON/OFF button.
Example:
To set maximum input power at 300W
STEP 1. Press W SET
STEP 2. Press 300 (unit is specified as “W” )
STEP 3. Press ↵
11
Page 15

(5). Setting of operational frequency:
n Connect the instrument according to Graph 3-3.
o Turn the power switch to “ON” position, then press C.C. MODE button (the light of C.C. MODE is on).
p Press FREQ. SET button; then input desired FREQ. value after the display indicating the original FREQ.
value.
Example:
To set operational frequency as 1000Hz
STEP 1. Press FREQ. SET
STEP 2. Press 1000 (unit is specified as “Hz” )
STEP 3. Press ↵
(6). Setting of operational duty:
n Connect the instrument according to Graph 3-3.
o Turn the power switch to “ON” position, then press C.C. MODE button (the light of C.C. MODE is on).
p Press DUTY SET button; then input desired DUTY value after the display indicating the original DUTY
value.
q Press LOAD ON/OFF button.
Example:
To set operation duty at 50%
STEP 1. Press DUTY SET
STEP 2. Press 50 (unit is specified as “%” )
STEP 3. Press ↵
12
Page 16

(7). Setting of dynamic mode:
n Connect the instrument according to Graph 3-3.
o Turn the power switch to “ON” position, then press C.C. MODE button (the light of C.C. MODE is on).
p Press SW ON/OFF button; the light of SW is on which indicates the operation is proceeded in dynamic
mode.
Note: be sure to complete the settings of FREQ. and DUTY before setting the dynamic mode.
Example:
To set operation in dynamic mode
STEP 1. Press SW ON/OFF button (the light of SW is on)
STEP 2. Press LOAD ON/OFF button
(the light of LOAD is on which indicates the operation is in SW mode)
(8). Setting of LOAD ON/OFF:
n Turn the power switch to “ON” position, then press C.C. MODE, C.V. MODE or C.R. MODE button.
o Press LOAD ON/OFF button; the light of LOAD is on which indicates the load has been turned on.
p Press LOAD ON/OFF button again; the light of LOAD is out which indicates the load has been turned
off.
Note: Make sure the preset input power is not too low that may cause an error message.
13
Page 17

9). Setting of STEP:
n Turn the power switch to “ON” position, then press SHIFT button to enable the secondary functions.
o Press V.I.R. SET button, key in digits to specify the value of STEP, then press ↵ button to complete the
setting.
Examples:
To set STEP value at 0.02A in C.C. MODE
STEP 1. Press SHIFT
STEP 2. Press V.I.R. SET
STEP 3. Press 0.02
STEP 4. Press ↵
To set STEP value at 0.33Ω in C.R. MODE
STEP 1. Press SHIFT
STEP 2. Press V.I.R. SET
STEP 3. Press 0.33
STEP 4. Press ↵
To set STEP value at 1V in C.V. MODE
STEP 1. Press SHIFT
STEP 2. Press V.I.R. SET
STEP 3. Press 1
STEP 4. Press ↵
(10). Setting of MEMORY:
n Turn the power switch to “ON” position, then press C.C. MODE, C.V. MODE or C.R. MODE button.
o Set operational voltage, current, resistance, frequency, DUTY, time, and the times of execution.
p Press SHIFT key to enable the secondary functions; press RCL V ; key in digits to specify a batch;
then press ↵ to complete the setting and to save them in the memory.
Note: Be sure to complete the setting of the data to be saved before proceeding execution.
14
Page 18

Examples:
In C.V. MODE, to set voltage at 10V, W SET at 300W, STEP at 1V and to save current data in the 99th batch.
STEP 1. C.V. MODE STEP 9. V.I.R. SET
STEP 2. V.I.R. SET STEP10. 1
STEP 3. 10 STEP11.
STEP 4.
STEP 5. W SET STEP13. RCL V
STEP 6. 300 STEP14. 99
STEP 7.
STEP 8. SHIFT
In C.C. MODE, to set current at 1A, power at 300W, STEP at 0.2A, FREQ. at 1000Hz, DUTY at 50%. To work
in SW MODE, and save data in the 11th batch.
Note: In addition to setting the values of current, power and STEP, FREQ. SET, and DUTY SET should also be
set while proceeding the setting of C.C. MODE SW function.
STEP 1. C.C. MODE STEP12. FREQ. SET
STEP 2. V.I.R. SET STEP13. 1000
STEP 3. 1
STEP 4.
STEP 5. W SET STEP16. 50
STEP 6. 300
STEP 7.
STEP 8. SHIFT STEP19. SHIFT
STEP 9. V.I.R. SET STEP20. RCL V
STEP10. 0.2 STEP21. 11
STEP11.
↵
↵
↵
↵
↵ STEP22. ↵
STEP12. SHIFT
STEP15.
STEP14. ↵
STEP15. DUTY SET
STEP17. ↵
STEP18. SW ON/OFF
↵
↵
15
Page 19

To save data in current batch
STEP 1. SHIFT
STEP 2. RCL V
STEP 3. ↵
(Assume MEMORY indicates 33, data will then be saved in the 33rd batch right after proceeding the 3 STEPs
aforementioned.)
(11). Setting the duration of execution:
n Press SHIFT to enable the secondary function.
o Press AUTO key and key in digits with a decimal (number before the decimal means “minute”; the one
after the decimal is specified as “second”) for the duration of execution.
Examples:
To set the running time as 20 minutes and 38 seconds
STEP 1. SHIFT
STEP 2. AUTO
STEP 3. 20.38
STEP 4. ↵
To set the running time as 40 seconds
STEP 1. SHIFT
STEP 2. AUTO
STEP 3. 0.40
STEP 4. ↵
16
Page 20

(12). Setting of repeated executions:
n Press SHIFT to enable the secondary function.
o Press RCLW key.
p Key in three sets of digits with two decimals in between. The first set of the digits is specified as “the
starting batch”, the second set is specified as “the ending batch”, and the last set is specified as
“the number of executions.”
q Then press ↵ .
Example:
To run batch 1 to batch 98 for 99 times
STEP 1. SHIFT
STEP 2. RCL W
STEP 3. 1.98.99
STEP 4. ↵
STEP 5. AUTO
STEP 6. LOAD ON/OFF
To retrieve data from batch 1 till batch 18
STEP 1. SHIFT
STEP 2. RCL W
STEP 3. 1.18
STEP 4. ↵
To run batch 1 to batch 98 endlessly
STEP 1. SHIFT
STEP 2. RCL W
STEP 3. 1.98
STEP 4. ↵
STEP 5. AUTO
STEP 6. LOAD ON/OFF
To retrieve data from the 10th batch
STEP 1. SHIFT
STEP 2. RCL W
STEP 3. 10
STEP 4. ↵
17
Page 21

(13). Setting of auto execution:
n The light of AUTO is out when auto execution is not functioning.
o Press AUTO button, the indicator will light up, and the function will be turned on.
Note: Be sure to complete the settings of item 1 to 7 and 10 to 12 before proceeding the setting of
auto execution.
Example:
To set auto execution
STEP 1. Press AUTO key (the light of AUTO is on)
STEP 2. Press LOAD ON/OFF to proceed auto execution
18
Page 22

4. CALIBRATION PROCEDURES
Instruments: 2 sets of DMM(digital multiple meters with 5 1/2 digits);
3 sets of POWER SUPPLY(60V, 6A; 8V, 75A; and 18V, 20A );
1 set of COUNTER (frequency counter).
4-1 Adjusting the reference voltage of C.V. MODE
n
Press SHIFT and C.V. MODE, then key in 3, 8, 0, 1, and ↵ .
o
When MEMORY indicates “01” and A indicates “CL01”, short the input terminal of the electronic load and
press ↵ .
p
When MEMORY indicates “02”, set the voltage of POWER SUPPLY to around 60V and the current of it to
0.8A.
q
Connect the output terminal of POWER SUPPLY to the input terminal of the electronic load.
r
Test the input terminal of load by the 200V range of a DMM. Adjust the POWER SUPPLY until the DMM
display reads 60.00V. Adjust SVR401 to make the voltage of load to be 60.00V.
s
Press ↵ .
Note : Applied instruments -- POWER SUPPLY (60V, 6A); DMM (5 1/2 digits)
Applied situation -- Voltage readings of the electronic load are not consistent with the true values.
19
Page 23

4-2 Adjusting the reference voltage in 10Ω∼1kΩ range of C.R. MODE
n
Set voltage of POWER SUPPLY to 60V and current of it to 1A.
o
Connect the output terminal of POWER SUPPLY to the input terminal of electronic load.
p
Press SHIFT and C.V. MODE, then key in 3, 8, 0, 2, and ↵.
q
Test the input terminal of load by the 200V range of a DMM. Adjust the POWER SUPPLY until the DMM
display reads 60.00V. Use the 20V range of another DMM to test TP1 of a PCB.
r
When MEMORY indicates “01” and A indicates “CL02”, key in the voltage reading (no less than 6 digits
including decimal) of TP1 (in unit of “V”) and press ↵.
s
When MEMORY indicates “02”, key in the voltage reading (no less than 7 digits including decimal) of TP1
(in unit of “V”) and press ↵ .
t
When MEMORY indicates “03”, key in the voltage reading (no less than 7 digits including decimal) of TP1
(in unit of “V”) and press ↵ .
Note: Applied instruments -- POWER SUPPLY (60V, 6A); DMM (5 1/2 digits)
Applied situation -- The C.R. MODE in 10Ω∼1kΩ range is not reliable.
4-3 Calibrating the D/A in 10Ω range of C.R. MODE
n
Set voltage of POWER SUPPLY to 17V and current of it to 20A.
o
Connect the output terminal of POWER SUPPLY to a DMM in 20A range in series. Hook up the DMM
with the input terminal of the electronic load.
p
Test the input terminal of the load by the 20V range of a DMM. Press SHIFT & C.V. MODE, key in 3,8,0,3,
and ↵. Then adjust the POWER SUPPLY until the DMM display reads 17.00V.
20
Page 24

q
When MEMORY indicates “01” and A indicates “CL03”, key in the current reading (no less than 6 digits
including decimal) of the DMM (in unit of “A”) and press ↵ .
r
When MEMORY indicates “02”, key in the current reading (no less than 5 digits including decimal) of the
DMM (in unit of “A”) and press ↵ .
s
When MEMORY indicates “03”, key in the current reading (no less than 5 digits including decimal) of the
DMM (in unit of “A”) and press ↵ .
t
When MEMORY indicates “04”, key in the current reading (no less than 5 digits including decimal) of the
DMM (in unit of “A”) and press ↵ .
Note: Applied instruments -- POWER SUPPLY (18V, 20A); DMM (5 1/2 digits)
Applied situation --The C.R. MODE in 10Ω range is not reliable.
4-4 Calibrating the OFFSET of C.R. MODE
n
Set voltage of POWER SUPPLY to 3V and current of it to 0.5A
o
Connect the output terminal of POWER SUPPLY to a DMM in 2A range in series. Then hook up the DMM
with the input terminal of the electronic load.
p
Test the input terminal of the load by the 20V range of a DMM. Adjust the POWER SUPPLY until the
DMM display reads 3.00V.
q
Set C.R. MODE to 10Ω (nselect C.R. MODE; o press V.I.R. SET; p key in “1”, “0”; q press ↵ ) first,
then set the load to LOAD ON status.
r
adjust the POWER SUPPLY until the DMM display reads 0.300A.
Note: Applied instruments -- POWER SUPPLY (60V, 6A); DMM (5 1/2 digits)
21
Page 25

4-5 Calibrating the D/A of C.V. MODE
n
Set voltage of POWER SUPPLY to 62V and current of it to 0.5A.
o
Connect the output terminal of POWER SUPPLY to the input terminal of electronic load.
p
Test the input terminal of the load by the 200V range of a DMM. Pursue a reading of 62.00V from the
DMM.
q
Press SHIFT and C.V. MODE, then key in 3, 8, 0, 4, and ↵.
r
When MEMORY indicates “01” and A indicates “CL04”, key in the voltage reading (5 digits including
decimal) of the DMM (in unit of “V”) and press ↵ .
s
When MEMORY indicates “02”, key in the voltage reading (5 digits including decimal) of the DMM (in unit
of “V”) and press ↵ .
t
When MEMORY indicates “03”, key in the voltage reading (5 digits including decimal) of the DMM (in unit
of “V”) and press ↵ .
Note: Applied instruments -- POWER SUPPLY (60V, 6A); DMM (5 1/2 digits)
Applied situation --The readings of the C.V. MODE are not reliable.
4-6 Calibrating the D/A, A/D in 6A range of C.C. MODE
n
Set voltage of POWER SUPPLY to 30V and current of it to 6.2A.
o
Connect the output terminal of POWER SUPPLY to a DMM in 20A range in series. Hook up the DMM
with the input terminal of electronic load.
22
Page 26

p
Test the input terminal of the load by the 200V range of a DMM. Press SHIFT and C.V. MODE, then key in
3, 8, 0, 5, and ↵ .
q
Adjust the POWER SUPPLY until t he DMM display reads 30.00V.
r
When MEMORY indicates “01” and A indicates “CL05”, key in the current reading (no less than 5 digits
including decimal) of the DMM (in unit of “A”) and press ↵ .
s
When MEMORY indicates “02”, key in the current reading (no less than 6 digits including decimal) of the
DMM (in unit of “A”) and press ↵ .
Note: Applied instruments -- POWER SUPPLY (60V, 6A); DMM (5 1/2 digits)
Applied situation --The C.C. MODE in 6A range is not reliable.
4-7 Calibrating the D/A in 6A range of W SET
n
Set the voltage of POWER SUPPLY to 50V and current of it to 6.2A.
o
Connect the output terminal of POWER SUPPLY to a DMM in 20A range in series. Hook up the DMM
with the input terminal of the electronic load.
p
Test the input terminal of the load by the 200V range of a DMM. Pursue a reading of 50.00V from the
DMM by adjusting the POWER SUPPLY.
q
Press SHIFT and C.V. MODE, then key in 3, 8, 0, 6, and ↵ .
r
When MEMORY indicates “01” and A indicates “CL06”, the execution will be proceeded automatically by
the pre-set program without key-in process.
Note: Applied instruments -- POWER SUPPLY (60V, 6A); DMM (5 1/2 digits)
Applied situation --The POWER SET in 6A range is not reliable.
23
Page 27

4-8 Calibrating the D/A, A/D in 0.6A range of C.C. MODE
n
Set voltage of POWER SUPPLY to 60V and current of it to 0.8A.
o
Connect the output terminal of POWER SUPPLY to a DMM in 2A range in series. Hook up the DMM
with the input terminal of the electronic load.
p
Test the input terminal of the load by the 200V range of a DMM. Press SHIFT and C.V. MODE, then key in
3, 8, 0, 7, and ↵ .
q
Adjust the POWER SUPPLY until t he DMM display reads 60.00V.
r
When MEMORY indicates “01” and A indicates “CL07”, key in the current reading (no less than 6 digits
including decimal) of the DMM (in unit of “A”) and press ↵ .
s
When MEMORY indicates “02”, key in the current reading (no less than 7 digits including decimal) of the
DMM (in unit of “A”) and press ↵ .
Note: Applied instruments -- POWER SUPPLY (60V, 6A); DMM (5 1/2 digits)
Applied situation --The readings of C.C. MODE in 0.6A range are not reliable.
4-9 Calibrating the D/A in 0.6A range of W SET
n
Set voltage of POWER SUPPLY to 60V and current of it to 0.8A.
o
Connect the output terminal of POWER SUPPLY to a DMM in 2A range in series. Hook up the DMM
with the input terminal of the electronic load.
p
Test the input terminal of the load by the 200V range of a DMM. Press SHIFT and C.V. MODE, then key in
3, 8, 0, 8, and ↵ .
24
Page 28

q
Adjust the POWER SUPPLY until t he DMM display reads 60.00V.
r
When MEMORY indicates “01” and A indicates “CL08”, the execution will be proceeded automatically by
the pre-set program without key-in process.
Note: Applied instruments -- POWER SUPPLY (60V, 6A); DMM (5 1/2 digits)
Applied situation --The POWER SET in 0.6A range is not reliable.
4-10 Calibrating the D/A, A/D in 60A range of C.C. MODE
n
Set voltage of POWER SUPPLY to 5V and current of it to 75A.
o
Connect the output terminal of POWER SUPPLY to a DMM in 75A range in series. Hook up the DMM
with the input terminal of the electronic load.
p
Test the input terminal of the load by the 20V range of a DMM. Press SHIFT and C.V. MODE, then key in
3, 8, 0, 9, and ↵ .
q
Adjust the POWER SUPPLY until t he DMM display reads 5.00V.
r
When MEMORY indicates “01” and A indicates “CL09”, key in the current reading (no less than 6 digits
including decimal) of the DMM (in unit of “A”) and press ↵ .
s
When MEMORY indicates “02”, key in the current reading (no less than 6 digits including decimal) of the
DMM (in unit of “A”) and press ↵ .
Note: Applied instruments -- POWER SUPPLY (8V, 75A); DMM (5 1/2 digits)
Applied situation --The C.C. MODE in 60A range is not reliable.
25
Page 29

4-11 Calibrating the D/A in 60A range of W SET
n
Set voltage of POWER SUPPLY to 5V and current of it to 75A.
o
Connect the output terminal of POWER SUPPLY to a DMM in 75A range in series. Hook up the DMM
with the input terminal of the electronic load.
p
Test the input terminal of the load by the 20V range of a DMM. Press SHIFT and C.V. MODE, then key in
3, 8, 1, 0, and ↵ .
q
Adjust the POWER SUPPLY until t he DMM display reads 5.00V.
r
When MEMORY indicates “01” and A indicates “CL10”, the execution will be proceeded automatically by
the pre-set program without key-in process.
Note: Applied instruments -- POWER SUPPLY (8V, 75A); DMM (5 1/2 digits)
Applied situation --The POWER SET in 60A range is not reliable.
4-12 Calibrating the reference voltage in 1Ω range of C.R. MODE
n
Set voltage of POWER SUPPLY to 17V and current of it to 1A.
o
Connect the output terminal of POWER SUPPLY to the input terminal of the electronic load. Hook up a
DMM in 200V range with the input terminal of the load. Press SHIFT and C.V. MODE, then key in 3, 8,
1, 1, and ↵. Pursue a reading of 17.00V from the DMM by adjusting the POWER SUPPLY.
p
Measure TP1 of PCB with another DMM in 20V range.
q
When MEMORY indicates “01” and A indicates “CL11”, key in the voltage reading of TP1 (no less than 6
digits including decimal) of the DMM (in unit of “V”) and press ↵ .
r
When MEMORY indicates “02”, key in the voltage reading of TP1 (no less than 7 digits including
decimal) of the DMM (in unit of “V”) and press ↵ .
26
Page 30

s
When MEMORY indicates “03”, key in the voltage reading of TP1 (no less than 7 digits including
decimal) of the DMM (in unit of “V”) and press ↵ .
Note: Applied instruments -- POWER SUPPLY (60V, 6A); DMM (5 1/2 digits)
Applied situation -- The readings of C.R. MODE are not reliable.
4-13 Calibrating the D/A in 1kΩ range of C.R. MODE
n
Set voltage of POWER SUPPLY to 60V and current of it to 1A.
o
Connect the output terminal of POWER SUPPLY to a DMM in 2A range in series. Hook up the DMM
with the input terminal of the electronic load.
p
Test the input terminal of the load by the 200V range of a DMM. Press SHIFT and C.V. MODE, then key
in 3,8,1,2,and ↵. Pursue a reading of 60.00V from DMM by adjusting the POWER SUPPLY.
q
When MEMORY indicates “01” and A indicates “CL12”, key in the current reading (no less than 6 digits
including decimal) of the DMM (in unit of “A”) and press ↵ .
r
When MEMORY indicates “02”, key in the current reading (no less than 7 digits including decimal) of the
DMM (in unit of “A”) and press ↵ .
s
When MEMORY indicates “03”, key in the current reading (no less than 7 digits including decimal) of the
DMM (in unit of “A”) and press ↵ .
t
When MEMORY indicates “04”, key in the current reading (no less than 7 digits including decimal) of the
DMM (in unit of “A”) and press ↵ .
Note: Applied instruments -- POWER SUPPLY (60V, 6A); DMM (5 1/2 digits)
Applied situation -- The readings of C.R. MODE are not reliable.
27
Page 31

4-14 Calibrating the D/A in 100Ω range of C.R. MODE
n
Set voltage of POWER SUPPLY to 40V and current of it to 6.2A.
o
Connect the output terminal of POWER SUPPLY to a DMM in 20A range in series. Then hook up the
DMM with the input terminal of the electronic load.
p
Test the input terminal of the load by the 200V range of a DMM. Press SHIFT and C.V. MODE, then key
in 3, 8, 1, 3, and ↵ . Adjust the POWER SUPPLY until the DMM display reads 40.
q
When MEMORY indicates “01” and A indicates “CL13”, key in the current reading (no less than 6 digits
including decimal) of the DMM (in unit of “A”) and press ↵.
r
When MEMORY indicates “02”, key in the current reading (no less than 6 digits including decimal) of the
DMM (in unit of “A”) and press ↵ .
s
When MEMORY indicates “03”, key in the current reading (no less than 6 digits including decimal) of the
DMM (in unit of “A”) and press ↵ .
t
When MEMORY indicates “04”, key in the current reading (no less than 6 digits including decimal) of the
DMM (in unit of “A”) and press ↵ .
Note: Applied instruments -- POWER SUPPLY (60V, 6A); DMM (5 1/2 digits)
Applied situation -- The readings of C.R. MODE are not reliable.
28
Page 32

4-15 Calibrating the D/A in 1Ω range of C.R. MODE
n
Set voltage of POWER SUPPLY to 5V and current of it to 75A.
o
Connect the output terminal of POWER SUPPLY to a DMM in 75A range in series. Then hook up the
DMM with the input terminal of the electronic load.
p
Test the input terminal of the load by the 20V range of a DMM. The readout should be 5.00V.
q
Press SHIFT and C.V. MODE, then key in 3, 8, 1,4, and ↵ . Then adjust the POWER SUPPLY until the
DMM display reads 5.00V.
r
When MEMORY indicates “01” and A indicates “CL14”, key in the current reading (no less than 5 digits
including decimal) of the DMM (in unit of “A”) and press ↵ .
s
When MEMORY indicates “02”, key in the current reading (no less than 5 digits including decimal) of the
DMM (in unit of “A”) and press ↵ .
t
When MEMORY indicates “03”, key in the current reading (no less than 5 digits including decimal) of the
DMM (in unit of “A”) and press ↵ .
u
When MEMORY indicates “04”, key in the current reading (no less than 5 digits including decimal) of the
DMM (in unit of “A”) and press ↵ .
Note: Applied instruments -- POWER SUPPLY (8V, 75A); DMM (5 1/2 digits)
Applied situation -- The readings of C.R. MODE are not reliable.
29
Page 33

4-16 Calibrating the100Hz∼1kHz range of SW MODE
n
Set voltage of POWER SUPPLY to 60V and current of it to 1A.
o
Connect the positive output terminal of POWER SUPPLY to a 0.1Ω 5W concrete resistance first, then
connect the resistance to the input terminal of electronic load. Hook up a DMM in 200V range with the
input terminal of the load. Connect the input terminal of COUNTER to both ends of the concrete
resistance.
p
Test the input terminal of the load by the 200V range of a DMM. Press SHIFT and C.V. MODE, then key
in 3, 8, 1,5, and ↵ . Then adjust the POWER SUPPLY until the DMM display reads 60.00V.
q
When MEMORY indicates “01” and A indicates “CL15”, key in the frequency reading (7 digits including
decimal) of the COUNTER (in unit of “Hz”) and press ↵ .
r
When MEMORY indicates “02”, key in the frequency reading (7 digits including decimal) of the
COUNTER (in unit of “Hz”) and press ↵ .
s
When MEMORY indicates “03”, key in the frequency reading (7 digits including decimal) of the
COUNTER (in unit of “Hz”) and press ↵ .
t
When MEMORY indicates “04”, key in the frequency reading (7 digits including decimal) of the
COUNTER (in unit of “Hz”) and press ↵ .
u
When MEMORY indicates “05”, key in the frequency reading (7 digits including decimal) of the
COUNTER (in unit of “Hz”) and press ↵ .
v
When MEMORY indicates “06”, key in the frequency reading (7 digits including decimal) of the
COUNTER (in unit of “Hz”) and press ↵ .
Note: Applied instruments -- POWER SUPPLY(60V, 6A); DMM(5 1/2 digits); COUNTER(frequency counter)
Applied situation -- The readings of FREQ. and DUTY are not reliable.
30
Page 34

4-17 Calibrating the D/A in 10Hz∼100Hz range of SW MODE
n
Set voltage of POWER SUPPLY to 60V and current of it to 1A.
o
Connect the positive output terminal of POWER SUPPLY to a 0.1Ω 5W concrete resistance first, then
connect the resistance to the input terminal of the electronic load. Hook up a DMM in 200V range with
the input terminal of the load. Connect the input terminal of COUNTER to both ends of the concrete
resistance.
p
Test the input terminal of the load by the 200V range of a DMM. Press SHIFT and C.V. MODE, then key
in 3, 8, 1,6, and ↵ . Then adjust the POWER SUPPLY until the DMM display reads 60.00V.
q
When MEMORY indicates “01” and A indicates “CL16”, key in the frequency reading (7 digits including
decimal) of the COUNTER (in unit of “Hz”) and press ↵ .
r
When MEMORY indicates “02”, key in the frequency reading (7 digits including decimal) of the
COUNTER (in unit of “Hz”) and press ↵ .
s
When MEMORY indicates “03”, key in the frequency reading (7 digits including decimal) of the
COUNTER (in unit of “Hz”) and press ↵ .
t
When MEMORY indicates “04”, key in the frequency reading (7 digits including decimal) of the
COUNTER (in unit of “Hz”) and press ↵ .
u
When MEMORY indicates “05”, key in the frequency reading (7 digits including decimal) of the
COUNTER (in unit of “Hz”) and press ↵ .
v
When MEMORY indicates “06”, key in the frequency reading (7 digits including decimal) of the
COUNTER (in unit of “Hz”) and press ↵.
Note: Applied instruments -- POWER SUPPLY (60V, 6A); DMM (5 1/2 digits);
COUNTER (frequency counter)
Applied situation --The readings of FREQ. and DUTY are not reliable.
31
Page 35

4-18 Calibrating the D/A in 1Hz∼10Hz range of SW MODE
n
Set voltage of POWER SUPPLY to 60V and current of it to 1A.
o
Connect the positive output terminal of POWER SUPPLY to a 0.1Ω 5W concrete resistance first, then
connect the resistance to the input terminal of the electronic load. Hook up a DMM in 200V range with
the input terminal of the load. Connect the input terminal of COUNTER to both ends of the concrete
resistance.
p
Test the input terminal of load by the 200V range of a DMM. Press SHIFT & C.V. MODE, then key in
3,8,1,7, and ↵. Adjust the POWER SUPPLY until the DMM display reads 60..
q
When MEMORY indicates “01” and A indicates “CL17”, key in the frequency reading (7 digits including
decimal) of the COUNTER (in unit of “Hz”) and press ↵ .
r
When MEMORY indicates “02”, key in the frequency reading (7 digits including decimal) of the
COUNTER (in unit of “Hz”) and press ↵ .
s
When MEMORY indicates “03”, key in the frequency reading (7 digits including decimal) of the
COUNTER (in unit of “Hz”) and press ↵ .
t
When MEMORY indicates “04”, key in the frequency reading (7 digits including decimal) of the
COUNTER (in unit of “Hz”) and press ↵ .
u
When MEMORY indicates “05”, key in the frequency reading (7 digits including decimal) of the
COUNTER (in unit of “Hz”) and press ↵ .
v
When MEMORY indicates “06”, key in the frequency reading (7 digits including decimal) of the
COUNTER (in unit of “Hz”) and press ↵ .
Note: Applied instruments -- POWER SUPPLY (60V, 6A); DMM (5 1/2 digits); COUNTER (frequency counter)
Applied situation --The readings of FREQ. and DUTY are not reliable.
32
Page 36

4-19 D/A Calibrating the SENSE current offset of C.C., C.R. MODE
n
Set voltage of POWER SUPPLY to 60V and current of it to 1A.
o
Connect the output terminal of POWER SUPPLY to a DMM in 2A range in series. Hook up the DMM
with the input terminal of the load.
p
Test the input terminal of the load by the 200V range of a DMM. Press SHIFT and C.V. MODE, then key
in 3, 8, 1, 8, and ↵ . Adjust the POWER SUPPLY until the DMM display reads 60.00V.
q
When MEMORY indicates “01” and A indicates “CL18”, key in the current reading (7 digits including
decimal) of the DMM (in unit of “A”) and press ↵ .
r
When MEMORY indicates “02”, key in the current reading (7 digits including decimal) of the DMM (in unit
of “A”) and press ↵ .
s
When MEMORY indicates “03”, key in the current reading (7 digits including decimal) of the DMM (in unit
of “A”) and press ↵ .
t
When MEMORY indicates “04”, key in the current reading (7 digits including decimal) of the DMM (in unit
of “A”) and press ↵ .
Note: Applied instruments -- POWER SUPPLY (60V, 6A); DMM (5 1/2 digits).
33
Page 37

5. APPLICATION
5-1 The Table of the error message
Code Cause Resolvent
Err-01
Err-02
Err-03
Err-04
Err-05
Err-06
Err-07
Err-08
Err-09
Err-10
Err-11
Err-12
Err-13
To clear the Error Message: [SHIFT] + [C.C. MODE]
Input voltage over 60V Lower the input voltage
Input power exceeds setting
Input voltage and power exceed setting
Input current exceeds setting Lower the input current
Input voltage and current exceed setting Same as Err-01 and Err-04
Input current and power exceed setting Same as Err-02 and Err-04
Input voltage, current and power exceed setting Same as ERR-01, Err-02 and Err-04
Error of the adjusting data when performing
CHECKSUM
Error inaccurate when performing CHECKSUM
The time of running AUTO has not been set Re-set the time of execution
Key-in value exceeds input range Key in the value again
The setting of STEP exceeds the resolution of
the range between chosen
The setting of STEP exceeds output range Set the value of V.I.R. again
Set higher power value or lower the voltage and
current
Lower the input voltage and set a higher power
value
Send the instrument back to the manufacturer
for adjustment or adjust by yourself.
Send the instrument back to the manufacturer
for repair
Set the value of STEP again
34
Page 38

5-2 Test Lead
The Selection of Output Test Lead and Feedback Test Lead:
For safety assurance, please select the adequate output test lead according to the following list:
(CSA)
Model
Wir e No.
AWG
ConductorUL
Component
pc/mm
Cross Section Area
(mm)
2
Outer
Diameter
Maximum
Conductive Resistor
Ω/km
Permissible
Current
A(amp)
mm
24 11/0.16 0.22 0.64 88.6 7.64
22 17/0.16 0.34 0.78 62.5 10.0
1015
TEW
(T wisted Wire)
20 21/0.18 0.53 0.95 39.5 13.1
18 34/0.18 0.87 1.21 24.4 17.2
16 26/0.254 1.32 1.53 15.6 22.6
14 41/0.254 2.08 2.03 9.90 30.4
12 65/0.254 3.29 2.35 6.24 40.6
10 65/0.32 5.23 3.00 3.90 55.3
Remark:
1. The ambient temperature of “Permissible Current” is at 40℃, the withstanding temperature of conductor is at
105℃ according to the condition of the distributed single wire.
2. The permissible current listed as above is suggested to be used under 70%.
3. If the feedback test leads are in need, the level above UL(CSA) AWG24, 22, 20… can be accepted. Besides,
when the load is a capacitive load, please use the twin wire by twisting (+)output test lead with (S+) feedback
test lead. Same way used on (-) output test lead and (S-) feedback test lead.
4. When the current value exceeds above suggestive list, can select more wires used in parallel according to above
list.
35
Page 39

6. SAFETY SUMMARY
SAFETY TERMS AND SYMBOLS:
These terms may appear in this manual or on the product:
WARNING. Warning statements identify condition or practices that could result in injury or loss of life.
CAUTION. Caution statements identify conditions or practices that could result in damage to this
product or other property
WARNING: This equipment is not for measurements performed for CAT II, III and IV.
Measurement category I is for measurements performed on circuits not directly connected to MAINS.
Measurement category II is for measurements performed on circuits directly connected to the low voltage installation.
Measurement category III is for measurements performed in the building installation.
Measurement category IV is for measurements performed at the source of the low-voltage installation.
The following symbols may appear in this manual or on the product:
.
DANGER ATTENTION Protective Functional Earth
High Voltage refer to Manual Conductor Terminal Terminal
36
Page 40

FOR UNITED KINGDOM ONLY
NOTE: This lead/appliance must only be wired by competent person.
WARNING: THIS APPLIANCE MUST BE EARTHED
IMPORTANT: The wires in this lead are coloured in accordance with the following code:
Green/ Yellow: Earth
Blue: Neutral
Brown: Live (Phase)
As the colours of the wires in main leads may not correspond with the colours marking identified in your plug/appliance,
proceed as follows:
The wire which is coloured Green & Yellow must be connected to the Earth terminal marked with the letter E or by the
earth symbol
The wire which is coloured Blue must be connected to the terminal which is marked with the letter N or coloured Blue or
Black.
The wire which is coloured Brown must be connected to the terminal marked with the letter L or P or coloured Brown or
Red. If in doubt, consult the instructions provided with the equipment or contact the supplier.
This cable/appliance should be protected by a suitably rated and approved HBC mains fuse: refer to the rating information
on the equipment and/or user instructions for details. As a guide, cable of 0.75mm
Larger conductors would normally require 13A types, depending on the connection method used.
or coloured Green or Green & Yellow.
2
should be protected by a 3A or 5A fuse.
37
Page 41

Any moulded mains connector that requires removal /replacement must be destroyed by removal of any fuse & fuse carrier
and disposed of immediately, as a plug with bared wires is hazardous if an engaged in live socket. Any re-wiring must be
carried out in accordance with the information detailed on this label.
WARNING: For continued fire protection, replace fuse only with the specific type and rating by
!
qualified personnel. Disconnect the power cord before replacing fuse.
Cleaning the Cabinet
Disconnect the AC power cord before cleaning the instrument.
Use a soft cloth dampened in a solution of mild detergent and water. Do not spray cleaner directly onto the instrument, since it may
leak into the cabinet and cause damage.
Do not use chemicals containing benzing, benzne, toluene, xylene, acetone, or similar solvents.
GW assumes no responsibility for its product being used in a hazardous or dangerous manner
38
!
either alone or in conjunction with other equipment. High voltage and high pulse current used in
some instruments may be dangerous if misused.
 Loading...