

Page 1

RF & Communication Trainer
GRF-1300A
STUDENT BOOK
USER MANUAL and TEXT BOOK
GW INSTEK PART NO. 82RF-1300AM01
ISO-9001 CERTIFIED MANUFACTURER
Page 2

This manual contains proprietary information, which is protected by copyright. All rights are reserved.
No part of this manual may be photocopied, reproduced or translated to another language without
prior written consent of Good Will Corporation.
The information in this manual was correct at the time of printing. However, Good Will continues to
improve its products and therefore reserves the right to change the specifications, equipment, and
maintenance procedures at any time without notice.
Good Will Instrument Co., Ltd.
No. 7-1, Jhongsing Rd., Tucheng Dist., New Taipei City 236, Taiwan.
Page 3

Table of Contents
Table of Contents
SAFETY INSTRUCTIONS ................................................................ 2
ABOUT THIS BOOK ....................................................................... 5
INTRODUCTION to the GRF-1300A ............................................... 6
Package Contents .................................................................................................... 8
Product Specifications and Function........................................................................ 8
Usage Instructions .................................................................................................. 9
OVERVIEW of the TIME and FREQUENCY DOMAIN.................... 16
Observation from a different perspective................................................................16
AN INTRODUCTION to SPECTRUM ANALYZERS ........................ 24
Broadband Receiver ................................................................................................24
Attenuator ..............................................................................................................25
Resolution Bandwidth Filter....................................................................................25
Detector .................................................................................................................27
Video Bandwidth Filter ...........................................................................................27
RF COMMUNICATION and SIGNALS EXPERIMENTS.................. 31
Experiment 1: Basic Operation of a Spectrum Analyzer...........................................32
Experiment 2: Measuring a Baseband Waveform.....................................................36
Experiment 3: Different Baseband Waveforms and their Harmonic Measurement...40
Experiment 4: Measurement of the RF Carrier.........................................................47
Experiment 5: AM Signal Measurement ..................................................................60
Experiment 6: FM signal measurement ...................................................................70
Experiment 7: Using a Spectrum Analyzer in Communication Systems ...................81
Experiment 8: Measurement of communication products .......................................88
Experiment 9: Production Line Applications ...........................................................91
Experiment 10: Mixer ..............................................................................................96
TEST for LEARNING OUTCOMES .............................................. 108
APPENDIX .................................................................................. 117
dBm Conversion Table ..........................................................................................117
The relationship between dB and dBc ...................................................................118
Resistor Values in π-type Resistance Attenuators..................................................119
Resistor Values in T-type Resistance Attenuators ..................................................120
Modulation Index and Sideband Amplitude Comparison Table .............................121
Declaration of Conformity.....................................................................................122
1
Page 4

GRF-1300A User Manual and Teaching Materials
SAFETY INSTRUCTIONS
This chapter contains important safety instructions that
should be followed when operating and storing the GRF-1300A.
Read the following before any operation to ensure your safety
and to keep the GRF-1300A in the best condition.
Safety Symbols
These safety symbols may appear in this manual or on the instrument.
WARNING
CAUTION
Warning: Identifies conditions or practices that could result in injury
or loss of life.
Caution: Identifies conditions or practices that could result in
damage to the GRF-1300A or to other objects or property.
DANGER High Voltage
Attention: Refer to the Manual
Protective Conductor Terminal
Earth (Ground) Terminal
Do not dispose electronic equipment as unsorted municipal waste.
Please use a separate collection facility or contact the supplier from
which this instrument was purchased.
Safety Guidelines
General
Guideline
CAUTION
2
• Do not place heavy objects on the device.
• Do not place flammable objects on the device.
• Avoid severe impact or rough handling that may damage the
device.
• Avoid discharges of static electricity on or near the device.
• Use only mating connectors, not bare wires, for the terminals.
• The device should only be disassembled by a qualified technician.
Page 5
Safety Instructions
Power Supply
WARNING
Fuse
WARNING
(Measurement categories) EN 61010-1:2010 specifies the measurement categories and
their requirements as follows. The device falls under category I.
• Measurement category IV is for measurement performed at the source of a low-voltage
installation.
• Measurement category III is for measurement performed in a building installation.
• Measurement category II is for measurement performed on circuits directly connected
to a low voltage installation.
• Measurement category I is for measurements performed on circuits not directly
connected to Mains.
• AC Input voltage: 100 ~ 240V AC, 50 ~ 60Hz.
• Connect the protective grounding conductor of the AC power cord
to an earth ground to prevent electric shock.
• Fuse type: 1A/250V.
• Only qualified technicians should replace the fuse.
• To ensure fire protection, replace the fuse only with the specified
type and rating.
• Disconnect the power cord and all test leads before replacing the
fuse.
• Make sure the cause of the fuse blowout is fixed before replacing
the fuse.
Cleaning the
GRF-1300A
Operation
environment
• Disconnect the power cord before cleaning the device.
• Use a soft cloth dampened in a solution of mild detergent and
water. Do not spray any liquid into the device.
• Do not use chemicals containing harsh products such as benzene,
toluene, xylene, and acetone.
• Location: Indoor, no direct sunlight, dust free, almost non-
conductive pollution (Note below) and avoid strong magnetic
fields.
• Relative Humidity: < 80%
• Altitude: < 2000m
• Temperature: 0°C to 40°C
(Pollution Degree) EN 61010-1:2010 specifies pollution degrees and their requirements as
follows. The device falls under degree 2.
Pollution refers to “addition of foreign matter, solid, liquid, or gaseous (ionized gases),
that may produce a reduction of dielectric strength or surface resistivity”.
• Pollution degree 1: No pollution or only dry, non-conductive pollution occurs. The
pollution has no influence.
• Pollution degree 2: Normally only non-conductive pollution occurs. Occasionally,
however, a temporary conductivity caused by condensation must be expected.
• Pollution degree 3: Conductive pollution occurs, or dry, non-conductive pollution
occurs which becomes conductive due to condensation which is expected. In such
conditions, equipment is normally protected against exposure to direct sunlight,
precipitation, and full wind pressure, but neither temperature nor humidity is
controlled.
Storage
environment
• Location: Indoor
• Relative Humidity: < 70%
• Temperature: -10°C to 70°C
3
Page 6

GRF-1300A User Manual and Teaching Materials
Disposal
Do not dispose this device as unsorted municipal waste. Please use a
separate collection facility or contact the supplier from which this
instrument was purchased. Please make sure discarded electrical
waste is properly recycled to reduce environmental impact.
Power cord for the United Kingdom
When using the device in the United Kingdom, make sure the power cord meets the following safety
instructions.
NOTE: This lead/appliance must only be wired by competent persons
WARNING: THIS APPLIANCE MUST BE EARTHED
IMPORTANT: The wires in this lead are coloured in accordance with the following code:
Green/ Yellow: Earth
Blue: Neutral
Brown: Live (Phase)
As the colours of the wires in main leads may not correspond with the coloured marking identified in
your plug/appliance, proceed as follows:
The wire which is coloured Green & Yellow must be connected to the Earth terminal marked with either
the letter E, the earth symbol or coloured Green/Green & Yellow.
The wire which is coloured Blue must be connected to the terminal which is marked with the letter N or
coloured Blue or Black.
The wire which is coloured Brown must be connected to the terminal marked with the letter L or P or
coloured Brown or Red.
If in doubt, consult the instructions provided with the equipment or contact the supplier.
This cable/appliance should be protected by a suitably rated and approved HBC mains fuse: refer to the
rating information on the equipment and/or user instructions for details. As a guide, a cable of 0.75mm2
should be protected by a 3A or 5A fuse. Larger conductors would normally require 13A types,
depending on the connection method used.
Any exposed wiring from a cable, plug or connection that is engaged in a live socket is extremely
hazardous. If a cable or plug is deemed hazardous, turn off the mains power and remove the cable, any
fuses and fuse assemblies. All hazardous wiring must be immediately destroyed and replaced in
accordance to the above standard.
4
Page 7

Introduction to the GRF-1300A
ABOUT THIS BOOK
This textbook was developed in conjunction with the GRF1300A RF & Communication Trainer and the GSP-730 3GHz
spectrum analyzer as an RF communications education system.
It not only offers detailed examples, but also the practical
knowledge necessary for RF measurements, such as spectrum
analyzer principals, as well as AM and FM communication
systems.
For you to easily understand the contents of this textbook,
we have included as many pictures and diagrams as possible to
strengthen your comprehension.
This book is divided into a teacher version and two student
versions. All experiment results are included in the teacher
edition. In addition, chapters with an asterisk (*) indicate
additional text for advanced reading not present in the student
addition. Students will not be affected by the omission of the
additional text. To further help students, the student edition
will contain a “Notes” section in these missing areas.
5
Page 8

GRF-1300A User Manual and Teaching Materials
INTRODUCTION to the GRF-1300A
The GRF-1300A is a well designed training kit capable of
producing a 3MHz baseband signal and a carrier signal up to
900MHz. The GRF-1300A is also able to perform AM and FM
RF circuit experiments as well. The practical exercises in the
training kit meet the needs of most general RF courses. The
GRF-1300A consists of three modules, namely: a baseband
module, an RF Synthesizer/FM module and an AM module.
The baseband module can simulate a baseband signal and
includes sine, square or triangle waveforms. Its output
frequency and amplitude are adjustable. During experiments
the three kinds of waveforms can be arbitrarily switched back
and forth to meet the signaling requirements of each of the
different experiments.
The RF Synthesizer/FM module is used to generate an
adjustable carrier frequency as well as perform frequency
modulation. This module covers some of the focus points in the
RF circuit theory. This will be highlighted in practical
experiments in later chapters. FM waveforms can also be
produced by using this module together with the baseband
module. The GSP-730 spectrum analyzer can be used to observe
the various characteristics of an FM waveform.
The AM module and baseband module can be used
together to perform amplitude modulation experiments. The
GSP-730 Spectrum Analyzer can be used to observe the various
characteristics of an AM waveform.
The mixer can convert the RF signal into an intermediate
frequency signal or it can do the opposite and convert the
intermediate frequency signal into an RF frequency signal in
order to transmit or process the carried message, respectively.
This experiment system can be connected to a computer via
the USB interface. The interface can be used to turn individual
circuits on or off so that students can perform diagnostic
experiments.
6
Students can learn the fundamental aspects of RF theory
through a variety of experiments. Understanding RF theory has
been made easier by breaking the RF circuits into fundamental
Page 9

Figure A-1.
The GRF-1300A
control panel
Introduction to the GRF-1300A
functions. This allows students to see in detail how the theory
relates to the practical aspects of the RF circuitry.
This system is a collection of different functions: signal
generation, frequency modulation, amplitude modulation,
communication and other functions. Connecting different
modules together can create a number of different RF circuit
experiments. Specific experiments will be highlighted in later
chapters. The GRF-1300A RF & Communication Trainer is
designed to modulate an audio signal with a carrier waveform.
The system takes into account the difficulties arising from RF
circuit theory and knowledge. It focuses on these theories and
sets up experiments to understand the theoretical aspects of RF
circuitry – This also has the added benefit of increasing a
student’s interest to learn RF circuits.
Figure A-2.
Reference
platform: GSP730 Spectrum
Analyzer
7
Page 10

GRF-1300A User Manual and Teaching Materials
Package Contents
This package contains the GRF-1300A unit, RF cable – 3 *
10cm, 1*20cm,RF cable 2* 80cm, a user manual CD, a student
book, an antenna, a power cord and so on.
Title Photo No Note
GRF-1300A
RF wire
RF wire
RF wire
Antenna
AC power cord
CD
Adapter
1
3 100mm
1 200mm
2 800mm
2 800-1000MHz
1
100-240V~50-60Hz
User manual and
1
software
1 N-SMA Adapter
Student
Textbook
Product Specifications and Function
Base Band
RF/FM Analysis
FM
AM
Function Item Spec.
Waveforms Sine, Square, Triangle
Frequency Range
Amplitude
Harmonics Distortion ≤-30dBc
Frequency Accuracy ±0.15MHz
Adjustable Range
Power Range ≥-15dBm
Max Frequency
Deviation
Peak Difference ≥-18dBm
RF & Communication
1
Trainer
0.1~3MHz
(Triangle-0.1~1MHz)
Step: 10kHz
≥1.5Vpp
≥0.75Vpp into 50Ω
≥45MHz (870M~920M)
Step: 1MHz
>3MHz
Mixer LO+IF ≥-35dBm
8
Page 11

Introduction to the GRF-1300A
LO-IF
≥-35dBm
Mixer+modulation ≥-60dBm
Bandpass Filter
Communication
Usage Instructions
Procedure
1. For safety purposes, please connect the unit to the correct AC
power source: 100V~240V,
50-60Hz.
Make sure the ground terminal is properly earthed to prevent
electric shock.
2. The power socket and USB port are on the rear panel. The
power switch is on the upper
left-hand side of the device.
Frequency Centre:
Bandwidth:±20MHz
2.4GHz
Turn circuits on or off by remote command for
the diagnostic experiments.
Figure A-3.
Connection
diagram between
different modules
USB port
AC socket
Power switch
3. When using several modules together at the same time,
connect each module with the appropriate RF cable.
4. The UP and DOWN buttons on the Baseband module can be
9
Page 12

GRF-1300A User Manual and Teaching Materials
used to adjust the frequency of the baseband signal. The
baseband module is adjustable in 10kHz steps.
• WAVE Select is used to select three different baseband
waveforms. When the waveform is selected, the
corresponding LED light will be lit up.
• The Reset button is used to reset the GRF-1300A. When
reset, the GRF-1300A will output a 0.10MHz sine wave
baseband signal and a carrier signal with a frequency
880MHz.
• The output port is used to output the set baseband signal.
• The four-digit display is used to display the frequency of
the output baseband signal.
• TP4 (test point 4) is used to used to monitor the output
signal from the output port.
• The potentiometer knob is used to adjust the voltage of the
output baseband signal. Turn clockwise to increase the
amplitude and turn anticlockwise to decrease its
amplitude.
Figure A-4.
Baseband module
5. The UP and DOWN buttons on the RF Synthesizer / FM
module can be used to adjust the frequency of the carrier. The
carrier can be adjusted in 1MHz steps.
10
Page 13

Introduction to the GRF-1300A
Figure A-5. RF
Synthesizer/FM
module
• The Four-digit display is used to display the frequency of
the carrier signal.
• FM in port and RF / FM Output port are used to receive
the FM signal and output the carrier signal respectively.
• TP2, TP3 and TP1 are used to monitor for breaks in the
circuit. For the position of each test point, please see Figure
A-7.
Figure A-6.
AM module
6. The AM module is used for amplitude modulation. The AM
in port and RF in port are used to input the modulating signal
and the carrier signal respectively. The AM output port
outputs the amplitude modulated waveform.
The mixer can convert the RF signal into an intermediate
frequency signal or it can do the opposite and convert the
intermediate frequency signal into an RF frequency signal in
order to transmit or process the carried message, respectively.
11
Page 14

GRF-1300A User Manual and Teaching Materials
Figure A-7.
Circuit location of
each test point
7. There are five test points (Tp1, Tp2, Tp3, Tp4, Tp5) on the
panel. These five test points are set at different points in the
circuit path of the connected modules. Their specific locations
are as shown in the Figure below. They are turned on or off
by their corresponding relays (B1, B2, B3, B4, B5). An
oscilloscope can be used to detect/determine the status of the
circuitry at these test points.
T
T
T
P1
B
1
P3
B
3
P4
B
4
T
P2
B
2
8. Install the GRF-1300A driver onto the PC.
• Connect the GRF-1300A to the PC. Below are the steps for
installing the software. Add the install software to the
install directory. Click next and a window as shown below
appears.
12
Page 15

Introduction to the GRF-1300A
Figure A-8.
Software
installation
• Next, click on the “Continue Anyway” button to continue
the installation until the installation procedure is complete.
Figure A-9.
Installation
procedure is
complete
• After the software installation is complete, users can
perform a system error check by sending commands to the
GRF-1300A using Hyper Terminal.
13
Page 16

GRF-1300A User Manual and Teaching Materials
Figure A-10.
Operation
interface for
HyperTerminal
14
Page 17

Introduction to the GRF-1300A
9. Below is a table listing each instruction and a description of
each function.
Instruction Function
*IDN? Returns the manufacturer, model name and
serial number.
RF? Returns the value on the digital display of the
FM/RF module.
AF?
WAVE? Returns the waveform type on the baseband
Bn? (n is the relay
number for the
corresponding test
point)
WAVE:0 The waveform to sine.
WAVE:1 Set the waveform to triangle.
WAVE:2 Set the waveform to square.
Bn:0 ( ‘n’ is the relay
number. I.e., B1:0)
Bn:1 ( ‘n’ is the relay
number. I.e., B3:1)
AF:N(N is setting
frequency)
RF:N(N is setting
frequency)
Returns the value on the digital display on
baseband module.
module.
Returns the state (open or closed) of the
currently selected relay.
Set the relay of corresponding no. to OFF.
Set the relay of corresponding no. to ON.
Set the AF frequency to N.
Set the RF frequency to N.
15
Page 18

GRF-1300A User Manual and Teaching Materials
OVERVIEW of the TIME and
FREQUENCY DOMAIN
Observation from a different perspective
When a signal is said to be in the time domain, it means that
the signal is expressed as a function of time. For example, if we
describe a sine wave signal that repeats once each microsecond
(μsec, 10-6), it means that the period of the signal is 1
microsecond. Usually we use an oscilloscope to measure these
signal characteristics in the time domain. In addition, when we
talk about the rise and fall time of a square waveform, we also
can observe that in the time domain. Phase delay is also
measured in the time domain. Oscilloscopes are well-known
electrical signal measurement instruments that perform
measurements in the time domain.
1μsec sine wave
However, when we observe a sine wave and a square wave
with the same amplitude and period, is there a way to describe
the difference between them? Frequency domain measurements
just provide a different view point.
First we will explain what frequency domain means.
Frequency domain means to observe the frequency composition
of a signal. If we add a sine wave signal that has a 1 microsecond
period to a spectrum analyzer, we will see an obvious signal on
the scale at 1 megahertz (MHz). We know that frequency is the
inverse of period. Therefore, a sine wave with a period of
microsecond has a frequency of 1MHz. You can measure voltage
Square wave with the same period
16
Page 19

Overview of the Time and Frequency Domain
from an oscilloscope and power (dBm) from a spectrum
analyzer. Voltage and power can be converted from one to the
other, so both of them can be used to display the strength of a
signal. Here we introduce a basic concept first. Each frequency
point in the spectrum represents a sinusoidal wave (could be a
sine or cosine) of a single frequency.
What about a square wave? We will now explain how a
square waveform and sine waveform are different to each other
in the frequency domain. If we input a square wave with a
period of 1 microsecond into a spectrum analyzer, its waveform
performance (we usually to say its spectrum or frequency
distribution) is as follows.
If we compare it with a sine wave spectrum, we can observe
that in addition to the point at the1MHz scale, other signal
points also appear at higher frequencies and with decreased
amplitudes. Therefore it shows that a square wave also includes
a combination of signals that are multiples of the frequency
baseband in addition to the 1MHz base frequency (fundamental
frequency).
We can see a classic relationship between the time domain
and frequency domain in the illustration below. A square wave
signal in the time domain can be decomposed into multiple
basic harmonic waves. The distribution of these harmonic
components can be clearly seen in the frequency domain.
Frequency domain analysis describes the characteristics of a
signal from another viewpoint.
17
Page 20

GRF-1300A User Manual and Teaching Materials
Time domain Frequency domain
18
Page 21

Overview of the Time and Frequency Domain
NOTES
19
Page 22

GRF-1300A User Manual and Teaching Materials
NOTES
20
Page 23

Overview of the Time and Frequency Domain
NOTES
21
Page 24

GRF-1300A User Manual and Teaching Materials
NOTES
22
Page 25

Overview of the Time and Frequency Domain
NOTES
23
Page 26

GRF-1300A User Manual and Teaching Materials
AN INTRODUCTION to SPECTRUM
ANALYZERS
Spectrum analyzers are one of the most important
instruments for RF microwave measurements. Being familiar
with spectrum analyzers in general is very important for
operating high frequency microwave equipment or for
performing communication measurements. In addition, being
familiar with the basic operating principals will allow you to
quickly understand other related test equipment. In this chapter,
we will briefly introduce the basic working principles of the
spectrum analyzer. After understanding the basic working
principles, you will find that a spectrum analyzer can be a
handy tool to use.
Broadband Receiver
The principal function of a spectrum analyzer is to convert
the input signal frequency down to a frequency (band) that
detection circuitry can handle. For example, a 2.4GHz signal
needs to be down-converted to several MHz before the
Detection & Display unit can process the signal. Therefore a
spectrum analyzer must be able to reduce the frequency band
down to several MHz. The first half of a spectrum analyzer is
called the radio frequency module and its task is to reduce the
input signal frequency. A mixer and a bandpass filter are used to
decrease the frequency (they can raise the frequency as well).
The mixer is a component with three ports: two inputs and one
output. Assume that the two input frequencies on input port are
fRF and fLO respectively, and then the output frequency will be
f
is made of two signals of different frequencies (fLO- fRF and
IF. fIF
fLO+ f
signal is the sum of the input signals and the other is the
difference. Determining which of the IF signals that will be used
depends on the system and subsequent bandpass filter design.
As for why the three ports are named after RF, LO, IF, they are
just the conventional terms that are used.
) that appear on the output port at the same time. One
RF
24
Page 27

Figure B-1.
The basic
structure of a
broadband
receiver
Attenuator
An Introduction to Spectrum Analyzers
Mixers
RF Input
Next, we are going to introduce the other basic functional
IF
BPFs
Tunable LOs
Detection
& Display
Unit
blocks that a spectrum analyzer is composed of. These blocks are
often mentioned when instructed on how to use a spectrum
analyzer.
An attenuator on the RF input path can increase the
dynamic range of the input signal level or provide more input
protection to the spectrum analyzer. Referring to Figure B-2, the
attenuator limits the signal level coming to the mixer (RF end) to
a certain level. If the input signal is above a reference level, it can
cause measurement errors, or cause spurious noise.
Figure B-2.
Attenuator
RF Input
Attenuator
Resolution Bandwidth Filter
When the input signal frequency is converted to an IF, a
RBW (resolution bandwidth) filter is used to distinguish the
signals that are close to each other in frequency. Figure B-3
shows this concept.
Mixers
IF
BPFs
Tunable LOs
Detection
& Display
Unit
25
Page 28
GRF-1300A User Manual and Teaching Materials
p
Figure B-3.
Basic structure of
a resolution
bandwidth filter
Figure B-4.
The effect of
different RBWs
(1)
RF In
ut
Attenuators
Mixers
IF
Tunable LOs
BPFs
RBW
Filter
Detection
& Display
Unit
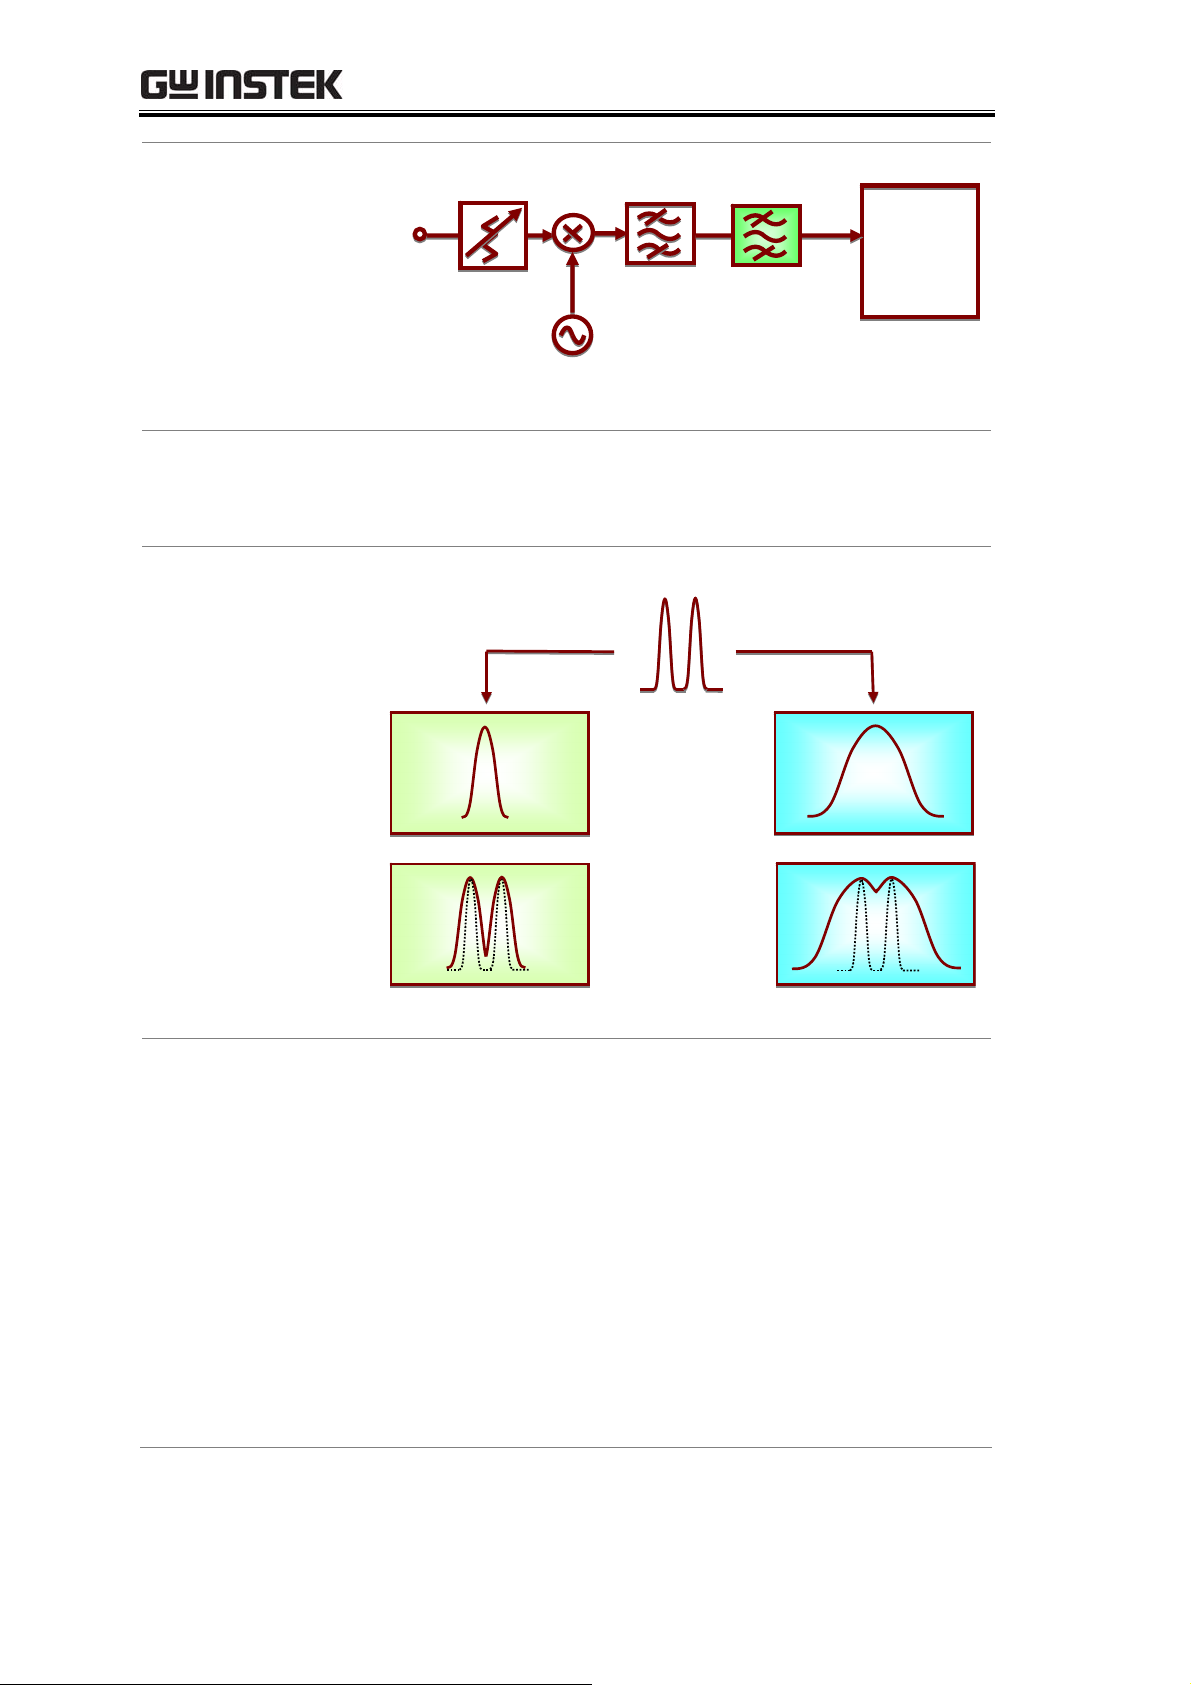
Figure B-4 shows how two different RBW filters distinguish
between two signals that are close to each other in frequency.
The bandwidth of RBW2 is wider that of RBW1.
Signal under test
RBW
Results
RBW1
After passing the narrower RBW1 filter, the components of
RBW2
the two tone signal are clearly distinguished from each other as
a result. But in the wider RBW2 filter, the result is not as clear as
RBW1. We can predict that if the resolution bandwidth of RBW2
is wider, we could even misinterpret the result as only one
signal. This will also happen if these two signals are even closer
together in frequency.
Another case is when the amplitude of one signal is much
higher than the other; the smaller signal can still be detected
using RBW1, but it is obscured if RBW2 is used. Figure B-5
illustrates this difference. This is why these filters are known as
resolution bandwidth filters.
26
Page 29

An Introduction to Spectrum Analyzers
Figure B-5.
The effect of
different RBWs
(2)
Detector
Signal under test
RBW
RBW1
RBW2
Following the RBW filter, the detector detects the power
and coverts it to DC voltage via an ADC so that it can be
displayed.
Figure B-6.
Detector
Video Bandwidth Filter
Figure B-7.
VBW filter
However, a filter is employed after the detector to filter out
the noise generated by the detector. This is the function of the
VBW (video bandwidth) filter as shown in Figure B-7.
27
Page 30

GRF-1300A User Manual and Teaching Materials
Figure B-8.
Different VBWs
Figure B-8 shows how the VBW affects the displayed
output. If the signal under test passes through two different
VBW filters, in which VBW1 is less than VBW2, we can see that
the magnitude of the noise floor of VBW2 is greater than that in
VBW1. But notice that the average level of the noise floor
remains the same. The VBW filter only averages the noise level;
It doesn’t affect the overall amplitude of the signal noise floor.
VBW
Signal under
Results
Noise
VBW1 VBW2
28
Page 31

An Introduction to Spectrum Analyzers
NOTES
29
Page 32

GRF-1300A User Manual and Teaching Materials
NOTES
30
Page 33

An Introduction to Spectrum Analyzers
RF COMMUNICATION and SIGNALS
EXPERIMENTS
In this chapter we will explain the basic operating
principals of a spectrum analyzer and introduce the
measurement experiments. Prior to this, we will briefly explain
how to operate the GW Instek GSP-730 spectrum analyzer. For
more detail about its operation, please refer to the GSP-730 user
manual.
31
Page 34

GRF-1300A User Manual and Teaching Materials
Experiment 1: Basic Operation of a Spectrum Analyzer
Relevant
information
Experiment
equipment
Experiment
goals
In addition to the sky, oceans and forests, there is an
invisible, intangible, inaudible and complex electromagnetic
network in our living environment. This network is intertwined
with wireless signals of various frequency bands. Although
these signals are invisible and intangible, we can use a spectrum
analyzer to understand and analyze these wireless signals.
In this experiment, the GSP-730 spectrum analyzer is used
to capture some wireless signals in the environment. This
experiment will help students to become familiar with using
spectrum analyzers as well as to arouse their curiosity in the
field of RF signals.
Item Equipment Quantity Note
1 Spectrum analyzer 1 GSP-730
2 Adapter 1 N-SMA
3 Antenna 1 800
To become familiar with how to use the GSP-730 and how to
use parameter settings such as frequency, amplitude and
markers.
Experiment
principles
Spectrum analyzers are mainly used to measure physical
quantities such as the frequency and amplitude of a signal. For
basic operation, the frequency range must be set first, then the
reference level amplitude.
32
Page 35

RF Communication and Signals Experiments
The Frequency,
Amplitude and
Span keys as well
as the keypad and
unit keys.
The figure above is a screen shot from a typical spectrum
analyzer display. The horizontal setting is frequency and the
vertical axis is amplitude. Therefore a spectrum analyzer is
basically used to perform frequency and amplitude-related
measurements. We can operate a spectrum analyzer by using the
Frequency, Amplitude and other function keys in conjunction
with the keypad to control the frequency, amplitude and other
related settings.
Experiment
contents
Experiment
steps
There are two ways to set the frequency. If the frequency of
the signal that you want to measure is known, then we can set
the frequency using the center frequency and span functions. If
we need to measure a frequency range, then we can set the start
and stop frequency range.
Connect the antenna to the GSP-730 spectrum analyzer to
test the radio waves in the environment.
1. Connect the antenna to the GSP-730 spectrum analyzer.
Measure the strength of a mobile phone’s transmitter signal.
Because the frequency band of a mobile phone is between
800MHz - 1900MHz, we will set the frequency range between
800 - 1900MHz.
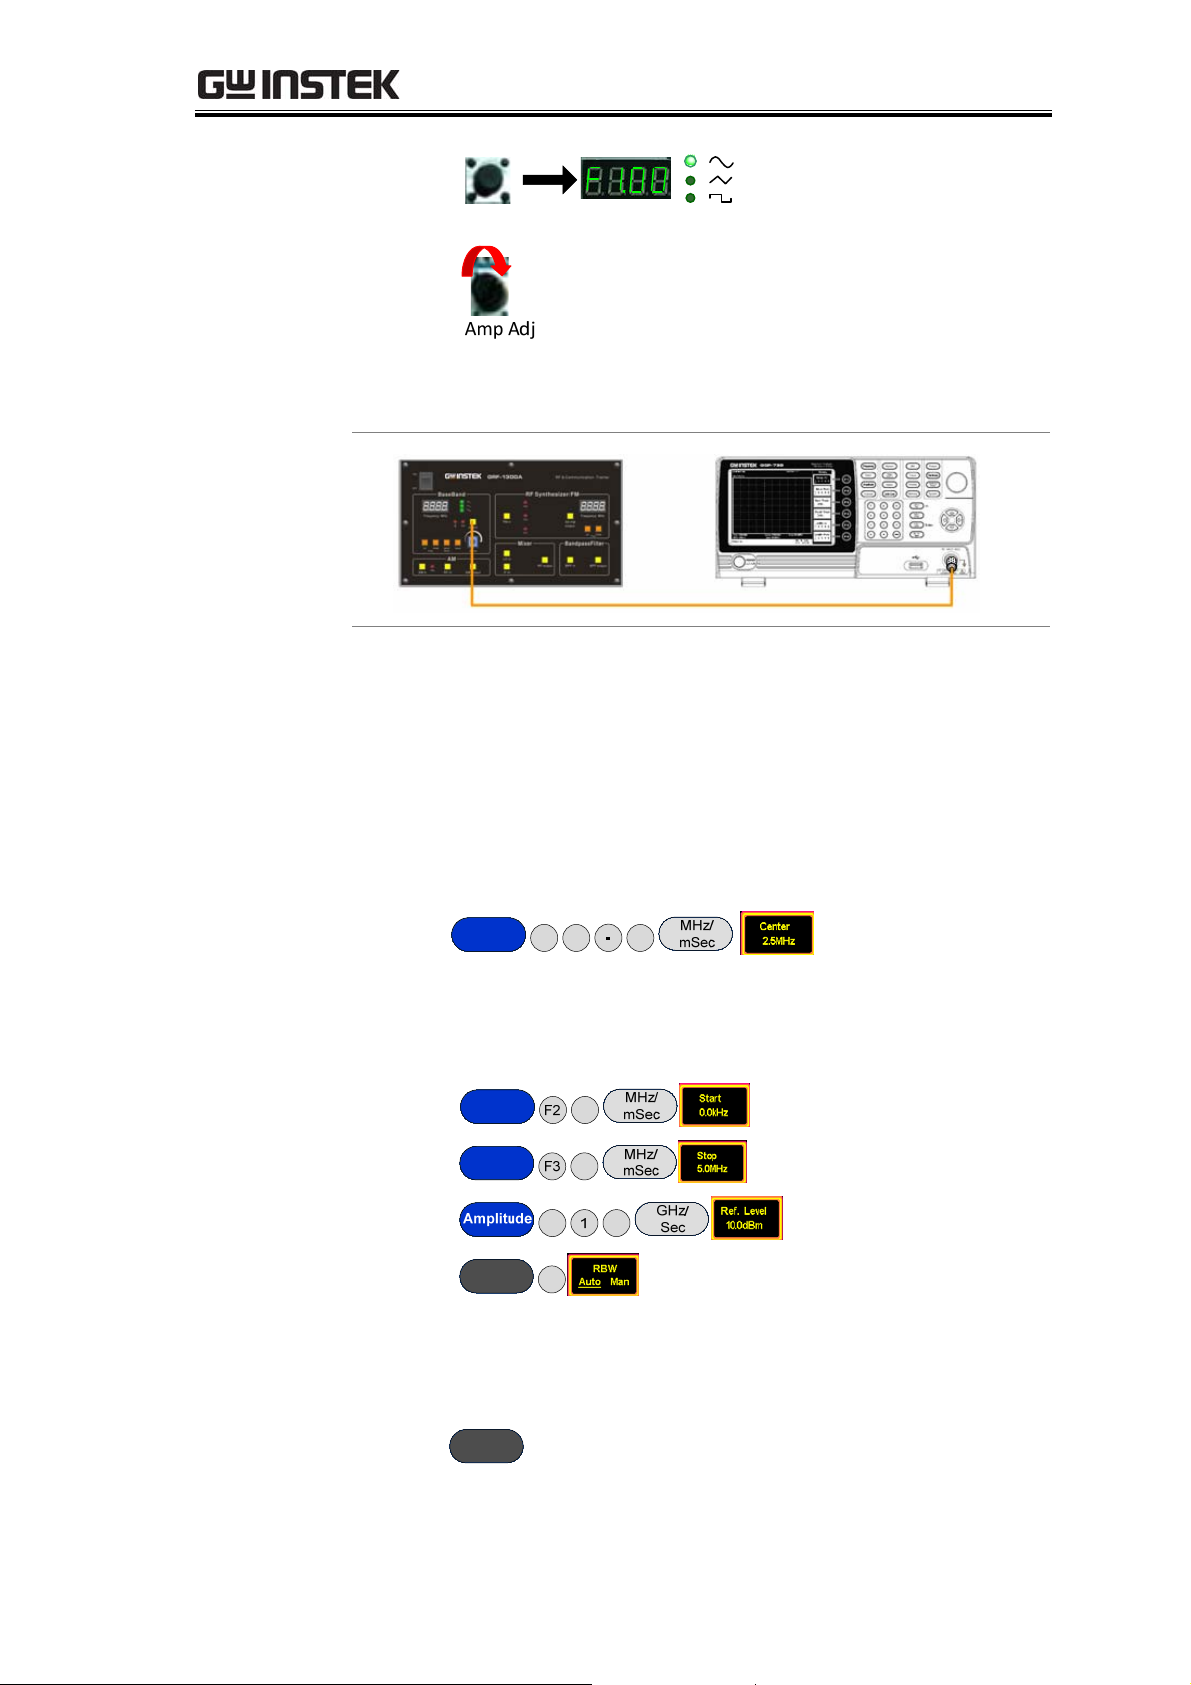
2. Set the GSP-730 as follows:
z Start frequency: 800MHz,
z Stop frequency: 1900MHz
• Reference level:-30dBm
• RBW(RBW):Auto
8
Step1
Step2
Frequency
F2
0
1 9
33
Page 36

GRF-1300A User Manual and Teaching Materials
Step3
Step4
3. Now we should see some signals on the spectrum analyzer
BW
F1 3
F1
0
screen. Identify the three highest peaks and write down their
frequency values. The reference level can be used to adjust the
strength of the signal.
4. As mobile phones use frequency hopping, we can use the
Peak Hold function to hold the reading of the signal on the
display screen. Record the frequency and amplitude of the
signal.
Step5
5. Change the span to 5MHz. Set the center frequency to each of
F3
the above three frequency points in sequence so that you can
observe each one more accurately. Record these three
frequency points in Table 1-1.
Experiment
results
Step6
F2
Set the center frequencies to each of the three frequency
points
Step7
Testing the wireless signals in the environment is shown in
6.
the picture below.
Antenna
34
Page 37

RF Communication and Signals Experiments
Frequency: _____Amplitude:_____
Question
Frequency: _____Amplitude:_____
Table 1-1. Frequency and amplitude of mobile phone’s transmitter
signal.
In addition to the mobile phone signal, what other wireless
signals can be measured in the environment?
35
Page 38

GRF-1300A User Manual and Teaching Materials
Experiment 2: Measuring a Baseband Waveform
Relevant
information
Experiment
goals
Relative to oscilloscopes, spectrum analyzers have many
outstanding advantages. They are also the primary measurement
tool for measuring frequency domain data. Learning how to use
a spectrum analyzer is an essential skill that every student must
master to gain RF knowledge.
By measuring a baseband signal, this experiment allows
students to comprehensively understand how to operate a
spectrum analyzer and lays the foundation for subsequent
experiments.
Item Equipment Quantity Note
1 Spectrum analyzer 1 GSP-730
RF & Communication
2
Trainer
1 GRF-1300A
3 RF wire 1 800mm
4 Adapter 1 N-SMA
1. Measurement and analysis on a basic signal.
2. To understand how to use the GRF-1300A system to output a
baseband signal.
Experiment
principles
Experiment
contents
Experiment
steps
Set the GRF-1300A to output a 1MHz sine waveform and
use the GSP-730 to measure its spectrum. The working principle
of a spectrum analyzer has been introduced in a previous
chapter. We won’t repeat it here.
Set and then measure the spectrum of a 1MHz sine wave.
Measure the harmonic ratio at each of the harmonic frequencies.
1. Turn on the GRF-1300A and the GSP-730.
2. Set the GRF-1300A baseband as follows:
• Waveform: Sine wave
• Frequency: 1MHz.
• Turn the amplitude knob clockwise to its end.
Step1
36
Page 39
RF Communication and Signals Experiments
Step2
UP
Step3
3. Connect the baseband signal from the output port of the GRF-
1300A to the input terminal of the GSP-730 using the RF wire.
4. Set the GSP-730 as follows:
• Center frequency: 2.5MHz
• Start frequency: 0kHz,
• Stop frequency: 5MHz
• Reference level: 10dBm
• RBW: Auto
Step1
Frequency
F1
2 5
When the first step is done, steps 2 and 3 (below) will
have already been automatically set. Students may do steps 2
and 3 here is for reference only.
Step2
Step3
Step4
Step5
5.Utilize the Marker function on the spectrum analyzer to
Frequency
Frequency
BW
F1
F1
0
5
0
determine the harmonic ratio and draw the spectrum in Table 2-
1.
Step6
Peak
Search
37
Page 40

GRF-1300A User Manual and Teaching Materials
After step 6 is done, make sure the "Delta" marker is used
for the next steps and not the "Normal" marker. Set the Delta
Marker to the peak point of each harmonic and make a record
by drawing a simple sketch of the spectrum in table 2-1.
Step7
Step8
6.A function signal generator can also be used as a signal source
Marker
Marker
1
2
in the above measurement, but be aware that the amplitude of
the output signal can’t be too high.
dBm is a power unit that is referenced to 1mW. The
formula for X dBm = 10*log(Px/1mW)
Putting 10 mW into the above formula, we get 10 * log
(10/1) = 10 * 1 = 10dBm. Similarly if we input 100 mW into the
above formula, X = 10 * log (100mW/1mW) = 10 * 2 = 20dBm.
Because the output voltage of a signal generator is often
used expressed as a voltage into a 50 ohm load, you must
convert voltage to power. A few common values are listed
below:
Experiment
results
Converting Voltage to dBm: (into 50 ohm load)
Vpp (V) Vm (V) Vrms (V) P (mW) dBm
10.00 5.00 3.54 250.00 23.98
5.00 2.50 1.77 62.50 17.96
2.00 1.00 0.71 10.00 10.00
1.00 0.50 0.35 2.50 3.98
Converting dBm to Voltage: (into 50 ohm load)
dBm P (mW) Vrms (V) Vm (V) Vpp (V)
20.00 100.00 2.24 3.16 6.32
10.00 10.00 0.71 1.00 2.00
0.00 1.00 0.22 0.32 0.63
-10.00 0.10 0.07 0.10 0.20
If voltage is measured without a load on an oscilloscope, the
Vpp and Vm values should be multiplied by 2. For instance,
when we get a measured value of 4Vpp into no load, it is the
equivalent of 2Vpp into 50 ohms, or 10dBm after conversion.
38
Page 41

RF Communication and Signals Experiments
The 2nd harmonic ratio is:
Question
Caution
The 3rd harmonic ratio is:
Table 2-1. 1MHz sine wave spectrum test results
1. What is the spectrum of a theoretical sine wave and why is it
different with the actual measured one?
2. What is the frequency domain feature of the analyzed signal?
1. The output power should not exceed the rated input of the
spectrum analyzer, otherwise the spectrum analyzer will be
damaged.
2. When using the RF cable to make a connection, be sure to
tighten the connector.
39
Page 42

GRF-1300A User Manual and Teaching Materials
Experiment 3: Different Baseband Waveforms and their Harmonic Measurement
Relevant
information
Experiment
equipment
You should already be familiar with electrical signals in
general. We have already said that an oscilloscope is used to
observe the amplitude of a waveform. In other words, it is used
to observe how an electrical signal, X(t), varies over time.
However, depending on what we are trying to study, the reason
for measuring a signal can also be different. For example, when
we analyze amplifiers, filters and mixers, we are no longer
interested in measuring a function related to time, but a response
function which can be characterized by frequency.
In this experiment, you will find that analyzing a signal in
the frequency domain often has a lot of advantages compared to
analyzing a signal in the time domain. You will also find that
there is a relationship that exists between the time domain and
the frequency domain, and will thus gain a better understanding
of the theory behind the Fourier series.
Item Equipment Quantity Note
1 Spectrum analyzer 1 GSP-730
2 RF & Communication Trainer 1 GRF-1300A
3 Oscilloscope 1 GDS-2204
4 RF wire 1 800mm
5 Adapter 1 N-SMA
Experiment
goals
40
1. Measure the harmonic content that is output from the
baseband signal.
2. Use the measurement results to verify the Fourier series
theorem.
3. Understand the internal relationship between the time
domain and the frequency domain in a signal.
4. Use this experiment to become familiar with how to measure
the spectral characteristics of a typical signal, such as the
amplitude and frequency.
Page 43

RF Communication and Signals Experiments
Experiment
principles
Experiment
contents
Experiment
steps
Set the waveform on the GRF-1300A and measure the
harmonic spectrum. Switch to a different waveform and
measure the harmonic spectrum. Compare the differences. The
relationship between the time domain and the frequency domain
has already been introduced in chapter 3. We won’t repeat it
again here.
We will become familiar with using a spectrum analyzer
and how to use the GRF-1300A by analyzing the spectrum of a
simple triangle and square wave signal.
1. Turn on the GRF-1300A and the GSP-730.
2. Set the GRF-1300A baseband as follows:
• Waveform: triangle
• Frequency: 1MHz.
• Turn the input amplitude knob clockwise to the end.
Step1
Step2
UP
Step3
3. Connect the baseband signal from the output port on the
GRF-1300A to the input terminal on GSP-730 with the RF
cable.
4. Set the GSP-730 as follows:
• Center frequency: 15MHz
• Start frequency: 0kHz,
• Stop frequency: 30MHz, Span: 30MHz
41
Page 44

GRF-1300A User Manual and Teaching Materials
• Reference level: 0dBm
• RBW: Auto
Step1
Step2
Step3
Step4
5. Observe the spectrum that appears. Use the Marker function
Amplitude
F1
F1
F1
F1
0
5
on the spectrum analyzer to determine the harmonic ratio and
draw the spectrum in Table 3-1.
Step5
After step 4 is done, make sure the "Delta" marker is used for
the next steps and not the "Normal" marker. Set the Delta
Marker to the peak point of each harmonic and make a record
by drawing a simple sketch of the spectrum in table 3-1.
Step
Marker
F3 2
6
Step
Marker
F3 4
7
6. Select the square wave on the GRF-1300A Baseband module.
Do the same spectrum measurements that were performed in
the previous steps.
Step8
7. Observe the square wave spectrum that appears on the
spectrum analyzer. Use the marker function to record the
harmonic ratio and draw the spectrum in table 3-3.
Draw the spectrum of the square wave spectrum as you did
previously for the triangle wave. Remember to remove the
delta marker (-Marker) that was originally used with the
42
triangle wave.
Page 45

RF Communication and Signals Experiments
Experiment
results
Step9
Marker
After the spectrogram on table 3-3 is drawn, measure the
harmonic ratio of each harmonic using the following steps:
Step10
Step11
1
2
In accordance to the method that is used above to
measure the harmonic ratio, students can try to measure the
harmonic ratio of the higher order harmonics.
8. After measuring the spectrum, connect the output port to the
input port of the oscilloscope and measure the time domain
waveform of the triangle wave and square wave, and record
the results in Table 3-2 and Table 3-4.
1. In the tables below, record the measurement results of the
time domain waveforms and the frequency domain spectrum
for both the triangle and square waves.
Tab l e 3- 1.
1MHz triangle
wave spectrum
test results.
43
Page 46

GRF-1300A User Manual and Teaching Materials
t
A
t
A
Tab l e 3- 2.
Time domain
waveform of the
1MHz triangle
wave.
Tab l e 3- 3.
1MHz square
wave spectrum
test results.
(t)
Tab l e 3- 4.
Time domain
waveform of the
1MHz square
wave.
44
(t)
Page 47

RF Communication and Signals Experiments
Harmonic ratio of
the 3rd harmonic
(triangle wave)
Harmonic ratio of
the 5th harmonic
(triangle wave)
2. For the triangle waveform, measure the harmonic ratio of the
3rd and 5th harmonic. For the square waveform, measure the
harmonic ratio of the 2nd and 3rd harmonic.
45
Page 48

Harmonic ratio of
nd
harmonic
the 2
(square wave)
Harmonic ratio of
rd
harmonic
the 3
(square wave)
GRF-1300A User Manual and Teaching Materials
Question
Caution
1. Compare the measurement results from the frequency
domain and the time domain, and consider the relationship to
the Fourier series theory.
2. Analyze the difference between the triangle and square wave
spectrum. Write their Fourier series in the form of a
trigonometric function. What relationship do you find
between each harmonic and each term in the series?
There are different ways to set the center frequency on a
spectrum analyzer. Set it according to your needs.
46
Page 49

RF Communication and Signals Experiments
Experiment 4: Measurement of the RF Carrier
Relevant
information
Experiment
equipment
In communication systems, RF signals generally use carrier
signals. As a low frequency signal cannot be easily transmitted
very far over air, the low frequency message (such as voice) must
be placed into a higher frequency signal so it can be being
transmitted over a distance using an antenna. This highfrequency signal carries the message, and is thus called the
carrier. In this experiment we will perform basic measurements
on RF signals and measure important parameters such as phase
noise and harmonic distortion.
The carrier of this experimental system is generated by a
PLL. Phase locked loops are widely used as phase-locked
receivers, or for phase-locked frequency modulation and
demodulation. They are also often used as a local oscillator for
transmitters and receivers. We must learn in detail the working
principles of PLL circuits when we study RF circuits. This
experiment allows students to comprehend high frequency
signals by measuring the carrier frequency spectrum. It also
makes students recognize the basic structure of a PLL circuit. In
the following experiments, we will further study the locked and
unlocked conditions of a phase-locked loop.
Item Equipment Quantity Note
1 Spectrum analyzer 1 GSP-730
2 RF & Communication Trainer
3 RF wire 1 800mm
4 Adapter 1 N-SMA
1 GRF-1300A
Experiment
goals
Experiment
principles
Measure an RF signal from the GRF-1300A RF &
Communication Trainer. Also perform measurements on more
important parameters such as phase noise and harmonic
distortion.
A Phase locked loop (PLL) is a phase error control system. It
compares the phase between a reference signal and an output
signal to generate a phase error voltage for adjusting the
frequency output of the voltage-controlled oscillator – for the
purpose of synchronizing the output frequency with the
reference signal. Its basic circuit structure is shown in Figure 4-1.
47
Page 50

Figure 4-1. PLL
f
P
s
P
circuit structure
GRF-1300A User Manual and Teaching Materials
Above: PD is the phase-locked loop phase detector, LF is the loop
filter and VCO stands for voltage-controlled oscillator.
The purity of the output signal from the VCO is directly
related to the phase noise. The lower the distortion of the output
signal, the lower the harmonic components and noise contained
in the output signal.
Phase noise is usually specified in dBc/Hz at a given
frequency offset value, where dBc is dB in relation to the center
frequency. The phase noise of an oscillator is normalized to the
noise generated in a bandwidth of 1Hz. The phase noise is
usually calculated using the formula below, where fm is the
frequency of a single sideband from the carrier and P
measured sideband power:
L(fm) = (P
where,
B = 1.2RBW (RBW is the resolution bandwidth)
– P0) – log B + 2.5
ssB
is the
ssB
Figure 4-2. Phase
noise definition
0
sB
m
As the oscillator is a non-linear component, it will produce
higher-harmonic content. Harmonic distortion is also an
important factor for RF signals. In general we use a filter to filter
this out.
48
Page 51

RF Communication and Signals Experiments
Experiment
contents
Experiment
steps
Measure the RF
signal spectrum
and harmonic
distortion.
1. Measure the RF signal spectrum.
2. Measure the harmonic distortion of the RF signal.
3. Measure the phase noise of the RF signal.
1. Turn on the GRF-1300A and GSP-730. Leave the GRF-1300A
in its power-on state.
2. Connect the RF/FM output port on the GRF-1300A to the
input terminal on GSP-730 with the RF cable.
3. Set the GSP-730 as follows:
• Span: Full Span
• Reference level: 0dBm
• RBW: Auto: Auto
Step1
Step2
Step3
BW
F1
F1
4. On the observed spectrum, use the marker function to
measure the amplitude of each frequency point. The Next
peak function can be used to find each consecutive peak. Plot
the results in table 4-1.
Step4
Step5
F2
5. Draw the results in table 4-1. The harmonic ratio of each the
harmonic can be measured according to the following steps.
Step6
Marker
7 6
Step7
Marker
2 6 4
49
Page 52

GRF-1300A User Manual and Teaching Materials
Measure the RF
phase noise.
For the last two steps, the span is quite large, and may produce
some errors. To find the second and third harmonic, you may
need to fine-tune the frequency. Record the results in table 4-2.
1. Turn on the GRF-1300A and the GSP-730.
2. Set the GRF-1300A RF Synthesizer/FM as follows:
• Carrier frequency: 875MHz
Step1
3. Connect the RF/FM output port on the GRF-1300A to the
input terminal on GSP-730 with the RF cable.
4. Set the GSP-730 as follows:
• Center frequency: 875MHz
• Span: 1MHz
• Reference level: 0dBm
• RBW: Auto (default state is 50kHz)
Step1
Step2
Frequency
Span
Step3
Step4
Peak
Step5
Search
5. Record the carrier power. Set the deviation of the carrier
BW
F1
F1
F1
F1
7 5
0
50
frequency fm to a deviation (of100kHz. Use the Delta
Page 53
RF Communication and Signals Experiments
f
marker function on the spectrum analyzer to measure the
value.
Step6
Marker
1 0
Record the value, then calculate the phase noise according to
the formula, and record the spectrum and measurement results
in Table 4-3.
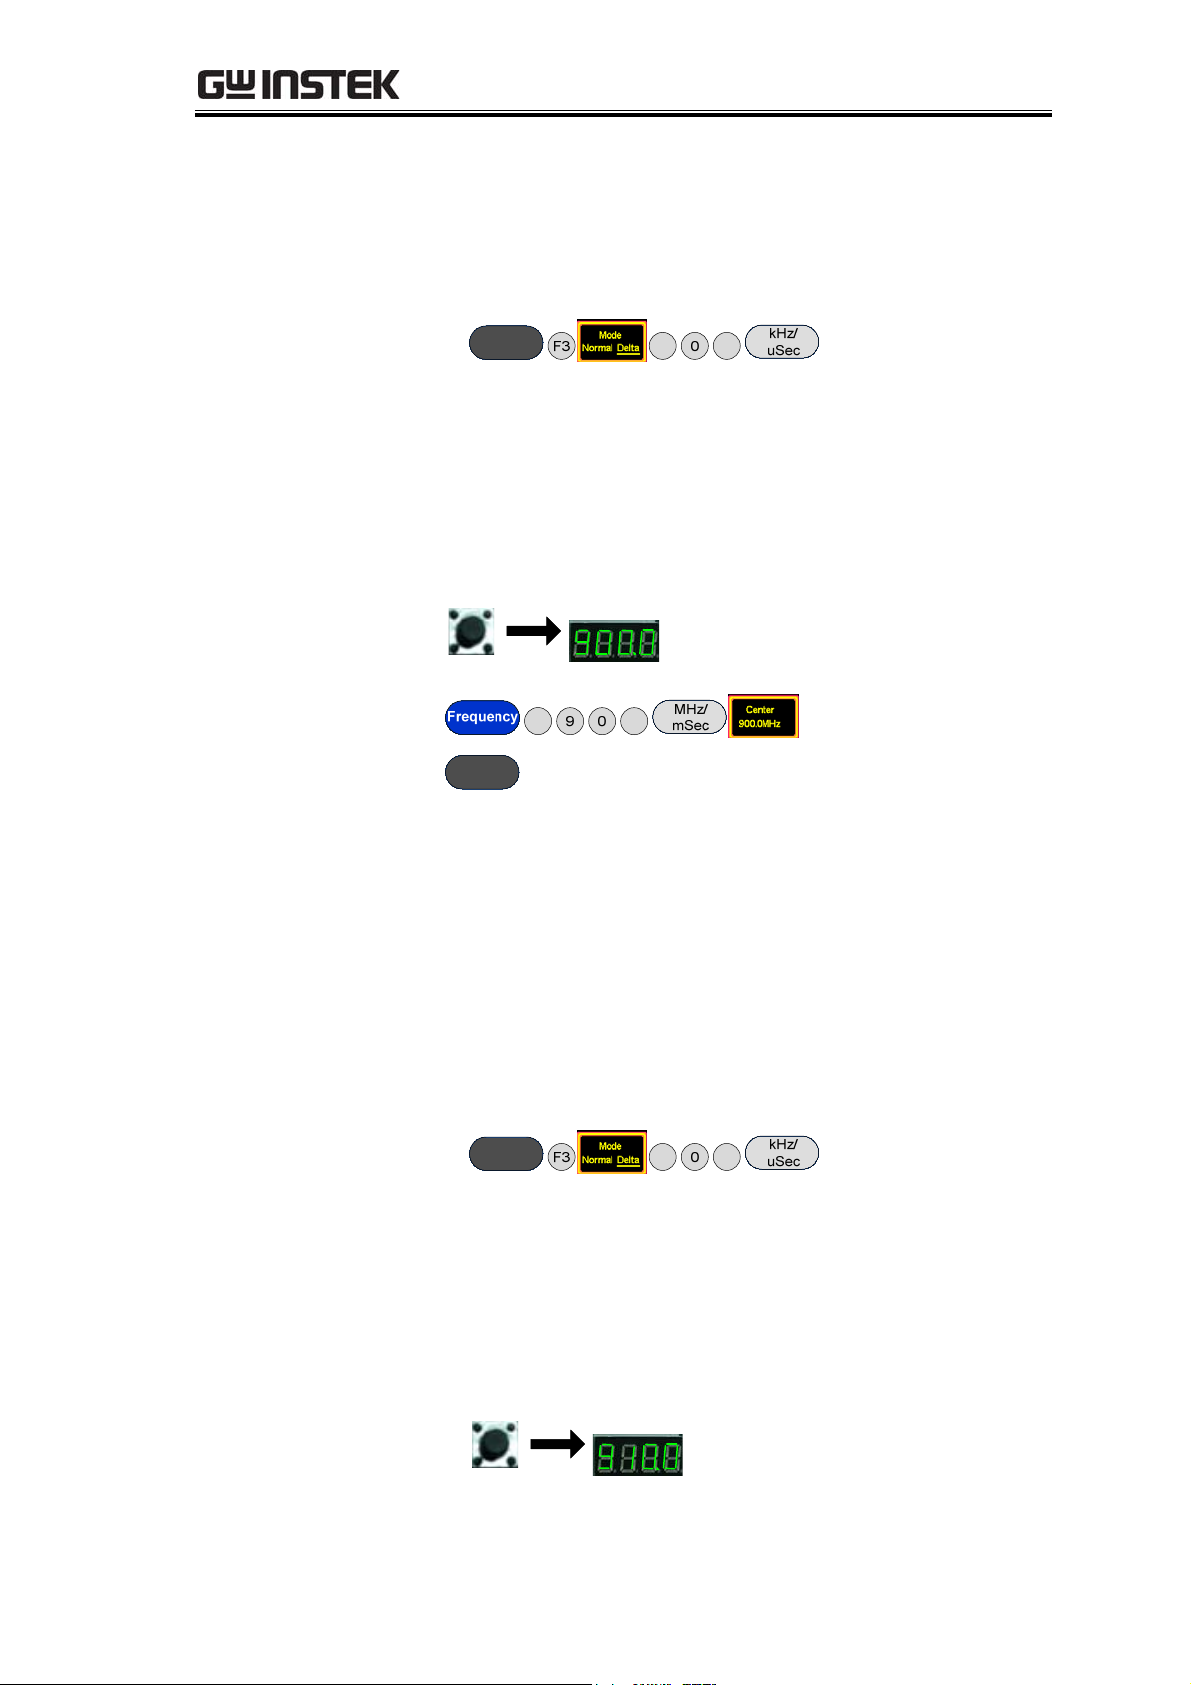
6. Adjust the PLL output frequency to 900MHz, and again
measure the power and phase noise corresponding to the
frequency.
Step7
Step8
Step9
UP
Peak
Search
F1
0
Record the carrier power. Set the deviation carrier frequency
to a deviation (of100kHz. Use the Delta Marker function on
m
the spectrum analyzer to measure the value.
Step10
Marker
1 0
Record the value, then calculate the phase noise according
to the formula, and record the spectrum and measurement
results in Table 4-3.
7. Adjust the PLL output frequency to 910MHz, and again
measure the power and phase noise corresponding to the
frequency.
Step11
UP
51
Page 54

GRF-1300A User Manual and Teaching Materials
f
Step12
Step13
F1
1 0
Record the carrier power. Set the deviation carrier frequency
to a deviation (of 100kHz. Use the Delta Marker function on
m
the spectrum analyzer to measure the value.
Step1
Marker
F3
0 0
4
Record the value, then calculate the phase noise according
to the formula, and record the spectrum and measurement
results in Table 4-3.
Experiment
results
Tab l e 4- 1. R F
Signal Spectrum
1. Measurement of the RF signal spectrum.
2. RF Signal Harmonic measurements
52
Page 55

Tab l e 4- 2. R F
Signal Spectrum
RF Communication and Signals Experiments
2nd Harmonic measurement
3rd Harmonic measurement
53
Page 56

GRF-1300A User Manual and Teaching Materials
Tab l e 4- 3.
Phase Noise
measurement
results
3. Phase noise measurement results
Carrier
Experiment results
Frequency
875MHz
Carrier frequency:_____ Output power:_____
Phase noise:_____
900MHz
54
Carrier frequency:_____ Output power:_____
Phase noise:_____
910MHz
Carrier frequency:_____ Output power:_____
Phase noise:_____
Page 57

RF Communication and Signals Experiments
Questions
Caution
1. A PLL circuit is formed by which parts? Explain the function
of each part.
2. What are the advantages of a PLL?
3. Explain the causes of phase noise? How can we improve
phase noise?
Be sure to tighten the connectors when connecting the RF cable.
55
Page 58

GRF-1300A User Manual and Teaching Materials
NOTES
56
Page 59

RF Communication and Signals Experiments
NOTES
57
Page 60

GRF-1300A User Manual and Teaching Materials
NOTES
58
Page 61

RF Communication and Signals Experiments
NOTES
59
Page 62

GRF-1300A User Manual and Teaching Materials
Experiment 5: AM Signal Measurement
Relevant
information
Experiment
equipment
Message signals are usually of a low frequency. In general,
these low frequency signals are not appropriate for
transmission. Therefore, modulation is required to transmit
messages for communication and test systems. Modulation is a
signal adjustment method used in signal transmission. It is used
to modulate a low frequency signal which carries information
with a signal of an appropriate frequency. This is used to solve
problems associated with the amplification and transmission of
weak signals. The role of modulation in RF communication
systems is essential. Not only is modulation used to modulate
the original low-frequency signal and its transmission, but it is
also used for frequency division multiplexing (FDM). If signals
with the same frequency range are transmitted on the same
channel at the same time, they can easily interfere with each
other, and hence why they are first modulated onto different
carriers so that multiple signals can be transmitted
simultaneously. These experiments start with amplitude
modulation. The spectrum analyzer is used to measure the
characteristics of AM signals, which has a great significance for
students to master FM as well as AM principles and
characteristics.
Item Equipment Quantity Note
1 Spectrum analyzer 1 GSP-730
2 RF & Communication Trainer
3 RF wire 2 100mm
4 RF wire 1 800mm
5 Adapter 1 N-SMA
1 GRF-1300A
Experiment
goals
Experiment
principles
1. Learn the working principals of amplitude modulation.
2. Use the spectrum analyzer to measure the AM characteristics
of an RF signal.
Modulation is the process of moving a low-frequency signal
to a high-frequency and then transmitting the high-frequency
signal. Generally the low frequency signal carrying the original
information is called the modulating signal or baseband signal.
The high-frequency signal is known as the carrier signal. After
the carrier signal is modulated by the modulating signal, the
resultant signal is called the modulated wave. There are three
kinds of modulation methods that are used: AM, FM and phase
modulation.
60
Page 63

RF Communication and Signals Experiments
This experiment begins with AM to learn some modulation
theory. AM uses the modulating signal to control the amplitude
of the high-frequency carrier signal. The modulating signal is
used to alter the amplitude of the carrier in proportion to the
amplitude of the modulating signal. A high frequency carrier
signal that is amplitude modulated is called an AM wave. AM
waves are divided into ordinary AM waves, double-sideband
AM waves with suppressed carrier transmission and singlesideband AM waves with suppressed carrier transmission.
1. The formula to express the modulated waveform is as follows:
Assuming that the modulating signal is a sine wave of a single
frequency (Ω=2πf
)
Ω
And
(t) = U
u
Ω
cosΩ t = UΩmcos2πfΩ t (5.1)
Ωm
then the carrier signal is
u
(t) = U
c
cosωc t = Ucmcos2πfc t (5.2)
cm
Because the carrier frequency remains unchanged after
amplitude modulation and the amplitude of an AM wave is
proportional to the modulating signal, therefore, the modulated
wave can be expressed as below:
u
AM
(t) = U
(t)cosωc t = Ucm(1+macosΩt) cosωc t (5.3)
AM
To simplify the analysis, we set the initial phase angle of both
waveforms to zero. In formula (5.3), m
is known as the degree of
a
AM modulation or the AM modulation index.
am
kU
Namely,
m
=
a
U
cm
Ω
This equation indicates to what degree the carrier amplitude
is controlled by the modulating signal. The constant ka is a
proportional constant determined by the modulation circuit. The
AM modulation index should be less than or equal to 1. When
the AM modulation index is greater than 1, it is called over
modulation and will distort the modulated signal.
We can see from this that the AM wave also oscillates at a
high frequency. Its amplitude varies regularly (envelope
changes) and is proportional to the modulating signal. Therefore,
the information in a modulating signal is carried in the
amplitude of an amplitude modulated wave. The following
figure shows how a signal changes from a carrier signal
61
Page 64

Figure 5-1. A
ω
ω
ω
ω
diagram showing
how an
unmodulated
carrier signal
undergoes the
process of
modulation.
GRF-1300A User Manual and Teaching Materials
(unmodulated state) to an AM wave (modulated state).
Figure 5-2. AM
waveform in the
time domain and
the frequency
domain
mU Ω
cmU
t
cmU
t
()AMUt
t
am
Ucm
2
c −
Ω
c
am
2
+Ω
Ucm
2. AM Wave Spectrum
Expand formula (4.3) to get the following formula:
AM cm c a cm c a cm cut U t mU t mU t−=ω+ ω+Ω+ ωΩ
( ) cos cos( ) cos( )
11
22
As can be seen here, a
single modulated audio signal consists of three high frequency
components. In addition to the carrier, two new frequency
components (ωc+Ω) and (ωc - Ω) are included. One is higher than
ωc, known as the upper sideband, and the other is lower than ωc,
known as the lower sideband. Its spectrum is shown in Figure 5-
3.
62
Page 65

Figure 5-3.
ω
ω
Spectrum of an
AM wave
RF Communication and Signals Experiments
Experiment
contents
1/2maU
c −ωΩ
cm
U
cm
c
1/2maU
+Ω
c
cm
From the above analysis, we can understand that amplitude
modulation is a process of shifting a low frequency modulating
signal into the sideband of a high frequency carrier. Obviously,
in AM waves, the carrier does not contain any useful
information. Information is only included in the sidebands.
1. Measure the waveform and spectrum of an AM wave.
2. Measure the spectrum of the AM wave with different carrier
frequencies and with modulating signals with different
amplitudes.
Experiment
steps
1. Turn on the power to the GRF-1300A and GSP-730.
2. Set the GRF-1300A as follows:
• Set the GRF-1300A to the default power-on state.
• Connect the output port on the Baseband module to the AM
in port on the AM module with an RF cable.
• Connect the RF/FM output port on the RF Synthesizer/FM
to the RF in port on the AM module with an RF cable.
• Turn the potentiometer clockwise to the end.
3. Connect the AM output port to the input port of the spectrum
analyzer with the 800mm RF cable.
63
Page 66

GRF-1300A User Manual and Teaching Materials
4. Set up the GSP-730 as follows:
• Center frequency:880MHz
• Span: 5MHz
• Reference level: 0dBm
• RBW: Auto
BW
F1 0
F1
0
F1
Step1
Step2
Step3
Step4
5. Use the Marker function to measure the carrier component of
the AM wave on the spectrum analyzer and the power of the
upper and lower sidebands. Use the oscilloscope to measure the
voltage at TP4 in relation to the position of the potentiometer
(i.e., the modulating amplitude). Draw the spectrum diagram in
Table 5-4.
64
Peak
Step5
Step6
Search
Marker
1
0
6. Turn the potentiometer counterclockwise to the half-way
mark. Measure the voltage with the oscilloscope. By changing
the output amplitude of the modulating signal, can you observe
any change in the spectrum? Record the experiment in Table 5-4.
7. Turn the potentiometer counterclockwise to decrease the
output voltage. Measure the voltage with the oscilloscope.
Observe any changes in the spectrum of the AM wave and
record it in Table 5-4.
Page 67

RF Communication and Signals Experiments
8. Turn the potentiometer clockwise to the maximum. Adjust the
UP button on the Baseband module to adjust the frequency of
modulating signal. Do you see any change in the AM wave
spectrum? Compare the experiment results with that of the
original baseband frequency of 100kHz and record it to Table 5-
5.
Step7
UP
Step8
F3 0
9. Use the UP button on the Baseband module to adjust the
frequency of the modulating signal. Do you see any change in
the AM wave spectrum? Record the result in Table 5-5.
Step9
Step10
UP
Marker
6
0
10. After completing the experiment steps above, press the Reset
button, and then use the UP button on the RF Synthesizer/FM
module to change the frequency of the carrier signal. Is there is
any change in the AM wave spectrum? Compare the experiment
result with that of the original carrier frequency of 880MHz and
record it to Table 5-6.
Step11
Reset
Step12
Step13
Step14
UP
Peak
Search
Marker
F3
0
1
11. Use the DOWN button on the RF Synthesizer/FM module to
change the frequency of the carrier signal. See if there is any
change to the AM wave spectrum and record it Table 5-6.
Step15
Step16
65
Page 68

GRF-1300A User Manual and Teaching Materials
Experiment
results
Tab l e 5- 4.
Experiment
results:
Changing the
modulating
voltage
1. Changing modulating voltage
Modulating
Experiment results
voltage
Vpp:
Carrier power:_____
Modulation index: :_____Lower sideband
power: :_____
Vpp:
Vpp:
Carrier power: :_____
Modulation index: :_____Lower sideband
power: :_____
66
Page 69

RF Communication and Signals Experiments
Carrier power: :_____
Modulation index: :_____Lower sideband
power: :_____
Tab l e 5- 5.
Experiment
results:
Changing the
modulating
signal frequency.
Conclusion:
2. Changing the modulating signal frequency.
Modulating
Experiment results
frequency
100kHz
Carrier power: :_____
Lower sideband power: :_____
300Khz
Carrier power: :_____
Lower sideband power: :_____
67
Page 70

GRF-1300A User Manual and Teaching Materials
600kHz
Carrier power: :_____
Lower sideband power: :_____
Tab l e 5- 6.
Experiment
results:
Changing the
carrier frequency.
Conclusion:
3. Changing the carrier frequency.
Carrier
Experiment results
Frequency
882MHz
68
880MHz
Page 71

RF Communication and Signals Experiments
Questions
878MHz
Conclusion:
1. If we change the frequency of the modulating wave but keep
the amplitude the same, will the AM wave be affected?
2. If the input cables on the AM modules were switched
(Connect the baseband signal to the "RF in" terminal and
connect the carrier signal to the "AM in" terminal.) what will
happen and why?
69
Page 72

GRF-1300A User Manual and Teaching Materials
Experiment 6: FM signal measurement
Relevant
information
Experiment
equipment
Since frequency modulation is a common type of modulation,
it is important to learn the principles and characteristics of FM
waves. Compared to AM waves, the amplitude of an FM wave
doesn’t carry the modulating signal information. This allows an
amplitude limiter to be used to eliminate the magnitude
interference before demodulation. The noise power spectral density
in an FM wave band is evenly distributed at the input terminal. But
due to frequency modulation, it is affected by frequency at the
output terminal. Because the bandwidth of a modulated signal is
far less than the FM wave bandwidth, it can pass through a lowpass filter to attenuate noise and increase the output signal to noise
ratio during demodulation. FM waveforms are advantageous as
they utilize power efficiently and have a high degree of fidelity as
they rely on the phase of the modulated signal and not the
amplitude to carry the baseband signal. The FM circuit in this
experiment uses a phase-locked loop. The phase-locked loop circuit
principles described earlier can be used to study the application of
a phase-locked loop circuit for this section.
Item Equipment Quantity Note
1 Spectrum analyzer 1 GSP-730
2 RF & Communication Trainer
1 GRF-1300A
3 RF wire 2 100mm
4 RF wire 1 800mm
5 Adapter 1 N-SMA
Experiment
goals
Experiment
principles
70
1. Understand the working principals of frequency modulation.
2. Use a spectrum analyzer to measure the FM characteristics of an
FM wave.
3. Master phase-locked loop principals that are used in FM.
1. Time domain analysis.
Frequency modulation is a type of modulation in which the
instantaneous frequency deviation of the modulated signal with
respect to the frequency of the carrier signal is directly
proportional to the instantaneous amplitude of the modulating
signal.
Assume that the modulating signal is
uΩ(t) = UΩmcosΩt
Page 73

Figure 6-1.
An FM signal
varying to the
change of a
modulating
signal
RF Communication and Signals Experiments
And the carrier signal is
uc(t) = U
cosωc t = Ucmcos2πfc t
cm
An FM signal varying to changes in the modulating signal is shown
in Figure 6-1.
u
Ω
t
c
u
t
u
t
In the positive half-period of the modulating signal, the
frequency of the modulated signal is higher than the frequency of
the carrier signal. At the peak of the positive half-period, the
angular frequency of the modulated signal is at its peak.
In the negative half-period of the modulating signal, the
frequency of the modulated signal is lower than the frequency of
the carrier signal, and its angular frequency is at its lowest. The
angular frequency ω of an FM wave changes in response to changes
in the modulation signal.
Then ω=ωc +ΔωcosΩt
In this formula, ω
is the angular frequency of the carrier wave, Δω
c
71
Page 74

GRF-1300A User Manual and Teaching Materials
f
Δ
Ω
Ω
ω
ω
ω
Ω
is the offset of the angular frequency determined by the modulating
signal UΩ
The general expression for the FM signal:
t
() cos[ () ]
ut U t k u tdtΩ=ω+ +
UtkUtdtΩ=ω+ Ω+
=ω+ Ω+
Ut t
cm c f
cm c f m
cos[ cos ]
cm c
t
∫
0
fm
kU
∫
0
Ω
ϕ
0
0
ϕ
0cos[ sin( ) ]
ϕ
Ω
Assume that,
M
f
Ω
==
ω
mm
kU
Ω
In this formula, Mf is called the FM index, Δωm is called the
maximum angular frequency deviation, its value is proportional to
the amplitude of the modulating signal.
2. Frequency domain analysis
Expressed by the time domain FM wave
fm
kU
( ) cos[ sin( ) 0]
ut U t t
cm c
=+Ω+ϕ
ω
Ω
=+Ω+ϕ
0cos[ sin( ) ]cm c fUtmt
Let the initial phase angle be 0 and expand as follows:
( ) [cos cos( sin ) sin sin( sin )]cm c f c fut U t m t t m t
=Ω+Ω
ω
When mf <<1, cos(mf sin Ωt) ≈1
sin(mf sin Ωt)≈ (mf sin Ωt)
Then we get,
=+ +Ω)+ −tΩ
() cos sin sincm c f cm cut U t mU t t
=+ Ω
fcm fcm
Ut t
cm c c c
cos cos( cos( )
mU mU
ωω ω
22
ω
We can see when mf <<1, the FM wave spectrum is composed of the
carrier, (ωc+Ω) frequency component and (ωc - Ω) frequency
component.
When mf >>1
=Ω+ Ω+ Ω+
02 4cos( sin ) ( ) 2 ( )cos 2 2 ( )cos 4 ......fff fmtJmJm tJm tΩ=+Ω+Ω
13 5sin( sin ) 2 ( )sin 2 ( )cos3 2 ( )sin5 ......fff fmtJm tJm tJm t
+
In this formula, J
) is called an n-order Bessel function of the
n(mf
first kind.
There are an infinite number of frequency components in FM
waves, and they are distributed symmetrically around the center of
72
Page 75

RF Communication and Signals Experiments
f
f
f
carrier frequency. The amplitude of each component depends on
the Bessel functions.
Theoretically, FM bandwidth is infinite, but the energy of an FM
signal is mainly concentrated near the carrier frequency. The
sidebands of the FM signal only contain a small amplitude
component and are generally ignored in practice by engineers.
Provided that the amplitude at the sidebands is negligible, less than
10%, we can get the FM wave band as follows:
B=2(mf +1)F
From above analysis
Because
Therefore B=2(Δ F + F )
When Δ F >>F, it is wide band modulation,
mf >>1, B ≈ 2Δ F
When Δ F <<F, it is narrow band modulation,
mf <<1, B ≈ 2 F
The amplitude of the sideband components in an FM signal is
related to the frequency modulation index. This can be seen in the
comparison table in the appendix. Below we have a few examples
of the absolute magnitudes of the sidebands for signals with a
modulation index of 0.5, 2.41 and 5.
0.5
m
=0.5
m
=2.41 m=5
The FM circuit in the GRF-1300A uses a phase-locked loop.
Using a PLL circuit for FM modulation not only solves the center
frequency stability problems in direct FM modulation but also the
narrow FM range limitations when using a crystal oscillator.
The spectrum of the modulating signal must be outside the of
73
Page 76

Figure 6-2.
GRF-1300A
FM principle
GRF-1300A User Manual and Teaching Materials
low-pass filter passband to achieve a phase-locked FM wave.
When the center frequency of the VCO is locked on to a stable
high frequency, it allows the VCO to shift in frequency when the
modulating signal is varied.
Experiment
contents
Experiment
steps
Measure the FM wave spectrum.
1.
2. Observe how the amplitude of the modulating signal affects the
FM wave frequency deviation.
3. Observe how the frequency of the modulating signal affects the
FM wave frequency deviation.
1. Turn on the GRF-1300A and GSP-730.
2. Set the GRF-1300A as follows:
• Under the default state (the state from power-up), turn the
potentiometer to the minimum position.
• Connect the output port on the Baseband module to the FM in
port on the RF Synthesizer/FM module with an RF cable.
• Connect the RF/FM output port to the RF input port on the
spectrum analyzer with an RF cable.
3. Set the GSP-730 as follows:
• Center frequency:880MHz
• Span: 50MHz
• Reference level: 0dBm
• RBW: Auto
74
Page 77

RF Communication and Signals Experiments
Step1
Step2
Step3
F1
F1
F1
8 0
5
0
Step4
4. Use the Marker function on the spectrum analyzer and measure
F1
the carrier position at this time.
Step5
5. Turn the potentiometer clockwise to an arbitrary position.
Measure the voltage with an oscilloscope. Does the FM wave
spectrum change after the output amplitude of the modulating
signal has changed? Follow the steps below to measure the
frequency deviation and record it in Table 6-2.
Step6
Marker
6. Turn the potentiometer clockwise again to a different position.
Measure the voltage with an oscilloscope. Does the spectrum of
the FM wave change when the output amplitude of modulating
signal changes? Follow the steps below to measure the frequency
deviation and record it in Table 6-2.
Step7
7. Adjust the potentiometer to the maximum position. Repeat the
above steps and record the results in Table 6-2.
Step8
8. After the completing the experiment steps above, see if there is
any change to the spectrum of the FM wave when the UP button
on the baseband module is used to change the frequency of the
modulating signal. Compare this to the original 100kHz
baseband signal and record it to Table 6-3.
Step9
UP
9. Change the modulating signal frequency to 600KHz. Observe the
change in the spectrum of the FM wave and record the results in
Table 6-3.
75
Page 78

GRF-1300A User Manual and Teaching Materials
Step10
UP
10.Change the modulating signal frequency to 1MHz. Observe the
change in the spectrum of the FM wave and record the results in
Table 6-3.
Step11
UP
11.After the completing the experiment steps above, press the Reset
button, and minimize the amplitude of the modulating signal in
order to view the FM spectrum within a span of 50MHz. Then use
the DOWN button on the RF Synthesizer/FM module to change the
frequency of the carrier signal. See if there is any change in FM
wave spectrum. Compare this result to the original carrier
frequency of 880MHz and record it in Table 6-4.
Step12
Step13
12.Adjust the carrier frequency again. See if there is any change on
FM wave spectrum and record it to Table 6-4.
Step14
UP
76
Page 79

RF Communication and Signals Experiments
Experiment
results
Tab l e 6- 2.
Experimental
Results:
Changing the
amplitude of
the modulating
signal
1. Changing the amplitude of the modulating signal.
Modulatin
Experiment result
g voltage
Vpp:
Frequency deviation:
FM index:
Vpp:
Frequency deviation:
FM index:
Vpp:
77
Page 80

GRF-1300A User Manual and Teaching Materials
Frequency deviation:
FM index:
Tab l e 6- 3.
Experimental
results:
Changing the
frequency of
the FM signal
Conclusio
n
2. Changing the frequency of an FM signal.
Modulating
Experimental result
frequency
100Khz
300Khz
600kHz
78
Page 81

RF Communication and Signals Experiments
1MHz
Conclusion
3. Changing the carrier frequency
Tab l e 6- 4.
Experimental
results:
Changing the
carrier
frequency
Carrier
frequency
875MHz
Experimental result
880MHz
79
Page 82

GRF-1300A User Manual and Teaching Materials
890MHz
Question
Conclusion
4. Draw a table to record the time domain waveform of the AM
wave that is measured by the oscilloscope.
1. For FM waves, if we keep the modulation signal amplitude
constant and double the modulation signal frequency, how will
the frequency deviation and bandwidth change in the
modulated signal?
2. Calculate the FM index of the modulation circuit through the
measured data obtained from the spectrum analyzer.
80
Page 83

RF Communication and Signals Experiments
Experiment 7: Using a Spectrum Analyzer in Communication Systems
Relevant
information
Experiment
equipment
ACPR and OCBW are important parameters in the
measurement of RF modulated signals. It is very important to
master using a spectrum analyzer to measure ACPR and OCBW.
We must know how to utilize a spectrum analyzer to measure
the RF parameters that are frequently used and to lay the
foundation for future use. ACPR is the ratio of the amount of
power leaked to an adjacent channel from the main channel.
OCBW is the occupied bandwidth that contains a specific
percentage of the total integrated power of the channel. At
present, third generation mobile communication systems (3G)
are becoming ubiquitous, while some countries and companies
are looking to develop fourth generation mobile communication
systems (4G). This experiment, therefore, has a high practical
value for the measurement of CDMA RF power and related
fields.
Item Equipment Quantity Note
1 Spectrum analyzer 1 GSP-730
2 RF & Communication Trainer 1 GRF-1300A
3 RF wire 2 100mm
4 RF wire 1 800mm
5 Adapter 1 N-SMA
Experiment
goal
1. To understand ACPR measurement principles and to perform
actual ACPR measurements.
2. Understand OCBW measurement principles and to perform
actual OCBW measurements.
81
Page 84

GRF-1300A User Manual and Teaching Materials
f
f
+
f
fB+
f
fB+
−
+
p
A
p
Experiment
principles
Figure 7-1.
RF power
amplifier input
and output
1. ACPR Measurement
ACPR (Adjacent Channel Power Ratio) is the ratio of the
amount of power leaked to an adjacent channel from the main
channel. It represents how much
power from the transmitter leaks into the transmission band of
other channels. The adjacent channel usually refers to the closest
adjacent channels near the transmission channel, other channels
can also be selected, depending on the measurement
requirements.
When two signals with similar frequencies are
input into an RF power amplifier, there are not only two output
signals, but also the inter-modulation signals (input signal 1 ±
input signal 2). A typical input and output frequency
spectrum is shown in Figure 7-1.
Figure 7-2.
Definition of
ACPR
输入信号
0
3fB−
0
B
−
B
0
0
0 3
carrier
CPR
adj
bandwidth
channel space
0
3fB
0fB−
0
0
0
3fB
82
Page 85

RF Communication and Signals Experiments
In accordance with the definition of ACPR (Figure 7-2), we know
that ACPR =10 log (P
adj
/P
carrier
).
When using a spectrum analyzer to measure ACPR, first you
need to select the appropriate settings for the span and the
resolution bandwidth (RBW). The span needs to be greater than
the measurement bandwidth. The RBW should be equal to
approximately 1% of the measurement bandwidth. Because the
sweep time of the spectrum analyzer is inversely proportional to
the square of the RBW, the RBW settings should be considered.
The RBW should not more than 4% of the measured channel
bandwidth. Otherwise, the RBW will too wide and will obscure
the original spectrum of channel. The RBW settings on the GSP730 have a number of set ranges, therefore it fine to set the RBW
to Auto mode.
2. OCBW-measurement
OCBW measurement is for measuring the bandwidth that the
channel occupies for a specified amount of power. This is used to
measure the occupied bandwidth as a percentage of the channel
power for a specified amount of power. Commonly used
parameters for the measurements are: channel bandwidth,
channel spacing and OCBW %.
Experiment
contents
Experiment
steps
1. Measure the ACPR from the FM signal produced by the GRF-
1300A.
2. Measure the OCBW from the FM signal produced by the GRF-
1300A.
1. Turn on the GRF-1300A and GSP-730.
2. Set up the GRF-1300A as follows:
• Set the GRF to the power-on default state.
• Use the RF wire to connect the baseband output to the FM
in port on the RF synthesizer/FM module.
• Connect the output terminal on the RF/FM module to the
input terminal on the spectrum analyzer with the RF cable.
83
Page 86

GRF-1300A User Manual and Teaching Materials
3. Set up the GSP-730 as follows:
• Center frequency:880MHz
• Span: 10MHz
• Reference level: -10dBm
• RBW: Auto
BW
F1
F1
F1
F1
1
Step1
Step2
Step3
Step4
4. Adjust the FM frequency deviation to 1MHz (2MHz in total)
0
0
1
with the amplitude knob.
2MHz
ACPR
measurement
84
5. Measure the ACPR and OCBW after these settings are
performed.
Step1
Step2
Meas
F1
F2
Page 87

RF Communication and Signals Experiments
Set the bandwidth of the main channel to 2MHz.
OCBW
measurement
Step3
F2
Set the main channel space to 5MHz.
Step4
F3
F1
Set the bandwidth of the 1st adjacent channel 0.8MHz.
Step5
F2
Set the offset of the 1st adjacent channel to 2MHz.
Step6
F3
Set the bandwidth of the 2nd adjacent channel to
0.5MHz.
Step7
Set the offset of the 2nd adjacent channel to 4MHz.
Increase the frequency deviation to 2MHz (4MHz in total)
using the amplitude knob. Measure the ACPR again and
record the results to table 7-1.
Step1
Meas
F3
Experiment
results
Step2
F1
Set the bandwidth of the channel that you will measure
to 2MHz.
Step3
F2
Set the span of the main channel space to 10MHz.
Step4
The OCBW is default at 90%.
Record the measurement data in Table 7-2
Step5 Adjust the frequency deviation of FM wave by
adjusting the potentiometer of GRF-1300A. Measure the
OCBW again and record the results to table 7-2.
Record the measurement data in Table 7-2
1. ACPR measurement results
85
Page 88
1MHz frequency
deviation results
2MHz frequency
deviation results
GRF-1300A User Manual and Teaching Materials
Table 7-1. ACPR measurement results
Test
Lower ACPR1 Upper ACPR1 Lower ACPR2 Upper ACPR2
No.
1
2
3
4
Average
2. OCBW measurement results
Item
86
Page 89

1MHz frequency
deviation results
2MHz frequency
deviation results
RF Communication and Signals Experiments
Table 7-2. OCBW measurement results
OCBW%:_________
Test No. CH Power OCBW Average
1
2
3
4
5
Questions
Caution
Describe the definition for ACPR?
Taking multiple measurements and the getting average value is
required for ACPR and OCBW measurements. Using the
Average function cannot be used as it uses a logarithmic method
to calculate the average.
87
Page 90

GRF-1300A User Manual and Teaching Materials
Experiment 8: Measurement of communication products
Relevant
information
Experiment
equipment
The computer mouse has experienced nearly four decades
of evolution and development since its inception in 1968. With
the popularity of consumer oriented computers over the past
decade, the mouse has seen tremendous progress. From the
early mechanical wheel mouse to the current mainstream optical
mouse or the high-end laser mouse, each evolution of the mouse
has been more enjoyable to use each time. In addition, the
demand for better work environments has made the wireless
mouse very popular. Wireless technology, depending on the
frequency band and its purpose, is divided into different
categories such as Bluetooth, Wi-Fi (IEEE 802.11), Infrared
(IrDA), ZigBee (IEEE 802.15.4) and so on. But for the current
mainstream wireless mouse, there are three different categories:
27Mhz, 2.4G and Bluetooth.
This experiment actually performs measurements on actual
communication products (a wireless mouse in this case). After
performing this experiment you should have a good
understanding of the spectrum analyzer and the measurement
methods used. This experiment will help to consolidate your RF
knowledge and to strengthen your practical spectrum analyzer
skills.
Item Equipment Quantity Note
1 Spectrum analyzer 1 GSP-730
2 2.4G wireless mouse 1
3 Antenna 1
4 Adapter 1 N-SMA
Experiment
goals
88
1. Use the spectrum analyzer to measure some parameters from
common every-day electronic communication products.
2. Learn how a wireless mouse works.
Page 91

RF Communication and Signals Experiments
Experiment
principles
In this experiment we will use a 2.4G wireless mouse. It
uses the so-called 2.4G frequency band. The advantage of the
2.4G band over the 27MHz band is that the 27MHz band has a
shorter transmission distance and is prone to interference from
other devices. We call it 2.4G because it operates in the 2.4GHz
frequency band. In most countries, this frequency band is
license-free.
The principle of the wireless mouse is actually very simple.
It mainly uses digital radio technology to provide adequate
bandwidth for communications equipment over a short
distance. It is ideal for peripheral equipment such as mice and
keyboards. The working principles behind a wireless mouse and
that of a traditional mouse are the same. The only difference is
that the X & Y position, as well each button press is transmitted
wirelessly via a transmitter. The wireless receiver then passes
this information to the host after decoding the signal. The driver
then tells the operating system to convert the signal to mouse
actions.
Experiment
contents
Experiment
steps
Measure the frequency and power of the signal that is
transmitted from a wireless mouse.
1. Connect the antenna to the input port of the spectrum
analyzer.
2. Set up the GSP-730 as follows:
• Center frequency: 2.4GHz
• Span: 200MHz
• Reference level: -20dBm
• RBW: Auto
Step1
Step2
Step3
Step4
BW
F1
F1
F1
F1
2 0
4
2
3. Turn the wireless mouse on.
Step5
Step6
Peak
Search
89
Page 92

GRF-1300A User Manual and Teaching Materials
4. A connection diagram is shown below.
5. A blue tooth device or wireless network card can also be used
in the same way to create a signal to measure.
Experiment
results
Question
Caution
90
Transmitting frequency: _____
Transmitted signal power: _____
What are the advantages for a wireless mouse to operate in the
2.4 G bandwidth?
Use the Peak Hold function on the spectrum analyzer to capture
the signal emitted from the wireless mouse. It is not easy to
dynamically measure the signal.
Page 93

RF Communication and Signals Experiments
Experiment 9: Production Line Applications
Relevant
information
Experiment
equipment
Experiment
goals
A spectrum analyzer can be used in Pass/Fail testing of RF
communication products. Testing can be done either manually
with a stand-alone instrument or via remote control using a PC.
When using remote control, the spectrum analyzer parameter
settings and test results can be returned remotely. This saves a lot
of time and can improve the efficiency of a production line. In
this experiment, we will imagine that the GRF-1300A is in a
production line environment. We will use the limit line function
to perform a simple test to see if a product has passed the test and
return the test results using remote commands.
Item Equipment Quantity Note
1 Spectrum analyzer 1 GSP-730
2 RF & Communication Trainer
3 RF wire 1 800mm/100mm
4 Adapter 1 N-SMA
1. Learn how to edit the pass/fail limit lines and understand how
to perform pass/fail testing.
2. Use remote commands to read back test data from the
spectrum analyzer.
1 GRF-1300A
Experiment
principles
1. Limt line editing and Pass/Fail testing.
The upper and lower limit lines apply throughout the entire
frequency span. The limit lines can be used to detect if the
signal amplitude is above or below a set amplitude level. The
judgment of the pass/fail test is shown on the bottom of the
screen.
To create a limit line, edit the ten points in the lower Limit Line
Editing Table, shown below.
91
Page 94

GRF-1300A User Manual and Teaching Materials
Set the amplitude and frequency of each point. Use the arrow
keys to move the cursor to each of the different points. Use the
same method is used to edit both the upper and lower limit
lines. Pass/Fail testing can be started after setting the limit
lines.
2. Use the remote commands to read back test results.
Manually setting the spectrum analyzer for testing can be
time-consuming. Here we will use remote commands to set
various parameters on the spectrum analyzer remotely. We
will briefly explain some of these commands below.
Frequency
Commands
meas:freq:cen? Return the center frequency in kHz.
meas:freq:cen Sets the center frequency, for
example:
meas:freq:cen_100_mhz
meas:freq:st? Returns the start frequency in kHz.
meas:freq:st Sets the start frequency, for example:
meas:freq:st_100_mhz
meas:freq:stp? Returns the stop frequency in kHz.
meas:freq:stp Sets the stop frequency, for example:
meas:freq:stp_100_mhz
Span
Commands
meas:span Sets the frequency span settings, for
meas:span? Returns the frequency span settings.
example:
meas:span:10_mhz
meas:span:full Sets the span to Full Span mode.
Amplitude
Commands
meas:refl:unit? Returns the reference level unit.
meas:refl:unit Sets the reference level unit.
Parameters: 1(dBm), 2(dBmV),
3(dBuV)
meas:refl? Returns the reference level in dBm.
meas:refl Sets the reference level in dBm. For
example: meas:refl:-30
92
Page 95

RF Communication and Signals Experiments
Experiment
contents
Experiment
steps
Limit line
Commands
meas:lmtline:on Turns the limit lines on.
Parameters:
0(low limit line), 1(high limit line)
meas:lmtline:off Turns the limit lines off.
Parameters:
0(low limit line), 1(high limit line)
meas:lmtline:pas
Turns pass/fail testing on.
sfail_on
1. Set the upper and lower limit lines to perform a pass/fail test
on the signal from the GRF-1300A.
2. Use remote commands to remotely setup the spectrum
analyzer.
1. Turn on the GRF-1300A and GSP-730.
2. Set the GRF-1300A to the power-on default state.
3. Connect the RF wire from the output port on the baseband
module to the FM in port on the RF Synthesizer/FM module.
4. Set up the GSP-730 as follows:
• Center frequency: 880MHz
• Span: 50MHz
• Reference level: 0dBm
• RBW: Auto
BW
F1
F1
F1
F1
Step1
Step2
Step3
Step4
5. Limit line Pass/Fail test.
8 0
0
93
Page 96

GRF-1300A User Manual and Teaching Materials
Experiment
results
Step5
Step6
F1 F2
F3
Below the display, you can set the magnitude and frequency of
each point. Move the cursor to select a point and edit it with the
number pad and unit keys. Press F6 to return to the previous
menu.
Step7
F1
6. According to the procedures above, students can set the limit
lines.
7. Adjust the amplitude knob on the GRF-1300A. Observe the
Pass/Fail test results and record the results to table 9-1.
8. The same functionality can be achieved by sending remote
commands from a PC using HyperTerminal.
Table 9-1. Results for adjusting the position of the amplitude knob.
5MHz frequency
deviation test
results.
94
Page 97

RF Communication and Signals Experiments
10MHz frequency
deviation test
results.
95
Page 98

GRF-1300A User Manual and Teaching Materials
f
L
f
Experiment 10: Mixer
Relevant
information
Experiment
Equipment
In experiment 5 and 6 we introduced how the signal is modulated
onto a carrier. However, what are the other processes that need to be
performed on the modulated signal before it can be transmitted?
One thing called a frequency mixer is very import in this process.
The main function of a frequency mixer is to perform frequency
conversion; The mixer can convert the RF signal into an
intermediate frequency signal or it can do the opposite and convert
the intermediate frequency signal into an RF frequency signal in
order to transmit or process the carried message, respectively. The
goal of this experiment is to observe how a mixer will shift the
frequency spectrum of a signal from a spectrum point of view and to
understand the principles of the mixer.
Item Equipment Quantity Note
1 Spectrum Analyzer 1 GSP-730
RF & Communication
2
Trainer
1 GRF-1300A
3 USB Signal Generator 1 USG-LF44
4 RF cable 2 100mm
5 RF cable 1 200mm
6 RF cable 1 800mm
7 Adapter 1 N-SMA
Experiment
goals
Experiment
principals
1. To understand the working principles of the mixer.
2. To observe frequency shift by analyzing the frequency spectrum
with a spectrum analyzer.
3. To measure mixer parameters such as conversion gain and port
isolation.
1. Introduction to the concept of mixing
The mixer is used for frequency conversion. Mixing is also known
as conversion. Mixing is used to convert a modulated signal with
a carrier frequency
frequency
for processing at the next circuit. This process is
c
to a modulated signal with the carrier the
called frequency shifting (shifting of the frequency spectrum).
Frequency conversion by the mixer needs to maintain the
modulation from the modulated carrier unchanged~ so it still
carries information and has no distortion.
The basic function of a mixer is to maintain the modulation of the
96
Page 99

RF Communication and Signals Experiments
f
L
f
f
f
L
f
f
L
f
f
f
=
f
f
fLf
x
xy
L
f
f
ff±
s
ω
ω
=
ω
+
ω
−
Figure 10-1 Th
mixer circuit
modulated signal constant, only to increase (up-conversion) o
decrease (down conversion) the carrier frequency. From the
spectrum point of view, the essence of mixing is to linearly mov
the spectrum of the modulated signal along the frequency ax
Therefore, a mixer circuit must be composed of a non-linear
device with a mult
iplicative function as well as band-pass filters,
as shown in 10-1.
e
c
I
()sut
frequency
oscillation frequency
c
and the local oscillator signal
, as shown in figure 10-2. According to t
multiplication of trigonometric functions, the multi licatio
the inputs r ults addition ees e r
ILC
.I.e.,
ff=+
in th and diff ence of
||ILC
and
ff−
, where
()Lut
with the
p n of
I
is called the
intermediate frequency. The mixing frequency signal with the
carrier frequency
()
iut
.
I
is called the intermediate frequency signal
c
and
r
e
is.
er The mixer multiplies the modulated signal with carri
he
Figure 10-2
Mixer sign
diagram
al
||
()
s
ut
()
L
ut
c
LC
y
||
LC
f−
C
f+
local oscillation sige nal is
t sig is Say the modulated inpu nal)
()Lut
()sut () cos(
()ut
cos( )LLLV t
scut V t
=
,th
,then the
product becomes
SL
( ) cos( ) cos( ) [cos( ) cos( ) ]
==++−
ISLc L cL Lc
ut VV t t t t
ωω ωω ωω
VV
2
Passing through a band-pass filter and removing one of th
Lc
cL
ω
frequency components (
frequency conversion. the new carrier frequency is
Generally
or
ω
) completes the
called the IF signal.
e
The spectrum of
the calculated result above is shown in the
97
Page 100

GRF-1300A User Manual and Teaching Materials
L
ω
ω
+
L
ω
=
ω
diagram below.
Down
conversion
c
ω
−
We can see from the spectrum shift in the chart above that the
mixing frequency signal is the addition and subtraction of the
input signal and the LO signal. As the frequency mixing dev
generally a non-linear device, it is obvious that a non-linea
combination of frequency distortion and interference will
inevitably occur in the mixing process. The harmonic componen
of the LO signal and the input signal will also be input into t
frequency mixer as well, therefore, the output will hav
positive and negative components for each harmonic.
Up
conversion
cL
ω
e the
ice is
r
ts
he
In a wireless transceiver circuit, the front-end small-signal low
noise amplifier (LNA) and the IF amplifier (IFA) has far less nonlinear frequency distortion than that produced by the freq
mixer. Therefore the combined non-linear distortion and
frequency interference in the wireless receiver circuit is m
generated by the frequency mixer circuit. The non-linear
characteristics of the frequency mixer for engineering is
commonly expressed by the following expansion formula:
01 2 3
++ + +
In the formula u is the total signal that is added to the input end
of the frequency mixer. Say the composition of u is
=+ +
23
...ia auau au
ωω
uency
ainly
3112 23cos cos cosuu tu tu t
98
 Loading...