

Page 1

Digital Storage Oscilloscope
GDS-1000-U, GDS-1000A-U, GDS-3000 Series
Freewave Installation & User Guide
ISO-9001 CERTIFIED MANUFACTURER
Page 2

This manual contains proprietary information, which is protected by
copyright. All rights are reserved. No part of this manual may be
photocopied, reproduced or translated to another language without
prior written consent of Good Will company.
The information in this manual was correct at the time of printing.
However, Good Will continues to improve products and reserves the
rights to change specification, equipment, and maintenance
procedures at any time without notice.
Freewave is free for single non-commercial use. Commercial use of
the software is strictly prohibited without authorization from Good
Will company.
Use the software at your own risk. Good Will accepts no liability for
any damages, either as a direct or indirect consequence of the use of
this product.
Good Will Instrument Co., Ltd.
No. 7-1, Jhongsing Rd., Tucheng Dist., New Taipei City 236, Taiwan
Page 3

TABLE OF CONTENTS
Table of Contents
Getting started ................................................. 5
Overview ............................................................................. 6
Types of Operations ............................................................ 7
Monitoring the Oscilloscope Display .................................... 7
Standard Memory Length Data Capture ................................ 8
Remote Controlling the Oscilloscope .................................. 11
Long Memory Length Data Capture .................................... 11
Installing Freewave ........................................ 13
Required Equipment .......................................................... 13
Install Microsoft .Net (full version 4.0 or later) and Visual
C++ 2010 Redistributable Package (x64) ............................ 14
Installation Steps .............................................................. 15
Installing the Software Package ........................................... 15
Connecting the Oscilloscope and Verifying Connectivity ... 19
Manually Installing the USB Driver ..................................... 21
Repairing/Uninstalling Freewave ....................................... 25
Monitoring the Oscilloscope .......................... 26
Viewing the Oscilloscope Display Contents ....................... 27
Viewing the Oscilloscope Virtual Panel ............................. 29
Taking a Snapshot of Display Contents .............................. 31
Taking a Video Clip of the Display Contents (GDS-1000-U
and GDS-1000A-U only) .................................................... 32
Printing Out Display Contents ........................................... 33
Short Memory Data Capture ........................... 34
Viewing Oscilloscope Waveforms ...................................... 34
Saving Waveform Data ...................................................... 39
Recalling Waveform Data ................................................... 40
Using the Commands .................................... 41
3
Page 4

Freewave Manual
Preparing a Command List ................................................ 41
Configuring and Running the Commands .......................... 44
Saving a Command List and its Result ............................... 46
Long Memory Data Capture (GDS-1000A-U Only)
...................................................................... 47
Viewing Long Memory Oscilloscope Waveforms ................ 47
Saving Waveform Data ....................................................... 50
Recalling Waveform Data ................................................... 51
4
Page 5
Getting started
GETTING STARTED
Freewave supports the GDS-1000-U, GDS-1000A-U and GDS-3000
series oscilloscopes and is freely available to all customers.
Freewave can transfer full screen images, video, or waveform data
from an oscilloscope to a PC via a USB connection. The software
display is updated in real-time from the host oscilloscope. Images
and movie clips can also be saved onto the PC. Images can be
printed directly to a printer.
For data analysis, Freewave is able to capture raw waveform data
from the oscilloscope and display it on the PC screen. Waveforms
can be saved in CSV format to be reused in other applications.
Freewave can also record long memory or standard memory length
waveforms with the GDS-1000A-U series.
5
Page 6

Freewave Manual
Applicable
oscilloscope
GDS-1000-U
GDS-1000A-U
GDS-3000
Applicable OS
Windows XP (32 bit)
Windows Vista (32 bit)
Windows 7 (32 bit, 64 bit)
Main features
Updates the oscilloscope display in real-time,
allowing remote observation.
Virtual Panel operation
Records oscilloscope images.
Records video clips to a PC (GDS-1000-U and
GDS-1000A-U only)
Captures digital waveform data in CSV format.
CSV is viewable and editable in most
spreadsheet applications. (standard and long
record lengths)
Automatically loads remote commands,
supports command lists, running commands
and saving results to a PC.
Supports fast USB 2.0 connections and captures
the oscilloscope display in almost real-time.
Automatically recognizes the oscilloscope
hardware and configures the channel number
and remote control commands accordingly.
Prints out snapshots of the oscilloscope display.
Inverting the background color is also available.
Overview
6
Page 7

Getting started
Types of Operations
Four types of operations are available in Freewave: Standard
memory length display monitoring, data capturing, and remote
controlling, long memory length data capturing.
Monitoring the Oscilloscope Display
The oscilloscope display contents appear in the Freewave screen in
real-time. You may store a snapshot image or video clip into the PC,
and invert the background color for better viewing. Snapshot images
can also be printed out. The oscilloscope monitor can be switched
between the Freewave screen and a simulated oscilloscope display.
When using the simulated display, all oscilloscope functions and
controls are available on a virtual oscilloscope panel.
7
Page 8

Freewave Manual
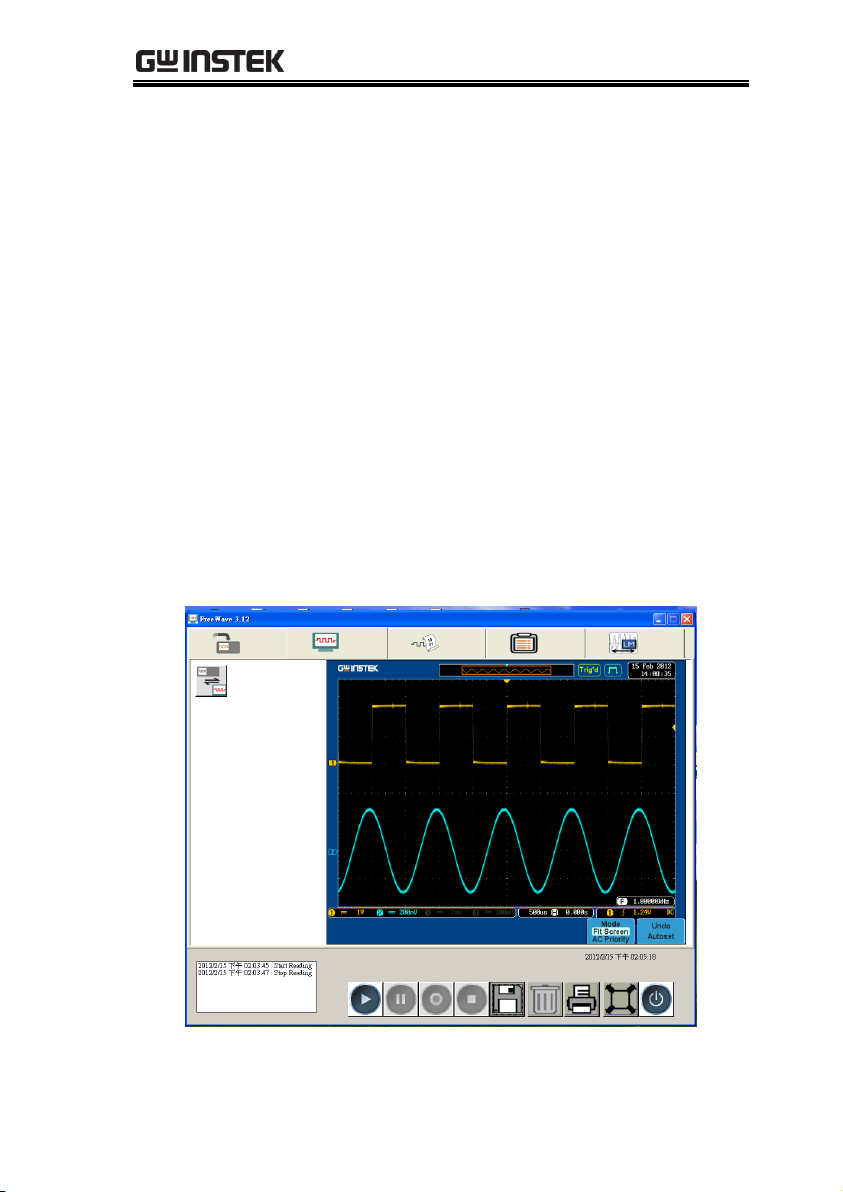
Standard Memory Length Data Capture
Standard memory length data can be directly transferred to the
Freewave screen. Up to 10 waveforms can be captured at any one
time for analysis. All waveforms can be zoomed and panned as well
as positioned vertically.
8
Page 9
Getting started
Waveform data as well as the oscilloscope identification can be
stored as a Comma Separated Values (*.csv) file which can be
opened and edited by a spreadsheet application such as Microsoft
Excel.
9
Page 10
Freewave Manual
10
Page 11

Getting started
Remote Controlling the Oscilloscope
Freewave automatically categorizes and lists the remote control
commands. To run the commands, users only have to pick and place
them on the list; no manual typing is required. The result can be
stored in CSV format.
Long Memory Length Data Capture
Freewave can take advantage of the long memory length of the
GDS-1000A-U series oscilloscopes. Waveform data can be arbitrarily
zoomed and panned with ease. Cursors can be placed on the screen
to accurately view measurements. Like the standard memory length
data capture, long memory data can be saved as a *.csv file to be
recalled at any time.
11
Page 12

Freewave Manual
12
Page 13

Installing Freewave
Item
Requirements
Oscilloscope
GDS-1000-U
GDS-1000A-U
GDS-3000
PC
For 32 bit OS
Windows XP, Windows Vista, Windows 7
Microsoft .Net Framework version 2.0 or later
For 64 bit OS
Windows 7
Microsoft. Net Framework full version 4.0 or
later
Microsoft Visual C++ 2010 Redistributable
Package
Freewave package
Version 3.12 or above.
USB driver
Version 1.03 or above
USB cable
USB 2.0, type A (PC) – type B (oscilloscope)
INSTALLING FREEWAVE
The installation process includes preparing the
necessary equipment, installing the software
package to the PC, and confirming the
connectivity.
Required Equipment
The following list shows the necessary hardware and software for
installing and running Freewave.
13
Page 14

Freewave Manual
1. Click on the Control panel>Add or remove program option. The list
of installed programs will appear. Check if Microsoft .NET is
installed.
2. If Microsoft .NET (full version 4.0 or later) is not appropriately
installed, download and install the latest versions from the
Microsoft website.
http://www.microsoft.com/download/en/details.aspx?displayl
ang=en&id=17718
3. If Microsoft Visual C++ 2010 Redistributable Package (x64) is not
appropriately installed, download it from the Microsoft website.
http://www.microsoft.com/download/en/details.aspx?id=1463
2
Install Required Software
Microsoft .Net (version 2.0 or later) is required to use some of the
Freewave functions for PCs with a 32 bit OS
Microsoft .Net (full version 4.0 or later) and Microsoft Visual C++
2010 Redistributable Package (x64) are required to use some of the
Freewave functions for PCs with a 64 bit OS
Microsoft .Net and Microsoft Visual C++ 2010 Redistributable
Package (x64) can both be downloaded for free from the
Microsoft website.
14
Page 15
Installing Freewave
1. Unzip the software package into an installation directory.
2. Activate setup.exe. if a dialog box appears for the Microsoft .Net
(full version 4.0 or later) framework.
Installation Steps
Follow these steps to properly install Freewave:
Download and install the software package. Two versions of the
software package (32 bit and 64 bit) are provided. Please select
the appropriate version to download.
Connect the oscilloscope to the PC.
Verify the connection and operation.
Installing the Software Package
15
Page 16
Freewave Manual
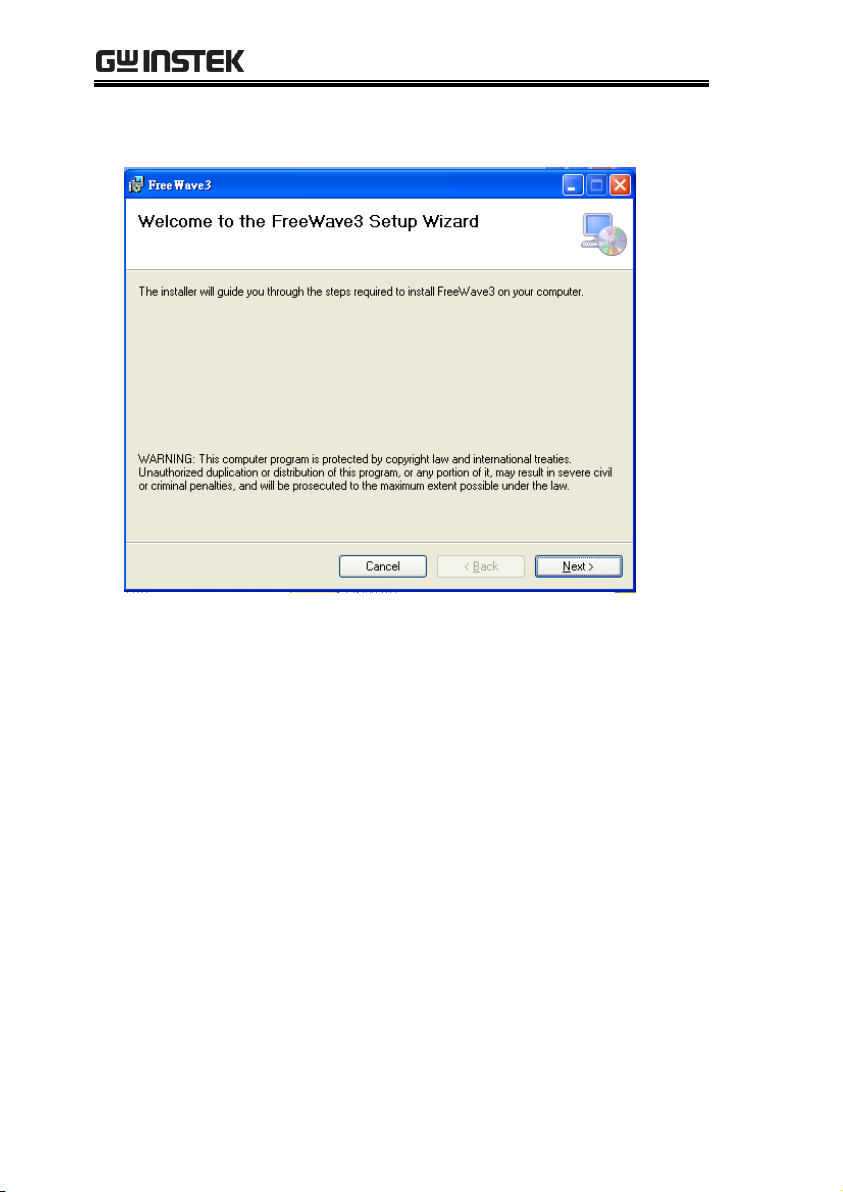
3. When a dialog box appears for installing FreeWave, click the
Next button to proceed.
4. Select the directory in which Freewave is to be installed. Click
Next.
To change the directory, click on the Browse button and select
another directory from the directory map.
To calculate the occupied space, click on the Disk Cost button. A
separate dialog box will appear, showing the disk space required
for Freewave and the entire space in the drive.
To control the software accessibility, check “Everyone” or “Just
me”.
16
Page 17

Installing Freewave
5. Click on the Next button again to start the installation.
17
Page 18

Freewave Manual
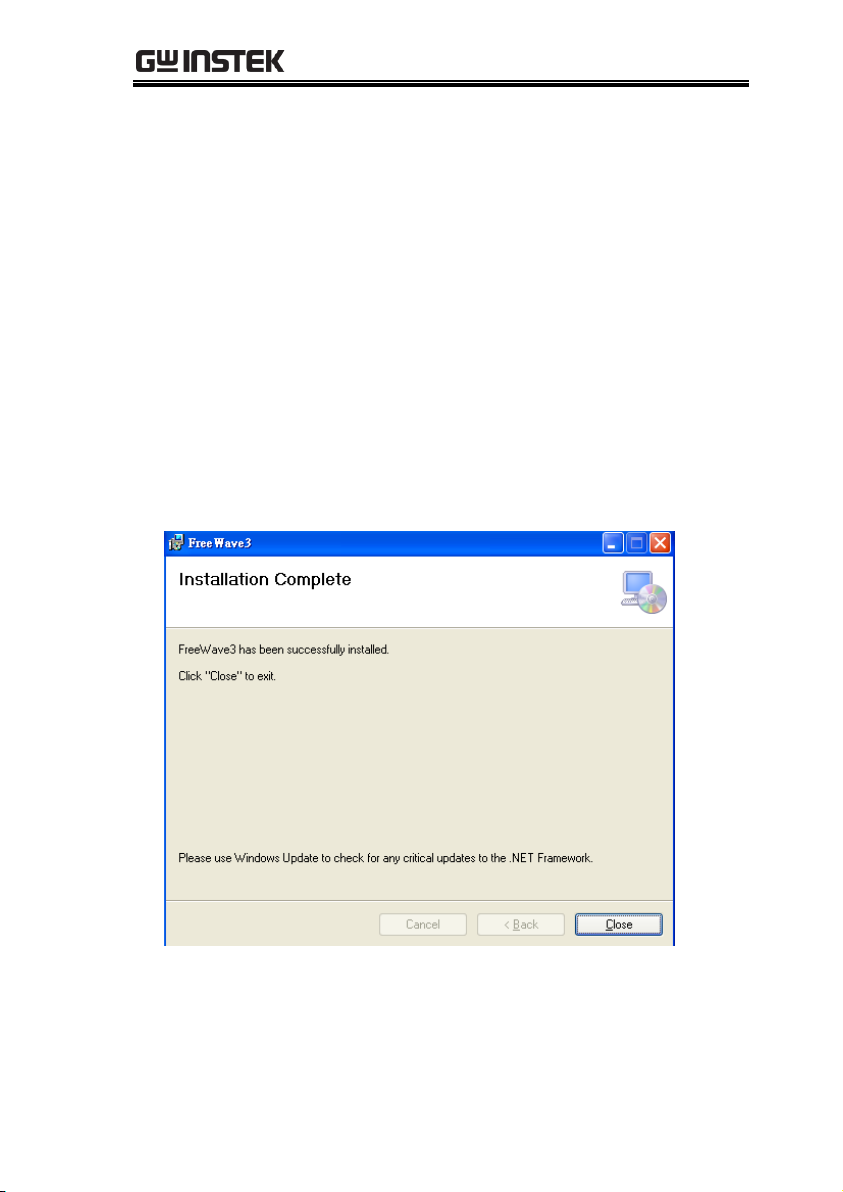
6. When the installation is completed, click on the Close button to
complete the process.
18
Page 19

Installing Freewave
1. Power the oscilloscope up.
2. Select the USB interface by pressing the Utility key, followed by
F5 (More). Then, press F4 (USB Port) repeatedly until Computer
is selected.(GDS-1000A-U and GDS-1000-U only)
Utility
More
F5
USB Port
Computer
F4
3. Connect the USB cable between the oscilloscope and PC.
GDS-1000-U, GDS-1000A-U USB
slave port
GDS-3000 series USB slave port
Connecting the Oscilloscope and Verifying Connectivity
19
Page 20

Freewave Manual
4. Activate Freewave. If the oscilloscope ID appears on the screen,
Freewave is ready for operation.
5. If the oscilloscope ID does not appear in the initial
display, click on the Scan (binoculars) icon to
manually search for the oscilloscope. If this still
fails, follow the instructions in the next section,
“Manually Installing the USB Driver”.
20
Page 21

Installing Freewave
1. Open the Control Panel in the PC and activate the System icon.
2. Select Device manager.
In Windows XP, select the
Hardware tab and activate the
Device Manager.
In Vista, select Device Manager
from the side menu.
Manually Installing the USB Driver
21
Page 22

Freewave Manual
3. Locate the oscilloscope either in the “Port” node (correct) or in
the “Other devices” corner (incorrect).
Port (correct)
Other devices (incorrect)
If the oscilloscope is correctly recognized (Port node), repair the
Freewave installation (page25).
If the oscilloscope is incorrectly recognized (Other devices node),
follow the next step.
Note
The COM port for the DSO should be set between
COM1 to COM20. If the COM port is greater than 20,
it can’t be detected by DSO.
4. Right-click on the oscilloscope name and select “Update Driver”
from the context menu. The driver installation dialog box should
appear.
5. Install the DSO driver from the Freewave install directory.
22
Page 23

Installing Freewave
XP
Vista
6. In the dialog box, select “No,
not this time” (not connecting
to Windows Update) and click
on the Next button.
In the “Update Driver
software – GDSXXXX”, select
the “Browse” dialog.
7. Next, select “Install from a list
or specific location” and click
on the Next button.
Click Browse and select the
Freewave installation
directory. Press Next.
23
Page 24

Freewave Manual
8. Select the directory where Freewave is installed and click on the
Next button. The USB driver “dso_vpo.inf” will be installed.
Click Next.
9. Check the Device Manager again. The oscilloscope should now
be recognized in the “Ports” node as DSO.
24
Page 25

Installing Freewave
Repair
Repairs corrupted functions by reinstalling
Freewave. Select this function if Freewave starts
malfunctioning.
Remove
Uninstalls Freewave from the PC.
1. Acitvate the setup.exe. A dialog box will appear.
2. Select Repair or Remove and click on the Finish button. Repair or
removal starts and finishes automatically.
3. When it is completed, click on the Close button to complete the
procedure.
Repairing/Uninstalling Freewave
After installing Freewave, repairing or uninstalling Freewave is
possible using the same setup.exe file used to install the program.
25
Page 26

Freewave Manual
MONITORING THE
OSCILLOSCOPE
The oscilloscope display contents appear in the Freewave screen, allowing observing and recording the waveforms in analog form; for capturing digital waveform points, refer to page26 “Monitoring the Oscilloscope”. Here are the available operations.
Viewing the oscilloscope’s display contents
Taking a snapshot image of the display contents
Recording a movie clip of the display contents
Printing out the display contents
The Virtual panel is able to remotely control a connected DSO and
display the DSO contents back onto the Virtual Panel display. All
functions and operations that can normally be performed on the
DSO panel can be performed on the Virtual Panel.
26
Page 27

Monitoring the Oscilloscope
1. Connect the oscilloscope to the PC and activate Freewave. For
details, see page19.
2. Select the Image tab (second from the left).
3. Click on the Play button in the control panel.
The oscilloscope’s display contents will appear
on-screen.
Note
The GDS-1000-U/1000A-U will continually send a
screen shot to the PC, while the GDS-3000 will only
send an initial screen shot once when the PLAY button
is clicked.
Pausing the
display
To stop updating the display, click
on the Pause button in the control
panel.
Operation log
Control panel
Date
Oscilloscope
display
View button
Viewing the Oscilloscope Display Contents
27
Page 28

Freewave Manual
Note
The pause button only applies to the GDS-1000U/1000A-U
Viewing in fullscreen mode
To view the display in full-screen
mode, click on the Full-screen
button in the control panel.
Note: to go back to the original
screen size, press the Space key, or
double click anywhere on the
screen.
Closing Freewave
To close Freewave, do one of the
following:
Click on the Close button in the
control panel
Press the Alt + F4 keys
Click on the Close icon at the top
right corner of the screen.
28
Page 29

Monitoring the Oscilloscope
1. Make sure that the oscilloscope’s display contents appear in the
Freewave screen. See “Viewing the Oscilloscope Display
Contents”, page 27.
2. Click the View button to toggle the display.
Operation log
Control panel
Date
Oscilloscope
display
View button
Operating Panel
keys
Left clicking on any button in the
virtual panel will perform the same
operation on the DSO remotely.
Operating
Variable knobs
To use any variable knob, place the
mouse cursor over a variable knob
until the cursor changes to a scroll
arrow.
Viewing the Oscilloscope Virtual Panel
29
Page 30

Freewave Manual
Use the mouse scroll wheel to scroll
the virtual variable knob.
Note
To operate a variable knob without
a scroll wheel, click on the left or
right of the variable knob to scroll
anticlockwise or clockwise,
respectively.
Return to the
Freewave screen
To return to the Freewave screen
view, press the View button again.
30
Page 31

Monitoring the Oscilloscope
1. Make sure that the oscilloscope’s display contents appear in the
Freewave screen (both Play and Pause mode works fine).
2. Click on the Save button. A file save dialog box will
appear.
3. Select the file type and location and save the snapshot image.
File type
GIF (*.gif)
JPEG (*.jpg)
Bitmap (*.bmp)
TIFF (*.tif)
PNG (*.png)
Taking a Snapshot of Display Contents
31
Page 32

Freewave Manual
1. Make sure the oscilloscope’s display contents appear in the
Freewave screen, updated in real-time (Play mode).
2. Select the recording area by selecting either “Freewave Screen” or
“Oscilloscope Display” in the Video Recording Area panel.
3. Click on the Record button. Freewave
automatically starts recording the display contents.
4. To stop the recording, click on the Stop button
which will open a file save dialog box. Enter the file
name, select the directory, and save the video in the
*.wmv format.
Taking a Video Clip of the Display Contents(GDS-1000-U and GDS-1000A-U only)
32
Page 33

Monitoring the Oscilloscope
1. Make sure the oscilloscope’s display contents appear in the
Freewave screen (both Play and Pause mode works fine).
2. Click on the Print button. A standard Windows
printout dialog box will appear.
3. Configure the printer and printout the oscilloscope
display contents.
Printing Out Display Contents
33
Page 34

Freewave Manual
1. Activate Freewave and connect the oscilloscope to the PC. For
details, see page19.
2. Select the Data tab (second from the right).
3. Select the channel(s) from the Source panel on
the left side of the Freewave screen.
SHORT MEMORY DATA
CAPTURE
The Data Capture function in Freewave directly transfers standard
memory length waveform data (4k points) from the oscilloscope to
the PC. Captured digital waveform data is stored in CSV format.
CSV is compatible with most spreadsheet applications. The Data
Capture function is used to:
View oscilloscope waveforms
Save waveform data
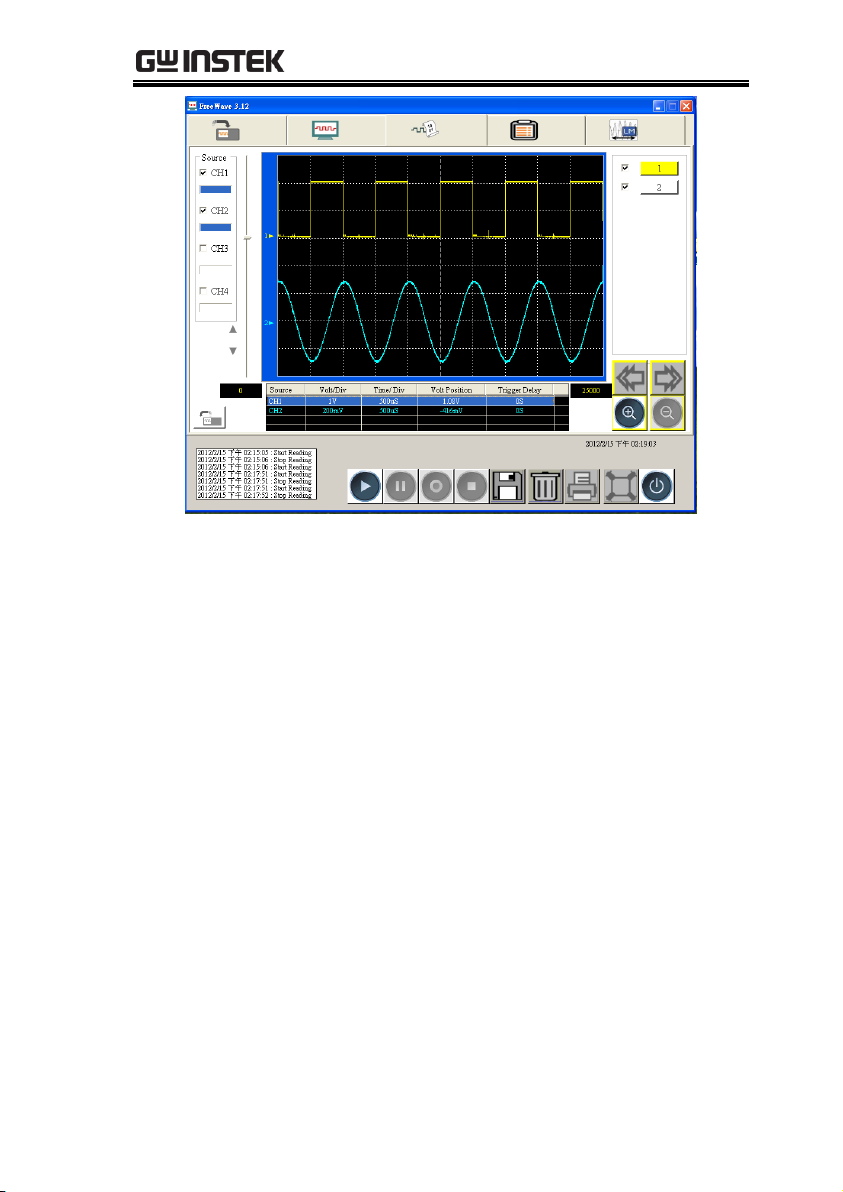
Viewing Oscilloscope Waveforms
34
Page 35

Short Memory Data Capture
4. Click on the Play button in the control panel.
Freewave captures the waveform data for a
single period and shows them in the screen.
Operation log Control panel
Date
Waveforms
Vertical
position bar
Zoom icon
Horizontal
position icon
Channel
Progress
bar
Waveform
identification
Waveform
data points
Source
channels
Adding a new
waveform
Select a new channel (if necessary)
and click on the Play button again.
Each time the Play button is
pressed a new waveform is
captured and placed in the
Waveform Identification list.
Note:
A maximum of only 10 waveforms can be added to the
waveform identification list.
35
Page 36

Freewave Manual
One waveform
Two waveforms
Hiding a
waveform from
the display
To hide a waveform, uncheck the
check box next to the waveform in
the Waveform Identification list.
The waveform data itself will not
be deleted.
1st channel on
1st channel off
Zooming in or
out
First, activate a waveform by
clicking on a waveform button
number.
When a channel is activated, the
waveform button will become
colored.
To zoom in, click on the Zoom In
(+) icon. To zoom out, click on the
Zoom Out (–) icon.
36
Page 37

Short Memory Data Capture
The on-screen waveform data points will be shown
under the oscilloscope display. Likewise the
Time/Division rate will also be updated.
Waveform Data points
Time/Div
Default (4,000 memory points)
Zoomed (1,250 memory points)
Vertically moving
a waveform
Click on the waveform ID and then
grab the short bar on the left side of
the display. Move the bar up or
down to change the waveform
position vertically.
(No.2 selected)
No.2 waveform moving down
No.2 waveform moving up
Horizontally
moving a
waveform
(This operation is available only
when the waveform is zoomed in.)
Click on the Left or Right icon to
move the waveform horizontally.
37
Page 38

Freewave Manual
The waveform position will be shown under the
vertical position bar.
Vertical postition
Deleting the
waveform data
To delete a waveform data, click on
the waveform ID and then click on
the Delete icon.
(No.2 selected)
38
Page 39

Short Memory Data Capture
1. Make sure that the waveform appears in the Freewave screen.
2. Click on the Save button. A file save dialog box will
appear.
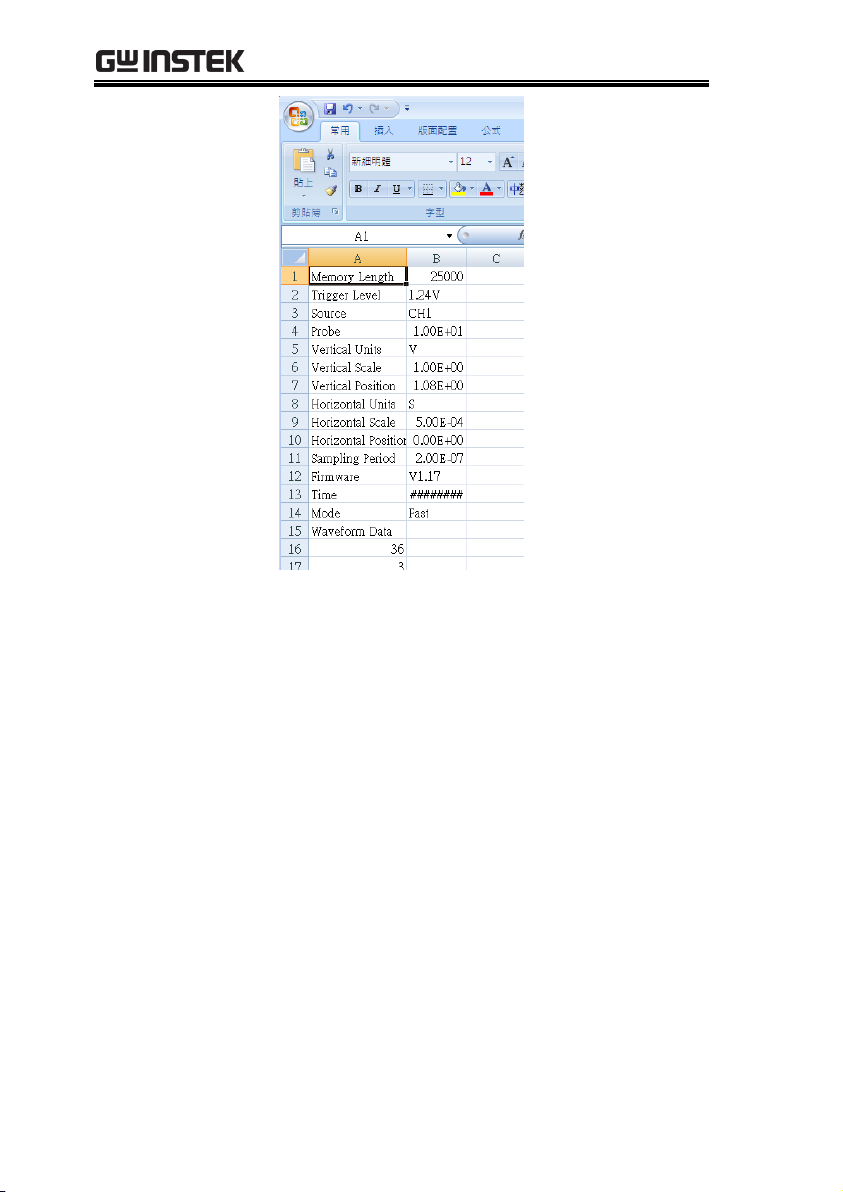
3. Select the file type and location and save the data. CSV data files
store the waveform data points as well as the oscilloscope
identification. Image data files store a snapshot of the waveform.
Data file format
CSV (*.csv)
Data file contents
Manufacturer
Serial number
Saved Date
Model name
Firmware
Waveform Data
Image file format
GIF (*.gif)
JPEG (*.jpg)
Bitmap (*.bmp)
TIFF (*.tif)
PNG (*.png)
When saving CSV data files, you will get the option to save as
“Fast” or “Detail” waveforms. Detail waveforms save the
amplitude and the time of each point relative to the trigger point.
Fast waveforms only store the amplitude data.
4. Choose Fast or Detailed and click OK.
Saving Waveform Data
39
Page 40

Freewave Manual
1. Click on the Recall button.
2. Select a file to recall from the file panel. Make sure that the file is
a short memory length file.
Data file format
CSV (*.csv)
Data file contents
Manufacturer
Serial number
Saved Date
Model name
Firmware
Waveform Data
Both Fast and Detail file formats can be recalled.
Recalling Waveform Data
40
Page 41

Using the Commands
1. Activate Freewave and connect the oscilloscope to the PC. For
details, see page19.
2. Select the leftmost Command tab.
3. Click on the “DSO Command” node on the left
side. A detailed command list appears.
Command list
The Command description area contains three
types of information:
Command: shows the command name in short
mode
Description: describes what the command does
Data: shows the command’s data format
For more details, see the GDS-1000-U, GDS-1000AU and GDS-3000 Programming Manual.
USING THE COMMANDS
The command function in Freewave allows the oscilloscope to be
controlled remotely without using a separate terminal application.
Commands are categorized and labeled along with their
descriptions. Data format and command order can be semiautomatically configured. Command results are shown in the screen
and can be saved to a CSV file. Here are the available operations:
Preparing a command list
Configuring and running commands
Saving a command list and its result
Preparing a Command List
41
Page 42

Freewave Manual
Operation log Control panel
Date
Command
description
Command
move icon
Command
select icon
Selected
commands
Command
list
4. Click on the command category
to show each command
(example: voltage measurement
commands).
5. Click on a command and then click on the right
arrow to copy the command into the command
list (example: MEAS:SOUR command).
→ →
6. Repeat this until all commands are copied into
the command list.
Deleting a
command
Click on a command in the command list and then
click on the left arrow. The command will be
deleted from the list.
→ →
42
Page 43

Using the Commands
Changing the
command order
Click on a command in the command list and then
click on the up or down arrow. The command
changes its position in the list.
Moving a command (MEAS:SOUR) up
→ →
Moving a command (MEAS:SOUR) down
→ →
43
Page 44

Freewave Manual
1. Prepare the command list according to the previous section.
2. Configure the parameters of the commands.
To change from “Set” to “Query”, simply double-click on the
“Set/Query” row.
→
To change from “Query” to “Set”, double-click on the
“Set/Query” row and then enter the setting value in the dialog
box. The parameter mode changes to “Set” with a new value.
→ →
To change the setting value, first change the mode from “Set” to
“Query” by double-clicking on the row, then reset the value.
→ →
→
3. Click on the Play button. The commands run
automatically in sequence and the returned values
will be displayed in the “Value” row.
Configuring and Running the Commands
44
Page 45

Using the Commands
→
Note
For more details regarding each command, see
the programming manuals.
Commands relating to screen or waveform
capture may not be available in Freewave.
45
Page 46

Freewave Manual
1. Prepare a command list and/or run the commands.
2. To save the command list and its result, click on
the Save button. The save file dialog box opens.
3. Select the file directory, enter the file name and save the list in
CSV (*.csv) format.
Opening the file
A command list in CSV format can be opened
using a spreadsheet application such as Microsoft
Excel.
File contents
Command name
Command result
Mode (set or query)
Command description
Saving a Command List and its Result
46
Page 47

Long Memory Data Capture (GDS-1000A-U Only)
1. Activate Freewave and connect the oscilloscope to the PC. For
details, see page19.
2. Select the Long Memory Data tab (last tab).
3. Choose the input channel(s).
4. Press the play icon at the bottom of the screen.
5. Freewave will start capturing data as soon as a waveform is
triggered. A dialog box will ask to input a signal to CH1/CH2.
LONG MEMORY DATA
CAPTURE (GDS-1000A-U ONLY)
The Long Memory Data Capture function in Freewave directly
transfers long memory digital waveform data (up to 2M) from the
oscilloscope to the PC. Captured digital waveform data is stored in
CSV format. CSV is compatible with most spreadsheet applications.
The Data Capture function is used to:
View oscilloscope waveforms
Save waveform data
Viewing Long Memory Oscilloscope Waveforms
47
Page 48

Freewave Manual
6. Wait while the data is transferred to the PC. This
is shown by a progress bar for each channel.
Operation log
Control panel
Date
Channel 2
vertical scale
Cursor key
Pan key
Waveforms
Channel
progress bar
Channel 1
vertical scale
Reset
Magnify
Horizontal
/position
Zooming in or
out
Click the Magnify key.
Create the area to be magnified by holding the left
mouse button and dragging the cursor over the
area to be magnified.
48
Page 49

Long Memory Data Capture (GDS-1000A-U Only)
The waveform will be magnified to the size of the
magnification area.
Horizontally
moving a
waveform
Click on the Pan key. To pan the
screen, hold the left mouse button
anywhere on the waveform screen
and drag the waveform left or
right.
The horizontal scale will change accordingly.
Horizontal scale
Cursors
To position cursors on the
waveforms, press the Cursor key.
To move a cursor, left click and
drag either the cursor line or cursor
point to the desired positions.
49
Page 50

Freewave Manual
Reset Waveform
Pressing the Reset key will reset the
waveform position and scale as
well as remove the cursors.
Clear waveforms
To clear the waveforms on the
screen, press the Delete key.
1. Make sure that there is a waveform in the Freewave screen.
2. Click on the Save button. A file save dialog box
will appear.
3. Select a file name and location and save the data. The CSV data
file stores the waveform data points as well as the oscilloscope
identification. A *.csv file will be saved for each active channel.
Each file will be appended with the channel number. For
example: test test1.csv, test2.csv
Data file format
CSV (*.csv)
Saving Waveform Data
50
Page 51

Long Memory Data Capture (GDS-1000A-U Only)
Data file contents
Manufacturer
Serial number
Saved Date
Model name
Firmware
Waveform Data
When saving files, you will get the option to save “Fast” or
“Detail” waveform data. Fast data only contains amplitude data.
Detail data also contains the time of each point relative to the
trigger point.
4. Choose Fast or Detailed and click OK. The file
will be saved.
1. Click on the Recall button.
2. Select a file to recall from the file panel. A file can be only be
loaded to the channel it was originally saved to.
Data file format
CSV (*.csv)
Data file contents
Manufacture
Serial number
Saved Date
Model name
Firmware
Waveform Data
Both Fast and Detail file formats can be recalled. Standard
memory and long memory files can also be recalled.
Recalling Waveform Data
51
 Loading...