

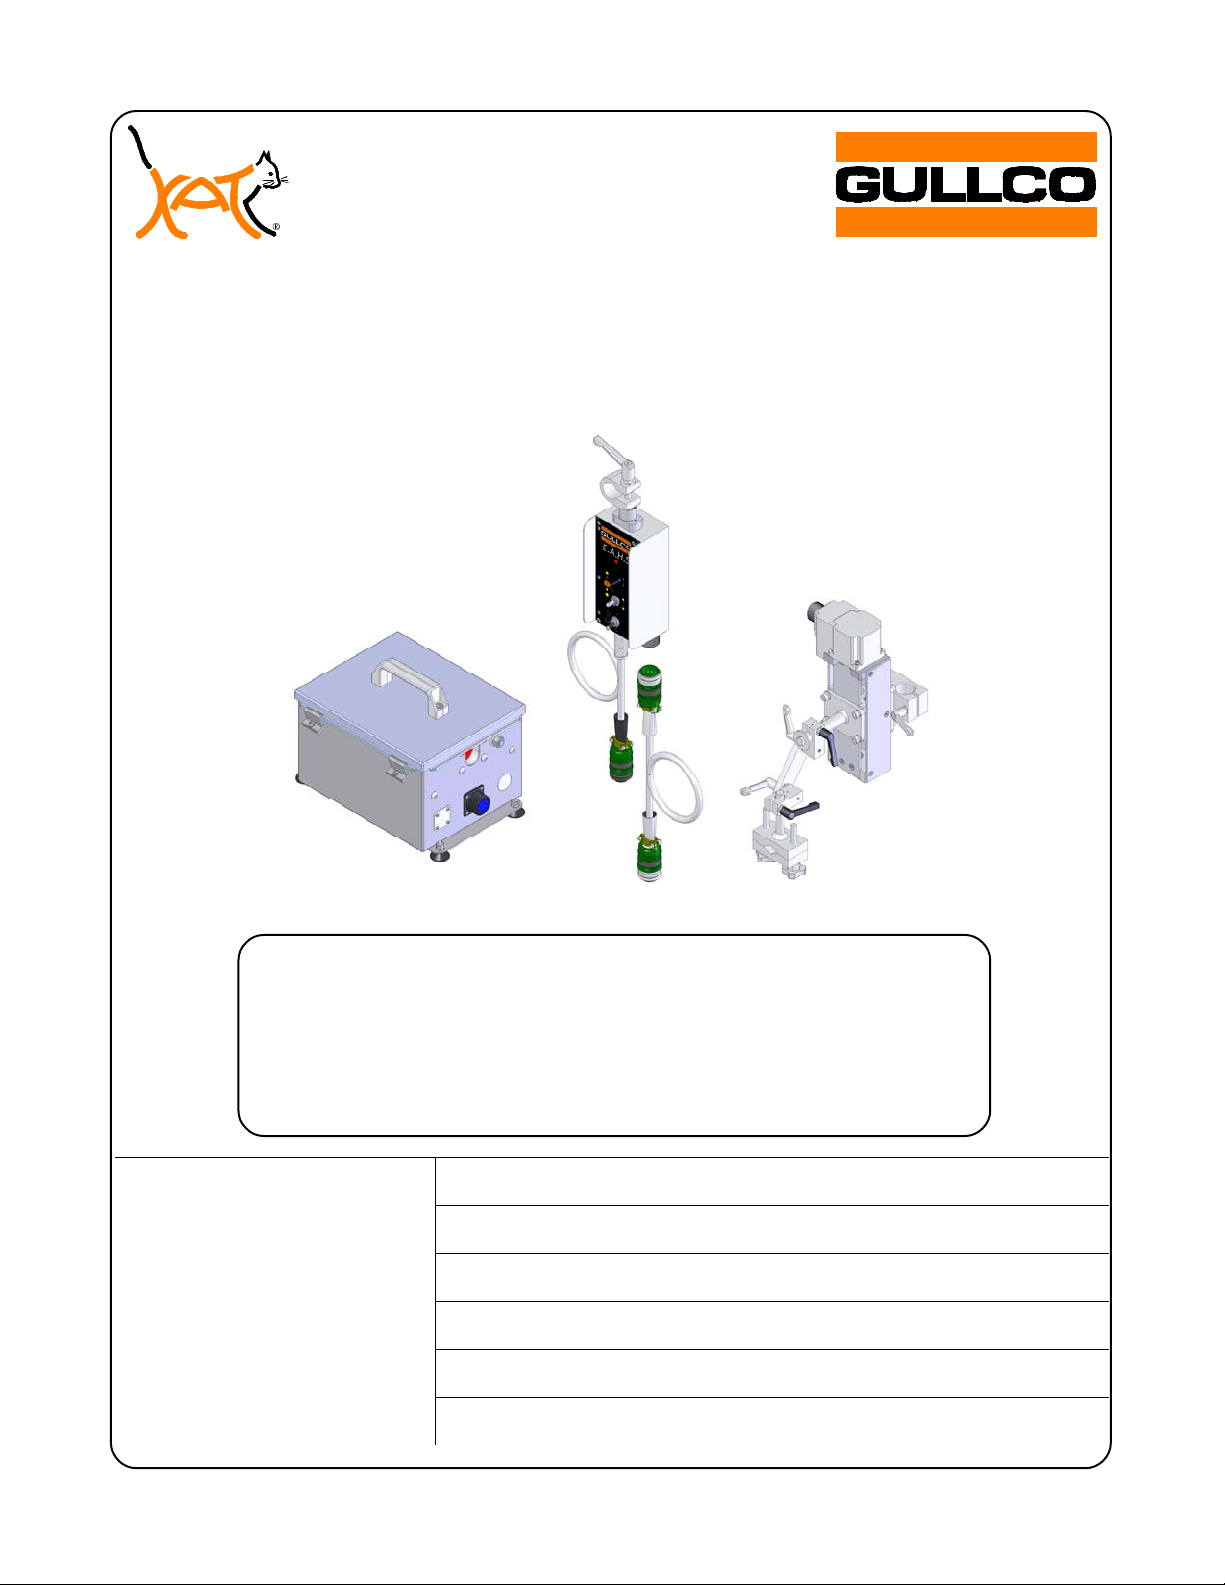
Gullco GK-203-400-12 User Manual
(
)
400 AMP ELECTRONIC ARC
HEIGHT SENSOR (E.A.H.S.)
WITH STANDARD SLIDE
GK-203-400-12-*
* INDICATES VOLTAGEREFERENCE
PARTS LIST
&
OPERATING INSTRUCTIONS
Website: www.gullco.com
Distributed by:
Phone: 905-953-4140 Fax: 905-953-4138 e-mail: sales@gullco.com
Phone: 440-439-8333 Fax: 440-439-3634 e-mail: ussales@gullco.com
Phone: +44 1257-253579 Fax: +44 1257-254629 e-mail: uksales@gullco.com
Phone: 61 (0) 7 3348-5515 Fax: 61 (0) 7 3348-5510 e-mail: ausales@gullco.com
Phone: 91-20-65260382 Fax: 91-20-26836656 e-mail: indsales@gullco.com
GULLCO INTERNATIONAL LIMITED – CANADA
GULLCO INTERNATIONAL INC. – U.S.A.
GULLCO INTERNATIONAL [U.K.] LIMITED - EUROPE
GULLCO INTERNATIONAL PTY LIMITED - AUSTRALIA
GULLCO INTERNATIONAL INDIA PRIVATE LIMITED
GULLCO INTERNATIONAL SHANGHAI – LIMITED
Phone: +8621-50460341 Fax: +8621-50463554 e-mail: c.zhang@gullco.com
Revised: December 23, 2014 GD-063

SAFETY INSTRUCTIONS
Although the Electronic Arc Height Sensor (E.A.H.S.) is manufactured for safe and dependable
operation, it is impossible to anticipate those combinations of circumstances, which could result in
an accident. An operator of this equipment is cautioned to always practice "Safety First" during
each phase of operation, setup and maintenance.
Read and understand the whole operating instructions before operating or performing service of this
equipment. Become familiar with the machine operation, applications and limitations. Keep the
operating instructions in a clean and readily available location.
This equipment is normally used to automate / semi-automate welding processes. These
processes usually have any combination of the following; bright and hot arcs, flying sparks, fumes,
ultraviolet and infrared radiated energy, hot work-pieces, compressed gases, etc. The onus is on
the operator of this equipment to know, understand and follow all the safety precautions associated
with the process being used.
A careless operator invites troubles, and failure to follow safety practices may cause serious injury
or even death. Important safety precautions are given in the following:
Electrical Shock Prevention
Do not use this equipment in damp or wet locations.
Do not expose this equipment to rain.
Never carry this equipment by the cables or pull the cables to disconnect from the
receptacle.
Keep all cables from heat, oil and sharp edges.
Inspect all cables periodically and replace if damaged.
Inspect the secureness of all cables periodically and repair if loose.
Disconnect the power cord when not in use.
Disconnect the power cord positively to prevent electrical shock before repair and service
of the equipment.
Bodily Injury Prevention
Do not wear loose clothing, jewellery and loose, long hair, which may get caught into
automatic systems or moving parts.
Do not operate this equipment if ill or drowsy from medication or fatigue.
Always keep the Electronic Arc Height Sensor (E.A.H.S.) clean and in good working order.
Report any unsafe condition for immediate correction.
ALL THE SAFE PRACTICES AND PRECAUTIONS MAY NOT BE GIVEN IN WRITING. SOME
ARE BASED ON COMMON SENSE, BUT OTHERS MAY REQUIRE TECHNICAL
BACKGROUND TO EXPLAIN.
1
SAFETY INSTRUCTIONS
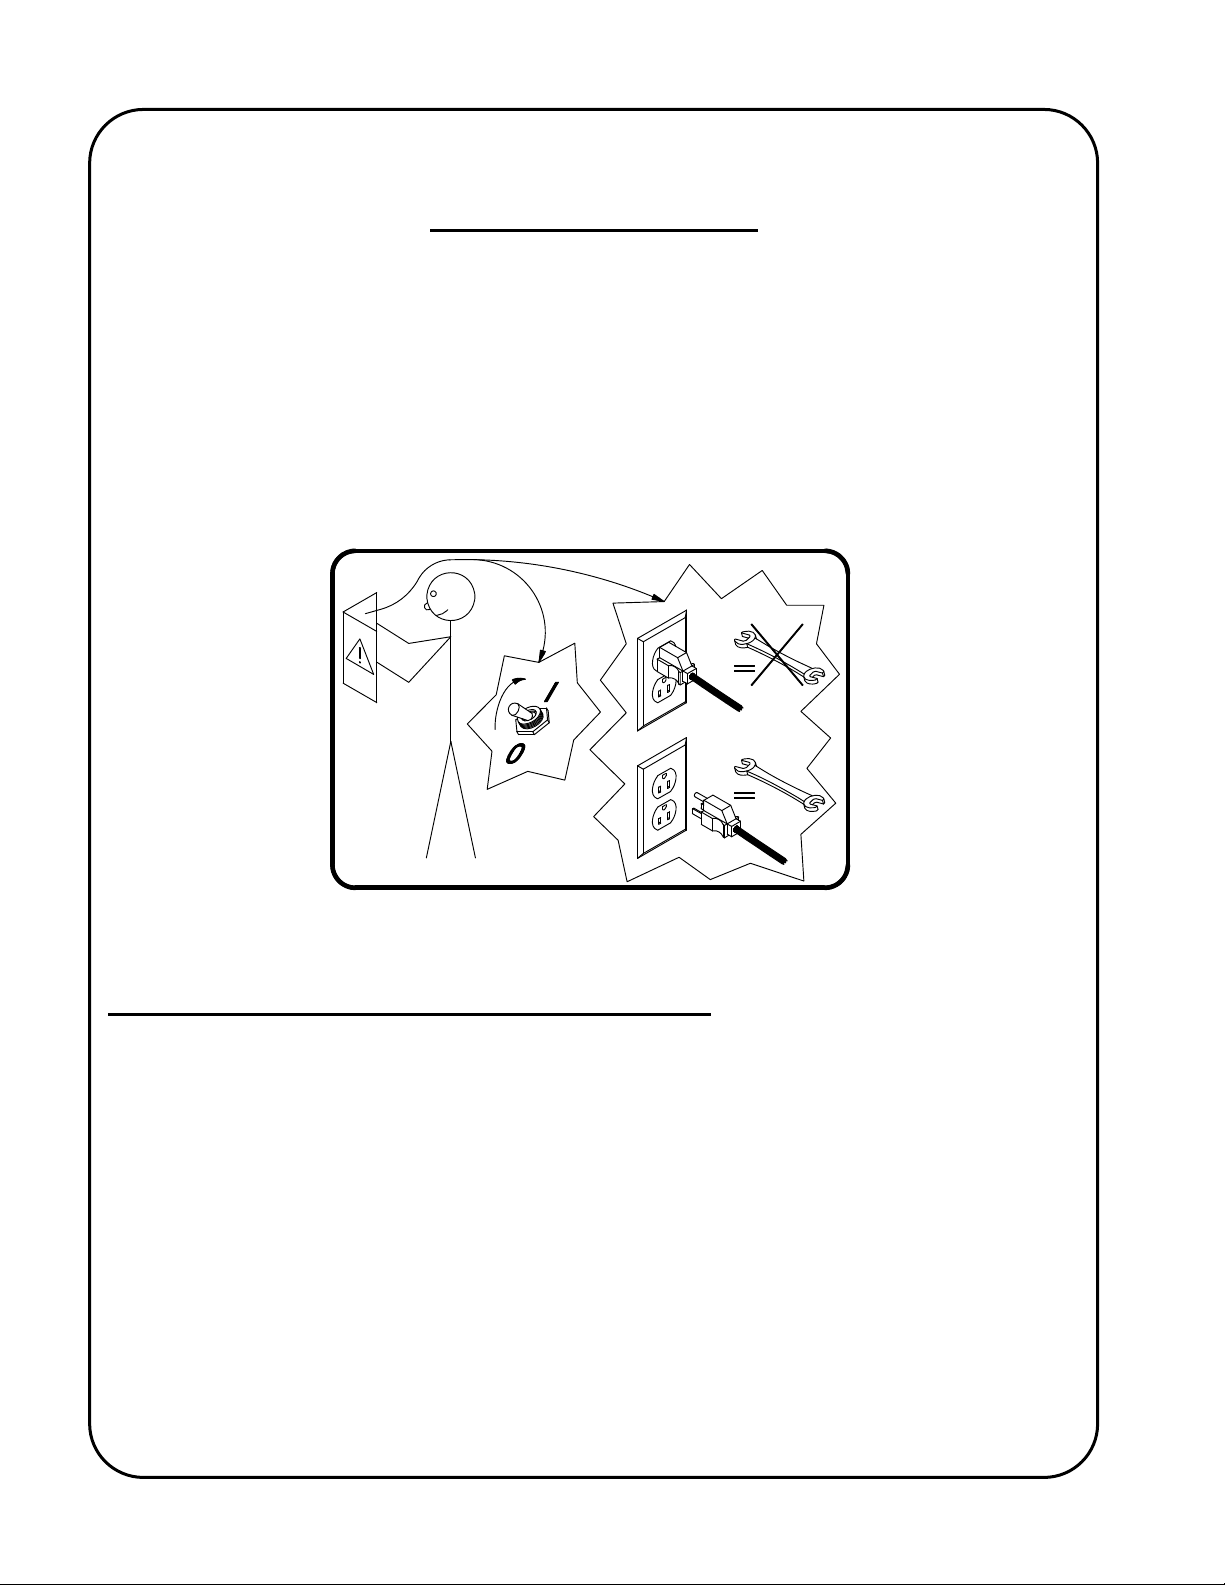
The following cautionary/warning label is attached to each Electronic Arc Height Sensor (E.A.H.S.):The below label pictorially represents the following:
“Warning:Read the manual before turning the unit on and before performing service.
Also, positively disconnect the unit from all power supplies before servicing!”
READ THIS BEFORE OPERATING THE E.A.H.S. UNIT
Always turn the main power off before connecting/disconnecting the cables to/from the Remote
Control Pendant, slide and control box. Failure to comply may result in control
damage.
The control must not be continually started and stopped by the removal and re-applying of power.
Allow ten (10) seconds after the removal of power before re-applying the power to the control.
Ensure that an adequate and well-maintained weld return path is provided with good electrical
contact. Failure to do so may result in the welding current passing through the equipment and
damaging the wiring and electrical components.
2
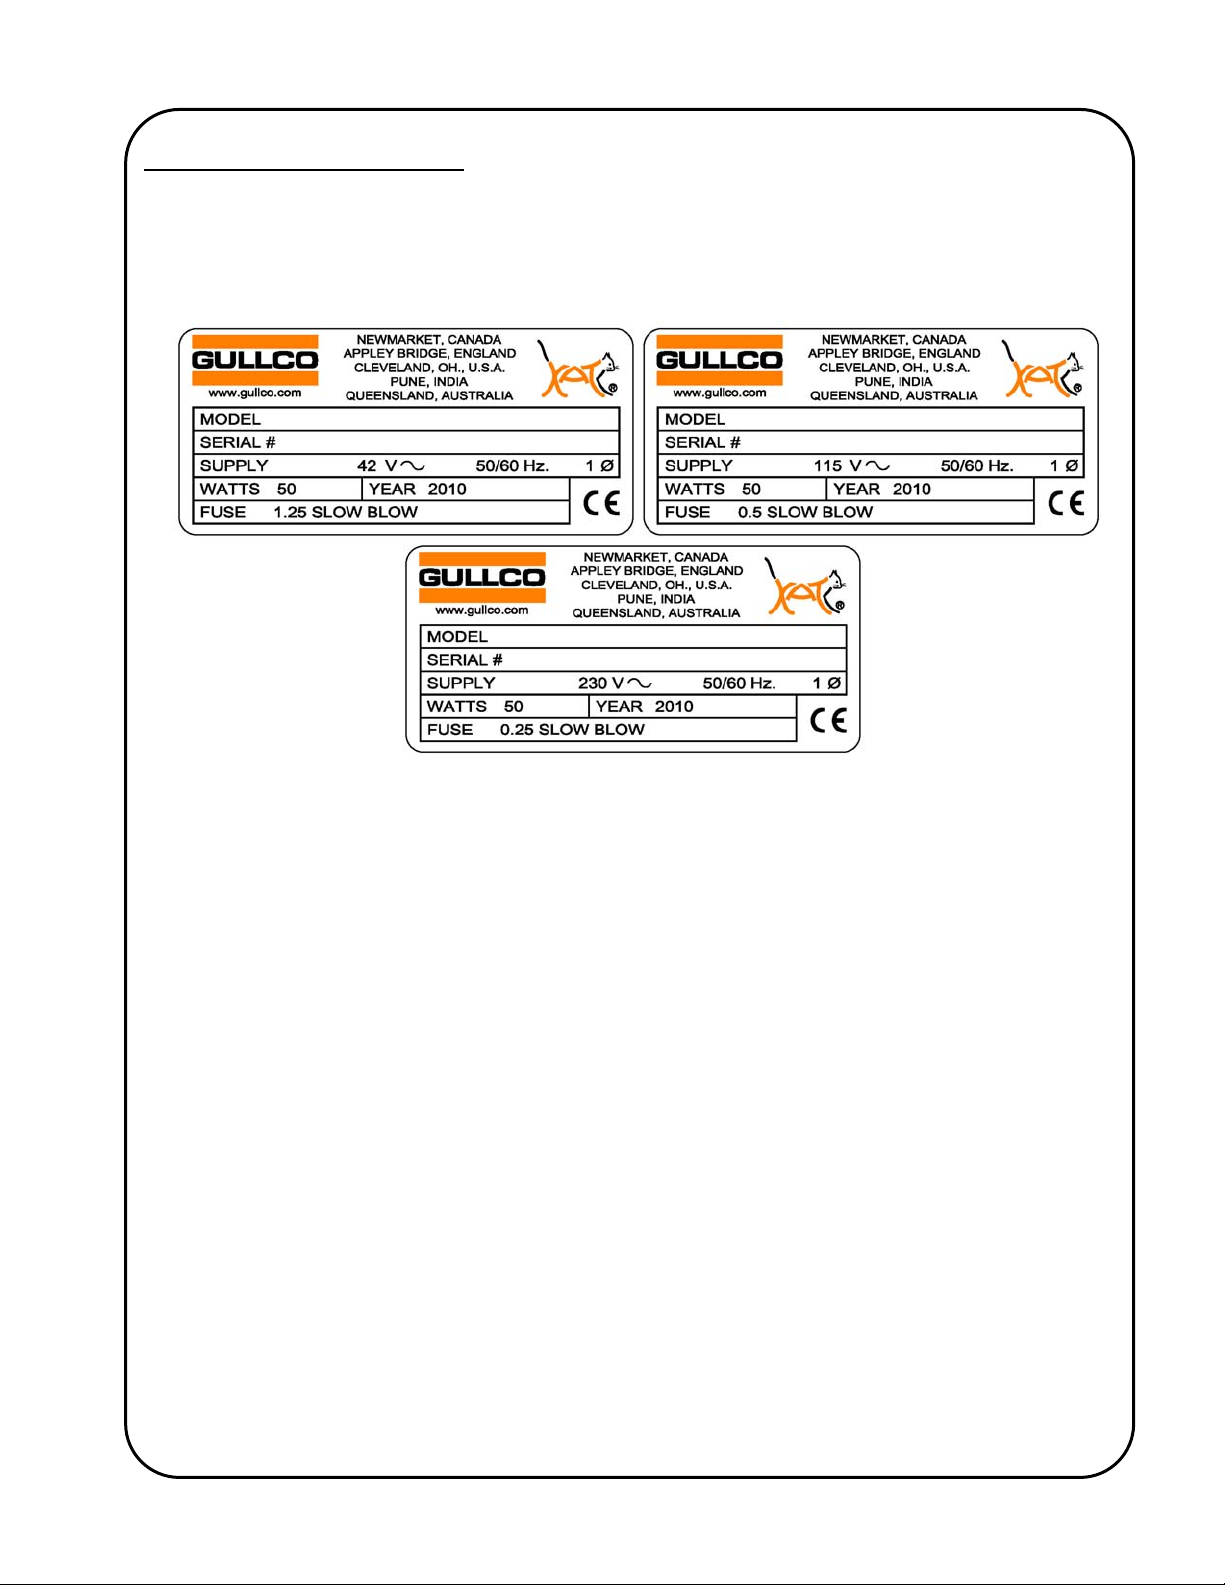
ELECTRICAL CONNECTION
WARNING! Before connecting the E.A.H.S. to a power source (receptacle, outlet, etc.,) be sure
that the voltage supplied is the same as that specified on the product label. If in
doubt, DO NOT PLUG IN THE E.A.H.S. Copies of the possible product labels are
shown below:
As the colours of the wires in the mains lead of this equipment may not correspond with the
coloured markings identifying the terminals in your plug, proceed as follows:
The Green & Yellow or Green wire must be connected to the terminal in the plug which is
allocated for “Earth” / “Ground”.
The Blue or White wire must be connected to the terminal that is allocated for “Neutral”.
The Brown or Black wire must be connected to the terminal that is allocated for “Live”.
230V Equipment must be installed in accordance with CEC, NEC or other applicable electrical
code.
WARNING! Ensure proper AC earth grounding of the Gullco E.A.H.S. and all auxiliary equipment
(where applicable), before applying power. Failure to do so may invalidate the
Gullco Warranty.
Note: If other torch mounting hardware is used that was not supplied by Gullco to mount the torch
to the slide, it is important that the torch is electrical isolated from the slide. i.e. no welding current
from the torch must be allowed to pass through the slide. Failure to do so will result in damage to
the E.A.H.S. controls. It is recommended that you consult your local Gullco representative when
considering other torch mounting hardware.
Warranty will be void if genuine Gullco replacement parts are not used.
3

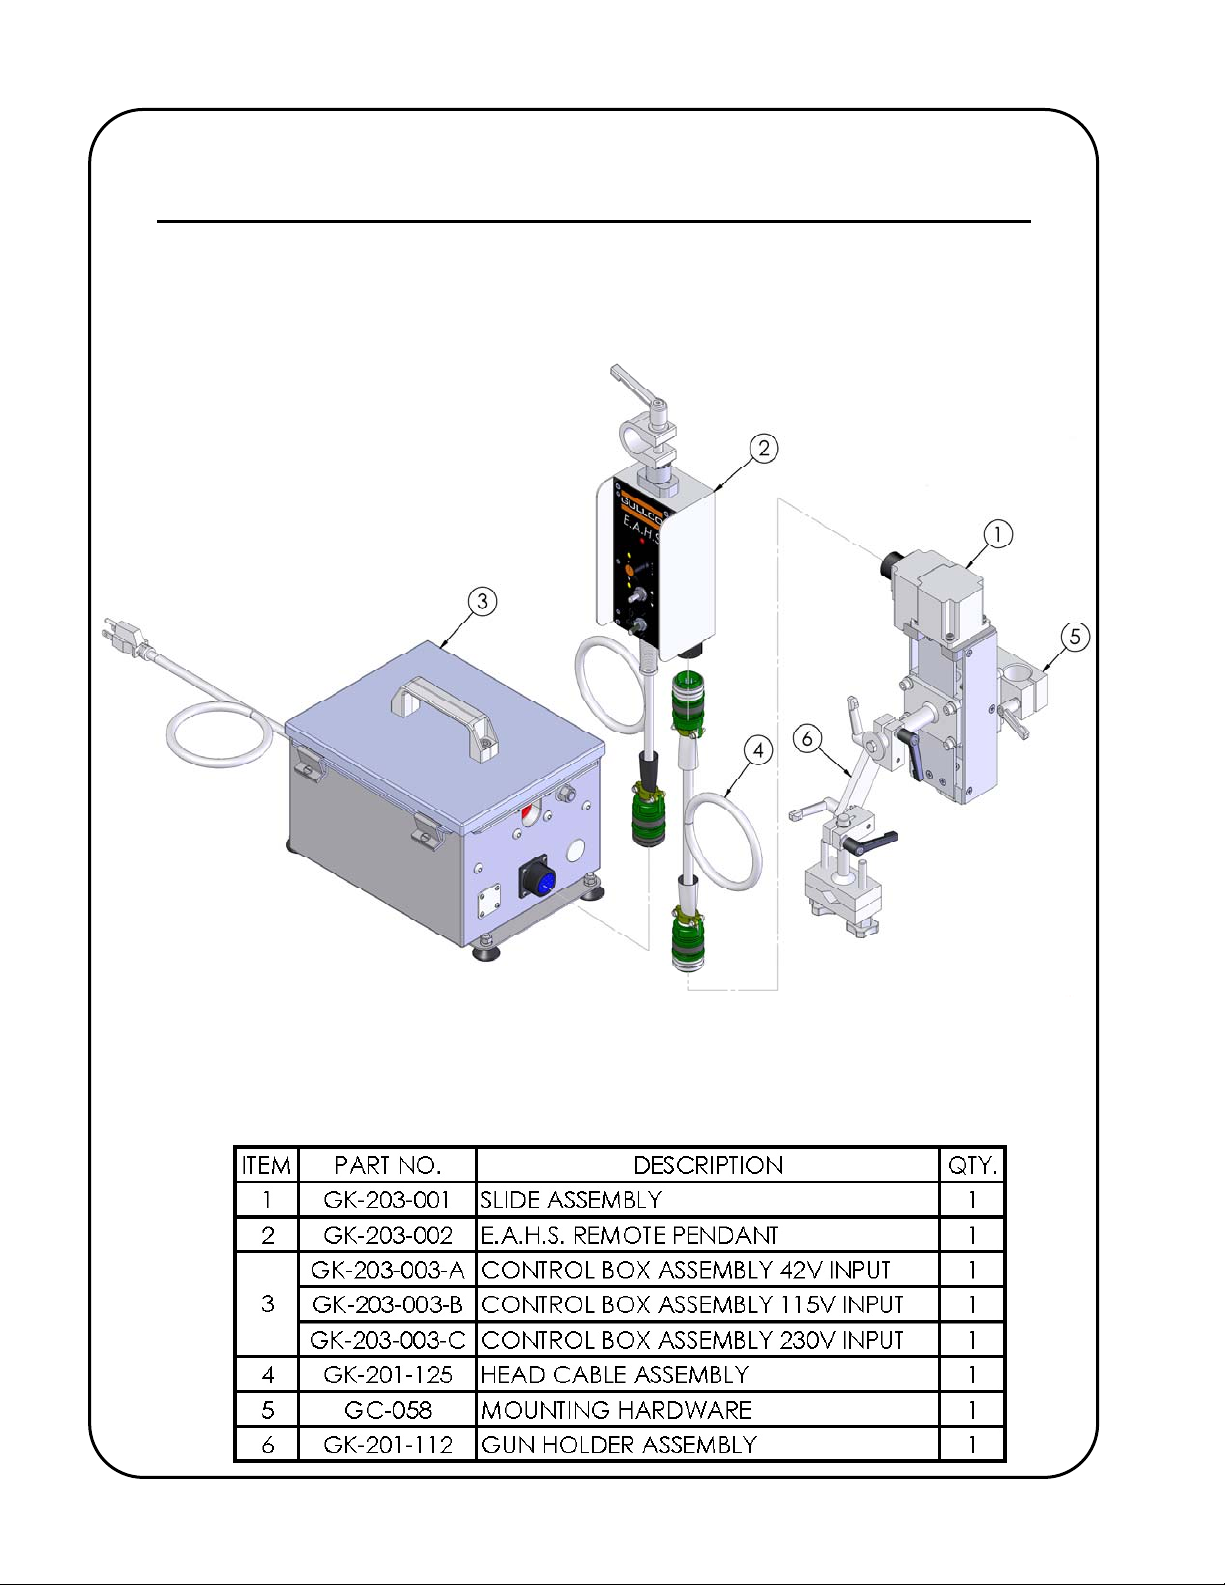
ELECTRONIC ARC HEIGHT SENSOR (E.A.H.S.)
This manual covers the operating instructions of the following Electronic Arc Height Sensor
(E.A.H.S.):- GK-203-400-12* (* indicates input voltage, A = 42V, B = 115V, C = 230V)
GENERAL DESCRIPTION
The Model GK-203-400-12 is a standalone unit meaning it does not interface with the customer’s
wire feeder. The arc activation trigger signal of the customer’s welding equipment that is used to
start/stop the welding process must come from a separate piece of equipment, i.e. customer
supplied control or other Gullco equipment. This advanced Electric Arc Height Sensor package
uses Gullco’s sophisticated, yet easy to use, E.A.H.S. remote pendant control, in conjunction with a
4” linear slide assembly and current sensing control box, to provide precision arc height control
during the welding process.
The Gullco linear slide is compact, light weight, yet durable, linear motion device with high torque,
high resolution and low vibration stepper motor. The slide imparts a linear motion to the welding
gun. The low voltage E.A.H.S. control provides user friendly functions while minimizing set-up and
welding down time. The Gullco E.A.H.S. system offers the following functions and features:
Lightweight and durable components to reduce operator fatigue.
The 4” standard slide features engraved top, bottom and center marks for quick slide
position reference to aid setup.
Standard 25 feet of remote pendant control cable means the current sensor main control
box can be kept away from the work area reducing trip hazards; an additional 25ft extension
is available.
Easy setup and torch height calibration (teach mode).
Sensor control box design allows the operator to use their standard existing welding cables
without any cutting or splicing that would be needed for a shunt type sensor.
Extremely accurate arc detection within 2% to 97% of the nominal amp range.
Slide travel speed factory set at 10 IPM [25.4cm/min], programmable range of 3 IPM
[7.6cm/min] to 17 IPM [43.2cm/min].
Easy to use remote pendant interface.
Coarse and fine slide adjustment.
Built in fault code diagnostics.
These features enable precise control over the torch height, generating accurate and repetitive high
quality results.
The E.A.H.S. sensor main control box is available in three line voltage inputs; 42, 115 and 230
VAC, single phase, 50/60 Hz.
Supplied adjustable torch bracketry allows for easy mounting of any semi-automatic and automatic
machine torches.
4

5
INTENDED / FORESEEN USAGE
The Gullco Electronic Arc Height Sensor (E.A.H.S.) system is used throughout the world to
automate and improve the quality and efficiency of the weld produced in automatic mechanized
welding operations. This is achieved through minimizing weld defects such as poor penetration,
incomplete fusion, overlap and undercut. Also, detrimental factors such as poor or awkward
accessibility, operator fatigue, or inconsistent workmanship are eliminated. Required quality levels
are consistently attained and productivity and profitability increased.
Welding guns are readily mounted on the linear slide. This equipment is intended to automatically
control the torch height throughout the welding process. The longitudinal movement can be
obtained from either the work piece traveling whilst the linear remains stationary, or, by a travel
carriage such as the Gullco “KAT”
work piece, which is the norm. By combining welding gun height control with the precision
controlled travel speed of the “KAT”
carriage carrying the E.A.H.S. equipment down the length of the
®
carriage high quality workmanship can be produced.
®
6
GK-203-400-12 E.A.H.S. SYSTEM COMPONENTS AND GENERAL ASSEMBLY
7
(
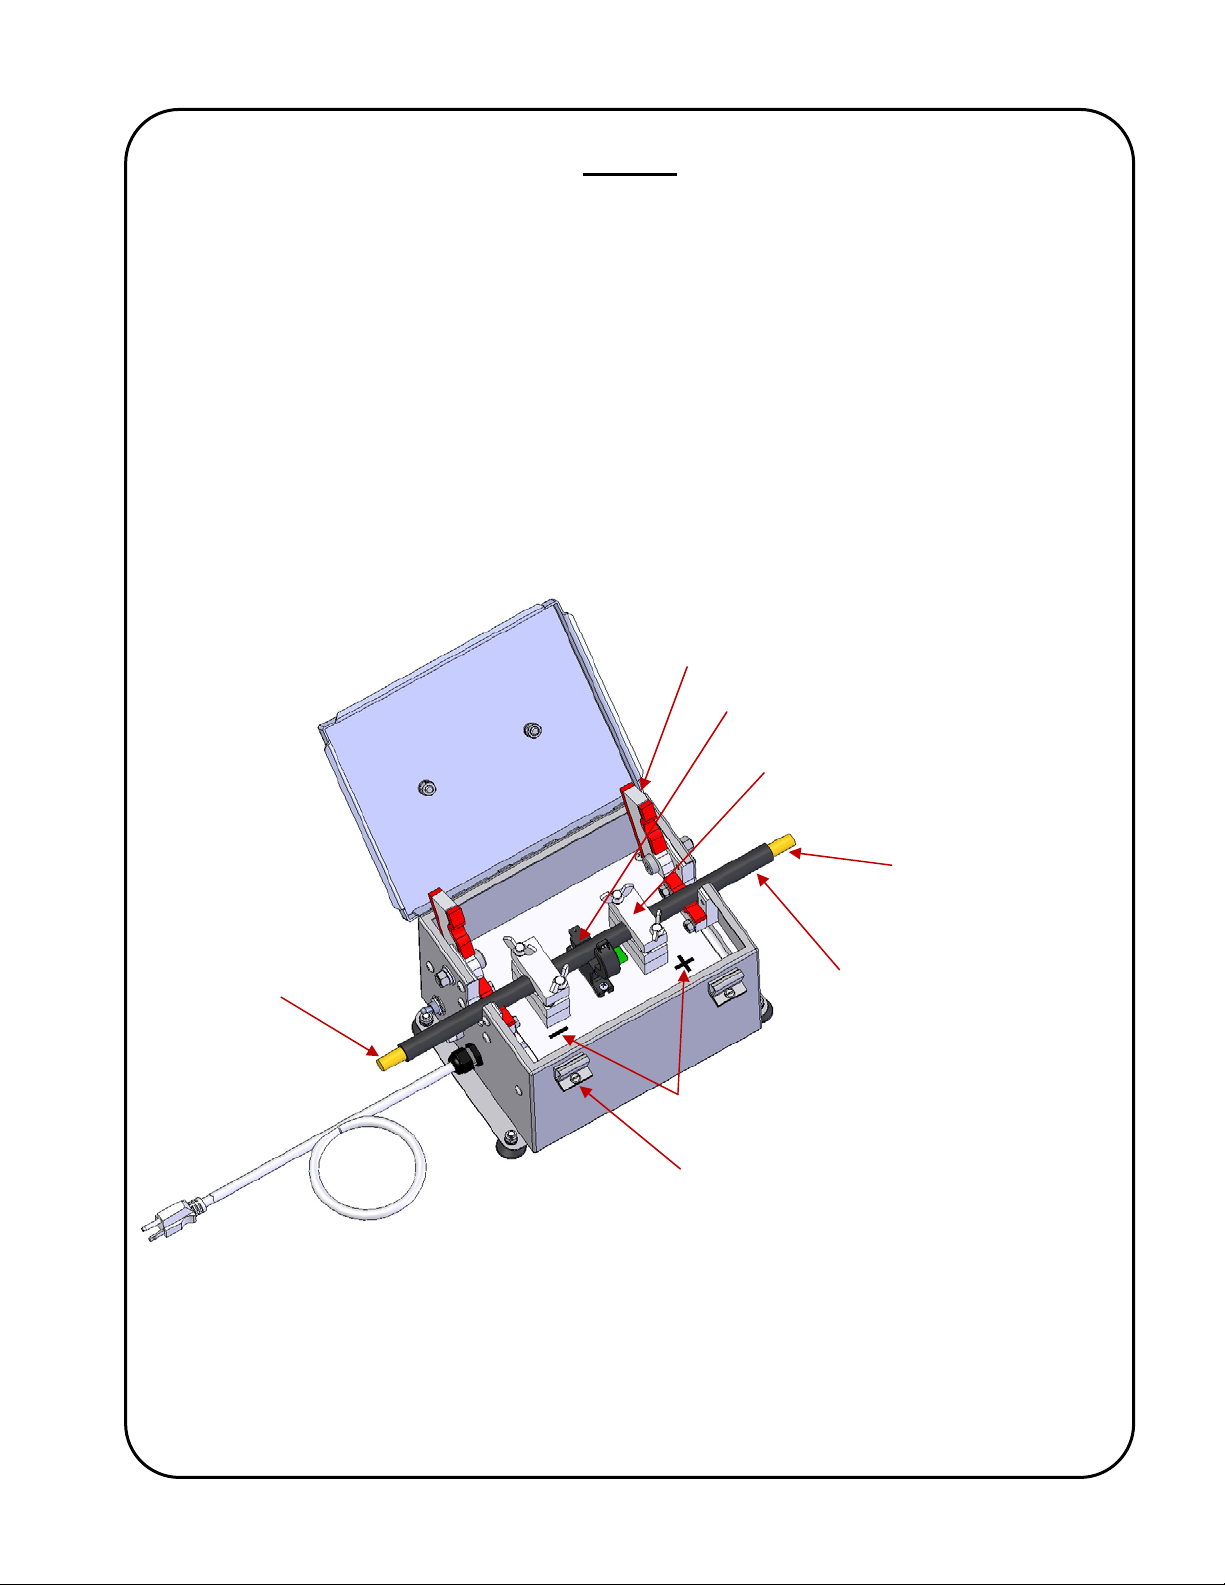
SETUP
Before powering up the E.A.H.S. make sure all components and cables are properly
connected. There are three (3) major components to the E.A.H.S. system; the sensor
control box, the remote pendant and the 4” linear slide. In order for the E.A.H.S. system to
operate, the welding ground cable must be routed through the sensor control box. The
direction of current flow or polarity is important or the E.A.H.S. will not be able detect
current thus not allowing it to track the arc height automatically. To open the sensor control
box loosen the lid clamping screws until the lid can be opened. Inside the control box there
are two (2) cable dust covers, two (2) cable clamps and the current sensor. To install the
welding ground cable open both dust covers and remove the wing screws on both cable
clamps. Remove small Phillips screw from the current sensor and open it. Place the
welding ground cable inside, shown below. Then close the current sensor reinstalling the
Phillips screw and tightening the cable clamps. Close the dust covers and the lid, then
tighten the lid clamp screws.
Electrode positive setup
“+” torch)
Dust cover
Current sensor
Cable clamp
Work piece ground
connection
Return path back to
welding power
source “-“ terminal
Welding ground
cable
Polarity reference
marks
Lid clamp
screw
For electrode negative setup (“-“ torch), flip the orientation of the welding ground in relation
the control box, the “+” reference will face welding power source while the “-“ reference will
face the work piece.
Note: Care should be taken to ensure that no foreign debris enters the main control box,
periodically check the condition of the foam gaskets and replace any that are damaged or
defective.
 Loading...