

Page 1
E-1
USE & CARE INSTRUCTIONS
Air Cleaning System
Model No. AC4825, AC5000 Series
3 (AC4825), 5 (AC5000) -Year Limited Warranty
English E - 1 French F - 1 Spanish S - 1
Date Purchased month ________ year _________
Customer Service
1.866.603.5900
www.guardiantechnologies.com
Use GENUINE Guardian Technologies replacement parts only.
REV0218
©2016 Guardian Technologies LLC
LIMITED WARRANTY
To the consumer, Guardian Technologies LLC warrants this product to be free of defects in materials or
workmanship commencing upon the date of the original purchase. In order to be eligible for this Limited Warranty,
an original sales receipt or comparable substitute proof of purchase bearing the date of original purchase is
required. Refer to the original product carton or specific product/model page on the Guardian Technologies
website for warranty length for your particular model. This warranty applies only to the original purchaser of this
product from the original date of purchase. This warranty covers product purchased from authorized distributors only.
This warranty applies to repair or replacement of product found to be defective in materials or workmanship. This
warranty does not apply to damage resulting from unusual wear, commercial, abusive, unreasonable use or
supplemental damage. This warranty does not cover damage from unauthorized repairs or from any use not in
accordance with the instruction manual. Defects that are the result of normal wear and tear will not be considered
manufacturing defects under this warranty.
If this product should become defective within the warranty period, we will repair or replace any defective parts
free of charge. All warranty repairs must be completed by Guardian Technologies LLC. This warranty gives you
specific legal rights and you may also have other rights (other rights may vary from state to state in the U.S.A.)
To submit product under warranty the complete machine must be delivered pre-paid to GuardianTechnologies LLC.
Please include complete information including: the problem, the model number of the product, the day of purchase,
and a copy of the original sales receipt along with your name, address, and telephone (email optional). Address
returns to the attention of: Customer Service, at the address below. Additional questions or comments can be made
toll free to the number listed below.
Additional copies of the instruction manual can be obtained by accessing and
printing directly from our website or calling customer service.
USA and Canada
Guardian Technologies LLC
26251 Bluestone Blvd.
Euclid, Ohio 44132
1.866.603.5900
www.guardiantechnologies.com
Please go to www.guardiantechnologies.com to register your product. We consider the registration process important
to ensuring superior service to our customers, however submitting the warranty registration is optional and does not
affect your rights to utilize this warranty according to the conditions stated above.
Page 2
READ AND SAVE THESE INSTRUCTIONS
WARNINGS
Failure to comply with the warnings listed below may
result in electric shock or serious injury.
This product should be used only in accordance with the specifications
outlined in this manual. Usage other than what has been specified here
may result in serious injury.
When using electrical appliances, basic precautions should always be followed to
reduce the risk of fire, electric shock and injury to persons, including the following:
• Read all instructions before using appliance.
• IMPORTANT - This appliance has a polarized plug (one blade is wider than the other).
To reduce the risk of electric shock, this plug is intended to fit in a polarized outlet only
one way. If the plug does not fit fully in the outlet, reverse the plug. If it still does not fit,
contact a qualified electrician. Do not attempt to defeat this safety feature.
• To avoid fire or shock hazard, plug the appliance directly into a 120V AC electrical outlet.
• Keep the cord out of heavy traffic areas. To avoid fire hazard, NEVER put the cord
under rugs, near heat registers, radiator, stoves or heaters.
• To protect against electrical hazards, DO NOT immerse in water or other liquids.
Do not use near water.
• Children cannot recognize the hazards associated with the usage of electrical
appliances. For this reason, always supervise children when they are near the unit.
• Always unplug the air purifier before moving it, opening the grill, changing filters, cleaning
or whenever the air purifier is not in use. Be sure to pull by the plug and not the cord.
• NEVER drop or insert any object into any openings.
• DO NOT run cord under carpeting.
• DO NOT cover cord with throw rugs, runners, or similar coverings.
• DO NOT route cord under furniture or appliances. Arrange cord away from traffic area
and where it will not be tripped over.
• DO NOT operate any appliance with a damaged cord or plug, if motor fan fails to rotate,
after the appliance malfunctions, or if it has been dropped or damaged in any manner.
Call Customer Service at 1.866.603.5900 for assistance.
• Use appliance only for intended household use as described in this manual. Any other use
not recommended by the manufacturer may cause fire, electric shock or injury to persons.
• DO NOT use outdoors.
• DO NOT place anything on top of unit.
• NEVER block the air openings, grills/outlets or place on a soft surface such as a bed or
sofa, as this could cause the unit to tip over, blocking the air intake or outtake opening.
• DO NOT attempt to repair or adjust any electrical or mechanical functions on this unit.
Doing so will void your warranty. The inside of the unit contains no user serviceable parts.
All servicing should be performed by qualified personnel only.
E-2
• WARNING: To reduce the risk of fire or electric shock, do not use this fan with any
solid-state speed control device.
• WARNING: Skin or eye damage may result from directly viewing the light produced by the
lamp in this apparatus. Always disconnect power before replacing lamp or servicing.
Replace Lamp With Lamp Manufactured by Guardian Technologies.
• Always unplug the unit before before cleaning or servicing in any way.
• CAUTION: Do NOT use gasoline, benzene, thinner, harsh cleaners, etc. on and/or in the
unit while cleaning as they will damage the product. NEVER use alcohol or other solvents.
This product earned the ENERGY STAR by meeting strict energy efficiency guidelines set by the US EPA.
US EPA does not endorse any manufacturer claims of healthier indoor air from the use of this product.
The energy efficiency of this ENERGY STAR qualified model is measured based on a ratio between the
model’s CADR for Dust and the electrical energy it consumes, or CADR/Watt.
E-3
LAMP CONTAINS MERCURY
Manage in accordance with Spills, Disposal and Site Cleanup Requirements. In case
of breakage, follow clean-up procedures provided by contacts below.
www.epa.gov/cflcleanup 1-866-284-4010
The 8 hour TWA Ozone for this product is 0.001 ppmv when tested in a 30 m3 chamber.
The product complies with the maximum allowable concentration of ozone of 0.050 parts
per million by volume (ppmv) in a 24-hour period. The Health Canada Guideline 2010
recommends that the maximum exposure limit, based on averaging time of 8 hours,
is 0.020 ppmv or less when tested in a sealed, controlled room approximately 30 m
3
.
WARNING: This product can expose you to chemicals including lead or lead
compounds, which are known to the State of California to cause cancer or
birth defects or other reproductive harm.
For more information go to www.P65Warnings.ca.gov.
Page 3
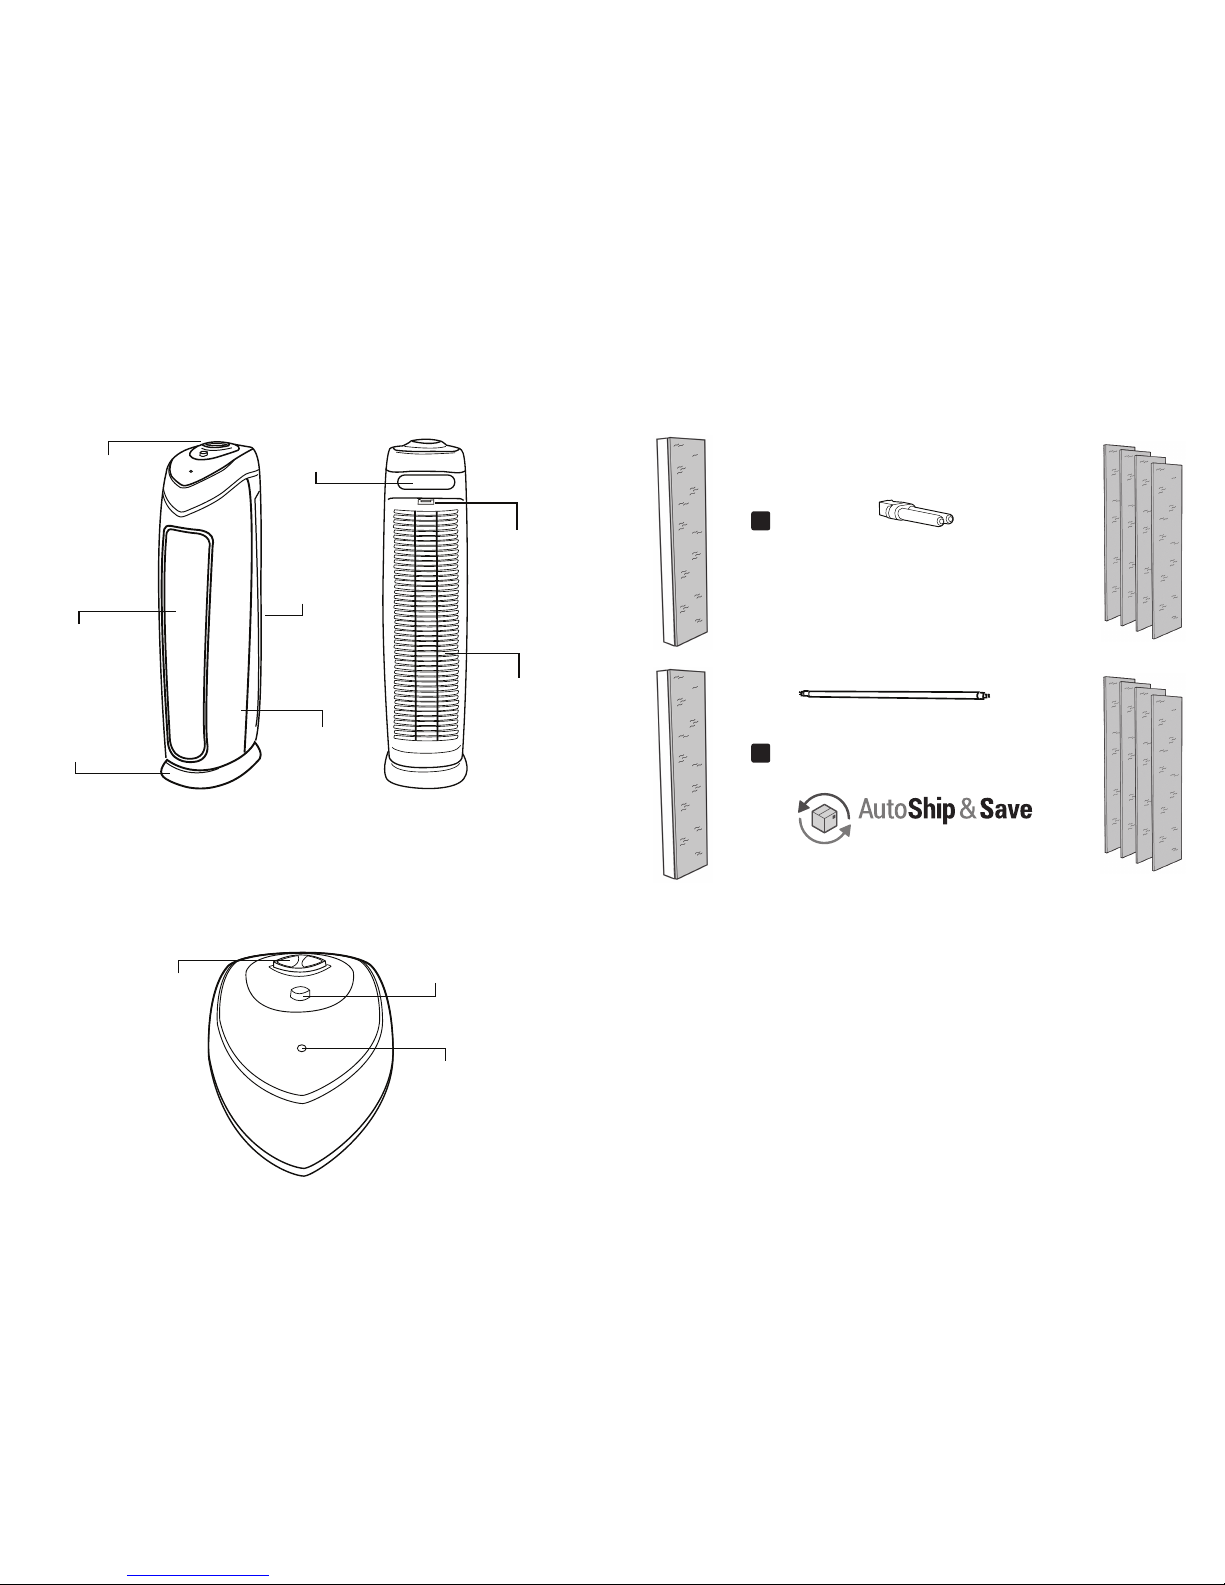
PRODUCT SPECIFICATIONS AND PARTS
REPLACEMENT PARTS
AC4825
AC5000
FILTER:
Filter
Model No.
FLT4825
B
UV-C BULB (5W):
Model No. LB4000
REPLACEMENT
CARBON FILTER
4-PACK:
Model No.
FLT22CB4
Improve your indoor air quality with your new germguardian® Air Cleaning System. Multiple levels
of cleaning include a combination filter that captures allergens, and Charcoal filter to remove odors.
UV-C light technology enhances germ-killing.
Pre-Filter - Captures initial dust and allergen particles.
Activated Carbon Filter - Charcoal/Activated Carbon contributes to the control and prevention of the
growth of bacteria, germs and mold.
UV-C Light - UV-C light technology works with Titanium Dioxide (TiO
2
) to enhance the elimination of
airborne germs. TiO2 is activated by the UV-C light to decompose remaining odor molecules caused by
smoking, cooking and pets.
*Pre-Filter and Carbon Filter are combined into one layer that attaches to the Filter.
FILTER:
Filter
Model No.
FLT5000
C
UV-C BULB (5W):
Model No. LB5000
Check out our
Filter Replacement Program
www.guardiantechnologies.com
™
IMPORTANT: Use Guardian Technologies GENUINE Replacement Parts
only.
To Purchase Contact Customer Service
AIR CLEANING SYSTEM
REPLACEMENT
CARBON FILTER
4-PACK:
Model No.
FLT28CB4
CONTROL PANEL
Control Panel
Air Outlet
Base
Air Inlet
Unit Body
Power Knob
UV-C Bulb Button
HEPA/UV Bulb Reset
Power Indicator/
Change Filter Indicator
Carrying
Handle
Lock & Release
Button (for accessing
Filter and Blub)
Filter
Access
Cover
FRONT OF UNIT BACK OF UNIT
E-4
E-5
Page 4
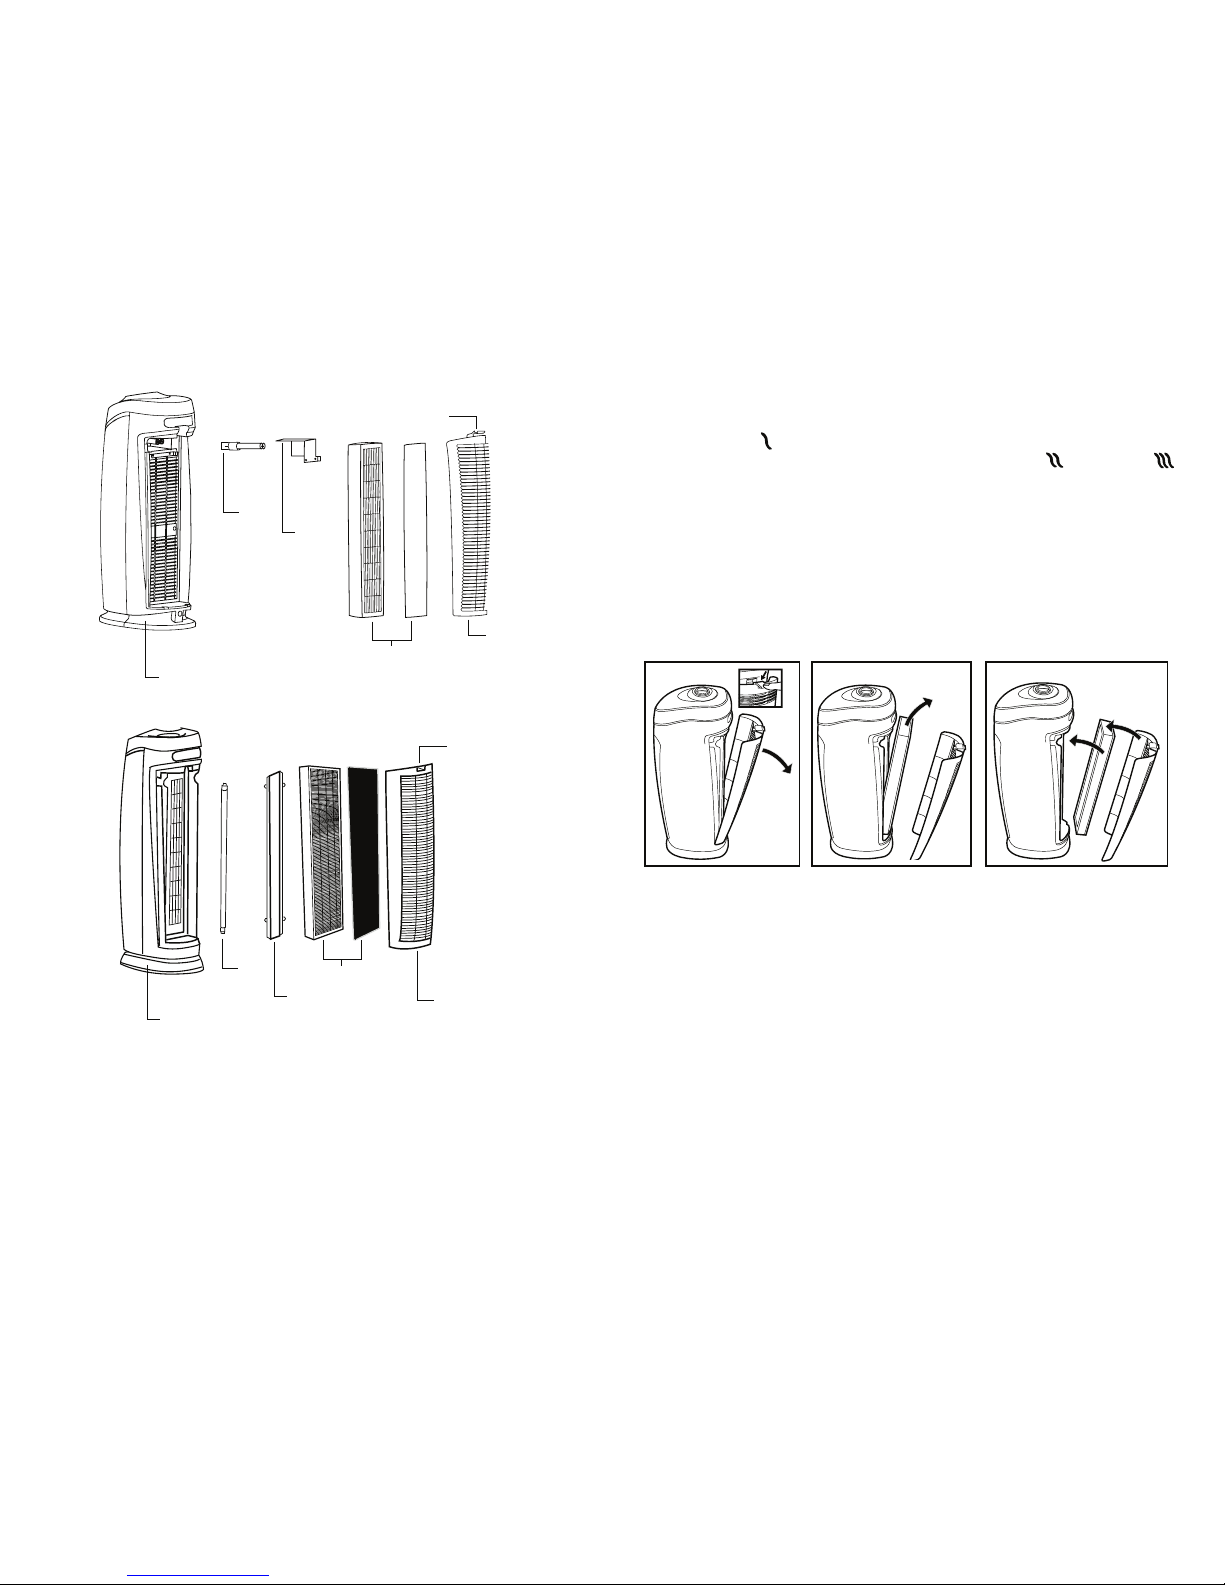
AIR CLEANING LAYERS
Main Unit
UV-C
Bulb
UV-C
Metal
Shield
Rear Cover
with Air
Inlet Grill
Lock & Release
Button
AC4825 SERIES
Main Unit
UV-C
Bulb
UV-C
Metal
Shield
Combination
Filter C includes
Pre/Charcoal &
HEPA filters
Lock & Release
Button
AC5000 SERIES
Combination
Filter B includes
Pre/Charcoal &
HEPA filters
Rear Cover
with Air
Inlet Grill
E-6
E-7
OPERATING INSTRUCTIONS
OPERATING THE AIR PURIFIER:
1. Turn the air purifier ON by rotating POWER KNOB clockwise.
2. Upon turning the air purifier ON, the power indicator will be lit (green) and the unit will
be in LOW mode ( ).
3. Rotate the POWER KNOB clockwise to set the air purifier to MEDIUM ( ) or High mode ( ).
4. To activate the UV-C Bulb, press the UV button. Press the button again to turn OFF the UV-C Bulb.
5. To turn the unit OFF, rotate the POWER KNOB counter-clockwise to OFF mode (•).
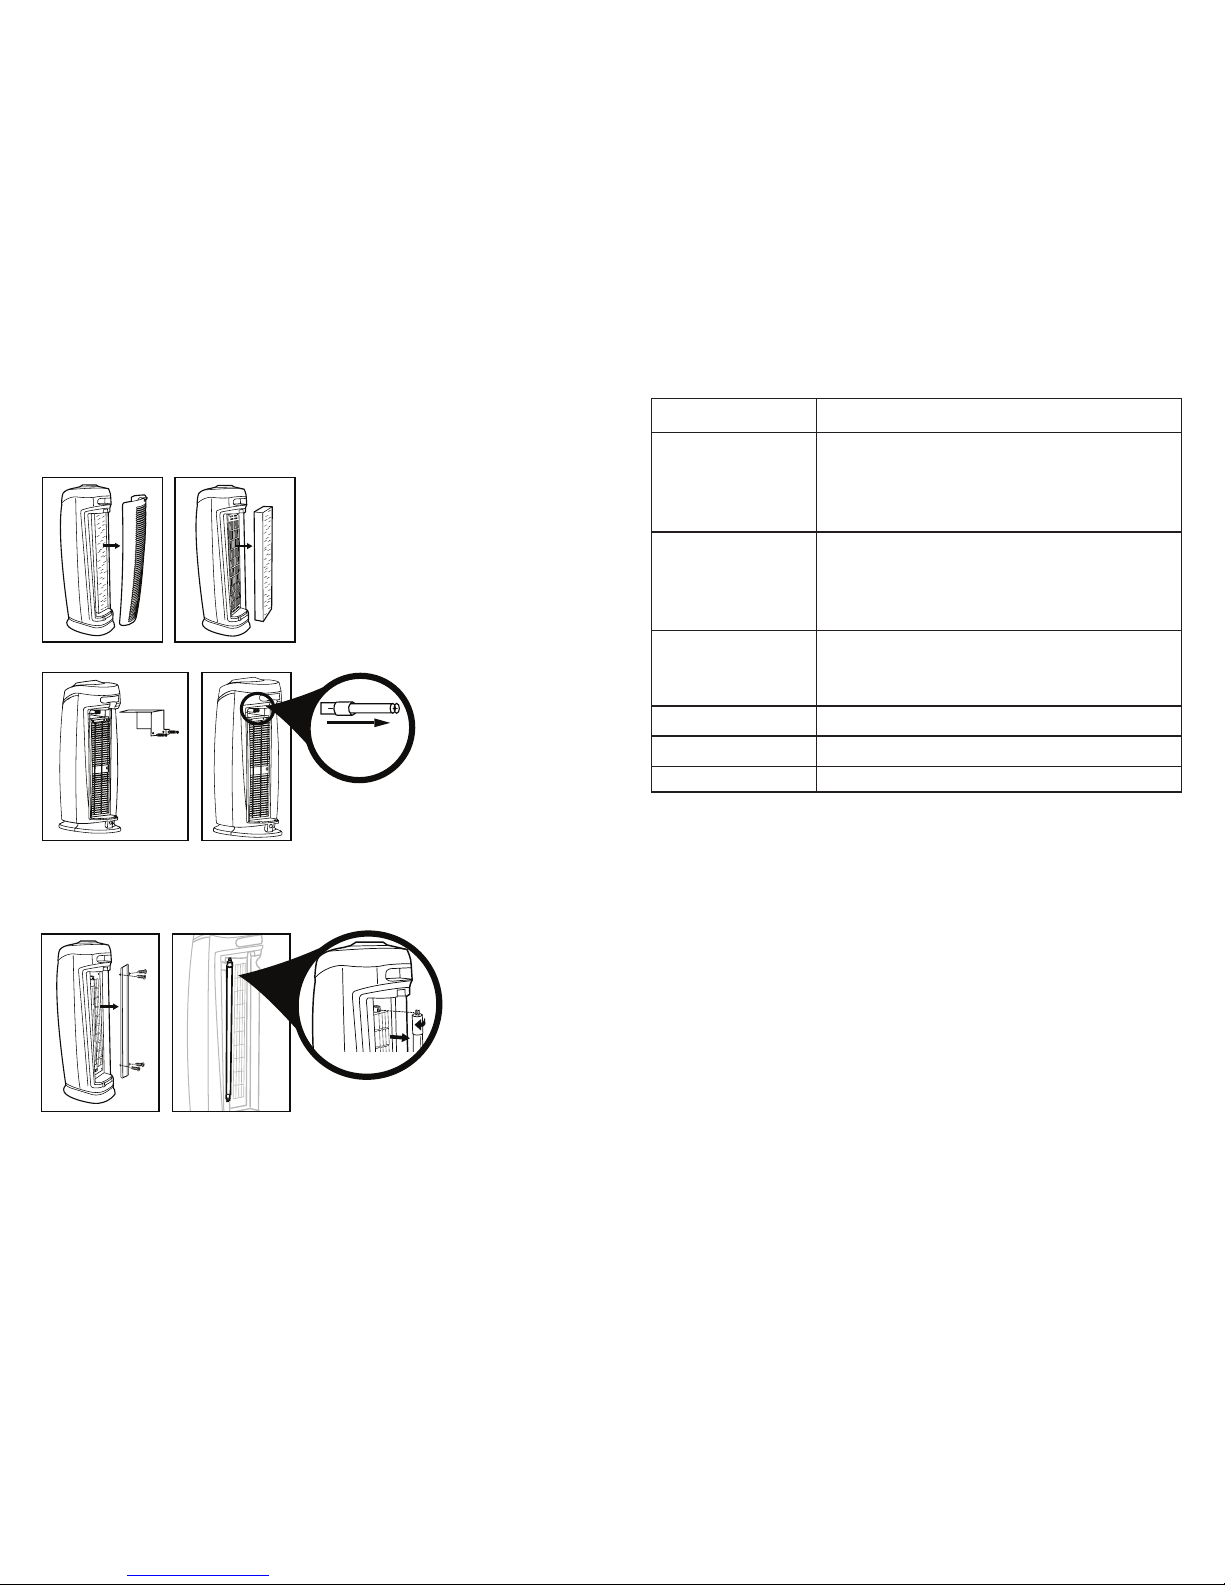
FILTER REPLACEMENT
5. Reattach the Rear Cover of the unit and securely latch into place.
6. Push and hold UV Control Button for 5 seconds to reset Filter Change Indicator.
CHANGE FILTER INDICATOR
The green power light on the air cleaner will turn red and flash continuously indicating that it is time
to replace the filter. Replace the filter according to the directions then press the UV control button
and hold for 5 seconds to restart the system. The light will turn back to green. Depending on usage,
filter will last approximately 6 months.
REPLACE FILTER
1. Turn off and unplug
the unit.
3. Remove the used
Combination Filter.
4. Insert new Combination Filter
into the unit. Consult the arrow
on the filter for correct
installation direction.
2. Press the Lock & Release
Button and remove the Rear
Cover from the unit.
CHECKING AND MAINTAINING FILTER
Maintain the filter by checking it frequently.
Depending on air quality conditions, you may need to replace it more frequently.
V
acuum the carbon filter layer as needed to remove loose debris and dust and to help prolong
the life of your filter.
To check the status of the filter, peel back the carbon layer to expose the pleated filter.
If the filter is no longer white and is covered in gray dust/dirt it should be replaced.
I MPORTANT: Do NOT try to wash and re-use the Combination Filter.
IMPORTANT: Use Guardian Technologies GENUINE Replacement Parts only.
BEFORE OPERATING THE AIR PURIFIER:
1. Carefully remove your air purifier from box and bag.
2. Select a firm, level and at location for the air purifier .
* For proper air flow, locate the unit at least 1 foot from any wall or furniture.
* Make sure none of the grills are blocked.
3. Plug the power cord into a 120V AC outlet.
IMPORTANT: When moving the air purifier, always lift unit by the carrying handle located on back.
OPERATING INSTRUCTIONS
Page 5
TROUBLESHOOTING GUIDE
Clean Air Delivery Rate
From air cleaner to air cleaner, compare the CADR numbers. First look at suggested room size. Then refer
to the Clean Air Delivery Rate (CADR) numbers. The higher the number, the faster the unit filters the air.
What is CADR?
CADR stands for “Clean Air Delivery Rate,” which indicates the volume of filtered air delivered by
an air purifier. CADR ratings show the effectiveness of how efficient the air purifier is at capturing
fine particles from things like tobacco smoke and plant pollens from the room.
Refer to website for individual model CADR numbers.
Check that the unit is plugged in.
Check that filter is in place.
Confirm that filter is Genuine Replacement Filter
Call Customer Service.
PROBLEM
Unit does not operate.
SOLUTION
Unit shuts off unexpectedly. Check that unit is plugged into a working electrical outlet.
Check that filter is firmly in place.
Check that the Rear Cover is latched firmly in place.
Call Customer Service.
No air circulating from unit.
Unplug unit. Check Pre-/Carbon and Hepa
filters. Clean Pre-/Carbon Filter if
necessary. Replace filter if necessary.
Increase in noise level.
Power light is red and flashing.
Blue UV-C light is flashing. Replace Bulb and reset.
Make sure the filters are clean. Replace if necessary.
Replace filter and reset system.
TWIST BULB 1/4 TURN
TO REMOVE BULB
INSTALLING & REMOVING UV-C BULB
1. Remove the Rear Cover of the unit by pushing
Lock & Release Button.
2. After removing the Rear Cover from the unit,
remove the Combination Filter.
3. After removing the Combination
Filter, use a Philips head screw driver to remove two (2) screws
and detach the UV-C Metal Shield.
4. The UV-C Bulb is removed by
carefully grasping the bulb with a
clean cloth or tissue and pulling
the bulb straight out of the unit.
5. The UV-C Bulb is reinstalled by sliding it,
horizontally, back into the slots at the top of the unit.
6. Push and hold UV Control Button for 5 seconds to
reset UV Bulb Change Indicator.
3.After removing the Combination
Filter, use a Philips head screw driver to remove four (4) screws
and detach the UV-C Metal Shield.
4. The UV-C Bulb is removed by
carefully grasping the bulb with a
clean cloth or tissue and twisting
the bulb 1/4 turn. Remove from unit.
5. The UV-C Bulb is reinstalled by reversing the
process in Step 4.
6. Push and hold UV Control Button for 5 seconds to
reset UV Bulb Change Indicator.
Bulb is NOT visible until
the UV-C METAL SHIELD
has been removed.
PULL UV-C BULB
STRAIGHT OUT
OF UNIT
CHANGE BULB INDICATOR
The blue light on the front of air cleaner will begin to flash continuously when it is time to replace
the UV-C bulb. Replace the bulb according to the directions then press the UV control button and
hold for 5 seconds to restart the system. The light should remain a constant blue.
REPLACE BULB
AC4825 SERIES
Bulb is NOT visible until the
UV-C METAL SHIELD has
been removed.
AC5000 SERIES
IMPORTANT: The UV-C Bulb should be replaced every 10 - 12 months depending on use.
Continue reading below for remaining
instructions on how to Install & Remove
the UV-C Bulb for the AC4825 Series and
the AC5000 Series.
E-8
E-9
Page 6

Système de purification d’air
Modèles des séries AC4825, AC5000
Garantie limitée de un 3 (AC4825) 5 (AC5000) an
Service à la
clientèle:
1.866.603.5900
www.guardiantechnologies.com
Date d'chat mois ________ année _________
Anglais E - 1 Français F - 1 Espagnol S - 1
Utilisez uniquement des pièces de rechange ORIGNALES
de Guardian Technologies.
REV0218
F-1
GARANTIE LIMITÉE
Des copies supplémentaires de ce manuel d’utilisation peuvent être obtenues sur
notre site Internet puis imprimées, ou en appelant le service à la clientèle.
©2016 Guardian Technologies LLC
Guardian Technologies LLC garantit au consommateur que cet appareil est exempt de défauts matériels ou de
fabrication, à partir de la date d'achat originale. Afin d’être admissible à cette Garantie limitée, un reçu de vente
original ou une autre preuve d’achat substitut comparable portant la date de l’achat original est requis. Consultez
la boîte de produit originale ou la page du produit/modèle spécifique sur le site Web de Guardian Technologies
pour la période de garantie concernant votre modèle en particulier. Cette garantie s’applique seulement à l’acheteur
original de ce produit à partir de la date d’achat originale. Cette garantie couvre un appareil acheté uniquement
auprès de distributeurs agréés.
Cette garantie s’applique à la réparation ou au remplacement du produit trouvé défectueux au niveau des matériaux
ou de la fabrication. Cette garantie ne s’applique pas aux dommages découlant d’une usure inhabituelle, d’une
utilisation commerciale, abusive ou déraisonnable ou de dommages additionnels. Cette garantie ne couvre pas les
dommages causés par des réparations non autorisées ou de toute utilisation non conforme avec le manuel des
instructions. Les défaillances découlant d’une usure normale ne seront pas considérées des défauts de fabrication
selon la présente garantie.
Si cet appareil s’avère défectueux pendant la période de garantie, nous réparerons ou remplacerons gratuitement
toutes les pièces défectueuses. Toute réparation couverte par la présente garantie doit être effectuée par Guardian
Technologies LLC. La présente garantie vous donne certains droits juridiques. Vous pouvez également bénéficier
d’autres droits (les droits peuvent varier d’un État à l’autre aux États-Unis).
Pour faire valoir la présente garantie, l’appareil complet doit être envoyé en port payé à Guardian Technologies LLC.
Veuillez inclure les renseignements complets, y compris : la nature du problème, le numéro de modèle, la date
d’achat, et incluez vos nom, adresse et numéro de téléphone (courriel facultatif) ainsi qu’une copie du reçu de vente
original. Retournez l’appareil à l’attention de : Customer Service, et à l’adresse indiquée ci-après. Adressez vos
questions ou vos commentaires au numéro sans frais indiqué ci-après.
États-Unis et Canada
Guardian Technologies LLC
26251 Bluestone Blvd.
Euclid, Ohio 44132
1866603-5900
www.guardiantechnologies.com
Veuillez vous rendre à www.guardiantechnologies.com pour enregistrer votre produit. Nous considérons le processus
d’enregistrement comme important afin d’assurer un service supérieur à notre clientèle. Cependant, l’envoi de cette
carte de garantie est facultatif et n’affectera en rien vos droits de faire valoir cette garantie en accord avec les
conditions susmentionnées..
Page 7

LIRE ET CONSERVER CES INSTRUCTIONS
AVERTISSEMENTS
Le non-respect des avertissements mentionnés ci-dessous peut provoquer
une décharge électrique ou des blessures graves.
Ce produit doit être utilisé en conformité avec les directives indiquées dans le
présent manuel. De graves blessures peuvent résulter d’un usage du produit
autre que celui indiqué dans le présent manuel.
Lorsque vous utilisez un appareil électrique, vous devez toujours respecter certaines consignes élémentaires
de sécurité afin de réduire le risque de feu, de choc électrique et de blessure, dont les suivantes.
• Lisez toutes les instructions avant d’utiliser cet appareil.
• IMPORTANT - Cet appareil d’éclairage portable est équipé d’une fiche polarisée (une tige de la fiche est
plus large que l’autre) pour réduire le risque de choc électrique. Cette fiche s’installe d’une seule façon
dans la prise de cournat. Si la fiche ne s’insère pas entièrement dans la prise, insérez-la dans l’autre sens.
Si elle ne s’insère toujours pas, contactez un électricien agréé. Ne jamais utiliser de rallonge électrique à
moins que la fiche s’insère entièrement. Ne modifiez pas la fiche.
• Pour éviter tout risque d’incendie ou de choc électrique, branchez l’appareil directement dans une prise
électrique de 120 V c.a.
• Gardez le cordon d’alimentation a l’écart des zones de passage. Pour éviter tout risque d’incendie,
ne faites JAMAIS passer le cordon d’alimentation sous un tapis ou à côté de grilles de chauffage,
de radiateurs, d’appareils de chauffage ou de cuisinières.
• Pour protéger contre tout risque de choc électrique, NE plongez PAS l’appareil dans l’eau ou
dans un liquide quelconque. N’utilisez pas cet appareil à proximité de l’eau.
• Une surveillance étroite est impérative lorsque tout appareil est utilisé à proximité d’enfants
ou d’animaux de compagnie.
• Débranchez toujours le purificateur d’air avant de le déplacer, d’ouvrir a grille de protection, de changer les
filtres ou lorsqu’il n’est pas utilisé. Assurez-vous de débrancher l’appareil en tirant sur la prise et non
sur le cordon.
• Ne laissez JAMAIS tomber et n’insérez JAMAIS d’objets dans tout orifice de l’appareil.
• Ne faites pas passer le cordon électrique sous la moquette.
• Ne recouvrez pas le cordon électrique avec des carpettes, des tapis d’escalier ou tout autre
revêtement similaire.
• Ne faites pas passer le cordon électrique sous les meubles ni les appareils électroménagers. Disposez le
cordon électrique à l’écart de la zone de passage et où personne ne risque de trébucher dessus.
• N’utilisez JAMAIS un appareil dont le cordon d’alimentation ou la fiche est endommagé, dont le moteur du
ventilateur ne tourne plus, à la suite d’une défaillance ou d’une panne, ou qui est tombé ou est endommagé
de quelque manière que ce soit. Veuillez communiquer avec le service à la clientèle au 1.866.603.5900 pour
obtenir de l’aide.
• N’utilisez l’appareil que conformément à son utilisation prévue et décrite dans le présent manuel. Toute
utilisation autre que celles recommandées par le fabricant risque de provoquer un incendie, un choc
électrique ou des blessures.
• N’utilisez PAS cet appareil à l’extérieur.
• N’obstruez JAMAIS les sorties d’air, les grilles de protection ou les prises de l’appareil. Ne placez
JAMAIS l’appareil sur une surface molle, telle qu’un lit ou un canapé, car cela risque de faire tomber
l’appareil, obstruant la sortie ou l’entrée d’air.
• N’essayez PAS de réparer ou de régler toute fonction électrique oumécanique de cet appareil.
Agir ainsi annulera la garantie. L’intérieur de cet appareil ne contient aucune pièce remplaçable.
Toute réparation doit être faite uniquement par un professionnel qualifié.
• NE METTEZ rien sur l’appareil.
• Les enfants ne peuvent pas identifier les risques liés à l’utilisation des appareils électriques. Pour
cette raison, surveillez toujours les enfants lorsqu’ils sont à proximité du purificateur d’air.
• AVERTISSEMENT: Pour réduire le risque d’incendie ou de choc électrique ne pas utiliser ce
ventilateur avec un dispositif de commande de la vitesse à semi-conducteurs quel qu’il soit.
• AVERTISSEMENT : Ne regardez pas directement la lumière émise par la lampe dans cet appareil pour
éviter des dommages à la peau ou aux yeux. Débranchez toujours l’alimentation avant de remplacer la
lampe ou d’entretenir l’appareil. Remplacez la lampe avec de lampe fabriqué par Guardian Technologies.
• Débranchez toujours l’appareil avant d’effectuer tout nettoyage ou tout entretien.
• MISE EN GARDE : N’utilisez PAS d’essence, de benzène, de diluant ou de nettoyants puissants
(entre autres) pour nettoyer la surface intérieure ou l’extérieur de l’appareil, car cela risque de l’endommager.
N’utilisez JAMAIS d’alcool ni d’autres dissolvants.
L’ozone moyenne pondérée dans le temps de 8 heures pour ce produit est de 0,001 ppmv lors de tests dans une
chambre de 30 m
3
. Le produit est conforme avec la concentration maximale permise d’ozone de 0,05 parties par million
par volume (ppmv) dans une période de 24 heures. Les lignes directrices de Santé Canada 2010 recommandent que la
limite d’exposition maximale, selon un temps moyen de 8 heures, soit de 0,020 ppmv ou moins lors de tests dans une
salle hermétique et contrôlée d'environ 30 m
3
.
Une étoile ENERGY STAR a été attribuée à cet article pour avoir satisfait les normes d'efficacité énergétique strictes
établies pas l'agence américaine de protection de l'environnement (EPA). L’EPA ne corrobore aucune des déclarations
du fabricant affirmant que l’utilisation de ce produit assainit l’air intérieur.
L’efficacité énergétique de ce modèle répondant aux exigences qui lui permettent de porter le symbole
ENERGY STAR est mesurée selon le rapport entre le débit d’air purifié (Clean Air Delivery Rate ou CADR)
pour la poussière du modèle et l’énergie électrique qu’il consomme, ou CADR/watts.
L’AMPOULE CONTIENT DU MERCURE
Veuillez respecter les exigences en matière de déversement, d’élimination et de nettoyage.
En cas de bris, suivez les consignes fournies par les sources ci-dessous pour le nettoyage.
www.epa.gov/cflcleanup 1-866-284-4010
AVERTISSEMENT: Ce produit peut vous exposer à des produits chimiques, y
compris du plomb et des composés de plomb, qui sont reconnus par l’État de la
Californie comme causant le cancer et des malformations congénitales, ou ayant
des effets nocifs sur la reproduction. Pour de plus amples informations visitez
le site www.P65Warnings.ca.gov.
F-2
F-3
Page 8

Check out our
Découvrez notre programme en ligne
de rappel de remplacement des filtres.
www.guardiantechnologies.com
SPÉCIFICATIONS DU PRODUIT ET PIÈCES
PIÈCES DE RECHANGE
AC4825
AC5000
FILTRE:
Filtre
No de modèle
FLT4825
B
TUBE UVC (5W):
No de modèle LB4000
Paquet de 4 filtres:
No de modèle
FLT22CB4
FILTRE:
Filtre
No de modèle
FL
T5000
C
TUBE UVC (5W):
No de modèle LB5000
IMPORTANT:
N'utilisez que des pièces de rechange AUTHENTIQUES de Guardian Technologies.
Pour acheter, communiquez avec le service à la clientèle.
SYSTÈME DE PURIFICATION D’AIR
Améliorez la qualité de l’air intérieur grâce à ce nouveau système complet de purification de l’air à filtre et
à rayon UVC de germguardian. Les multiples niveaux de purification incluent l’action conjointe du filtre pour
retenir les allergenes et les acariens que du filtre a charbon pour eliminer les odeurs. La technologie à rayon
UVC améliore l’élimination des germes.
Préiltre - Retient les particules de poussière et d’allergènes initiales.
Charbon Actif - Permet le contrôle et la prévention de la prolifération des bactéries, des germes et
des moisissures.
Lampe à rayon UVC - L’action conjointe de la technologie à rayon UVC et des filtres permet d’amélior
l’elimination des germes en suspension dans l’air.
*Le préfiltre et le filtre au charbon sont combinés en un seul filtre que s’accrouche au filtre et anti-acariens.
Paquet de 4 filtres:
No de modèle
FLT28CB4
PANNEAU DE COMMANDE
Panneau de
commande
Sortie d’air
Base
Entrée d’air
Corps de
l’apparei
Bouton de
mise en
marche
Bouton activer/désactiver tube
UVC/bouton de réinitialisation
filtre HEPA et tube UVC
Indicateur marche/arrêt
Indicateur de remplacement
de filtre
Poignée
de transport
bouton de
verrouillage
et de
déverrouillage
(pour accéder
au ltre et
au tube UV)
Couvercle
d’accès
du filtre
Devant de l’appareil Arrière de l’appareil
F-4
F-5
Page 9

NIVEAUX DE LA PURIFICATION DE L’AIR
Appareil
Appareil
Tube
UVC
Protecteur
métallique
de la lampe
UVC
Tube
UVC
Protecteur
métallique de
la lampe UVC
Couvercle
arrière avec
grille de
protection
de l’entrée d’air
Couvercle
arrière avec
grille de
protection
de l’entrée d’air
Bouton de
verrouillage/
déverrouillage
Bouton de
verrouillage/
déverrouillage
SÉRIE AC4825
Combinaison de
filtres C incluant
pré-filtre, filtre au
charbon et filtre
HEPA
SÉRIE AC5000
Combinaison
de filtres B
incluant pré-filtre,
filtre au charbon
et filtre HEPA
F-6
F-7
INSTRUCTIONS D’UTILISATION
FONCTIONNEMENT DU PURIFICATEUR D’AIR:
1. Tournez le BOUTON MARCHE/ARRÊT dans le sens des aiguilles d’une montre.
2. Une fois en marche, l’indicateur MARCHE/ARRÊT s’allume (vert). Le système est réglé par
défaut sur le mode VITESSE BASSE ( ).
3. Tournez le BOUTON MARCHE/ARRÊT dans le sens des aiguilles d’une montre a n de passer au
mode VITESSE MOYENNE ( ) ou VITESSE ÉLEVÉE ( ).
4. To activate the UV-C Bulb, press the UV button. Press the button again to turn OFF the UV-C Bulb.
5. To turn the unit OFF, rotate the POWER KNOB counter-clockwise to OFF mode (•).
REMPLACEMENT DU FILTRE
5. Reattachez le couvercle arriere de l’appareil et verrouillez-le bien en place.
6. Appuyez sur le bouton activer/désactiver tube UVC pendant 5 secondes pour
réinitialiser l’indicateur de remplacement de filtre.
INDICATEUR DE REMPLACEMENT DE FILTRE
L’indicateur marche/arrêt du système, normalement vert, passe au rouge et clignote en continu pour indiquer
qu’il est temps de remplacer le filtre. Remplacez le filtre en suivant les instructions puis appuyez sur le bouton
activer/désactiver tube UVC pendant 5 secondes pour réinitialiser le système. L’indicateur marche/arrêt repasse
au vert. Selon l’utilisation, la durée de vie du filtre est d’environ 6 mois..
REMPLACER LE FILTRE
1. Éteignez et débranchez
l’appareil.
3. Retirez la combinaison de
filtres usagée.
4. Insérez la nouvelle combinaison
de filtres dans le système. Suivez
la direction de la flèche sur le filtre
afin de l’insérer correctement.
2. Appuyez sur le bouton de
verrouillage/déverrouillage et
retirez le couvercle à l’arrière
de l’appareil.
AVANT D’UTILISER LE PURIFICATEUR D’AIR:
1. Retirez avec précaution le système de puri cation d’air du carton et du sac de protection.
2. Choisissez une surface dure, plane et de niveau pour y poser l’appareil.
* Pour un bon écoulement de l’air, placez l’appareil à au moins 30 cm (1 pied) de tout mur
et de tout meuble.
* Véri ez qu’aucune des grilles de protection n’est obstruée.
3. Branchez le cordon d’alimentation dans une prise de courant standard de 120V c.a.
IMPORTANT: Lors du transport de l’appareil, soulevez-le toujours à l’aide de la poignée située a l’arrière.
INSTRUCTIONS D’UTILISATION
NETTOYAGE ET ENTRETIEN DE LA COMBINAISON DE FILTRES
Faites l’entretien du filtre en le vérifiant fréquemment.
Selon les conditions de la qualité de l’air, vous pourriez devoir le remplacer plus fréquemment.
Aspirez la couche du filtre à charbons si requis pour enlever les débris lâches et la poussière, et pour aider
à prolonger la durée de vie de votre filtre.
Pour vérifier le statut du filtre, enlevez la couche de carbone pour monter le filtre plissé.
Si le filtre n'est plus blanc et qu’il est couvert d’une poussière grise et d’une saleté, il doit être remplacé..
Important : ne lavez PAS et ne réutilisez PAS la combinaison de filtres.
IMPORTANT: N’utilisez que des pièces AUTHENTIQUES de rechange de Guardian Technologies.
Page 10

GUIDE DE DEPANNAGE
Vérifiez que l’appareil est branché.
Vérifiez que le filtre est bien en place.
Confirmez que le filtre de rechange est un filtre
authentique la clientèle.
PROBLÈME
L’appareil ne fonctionne pas.
SOLUTION
L’appareil s’éteint
intempestivement.
Véri ez que l’appareil est branché à une prise de courant functionnelle.
Véri ez que le ltre HEPA est bien en place.
Véri ez que le couvercle arrière est bien verrouillé.
Veuillez communiquer avec le service à la clientèle.
Il n’y pas de circulation d’air.
Débranchez l’appareil. Véri ez le pré ltre/ ltre au charbon et le
filtre HEPA.
Nettoyez le pré ltre/ ltre au charbon au besoin.
Remplacez le ltre HEPA au besoin.
Augmentation du niveau
de bruit.
L’indicateur marche/arrêt
clignote rouge.
L’indicateur activer/désactiver
tube UVC clignote bleu.
Remplacez le tube et réinitialisez le système.
Assurez-vous que les ltres sont propres. Remplacez-les
au besoin.
Remplacez le ltre et réinitialisez le système.
TOURNEZ LE TUBE D’1⁄4
DE TOUR POUR
LE RETIRER.
INSTALLER ET RETIRER LE TUBE UVC
1. Retirez le couvercle arrière de l’appareil en
appuyant sur le bouton de verrouillage/déverrouillage.
2. Après avoir retiré le couvercle arrière de
l’appareil, enlevez la combinaison de filtres.
3. Après avoir retiré le filtre combiné,
utilisez un tournevis cruciforme pour
dévisser les 2 vis et détacher le
protecteur métallique de la lampe UVC.
4. Pour retirer le tube UVC, saisissez-le
en utilisant un chiffon ou un mouchoir
en papier propre et tirez dessus pour
le dégager de l’appareil.
5. Pour réinstaller le tube UVC, faites-le glisser
horizontalement dans la fente en haut de l’appareil.
6. Appuyez sur le bouton activer/désactiver tube
UVC pendant 5 secondes pour réinitialiser l’indicateur
de remplacement de tube.
3. Après avoir retiré la combinaison
de filtres, utilisez un tournevis
cruciforme pour retirer les quatre (4)
vis du protecteur métallique du tube
UVC et détachez-le.
4. Pour retirer le tube UVC,
saisissez-le avec précaution en
utilisant un chiffon ou un mouchoir
en papier propre et tournez le tube
d’1⁄4 de tour pour le retirer.
5. Pour réinstaller le tube UVC, suivez les
instructions de l’étape 4 dans le sens inverse.
6. Appuyez sur le bouton activer/désactiver tube
UVC pendant 5 secondes pour réinitialiser
l’indicateur de remplacement de tube.
Le tube est INVISIBLE tant
que le PROTECTEUR
MÉTALLIQUE DU TUBE
UVC n’est pas retiré.
DÉGAGEZ LE TUBE
UVC DU SYSTÈME EN
TIRANT DESSUS
HORIONTALEMENT.
INDICATEUR DE REMPLACEMENT DE TUBE
L’indicateur bleu sur le devant du système clignote en continu pour indiquer qu’il est temps de remplacer le
tube UVC. Remplacez le tube en suivant les instructions puis appuyez sur le bouton activer/désactiver tube
UVC pendant 5 secondes pour réinitialiser le système. L’indicateur repasse alors au bleu stable.
REMPLACER LE TUBE
SÉRIE AC4825
Le tube est INVISIBLE tant
que le PROTECTEUR
MÉTALLIQUE DU TUBE
UVC n’est pas retiré.
SÉRIE AC5000
IMPORTANT: Le tube UVC doit être remplacé tous les 10 à 12 mois, selon l’usage.
Lisez ce qui suit pour le reste des instructions
sur la manière d’installer et de retirer le tube
UVC pour les séries AC4825 et AC5000.
F-8
F-9
Reportez-vous au site Web pour chaque modèle de numéros CADR
Débit d’air pur
Comparez les performances des différents purificateurs d’air à l’aide du CADR. Premièrement, repérez la superficie
de la pièce suggérée. Puis, consultez les données CADR. Plus la valeur est élevée, plus l’appareil filtre rapidement l’air.
Qu’est-ce que le CADR?
CADR est l’acronyme de Clean Air Delivery Rate, soit le volume d’air filtré produit par unpurificateur d’air. Le classement
CADR indique l’efficacité d’un purificateur d’air dans sa filtration des particules fines, telles que la fumée de tabac et les
pollens de plantes, dans une pièce.
Page 11

GARANTÍA LIMITADA
Se pueden obtener copias adicionales al acceder directamente a nuestro sitio
web para imprimirlas, o al llamar al departamento de servicio al cliente.
©2016 Guardian Technologies LLC
Para el consumidor, Guardian Technologies LLC garantiza que este producto se encuentra libre de defectos de
materiales o mano de obra a partir de la fecha de compra original. Para poder ser elegible para esta Garantía
limitada, se requiere presentar el recibo original de la venta o un comprobante de compra sustituto comparable
que lleve la fecha de la compra original. Consulte la caja original del producto o la página del producto/modelo
específico en el sitio web de Guardian Technologies para consultar la duración de la garantía de su modelo en
particular. Esta garantía aplica solamente para el comprador original de este producto, a partir de la fecha original
de compra. Esta garantía cubre únicamente los productos comprados a distribuidores autorizados.
Esta garantía aplica para reparaciones o reemplazos de productos con defectos en el material o en la mano de
obra. Esta garantía no aplica para los daños que se deriven del desgaste inusual; el uso comercial, abusivo,
irrazonable, o daños suplementarios. Esta garantía no cubre los daños que se deriven de reparaciones no
autorizadas, o de algún uso que no esté de acuerdo con este manual de instrucciones. Los defectos que se
deriven del uso y desgaste normales no se considerarán defectos de fábrica bajo esta garantía.
Si durante el período de garantía se detecta que el producto está defectuoso, repararemos o reemplazaremos las
piezas defectuosas sin ningún costo. Guardian Technologies LLC deberá realizar todas las reparaciones de
garantía. Esta garantía le otorga derechos legales específicos y usted pudiera tener otros derechos adicionales
(los cuales varían en cada estado de los EE.UU.)
Para presentar un producto para garantía, la máquina completa se debe enviar, con el envío pagado con anterioridad,
a Guardian Technologies LLC. El envío debe contener la información completa, que incluye: el problema, el
número de modelo del producto, el día de la compra y una copia del recibo de compra original, junto con su nombre,
dirección y teléfono (correo electrónico opcional). Envíe el producto para devolución a: Servicio al cliente, a la
siguiente dirección. Si tiene alguna pregunta o comentario, puede llamar a la línea telefónica gratuita indicada
más adelante.
EE.UU. y Canadá
Guardian Technologies LLC
26251 Bluestone Blvd.
Euclid, Ohio 44132
1.866.603.5900
www.guardiantechnologies.com
Visite www.guardiantechnologies.com para registrar su producto. Consideramos que el proceso de registro es
importante para garantizar un servicio superior a nuestros clientes; sin embargo, el envío de la tarjeta de garantía
es opcional y no afecta sus derechos para utilizar la garantía de acuerdo a las condiciones estipuladas anteriormente.
INSTRUCIONES DE USO Y CUIDADO
Sistema para la Limpieza del Aire
Modelo No. AC4825, Serie AC5000
Garantía limitada por 3 (AC4825), 5
(AC5000) años
Atención al cliente
1.866.603.5900
www.guardiantechnologies.com
Fecha de compra mes ________ año _________
Inglés E - 1 Francés F - 1 Español S - 1
Utilice únicamente piezas de repuesto GENUINAS de Guardian Technologies.
REV0218
Page 12

S-2
S-3
ADVERTENCIA: Este producto puede exponerlo a químicos que incluyen plomo,
ocompuestos de plomo, que son conocidos enel estado de California como
causantes de cáncer, defectos de nacimiento o daños reproductivos.
Para mayor información, visite www.P65Warnings.ca.gov.
LEA Y GUARDE ESTAS INSTRUCCIONES
ADVERTENCIAS
Elnocumplirlasadvertenciasqueseenumeran a continuación
puede provocar un choque eléctrico o lesiones severas.
Debe usarse este producto sólo de acuerdo a las especificaciones descritas en este
manual. Usarlo de una manera diferente a lo indicado puede ocasionar lesiones serveras.
Alusar un electrodoméstico, debe seguir siempre ciertas precauciones básicas para disminuir el
riesgo de incendio, choque eléctrico y lesiones personales, las cuales incluyen todo lo siguiente:
• Antes de usar el electrodoméstico, lea todas las instrucciones.
• IMPORTANTE - Como una característica adicional, esta luminara portátil tiene una clavija polarizada
(una hoja es más ancha que la otra) con el fin de reducir el riesgo de choque eléctrico. Estaclavija
encajará en un tomacorriente polarizado de una manera solamente. Si la clavija no encaja bien en el
tomacorriente, invierta la clavija. Si aún así no encaja, póngase en contacto con un electricista
calificados. Nunca use una extensión eléctrica a menos que la clavija pueda insertarse por completo.
Nomodifique la clavija.
• Para evitar un incendio o choque eléctrico, conecte directamente el aparato a un tomacorriente de
120 V de corriente CA.
• Mantenga el cordón eléctrico alejado de las áreas de gran tránsito peatonal. Para evitar el riesgo
de incendio, NUNCA ponga el cordón eléctrico debajo de las alfombras, ni cerca de rejillas de
calefacción, radiadores, estufas ni calentadores.
• Para evitar los riesgos eléctricos, NO sumerja este aparato en agua o en otros líquidos.
Nouse este aparato cerca del agua.
• Cuando se utilice un aparato en un área donde hay niños o mascotas presentes, debe vigilarlos en
todo momento.
• Desconecte siempre el purificador de aire antes de moverlo, abrir la rejilla, cambiar los filtros, antes de
limpiarlo o cuando no lo use. Asegúrese de desconectarlo tomándolo del enchufe, no del cordón eléctrico.
• NUNCA deje caer ni inserte un objeto en cualquier abertura.
• No pase el cordón eléctrico por debajo de la alformbra.
• No cubra el cordón eléctrico con tapetes, plásticos protectores para alfombrado o cubiertas similares.
• No pase el cordón eléctrico por debajo de los muebles o aparatos electrodomésticos. Mantenga el cordón
eléctrico alejado de las áreas de gran tránsito peatonal y de los lugares en que pueda provocar tropezones.
• NO utilice ningún aparato cuyo cordón eléctrico o clavija estén dañados, si el motor del ventilador
no gira, si el aparato no funciona correctamente o si se ha caído o dañado de alguna forma.
Si necesita ayuda, llame al departamento de servicio al cliente al 1.866.603.5900.
• Use este aparato únicamente para el uso doméstico previsto, como se describe en este manual.
Cualquier otro tipo de uso no recomendado por el fabricante podría provocar un incendio, choque
eléctrico o lesiones personales.
• No se debe utilizar en exteriores.
• NUNCA bloquee las aberturas para el aire, las rejillas/salidas del aparato, ni coloque el producto
sobre una superficie suave, como una cama o sofá, ya que esto podría provocar que el aparato se
vuelque, se bloquee la abertura de entrada o la salida del aire.
• No intente reparar o ajustar un funcionamiento eléctrico o mecánico incorrecto de esta unidad. El hacerlo
anulará la garantía. El interior del aparato no contiene piezas que requieren mantenimiento. Todas las labores
de servicio y mantenimiento deben ser realizadas sólo por personal calificado.
• NO coloque ningún objeto en la parte superior de la unidad.
• Los niños no pueden percatarse de los riesgos asociados con el usa de aparatos electrodomésticos.
Por este motivo siempre debe vigilar a los niños cuando se encuentren cerca del purificador de aire.
(una hoja es más ancha que la otra) con el fin de reducir el riesgo de choque eléctrico. Estaclavija
• ADVERTENCIA: Para disminuir el riesgo de incendio o choque eléctrico, no utilice este ventilador
con ningún dispositivo de conrol de velocidad de estado sólido.
• ADVERTENCIA: Ver directamente la luz producida por la lámpara de este aparato podría ocasionar daños
en la piel o en los ojos. Siempre desconecte la corriente antes de reemplazar o darle mantenimiento a la
lámpara. Reemplace la lámpara con la lámpara fabricado por Guardian Technologies.
• Desconecte siempre la unidad antes de limpiarla o darle mantenimiento.
• PRECAUCIÓN: NO utilice gasolina, benceno, solvente, limpiadores agresivos, etc. para limpiar el interior
y el exterior de la unidad, ya que podrían dañar el aparato. NUNCA utilice alcohol ni otro tipo de solventes.
El valor límite de umbral (TWA) de ozono durante 8 horas de este producto es 0.001 ppmv cuando se prueba en una
habitación de 30 m
3
. El producto cumple con la concentración máxima permisible de ozono, de 0.050 partes por millón
por volumen (ppmv) en un periodo de 24 horas. Los Lineamientos de salud de Canadá de 2010 recomiendan que el límite
máximo de exposición, basado en un tiempo promedio de 8 horas, es de 0.020 ppmv o menor, cuando se ha probado
en una habitación confinada y controlada de aproximadamente 30 m
3
.
Este producto obtuvo la certificación ENERGY STAR mediante el cumplimiento de estrictas normas de ahorro de
energía establecidas por la Agencia de Protección Ambiental de los Estados Unidos (US EPA, por su sigla en inglés).
La EPA de los Estados Unidos no respalda las afirmaciones hechas por cualquier fabricante sobre la obtención de
una calidad de aire en interiores más saludable debido al uso de este producto.
La eficiencia energética de este modelo con la certificación ENERGY STAR se mide en base a la
proporción del promedio de emisión de aire puro (CADR, por su sigla en inglés) del modelo para el
polvo y la energía eléctrica que consume, o CADR/vatio.
LA BOMBILLA CONTIENE MERCURIO
Manipule según las exigencias sobre derrames, eliminación y limpieza dellugar. En caso
se rompa, siga el método de limpieza proporcionado porlos siguientes contactos.
www.epa.gov/cflcleanup 1-866-284-4010
Page 13

Pruebe nuestro recordatorio de cambio de
filtro y el programa de filtros de repuesto en línea.
ESPECIFICACIONES Y PARTES DEL PRODUCTO
PARTES DE REPUESTO
AC4825
AC5000
FILTRO:
Filtro C
Modelo No.
FLT4825
B
FOCO UV-C (5W):
Model No. LB4000
FILTRO
4-PAQUETE:
Model No.
FLT22CB4
FILTRO:
Filtro
Model No.
FL
T5000
C
FOCO UV-C (5W):
Model No. LB5000
Check out our
www.guardiantechnologies.com
IMPORTANTE:
Utilice únicamente piezas de repuesto GENUINAS de Guardian Technologies. Para realizar
la compra, comuníquese con el departamento de Servicio al cliente.
SISTEMA PARA LA LIMPIEZA DEL AIRE
Mejore la calidad del aire dentro de su hogar con un sistema completo para la limpieza del aire UV-C y con
filtro genuino germguardian. Los diversos niveles de purificación incluyen un filtro combinado genuino que
absorbe los alérgenos, un filtro de carbón para eliminar los olores. La tecnología de luz UV-C mejora el
poder de erradicación de gérmenes.
Prefiltro- Absorbe las primeras partículas de polvo y alérgenos.
Conocido También Como Carbón Activado - Contribuye a controlar y prevenir la proliferación
de baterias, gérmenes y moho..
Luz UV-C - La tecnología de luz UV-C trabaja junto con los filtros para optimizar la eliminación de los
gérmenes suspendidos en el aire.
*El prefiltro y el filtro de carbon se encuentran combinados en una sola capa que se fija al fitlro.
FILTRO
4-PAQUETE:
Model No.
FLT28CB4
PANEL DE CONTROL
Panel de
control
Salida de aire
Base
Air Inlet
Cuerpo de
la unidad
Perilla de
potencia
Botón del foco UVC/Filtro
HEPA/Restablecer foco UV
Indicador de corriente/
Indicador de cambio
de filtro
Asa para
el transporte
botón de bloqueo
y liberación
(para obtener
acceso al ltro
y el foco)
Cubierta
para obtener
acceso al ltro
Parte anterior Parte posterior
S-4
S-5
Page 14

NIVELES DE PURIFICACIÓN DEL AIRE
Unidad principal
Foco
UV-C
Cubierta de
metal de
la luz UV-C
Cubierta posterior
con rejilla de
entrada de aire
Botón de bloqueo
y liberación
SERIE AC4825
AC5000 SERIES
El Filtro combinado B
incluye el filtro previo,
de carbón y los filtros
HEPA genuinos
S-6
S-7
INSTRUCCIONES DE FUNCIONAMIENTO
FUNCIONAMIENTO DEL PURIFICADOR DE AIRE:
1. Encienda el puri cador de aire haciendo girar la PERILLA DE POTENCIA en el sentido de las agujas del reloj.
2. Inmediatamente después de encender el puri cador de aire, se iluminará el indicador de corriente (verde) y
la unidad funcionará a velocidad BAJA ( ).
3. Gire la PERILLA DE POTENCIA todavía más en el sentido de las agujas del reloj para hacer funcionar el
puri cador de aire a velocidad MEDIA ( ) o Alta ( ).
4. Para activar el foco UV-C, oprima el botón UV. Vuelva a oprimir este botón para apagar el foco UV-C.
5. Para apagar el puri cador, gire la PERILLA DE POTENCIA en sentido contrario a las agujas del reloj hasta
la posición “OFF” (•).
REEMPLACE EL FILTRO
5. Vuelva a colocar la cubierta de la unidad y asegúrela en su sitio.
6. Presione y sostenga el botón de control de la luz UV durante 5 segundos para
restablecer el indicador de cambio de filtro.
INDICADOR DE CAMBIO DE FILTRO
La luz verde indicadora de corriente del puri cador de aire cambiará a roja y destellará continuamente
para indicar que es el momento de reemplazar el ltro. Reemplace el ltro según las instrucciones y
enseguida presione y sostenga el botón de control de la luz UV durante 5 segundos para restablecer el
sistema. La luz cambiará nuevamente a verde. Dependiendo del uso del aparato, el filtro puede durar 6
meses aproximadamente.
REEMPLACE EL FILTRO
1. Apague y desconecte
la unidad.
3. Quite el filtro combinado
usado.
4. Instale un filtro combinado nuevo
en el puri cador de aire. Consulte la
flecha que se encuentra dibujada
en el filtro para instalarlo en la
dirección correcta.
2. Oprima el botón de bloqueo
y liberación y retire la cubierta
posterior de la unidad.
NETTOYAGE ET ENTRETIEN DE LA COMBINAISON
DE FILTRES
Mantenga el filtro revisándolo frecuentemente.
Según las condiciones de la calidad del aire, podría necesitar reemplazarlo más frecuentemente.
Aspire la capa del filtro de carbón tan seguido como sea necesario para retirar los escombros
sueltos y el polvo, y para ayudar a prolongar la vida de su filtro.
Para revisar el estado del filtro, retire la capa de carbón para exponer el filtro plisado. Si el filtro
ya no es de color blanco y está cubierto con polvo gris o suciedad, debe reemplazarlo.
Important : ne lavez PAS et ne réutilisez PAS la combinaison de filtres.
IMPORTANTE: Utilice únicamente piezas de repuesto GENUINAS de Guardian Technologies.
ANTES DE PONER A FUNCIONAR EL PURIFICADOR DE AIRE:
1. Saque cuidadosamente el puri cador de aire de la caja y la bolsa.
2. Elija una super cie rme, plana y nivelada para colocar el puri cador de aire.
* Para que el ujo de aire sea adecuado, ubique el aparato al menos a una distancia
de 30.5cm (1 pie) de la pared o muebles.
* Veri que que ninguna de las rejillas este bloqueada.
3. Conecte el cordón eléctrico a un tomacorriente de 120V de corriente CA.
IMPORTANTE: Para mover el puri cador de aire, levante siempre el aparato con el asa
para el transporte ubicada en la parte posterior.
INSTRUCCIONES DE FUNCIONAMIENTO
Unidad
principal
Foco
UV-C
Cubierta de
metal de
la luz UV-C
Botón de bloqueo
y liberación
El Filtro
combinado C
incluye el filtro
previo, de carbón
y los filtros HEPA genuinos
Cubierta posterior
con rejilla de
entrada de aire
Page 15

GUÍA DE SOLUCIÓN DE PROBLEMAS
Veri que que la unidad esté conectada.
Llame al departamento de servicio al cliente.
PROBLEMA
La unidad no funciona.
SOLUCIÓN
La unidad se apaga de
forma imprevista.
Veri que que la unidad esté conectada en un tomacorriente
que funcione perfectamente.Check that filter is firmly in place.
Veri que que el ltro HEPA esté asegurado en su sitio.
Veri que que la cubierta posterior esté asegurada firmemente
en su sitio.
Llame al departamento de servicio al cliente.
La unidad no hace circular aire.
Desconecte la unidad. Veri que el pre filtro/ filtro de carbón y el
filtro HEPA.
Limpie el pre filtro/ filtro de carbón si es necesario. Reemplace
el filtro HEPA si es necesario.
Incremento del nivel de ruido.
La luz indicadora de corriente
está roja y destellando.
Blue UV-C light is flashing. Reemplace el filtro y restablezca el sistema.
Cerciórese que los filtros estén limpios. Reemplácelos si
es necesario.
Reemplace el filtro y restablezca el sistema.
GIRE EL FOCO 1/4 DE
VUELTA PARA RETIRARLO
INSTALACIÓN Y RETIRO EL FOCO UV-C
1. Retire la cubierta posterior de la unidad oprimiendo
el botón de “bloqueo y liberación.”
2. Después de retirar la cubierta posterior de la
unidad, quite el ltro combinado.
3. Después de quitar el filtro combinado,
utilice un destornillador Phillips para
retirar los dos tornillos y quitar la
cubierta de metal de la luz UV-C.
4. El foco UV-C se retira tomándolo
cuidadosamente con un paño limpio
o pañuelo desechable y tirando del
mismo para sacarlo de la unidad.
5. El foco UV-C se vuelve a instalar deslizándolo de
manera horizontal para insertarlo en las ranuras que se
encuentran en la parte superior de la unidad.
6. Presione y sostenga el botón de control de la luz
UV durante 5 segundos para restablecer el indicador
de cambio de foco.
3. After removing the Combination
Filter, use a Philips head screw-
driver to remove four (4) screws
and detach the UV-C Metal Shield.
4. The UV-C Bulb is removed by
carefully grasping the bulb with a
clean cloth or tissue and twisting
the bulb 1/4 turn. Remove from unit.
5. The UV-C Bulb is reinstalled by reversing the
process in Step 4.
6.
Push and hold UV Control Button for 5 seconds to
reset UV Bulb Change Indicator
.
El foco NO puede verse
hasta que se retira la cubierta
de metal de la luz UV-C.
SAQUE EL FOCO
UV-C DE LA UNIDAD
INDICADOR DE CAMBIO DE FOCO
La luz azul en la parte frontal del puri cador de aire destellará continuamente cuando llegue el momento de
reemplazar el foco UV-C. Reemplace el foco según las instrucciones y enseguida presione y sostenga el botón
de control de la luz UV durante 5 segundos para restablecer el sistema. La luz debe permanecer de color
azul constante.
SERIE AC4825
El foco NO puede verse
hasta que se retira la
cubierta de metal de la
luz UV-C.
SERIE AC5000
IMPORTANT: El foco UV-C debe reemplazarse cada 10 a 12 meses, dependiendo del uso.
Para comprar un ltro de repuesto
Siga leyendo abajo el resto de las instrucciones
sobre cómo instalar y sacar el foco UV-C de las
series AC4825 y AC5000.
S-8
S-9
REEMPLACE EL FOCO
Consulte el sitio web para los números CADR modelo individuales.
Promedio de emisión de aire puro
Compare los números CADR entre un purificador de aire y otro. Mire primero el tamaño de la habitación
para la cual se recomienda. Enseguida, consulte los números del promedio de emisión de aire puro(CADR).
Mientras más elevado sea el número, más rápidamente se filtra ell aire.
¿Qué significa CADR?
CADR es la sigla en inglés de Clean Air Delivery Rate, e indica el volumen de aire filtrado por un
purificador de aire. Las clasificaciones CADR muestran la efectividad del purificador de aire para
atrapar las partículas finas del humo del tabaco y pólenes en la habitación, entre otras.
 Loading...