

Page 1
Instructions
PNEG-1923
1004 East Illinois Street • Assumption, IL 62510 • 1-217-226-4421
10° Roof Assembly Instructions
IMPORTANT: Read all instructions BEFORE STARTING ASSEMBLY.
Refer to Bulk Feed Tank manual for additional assembly information. These instructions apply only to the
assembly of the 10° roof.
IMPORTANT: All tanks with 10° roofs must be assembled vertically to avoid damage to component parts.
General Assembly Instructions
1. Assemble top sidewall sheets. (Refer to Bulk Feed Tank manual.)
NOTE: Top ring is special 16 gauge (Color Code Blue).
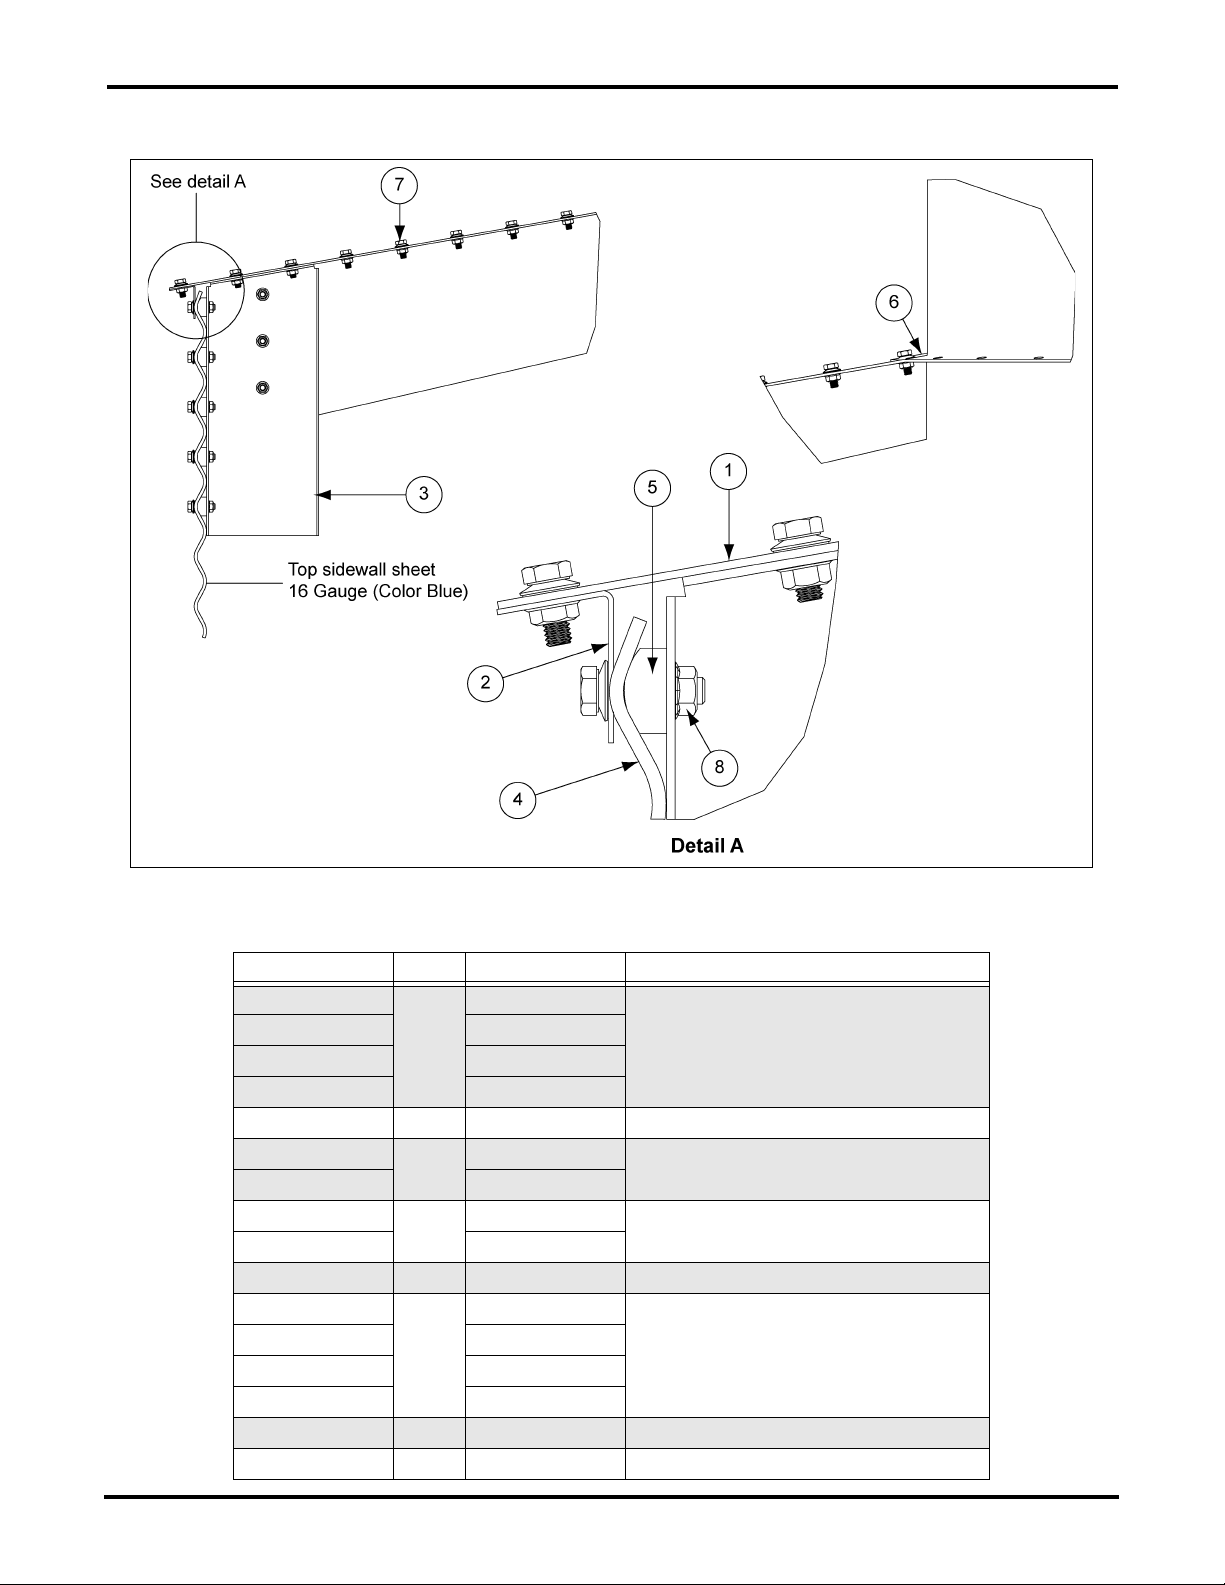
2. Beginning with the second vertical row of holes (clockwise) from the sidewall vertical seam,
assemble an eave support bracket, spacers and an eave seal angle to the top sidewall sheet.
On every third vertical row of holes thereafter, attach another eave support bracket with spacers.
Refer to Figure 1 on Page 2 and Figure 2 on Page 3 for assembly diagrams and details. Be sure to
caulk all areas indicated.
3. Assemble roof panels to the eave support brackets, eave seal angles and peak ring. Roof panel
seams are located at each eave support bracket. Note roof panel overlap and caulking detail. Roof
panels must be supported at 10° angle during assembly. Remove supports when roof assembly
is complete.
4. Assemble guardrail brackets to the top sidewall sheets, starting again with the second vertical row of
holes (clockwise) from the sidewall vertical seam. Every fourth vertical row of holes thereafter, attach
another guardrail bracket.
5. Assemble guardrail posts to guardrail brackets. Refer to guardrail and safety cage assembly diagram
in Figure 5 on Page 6 and Figure 6 on Page 7 for details.
6. Assemble guardrail tubes and toe boards to guardrail posts. (None at ladder location.)
Date: 04-10-13 PNEG-1923
Printed in the U.S.A.
Copyright © 2013 by GSI Group
www.gsiag.com
Page 1 of 7
CN-304634
Page 2
10° Roof Assembly Instructions
10° Roof Assembly
Figure 1
10° Roof Assembly Parts List
Bin Diameter Ref # Part # Description
9'
12' BLK-11431
15' BLK-11432
18' BLK-11390
All 2 BLK-11392 Eave Seal Angle
9' and 12'
15' and 18' BLK-11395
9' and 12'
15' and 18' HT-6910
All 5 S-7041 Spacer
9'
12' BLK-11436
15' BLK-11433
18' BLK-11401
All 7 S-275 Bolt, HH Bin 5/16"-18 x 3/4" YDP Grade 5
All 8 S-3611 Flange Nut 5/16"-18 YDP Grade 2
1
3
4
6
BLK-11389
BLK-11394
SS-6911
BLK-11393
10° Roof Panel
Eave Support Bracket
Top Sidewall Sheet
Peak Ring
Page 2 of 7 PNEG-1923
Page 3
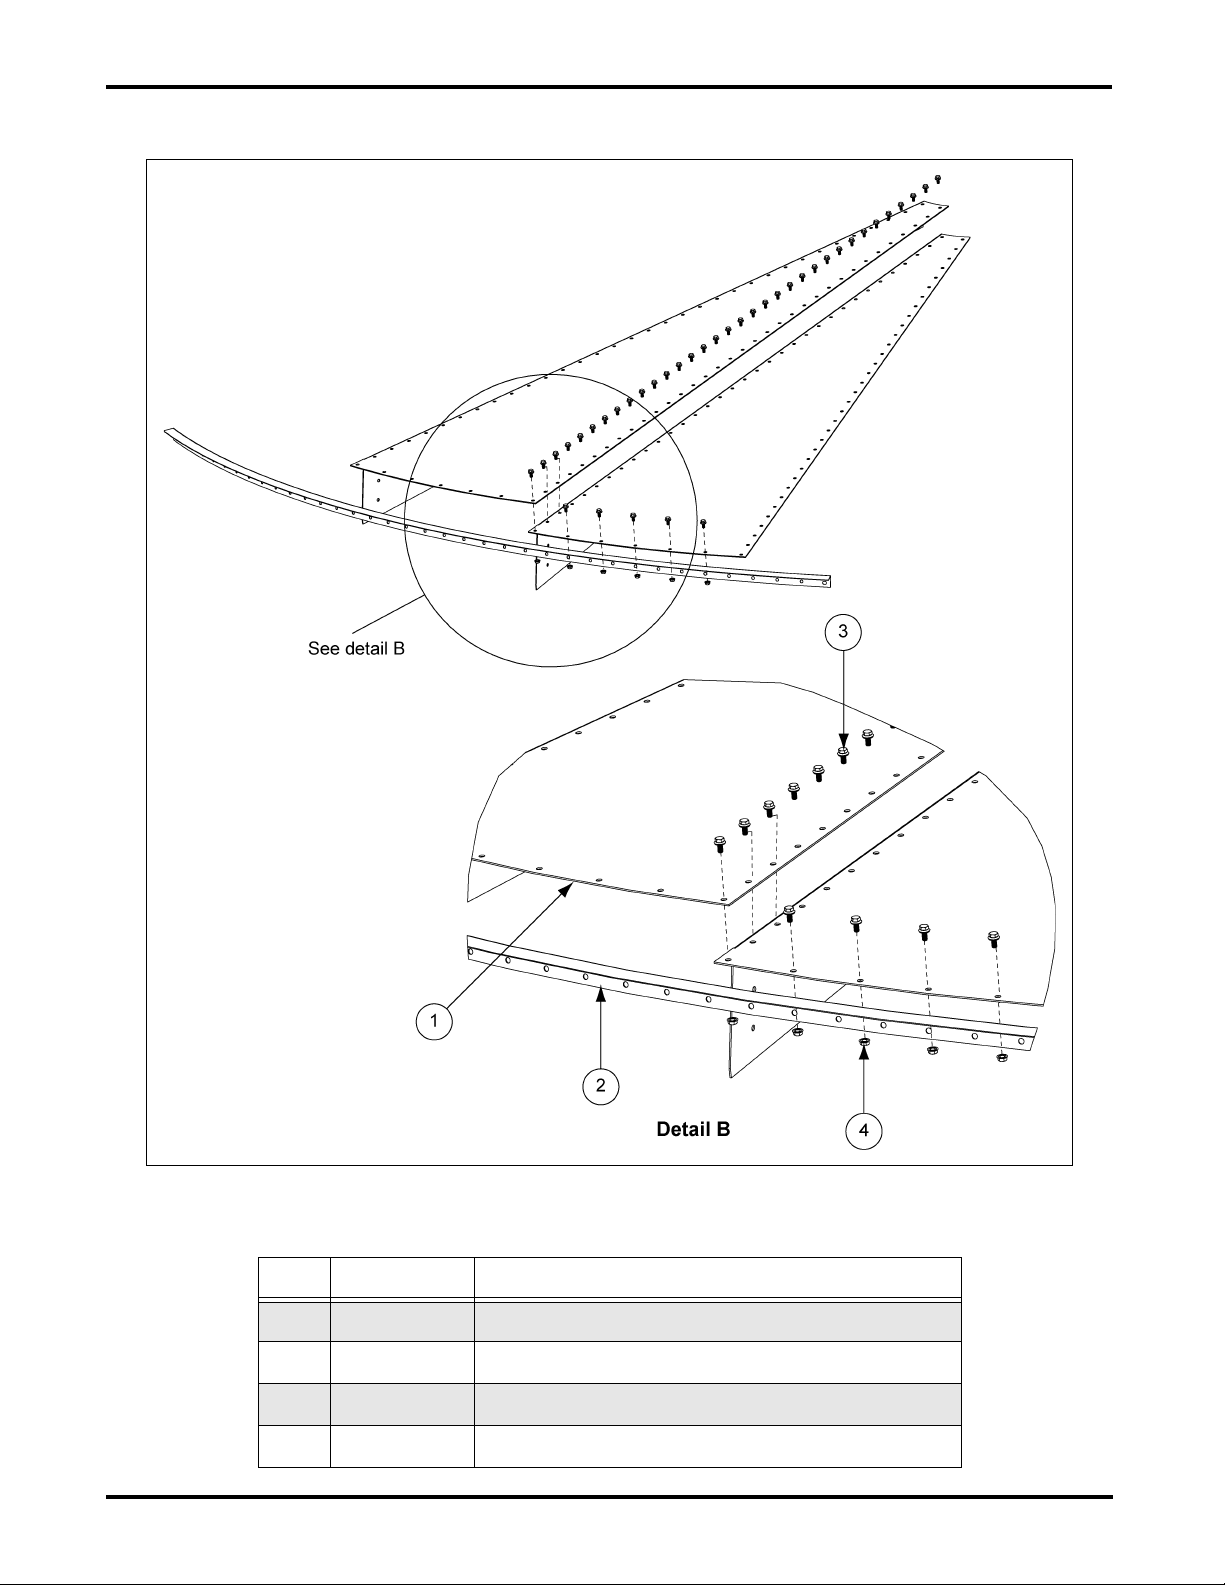
10° Roof Assembly (Continued)
10° Roof Assembly Instructions
Figure 2
10° Roof Assembly Parts List
Ref # Part # Description
1 BLK-11390 18' 10° Roof Panel
2 BLK-11392 Eave Seal Angle
3 S-275 Bolt, HH Bin 5/16"-18 x 3/4" YDP Grade 5
4 S-3611 Flange Nut 5/16"-18 YDP Grade 2
PNEG-1923 Page 3 of 7
Page 4

10° Roof Assembly Instructions
Ladder Section Assembly
Two (2) splice plates are required to attach each additional ladder section. The head of the bolt should be
to the inside of the ladder with the splice plate on the outside as shown in Figure 3. Use 5/16" x 3/4" bolts
for all connections.
NOTE: With most installations, the last ladder section to reach the concrete will need to be cut to fit.
(See Figure 4 on Page 5.)
Figure 3
Page 4 of 7 PNEG-1923
Page 5

Ladder Section Assembly (Continued)
10° Roof Assembly Instructions
Figure 4
Ref # Part # Description Qty
1 4FOOTRF 4' Ladder Section 1
2 LDR-4346 Placement Bracket New Ladder L.H. 1
3 LDR-4347 Placement Bracket New Ladder R.H. 1
4 LDR-4314 Ladder Standoff Roll Formed 2
PNEG-1923 Page 5 of 7
Page 6

10° Roof Assembly Instructions
Guardrail and Safety Cage Assembly
Figure 5
Guardrail and Safety Cage Assembly Parts List
Ref # Part # Description
1 BLK-11445 10° Roof Guardrail Post
2 BLK-11443 10° Roof Guardrail Tube
3 BLK-13440 10° Roof Safety Cage Tie Strap
4 BLK-11444 10° Roof Guardrail Toe Board
5 BLK-11442 10° Roof Guardrail Bracket
6 4FOOTRF 4' Ladder Section
7 8FOOTRFB 8'-4" Top Ladder Rail
8 LDR-4201 Safety Cage Hoop Half
9 LDR-4346 Placement Bracket New Ladder L.H.
10 LDR-4347 Placement Bracket New Ladder R.H.
11 LS-6713 48" Safety Cage Vertical Support
12 LS-6714 24" Safety Cage Vertical Support
Page 6 of 7 PNEG-1923
Page 7

10° Roof Assembly Instructions
Guardrail and Safety Cage Assembly (Continued)
Figure 6
Guardrail and Safety Cage Assembly Parts List
Ref # Part # Description Qty
1 4FOOTRF 4' Ladder Section 1
2 LDR-4403 Safety Cage Extension Rail Spacer 4
3 8FOOTRFB 8'-4" Top Ladder Rail 2
4 LDR-4201 Safety Cage Hoop Half 6
5 LDR-4346 Placement Bracket New Ladder L.H. 1
6 LDR-4347 Placement Bracket New Ladder R.H. 1
7 BLK-13440 10° Roof Safety Cage Tie Strap 4
8 LS-6713 48" Safety Cage Vertical Support 7
9 LS-6714 24" Safety Cage Vertical Support 7
PNEG-1923 Page 7 of 7
 Loading...