

Page 1

Instructions
PNEG-1909
40 Series Roof Ladder
1004 East Illinois Street • Assumption, IL 62510 • 1-217-226-4421
Step Installation
Installing Roof Ladder Steps
Roof ladder steps will allow access to roof and manway access.
What You Should Know
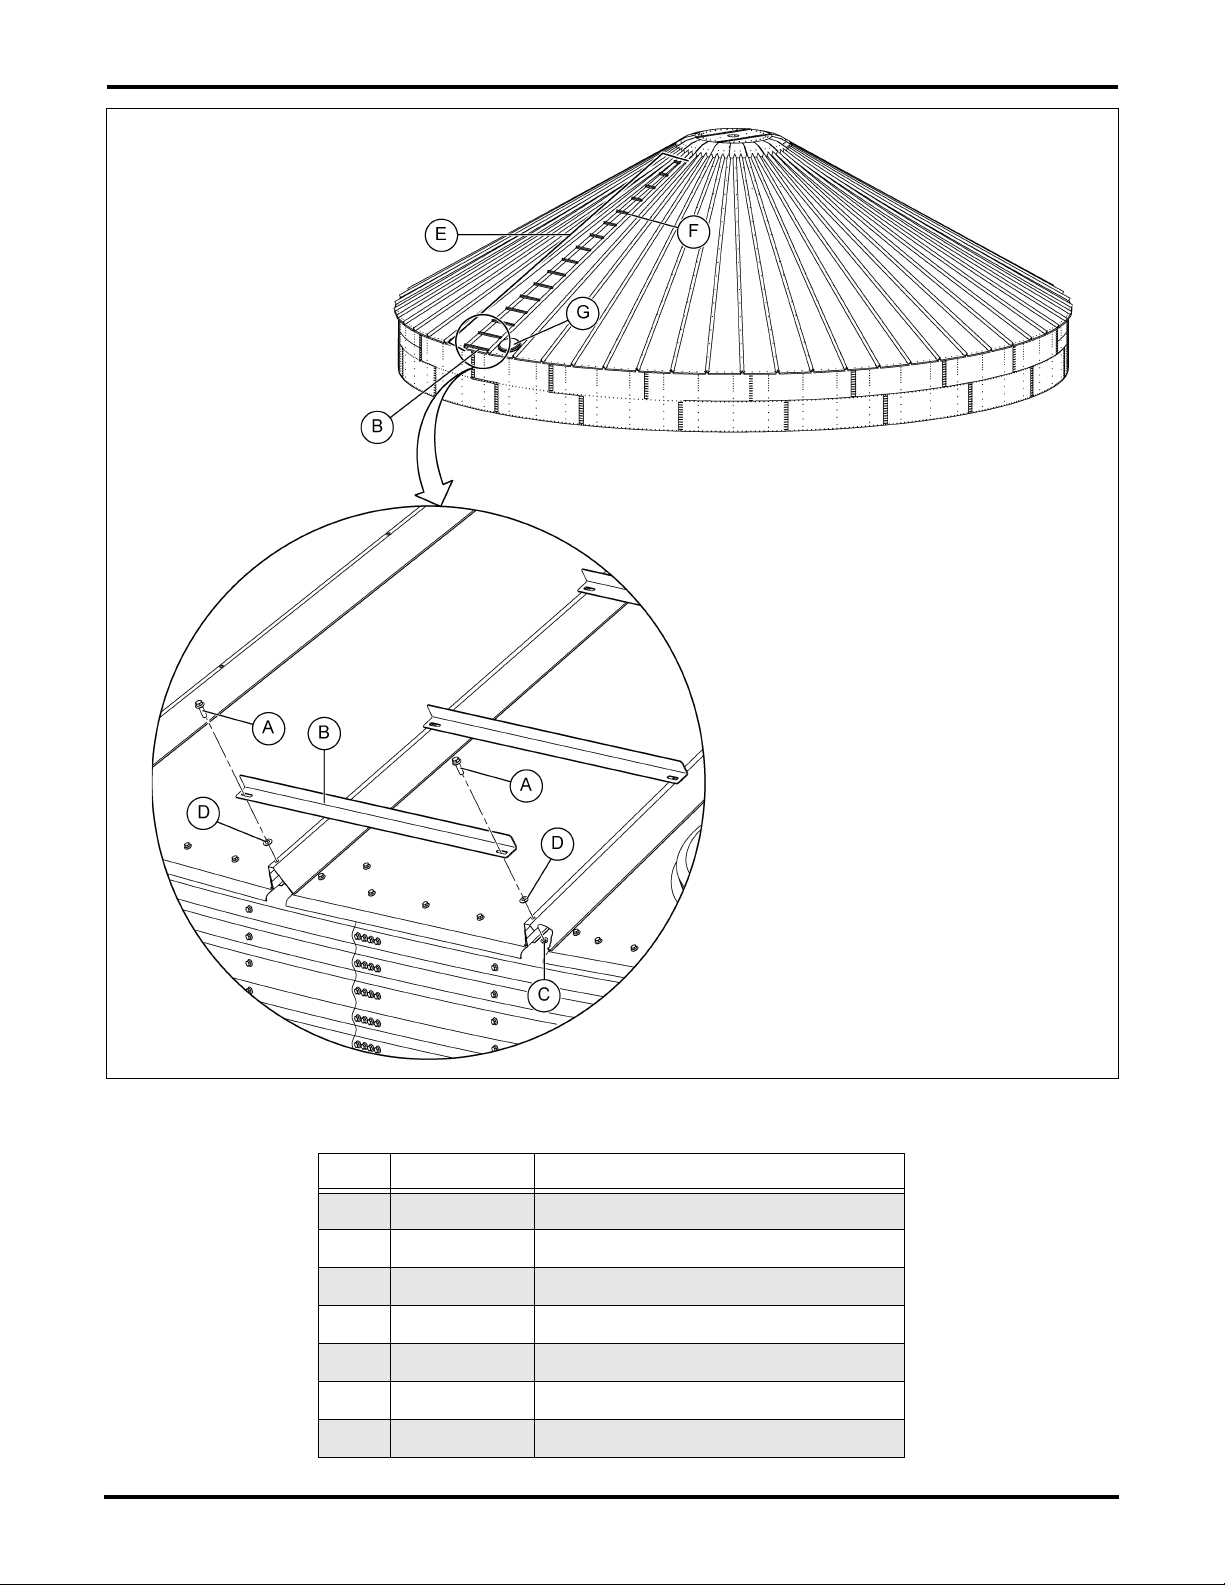
Each eave-to-peak ladder step package (E) will differ with the diameter of each bin. When installing the
ladder steps, always start from the eave and work up toward the peak, installing the longest step first and
the shortest step last.
NOTE: Use the table at the end of this procedure for part listings and the correct placement of each ladder
step configuration for various bin sizes. See eave-to-peak ladder step kit, ladder step placement
on Page 3.
1. Place the first roof ladder step (B) onto the corresponding roof panel, next to the manway access (G).
NOTE: If support rings will be installed, roof ladder steps (B and F) will not be installed. Proceed to
next available ladder step.
2. Install two (2) flange bolts (A) and install two (2) sealing washers (D) between the ladder step (B)
and the roof panel rib. Secure the roof ladder step to the roof panel with two (2) flange nuts (C).
Tighten to the recommended torque specifications, see bolt torque specifications.
3. Repeat this procedure for the remaining ladder steps in the eave-to-peak ladder step package (E).
(See Figure 1 on Page 2.)
Date: 01-18-13 PNEG-1909
Printed in the U.S.A.
Copyright © 2013 by GSI Group
www.gsiag.com
Page 1 of 3
CN-303689
Page 2
40 Series Roof Ladder Step Installation
Figure 1 Exploded View of a Roof Ladder Step
Ref # Part # Description
A S-10260 5/16"-18 x 1" Flange Bolt
B LS-260-19 39-1/2" Roof Ladder Step
C S-3611 5/16"-18 Flange Nut YDP Grade 2
D S-3558 Sealing Washer
E PLS-42496-XX Eave-to-Peak Ladder Step Package
F LS-260-7 18-1/2" Roof Ladder Step
G Manway Access
Page 2 of 3 PNEG-1909
Page 3

40 Series Roof Ladder Step Installation
Use the following table as a guide to the location of each ladder step.
Ladder Step Placement Chart
Eave-to-Peak Ladder Step Package (Peak-to-Exhauster Level shaded)
Bin Diameter (Feet)
Location 60' 72' 75' 78' 90' 105' 135'
Bin Peak 37
36 LS-260-1
35 LS-260-1
34
33 LS-260-2
32 LS-260-2
31
30 LS-260-3
29 LS-260-1 LS-260-4
28
27 LS-260-1 LS-260-4
26
25
24 LS-260-1 LS-260-3 LS-260-5
23 LS-260-2 LS-260-3 LS-260-6
22
21 LS-260-1 LS-260-3 LS-260-4 LS-260-6
20 LS-260-1 LS-260-2 LS-260-3 LS-260-5 LS-260-7
19
18 LS-260-2 LS-260-3 LS-260-3 LS-260-5 LS-260-6 LS-260-8
17 LS-260-3 LS-260-3 LS-260-4 LS-260-5 LS-260-6 LS-260-8
16
15 LS-260-4 LS-260-4 LS-260-5 LS-260-5 LS-260-6 LS-260-7 LS-260-9
Roof Rib Hole Number from Bin Eave
Bin Eave 1 LS-260-19 LS-260-14 LS-260-14 LS-260-14 LS-260-14 LS-260-14 LS-260-14
14
13 LS-260-6 LS-260-6 LS-260-6 LS-260-6 LS-260-7 LS-260-8 LS-260-9
12 LS-260-7 LS-260-6 LS-260-7 LS-260-7 LS-260-8 LS-260-9 LS-260-10
11 LS-260-8 LS-260-7 LS-260-7 LS-260-7 LS-260-8 LS-260-9 LS-260-10
10 LS-260-9 LS-260-8 LS-260-8 LS-260-8 LS-260-9 LS-260-10 LS-260-11
9 LS-260-10 LS-260-8 LS-260-9 LS-260-9 LS-260-9 LS-260-10 LS-260-11
8 LS-260-11 LS-260-9 LS-260-9 LS-260-9 LS-260-10 LS-260-11 LS-260-11
7 LS-260-13 LS-260-10 LS-260-10 LS-260-10 LS-260-11 LS-260-11 LS-260-12
6 LS-260-14 LS-260-10 LS-260-11 LS-260-11 LS-260-11 LS-260-12 LS-260-12
5 LS-260-15 LS-260-11 LS-260-11 LS-260-11 LS-260-12 LS-260-12 LS-260-13
4 LS-260-16 LS-260-12 LS-260-12 LS-260-12 LS-260-12 LS-260-13 LS-260-13
3 LS-260-17 LS-260-13 LS-260-13 LS-260-13 LS-260-13 LS-260-13 LS-260-13
2 LS-260-18 LS-260-13 LS-260-13 LS-260-13 LS-260-13 LS-260-14 LS-260-14
LS-260-2 LS-260-3 LS-260-4 LS-260-5 LS-260-6 LS-260-7 LS-260-8
LS-260-5 LS-260-5 LS-260-5 LS-260-6 LS-260-7 LS-260-8 LS-260-9
LS-260-1 LS-260-2 LS-260-3 LS-260-4 LS-260-5 LS-260-7
LS-260-1 LS-260-2 LS-260-5
LS-260-2 LS-260-4 LS-260-6
LS-260-1 LS-260-4
LS-260-2 LS-260-5
LS-260-1
LS-260-2
LS-260-3
NOTE: The table above shows the correct ladder step and part number to be installed in the
corresponding hole in the roof rib. Shaded areas will also show the correct roof exhauster
ladder step and part number with the corresponding hole in the roof rib.
Kit Numbers
Eave-to-Peak Kit PLS-42496-XX (-XX is the Bin Diameter)
Peak-to-Exhauster Kit PLS-42497-XX (-XX is the Bin Diameter)
PNEG-1909 Page 3 of 3
 Loading...