

Page 1

PNEG-1853
12' Tower Dryer Fan Style
Catwalk Assembly
Installation Manual
PNEG-1853
Date: 01-28-13
Page 2

2 PNEG-1853 12' Tower Dryer Fan Style Catwalk Assembly
Page 3

Table of Contents
Contents
Chapter 1 Introduction .......................................................................................................................................... 4
Chapter 2 Safety ..................................................................................................................................................... 5
Safety Guidelines .................................................................................................................................. 5
Chapter 3 Decals .................................................................................................................................................... 7
Chapter 4 12' Outside Catwalk Installation Instructions .................................................................................. 10
Installing Z-Clips (GT1-2036) .............................................................................................................. 10
Installing Swing Gate Stop (GT1-2045) .............................................................................................. 11
Installing Catwalk Support Clip (GT1-2040-BS) ............................ ................................................... ... 12
Installing Inner Toe Board (GT1-2035) and Ladder Opening Toe Board (GT4-1465) ........................ 13
Installing Plank (GT1-2033) to Inner Toe Board (GT1-2035) .............................................................. 15
Installing Plank Support (GT1-2086) ................................................................................................... 18
Installing Knee Support (GT1-2039-BS) ............................................................................................. 19
Installing Outer Toe Board (GT1-2034-12) and Catwalk Vertical Support (GT1-2037-BS) ................ 20
Installing Handrails (GT1-2038-12O) .................................................................................................. 21
Installing Safety Gate (GT4-1455) ......................................... .... ... ... ... ... .... ... ...................................... 23
Installing Ladder Bracket (GT1-2088) ................................................................................................. 25
Installing Planks at Jack Pole Locations ............................................................................................. 26
Outside Catwalk Walk Surface ............................................................................................................ 28
Chapter 5 12' Inside Catwalk Installation Instructions ..................................................................................... 30
Installing Z-Clips (GT1-2036) .............................................................................................................. 30
Installing Catwalk Support Clip (GT1-2040-BS) ............................ ................................................... ... 31
Installing Outer Toe Board (GT1-2062) .................................. ................ ................. ................ ............ 32
Installing Planks (GT1-2060) to Outer Toe Board (GT1-2062) ........................................................... 33
Installing Knee Support (GT1-2039-BS) ............................................................................................. 35
Installing Inner Toe Board (GT1-2061) and Catwalk Vertical Support (GT1-2037-BS) ...................... 36
Installing Handrail (GT1-2038-12I) ............................ .................................................... ...................... 37
Inside Catwalk Walk Surface .............................................................................................................. 38
Chapter 6 12' Offset and Roof Hatch Platform Installation Instructions ........................................................40
Installing Z-Clips (GT1-2036) .............................................................................................................. 40
Installing Swing Gate Stop (GT1-2045) .............................................................................................. 42
Installing Catwalk Support Clip (GT1-2040-BS) ............................ ................................................... ... 43
Installing Inner Toe Board (GT1-2035) ............................................................................................... 45
Installing Plank (GT1-2033) to Inner Toe Board (GT1-2035) .............................................................. 47
Installing Plank Support (GT1-2086) ................................................................................................... 50
Installing Knee Support (GT1-2039-BS) ............................................................................................. 51
Installing Outer Toe Board (GT1-2034-12) and Catwalk Vertical Support (GT1-2037-BS) ................ 52
Installing Long Handrails (GT1-2038-12O) ......................................................................................
Installing Safety Gate (GT4-1455) with Plank Support (GT1-2086) .................................................... 56
Chapter 7 Parts List ............................................................................................................................................. 59
12' Outside Fan Style Catwalk (GT4-1039-12F) ................................................................................. 60
12' Inside Fan Style Catwalk (GT4-1043-12F) .................................................................................... 64
12' Offset Fan Style Platform (GT4-1047-12F) ................................................................................... 68
12' Roof Hatch Fan Style Platform (GT4-1051-12F) ........................................................................... 72
... 53
Chapter 8 Warranty .............................................................................................................................................. 77
PNEG-1853 12' Tower Dryer Fan Style Catwalk Assembly 3
Page 4

1. Introduction
READ THIS MANUAL carefully to learn how to properly use and install equipment. Failure to do so could
result in personal injury or equipment damage.
INSPECT the shipment immediately upon arrival. The customer is responsible for ensuring that all
quantities are correct. The customer should report and note any damage or shortage on the bill of
lading to justify their claim to the transport company.
THIS MANUAL SHOULD BE CONSIDERED a permanent part of your equipment and should be easily
accessible when needed.
This warranty provides you the assurance that the company will back its products when defects appear
within the warranty period. In some circumstances, the company also provides field improvements, often
without charge to the customer, even if the product is out of warranty. Should the equipment be abused,
or modified to change its performance beyond the factory specifications, the warranty will become void
and field improvements may be denied.
4 PNEG-1853 12' Tower Dryer Fan Style Catwalk Assembly
Page 5
2. Safety
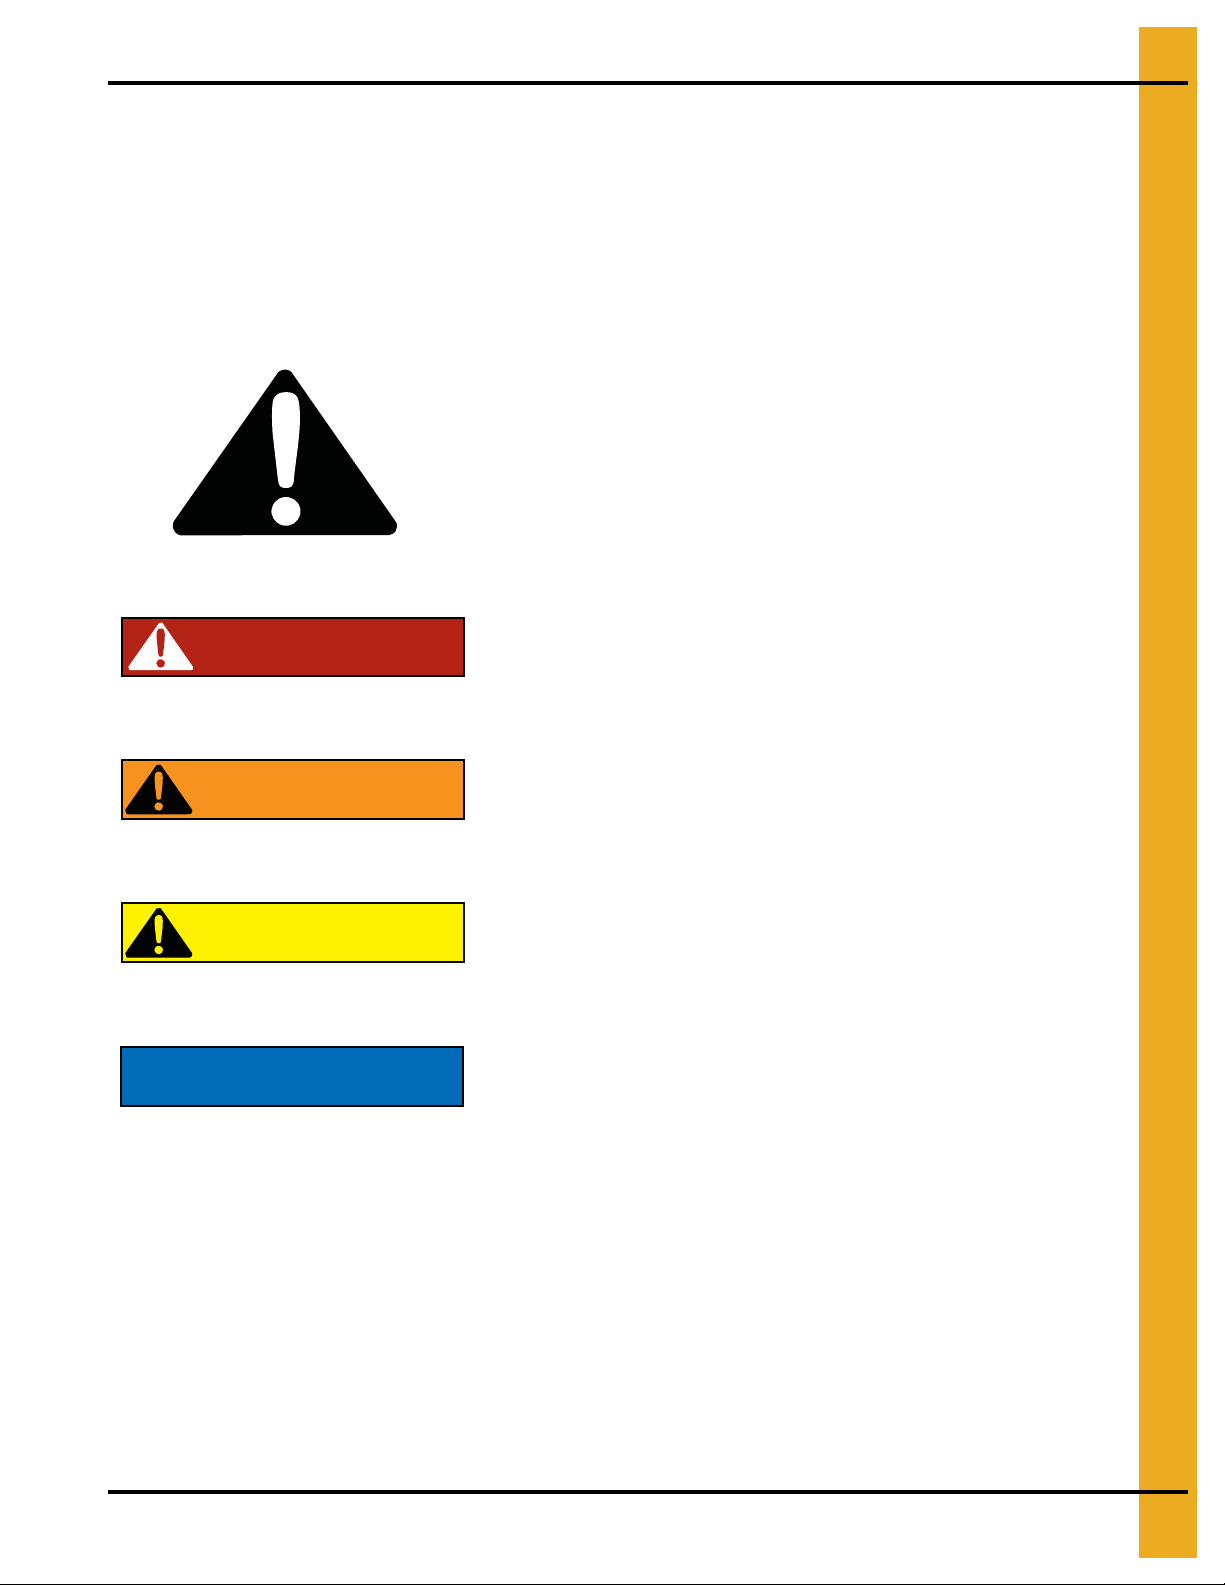
DANGER
WARNING
CAUTION
NOTICE
This is the safety alert symbol. It is used to alert you
to potential personal injury hazards. Obey all safety
messages that follow this symbol to avoid possible
injury or death.
WARNING indicates a hazardous situation which, if not
avoided, could result in death or serious injury.
CAUTION, used with the safety alert symbol, indicates a
hazardous situation which, if not avoided, could result in
minor or moderate injury.
NOTICE is used to address practices not related to
personal injury.
DANGER indicates a hazardous situation which, if not
avoided, will result in death or serious injury.
Safety Guidelines
This manual contains information that is important for you, the owner/operator, to know and understand.
This information relates to protecting personal safety and preventing equipment problems. It is the
responsibility of the owner/operator to inform anyone operating or working in the area of this equipment
of these safety guidelines. To help you recognize this information, we use the symbols that are defined
below. Please read the manual and pay attention to these sections. Failure to read this manual and its
safety instructions is a misuse of the equipment and may lead to serious injury or death.
PNEG-1853 12' Tower Dryer Fan Style Catwalk Assembly 5
Page 6
2. Safety
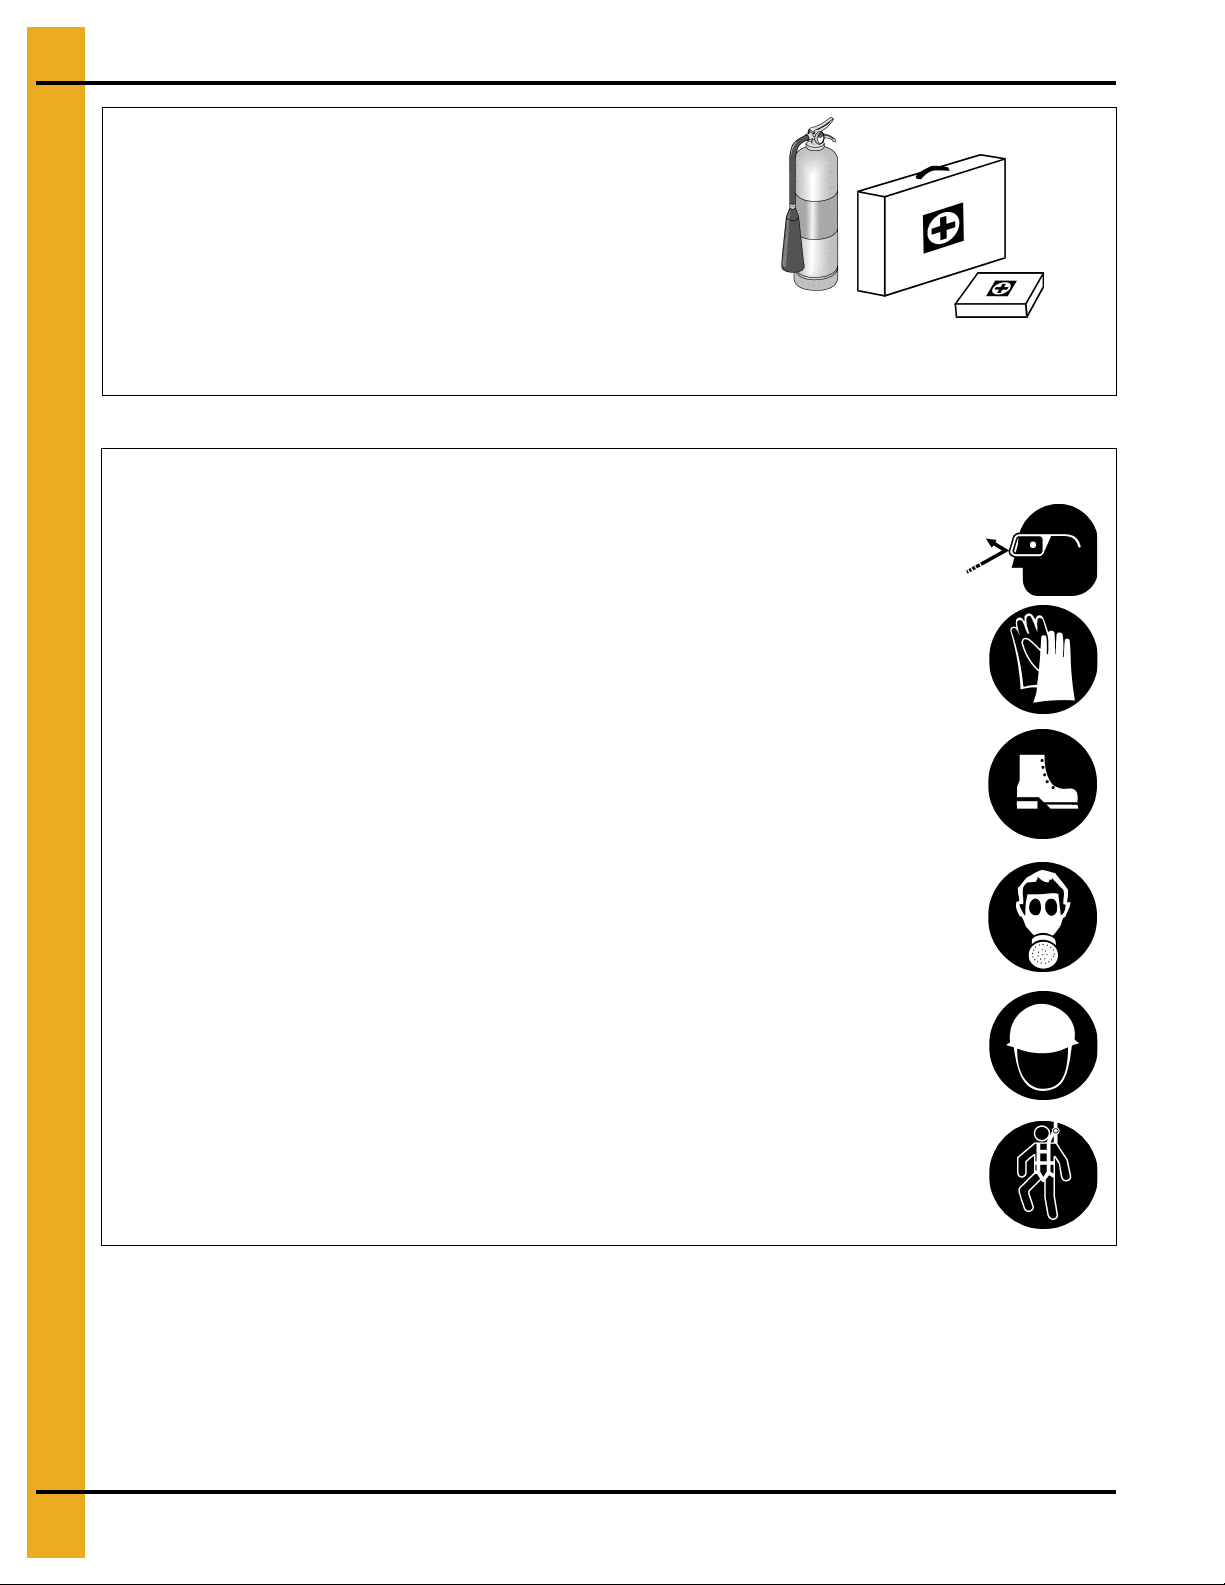
Prepare for Emergencies
Be prepared if fire starts.
Keep a first aid kit and fire extinguisher handy.
Keep emergency numbers for doctors, ambulance service,
hospital, and fire department near your telephone.
Keep Emergency Equipment
Quickly Accessible
Wear Protective Clothing
Wear close-fitting clothing and safety equipment appropriate
to the job.
Remove all jewelry.
Tie long hair up and back.
Wear safety glasses at all times to protect eyes from debris.
Wear gloves to protect your hands from sharp edges on plastic
or steel parts.
Wear steel-toed boots to help protect your feet from falling
debris. Tuck in any loose or dangling shoestrings.
A respirator may be needed to prevent breathing potentially
toxic fumes and dust.
Wear a hard hat to help protect your head.
Wear appropriate fall protection equipment when working at
elevations greater than six feet (6').
Eye Protection
Gloves
Steel-Toed Boots
Respirator
Hard Hat
Fall Protection
6 PNEG-1853 12' Tower Dryer Fan Style Catwalk Assembly
Page 7
3. Decals
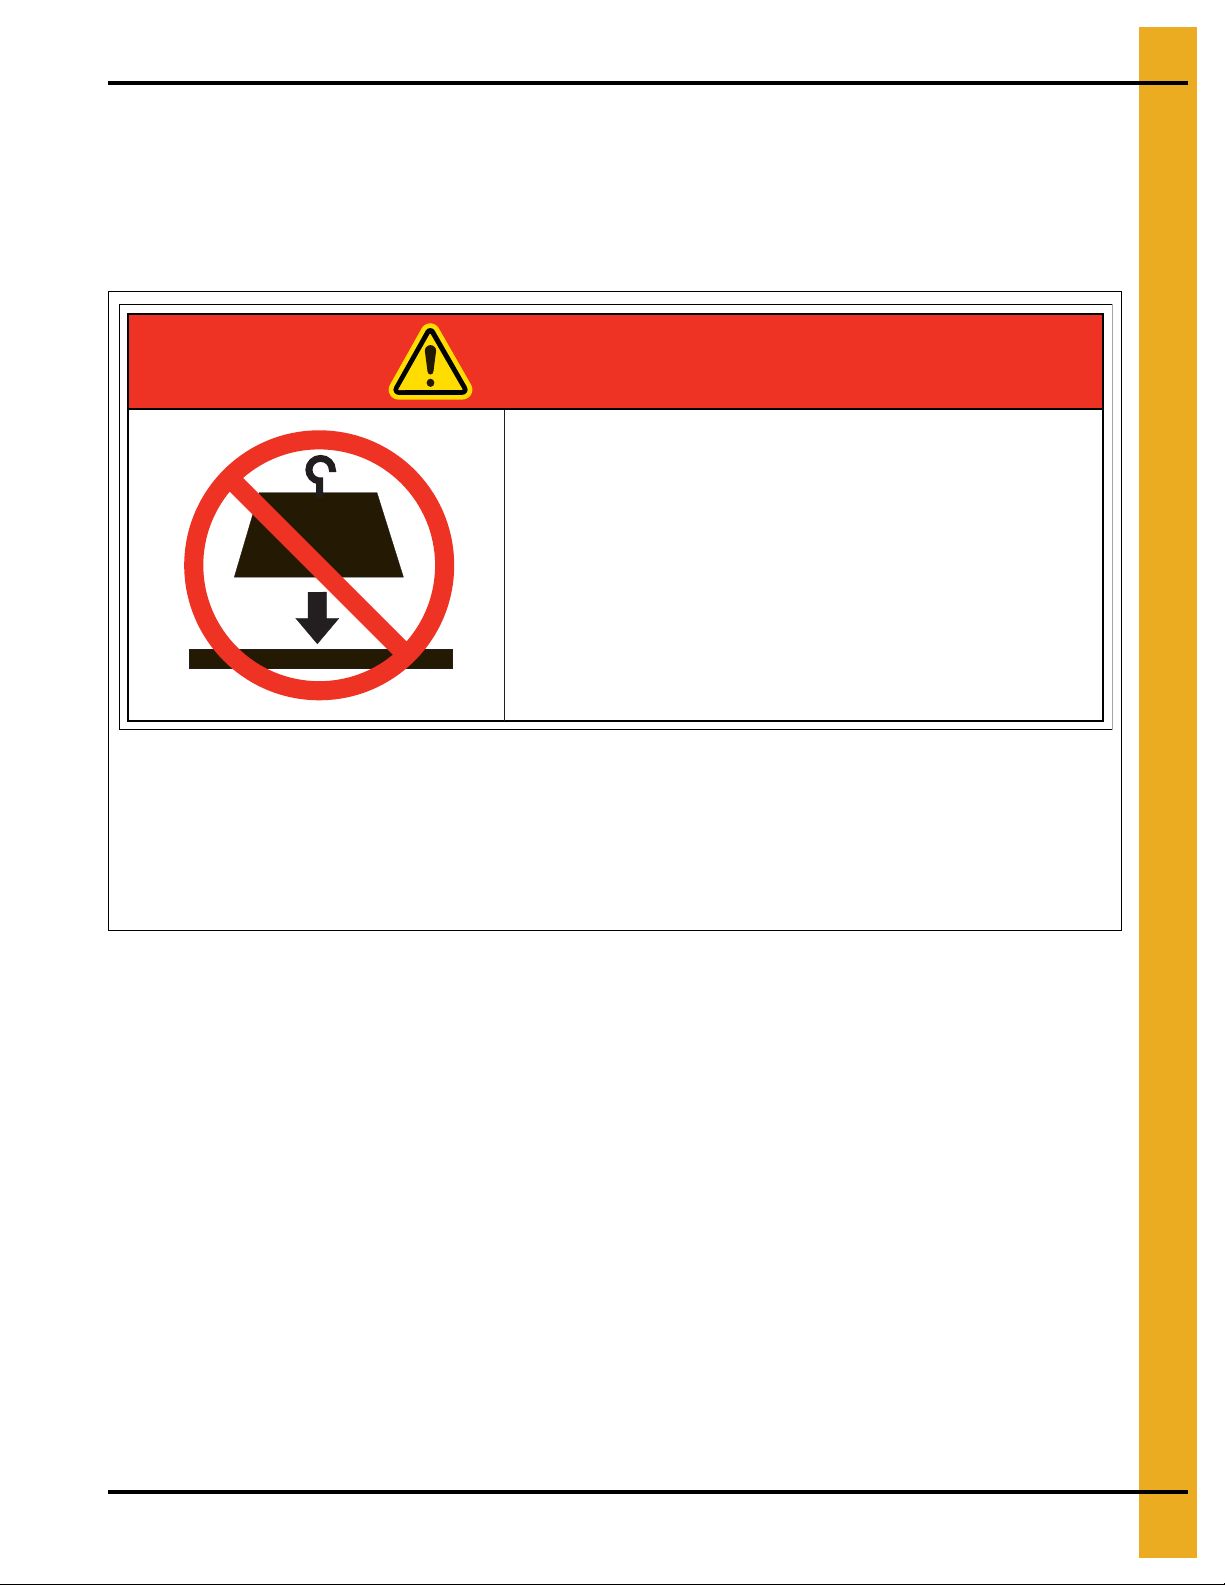
DO NOT EXCEED PLATFORM
LOAD LIMIT
DC-2188
Excessive load will damage
platform and cause platform to fall.
Load limit = 1000 LBS. (4.50 kN)
DANGERDANGER
> 1000 lbs
(4.50 kN)
Injury or death will result.
DC-2188
Background: White
Colors: Black, Safety Red (PMS 485C), Safety Yellow (PMS 109C)
Size: 3.0" x 7.0"
Safety decals should be read and understood by all people in and around the dryer area. If the following
safety decals are not displayed on your dryer or if they are damaged, contact the GSI for replacement:
GSI Decals
1004 E. Illinois St.
Assumption, IL. 62510
Phone: 1-217-226-4421
PNEG-1853 12' Tower Dryer Fan Style Catwalk Assembly 7
Page 8

NOTES
8 PNEG-1853 12' Tower Dryer Fan Style Catwalk Assembly
Page 9

12' Outside Fan Style
Catwalk Assembly Instructions
(GT4-1039-12F)
PNEG-1853 12' Tower Dryer Fan Style Catwalk Assembly 9
Page 10

4. 12' Outside Catwalk Installation Instructions
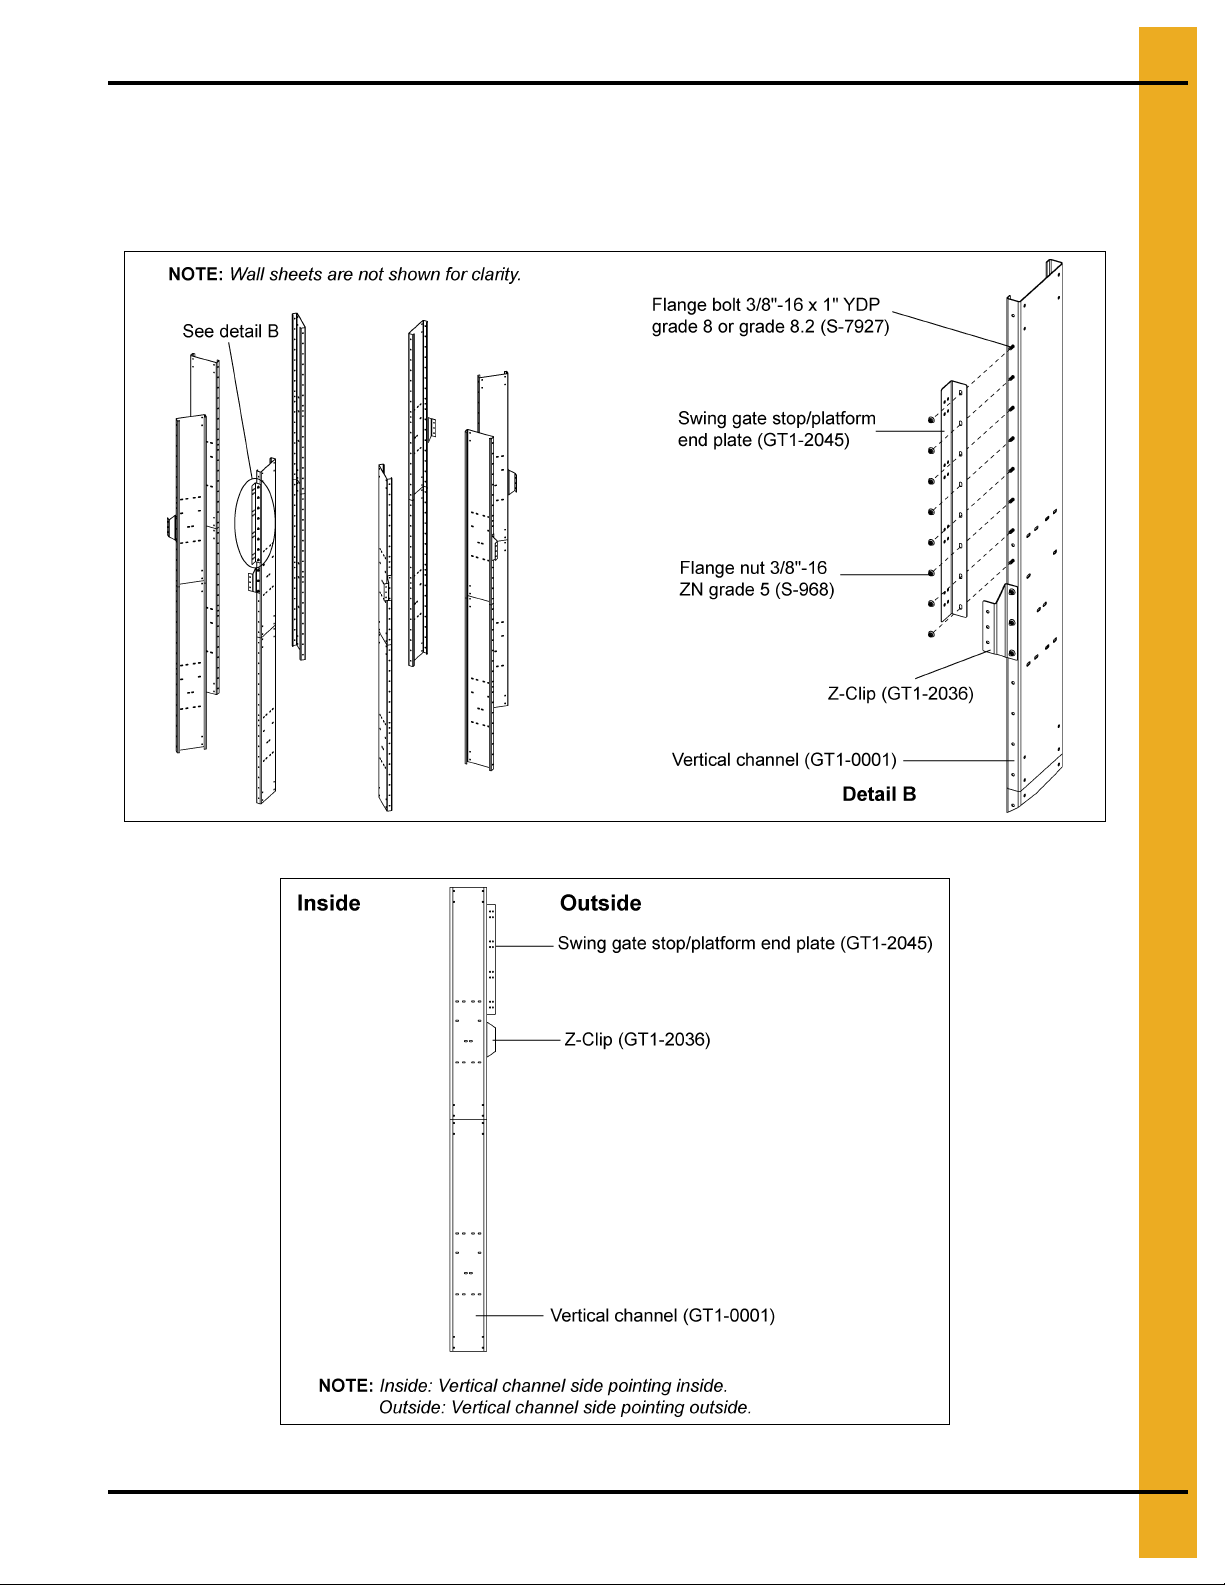
Installing Z-Clips (GT1-2036)
1. Bolt Z-clip (GT1-2036) to all vertical channels (GT1-0001). The Z-clip can be installed on each
vertical channel as wall sheets are installed using 3/8"-16 x 1" YDP grade 8 or grade 8.2 bolts
(S-7927) and 3/8"-16 ZN grade 5 nuts (S-968). (See Figure 4A and Figure 4B.)
Figure 4A
Figure 4B
10 PNEG-1853 12' Tower Dryer Fan Style Catwalk Assembly
Page 11
4. 12' Outside Catwalk Installation Instructions
Installing Swing Gate Stop (GT1-2045)
1. Identify the ladder opening vertical channel and install the swing gate stop (GT1-2045) to the vertical
channel (GT1-0001) as wall sheets are installed using 3/8"-16 x 1" YDP grade 8 or grade 8.2 bolts
(S-7927) and 3/8"-16 ZN grade 5 nuts (S-968). (See Figure 4C and Figure 4D.)
Figure 4C
Figure 4D
PNEG-1853 12' Tower Dryer Fan Style Catwalk Assembly 11
Page 12
4. 12' Outside Catwalk Installation Instructions
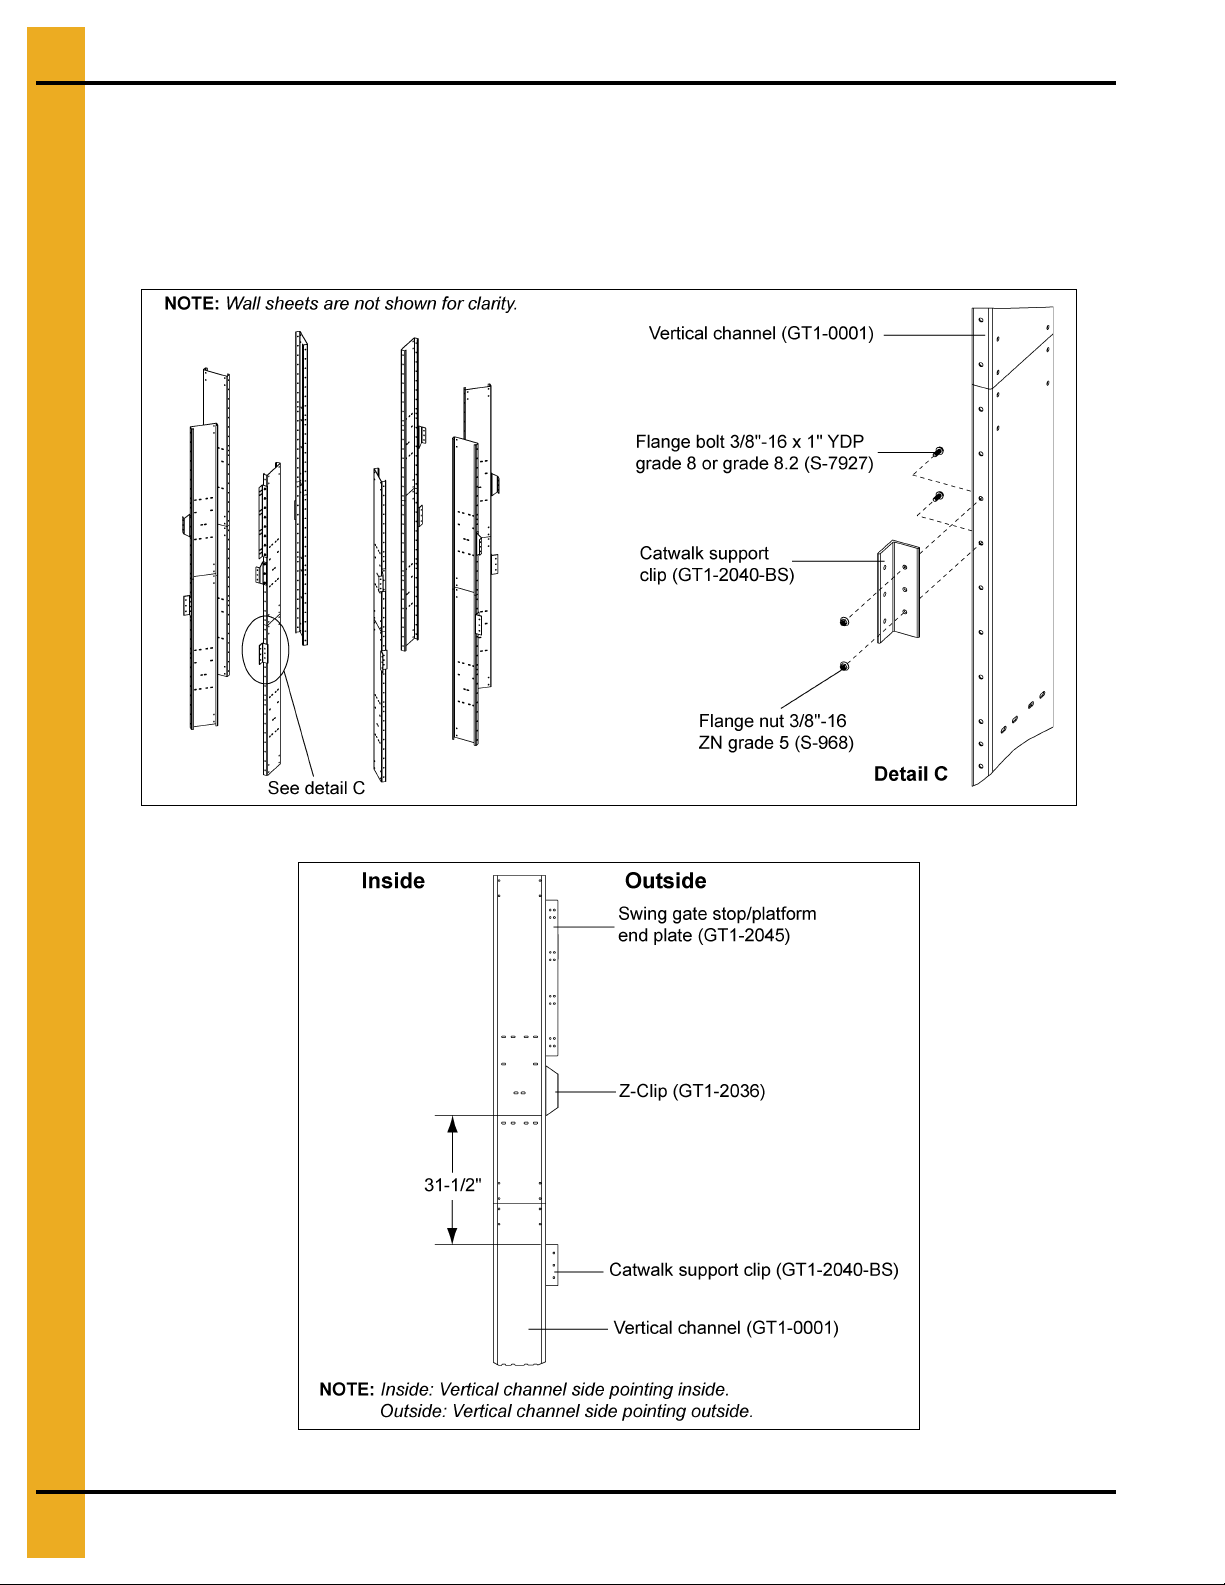
Installing Catwalk Support Clip (GT1-2040-BS)
1. Install catwalk support clips (GT1-2040-BS) to all vertical channels (GT1-0001). Support clip ca n be
installed on each vertical channel as the wall sheets are installed using 3/8"-16 x 1" YDP grade 8
or grade 8.2 bolts (S-7927) and 3/8"-16 ZN grade 5 nuts (S-968). (See Figure 4E.)
2. The distance between the Z-clip and support clip for 12' outsid e catwalk is 31-1 /2". (See Fig ure 4F .)
Figure 4E
Figure 4F
12 PNEG-1853 12' Tower Dryer Fan Style Catwalk Assembly
Page 13
4. 12' Outside Catwalk Installation Instructions
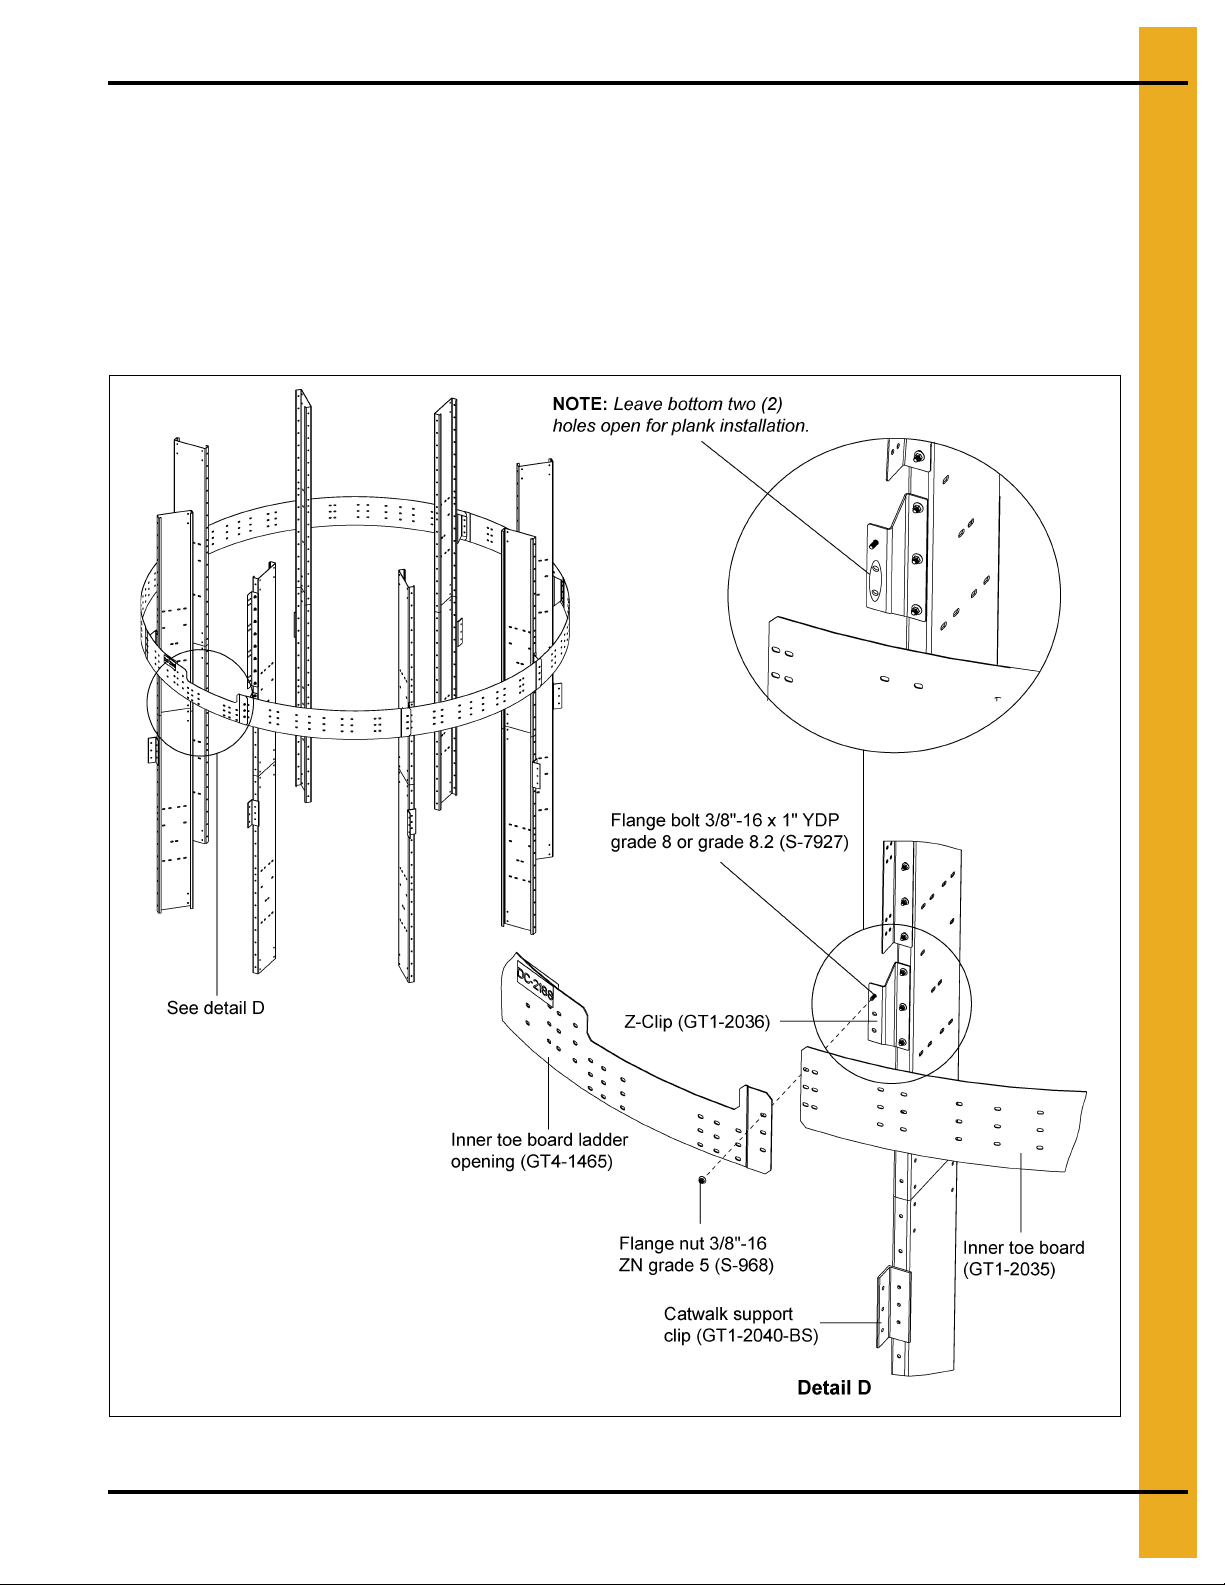
Installing Inner Toe Board (GT1-2035) and Ladder Opening
Toe Board (GT4-1465)
1. Install the inner toe board (GT1-2035) to the Z-clips (GT1-2036). All toe boards should be installed
between the Z-clips using 3/8"-16 x 1" YDP grade 8 or grade 8.2 bolts (S-7927) and 3/8"-16 ZN
grade 5 nuts (S-968). (See Figure 4G.)
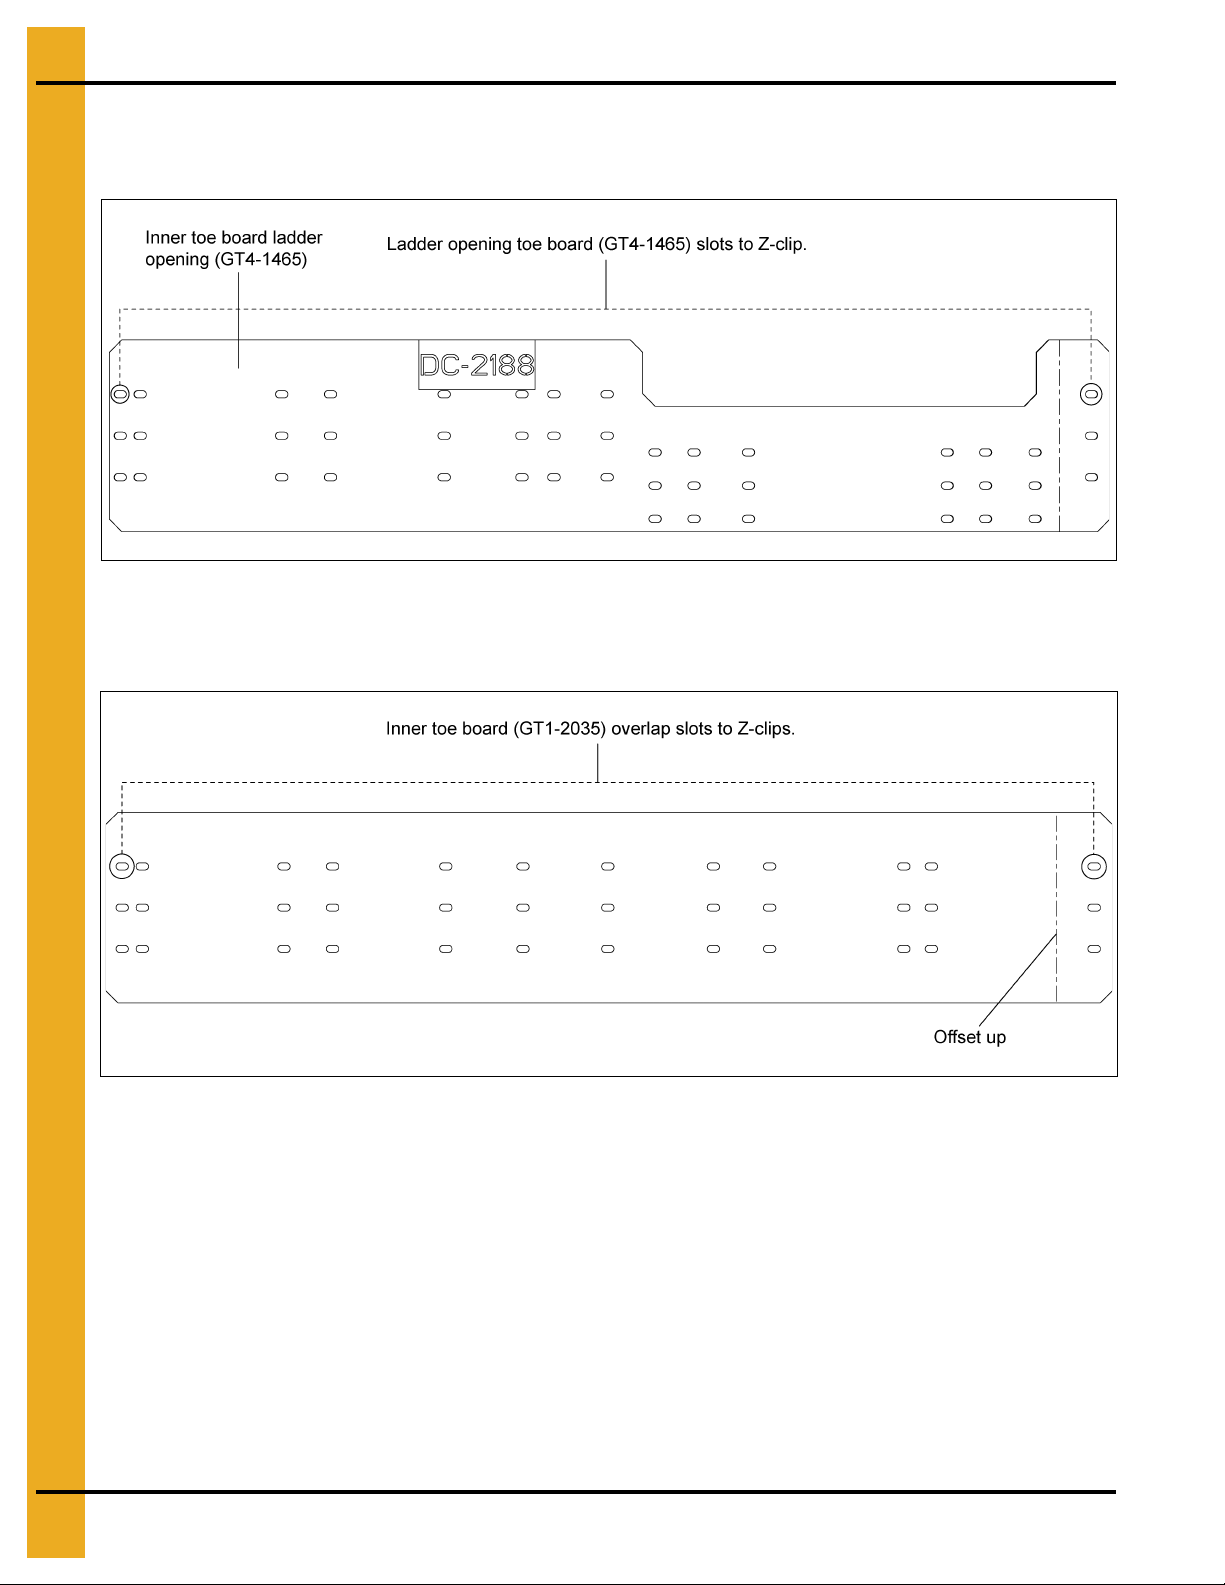
2. At the ladder location, install the ladder opening toe board (GT4-1465) to Z-clips using 3/8"-16 x 1"
YDP grade 8 or grade 8.2 bolts (S-7927) and 3/8"-16 ZN grade 5 nuts (S-968) in such a way that
toe board opening falls on the ladder path. (See Figure 4G below and Figure 4H on Page 14.)
Figure 4G
PNEG-1853 12' Tower Dryer Fan Style Catwalk Assembly 13
Page 14
4. 12' Outside Catwalk Installation Instructions
Installing Inner Toe Board (GT1-2035) and Ladder Opening
Toe Board (GT4-1465) (Continued)
Figure 4H 12' Ladder Opening Toe Board (GT4-1465)
3. Inner toe board is arranged with overlap slots on each side. Install 12' inner toe boards (GT1-2035)
to corresponding slots as shown in Figure 4I.
Figure 4I 12' Inner Toe Board (GT1 -2 03 5)
14 PNEG-1853 12' Tower Dryer Fan Style Catwalk Assembly
Page 15
4. 12' Outside Catwalk Installation Instructions
NOTE: Make sure the planks are aligned to right slots as marked in Figure 4K.
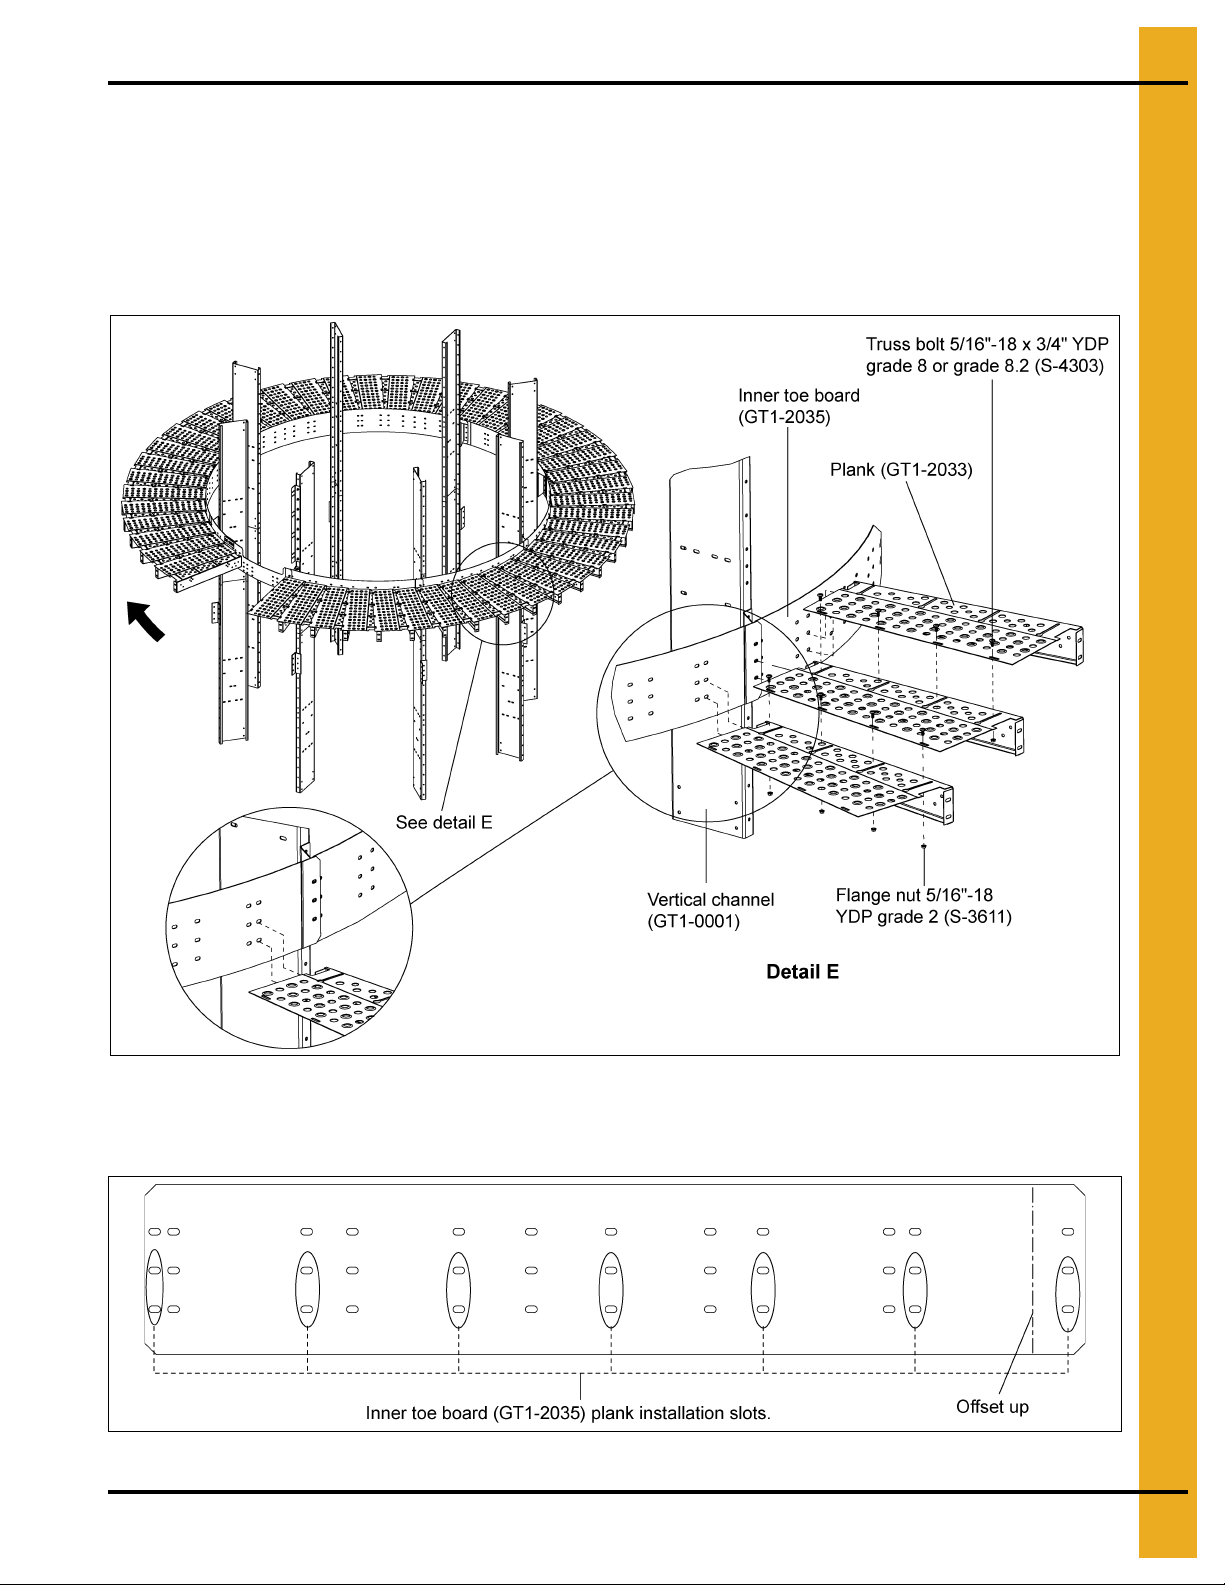
Installing Plank (GT1-2033) to Inner Toe Board (GT1-2035)
1. Install planks around the dryer on inner toe board starting from ladder opening toe board (GT4-1465)
as shown by arrow in the Figure 4J.
2. Planks (GT1-2033) are installed to bottom two (2) holes of the inner toe board (GT1-2035) using
3/8"-16 x 1" YDP grade 8 or grade 8.2 bolts (S-7927) and 3/8"-16 ZN grade 5 nuts (S-968).
(See Figure 4J.)
Figure 4J
3. Inner toe board (GT1-2035) is arranged with many slots to install p lank. Install planks to corresponding
slots as shown in
PNEG-1853 12' Tower Dryer Fan Style Catwalk Assembly 15
Figure 4K
.
Figure 4K 12' Inner Toe Board (GT1-2035)
Page 16
4. 12' Outside Catwalk Installation Instructions
Jack pole
Plank (GT1-2033)
Installing Planks (GT1-2033) to Inner Toe Board (GT1-2035)
(Continued)
4. Install all the planks (GT1-2033) continuously around the dryer except at the jack pole locations.
(See Figure 4L and Figure 4M.)
Figure 4L
Figure 4M
16 PNEG-1853 12' Tower Dryer Fan Style Catwalk Assembly
Page 17
4. 12' Outside Catwalk Installation Instructions
Truss bolt 5/16"-18 x
3/4" YDP grade 8 or
grade 8.2 (S-4303)
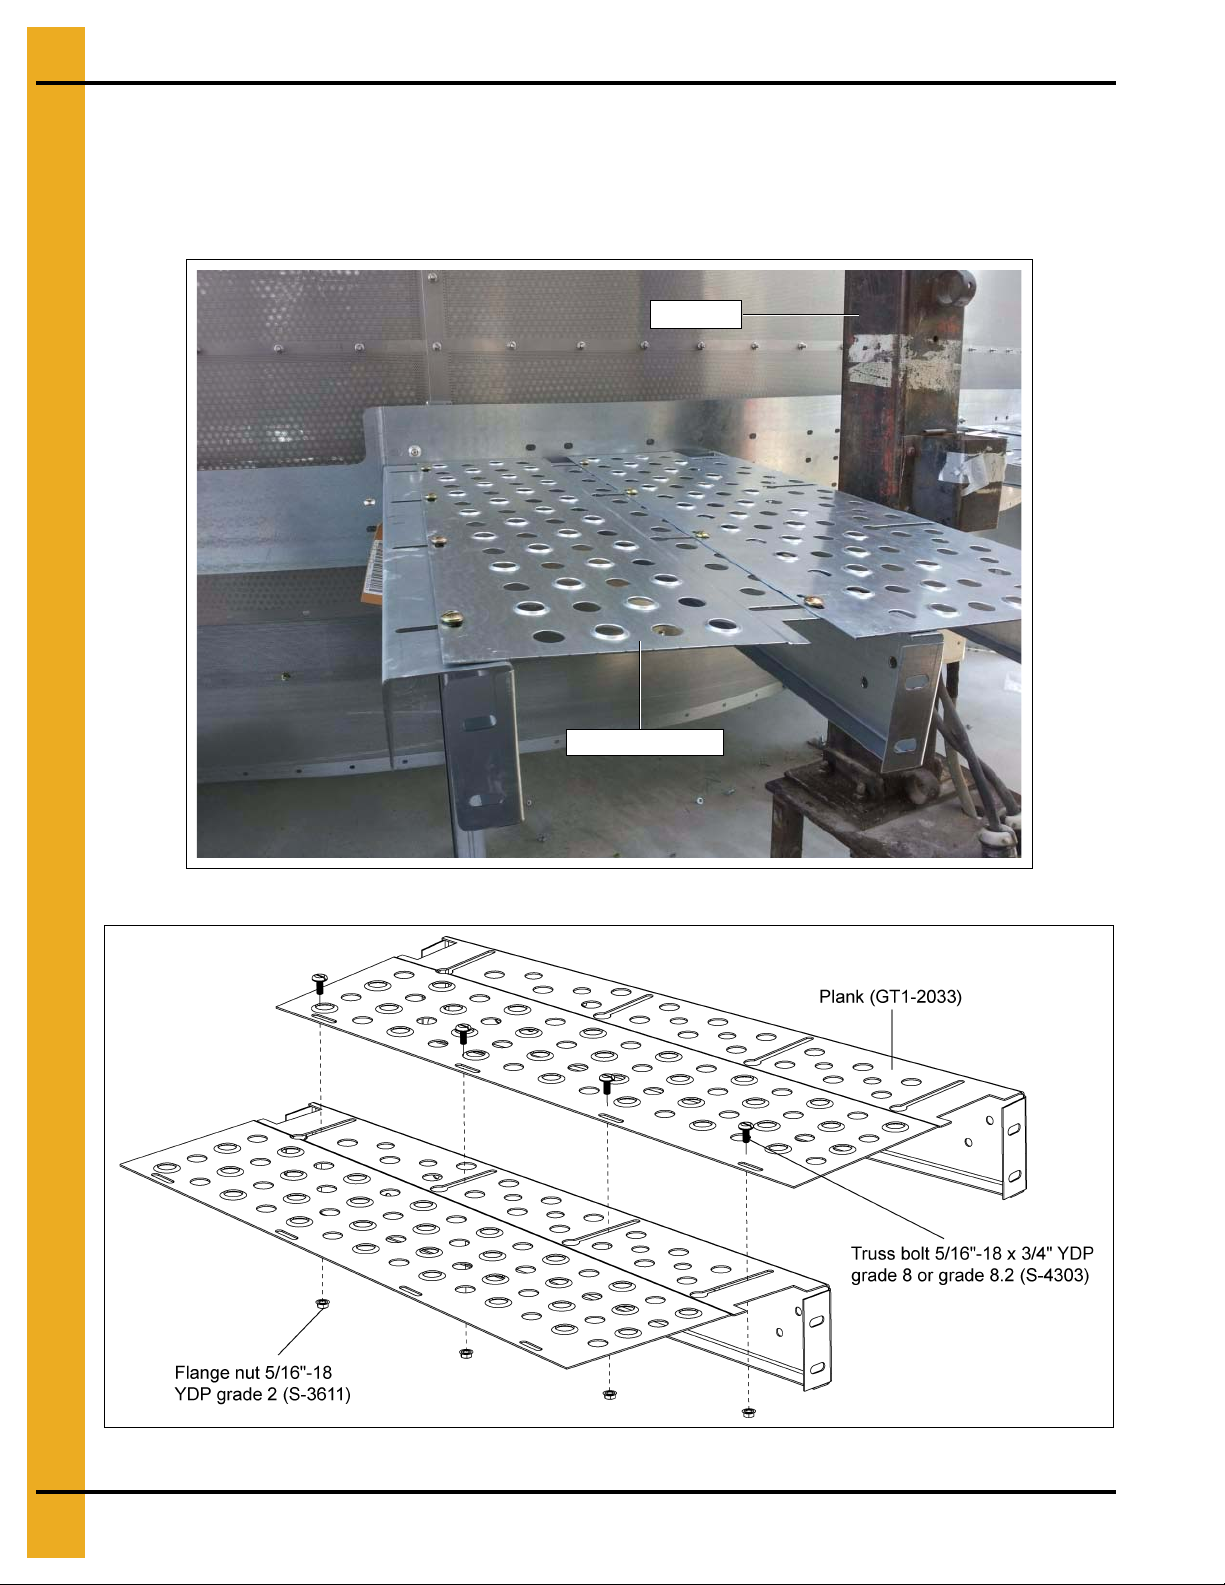
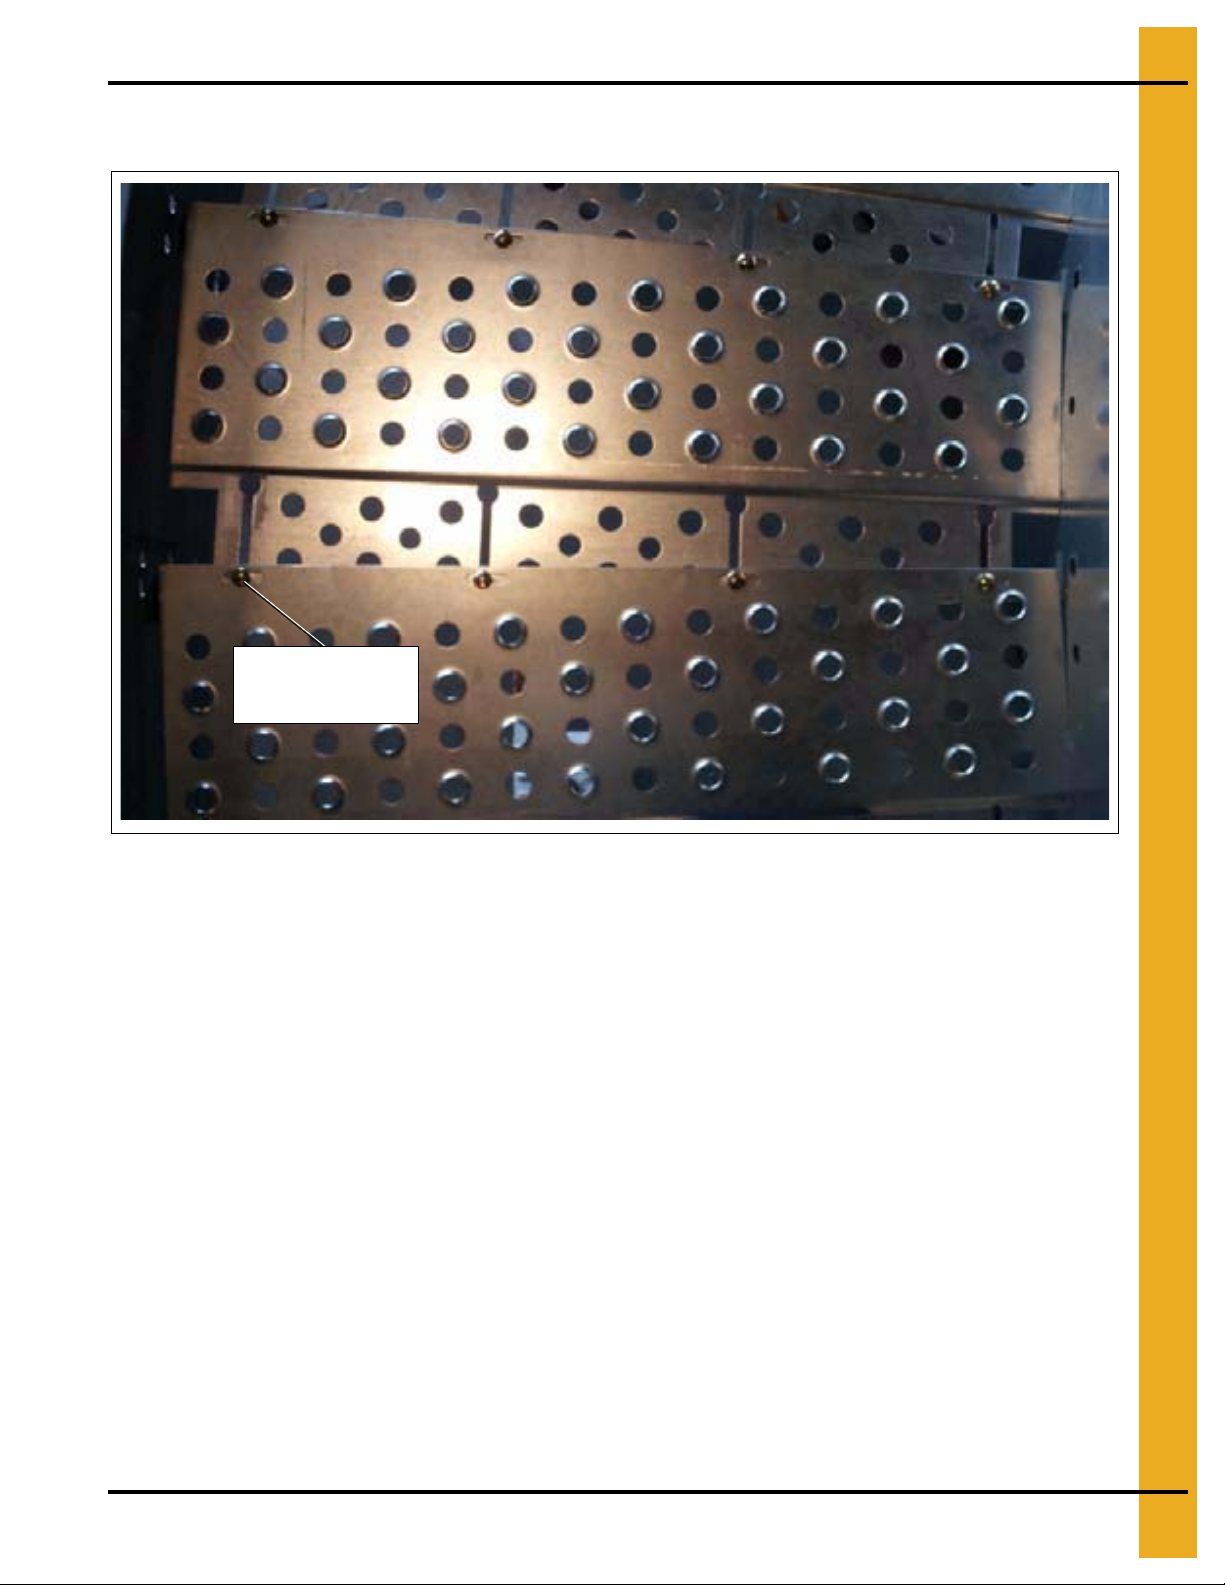
5. Each plank should be overlapped at the edges and bolted with 5/16"-18 x 3/4" YDP grade 8 or
grade 8.2 bolts (S-4303) and 5/16"-18 YDP grade 2 nuts (S-3611). (See Figure 4N.)
Figure 4N
PNEG-1853 12' Tower Dryer Fan Style Catwalk Assembly 17
Page 18
4. 12' Outside Catwalk Installation Instructions
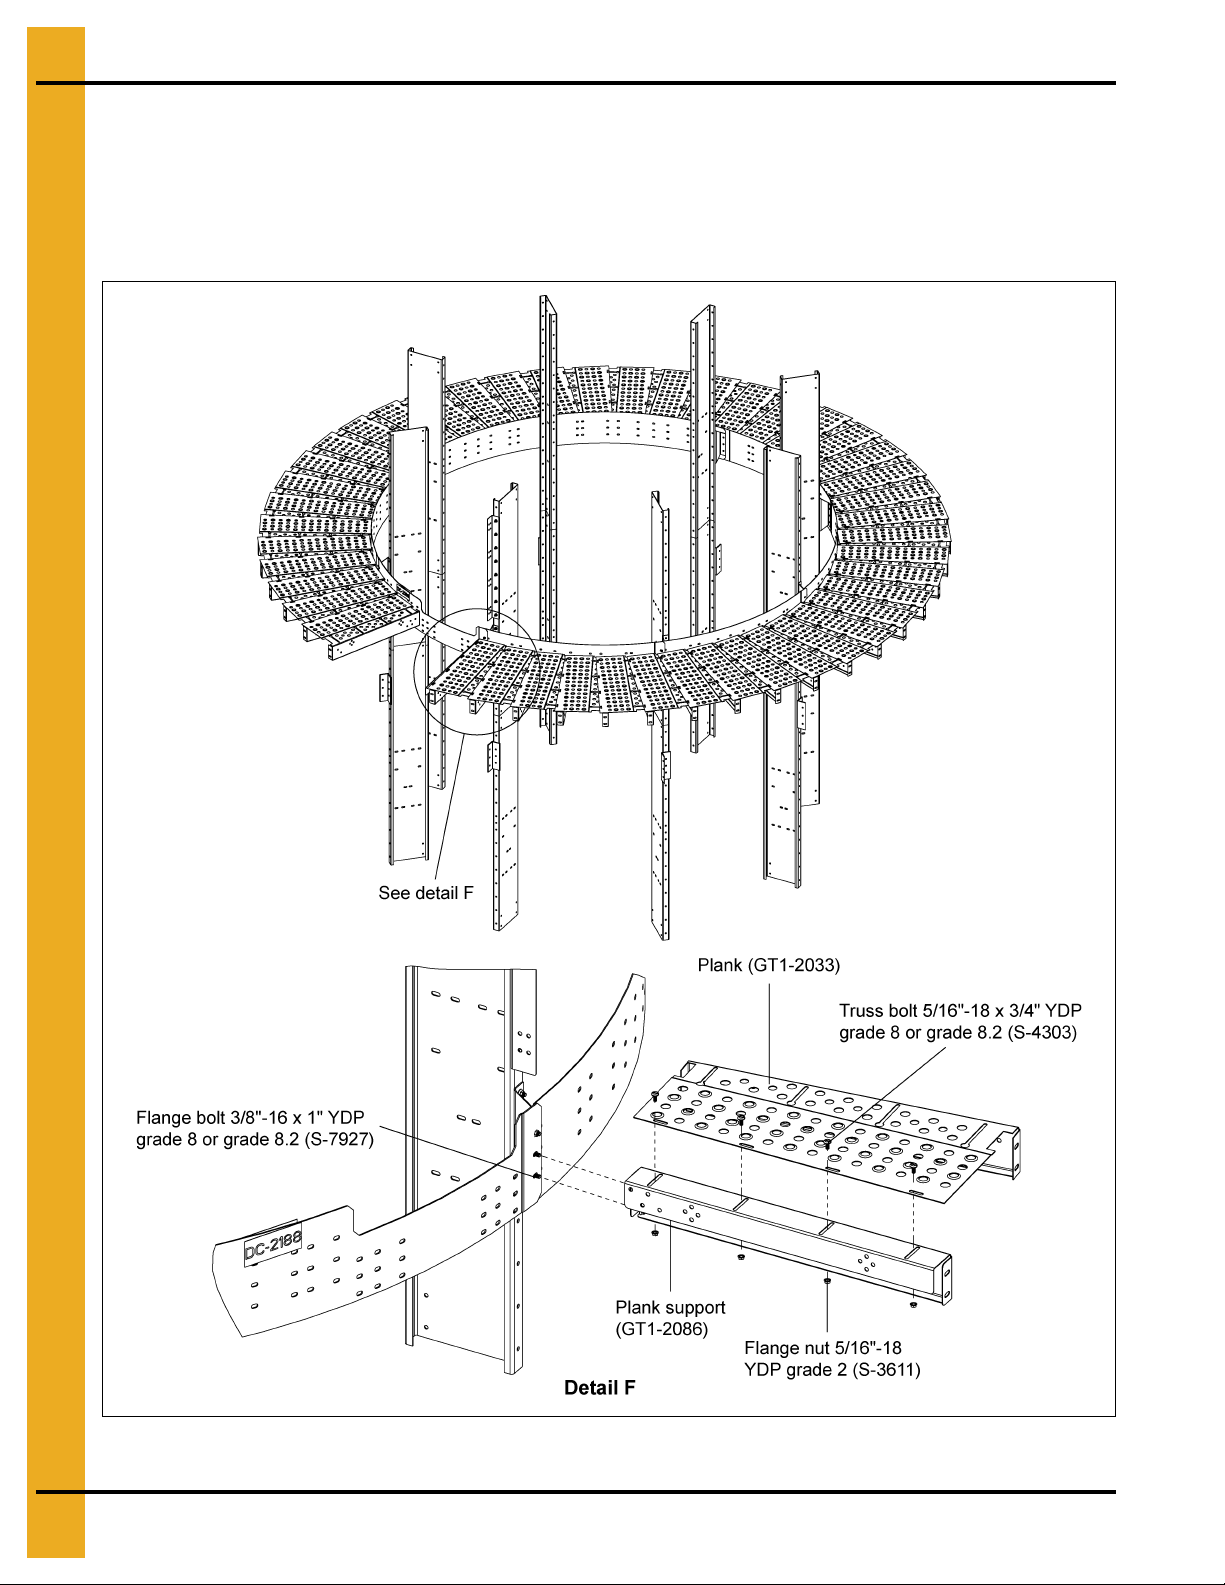
Installing Plank Support (GT1-2086)
1. Once the planks are installed, install the plank support (GT1-2086) to the last plank (GT1-2033)
and toe board (GT4-1465) using 5/16"-18 x 3/4" YPD grade 8 and grade 8.2 bolts (S-4303),
5/16"-18 YPD grade 2 nuts (S-3611) and flange bolts 3/8"-16 x 1" YDP grade 8 or grade 8.2 (S-7927).
(See Figure 4O.)
Figure 4O
18 PNEG-1853 12' Tower Dryer Fan Style Catwalk Assembly
Page 19
4. 12' Outside Catwalk Installation Instructions
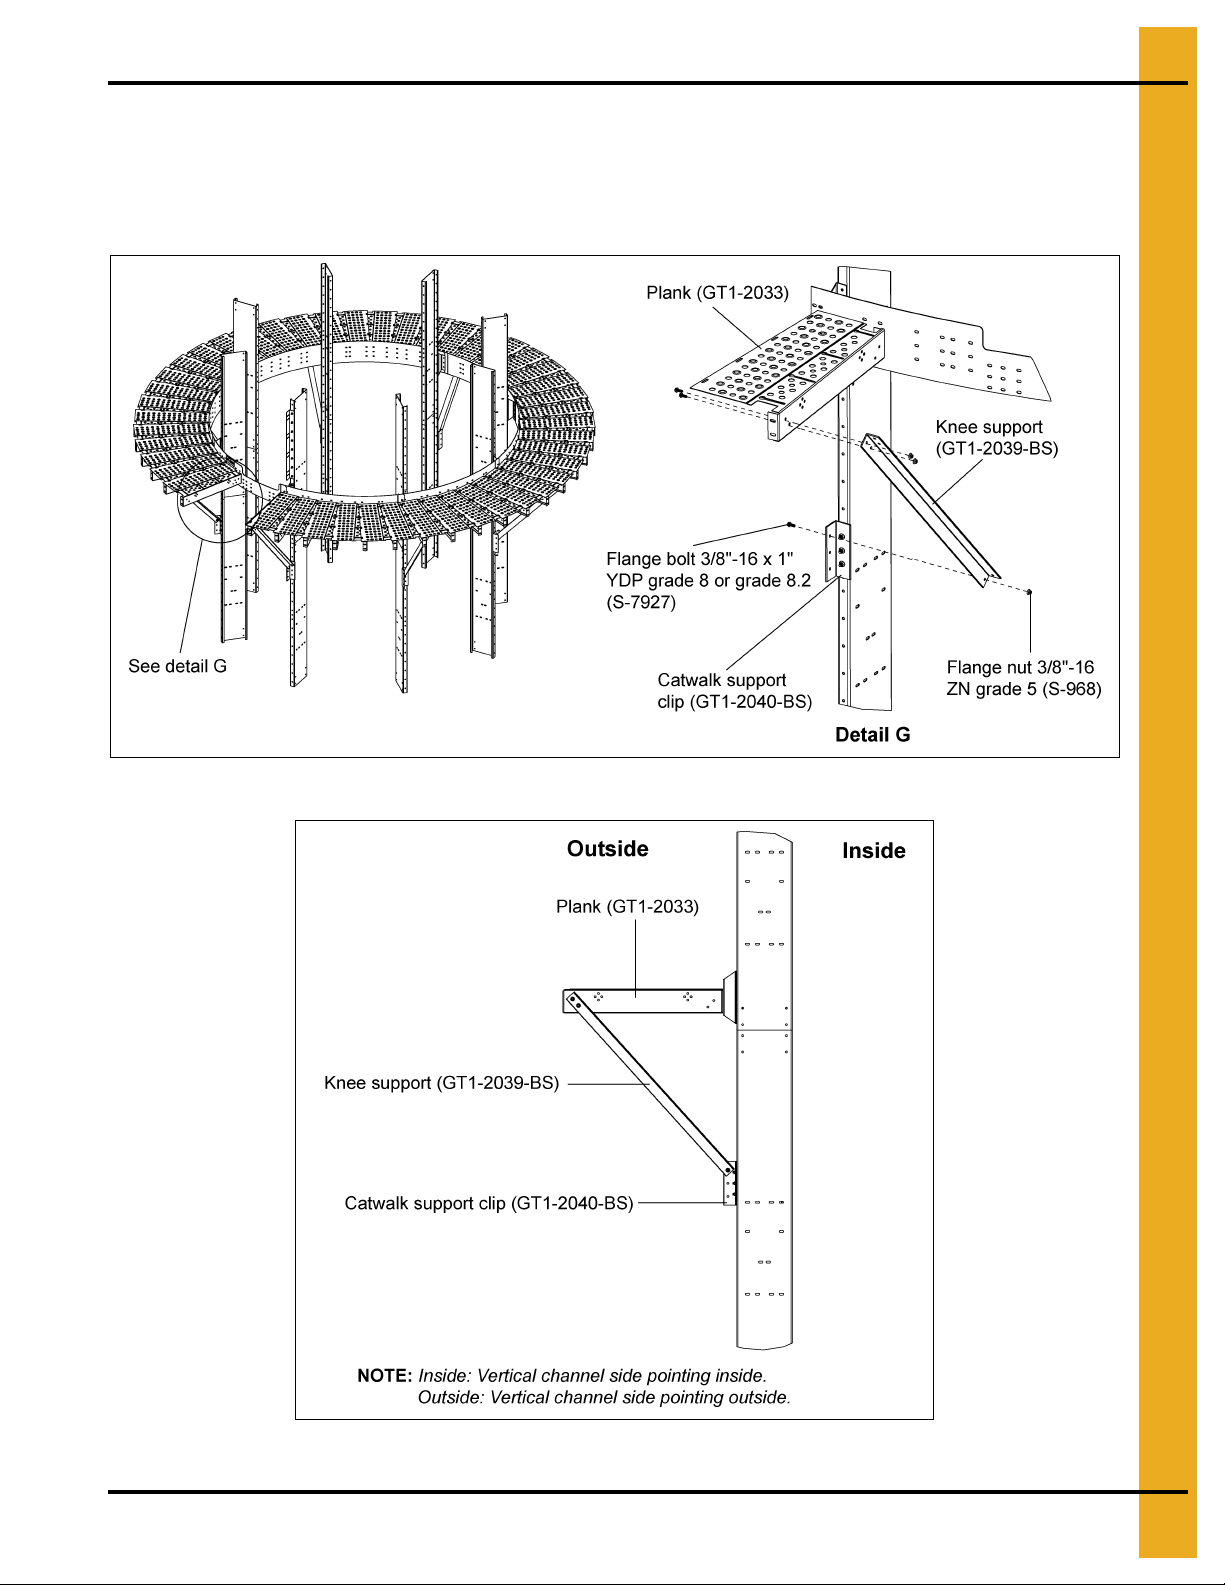
Installing Knee Support (GT1-2039-BS)
1. Install the knee support (GT1-2039-BS) around the dryer between the catwalk support clips
(GT1-2040-BS) and planks (GT1-2033) using 3/8"-16 x 1" YDP grade 8 or grade 8 .2 bolts (S-79 27)
and 3/8"-16 ZN grade 5 nuts (S-968). (See Figure 4P and Figure 4Q.)
Figure 4P
Figure 4Q
PNEG-1853 12' Tower Dryer Fan Style Catwalk Assembly 19
Page 20
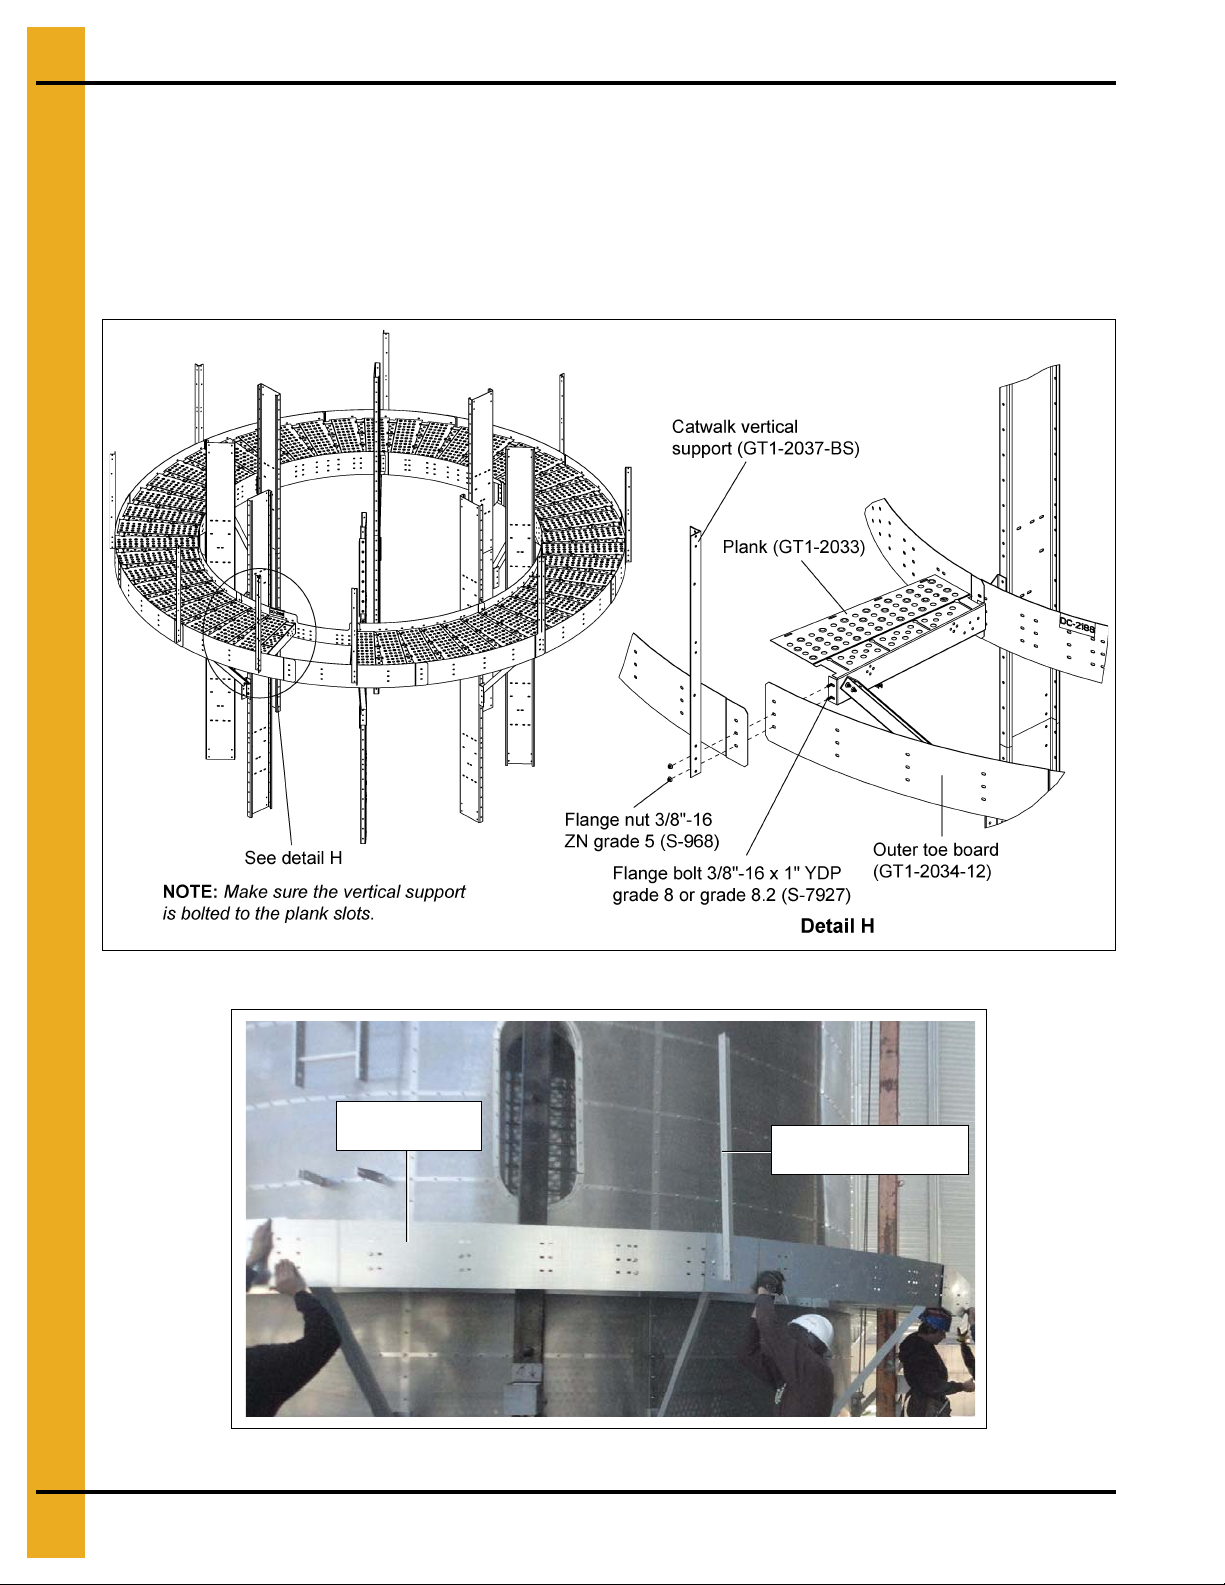
4. 12' Outside Catwalk Installation Instructions
Outer toe board
(GT1-2034-12)
Catwalk vertical
support (GT1-2037-BS)
Installing Outer Toe Board (GT1-2034-12) and Catwalk Vertical
Support (GT1-2037-BS)
1. Install all the outer toe boards (GT1-2034-12) to the planks (GT1-2033). (See Figure 4R.)
2. When installing the outer toe board with planks, install the catwalk vertical support (GT1-2037-BS)
simultaneously at proper locations using 3/8"-16 x 1" YDP grade 8 or grade 8.2 bolts (S-7927)
and 3/8"-16 ZN grade 5 nuts (S-968). (See Figure 4R and Figure 4S.)
Figure 4R
Figure 4S
20 PNEG-1853 12' Tower Dryer Fan Style Catwalk Assembly
Page 21
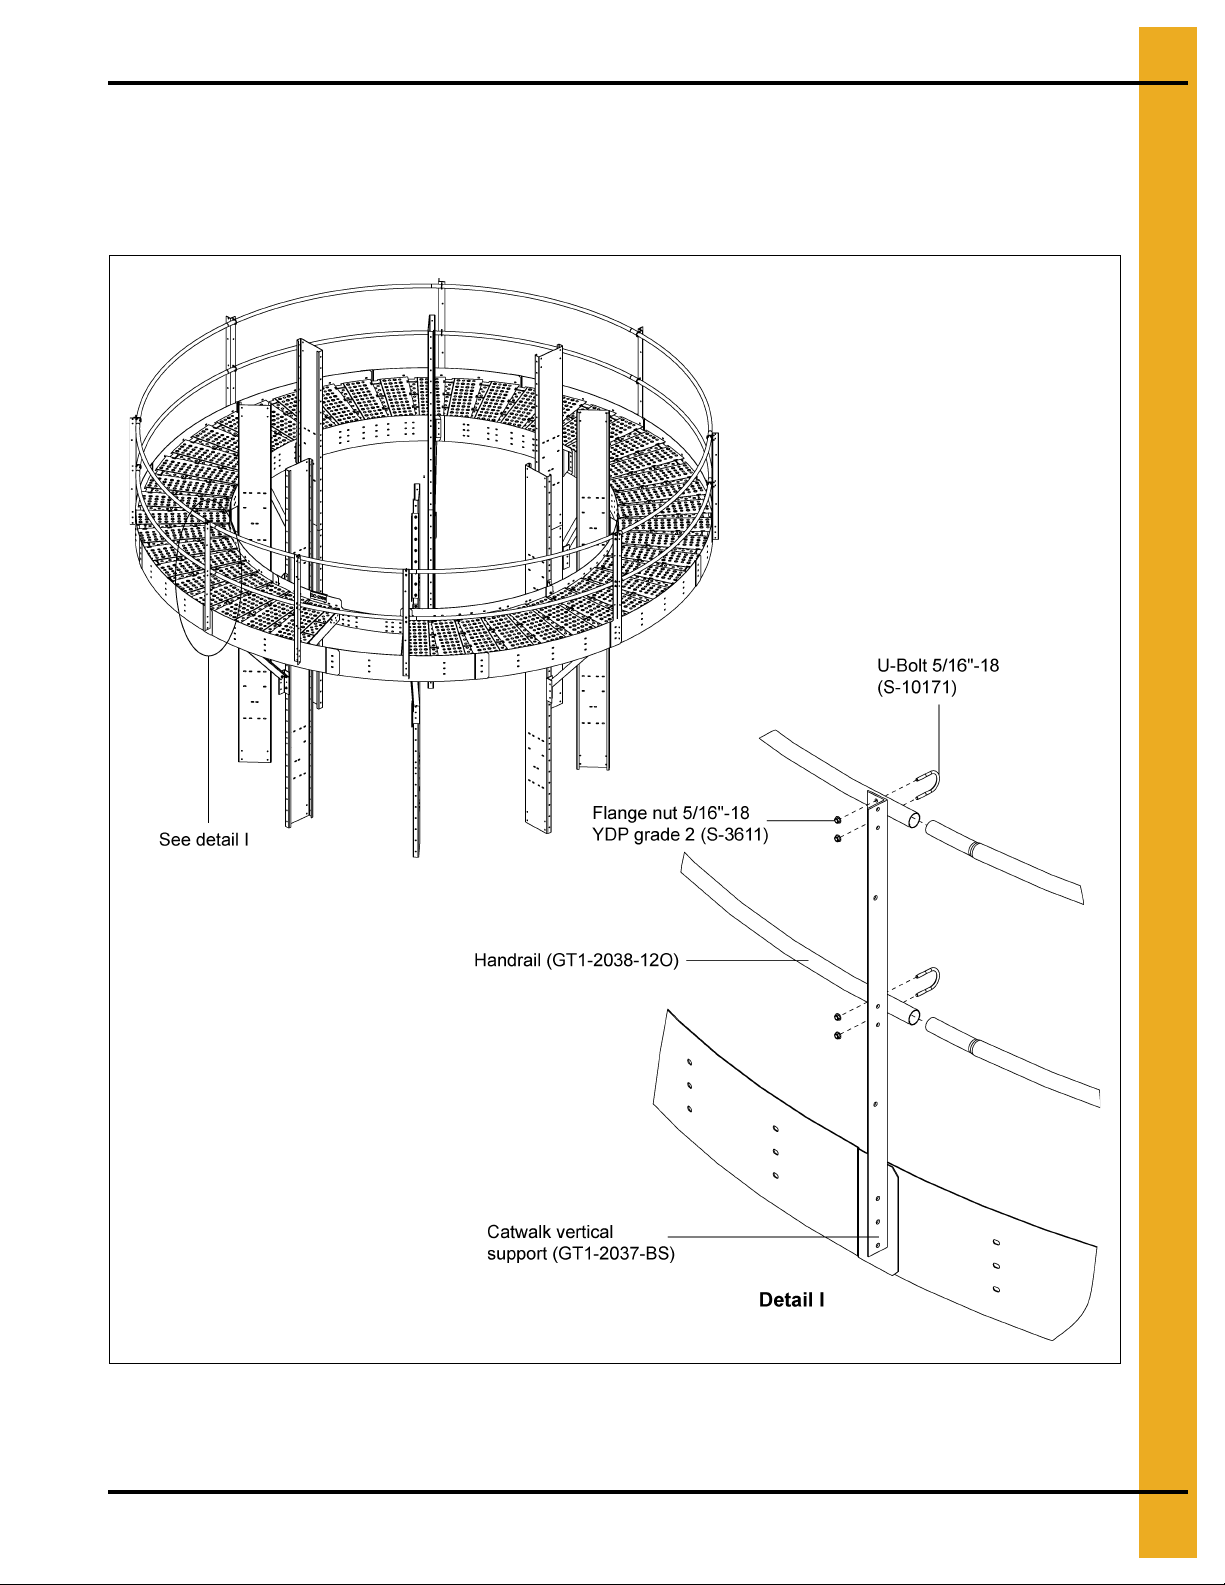
4. 12' Outside Catwalk Installation Instructions
Installing Handrails (GT1-2038-12O)
1. Install the handrail (GT1-2038-12O) to the catwalk vertical support (GT1-2037-BS) usin g 5/16"-18 ZN
U-bolts (S-10171) and 5/16"-18 YDP grade 2 nuts (S-3611) to tighten the handrail with vertical p ost.
(See Figure 4T.) (See Page 22.)
Figure 4T
PNEG-1853 12' Tower Dryer Fan Style Catwalk Assembly 21
Page 22
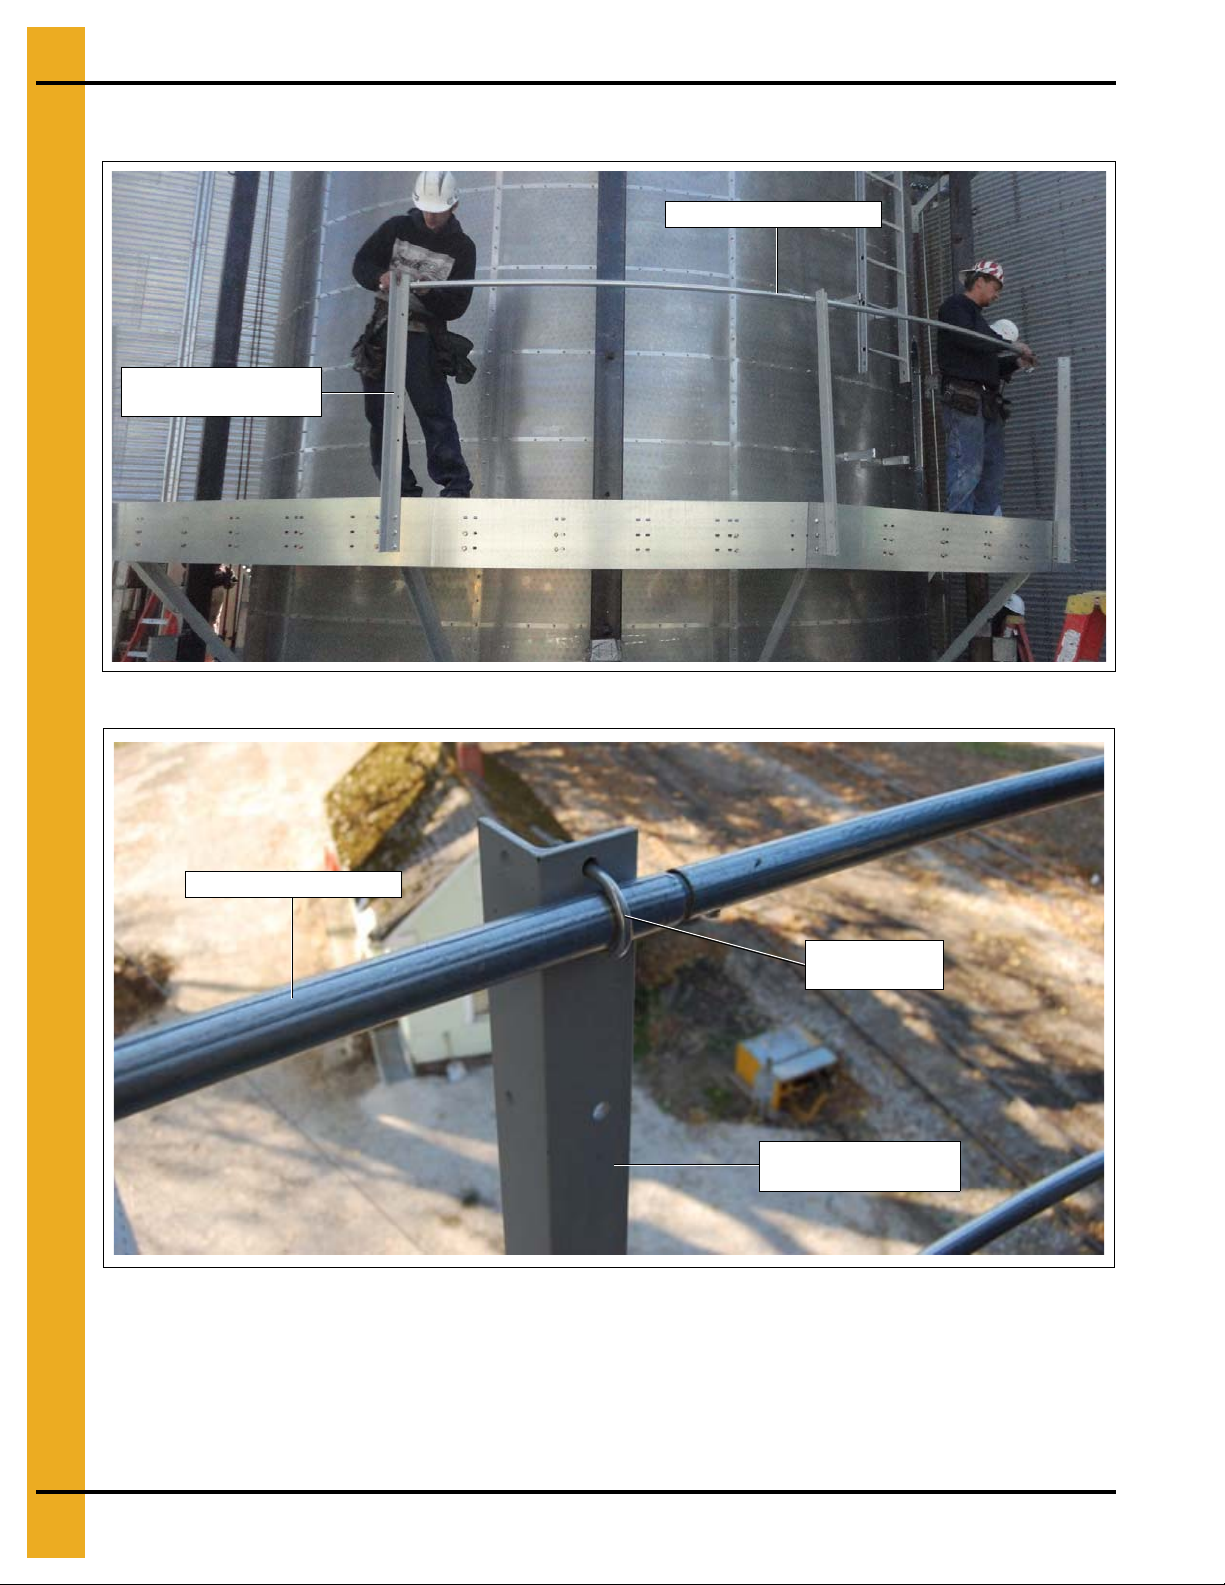
4. 12' Outside Catwalk Installation Instructions
Catwalk vertical
support (GT1-2037-BS)
Handrail (GT1-2038-12O)
Catwalk vertical
support (GT1-2037-BS)
Handrail (GT1-2038-12O)
U-Bolt 5/16"-18
ZN (S-10171)
Installing Handrails (GT1-2038-12O) (Continued)
Figure 4U
Figure 4V
22 PNEG-1853 12' Tower Dryer Fan Style Catwalk Assembly
Page 23

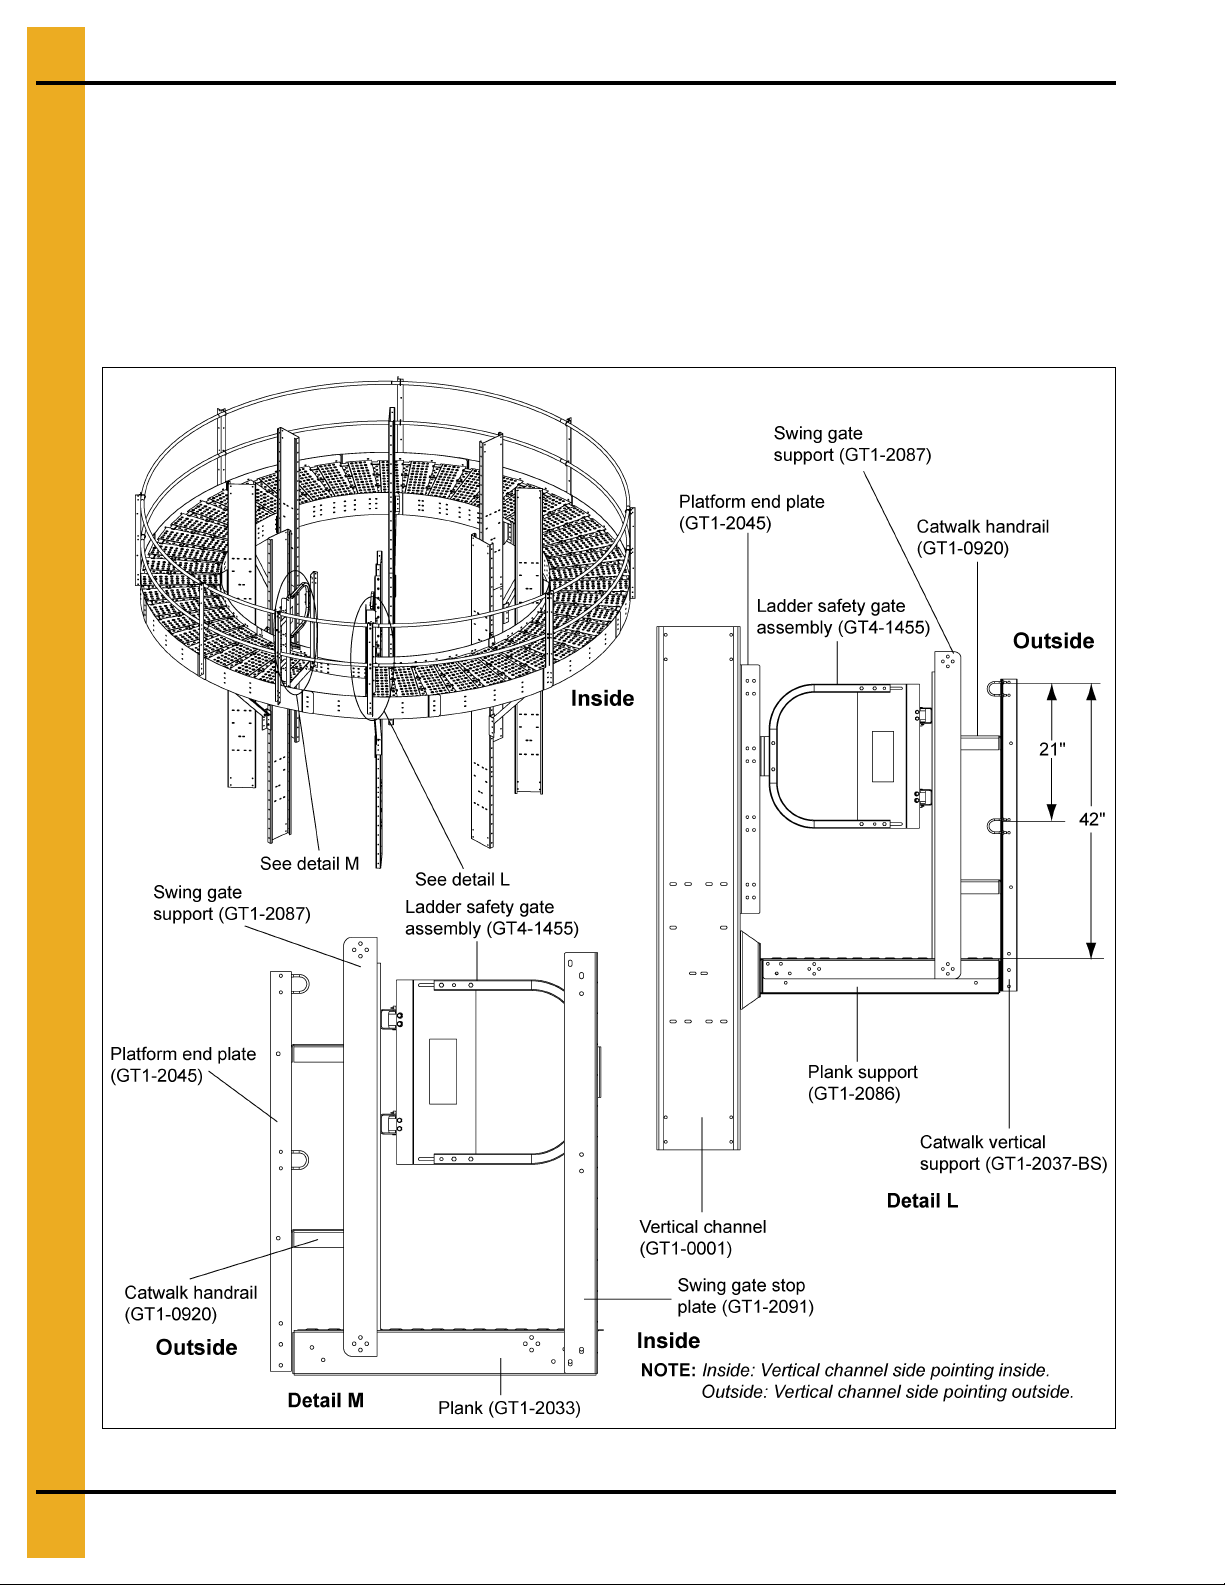
4. 12' Outside Catwalk Installation Instructions
Installing Safety Gate (GT4-1455)
1. Install the swing gate support (GT1-2087) with the plank support (GT1-2086) using 3/8"-16 x 1" YDP
grade 8 or grade 8.2 bolts (S-7927) and 3/8"-16 ZN grade 5 nuts (S-968). (See detail J in Figure 4W.)
2. Install two (2) catwalk handrails (GT1-0920) between the swing gate support (GT1-2087) and the
catwalk vertical support (GT1-2037-BS) using 3/8"-16 x 1" YDP grade 8 or grade 8.2 bolts (S-7927)
and 3/8"-16 ZN grade 5 nuts (S-968). (See detail J in Figure 4W.)
3. On the other side, install the swing gate support (GT1-2087) to the plank (GT1-2033) using
3/8"-16 x 1" YDP grade 8 or grade 8.2 bolts (S-7927) and 3/8"-16 ZN grade 5 nuts (S-968).
(See detail K in Figure 4W.)
4. Install two (2) catwalk handrails (GT1-0920) between the swing gate support (GT1-2087) and the
catwalk vertical support (GT1-2037-BS) using 3/8"-16 x 1" YDP grade 8 or grade 8.2 bolts (S-7927)
and 3/8"-16 ZN grade 5 nuts (S-968). (See detail K in Figure 4W.)
Figure 4W
PNEG-1853 12' Tower Dryer Fan Style Catwalk Assembly 23
Page 24
4. 12' Outside Catwalk Installation Instructions
Installing Safety Gate (GT4-1455) (Continued)
5. Install the ladder safety gate assembly (GT4-1455) to the swing gate support (GT1-2087)
using 3/8"-16 x 1" YDP grade 8 or grade 8.2 bolts (S-7927) and 3/8"-16 ZN grade 5 nuts (S-968).
(See detail L in
6. Install the ladder safety gate (GT4-1455) to the swing gate support (GT1-2087) and attach the
stop plate (GT1-2091) to the ladder opening toe board (GT4-1465) and the plank (GT1-2033)
using 3/8"-16 x 1" YDP
(See detail M in
Figure 4X
grade 8 or grade 8.2
Figure 4X
.)
bolts (S-7927) and 3/8"-16 ZN grade 5 nuts (S-968).
.) The distance between the plank and handrail is 42".
Figure 4X
24 PNEG-1853 12' Tower Dryer Fan Style Catwalk Assembly
Page 25

4. 12' Outside Catwalk Installation Instructions
Installing Ladder Bracket (GT1-2088)
1. Install the ladder bracket (GT1-2088) to the ladder ope ning toe board (GT4-1465) using 3/8"-16 x 1"
YDP
grade 8 or grade 8.2
bolts (S-7927) and 3/8"-16 ZN grade 5 nuts (S-968). (See Figure 4Y.)
Figure 4Y
PNEG-1853 12' Tower Dryer Fan Style Catwalk Assembly 25
Page 26

4. 12' Outside Catwalk Installation Instructions
Installing Planks at Jack Pole Locations
Once catwalk is lifted above the jack poles, install the planks at jack pole locations from top using
5/16"-18 x 3/4" YPD grade 8 or grade 8.2 bolts (S-4303) and retainer nuts (090-1709-6). (See Figure 4Z.)
Figure 4Z
1. Insert the retainer nut (090-1709-6) to the rounded edge of the plank slot and slide it to the proper
position as shown in the detail O of Figure 4AA.
2. Place the following plank over the installed plank and bolt to the retainer nut (090-1709-6) using
5/16"-18 x 3/4" bolt (S-4303) as shown in the detail P of Figure 4AA.
Figure 4AA
26 PNEG-1853 12' Tower Dryer Fan Style Catwalk Assembly
Page 27

4. 12' Outside Catwalk Installation Instructions
Installing Planks at Jack Pole Locations (Continued)
3. Install the holding plate (GT1-2144) (pre-assembled with two (2) extruded nuts (S-10175)) to the
proper slots in the toe board and hand tight using 3/8"-16 x 1" YDP grade 8 or grade 8.2 bolt
(S-7927) and 3/8"-16 ZN grade 5 nut (S-968). (See Figure 4AB.)
4. Now adjust the plank to align with the slot and bolt from outside the toe board. (See Figure 4AB.)
Figure 4AB
Figure 4AC
PNEG-1853 12' Tower Dryer Fan Style Catwalk Assembly 27
Page 28

4. 12' Outside Catwalk Installation Instructions
Outside Catwalk Walk Surface
Figure 4AD
28 PNEG-1853 12' Tower Dryer Fan Style Catwalk Assembly
Page 29

12' Inside Fan Style
Catwalk Assembly Instructions
(GT4-1043-12F)
PNEG-1853 12' Tower Dryer Fan Style Catwalk Assembly 29
Page 30

5. 12' Inside Catwalk Installation Instructions
Installing Z-Clips (GT1-2036)
1. Bolt Z-clips (GT1-2036) to all vertical channels (GT1-0001). The Z-clip can be installed on each
vertical channel as inner wall sheets are installed using 3/8"-16 x 1" YDP grade 8 or g rade 8.2 bo lts
(S-7927) and 3/8"-16 ZN grade 5 nuts (S-968). (See Figure 5A.)
Figure 5A
30 PNEG-1853 12' Tower Dryer Fan Style Catwalk Assembly
Page 31

5. 12' Inside Catwalk Installation Instructions
Installing Catwalk Support Clip (GT1-2040-BS)
1. Install catwalk support clips (GT1-2040-BS) to vertical channels (GT1-0001). Support clip can be
installed on each vertical channel as the inner wall sheets are installed using 3/8"-16 x 1" YDP
grade 8 or grade 8.2 bolts (S-7927) and 3/8"-16 ZN grade 5 nuts (S-968). (See Figure 5B.)
2. The distance between the Z-clip and support clip for 12' inside catwalk is 36-1/2". (See Figure 5C.)
Figure 5B
Figure 5C
PNEG-1853 12' Tower Dryer Fan Style Catwalk Assembly 31
Page 32

5. 12' Inside Catwalk Installation Instructions
Installing Outer Toe Board (GT1-2062)
1. Install the outer toe board (GT1-2062) to the Z-clips (GT1-2036). All toe boards should be installed
between the Z-clips using 3/8"-16 x 1" YDP grade 8 or grade 8.2 bolts (S-7927) and 3/8"-16 ZN
grade 5 nuts (S-968). (See Figure 5D.)
Figure 5D
2. Outer toe board is arranged with overlap slots on each side. Install 12' outer toe boards (GT1-2062)
to corresponding slots as shown in Figure 5E.
Figure 5E 12' Outer Toe Board (GT1-2062)
32 PNEG-1853 12' Tower Dryer Fan Style Catwalk Assembly
Page 33

5. 12' Inside Catwalk Installation Instructions
NOTE: Make sure the planks are aligned to right slots
as marked in Figure 5H on Page 34.
Installing Planks (GT1-2060) to Outer Toe Board (GT1-2062)
1. Install the planks (GT1-2060) to the outer toe board (GT1-2062) using 3/8"-16 x 1" YDP grade 8 or
grade 8.2 bolts (S-7927) and 3/8"-16 ZN grade 5 nuts (S-968). (See Figure 5F.)
PNEG-1853 12' Tower Dryer Fan Style Catwalk Assembly 33
Figure 5F
Page 34

5. 12' Inside Catwalk Installation Instructions
Installing Planks (GT1-2060) to Outer Toe Board (GT1-2062)
(Continued)
2. Install all the planks (GT1-2060) continuously around the dryer. (See Figure 5G.)
Figure 5G
3. Outer toe board (GT1-2062) is arranged with many slots to install plank. Install planks to
corresponding slots as shown in Figure 5H.
Figure 5H 12' Outer Toe Board (GT1-2062)
34 PNEG-1853 12' Tower Dryer Fan Style Catwalk Assembly
Page 35

5. 12' Inside Catwalk Installation Instructions
Installing Knee Support (GT1-2039-BS)
1. Install the knee support (GT1-2039-BS) around the dryer between the catwalk support clips
(GT1-2040-BS) and planks (GT1-2060) using 3/8"-16 x 1" YDP grade 8 or grade 8 .2 bolts (S-79 27)
and 3/8"-16 ZN grade 5 nuts (S-968). (See Figure 5I.)
Figure 5I
PNEG-1853 12' Tower Dryer Fan Style Catwalk Assembly 35
Page 36

5. 12' Inside Catwalk Installation Instructions
Installing Inner Toe Board (GT1-2061) and Catwalk Vertical
Support (GT1-2037-BS)
1. Install all the inner toe boards (GT1-2061) to the planks (GT1-2060). (See Figure 5J.)
2. When installing the inner toe board with planks, install the catwalk vertical support (GT1-2037-BS)
simultaneously at proper locations using 3/8"-16 x 1" YDP grade 8 or grade 8.2 bolts (S-7927)
and 3/8"-16 ZN grade 5 nuts (S-968). (See Figure 5J.)
Figure 5J
3. Inner toe board is arranged with overlap slots on each side and plank installation slots. Install
12' inner toe boards (GT1-2061) to corresponding overlap and plank installation slots as shown
in Figure 5K.
Figure 5K 12' Inner Toe Board (GT1-2061)
36 PNEG-1853 12' Tower Dryer Fan Style Catwalk Assembly
Page 37

5. 12' Inside Catwalk Installation Instructions
Handrail
(GT1-2038-12I)
Catwalk vertical
support (GT1-2037-BS)
5/16"-18 ZN
U-Bolt (S-10171)
Installing Handrail (GT1-2038-12I)
1. Install the handrail (GT1-2038-12I) to the catwalk vertical support (GT1-2037-BS) using 5/16"-18 ZN
U-bolts (S-10171) and 5/16"-18 YDP grade 2 nuts (S-3611) to tighten the handrail with vertical p ost.
(See Figure 5L and Figure 5M.)
Figure 5L
PNEG-1853 12' Tower Dryer Fan Style Catwalk Assembly 37
Figure 5M
Page 38

5. 12' Inside Catwalk Installation Instructions
Inside Catwalk Walk Surface
Figure 5N
38 PNEG-1853 12' Tower Dryer Fan Style Catwalk Assembly
Page 39

12' Offset (GT4-1047-12F)
and Roof Hatch (GT4-1051-12F)
Fan Style Platform Assembly
Instructions
PNEG-1853 12' Tower Dryer Fan Style Catwalk Assembly 39
Page 40

6. 12' Offset and Roof Hatch Platform Installation Instructions
Installing Z-Clips (GT1-2036)
1. Bolt Z-clips (GT1-2036) to vertical channels (GT1-0001). The Z-clip can be installed on each vertical
channel as wall sheets are installed using 3/8"-16 x 1" YDP grade 8 or grade 8.2 bolts (S-7927)
and 3/8"-16 ZN grade 5 nuts (S-968). (See Figure 6A, Figure 6B b elow, Figure 6C and Figure 6D on
Page 41.)
Figure 6A Offset Z-Clip Installation
Figure 6B Offset Z-Clip Installation
40 PNEG-1853 12' Tower Dryer Fan Style Catwalk Assembly
Page 41

6. 12' Offset and Roof Hatch Platform Installation Instructions
Installing Z-Clips (GT1-2036) (Continued)
Figure 6C Roof Hatch Z-Clip Installation
Figure 6D Roof Hatch Z-Clip Installation
PNEG-1853 12' Tower Dryer Fan Style Catwalk Assembly 41
Page 42

6. 12' Offset and Roof Hatch Platform Installation Instructions
Installing Swing Gate Stop (GT1-2045)
1. Install swing gate stops (GT1-2045) to the safety gate opening vertical channel and catwalk end
vertical channel on offset catwalk as wall sheets are installed using 3/8"-16 x 1" YDP grade 8 or
grade 8.2 bolts (S-7927) and 3/8"-16 grade 5 nuts (S-968). (See Figure 6E and Figure 6F.)
Figure 6E Offset Swing Gate Stop Installation
Figure 6F
42 PNEG-1853 12' Tower Dryer Fan Style Catwalk Assembly
Page 43

6. 12' Offset and Roof Hatch Platform Installation Instructions
Installing Catwalk Support Clip (GT1-2040-BS)
1. Install catwalk support clips (GT1-2040-BS) to vertical channels (GT1-0001). Support clip can be
installed on each vertical channel as the wall sheets are installed using 3/8"-16 x 1" YDP grade 8 or
grade 8.2 bolts (S-7927) and 3/8"-16 ZN grade 5 nuts (S-968). (See Figure 6G below and
Figure 6I on Page 44.)
2. The distance between the Z-clip and support clip 12' offset and roof hatch platform is 31-1/2".
(See Figure 6H below and Figure 6J on Page 44.)
Figure 6G Offset Catwalk Support Clip Installation
Figure 6H
PNEG-1853 12' Tower Dryer Fan Style Catwalk Assembly 43
Page 44

6. 12' Offset and Roof Hatch Platform Installation Instructions
Installing Catwalk Support Clip (GT1-2040-BS) (Continued)
Figure 6I Roof Hatch Catwalk Support Clip Installation
Figure 6J
44 PNEG-1853 12' Tower Dryer Fan Style Catwalk Assembly
Page 45

6. 12' Offset and Roof Hatch Platform Installation Instructions
Installing Inner Toe Board (GT1-2035)
1. Install the inner toe board (GT1-2035) to the Z-clips (GT1-2036). (See Figure 6K.)
2. All the toe boards should be installed between the Z-clips using 3/8"-16 x 1" YDP grade 8 or
grade 8.2 bolts (S-7927) and 3/8"-16 ZN grade 5 nuts (S-968). (See Figure 6K.)
Figure 6K Inner Toe Board Installation for Offset and Roof Hatch Catwalks
PNEG-1853 12' Tower Dryer Fan Style Catwalk Assembly 45
Page 46

6. 12' Offset and Roof Hatch Platform Installation Instructions
Installing Inner Toe Board (GT1-2035) (Continued)
3. Inner toe board is arranged with overlap slots on each side. Install 12' offset and roof hatch inner toe
boards (GT1-2035) to corresponding slots as shown in Figure 6L.
Figure 6L 12' Inner Toe Board (GT1-2035)
46 PNEG-1853 12' Tower Dryer Fan Style Catwalk Assembly
Page 47

6. 12' Offset and Roof Hatch Platform Installation Instructions
NOTE: Make sure the planks are aligned to right slots
as marked in Figure 6N on Page 48.
Installing Plank (GT1-2033) to Inner Toe Board (GT1-2035)
1. Install planks (GT1-2033) to bottom two (2) holes of the inner toe board (GT1-2035) using 3/8"-16 x 1"
YDP grade 8 or grade 8.2 bolts (S-7927) and 3/8"-16 ZN grade 5 nuts (S-968).
(See Figure 6M.)
Figure 6M Inner Toe Board (GT1-2035) Plank Installation for Offset and Roof Hatch Catwalks
PNEG-1853 12' Tower Dryer Fan Style Catwalk Assembly 47
Page 48

6. 12' Offset and Roof Hatch Platform Installation Instructions
Jack pole
Plank (GT1-2033)
Installing Plank (GT1-2033) to Inner Toe Board (GT1-2035)
(Continued)
2. Inner toe board (GT1-2035) is arranged with many slots to install plank. In stall offset and roo f hatch
planks to corresponding slots as shown in Figure 6N.
Figure 6N 12' Inner Toe Board (GT1-2035)
3. Install all the planks (GT1-2033) continuously around the dryer except at the jack pole locations.
(See Figure 6O.)
Figure 6O
48 PNEG-1853 12' Tower Dryer Fan Style Catwalk Assembly
Page 49

6. 12' Offset and Roof Hatch Platform Installation Instructions
Truss bolt 5/16"-18 x
3/4" YDP grade 8 or
grade 8.2 (S-4303)
Installing Plank (GT1-2033) to Inner Toe Board (GT1-2035)
(Continued)
Figure 6P
4. Each plank should be overlapped at the edges and bolted with 5/16"-18 x 3/4" YPD grade 8 or
grade 8.2 bolts (S-4303) and 5/16"-18 x 3/4" YPD grade 2 nuts (S-3611). (See Figure 6Q.)
PNEG-1853 12' Tower Dryer Fan Style Catwalk Assembly 49
Figure 6Q
Page 50

6. 12' Offset and Roof Hatch Platform Installation Instructions
Installing Plank Support (GT1-2086)
1. Once the planks are installed, install the plank support (GT1-2086) at the catwalk closing end
using 5/16"-18 x 3/4" YPD grade 8 or grade 8.2 bolts (S-4303) and 5/16"-18 YDP grade 2 nuts
(S-3611). (See Figure 6R.)
Figure 6R Plank Support (GT1-2086) Installation for Offset and Roof Hatch Catwalks
50 PNEG-1853 12' Tower Dryer Fan Style Catwalk Assembly
Page 51

6. 12' Offset and Roof Hatch Platform Installation Instructions
Installing Knee Support (GT1-2039-BS)
1. Install the knee support (GT1-2039-BS) around the dryer between the catwalk support clips
(GT1-2040-BS) and the planks (GT1-2033) using 3/8"-16 x 1" YDP grade 8 or grade 8.2 bolts
(S-7927) and 3/8"-16 ZN grade 5 nuts (S-968). (See Figure 6S.)
Figure 6S Knee Support (GT1-2039-BS) Installation for Offset and Roof Hatch Catwalks
PNEG-1853 12' Tower Dryer Fan Style Catwalk Assembly 51
Page 52

6. 12' Offset and Roof Hatch Platform Installation Instructions
Installing Outer Toe Board (GT1-2034-12) and Catwalk Vertical
Support (GT1-2037-BS)
1. Install all the outer toe boards (GT1-2034-12) to the planks (GT1-2033). (See Figure 6T.)
2. When installing the outer toe board with planks, install the catwalk vertical support (GT1-2037-BS)
simultaneously at proper locations using 3/8"-16 x 1" YDP grade 8 or grade 8.2 bolts (S-7927)
and 3/8"-16 ZN grade 5 nuts (S-968). (See Figure 6T.)
Figure 6T Outer Toe Board (GT1-2034-12) and Vertical Support (GT1-2037-BS)
Installation for Offset and Roof Hatch Catwalks
52 PNEG-1853 12' Tower Dryer Fan Style Catwalk Assembly
Page 53

6. 12' Offset and Roof Hatch Platform Installation Instructions
Installing Long Handrails (GT1-2038-12O)
1. Install the long handrail (GT1-2038-12O) to the catwalk vertical support (GT1-2037-BS) using
5/16"-18 ZN U-bolts (S-10171) and 5/16"-18 YDP grade 2 nuts (S-3611) to tighten the han drail with
vertical post. (See Figure 6U.)
2. Use the self-tapping screws SDS #10-16 x 3/4" HWH ZN grade 2 (S-7466) at all handrail pipe joints.
(See Figure 6U.)
Figure 6U Handrail (GT1-2038-12O) Installation for Offset and Roof Hatch Catwalks
PNEG-1853 12' Tower Dryer Fan Style Catwalk Assembly 53
Page 54

6. 12' Offset and Roof Hatch Platform Installation Instructions
Installing Long Handrails (GT1-2038) (Continued)
3. Install the platform end handrail (GT1-2044) to the catwalk vertical support (GT1-2037-BS) and the
platform end plate (GT1-2045). (See Figure 6V below and Figure 6W on Page 55.)
Figure 6V Offset Platform End Handrail (GT1-2044) Installation
54 PNEG-1853 12' Tower Dryer Fan Style Catwalk Assembly
Page 55

6. 12' Offset and Roof Hatch Platform Installation Instructions
Installing Long Handrails (GT1-2038) (Continued)
Figure 6W Roof Hatch Platform End Handrail (GT1-2044) Installation
PNEG-1853 12' Tower Dryer Fan Style Catwalk Assembly 55
Page 56

6. 12' Offset and Roof Hatch Platform Installation Instructions
Installing Safety Gate (GT4-1455) with Plank Support (GT1-2086)
1. Install the swing gate support (GT1-2087) with the plank support (GT1-2086).
2. Install two (2) catwalk handrails (GT1-0920) between the swing gate support (GT1-2087) and catwalk
vertical support (GT1-2037-BS). (See Figure 6X below and Figure 6Y on Page 57.)
Figure 6X Installing Safety Gate (GT4-1455) to Offset and Roof Hatch Catwalks
56 PNEG-1853 12' Tower Dryer Fan Style Catwalk Assembly
Page 57

6. 12' Offset and Roof Hatch Platform Installation Instructions
Installing Safety Gate with Plank Support (Continued)
3. Install the ladder safety gate assembly (GT4-1455) to the swing gate support (GT1-2087)
using 3/8"-16 x 1" YDP grade 8 or grade 8.2 bolts (S-7927) and 3/8"-16 ZN grade 5 nuts (S-968).
The distance between the plank and handrail is 42". (See Figure 6Y.)
Figure 6Y Offset Ladder Safety Gage Assembly to Swing Gate Support (GT1-2087)
PNEG-1853 12' Tower Dryer Fan Style Catwalk Assembly 57
Page 58

6. 12' Offset and Roof Hatch Platform Installation Instructions
Installing Safety Gate with Plank Support (Continued)
Figure 6Z Roof Hatch Ladder Safety Gage Assembly to Swing Gate Stop Plate (GT1-2091)
58 PNEG-1853 12' Tower Dryer Fan Style Catwalk Assembly
Page 59

1. 12' Outside Fan Style Catwalk (GT4-1039-12F) - (See Pages 60-63.)
2. 12' Inside Fan Style Catwalk (GT4-1043-12F) - (See Pages 64-67.)
3. 12' Offset Fan Style Platform (GT4-1047-12F) - (See Pages 68-71.)
4. 12' Roof Hatch Fan Style Platform (GT4-1051-12F) - (See Pages 72-75.)
7. Parts List
PNEG-1853 12' Tower Dryer Fan Style Catwalk Assembly 59
Page 60

7. Parts List
NOTE: Use retainer nuts (090-1709-6)
at jack pole positions for plank overlap.
12' Outside Fan Style Catwalk (GT4-1039-12F)
60 PNEG-1853 12' Tower Dryer Fan Style Catwalk Assembly
Page 61

7. Parts List
12' Outside Fan Style Catwalk (GT4-1039-12F) Parts List
Ref # Part # Description Qty
1 GT1-0001 Vertical Channel 16
2 GT1-2036 Catwalk/Platform to Dryer Wall Bracket 8
3 GT1-2035 Inner Toe Board 7
4 GT1-2033 Plank 45
5 GT1-2034-12 Outer Toe Board 12
6 GT1-2039-BS Outside/Inside Catwalk Diagonal Support - Bin Silver 8
7 GT1-2040-BS Catwalk Support Clip - Bin Silver 8
8 GT1-2037-BS Catwalk Vertical Support - Bin Silver 9
9 GT1-2038-12O 12' Outside Catwalk/Platform Handrail 16
10 GT1-2086 Catwalk Plank Support 1
11 GT4-1465 Ladder Opening Inner Toe Board 1
12 GT1-2087 Swing Gate Support 2
13 GT1-0920 Catwalk End Handrail 4
14 GT4-1455 Ladder Safety Gate 2
15 GT1-2045 Platform End Plate 1
16 GT1-2091 Swing Gate Stop Plate 1
17 GT1-2088 Ladder to Toe Board Bracket 2
18 S-4303 Truss Bolt 5/16"-18 x 3/4" YDP Grade 8 or Grade 8.2 200
19 S-7927 Flange Bolt 3/8"-16 x 1" YDP Grade 8 or Grade 8.2 363
20 S-968 Flange Nut 3/8"-16 ZN Grade 5 Wide Flange 363
21 S-10171 Bolt, U-Bolt 5/16"-18 for 1-1/4" Pipe ZN 20
22 S-3611 Flange Nut 5/16"-18 YDP Grade 2 220
N/S 090-1709-6 Retainer Nut 5/16"-18 x 0.120" ZN 53
N/S GT1-2144 Holding Plate, Inner Toe Board to Plank 26
N/S S-10175 Extruded Nut 3/8"-16, Tapped Hole, 050-0.200 Panel Range, Black 52
PNEG-1853 12' Tower Dryer Fan Style Catwalk Assembly 61
Page 62

7. Parts List
12' Outside Fan Style Catwalk (GT4-1039-12F) (Continued)
62 PNEG-1853 12' Tower Dryer Fan Style Catwalk Assembly
Page 63

7. Parts List
12' Outside Fan Style Catwalk (GT4-1039-12F) Parts List
Ref # Part # Description Qty
1 GT1-0001 Vertical Channel 16
2 GT1-2036 Catwalk/Platform to Dryer Wall Bracket 8
3 GT1-2035 Inner Toe Board 7
4 GT1-2033 Plank 45
5 GT1-2034-12 Outer Toe Board 12
6 GT1-2039-BS Outside/Inside Catwalk Diagonal Support - Bin Silver 8
7 GT1-2040-BS Catwalk Support Clip - Bin Silver 8
8 GT1-2037-BS Catwalk Vertical Support - Bin Silver 9
9 GT1-2038-12O 12' Outside Catwalk/Platform Handrail 16
10 GT1-2086 Catwalk Plank Support 1
11 GT4-1465 Ladder Opening Inner Toe Board 1
12 GT1-2087 Swing Gate Support 2
13 GT1-0920 Catwalk End Handrail 4
14 GT4-1455 Ladder Safety Gate 2
15 GT1-2045 Platform End Plate 1
16 GT1-2091 Swing Gate Stop Plate 1
17 GT1-2088 Ladder to Toe Board Bracket 2
18 S-4303 Truss Bolt 5/16"-18 x 3/4" YDP Grade 8 or Grade 8.2 200
19 S-7927 Flange Bolt 3/8"-16 x 1" YDP Grade 8 or Grade 8.2 363
20 S-968 Flange Nut 3/8"-16 ZN Grade 5 Wide Flange 363
21 S-10171 Bolt, U-Bolt 5/16"-18 for 1-1/4" Pipe ZN 20
22 S-3611 Flange Nut 5/16"-18 YDP Grade 2 220
N/S 090-1709-6 Retainer Nut 5/16"-18 x 0.120" ZN 53
N/S GT1-2144 Holding Plate, Inner Toe Board to Plank 26
N/S S-10175 Extruded Nut 3/8"-16, Tapped Hole, 050-0.200 Panel Range, Black 52
PNEG-1853 12' Tower Dryer Fan Style Catwalk Assembly 63
Page 64

7. Parts List
12' Inside Fan Style Catwalk (GT4-1043-12F)
64 PNEG-1853 12' Tower Dryer Fan Style Catwalk Assembly
Page 65

12' Inside Fan Style Catwalk (GT4-1043-12F) Parts List
Ref # Part # Description Qty
1 G T1-0001 Vertical Channel 8
2 GT1-2036 Catwalk/Platform to Dryer Wall Bracket 8
3 G T1-2060 Plank 24
4 GT1-2039-BS Outside/Inside Catwalk Diagonal Support - Bin Silver 8
5 GT1-2040-BS Catwalk Support Clip - Bin Silver 8
6 GT1-2062 Outer Toe Board 8
7 G T1-2061 Inner Toe Board 4
8 GT1-2037-BS Catwalk Vertical Support - Bin Silver 8
9 G T1-2038-12I 12' Inside Catwalk Handrail 4
10 S-4303 Truss Bolt 5/16"-18 x 3/4" YDP Grade 8 or Grade 8.2 106
11 S-7927 Flange Bolt 3/8"-16 x 1" YDP Grade 8 or Grade 8.2 195
7. Parts List
12 S-968 Flange Nut 3/8"-16 ZN Grade 5 Wide Flange 195
13 S-10171 Bolt, U-Bolt 5/16"-18 for 1-1/4" Pipe ZN 20
14 S-3611 Flange Nut 5/16"-18 YDP Grade 2 142
PNEG-1853 12' Tower Dryer Fan Style Catwalk Assembly 65
Page 66

7. Parts List
12' Inside Fan Style Catwalk (GT4-1043-12F) (Continued)
66 PNEG-1853 12' Tower Dryer Fan Style Catwalk Assembly
Page 67

12' Inside Fan Style Catwalk (GT4-1043-12F) Parts List
Ref # Part # Description Qty
1 G T1-0001 Vertical Channel 8
2 GT1-2036 Catwalk/Platform to Dryer Wall Bracket 8
3 G T1-2060 Plank 24
4 GT1-2039-BS Outside/Inside Catwalk Diagonal Support - Bin Silver 8
5 GT1-2040-BS Catwalk Support Clip - Bin Silver 8
6 GT1-2062 Outer Toe Board 8
7 G T1-2061 Inner Toe Board 4
8 GT1-2037-BS Catwalk Vertical Support - Bin Silver 8
9 G T1-2038-12I 12' Inside Catwalk Handrail 4
10 S-4303 Truss Bolt 5/16"-18 x 3/4" YDP Grade 8 or Grade 8.2 106
11 S-7927 Flange Bolt 3/8"-16 x 1" YDP Grade 8 or Grade 8.2 195
7. Parts List
12 S-968 Flange Nut 3/8"-16 ZN Grade 5 Wide Flange 195
13 S-10171 Bolt, U-Bolt 5/16"-18 for 1-1/4" Pipe ZN 20
14 S-3611 Flange Nut 5/16"-18 YDP Grade 2 142
PNEG-1853 12' Tower Dryer Fan Style Catwalk Assembly 67
Page 68

7. Parts List
NOTE: Use retainer nuts (090-1709-6) at
jack pole positions for plank overlap.
12' Offset Fan Style Platform (GT4-1047-12F)
68 PNEG-1853 12' Tower Dryer Fan Style Catwalk Assembly
Page 69

7. Parts List
12' Offset Fan Style Platform (GT4-1047-12F) Parts List
Ref # Part # Description Qty
1 GT1-0001 Vertical Channel 6
2 GT1-2036 Catwalk/Platform to Dryer Wall Bracket 3
3 GT1-2035 Inner Toe Board 2
4 GT1-2033 Plank 12
5 GT1-2034-12 Outer Toe Board 3
6 GT1-2040-BS Catwalk Support Clip - Bin Silver 3
7 GT1-2039-BS Outside/Inside Catwalk Diagonal Support - Bin Silver 3
8 GT1-2037-BS Catwalk Vertical Support - Bin Silver 3
9 GT1-2038-12O 12' Outside Catwalk/Platform Handrail 4
10 GT1-2045 Platform End Plate 2
11 GT1-2044 Platform End Handrail 2
12 GT1-2086 Catwalk Plank Support 1
13 GT1-2087 Swing Gate Support 1
14 GT1-0920 Catwalk End Handrail 2
15 GT4-1455 Ladder Safety Gate 1
16 GT1-2095 Platform End Toe Board 1
17 S-4303 Truss Bolt 5/16"-18 x 3/4" YDP Grade 8 or Grade 8.2 58
18 S-7927 Flange Bolt 3/8"-16 x 1" YDP Grade 8 or Grade 8.2 130
19 S-968 Flange Nut 3/8"-16 ZN Grade 5 Wide Flange 130
20 S-10171 Bolt, U-Bolt 5/16"-18 for 1-1/4" Pipe ZN 12
21 S-3611 Flange Nut 5/16"-18 YDP Grade 2 85
22 S-7466 Screw, SDS #10-16 x 3/4" HWH ZN Grade 2 5
N/S 090-1709-6 Retainer Nut 5/16"-18 x 0.120" ZN 12
N/S GT1-2144 Holding Plate, Inner Toe Board to Plank 6
N/S S-10175 Extruded Nut 3/8"-16, Tapped Hole, 050-0.200 Panel Range, Black 12
PNEG-1853 12' Tower Dryer Fan Style Catwalk Assembly 69
Page 70

7. Parts List
12' Offset Fan Style Platform (GT4-1047-12F) (Continued)
70 PNEG-1853 12' Tower Dryer Fan Style Catwalk Assembly
Page 71

7. Parts List
12' Offset Fan Style Platform (GT4-1047-12F) Parts List
Ref # Part # Description Qty
1 GT1-0001 Vertical Channel 6
2 GT1-2036 Catwalk/Platform to Dryer Wall Bracket 3
3 GT1-2035 Inner Toe Board 2
4 GT1-2033 Plank 12
5 GT1-2034-12 Outer Toe Board 3
6 GT1-2040-BS Catwalk Support Clip - Bin Silver 3
7 GT1-2039-BS Outside/Inside Catwalk Diagonal Support - Bin Silver 3
8 GT1-2037-BS Catwalk Vertical Support - Bin Silver 3
9 GT1-2038-12O 12' Outside Catwalk/Platform Handrail 4
10 GT1-2045 Platform End Plate 2
11 GT1-2044 Platform End Handrail 2
12 GT1-2086 Catwalk Plank Support 1
13 GT1-2087 Swing Gate Support 1
14 GT1-0920 Catwalk End Handrail 2
15 GT4-1455 Ladder Safety Gate 1
16 GT1-2095 Platform End Toe Board 1
17 S-4303 Truss Bolt 5/16"-18 x 3/4" YDP Grade 8 or Grade 8.2 58
18 S-7927 Flange Bolt 3/8"-16 x 1" YDP Grade 8 or Grade 8.2 130
19 S-968 Flange Nut 3/8"-16 ZN Grade 5 Wide Flange 130
20 S-10171 Bolt, U-Bolt 5/16"-18 for 1-1/4" Pipe ZN 12
21 S-3611 Flange Nut 5/16"-18 YDP Grade 2 85
22 S-7466 Screw, SDS #10-16 x 3/4" HWH ZN Grade 2 5
N/S 090-1709-6 Retainer Nut 5/16"-18 x 0.120" ZN 12
N/S GT1-2144 Holding Plate, Inner Toe Board to Plank 6
N/S S-10175 Extruded Nut 3/8"-16, Tapped Hole, 050-0.200 Panel Range, Black 12
PNEG-1853 12' Tower Dryer Fan Style Catwalk Assembly 71
Page 72

7. Parts List
NOTE: Use retainer nuts (090-1709-6) at
jack pole positions for plank overlap.
12' Roof Hatch Fan Style Platform (GT4-1051-12F)
72 PNEG-1853 12' Tower Dryer Fan Style Catwalk Assembly
Page 73

7. Parts List
12' Roof Hatch Fan Style Platform (GT4-1051-12F) Parts List
Ref # Part # Description Qty
1 G T1-0001 Vertical Channel 3
2 GT1-2036 Catwalk/Platform to Dryer Wall Bracket 3
3 G T1-2035 Inner Toe Board 2
4 GT1-2033 Plank 12
5 G T1-2034-12 Outer Toe Board 3
6 GT1-2086 Catwalk Plank Support 1
7 GT1-2040-BS Catwalk Support Clip - Bin Silver 3
8 GT1-2039-BS Outside/Inside Catwalk Diagonal Support - Bin Silver 3
9 GT1-2037-BS Vertical Support Handrail - Bin Silver 3
10 GT1-2038-12O 12' Outside Catwalk/Platform Handrail 4
11 GT1-2044 Platform End Handrail 2
12 GT1-2087 Swing Gate Support 1
13 GT1-0920 Catwalk End Handrail 2
14 GT4-1455 Ladder Safety Gate 1
15 GT1-2095 Platform End Toe Board 1
16 GT1-2091 Swing Gate Stop Plate 2
17 S-4303 Truss Bolt 5/16"-18 x 3/4" YDP Grade 8 or Grade 8.2 58
18 S-7927 Flange Bolt 3/8"-16 x 1" YDP Grade 8 or Grade 8.2 130
19 S-968 Flange Nut 3/8"-16 ZN Grade 5 Wide Flange 130
20 S-10171 Bolt, U-Bolt 5/16"-18 for 1-1/4" Pipe ZN 12
21 S-3611 Flange Nut 5/16"-18 YDP Grade 2 85
22 S-7466 Screw, SDS #10-16 x 3/4" HWH ZN Grade 2 5
N/S 090-1709-6 Retainer Nut 5/16"-18 x 0.120" ZN 12
N/S GT1-2144 Holding Plate, Inner Toe Board to Plank 6
N/S S-10175 Extruded Nut 3/8"-16, Tapped Hole, 050-0.200 Panel Range, Black 12
PNEG-1853 12' Tower Dryer Fan Style Catwalk Assembly 73
Page 74

7. Parts List
12' Roof Hatch Fan Style Platform (GT4-1051-12F) (Continued)
74 PNEG-1853 12' Tower Dryer Fan Style Catwalk Assembly
Page 75

7. Parts List
12' Roof Hatch Fan Style Platform (GT4-1051-12F) Parts List
Ref # Part # Description Qty
1 G T1-0001 Vertical Channel 3
2 GT1-2036 Catwalk/Platform to Dryer Wall Bracket 3
3 G T1-2035 Inner Toe Board 2
4 GT1-2033 Plank 12
5 G T1-2034-12 Outer Toe Board 3
6 GT1-2086 Catwalk Plank Support 1
7 GT1-2040-BS Catwalk Support Clip - Bin Silver 3
8 GT1-2039-BS Outside/Inside Catwalk Diagonal Support - Bin Silver 3
9 GT1-2037-BS Vertical Support Handrail - Bin Silver 3
10 GT1-2038-12O 12' Outside Catwalk/Platform Handrail 4
11 GT1-2044 Platform End Handrail 2
12 GT1-2087 Swing Gate Support 1
13 GT1-0920 Catwalk End Handrail 2
14 GT4-1455 Ladder Safety Gate 1
15 GT1-2095 Platform End Toe Board 1
16 GT1-2091 Swing Gate Stop Plate 2
17 S-4303 Truss Bolt 5/16"-18 x 3/4" YDP Grade 8 or Grade 8.2 58
18 S-7927 Flange Bolt 3/8"-16 x 1" YDP Grade 8 or Grade 8.2 130
19 S-968 Flange Nut 3/8"-16 ZN Grade 5 Wide Flange 130
20 S-10171 Bolt, U-Bolt 5/16"-18 for 1-1/4" Pipe ZN 12
21 S-3611 Flange Nut 5/16"-18 YDP Grade 2 85
22 S-7466 Screw, SDS #10-16 x 3/4" HWH ZN Grade 2 5
N/S 090-1709-6 Retainer Nut 5/16"-18 x 0.120" ZN 12
N/S GT1-2144 Holding Plate, Inner Toe Board to Plank 6
N/S S-10175 Extruded Nut 3/8"-16, Tapped Hole, 050-0.200 Panel Range, Black 12
PNEG-1853 12' Tower Dryer Fan Style Catwalk Assembly 75
Page 76

NOTES
76 PNEG-1853 12' Tower Dryer Fan Style Catwalk Assembly
Page 77

8. Warranty
9101239_1_CR_rev7.DOC (revised July 2009)
GSI Group, LLC Limited Warranty
The GSI Group, LLC (“GSI”) warrants products which it manufactures to be free of defects in materials and workmanship
under normal usage and conditions for a period of 12 months after sale to the original end-user or if a foreign sale,
14 months from arrival at port of discharge, whichever is earlier. The end-user’s sole remedy (and GSI’s only obligation)
is to repair or replace, at GSI’s option and expense, products that in GSI’s judgment, contain a material defect in materials
or workmanship. Expenses incurred by or on behalf of the end-user without prior written authorization from the GSI
Warranty Group shall be the sole responsibility of the end-user.
Warranty Extensions:
The Limited Warranty period is extended for the following products:
Product Warranty Period
Performer Series Direct Drive Fan Motor 3 Years
AP Fans and Flooring
Cumberland
Feeding/Watering
Systems
Grain Systems Grain Bin Structural Design 5 Years
Grain Systems
Farm Fans
Zimmerman
All Fiberglass Housings Lifetime
All Fiberglass Propellers Lifetime
Feeder System Pan Assemblies 5 Years **
Feed Tubes (1-3/4" and 2.00") 10 Years *
Centerless Augers 10 Years *
Watering Nipples 10 Years *
Portable and Tower Dryers 2 Years
Portable and Tower Dryer Frames and
Internal Infrastructure †
5 Years
* Warranty prorated from list price:
0 to 3 years - no cost to end-user
3 to 5 years - end-user pays 25%
5 to 7 years - end-user pays 50%
7 to 10 years - end-user pays 75%
** Warranty prorated from list price:
0 to 3 years - no cost to end-user
3 to 5 years - end-user pays 50%
† Motors, burner components
and moving parts not included.
Portable dryer screens included.
Tower dryer screens not included.
GSI further warrants that the portable and tower dryer frame and basket, excluding all auger and auger drive components,
shall be free from defects in materials for a period of time beginning on the twelfth (12
and continuing until the sixtieth (60
th
) month from the date of purchase (extended warranty period). During the extended
th
) month from the date of purchase
warranty period, GSI will replace the frame or basket components that prove to be defective under normal conditions
of use without charge, excluding the labor, transportation, and/or shipping costs incurred in the performance of this
extended warranty.
Conditions and Limitations:
THERE ARE NO WARRANTIES THAT EXTEND BEYOND THE LIMITED WARRANTY DESCRIPTION SET FORTH
ABOVE. SPECIFICALLY, GSI MAKES NO FURTHER WARRANTY OF ANY KIND, EXPRESS OR IMPLIED,
INCLUDING, WITHOUT LIMITATION, WARRANTIES OF MERCHANTABILITY OR FITNESS FOR A PARTICULAR
PURPOSE OR USE IN CONNECTION WITH: (I) PRODUCT MANUFACTURED OR SOLD BY GSI OR (II) ANY ADVICE,
INSTRUCTION, RECOMMENDATION OR SUGGESTION PROVIDED BY AN AGENT, REPRESENTA TIVE OR
EMPLOYEE OF GSI REGARDING OR RELATED TO THE CONFIGURATION, INSTALLATION, LAYOUT, SUITABILITY
FOR A PARTICULAR PURPOSE, OR DESIGN OF SUCH PRODUCTS.
GSI shall not be liable for any direct, indirect, incidental or consequential damages, including, without limitation, loss of
anticipated profits or benefits. The sole and exclusive remedy is set forth in the Limited Warranty, which shall not exceed
the amount paid for the product purchased. This warranty is not transferable and applies only to the original end-user. GSI
shall have no obligation or responsibility for any representations or warranties made by or on behalf of any dealer, agent
or distributor.
GSI assumes no responsibility for claims resulting from construction defects or unauthorized modifications to products
which it manufactured. Modifications to products not specifically delineated in the manual accompanying the equipment at
initial sale will void the Limited Warranty.
This Limited Warranty shall not extend to products or parts which have been damaged by negligent use, misuse, alteration,
accident or which have been improperly/inadequately maintained. This Limited Warranty extends solely to products
manufactured by GSI.
Prior to installation, the end-user has the responsibility to comply with federal, state and local codes which apply to the
location and installation of products manufactured or sold by GSI.
PNEG-1853 12' Tower Dryer Fan Style Catwalk Assembly 77
Page 78

This equipment shall be installed in accordance with
the current installation codes and applicable
regulations, which should be carefully followed in all
cases. Authorities having jurisdiction should be
consulted before installations are made.
Copyright © 2013 by GSI Group
Printed in the USA
GSI Group
1004 E. Illinois St.
Assumption, IL 62510-0020
Phone: 1-217-226-4421
Fax: 1-217-226-4420
www.gsiag.com
CN-206276
 Loading...