

Page 1
PNEG-17 0 7
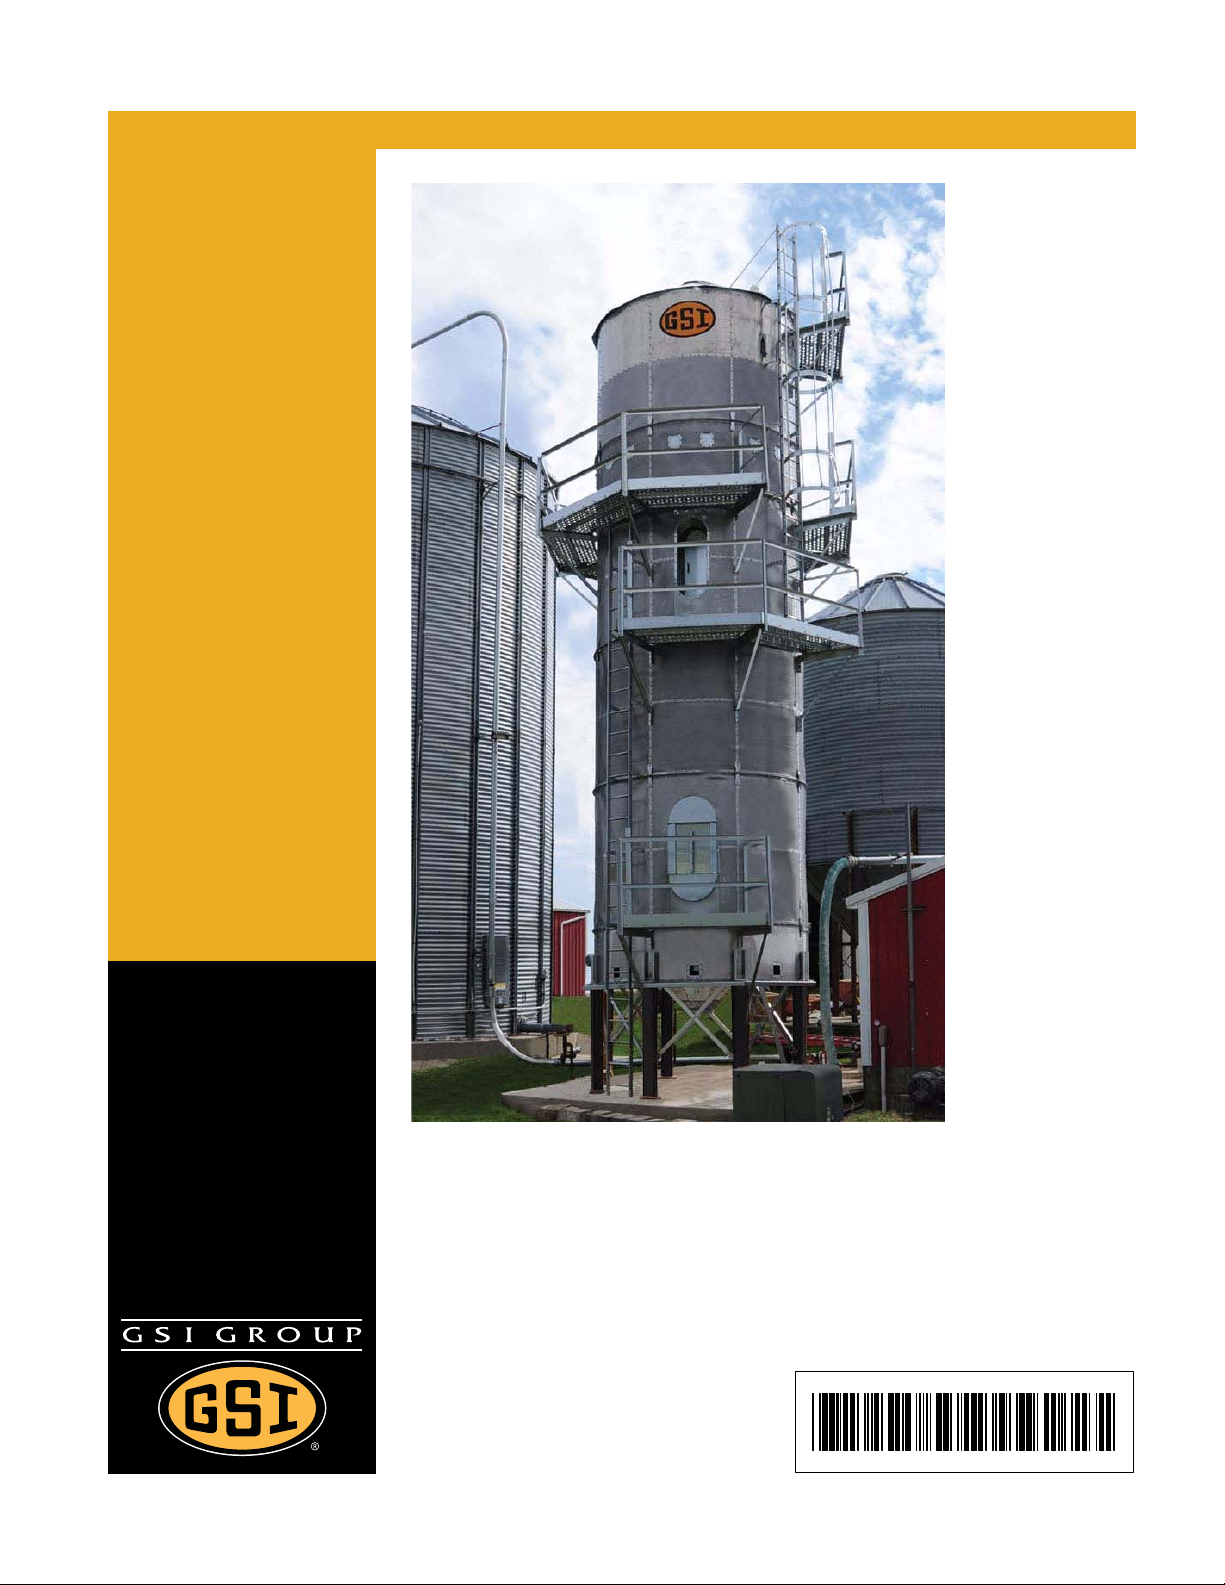
TM-Series Tower Dryer
Operation Manual
PNEG-1707
Date: 12-28-09
Page 2

All information, illustrations, photos, and specifications in this manual are based on the latest
information available at the time of publication. The right is reserved to make changes at any
time without notice.
2 PNEG-1707 TM-Series Tower Dryer
Page 3

Table of Contents
Contents
Chapter 1 Safety .................................................................................................................................................. 5
Safety Guidelines .......................................................................................................................... ... .. 5
Dryer Operation .................................................................................................................................. 6
Emergency Stop Switch ................................... ... ... ... .... ... ... ... .... ... ... ................................................ .. 6
Operating Precautions ........................................................ ... .... ... ... ... ............................................. .. 7
Chapter 2 Safety Decals ..................................................................................................................................... 9
Chapter 3 Specifications .................................................................................................................................. 11
Modular Tower Dryer Specifications ................................................................................................ 11
Dimensions ...................................................................................................................................... 12
Chapter 4 Dryer Installation ............................................................................................................................. 14
Dryer Layout ..................................................................................................................................... 14
Liquid Propane (LP) Dryers with Internal Vaporizers ....................................................................... 14
Natural Gas (NG) Dryers ........................... ................ ................. ............ ................. ......................... 14
Modular Base Layout ....................................................................................................................... 15
Central United States Foundation Plan ............................................................................................ 16
Northern United States Foundation Plan ......................................................................................... 17
Fuel Supply ...................................................................................................................................... 18
Electrical Power Supply ................................................................................................................... 19
Transformers and Wiring Voltage Drop ............................................................................................ 19
Power Supply Disconnect ................................................................................................................ 20
Machine to Earth Grounding ............................................................................................................ 21
Proper Installation of Ground Rod .................................................................................................... 21
Connecting Auxiliary Conveyors ...................................................................................................... 21
Chapter 5 Operating Controls .......................................................................................................................... 22
Vision Control Panel Layout ............................................................................................................. 22
Control Power Switch ....................................................................................................................... 22
Fan Switch ....................................................................................................................................... 22
Heater Switch ................................................................................................................................... 23
Load Auger Switch .................................... ... .... ... ... ... .... .......................................... ... ...................... 23
Unload Switch .................................................................................................................................. 23
Outside Light Switch ........................................................................................................................ 23
Start Switch ...................................................................................................................................... 23
Stop Switch ...................................................................................................................................... 23
Chapter 6 Vision Touch Screen Display ........................ ... ... ... .... ... .......................................... ... ... ................. 24
Boot Screen ..................................................................................................................................... 24
Default Operation Screen ................................................................................................................. 24
Setting the Timers ............................................................................................................................ 25
Setting the Temperatures ................................................................................................................. 26
The Setup Screen ............................................................................................................................ 28
PNEG-1707 TM-Series Tower Dryer 3
Page 4

Table of Contents
Chapter 7 Test Firing ........................... ... ... .... ... ... ... ... .... .......................................... ... ......................................34
Dryer Checks . ... .... ... ... ... .... ... ............................................................................................................ 34
Inspect the Accutrol Metering System .............................................................................................. 34
Electrical Power ................................................................................................................................ 34
Control Power Switch ................. .... ... ... ... ... .... ... .......................................... ... ... .... ... ........................ 34
Start Switch ...................................................................................................................................... 34
Fuel Check .............................. ... .... ... ... ............................................................................................ 34
Load Auger ....................................................................................................................................... 34
Unload Auto Operation ..................................................................................................................... 35
Unload Manual Operation ................................................................................................................. 35
Accutrol Sweep Metering System Operation .................................................................................... 35
Fan Switch ..... ... .............................................................................. ... ... .... ... ... ... .... ... ........................ 35
Burner Safety .................................. ... ... ... ......................................................................................... 35
Burner Test Fire ....................................... ... .... ... ... ... .......................................... .... ........................... 35
Dryer Shut Down ..................... ... .... .......................................... ... ..................................................... 36
Emergency ....................................................................................................................................... 36
Chapter 8 Dryer Operation ............................... ... ... ... .... ... ... ... .... ... ...................................................................37
Dryer Start-up .................................................................................... ... .... ... ... ... .... ... ... ..................... 37
Dryer Shut Down ..................... ... .... .......................................... ... ..................................................... 38
Moisture Control Setup ..................................................................................................................... 39
Chapter 9 Drying Time Tables ................................................................................. ... ... ... .... ............................43
Drying Time Table……..Model 1008 ................................................................................................ 43
Drying Time Table……..Model 1010 ................................................................................................ 44
Drying Time Table……..Model 1012 ................................................................................................ 46
Drying Time Table……..Model 1015 ................................................................................................ 47
Chapter 10 Service ......................................................... ... ... ... .... ......................................................................49
Pre-seasonal Inspection and Service ............................................................................................. 49
Seasonal Inspection and Service .................................................................................................... 49
Pre-season Service Check List ....................................................................................................... 51
End of Season Shut Down Procedure ............................................................................................ 51
Chapter 11 Safety Circuit Shut Down Messages ............................... .... ... ... ... ... .... .........................................53
Fan/Heater Generated Errors ......................................................................................................... 53
Input/Output Generated Errors ....................................................................................................... 55
Master Display Generated Errors ................................................................................................... 56
Chapter 12 Wiring Diagrams ............... ... ... .... ... ... ... ... .... ... ... ... .... ... ... ... .... ... ......................................................58
Power Box Back Panel Wiring ........................................................................................................ 58
Fan/Heater Board Wiring ................................................................................................................ 61
Main Input/Output Power Box Wiring .............................................................................................. 62
Top Terminal Strip Power Box ........................................................................................................ 63
Bottom Terminal Strip Power Box ................................................................................................... 64
Burner Control Wiring ..................................................................................................................... 65
DC Motor Wiring .................................... .......................................... ... .... ... ... .................................. 66
Fan Contactor and Overload (ACL) .................... ... .... ... ... ... .... ......................................... .... ... ... ..... 67
Fan Contactor Part Winding Starter ................................................................................................ 68
Fan Contactor Soft Starter .............................................................................................................. 69
Moisture Sensor Wiring ........................................................................................................
Chapter 13 Warranty ..................... .... ... .......................................... ... ... .... ... ... ...................................................71
........... 70
4 PNEG-1707 TM-Series Tower Dryer
Page 5
1. Safety
This is the safety alert symbol. It is used to alert you to
potential personal injury hazards. Obey all safety
messages that follow this symbol to avoid possible
injury or death.
WARNING indicates a potentially hazardous situation
which, if not avoided, could result in death or serious injury.
CAUTION indicates a potentially hazardous situation which,
if not avoided, may result in minor or moderate injury.
CAUTION used without the safety alert symbol indicates a
potentially hazardous situation which, if not avoided, may
result in property damage.
NOTE indicates information about the equipment that you
should pay special attention.
DANGER indicates an imminently hazardous situation
which, if not avoided, will result in death or serious injury.
Safety Guidelines
This manual contains information that is important for you, the owner/operator, to know and understand.
This information relates to protecting personal safety and preventing equipment problems. It is the
responsibility of the owner/operator to inform anyone operating or wo rking in the area of this equipment
of these safety guidelines. To help you recognize this information, we use the symbols that are defined
below. Please read the manual and pay attention to these sections. Failure to read this manual and its
safety instructions is a misuse of the equipment and may lead to serious injury or death.
PNEG-1707 TM-Series Tower Dryer 5
Page 6
1. Safety
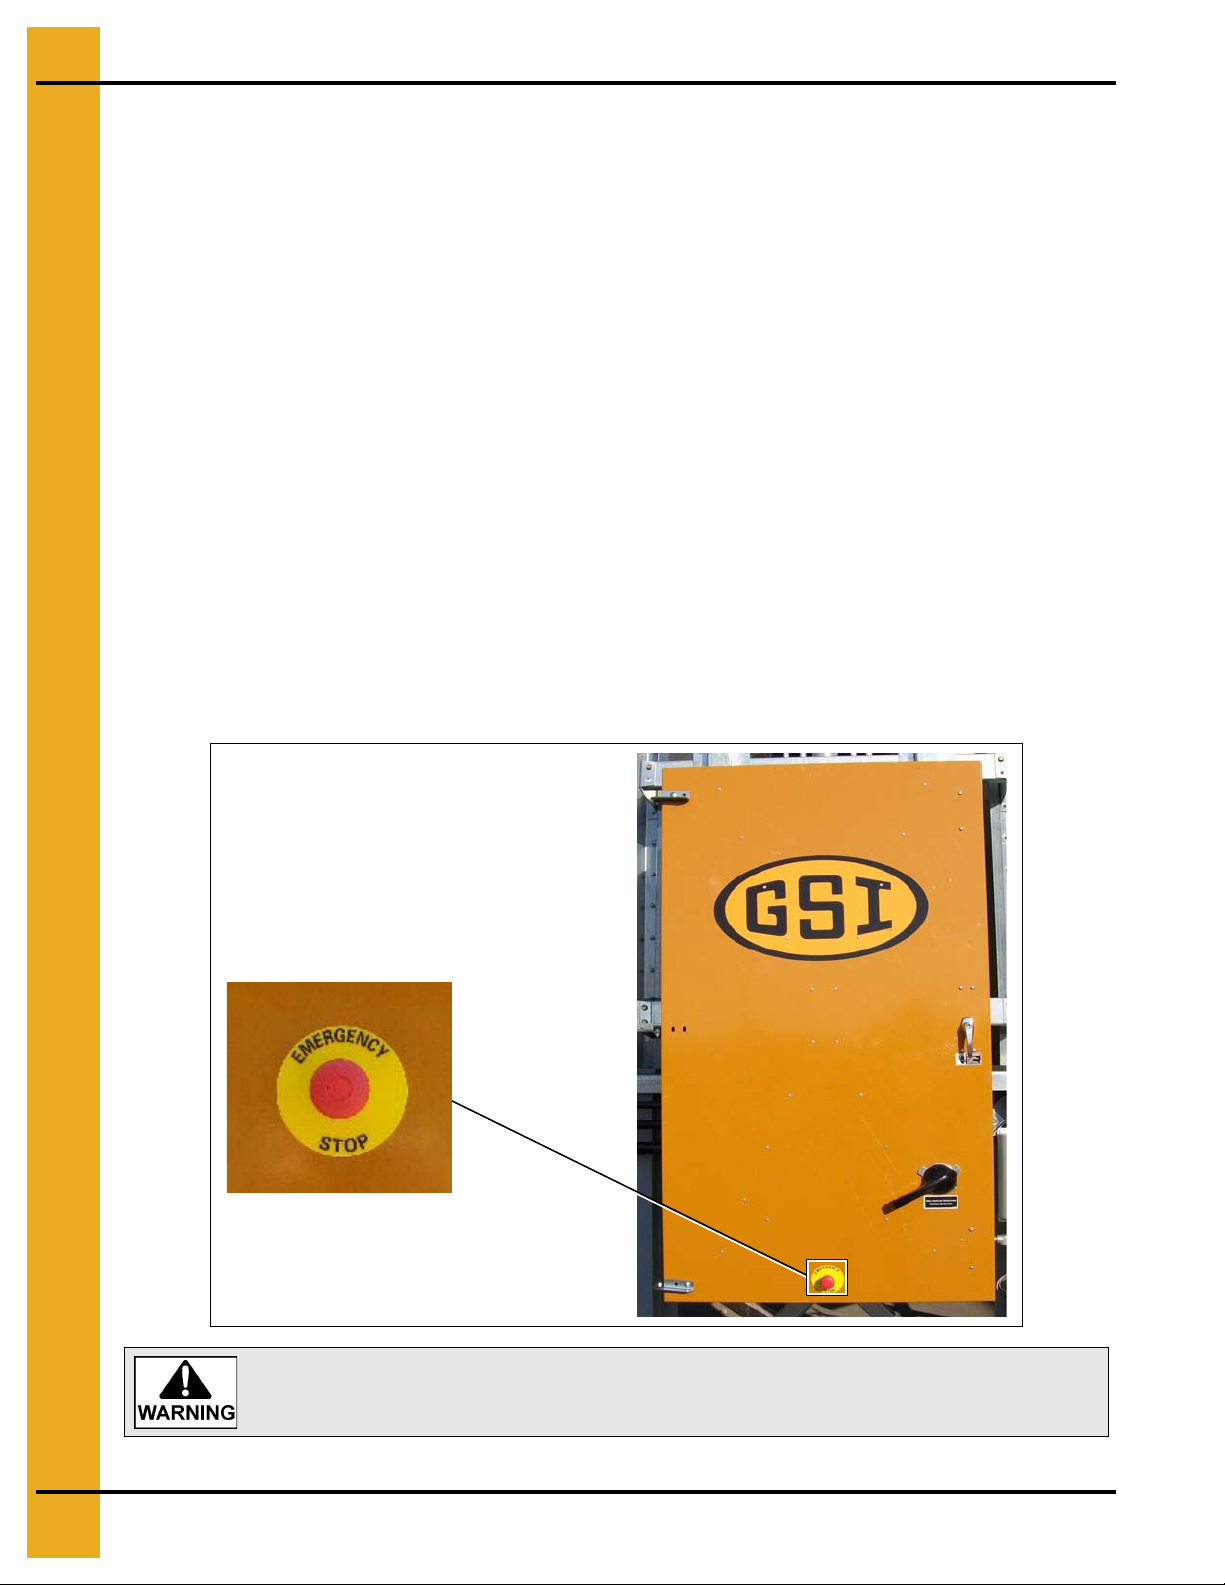
Emergency stop
Pushing the Emergency Stop switch does not interrupt the main power to the
upper control box panel.
Dryer Operation
Thank you for choosing a GSI product. It is designed to give excellent performance and service for
many years.
This manual describes the operation for all standard production model dryers. These dryers are available
with liquid propane or natural gas fuel supply and 3 phase 230 , 38 0, 46 0, o r 575 vo lts (50 Hz or 60 Hz)
electrical power.
Our foremost concern is your safety and the safety of others associated with this equipment. We want
to keep you as a customer. This manual is to help you understand safe op erating procedures and some
problems which may be encountered by the operator and other personnel.
As owner and/or operator, it is your responsibility to know what requirements, hazards and precautions
exist, and to inform all personnel associated with the equipment or in the area. Safety precautions may
be required from the personnel. Avoid any alterations to the equipment. Such alterations may produce
a very dangerous situation where SERIOUS INJURY or DEATH may occur.
This equipment shall be installed in accordance with the current installation codes and applicable
regulations which should be carefully followed in all cases. Authorities having jurisdiction should be
consulted before installations are made.
Emergency Stop Switch
The Emergency Stop switch is located on the upper control box door. Pushing the Emergency Stop
switch will interrupt the control power and stop all dryer functions.
6 PNEG-1707 TM-Series Tower Dryer
Page 7
1. Safety
Keep the dryer clean. Do not allow fine material to accumulate in the plenum
chamber or surrounding the outside of the dryer.
Operating Precautions
READ THESE INSTRUCTIONS BEFORE INSTALLATION AND OPERATION
SAVE FOR FUTURE REFERENCE
1. Read and understand the operations manual before attempting to operate the unit.
2. Keep ALL guards, safety decals, and safety devices in place. NEVER operate dryer while guards
are removed.
3. Keep visitors, children and untrained personnel away from dryer at all times.
4. Never attempt to operate the dryer by jumping or otherwise bypassing any safety devices on
the unit.
5. Always set the main power supply disconnect switch to OFF and lock it in the OFF position using
a padlock before performing any service or maintenance work on the dryer or the auxiliary
conveyor equipment.
6. Keep the dryer and wet holding equipment CLEAN. DO NOT allow fine material to accumulate.
7. On LP fired units, set pressure regulator to avoid excessive gas pressure applied to a burner
during ignition and when the burner is in operation. Do not exceed maximum recommended
drying temperatures.
8.
DO NOT
operate the dryer if any gas leak is detected. Shut down and repair before further operation.
9. Clean grain is safer and easier to dry. Fine materials can be highly combustible, and it also requires
removal of extra moisture.
10. Use CAUTION in working around high-speed fans, gas burner, augers and auxiliary conveyors
which can START AUTOMATICALLY.
11. Be certain that capacities of auxiliary conveyors are matched to dryer metering capacities.
12. DO NOT operate in an area where combustible material will be drawn into the dryer.
13. The operating and safety recommendations in this manual pertain to the common cereal grains as
indicated. When drying any other grain or products, consult the factory for additional
recommendations.
14. Routinely check for any developing gas plumbing leaks.
15. Before attempting to remove and reinstall the fan blade, contact GSI for the recommended procedure.
Use Caution in the Operation of this Equipment
This dryer is designed and manufactured with operator safety in mind. However, the very nature of a
grain dryer having a gas burner, high voltage electrical equipment and high speed rotating parts,
presents hazards to personnel which cannot be completely safeguarde d against without interfering with
the efficient operation of the dryer and reasonable access to its components.
Use extreme caution in working around high speed fans, gas-fired heaters, augers and auxiliary
conveyors, which may start without warning when the dryer is operating on automatic control.
Continued safe, dependable operation of automatic equipment depends, to a great degree, upon the
owner. For a safe and dependable drying system, follow the recommendations within the Owner’s Manu al
and make it a practice to regularly inspect the unit for any developing problems or unsafe conditions.
Take special note of the Operating Precautions before attempting to operate the dryer.
PNEG-1707 TM-Series Tower Dryer 7
Page 8
1. Safety
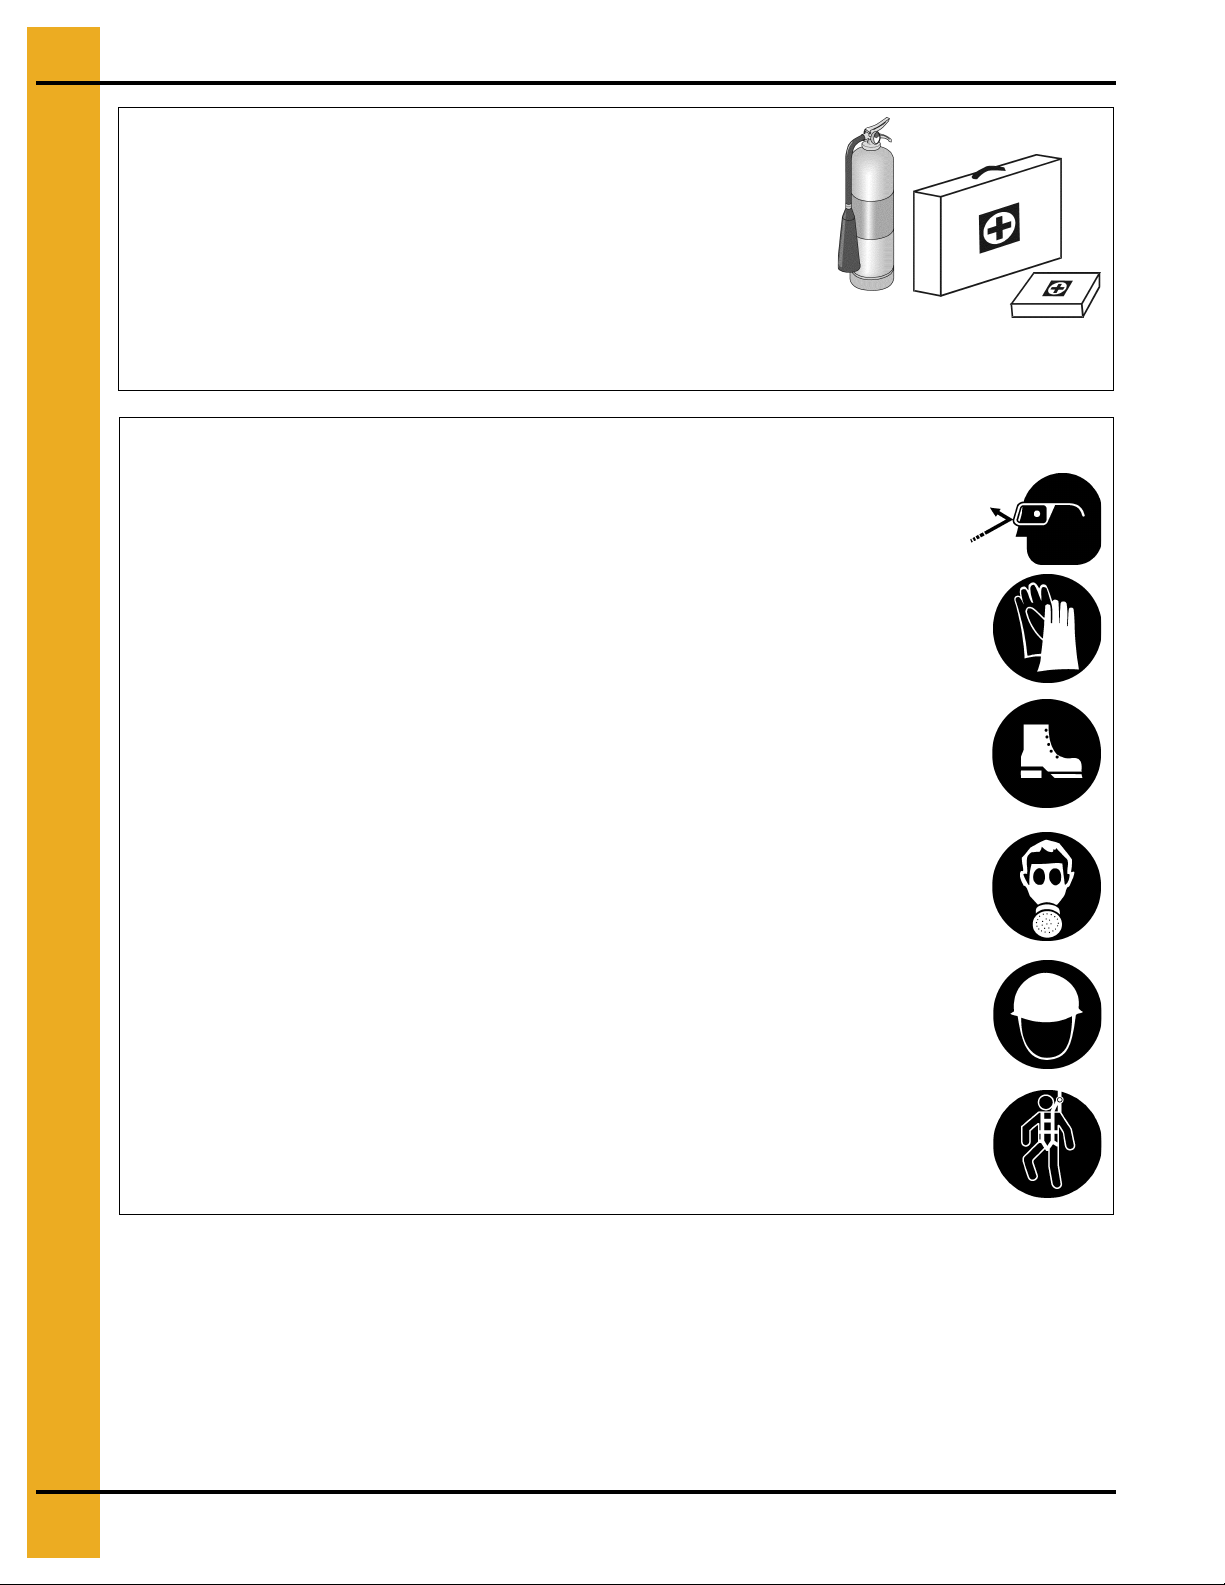
Prepare for Emergencies
Be prepared if fire starts.
Keep a first aid kit and fire extinguisher handy.
Keep emergency numbers for doctors, ambulance service,
hospital and fire department near your telephone.
Keep Emergency Equipment
Quickly Accessible
Wear Protective Clothing
Wear close fitting clothing and safety equipment appropriate
to the job.
Remove all jewelry.
Long hair should be tied up and back.
Safety glasses should be worn at all times to protect eyes
from debris.
Wear gloves to protect your hands from sharp edges on
plastic or steel parts.
Wear steel toe boots to help protect your feet from falling
debris. Tuck in any loose or dangling shoe strings.
A respirator may be needed to prevent breathing potentially
toxic fumes and dust.
Wear hard hat to help protect your head.
Wear appropriate fall protection equipment when working at
elevations greater than six feet (6').
Eye Protection
Gloves
Steel Toe Boots
Respirator
Hard Hat
Fall Protection
8 PNEG-1707 TM-Series Tower Dryer
Page 9
2. Safety Decals
HIGH VOLTAGE.
Will cause serious
injury or death.
Lockout power
before servicing.
DC-1224
Decal: DC-889
Decal DC-889 has two locations. One inside the
fan/heater control box and another on the dryer upper
control box door next to the main power disconnect.
Decal: DC-1224
Decal DC-1224 is located in two places on the fan/heater control box. One
on the lid and one on the front of the fan heater control box. Another location
for this decal is inside the upper control box for the dryer.
Contact the local power company to have a representative survey the installation to assure the wiring is
compatible with their system and adequate power is supplied to the unit. Safety decals should be read
and understood by all people in the grain handling area. Inspect all decals and replace any that are
illegible, worn, or missing. Contact your dealer or the factory to order replacement decals.
If a decal is damaged or is missing, contact:
GSI Decals
1004 E. Illinois St.
Assumption, IL. 62510
Phone: 1-217-226-4421
A free replacement will be sent to you.
NOTE: Decals are not shown actual size.
PNEG-1707 TM-Series Tower Dryer 9
Page 10
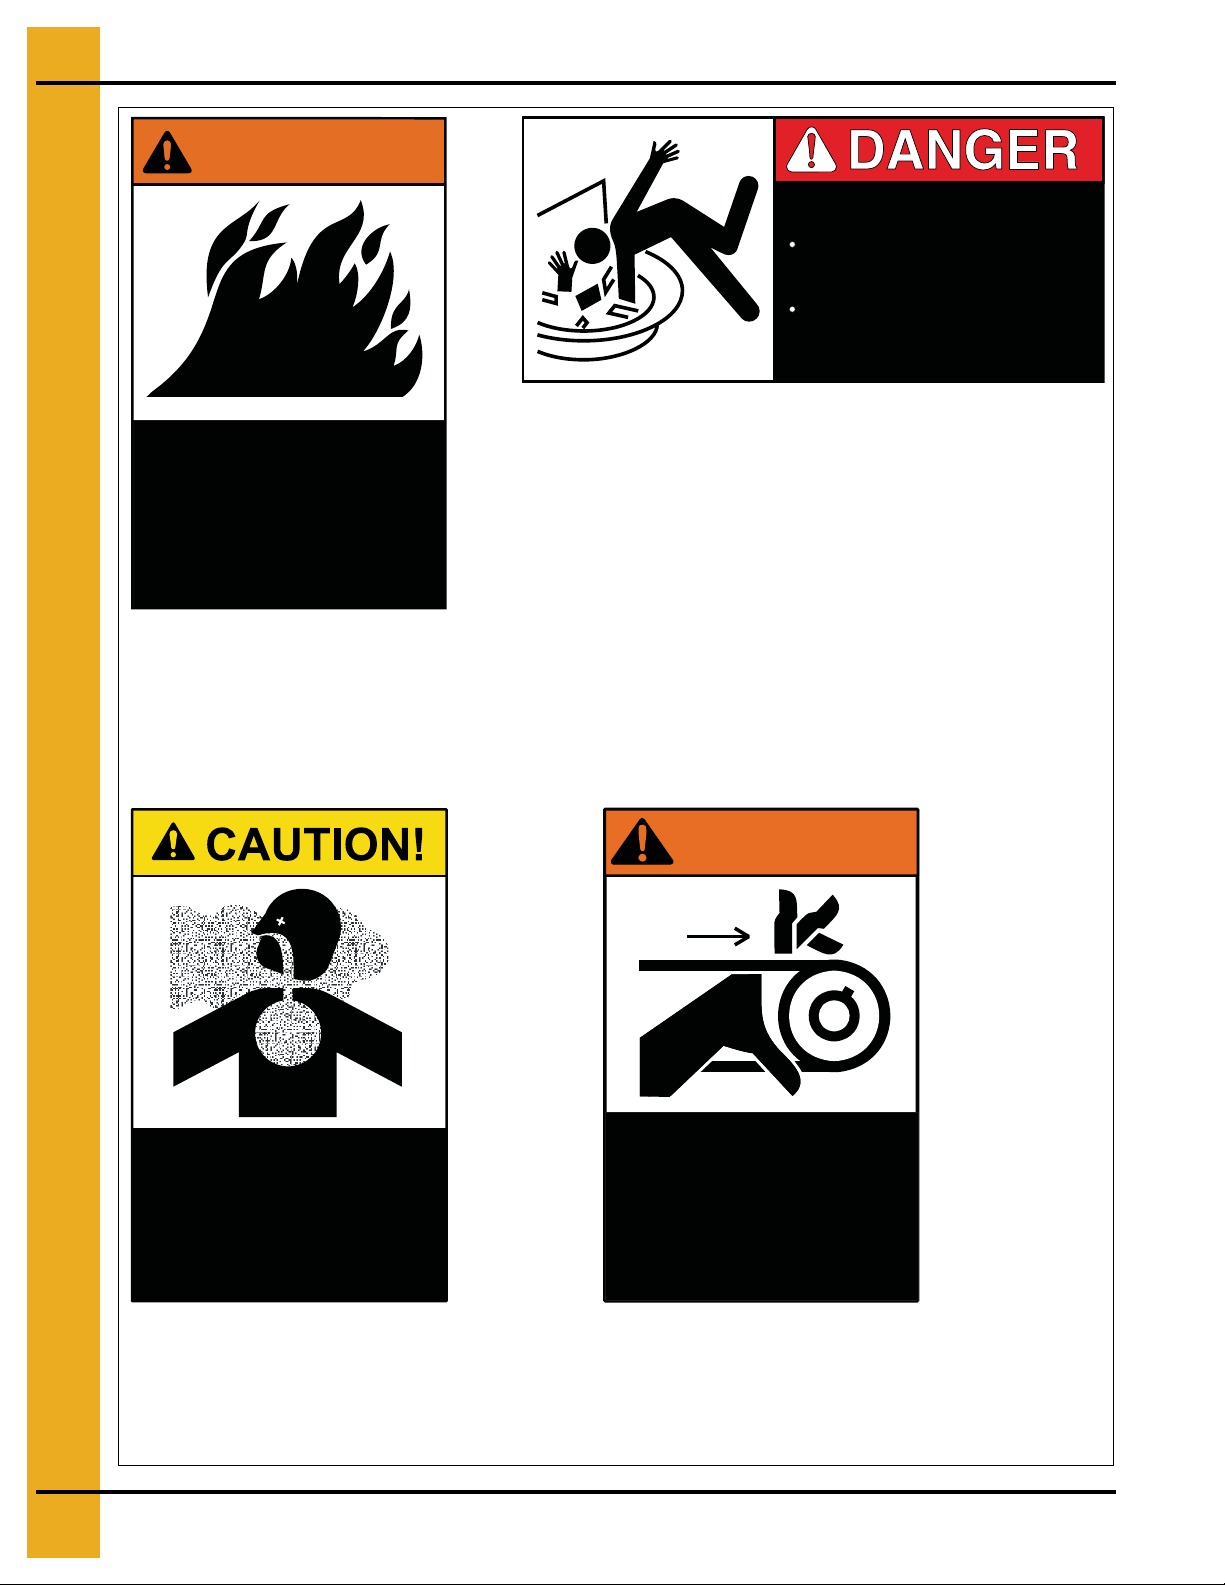
2. Safety Decals
Flame and pressure
beyond door. May
cause serious injury.
Do not enter when
dryer is running.
DC-1061
WARNING!
DC-1062
DO NOT STAND ON DRUM!
Rotating drum will cause
serious injury or death.
Disconnect power before
servicing.
Airborne particles during
operation. May impair
vision and breathing.
Do not enter when
dryer is running.
DC-1063
High speed belt drive
operating overhead.
Can cause serious injury.
Keep head and hands
clear. Do not enter when
dryer is running.
WARNING!
DC-1064
Decal: DC-1062
Decal DC-1062 is located inside the cooling section of the
dryer on the two access doors to the metering section.
Decal: DC-1063
Decal DC-1063 is located on the louvered
access door to the cooling section of the dryer.
Decal: DC-1064
Decal DC-1064 is located on the louvered access
door to the cooling section of the dryer.
Decal: DC-1061
Decal DC-1061 is located on the outside
of the heat section door.
10 PNEG-1707 TM-Series Tower Dryer
Page 11
Modular Tower Dryer Specifications
Models TM-1008 TM-1010 TM-1012 TM-1015
Blower Size 43" Axial 43" Axial 43" Axial 48" Axial
Blower RPM 1775 1775 1775 1775
Blower HP 40 50 60 75
Metering HP 1111
Drying CFM 38000 45000 52000 66000
Cooling CFM 19500 22500 26000 33000
3. Specifications
Burner Capacity (mBtu)
Average Heat Use (mBtu) 5.1 6.1 7.0 8.9
Grain Column 12-3/4" 12-3/4" 12-3/4" 12-3/4"
Tower Diameter
Overall Height 42'-1" 48'-11" 55'-9" 62'-7"
Wet Holding (BU) 260 260 260 260
Maximum Heat Holding (BU) 552 726 900 1074
Minimum Heat Holding (BU) 450 624 798 972
Maximum Cool Holding (BU) 246 246 289 289
Minimum Cool Holding (BU) 1 44 144 187 187
Dryer Holding (BU) 1049 1223 1397 1571
Outside Catwalks 1 2 3 3
BPH (20%-15%) Maximum Cooling 800 1000 1200 1500
BPH (25%-15%) Maximum Cooling 480 600 720 900
BPH (20%-15%) Minimum Cooling* 900 1125 1350 1690
1
2
8.2 9.7 11.2 14.3
10'-7" 10'-7" 10'-7" 10'-7"
BPH (25%-15%) Minimum Cooling* 540 675 810 1010
¹ Dimensions exclude outside catwalk.
² Capacities listed are wet bushels/tonnes, shelled corn at listed moisture content and are
estimates based on drying principles, field results and computer simulation. Variance may
occur due to grain’s physiological factors (kernel size, chemical composition, variety, maturity),
excessive fines, adverse weather conditions, etc.
* Minimum cooling capacities with cooling floor set in the lower position and assumes utilization
of cooling in bin (dryeration).
PNEG-1707 TM-Series Tower Dryer 11
Page 12

3. Specifications
M-1008T - Five (5) sections total
usually ships on two (2) trucks
all five (5) sections are 10'-10" in diameter.
M-1010T - Six (6) sections total
usually ships on two (2) trucks
all six (6) sections are 10'-10" in diameter.
Dimensions
Figure 3A M-1008T Figure 3B M-1010T
12 PNEG-1707 TM-Series Tower Dryer
Page 13
Dimensions (Continued)
M-1012T - Seven (7) sections total
usually ships on three (3) trucks
all seven (7) sections are 10'-10" in diameter.
M-1015T - Eight (8) sections total
usually ships on three (3) trucks
all eight (8) sections are 10'-10" in diameter.
3. Specifications
Figure 3C M-1012T
PNEG-1707 TM-Series Tower Dryer 13
Figure 3D M-1015T
Page 14

4. Dryer Installation
Dryer Layout
System Layout
Consider the grain handling system and location of storage bins and existing conveyors when selecting
dryer site, to facilitate wet grain supply and dry grain discharge to conveyors. Other considerations are
prevailing wind direction, fuel and power supply locations, noise and convenience of control location.
Site Location
The dryer should not be operated inside a building or in any area not permitted by electrical code,
fuel installation regulations, or insurance requirements. Do not operate in an area where combustible
material can be drawn into the dryer. Maintain a minimum distance of five feet (5') to other structures.
Refer to dryer specifications on Page 11 and dimensions on Pages 12 and 13.
Foundation
The dryer should be placed on a reinforced concrete slab located in a well drained area. See Figure 4A
on Page 15, See Figure 4B on Page 16 and Figure 4C on Page 17 for recommended dryer foundations
for soils with minimum soil bearing pressure of 3000 lbs/ft².
Liquid Propane (LP) Dryers with Internal Vaporizers
Liquid Draw
The dryer is designed to operate on liquid propane, with liquid draw from the supp ly tank. A piping
system is provided on the dryer, including strainer, pressure relief valve, and manual shut off valve.
(See Figure 4D on Page 18.)
Ammonia Tanks
Do not use propane supply tanks which have previously contained ammonia or fertilizer solutions.
These substances are extremely corrosive and damaging to fuel supply and burner parts.
Oil or Water in Tanks
With liquid draw from the supply tank, any water present in the tank may freeze in the piping and controls
in cold weather. To ensure that tanks are free of moisture, the usual precaution is to purge with met hanol.
Avoid tanks which may contain an accumulation of oil or heavy hydrocarbons from long use on a vapor
withdrawal system.
Natural Gas (NG) Dryers
Gas Volume and Pressure
The dryer is designed to operate on natural gas having a heat value of about 1000 BTU per cubic foot.
The dryer is equipped with a natural gas supply pipe system connected to the heater solenoid valves.
A regulated pressure of 10 PSI must be provided at the connection to the dryer, with gas available in
sufficient volume to maintain operating pressure. (See Figure 4E on Page 18.)
14 PNEG-1707 TM-Series Tower Dryer
Page 15
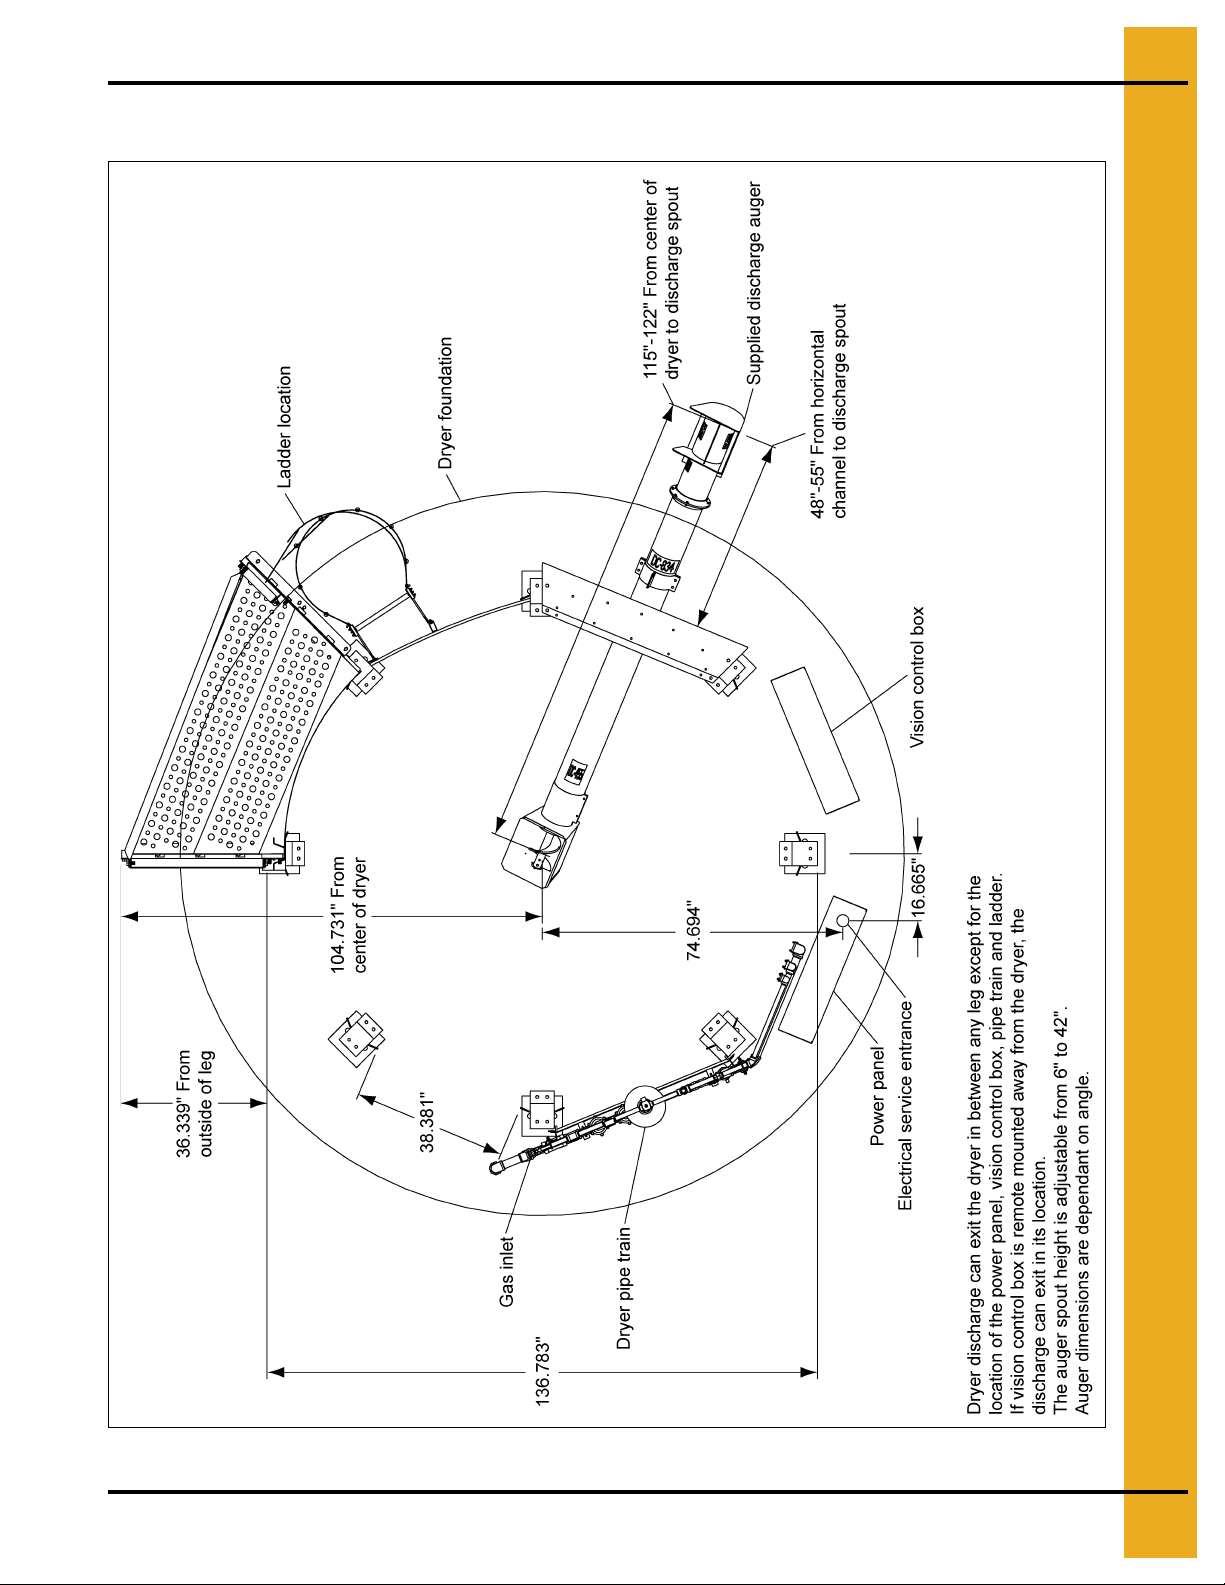
Modular Base Layout
4. Dryer Installation
Figure 4A
PNEG-1707 TM-Series Tower Dryer 15
Page 16
4. Dryer Installation
Central United States Foundation Plan
Figure 4B
16 PNEG-1707 TM-Series Tower Dryer
Page 17
Northern United States Foundation Plan
4. Dryer Installation
Figure 4C
PNEG-1707 TM-Series Tower Dryer 17
Page 18

4. Dryer Installation
NOTE: See table on
Page 19 for recommended
line size.
Connection to natural gas manifold on dryer
NOTE: See table on Page 19 for
recommended line size.
Natural gas meter and regulator.
Fuel Supply
Figure 4D Liquid Propane (LP) Fuel Supply
Figure 4E Natural Gas (N) Fuel Supply
18 PNEG-1707 TM-Series Tower Dryer
Page 19
Fuel System Requirements
TM-1008 TM-1010 TM-1012 TM-1015
4. Dryer Installation
Burner Capacity (Btu/hr)
Maximum Fuel Usage (gal/hr) 90 106 122 156
Liquid
Propane
Natural
Gas
1
Burner capacity for fuel line sizing. Actual average fuel usage is typically 50%-60% of the burner capacity.
Recommended Liquid Line Size (<100') 3/4" 3/4" 3/4" 3/4"
Fuel Train Orifice Size (inch) 0.500" 0.625" 0.62 5" 0.7187"
Pressure Regulator Setting (lb/in2)
Burner Capacity (Btu/hr)
Maximum Fuel Usage (ft3/hr)
Recommended Fuel Line Size (<100') 2" 2" 2" 2-1/2"
Fuel Train Orifice Size (inch) 0.625" 0.688" 0.688" 0.8125"
Supplied Pressure to Fuel Train (lb/in2)
1
1
8,200,000 9,700,000 11,200,000 14,300,000
9 9 9 9
8,200,000 9,700,000 11,200,000 14,300,000
8200 9700 11200 14300
10 10 10 10
Electrical Power Supply
An adequate power supply and proper wiring are important factors for maximum performance and long
life of the dryer. Electrical service must be adequate enough to prevent low voltage damage to motors
and control circuits. (See electrical requirements on Page 20.)
Transformers and Wiring Voltage Drop
Advise the service representative of the local power supplier that an additional load will be placed on the
line. Check on KVA rating of transformers, considering total horsepower load. The power supply wiring,
main switch equipment and transformers must provide adequate motor starting and operating voltage.
Voltage drop during motor starting should not exceed 14% of normal voltage, and after motor is running
at full speed it should be within 8% of normal voltage.
PNEG-1707 TM-Series Tower Dryer 19
Page 20
4. Dryer Installation
Power Supply Disconnect
All dryers are equipped with a power disconnect switch in the power box to permit total power shut down
before opening the power box door, as required for inspection and service. The power disconnect switch
is located on the power box door for quick shut down. See table on electrical requirements below for
sizing the electrical service to the dryer.
Electrical Requirements
Dryer Model Voltage Motor HP
Fan 40 94
230V
3 Phase
TM-1008
460V
3 Phase
230V
3 Phase
TM-1010
460V
3 Phase
230V
3 Phase
TM-1012
460V
3 Phase
230V
3 Phase
TM-1015
460V
3 Phase
1/
Assumes a 10 HP auxiliary load.
Metering System 1 - DC 5
Unload Auger 3 8.4
Auxiliary (1) 10 28
Fan 40 47
Metering System 1 - DC 5
Unload Auger 3 4.2
Auxiliary (1) 10 14
Fan 50 118
Metering System 1 - DC 5
Unload Auger 3 8.4
Auxiliary (1) 10 28
Fan 50 59
Metering System 1 - DC 5
Unload Auger 3 4.2
Auxiliary (1) 10 14
Fan 60 140
Metering System 1 - DC 5
Unload Auger 3 8.4
Auxiliary (1) 10 28
Fan 60 70
Metering System 1 - DC 5
Unload Auger 3 4.2
Auxiliary (1) 10 14
Fan 75 172
Metering System 1 - DC 5
Unload Auger 3 8.4
Auxiliary (1) 10 28
Fan 75 86
Metering System 1 - DC 5
Unload Auger 3 4.2
Auxiliary (1) 10 14
Motor Full
Load Amps
Dryer Full
Load Amps
1/
141 200
76 150
165 300
88 200
187 300
99 200
219 400
115 200
Main Breaker
and Service
(Amps)
20 PNEG-1707 TM-Series Tower Dryer
Page 21

4. Dryer Installation
Machine to Earth Grounding
It is very important that a machine to earth ground rod be installed at the dryer. Place the ground rod that
comes standard, within eight feet (8') of the dryer and attach it to the dryer control panel with at least a
#6 solid, bare, copper ground wire and the clamp provided. The grounding rod located at the power pole
will not provide adequate grounding for the dryer. The proper grounding will provide additional safety
in case of any short and will ensure long life of all circuit boards, SCR drive, and the ignition system.
The ground rod must be in accordance with local requirements.
Proper Installation of Ground Rod
It is not recommended that the rod be driven into dry ground. Follow these instructions for
proper installation.
1. Dig a hole large enough to hold one (1) to two (2) gallons of water.
2. Fill hole with water.
3. Insert rod through water and jab it into the ground.
4. Continue jabbing the rod up and down. The water will work its way down the hole , making it possible
to work the rod completely into the ground. This method of installation assures good contact with
the surrounding soil, making a proper ground.
5. Connect the bare, copper ground wire to the rod with proper clamp.
6. Connect ground wire to control panel with the ground lug provided in the control box.
7. Ground wire must not have any breaks or splices. Insulated wire is not recommended for
grounding applications.
Connecting Auxiliary Conveyors
The auxiliary load augers or conveyors can be wired directly to the dryer. The maximum horsepower of
auxiliary that can be wired to the dryer is 10 horsepower. If an auxiliary motor is larger than what is
recommended, then it must be powered from a source outside the dryer, and must use a separate
contractor and overload protection device for each motor. However, the operation of the auxiliaries can
be performed by the control panel.
It is recommended that you contact the local power company and have a representative survey the
installation to see that the wiring is compatible with their system and that adequate power is supplied
to the unit. Remember that the only thing connected to the recommended service amps should be the
grain dryer. Standard electrical safety practices and codes should be used. (Refer to National Electrical
Code Standard Handbook by National Fire Protection Association.) A qualified e lectrician shou ld make
all electrical wiring installations.
PNEG-1707 TM-Series Tower Dryer 21
Page 22
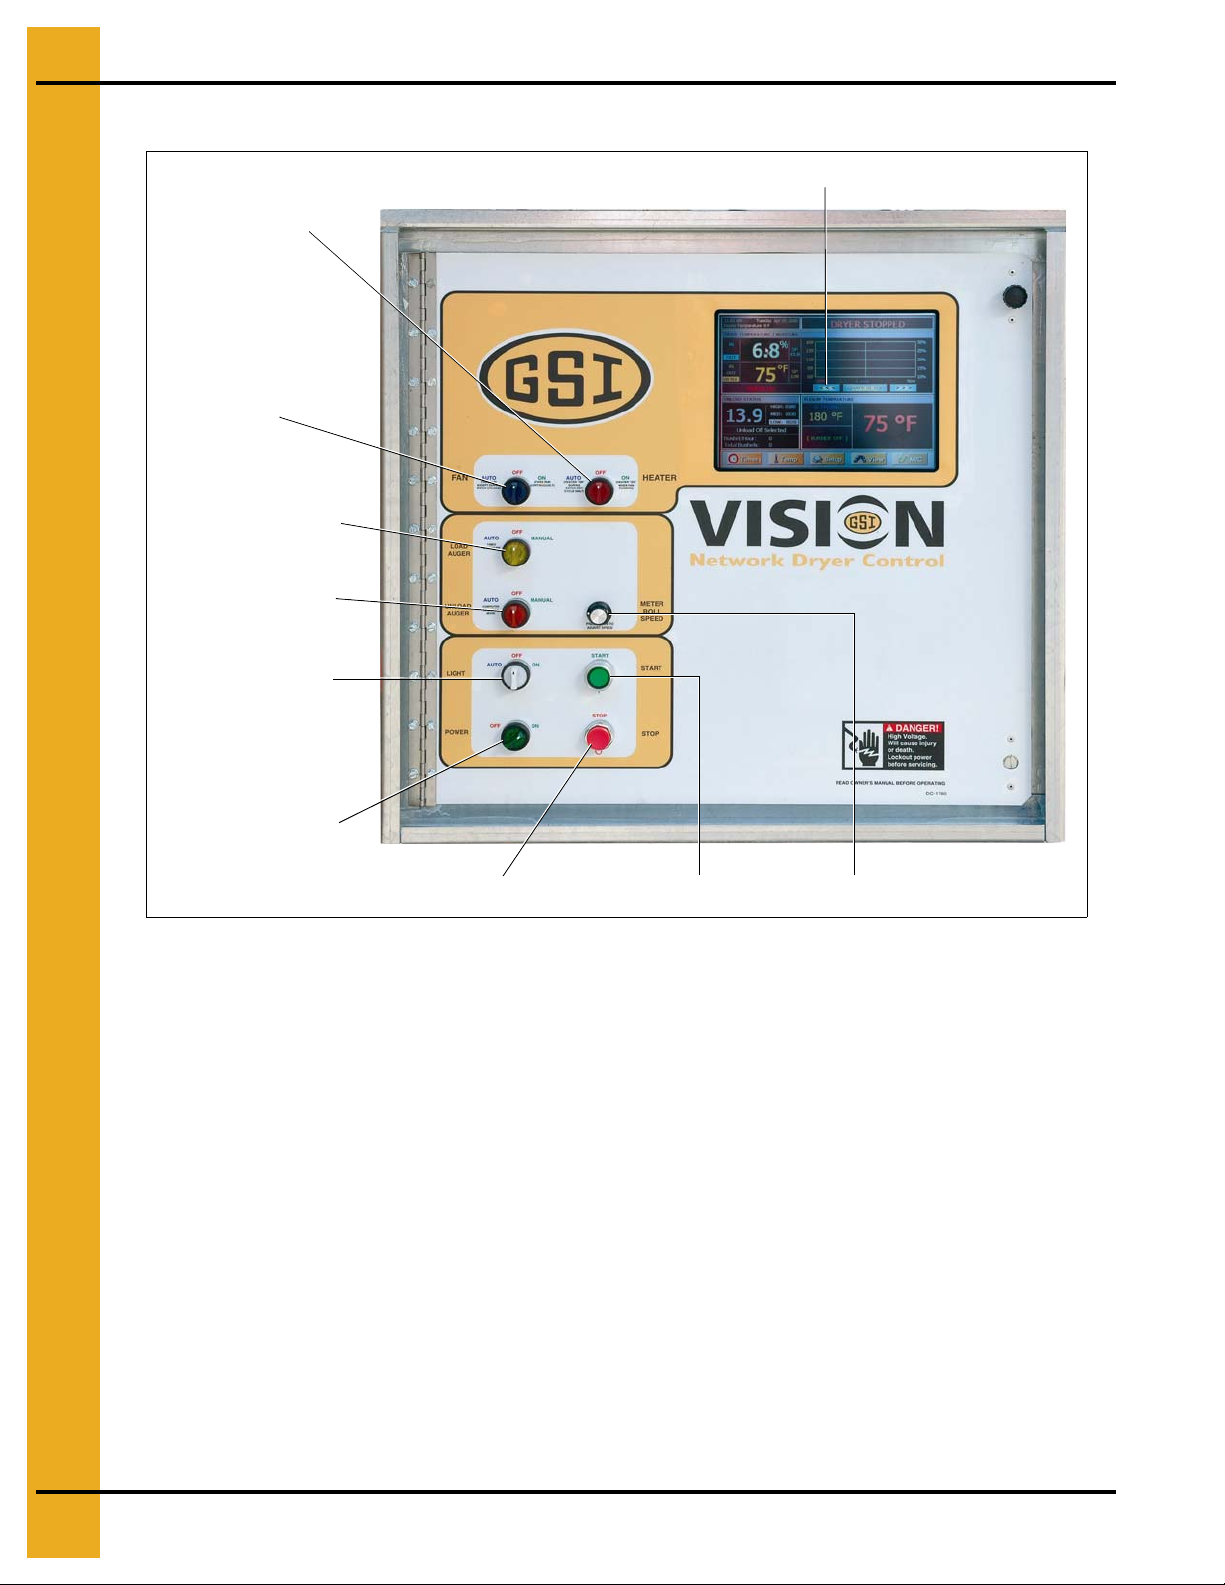
5. Operating Controls
Heater switch
Fan switch
Load auger switch
Unload auger switch
Operator light switch
Control power switch
Stop switch
Start switch
Meter system speed
Touch screen
Vision Control Panel Layout
Figure 5A
The vision control system is a state of the art dryer controller used on several GSI drying products.
The vision control can operate any dryer in either a batch or a continuous flow mode. All operating
instructions for the TM-Series dryer describes continuous flow operation only.
Control Power Switch
The vision control system is turned ON or OFF with this switch.
NOTE: This switch does NOT disconnect the power that is present at the breakers, contractors,
transformers, fuses or other electrical components found in the control or power box. Turn the
main disconnect handle located on the power box to the OFF position prior to servicing any of
the installed components.
Fan Switch
The fan is turned ON or OFF with this switch. Turning the switch to the ON position will turn the fan ON.
Turning the switch to the OFF position turns the fan OFF. The light inside the switch will illuminate
whenever the air pressure sensor senses air movement through the fan. (NOTE: The fan AUTO position
is not used for continuous flow operation.)
22 PNEG-1707 TM-Series Tower Dryer
Page 23

5. Operating Controls
Heater Switch
The burner is turned ON or OFF with this switch. Turning the switch to the ON position will start the
burner ignition sequence if the fan is also running. Turning the switch to the OFF position turns the
burner OFF. The light inside of the switch will illuminate only when the flame sensor detects the burner
flame. (NOTE: The heater AUTO position is not used for continuous flow operation.)
Load Auger Switch
This switch is used to select the operation of the wet fill conveyor. In both the AUTO and the MANUAL
positions, the wet fill conveyor will operate if the dryer is low on grain and will automatically shut off
when the dryer is full. In the AUTO position only, the dryer will automatica lly shut down should the dryer
go low on grain. The time period between the dryer going low on grain and the actual shut down is
determined by the setting on the out of grain timer. In the MANUAL position, the out of grain timer is
deactivated. The MANUAL switch position should be used for initially filling the dryer. The AUTO
switch position should be used during normal dryer operation. The switch will illuminate whenever the
load auger is operating.
Unload Switch
The Unload switch turns the accutrol metering system and the unload auger ON or OFF and also selects
the operation of the metering system. In the MANUAL position, the metering system operates at the
speed set by the Metering Roll Speed Rotary switch. In the AUTO position, the metering system
switches to a multi-speed operation controlled by the automatic moisture control. The switch will
illuminate whenever the unload auger is operating.
Outside Light Switch
The service light is turned ON or OFF with this switch. In the AUTO position, the light is turned ON
while the dryer is running automatically and turns OFF if a shut down occurs. In the ON position, the light
is turned ON.
Start Switch
This switch starts and operates the dryer. If all of the above Dryer Operational switches are in the OFF
position, each component can be turned ON by turning the Component switch to the ON position after
the Run switch has been pressed. Or, if the Operational switches are preset to their ON position, the
vision controls will sequentially start the various dryer components after the Run switch is pressed.
Stop Switch
This switch stops all dryer functions except the blower. If the Blower switch is in the ON position, the
blower will continue to run for 15 minute. If you desire the blower to be OFF, simply turn the Blower switch
to the OFF position. If an automatic dryer shut down occurs, first determine and correct the cause of the
shut down. Then press the Dryer Power Stop button to reset the dryer before restarting.
PNEG-1707 TM-Series Tower Dryer 23
Page 24

6. Vision Touch Screen Display
These two (2) buttons are
used to update software.
Boot Screen
Turning the Power switch in the ON position, will start the Vision computer. The first screen to appear
will be the Boot screen. (See Figure 6A.) Notice that there are four (4) “buttons” on the Boot screen.
Install Dryer Software and Get Program From USB Flash buttons are only used for program updates that
may be released at a later date. Touching the Start Dryer button will display the Default Operation
screen. Touching the Exit To Windows button will close down the dryer program and take you to the
Windows CE Operating System.
Figure 6A
Default Operation Screen
As you can see the Operation screen is divided into five (5) sections.
1. Dryer operation animation: Located on the left side of the Operation screen the operation
animation shows the status of the fan/heaters, load and unload augers and mete r rolls. It will a lso
display the grain temperature, moisture content, M/C set point and bushel counter.
2. Dryer status: Located at the very top of the right side of the Operation screen the dryer status will
tell you if the dryer is stopped, started, loading or unloading.
3. Dryer status chart: Located directly below dryer status chart. This chart will show the grain
temperature, moisture in/out, temperature out and M.R.O. over a period of time.
4. Plenum: Located directly below dryer status chart. This chart will show the plenum t emperature set
point (SP), actual plenum temperature and burner status.
5. Setup buttons: Located across the botto m of the Operation screen. By touching these buttons the
timers, temperature set points, dryer model and moisture control can be set up.
24 PNEG-1707 TM-Series Tower Dryer
Page 25

6. Vision Touch Screen Display
Figure 6B
Setting the Timers
Setting the timers for the dryer is a simple procedure. To set the timers, touch the button at
the bottom of Operation screen. A new screen will appear called the Select Timers to Modify screen.
(See Figure 6C on Page 26.) As you can see there are five (5) timers that you can modify:
1. Load delay: This delay is used to delay the starting of the load conveyor when the dryer is
unloading to prevent the load conveyor from cycling to often.
2. Out of grain (OOG) tim er: The OOG timer should be set to the maximum time it takes for the dryer
to refill. Note that the computer will display the time required to fill the dryer on the previous load
operation to aid you in setting an accurate time. If the dryer runs out of grain while the Load Auger
switch is in the AUTO position, the OOG timer automatically shuts off the dryer after the period of
time preset on the timer.
3. Fan delay timer: The fan sequence delay timer.
4. Cool down timer: The cool down timer is used to set the amount of time the fan is to run, after a
non-heat related shut down. Setting to 0 will cause an immediate shut down on a warning. The
range is from 0 to 20 minute.
5. Unload delay timer: The unload delay timer is used to control the amount of time the unload auger
runs after the metering system stops to allow the unload auger to clean itself out.
PNEG-1707 TM-Series Tower Dryer 25
Page 26

6. Vision Touch Screen Display
Operation screen for setting timers
Modifying timer set point
Figure 6C
To setup a timer touch the button of the timer you wish to modify. The Modify Timer Set Point screen
will then be displayed. (See Figure 6C.) Note that there are two (2) number pads on this modify screen.
The left number pad is used to modify the minutes and the right number pad will modify the seconds.
Touching the Default button will automatically set the timer to the default set point for that timer.
The Accept button will save the timer set point displayed in the time display. Touching Cancel will exit
the Modify Timer Set Point screen without saving any changes and the timer will stay at the currently
saved set point.
Once you have the timer set points set touching the Exit button at the bottom of the Modify Timer
Set Point screen will return you to the Operation screen.
Setting the Temperatures
Setting the plenum temperature set point for the dryer is a simple procedure. To adjust the plenum
temperature touch the button at the bottom of Operation screen. A new screen will appear
called the Select Temperature Set Point to Modify screen. (See Figure 6D on Page 27.)
26 PNEG-1707 TM-Series Tower Dryer
Page 27

6. Vision Touch Screen Display
Figure 6D
The plenum temperature set point range is 80°F-250°F, and the current temperature set point for each
plenum is displayed next to the corresponding Plenum button.
The grain temperature set point range is 80°F-150°F, a nd the current temperature set point for the grain
temperature is displayed next to the Grain Temperature button. The grain temperature se t point is used
for the temperature based moisture control only.
Modifying a temperature set point is much like setting a timer described on Page 25. Touch the
desired button of the set point you wish to change. The Modify Temperature Set Point screen will
appear. Enter the desired temperature using the displayed number pad then touch the Accept button.
Touching the Exit button at the bottom of the Select Temperature Set Point to Modify screen will retu rn
you to the Operators screen.
PNEG-1707 TM-Series Tower Dryer 27
Page 28

6. Vision Touch Screen Display
The Setup Screen
The Setup screen will allow you to setup other parameters of the dryer. To use the Setup screen touch
the button. The Select Hardware Setup Parameter to Modify screen will now be displayed. As you
can see there several different parameters that can be modified on this screen:
Figure 6E
1. Drying mode: Touching the Drying Mode button will display the select Drying Mode window.
Continuous flow will be the only option for Tower Dryers.
2. M/C setup: The M/C Setup op erations are described in greater detail in the dryer operation section
on Page 37 of this manual.
3. Unload parameters: Touching the Unload Parameters button will present a screen where you will
edit you maximum and minimum unload rates.
Figure 6F
28 PNEG-1707 TM-Series Tower Dryer
Page 29

6. Vision Touch Screen Display
4. Plenum temperature manager: The plenum temperature manager is used by the automatic
moisture control to automatically lower drying temperatures if the maximum dryer unload rate is
exceeded. Touching the Plenum Temperature Manager will display a Configuration screen that will
allow you to turn this feature ON or OFF. Also, a configuration section is presented so that the user
can edit the behavior of this option.
Figure 6G
5. Burner mode: Touching the Burner Mode button will display the Select Burner Mode screen.
(See Figure 6H.) Tower dryer burner mode should always be set to ALL HIGH/LOW.
Figure 6H
PNEG-1707 TM-Series Tower Dryer 29
Page 30

6. Vision Touch Screen Display
6. Ca librate moisture sensor: Touching this button will display the Configuration screen to adjust the
offset for wet and dry moisture and temperature.
7.
Extended setup:
Figure 6I
Touching this button will display a setup menu with ex tended features a nd options.
Figure 6J
30 PNEG-1707 TM-Series Tower Dryer
Page 31

6. Vision Touch Screen Display
1. Diagnostics: The Diagnostics operations are described in greater detail in the service
section on Page 49 of this manual.
2. Differential: Touching the Differential button will display the Modify Burner Differential
Settings screen. (See Figure 6K.) Adjusting the burner differential settings allows the
operator to keep the plenum temperature within a certain range. For example: If you have
the temperature set point at 180° and you select ± 3° as the burner differential, then the
burner will switch to low heat at 183° and back to high heat at 177°. To modify a burner
differential setting first touch the Plenum button you wish to modify, then select one of the
five (5) differential setting button on the right side of the Modifying Burner Differential Settings
screen. Touch the Accept/Exit button to save settings and return to the Select Hardware
Setup Parameter to Modify screen. NOTE: Tower dryer only have plenum #1.
Figure 6K
3. Printer setup: This section only applies if the dryer is equipped with a printer.
Figure 6L
PNEG-1707 TM-Series Tower Dryer 31
Page 32

6. Vision Touch Screen Display
4. BPH calibration: Touching the BPH Calib ration button will display the Unload Bushels Setup
screen. (See Figure 6M.) As you can see the bushel counter can be cle ared by touching the
Clear button. However if the bushel counter is out of calibration it can be calibrated by
touching the Increase and Decrease buttons.
Example: If you ran 1000 bushels through the dryer but the bushel counter on the dryer
reads 900 bushels then touch the Decrease button until the calibration reads 90%, or if you
ran a1000 bushels and the counter reads 1100 bushels then touch the Increase button until
the calibration reads 110%.
When you are finished with the calibration or clearing the bushel counter touch the Accept
button to return to the Hardware Setup Parameter screen.
Figure 6M
5. Set Time/Date: Touching the Set Time/Date button will display the Set Time/Date window.
Use the Up and Down buttons to change each of the parameters for date and time. Touch
Accept/Exit to save settings and return to the Select Hardware Parameter to Modify screen.
Figure 6N
32 PNEG-1707 TM-Series Tower Dryer
Page 33

6. Vision Touch Screen Display
6. Temp scale: Touch the Temp Scale button to choose either English units or SI units
temperature scales. Depending what temperature scale you now operating in touching this
button will display a Pop-up window asking if you want to switch to SI (celsius, metric tons,
etc.,) or English units (fahrenheit, bushels, etc.).
7. Dryer model: Touching the Dryer Model button will display the Dryer Hardware Setup
window. In order for the dryer operate properly the following items must be entered correctly:
model number and fuel type. Touch the select button until a check mark appears n ext to the
parameter corresponding to the dryer model.
Figure 6O
8. Data logger setup: Touching this button will display a dialogue box which will allow you to
turn this option ON. Also, you will have the option to delete the log file or copy it to a USB
thumb drive.
9. User saved defaults: Pressing this but ton will prompt you to save t he current dryer settings
as the default settings for the system.
PNEG-1707 TM-Series Tower Dryer 33
Page 34

7. Test Firing
Before attempting to operate the dryer make sure all safety shields are in place,
all access doors are closed and all personnel are clear of the dryer.
Any gas leaks must be fixed immediately.
Dryer Checks
This section gives a series of checks to be carried out on the dryer before starting for the first time in the
drying season. If any of the checks fail to produce the stated result, you should consult your dealer.
You should not attempt to use the dryer unless all the pre-start checks have been successfully completed.
Inspect the Accutrol Metering System
Open the four (4) access doors and inspect the accutrol sweep metering system to ensure that the
system is free of foreign material.
Electrical Power
Turn ON the electrical power supply to the dryer, set all circuit breakers to ON, including the safety
disconnect handle mounted on front of the dryer power panel.
Control Power Switch
Turn the Control Power switch to ON. At this point the controller will lock out all other dryer functions.
Once the Boot screen appears (See Page 24), touch the Start Dryer button and the dryer will perform a
safety circuit check. If a fault is found, the cause will be displayed on the Main screen. If all are found
safe, the Start switch will illuminate, indicating that the dryer is ready to be started.
Start Switch
Push the Dryer Start switch, and all the selector switches on the control panel will be activated.
Fuel Check
If using LP gas, make sure the tank has plenty of fuel and that the tank does not have a regulator
mounted on the liquid line. Slowly open the main fuel supply valve at the tank. Then, open the manual
shut off valve on the dryer to allow fuel flow to the dryer.
If using natural gas, make sure an adequate supply at 10 PSI of pressu re is available. Turn ON the valve
along the supply line. Inspect all gas lines and connections for possible leaks.
Load Auger
With the grain supply shut off, quickly bump the Load Auger switch to manual, and check all filling
equipment for proper rotation.
Turn the Load Auger switch to the AUTO position. The filling equipment should run for eight (8) minutes
(the default out of grain setting) and then the dryer will shut down le aving the safety shut down message
(out of grain warning) displayed. Press the Dryer Power Stop button to reset the panel, then press the
Start button.
34 PNEG-1707 TM-Series Tower Dryer
Page 35

7. Test Firing
Unload Auto Operation
To check auto operation place the Unload switch in the AUTO setting. Check unload equipment for
proper rotation.
Unload Manual Operation
To check manual operation move the Unload switch to the MANUAL position. Check unload equipment
for proper rotation.
Accutrol Sweep Metering System Operation
To check the metering operation turn the knob clockwise, and the metering speed should increase.
The metering system should be turning clockwise when viewed from above. Turning the knob
counterclockwise will decrease the speed. When the meter system is set to maximum (1000) the meter
roll speed should be 2.6 RPM. Turn the Unload switch OFF after these checks are complete. The
adjustable dry grain auger will continue to run for 60 second (default clean out delay setting) after the
switch is turned OFF to allow for clean out.
Fan Switch
Momentarily turn the Fan switch to ON and observe the fan for rotation.
Burner Safety
To check the burner safety function, first make sure the main gas valve is OFF. Turn the Fan switch ON
and allow the fan to start. Then, turn the Heater switch ON. The dryer will go through a 15 second purge
time follower by a 10 second ignition time. The dryer will them shut down. The safety message, “Ignition
Failure Fan #” will appear.
Burner Test Fire
Test fire the burner by starting the fan. Adjust the plenum temperature set point to 140°F (60°C). On LP
fired dryers, open the liquid shut off valve and the manual shut off valve. On NG fired dryers, open the
manual shut off valve. Turn the Burner switch to the ON position. After a 30 second purge time, the main,
blocking and bypass solenoid shut off valves (and the liquid solenoid valve on LP fired dryers) will open
and the burner will illuminate. The Burner switch should be illuminated and the plenum temperature will
start to increase. On LP fired dryers, adjust the gas pressure regulator so that the inlet pressu re on t he
fuel train is at approximately 7-9 PSI. On NG fired dryers, the manual shut off valve should be used to
adjust the inlet pressure to 7-10 PSI of pressure. (See Figure 7A and Figure 7B on Page 36.) When the
plenum temperature reaches the set point, the bypass solenoid will close. Adjust the bypass solenoid
adjustment screw so that the burner pressure gauge reads approximately 8-12 ounces of pressure on
Low-Fire. Turning the adjustment screw clockwise decreases the burner pressure when the bypass
solenoid is closed. The computer should cycle the burner between High-Fire and Low-Fire 4 to 5 times
a minute. If, during normal operation, the burner continuously remains on High-Fire or does not get to
operating temperature, slightly open the manual shut off valve on NG dryers or slightly increase the
regulator pressure on LP dryers. If the burner stays on Low-Fire and does not cycle, slightly close the
bypass solenoid by turning the adjusting screw clockwise.
PNEG-1707 TM-Series Tower Dryer 35
Page 36

7. Test Firing
Dryer Shut Down
To shut down the dryer,
1. Close the fuel supply valve at the tank or valve along the fuel line.
2. If the burner is operating, let the dryer run out of fuel, and it will shut down automatically due to loss
of flame.
3. Close the fuel valve at the dryer, and press the Dryer Power Stop button.
4. Turn OFF the control power.
5. Turn OFF the safety disconnect handle on the front of the power box, and turn OFF the main power
to the dryer.
Emergency
In case of emergency push the Dryer Stop button or the Emergency Stop button. This will interrupt powe r
to the control panel and the fan, burner and all augers will stop immediately.
Figure 7A Vapor Fuel Train
Figure 7B Modulator Fuel Train
36 PNEG-1707 TM-Series Tower Dryer
Page 37

8. Dryer Operation
Dryer Start-up
1. Before attempting to operate the dryer, make sure all safety shields are in place, the burner is
uncovered, all column clean-out doors are closed, the four (4) metering access doors are closed,
the drain valve in the fuel train is closed and all personnel are clear of the dryer and grain
handling machinery.
2. Turn all selector switches on the control panel to the OFF position.
3. Turn ON the electrical power supply to the dryer and move the dryer’s main breaker disconnect
handle mounted on the dryer’s power box to the ON position.
4. Turn the Control Power switch located on the control panel to the ON position. The switch will
illuminate. At this point, the controller will lock out all other dryer functions. Once the Boot screen
appears, touch the Start Dryer button. The dryer will perform a safety circuit check. If no faults are
found, the dryer is ready to be started.
5. Move the Load Auger switch to the MANUAL and push the Dryer Start switch. The load auger will
immediately start and the Load Auger switch will illuminate. If additional loading equipment is wired
to the dryer it will also start-up.
6. When the dryer is full of grain the load auger will stop automatically and any auxiliary loading
equipment wired to the dryer will also stop.
7. Move the Load Auger switch to the AUTO position to activate the out of grain timer. (See Page 25
for adjusting the out of grain timer.)
8. Open the main fuel valve on the propane tank or the natural gas fuel supply line. Open all manual
fuel shut off valves on the dryer.
9. Turn the Fan switch to the ON position. The fan will start and the light in the switch will illuminate
when air pressure in the dryer is detected.
10. Turn the Heater switch to the ON position. After a purge period of approximately 30 seconds, the
burner will fire and the Heater switch will illuminate when the flame sensing circuit is sensing flame.
For initial burner testing set the plenum temperature to 140°F using the “setting temperatures”
procedure found on Page 26. For normal drying operations, use the following guidelines for setting
the drying temperature:
a. Shelled corn (20% to 30%) --- 210°F to 220°F.
b. Shelled corn (15% to 20%) --- 180°F to 200°F
c. Small grains (wheat, oats, barley or milo) --- 150°F
d. Soybeans -- 130°F.
e. NOTE: As a general rule for obtaining the highest drying efficiency, use the highest drying
temperature which will not adversely affect grain quality.
Set the drying temperature to the desired level.
11. Look in the reference setting tables on Pages 43-48 and select the appropriate table for the dryer
and grain moisture levels. Turn the Unload Auger switch to MANUAL position. The unload auger
and metering system will start discharging grain from the dryer. Push the Metering Roll Speed
switch and turn the knob to adjust the speed to that suggested in the setting tables. (NOTE: Make
sure to press the “Accept/Exit” button on the Metering Roll screen when changing metering roll
speed to lock in the new speed.) (See Figure 8A on Page 38.)
PNEG-1707 TM-Series Tower Dryer 37
Page 38

8. Dryer Operation
Figure 8A
12. It is important to remember that adjustments in the metering roll speed takes 1-2 hours for the full
impact of the adjustment to be realized on exiting grain moisture levels. Continue to operate the
dryer’s metering speed manually making small hourly changes either up or down to adjust for the
desired final moisture content.
13. The metering system can be operated either manually or can be operated in the automatic mode
with the dryer automatically speeding up and slowing the metering system to maintain the desired
grain moisture output. For automatic operation, see moisture control setup section on Page 39.
Dryer Shut Down
1. To turn the dryer off at the end of the day, turn the Heater switch OFF, the Load Auger switch OFF
and the Unload Auger switch OFF.
2. Continue to let the fan operate for approximately 15 minutes to cool the warm grain in the dryer
down. Should the dryer shut off by itself due to an out of grain or loss of flame warning, th e fan will
continue to operate for the time set on the cool down timer on Page 25. Pushing the control panel
Off button will also automatically shut the fan OFF after the cool down timer setting. The fan can
be stopped immediately by turning the Fan switch to the OFF position.
3. Turn the Control Power switch OFF.
4. Shut all gas valves.
5. Move the dryer’s main breaker disconnect handle mounted on the dryer’s power box to the
OFF position.
38 PNEG-1707 TM-Series Tower Dryer
Page 39

Moisture Control Setup
8. Dryer Operation
1. To setup the moisture control, first press the Setup button on the dryer touch screen.
(See Figure 8B.)
Figure 8B
2. Press the M/C Setup button on the Setup screen. (See Figure 8C.) A screen entitled Continuous
Flow Setup will appear. (See Figure 8D on Page 40.)
Figure 8C
PNEG-1707 TM-Series Tower Dryer 39
Page 40

8. Dryer Operation
3. The dryer can be operated using a grain temperature only based moisture control or a moisture based
control utilizing the moisture sensors on the dryer. Most operators choo se to operate the dryer using
the moisture based moisture contro ller. To set the mo isture controller to th e moisture base d system,
press the Moisture button.
4. Two (2) options exist for the moisture based moisture control, either “Variable” or “5 Speed”. In the
“Variable” mode the unload rate of the dryer will continuously vary to maintain the desired final
moisture levels. In the “5 Speed” mode, the unload rate will make stepped changes in speed to
maintain the desired final moisture. The “Variable” option works best if the incoming moisture to th e
dryer is fairly consistent. The “5 Speed” option works best for changing incoming moisture levels.
To activate either, press the appropriate button under the Moisture Based Options portion of the
window shown in Figure 8D.
(See Figure 8D.)
The Moisture box should have a check mark.
Figure 8D
5. Once the appropriate moisture controller option is selected, the dryer unload rate can be
automatically controlled by first selecting the desired final moisture content of the grain exiting
the dryer. Press the M/C button on the bottom right hand corner of the main dryer screen.
(See Figure 8B on Page 39.) Enter the final desired moisture content. (See Figure 8E.) To activate
the automatic moisture control, turn the Unload Auger switch to the AUTO position. NOTE: To avoid
wide swings in outgoing moisture levels on initial cold dryer start-ups, it is best to operate the unload
system manually until the dryer and grain within the dryer is warmed up.
Figure 8E
40 PNEG-1707 TM-Series Tower Dryer
Page 41

8. Dryer Operation
6. The centering point about which the unload rate will vary, is determined by the manual unload rate
at the time that the dryer is placed into automatic operation. When using the “5 Speed” option, the
dryer will automatically adjust this centering point throughout the day if the Auto Centering button
is pressed on the Continuous Flow Setup screen. (See Figure 8D on Page 40.) It is helpful when
restarting a dryer after a lengthy drying run to set the manual unload rate to the same rate as the
last operating unload rate reading indicated on the dryer status chart under the MRO column.
(See Figure 8B on Page 39.) Operating the dryer in the manual mode until it is warmed up at this
unload rate before switching the Auger Unload switch to AUTO in either the “Variable” or “5 Speed”
mode will ensure a more accurate dryer unload control.
7. The parameters for “5 Speed operation” are preset for typical dryer operation. They can be modified
if desired by pressing 5 Speed Setup. (See Figure 8D on Page 40.) Changes to the parameters can
be made in the resulting screen that appears. (See Figure 8F.)
Figure 8F
8. For accurate moisture control, it is important that the moisture sensors on the dryer be calibrated.
It is recommended that the dry sensor be calibrated daily. To calibrate the moisture sensors, press
the Calibrate Moisture Sensor button on the Setup screen. (See Figure 8C on Page 39.) The
following screen will appear. (See Figure 8G.) To calibrate, compare a moisture sample on a
moisture tester to the dryer’s moisture reading. If for example, the tester gives a reading o f 15.7%
and the dryer’s dry sensor reads 14% enter a dry moisture offset of +1.7% so th at the dryer reading
will compare with the moisture tester reading.
Figure 8G
PNEG-1707 TM-Series Tower Dryer 41
Page 42

8. Dryer Operation
9. To avoid overloading dry conveyors taking grain away from the dryer when the dryer unload is
operating in the automatic mode, it may be necessary to limit the maximum and minimum unload
rate on the dryer’s metering system. To accomplish this, press the Unload Parameters button on
the Setup screen. (See Figure 8C on Page 39.) The following screen will appear. (See Figure 8H.)
Set the appropriate limits if necessary.
Figure 8H
42 PNEG-1707 TM-Series Tower Dryer
Page 43

Drying Time Table……..Model 1008
Reference Setting Table for Corn -- Model 1008
Divider Set for Maximum Heat Area Divider Set for Minimum Heat Area
9. Drying Time Tables
Moisture
In Out
17% 15% 510 600 700 500 590 670
18% 15% 380 460 520 380 440 510
19% 15% 310 370 430 310 360 410
20% 15% 270 320 360 260 310 350
21% 15% 230 270 330 230 270 300
22% 15% 200 240 280 200 230 270
23% 15% 180 210 250 180 210 240
24% 15% 160 190 220 160 190 210
25% 15% 140 170 200 140 170 190
26% 15% 130 150 180 130 150 170
27% 15% 120 140 160 110 130 150
28% 15% 100 120 140 100 120 140
29% 15% 90 110 130 90 110 120
30% 15% 90 100 120 80 100 110
170°F
% Unload Rate
190°F
% Unload Rate
210°F
% Unload Rate
170°F
% Unload Rate
190°F
% Unload Rate
210°F
% Unload Rate
32% 15% 70 80 100 70 80 90
35% 15% 60 70 80 60 60 70
Reference Setting Table for Wheat, Barley, Milo -- Model 1008
Divider Set for Maximum Heat Area Divider Set for Minimum Heat Area
Moisture
In Out
15% 13% 440 490 540 400 440 490
16% 13% 330 370 410 300 340 370
17% 13% 270 300 330 250 270 300
18% 13% 230 260 280 210 230 260
19% 13% 200 220 250 180 200 220
20% 13% 180 200 180 160 180 200
21% 13% 160 170 190 140 160 170
23% 13% 130 140 150 130 130 140
25% 13% 100 110 120 90 100 110
140°F
% Unload Rate
150°F
% Unload Rate
160°F
% Unload Rate
140°F
% Unload Rate
150°F
% Unload Rate
160°F
% Unload Rate
PNEG-1707 TM-Series Tower Dryer 43
Page 44

9. Drying Time Tables
Reference Setting Table for Soybeans -- Model 1008
Divider Set for Maximum Heat Area Divider Set for Minimum Heat Area
Moisture
In Out
15% 13% 490 510 580 400 460 520
16% 13% 330 380 430 300 340 390
17% 13% 270 310 350 240 280 310
18% 13% 230 260 300 210 240 270
19% 13% 200 230 260 180 210 230
20% 13% 180 200 230 160 180 210
21% 13% 160 180 200 140 160 180
23% 13% 130 140 160 1 10 130 150
25% 13% 100 120 130 90 100 120
120°F
% Unload Rate
130°F
% Unload Rate
140°F
% Unload Rate
120°F
% Unload Rate
130°F
% Unload Rate
% Unload Rate
Drying Time Table……..Model 1010
Reference Setting Table for Corn -- Model 1010
Divider Set for Maximum Heat Area Divider Set for Minimum Heat Area
140°F
Moisture
In Out
17% 15% 680 800 930 650 760 870
18% 15% 510 610
19% 15% 420 490 570 400 460 530
20% 15% 350 420
21% 15% 310 360 440 290 340 390
22% 15% 270 320
23% 15% 240 280 330 230 270 310
24% 15% 220 250
25% 15% 190 230 260 180 210 240
26% 15% 170 200
27% 15% 150 180 210 150 170 200
28% 15% 140 160
29% 15% 130 150 170 120 140 160
30% 15% 110 130
170°F
% Unload Rate
190°F
% Unload Rate
210°F
% Unload Rate
700 490 570 650
480 340 400 450
370 260 300 350
290 210 240 270
240 160 190 220
190 130 160 180
160 110 130 150
170°F
% Unload Rate
190°F
% Unload Rate
210°F
% Unload Rate
32% 15% 100 110 130 90 110 120
35% 15% 80 90
100 70 80 100
44 PNEG-1707 TM-Series Tower Dryer
Page 45

9. Drying Time Tables
Reference Setting Table for Wheat, Barley, Milo -- Model 1010
Divider Set for Maximum Heat Area Divider Set for Minimum Heat Area
Moisture
In Out
15% 13% 550 610 680 510 570 630
16% 13% 420 460
17% 13% 340 380 420 310 350 380
18% 13% 290 320
19% 13% 250 280 310 230 260 280
20% 13% 220 250
21% 13% 200 220 240 180 200 220
23% 13% 160 170
25% 13% 130 140 150 120 130 140
140°F
% Unload Rate
150°F
% Unload Rate
160°F
% Unload Rate
510 390 430 470
350 270 300 330
230 200 230 250
190 160 160 180
140°F
% Unload Rate
150°F
% Unload Rate
160°F
% Unload Rate
Reference Setting Table for Soybeans -- Model 1010
Divider Set for Maximum Heat Area Divider Set for Minimum Heat Area
Moisture
In Out
120°F
% Unload Rate
130°F
% Unload Rate
140°F
% Unload Rate
120°F
% Unload Rate
130°F
% Unload Rate
140°F
% Unload Rate
15% 13% 620 640 720 520 590 670
16% 13% 420 480
17% 13% 340 390 440 310 360 400
18% 13% 290 330
19% 13% 250 290 320 230 270 300
20% 13% 220 250
21% 13% 200 230 250 180 210 230
23% 13% 160 180
25% 13% 130 140 160 120 130 150
540 390 440 490
370 270 300 340
290 210 230 260
200 150 170 190
PNEG-1707 TM-Series Tower Dryer 45
Page 46

9. Drying Time Tables
Drying Time Table……..Model 1012
Reference Setting Table for Corn -- Model 1012
Divider Set for Maximum Heat Area Divider Set for Minimum Heat Area
Moisture
In Out
17% 15% 820 970 780 910
18% 15% 620 730 850 590 690 790
19% 15% 510 600 690 480 560 640
20% 15% 430 510
21% 15% 370 440 530 360 410 470
22% 15% 330 390
23% 15% 290 340 400 280 320 370
24% 15% 260 310
25% 15% 230 280 320 220 260 300
26% 15% 210 250
27% 15% 190 220 260 180 210 240
28% 15% 170 200
29% 15% 150 180 210 150 170 190
30% 15% 140 160
170°F
% Unload Rate
190°F
% Unload Rate
210°F
% Unload Rate
590 410 480 550
450 310 370 420
350 250 290 330
280 200 230 270
230 160 190 210
190 130 150 180
170°F
% Unload Rate
190°F
% Unload Rate
210°F
% Unload Rate
32% 15% 120 140 160 110 130 150
35% 15% 90 110
120 90 100 120
Reference Setting Table for Wheat, Barley, Milo -- Model 1012
Divider Set for Maximum Heat Area Divider Set for Minimum Heat Area
Moisture
In Out
15% 13% 660 730 810 620 690 760
16% 13% 500 550
17% 13% 410 450 500 380 430 470
18% 13% 350 380
19% 13% 300 330 370 280 310 350
20% 13% 260 290
21% 13% 230 260 290 220 250 270
23% 13% 190 210
25% 13% 150 170 180 140 160 170
140°F
% Unload Rate
150°F
% Unload Rate
160°F
% Unload Rate
610 470 530 570
420 330 360 400
270 250 280 310
230 200 200 220
140°F
% Unload Rate
150°F
% Unload Rate
160°F
% Unload Rate
46 PNEG-1707 TM-Series Tower Dryer
Page 47

9. Drying Time Tables
Reference Setting Table for Soybeans -- Model 1012
Divider Set for Maximum Heat Area Divider Set for Minimum Heat Area
Moisture
In Out
15% 13% 740 770 860 630 720 810
16% 13% 500 570
17% 13% 410 460 520 380 440 490
18% 13% 340 390
19% 13% 300 340 390 280 320 360
20% 13% 270 300
21% 13% 240 270 300 220 250 290
23% 13% 190 220
25% 13% 150 170 190 140 160 180
120°F
% Unload Rate
130°F
% Unload Rate
140°F
% Unload Rate
640 470 540 600
440 320 370 420
340 250 290 320
240 180 200 230
120°F
% Unload Rate
130°F
% Unload Rate
% Unload Rate
Drying Time Table……..Model 1015
Reference Setting Table for Corn -- Model 1015
Divider Set for Maximum Heat Area Divider Set for Minimum Heat Area
140°F
Moisture
In Out
17% 15% 980
18% 15% 760 900 740 860 980
19% 15% 620 730 850 600 700 800
20% 15% 530 620
21% 15% 460 540 650 440 520 590
22% 15% 400 480
23% 15% 360 420 490 350 400 460
24% 15% 320 380
25% 15% 290 340 390 280 320 370
26% 15% 260 300
27% 15% 230 270 320 220 260 300
28% 15% 210 250
29% 15% 190 220 260 180 210 240
30% 15% 170 200
170°F
% Unload Rate
190°F
% Unload Rate
210°F
% Unload Rate
720 510 590 680
550 390 460 520
440 310 360 410
350 250 290 330
280 200 230 270
230 160 190 220
170°F
% Unload Rate
190°F
% Unload Rate
210°F
% Unload Rate
32% 15% 140 170 200 140 160 180
35% 15% 110 130
150 110 130 140
PNEG-1707 TM-Series Tower Dryer 47
Page 48

9. Drying Time Tables
Reference Setting Table for Wheat, Barley, Milo -- Model 1015
Divider Set for Maximum Heat Area Divider Set for Minimum Heat Area
Moisture
In Out
15% 13% 820 910 1000 780 860 950
16% 13% 610 680
17% 13% 500 560 610 480 530 580
18% 13% 430 470
19% 13% 370 410 450 350 390 430
20% 13% 330 360
21% 13% 290 320 350 280 310 340
23% 13% 230 260
25% 13% 190 210 230 180 200 220
140°F
% Unload Rate
150°F
% Unload Rate
160°F
% Unload Rate
750 590 650 710
520 410 450 490
330 310 340 380
280 250 240 270
140°F
% Unload Rate
150°F
% Unload Rate
160°F
% Unload Rate
Reference Setting Table for Soybeans -- Model 1015
Divider Set for Maximum Heat Area Divider Set for Minimum Heat Area
Moisture
In Out
120°F
% Unload Rate
130°F
% Unload Rate
140°F
% Unload Rate
120°F
% Unload Rate
130°F
% Unload Rate
140°F
% Unload Rate
15% 13% 910 940 790 900
16% 13% 610 700 790 580 670 750
17% 13% 500 570 640 480 540 610
18% 13% 420 480
19% 13% 370 420 480 350 400 450
20% 13% 330 370
21% 13% 290 330 370 280 320 360
23% 13% 230 260
25% 13% 190 210 240 180 200 230
550 400 460 520
420 310 360 400
300 220 250 280
48 PNEG-1707 TM-Series Tower Dryer
Page 49

10. Service
Pre-seasonal Inspection and Service
The dryer is made of weather-resistant material, and is designed to require minimum service. However,
each season we recommend the following items be checked before the unit is used, and any damaged
or questionable parts replaced. These checks will help eliminate possible failures, and assure
dependable operation of the equipment.
1. Shut off electrical power. Open power box and control box, and inspect for moisture, rodent damage
or accumulated foreign material present. Inspect and tighten any loose terminal connections.
Replace any damaged or deteriorated wiring.
2. Lubricate the blowers, motors, and metering system as outlined in the lubrication table on Page 52.
3. Inspect and clean the burner. Visually check that no holes in the stainless steel air mixing plates
are plugged. If burner ports are plugged, clear them with a piece of wire or a drill bit.
4. Check electrical connections at both the flame rod and spark plug. Clean spark ignitor and flame
rod. Replace if necessary.
5. Check drain valve on gas train to ensure that there is no water in the gas train. Valve sho uld always
be open when the dryer is not being used. Ensure that drain valve is closed prior to dryer operation.
6. Check the discharge area to ensure that the area is cleaned of stalks and old grain. Inspect the
sweeps for excessive wear.
IMPORTANT: The covers to the discharge sections on the tower dryers must be in place and
clamped down at all times when the dryer is in operation. If the cover is off during
operation, the vacuum created by the blowers will suck foreign matter from the
discharge area and deposit it in the heat section of the dryer plugging the inside
screens of the dryer also creating a fire hazard.
See pre-season check list on Page 51.
Seasonal Inspection and Service
IMPORTANT: The covers to the metering system access door(s) must b e in place at all times when
the dryer is in operation. Before turning blowers always make sure this door is
clamped into position.
1. Follow lubrication guides as outlined in the lubrication table.
2. Do not let grain fines and dust accumulat e inside the cooling section of the dryer. Bi-weekly
if drying most products or daily if drying milo, clean the cooling chamber floor of fines and dust.
Sweep down the cooling section sheets if necessary. Fines can be swept into the unload systems.
3. Do not let grain fines and dust accumulate inside the heat section of the dryer. Daily check
the hopper divider that separates the heat section f rom the cooling section to ensure that it r emains
clean and open.
4. When cleaning dryer, check the grain discharge area on the dryer. Check the metering sweeps for
trash or stalk build ups that could be obstructing grain flow.
5. If undried grain is left in the dryer for more than a week during the drying season, inspect the
plenum roof to make sure that there is no wet grain sticking to the roof that could restrict grain f low.
When the dryer is restarted make sure that all grain columns are evenly unloading.
PNEG-1707 TM-Series Tower Dryer 49
Page 50

10. Service
6. When drying dirty corn in high humidity conditions, sludge may build up in the upper outside sheets
of the dryer. This build up can be removed by either washing the sheets down with a high pressure
water hose, or by shutting incoming grain, dropping the grain level to below the plugged area, and
then running the fans and burner to dry the affected area. Tapping or sweeping the sheets will
dislodge debris. Attempting to sweep off the sheet build up while it is still wet will usually plug the
sheet more.
In Case of Fire
1. When you first detect a fire, the entire drying operation should be shut down, including grain flow
into and out of the dryer. The emergency controls may have already done this. Also, shut off the
electrical and fuel supply to the dryer.
2. Do not try to cool a fire by running fan(s).
3. Never run grain from the dryer into the elevator or storage if a fire is known or suspected.
4. Locate the area of the fire.
5. If the fire can be extinguished with a fire extinguisher, water hose or by removing the burning
material, this should be done right away. Watch the dryer closely for another fire after one
has occurred.
6. Emergency discharge slide gates at the bottom of each column as well as easy access gates
located near the hopper discharge area permit fast dumping of each individual grain column. If it is
necessary to emergency dump grain from the dryer, wait until the fire d epartment is onsite b efore
doing so.
7. A fire extinguisher should be located at or near the dryer, if a fire seems to be getting out of control
call the fire department.
End of Season Service
1. Empty the dryer at the end of the drying season. The dryer should not be used for grain storage.
Grain left in there for an extended period of time can become wet, swell and spoil. Chunks of
spoiled grain can plug the metering system and swelled grain places undue stress on the interior
and exterior sheeting of the dryer.
2. Clean out the plenum roof grain cushion and remove any grain that may be hanging up on the
plenum roof.
3. Make sure the grain exchangers are clean.
4. Clean out the hopper that divides the heat section from the cooling section.
5. Clean the cooling chamber floor.
6. Remove all grain and trash from the metering drum floor. This grain can be raked out by hand by
opening the slide gates located in the hopper bottom of the dryer.
7. Make sure gas supply is shut off to the dryer.
8. Open the gas train drain valve located on the bottom of the gas train.
9. It is a good practice to cover the burner with a tarpaulin or plastic to ensure a clean burner.
50 PNEG-1707 TM-Series Tower Dryer
Page 51

Pre-season Service Check List
___ Lubricate blower motor bearings, if needed.
___ Clean burner ports.
___ Inspect flame rod and spark ignitor.
___ Inspect divider hopper between heat and cooling section. Clean if necessary.
___ Inspect bindicator grain level switches.
___ Check gas pressure gauges.
___ Clean control and power panels, tighten loose connections, and check for leaks.
___ Inspect metering systems. Clean accumulated stalks and old grain.
___ Start-up dryer and check operating controls.
___ Other: Itemize ___________________________________________________________
End of Season Shut Down Procedure
10. Service
___ Start unload and empty all grain from dryers.
___ Clean out grain cushion (on plenum roof under fill spout). Clean plenum roof.
___ Clean off grain exchangers.
___ Clean out divider hopper, between heating and cooling section.
___ Clean inside cooling sheets and cooling floor.
___ Remove all grain and trash from unload section of dryer.
___ Open emergency grain discharge doors.
___ Open drain valve in gas train.
___ Cover burner with a tarp or plastic sheeting.
PNEG-1707 TM-Series Tower Dryer 51
Page 52

10. Service
Lubrication Table
Location Instructions
Accutrol (sweep unload)
bottom shaft bearing.
Blower motor bearings. See motor lubrication
Metering variable speed
drive motor.
Accutrol sweep gearbox. Grease filled gearbox.
¹Lubrication of motors - Operate motor for 20 minutes. Clean grease fitting. Remove grease relief plug and using a
low pressure grease gun, pump in the required grease. After re-lubricating, allow motor to run for 10 minutes before
replacing relief hardware. DO NOT over grease.
Lubricate slowly until lube
shows through seal.
Wipe clean.
procedure below.
See motor lubrication
procedure below.
Additional grease does not
need to be added.
High quality, grade #2
lithium based grease.
High quality, grade #2
lithium based grease.
High quality, grade #2
lithium based grease.
Ty pe of
Lubrication
Lubrication Interval
Beginning of season (annually).
Every 2 years (Normal
operation, ever 8-10 months
continuous operation).
Every 2 years (Normal
operation, ever 8-10 months
continuous operation).
52 PNEG-1707 TM-Series Tower Dryer
Page 53

11. Safety Circuit Shut Down Messages
Shut down warning window:
Touch the Help button
to display the shut down
help window.
Figure 11 A
Fan/Heater Generated Errors
The following is a list of errors that are generated with the fan/heater controller. Each fan/heater has
there own set of safeties which are listed below. You will need to inspect the controller associated with
the error. Example: If you get this error, it is telling you the prob lem is with housin g 1 (bottom most fan)
High-Limit. (See Figure 11A.)
Air Switch Stuck
The air switch contacts have closed prior to the fan starting, indicating a freewheeling blade or improper
setting of the air switch. The message will distinguish between which fan caused the shut down. This
indicates that 12 VDC has been lost to terminal J4-04 on the Fan/Heater board.
Fan Loss of Airflow
This error message is displayed when airflow (air pressure) has been established but was lost for some
reason. This could happen if while during the dryers operation the grain has settled or shrinkage in the
grain columns causing a loss of air pressure in the plenum chamber.
Fan No Airflow
Contacts in the air switch have never opened due to the fan not turning, or the air switch may need
adjustment. The message will distinguish between which fan caused the shut down.
Flame Loss
The flame sensor has failed to detect a burner flame which had been establish ed but was lost for some
reason and there is a problem with the flame sensing circuitry or the dryer is not getting burner fuel.
The message will distinguish between which burner caused the shut down. The reference t o the number
one (1) is telling you that it is burner number one (1) which is the bottom most fan.
PNEG-1707 TM-Series Tower Dryer 53
Page 54

11. Safety Circuit Shut Down Messages
Grain Temp Short
This error indicates there is a shorted condition with one of the grain temperature sensors located inside
the left or right grain columns. This could be a shorted sensor or the sensor wires could be shorted.
Grain Overheat
An over temperature condition has occurred in one of the grain columns causing the control to shut down
the dryer. This control is set at 210°F (99°C) and automatically resets itself when cool. This can be
caused from a grain column plugged with trash or the meter rolls may be adjusted to slow. Feel the
grain columns to determine which one may be causing the problems. If all the columns are hot to the
touch then you will probably need to check the meter roll settings. If not, then examine the column that
feels hot, make sure you can see the grain moving down the column screens. For more information on
service see meter roll servicing.
Housing High-Limit
The temperature High-Limit located on the fan/burner housing has opened, indicating an over
temperature condition has occurred towards the rear of the fan/heater housing. This control is set at
200°F (93°C) and must be manually reset. The message will distinguish between which fan housing
caused the shut down. The reference to the number one (1) is telling you that it is fan number one (1)
which is the bottom most fan.
Ignition Failure
This condition happens during the initial ignition of the burner. If the burner fails to light, check to make
sure that the gas has been turned ON and/or the maxon valve has been turned ON. The reference to the
number one (1) is telling you that it is burner number one (1) which is the bottom most fan.
Illegal Flame
This message is displayed when the flame detection circuit of the heater is sensing flame when the
burner is supposed to be OFF. Example, if you shut down the dryer and the heater continues to burn
due to a solenoid stuck in an open state, it will generate this type of error.
Motor Overload
One of the thermal overloads on either the fan, load, unload or auxiliary motors has opened, indicating
an over current condition. The overloads must be manually reset. The message will distinguish between
which fan overload caused the shut down. The reference to the number one (1) is telling you that it is fan
number one (1) which is the bottom most fan.
Vapor High-Limit
The LP gas vapor temperature sensor located in the gas pipe train downstream from the vaporizer,
has opened indicating that the vaporizer is running too hot and must be readjusted. This sensor is
set at 200°F (93°C) and automatically resets itself when cool. The message will distinguish between
which burner caused the shut down. The reference to the number one (1) is telling you that it is burner
number one (1) which is the bottom most fan/heater unit, is where the malfunction is located. Try
adjusting the vaporizer coils farther away from the burners flame. You may also want to try switching the
burner mode from High/Low to ON/OFF, especially on warmer days.
54 PNEG-1707 TM-Series Tower Dryer
Page 55

11. Safety Circuit Shut Down Messages
Input/Output Generated Errors
The following is a list of errors that are generated with the Input/Output board located in the upper
control box.
Air System Failure
A shut down has occurred due to a air system that was installed with an integral Safety switch that was
in the unit. The air system safety connections are located in the upper control box on the terminal strip.
This can occur if this safety looses 12 VDC to terminal J1-10 on the Input/Output board. This input
is jumpered on the terminal strip when it leaves the factory and is usually installed in the field by a
qualified electrician.
Aux Load Overload
The motor overload relay has tripped on the aux load motor circuit located in the upper control box.
This can occur if this safety looses 12 VDC to terminal J1-05 on the Input/Output board. Push the
Red button on the overload to reset this error. This is caused from the motor operating with to much of
a work load, which in turn uses more current (amperage). If the p roblem reoccurs then check the motor
to make sure it is not being overworked. You may need to call an electrician to measure the motors
full load amps (FLA).
Aux Unload Overload
The motor overload relay has tripped on the aux unload motor circuit located in the upper control box.
This can occur if this safety looses 12 VDC to terminal J1-04 on the Input/Output board. Push the
Red button on the overload to reset this error. This is caused from the motor operating with to much of
a work load, which in turn uses more current (amperage). If the p roblem reoccurs then check the motor
to make sure it is not being overworked. You may need to call an electrician to measure the motors
full load amps (FLA).
Load Motor Overload
The motor overload has tripped on the load motor overload located in the upper control box. This can
occur if this safety looses 12 VDC to terminal J1-03 on the Input/Output board. Push the Red button
on the overload to reset this error. This is caused from the motor operating with to much of a work load,
which in turn uses more current (amperage). If the problem reoccurs then check the motor to make
sure it is not being overworked. You may need to call an electrician to measure the motors full load
amps (FLA).
Meter Rolls Failed
If you have the meter roll speed adjustment turned too low (not turning), this will cause this error
message. It also could indicate that you have a defective meter roll sensor, the metering roll drive
system has failed to turn or broken chain or jammed metering roll is a possibility. This can occur if the
input is not receiving a 5 volt pulse on terminal J4-04 on the Input/Output board.
Out of Grain
The dryer has run low on grain, and the out of grain timer has timed out, shutting the dryer down. The
unload auger will continue to run so it can clean out the remaining grain before shutting down.
PNEG-1707 TM-Series Tower Dryer 55
Page 56

11. Safety Circuit Shut Down Messages
Unload Motor Overload
The motor overload has tripped on the unload motor overload located in the upper control box. This
indicates that 12 VDC has been lost to terminal J1-02 on the Input/Output board. Push the Red button
on the overload to reset this error. This is caused from the motor operating with to much of a work
load, which in turn uses more current (amperage). If the problem reoccurs then check the motor to
make sure it is not being overworked. You may need to call an electrician to measure the motors
full load amps (FLA).
User Safety
A shut down has occurred due to a user installe d Safety switch that was installed on the dryer. The user
installed safety connections are located in the upper control box on the terminal strip. This also indicates
that 12 VDC has been lost to terminal J2-01 on the Input/Output board. This input is jumpered on the
terminal strip when it leaves the factory and is usually installed in the field by a qualified electrician.
Master Display Generated Errors
The following is a list of errors that are generated with the Master Display board located in the lower
control box.
Cont-Batch Mode Chng
This error occurs when you switch the Dryer Mode switch from the continuous flow to the staged batch
position while the dryer is running in the continuous flow mode. To avoid this shut down, stop the dryer
before switching modes. Press stop to clear the error.
Network Failed FH
This error is generated whenever Fan/Heater board has lost its communications link with the
Input/Output board (upper control panel) and the Master Display board (lower control panel). Check
the ethernet cable jacks to make sure they are plugged in tightly. An ethernet cable is a computer
communication cable that looks like the phone cable in the home. (See Figure 11B on Page 57.)
The reference to the number one (FH1) is telling you that it is fan number one (1) which is the bottom
most fan.
Network Failed Input/Output
This error is generated whenever Input/Output board (upper control panel) has lost its communications
link with the master (lower control panel door) and the Fan/Heater boards. Check the ethernet cable
jacks to make sure they are plugged in tightly. There are three (3) LED lights next to this plug, one (1)
indicates power and the other two (2) indicate data being transmitted. These two (2) labeled RXD and
TXD, should be flashing randomly back and forth indicating network activity.
Network Failed Mast
This error is generated whenever Master Display board (lower control panel) has lost its communications
link with the Input/Output board (upper control panel door) and the Fan/Heater boards. Check the
ethernet cable jacks to make sure they are plugged in tightly.
56 PNEG-1707 TM-Series Tower Dryer
Page 57

11. Safety Circuit Shut Down Messages
Figure 11 B
Plenum Temp Open
This error indicates there is a open condition with the plenum temperature sensor located inside the
plenum chamber. This could be a open sensor or the sensor wires could have a open connection.
Plenum Temp Short
This error indicates there is a shorted condition with the plenum temperature sensor located inside the
plenum chamber. This could be a shorted sensor or the sensor wires could be shorted.
Plenum Overheat
An over temperature condition has occurred inside the dryer plenum. This control is a 300°F (149°C) limit
and automatically resets itself when cool. The message will distinguish between which plenum caused
the shut down.
PNEG-1707 TM-Series Tower Dryer 57
Page 58

12. Wiring Diagrams
Power Box Back Panel Wiring
58 PNEG-1707 TM-Series Tower Dryer
Page 59

Power Box Back Panel Wiring (Continued)
12. Wiring Diagrams
PNEG-1707 TM-Series Tower Dryer 59
Page 60

12. Wiring Diagrams
Power Box Back Panel Wiring (Continued)
60 PNEG-1707 TM-Series Tower Dryer
Page 61

Fan/Heater Board Wiring
12. Wiring Diagrams
PNEG-1707 TM-Series Tower Dryer 61
Page 62

12. Wiring Diagrams
Main Input/Output Power Box Wiring
62 PNEG-1707 TM-Series Tower Dryer
Page 63

Top Terminal Strip Power Box
12. Wiring Diagrams
PNEG-1707 TM-Series Tower Dryer 63
Page 64

12. Wiring Diagrams
Bottom Terminal Strip Power Box
64 PNEG-1707 TM-Series Tower Dryer
Page 65

Burner Control Wiring
12. Wiring Diagrams
PNEG-1707 TM-Series Tower Dryer 65
Page 66

12. Wiring Diagrams
DC Motor Wiring
66 PNEG-1707 TM-Series Tower Dryer
Page 67

Fan Contactor and Overload (ACL)
12. Wiring Diagrams
PNEG-1707 TM-Series Tower Dryer 67
Page 68

12. Wiring Diagrams
Fan Contactor Part Winding Starter
68 PNEG-1707 TM-Series Tower Dryer
Page 69

Fan Contactor Soft Starter
12. Wiring Diagrams
PNEG-1707 TM-Series Tower Dryer 69
Page 70

12. Wiring Diagrams
Moisture Sensor Wiring
70 PNEG-1707 TM-Series Tower Dryer
Page 71

13. Warranty
9101239_1_CR_rev7.DOC (revised July 2009)
GSI Group, LLC Limited Warranty
The GSI Group, LLC (“GSI”) warrants products which it manufactures to be free of defects in materials and workmanship
under normal usage and conditions for a period of 12 months after sale to the original end-user or if a foreign sale,
14 months from arrival at port of discharge, whichever is earlier. The end-user’s sole remedy (and GSI’s only obligation)
is to repair or replace, at GSI’s option and expense, products that in GSI’s judgment, contain a material defect in materials
or workmanship. Expenses incurred by or on behalf of the end-user without prior written authorization from the GSI
Warranty Group shall be the sole responsibility of the end-user.
Warranty Extensions:
The Limited Warranty period is extended for the following products:
Product Warranty Period
Performer Series Direct Drive Fan Motor 3 Years
AP Fans and Flooring
Cumberland
Feeding/Watering
Systems
Grain Systems Grain Bin Structural Design 5 Years
Grain Systems
Farm Fans
Zimmerman
All Fiberglass Housings Lifetime
All Fiberglass Propellers Lifetime
Feeder System Pan Assemblies 5 Years **
Feed Tubes (1-3/4" and 2.00") 10 Years *
Centerless Augers 10 Years *
Watering Nipples 10 Years *
Portable and Tower Dryers 2 Years
Portable and Tower Dryer Frames and
Internal Infrastructure †
5 Years
* Warranty prorated from list price:
0 to 3 years - no cost to end-user
3 to 5 years - end-user pays 25%
5 to 7 years - end-user pays 50%
7 to 10 years - end-user pays 75%
** Warranty prorated from list price:
0 to 3 years - no cost to end-user
3 to 5 years - end-user pays 50%
† Motors, burner components
and moving parts not included.
Portable dryer screens included.
Tower dryer screens not included.
GSI further warrants that the portable and tower dryer frame and basket, excluding all auger and auger drive
components, shall be free from defects in materials for a period of time beginning on the twelfth (12
the date of purchase and continuing until the sixtieth (60
th
) month from the date of purchase (extended warranty period).
th
) month from
During the extended warranty period, GSI will replace the frame or basket components that prove to be defective
under normal conditions of use without charge, excluding the labor, transportation, and/or shipping costs incurred in
the performance of this extended warranty.
Conditions and Limitations:
THERE ARE NO WARRANTIES THAT EXTEND BEYOND THE LIMITED WARRANTY DESCRIPTION SET FORTH
ABOVE. SPECIFICALLY, GSI MAKES NO FURTHER WARRANTY OF ANY KIND, EXPRESS OR IMPLIED,
INCLUDING, WITHOUT LIMITATION, WARRANTIES OF MERCHANTABILITY OR FITNESS FOR A PARTICULAR
PURPOSE OR USE IN CONNECTION WITH: (I) PRODUCT MANUFACTURED OR SOLD BY GSI OR (II) ANY
ADVICE, INSTRUCTION, RECOMMENDATION OR SUGGESTION PROVIDED BY AN AGENT, REPRESENTATIVE
OR EMPLOYEE OF GSI REGARDING OR RELATED TO THE CONFIGURATION, INSTALLATION, LAYOUT,
SUITABILITY FOR A PARTICULAR PURPOSE, OR DESIGN OF SUCH PRODUCTS.
GSI shall not be liable for any direct, indirect, incidental or consequential damages, including, without limitation, loss of
anticipated profits or benefits. The sole and exclusive remedy is set forth in the Limited Warranty, which shall not exceed
the amount paid for the product purchased. This warranty is not transferable and applies only to the original end-user.
GSI shall have no obligation or responsibility for any representations or warranties made by or on behalf of any dealer,
agent or distributor.
GSI assumes no responsibility for claims resulting from construction defects or unauthorized modifications to products
which it manufactured. Modifications to products not specifically delineated in the manual accompanying the equipment
at initial sale will void the Limited Warranty.
This Limited Warranty shall not extend to products or parts which have been damaged by negligent use, misuse, alteration,
accident or which have been improperly/inadequately maintained. This Limited Warranty extends solely to products
manufactured by GSI.
Prior to installation, the end-user has the responsibility to comply with federal, state and local codes which apply to the
location and installation of products manufactured or sold by GSI.
PNEG-1707 TM-Series Tower Dryer 71
Page 72

This equipment shall be installed in accordance with
the current installation codes and applicable
regulations which should be carefully followed in all
cases. Authorities having jurisdiction should be
consulted before installations are made.
Copyright © 2009 by GSI Group
Printed in the USA
GSI Group
1004 E. Illinois St.
Assumption, IL 62510-0020
Phone: 1-217-226-4421
Fax: 1-217-226-4420
www.gsiag.com
 Loading...