

Page 1
PNEG-1567
54' Diameter Bins
Cor-Lok and Cut-Lok Flooring
and Grandstand Layout
Installation Manual
PNEG-1567
Date: 09-27-12
Page 2

2 PNEG-1567 54' Cor-Lok and Cut-Lok Flooring
Page 3

Table of Contents
SEE PAGE 17 AND PAGE 18 FOR 20 GAUGE FLOOR SUPPORT REQUIREMENTS.
Contents
Chapter 1 Safety .....................................................................................................................................................4
Safety Guidelines .................................................................................................................................. 4
Safety Instructions ..................... ... .... ...................................... .... ... ... ... ... .... ... ........................................ 5
Chapter 2 Recommended Method for Full Floor Installation .............................................................................7
Fan Placement Diagram ....................................................................................................................... 7
Grain Systems Recommended Method for Full Floor Installation ......................................................... 8
Installing the Undersplice .................................... ... ... .... ... ... ... .... ... ...................................................... 10
Chapter 3 Grandstand Identification .................... ....................................................... .......................................12
20 Gauge Grandstand Identification .......................................... ... ... ... ... .... ... ... ... .... ... ... ... ... .... ... ......... 12
Chapter 4 Flashing Installation ............................. ....................... ...................... .................................................13
Grain Systems Formed Flashing Installation ...................................................................................... 13
Chapter 5 Well Installation Cut Detail ................................................................................................................14
Well Installation Plank Cut Detail for 54' Split Floor ............................................................................ 14
Chapter 6 54' Cor-Lok/Cut-Lok Plank Order ..................... ... ... .... ... ... ... .... ... .......................................................15
Chapter 7 Plank Lengths .....................................................................................................................................16
Chapter 8 20 Gauge Floor Support Requirements ...........................................................................................17
20 Gauge Grandstand Chart - 2.66" Corrugation ................................................................................ 17
20 Gauge Grandstand Chart - 4.00" Corrugation ................................................................................ 18
Chapter 9 Flashing Support at Stiffeners ..........................................................................................................19
Stiffener Flashing Support Instructions for Internal Universal Stiffeners ............................................. 19
Chapter 10 Air Flow Support Instructions .........................................................................................................20
Installation of Air Flow Supports ........................................................................................................ 20
Chapter 11 Warranty ............................................................................................................................................27
PNEG-1567 54' Cor-Lok and Cut-Lok Flooring 3
Page 4

1. Safety
This is the safety alert symbol. It is used to alert you
to potential personal injury hazards. Obey all safety
messages that follow this symbol to avoid possible
injury or death.
WARNING indicates a hazardous situation which, if not
avoided, could result in death or serious injury.
CAUTION, used with the safety alert symbol, indicates a
hazardous situation which, if not avoided, could result in
minor or moderate injury.
NOTICE is used to address practices not related to
personal injury.
DANGER indicates a hazardous situation which, if not
avoided, will result in death or serious injury.
Safety Guidelines
This manual contains information that is important for you, the owner/operator, to know and understand.
This information relates to protecting personal safety and preventing equipment problems. It is the
responsibility of the owner/operator to inform anyone operating or working in the area of this equipment
of these safety guidelines. To help you recognize this information, we use the symbols that are defined
below. Please read the manual and pay attention to these sections. Failure to read this manual and its
safety instructions is a misuse of the equipment and may lead to serious injury or death.
DANGER
WARNING
CAUTION
NOTICE
4 PNEG-1567 54' Cor-Lok and Cut-Lok Flooring
Page 5
1. Safety
Follow Safety Instructions
Carefully read all safety messages in this manual and
safety signs on your machine. Keep signs in good
condition. Replace missing or damaged safety signs. Be
sure new equipment components and repair parts include
the current safety signs. Replacement safety signs are
available from the manufacturer.
Learn how to operate the machine and how to use controls
properly. Do not let anyone operate without instruction.
Keep your machinery in proper working condition.
Unauthorized modifications to the machine may impair
the function and/or safety and affect machine life.
If you do not understand any part of this manual or need
assistance, contact your dealer.
Read and Understand Manual
Rotating Flight
Grain augers can kill or dismember.
Keep clear of all augers and never enter the bin unless all
power is disconnected and locked out. Failure to do so will
result in serious injury or death.
Rotating Flight
Safety Instructions
Our foremost concern is your safety and the safety of others associated with this equipment. We want to
keep you as a customer. This manual is to help you understand safe operating procedures and some
problems that may be encountered by the operator and other personnel.
As owner and/or operator, it is your responsibility to know what requirements, hazards, and precautions
exist, and to inform all personnel associated with the equipment or in the area. Safety precautions may be
required from the personnel. Avoid any alterations to the equipment. Such alterations may produce a very
dangerous situation where SERIOUS INJURY or DEATH may occur.
This equipment shall be installed in accordance with the current installation codes and applicable
regulations, which should be carefully followed in all cases. Authorities having jurisdiction should be
consulted before installations are made.
PNEG-1567 54' Cor-Lok and Cut-Lok Flooring 5
Page 6
1. Safety
Prepare for Emergencies
Be prepared if fire starts.
Keep a first aid kit and fire extinguisher handy.
Keep emergency numbers for doctors, ambulance service,
hospital, and fire department near your telephone.
Keep Emergency Equipment
Quickly Accessible
Eye Protection
Gloves
Steel-Toed Boots
Respirator
Hard Hat
Fall Protection
Wear Protective Clothing
Wear close-fitting clothing and safety equipment appropriate
to the job.
Remove all jewelry.
Tie long hair up and back.
Wear safety glasses at all times to protect eyes from debris.
Wear gloves to protect your hands from sharp edges on
plastic or steel parts.
Wear steel-toed boots to help protect your feet from falling
debris. Tuck in any loose or dangling shoestrings.
A respirator may be needed to prevent breathing potentially
toxic fumes and dust.
Wear a hard hat to help protect your head.
Wear appropriate fall protection equipment when working at
elevations greater than six feet (6').
6 PNEG-1567 54' Cor-Lok and Cut-Lok Flooring
Page 7
2. Recommended Method for Full Floor Installation
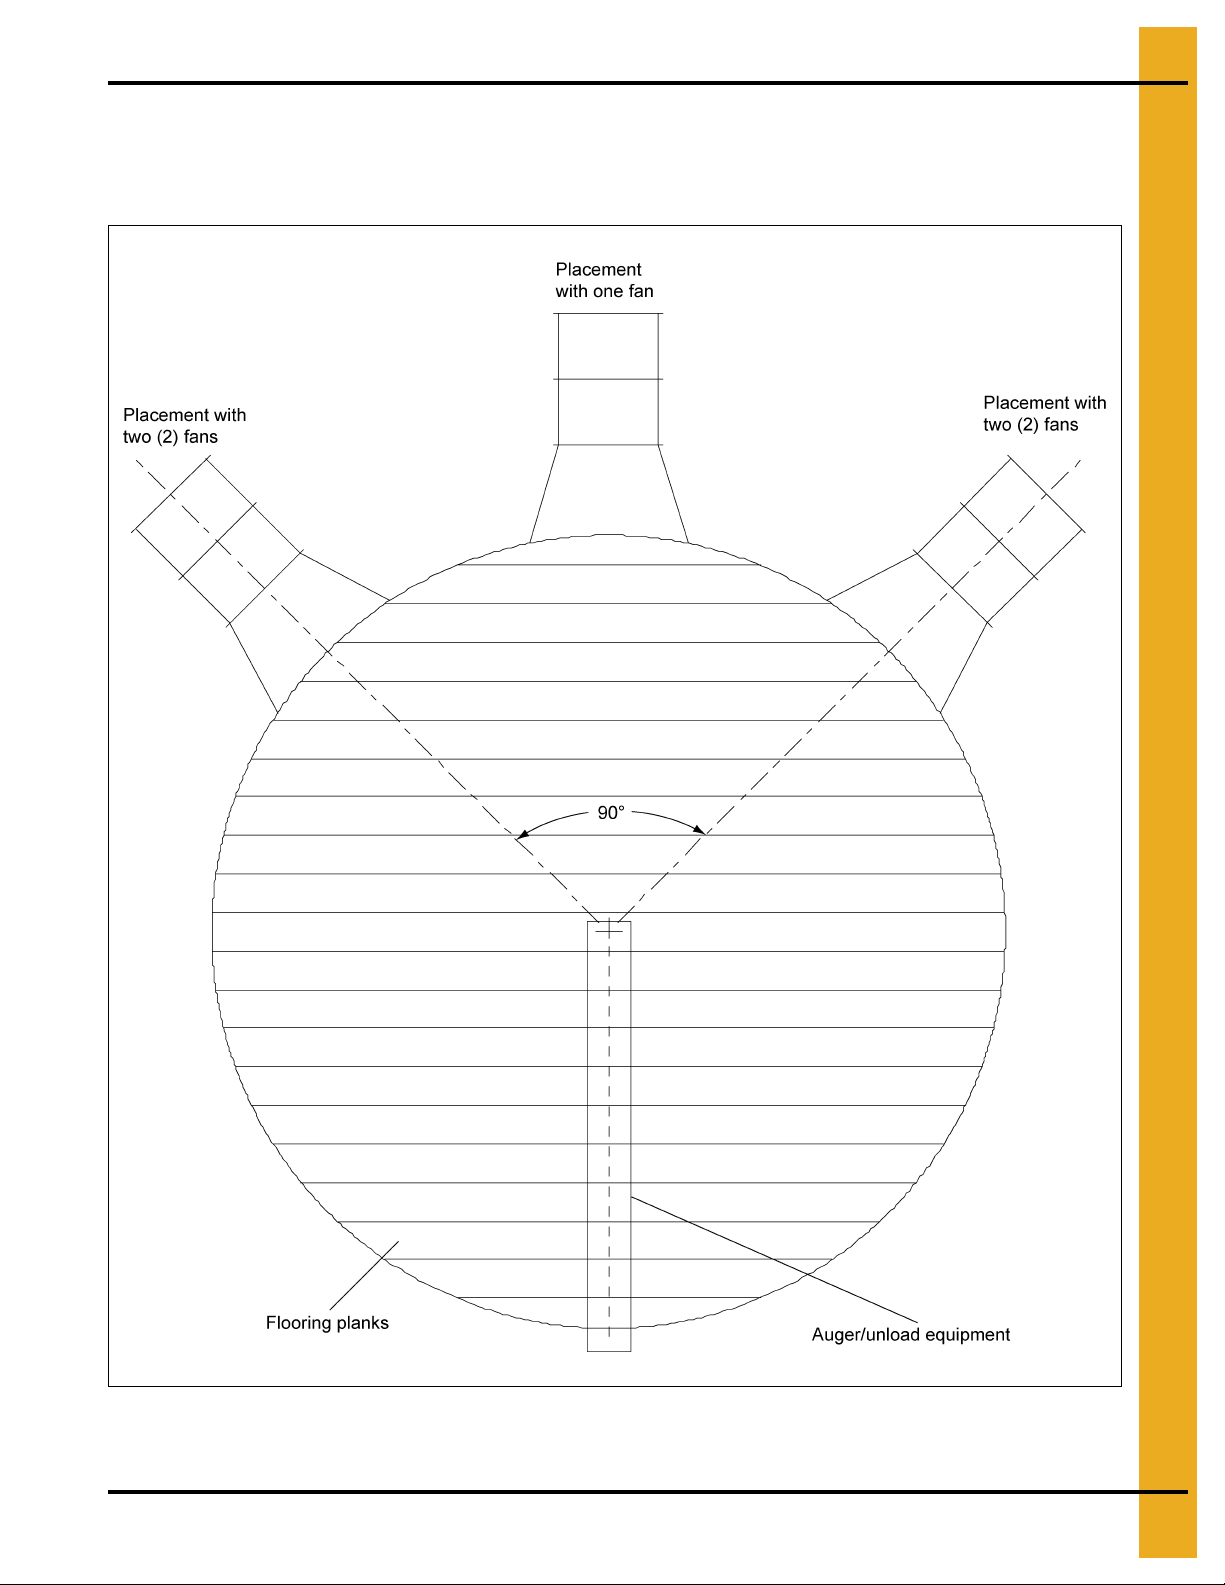
Fan Placement Diagram
For uniform air flow, place the fans in relation to the unloading tube as shown in Figure 2A. Floor planks
should be perpendicular to the unloading tube.
Figure 2A
PNEG-1567 54' Cor-Lok and Cut-Lok Flooring 7
Page 8
2. Recommended Method for Full Floor Installation
Chalked lines referred to Step 2.
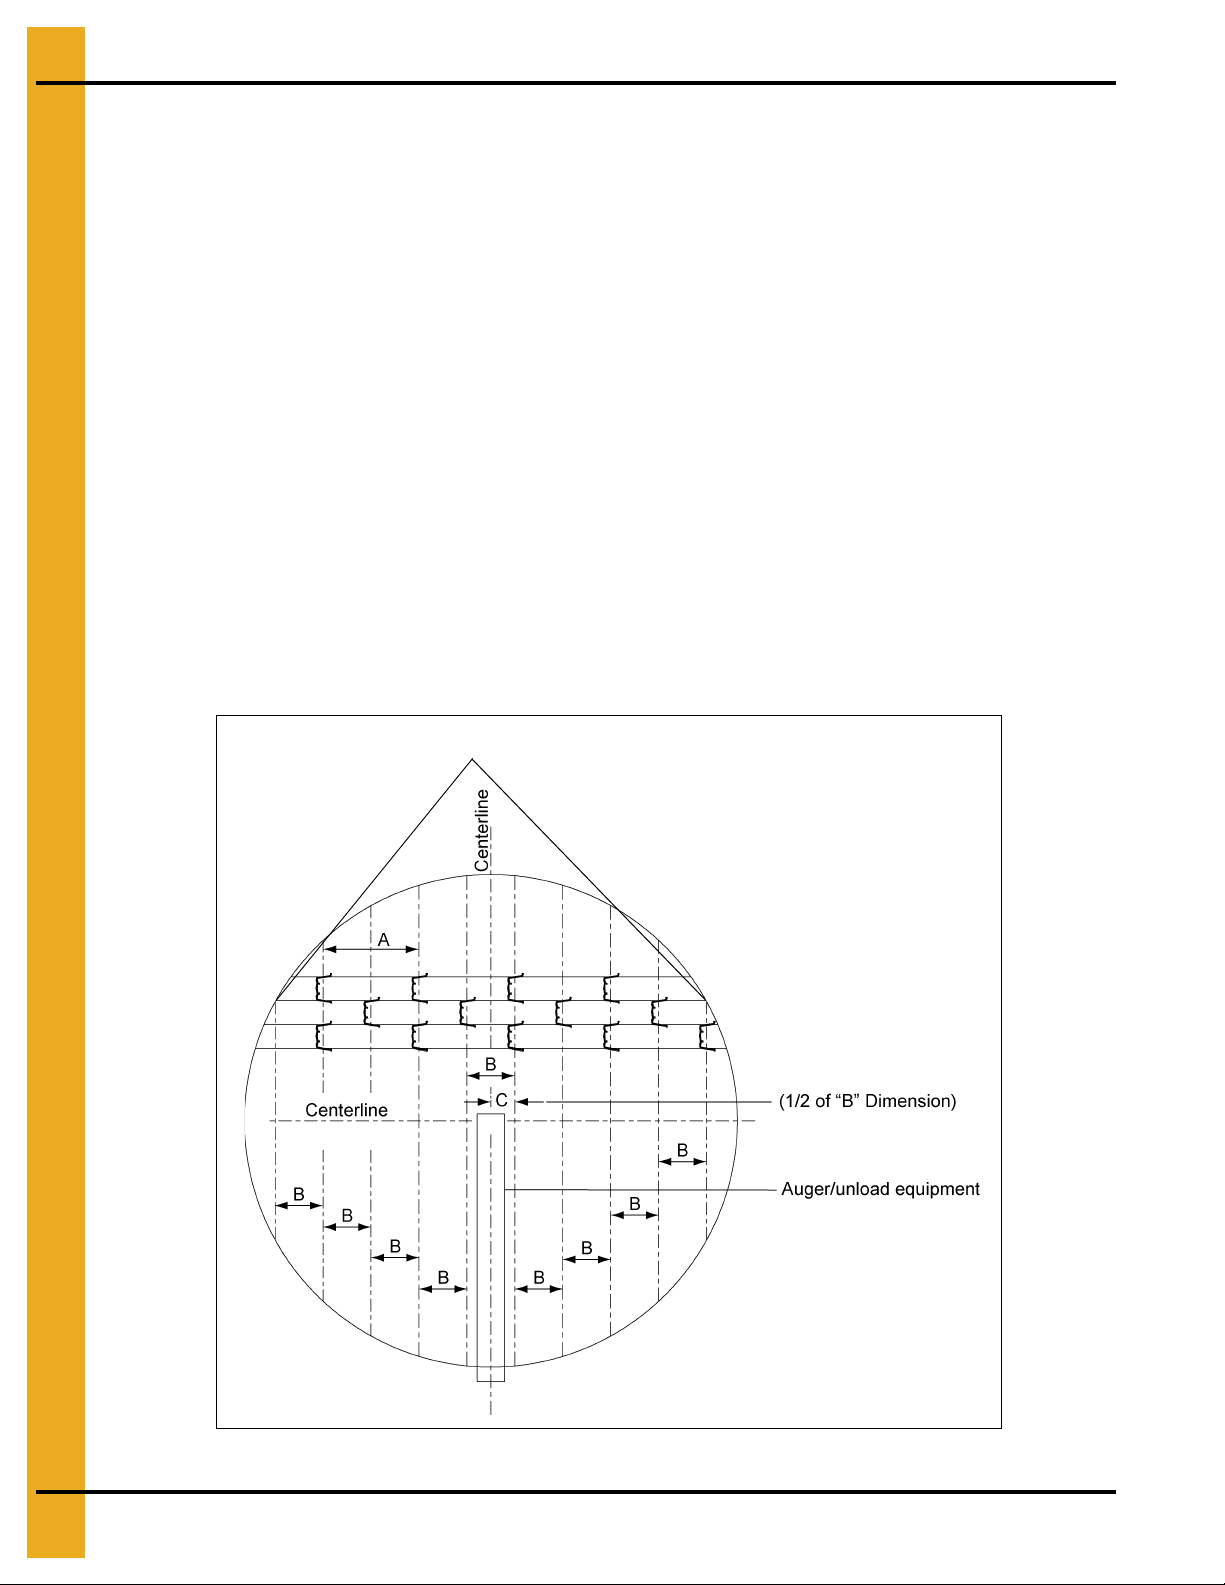
Grain Systems Recommended Method for Full Floor Installation
Using the GSI recommended method for full floor installation should save construction time and eliminate
the problem of improper installation which could invalidate your warranty. Note the following dimensions
as shown in Figure 2B.
• Dimension “A” is the leg-to-leg spacing along the centerline of a given plank.
• Dimension “B” is the amount of stagger between supports under adjacent planks and is half
of Dimension “A”.
• Dimension “C” is the distance from the center of the unload auger to the nearest rows of supports and
is half of Dimension “B”.
Dimensions “A”, “B” and “C” are shown on the appropriate grandstand layout for wall heights under 32'.
For taller bins, grandstand quantity as well as Dimensions “A” and “B” are given on Page 17 and Page 18
for 20 gauge.
1. Layout centerlines of tank being sure one centerline is in line with the direction of the floorin g planks
while the other centerline is perpendicular with the flooring planks. (See Figure 2B.)
2. Measure over “C” Dimension from centerline that is perpendicular to the direction of the flooring
planks. Do this at each end of the bin. Strike a chalk line here. (See Figure 2B.)
3. Measure over “B” Dimension from the previously (chalked in step #2) and strike a chalk line here.
Continue this procedures until the bin wall is reached in both directions. (See Figure 2B.)
Figure 2B
8 PNEG-1567 54' Cor-Lok and Cut-Lok Flooring
Page 9
2. Recommended Method for Full Floor Installation
IMPORTANT: First piece of flooring must start at the
proper distance from centerline of bin. Refer to floor
layout on Page 15. First piece may need to be
trimmed for length to fit at the proper location.
4. When completed there should be a set of parallel lines “B” dimensions apart.
5. Start at bin wall with shortest floor piece.
SUPPORT LAYOUT FOR CORRECT BIN DIAMETER AND SUPPORT SPACING.
of floor piece is facing bin wall and is at designated distance from the wall. (The open channel edge
of floor must be facing the center of the bin.)
6. POSITION THE NEXT ROW OF SUPPORTS ACCORDING TO THE CHALK LINES and support
layout. The straight tab should “snap” under the first (previous) floor piece. After the supports in the
row are correctly positioned, install the next floor piece by hooking the open channel edge under the
outside hooks of the floor supports. Push down sharply on the edge of the floor piece until it snaps
into the previous floor piece. (See Figure 2C.) Continue this process for the rest of the floor cutting
planks for center and intermediate wells as needed. See Figure 5A on Page 14 for center well
support locations.
NOTE: Whenever there is more than Dimension “B” divided by three inches (B/3") of plank unsupported
beside the bin wall, there should be a support on that plank or a support on each of the
planks adjacent to it such that no more than Dimension “B” divided by three inches (B/3") is
unsupported.
PNEG-1567 54' Cor-Lok and Cut-Lok Flooring 9
Figure 2C
POSITION SUPPORTS FOR THIS PIECE AS SHOWN ON
Be sure flat side
Page 10

2. Recommended Method for Full Floor Installation
Installing the Undersplice
The undersplice should be installed underneath the planks at the split after both plank lengths have been
butted together. Each splice has to be laid as each row of planks are laid rather than after all have been
placed. Figure 2D shows the layout of the undersplice plates a nd t he screw pattern used to secure them.
Figure 2D Pattern for Fastening Splice to Planks
10 PNEG-1567 54' Cor-Lok and Cut-Lok Flooring
Page 11

2. Recommended Method for Full Floor Installation
Installation Instructions
1. When a splice is needed, plank length A as described in the floor manual should be installed
alongside plank length B.
2. The under-splice should then be installed under the split of plank A and B. The splice should extend
3" under each plank. The splice should be screwed in place as shown in Figure 2D on Page 10.
3. This process will be repeated for all plank locations requiring a splice.
Figure 2E
PNEG-1567 54' Cor-Lok and Cut-Lok Flooring 11
Page 12

3. Grandstand Identification
20 Gauge Grandstand Identification
20 Gauge
Plenum Clearance Grandstand Color Code
11-7/8" Blue
14-3/8" White
17-3/16" Yellow
Figure 3A
12 PNEG-1567 54' Cor-Lok and Cut-Lok Flooring
Page 13

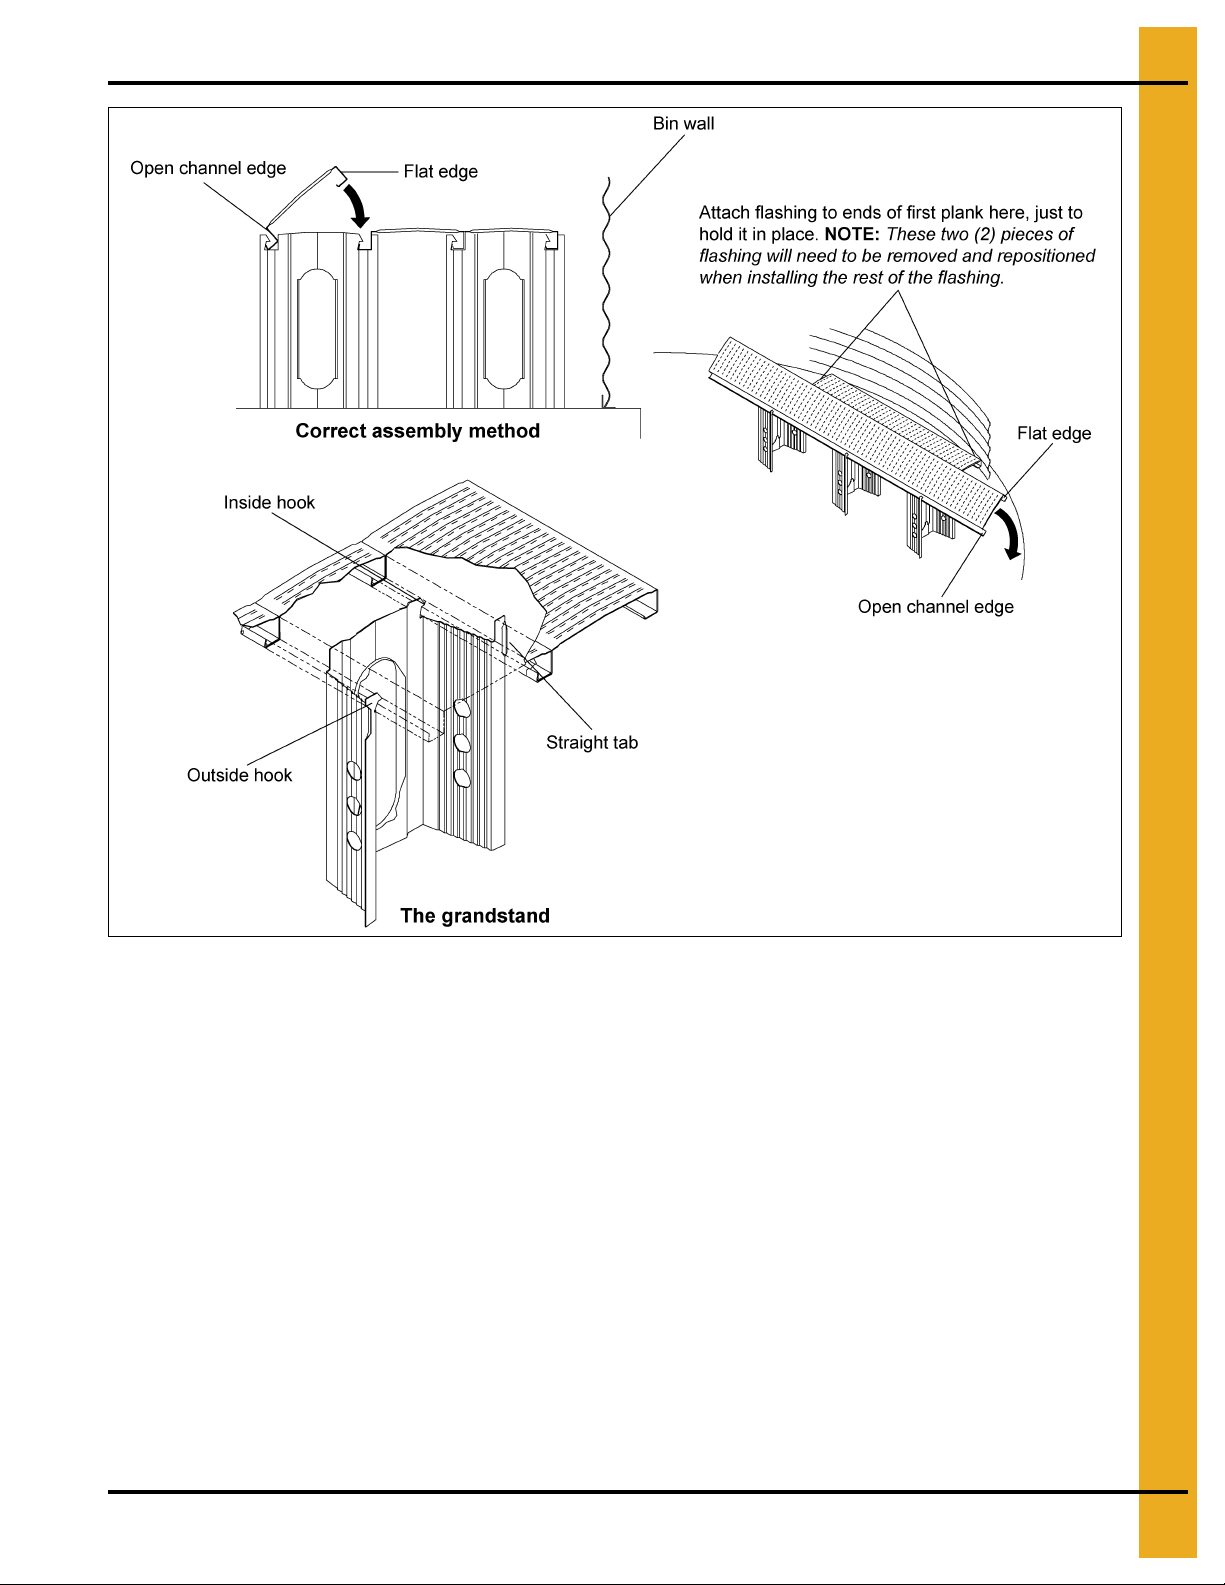
Figure 4A
4. Flashing Installation
Grain Systems Formed Flashing Installation
If a bin sweep auger will be used, overlap flashing so that the sweep will climb up on to the next flashing
section when rotating (usually clockwise). (See Figure 4A.) This will prevent the rotating/slipping outer
wheel of the sweep from catching on the flashing edges. (All GSI power sweeps and carry-in sweeps
manufactured after April 2002 run clockwise.)
After floor is in place, place 1-1/4" bolts through pre-punched holes in sidewall. Bolt heads should be on
outside of bin. See Figure 4B to determine the correct sequence for placing the nuts and washers. Finger
tighten the nuts until all flashing is installed, then go back and fully tighten. While holding the flashing flat
and pushing in towards the bin wall, fasten the flashing to the floor with two (2) sheet metal screws.
Figure 4B
PNEG-1567 54' Cor-Lok and Cut-Lok Flooring 13
Page 14
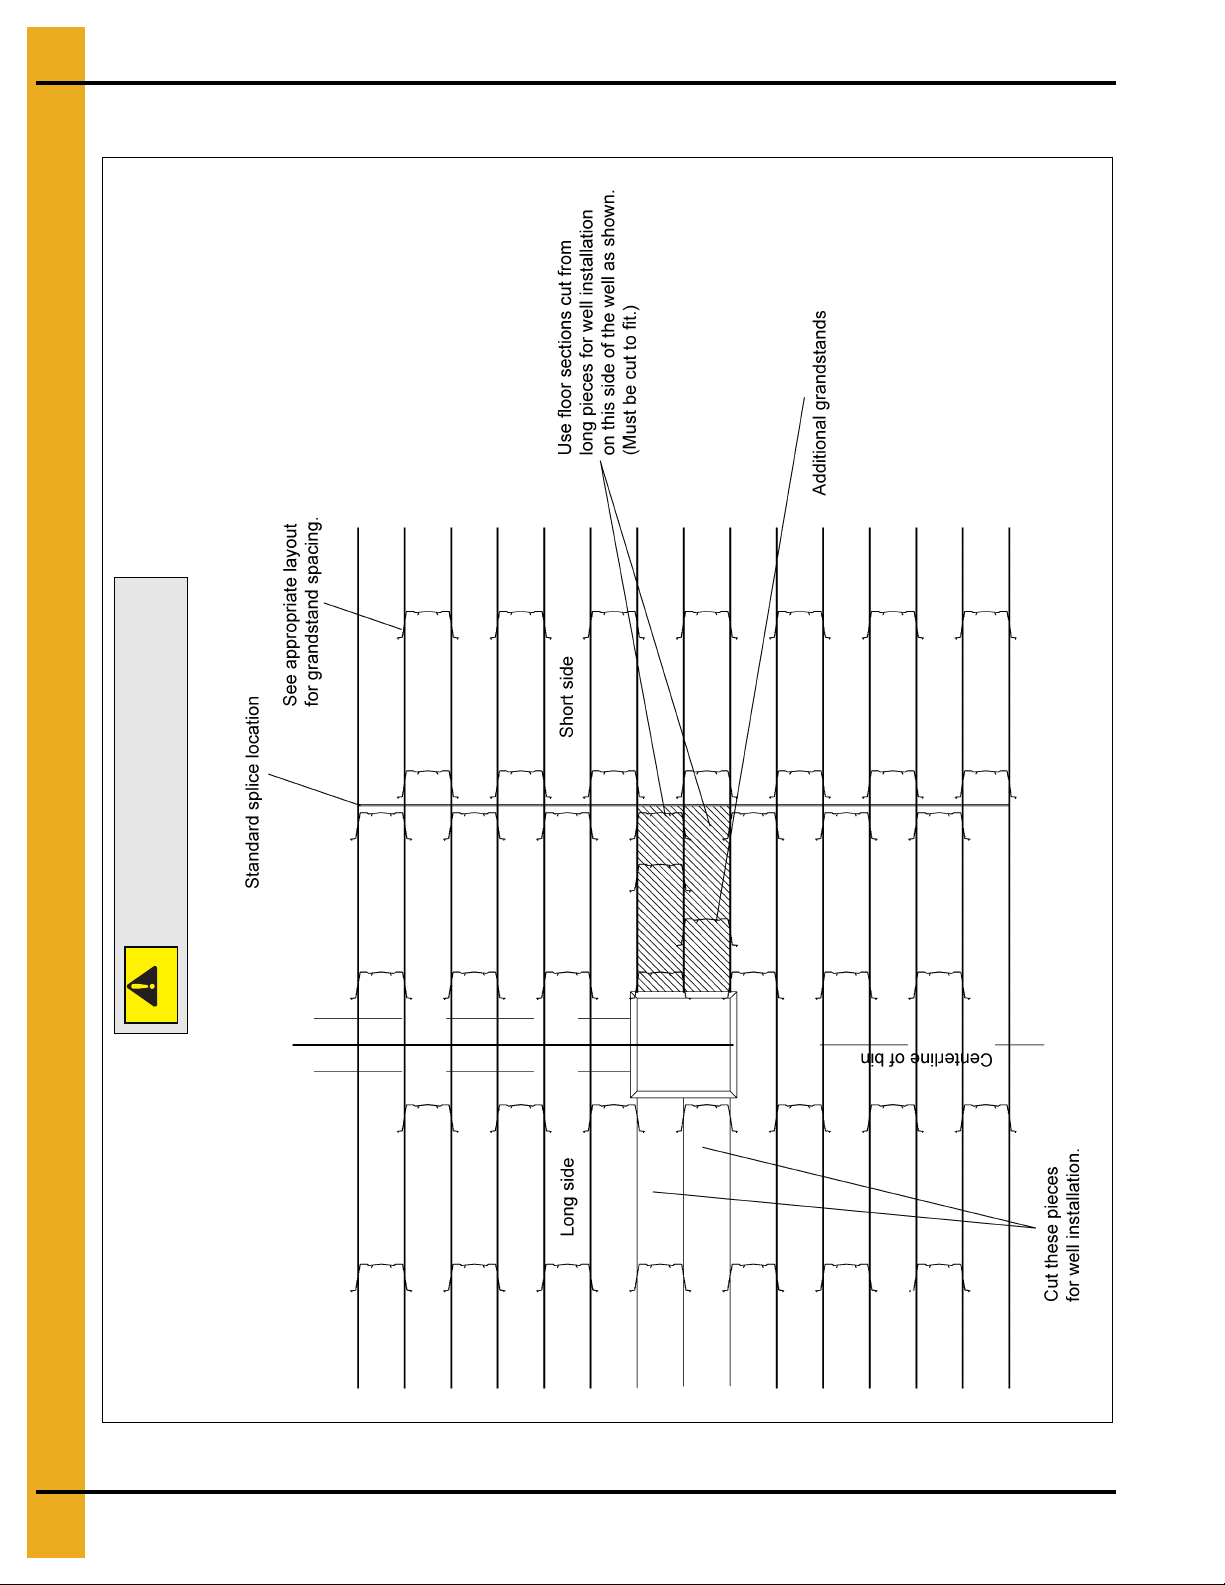
5. Well Installation Cut Detail
Support all center wells to concrete.
CAUTION
Well Installation Plank Cut Detail for 54' Split Floor
Figure 5A
14 PNEG-1567 54' Cor-Lok and Cut-Lok Flooring
Page 15

6. 54' Cor-Lok/Cut-Lok Plank Order
Support all center wells to concrete.
CAUTION
Figure 6A
PNEG-1567 54' Cor-Lok and Cut-Lok Flooring 15
Page 16

7. Plank Lengths
The following plank lengths start at the sidewall and work towards the center of the bin. Refer to
grandstand layout pages for floor drawing.
1st Plank (A)
Feet and Inches Total Inches
2'-4" 28''
11'-3" 135''
15'-9" 189''
19'-0" 228''
21'-9" 261''
24'-2" 290''
26'-4" 316''
28'-4" 340''
1st Plank (A) 2nd Plank (B)
T otal Inches Feet and Inches Feet and Inches Total Inches
216'' 18'-0" 12'-0" 144''
225'' 18'-9" 12'-9" 153''
234'' 19'-6" 13'-6" 162''
243'' 20'-3" 14'-3" 171''
251'' 20'-11" 14'-11" 179''
258'' 21'-6" 15'-6" 186''
265'' 22'-1" 16'-1" 193''
272'' 22'-8" 16'-8" 200''
278'' 23'-2" 17'-2" 206''
284'' 23'-8" 17'-8" 212''
289'' 24'-1" 18'-1" 217''
294'' 24'-6" 18'-6" 222''
299'' 24'-11" 18'-11" 227''
304'' 25'-4" 19'-4" 232''
308'' 25'-8" 19'-8" 236''
313'' 26'-1" 20'-1" 241''
317'' 26'-5" 20'-5" 245''
320'' 26'-8" 20'-8" 248''
324'' 27'-0" 21'-0" 252''
327'' 27'-3" 21'-3" 255''
330'' 27'-6" 21'-6" 258''
333'' 27'-9" 21'-9" 261''
336'' 28'-0" 22'-0" 264''
338''
341'' 28'-5" 22'-5" 269''
343''
345'' 28'-9" 22'-9" 273''
346''
348'' 29'-0" 23'-0" 276''
349''
351'' 29'-3" 23'-3" 279''
352''
353'' 29'-5" 23'-5" 281''
354'' 29'-6" 23'-6" 282''
354'' 29'-6" 23'-6" 282''
355'' 29'-7" 23'-7" 283''
355'' 29'-7" 23'-7" 283''
355'' 29'-7" 23'-7" 283''
28'-2" 22'-2" 266''
28'-7" 22'-7" 271''
28'-10" 22'-10" 274''
29'-1" 23'-1" 277''
29'-4" 23'-4" 280''
16 PNEG-1567 54' Cor-Lok and Cut-Lok Flooring
Page 17

8. 20 Gauge Floor Support Requirements
Floor styles list in order of
increasing strength
20 Gauge COR-LOK
18 Gauge COR-LOK
CUT-LOK
20 Gauge Grandstand Chart - 2.66" Corrugation
Narrow/2.66" Corrugation - 20 Gauge Grandstand Floor Support Chart
Full Floor Supports Required for Plank Type Flooring 2.66" Corrugation
(* Based Upon 13-1/2" or Taller Floor Heights)
Rings 12 15 18 21 24 27 30 33 36 39 42 45 48 54 60 72 75 78 90 105
Dia.
57/27
3
62
54/276258/298054/27
4
54/276258/298054/27
5
54/276254/278854/27
6
54/276252/269648/24
7
48/247048/24
8
48/247048/24
9
42/217542/21
10
42/217542/21
11
38/198040/20
12
38/198038/19
13
34/179034/17
14
32/169532/16
15
30/15
16
100
28/14
17
106
26/13
18
110
19
20
21
22
23
CUT-LOK only if
24
diameter and number
of rings are in bottom
25
26
27
28
29
shaded area.
100
100
110
110
115
120
130
140
30/15
150
28/14
160
26/13
170
24/12
180
22/11
190
120
120
120
138
48/24
144
42/21
144
42/21
144
42/21
144
40/20
154
38/19
166
34/17
180
32/16
190
30/15
205
28/14
215
24/12
240
24/12
240
22/11
260
SUPPORT SPACING
SUPPORT QUANTITY
52/26
56/28
205
52/26
215
48/24
225
46/23
230
42/21
243
42/21
250
40/20
265
38/19
280
36/18
290
34/17
300
32/16
320
28/14
360
26/13
380
24/12
400
22/11
440
22/11
440
20/10
470
18/9
520
18/9
520
16/8
580
14/7
650
54/27
249
48/24
275
48/24
275
46/23
300
44/22
303
42/21
309
40/20
319
38/19
345
36/18
360
34/17
380
32/16
400
28/14
450
26/13
480
24/12
510
22/11
550
22/11
550
20/10
600
18/9
660
16/8
730
16/8
730
14/7
820
14/7
820
12/6
950
12/6
950
12/6
950
160
52/26
160
50/25
168
46/23
182
42/21
190
42/21
190
42/21
190
40/20
202
36/18
220
34/17
230
32/16
250
30/15
260
26/13
290
24/12
310
22/11
340
22/11
340
20/10
370
18/9
400
18/9
400
16/8
450
14/7
500
All floor styles OK
for bin sizes in upper
shaded area.
54/27
50/25
304
390
50/25
50/25
333
390
48/24
46/23
347
425
44/22
44/22
363
435
42/21
42/21
387
465
40/20
40/20
397
479
38/19
36/18
417
525
36/18
34/17
441
550
34/17
32/16
470
600
32/16
30/15
500
630
30/15
28/14
520
670
28/14
28/14
550
670
26/13
26/13
590
710
24/12
24/12
630
760
22/11
22/11
680
820
20/10
20/10
740
890
20/10
20/10
740
890
18/9
18/9
810
970
16/8
16/8
900
1080
16/8
16/8
900
1080
14/7
14/7
1010
1220
14/7
14/7
1010
1220
12/6
12/6
1160
1410
12/6
12/6
1160
1410
12/6
12/6
1160
1410
50/25
470
48/24
487
44/22
523
44/22
523
40/20
565
38/19
597
36/18
620
34/17
659
32/16
710
30/15
750
28/14
790
26/13
840
24/12
900
24/12
900
22/11
970
20/10
1060
20/10
1060
18/9
1160
16/8
1290
16/8
1290
14/7
1450
14/7
1450
12/6
1670
12/6
1670
12/6
1670
50/25
576
48/24
46/23
586
695
46/23
44/22
606
735
44/22
42/21
624
750
42/21
40/20
656
790
38/19
38/19
716
820
36/18
34/17
746
900
34/17
32/16
786
950
30/15
30/15
880
1010
28/14
28/14
930
1070
26/13
26/13
990
1140
24/12
24/12
1060
1220
24/12
22/11
1060
1320
22/11
22/11
1140
1320
22/11
20/10
1140
1430
20/10
20/10
1240
1430
20/10
18/9
1240
1570
18/9
18/9
1360
1570
16/8
16/8
1510
1740
16/8
16/8
1510
1740
14/7
14/7
1700
1960
14/7
14/7
1700
1960
12/6
12/6
1960
2260
12/6
12/6
1960
2260
12/6
SUPPORT SPACING
1960
SUPPORT QUANTITY
46/23
806
44/22
836
42/21
866
40/20
906
36/18
986
34/17
1036
32/16
1096
30/15
1160
26/13
1310
24/12
1400
24/12
1400
22/11
1510
20/10
1640
20/10
1640
18/9
1800
18/9
1800
16/8
2000
16/8
2000
16/8
2000
14/7
2260
14/7
2260
12/6
2600
12/6
2600
46/23
909
44/22
933
42/21
977
40/20
1019
36/18
1109
34/17
1163
32/16
1230
28/14
1390
26/13
1480
24/12
1590
22/11
1710
20/10
1860
20/10
1860
18/9
2040
18/9
2040
16/8
2270
16/8
2270
16/8
2270
14/7
2560
14/7
2560
14/7
2560
12/6
2950
12/6
2950
44/22
1196
42/21
1236
40/20
1296
38/19
1346
34/17
1486
32/16
1566
30/15
1660
28/14
1760
26/13
1870
24/12
2000
22/11
2160
20/10
2350
18/9
2570
18/9
2570
16/8
2860
16/8
2860
16/8
2860
14/7
3230
14/7
3230
14/7
3230
12/6
3720
12/6
3720
12/6
3720
44/22
1430
42/21
1477
40/20
1544
36/18
1697
34/17
18 Gauge COR-LOK or CUT-LOK
1779
if Dia. and number of rings are in
32/16
1883
30/15
1993
26/13
2300
24/12
2460
22/11
2650
20/10
2880
20/10
2880
18/9
3170
16/8
3520
16/8
3520
14/7
3970
14/7
3970
14/7
3970
12/6
4570
12/6
4570
12/6
4570
12/6
4570
middle unshaded area.
26/13
26/13
3300
24/12
3540
22/11
3820
22/11
3820
20/10
4150
18/9
4550
16/8
5060
16/8
5060
14/7
5710
14/7
5710
12/6
6580
12/6
6580
12/6
6580
Corrugated floors and monorail
supports are required if diameter
and number of rings are in bottom
26/13
3580
3870
24/12
24/12
3840
4150
22/11
22/11
4150
4480
20/10
20/10
4500
4870
20/10
18/9
4500
5340
18/9
18/9
4950
5340
16/8
16/8
5500
5940
16/8
16/8
5500
5940
14/7
14/7
6200
6710
14/7
14/7
6200
6710
12/6
12/6
7140
7730
12/6
12/6
7140
7730
12/6
7140
unshaded area.
24/12
5520
22/11
5960
20/10
6480
18/9
7120
18/9
7120
16/8
7910
16/8
7910
14/7
8920
14/7
8920
12/6
10280
12/6
10280
22/11
8110
20/10
8820
18/9
9680
18/9
9680
16/8
10760
16/8
10760
14/7
12150
14/7
12150
12/6
13990
12/6
13990
* For Aeration Systems recessed in the concrete, add 1 ring for proper spacing.
When using FL-3102-3 or FL-3102-6 (3", 6") Grandstands, increase the listed quantities by 33%
(Standard Quantity x 1.33).
Quantities of Grandstands are minimum required for installation - Due to varying conditions
and construction techniques at floor and wall penetrations, additional supports may need to
be ordered.
How to read the chart: For example, a 12' diameter bin with 7 rings would have spacing of 57/27 (the top
numbers). Meaning A=57" and B=27". The number of supports needed would be 62, (the bottom number).
PNEG-1567 54' Cor-Lok and Cut-Lok Flooring 17
Page 18

8. 20 Gauge Floor Support Requirements
20 Gauge Grandstand Chart - 4.00" Corrugation
Wide/4.00" Corrugation - 20 Gauge Grandstand Floor Support Chart
Full Floor Supports Required for Plank Type Flooring 4.00" Corrugation
(* Based Upon 13-1/2" or Taller Floor Heights)
Rings12 1518212427 30333639424548 54 6072 75 78 90105
Dia.
10
11
12
13
14
15
16
17
18
19
20
21
22
SUPPORT SPACING
SUPPORT QUANTITY
54/276258/298054/27
3
54/276254/278854/27
4
54/276252/269648/24
5
48/247048/24
6
42/217542/21
7
42/217542/21
8
38/198040/20
9
36/189034/17
32/169530/15
28/14
28/14
100
26/13
26/13
110
CUT-LOK only if
diameter and number
of rings are in bottom
shaded area.
100
110
110
115
130
150
160
170
120
120
138
48/24
138
42/21
144
42/21
144
38/19
166
34/17
180
32/16
190
28/14
210
26/13
220
22/11
260
52/26
150
52/26
160
50/25
168
46/23
182
42/21
190
42/21
190
38/19
220
34/17
230
32/16
250
28/14
280
26/13
290
22/11
340
20/10
370
18/9
400
56/28
202
52/26
214
48/24
224
46/23
230
42/21
249
40/20
265
38/19
277
34/17
300
32/16
320
28/14
360
24/12
400
22/11
440
20/10
480
18/9
520
16/8
580
16/8
580
54/27
249
48/24
275
48/24
275
44/22
303
42/21
309
40/20
319
36/18
355
34/17
380
32/16
400
28/14
450
24/12
510
22/11
550
20/10
600
18/9
660
16/8
730
16/8
730
14/7
820
12/6
950
12/6
950
50/25
333
50/25
333
48/24
347
44/22
363
42/21
387
38/19
417
34/17
471
32/16
500
30/15
520
28/14
550
24/12
630
22/11
680
20/10
740
18/9
810
16/8
900
16/8
900
14/7
1010
12/6
1160
12/6
1160
50/25
390
50/25
390
46/23
425
44/22
435
40/20
480
36/18
525
34/17
555
32/16
600
30/15
650
28/14
670
24/12
760
22/11
820
20/10
890
18/9
970
16/8
1080
16/8
1080
14/7
1220
12/6
1410
12/6
1410
50/25
470
50/25
470
44/22
523
44/22
523
40/20
565
36/18
620
32/16
695
30/15
750
28/14
790
26/13
840
24/12
900
20/10
1060
20/10
1060
18/9
1160
16/8
1290
16/8
1290
14/7
1450
12/6
1670
12/6
1670
50/25
576
50/25
576
46/23
606
42/21
656
40/20
686
36/18
746
32/16
830
28/14
930
26/13
990
24/12
1060
22/11
1140
20/10
1240
18/9
1360
18/9
1360
16/8
1510
16/8
1510
14/7
1700
12/6
1960
12/6
1960
46/23
695
46/23
695
46/23
695
42/21
751
38/19
821
34/17
900
32/16
951
30/15
1010
26/13
1140
24/12
1220
22/11
1320
20/10
1430
18/9
1570
18/9
1570
16/8
1750
16/8
1750
14/7
1970
12/6
2270
12/6
2270
52/26
735
48/24
775
44/22
836
42/21
866
38/19
946
34/17
1036
30/15
1156
28/14
1230
24/12
1400
22/11
1510
20/10
1640
18/9
1800
18/9
1800
16/8
2000
16/8
2000
16/8
2000
14/7
2260
12/6
2600
12/6
2600
48/24
869
48/24
869
44/22
933
42/21
977
38/19
1057
34/17
1163
30/15
1303
28/14
1390
24/12
1590
22/11
1710
20/10
1860
18/9
2040
16/8
2270
16/8
2270
16/8
2270
14/7
2560
14/7
2560
12/6
2950
12/6
2950
46/23
1156
42/21
1236
40/20
1296
36/18
1416
32/16
1566
30/15
1660
26/13
1870
24/12
2000
20/10
2350
18/9
2570
16/8
2860
16/8
2860
16/8
2860
14/7
3230
14/7
3230
12/6
3720
12/6
3720
All floor styles OK
for bin sizes in upper
44/22
1430
42/21
1477
38/19
1650
34/17
1779
32/16
1883
28/14
28/15
2160
3550
24/12
22/11
2460
3820
22/11
20/10
2650
4150
20/10
18/9
2880
4550
18/9
16/8
3170
5060
16/8
16/8
3520
5060
16/8
14/7
3520
5710
14/7
12/6
3970
6580
14/7
12/6
3970
6580
12/6
4570
12/6
4570
shaded area.
18 Gauge COR-LOK
or CUT-LOK if
diameter and number
of rings are in middle
unshaded area.
24/12
24/12
3850
4160
22/11
22/11
4150
4480
20/10
20/10
4500
4870
18/9
18/9
4950
5340
16/8
16/8
5500
5940
16/8
16/8
5500
5940
14/7
14/7
6200
6710
12/6
12/6
7140
7730
12/6
12/6
7140
7730
22/11
5970
20/10
6480
18/9
7120
16/8
7910
16/8
7910
14/7
8920
14/7
8920
12/6
10280
20/10
8820
18/9
9680
16/8
10760
16/8
10760
14/7
12150
14/7
12150
12/6
13990
23
* For Aeration Systems recessed in the concrete, add 1 ring for proper spacing.
When using FL-3102-3 or FL-3102-6 (3", 6") Grandstands, increase the listed quantities by 33%
(Standard Quantity x 1.33).
Quantities of Grandstands are minimum required for installation - Due to varying conditions
and construction techniques at floor and wall penetrations, additional supports may need
to be ordered.
How to read the chart: For example, a 12' diameter bin with 5 rings would have spacing of 54/27 (the top
numbers). Meaning A=54" and B=27". The number of supports needed would be 62, (the bottom number).
18 PNEG-1567 54' Cor-Lok and Cut-Lok Flooring
Page 19

9. Flashing Support at Stiffeners
Stiffener Flashing Support Instructions for Internal
Universal Stiffeners
1. Install the floor and support system, cutting the floor to go around the internal stiffeners as required.
2. Break the stiffener flashing support (SS-6984) into its three (3) components.
3. Lay the flashing supports on top of the flooring and weld the flashing supports to the stiffener as close
as possible. Fasten the flashing to the wall, flashing support and floor. Seal all spaces by welding
or caulking.
4. Paint all welds with good quality zinc rich paint.
5. Stiffener flashing supports (SS-6984) must be ordered separately from the standard floor
and flashing. (See Figure 9A.)
Figure 9A
PNEG-1567 54' Cor-Lok and Cut-Lok Flooring 19
Page 20

10. Air Flow Support Instructions
Installation of Air Flow Supports
1. Determine the spacing and quantity of air flow supports required from the chart on Page 22.
Make sure that the correct supports have been ordered for use with the proper depth of plank
(either 1-1/8" or 1-3/8" deep).
2. Mark location of center of bin.
3. Install discharge auger.
4. Mark spacing lines parallel to discharge auger.
5. Start on the side of the bin opposite from the discharge auger and place the first two (2) rows of
supports on the spacing lines. Note that air flow supports are installed at an angle in an overlapping
pattern so the ends will overlap. See floor layouts in Figure 10B on Page 23.
6. Install the channel lock flooring on the first two (2) rows of supports and secure in place with some
bin wall flashing.
7. Finish placing supports on the spacing lines and installing floor planks.
a. Single supports are used next to the bin wall and at the ends of split floor planks in order to
maintain the floor manufacturer’s recommended minimum distance from the end of a plank to
a support.
b. Double supports are used at the sump and along the sides of the discharge auger for spacing of
16" or less and for recirculating bin equipment.
c. Full supports may have to be overlapped or angled to provide support at walls and to maintain
spacing and flashing requirements.
20 PNEG-1567 54' Cor-Lok and Cut-Lok Flooring
Page 21

10. Air Flow Support Instructions
The following Figure 10A show methods of support placement to achieve the necessary spacing close to
discharge augers and sumps.
Figure 10A
PNEG-1567 54' Cor-Lok and Cut-Lok Flooring 21
Page 22

10. Air Flow Support Instructions
* Installation, Spacing and Quantities of Air Flow Supports Under Channel Lock Floors
Bin Diameter - Number of Supports
Grain
Depth at
Bin Wall
(ft.)
18' 30" 34 2 8 48 2 10 60 2 12 84 2 14 88 2 14
24' 26" 36 2 8 56 2 10 74 2 12 92 2 14 104 2 14
27' 24" 44 2 8 62 2 10 76 2 12 92 2 14 112 2 14
32' 20" 54 2 10 64 2 12 84 2 14 106 2 16 130 2 18
40' 16" 58 10 14 80 12 16 104 14 18 128 16 20 160 18 22
48' 13" 72 10 16 98 12 20 126 14 22 158 16 24 190 18 28
53' 12" 76 10 18 106 12 22 140 14 24 172 16 28 210 18 30
68' 10" 86 10 22 116 12 26 156 14 28 212 16 32 250 18 36
16' 24" and 12" 68 10 8 82 12 10 104 14 12 120 16 14 140 18 14
(for Grain Flow)
Spacing
(in.)
18 Ft. Dia. 21 Ft. Dia. 24 Ft. Dia. 27 Ft. Dia. 30 Ft. Dia.
Full Double Single Full Double Single Full Double Single Full Double Single
Full Double Single
Bin Diameter - Number of Supports
Grain
Depth at
Bin Wall
(ft.)
18' 30" 116 2 16 136 2 18 172 2 20 Use 24" Spacing Use 24" Spacing Use 24" Spacing
24' 26" 124 2 16 144 2 18 200 2 20 Use 24" Spacing Use 24" Spacing Use 24" Spacing
27' 24" 136 2 16 154 2 18 212 2 20 274 2 22 365 2 26 422 2 30
32' 20" 150 2 20 184 2 22 242 2 26 326 2 28 442 34 39 498 2 36
40' 16" 192 20 24 234 22 28 314 24 32 410 28 36 525 34 43 620 34 46
48' 13" 238 20 30 278 22 34 368 24 38 488 28 44 646 34 48 762 34 56
53' 12" 262 20 34 306 22 36 416 24 42 534 28 48 700 34 53 838 34 60
68' 10" 296 20 40 356 22 44 478 24 50 652 28 58 840 34 69 1024 34 72
16' 24" and 12" 168 20 16 188 20 18 264 24 20 350 28 20 N/A N/A N/A N/A N/A N/A
(for Grain Flow)
Spacing
(in.)
33 Ft. Dia. 36 Ft. Dia. 42 Ft. Dia. 48 Ft. Dia. 54 Ft. Dia. 60 Ft. Dia.
Full Double Single Full Double Single Full Double Single Full Double Single
Full Double Single Full Double Single
NOTES:
1. Use a maximum spacing of 16" for perforated corrugated flooring.
2. The number of supports listed is based on the maximum peaked capacity of each bin.
3. Use extra single supports for split floors.
4. Extra supports are required for grain recirculating equipment. Use the manufacturer’s
recommendation for the number and spacing of extra supports. NOTE: For grain flows, air flow
supports are doubled in a 14' diameter in the center of the floor.
5. Contact a representative for air flow supports required for larger bins and deeper grain depths.
6. * Increase the number of supports by 5% when used with 6-3/4" wide MFS
floor planks.
22 PNEG-1567 54' Cor-Lok and Cut-Lok Flooring
Page 23

10. Air Flow Support Instructions
Figure 10B
PNEG-1567 54' Cor-Lok and Cut-Lok Flooring 23
Page 24

10. Air Flow Support Instructions
Installation, Spacing and Quantities of Air Flow Supports Under Channel
Lock Floors York and Chief Bins
Bin Diameter - Number of Supports
Grain
Depth at
Bin Wall
(ft.)
(for Grain Flow)
Spacing
(in.)
18' 30" 26 2 8 36 2 8 50 2 10 64 2 12 80 2 14
24' 26" 30 2 8 42 2 8 56 2 10 74 2 12 92 2 14
27' 24" 32 2 8 44 2 8 60 2 10 78 2 12 98 2 14
32' 20" 38 2 10 52 2 10 72 2 12 92 2 14 116 2 16
40' 16" 46 10 14 64 12 14 86 14 16 114 14 18 142 16 20
48' 13" 54 10 16 78 12 16 106 14 20 136 14 22 172 16 24
53' 12" 58 10 18 84 12 18 114 14 22 148 14 24 184 16 28
68' 10" 70 10 22 98 12 22 134 14 26 174 14 28 220 16 32
16' 24" and 12" 60 10 8 72 12 8 88 14 10 106 14 12 126 16 14
15' 6" 18' 7" 21' 8" 24' 9" 27' 10"
Full Double Single Full Double Single Full Double Single Full Double Single Full Double Single
Bin Diameter - Number of Supports
Grain
Depth at
Bin Wall
(ft.)
18' 30" 98 2 14 116 2 16 136 2 18 160 2 20 182 2 22
24' 26" 112 2 14 132 2 16 154 2 18 182 2 20 208 2 22
27' 24" 120 2 14 142 2 16 166 2 18 196 2 20 224 2 22
32' 20" 140 2 18 168 2 20 198 2 22 232 2 26 260 2 26
40' 16" 174 18 22 208 20 24 244 22 28 286 24 32 330 26 32
48' 13" 210 18 28 252 20 30 298 22 34 350 24 38 402 26 38
53' 12" 228 18 30 272 20 34 316 22 36 378 24 42 434 26 42
68' 10" 270 18 36 324 20 40 384 22 44 450 24 50 520 26 50
16' 24" and 12" 148 18 14 170 20 16 194 22 18 224 24 20 252 26 22
(for Grain Flow)
Spacing
(in.)
Full Double Single Full Double Single Full Double Single Full Double Single Full Double Single
Grain
Depth at
Bin Wall
(ft.)
18' 24" 288 2 28 362 2 32 444 2 36
24' 20" 346 2 28 436 2 32 536 2 36
27' 20" 346 2 28 436 2 32 536 2 36
32' 20" 346 2 28 436 2 32 536 2 36
40' 16" 428 28 36 540 32 42 664 36 46
48' 13" 524 28 44 660 32 52 812 36 56
53' 12" 566 28 48 714 32 54 878 36 60
68' 10" 676 28 58 852 32 68 1050 36 72
31' 34' 37' 1" 40' 3" 43' 4"
Bin Diameter - Number of Supports
Spacing
(in.)
Full Double Single Full Double Single Full Double Single
49' 6" 55' 8" 61' 10"
24 PNEG-1567 54' Cor-Lok and Cut-Lok Flooring
Page 25

10. Air Flow Support Instructions
Installation, Spacing and Quantities of Air Flow Supports
Under Channel Lock Floors Behlen Bins
Bin Diameter - Number of Supports
Grain Depth at
Bin Wall (ft.)
18' 30" 30 2 8 42 2 10 56 2 12 70 2 14
24' 26" 32 2 8 46 2 10 64 2 12 80 2 14
27' 24" 36 2 8 50 2 10 68 2 12 86 2 14
32' 20" 42 2 10 60 2 12 80 2 14 102 2 16
40' 16" 50 10 14 72 12 16 98 14 18 124 16 20
48' 13" 60 10 16 88 12 20 118 14 22 152 16 24
53' 12" 66 10 18 94 12 22 126 14 24 164 16 28
68' 10" 78 10 22 110 12 26 150 14 28 194 16 32
16' 24" and 12" 64 10 8 78 12 10 96 14 12 114 16 14
(for Grain Flow)
Grain Depth at
Bin Wall (ft.)
Spacing
(in.)
Spacing
(in.)
Full Double Single Full Double Single Full Double Single Full Double Single
Full Double Single Full Double Single Full Double Single Full Double Single
16' 5" 19' 8" 22' 11" 26' 3"
Bin Diameter - Number of Supports
29' 6" 36' 1" 42' 8" 49' 3"
18' 30" 90 2 14 130 2 18 178 2 20 * 286 2 28
24' 26" 102 2 14 148 2 18 202 2 20 * 286 2 28
27' 24" 108 2 14 160 2 18 218 2 20 ** 344 2 28
32' 20" 128 2 18 188 2 22 260 2 26 344 2 28
40' 16" 158 18 22 232 22 28 320 24 32 426 28 36
48' 13" 192 18 28 282 22 34 390 24 38 520 28 44
53' 12" 206 18 30 306 22 36 422 24 42 562 28 48
68' 10" 246 18 36 364 22 44 504 24 50 670 28 58
16' 24" and 12" 136 18 14 188 22 18 246 24 20 N/A N/A N/A
(for Grain Flow)
* Use 24" Spacing
** Use 20" Spacing
PNEG-1567 54' Cor-Lok and Cut-Lok Flooring 25
Page 26

NOTES
26 PNEG-1567 54' Cor-Lok and Cut-Lok Flooring
Page 27

11. Warranty
9101239_1_CR_rev7.DOC (revised July 2009)
GSI Group, LLC Limited Warranty
The GSI Group, LLC (“GSI”) warrants products which it manufactures to be free of defects in materials and workmanship
under normal usage and conditions for a period of 12 months after sale to the original end-user or if a foreign sale,
14 months from arrival at port of discharge, whichever is earlier. The end-user’s sole remedy (and GSI’s only obligation)
is to repair or replace, at GSI’s option and expense, products that in GSI’s judgment, contain a material defect in materials
or workmanship. Expenses incurred by or on behalf of the end-user without prior written authorization from the GSI
Warranty Group shall be the sole responsibility of the end-user.
Warranty Extensions:
The Limited Warranty period is extended for the following products:
Product Warranty Period
Performer Series Direct Drive Fan Motor 3 Years
AP Fans and Flooring
Cumberland
Feeding/Watering
Systems
Grain Systems Grain Bin Structural Design 5 Years
Grain Systems
Farm Fans
Zimmerman
All Fiberglass Housings Lifetime
All Fiberglass Propellers Lifetime
Feeder System Pan Assemblies 5 Years **
Feed Tubes (1-3/4" and 2.00") 10 Years *
Centerless Augers 10 Years *
Watering Nipples 10 Years *
Portable and Tower Dryers 2 Years
Portable and Tower Dryer Frames and
Internal Infrastructure †
5 Years
* Warranty prorated from list price:
0 to 3 years - no cost to end-user
3 to 5 years - end-user pays 25%
5 to 7 years - end-user pays 50%
7 to 10 years - end-user pays 75%
** Warranty prorated from list price:
0 to 3 years - no cost to end-user
3 to 5 years - end-user pays 50%
† Motors, burner components
and moving parts not included.
Portable dryer screens included.
Tower dryer screens not included.
GSI further warrants that the portable and tower dryer frame and basket, excluding all auger and auger drive components,
shall be free from defects in materials for a period of time beginning on the twelfth (12
and continuing until the sixtieth (60
th
) month from the date of purchase (extended warranty period). During the extended
th
) month from the date of purchase
warranty period, GSI will replace the frame or basket components that prove to be defective under normal conditions
of use without charge, excluding the labor, transportation, and/or shipping costs incurred in the performance of this
extended warranty.
Conditions and Limitations:
THERE ARE NO WARRANTIES THAT EXTEND BEYOND THE LIMITED WARRANTY DESCRIPTION SET FORTH
ABOVE. SPECIFICALLY, GSI MAKES NO FURTHER WARRANTY OF ANY KIND, EXPRESS OR IMPLIED,
INCLUDING, WITHOUT LIMITATION, WARRANTIES OF MERCHANTABILITY OR FITNESS FOR A PARTICULAR
PURPOSE OR USE IN CONNECTION WITH: (I) PRODUCT MANUFACTURED OR SOLD BY GSI OR (II) ANY ADVICE,
INSTRUCTION, RECOMMENDATION OR SUGGESTION PROVIDED BY AN AGENT, REPRESENTA TIVE OR
EMPLOYEE OF GSI REGARDING OR RELATED TO THE CONFIGURATION, INSTALLATION, LAYOUT, SUITABILITY
FOR A PARTICULAR PURPOSE, OR DESIGN OF SUCH PRODUCTS.
GSI shall not be liable for any direct, indirect, incidental or consequential damages, including, without limitation, loss of
anticipated profits or benefits. The sole and exclusive remedy is set forth in the Limited Warranty, which shall not exceed
the amount paid for the product purchased. This warranty is not transferable and applies only to the original end-user. GSI
shall have no obligation or responsibility for any representations or warranties made by or on behalf of any dealer, agent
or distributor.
GSI assumes no responsibility for claims resulting from construction defects or unauthorized modifications to products
which it manufactured. Modifications to products not specifically delineated in the manual accompanying the equipment at
initial sale will void the Limited Warranty.
This Limited Warranty shall not extend to products or parts which have been damaged by negligent use, misuse, alteration,
accident or which have been improperly/inadequately maintained. This Limited Warranty extends solely to products
manufactured by GSI.
Prior to installation, the end-user has the responsibility to comply with federal, state and local codes which apply to the
location and installation of products manufactured or sold by GSI.
PNEG-1567 54' Cor-Lok and Cut-Lok Flooring 27
Page 28

This equipment shall be installed in accordance with
the current installation codes and applicable
regulations, which should be carefully followed in all
cases. Authorities having jurisdiction should be
consulted before installations are made.
Copyright © 2012 by GSI Group
Printed in the USA
GSI Group
1004 E. Illinois St.
Assumption, IL 62510-0020
Phone: 1-217-226-4421
Fax: 1-217-226-4420
www.gsiag.com
CN-301476
 Loading...