

Page 1
Digi 42/2
Two Circuit Electronic
24 Hour or 7 Day Time Switch
Operating Instructions
APPLICATION
Time based control of lighting, ventilating, heating,
cooling or other electrical loads in commercial and
industrial applications. The Digi 42 time switches are
programmable for 24-hour or 7-day schedules as well
as a “8th day” or holiday schedule.
TECHNICAL DATA
Output–2 SPDT relays with dry contacts
Switch Rating: 16A/250VAC general purpose
1000 watt tungsten @ 240V
500 watt @ 120V
1/2 hp @ 120VAC, 1 hp @ 240VAC
720VA pilot duty
2 week battery back-up
Supply voltages: Separate Models – 24VAC/DC,
120VAC, 208/240VAC, all 50/60Hz (refer to prod-
uct label)
Shortest switch time–1 minute
Ambient Temperature Range –20°F to 140°F
(–28°C to 60°C)
AM/PM LCD display or 24:00 hr. military display
Input Power: 4VA
Screw terminal connections for up to #12AWG wire
Accuracy ± 4 minutes per year
Daylight time changeover: manual or automatic
NOTE:
When first applying power, it may take several
minutes for the battery to take a charge. If the LCD
display does not come on after a few minutes, press
reset.
Installation
To the installer:
1. Read operating instructions carefully.
2. Check the input and output ratings marked on the unit to
make sure this product is suitable for your power supply
and application.
3. Disconnect power supply prior to installation to prevent
electrical shock.
4. Wire in accordance with National and Local electrical code
requirements.
The Digi 42 time switch can be surface, flush or rail mounted
and is also available with an enclosure for stand-alone applications (GMX2).
MOUNTING
Lift off front cover and loosen the two screws on opposite
corners. Pull off plug-in base with a left-to-right rolling motion.
SURFACE MOUNTING
(inside panel)
Place screws through holes in base and screw to back of
panel or wall. Connect wires to wiring terminals.
Place terminal cover over terminal block and, by lining up the
two screws with corner holes in base, push timer firmly onto
plug-in base. Tighten the two screws. A base for DIN rail mounting is also available as an option. Order Part No. MB-DIN.
PANEL MOUNTING (flush mounting through panel door)
Cut a square hole 2-5/8” x 2-5/8” (66 x 66mm) in the front
of the panel. Remove plug-in base and insert the time switch
through the opening. Place the flush mounting bracket over
rear of the unit to secure to the panel door.
For stand-alone installations, the unit may be surface
mounted inside an E100 indoor or E200 outdoor enclosure
which is available from Grasslin Controls Corporation or your
wholesaler.
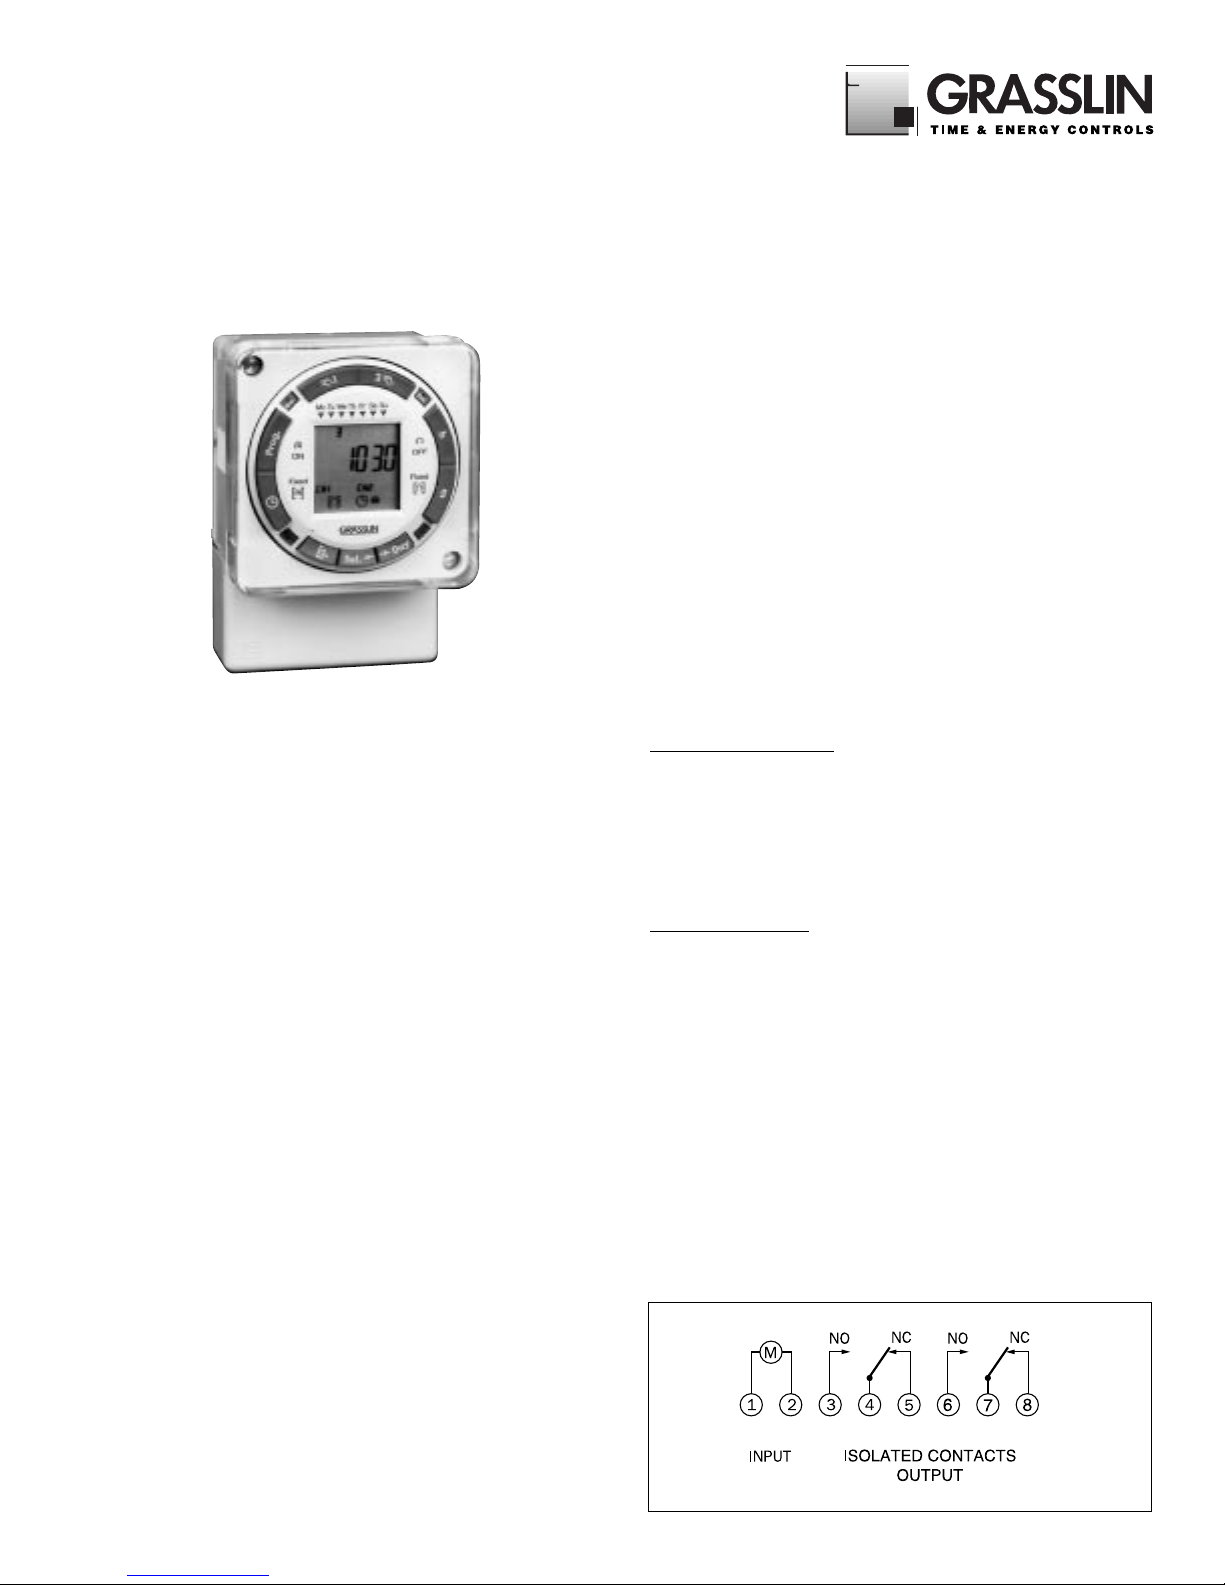
WIRING
1. Wire power to input terminals 1 and 2 (
make sure to apply
correct voltage; use of incorrect voltage will void warranty
).
2. Wire power to circuit 1 and 2 common terminals. Wire NO
(closed during ON times) or NC (open during ON times) to
the load.
COM COM
Circuit 1 Circuit 2
Page 2
■ KEYPAD DESCRIPTION
Setting the Time/Automatic Run Mode
Prog. Program Mode
Res.* Reset: Clears all programs and time
Select ON or OFF in Prog. Mode, Manual Override in Run Mode
±1h* Manual Daylight Time Change
h Setting the Hour (12:– – AM)
m Setting the Minute (12:01 AM)
Day Set Current Day and Select Days to be Omitted
Sel. Omit Day Selected w/Day key
Holiday Program
*Recessed keys; use a pen point to press
■ LCD DISPLAY ELEMENTS
■ PROGRAMS
The Digi 42/2 will accept up to 42 programs
A program consists of:
1. An ON or OFF command
2. Time of day (Hour and Minute)
3. Single day or multiple days
A program is required for each ON event, and a program is
required for each OFF event.
NOTE: MULTIPLE ON OR OFF EVENTS MAY BE PROGRAMMED.
For example, Program 1 may turn the office air conditioning ON at 8AM
Mon.-Fri. Program 2 may turn the air conditioning OFF at 5PM Mon.-Fri.
If someone is working late, they may press the override key to turn on
the air conditioning. If they forget to press the override key again when
they leave, the air conditioning will stay on all night (or all weekend).
To prevent this from occurring, additional OFF times may be pro-
grammed.
• Program 3 can turn the air conditioning OFF at 6PM.
• Program 4 can turn the air conditioning OFF at 7PM.
• Program 5 can turn the air conditioning OFF at 8PM., etc.
!
IMPORTANT: BEFORE PROCEEDING WITH SETTING THE
TIME AND PROGRAMMING THE UNIT, PRESS THE RESET
KEY TO CLEAR ALL DATA FROM THE MEMORY.
■ SELECTING AM/PM OR MILITARY TIME
After pressing reset, the display may show AM (right). The numbered day symbols will be flashing on
and off.
If the display does not show AM, it is
in military time mode (24:00 hr.) To
change to AM/PM mode, press and hold
the h key and press the ±1h key once.
AM will appear in display.
If display is in AM mode and military
mode is desired, press and hold the h
key, press the ±1h key once.
■ SETTING THE TIME
NOTE: If the h and m keys are held down longer than 2 seconds,
the numbers will advance rapidly.
Press and hold the key during the following:
(If Daylight Savings Time is in effect, press
±1h
first)
1. Press h to advance to the current hour
(while holding down the key)
2. Press m to advance to the current minute
(while holding down the key)
3. Press Day repeatedly to advance to current day (while holding
down the key)
NOTE: If the days are flashing, it indicates the day of the week was
not set when setting the time. The timer cannot be programmed unless
the day of the week is entered.
■ MANUAL DAYLIGHT TIME CHANGEOVER
Each year, in the Spring, press ±1h to advance the time an hour. In
the Fall, press ±1h to set back an hour.
■ SETTING AUTOMATIC DAYLIGHT TIME
CHANGEOVER (OPTIONAL)
NOTE: It is only necessary to program the changeover dates once.
The timer will then automatically change the time at 2:00AM on the first
Sunday in April and the last Sunday in October until the year 2079.
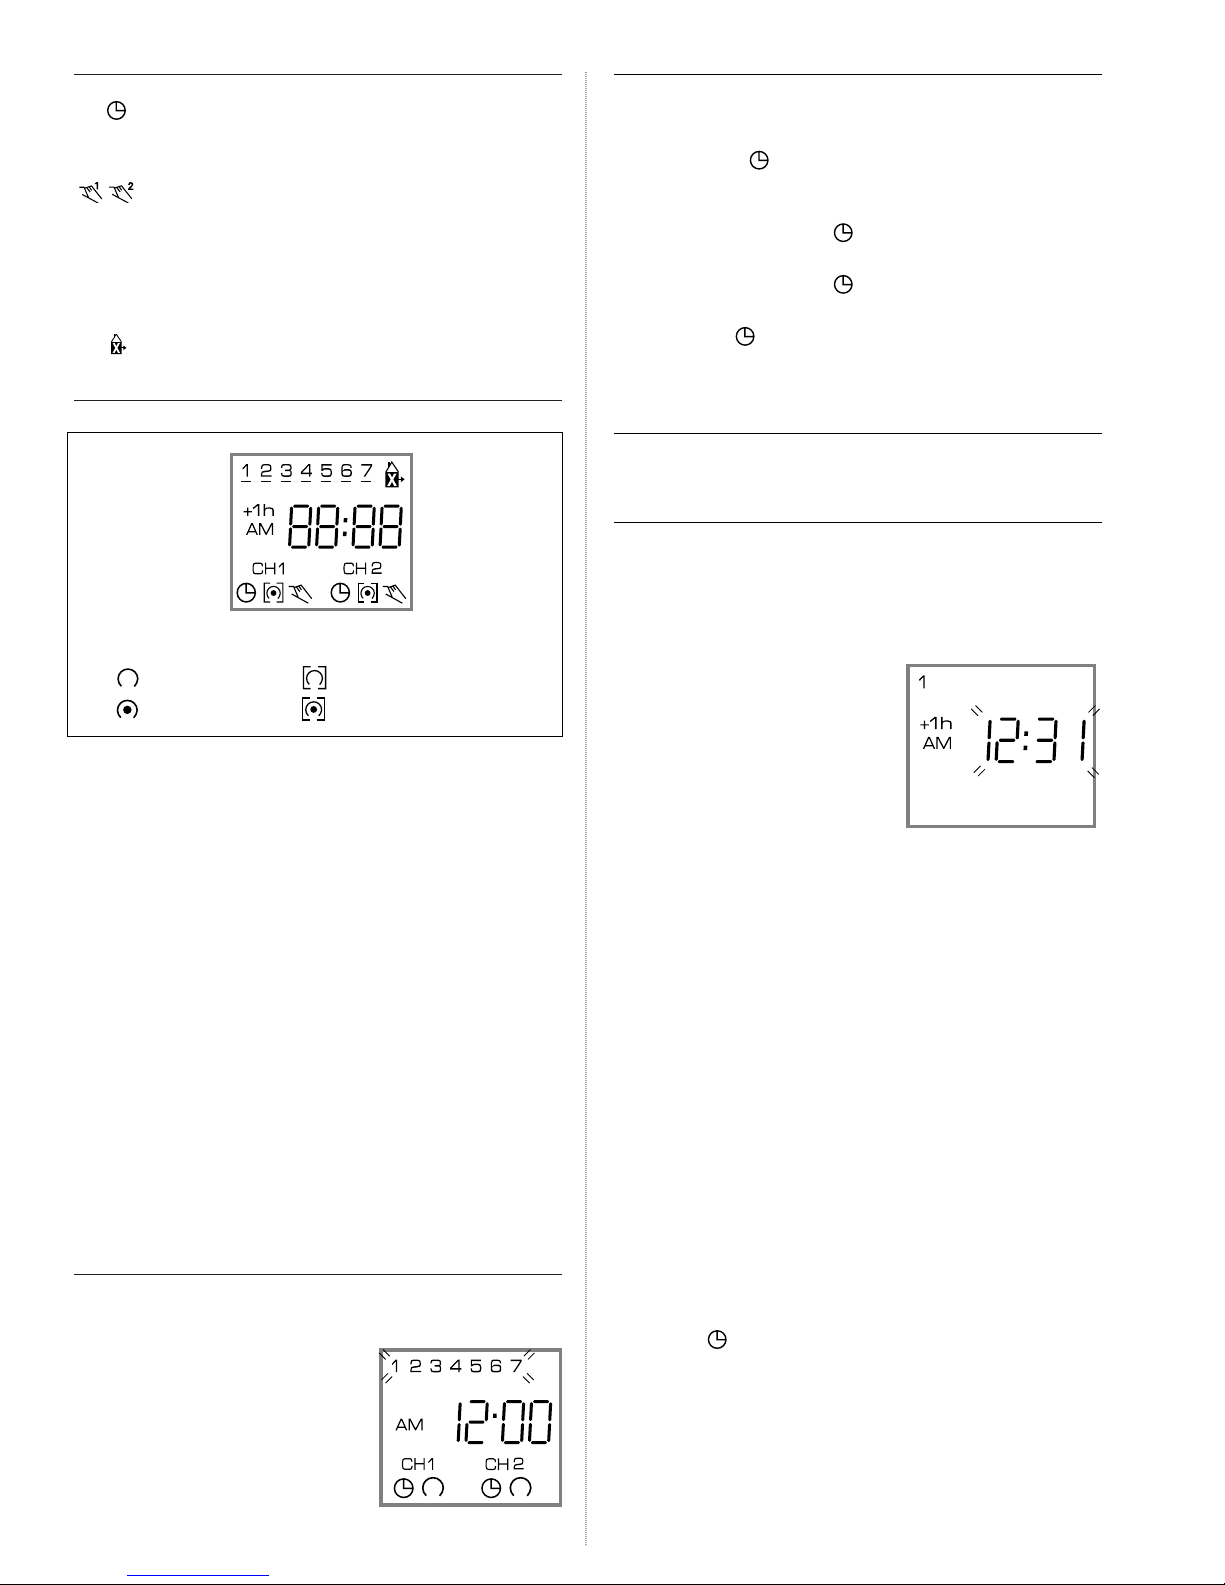
1. Press and hold the ±1h key
and press the Day key once. If
in AM/PM mode, “12:31” (Dec.
31) will be flashing. If in military
time mode, “31:12” will be
flashing.
2. Enter the current (today’s) date.
Example: June 15, 1997.
Press m key (for date) to 15
first and then press h key (for month) to 06 (If in military time, h
is date and m is month)
3. Press ±1h once, a 2 under Tu and 1995 appears in display
4. Enter the current year. Example: 1997. Press m key twice to
1997 (If you overshoot, hold down the m key – the years will
scroll to 2079 and back to 1995)
5. Press ±1h once, a 3 under We and AU appears in display,
which indicates preset European dates.
6. Press m key once so display shows cHA (If m key is inadvertently pressed twice and HA shows in display, press m key two
more times until cHA shows)
7. Press ±1h once, a 4 under Fr and 03:30 (for 1997) appears in
display, which indicates March 30 (30:03 in military)
8. Enter the date for spring time change. Example: April 6, 1997.
Press h key (for month) to 04. Press m key (for date) to 06 (If
in military time, h is date and m is month)
9. Press ±1h once, a 5 under Sa and the fall time change date
appears in display. Example: 10:26 for 1997
10. Press key to enter Run Mode
Daylight Time Changeover Dates
1997 April 6 - October 26 2002 April 7 - October 27
1998 April 5 - October 25 2003 April 6 - October 26
1999 April 4 - October 31 2004 April 4 - October 31
2000 April 2 - October 29 2005 April 3 - October 30
2001 April 1 - October 28 2006 April 2 - October 29
Days of the Week ➠
Daylight Time Symbol ➠
AM and PM Symbol ➠
Channel Indication ➠
➠
➠
➠
➠
➠
Holiday Indicator
Time of Day or
Switching Time
Manual Override ON
ON/OFF Symbol
OFF Symbol
ON Symbol
Continuous OFF Symbol
Continuous ON Symbol
Run Mode Symbol
Page 3

■
PROGRAMMING 24 HOUR OR 7 DAY SCHEDULES
It is helpful to write out the program schedules
before
beginning. See last page.
!
IMPORTANT: THE CURRENT TIME OF DAY AND DAY OF
WEEK MUST BE SET PRIOR TO PROGRAMMING. SEE “SETTING THE TIME”
NOTE: The Day and Sel. keys are used to
omit
days of the week for
which the OFF or ON time is not to be implemented. For 24 hour schedules (same program every
day fo the week), ignore Day and Sel. keys.
If an ON or OFF symbol is not entered, the ON symbol will flash,
and program will not be accepted.
Example
Program 1: CH1 ON at 7:00AM Monday thru Friday
Program 2: CH1 OFF at 6:00PM Monday and Friday only
Program 3: CH1 OFF at 5:00PM Tuesday, Wednesday and Thursday
Three programs need to be entered.
Press Prog. key only once. Display shows:
Program 1
(CH1 ON at 7:00AM Monday thru Friday)
Press key once CH1 ON symbol appears
Press h key to 07AM
Press m key once to 00
Press Day key 6 times flashing line appears under 6
Press Sel. key once to omit 6 in display flashes
Press Day key once flashing line appears under 7
Press Sel. key once to omit 7 in display flashes
Press Prog. key to enter
Program 2
(CH1 OFF at 6:00PM Monday and Friday)
Press key twice CH1 OFF symbol appears
Press h key to 06PM
Press m key once to 00
Press Day key twice flashing line appears under 2
Press Sel. key once to omit 2 in display flashes
Press Day key once flashing line appears under 3
Press Sel. key once to omit 3 in display flashes
Repeat Day and Sel. keys for days 4, 6, and 7
Press Prog. key to enter
Program 3
(CH1 OFF at 5:00PM Tuesday, Wednesday and Thursday)
Press key twice CH1 OFF symbol appears
Press h key to 05PM
Press m key once to 00
Press Day key once flashing line appears under 1
Press Sel. key once to omit 1 in display flashes
Press Day key 4 times flashing line appears under 5
Press Sel. key once to omit 5 in display flashes
Repeat Day and Sel. keys for days 6 and 7
Press Prog. key to enter
Press key to enter Run Mode
!
IMPORTANT: IF AN “ON” TIME WAS PROGRAMMED THAT IS EARLI-
ER IN THE DAY THAN THE CURRENT TIME, PRESS AND/OR
ONCE TO TURN THE TIMER “ON”. (IT DOES NOT “LOOK BACK” TO
DETERMINE IF IT SHOULD BE ON OR OFF AFTER PROGRAMMING)
■ CHANNELS
In each program, CH1 and/or CH2 can be a OFF or ON event. Also,
one channel can be an OFF event and the other an ON event in the
same program. With both channels programmed to the same ON/OFF
schedule, the timer becomes a DPDT time switch.
Example: CH1 ON, CH2 OFF at 8AM Every Day.
Press Prog. key once
Press key once CH1 ON symbol appears
Press key twice CH2 OFF symbol appears
Press h key to 08AM
Press m key to 00
Press Prog. key to enter additional programs
■ MANUAL OVERRIDE
TEMPORARY: While in the Run Mode, pressing the or
key once will reverse the output; ON to OFF or OFF to ON. The
or symbol appears in the display to indicate a temporary over-
ride. At the next scheduled switching time, automatic control resumes,
eliminating the override.
CONTINUOUS: While in the Run Mode...
• Pressing the or key twice will turn the output to ON
permanently. symbol appears in display.
• Pressing the
or
key three times will turn the output OFF
permanently. symbol appears in display.
• To terminate a continuous override, press theorkey
until appears in the display.
■ REVIEWING PROGRAMS
To review the programs at any time, press Prog. key. Programs will
appear in the order they were entered with repeated presses of the
Prog. key. After all programs have been reviewed, the blank display
will appear to allow entering another program. Another press of the
Prog. key will display the number of free programs available, such as
Fr 38 if 4 programs have been entered.
■
CHANGING A PROGRAM
Select the program to be changed with the Prog. key. New days
may be omitted or omitted days may be returned by using the Day
and Sel. keys just as in initial programming. Hour and minute can be
changed with the h and m keys.
Press Prog. or key to store the new program.
■
DELETING A PROGRAM
To delete only one or a few programs:
Press Prog. key until the desired program is displayed.
Press m key to :59 and press once more to blank out.
Press h key to 11PM and press once more to blank out.
Press key, display will flash for several seconds and then enter
the Run Mode.
Using the reset key will delete ALL programs, the time of day, and
daylight change dates.
Page 4

■
HOLIDAY PROGRAM
An “8th day”, or Holiday program schedule may be entered for use
on holidays or vacation periods. More than one ON or OFF time may be
entered for the Holiday program.
A typical Holiday schedule may be to turn OFF at 12:01AM during the holiday period.
1. Press Prog. key to first free program
2. Press key twice; OFF symbol appears
3. Press h key once to 12AM
4. Press m key twice to 01
5. Press key once
Enter additional ON or OFF schedules as above, followed by
the key.
6. Press key to enter Run Mode
■
IMPLEMENTING HOLIDAY PROGRAM
Up to 6 days in advance of the Holiday, the “8th day” or Holiday
schedule may be selected to begin on a certain day of the week, and
continue from 1 to 99 days.
Example: Thursday and Friday will be Holidays
1. Press key once
2. Press Day key to 4 (Th)
3. Press Sel. key twice to 02
4. Press key to enter Run Mode
Display will show symbol above current time
8th day schedule will be implemented on Thursday and run for 2
days and then timer will revert back to normal programs.
NOTE: If Sel. key is held down, it will scroll rapidly to 99 and back
to 01
To review the implementation scheduled, press key once.
Display shows day of implementation and number of days holiday program will be active. Press key.
To delete the implementation scheduled, press key twice.
symbol disappears from display.
On the day the Holiday Program is selected to begin, the 8th day
program will be implemented. The display will show the Holiday symbol
and number of days remaining in the holiday period. To cancel at this
point, press once.
■ TROUBLESHOOTING
PROBLEM: Days are flashing, pressing any key does nothing
except key turns output ON and OFF.
SOLUTION: Time of Day and Day of Week have not been set. See
“SETTING THE TIME”
NOTE: This is the condition after a reset. If the timer is found in this
condition after it has been installed, programmed and operating for a
while, it may indicate that electrical noise or voltage transients have disrupted the microprocessor causing a loss of program information. Call 1800-272-1115 and request that a no-charge “Snubber Filter” be sent to
you to place across the input to the timer, which may solve the problem.
A second, but very unlikely cause of loss of program is a power failure with the backup battery low or dead. Check by disconnecting power
and monitoring how long the battery keeps the time of day in the display.
PROBLEM: Time of day was set while holding the key down,
but days are still flashing.
SOLUTION: Current day of week was not set while holding down
the key. See “SETTING THE TIME”
PROBLEM: It is 10AM and a ON program for 8AM was entered, but
the output is not ON. Display shows the and symbols.
SOLUTION: After programming, the timer does not “look back” to
determine if it should be ON. Press the key (temporary override)
to turn the output ON; appears in display. The timer will
assume automatic operation at the next programmed event.
PROBLEM: A program for 8AM Monday thru Friday was entered,
but it will not accept it and CH1
is flashing.
SOLUTION: The ON or OFF was not entered as part of the
program. ON or OFF must be selected.
Printed in USA 082US 010.97
_____________________________________________________________________________________________________________________________________________________________________________
_____________________________________________________________________________________________________________________________________________________________________________
_____________________________________________________________________________________________________________________________________________________________________________
_____________________________________________________________________________________________________________________________________________________________________________
_____________________________________________________________________________________________________________________________________________________________________________
CH1 CH2 Holiday
Prog ON/OFF ON/OFF h m Day(s) Program
1 On 7 am 30 Mon., Tue., Wed., Thurs, Fri. No
Digi 42/2 Program Schedules
GRÄSSLIN GmbH & Co. KG is ISO 9001 Certified
GRASSLIN CONTROLS CORPORATION
31 Industrial Ave. • Mahwah, New Jersey 07430 • Tel.: 201-825-9696 • Fax: 201-825-8694
E-mail: GCCsales@grasslin.com • www.grasslin.com
Number
of Days
 Loading...