

www.etoncorp.com
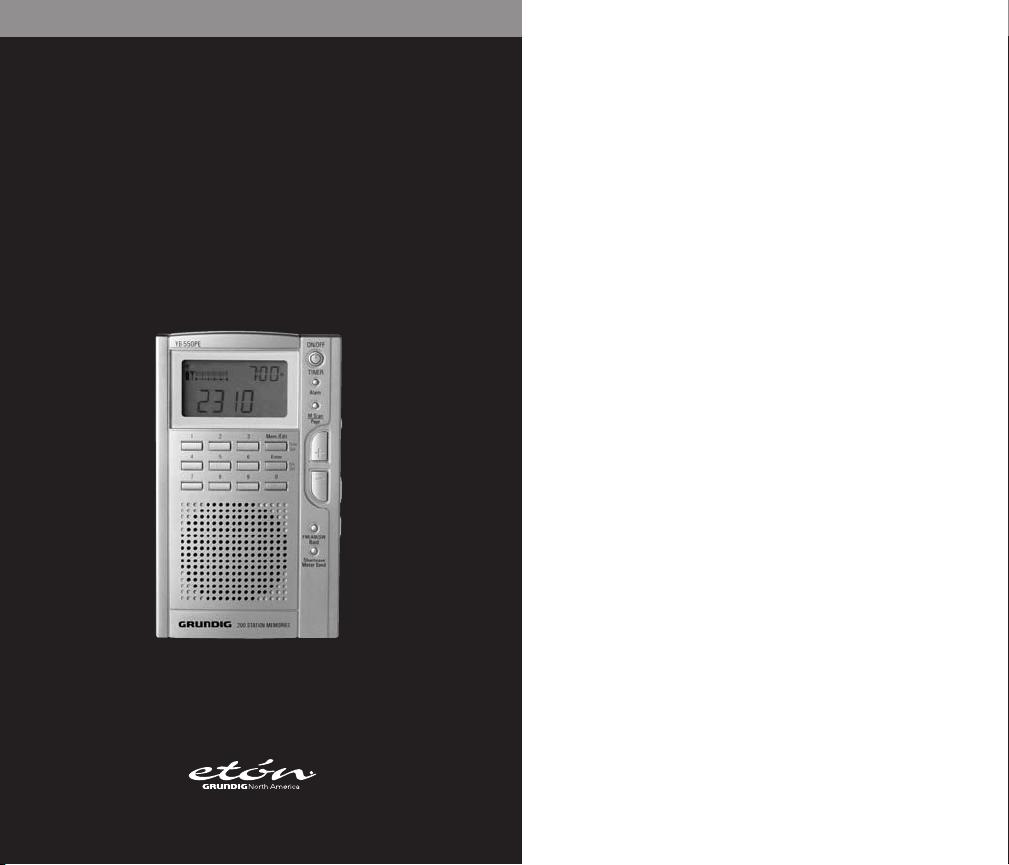
YB550
OPERATION MANUAL
AM/FM SHORTWAVE RADIO
1

YB 550PE OPERATION MANUAL
DO YOU NEED HELP?
HERE’S HOW TO CONTACT US:
• From the United States: (800) 872-2228
• From Canada: (800) 637-1648
• From Everywhere Else: (650) 903-3866
• Email: customersvc@etoncorp.com
• Internet: www.etoncorp.com
3

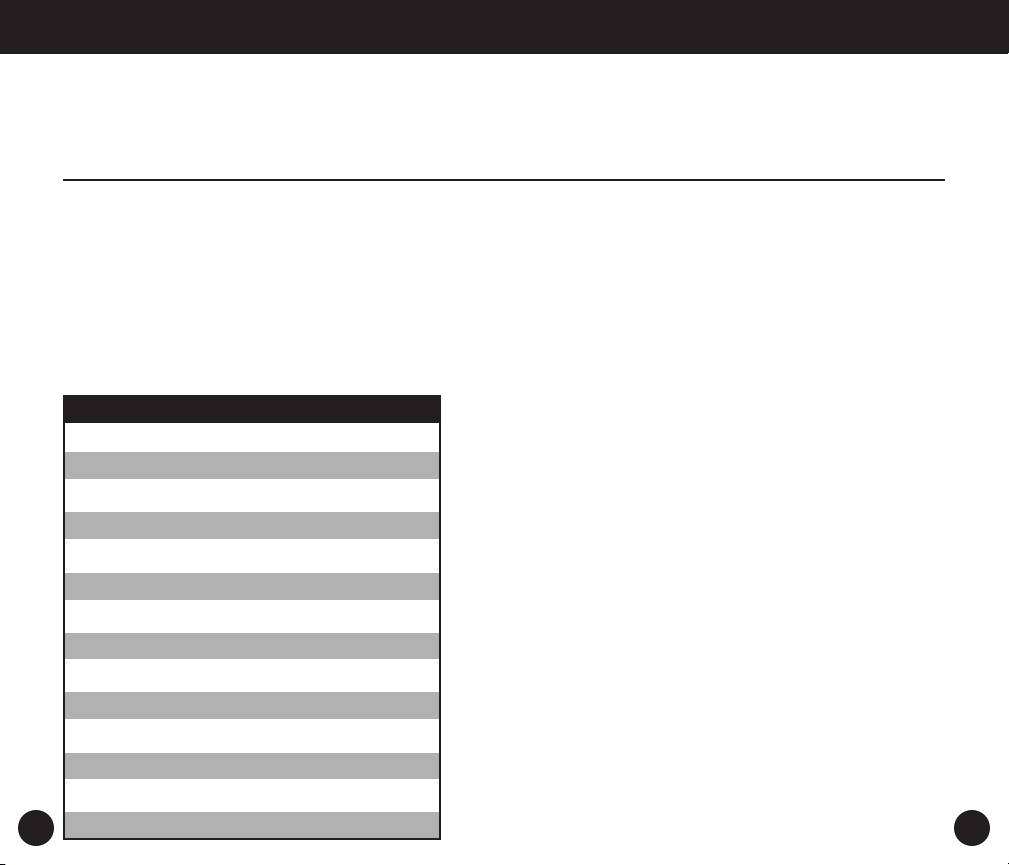
TABLE OF CONTENTS
YB 550PE OPERATION MANUAL
page
1 INTRODUCTION . . . . . . . . . . . . . . . . . . . . . . . . . . . . .7
DIAGRAMS . . . . . . . . . . . . . . . . . . . . . . . . . . . . . . . . .8-11
2 QUICK GUIDE . . . . . . . . . . . . . . . . . . . . . . . . . . .12-18
3 DETAILED OWNER’S MANUAL . . . . . . . . . . . . . . . . .19
INSTALLING BATTERIES . . . . . . . . . . . . . . . . . . . . . . . . .19
SELECTING AND USING AN AC ADAPTOR . . . . . . . . . . .20
SIGNAL STRENGTH AND
BATTERY STRENGTH INDICATOR . . . . . . . . . . . . . . . . . .20
IMPORTANT INITIAL SETUP . . . . . . . . . . . . . . . . . . . . . .21
4 BASIC RADIO OPERATION . . . . . . . . . . . . . . . . . . . .22
TURNING ON AND OFF . . . . . . . . . . . . . . . . . . . . . . . . . .22
VOLUME AND TONE CONTROLS . . . . . . . . . . . . . . . . . . .23
SELECTING AM, FM OR SHORTWAVE . . . . . . . . . . . . . . .23
SETTING UP AM AND FM OUTSIDE OF
NORTH AMERICA . . . . . . . . . . . . . . . . . . . . . . . . . . . . . .24
FOUR WAYS TO TUNE IN STATIONS . . . . . . . . . . . . . . . .25
5 USING SHORTWAVE . . . . . . . . . . . . . . . . . . . . . . . . .26
SELECTING A SHORTWAVE METER BAND . . . . . . . . . . .27
AUTOSCAN TUNING WHILE IN SHORTWAVE . . . . . . . . .28
SHORTWAVE BAND CHART OF
AUTOSCANNING RANGES . . . . . . . . . . . . . . . . . . . . . . .28
6 CLOCK AND ALARM FEATURES . . . . . . . . . . . . . . . .29
SETTING THE CLOCK . . . . . . . . . . . . . . . . . . . . . . . . . . . .29
SETTING THE ALARM . . . . . . . . . . . . . . . . . . . . . . . . . . .30
FAVORITE STATION WAKE-UP . . . . . . . . . . . . . . . . . . . . .30
USING THE SNOOZE FEATURE . . . . . . . . . . . . . . . . . . . .31
ACTIVATING AND DEACTIVATING THE ALARM . . . . . . . .31
7 WORKING WITH MEMORY . . . . . . . . . . . . . . . . . . . .32
SELECTING MEMORY PAGES . . . . . . . . . . . . . . . . . . . . .32
STORING STATIONS INTO MEMORY . . . . . . . . . . . . . . . .33
ACCESSING WHAT IS STORED INTO MEMORY . . . . . . . .34
DIRECT MEMORY ACCESS . . . . . . . . . . . . . . . . . . . . . . .34
MEMORY SEARCH . . . . . . . . . . . . . . . . . . . . . . . . . . . . .35
MEMORY AUTOSCAN . . . . . . . . . . . . . . . . . . . . . . . . . . .35
MOVING A STORED FREQUENCY . . . . . . . . . . . . . . . . . .36
DELETING A STORED FREQUENCY . . . . . . . . . . . . . . . . .36
DELETING ALL MEMORY CONTENTS OF A PAGE . . . . . .37
CUSTOMIZING MEMORY PAGES . . . . . . . . . . . . . . . . . . .37
8 SYSTEM SET CODE TABLE . . . . . . . . . . . . . . . . . . . .38
CHANGING SYSTEM SET CODES . . . . . . . . . . . . . . . . . .38
CHANGING THE CLOCK FORMAT . . . . . . . . . . . . . . . . . .39
DEFAULT FACTORY SYSTEM SET CODES . . . . . . . . . . . . .40
MONITORING CURRENT SET CODE STATUS . . . . . . . . . .40
SYSTEM SET CODE TABLE . . . . . . . . . . . . . . . . . . . . . . . .41
4
5

YB 550PE OPERATION MANUAL
1 INTRODUCTION
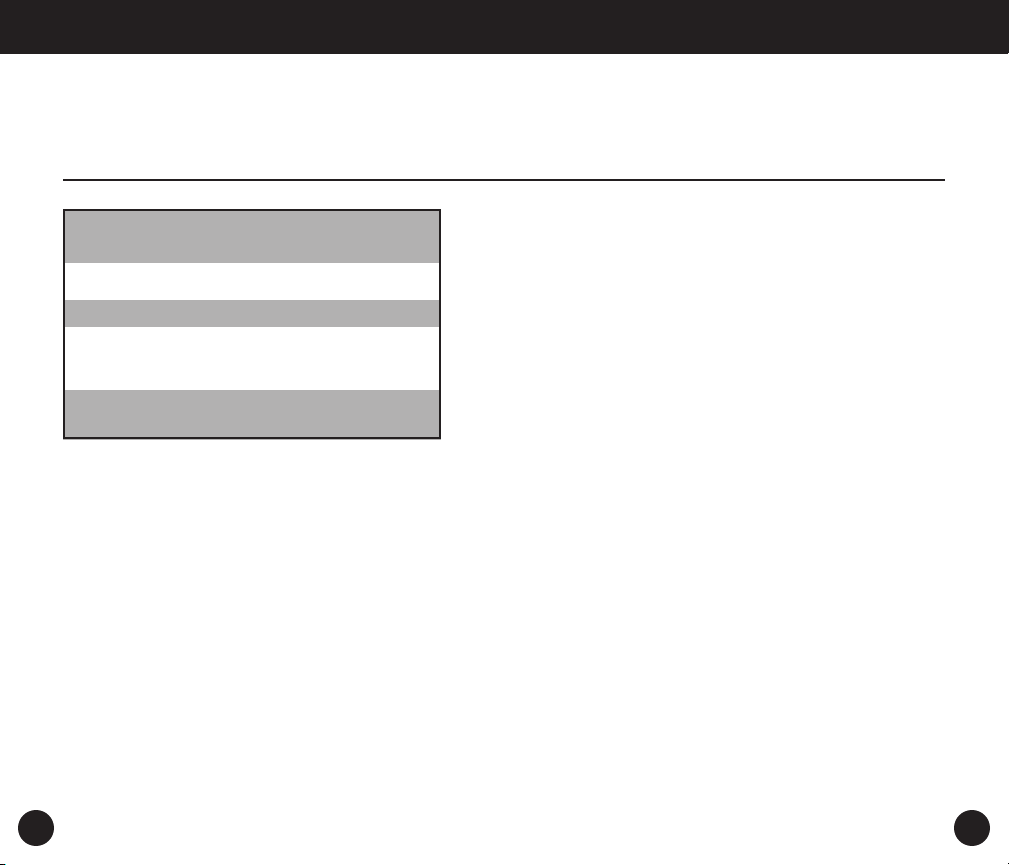
9 ADDITIONAL INFORMATION . . . . . . . . . . . . . . . . . .43
USING THE LIGHT . . . . . . . . . . . . . . . . . . . . . . . . . . . . . .43
USING EARPHONES . . . . . . . . . . . . . . . . . . . . . . . . . . . .43
USING THE DX/LOCAL SWITCH . . . . . . . . . . . . . . . . . . . .43
USING THE LOCK SWITCH . . . . . . . . . . . . . . . . . . . . . . .44
PREVENTING BATTERY ACID LEAKAGE . . . . . . . . . . . . .44
TROUBLESHOOTING . . . . . . . . . . . . . . . . . . . . . . . . . . . .45
RESET PROCEDURE . . . . . . . . . . . . . . . . . . . . . . . . . . . . .47
MAJOR FEATURES OF THE YB 550PE . . . . . . . . . . . . . . .48
10SERVICE INFORMATION . . . . . . . . . . . . . . . . . . . . . .50
Thank you for purchasing the YB 550PE AM/FM/Shortwave
Radio. This owner’s manual is conveniently divided into two
sections, BASIC OPERATION and INTRODUCTION TO SHORTWAVE (both sections are important). If you are new to shortwave listening, the INTRODUCTION TO SHORTWAVE section
will give you all the information that you need to fully enjoy
broadcasts from around the world. This radio has been
designed and manufactured to high quality standards, and
will provide reliable operation for many years. Please carefully read the Owner’s Manual in order to take advantage of the
many interesting features of the YB 550PE.
WHAT THE YB 550PE INCLUDES
• Earbud style earphones
• Batteries
• Carrying pouch
QUICK GUIDE
More experienced digital product users may want to use the
quick guide, titled YB 550PE QUICK GUIDE, starting on page
12.
Note, however, that the DETAILED OWNER’S MANUAL, start-
ing on page 19, is the most thorough and comprehensive
guide to the YB 550PE’s operation.
6
7
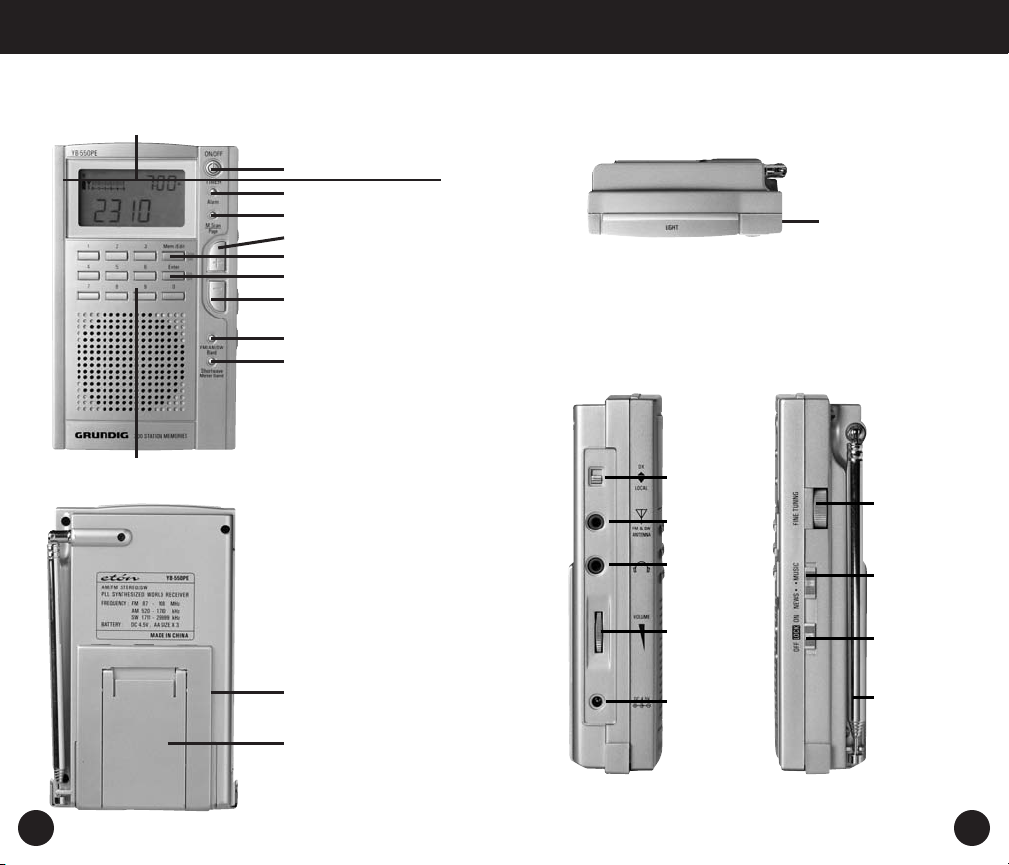
ON/OFF/ Timer Button (2)
Display (1)
FRONT TOP
LEFT SIDE RIGHT SIDE
Numeric Keypad (10A)
Snooze Light Button (22)
Stand (20)
BACK
Battery Compartment
Cover (21)
Alarm Button (3)
Memory/Edit; Time Set (5)
+ Tuning Button (7)
– Tuning Button (8)
Enter; Sys.Set (6)
AM/FM/SW Band Button (9)
Shortwave Meter Band Button (10)
Memory Scan/Page Button (4)
DX Local Switch
(11)
Antenna Socket
(12)
Earphone Socket
(13)
Volume
Control
(14)
DC Socket
(15)
Fine Tuning Control
(16)
Tone Control
(17)
Lock Switch
(18)
Telescopic Antenna
(19)
DIAGRAMS
YB 550PE OPERATION MANUAL
8 9

RADIO OFF DISPLAY
Triangle Pointer (23)
Antenna Symbol (24)
Battery
Symbol
(31)
RADIO ON DISPLAY
Time AM/PM Indicator (29)
Frequency Digits (34)
Triangle Pointer (23)
Antenna Symbol (24)
1-5 Scale (30)
MEMORY DISPLAY
Refers only to the display’s upper right corner.
SHORTWAVE METER BAND DISPLAY
SYSTEM SET CODE DISPLAY
Refers only to the display’s upper right corner.
1-5 Scale (30) Sleep Timer Symbol (32)
Alarm AM/PM Indicator (25)
Clock
Digits
(28)
Battery
Symbol
(31)
FM,
MW,
SW,
Indicators
(35)
Alarm
Activation
Symbol
(27)
Alarm
Clock
Digits
(26)
Memory
Display
(36)
Shortwave
Meter
Band
Display
(37)
(39)
(40)
Delete
Indicator
(38)
Alarm
Activation
Symbol
(27)
Clock
Digits
(33)
YB 550PE OPERATION MANUAL
10
11

2 QUICK GUIDE
YB 550PE OPERATION MANUAL
The purpose of this Quick Guide is to enable immediate use
of the radio. Please note that it is not a replacement for the
Detailed Owner’s Manual, a much more thorough document.
Please refer to it for detailed operating instructions, starting
on Page 19.
INSTALL BATTERIES
Remove the stand and battery compartment cover and install
3 AA alkaline batteries.
PERFORM THE INITIAL SET-UP
Assure that the radio is unlocked.The LOCK switch is on right
side of the radio and should be OFF.Assure that the
DX/LOCAL switch, on the left side of the radio is in the DX
position.
TURNING THE YB 550PE ON AND OFF
A short press of the (ON/OFF-TIMER) button turns the
radio on with a 90 minute, automatic turn-off timer engaged,
with in the display.To defeat this timer, allowing indefinite turn-on and play, use a long press on the button. When
defeating the timer ‘yb550’ will appear in the display for 5
seconds before turning on.
SELECTING FM, AM OR SHORTWAVE
Use the FM/AM/SW Band button to select FM, AM or SW
(shortwave). AM is shown with the MW symbol in the display.
TUNE IN STATIONS
Use the +/- buttons. Quick, short presses for non-scan tuning;
long presses for autoscan tuning. If you know the frequency,
press the ‘Enter’ button, then key in the frequency with the
numeric keypad. Use the FINE TUNING control for fine tuning
or as you would a tuning knob.
SHORTWAVE BASICS
• Night shortwave reception is almost always better than
daytime shortwave reception
• During daytime, the most active shortwave bands are 13,
15, 16, 19, and 22 meters, 16 and 19 usually best.At
night, the most active bands are 25, 31, 41 and 49
meters, with 31 and 49 usually best
• Around sunset and sunrise, both the day and night bands
may be good. It pays to experiment with this
• Getting very close to a window often helps signal
strengths
• Holding the radio often helps signal strengths (this may
also be true for AM and FM reception)
12
13
YB 550PE OPERATION MANUAL
SELECTING A SHORTWAVE METER BAND
The following bands can be selected: 120, 90, 75, 60, 49, 31,
25, 22, 19, 16, 15, 13 and 11 meters. Pressing the SHORTWAVE METER BAND BUTTON successively jumps it to the
beginning of bands.Alternately, press the same button followed by the +/- buttons to go up and down bands. Start
tuning after the clock reappears.When using autoscan tuning, it will jump to the next band automatically after tuning
through the band that was initially selected.
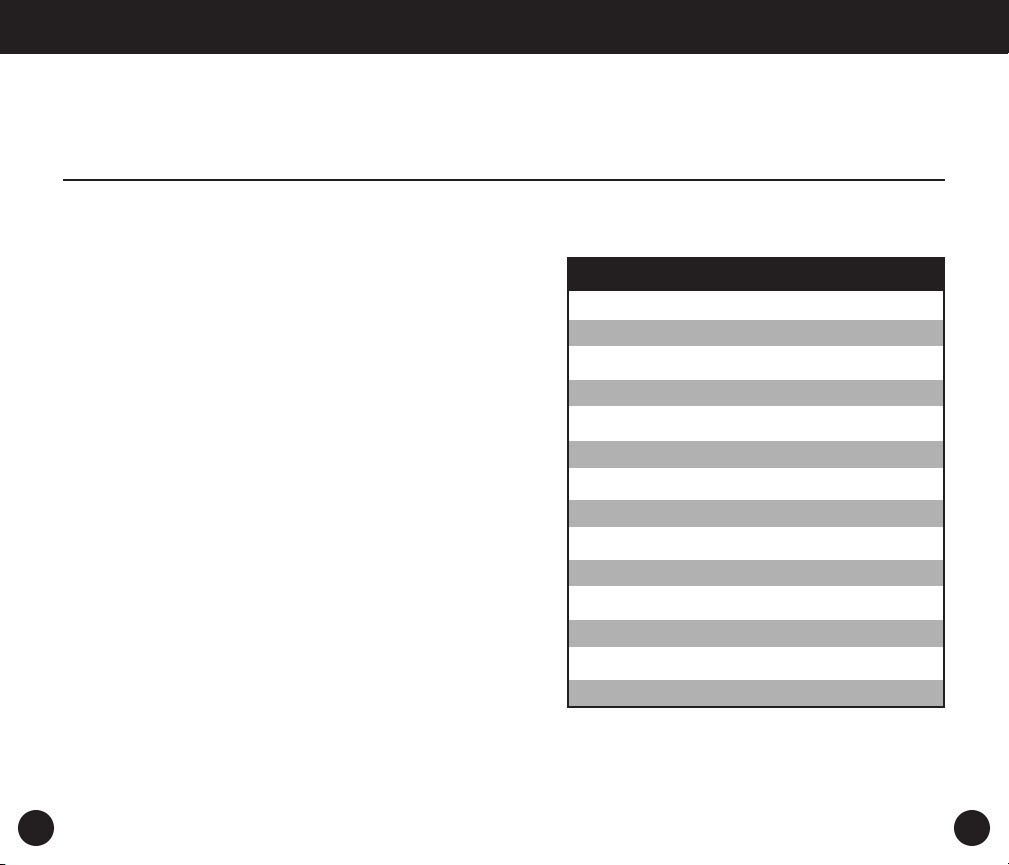
SHORTWAVE BAND CHART OF
AUTOSCANING RANGES
BAND (meters} FREQUENCY RANGE (kilohertz)
120 2250 - 2550
90 3150 - 3450
75 3850 - 4050
60 4700 - 5100
49 5800 - 6300
41 7100 - 7500
31 9400 - 1000
25 11500 - 12150
22 13500 - 13900
19 15000 - 15900
16 17450 - 18000
15 18850 - 19100
13 21450 - 21950
11 25600 – 26100
14
15

YB 550PE OPERATION MANUAL
STORING A FREQUENCY INTO MEMORY
200 frequencies can be stored into 8 pages of memory, each
page holding 25 frequencies.Turn on the radio. First, select a
memory page by pressing the M.Scan/Page button for about
3 seconds.The memory page then flashes in the upper right
corner of the display.Within 5 seconds select the desired
page with the +/ – buttons. Once selected, either
press/release the M.Scan/Page button or wait about 3 seconds, causing the memory page to be entered. Next, tune to
the desired radio station, then press/release the Mem./Edit
button and note that the ‘PRESET’ digits flash in the upper
right corner of the display.Within 5 seconds use the numeric
keypad to enter the memory preset number that you wish to
store the station into (in the factory default setting, there are
25 presets per page). Punch in a number from 1 to 25.Within
5 seconds press the Mem./Edit button.
ACCESSING WHAT IS STORED INTO
MEMORY
Once a page number has been selected or changed, even if it
is not seen on the screen, you can access any memory preset
on that page by keying in the memory number with the
numeric keypad.To change pages, use the procedure
described previously. Memory Search enables searching
through the memory presets within a memory page.
Press/release the M.Scan/Page button, then use quick, short
presses on the +/– buttons to search through the memory
presets. Using a longer, 3 second press of +/- engages
Memory Autoscan, allowing about 5 seconds on each memory
before automatically moving on to the next one.To stop memory preset autoscan, press/release one of the +/– buttons.
16
17

YB 550PE OPERATION MANUAL
3 DETAILED OWNERS MANUAL
DELETING MEMORIES AND MEMORY
PAGES
To delete a frequency stored in a memory, press/release the
M.Scan/Page button, then use the +/- buttons to select the
memory preset location of the frequency that you wish to
delete.Then press/hold the Mem./Edit button for about 2 seconds and then release it. ‘dEL’ appears flashing in the display.
Within 2 seconds, press/release the Mem./Edit button.To
delete all contents of a page, press/release the M.Scan/Page
button, then press/hold the Mem./Edit button for 4 seconds
and then release it. ‘dEL’ appears flashing in the display.
Within 2 seconds, press/release the Mem./Edit button.
LEARNING MORE ABOUT THE YB 550PE
All of the YB 550PE’s capabilities cannot be addressed in this
Quick Guide.You can tailor the radio to your own liking with
System Set Codes.To do this, see the section titled SYSTEM
SET CODE TABLE, pages 41-42.
Note: In the instructions below, numbers in parenthesis ( ),
refer to the diagrams and appear only at the first use or
description of the item. See the previous section titled DIAGRAMS.
INSTALLING BATTERIES
Install 3 AA alkaline batteries into the battery compartment
(21), observing the battery polarity diagram on the back of
the radio.To remove the battery compartment cover, first
remove the STAND (20) by pulling its locking tabs away from
the lower sides of the radio and then removing it from the
back.
USING RECHARGEABLE BATTERIES: Rechargeable batteries
must be charged in their own charger. They will not charge
inside the YB 550PE.We suggest nickelmetal-hydride batteries
(Ni-MH). Be sure to change the SYSTEM SET CODE accordingly.
See the section titled SYSTEM SET CODE TABLE, on pages
41-42.
18 19

YB 550PE OPERATION MANUAL
SELECTING AND USING AN AC ADAPTOR
Use an adaptor with the following specifications: output of
4.5 volts DC, negative polarity; rated at 100 milliamperes or
greater; coaxial plug tip inner diameter of 3.4 millimeter,
inner diameter of 1.3 millimeters.An appropriate adaptor for
use in North America is available for purchase from Eton
Corporation/Grundig. For details, visit www.etoncorp.com or
contact us via phone. Plug it into the DC socket (15), located
on the left side of the radio.
SIGNAL STRENGTH AND BATTERY STRENGTH
INDICATOR
When the radio is turned off, the upper left corner of the display (1) shows battery strength on the 1–5 scale (30), with
the triangle pointer (23) over the battery symbol (31) on the
far left side of the scale.When the radio is turned on, the
pointer is over the antenna symbol (24) and the 1-5 scale
shows relative signal strength.
IMPORTANT INITIAL SET-UP
2. Assure that the radio is unlocked, with the LOCK switch
(18) on right side of the radio in the OFF position. This
switch can be used to lock the radio when it is not in use
or when traveling.
3. Assure that the DX/LOCAL switch (11), on the left side of
the radio is in the DX position.
20
21
4 BASIC RADIO OPERATION
YB 550PE OPERATION MANUAL
TURNING ON AND OFF
The YB 550PE can be turned on by the two methods shown
below.To turn it off, press the ON/OFF-TIMER button (2).
1. BATTERY SAVER / SLEEP TIMER
METHOD:
Perform a quick, short press of the ON/OFF-TIMER button
(2). This causes the radio to shut off automatically after 90
minutes. Note that (32) appears in the display.To
change the time from 90 minutes to a time of your preference, use the + and – buttons (7, 8) immediately after pressing the button, allowing selection of 1 – 120 minutes of
play time.The number of minutes that you last set are also
used the next time the radio is turned on.
2. TIMER-DEFEAT METHOD:
This method defeats the automatic 90 minute timer and causes
the radio to stay on until deliberately turned off. Hold the
button down for about 2 seconds, then release. Note that
‘YB550’ appears in the display for about 5 seconds, then the
radio turns on.
VOLUME AND TONE CONTROLS
The volume control (14), labeled VOLUME, is located on the
left side of the radio.The tone control (17), on the right side
of the radio is labeled NEWS/MUSIC. Use the position that
you like best.
SELECTING FM, AM OR SHORTWAVE
Pressing the button labeled ‘FM/AM/SW Band’ (9), allows selection of FM,AM and SW (35). The frequency digits (34) appear in
the lower portion of the display.The local stations of your area
will be heard on AM and FM. International Shortwave stations
from around the world will be heard on SW.
Note: When the AM band is selected, the display shows
MW, not AM.
22
23

YB 550PE OPERATION MANUAL
SETTING UP AM AND FM
OUTSIDE OF NORTH AMERICA
You can skip this section if you are in North America and just
purchased the YB 550PE. It is already set-up in the factory for
use in North America. If you travel to other world regions,
make the changes below as necessary. Outside of North
America, AM stations (MW in the YB 550PE’s display) are
spaced at 9 KHz. The FM frequency range may be like that
used in Japan, 76-108 MHz.To make these changes please
see the instructions titled SYSTEM SET CODE TABLE, on pages
41-42.
FOUR WAYS TO TUNE IN STATIONS
There are four ways to tune in stations, described in detail
below:
1. REGULAR TUNING (MANUAL TUNING)
Quick, short presses of the +/- buttons enables tuning up or
down frequency.
2. AUTOSCAN TUNING
Pressing the + or – buttons for just over 1 second enables
automatic scan-tuning. The radio will then automatically stop
on the next station encountered. Use the + button to
autoscan upward in frequency and the – button to autoscan
downward in frequency.
3. DIRECT FREQUENCY ENTRY
When the exact desired frequency is known, it can be entered
via the numeric keypad (10A) and the ‘Enter’ button. Make
sure that the correct band,AM, FM or SW is selected.To enter
a frequency, do the following in a rapid sequence:
a. Press/release the ‘Enter’ (6) button.
b. Enter the frequency using the numeric keypad.
4. FINE TUNING
The FINE TUNING control (16) is located on the right side of
the radio. It tunes in 1 Kilohertz steps in AM and Shortwave
and .05 Megahertz steps in FM. Use it to ‘fine-tune’ stations
to your liking, or use it as you would a tuning knob.
24
25

5 USING SHORTWAVE
YB 550PE OPERATION MANUAL
Shortwave enables listening to stations from around the
world. If you are completely new to shortwave, or just need a
refresher on shortwave basics, please see the SHORTWAVE
LISTENING GUIDE that accompanies this product. To get you
started, some basics are noted below
• Night shortwave reception is almost always better than
daytime shortwave.
• During daytime the most active shortwave bands are 13,
15, 16, 19, and 22 meters, 16 and 19 usually best.At
night, the most active bands are 25, 31, 41 and 49
meters, 31 and 49 usually best
• Around sunset and sunrise, both the day and night bands
may be good, sometimes exceptionally good. Listening at
these times can often be quite rewarding
• Signal strengths are often stronger when holding the
radio and being very close to a window
SELECTING A SHORTWAVE METER BAND
All 14 of the international broadcast bands can be
accessed.The bands are numbered 120, 90, 75, 60, 49, 31, 25,
22, 19, 16, 15, 13 and 11 meters. See the section below titled
SHORTWAVE BAND CHART OF AUTOSCANNING RANGES
which shows the full frequency range of each band used by
the radio’s autoscan system.
There are two ways to access a band, each method placing
the tuner at the beginning of the band that has been
accessed.
1. Each successive quick, short press of the button labeled
SHORTWAVE METER BAND (10) places the radio at the
beginning of a band.While pressing the button, the band
number shows in the upper right corner of the display
(37) and disappears a few seconds after it is released,
causing the clock to reappear in the corner. Start tuning
only after the clock reappears.
2. Perform one quick, short press of the button labeled
SHORTWAVE METER BAND, immediately followed by
quick, short presses of either the + or – tuning
buttons.The band number appears in the upper right corner of the display.After the band of choice is selected,
start tuning after the clock reappears in the upper right
corner.
26
27
YB 550PE OPERATION MANUAL
6 CLOCK AND ALARM FEATURES
AUTOSCAN TUNING WHILE IN SHORTWAVE
In shortwave, autoscan tuning only autoscans in the shortwave frequency ranges noted below in the SHORTWAVE
BAND CHART OF AUTOSCANNING RANGES.To tune shortwave frequencies that are in-between these ranges, or outside of these ranges, use one of the other tuning methods.
SHORTWAVE BAND CHART
OF AUTOSCANING RANGES
BAND (meters} FREQUENCY RANGE (kilohertz)
120 2250 - 2550
90 3150 - 3450
75 3850 - 4050
60 4700 - 5100
49 5800 - 6300
41 7100 - 7500
31 9400 - 1000
25 11500 - 12150
22 13500 - 13900
19 15000 - 15900
16 17450 - 18000
15 18850 - 19100
13 21450 - 21950
11 25600 - 26100
28
SETTING THE CLOCK
The factory default has set the clock to function as a 24 hour
format clock. If you prefer a 12 hour,AM/PM clock format,
see the section titled CHANGING THE CLOCK FORMAT, on
page 39.
To set the clock:
1. Turn the radio off.The clock digits appear in the lower
portion of the display (28).
2. Press/release the button labeled ‘Time Set’ (5). The clock’s
digits flash in the display.
3. Within 5 seconds, set the hour using the + button and the
minutes using the – button. Make sure that AM or PM
(29) appear in the display appropriately for the time of
day if your clock is set up in the 12 hr. AM/PM format.
4. Within 5 seconds of finishing, press/release the ‘Time Set’
button twice.
29
YB 550PE OPERATION MANUAL
SETTING THE ALARM
After setting the alarm time, be sure to read the next section
titled ACTIVATING AND DEACTIVATING THE ALARM.The
alarm will wake you to the last radio station tuned, unless set
for Favorite Station Wake-Up. See Below.The radio will play
for 30 minutes, until you turn it off or until you press the
SNOOZE/LIGHT button (see USING THE SNOOZE FEATURE,
below).
1. Turn the radio off. The alarm clock digits (26) appear in
the upper right corner of the display.
2. Press/release the button labeled ‘Time Set’ twice.The
alarm clock’s digits flash in the display.
3. Within 5 seconds, set the hour using the + button and the
minutes using the – button. Make sure that AM or PM
(25) appear in the display appropriately for the time of
day if your clock is set up in the 12 hr. AM/PM format.
4. Within 5 seconds of finishing, press the ‘Time Set’ button
once.
FAVORITE STATION WAKE-UP
Use system set code 01. See pages 41-42.
USING THE SNOOZE FEATURE
When the alarm activates and turns the radio on, the
symbol appears flashing in the display.While it is flashing,
press/release the SNOOZE/LIGHT button (22). The radio will
turn off and then turn on again in 10 minutes.This process
can be repeated 3 times.
ACTIVATING AND DEACTIVATING THE ALARM
For the alarm to function, it must be activated by pressing the
button labeled ALARM (3).The symbol (27) appears in
the display.To deactivate the alarm, press/release the ALARM
button again, causing the symbol to disappear from the
display.
Note that once the alarm turns on the radio and the above
pictured alarm symbol is flashing, except for the
SNOOZE/LIGHT button, the radio’s controls will not function
until the ON/OFF-TIMER button is pressed.
30
31

7 WORKING WITH MEMORY
YB 550PE OPERATION MANUAL
To store frequencies into memory, it must first be learned
how to select memory pages. By factory default, there are 8
pages of memory, each page holding 25 frequencies. This
enables storing of 200 frequencies into memory.This default
can be changed and tailored to your personal need. See the
section CUSTOMIZING MEMORY PAGES on page 37.
SELECTING MEMORY PAGES
1. Press/hold the M.Scan/Page button (4) for about 3 sec-
onds.Then release it. Note that the memory page (36) is
flashing in the upper right corner of the display.
2. Within 5 seconds select the desired page with the + and
– buttons.You will see the memory page change with
each press.When the page of your choice is reached, stop
pressing.
3. When finished, either press/release the M.Scan/Page but-
ton, or wait about 3 seconds, causing the memory page to
be entered. The clock (33) will reappear in the display’s
upper right corner.
STORING STATIONS INTO MEMORY
In the instructions below, the term ‘preset’ and ‘memory preset’ refer to memory locations.
1. Turn on the radio.
2. Select the memory page that you wish to use, using the
procedure titled SELECTING MEMORY PAGES, above. If
you know that it’s already on the correct memory page,
skip this step.
3. Tune to the desired station.
4. Press/release the Mem./Edit button. Note that the ‘PRE-
SET’ digits (36) flash in the upper right corner of the display.The memory page number also appears, but does not
flash.
5. Within 5 seconds use the numeric keypad to enter the
memory preset number that you wish to store the station
into (in the factory default setting, there are 25 presets
per page). Punch in a number from 1 to 25.
6. Within 5 seconds press the Mem./Edit button, or wait 5
seconds.After a few seconds, the upper right corner’s display returns to the clock.
32
33

YB 550PE OPERATION MANUAL
ACCESSING WHAT IS STORED INTO MEMORY
Below, the three ways to access what has been stored into
memory are described: Direct Memory Access, Memory Search
and Memory Autoscan.When the memory page and memory
preset numbers appear in the upper right corner of the display, as it will in the sections below, the radio is in MEMORY
ACCESS MODE. This mode can be exited any time with a
press/release of the M.Scan/Page button.
DIRECT MEMORY ACCESS: To directly access a memory preset, the page number and preset number must be entered, as
shown below:
1. Press/hold the M.Scan/Page button for about 3
seconds.Then release it. Note that the memory page is
flashing in the upper right corner of the display.
2. Within 5 seconds select the desired page with the + and
– buttons.
3. Within 5 seconds, use the numeric keypad to key-in the
memory preset number that you wish to access. (if it is
under 10, key in 01, 02, etc.). NOTE: Once a page number
has been selected or changed, even if it is not seen on the
screen, a memory preset on that page can be selected by
keying in the memory number with the numeric keypad,
without having to re-do steps 1 and 2 above.
MEMORY
MEMORY SEARCH: Memory Search enables searching
through the memory presets within a memory page, as
shown below:
1. Press/release the M.Scan/Page button.
2. Use quick, short presses on the + or – buttons to search
through the memory presets.
MEMORY AUTOSCAN: Memory Autoscan enables scanning
through the memory presets within a memory page.The
memory being scanned enables listening to the station for
about 5 seconds and will then move on to the next memory
automatically.Autoscan will continue indefinitely on the
selected page until deliberately stopped.
1. Press/release the M.Scan/Page button.
2. Press/hold either the + or – button for about 3 seconds.
Then release it. Note that the memory preset number in
the upper right corner of the display flashes and the preset being scanned remains for about 5 seconds. It then
moves on to the next memory preset for another 5 seconds.To stop memory preset autoscan, press/release
either the + or – button.
34
35

YB 550PE OPERATION MANUAL
MOVING A STORED FREQUENCY
1. Turn on the radio.
2. Press/hold the M.Scan/Page button for about 3 seconds
and release it.
3. Use the + or – button to select the required memory
page.
4. Press/release the M.Scan/Page button twice.
5. Press/release the Mem./Edit button.
6. Within 5 seconds use the numeric keypad to enter the
memory preset number that you wish to store the station
into.
7. Within 5 seconds press/release the Mem./Edit button.
DELETING A STORED FREQUENCY
1. Press/release the M.Scan/Page button.
2. Use the + or – button to select the memory preset loca-
tion of the frequency that you wish to delete.
3. Press/hold the Mem./Edit button for about 2 seconds and
then release it. ‘dEL’ appears flashing in the display.
4. Within 2 seconds, press/release the Mem./Edit button.
DELETING ALL MEMORY
CONTENTS OF A PAGE
1. Press/release the M.Scan/Page button.
2. Press/hold the Mem./Edit button for 4 seconds and then
release it. ‘Del’ (38) appears flashing in the display.
3. Within 2 seconds, press/release the Mem./Edit button.
CUSTOMIZING MEMORY PAGES
The number of memory pages can be changed from 8 to 4, 5,
or 20. While this changes the number of frequencies stored
per page, in all cases 200 total frequencies can be stored.To
see the details of these changes and to make these changes
please see the instructions titled SYSTEM SET CODE TABLE,
on Pages 41-42.
36
37

8 SYSTEM SET CODE TABLE
YB 550PE OPERATION MANUAL
Certain functions can be programmed and changed using
SYSTEM SET CODES. These functions and their descriptions
are noted in the SYSTEM SET CODE TABLE, on Page 41.
CHANGING SYSTEM SET CODES
To enter a system code of your choice, use the procedure
below.
1. Turn off the radio.
2. Press/release the ‘Sys. Set’ button (6). Note that ‘- - ‘ (39)
appears in the upper right corner of the display and the
clock digits disappear.
3. Within 5 seconds, enter the desired numeric code with the
numeric key pad, then immediately press/release the button labeled ENTER. The code ICON (40) will briefly appear
in the lower right corner of the display.
CHANGING THE CLOCK FORMAT
The instructions below serve as an excellent example of how
to change a system set code, in this case changing the clock
system to a 12 hour format:
1. Turn off the radio.
2. Press/release the ‘Sys. Set’ button. Note that ‘- - ‘ appears
in the upper right corner of the display and the clock digits disappear.
3. Within 5 seconds, enter 12 with the numeric keypad, then
immediately press/release the button labeled ENTER.
‘12H’ briefly appears in the display.
38
39

YB 550PE OPERATION MANUAL
DEFAULT FACTORY SYSTEM SET CODES USED
FOR NORTH AMERICA
When shipped from the factory, the radio is set up as follows.
Changes can be made via the SYSTEM SET CODE TABLE and
the section titled CHANGING SYSTEM SET CODES, on the previous page
• 24 hour clock system. Code 24.
• 10 KHz AM (MW) tuning rate. Code 10.
• Eight pages with 25 memories (200 memories total). Code
08.
• 87-108 MHz FM frequency coverage. Code 88.
• 1.5 Volt AA batteries. Code 29.
• Radio alarm uses last station tuned. Code 02.
MONITORING CURRENT SET CODE STATUS
In the set code table shown below, the current status of the
set codes identified with an asterisk (*) can be monitored by
performing a 3 second press of the ‘Sys. Set’ button. The
applicable icon shows briefly in the display window for each
code.
SYSTEM SET CODE TABLE
SHOWN IN
CODE NO. DESCRIPTION DISPLAY
01 * Alarm uses radio station on AL. 1
Page 1, Mem 1
02 * Alarm uses last radio station tuned AL. 2
04 Divide the memories into 4 pages P4: 50
with 50 locations
05 Divide the memories into 5 pages P5: 40
with 40 locations
08 Divide the memories into 8 pages P8: 25
with 25 locations
20 Divide the memories into 20 pages P20: 10
with 10 locations
09 * Set the tuning rating for MW
to 9KHz 9KHz
10 * Set the tuning rating for MW
to 10KHz 10KHz
12 * Set the clock system to 12Hr 12H
24 * Set the clock system to 24H 24H
40
41
YB 550PE OPERATION MANUAL
9 ADDITIONAL INFORMATION
22 Check all the segments on LCD All LCD
display and model no. segments show
28 * Rechargeable battery to be used 1.2
29 * Normal AA battery to be used 1.5
76 * Set the FM frequency range to 76 108
76-108MHz (Japan)
88 * Set the FM frequency range to 87 108
87 –108MHz (N.America;Western Europe).
USING THE LIGHT
A quick, short press/release of the SNOOZE/LIGHT button
(22), located at the top of the radio, will turn on the display
light, shining from the right side of the display, for about 10
seconds.A longer, 5 second press/release of the button will
cause it to stay on indefinitely (note that this will greatly
decrease battery life). Turn off the light with a quick short
press of the button.
USING EARPHONES
Plug stereo earphones/headphones with a 1/8 inch stereo
plug into the earphone socket (13) on the left side of the
radio.
USING THE DX LOCAL SWITCH
Always use the DX position. Use LOCAL only if you live
extremely close to the local radio station that you are listening to and its power causes audio distortion. ‘DX’ stands for
‘distance’. This position gives the radio maximum sensitivity
to radio signals.
42
43

YB 550PE OPERATION MANUAL
USING THE LOCK SWITCH
Placing the LOCK switch into the ON position will render all
buttons and the FINE TUNING control inoperative. If the radio
is turned on while LOCK is on, the volume control is still
operative.This is an excellent feature to use when traveling.
Before placing the radio into a suitcase, purse or briefcase,
turn it off and then lock it. This will prevent accidental turnon and battery drainage.
PREVENTING BATTERY ACID LEAKAGE
To avoid battery acid leakage, only use high quality alkaline
or rechargeable nickel-metal-hydride batteries. Never intermix
old with new, or different brands or types of batteries. If the
batteries leak, immediately contact the manufacturer of the
batteries and don’t throw them away. Battery acid leakage
is not covered by warranty and voids the warranty.
TROUBLESHOOTING
RADIO WILL NOT TURN ON
• Assure that the LOCK switch is in the OFF position
• Assure that the radio is powered by either batteries or an
AC adaptor
• Assure that the AC adaptor is plugged into the household
outlet (mains socket) and into the radio’s DC socket. Take
care not to plug it into the ear phone socket or the antenna socket.The AC adaptor may be defective
• Assure that batteries are inserted with correct polarity
• Assure that the batteries are not depleted
CLOCK SHOWS IN DISPLAY, BUT RADIO
WILL NOT TURN ON
There are two possibilities: dead batteries or the LOCK switch
is ON.
SHUTS OFF ABRUPTLY WHILE PLAYING
DURING BATTERY USE
This is caused by depleted batteries.
SHUTS OFF ABRUPTLY WHILE BEING
MOVED DURING AC ADAPTOR USE
This is caused by a broken wire or loose connection in the AC
adaptor cord.
OPERATES ERRATICALLY
Perform a RESET, as described in the section titled RESET
PROCEDURE.
44
45

YB 550PE OPERATION MANUAL
STATIONS ARE RECEIVED TOO WEAK
• Assure that the DX/LOCAL switch is set to the DX position
• Assure that the telescopic antenna is pulled up all the
way for FM and Shortwave reception
• If listening to AM stations, swivel the radio.The internal
ferrite bar AM antenna is highly directional
THERE IS NO SOUND FROM THE SPEAKER
Assure that earphones/headphones are not plugged in and
that the volume control is turned up.
STATIONS ARE RECEIVED TOO WEAK
• Assure that the DX/LOCAL switch is set to the DX position
• Assure that the telescopic antenna is pulled up all the
way for FM and Shortwave reception
• If listening to AM stations, swivel the radio.The internal
ferrite bar AM antenna is highly directional
A STATION CAUSES SEVERE AUDIO
DISTORTION, BUT SEEMS TO BE VERY
STRONG IN SIGNAL STRENGTH
This is probably a strong, local station, very close to your
location. Because of its close proximity to you, its signal is
too strong. To reduce signal strengths, place the DX/LOCAL
switch into the LOCAL position. Also, try retuning the station
with the FINE TUNING control.
THE BATTERY COMPARTMENT A STICKY
LIQUID OR DRIED WHITE POWDER IN IT
This is the result of battery acid leakage. Battery acid leakage
is not covered by warranty. Do not throw away the leaked
batteries and immediately contact their manufacturer.
RESET PROCEDURE
When performing a ‘reset’, assure that the batteries in use
are good. If the radio does not function and the solutions
below do not resolve the problem, perform a ‘reset’.To do
this, remove the batteries and press/release the small, round
button recessed into the battery compartment floor, using a
straightened out paper clip or ballpoint pen. Reinstall the batteries and test the radio. If it still does not resolve the problem, try again, pressing the button two or three times.
46
47

YB 550PE OPERATION MANUAL
MAJOR FEATURES OF THE YB 550PE
• SHORTWAVE – 1711-29.995 KHz.
• FM 87.0 – 108.0MHz; MW 520 – 1710 KHz
• Manual and Auto-Scan Tuning
• Direct Keypad Frequency Entry
• Manual/Auto Scan to scan the preset stations
• Fine-Tuning Control
• 200 Random Programmable Memories
• Memory Page Customizing
• 9/10KHz step size selector for correct worldwide Medium
Wave (AM) reception
• FM-Stereo/Signal Strength/Power Level Indicators
• Digital Clock
• Selectable 12/24 hour clock display format.
• Simultaneous display of frequency and clock
• Favorite Station Wake-Up.
• Programmable Alarm
• Programmable Sleep Timer (10 – 90min.) functions
• LCD display light.
• Built in antennas for AM, FM and SW reception
• Earphone socket (earbud style earphones included)
• AC adaptor socket (adaptor not included)
• External antenna socket (external antenna not included)
• Includes carrying pouch
48
49

10 SERVICE INFORMATION
YB 550PE OPERATION MANUAL
You may contact the Etón Service Department for additional
information or assistance by calling toll-free Monday through
Friday, 8:30am - 4:00pm Pacific Standard Time:
1-800-872-2228 (United States)
1-800-673-1648 (Canada)
Call for a Return Authorization prior to shipping your unit.
Should you want to return your unit for service, pack the
receiver carefully using the original carton or other suitable
container. Write your return address clearly on the shipping
carton and on an enclosed cover letter describing the service
required, symptoms or problems.Also, include your daytime
telephone number and a copy of your proof of purchase.The
receiver will be serviced under the terms of the Etón Limited
Warranty and returned to you.
ONE YEAR LIMITED WARRANTY
Etón warrants to the original purchaser this product shall be
free from defects in material or workmanship for one year
from the date of original purchase. During the warranty period Etón or an authorized Etón service facility will provide,
free of charge, both parts and labor necessary to correct
defects in material and workmanship.At their option, Etón
may replace a defective unit.
(1) Complete and send in the Warranty Registration Card
within ten (10) days of purchase.
(2) Call Etón or the nearest authorized service facility, as soon
as possible after discovery of a possible defect. Have ready:
(a) the model and serial number.
(b) the identity of the seller and the approximate date of
purchase.
(c) a detailed description of the problem, including details
on the electrical connection to associated equipment
and the list of such equipment.
(3) Etón will issue a Return Authorization number and the
address to which the unit can be shipped. Ship the unit in
its original container or equivalent, fully insured and shipping charges prepaid. Correct maintenance, repair, and
use are important to obtain proper performance from this
product. Therefore carefully read the Instruction Manual.
This warranty does not apply to any defect that Etón
determines is due to:
(1) Improper maintenance or repair, including the installa-
tion of parts or accessories that do not conform to the
quality and specification of the original parts.
(2) Misuse, abuse, neglect or improper installation.
(3) Accidental or intentional damage.
(4) Battery leakage.
50
51

All implied warranties, if any, including warranties of merchantability and fitness for a particular purpose, terminate
one (1) year from the date of the original purchase.The foregoing constitutes Etón entire obligation with respect to this
product, and the original purchaser shall have no other remedy and no claim for incidental or consequential damages,
losses, or expenses. Some states do not allow limitations on
how long an implied warranty lasts or do not allow the exclusions or limitation of incidental or consequential damages, so
the above limitation and exclusion may not apply to you. This
warranty give you specific legal rights and you may also have
other rights which vary from state to state. For service information contact:
Etón Corporation
1015 Corporation Way
Palo Alto, CA 94303
U.S.A.
YB 550PE OPERATION MANUAL
52
53

YB 550PE MANUEL D'OPÉRATION
VOUS AVEZ BESOIN D’AIDE?
VOICI COMMENT NOUS CONTACTER:
• From the United States: (800) 872-2228
• From Canada: (800) 637-1648
• From Everywhere Else: (650) 903-3866
• Email: customersvc@etoncorp.com
• Internet: www.etoncorp.com
54
55

TABLE DES MATIÈRES
YB 550PE MANUEL D'OPÉRATION
1 INTRODUCTION . . . . . . . . . . . . . . . . . . . . . . . . . . . .59
LES DIAGRAMMES . . . . . . . . . . . . . . . . . . . . . . . . . .60-63
2 LE GUIDE RAPIDE . . . . . . . . . . . . . . . . . . . . . . . .64-70
3 LE GUIDE DÉTAILLÉ D’UTILISATION . . . . . . . . . . . . .71
COMMENT INSTALLER LES PILES . . . . . . . . . . . . . . . . . .71
LA SÉLECTION ET L’UTILISATION
D’UN ADAPTATEUR CA . . . . . . . . . . . . . . . . . . . . . . . . . .72
L’INDICATEUR DE LA FORCE DU SIGNAL
ET DE LA CHARGE DES PILES . . . . . . . . . . . . . . . . . . . . .72
LES RÉGLAGES INITIAUX IMPORTANT . . . . . . . . . . . . . .73
4 LE FONCTIONNEMENT DE BASE
DU POSTE RÉCEPTEUR DE RADIO . . . . . . . . . . . . . .74
COMMENT ALLUMER ET ÉTEINDRE LE YB 550PE . . . . . .74
LES COMMANDES DE RÉGLAGE DU VOLUME
ET DE LA TONALITÉ . . . . . . . . . . . . . . . . . . . . . . . . . . . .75
COMMENT SÉLECTIONNER AM, FM
OU LES ONDES COURTES . . . . . . . . . . . . . . . . . . . . . . . .75
COMMENT RÉGLER L’ÉCOUTE DES ONDES AM
ET FM EN DEHORS DE L’AMÉRIQUE DU NORD . . . . . . .76
LES QUATRE FAÇONS DE SYNTONISER UNE STATION . .76
5 COMMENT UTILISER LES ONDES COURTES . . . . . . .78
LA SÉLECTION D’UNE BANDE DE FRÉQUENCE
EN MÈTRES DES ONDES COURTES . . . . . . . . . . . . . . . . .78
LE TABLEAU DES BANDES DE BALAYAGE
AUTOMATIQUE POUR LES BANDES DE
FRÉQUENCES DES ONDES COURTES . . . . . . . . . . . . . . .80
56
Page No
6 LES CARACTÉRISTIQUES DE L’HORLOGE ET
E LA FONCTION DE RÉVEIL . . . . . . . . . . . . . . . . . . .81
COMMENT RÉGLER L’HORLOGE . . . . . . . . . . . . . . . . . . .81
COMMENT RÉGLER LA FONCTION DE RÉVEIL . . . . . . . .82
LA RÉVEIL À UNE STATION PRÉFÉRÉE . . . . . . . . . . . . . .83
L’UTILISATION DE LA FONCTION DE RAPPEL D’ALARME83
LA MISE EN MARCHE ET LA MISE EN SOMMEIL
DE LA FONCTION DE RÉVEIL . . . . . . . . . . . . . . . . . . . . .83
7 L’UTILISATION DE LA MÉMOIRE . . . . . . . . . . . . . . .84
COMMENT SÉLECTIONNER LES PAGES DE MÉMOIRE . .84
COMMENT STOCKER DES STATIONS EN MÉMOIRE . . . .85
COMMENT ACCÉDER À CE QUI
EST STOCKÉ EN MÉMOIRE . . . . . . . . . . . . . . . . . . . . . . .86
L’ACCÈS DIRECT À LA MÉMOIRE . . . . . . . . . . . . . . . . . .86
LA FONCTION DE RECHERCHE DE LA MÉMOIRE . . . . . .87
LE FONCTION DE BALAYAGE AUTOMATIQUE
DE LA MÉMOIRE . . . . . . . . . . . . . . . . . . . . . . . . . . . . . . .87
LE DÉPLACEMENT D’UNE FRÉQUENCE
STOCKÉE EN MÉMOIRE . . . . . . . . . . . . . . . . . . . . . . . . .88
LA SUPPRESSION D’UNE FRÉQUENCE
STOCKÉE EN MÉMOIRE . . . . . . . . . . . . . . . . . . . . . . . . .88
LA SUPPRESSION DE TOUT LE CONTENU
EN MÉMOIRE D’UNE PAGE . . . . . . . . . . . . . . . . . . . . . . .89
COMMENT PERSONNALISER LES PAGES DE MÉMOIRE .89
8 COMMENT CHANGER LES CODES
DE RÉGLAGE DU SYSTÈME. . . . . . . . . . . . . . . . . . . .90
COMMENT FAIRE PASSER L’HORLOGE DU FORMAT
DE 12 HEURES AU FORMAT DE 24 HEURES . . . . . . . . . .91
57

YB 550PE MANUEL D'OPÉRATION
1 INTRODUCTION
LES CODES DE RÉGLAGE DU SYSTÈME PAR DÉFAUT EN
USINE QUI SONT UTILISÉS EN AMÉRIQUE DU NORD . . .92
COMMENT SURVEILLER LE STATUT
DES CODES DE RÉGLAGE ACTUELS . . . . . . . . . . . . . . . .92
LE TABLEAU DES CODES DE RÉGLAGE DU SYSTÈME . . .93
9 INFORMATIONS SUPPLÉMENTAIRES . . . . . . . . . . . .95
L’UTILISATION DE L’ÉCLAIRAGE . . . . . . . . . . . . . . . . . . .95
COMMENT UTILISER LES ÉCOUTEURS . . . . . . . . . . . . . .95
COMMENT UTILISER LE COMMUTATEUR DX/LOCAL . . .95
COMMENT UTILISER LE COMMUTATEUR
DE VERROUILLAGE . . . . . . . . . . . . . . . . . . . . . . . . . . . . .96
COMMENT EMPÊCHER LES FUITES DE L’ACIDE
SULFURIQUE DES PILES . . . . . . . . . . . . . . . . . . . . . . . . .96
DÉPANNAGE . . . . . . . . . . . . . . . . . . . . . . . . . . . . . . . . . .97
LA PROCÉDURE DE RÉINITIALISATION . . . . . . . . . . . . . .99
LES CARACTÉRISTIQUES PRINCIPALES DU YB 550PE . .100
10RENSEIGNEMENTS SUR LES SERVICES . . . . . . . . .102
58
Nous vous remercions de votre achat du poste récepteur de
radio AM / FM / ondes courtes YB 550PE. Ce guide d’utilisation est divisé en deux sections commodes, LE FONCTIONNEMENT DE BASE et l’INTRODUCTION AUX ONDES COURTES
(les deux sections sont importantes). Si vous êtes nouveau à
l’écoute des ondes courtes, la section INTRODUCTION AUX
ONDES COURTES vous fournira toutes les informations dont
vous avez besoin pour profiter pleinement des émissions de
radio de partout dans le monde. Ce poste récepteur de radio
a été conçu et fabriqué selon des normes de qualité élevées
et fonctionnera de manière fiable pendant de nombreuses
années.Veuillez en lire soigneusement le Guide d’utilisation
afin de profiter des nombreuses fonctions intéressantes du
YB 550PE.
CE QUI EST INCLUS AVEC LE YB 550PE
• une paire d’écouteurs de style mini-écouteurs
• des piles
• une pochette de transport
LE GUIDE RAPIDE
Les utilisateurs plus expérimentés de produits numériques
pourraient préférer utiliser le guide rapide, intitulé LE GUIDE
RAPIDE DU YB 550PE, que vous pouvez trouver à partir de la
page 64. Cependant, remarquez que LE GUIDE DÉTAILLÉ
D’UTILISATION,que vous pouvez trouver à partir de la page
71, est le guide le plus approfondi et détaillé d’utilisation du
YB 550PE. Cependant, remarquez que LE GUIDE DÉTAILLÉ
D’UTILISATION,que vous pouvez trouver à partir de la page 71,
est le guide le plus approfondi et détaillé d’utilisation du YB
550PE.
59

ALLUMER / ÉTEINDRE/ Minuterie (2)
Affichage (1)
DEVANT DESSUS
CÔTÉ GAUCHE CÔTÉ DROIT
Pavé num érique (10A)
Rappel d'alarme / Éclair age
(22)
Support (20)
ARRIÈRE
Couvercle du compartiment
des piles (21)
F onction de r éveil (3)
Mémoire / Éditer ; Réglage de l'heure (5)
Réglage de la syntonisation + (7)
Réglage de la syntonisation ± (8 )
Saisie ; Régl. du sys . (6)
Bandes de fr équences AM / FM /
ondes courtes (9)
Bandes de fr équences en m ètres des
ondes courtes (10)
Balay age / P age de m émoire (4)
Commutateur
DX Local
(11)
Douille
d'antenne (12)
Prise pour
écouteurs (13)
Réglage du
volume (14)
Prise
d'alimentation
C .C . (15)
Accord fin (16)
Réglage de la
tonalit é (17)
Commutateur de
verrouillage
(18)
Antenne
télescopique
(19)
DIAGRAMMES
YB 550PE MANUEL D'OPÉRATION
60
61

AFFICHAGE DU POSTE RÉCEPTEUR DE RADIO ÉTEINT
Pointeur en triangle (23)
Symbole de l'antenne (24)
Symbole
des piles
(31)
AFFICHAGE DU POSTE RÉCEPTEUR DE RADIO ALLUMÉ
Indicateur AM / PM de l'heure (29)
Chiffres de la fr équence (34)
Pointeur en triangle (23)
Symbole de l'antenne (24)
èchelle de 1 à 5 ( 30)
AFFICHAGE DE LA MÉMOIRE
F ait seulement référence au coin supérieur droit de l'affichage.
AFFICHAGE DE LA BANDE DE FRÉQUENCES
EN MÜ TRES DES ONDES COURTES
AFFICHAGE DES CODES DE RÉGLAGE DU SYSTÜ ME
F ait seulement référence au coin supérieur droit de l'affichage.
èchelle de 1 à 5 ( 30)
Symbole de la minuterie
de veille (32)
Indicateur AM / PM de la fonction de réveil (25)
Indicateur
de
suppression
(28)
Symbole
des piles
(31)
Indicateurs
FM, MW
(AM), SW
(ondes
courtes)
(35)
Symbole de
l'activ ation de
la fonction de
réveil (27)
Chiffres de la
fonction de
réveil matin
(26)
Affichage
de la
mémoire
(36)
Affichage
de la
bande de
fréquences
en m$ tres
des ondes
courtes
(37)
(39)
(40)
Delete
Indicator
(38)
Symbole de
l'activ ation
de la
fonction de
réveil (27)
Chiffres de
l'horloge
(33)
YB 550PE MANUEL D'OPÉRATION
62
63

2 LE GUIDE RAPIDE
YB 550PE MANUEL D'OPÉRATION
Le but de ce Guide rapide est de vous permettre d’utiliser
immédiatement le poste de récepteur radio.Veuillez noter
que ce n’est pas un remplacement du Guide détaillé d’utilisation, qui est un document beaucoup plus approfondi.Veuillez
y faire référence si vous désirez consulter un mode d’emploi
détaillé, que vous pouvez trouver à partir de la page 71.
L’INSTALLATION DES PILES
Retirez le support et le couvercle du compartiment des piles,
et installez 3 piles AA alcalines.
EFFECTUEZ LES RÉGLAGES INITIAUX
Assurez-vous que le poste récepteur de radio ne soit pas
verrouillé. Le commutateur LOCK (VERROU) est sur le côté
droit du poste récepteur de radio, et doit être en position
« OFF » (HORS SERVICE). Assurez-vous que le commutateur
« DX/LOCAL », sur le côté gauche de la radio, est en position
« DX ».
COMMENT ALLUMER ET ÉTEINDRE LE YB 550PE
Si vous appuyez pendant un court instant sur la touche
«(ON/OFF -TIMER) » (ALLUMER/ÉTEINDRE–MINUTERIE), le
poste récepteur de radio s’allume alors que la minuterie de
mise hors tension automatique après 90 minutes se met en
marche, avec sur l’affichage. Pour annuler cette minuterie, ce qui permet au poste récepteur de radio de rester
allumé et en marche pendant une durée indéterminée,
appuyez pendant un long moment sur la touche. Lorsque
vous annulez la minuterie, les caractères « yb550 » apparaîtront pendant 5 secondes à l’affichage avant que le poste
récepteur de radio ne s’allume.
64
COMMENT SÉLECTIONNER FM, AM OU
LES ONDES COURTES
Utilisez la touche « FM/AM/SW Band » (Bandes de
fréquences FM / AM / ondes courtes) pour sélectionner FM,
AM ou les ondes courtes (SW). AM est indiqué avec le
symbole MW sur l’affichage.
COMMENT SYNTONISER LES STATIONS
COMMENT UTILISER LES TOUCHES « + » ET « - » Appuyez
rapidement et pendant un court instant pour syntoniser sans
balayer ; appuyez pendant un long moment pour syntoniser
avec balayage automatique. Si vous connaissez la fréquence,
appuyez sur la touche « Enter » (Saisir), puis saisissez la
fréquence à l’aide du pavé numérique. Utilisez la commande
« FINE TUNING » (ACCORD FIN) pour obtenir un accord fin
ou comme vous le feriez avec un bouton de syntonisation.
LES NOTIONS DE BASE DES ONDES
COURTES
• La réception des ondes courtes pendant la nuit est
presque toujours meilleure que la réception des ondes
courtes pendant la journée
• Pendant la journée, les bandes de fréquences des ondes
courtes les plus actives sont celles de 13, 15, 16, 19 et 22
mètres, les bandes de fréquences de 16 et 19 mètres sont
généralement les meilleures.
• Pendant la nuit, les bandes de fréquences des ondes cour-
tes les plus actives sont celles de 25, 31, 41 et 49 mètres,
65

YB 550PE MANUEL D'OPÉRATION
les bandes de fréquences de 31 et 49 mètres sont
généralement les meilleures.
• Vers le coucher et le lever du soleil, les bandes de
fréquences de jour ainsi que celles de nuit peuvent être
bonnes. Essayer plusieurs bandes de fréquences est une
bonne idée
• Se mettre très près d’une fenêtre aide souvent à obtenir
de meilleures forces de signal
• Tenir le poste récepteur de radio aide souvent à obtenir
de meilleures forces de signal (cela peut également être le
cas pour la réception AM et FM)
LA SÉLECTION D’UNE BANDE DE
FRÉQUENCES EN MÈTRES DES ONDES
COURTES
Les bandes de fréquences suivantes peuvent être sélectionnées : 120, 90, 75, 60, 49, 31, 25, 22, 19, 16, 15, 13 et 11
mètres. Si vous appuyez sur la touche « SHORTWAVE METER
BAND » (BANDE DE FRÉQUENCES EN MÈTRES DES ONDES
COURTES), le poste de récepteur radio sautera au début de la
bande de fréquences suivante.Vous pouvez également appuyer
sur la même touche, puis sur les touches « + » ou « - » pour
remonter ou redescendre les bandes de fréquences.
Commencez à syntoniser après que l’horloge soit apparue à
nouveau à l’affichage. Lorsque vous utilisez la syntonisation à
balayage automatique, le poste récepteur de radio passera
automatiquement à la bande de fréquences suivante après
avoir syntonisé par la bande de fréquences qui était sélec-
66
tionnée au départ.
TABLEAU DES BANDES DE BALAYAGE
AUTOMATIQUE POUR LES BANDES DE
FRÉQUENCES POUR ONDES COURTES
BANDE DE FRÉQUENCES (en mètres) FRÉQUENCES
(en kilohertz)
120 2250 - 2550
90 3150 - 3450
75 3850 - 4050
60 4700 - 5100
49 5800 - 6300
41 7100 - 7500
31 9400 - 1000
25 11500 - 12150
22 13500 - 13900
19 15000 - 15900
16 17450 - 18000
15 18850 - 19100
13 21450 - 21950
11 25600 - 26100
67

YB 550PE MANUEL D'OPÉRATION
LE RÉGLAGE DE L’HORLOGE ET DE LA
FONCTION DE RÉVEIL
Éteignez le poste récepteur de radio et effectuez rapidement
les opérations suivantes. L’HORLOGE : le préréglage par
défaut en usine est l’horloge en format de 24 heures. Pour le
changer, référez-vous à la page 71 du guide d’utilisation.
Appuyez puis relâchez la touche « Time set » (Réglage de
l’heure), puis utilisez les touches « + » et « - » pour régler
l‘heure.Appuyez deux fois sur « Time set » (Réglage de
l’heure) lorsque vous avez terminé. LA FONCTION DE RÉVEIL :
appuyez puis relâchez la touche « Time set » (Réglage de
l’heure), puis utilisez les touches « + » et « - » pour régler
l‘heure de la fonction de réveil. Appuyez puis relâchez une
seule fois la touche « Time set » (Réglage de l’heure) lorsque
vous avez terminé.
COMMENT STOCKER UNE FRÉQUENCE
EN MÉMOIRE
Éteignez le poste rVous pouvez stocker jusqu’à 200
fréquences dans 8 pages de mémoire, chaque page pouvant
contenir 25 fréquences.Allumez le poste récepteur de radio.
Tout d’abord, sélectionnez une page de mémoire en appuyant
sur la touche « M.Scan/Page » (Balayage/Page de mémoire)
pendant 3 secondes environ. La page de mémoire clignote
alors dans le coin supérieur droit de l’affichage. Dans les 5
secondes, sélectionnez la page voulue avec les touches « + »
et « - ». Une fois la page sélectionnée, vous devez appuyez
puis relâcher la touche « M.Scan/Page » (Balayage/Page de
Mémoire), ou bien attendre pendant 3 secondes environ, ce
qui saisira la page de mémoire. Ensuite, syntonisez sur la
68
station de radio voulue, puis appuyez et relâchez la touche
« Mem./Edit » (Mém./Éditer), et remarquez que les caractères
« PRESET » (PRÉRÉGLAGE) clignotent dans le coin supérieur
droit de l’affichage. Dans les 5 secondes, utilisez le pavé
numérique pour saisir le numéro de préréglage de mémoire
où vous désirez stocker la fréquence de la station de radio
(dans le réglage par défaut en usine, il y a 25 préréglages par
page). Saisissez un nombre entre 1 et 25. Dans les 5 secondes,
appuyez sur la touche « Mem./Edit » (Mém./Éditer).
COMMENT ACCÉDER À CE QUI EST
STOCKÉ EN MÉMOIRE
Une fois qu'un numéro de page a été sélectionné ou modifié,
même s'il n'est pas vu à l'écran, vous pouvez accéder à tout
préréglage de mémoire sur cette page en saisissant le
numéro de mémoire avec le pavé numérique. Pour changer de
page, utilisez la procédure décrite ci-dessus. La Fonction de
recherche de la mémoire permet de chercher parmi les
préréglages en mémoire dans une page de mémoire.Appuyez
et relâchez la touche « M.Scan/Page » (Balayage/Page de
mém.), puis appuyez rapidement et pendant un court instant
sur les touches « + » et « - » pour chercher parmi les
préréglages en mémoire. Si vous appuyez pendant un plus
long moment (3 secondes) sur les touches « + » et « - », le
Balayage automatique de la mémoire se met en marche, ce
qui donne 5 secondes environ sur chaque préréglage de
mémoire avant de passer automatiquement au préréglage
suivant. Pour arrêter le balayage automatique des
préréglages en mémoire, appuyez puis relâchez l'une des
touches « + » ou « - ».
69

YB 550PE MANUEL D'OPÉRATION
3 LE GUIDE DÉTAILLÉ D’UTI
COMMENT SUPPRIMER LES PRÉRÉGLAGES
EN MÉMOIRE ET LES PAGES DE MÉMOIRE
Pour supprimer une fréquence stockée dans une mémoire,
appuyez et relâchez la touche « M.Scan/Page »
(Balayage/Page de mém.), puis utilisez les touches « + » et
« - » pour sélectionner l’emplacement du préréglage de
mémoire de la fréquence que vous voulez supprimer. Ensuite,
appuyez puis maintenez appuyée la touche « Mem./Edit »
(Mém./Éditer) pendant 2 secondes environ, puis relâchez-la.
Le caractères « dEL » (Suppr.) se mettent alors à clignoter à
l’affichage. Dans les 2 secondes, appuyez puis relâchez la
touche « Mem./Edit » (Mém./Éditer). Pour supprimer le contenu en entier d’une page, appuyez et relâchez la touche
« M.Scan/Page » (Balayage/Page de mém.), puis appuyez et
maintenez appuyée la touche « Mem./Edit » (Mém./Éditer)
pendant 4 secondes, et ensuite relâchez-la. Les caractères
« dEL » (Suppr.) se mettent alors à clignoter à l’affichage
Dans les 2 secondes, appuyez puis relâchez la touche
« Mem./Edit » (Mém./Éditer).
POUR EN APPRENDRE PLUS SUR LE YB
550PE
Ce Guide rapide ne peut pas décrire toutes les capacités du
YB 550PE.Vous pouvez personnaliser le poste selon vos propres goûts avec les Codes de réglage du système. Si c’est ce
que vous voulez accomplir, référez-vous à la section intitulée
LE TABLEAU DES CODES DE RÉGLAGE DU SYSTÈME, aux
pages 93 à 94.
Remarque : dans le mode d’emploi ci-dessous, les nombres
entre parenthèses ( ) font référence aux diagrammes, et ne
sont utilisés que pour la première utilisation ou description de
l’article. Référez-vous à la section précédente intitulée LES
DIAGRAMMES.
COMMENT INSTALLER LES PILES
Installez 3 piles AA alcaline dans le compartiment des piles
(21), en suivant le diagramme de polarité des batteries qui se
trouve à l’arrière du poste récepteur radio.Pour enlever le
couvercle du compartiment des piles, enlevez d’abord le
SUPPORT (20) en retirant ses languettes d’accrochage des
côtés inférieurs du poste récepteur de radio, puis en l’enlevant de l’arrière.
COMMENT UTILISER DES PILES RECHARGEABLES : Les
piles rechargeables doivent être chargées dans leur propre
chargeur. Elles ne se chargeront pas à l’intérieur du YB
550PE. Nous vous suggérons d’utiliser des piles en nickelmétalhydrure (Ni-MH). Assurez-vous de bien changer les
CODES DE RÉGLAGE DU SYSTÈME en conséquence. Référezvous à la section intitulée LE TABLEAU DES CODES DE
RÉGLAGE DU SYSTÈME, aux pages 93 à 94.
70
71

YB 550PE MANUEL D'OPÉRATION
LA SÉLECTION ET L’UTILISATION D’UN
ADAPTATEUR CA
(adaptateur du réseau électrique) Utilisez un adaptateur qui
possède les spécifications suivantes : sortie de 4,5 volts en
courant continu, polarité négative ; capacité de courant de
100 milliampères ou plus ; diamètre intérieur du bout de la
fiche coaxiale de 3,4 millimètres, diamètre intérieur de 1,3
millimètres. Un adaptateur approprié à l’utilisation en
Amérique du Nord est offert à la vente par Eton Corporation /
Grundig. Pour obtenir de plus amples détails, visitez le site
Web www.etoncorp.com ou contactez-nous au téléphone.
Branchez-le dans la prise de courant direct (15), située sur le
côté gauche du poste récepteur de radio.
L’INDICATEUR DE LA FORCE DU SIGNAL ET
DE LA CHARGE DES PILES
Lorsque le poste récepteur de radio est éteint, le coin
supérieur gauche de l’affichage (1) indique la charge des
piles sur une échelle de 1 à 5 (30), avec un pointeur en
triangle (23) au-dessus du symbole de pile (31) sur le coté
complètement à gauche de l’échelle. Lorsque le poste récepteur de radio est allumé, le pointeur est au-dessus symbole
de l’antenne (24) et l’échelle de 1 à 5 indique la force relative
du signal.
LES RÉGLAGES INITIAUX IMPORTANTS
2. Assurez-vous que le poste récepteur de radio n’est pas
verrouillé, avec le commutateur « LOCK » (VERROU) sur
le côté droite de la radio en position « OFF » (HORS
SERVICE). Ce commutateur peut être utilisé pour
verrouiller le poste récepteur de radio lorsqu’il n’est
pas utilisé ou lorsque vous êtes en voyage.
3. Assurez-vous que le commutateur DX/LOCAL (1), sur le
côté gauche du poste récepteur de radio, est en position
DX.
72
73

4 LE FONCTIONNEMENT
DE BASE DU POSTE
RÉCEPTEUR DE RADIO
YB 550PE MANUEL D'OPÉRATION
COMMENT ALLUMER ET ÉTEINDRE
LE YB 550PE
LE YB 550PE peut être allumé par l’une des deux méthodes
expliquées ci-dessous. Pour éteindre le poste récepteur de
radio, appuyez sur la touche « ON/OFF–TIMER »
(ALLUMER/ÉTEINDRE-MINUTERIE) (2).
1. LA MÉTHODE DE L’ÉCONOMIE DES
PILES / DE LA MINUTERIE DE SOMMEI :
Appuyez rapidement et pendant un court instant sur la
touche « ON/OFF–TIMER » (ALLUMER/ÉTEINDRE–MINUTERIE) (2). Ceci force le poste récepteur radio à s’éteindre
automatiquement après 90 minutes. Remarquez que
(32) apparaît à l’affichage. Pour modifier cette durée de 90
minutes en une durée de temps que vous préférez, utilisez les
touches « + » et « – » (7, 8) immédiatement après avoir
appuyé sur le bouton , ce qui permet de sélectionner entre
1 et 120 minutes de durée d’écoute. Le nombre de minutes
que vous avez établi en dernier lieu sera également utilisé la
prochaine fois que le poste récepteur de radio est allumé.
2. LA MÉTHODE DE L’ANNULATION DE LA
MINUTERIE :
Cette méthode annule la minuterie automatique de 90 minutes
et force le poste récepteur de radio à rester allumé jusqu’à
ce qu’il soit délibérément éteint par l’utilisateur. Maintenez
la touche appuyée pendant 2 secondes environ, puis
relâchez-la. Remarquez que les caractères « YB550 »
apparaissent à l’affichage pendant 5 secondes environ,
puis que le poste récepteur de radio s’allume.
74
LES COMMANDES DE RÉGLAGE DU VOLUME
ET DE LA TONALITÉ
Le réglage du volume (14), appelé VOLUME, est situé sur le
côté gauche du poste récepteur de radio. Le réglage de tonalité
(17), sur le côté droit du poste récepteur de radio, est appelé
« NEWS/MUSIC » (NOUVELLES/MUSIQUE). Utilisez la position
que vous préférez.
COMMENT SÉLECTIONNER FM, AM OU LES
ONDES COURTES
Pour permettre la sélection de FM,AM ou des ondes courtes
(35), appuyez sur la touche appelée « FM/AM/SW Band »
(Bandes de fréquences FM / AM / ondes courtes) (9). Vous
pouvez écoutez les stations locales de votre région sur AM
et FM.Vous pouvez écoutez les stations internationales en
ondes courtes en provenance du monde entier sur SW
(ondes courtes).
Remarquez : Lorsque la bande AM est sélectionnée,
l’affichage indique MW et non AM.
75

YB 550PE MANUEL D'OPÉRATION
COMMENT RÉGLER L’ÉCOUTE DES ONDES AM
ET FM EN DEHORS DE L’AMÉRIQUE DU NORD
Vous pouvez sauter cette section si vous êtes en Amérique du
nord et si vous venez d’acheter le YB 550PE. Il est déjà réglé
à l’usine pour être utilisé en Amérique du Nord. Si vous voyagez dans d’autres régions du monde, effectuez les changements ci-dessous lorsque c’est nécessaire. En dehors de
l’Amérique du Nord, les stations AM (MW sur l’affichage du
YB 550PE) sont espacées de 9 kHz. La gamme des fréquences
FM peut être semblable à celle qui est utilisée au Japon,
entre 76 MHz et 108 MHz. Pour effectuer ces changements,
veuillez lire les instructions intitulées LE TABLEAU DES CODES
DE RÉGLAGE DU SYSTÈME, situées au pages 93 à 94.
LES QUATRE FAÇONS DE SYNTONISER
UNE STATION
Il y a quatre façons de syntoniser une station, et elles sont
décrites en détail ci-dessous :
1. LA SYNTONISATION STANDARD
(SYNTONISATION MANUELLE)
Appuyez rapidement et pendant un court instant sur les
touches « + » et « – » pour syntoniser les fréquences
supérieures ou inférieures.
2. LA SYNTONISATION PAR BALAYAGE
AUTOMATIQUE
Appuyez sur les touches « + » ou « – » pendant un peu plus
d’une seconde pour mettre en marche la syntonisation par
balayage automatique. Le poste récepteur de radio s’arrêtera
76
alors automatiquement à la station suivante qu’il balayera.
Utilisez la touche « + » pour balayer automatiquement vers
les fréquences plus élevées, et la touche « – » pour balayer
automatiquement vers les fréquences plus basses.
3. LA SAISIE DIRECTE DES FRÉQUENCES
Lorsque vous connaissez la fréquence exacte voulue, vous
pouvez la saisir à l’aide du pavé numérique (10A) et de la
touche « Enter » (Saisir).Assurez-vous que la bande de
fréquences correcte,AM, FM ou ondes courtes, est sélectionnée.
Pour saisir une fréquence, effectuez rapidement la suite des
opérations suivantes :
a. appuyez puis relâchez la touche « Enter » (Saisir) (6)
b. saisissez la fréquence en utilisant la pavé numérique.
4. L’ACCORD FIN
La commande « FINE TUNING » (ACCORD FIN) (16), est
située sur le côté droit du poste récepteur de radio. Elle
syntonise en bonds de 1 kilohertz en AM et en ondes courtes,
et en bonds de 0,05 mégahertz en FM. Utilisez-la pour
« accorder finement » des stations comme vous le désirez,
ou utilisez-la comme vous le feriez pour un bouton de
syntonisation.
77

5 L’UTILISATION DES
ONDES COURTES
YB 550PE MANUEL D'OPÉRATION
Vous pouvez écoutez des stations en provenance du monde
entier grâce aux ondes courtes. Si vous êtes complètement
nouveau à l’écoute des ondes courtes, ou que vous nécessitez
un rappel sur les notions de base des ondes courtes, veuillez
vous référer au GUIDE D’ÉCOUTE DES ONDES COURTES qui
accompagne ce produit. Pour vous lancer sur la bonne voie,
certaines notions de bases sont indiquées ci-dessous
• La réception des ondes courtes pendant la nuit est
presque toujours meilleure que la réception des ondes
courtes pendant la journée.
• Pendant la journée, les bandes de fréquences des ondes
courtes les plus actives sont celles de 13, 15, 16, 19 et 22
mètres, les bandes de fréquences de 16 et 19 mètres sont
généralement les meilleures. Pendant la nuit, les bandes
de fréquences des ondes courtes les plus actives sont
celles de 25, 31, 41 et 49 mètres, les bandes de
fréquences de 31 et 49 mètres sont généralement les
meilleures.
• Vers le coucher et le lever du soleil, les bandes de
fréquences de jour ainsi que celles de nuit peuvent être
bonnes., quelques fois même exceptionnellement bonnes.
L’écoute pendant ces heures peut souvent être de très
bonne qualité
• La force du signal est souvent plus forte lorsque vous
tenez le poste radio et que vous êtes très près d’une
fenêtre.
LA SÉLECTION D’UNE BANDE DE FRÉQUENCES
EN MÈTRES DES ONDES COURTES
Le poste récepteur de radio peut accéder à chacune des 14
78
bandes de fréquences de radiodiffusion internationale. Les
bandes de fréquences sont numérotées 120, 90, 75, 60, 49,
31, 25, 22, 19, 16, 13 et 11 mètres. Référez-vous à la section
ci-dessous intitulée LE TABLEAU DES BANDES DE BALAYAGE
AUTOMATIQUE POUR LES BANDES DE FRÉQUENCES DES
ONDES COURTES qui indiquent les gammes complètes de
fréquences pour chacune des bandes de fréquences utilisées
par le système de balayage automatique du poste récepteur
de radio. Il y a deux manières d’accéder une bande de
fréquences, chaque méthode place le syntoniseur au début de
la bande de fréquences qui a été accédée.
1. Chaque fois que vous appuyez rapidement et pendant un
court instant sur la touche appelée « SHORTWAVE METER
BAND » (BANDES DE FRÉQUENCES EN MÈTRES DES
ONDES COURTES) (10), le poste récepteur de radio est
syntonisé a u début de la bande de fréquences. Pendant
que vous appuyez sur la touche, le numéro de bande de
fréquences est indiqué dans le coin supérieur droit de
l’affichage (37) et disparaît quelques secondes après que
la touche ait été relatée, ce qui permet à l’horloge de
réapparaître dans ce coin de l’affichage. Ne commencez
à syntoniser qu’après que l’horloge ait réapparue.
2. Appuyez rapidement et pendant un court instant sur la
touche appelée « SHORTWAVE METER BAND » (BANDES
DE FRÉQUENCES EN MÈTRES DES ONDES COURTES), et
appuyez ensuite, immédiatement, rapidement et pendant
un court instant, sur les touches de syntonisation « + »
ou « - ». Le numéro de bande de fréquences apparaît
alors dans le coin supérieur droit de l’affichage.Après
avoir sélectionné la bande de fréquences de votre choix,
commencez à syntoniser après que l’horloge ait réapparu
dans le coin supérieur droit de l’affichage.
79

YB 550PE MANUEL D'OPÉRATION
6 LES CARACTÉRISTIQUES
DE L’HORLOGE ET DE LA
FONCTION DE RÉVEIL
LA SYNTONISATION AUTOMATIQUE EN
ONDES COURTES
En ondes courtes, la syntonisation en balayage automatique
ne balaye automatiquement que les gammes de fréquences
des ondes courtes listées ci-dessous dans LE TABLEAU DES
BANDES DE BALAYAGE AUTOMATIQUE POUR LES BANDES DE
FRÉQUENCES DES ONDES COURTES. Pour syntoniser des
fréquences des ondes courtes qui sont entre ces gammes, ou
à l’extérieur de ces gammes, utilisez l’une des autres méthodes de syntonisation.
LE TABLEAU DES BANDES DE BALAYAGE AUTOMATIQUE
POUR LES BANDES DE FRÉQUENCES DES ONDES COURTES
BANDE DES FRÉQUENCES FRÉQUENCES
(en mètres) (en kilohertz)
120 2250 - 2550
90 3150 - 3450
75 3850 - 4050
60 4700 - 5100
49 5800 - 6300
41 7100 - 7500
31 9400 - 1000
25 11500 - 12150
22 13500 - 13900
19 15000 - 15900
16 17450 - 18000
15 18850 - 19100
13 21450 - 21950
11 25600 - 26100
80
LE RÉGLAGE DE L’HORLOGE
Le réglage par défaut en usine a établi le fonctionnement de
l’horloge en format d’horloge de 24 heures. Si vous préférez
un format d’horloge « AM/PM » (matin / après-midi ou soir)
de 12 heures, référez-vous à la section intitulée COMMENT
FAIRE PASSER L’HORLOGE DU FORMAT DE 24 HEURES AU
FORMAT DE 12 HEURES, à la page 91.
Pour régler l’horloge :
1. éteignez le poste récepteur de radio. les chiffres de l’hor-
loge apparaissent dans la partie inférieure de l’affichage
(28).
2. appuyez puis relâchez la touche appelée « Time set »
(Réglage de l’heure). Les chiffres de l’horloge clignotent à
l’affichage.
3. Dans les 5 secondes, réglez les heures en utilisant la
touche « + », et réglez les minutes en utilisant la touche
« - ». Assurez-vous que « AM » (matin) ou « PM » (aprèsmidi ou soir) (29) apparaît à l’affichage selon l’heure, si
votre horloge est réglée en format d’horloge « AM/PM »
(matin / après-midi ou soir) de 12 heures.
4. Dans les 5 secondes après avoir terminé, appuyez puis
relâchez deux fois la touche « Time set » (Réglage de
l’heure).
81

YB 550PE MANUEL D'OPÉRATION
LE RÉGLAGE DE LA FONCTION
Après avoir réglé l’heure de la fonction du réveil, assurezvous de lire la section suivante intitulée LA MISE EN MARCHE
ET LA MISE EN SOMMEIL DE LA FONCTION DE RÉVEIL. La
fonction de réveil vous réveillera à la dernière station de
radio syntonisée, à moins que le poste récepteur de radio ne
soit réglé pour le Réveil à une station préférée.Voir ci-dessous.
Le poste récepteur de radio restera en marche pendant 30
minutes, jusqu’à ce que vous l’éteigniez ou que vous
appuyiez sur la touche « SNOOZE/LIGHT » (RAPPEL
D’ALARME / ÉCLAIRAGE) (voir la section L’UTILISATION DE LA
FONCTION DE RAPPEL D’ALARME, ci-dessous).
1. éteignez le poste radio. Les chiffres de l’horloge de la
fonction de réveil (26) apparaissent dans la coin supérieur
droit de l’affichage.
2. appuyez puis relâchez deux fois la touche appelée « Time
set » (Réglage de l’heure). Les chiffres de l’horloge de la
fonction de réveil clignoteront alors à l’affichage.
3. dans les 5 secondes, réglez les heures en utilisant la
touche « + », et réglez les minutes en utilisant la touche
« - ». Assurez-vous que « AM » (matin) ou « PM » (aprèsmidi ou soir) (25) apparaît à l’affichage selon l’heure, si
votre horloge est réglée en format d’horloge « AM/PM »
(matin / après-midi ou soir) de 12 heures.
4. Dans les 5 secondes après avoir terminé, appuyez puis
relâchez une fois la touche « Time set » (Réglage de
l’heure).
82
LA RÉVEIL À UNE STATION PRÉFÉRÉE
Utilisez le code de réglage du système 01. Référez-vous aux
pages 93 à 94.
LA FONCTION DE RAPPEL D’ALARME
L’UTILISATION DE LA FONCTION DE RAPPEL
D’ALARME
Lorsque le réveil se met en marche et allume le poste
récepteur de radio, le symbole apparaît en clignotant à
l’affichage. Pendant que le symbole clignote, appuyez puis
relâchez la touche « SNOOZE/LIGHT » (RAPPEL
D’ALARME/ÉCLAIRAGE) (22). Le poste récepteur de radio
s’éteindra et se rallumera à nouveau dans 10 minutes. Ce
processus peut être répété jusqu’à 3 fois.
LA MISE EN MARCHE ET LA MISE EN
SOMMEIL DE LA FONCTION DE RÉVEIL
Pour que la fonction de réveil puisse fonctionner, elle doit être
mise en marche en appuyant sur la touche appelée « ALARM
» (FONCTION DE RÉVEIL) (3). Le symbole (27) apparaît à
l’affichage. Pour mettre en sommeil la fonction de réveil,
appuyez puis relâchez encore une fois la touche « ALARM »
(FONCTION DE RÉVEIL), et le symbole disparaîtra de
l’affichage. Remarquez qu’une fois que la fonction de réveil
allume le poste récepteur radio et que le symbole de réveil
illustré ci-dessus clignote, les commandes du poste récepteur
de radio, à l’exception de la touche « SNOOZE/LIGHT »
(RAPPEL D’ALARME/ÉCLAIRAGE), ne fonctionneront plus
jusqu’à ce que vous appuyiez sur la touche « ON/OFF–TIMER
» (ALLUMER/ÉTEINDRE-MINUTERIE).
83

7 L’UTILISATION
DE LA MÉMOIRE
YB 550PE MANUEL D'OPÉRATION
Pour stocker des fréquences en mémoire, il faut d’abord
apprendre à sélectionner les pages de mémoire. La configuration par défaut en usine consiste en 8 pages de mémoire, où
chaque page peut contenir 25 fréquences. Ceci permet de
stocker 200 fréquences en mémoire. Cette configuration par
défaut peut être modifiée et personnalisée selon vos besoins
propres. Référez-vous à la section intitulée COMMENT
PERSONNALISER LES PAGES DE MÉMOIRE, à la page 89.
COMMENT SÉLECTIONNER
UNE PAGE DE MÉMOIRE
1. Appuyez puis maintenez appuyée la touche
« M.Scan/Page » (Balayage/Page de mém. ) (4) pendant 3
secondes environ. Ensuite, relâchez-la. Remarquez que le
numéro de la page de mémoire (36) clignote dans le coin
supérieur droit de l’affichag
2. Dans les 5 secondes, sélectionnez la page voulue avec les
touches « + » et « - ».Vous verrez la page de mémoire
change chaque fois que vous appuyez sur l’une de ces
touches. Lorsque vous avez atteint la page de votre choix,
arrêtez d’appuyer.
3. Lorsque vous avez terminé, appuyez puis relâchez la
touche « M.Scan/Page » (Balayage/Page de mém. ), ou
bien attendez pendant 3 secondes environ, ce qui saisira
la page de mémoire. L’horloge (33) apparaîtra à nouveau
dans le coin supérieur droit de l’affichage.
84
COMMENT GARDER DES STATIONS
EN MÉMOIRE
Dans le mode d’emploi ci-dessous, les termes « préréglage »
et « préréglage de lamémoire » font référence aux emplacements de mémoire.
1. Allumez le poste récepteur de radio.
2. Sélectionnez la page de mémoire que vous voulez utiliser,
en utilisant la procédure intitulée COMMENT
SÉLECTIONNER UNE PAGE DE MÉMOIRE, ci-dessus. Si
vous savez que le poste récepteur de radio est déjà sur la
bonne page de mémoire, sautez cette étape.
3. Syntonisez à la station voulue.
4. Appuyez puis relâchez la touche « Mem./Edit »
(Mém./Éditer). Remarquez que les caractères « PRESET »
(PRÉRÉGLAGE) (36) clignotent dans le coin supérieur droit
de l’affichage. La numéro de la page de mémoire est
également affiché, mais ne clignote pas.
5. Dans les 5 secondes, utilisez le pavé numérique pour saisir
le numéro de préréglage de mémoire où vous voulez
stocker la fréquence de la station (dans la configuration
par défaut en usine, il y a 25 préréglages par page).
Saisissez un nombre entre 1 et 25.
6. Dans les 5 secondes, appuyez sur la touche « Mem./Edit »
(Mém./Éditer) ou attendez pendant 5 secondes.Après
quelques secondes, le coin supérieur droit de l’affichage
indique à nouveau l’horloge.
85

YB 550PE MANUEL D'OPÉRATION
COMMENT SUPPRIMER LES PRÉRÉGLAGES
EN MÉMOIRE ET LES PAGES DE MÉMOIRE
Les trois méthodes pour accéder à ce qui a été stocké en
mémoire sont décrites ci-dessous : l’accès direct à la
mémoire, la fonction de recherche de la mémoire et la fonction de balayage automatique de la mémoire. Lorsque les
numéros de la page de mémoire et du préréglage de
mémoire apparaissent dans le coin supérieur droit de l’affichage, comme ce sera le cas dans les sections ci-dessous, le
poste récepteur de radio est en MODE D’ACCÈS À LA
MÉMOIRE.Vous pouvez quitter ce mode à tout moment en
appuyant puis relâchant la touche « M. Scan/Page »
(Balayage/Page de mém.).
L’ACCÈS DIRECT À LA MÉMOIRE : pour accéder directement à un préréglage de mémoire, vous devez saisir le
numéro de la page et le numéro du préréglage, tel
qu’expliqué ci-dessous :
1. appuyez puis maintenez appuyée la touche «
M.Scan/Page » (Balayage/Page de mém.) pendant 3
secondes environ. Ensuite, relâchez-la. Remarquez que le
numéro de la page de mémoire clignote dans le coin
supérieur droit de l’affichage.
2. dans les 5 secondes, sélectionnez la page voulue avec les
touches « + » et « - ».
3. dans les 5 secondes, utilisez le pavé numérique pour saisir
le numéro de préréglage de mémoire auquel vous voulez
accéder. (s’il est inférieur à 10, saisissez 01, 02, etc.)
REMARQUE : une fois qu’un numéro de page a été sélectionné ou modifié, même s’il n’est pas vu à l’écran, vous
pouvez sélectionner un préréglage de mémoire sur cette
page en saisissant le numéro de la mémoire avec le pavé
numérique, sans avoir à répéter les étapes 1 et 2 cidessus.
86
LA MÉMOIRE
LA FONCTION DE RECHERCHE DE LA MÉMOIRE la fonc-
tion de recherche de la mémoire vous permet de chercher
parmi les préréglages en mémoire dans une page de
mémoire, tel qu’expliqué ci-dessous :
1. appuyez puis relâchez la touche « M.Scan/Page »
(Balayage/Page de mém.).
2. appuyez rapidement et pendant un court instant sur les
touches « + » ou « - » pour chercher parmi les
préréglages en mémoire.
LA FONCTION DE BALAYAGE AUTOMATIQUE DE LA
MÉMOIRE : la fonction de balayage automatique de la
mémoire permet de balayer les préréglages en mémoire à
l’intérieur d’une page de mémoire. La mémoire qui est balayée permet d’écouter une station de radio pendant 5 seconds environ, et passera ensuite automatiquement à la
mémoire suivante. Le balayage automatique continuera
indéfiniment sur la page sélectionnée jusqu’à ce que cette
fonction soit délibérément arrêtée.
1. Appuyez puis relâchez la touche « M.Scan/Page »
(Balayage/Page de mém.).
2. Appuyez puis maintenez appuyée la touche « + » ou « - »
pendant 3 secondes environ. Ensuite, relâchez-la.
Remarquez que le numéro du préréglage de mémoire clignote dans le coin supérieur droit de l’affichage et que le
préréglage qui est balayé demeure pendant 5 secondes
environ. Il passe ensuite au préréglage de mémoire suivant pendant 5 autres secondes. Pour arrêter le balayage
automatique des préréglages en mémoire, appuyez puis
relâchez l’une des touches « + » ou « - ».
87

YB 550PE MANUEL D'OPÉRATION
COMMENT DÉPLACER UNE FRÉQUENCE
STOCKÉE EN MÉMOIRE
1. Allumez le poste récepteur de radio.
2. Appuyez puis maintenez appuyée la touche
« M.Scan/Page » (Balayage/Page de mém.) pendant 3
secondes environ, puis relâchez-la.
3. Utilisez la touche « + » ou « – » pour sélectionner la
page de mémoire nécessaire.
4. Appuyez puis relâchez deux fois la touche « M.Scan/Page »
(Balayage/Page de mém.).
5. Appuyez puis relâchez la touche « Mem./Edit »
(Mém./Éditer).
6. Dans les 5 secondes, utilisez le pavé numérique pour saisir
le numéro de préréglage de mémoire dans lequel vous
désirez stocker la fréquence de la station.
7. Dans les 5 secondes, appuyez puis relâchez la touche
« Mem./Edit » (Mém./Éditer).
LA SUPPRESION D’UNE FRÉQUENCE STOCKÉE
EN MÉMOIRE
1. Appuyez puis relâchez la touche « M.Scan/Page »
(Balayage/Page de mém.).
2. Utilisez la touche « + » ou « – » pour sélectionner
l’emplacement du préréglage de mémoire de la fréquence
que vous voulez supprimer.
3. Appuyez puis maintenez appuyée la touche « Mem./Edit »
(Mém./Éditer) pendant 2 secondes environ, puis relâchez-la.
Le caractères « dEL » (Suppr.) se mettent alors à clignoter
à l’affichage
4. Dans les 2 secondes, appuyez puis relâchez la touche
88
« Mem./Edit » (Mém./Éditer).
LA SUPPRESSION DE TOUT LE CONTENU EN
MÉMOIRE D’UNE PAGE
1. Appuyez puis relâchez la touche « M.Scan/Page »
(Balayage/Page de mém.).
2. Appuyez puis maintenez appuyée la touche « Mem./Edit »
(Mém./Éditer) pendant 4 secondes, puis relâchez-la. Les
caractères « Del » (Suppr.) se mettent alors à clignoter à
l’affichage.
3. Dans les 2 secondes, appuyez puis relâchez la touche
« Mem./Edit » (Mém./Éditer).
COMMENT PERSONALISER LES PAGES DE
MÉMOIRE
Le nombre de pages de mémoire peut être modifié de 8 en 4,
5 ou 20. Bien que cela modifie le nombre de fréquences
stockées par pages, dans tous les cas un maximum de 200
fréquences peut être stocké en mémoire. Pour examiner le
détail de ces changements et pour effectuer ces changements, veuillez lire le mode d’emploi intitulé LE TABLEAU DES
CODES DE RÉGLAGE DU SYSTÈME, aux pages 93 à 94.
89

8 LE TABLEAU DES CODES DE
RÉGLAGE DU SYSTÈME
YB 550PE MANUEL D'OPÉRATION
Certaines fonctions peuvent être programmées et modifiées
en utilisant les CODES DE RÉGLAGE DU SYSTÈME. Ces fonctions et leur description sont indiquées dans LE TABLEAU DES
CODES DE RÉGLAGE DU SYSTÈME, à la page 93.
COMMENT CHANGER LES CODES DE
RÉGLAGE DU SYSTÈME
Pour saisir le code du système de votre choix, utilisez la
procédure ci-dessous.
1. Éteignez le poste récepteur de radio.
2. Appuyez puis relâchez la touche « Sys. Set » (Régl. du
sys.) (6). Remarquez que les caractères « -- » (39) apparaissent dans le coin supérieur droit de l’affichage, et que
les chiffres de l’horloge disparaissent.
3. Dans les 5 secondes, saisissez le code numérique voulu
avec la pavé numérique, puis appuyez et relâchez immédiatement le touche appelée « ENTER » (SAISIR). Le code
« ICON » (ICÔNE) apparaîtra un court instant au coin
inférieur droit de l’affichage.
COMMENT FAIRE PASSER L’HORLOGE DU
FORMAT DE 24 HEURES AU FORMAT DE 12
HEURES
Le mode d’emploi ci-dessous constituent un très bon exemple
de la façon de changer un code de réglage du système, dans
ce cas il s’agit de faire passer le système d’horloge à une
format de 12 heures :
1. éteignez le poste récepteur de radio.
2. appuyez puis relâchez la touche « Sys. Set » (Régl. du
sys.). Remarquez que les caractères « -- » apparaissent
dans le coin supérieur droit de l’affichage, et que les
chiffres de l’horloge disparaissent.
3. dans les 5 secondes, saisissez le nombre 12 à l’aide du
pavé numérique, puis appuyez et relâchez immédiatement
la touche appelée « ENTER » (SAISIR). Les caractères
« 12H » apparaissent un court instant à l’affichage.
90
91

YB 550PE MANUEL D'OPÉRATION
LES CODES DE RÉGLAGE DU SYSTÈME PAR
DÉFAUT EN USINE QUI SONT UTILISÉS EN
AMÉRIQUE DU NORD
Lorsqu’il est livré de l’usine, le poste récepteur radio est réglé
de la façon suivante. Des modifications peuvent être effectuées à l’aide du TABLEAU DES CODES DE RÉGLAGE DU
SYSTÉME et de la section intitulée COMMENT CHANGER LES
CODES DE RÉGLAGE DU SYSTÈME, sur la page précédente
• Système d’horloge en format de 24 heures. Code 24.
• Bonds de syntonisation de 10 kHz en AM (MW). Code 10.
• Huit pages avec 25 mémoires chacune (200 mémoires au
total). Code 08.
• Couverture des fréquences de 87 MHz à 108 MHz en FM.
Code 88.
• Piles AA de 1,5 volts. Code 29.
• La fonction réveil du poste récepteur de radio utilise la
dernière station syntonisee. Code 02.
COMMENT SURVEILLER LE STATUT DES
CODES DE RÉGLAGE ACTUELS
Dans le tableau des codes de réglage qui est affiché cidessous, le statut actuel des codes de réglage qui sont
indiqués avec une astérisque (« * ») peut être surveillé en
appuyant pendant 3 secondes sur la touche « Sys. Set »
(Réglage du sys.). L’icône applicable apparaît un court instant
dans la fenêtre d’affichage pour chaque code.
LE TABLEAU DES CODES DE RÉGLAGE DU
SYSTÈME
CE QUI APPARAÎT
No DE CODE DESCRIPTION À L’AFFICHAGE
01 * La fonction de réveil utilise la station AL. 1
de radio à la page 1, mémoire 1
02 * La fonction de réveil utilise la AL. 2
dernière station syntonisée
04 Diviser les mémoires en 4 pages P4: 50
avec 50 adresses chacune
05 Diviser les mémoires en 5 pages P5:40
avec 40 adresses chacunes
08 Diviser les mémoires en 8 pages P8: 25
avec 25 adresses chacune
20 Diviser les mémoires en 20 pages P20:10
avec 10 adresses chacune
09 * Régler le bond de syntonisation à
9 kHz pour MW (AM) 9KHz
10 * Régler le bon de syntonisation à
10 kHz pour MW (AM 10KHz
12 * Régler le système de l’horloge en
format de 12 heures
92
93

YB 550PE MANUEL D'OPÉRATION
9 RENSEIGNEMENTS
SUPPLÉMENTAIRES
24 * Régler le système de l’horloge
en format de 24 heures
22 Vérifier tous les segments sur Tous les
l’affichage de l’écran à cristaux segments de
liquides et le numéro du modèle l’écran à
cristaux liquides
sont affichés
28 * Des piles rechargeables seront 1.2
utilisées
29 * Des piles AA normales seront 1.5
utilisées
76 * Régler la gamme de fréquences FM, 76 108
de 76 MHz à 108 MHz (Japon)
88 * Régler la gamme de fréquences FM, 87 108
de 87 MHz à 108 MHz (Amérique du
Nord ; Europe de l’Ouest).
L’UTILISATION DE L’ÉCLAIRAGE
Si vous appuyez puis relâchez rapidement et un court instant
la touche « SNOOZE/LIGHT » ( RAPPEL D’ALARME /
ÉCLAIRAGE) (22), située au-dessus du poste de radio, l’éclairage de l’affichage s’allumera, en éclairant à partir du
côté droit de l’affichage, pendant 10 secondes environ. Si
vous appuyez puis relâchez la touche plus longtemps (5 secondes), l’éclairage restera allumé indéfiniment(remarquez que
cela diminuera fortement la durée de vie des piles).Vous pouvez éteindre l’éclairage en appuyant rapidement et un court
instant sur la touche.
COMMENT UTILISER DES ÉCOUTEURS
Branchez les écouteurs / le casque stéréo avec une fiche
stéréo de 1/8 de pouce dans le prise pour écouteurs (13)
située sur le côté gauche du poste récepteur de radio.
COMMENT UTILISER LE COMMUTATEUR
« DX LOCAL »
Utilisez toujours la position « DX ». N’utilisez la position «
LOCAL » que si vous habitez très près de la station de radio
locale que vous écoutez, et que sa puissance provoque des
distorsions audio. « DX » signifie « distance ». Cette position
donne au poste récepteur de radio un sensibilité maximale
aux signaux radio.
94
95

YB 550PE MANUEL D'OPÉRATION
COMMENT UTILISER LE COMMUTATEUR DE
VERROUILLAGE
Si vous mettez le commutateur « LOCK » (VERROUILLAGE) en
position « ON » (EN SERVICE), toutes les touches et la commande « FINE TUNING » (ACCORD PRÉCIS) seront rendus
inopérants. Si la radio est allumée pendant que le commutateur « LOCK » (VERROUILLAGE) est en service, la commande
de réglage du volume sera toujours opérationnelle. C’est une
fonction excellente à utiliser lorsque vous voyagez. Avant de
mettre le poste récepteur de radio dans une valise, un sac à
main ou une serviette, éteignez-le puis verrouillez-le. Ceci
empêchera une mise en marche accidentelle et l’épuisement
des piles.
COMMENT EMPÊCHER LES FUITES DE
L’ACIDE DES PILES
Pour empêcher les fuites de l’acide des piles, n’utilisez que
des piles de grande qualité, alcalines ou rechargeables en
nickel-métal-hydrure. Ne mélangez jamais des piles vieilles et
neuves, ou des marques ou types différents de piles. Si les
piles fuient, contactez immédiatement le fabricant des piles
et ne les jetez pas. Les fuites d’acide des batteries ne
sont pas couvertes sous la garantie, et annulent la
garantie.
DÉPANNAGE
LE POSTE RÉCEPTEUR DE RADIO NE
S’ALLUME PAS
• Assurez-vous que le commutateur « LOCK » (VERROUIL-
LAGE) est en position « OFF » (hors service).
• Assurez-vous que le poste récepteur de radio est alimenté
par des piles ou par un adaptateur CA
• Assurez-vous que l’adaptateur CA est branché dans une
prise de courant de la maison (prise du réseau électrique)
et dans la prise d’alimentation C.C. du poste récepteur de
radio. Faites attention de ne pas le brancher dans la prise
pour écouteurs ou la douille d’antenne. Il se peut que
l’adaptateur CA soit défectueux
• Assurez-vous que les piles sont insérées avec la bonne
polarité
• Assurez-vous que les piles ne sont pas épuisées
L’HORLOGE APPARAÎT DANS
L’AFFICHAGE, MAIS LE POSTE RÉCEPTEUR
DE RADIO NE S’ALLUME PAS
Il y a deux possibilités : des piles mortes ou le commutateur
« LOCK » (VERROUILLAGE) est en position «ON » (EN
SERVICE).
LE POSTE RÉCEPTEUR DE RADIO
S’ÉTEINT BRUSQUEMENT LORSQUE
VOUS L’UTILISEZ SOUS PILES
Ceci est causé par des piles épuisées.
96
97

YB 550PE MANUEL D'OPÉRATION
LE POSTE RÉCEPTEUR DE RADIO S’ÉTEINT
BRUSQUEMENT LORSQUE VOUS LE
DÉPLACEZ ET VOUS L’UTILISEZ AVEC UN
ADAPTATEUR CA
Ceci est causé par un câble cassé ou un branchement lâche
dans le cordon de l’adaptateur CA.
LE POSTE RÉCEPTEUR DE RADIO
FONCTIONNE IRRÉGULIÉREMENT
Effectuez une RÉINITIALISATION,tel que décrit dans la section intitulée LA PROCÉDURE DE RÉINITIALISATION.
LE SIGNAL DES STATIONS REÇUES EST
TROP FAIBLE
• Assurez-vous que le commutateur « DX/LOCAL » est en
position « DX »
• Assurez-vous que l’antenne télescopique est déployée en
entier pour la réception FM et des ondes courtes
• Si vous écoutez des stations AM, faites pivoter le poste
radio. L’antenne AM intégrée à ferrite est très directionnelle
IL N’Y A PAS DE SON EN PROVENANCE
DU HAUT-PARLEUR
Assurez-vous que des écouteurs ou un casque ne sont pas
branchés dans le poste récepteur de radio, et que la commande de réglage du volume est à un niveau élevé.
LE SIGNAL DES STATIONS REÇUES EST
TROP FAIBLE
• Assurez-vous que le commutateur « DX/LOCAL » est en
position « DX »
• Assurez-vous que l’antenne télescopique est déployée en
entier pour la réception FM et des ondes courtes
98
• Si vous écoutez des stations AM, faites pivoter le poste
radio. L’antenne AM intégrée à ferrite est très directionnelle
UNE STATION PROVOQUE DES DISTORTIONS AUDIO GRAVES, MAIS SEMBLE
POSSÉDER UN SIGNAL TRÈS FORT
Il s’agit probablement d’une station locale et forte, très près
de votre emplacement. Comme cette station est très proche
de vous, son signal est trop fort. Pour réduire la puissance du
signal, mettez le commutateur « DX/LOCAL » en position
« LOCAL ». Essayez également de resyntoniser la station avec
la commande « FINE TUNING » (ACCORD FIN).
LE COMPARTIMENT DES PILES CONTIENT
UN LIQUIDE COLLANT OU UNE POUDRE
BLANCHE DESSÉCHÉE
C’est la conséquence de fuite d’acide de batterie. Les fuites
d’acide de batterie ne sont pas couvertes sous la garantie. Ne
jetez pas les batteries qui fuient et contactez immédiatement
leur fabricant.
LA PROCÉDURE DE RÉINITIALISATION
Lorsque vous effectuez une « réinitialisation », assurez-vous
que les piles utilisées sont en bonne condition. Si le poste
récepteur de radio ne fonctionne pas et que les solutions cidessous ne résolvent pas le problème, effectuez une « réinitialisation ». Pour effectuer cette opération, enlevez les piles,
et appuyez puis relâchez le petit bouton rond qui est encastré
à l’intérieur du compartiment des piles, en utilisant un trombone redressé ou un stylo à bille. Réinstallez les piles et
essayez le poste récepteur de radio. Si cela ne résout toujours
pas le problème, essayez à nouveau, en appuyant 2 ou trois
fois sur le bouton.
99

YB 550PE MANUEL D'OPÉRATION
LES CARACTÉRISTIQUES PRINCIPALES
DU YB 550PE
• LES ONDES COURTES – 1 711 kHz à 29 995 kHz. o FM
97,0 MHz à 108,0 MHz ; MW (AM) 520 kHz à 1 710 kHz
• Syntonisation manuelle et à balayage automatique o
Saisie directe des fréquences avec le pavé numérique
• Balayage manuel ou automatique pour balayer les
stations préréglées
• Une commande d’accord fin
• 200 mémoires à accès sélectif programmables
• Personnalisation des pages de mémoire
• Un sélecteur de taille de bond de 9 ou 10 kHz pour bien
recevoir les ondes hectométriques (AM) dans le monde
entier
• Des indicateurs de la force du signal / du niveau de
puissance / de la stéréo pour FM
• Une horloge numérique o Des formats sélectionnables
d’affichage de l’horloge en 12 ou 24 heures.
• Affichage simultané de la fréquence et de l’horloge o
Réveil à une station préférée.
• Une fonction de réveil programmable o Une fonction de
minuterie de sommeil programmable (de 10 à 90 minutes)o Éclairage de l’écran à cristaux liquides o Des
antennes intégrées pour la réception en AM, FM et ondes
courtes
• Une prise pour les écouteurs (des écouteurs de style
mini-écouteurs sont inclus)
• Une prise d’adaptateur CA (l’adaptateur n’est pas
compris)
• Une douille d’antenne externe (l’antenne externe n’est
pas comprise)
• Inclut une pochette de transport
100
101

10 RENSEIGNEMENTS
SUR LES SERVICES
YB 550PE MANUEL D'OPÉRATION
Pour obtenir de plus amples renseignements ou de l’assistance, vous pouvez contacter le Service des réparations de
Etón en appelant les numéros sans frais suivant, du lundi au
vendredi, de 8 h 30 à 16 h, heure normale du Pacifique:
1-800-872-2228 (AUX ÉTATS-UNIS)
1-800-673-1648 (AU CANADA)
Veuillez appeler pour obtenir un Numéro d’autorisation de
retour avant d’expédier votre appareil. Si vous voulez renvoyer
votre appareil pour le faire réparer, emballez soigneusement
le récepteur en utilisant sa boîte d’origine ou une autre boîte
appropriée. Inscrivez lisiblement votre adresse de retour sur la
boîte d’expédition et sur la lettre jointe qui décrit la réparation nécessaire, les symptômes ou les problèmes. Veuillez
inclure aussi le numéro de téléphone où l’on peut vous joindre
pendant la journée, ainsi qu’une copie de votre preuve
d’achat. Le récepteur sera réparé selon les modalités de la
Garantie limitée de Etón et vous sera retourné.
LA GARANTIE LIMITÉE DE UN AN
Etón garantit à l’acheteur initial que ce produit sera exempt
de tout défaut de matériau ou de main-d’oeuvre pendant une
année à partir de la date de l’achat initial.
Pendant la durée de la garantie, Etón ou un centre accrédité
de réparation Etón fournira, gratuitement, les pièces et la
main-d’oeuvre nécessaires pour corriger les vices de matériau
et de main-d’oeuvre. En outre, Etón peut choisir de remplacer
un appareil défectueux.
102
(1) Remplissez et envoyez la Fiche d’enregistrement de la
garantie dans les dix (10) jours qui suivent la date de
l’achat.
(2) Appelez Etón ou le centre accrédité de réparation le plus
proche, aussitôt que possible après la découverte d’une
possibilité de vice. Soyez prêt à donner :
(a) le numéro de modèle et le numéro de série.
(b) le nom du revendeur et la date approximative de
l’achat.
(c) une description détaillée du problème, y compris les
détails sur les branchements électriques à
l’équipement associé et la liste de cet équipement.
3) Etón vous donnera un numéro d’Autorisation de retour et
l’adresse à laquelle vous pouvez envoyer l’appareil.
Envoyez l’appareil dans sa boîte d’origine ou une boîte
équivalente, entièrement assuré et les frais de port payés à
l’avance.
Un entretien, des réparations et une utilisation corrects sont
importants pour obtenir un bon fonctionnement de ce produit.
Veuillez donc lire soigneusement ce Mode d’emploi. Cette
garantie ne s’applique pas aux défauts qui, selon l’évaluation
de Etón, ont été provoqués par :
(1) un entretien ou des réparations incorrects, y compris l’instal-
lation de pièces ou d’accessoires qui ne sont pas conformes
à la qualité et aux spécifications des pièces d’origine.
(2) une utilisation incorrecte, abusive ou négligente, ou une
installation incorrecte.
103

(3) des dégâts accidentels ou intentionnels.
(4) une fuite des piles.
Toutes les garanties implicites, le cas échéant, y compris les
garanties de valeur marchande et d’aptitude à une utilisation
particulière, cessent une (1) année après la date de l’achat
initial.
Ce qui précède constitue l’ensemble des obligations de Etón
envers ce produit, et l’acheteur initial n’aura aucun autre
recours ni réclamation pour des dommages indirects ou
consécutifs, des pertes ou des dépenses. Certains états
n’autorisent aucune limitation sur la durée d’une garantie
implicite ou ne permettent pas les exclusions ou les limitations sur les dommages indirects ou consécutifs, et donc les
limitations et exclusions ci-dessus peuvent ne pas s’appliquer
à vous.
Cette garantie vous donne des droits juridiques précis, et
vous pouvez également avoir d’autres droits qui varient
d’état en état.
Pour obtenir de plus amples renseignements sur les services,
contactez :
Etón Corporation
1015 Corporation Way
Palo Alto, CA 94303
États-Unis
YB 550PE MANUEL D'OPÉRATION
104
105

YB 550PE BETRIEB HANDBUCH
SIE BENÖTIGEN HILFE? HIER IST, WIE UNS ZU
BERÜHREN:
• Telefon: 49 (0) 89 35874-354
• Faksimile: 49 (0) 89 35874-103
• Email: customersvc@etoncorp.com
• Internet: www.etoncorp.com
106
107

INHALTSVERZEICHNIS
YB 550PE BETRIEB HANDBUCH
Seitennr.
1 EINFÜHRUNG . . . . . . . . . . . . . . . . . . . . . . . . . . . . .111
ABBILDUNGEN . . . . . . . . . . . . . . . . . . . . . . . . . . .112-115
2 KURZANLEITUNG . . . . . . . . . . . . . . . . . . . . . .116-124
3 AUSFÜHRLICHES BENUTZERHANDBUCH . . . . . . . .125
EINSETZEN DER BATTERIEN . . . . . . . . . . . . . . . . . . . . .125
WAHL UND GEBRAUCH EINES-NETZTEILS . . . . . . . . . .126
ANZEIGE DER SIGNALSTÄRKE UND BATTERIELADUNG126
WICHTIGE ERSTEINSTELLUNGEN . . . . . . . . . . . . . . . . .127
4 ALLGEMEINER BETRIEB DES RADIOS . . . . . . . . . .128
EIN- UND AUSSCHALTEN DES YB 550PE . . . . . . . . . . . .128
REGELUNG DER LAUTSTÄRKE UND DES KLANGS . . . .129
WAHL VON UKW, MW ODER KURZWELLE . . . . . . . . . .129
EINSTELLEN VON UKW UND MW
AUSSERHALB VON NORDAMERIKA . . . . . . . . . . . . . . .130
VIER MÖGLICHKEITEN ZUR
EINSTELLUNG VON SENDERN . . . . . . . . . . . . . . . . . . . .130
5 GEBRAUCH DER KURZWELLE . . . . . . . . . . . . . . . . .132
WAHL EINES KURZWELLENBANDS . . . . . . . . . . . . . . . .133
FINDEN VON KURZWELLEN-SENDERN
MIT AUTOMATISCHER SENDERSUCHE . . . . . . . . . . . . .134
TABELLE DER KURZWELLENBÄNDER MIT
DEN AUTOMATISCHEN SUCHBEREICHEN . . . . . . . . . . .134
6 UHR- UND WECKERFUNKTION . . . . . . . . . . . . . . . .135
STELLEN DER UHR . . . . . . . . . . . . . . . . . . . . . . . . . . . .135
STELLEN DER WECKZEIT . . . . . . . . . . . . . . . . . . . . . . . .136
WECKEN DURCH EINEN LIEBLINGSSENDER . . . . . . . . .136
SCHLUMMERFUNKTION (SNOOZE) . . . . . . . . . . . . . . .137
AKTIVIEREN UND DEAKTIVIEREN DER
WECKFUNKTION . . . . . . . . . . . . . . . . . . . . . . . . . . . . . .137
7 SPEICHERFUNKTION . . . . . . . . . . . . . . . . . . . . . . .138
WAHL DER SPEICHERSEITEN . . . . . . . . . . . . . . . . . . . .138
EINGEBEN VON SENDERN IN DEN SPEICHER . . . . . . . .139
ZUGRIFF AUF GESPEICHERTE FREQUENZEN . . . . . . . . .140
DIREKTZUGRIFF AUF DEN SPEICHER . . . . . . . . . . . . . .140
SPEICHERSUCHE . . . . . . . . . . . . . . . . . . . . . . . . . . . . . .141
AUTOMATISCHE SPEICHERSUCHE . . . . . . . . . . . . . . . .141
SPEICHERN EINER EINGEGEBEN FREQUENZ
AN EINEM ANDEREN PLATZ . . . . . . . . . . . . . . . . . . . . .142
LÖSCHEN EINER GESPEICHEETEN FREQUENZ . . . . . . .143
LÖSCHEN ALLER SPEICHERINHALTE EINER SEI . . . . . . .143
ANPASSEN DER SPEICHERSEITEN . . . . . . . . . . . . . . . . .143
8 TABELLE DER CODES ZUR SYSTEMEINSTELLUNG .144
ÄNDERN DER CODES ZUR SYSTEMEINSTELLUNG . . . .144
ÄNDERN DES ZEITFORMATS VON 24 STUNDEN
IN 12 STUNDEN . . . . . . . . . . . . . . . . . . . . . . . . . . . . . .145
108
109

YB 550PE BETRIEB HANDBUCH
1 EINFÜHRUNG
VOM WERK EINSTELLTE SYSTEMCODES FÜR
NORDAMERIKA . . . . . . . . . . . . . . . . . . . . . . . . . . . . . .146
PRÜFEN DES MOMENTAN EINGESTELLTEN
CODE-STATUS . . . . . . . . . . . . . . . . . . . . . . . . . . . . . . . .146
TABELLE DER CODES ZUR SYSTEMEINSTELLUNG . . . . .147
9 WEITERE INFORMATIONEN . . . . . . . . . . . . . . . . . .149
LICHT . . . . . . . . . . . . . . . . . . . . . . . . . . . . . . . . . . . . . .149
KOPFHÖRER . . . . . . . . . . . . . . . . . . . . . . . . . . . . . . . . .149
SCHALTER DX/LOCAL . . . . . . . . . . . . . . . . . . . . . . . . . .149
SPERRSCHALTER . . . . . . . . . . . . . . . . . . . . . . . . . . . . . .150
VERMEIDEN DES AUSLAUFEN DER BATTERIESÄURE . .150
FEHLERBEHEBUNG . . . . . . . . . . . . . . . . . . . . . . . . . . . .151
VORGEHENSWEISE BEIM ZUZRÜCKSETZEN . . . . . . . . .153
DIE WICHTIGSTEN FUNKTIONEN DES YB 550PE . . . . . .154
10INFORMATIONEN ZUR WARTUNG . . . . . . . . . . . . .156
Vielen Dank, dass Sie sich für das YB 550PE UKW/MW/KW Radio entschieden haben. Dieses Handbuch ist zur besseren
Übersicht in zwei Abschnitte aufgeteilt:ALLGEMEINER
BETRIEB und die EINFÜHRUNG IN DIE KURZWELLE (beide
Abschnitte sind wichtig). Wenn Sie mit dem Hören der
Kurzwelle nicht vertraut sind, bietet Ihnen der Abschnitt
EINFÜHRUNG IN DIE KURZWELLE alle Informationen, die zum
erfolgreichen Empfang von Sendungen aus der ganzen Welt
wichtig sind. Dieses Radio wurde nach hohen
Qualitätsstandards entwickelt und hergestellt und kann über
viele Jahre hinweg einen zuverlässigen Dienst leisten. Bitte
lesen Sie das Benutzerhandbuch sorgfältig durch, so dass Sie
die vielen interessanten Funktionen des YB 550PE nutzen
können.
MIT DEM YB 550PE MITGELIEFERT
• Kopfhörer in Form von Ohrsteckern
• Batterien
• Tragetasche
KURZANLEITUNG
Wenn Sie schon mit digitalen Geräten Erfahrung haben, können Sie die Zusammenfassung mit der Überschrift KURZANLEITUNG ZUM YB 550PE auf Seite 10 verwenden.
Das AUSFÜHRLICHE BENUTZERHANDBUCH auf Seite 125 ist
jedoch eine genauere und gründlichere Anleitung zum Betrieb
des YB 550PE.
110
111

Knopf EIN/AUS / Timer (2)
Anzeige (1)
VORDERSEITE OBERSEITE
LINKE SEITE RECHTE SEITE
Zifferntasten (10A)
Knopf für Schlummerfunktion
bzw. Licht (SNOOZE/LIGHT) (22)
Ständer (20)
RÜCKSEITE
Abdeckung Batteriefach (21)
Knopf für die Weckfunktion (Alarm) (3)
Speicher/Bearbeiten; Zeiteinstellung
(Mem./Edit; Time Set) (5)
Taste ‚+’ zur Sendereinstellung (7)
Taste ‚-’ zum Einstellen von Sendern (8)
T
Eingabe; Systemeinstellung (Sys. Set) (6)
Knopf zur Bandwahl von MW /
UKW / KW (9)
Knopf zur Einstellung des
Kurzwellenbands (10)
Knopf ‚Automatischen Speichersuche /
Seite’ (M.Scan/Page) (4)
Schalter für
normalen bzw.
lokalen Empfang
(DX Local) (11)
Antennenbuchse
(12)
Kopfhörerbuchse
(13)
Lautstärkenregler
(14)
GS-Buchse (15)
Knopf zur
Feineinstellung
von Sendern (16)
Klangregler (17)
Sperrschalter (Lock)
(18)
Teleskopische Antenne
(19)
ABBILDUNGENS
YB 550PE BETRIEB HANDBUCH
112
113

ANZEIGE BEI AUSGESCHALTETEM RADIO
Dreieckspfeil (23)
Antennensymbol (24)
Batteriesymbol
(31)
ANZEIGE BEI EINGESCHALTETEM RADIO
AM bzw. PM -Anzeige für die Uhrzeit (29)
Anzeige der Frequenz (34)
Dreieckspfeil (23)
Antennensymbol (24)
Skala von 1 bis 5 (30)
ANZEIGE SPEICHER
Bezieht sich nur auf die rechte obere Ecke der Anzeige.
ANZEIGE KURZWELLENBAND
ANZEIGE DER CODES FÜR DIE SYSTEMEINSTELLUNG
Bezieht sich nur auf die rechte obere Ecke der Anzeige.
Skala von 1 bis 5 (30) Symbol für Einschlafzeit-Automatik (Sleep) (32)
AM bzw. PM -Anzeige
für die Weckzeit (25)
Anzeige
der
Uhrzeit
(28)
Batteriesymbol
(31)
Anzeige
von MW,
UKW, KW
(35)
Symbol
für aktivierte
Weckfunktion
(27)
Anzeige
der
Weckzeit
(26)
Speicheranzeige
(36)
Anzeige der
Kurzwellenbänder
(37)
(39)
(40)
Löschanzeige
(38)
Symbol
für aktivierte
Weckfunktion
(27)
Anzeige der
Uhrzeit (33)
YB 550PE BETRIEB HANDBUCH
114
115

2 KURZANLEITUNG
YB 550PE BETRIEB HANDBUCH
Diese Kurzanleitung soll beim sofortigen Gebrauch des Radios
helfen. Sie ist jedoch kein Ersatz für das ausführliche
Benutzerhandbuch, welches ein weitaus detaillierteres
Dokument darstellt. Bitte nehmen Sie dieses zur Hilfe, wenn
detaillierte Anleitungen notwendig sind. Die ausführlichen
Anleitungen beginnen auf Seite 125.
BATTERIEN EINSETZEN
Zum Einsetzen der drei AA -Alkalibatterien den Ständer
abnehmen und die Abdeckung des Batteriefachs entfernen.
DURCHFÜHREN DER ERSTEN
EINSTELLUNGEN
Prüfen, ob das Radio entsperrt ist. Der Sperrschalter LOCK
befindet sich auf der rechten Seite des Radios und sollte auf
AUS gestellt sein. Prüfen, ob sich der Schalter DX/LOCAL auf
der linken Seite des Radios in der Stellung DX befindet.
EIN- UND AUSSCHALTEN DES YB 550PE
Ein kurzer Druck auf den Knopf (TIMER EIN/AUS) schaltet
das Radio ein. Dabei ist der automatische Timer aktiviert, der
das Radio nach 90 Minuten abschaltet, und in der Anzeige
erscheint . Um diesen Timer zu umgehen, damit das
Radio unbegrenzt läuft, lange auf den Knopf drücken.Wenn
der Timer umgangen wird, erscheint auf der Anzeige fünf
Sekunden lang ‚yb550’. Dann schaltet sich das Radio ein.
WAHL VON UKW, MW ODER KURZWELLE
UKW, MW oder KW (Kurzwelle) werden mit dem Knopf zur
UKW/MW/KW -Bandwahl eingestellt.
116
EINSTELLEN VON SENDERN
Die Tasten + bzw. - verwenden. Schnelles kurzes Drücken
bewirkt eine manuelle Sendersuche, durch langes Drücken
wird die automatische Sendersuche aktiviert. Wenn die
Frequenz bekannt ist, den Knopf ‚Eingabe’ drücken, dann die
Frequenz über die Zifferntasten eingeben. Mit dem Knopf zur
FEINEINSTELLUNG kann eine Feineinstellung der Sender
vorgenommen werden. Er wird wie ein Knopf zur
Sendereinstellung verwendet.
GRUNDLAGEN ZUR KURZWELLE
• Der Empfang der Kurzwelle während der Nacht ist fast
immer besser als der Kurzwellenempfang während des
Tages.
• Während des Tags sind die aktivsten Kurzwellenbänder
13, 15, 16, 19 und 22 Meter. 16 und 19 sind im
Allgemeinen am besten. • Während der Nacht sind die
aktivsten Bänder 25, 31, 41 und 49 Meter. 31 und 49 sind
im Allgemeinen am besten.
• Während des Sonnenauf- und Sonnenuntergangs können
sowohl die Tages- als auch die Nachtbänder gut sein. Es
zahlt sich aus, damit zu experimentieren
• Die Signalstärke verbessert sich oft wesentlich, wenn man
sich sehr nahe an ein Fenster stellt.
• Die Signalstärke wird oft auch dadurch verbessert, dass
man das Radio in den Händen hält (das kann auch für
den UKW- und MW- Empfang gelten).
117

YB 550PE BETRIEB HANDBUCH
WAHL EINES KURZWELLENBANDS
Die folgenden Bänder können gewählt werden: 120, 90, 75,
60, 49, 31, 25, 22, 19, 16, 15, 13 und 11 Meter. Wenn der
Knopf KURZWELLENBAND wiederholt gedrückt wird, wird an
den Anfang der Bänder gesprungen. Es ist auch möglich,
diesen Knopf und dann die Tasten + oder - zu drücken, um
jeweils zum nächsten oder vorherigen Band zu gehen. Wenn
die Zeitanzeige wieder erscheint, kann mit der Sendersuche
begonnen werden. Wenn die automatisch Sendersuche verwendet wird, springt sie automatisch zu dem nächsten Band,
nachdem das ursprünglich gewählte Band abgesucht ist.
TABELLE DER KURZWELLENBÄNDER MIT
DEN AUTOMATISCHEN SUCHBEREICHEN
BAND (Meter) FREQUENZBEREICH (Kilohertz)
120 2250 - 2550
90 3150 - 3450
75 3850 - 4050
60 4700 - 5100
49 5800 - 6300
41 7100 - 7500
31 9400 - 1000
25 11500 - 12150
22 13500 - 13900
19 15000 - 15900
16 17450 - 18000
15 18850 - 19100
13 21450 - 21950
11 25600 - 26100
118
119

YB 550PE BETRIEB HANDBUCH
STELLEN DER UHR UND DER
WECKFUNKTION
Das Radio abschalten und in rascher Reihenfolge vorgehen.
UHR: Die Uhr ist vom Werk im 24-Stundenformat eingestellt.
Wenn dies geändert werden soll, bitte auf Seite 145 des
Benutzerhandbuchs nachschlagen.
Zum Einstellen der Zeit den Knopf ‚Time Set’ drücken und
wieder loslassen. Dann die Tasten + bzw. - betätigen. Nach
Beendigung den Knopf ‚Time Set’ zweimal drücken.WECKFUNKTION: Zum Einstellen der Weckzeit den Knopf ‚Time Set’
zweimal drücken und wieder loslassen. Dann die Knöpfe +
bzw. - betätigen. Nach Beendigung den Knopf ‚Time Set’ einmal drücken.
AKTIVIERUNG DER WECKFUNKTION:
Die Weckfunktion muss aktiviert werden,wenn sie sich einschalten soll. Den Knopf ALARM drücken und wieder loslassen.
Auf der Anzeige erscheint das Symbol für die Weckfunktion.
Zur Deaktivierung den Knopf ALARM noch einmal drücken und
wieder loslassen. Das Symbol wird ausgeblendet.Wenn sich die
Weckfunktion einschaltet, den Knopf SNOOZE drücken und
wieder loslassen, wenn man noch 10 Minuten schlafen möchte
(dies kann bis zu drei Mal erfolgen).
120
121

YB 550PE BETRIEB HANDBUCH
EINGABE EINER FREQUENZ
IN DEN SPEICHER
Es können 200 Frequenzen in 8 Speicherseiten eingegeben
werden. Auf jede Seite passen 25 Frequenzen. Das Radio einschalten. Zuerst eine Speicherseite wählen. Dazu den Knopf
‚M.Scan/Page’ ungefähr 3 Sekunden lang drücken. In der
oberen rechten Ecke der Anzeige blinkt jetzt die Speicherseite.
Innerhalb von 5 Sekunden mit den Tasten + bzw. - die
gewünschte Seite wählen. Nachdem eine Seite gewählt
wurde, entweder den Knopf ‚M.Scan/Page’ drücken und
wieder loslassen oder ungefähr 3 Sekunden lang warten.
Dadurch wird die Seite eingegeben. Dann den gewünschten
Radiosender einstellen und den Knopf ‚Mem./Edit’ drücken
und wieder loslassen. Jetzt blinken in der oberen rechten Ecke
der Anzeige die Ziffern für die Voreinstellung. Mit den
Zifferntasten innerhalb von 5 Sekunden die Nummer der
Speichervoreinstellung eingeben, in der der Sender gespeichert werden soll (die Werkseinstellung sieht 25
Voreinstellungen pro Seite vor). Eine Zahl von 1 bis 25
eingeben und den Knopf ‚Mem./Edit’ innerhalb von 5
Sekunden drücken.
ZUGRIFF AUF GESPEICHERTE FREQUENZEN
Nachdem eine Seitennummer gewählt oder geändert wurde,
kann auf jede Speichervoreinstellung auf dieser Seite zugegriffen werden indem über die Zifferntasten die
Speichernummer eingegeben wird, auch wenn die Nummer
auf der Anzeige nicht sichtbar ist. Zum Ändern von Seiten wie
oben beschrieben vorgehen. Die Speichersuche ermöglicht
eine Suche durch die Speichervoreinstellungen innerhalb einer
Speicherseite. Den Knopf ‚M.Scan/Page’ drücken und wieder
loslassen. Dann durch kurzes schnelles Drücken auf die Tasten
+ bzw. - die Speichervoreinstellungen durchsuchen. Durch
längeres Drücken (ungefähr 3 Sekunden) auf die Tasten +
bzw. - wird sie automatische Speichersuche aktiviert. Sie
bleibt ungefähr 5 Sekunden auf jedem Speicherplatz stehen,
bevor sie zum nächsten Speicherplatz übergeht. Zum Stoppen
der automatischen Speichersuche, die Taste + oder - drücken
und wieder loslassen.
122
123

YB 550PE BETRIEB HANDBUCH
3 AUSFÜHRLICHES
BENUTZERHANDBUCH
SPEICHER UND SPEICHERSEITEN LÖSCHEN
Zum Löschen einer Frequenz, die im Speicher aufgenommen
wurde, den Knopf ‚M.Scan/Page’ drücken und wieder
loslassen. Dann die Tasten + bzw. - drücken, um den voreingestellten Speicherplatz der Frequenz zu finden, die
gelöscht werden soll. Dann den Knopf ‚Mem./Edit’ ungefähr 2
Sekunden lang gedrückt halten und wieder loslassen. Auf der
Anzeige blinkt ‚dEL’. Innerhalb von 2 Sekunden den Knopf
‚Mem./Edit’ drücken und wieder loslassen.Wenn der gesamte
Inhalt einer Seite gelöscht werden soll, den Knopf
‚M.Scan/Page’ drücken und wieder loslassen. Dann den Knopf
‚Mem./Edit’ 4 Sekunden gedrückt halten und wieder
loslassen. Auf der Anzeige blinkt ‚dEL’. Innerhalb von 2
Sekunden den Knopf ‚Mem./Edit’ drücken und wieder
loslassen.
WEITERE INFORMATIONEN ÜBER DAS
YB 550PE
In dieser Kurzanleitung können nicht alle Funktionen des YB
550PE erwähnt werden. Durch die Codes zur
Systemeinstellung kann das Radio Ihren Bedürfnissen
angepasst werden. Dazu bitte den Abschnitt mit dem Titel
TABELLE DER CODES ZUR SYSTEMEINSTELLUNG auf Seite
147 und 148 lesen.
Anmerkung: In den Anleitungen unten beziehen sich die
Zahlen in Klammern ( ) auf die Abbildungen und werden nur
dann angegeben, wenn eine Funktion zum ersten Mal erwähnt oder beschrieben wird.Siehe oben: Abschnitt mit der Überschrift ABBILDUNGEN.
EINSETZEN DER BATTERIEN
Drei AA -Alkalibatterien in das Batteriefach (21) einlegen.
Dabei die Polarität gemäß der Abbildung auf der Rückseite
des Radios beachten. Zum Abnehmen der
Batteriefachabdeckung zuerst den Ständer entfernen (20).
Dazu die Laschen von der Unterseite des Radios wegziehen
und ihn dann von hinten abnehmen.
EINSATZ VON WIEDERAUFLADBAREN
BATTERIEN:
Wiederaufladbare Batterien müssen in einem dazu bestimmten Ladegerät aufgeladen werden. Sie werden nicht in
dem YB 550PE aufgeladen. Es werden Nickel-Metallhydrid Batterien (Ni-MH) empfohlen. Der CODE ZUR SYSTEMEINSTELLUNG muss entsprechend geändert werden.
Siehe Abschnitt mit der Überschrift TABELLE DER CODES ZUR
SYSTEMEINSTELLUNG auf Seite 147 und 148.
124
125

YB 550PE BETRIEB HANDBUCH
WAHL UND GEBRAUCH EINES-NETZTEILS
Ein Netzteil mit den folgenden Spezifikationen wählen:
Ausgabe von 4,5 Volt GS, negative Polarität; 100 mA oder
darüber; Außendurchmesser der Koaxial-Steckerspitze 3,4
mm, Innendurchmesser 1,3 mm. Netzteil in die GS-Buchse
(15) auf der linken Seite des Radios einstecken.
ANZEIGE DER SIGNALSTÄRKE
UND BATTERIELADUNG
Wenn das Radio ausgeschaltet ist, wird in der oberen linke
Ecke der Anzeige (1) die Batteriestärke auf einer Skala von 1
bis 5 (30) angezeigt. Der Dreieckspfeil (23) befindet sich
dabei über dem Batteriesymbol (31) auf der linken Seite der
Skala. Wenn das Radio eingeschaltet ist, befindet sich der
Pfeil über dem Antennensymbol (24) und die Skala von 1 bis
5 zeigt jetzt die relative Signalstärke.
WICHTIGE ERSTE EINSTELLUNGEN
2. Prüfen, ob das Radio entsperrt ist. Dazu muss sich der
Schalter LOCK (18) auf der rechten Seite des Radios in der
Stellung AUS befinden. Dieser Schalter dient dem Sperren
des Radios auf Reisen oder wenn es nicht verwendet
wird.
3. Prüfen, ob sich der Schalter DX/LOCAL (11) auf der linken
Seite des Radios in der Stellung DX befindet.
126
127

4 ALLGEMEINER BETRIEB DES
RADIOS
YB 550PE BETRIEB HANDBUCH
EIN- UND AUSSCHALTEN DES YB 550PE
Das YB 550PE kann auf eine der beiden unten beschriebenen
Weisen eingeschaltet werden. Zum Ausschalten den Knopf
TIMER EIN/AUS (2) drücken.
1. EINSCHALTEN MIT BATTERIESCHUTZ
BZW. EINSCHLAF-AUTOMATIK:
Den Knopf TIMER EIN/AUS (2) schnell und kurz drücken.
Dadurch wird das Radio veranlasst, sich nach 90 Minuten
automatisch abzuschalten. Auf der Anzeige erscheint
(32). Durch die Tasten + oder – (7, 8) kann die Abschaltzeit
von 90 Minuten in eine andere erwünschte Zeit geändert
werden. Dies muss sofort nach dem Drücken des Knopfs erfolgen. Es sind Spielzeiten von 1 bis 120 Minuten möglich. Die
Minutenzahl die zuletzt eingestellt wurde, wird auch beim
nächsten Einschalten des Radios verwendet.
2. EINSCHALTEN MIT UMGEHEN DES
TIMERS:
Mit dieser Methode wird der automatische 90-minütige Timer
umgangen. Das Radio bleibt eingeschaltet, bis es absichtlich
wieder ausgeschaltet wird. Den Knopf 2 Sekunden lang
gedrückt halten und dann loslassen. Anmerkung: Auf der
Anzeige erscheint ungefähr 5 Sekunden lang ‚YB550’, dann
schaltet sich das Radio ein.
REGELUNG DER LAUTSTÄRKE UND DES
KLANGS
Der Lautstärkenregler (14) mit der Bezeichnung VOLUME
befindet sich auf der linken Seite des Radios.
Der Klangregler (17) mit der Bezeichnung NEWS/MUSIC
befindet sich auf der rechten Seite des Radios.
Die Einstellungen nach Belieben vornehmen.
WAHL VON UKW, MW ODER KURZWELLE
Die Wahl von UKW, MW oder KW erfolgt durch Drücken auf
den Knopf ‚UKW/MW/KW -Band’ (35). Die Frequenz erscheint
in Ziffern (34) im unteren Teil der Anzeige.
Die örtlichen Sender in Ihrem Gebiet werden über UKW und
MW gehört. Internationale Kurzwellensender aus aller Welt
können übe KW gehört werden.
128
129

YB 550PE BETRIEB HANDBUCH
EINSTELLEN VON UKW UND MW AUSSERHALB VON NORDAMERIKA
Sie können diesen Abschnitt überspringen, wenn Sie sich in
Nordamerika befinden und das YB 550PE gerade erst gekauft
haben. Es wurde im Werk schon für den Gebrauch in
Nordamerika eingestellt. Wenn Sie in andere Teile der Welt
reisen, müssen je nach Bedarf die unten angeführten
Änderungen vorgenommen werden.
Außerhalb Nordamerikas werden die MW-Stationen ei 9 kHz
angeordnet. Der MW-Bereich kann bei 76-108 MHz liegen,
wie der in Japan. Um diese Änderungen vorzunehmen, die
Anleitungen mit der Überschrift TABELLE DER CODES ZUR
SYSTEMEINSTELLUNG auf Seite 147 und 148 befolgen.
VIER MÖGLICHKEITEN ZUR EINSTELLUNG
VON SENDERN
Unten werden ausführlich vier Methoden beschrieben, auf die
Sender gefunden werden können.
1. NORMALE SENDERSUCHE (MANUELLE
SENDERSUCHE)
Durch schnelles kurzes Drücken auf die Tasten + bzw. - kann
eine Frequenzeinstellung nach oben oder unten vorgenommen werden.
2. AUTOMATISCHE SENDERSUCHE
Wenn die Tasten + oder - etwas länger als eine Sekunde
gedrückt werden, wird die automatische Sendersuche
aktiviert. Das Radio hält dann automatisch bei dem nächsten
gefundenen Sender an. Mit der Taste + automatisch in
steigender Frequenz, mit der Taste + / - in absteigender
Frequenz suchen.
3. DIREKTE FREQUENZEINGABE
Wenn die genaue erwünschte Frequenz bekannt ist, kann sie
über die Zifferntasten (10A) und den Knopf ‚Eingabe’
eingegeben werden. Zuvor prüfen, ob das richtige Band UKW, MW oder KW - gewählt ist. Zur Eingabe einer Frequenz,
schnell hintereinander die folgenden Schritte durchführen:
a. Den Knopf ‚Eingabe’ (6) drücken und wieder loslassen.
b. Die Frequenz mit den Zifferntasten eingeben.
4. FEINEINSTELLUNG
Der Regler zur FEINEINSTELLUNG (16) befindet sich auf der
rechten Seite des Radios. Die Einstellung der Mittelwelle
erfolgt in Stufen von 1 Kilohertz und der UKW in Stufen von
0,05 MHz. Der Regler kann nach Bedarf zur ‚Feineinstellung’
von Sendern oder auch als regulärer Knopf zur Sendersuche
verwendet werden.
130
131

5 GEBRAUCH DER KURZWELLE
YB 550PE BETRIEB HANDBUCH
Über Kurzwelle können Sender aus der ganzen Welt gehört
werden. Wenn Sie keinerlei Erfahrungen mit Kurzwelle haben
oder Ihre Grundkenntnisse auffrischen möchten, schauen Sie
bitte in dem FÜHRER ZUR KURZWELLE nach, der diesem
Produkt beiliegt. Für den Anfang sind unten einige
Grundlagen aufgeführt
• Der Empfang der Kurzwelle während der Nacht ist fast
immer besser als der Kurzwellenempfang während des
Tags.
• Während des Tags sind die aktivsten Kurzwellenbänder
13, 15, 16, 19 und 22 Meter. 16 und 19 sind im
Allgemeinen am besten. • Während der Nacht sind die
aktivsten Bänder 25, 31, 41 und 49 Meter. 31 und 49 sind
im Allgemeinen am besten.
• Während des Sonnenauf- und Sonnenuntergang können
sowohl die Tages- als auch die Nachtbänder gut sein,
manchmal ungewöhnlich gut. Das Hören zu diesen Zeiten
kann oft besonders lohnend sein.
• Die Signalstärke ist oft besser, wenn das Radio in der
Hand gehalten wird und sich sehr nahe an einem Fenster
befindet.
132
WAHL EINES KURZWELLENBANDS
Es kann auf alle 14 internationalen Übertragungsbänder
zugegriffen werden. Die Bänder sind mit 120, 90, 75, 60, 49,
31, 25, 22, 19, 16, 15, 13 und 11 Meter nummeriert. Der
Abschnitt unten mit der Überschrift TABELLE DER
KURZWELLENBÄNDER MIT DEN AUTOMATISCHEN SUCHBEREICHEN zeigt den vollständigen Frequenzbereich aller
Bänder, die von dem automatischen Sendersuchsystems des
Radios verwendet werden. Auf ein Band kann auf zwei
Weisen zugegriffen werden. Bei beiden Methoden erfolgt die
Sendereinstellung am Anfang des Bands, auf das zugegriffen
wurde.
1. Jeder aufeinanderfolgende schnelle kurze Druck auf den
Knopf KURZWELLENBABD (10) stellt das Radio an den
Anfang eines Bands.Während der Knopf gedrückt wird,
erscheint die Bandnummer in der oberen rechten Ecke der
Anzeige (37) und wird einige Sekunden nach Loslassen
des Knopf wieder ausgeblendet. Dann wird in dieser Ecke
wieder die Uhrzeit eingeblendet. Die Sendersuche erst
beginnen, wenn die Uhrzeit wieder erscheint.
2. Einmal schnell und kurz auf den Knopf KURZWELLEN-
BABD und danach sofort schnell und kurz entweder auf
die Taste + oder die Taste - zur Sendereinstellung drücken.
In der oberen rechten Ecke der Anzeige erscheint die
Bandnummer. Nachdem das gewünschtes Band gewählt
wurde, mit der Sendersuche erst beginnen, nachdem in
der oberen rechten Ecke wieder die Uhrzeit erscheint.
133

YB 550PE BETRIEB HANDBUCH
6 UHR- UND WECKFUNKTION
FINDEN VON KURZWELLENSENDERN MIT
DER AUTOMATISCHEN SENDERSUCHE
In Kurzwelle sucht die automatische Sendersuche nur in den
Frequenzbereichen, die unten in der TABELLE DER
KURZWELLENBÄNDER MIT DEN AUTOMATISCHEN SUCHBEREICHEN aufgeführt sind. Zum Einstellen von Frequenzen,
die zwischen diesen Bereichen oder außerhalb dieser Bereiche
liegen, muss eine andere Einstellungsmethode angewendet
werden.
TABELLE DER KURZWELLENBÄNDER MIT DEN
AUTOMATISCHEN SUCHBEREICHEN
BAND (Meter) FREQUENZBEREICH (Kilohertz)
120 2250 - 2550
90 3150 - 3450
75 3850 - 4050
60 4700 - 5100
49 5800 - 6300
41 7100 - 7500
31 9400 - 1000
25 11500 - 12150
22 13500 - 13900
19 15000 - 15900
16 17450 - 18000
15 18850 - 19100
13 21450 - 21950
11 25600 - 26100
134
STELLEN DER UHR
Das Zeitformat wird im Werk auf 24 Stunden eingestellt.
Wenn ein Zeitformat von 12 Stunden mit AM und FM vorgezogen wird, bitte in dem Abschnitt mit der Überschrift
ÄNDERN DES ZEITFORMATS VON 24 STUNDEN IN 12 STUNDEN auf Seite 145 lesen.
Stellen der Uhr:
1. Das Radio ausschalten. Die Ziffern der Uhrzeit erscheinen
im unteren Teil der Anzeige (28).
2. Den Knopf ‚Time Set’ (5) drücken und wieder loslassen.
Die Ziffern der angezeigten Uhrzeit blinken.
3. Innerhalb von 5 Sekunden die Stunden mit der Taste +
und die Minuten mit der Taste - einstellen. Sicherstellen,
dass entsprechend der Tageszeit AM oder PM (29) in der
Anzeige erscheint und dass ein Zeitformat von 12 Stunden
mit AM und PM eingestellt ist.
4. Innerhalb von 5 Sekunden nach vollendeter Eingabe den
Knopf ‚Time Set’ zweimal drücken.
135

YB 550PE BETRIEB HANDBUCH
STELLEN DER WECKZEIT
Nach dem Einstellen der Weckzeit unbedingt den nächsten
Abschnitt mit der Überschrift AKTIVIEREN UND DEAKTIVIERERN DER WECKFUNKTION lesen. Die Weckfunktion weckt mit
dem zuletzt eingestellten Sender, es sei denn, es ist auf
‚Wecken mit Lieblingssender’ eingestellt. Siehe unten. Das
Radio spielt 30 Minuten lang, bis es abgeschaltet wird oder
bis der Knopf SNOOZE/LIGHT gedrückt wird (siehe unten
SCHLUMMERFUNKTION).
1. Das Radio ausschalten. In der oberen rechten Ecke der
Anzeige erscheint die Weckzeit in Ziffern (26).
2. Den Knopf ‚Time Set’ zweimal drücken und wieder
loslassen. Die Ziffern der angezeigten Weckzeit blinken.
3. Innerhalb von 5 Sekunden die Stunden mit der Taste +
und die Minuten mit der Taste - einstellen. Sicherstellen,
dass entsprechend der Tageszeit AM oder PM (25) in der
Anzeige erscheint und dass ein Zeitformat von 12 Stunden
mit AM und PM eingestellt ist.
4. Innerhalb von 5 Sekunden nach vollendeter Eingabe, den
Knopf ‚Time Set’ einmal drücken.
WECKEN DURCH LIEBLINGSSENDER
Code zur Systemeinstellung 01 verwenden. Siehe Seite 147
und 148.
SCHLUMMERFUNKTION
Wenn sich das Radio über die Weckfunktion einschaltet,
blinkt auf der Anzeige das Symbol . Während das Symbol
blinkt, den Knopf SNOOZE/LIGHT (22) drücken und wieder
loslassen. Das Radio schaltet sich ab und nach 10 Minuten
wieder ein. Dieser Vorgang kann 3 Mal wiederholt werden.
AKTIVIEREN UND DEAKTIVIEREN
DER WECKFUNKTION
Damit sich die Weckfunktion einschalten kann, muss sie
aktiviert werden, indem der Knopf ALARM (3) gedrückt wird.
Auf der Anzeige erscheint das Symbol (27). Zur
Deaktivierung den Knopf ALARM noch einmal drücken und
wieder loslassen. Das Symbol wird dadurch ausgeblendet.
Anmerkung: Wenn die Weckfunktion das Radio einschaltet
und das oben abgebildete Symbol für die Weckfunktion
blinkt, sind die Bedienelemente des Radios, mit Ausnahme
des Knopfs SNOOZE/LIGHT, deaktiviert bis der Knopf TIMER
EIN/AUS gedrückt wird.
136
137

7 SPEICHERFUNKTION
YB 550PE BETRIEB HANDBUCH
Wenn Frequenzen in den Speicher eingegeben werden sollen,
muss zuerst gelernt werden, wie Speicherseiten gewählt werden. Die Werkseinstellung sieht 8 Speicherseiten vor. Auf jede
Seite passen 25 Frequenzen. Folglich können 200 Frequenzen
in die Speicher eingegeben werden. Diese Grundeinstellung
kann geändert und je nach persönlichen Vorlieben angepasst
werden. Siehe Abschnitt ANPASSEN DER SPEICHERSEITEN auf
Seite 143.
WAHL DER SPEICHERSEITEN
1. Den Knopf ‚M.Scan/Page’ (4) ungefähr drei Sekunden lang
gedrückt halten. Dann loslassen. Die Speicherseite (36)
blinkt jetzt in der oberen rechten Ecke der Anzeige.
2. Innerhalb von 5 Sekunden mit den Tasten + und - die
gewünschte Seite wählen. Die Anzeige der Speicherseite
ändert sich mit jedem Druck. So lange drücken, bis die
gewünschte Seite erreicht ist.
3. Nachdem die Seite gewählt wurde, entweder den Knopf
‚M.Scan/Page’ drücken und wieder loslassen oder ungefähr 3 Sekunden lang warten. Dadurch wird die Seite
eingegeben. In der rechten oberen Ecke der Anzeige
erscheint wieder die Uhrzeit (33).
EINGABE VON SENDERN IN DIE SPEICHER
In den Anweisungen unten beziehen sich die Begriffe
‚Voreinstellung’ und ‚Speichervoreinstellung’ auf
Speicherplätze.
1. Das Radio einschalten.
2. Die gewünschte Speicherseite wählen. Dabei so wie oben
in dem Abschnitt mit der Überschrift SPEICHERSEITEN
WÄHLEN beschrieben vorgehen. Wenn Radio schon auf
die richtige Speicherseite eingestellt ist, diesen Schritt
überspringen.
3. Den gewünschten Sender einstellen.
4. Den Knopf ‚Mem./Edit’ drücken und wieder loslassen. Die
Ziffern der Voreinstellung (36) blinken jetzt in der oberen
rechten Ecke der Anzeige. Die Speicherseite wird ebenfalls
angezeigt, blinkt jedoch nicht.
5. Mit den Zifferntasten innerhalb von 5 Sekunden die
Nummer der Speichervoreinstellung eingeben, in der der
Sender gespeichert werden soll (die Werkseinstellung
sieht 25 Voreinstellungen pro Seite vor). Eine Zahl von 1
bis 25 eingeben.
6. Innerhalb von 5 Sekunden den Knopf ‚Mem./Edit’ drücken
oder 5 Sekunden warten. Nach einigen Sekunden
erscheint in der oberen rechten Ecke wieder die Uhrzeit.
138
139

YB 550PE BETRIEB HANDBUCH
ZUGRIFF AUF GESPEICHERTE FREQUENZEN
Im Folgenden werden drei Methoden beschrieben, die für den
Zugriff auf im Speicher eingegebene Frequenzen verwendet
werden können. Direkter Zugriff auf den Speicher,
Speichersuche und automatische Speichersuche.Wenn die
Speicherseite und die voreingestellten Speichernummern in
der oberen rechten Ecke der Anzeige erscheinen, wie es in
dem Abschnitt unten der Fall sein wird, ist das Radio im
MODUS SPEICHEZUGRIFF. Durch Drücken und wieder
Loslassen des Knopfs ‚M.Scan/Page’ kann dieser Modus jederzeit verlassen werden.
DIREKTZUGRIFF AUF DEN SPEICHER:Wenn direkt auf eine
Speichervoreinstellung zugegriffen werden soll, müssen die
Seitennummer und die Nummer der Voreinstellung so wie
unten beschrieben eingegeben werden:
1. Den Knopf ‚M.Scan/Page’ ungefähr drei Sekunden lang
gedrückt halten. Dann loslassen. Die Speicherseite blinkt
jetzt in der oberen rechten Ecke der Anzeige.
2. Innerhalb von 5 Sekunden mit den Tasten + und - die
gewünschte Seite wählen.
3. Innerhalb von 5 Sekunden mit den Zifferntasten die
Nummer der gewünschten Speichervoreinstellung
eingeben. (wenn die Zahl kleiner als 10 ist, 01, 02 usw.
eingeben).
HINWEIS: Nachdem eine Seitennummer gewählt oder geändert wurde, kann auf jede Speichervoreinstellung auf dieser
Seite zugegriffen werden, indem über die Zifferntasten die
Speichernummer eingegeben wird, auch wenn die Nummer
nicht auf der Anzeige erscheint. Die Schritte 1 und 2 oben
müssen nicht wiederholt werden.
SPEICHER
SPEICHERSUCHE: Die Speichersuche ermöglicht eine Suche
der Speichervoreinstellungen innerhalb einer Speicherseite
(siehe unten).
1. Den Knopf ‚M.Scan/Page’ drücken und wieder loslassen.
2. Durch kurzes schnelles Drücken auf die Tasten + oder - die
Speichervoreinstellungen durchsuchen.
AUTOMATISCHE SPEICHERSUCHE: Die automatische
Speichersuche ermöglicht eine automatische Suche der
Speichervoreinstellungen innerhalb einer Speicherseite.Wenn
der Speicher abgesucht wird, kann jeder Sender ungefähr 5
Sekunden lang gehört werden, bevor automatisch auf die
nächste gespeicherte Frequenz weitergeschaltet wird. Die
automatische Suche setzt sich auf der gewählten Seite unbegrenzt fort, bis sie absichtlich gestoppt wird.
1. Den Knopf ‚M.Scan/Page’ drücken und wieder loslassen.
2. Die Taste + oder - ungefähr drei Sekunden lang gedrückt
halten. Dann loslassen.
140
141

YB 550PE BETRIEB HANDBUCH
Anmerkung: die Nummer der Speichervoreinstellung blinkt in
der oberen rechten Ecke der Anzeige und die gefundene
Frequenz bleibt ungefähr 5 Sekunden lang eingestellt. Dann
wird für ungefähr 5 Sekunden zur nächsten
Speichervoreinstellung weitergegangen.
Zum Stoppen der automatischen Voreinstellungssuche, die
Taste + oder - drücken und wieder loslassen.
SPEICHERN EINER FREQUENZ AN EINEM
ANDERN PLATZ
1. Das Radio einschalten.
2. Den Knopf ‚M.Scan/Page’ ungefähr drei Sekunden lang
gedrückt halten und dann loslassen.
3. Mit den Tasten + oder - die gewünschte Speicherseite
wählen.
4. Den Knopf ‚M.Scan/Page’ zweimal drücken und wieder
loslassen.
5. Den Knopf ‚Mem./Edit’ drücken und wieder loslassen.
6. Mit den Zifferntasten innerhalb von 5 Sekunden die
Nummer der Speichervoreinstellung eingeben, in der der
Sender gespeichert werden soll.
7. Innerhalb von 5 Sekunden den Knopf ‚Mem./Edit’ drücken
und wieder loslassen.
142
LÖSCHEN EINER GESPEICHERTEN FREQUENZ
1. Den Knopf ‚M.Scan/Page’ drücken und wieder loslassen.
2. Mit den Tasten + oder - den Speicherplatz der Frequenz
wählen, die gelöscht werden soll.
3. Den Knopf ‚Mem./Edit’ ungefähr 2 Sekunden lang
gedrückt halten und dann loslassen. Auf der Anzeige
blinkt ‚dEL’.
4. Innerhalb von 2 Sekunden den Knopf ‚Mem./Edit’ drücken
und wieder loslassen.
LÖSCHEN ALLER SPEICHERINHALTE EINER
SEITE
1. Den Knopf ‚M.Scan/Page’ drücken und wieder loslassen.
2. Den Knopf ‚Mem./Edit’ 4 Sekunden lang gedrückt halten
und dann loslassen. Auf der Anzeige blinkt ‚Del’ (38).
3. Innerhalb von 2 Sekunden den Knopf ‚Mem./Edit’ drücken
und wieder loslassen.
ANPASSEN VON SPEICHERSEITEN
Die Anzahl der Speicherseiten kann von 8 auf 4, 5 oder 20
eingestellt werden. Dies ändert die Anzahl der Frequenzen,
die pro Seite gespeichert werden können. Insgesamt werden
jedoch immer 200 Frequenzen gespeichert. Einzelheiten zu
diesen Änderungen und die Vorgehensweise bei diesen
Änderungen sind in der Anleitung mit dem Titel TABELLE DER
CODES ZUR SYSTEMEINSTELLUNG auf Seite 147 und 148
beschrieben.
143

8 TABELLE DER CODES ZUR
SYSTEMEINSTELLUN
YB 550PE BETRIEB HANDBUCH
Manche Funktionen können programmiert und über die
CODES ZUR SYSTEMEINSTELLUNG geändert werden. Diese
Funktionen und ihre Beschreibung sind in der TABELLE DER
CODES ZUR SYSTEMEINSTELLUNG auf Seite 147 aufgeführt.
ÄNDERN DER CODES ZUR
SYSTEMEINSTELLUNG
Zur Eingabe eines gewünschten Systemcodes den unten
genannten Schritten folgen:
1. Das Radio ausschalten.
2. Den Knopf ‚Sys. Set’ (6) drücken und wieder loslassen.
Anmerkung: In der oberen rechten Ecke der Anzeige
erscheint ‚- -’ (39) und die Uhrzeit wird ausgeblendet.
3. Innerhalb von 5 Sekunden mit den Zifferntasten den
gewünschten Zahlencode eingeben und dann sofort den
Eingabeknopf drücken und wieder loslassen. Der Code
ICON (40) erscheint kurz in der unteren rechten Ecke der
Anzeige.
ÄNDERN DES ZEITFORMATS VON 24
STUNDEN IN 12 STUNDEN
Die Anleitungen unten sind ein sehr gutes Beispiel dafür, wie
ein Code zur Systemeinstellung geändert wird. In diesem Fall
handelt es sich um die Änderung in das Zeitformat mit 12
Stunden.
1. Das Radio ausschalten.
2. Den Knopf ‚Sys. Set’ drücken und wieder loslassen.
Anmerkung: In der oberen rechten Ecke der Anzeige
erscheint ‚- -’ und die Uhrzeit wird ausgeblendet.
3. Innerhalb von 5 Sekunden mit den Zifferntasten ‚12’
eingeben und dann sofort den Eingabeknopf drücken und
wieder loslassen. Auf der Anzeige erscheint kurz ‚12H’.
144
145

YB 550PE BETRIEB HANDBUCH
VOM WERK EINGESTELLTE SYSTEMCODES
FÜR NORDAMERIKA
Wenn das Gerät aus dem Werk geliefert wird, ist das Radio
folgendermaßen eingestellt. Änderungen können mithilfe der
TABELLE DER CODES ZUR SYSTEMEINSTELLUNG und dem
Abschnitt mit der Überschrift ÄNDERN DER CODES ZUR SYSTEMEINSTELLUNG (oben) vorgenommen werden.
• 24-Stunden-Uhrzeitformat. Code 24.
• Einstellungsstufen MW (AM): 10 kHz Code 10.
• Acht Seiten mit je 25 Speichern (insgesamt 200 Speicher).
Code 08.
• UKW-Frequenzabdeckung: 87-108 MHz. Code 88.
• 1,5 Volt AA-Batterien. Code 29.
• Radioweckfunktion verwendet den zuletzt eingestellten
Sender. Code 02.
PRÜFEN DES MOMENTAN EINGESTELLTEN
CODE-STATUS
In der Tabelle zur Codeeinstellung unten ist der momentane
Status der eingestellten Codes durch ein Sternchen (*)
gekennzeichnet. Er kann durch das Drücken des Knopf ‚Sys
Set’ drei Sekunden lang gesehen werden. Für jeden Code
erscheint in der Anzeige kurz das entsprechende Symbol.
TABELLE DER CODES ZUR
SYSTEMEINSTELLUNG
CODENR. BESCHREIBUNG CODE IN ANZEIGE
01 * Weckfunktion verwendet AL. 1
Radiosender auf Seite 1, Speicher 1
02 * Weckfunktion verwendet den zuletzt AL. 2
eingestellten Sender
04 Speicher auf 4 Seiten mit je 50 P4: 50
Speicherplätzen aufteilen
05 Speicher auf 5 Seiten mit je 40 P5: 40
Speicherplätzen aufteilen
08 Speicher auf 8 Seiten mit je 25 P8: 25
Speicherplätzen aufteilen
20 Speicher auf 20 Seiten mit je 10 P20: 10
Speicherplätzen aufteilen
09 * Sendereinstellungsstufen für MW
auf 9 kHz einstellen 9kHz
10 * Sendereinstellungsstufen für MW
auf 10 kHz einstellen 10kHz
12 * Zeitformat der Uhr auf 12 Stunden
einstellen 12H
146 147

YB 550PE BETRIEB HANDBUCH
9 WEITERE INFORMATIONEN
24 * Zeitformat der Uhr auf 24
Stunden einstellen 24H
22 Alle Segmente auf der LCD-Anzeige Alle LCD
und Modellnummer prüfen Segmente
werden
gezeigt
28 * Gebrauch mit wiederaufladbaren 1.2
Batterien
29 * Gebrauch mit regulären AA -Batterien 1.5
76 * Den UKW-Frequenzbereich auf 76 76 108
bis 108 MHz einstellen (Japan)
88 * Den UKW-Frequenzbereich auf 87 87 108
bis 108 MHz einstellen (Nordamerika; Westeuropa).
LICHT
Durch eine schnelles kurzes Drücken und wieder Loslassen
des Knopf SNOOZE/LIGHT (22) auf der Oberseite des Radios
wird das Licht für die Anzeige eingeschaltet. Es leuchtet
ungefähr 10 Sekunden lang von der rechten Seite der Anzeige
aus.Wenn der Knopf für 5 Sekunden gedrückt und dann
wieder losgelassen wird, bleibt das Licht unbegrenzt an
(dadurch wird die Lebensspanne der Batterien erheblich
verkürzt).
Das Licht wird durch einen schnellen kurzen Druck auf den
Knopf ausgeschaltet.
KOPFHÖRER
Die Stereo-Kopfhörer oder Ohrstecker mit einem Stecker von
1/8-Zoll in die Kopfhörerbuchse (13) auf der linken Seite des
Radios stecken.
SCHALTER DX LOCAL
Immer die Stellung DX verwenden. LOCAL wird nur verwendet, wenn Sie sehr nahe an dem örtlichen Radiosender
wohnen, dessen Stärke beim Hören Klangverzerrungen verursacht. ‚DX’ bedeutet ‚Entfernung’. In dieser Position hat das
Radio die maximale Empfindlichkeit für Radiosignale.
148
149

YB 550PE BETRIEB HANDBUCH
SPERRSCHALTER
Wenn der Sperrschalter LOCK auf der Stellung EIN steht, werden alle Knöpfe und der Regler zur FEINEINSTELLUNG deaktiviert. Wenn das Radio eingeschaltet ist, während der
Sperrschalter LOCK eingeschaltet wird, bleibt der
Lautstärkenregler funktionsfähig. Diese Funktion ist auf
Reisen sehr nützlich. Das Radio vor dem Verpacken in einen
Koffer, das Handgepäck oder einen Aktenkoffer ausschalten
und dann sperren. Dadurch wird verhindert, dass es sich aus
Versehen einschaltet und die Batterien entlädt.
VERMEIDEN DES AUSLAUFEN DER
BATTERIESÄURE
Um das Auslaufen von Batteriesäure zu vermeiden, nur
Alkalibatterien bester Qualität oder wiederaufladbare Ni-MH
-Batterien verwenden. Nie alte und neue Batterien oder
Batterien verschiedener Marken oder Typen kombinieren.
Wenn die Batterien auslaufen, sofort den Hersteller der
Batterien benachrichtigen und die Batterien nicht wegwerfen.
Das Auslaufen von Batteriesäure ist nicht durch die Garantie
abgedeckt und macht diese ungültig.
150 151
FEHLERBEHEBUNG
KANN NICHT EINGESCHALTET WERDEN
• Prüfen, ob sich der Sperrschalter LOCK in der Stellung AUS
befindet.
• Sicherstellen, dass eine Stromzufuhr zum Radio besteht -
entweder durch Batterien oder über ein Netzteil.
• Sicherstellen, dass das Netzteil in eine geeignete
Steckdose und am anderen Ende in die Gleichstrombuchse
des Radios eingesteckt ist. Darauf achten, dass es nicht in
die Kopfhörerbuchse oder die Antennenbuchse eingesteckt
wird. Das Netzteil kann möglicherweise schadhaft sein.
• Sicherstellen, dass die Batterien mit der richtigen Polarität
eingelegt sind.
• Sicherstellen, dass die Batterien nicht entladen sind.
IN DER ANZEIGE IST DIE UHRZEIT ZU
SEHEN, DAS RADIO KANN JEDOCH NICHT
EINGESCHALTET WERDEN
Es bestehen zwei Möglichkeiten: Die Batterien sind leer oder
der Sperrschalter LOCK steht auf EIN.
SCHALTET SICH BEIM EINSATZ MIT
BATTERIEN PLÖTZLICH AB
Dies wird durch leere Batterien verursacht.
SCHALTET SICH BEIM EINSATZ MIT DEM
NETZTEIL PLÖTZLICH AB, WENN ES
UMGESELLT WIRD
Dies wird durch gebrochene Kabel oder lose Verbindungen im
Netzteilkabel verursacht.

YB 550PE BETRIEB HANDBUCH
UNREGELMÄSSIGER BETRIEB
Das Gerät zurücksetzen wie in dem Abschnitt mit der Überschrift VORGEHENSWEISE BEIM ZURÜCKSETZEN beschrieben.
SENDER WERDEN ZU SCHWACH
EMPFANGEN
• Sicherstellen, dass sich der Schalter DX/LOCAL in der
Stellung DX befindet.
• Sicherstellen, dass zum UKW- und Kurzwellenempfang die
teleskopische Antenne ganz herausgezogen ist.
• Beim Empfang von Mittelwellensendern das Radio
drehen. Die interne MW-Ferritantenne ist sehr richtungsempfindlich.
ES KOMMT KEIN KLANG AUS DEM
LAUTSPRECHER
Sicherstellen, dass kein Kopfhörer bzw. Ohrstecker eingesteckt
ist und dass sich der Lautstärkenregler in der richtigen
Position befindet.
SENDER WERDEN ZU SCHWACH EMPFANGEN
• Sicherstellen, dass sich der Schalter DX/LOCAL in der
Stellung DX befindet.
• Sicherstellen, dass zum UKW- und Kurzwellenempfang die
teleskopische Antenne ganz herausgezogen ist.
• Beim Empfang von Mittelwellensendern das Radio
drehen. Die interne MW-Ferritantenne ist sehr richtungsempfindlich.
152 153
DER KLANG EINES SENDERS IST STARK
VERZERRT, SCHEINT JEDOCH EIN SEHR
STARKES SIGNAL ZU HABEN
Es handelt sich wahrscheinlich um einen starken örtlichen
Sender, der sich sehr nahe an Ihrem Aufenthaltsort befindet.
Da er so nahe ist, ist das Signal zu stark. Zur Verminderung
der Signalstärke den Schalter DX/LOCAL in die Stellung
LOCAL bringen. Außerdem versuchen, den Sender mit dem
Regler zur FEINEINSTELLUNG neu einzustellen.
IM BATTERIEFACH BEFINDET SICH EINE
KLEBRIGE FLÜSSIGKEIT ODER WEISSES
PULVER
Der Grund hierfür sind ausgelaufene Batterien. Das Auslaufen
von Batteriesäure ist nicht durch die Garantie abgedeckt. Die
ausgelaufenen Batterien nicht wegwerfen und den Hersteller
der Batterien sofort benachrichtigen.
VORGEHENSWEISE BEIM ZUZRÜCKSETZEN
Wenn ein Zurücksetzen durchgeführt wird, sicherstellen, dass
die verwendeten Batterien gut sind. Wenn das Radio nicht
funktioniert und die unten angeführten Maßnahmen das
Problem nicht lösen, das Radio ‚zurücksetzen’. Dazu die
Batterien herausnehmen und den kleinen runden Knopf, der
in den Boden des Batteriefachs eingelassen ist, mit einer
gestreckten Büroklammer oder einem Kugelschreiber drücken
und wieder loslassen. Die Batterien wieder einsetzen und das
Radio testen. Wenn das Problem dadurch noch immer nicht
gelöst wird, den Vorgang wiederholen und den Knopf zwei
oder drei Mal drücken.

YB 550PE BETRIEB HANDBUCH
DIE WICHTIGSTEN FUNKTIONEN DES
YB 550PE
• KURZWELLE – 1171 – 29,995 kHz
• UKW 87,0 – 108,0 MHz; MW 520 – 1710 KHz
• Manuelle und automatische Sendersuche
• Direkte Frequenzeingabe über Tasten
• Manuelle und automatische Suche der voreingestellten
Sender
• Feineinstellung von Sendern
• 200 beliebig programmierbare Speicher
• Anpassen der Speicherseiten
• Frequenzwahl in Stufen von 9 bzw. 10 kHz für besten
Empfang der Mittelwelle
• Anzeige für UKW Stereo, Signalstärke und Batterieladung
• Digitale Uhr
• Wählbares Zeitformat mit 12 bzw. 24 Stunden.
• Gleichzeitige Anzeige der Frequenz und der Uhr
• Weckfunktion mit Lieblingsstation.
• Programmierbare Weckfunktion
• Programmierbare Einschlafzeit-Automatik (10 – 90
Minuten)
• Licht für LCD-Anzeige
• Eingebaute Antennen zum Empfang von UKW, MW und
KW.
• Kopfhörerbuchse (Kopfhörer in Form von Ohrsteckern
mitgeliefert)
• Netzteilbuchse (Netzteil nicht mitgeliefert)
• Buchse für zusätzliche Antenne (zusätzliche Antenne nicht
mitgeliefert)
• Mitgelieferte Tragetasche
154
155

10 INFORMATIONEN ZUR
WARTUNG
YB 550PE BETRIEB HANDBUCH
Sie können den Etón technischen kundendienst für weitere
informationen oder hilfe durch erreichen uns an berühren:
Telefon: 49 (0) 89 35874-354
Faksimile: 49 (0) 89 35874-103
Vor dem Einschicken des Geräts per Telefon eine
Rückgabegenehmigung anfordern. Wenn Sie Ihr Gerät zur
Wartung einschicken möchten, den Empfänger sorgfältig im
Originalkarton oder einen anderen geeigneten Behälter verpacken. Den Absender deutlich auf dem Verpackungskarton
und einem beigelegten Begleitschreiben angeben. In dem
Schreiben sollte die Art der notwendigen Wartung, die
Symptome oder die Probleme erwähnt werden. Auch eine
Telefonnummer angeben, unter der Sie tagsüber zu erreichen
sind, sowie eine Kopie des Kaufnachweises. Der Empfänger
wird unter den Bedingungen der eingeschränkten Garantie
von Etón gewartet und an Sie zurückgeschickt.
EINJÄHRIGE EINGESCHRÄNKTE GARANTIE
Etón garantiert dem ursprünglichen Käufer, dass dieses
Produkt frei von Material- oder Verarbeitungsmängeln ist.
Diese Garantie gilt für ein Jahr ab Kaufdatum.
Während der Garantieperiode stellt Etón oder eine von Etón
autorisierte Servicestelle kostenlos Teile und Arbeitszeit bereit,
die zur Behebung von Material- und Verarbeitungsmängeln
notwendig sind. Etón kann ein schadhaftes Gerät nach eigenem Ermessen ersetzen.
(1) Füllen Sie die Garantie-Registrierungskarte innerhalb von
zehn (10) Tagen nach Kauf aus.
(2) Rufen Sie Etón oder die nächste Servicestelle sobald wie
möglich an, wenn Sie einen Mangel feststellen. Halten Sie
Folgendes bereit:
(a) Modell und Seriennummer.
(b) Namen des Händlers und das ungefähre Kaufdatum.
(c) Eine genaue Beschreibung des Problems, einschließlich
Details über die elektrischen Verbindungen zu anderen
Geräten und eine Liste dieser Geräte.
(3) Etón stellt eine Rückgabegenehmigungsnummer aus und
teilt die Adresse mit, an die das Gerät geschickt werden
kann. Das Gerät im Originalkarton oder einem anderen
geeigneten Behälter schicken. Eine volle Versicherung
abschließen und das Porto im Voraus bezahlen.
Eine sachgemäße Wartung, Reparatur und der richtige
Gebrauch sind wichtig, damit das Gerät eine entsprechende
Leistung bringen kann. Lesen Sie daher die
Gebrauchsanleitung sorgfältig. Diese Garantie gilt für keine
Schäden, die nach Ermessen von Etón auf folgende Gründe
zurückzuführen sind:
(1) Unsachgemäße Wartung oder Reparatur, einschließlich der
Installation von Teilen oder Zubehör, die nicht der Qualität
und den Spezifikationen der Originalteile entsprechen.
156
157

(2) Unsachgemäße Behandlung, Missbrauch,
Vernachlässigung oder falsche Installation.
(3) Versehentliche oder mutwillige Beschädigung.
(4) Auslaufende Batterien.
Alle stillschweigenden Garantien, falls solche bestehen, ein-
schließlich Garantien der Marktfähigkeit und der Eignung für
einen bestimmten Zweck, laufen ein (1) Jahr nach dem
ursprünglichen Kaufdatum aus.
Das oben Erwähnte stellt die vollständige Verpflichtung von
Etón bezüglich dieses Produkts dar. Der ursprüngliche Käufer
ist zu keiner anderen Behebung berechtigt und hat keinen
Anspruch für zufällige oder Folgeschäden,Verluste oder
Ausgaben. In manchen Staaten ist eine Beschränkung der
Länge stillschweigender Garantien oder der Ausschluss
beiläufig entstandener bzw. Folgeschäden nicht zulässig. Die
obige Beschränkung trifft also für Sie eventuell nicht zu.
Diese Garantie erkennt Ihnen bestimmte gesetzliche Rechte
zu. Sie haben eventuell auch andere Rechte, die von Staat zu
Staat verschieden sind.
Für Informationen über unseren service:
Etón Europe
World Wide Business Centres
Leopoldstr. 236
D-80807 München
Germany
158

www.etoncorp.com
From the United States: (800) 872-2228
From Canada: (800) 637-1648
From Everywhere Else: (650) 903-3866
Email: customersvc@etoncorp.com
Internet: www.etoncorp.com
Etón Corporation
1015 Corporation Way
Palo Alto, California 94303
USA
160
 Loading...