

Page 1

WORLD
RECEIVER
Yacht Boy 2000
ǵ
Page 2

CARE AND SAFETY
________________________________________________
ENGLISH
This device is designed for the playback of audio signals. Any other use is expressly
prohibited.
Prolonged use of the earphones can damage your hearing.
Make sure the device is protected from dripping or splashing water. Do not place any
vessels such as vases on the device. These may be knocked over and spill fluid on the electrical components, thus presenting a safety risk. Do not place any naked flames such as
candles on the device.
When deciding where to place the device, please note that furniture surfaces are covered
by various types of varnish and plastic, most of which contain chemical additives. These
additives may cause corrosion to the feet of the unit and leave stains on the surface of the
furniture which could be difficult or impossible to remove.
Do not use any cleaning agents as they may damage the housing. Clean the device with a
clean, damp leather cloth.
Never open the device casing. No warranty claims are accepted for damage caused by
incorrect handling.
The type plate is located on the back of the device.
Environmental note:
Batteries, including those which contain no heavy metals, may not be disposed of with
household waste. Please dispose of used batteries in an environmentally sound manner.
Find out about the legal regulations which apply in your area.
ENGLISH
29
Page 3
30
OVERVIEW
___________________________________________________________
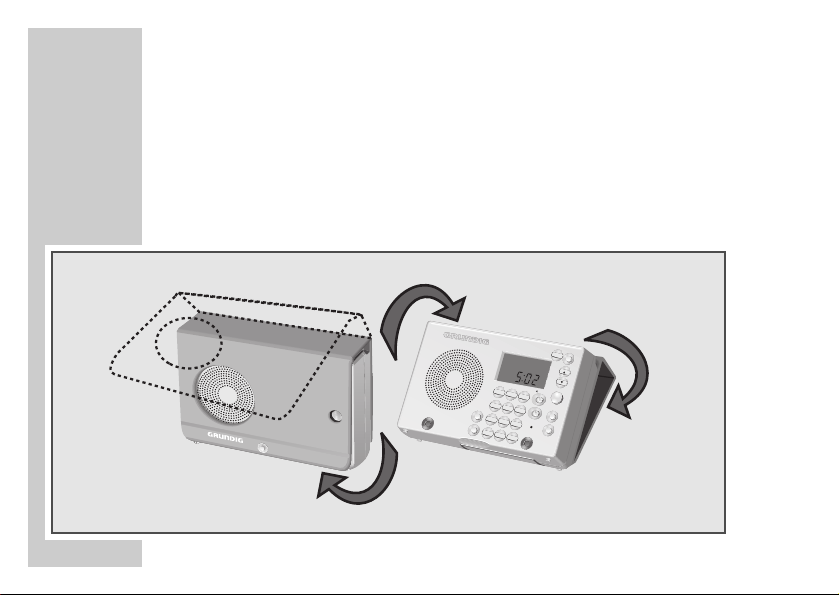
Special features
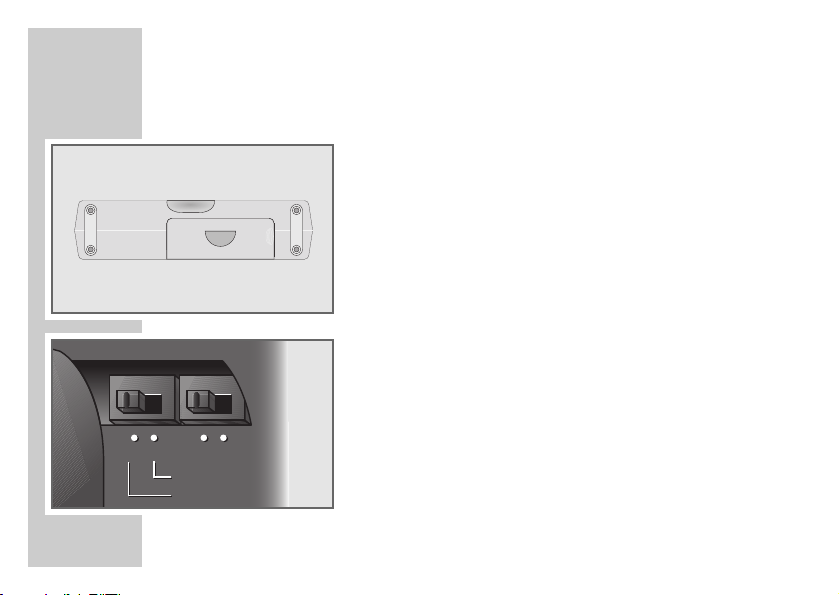
Your Yacht Boy 2000 is supplied with a leather cover which protects the device and lets you
use it in a tilted position. On the back of the device there are four buttons for securing the
leather cover.
Fold the leather cover back as you can see in the picture. Now you can use the device in a
tilted position.
L
IG
H
T
1
H
M
L
O
C
1
K
2
P
3
O
W
E
4
M
EM
O
T
I
P
O
W
R
E
M
E
S
E
T
7
A
L
A
R
M
M
O
D
E
0
R
5
M
E
T
E
R
6
R
A
D
I
O
/
B
U
8
Z
Z
9
RE
S
E
T
F
R
E
S
Q
L
E
E
P
Page 4
OVERVIEW
M
Controls
___________________________________________________________
MEMO
TIME SET
ALARM
213
213
546
879
MODE FREQ
0
LOCK
LOCK
RADIO/BUZZ
RESET
LIGHT
H
M
Front
POWER Switches the device on and off.
A For setting the clock and alarm time (hours).
H
In radio mode: changes the frequency
up in stages, starts an automatic
forwards station search.
POWER
METER
S For setting the clock and alarm time
M
(minutes).
In radio mode: changes the frequency
down in stages, starts an automatic reverse
POWER
METER
LIGHT Switches the backlight display on for
station search.
approx. twelve seconds.
METER Selects the frequency in the short wave
SLEEP
SLEEP Activates the sleep timer.
bands.
ENGLISH
31
Page 5
32
MEMO
TIME SET
ALARM
OVERVIEW
213
546
879
MODE FREQ
0
MEMO
TIME SET
ALARM
MODE FREQ
___________________________________________________________
LOCK
POWER
METER
RADIO/BUZZ
RESET
SLEEP
213
546
RADIO/BUZZ
879
0
RESET
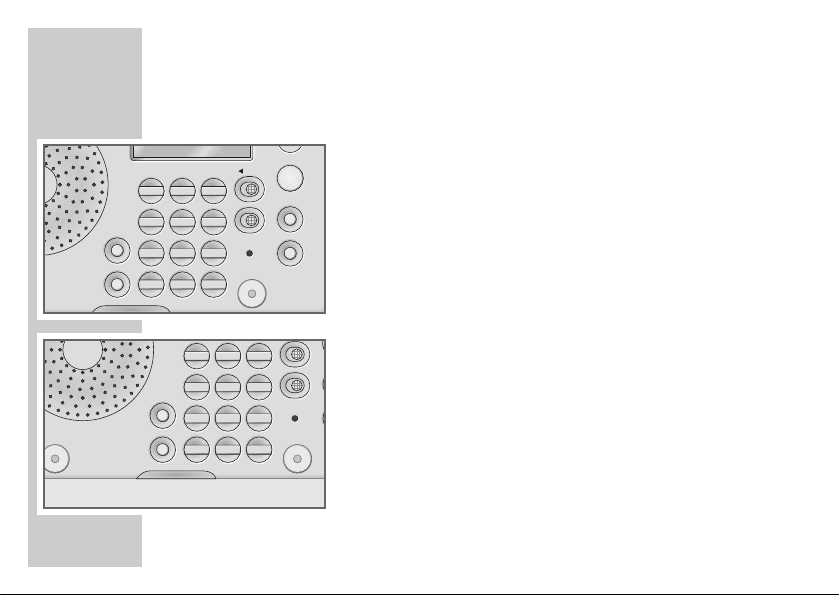
a LOCK Activates and deactivates the key lock.
RADIO/BUZZ
RESET
Switches the alarm signal between radio stations
and the signal tone
.
Returns the device to its original setting.
All settings will be deleted.
FREQ Activates and confirms the numerical entry of the
frequency.
1 ... 0 Numerical keys for entering the frequency.
Stores radio stations. Select presets.
MODE Switches the display between the local time,
dual time and the alarm time.
ALARM Activates and deactivates the alarm.
MEMO Activates the memory function for radio stations.
TIME SET Activates the time setting.
Page 6
OVERVIEW
MONO/STEREO
DC 4.5V
VOLUME
WORLD TIME ZONES BEHIND COVER
___________________________________________________________
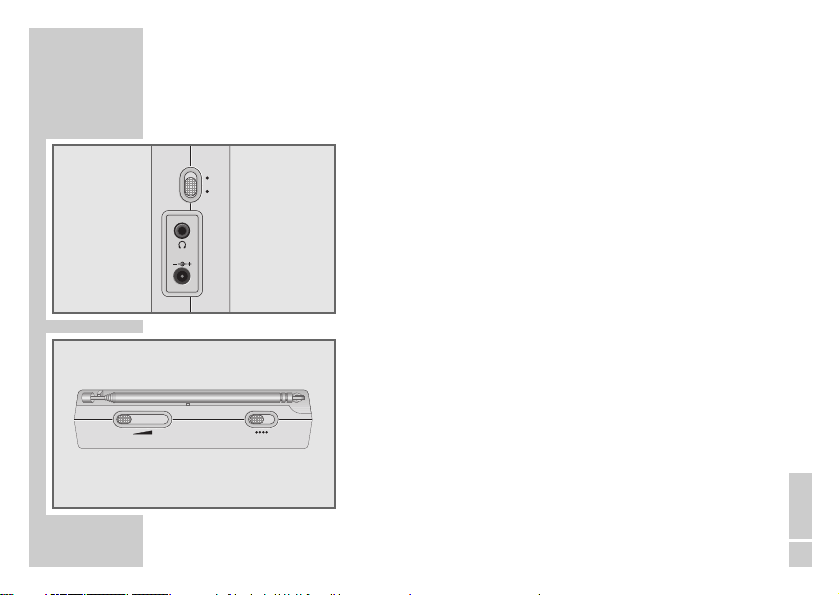
Left side of device
DC 4,5V Socket for mains plug (not supplied),
ˇ
input voltage 4.5 V (200 mA).
0 Socket for earphones (3.5 mm stereo jack).
MONO/STEREO Switches between stereo and mono recep-
tion in earphone mode.
Top of device
| VOLUME Adjusts the volume.
FM MW Switches between FM (VHF), MW (medium
FM MW SW1 SW2
SW1 SW2 wave) and SW (short wave 1 and 2),
Telescopic Antenna for SW and FM reception.
frequency bands.
The radio has a built-in rod antenna for
MW reception.
ENGLISH
33
Page 7
34
OVERVIEW
SW FREQ. AM STEP
SW FREQ. AM STEP
A B 9K 10K
A B 9K 10K
CONTINUOUS
CONTINUOUS
METER BAND
METER BAND
___________________________________________________________
Bottom of device
Batteries Battery compartment (3 x 1.5 V, AA type
batteries).
SW FREQ. Switches between frequencies in SW and
A B selects frequencies in the wavelength gaps
(in the battery compartment).
AM STEP Switches between MW fine tuning in 9 kHz
9kHz 10kHz and 10 kHz steps (in the battery compart-
ment).
Page 8

OVERVIEW
___________________________________________________________
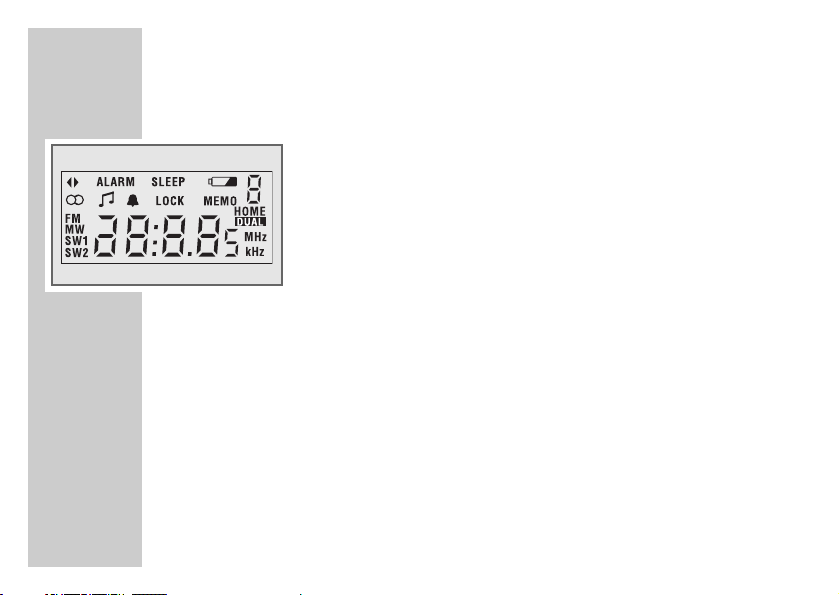
Displays
88:8.85 Shows the current time and the frequency.
FM MW Shows the waveband FM (VHF), medium wave (MW)
SW1 SW2 or short wave (SW).
MHz kHz Frequency display for FM, SW (MHz) and MW (kHz).
ɳ A stereo FM station is being received.
ɷ The radio alarm function is activated.
ʍ The signal alarm function is activated.
LOCK The key lock is activated.
HOME The local time at home is displayed.
DUAL
as Lights up when a radio station is tuned in properly.
ALARM The alarm function is activated.
The dual time is displayed.
ENGLISH
35
Page 9
36
OVERVIEW
___________________________________________________________
SLEEP The sleep timer is activated.
2
MEMO A station is being stored.
8 Displays the preset number (stored radio station).
The batteries are low.
Page 10

POWER SUPPLY
____________________________________________________
Battery operation
1 To open the battery compartment, press the marking and open the lid.
2 When inserting the batteries (3 x 1.5 V, AA type batteries), observe the polarity marked
in the compartment.
Notes:
When the batteries are low, » « appears in the display. Take out the batteries when
you know that the device will not be used for a long period of time. Change the batteries
within two minutes so that the memory content is saved.
The manufacturer accepts no liability for damage caused by leaking batteries.
2
Mains operation (with power supply unit 4.5 V/200 mA)
Check if the power supply unit on the type plate corresponds to your local mains supply.
The only way to disconnect the device from the mains is to unplug the power supply unit.
1 Plug the power supply unit into the »DC 4,5 V « socket on the left of the
device.
2 Plug the power supply unit into the wall socket.
– The batteries in the compartment are switched off.
ˇ
ENGLISH
37
Page 11

38
SETTINGS
_____________________________________________________________
Setting the time
The earth spins round on its axis once every 24 hours, and around the sun once a year.
This movement determines global time differences and seasons. Because of the earth’s rotation, it is always earlier in the day to the west of you and later in the day to the east of you.
The earth is divided into 24 hourly time zones. This system is based on a standard time
zone called UTC (Coordinated Universal Time), previously known as GMT (Greenwich
Mean Time). Short-wave radio stations always announce the time in UTC.
To find out which time-zone you are in, have a look at the map of the world on the back of
the device.
Setting your own local time (Home)
When you first switch on the device, or if it has been without a power supply for a lengthy
period, »0: 00« appears in the display to indicate that the clock has to be set.
1 Keep pressing »MODE« until »HOME« appears in the display.
2 Press »MEMO TIME SET«.
– Display: the hours and minutes flash.
3 Press »H
quickly.
A« repeatedly to set the hours step-by-step or hold down to run through
Page 12

SETTINGS
4 Press »M S« repeatedly to set the minutes step-by-step or hold down to run through
5 To store the setting, press »MEMO TIME SET«.
_____________________________________________________________
quickly.
Switching between your local time and dual time
1 Keep pressing »MODE« until the dual time appears in the display and » « flashes.
2 Press »MEMO TIME SET«.
– Display: dual time and » « continuously.
3 Keep pressing »MODE« until your own local time appears in the display and »HOME«
flashes.
4 Press »MEMO TIME SET«.
– Display: your own local time and »HOME« continuously.
DUAL
DUAL
Setting the dual time
If you are on a trip, for example in Hong Kong, you can set the local time there without
having to change your local time at home.
1 Switch the device to dual time.
ENGLISH
39
Page 13

40
SETTINGS
2 Press »MEMO TIME SET«.
3 Press »H
4 Press »M
5 To store the setting, press »MEMO TIME SET«.
_____________________________________________________________
– Display: the hours and minutes flash.
A« repeatedly to set the hours step-by-step or hold down to run through
quickly.
S« repeatedly to set the minutes step-by-step or hold down to run through
quickly.
Setting the alarm time
1 Keep pressing »MODE« until »ALARM« appears in the display.
2 Press »MEMO TIME SET«.
– Display: the hours and minutes flash.
3 Press »H
quickly.
4 Press »M
quickly.
5 To store the setting, press »MEMO TIME SET«.
A« repeatedly to set the hours step-by-step or hold down to run through
S« repeatedly to set the minutes step-by-step or hold down to run through
Page 14

SETTINGS
_____________________________________________________________
Tuning to radio stations
There are three ways to tune into stations: automatically – with the station search,
manually – with a step-by-step search through the frequencies, directly - by entering the
frequency number.
1 Press »POWER« to switch on the device.
2 Press »FM MW SW1 SW2« to set the waveband.
Note:
If you have set short wave, select the band you want (see the table on page 26). Press
»METER« repeatedly.
Automatically
1 Keep pressing »H A« or »M S« until the frequency switches to rapid run-through.
– The search stops when a station with good reception is found.
ENGLISH
41
Page 15

42
SETTINGS
_____________________________________________________________
Manually
1 Keep pressing »H A« or »M S« until the frequency switches to rapid run-through.
2 When you have nearly reached the frequency you want, briefly press the opposite key
(»M
S« or »H A«).
– The search stops.
3 Press »H
A« or »M S« briefly several times to set the frequency step-by-step.
Directly
1 Press »FREQ« briefly.
– Display: the frequency disappears.
2 Enter the frequency with the number buttons »1 ... 0«.
3 Press »FREQ« to confirm your entry.
– The device then switches to the frequency.
Page 16

SETTINGS
_____________________________________________________________
Storing radio stations
You can store a total of thirty-six radio stations as presets, nine for each wave band
(FM, MW, SW1 and SW2).
1 Press »FM MW SW1 SW2« to set the waveband.
2 Tune in to the station you want.
3 Press »MEMO TIME SET« briefly.
– Display: »MEMO« flashes.
4 Select the preset using the number buttons »1 ... 0«.
5 Save the station using »MEMO TIME SET«.
– Display: »MEMO« disappears, the number of the preset appears e.g. »3«.
ENGLISH
43
Page 17

44
SETTINGS
_____________________________________________________________
Switching to SW frequency tuning
This function lets you tune into the SW frequencies between wave bands and off the wave
bands.
1 Move the »SW FREQ. A B« (in battery compartment) switch to the »A« position.
– Only stations with frequencies within the wave band can be received.
2 Move the »SW FREQ. A B« (in battery compartment) switch to the »B« position.
– Stations with frequencies in the gaps of the wave band can also be received.
Switching to MW fine tuning
The distance between neighbouring stations on MW range is standardised worldwide.
However, North and South America use a different standard to other countries.
1 Move the »AM STEP 9kHz 10kHz« (in battery compartment) switch to the
»9kHz« position.
– MW fine tuning is done in 9 kHz stages (except in North and South America).
2 Move the »AM STEP 9kHz 10kHz« (in battery compartment) switch to the
»10kHz« position.
– MW fine tuning is done in 10 kHz stages (in North and South America).
Page 18

OPERATION
_________________________________________________________
Switching on and off
1 Press »POWER« to switch on the device.
– The device switches on with the radio station last selected.
2 Press »POWER« to switch off the device.
Radio mode
1 Press »FM MW SW1 SW2« (top of the device) to set the waveband.
2 Use »1 ... 0« to select the radio station.
Notes:
For FM reception pull out the telescopic antenna and tilt it until you receive the best
signal. For short wave reception (SW) the antenna should be upright. For medium wave
reception (MW), align the antenna by turning the device.
3 Press »
Listening with earphones
1 Insert the earphone plug (3.5 mm, stereo) into the »0« jack on the left of the device.
MONO/STEREO
DC 4.5V
| VOLUME« on the top of the device to adjust the volume.
– The loudspeaker of the device is automatically switched off.
ENGLISH
45
Page 19

46
OPERATION
Stereo/mono reception (with earphones only)
However, if the signal from the FM stereo station is weak, you can improve the sound
quality by switching to mono reception.
1 Press »MONO/STEREO« on the left of the device to switch to mono.
– Display: »
2 Press »MONO/STEREO« on the left of the device to switch to stereo.
– Display: »
_________________________________________________________
ɳ« disappears.
ɳ«, if a stereo station is being received.
Alarm mode
Viewing the alarm time
1 Keep pressing »MODE« until »ALARM« appears in the display.
– Display: the set alarm time.
Alarm with radio station
1 Press »POWER« to switch on the device.
2 Press »FM MW SW1 SW2« on top of the device to set the waveband.
3 Tune in to the station you want.
4 Press »
| VOLUME« on top of the device to adjust the alarm volume.
Page 20

OPERATION
5 Set the station for the alarm (»ɷ«) by pressing »RADIO/BUZZ«.
6 Press »POWER« to switch off the device.
– The device wakes you up at the set time with the radio station (alarm duration is one
hour).
_________________________________________________________
Alarm with signal tone
1 Set the signal tone (»ʍ«) by pressing »RADIO/BUZZ«.
– The device wakes you up at the set time with the signal tone (alarm duration is one
hour).
Cancelling the alarm for the day
1 Press »POWER« while the alarm is sounding.
– The alarm signal (radio station or signal tone) stops.
– The alarm retains the set time for the next day.
Activating and deactivating the alarm
1 To switch off the alarm, press »ALARM«.
– Display: »ALARM« and the alarm signal disappears.
2 To switch on the alarm, press »ALARM«.
– Display: »ALARM« and the alarm signal.
Note:
The device always wakes you up with at the time shown in the display.
ENGLISH
47
Page 21

48
OPERATION
_________________________________________________________
Timer mode
The device has a sleep timer, which switches it off in radio mode at a preset time. You can
set the switch-off time in one minute steps between ten and ninety minutes.
Switching on the sleep timer
1 With the radio playing, press »SLEEP«.
– Display: »SLEEP« and the switch-off time »60«.
2 Press »H
down to run through quickly.
– After the selected switch-off time has elapsed, the device switches off automatically.
Switching off the sleep timer
1 To switch off the sleep timer early, briefly press »POWER«.
– Display: »SLEEP« disappears.
– The device remains switched on.
A« or »M S« repeatedly to set the switch-off time step-by-step or hold
Page 22

OPERATION
_________________________________________________________
General information
Key lock
1 Press »a LOCK« to disable the buttons in the direction of the arrow.
– Display: »LOCK«.
– The volume control, stereo/mono switch and frequency band selector are not
disabled.
2 To unlock the keys, push back »a LOCK«.
– Display: »LOCK« disappears.
Display lighting
1 Select the display lighting by pressing »LIGHT« for about twelve seconds.
2 To switch off the display lighting, press »LIGHT«.
Resetting the device
1 Press »RESET« (e.g. with a paper clip) to restore the device to its original setting.
– All saved settings are deleted.
ENGLISH
49
Page 23

50
INFORMATION
_____________________________________________________
Short wave
Your radio is able to receive numerous wavebands. Tuning into FM and MW stations will
soon become much easier as the stations will always be in the same place on the tuning
scale and linked to a particular wave length and frequency.
Unfortunately, this is not always the case with short wave stations. Short wave transmissions
have to change their wavelengths very often because of atmospheric interference. Most
short wave bands are available all over the world and can be used by international broadcasters. At present these are the only wavelengths which provide listeners with direct reception over long distances. For this reason, short wave frequencies are not only used by radio
stations, but also by other users such as amateur radio enthusiasts, shipping, aircraft and
radio navigation systems.
Listening to short wave radio stations means you have to be well informed about all the frequencies and wavelengths. Many short wave stations will send you broadcasting schedules
which give you the information you need. You can also download the information from the
Internet.
Deutsche Welle Tel.: +49 (0)228-429-4000
Customer service Fax: +49(0)228-429-15400
Kurt-Schumacher-Straße 3 E-mail: info@dw-world.de
D-53117 Bonn www.dw-world.de
Page 24

INFORMATION
_____________________________________________________
Table for stations in short wave bands
SW1 (MHz)
SW M-Band (MHz)
2.30 - 7.40 int
2.30 - 2.55 (120 m)
3.15 - 3.45 (90 m)
3.85 - 4.05 (75 m)
4.70 - 5.15 (60 m)
5.75 - 6.30 (49 m)
7.05 - 7.40 (41 m)
SW2 (MHz)
SW M-Band (MHz)
9.40 - 26.10 int
9.40 - 10.05 (31 m)
11.50 - 12.20 (25 m)
13.50 - 13.90 (22 m)
14.95 - 15.70 (19 m)
17.40 - 18.00 (16 m)
21.30 - 21.95 (13 m)
25.60 - 26.10 (11 m)
ENGLISH
51
Page 25

52
INFORMATION
_____________________________________________________
Environmental note
This product has been made from high-quality parts and materials which can be re-used
and recycled. Therefore, do not throw the product away with normal household waste at
the end of its life. Take it to a collection point for recycling electrical and electronic devices.
This is indicated by this symbol on the product, in the operating manual and on the
packaging.
Please find out about collection points operated by your local authority.
Help protect the environment by recycling used products.
Technical data
This device is noise-suppressed according to the applicable EU directives.
This product fulfils the European directives 89/336/EEC, 73/23/EEC and 93/68/EEC.
This device conforms to the safety regulation DIN EN 60065 (VDE 0860) and therefore
the international safety regulation IEC 60065.
Technical and design modifications reserved.
Page 26

INFORMATION
_____________________________________________________
Power supply
Battery operation 3 x 1.5 V batteries (AA type)
Mains operation 4.5 V (200 mA) with power supply unit, voltage
Output 250 mW
Antennas
Telescopic antenna FM (VHF) and SW (short wave)
Ferrite rod antenna MW (medium wave)
Frequency bands
FM (VHF) 87.5 ... 108 MHz
MW (medium wave) 522 ... 1620 kHz
SW 1 (short wave) 2.3 ... 7.4 MHz
SW 2(short wave) 9.4 ... 26.1 MHz
Sockets
DC socket 5.5 mm, 4.5 V (200 mA)
Earphone jack 3.5 mm stereo, 2 x 32 Ω impedance
Dimensions and weight 142 mm x 92 mm x 35 mm (W x H x D); 330 g
ENGLISH
53
Page 27

Grundig Multimedia B.V.
Atrium, Strawinskylaan 3105 • NL-1077 ZX Amsterdam • http://www.grundig.com
72011 406 9000
 Loading...