

Page 1
KETTLE
WK 5260
WK 5260 C
DE EN FR
TR
Page 2

Page 3
______________________________________________
B
A
C
D
E
F
G
H
I
3
Page 4
______________________________________________
DEUTSCH 05-11
ENGLISH 12-17
FRANÇAIS 18-23
TÜRKÇE 24-29
4
Page 5

SICHERHEIT UND AUFSTELLEN _______________
Lesen Sie diese Bedienungsanleitung sorgfältig,
bevor Sie das Gerät benutzen! Befolgen Sie alle
Sicherheitshinweise, um Schäden wegen falscher
Benutzung zu vermeiden!
Bewahren Sie die Bedienungsanleitung zum
späteren Nachschlagen auf. Sollte das Gerät
an Dritte weitergegeben werden, muss diese
Bedienungsanleitung ebenfalls mit ausgehändigt
werden.
7
Dieses Gerät ist nur für den privaten Gebrauch im Haushalt bestimmt und ist nicht für
den professionell-gastronomischen Einsatz
geeignet. Es darf nicht für den gewerblichen
Gebrauch verwendet werden.
7
Gerät nicht für Zwecke benutzen, für die es
nicht bestimmt ist. Der Wasserkocher ist nur
zum Kochen von Wasser geeignet. Den Wasserkocher nicht verwenden, um andere Flüssigkeiten oder Speisen aus Dosen, Gläsern
oder Flaschen zu erhitzen.
7
Gerät nie an oder in der Nähe von brennbaren, entzündlichen Orten oder Materialien
benutzen.
7
Gerät nicht im Freien oder im Badezimmer
benutzen.
7
Prüfen, ob die Netzspannung auf dem Typenschild mit der lokalen Versorgungsspannung
übereinstimmt. Die einzige Möglichkeit, das
Gerät von der Stromversorgung zu trennen, ist
den Netzstecker zu ziehen.
7
Falls nicht vorhanden, wird als zusätzlicher
Schutz die Installation einer FehlerstromSchutzeinrichtung (RCD) mit einem Bemessungsauslösestrom von nicht mehr als 30 mA
empfohlen. Fragen Sie einen Elektriker.
7
Gerät, Sockel, Netzkabel oder Netzstecker
nicht in Wasser oder andere Flüssigkeiten
tauchen und keine Teile in der Geschirrspülmaschine reinigen.
7
Netzstecker immer aus der Steckdose ziehen;
nach der Benutzung des Gerätes, vor der
Reinigung des Gerätes, bevor der Raum verlassen wird oder wenn ein Fehler auftritt.
7
Netzstecker nicht am Kabel aus der Steckdose ziehen.
7
Netzkabel nicht um das Gerät wickeln.
7
Schäden am Netzkabel vermeiden, nicht
quetschen, knicken oder über scharfe Kanten
ziehen. Netzkabel von heißen Oberflächen
und offenem Feuer fernhalten.
7
Gerät nicht mit einem Verlängerungskabel
benutzen.
7
Gerät niemals benutzen, wenn das Netzkabel
oder das Gerät selbst beschädigt ist.
7
Unsere GRUNDIG Haushaltsgeräte entsprechen den geltenden Sicherheitsnormen. Wenn
das Gerät oder das Netzkabel beschädigt ist,
muss es von einem Service-Zentrum repariert
oder ausgetauscht werden, um Gefährdungen
zu vermeiden. Fehlerhafte oder unqualifizierte
Reparaturen können Gefahren und Risiken für
den Benutzer verursachen.
7
Gerät unter keinen Umständen öffnen. Für
Schäden aufgrund von falscher Benutzung
wird keine Haftung übernommen.
7
Gerät immer von Kindern fernhalten.
7
Gerät darf von folgenden Personen – einschließlich Kindern – nicht benutzt werden:
solche mit eingeschränkten physischen, sensorischen oder psychischen Fähigkeiten und
solche mit Mangel an Erfahrung und Wissen.
Für Letztere gilt dies nicht, falls sie im Gebrauch des Gerätes unterwiesen wurden oder
dieses unter Aufsicht einer für die Sicherheit
verantwortlichen Person benutzen. Kinder sollten stets soweit beaufsichtigt werden, dass sie
nicht mit dem Gerät spielen.
7
Gerät während der Benutzung nicht unbeaufsichtigt lassen. Vorsicht, wenn das Gerät in
der Nähe von Kindern und Personen mit eingeschränkten physischen, sensorischen oder
mentalen Fähigkeiten benutzt wird.
7
Vor dem Gebrauch sorgfältig alle Teile, die
mit Wasser in Kontakt kommen, reinigen.
Sämtliche Einzelheiten finden Sie im Abschnitt
„Reinigung und Pflege“.
DEUTSCH
5
Page 6

SICHERHEIT UND AUFSTELLEN _______________
7
Gerät trocknen, bevor es mit der Stromversorgung verbunden wird.
7
Gerät und dessen Zubehör niemals auf oder
in der Nähe von heißen Oberflächen wie
Gasbrennern, elektrischen Kochplatten oder
heißen Öfen betreiben oder platzieren.
7
Gerät ausschließlich mit den mitgelieferten
Teilen betreiben.
7
Gerät nur mit seinem Originalsockel betreiben. Der Sockel darf zu keinem anderen
Zweck verwendet werden.
7
Gerät nie mit feuchten oder nassen Händen
benutzen.
7
Gerät immer auf eine stabile, ebene, saubere
und trockene Oberfläche stellen.
7
Anschlusskabel so verlegen, dass ein unbeabsichtigtes Ziehen daran bzw. ein Darüberstolpern nicht möglich ist.
7
Gerät so aufstellen, dass der Netzstecker
immer zugänglich ist.
7
Gerät nur am Handgriff halten. Es besteht die
Gefahr von Verbrennungen. Den Kontakt mit
heißen Oberflächen sowie mit austretendem
Dampf vermeiden.
7
Deckel so öffnen, dass der Dampf vom Körper weggeleitet wird.
7
Deckel nicht während des Kochvorgangs
öffnen. Vorsicht, wenn nach dem Kochen
des Wassers der Deckel geöffnet wird. Der
Dampf, der aus dem Wasserkocher austritt, ist
sehr heiß.
7
Deckel des Wasserkochers muss immer vollständig geschlossen sein.
7
Gerät höchstens bis zur maximalen Füllstandsanzeige füllen. Wenn es überfüllt ist, kann
Wasser herausspritzen.
7
Wasserkocher mindestens bis zur Markierung
der Mindestfüllmenge befüllen.
7
Betreiben Sie das Gerät nie ohne Wasser.
Gerät ausschalten, bevor es vom Sockel genommen wird.
7
Wasserkocher nicht füllen, wenn er auf den
Sockel aufgesetzt ist.
7
Keine Fremdkörper auf das Gerät kleben.
6
DEUTSCH
Page 7

AUF EINEN BLICK ____________________________
Sehr geehrte Kundin, sehr geehrter Kunde,
herzlichen Glückwunsch zum Kauf Ihres neuen
GRUNDIG Wasserkochers WK 5260/WK 5260 C.
Bitte lesen Sie die folgenden Hinweise sorgfältig,
um sicherzustellen, dass Sie Ihr Qualitätsprodukt
von GRUNDIG noch viele Jahre lang benutzen
können.
Verantwortungsbewusstes Handeln!
GRUNDIG setzt intern wie auch bei
unseren Lieferanten auf vertraglich
zugesicherte soziale Arbeitsbedingungen mit fairem Lohn, auf effizienten Rohstoffeinsatz bei stetiger
Abfallreduzierung von mehreren
Tonnen Plastik pro Jahr – und auf mindestens 5
Jahre Verfügbarkeit sämtlichen Zubehörs.
Für eine lebenswerte Zukunft.
Aus gutem Grund. Grundig.
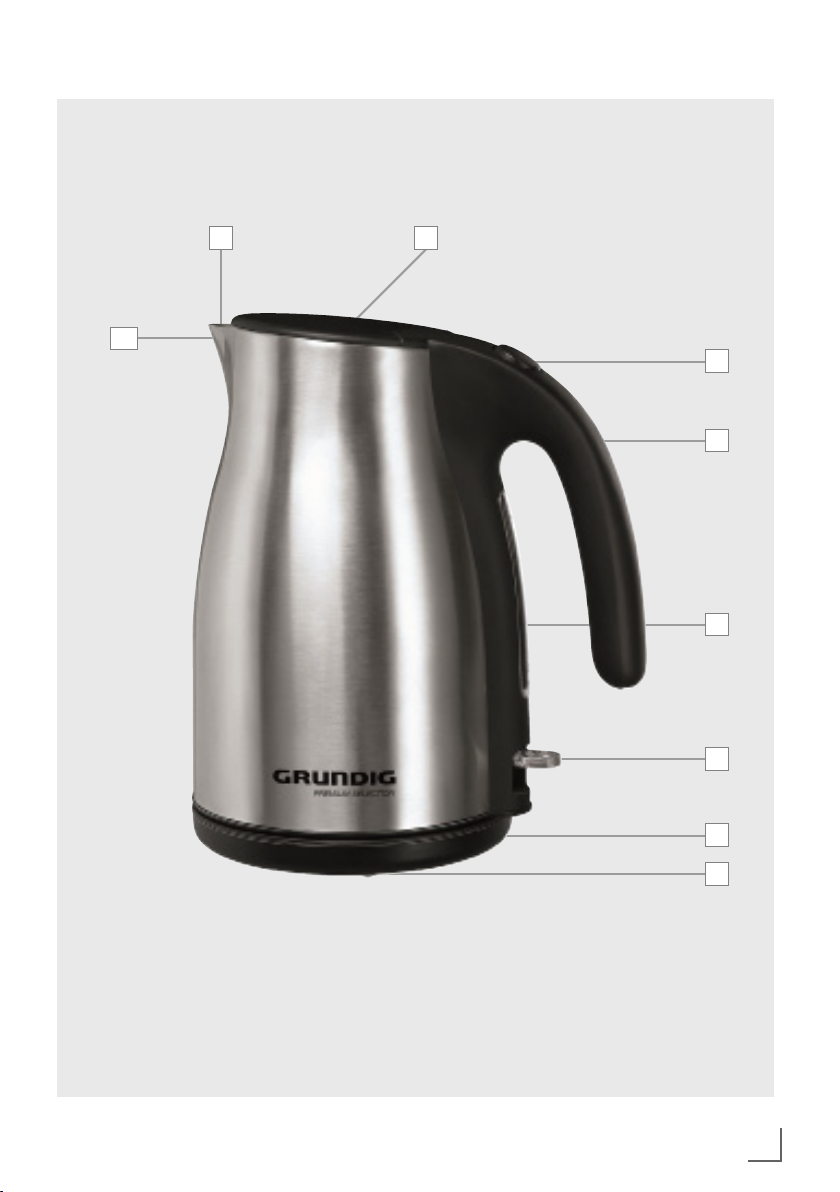
Bedienelemente und Teile
Siehe Abbildung auf Seite 3.
A
Ausgießer
B
Kalk-Wasserfilter
C
Deckel
D
Entriegelungstaste für den Deckel
E
Griff
F
Wasserstandsanzeige
G
Ein-/Ausschalter
H
Sockel
I
Kabelaufwicklung
DEUTSCH
7
Page 8

BETRIEB ______________________________________
Vorbereitung
1 Alle Verpackungsmaterialien und Aufkleber
entfernen und diese entsprechend den gesetzlichen Vorschriften entsorgen.
2 Vor dem Gebrauch sorgfältig alle Teile, die
mit Wasser in Kontakt kommen, reinigen (siehe
Abschnitt „Reinigung und Pflege“).
3 Netzkabel vollständig von der Kabelaufwick-
lung I an der Unterseite des Sockels H abrollen. Netzkabel durch den Schlitz am Sockel
führen.
4 Wassertank mit Wasser füllen.
5 Wasserkocher auf den Sockel H stellen. Si-
cherstellen, dass sich der Wasserkocher in
einer aufrechten Position befindet und richtig
und stabil auf dem Sockel platziert ist.
6 Das heiße Wasser ausgießen, den Wasserko-
cher mit Wasser ausspülen. Dadurch werden
verbleibende Herstellungsrückstände aus dem
Inneren des Wassertanks entfernt.
7 Wasserkocher vor der ersten Benutzung
gründlich reinigen; das Wasser der ersten beiden Kochvorgänge wegschütten.
Betrieb
1 Entriegelungstaste für den Deckel D am Was-
serkocher drücken, der Deckel C öffnet sich.
― Der Deckel C öffnet sich automatisch.
2 Wassertank mit Wasser füllen.
Hinweise
7
Wassertank beim Befüllen mit Wasser nicht
auf den Sockel H stellen.
7
Wassertank soweit füllen, dass sich die
Wassermenge innerhalb der Markierungen
(Minimum/Maximum) befindet.
3 Deckel C schließen, sodass er einrastet.
4 Wassertank auf den Sockel H stellen. Sicher-
stellen, dass er sich stabil in aufrechter Position befindet.
5 Netzstecker in die Steckdose stecken.
6 Ein-/Ausschalter G drücken.
― Der Ein-/Ausschalter G leuchtet blau, der
Kochvorgang beginnt.
Hinweis
7
Der Deckel C sollte während des Kochvorgangs immer geschlossen sein; andernfalls
schaltet sich der Wasserkocher nicht automatisch aus.
7 Nach einigen Minuten beginnt das Wasser zu
kochen. Der Wasserkocher schaltet sich automatisch aus, der Ein-/Ausschalter G bewegt
sich nach oben.
― Das blaue Licht erlischt.
Hinweis
7
Die Erhitzung kann durch Drücken des Ein-/
Ausschalters G nach oben auch manuell beendet werden.
8 Netzstecker aus der Steckdose ziehen.
9 Wassertank vom Sockel H nehmen. Nur am
Griff E halten.
Achtung
7
Deckel C nicht öffnen, da heißes Wasser
herausspritzen kann. Sicherstellen, dass kein
Wasser auf den Sockel H spritzt.
10 Wasser über den Ausgießer A in die ge-
wünschte Tasse oder ein Glas gießen.
Hinweise
7
Zum Fortsetzen des Kochvorgangs die Schritte
1 bis 10 wiederholen.
7
Wasserkocher zwischen jedem Einsatz abkühlen lassen.
Tipps und Tricks
7
Der Wasserkocher ist mit einem Kalk-Wasserfilter B ausgestattet, der beim Ausgießen
Kalk und andere Rückstände aus dem Wasser
filtert.
7
Zur Verhinderung der Kalkbildung, weiches
oder gefiltertes Wasser verwenden.
8
DEUTSCH
Page 9

INFORMATIONEN ___________________________
Reinigung und Pflege
Achtung
7
Zur Reinigung des Gerätes niemals Benzin,
Lösungsmittel, Scheuermittel oder harte Bürsten verwenden.
7
Weder Gerät noch Sockel H oder Netzkabel
in Wasser oder andere Flüssigkeiten tauchen.
1 Gerät ausschalten und Netzstecker aus der
Steckdose ziehen.
2 Gerät vollständig abkühlen lassen.
3 Außenseite des Gerätes mit einem feuchten, wei-
chen Tuch und etwas mildem Reinigungsmittel
reinigen.
4 Kalk-Wasserfilter B kann zum Reinigen ent-
nommen werden. Dazu wie folgt vorgehen:
― Entriegelung nach unten drücken und den
Filter herausnehmen.
― Je nach Ausprägung der Verkalkung Filter
mit Wasser und ein wenig Zitronensaft oder
Weißweinessig und einer weichen Bürste
reinigen.
― Filter wieder von oben einsetzen, sodass er
einrastet.
Hinweis
7
Nach der Reinigung und vor der Benutzung
des Gerätes alle Teile sorgfältig mit einem
weichen Handtuch trocknen.
Wasserkocher entkalken
Das Entkalken des Wasserkochers verlängert
seine Lebensdauer. Die Häufigkeit hängt von der
Wasserhärte in Ihrem Gebiet ab.
1 Wasserkocher mit Wasser – bis zu drei Viertel
der maximalen Füllmenge – füllen.
2 Weißweinessig oder Zitronensaft bis zum ma-
ximalen Füllstand hinzugeben.
3 Lösung kochen (siehe Abschnitt Betrieb).
4 Wasserkocher ausschalten und den Netzste-
cker aus der Steckdose ziehen.
5 Lösung einige Stunden im Wasserkocher ste-
hen lassen.
6 Lösung abgießen und das Innere sorgfältig
ausspülen.
7 Wasserkocher mit sauberem Wasser füllen und
dieses kochen.
8 Wasserkocher entleeren und erneut mit Was-
ser ausspülen.
Hinweise
7
Wenn immer noch Kalk vorhanden ist, den
Vorgang wiederholen.
7
Es kann auch ein geeignetes Entkalkungsmittel
verwendet werden. Hierzu die Anweisungen
auf der Verpackung des Entkalkungsmittels
beachten.
Warnung
7
Wird der Wasserkocher nach langer Benutzung nicht entkalkt, bildet sich am Boden des
Wasserkochers eine Kalkschicht und die Funktionstüchtigkeit des Gerätes ist beeinträchtigt.
In diesem Fall muss es in einem Kundencenter
repariert werden.
7
Für Schäden aufgrund von falscher Benutzung
wird keine Haftung übernommen.
Lagerung
7
Wenn das Gerät längere Zeit nicht benutzt
wird, sollte es sorgfältig aufbewahrt werden.
7
Darauf achten, dass der Netzstecker gezogen
wird und das Gerät komplett trocken ist.
7
Das Gerät an einem kühlen, trockenen Ort
lagern.
7
Das Gerät sollte sich immer außerhalb der
Reichweite von Kindern befinden.
7
Das Netzkabel um die Kabelaufwicklung I
an der Unterseite des Sockels H wickeln.
Umwelthinweis
DEUTSCH
9
Page 10

INFORMATIONEN ___________________________
Dieses Produkt wurde aus hochwertigen Teilen
und Materialien hergestellt, die wiederverwendet werden können und zum Recycling geeignet
sind.
Deshalb dürfen Geräte am Ende ihrer
Lebensdauer nicht über den normalen
Hausmüll entsorgt werden. Bringen
Sie es zu einer Sammelstelle zum Recycling von elektrischen und elektroni-
schen Geräten. Dies wird durch dieses
Symbol auf dem Produkt, in der Bedienungsanleitung und auf der Verpackung angegeben.
Informieren Sie sich über Sammelstellen, die von
Ihrem Händler oder der lokalen Behörde betrieben werden.
Die Wiederverwertung und das Recycling von
Altgeräten ist ein wichtiger Beitrag zum Schutz
unserer Umwelt.
Technische Daten
Dieses Produkt entspricht den Europäischen Richtlinien 2004/108/EG,
2006/95/EG, 2009/125/EG und
2011/65/EU.
Spannungsversorgung: 220-240 V ~,
50/60 Hz
Leistung: 2550-3000 W
Technische und optische Änderungen vorbehalten.
10
DEUTSCH
Page 11

INFORMATIONEN __________________________
Service und Ersatzteile
Unsere Geräte werden nach den neuesten technischen Erkenntnissen entwickelt, produziert und
geprüft. Sollte trotzdem eine Störung auftreten,
so bitten wir Sie, sich mit Ihrem Fachhändler
bzw. mit der Verkaufsstelle in Verbindung zu
setzen. Sollte dies nicht möglich sein, wenden
Sie sich bitte an das GRUNDIG-Service-Center
unter folgenden Kontaktdaten:
TELEFON: 0180/5231852*
(Montag bis Freitag von 08.00 bis 18.00 Uhr)
Telefax: 0180/5231846*
http://service.grundig.de
E-Mail: service@grundig.com
* gebührenpflichtig (0,14 €/Min. aus dem Festnetz,
Mobilfunk: max. 0,42 €/Min.)
Unter den obengenannten Kontaktdaten
erhalten Sie ebenfalls Auskunft über den Bezug
möglicher Ersatz- und Zubehörteile.
GRUNDIG
Kundenberatungszentrum
Montag bis Freitag von 8.00 bis 18.00 Uhr
Deutschland : 0180 / 523 18 80 *
Österreich : 0820 / 220 33 22 **
* gebührenpflichtig (0,14 €/Min. aus dem Festnetz,
Mobilfunk: max. 0,42 €/Min.)
** gebührenpflichtig (0,145 €/Min. aus dem Festnetz,
Mobilfunk: max. 0,20 €/Min.)
Haben Sie Fragen?
Unser Kundenberatungszentrum steht Ihnen
werktags stets von 8.00 – 18.00 Uhr zur
Verfügung.
DEUTSCH
11
Page 12

SAFETY AND SET-UP _________________________
Please read this instruction manual thoroughly
prior to using this appliance! Follow all safety
instructions in order to avoid damages due to
improper use!
Keep the instruction manual for future reference.
Should this appliance be given to a third party,
then this instruction manual must also be handed
over.
7
This appliance is intended for private
domestic use only and is not suitable for
professional-catering purposes. It should not
be used for commercial use.
7
Do not use the appliance for anything other
than its intended use. The kettle is designed
for boiling water. Do not use the kettle to boil
and heat any other liquids or tinned, jarred,
bottled food.
7
Never use the appliance in or near to combustible, inflammable places and materials.
7
Do not use the appliance outdoors or in the
bathroom.
7
Check if the mains voltage on the rating label
corresponds to your local mains supply. The
only way to disconnect the appliance from
the mains is to pull out the plug.
7
For additional protection, this appliance
should be connected to a household faulty
current protection switch with no more than
30 mA. Consult an electrician for advice.
7
Do not immerse the appliance, base, power
cord or power plug in water or in other liquids and do not clean parts in dishwasher.
7
Disconnect the power plug after using the
appliance, before cleaning the appliance, before leaving the room or if a fault occurs.
7
Do not disconnect the plug by pulling on the
cord.
7
Do not wrap the power cord around the appliance.
7
Prevent damage to the power cord by not
squeezing, bending or rubbing it on sharp
edges. Keep the cord away from hot surfaces
and open flames.
7
Do not use an extension cord with the appliance.
7
Never use the appliance if the power cord or
the appliance is damaged.
7
Our GRUNDIG Household Appliances meet
applicable safety standards, thus if the appliance or power cord is damaged, it must
be repaired or replaced by a service centre
to avoid any dangers. Faulty or unqualified
repair work may cause dange and risks to the
user.
7
Do not dismantle the appliance under any circumstances. No warranty claims are accepted
for damage caused by improper handling.
7
Keep the appliance always out of the reach
of children.
7
The appliance should not be used by the following persons, including children: those with
limited physical, sensory or mental capabilities
and also those with a lack of experience and
knowledge. This does not apply to the latter
if they were instructed in the use of the appliance, or if they use it under the supervision of
a person responsible for their safety. Children
should always be supervised to ensure that
they do not play with the appliance.
7
Do not leave the appliance unattended as
long as it is in use. Extreme caution is advised
when the appliance is being used near children and people with limited physical, sensory
or mental capabilities.
7
Before using the appliance for the first time,
clean all parts which come into contact with
water carefully. Please see full details in the
“Cleaning and Care” section.
7
Dry the appliance before connecting it to
mains supply.
7
Never operate or place any part of this appliance on or near hot surfaces such as gas
burner, electric burner or heated oven.
7
Operate the appliance with delivered parts
only.
12
ENGLISH
Page 13

SAFETY AND SET-UP _________________________
7
Operate the appliance with its original base
Do not use the base for any other purpose.
7
Do not use the appliance with damp or wet
hands.
7
Always use the appliance on a stable, flat,
clean and dry surface.
7
Make sure that there is no danger that the
power cord could be accidentally pulled or
that someone could trip over it when the appliance is in use.
7
Position the appliance in such a way that the
plug is always accessible.
7
Hold the appliance by the handle only. There
is a danger of burns. Avoid contact with hot
surfaces as well as with the emitting steam.
7
Position the lid so that the hot steam is directed away from you.
7
Do not open the lid while the water is boiling.
Be careful while you are opening the lid after
the water has boiled. The steam which comes
out of the kettle is very hot.
7
Make sure that when using the kettle, the lid
always remains closed properly.
7
Never fill the appliance above the maximum
level indicator. If it is overfilled, then boiling
water may splash out.
7
Do not fill the kettle below the minimum level
indicator.
7
Never operate the appliance without any
water inside it.
7
Do not fill the kettle when it is fitted on its
base.
7
Do not stick any foreign objects on the appliance.
ENGLISH
13
Page 14

AT A GLANCE ________________________________
Dear Customer,
Congratulations on the purchase of your new
GRUNDIG Kettle WK 5260/WK 5260 C.
Please read the following user notes carefully to
ensure you can enjoy your quality product from
Grundig for many years to come.
A responsible approach!
GRUNDIG focuses on contractually agreed social working conditions with fair wages for both
internal employees and suppliers,
as well as on the efficient use of
raw materials with continual
waste reduction of several tonnes of plastic each
year - and availability of at least 5 years. for all
accessories.
For a future worth living.
For a good reason. Grundig.
Controls and parts
See the figure on page 3.
A
Spout
B
Hard water filter (inside)
C
Lid
D
Lid release button
E
Handle
F
Water level indicator
G
On/Off switch
H
Base
I
Power cord rewind
14
ENGLISH
Page 15

OPERATION _________________________________
Preparation
1 Remove all packaging and sticker materials
and dispose of them according to the applicable legal regulation.
2 Before using the appliance for the first time,
clean all parts which come into contact with
water carefully. (See the “Cleaning and care”
section).
3 Completely roll out the power cord from the
rewind I on the bottom of the base H. Pass
the power cord through the slot on the base.
4 Fill the water tank with water.
5 Set the kettle on its base H. Make sure that
the kettle is sitting in an upright position and
that it is sitting on the base correctly and in a
stable position.
6 Pour out the hot water and rinse the kettle with
water. This will remove any remaining manufacturing residues from the inside of the water
tank.
7 Clean kettle well before initial use and discard
water of first two boiling cycles.
Operation
1 Push the lid release button D on the kettle to
open the lid C.
― The lid C opens automatically.
2 Fill the water tank with water.
Notes
7
Do not place the water tank on the base H
while filling it with water.
7
Never fill the water tank above the maximum
level indicator or below the minimum level
indicator.
3 Close the lid C until it clicks into place.
4 Place the water tank on the base H. Make
sure that it is sitting in an upright and stable
position.
5 Insert the plug into the wall socket.
6 Press down On/Off switch G.
― On/Off switch G illuminates blue and boil-
ing process begins.
Note
7
Lid C should always be closed during the
boiling process; otherwise the kettle will not
switch off automatically.
7 After a few minutes, the water will start to boil.
The kettle switches off automatically and On/
Off switch G moves upwards.
― The blue light goes off.
Note
7
If you want to stop the heating manually, push
the On/Off switch G upwards.
8 Disconnect the plug from the wall socket.
9 Take the water tank from the base H. Only
hold it by the handle E.
Caution
7
Do not open the lid C as hot water could
splash out. Make sure that no water splashes
onto the base H.
10 Pour the water from the spout A to the cup
or glass you want to use.
Notes
7
If you want to continue the boiling process,
repeat the procedure from 1 to 10.
7
Let the kettle cool down between each heating process.
Hints and Tips
7
The kettle is equipped with a hard water filter
B
which filters out limestone and other resi-
dues when the water is being poured out.
7
Use softened or filtered water to prevent lime
build-up.
ENGLISH
15
Page 16

INFORMATION ______________________________
Cleaning and care
Caution
7
Never use petrol, solvents or abrasive cleaners, metal objects or hard brushes to clean the
appliance.
7
Never put the appliance, base H or power
cord in water or any other liquid.
1 Turn the appliance off and disconnect it from
the wall socket.
2 Let the appliance cool down completely.
3 Use a damp soft cloth and a little mild cleanser to
clean the exterior of the appliance.
4 Hard water filter B can be removed for clean-
ing purposes. To do this:
― Press the release downwards and take out
the filter.
― Depending on the level of lime build-up,
clean the filter with water and a little lemon
juice or white vinegar. Use a soft brush.
― Insert the filter again from above until it
clicks into place.
Note
7
Before using the appliance after cleaning, dry
all parts carefully using a soft towel.
Descaling the kettle
Descaling extends the life of your kettle. Descaling period depends on the water hardness of
your area.
1 Fill the kettle with water, up to three quarters of
the maximum level.
2 Add white vinegar or lemon juice in the kettle
up to the maximum level.
3 Boil the solution (refer to operation section).
4 After the kettle has switched off, unplug the ap-
pliance.
5 Leave the solution in the kettle for a few hours.
6 Pour out the solution and rinse the inside thor-
oughly.
7 Fill the kettle with clean water and boil the
water.
8 Empty the kettle and again rinse it with water.
Notes
7
If there is still some scale, repeat the procedure.
7
You can also use a descaler which is appropriate for utensils. If you use a descaler,
please follow the instructions of that descaler.
Warning
7
If you do not descale the kettle after a long
time you use it, the bottom at the inside of the
water tank fully gets covered with lime scale
and the appliance will not work again. In that
case, it requires to be repaired by a service
centre.
7
No warranty claims are accepted for damage
caused by improper handling.
Storage
7
If you do not plan to use the appliance for a
long period of time, please store it carefully.
7
Make sure the appliance is unplugged and
completely dry.
7
Store the appliance in a cool, dry place.
7
Make sure the appliance is kept out of the
reach of children.
7
Wind up the power cord around the power
cord rewind I on the bottom of the base H .
16
ENGLISH
Page 17

INFORMATION ______________________________
Environmental note
This product has been made from high-quality
parts and materials which can be re-used and
are suitable for recycling.
Therefore, do not dispose of the
product with normal household waste
at the end of its service life. Take it to
a collection point for the recycling of
electrical and electronic equipment.
This is indicated by this symbol on
the product, in the operating manual and on the
packaging.
Please consult your local authorities to find out
where the nearest collection point is.
Help protect the environment by recycling used
products.
Technical data
This product conforms to the
European directives 2004/108/EC,
2006/95/EC, 2009/125/EC and
2011/65 EU.
Power supply: 220-240 V ~, 50/60 Hz
Power: 2550-3000 W
Technical and design modifications reserved.
ENGLISH
17
Page 18

SÉCURITÉ ET INSTALLATION __________________
Veuillez lire attentivement le présent manuel d'utilisation avant d'utiliser cet appareil ! Respectez
toutes les consignes de sécurité pour éviter des
dommages dus à une mauvaise utilisation !
Conservez le manuel d'utilisation car vous pourriez en avoir besoin ultérieurement. Dans le cas
où cet appareil change de propriétaire, remettez
également le manuel d'utilisation au nouveau bénéficiaire.
7
Le présent appareil est destiné à un usage
domestique privé uniquement et ne saurait
convenir à une utilisation professionnelle en
restauration. Il ne doit pas être utilisé à des
fins commerciales.
7
N'utilisez pas l'appareil pour un autre usage
que celui pour lequel il a été prévu. La
bouilloire est conçue pour faire bouillir de
l'eau. N'utilisez pas la bouilloir pour faire
bouillir et chauffer d'autres liquides ou de la
nourriture en boîte, pot ou bouteille.
7
Ne jamais utiliser l'appareil à l'intérieur ou à
proximité des combustibles, des endroits, des
matières, et des matériaux inflammables.
7
Évitez d'utiliser l'appareil à l'extérieur ou dans
la salle de bain.
7
Assurez-vous que la tension de secteur figurant sur la plaque signalétique correspond
à votre alimentation secteur locale. Le seul
moyen de déconnecter l'appareil du secteur
consiste à débrancher la prise.
7
Pour plus de protection, l'appareil doit également être branché à un dispositif de courant
résiduel domestique d'une valeur nominale ne
dépassant pas 30 mA. Demandez conseil à
votre électricien.
7
N'immergez pas l'appareil, lla base, le câble
d'alimentation ou la prise dans de l'eau ou
tout autre liquide et ne lavez pas les composants au lave-vaiselle.
7
Débranchez la fiche d'alimentation électrique
après avoir utilisé l'appareil, avant de de le
nettoyer, avant de quitter la pièce ou si un
problème se produit.
7
Évitez de débrancher l'appareil en tirant sur
le câble.
7
Évitez d'entourer le câble d'alimentation autour de l'appareil.
7
Ne pincez ou ne courbez pas le cordon d'alimentation et ne le laissez pas frotter contre
des bords saillants pour éviter de l'endommager. Éloignez-le des surfaces brûlantes et des
flammes nues.
7
N'utilisez pas de cordon prolongateur avec
l'appareil.
7
N'utilisez jamais l'appareil si le câble d'alimentation ou l'appareil lui-même est endommagé.
7
Nos appareils ménagers de marque
GRUNDIG respectent les normes de sécurité
applicables. Par conséquent, si l’appareil
ou le cordon d’alimentation venait à être endommagé, faites-le réparer ou remplacer par
un centre de service agréé afin d’éviter tout
danger. Des réparations défectueuses et non
professionnelles peuvent être sources de danger et de risque pour l'utilisateur.
7
N'ouvrez en aucun cas l'appareil. Aucune
réclamation au titre de la garantie ne sera
acceptée pour les dégâts résultats d'une manipulation incorrecte.
7
Tenir l'appareil hors de portée des enfants.
7
L'appareil ne doit pas être utilisé par les
personnes suivantes, enfants inclus: les personnes présentant des capacités physiques,
sensorielles ou mentales limitées, et les personnes ne possédant pas l'expérience et la
connaissance suffisantes. Cela ne s'applique
plus à ces dernières si on leur apprend l'utilisation de l'appareil ou s'elles l'utilisent sous la
supervision d'une personne responsable de
leur sécurité. Les enfants doivent toujours être
surveillés pour s'assurer qu'ils ne jouent pas
avec l'appareil.
18
FRANÇAIS
Page 19

SÉCURITÉ ET INSTALLATION __________________
7
Ne laissez pas l'appareil sans surveillance
lorsque vous l'utilisez. Nous vous recommandons la plus grande prudence lorsque
l'appareil est utilisé à proximité d'enfants et
de personnes présentant des capacités physiques, sensorielles ou mentales limitées
7
Avant la première utilisation de l'appareil, nettoyez soigneusement tous les éléments qui seront en contact avec de l'eau. Reportez-vous
aux renseignements fournis dans la rubrique
"Nettoyage et entretien".
7
Séchez l'appareil avant de le connecter à la
prise d'alimentation.
7
Ne faites jamais fonctionner ni n'installez
aucun composant de cet appareil au-dessus
ou à proximité de surfaces chaudes telles
qu'un brûleur à gaz, un brûleur électrique ou
un four chaud.
7
Faites fonctionner l'appareil uniquement avec
les éléments fournis.
7
Faites fonctionner l'appareil avec son socle
d'origine. N'utilisez pas le socle à d'autres
fins.
7
Évitez d'utiliser l'appareil avec des mains
mouillées ou humides.
7
Utilisez toujours l'appareil sur une surface
stable, plane, propre et sèche.
7
Assurez-vous qu'il n'y a aucun danger de tension accidentelle sur le câble d'alimentation
ou que quelqu'un puisse se prendre les pieds
dedans lorsque l'appareil est en marche.
7
Placez l'appareil de manière à ce que la
prise soit toujours accessible.
7
Tenez l'appareil par la poignée uniquement.
Il y a un danger de brûlure. Evitez le contact
avec les surfaces chaudes et la vapeur qui
sort.
7
Positionnez le couvercle de sorte que la vapeur chaude soit dirigée loin de vous.
7
N'ouvrez pas le couvercle pendant que l'eau
bout. Faites attention quand vous ouvrez le
couvercle après que l'eau a bouilli. La vapeur
qui sort de la bouilloire est très chaude.
7
Assurez vous que le couvercle est toujours bien fermé pendant l'utilisation de la
bouilloire.
7
Ne remplissez jamais l'appareil au-dessus
du niveau maximum indiqué. Si elle est trop
pleine, l'eau bouillante peut gicler.
7
Ne remplissez pas la bouilloire sous le niveau
minimum indiqué.
7
Ne faites jamais fonctionner l'appareil sans
eau à l'intérieur.
7
Ne remplissez pas la bouilloire quand elle est
placée sur son socle.
7
Ne collez aucun élément extérieur sur l'appareil.
FRANÇAIS
19
Page 20

APERÇU _____________________________________
Cher client,
Félicitations pour l'achat de votre nouvelle
bouilloire GRUNDIG WK 5260/WK 5260 C.
Veuillez lire attentivement les recommandations
ci-après pour pouvoir profiter au maximum de
la qualité de votre produit Grundig pendant de
nombreuses années à venir.
Une approche responsable !
GRUNDIG est attaché à des
conditions de travail négociées sur
contrat avec des salaires équitables pour les employés internes
et les fournisseurs. Nous attachons
également une grande importance
à l'utilisation efficace des matières brutes avec
une constante réduction des déchets de plusieurs
tonnes de plastique chaque année. En outre, tous
nos accessoires sont disponibles au moins 5 ans.
Pour un avenir valant la peine d’être vécu.
Pour une bonne raison. Grundig.
Commandes et pièces
Voir l'image en page 3.
A
Bec
B
Filtre pour eau dure
C
Couvercle
D
Bouton d’ouverture du couvercle
E
Manche
F
Indicateur de niveau d’eau
G
Bouton Marche/Arret
H
Socle
I
Rembobinage du câble d’alimentation
20
FRANÇAIS
Page 21

FONCTIONNEMENT __________________________
Préparation
1 Retirez les emballages et autocollants avant
de les jeter selon les lois en vigueur.
2 Avant la première utilisation de l'appareil, net-
toyez soigneusement tous les éléments qui seront en contact avec de l'eau. (Voir le chapitre
"Nettoyage et entretien")
3 Déroulez complètement le câble d'alimenta-
tion depuis le rembobinage du câble d’alimentation I se trouvant dans la partie inférieure
du socle H. Passez le câble d'alimentation au
travers de la fente du socle.
4 Remplissez le réservoir à eau avec de l'eau.
5 Posez la bouilloire sur sa base H. Assurez-
vous que la bouilloire est placée en position
verticale et qu'elle est bien enclenchée sur son
socle, en position stable.
6 Versez l'eau chaude et rincez la bouilloire à
l'eau. Cela enlèvera les résidus de production
de l'intérieur du réservoir à eau.
7 Nettoyez bien la bouilloire avant la première
utilisation et jetez l'eau des deux premières
utilisations.
Fonctionnement
1 Appuyez sur le bouton d'ouverture du couvercle
D
de la bouilloire pour ouvrir le couvercle C.
― Le couvercle C s'ouvre automatiquement.
2 Remplissez le réservoir à eau avec de l'eau.
Remarques
7
Ne placez pas le réservoir à eau sur son
socle H pendant le remplissage.
7
Ne remplissez jamais le réservoir d'eau
au-delà du niveau maximum ou en-deça du
niveau minimum.
3 Fermez le couvercle C jusqu'à ce qu'il s'en-
clenche à sa place.
4 Placez le réservoir d'eau sur le socle H. As-
surez-vous qu'il est placé en position verticale
et stable.
5 Branchez la prise à la prise murale.
6 Appuyez sur le bouton Marche/Arrêt G.
― Le bouton Marche/arrêt G s'allume et le
processus de cuisson commence.
Remarque
7
Le couvercle C doit être toujours fermé durant
le cuisson, sinon la bouilloire ne s'éteindra pas
automatiquement.
7 L'eau commence à bouillir au bout de quelques
minutes. La bouilloire s'éteint automatiquement
et le bouton Marche/Arrêt E remonte.
― Le voyant bleu s'éteint.
Remarque
7
Si vous souhaitez arrêter manuellement le
chauffage, appuyez sur le bouton Marche/
Arrêt G.
8 Débranchez la prise de la prise murale.
9 Enlevez le réservoir d'eau de son socle H.
Tenez le seulement par le manche E.
Attention
7
N'ouvrez pas le couvercle C car de l'eau
chaude pourrait gicler. Vérifiez qu'il n'y a pas
d'eau qui gicle sur le socle H.
10 Versez l'eau par le bec A dans la tasse ou
le verre que vous souhaitez utiliser.
Remarques
7
Si vous voulez continuer le processus de cuisson, répéter les instructions 1 à 10.
7
Laissez la bouilloire refroidir entre chaque
utilisation.
Conseils et astuces
7
La bouilloire est équipée d'un filtre pour eau
dure B qui élimine le calcaire et les autres
résidus quand vous y versez de l'eau.
7
Utilisez de l'eau adoucie ou filtrée pour empêcher la formation de calcaire.
FRANÇAIS
21
Page 22

INFORMATIONS _____________________________
Nettoyage et entretien
Attention
7
N'utilisez jamais d'essence, de solvants ou de
nettoyants abrasifs, d'objets métalliques ou de
brosses dures pour nettoyer l'appareil.
7
Ne jamais introduire l'appareil, le socle H
ou le câble d'alimentation dans l'eau ou tout
autre liquide.
1 Éteignez l'appareil et débranchez le câble
d'alimentation de la prise murale.
2 Laissez l'appareil refroidir totalement.
3 Utilisez un chiffon doux humide et un peu de
détergent doux pour nettoyer le boîtier de l'appareil.
4 Le filtre pour eau dure B peut être rétiré pour
être nettoyé. Pour ce faire :
― Appuyez sur le bouton d'ouverture et sortez
le filtre.
― En fonction du degré de calcaire, nettoyez le
filtre avec de l’eau, un peu de jus de citron
ou du vinaigre blanc et utilisez une brosse
souple.
― Remettez le filtre en place par le dessus
jusqu'à entendre un clic.
Remarque
7
Avant d'utiliser l'appareil après le nettoyage,
séchez soigneusement tous ses éléments
l'aide d'une serviette douce.
Détartrer la bouilloire
Le détartrage allonge la vie de votre bouilloire.
La fréquence du détartrage dépend de la dureté
de l'eau dans votre région.
1 Remplissez la bouilloire d'eau au trois-quarts
du niveau maximum.
2 Ajoutez du vinaigre blanc ou du jus de citron
pour remplir la bouilloire au maximum.
3 Faitez bouillir la solution (voir le chapitre fonc-
tionnement).
4 Après l'extinction de la bouilloire, débranchez
l'appareil.
5 Laissez la solution dans la bouilloire pendant
quelques heures.
6 Videz la solution et rincez bien l'intérieur.
7 Remplissez la bouilloire avec de l'eau claire et
faites la bouillir.
8 Videz la bouilloire et rincez-la à nouveau avec
de l'eau.
Remarques
7
S'il reste du calcaire, répéter l'opération.
7
Vous pouvez aussi utilisez un détartrant pour
appareils. Si vous utilisez un détartrant, suivez
les consignes de ce détartrant.
Avertissement
7
Si vous ne détartrez pas la bouilloire pendant
longtemps, le fond du réservoir sera couvert
de tartre et l'appareil ne marchera plus. Dans
ce cas, il devra être réparé par un centre
agréé.
7
Aucune réclamation au titre de la garantie ne
sera acceptée pour les dégâts résultats d'une
manipulation incorrecte.
Rangement
7
Veuillez conserver soigneusement votre appareil si vous ne comptez pas l'utiliser pendant
une période prolongée.
7
Veillez également à ce qu'il soit débranché et
entièrement sec.
7
Conservez-le dans un lieu frais et sec.
7
Assurez-vous de tenir l'appareil hors de portée
des enfants.
7
Enroulez le câble d'alimentation autour du
rembobinage du câble d’alimentation I se
trouvant dans la partie inférieure du socle H.
22
FRANÇAIS
Page 23

INFORMATIONS _____________________________
Remarque à caractère environnemental
Le présent appareil a été fabriqué avec des
pièces et du matériel de qualité supérieure susceptibles d'être réutilisés à des fins de recyclage.
Ne le mettez donc pas au rebut aux
côtés des déchets domestiques à la
fin de sa durée de vie. Nous vous
conseillons de l'apporter à un point
de collecte pour le recyclage du ma-
tériel électrique et électronique. Cette
recommandation est indiquée par le symbole de
poubelle barrée qui figure sur le produit, dans le
manuel d'utilisation, et sur l'emballage.
Veuillez contacter les autorités de votre localité
pour en savoir plus sur le point de collecte le plus
proche.
Aidez-nous à protéger l'environnement en recyclant les produits usagés.
Données techniques
Ce produit est conforme aux directives européennes 2004/108/EC,
2006/95/EC, 2009/125/EC et
2011/65/EU.
Alimentation : 220-240 V ~, 50/60 Hz
Puissance : 2550-3000 W
Modifications relatives à la technique et à la
conception réservées.
FRANÇAIS
23
Page 24

GÜVENLİK VE KURULUM ____________________
Lütfen cihazı kullanmadan önce bu kullanma kılavuzunu tam olarak okuyun! Hatalı kullanımdan
kaynaklanan hasarları önlemek için tüm güvenlik
talimatlarına uyun!
Kullanma kılavuzunu daha sonra başvurmak
üzere saklayın. Bu cihaz üçüncü bir şahsa verildiğinde bu kullanma kılavuzu da teslim edilmelidir.
7
Bu cihaz özel ev kullanımı için tasarlanmış
olup profesyonel kullanım-catering için uygun
değildir. Ticari kullanım için kullanılmamalıdır.
7
Cihazı, kullanım amacının dışında hiçbir amaç
için kullanmayın. Bu su ısıtıcısı, su kaynatmak
için tasarlanmıştır. Isıtıcıyı, başka sıvıları kaynatmak veya kutulanmış, kavanozlanmış veya
şişelenmiş olan yiyecekleri ısıtmak için kullanmayın.
7
Cihazı asla parlayıcı veya yanıcı ortamların
ve maddelerin bulunduğu yerde veya yakınında kullanmayın.
7
Bu cihazı dış mekanlarda veya banyoda kullanmayın.
7
Tip plakası üzerinde belirtilen şebeke geriliminin yerel şebeke gerilimiyle uyumlu olup olmadığını kontrol edin. Cihazın elektrik bağlantısını kesmenin tek yolu fişini çekmektir.
7
Bu cihaz, ilave koruma için azami 30 mA'lık
ev tipi bir kaçak akım koruma sigortasına
bağlanmış olmalıdır. Öneri için bir elektrik teknisyenine danışın.
7
Cihazı, taban ünitesini, elektrik kablosunu
veya elektrik fişini suya ya da diğer sıvılara
batırmayın ve parçalarını bulaşık makinesinde
yıkamayın.
7
Cihazı kullandıktan sonra, temizlemeden
önce, cihazın bulunduğu odadan çıkarken
veya bir arıza olduğunda fişini çıkartın.
7
Cihazın fişini kablosundan çekerek çıkarmayın.
7
Elektrik kablosunu cihazın etrafına sarmayın.
7
Zarar görmemesi için elektrik kablosunu sıkıştırıp bükmeyin ve keskin köşelere sürtmeyin.
Kabloyu sıcak yüzeylerden ve açık ateşlerden
uzak tutun.
7
Cihazla birlikte bir uzatma kablosu kullanmayın.
7
Elektrik kablosu veya cihaz hasarlıysa cihazı
asla kullanmayın.
7
GRUNDIG Küçük Ev Aletleri, geçerli güvenlik standartlarına uygundur; bu nedenle cihaz
veya elektrik kablosu hasar görürse, herhangi
bir tehlikeyi önlemek için servis merkezi tarafından onarılmalı veya değiştirilmelidir. Hatalı
veya gerekli vasıflar olmadan yapılan onarım
işlemleri, kullanıcıya yönelik tehlike ve riskler
meydana getirebilir.
7
Kesinlikle cihazı parçalarına ayırmayın. Hatalı
kullanımın neden olduğu hasar için hiçbir garanti talebi kabul edilmez.
7
Cihazı daima çocukların ulaşamayacağı bir
yerde muhafaza edin.
7
Cihaz aşağıda tanımlanan kişiler ve çocuklar tarafından kullanılmamalıdır: fiziksel, duyusal ve zihinsel becerileri kısıtlı olan, deneyim
ve bilgi eksikliği olan kişiler. Son belirtilenler
cihazla ilgili bilgi almışlarsa ya da cihazı güvenliklerinden sorumlu olan bir kişinin gözetiminde kullanıyorlarsa, bu kural onlar için geçerli olmaz. Küçük çocuklara, aletle oynamadıklarından emin olmak için daima gerekli dikkat gösterilmelidir.
7
Kullanımda olduğu sürece cihazı gözetimsiz olarak bırakmayın. Cihaz çocukların ve sınırlı fiziksel, duyusal ya da zihinsel kapasiteye
sahip insanların yakınında kullanıldığında son
derece dikkatli olunması tavsiye edilir.
7
Cihazı ilk kez kullanmadan önce su ile temas
eden tüm parçaları dikkatli şekilde temizleyin.
Lütfen “Temizlik ve Bakım” bölümündeki tüm
ayrıntılara bakın.
7
Cihazı ana elektrik şebekesine bağlamadan
önce kurutun.
7
Asla cihazın herhangi bir parçasını gazlı
ocak, elektrikli ocak veya ısınmış fırın gibi
sıcak yüzeylerin üzerinde veya yanında çalıştırmayın veya bu yüzeylerin üstüne koymayın.
24
TÜRKÇE
Page 25

GÜVENLİK VE KURULUM ____________________
7
Cihazı sadece birlikte verilen parçalarla kullanın.
7
Cihazı sadece orijinal taban ünitesiyle kullanın. Taban ünitesini başka herhangi bir amaç
için kullanmayın.
7
Cihazı elleriniz ıslak veya nemliyken kullanmayın.
7
Cihazı daima dengeli, düz, temiz ve kuru bir
yüzey üzerinde kullanın.
7
Cihazın kullanımı esnasında elektrik kablosunun yanlışlıkla çekilmesi veya birinin kabloya
takılma tehlikesinin olmadığından emin olun.
7
Cihazı, elektrik fişine her zaman ulaşılabilecek şekilde yerleştirin.
7
Cihazı sadece tutamağından tutun. Yanma
riski vardır. Sıcak yüzeyler ve cihazdan çıkan
buhara temas etmekten kaçının.
7
Cihazın kapağını açarken, sıcak buhar, üzerinize gelmeyecek şekilde konumlandırın.
7
Su kaynarken cihazın kapağını açmayın. Su
kaynadıktan sonra kapağını açarken dikkatli
olun. Isıtıcıdan çıkan buharın sıcaklığı çok yüksektir.
7
Isıtıcıyı kullanırken, kapağının daima düzgün
kapatıldığından emin olun.
7
Cihazı asla maksimum seviye göstergesinin
üzerinde doldurmayın. Gereğinden fazla doldurulması durumunda, su kaynadığında dışarı
sıçrayabilir.
7
Isıtıcıyı minimum seviye göstergesinin altında
doldurmayın.
7
Cihazı içerisinde su olmadan asla çalıştırmayın.
7
Isıtıcıyı, taban ünitesi üzerindeyken doldurmayın.
7
Cihaz üzerine yabancı nesneler yapıştırmayın.
TÜRKÇE
25
Page 26

GENEL BAKIŞ ________________________________
Değerli Müşterimiz,
Yeni GRUNDIG Su Isıtıcısı WK 5260/WK 5260 C'ı
satın aldığınız için sizi kutlarız.
Grundig kalitesindeki ürününüzü yıllarca keyifle
kullanabilmeniz için aşağıdaki kullanıcı notlarını
dikkatle okuyun.
Sorumlu yaklaşım!
GRUNDIG hem çalışanlar hem de
tedarikçiler için adil ücretlendirme
sunan sözleşmeyle kabul edilmiş sosyal çalışma koşulları sağlamayı
hedef alır. Hammaddelerin etkin kul-
lanımı ve her yıl birkaç ton plastik
atık miktarını düzenli olarak azaltmak da öncelikli
hedeflerimiz arasında yer alıyor. Ayrıca, tüm aksesuarlarımız en az 5 yıl boyunca kullanılabilir.
Yaşamaya değer bir gelecek için.
İyi bir amaç için. Grundig.
Kontroller ve parçalar
Sayfa 3'teki şekle bakın.
A
Dolum Ağzı
B
Kireçli su filtresi
C
Kapak
D
Kapak açma düğmesi
E
Tutamak
F
Su seviyesi göstergesi
G
Açma/Kapama düğmesi
H
Taban Ünitesi
I
Elektrik kablo yuvası
26
TÜRKÇE
Page 27

KULLANIM __________________________________
Hazırlık
1 Tüm ambalaj ve etiket malzemelerini çıkarın ve
yürürlükteki yasal düzenlemelere uygun olarak atın.
2 Cihazı ilk kez kullanmadan önce su ile temas
eden tüm parçaları dikkatli şekilde temizleyin.
(“Temizleme ve bakım” bölümüne bakın).
3 Elektrik kablosunun tamamını taban ünitesinin
H
altındaki elektrik kablosu yuvasından I çıkarın. Güç kablosunu taban ünitesindeki delikten geçirin.
4 Su haznesini suyla doldurun.
5 Su ısıtıcısını taban ünitesinin H üzerine yerleş-
tirin. Su ısıtıcısının, dik konumda durduğundan
ve taban ünitesine doğru ve sabit bir pozisyonda yerleştirildiğinden emin olun.
6 Sıcak suyu dökün ve su ısıtıcısını su ile durula-
yın. Bu işlem, varsa su haznesinin içerisindeki
üretim kalıntılarını temizleyecektir.
7 İlk kez kullanmadan önce su ısıtıcısını iyice te-
mizleyin ve iki kez su kaynatıp kullanmadan
atın.
Kullanım
1 Kapağını C açmak için D ısıtıcının üze-
rindeki kapak açma düğmesine bastırın.
― Kapak C otomatik olarak açılır.
2 Su haznesini suyla doldurun.
Notlar
7
Isıtıcıya su koyarken, su haznesini taban ünitesine H yerleştirmeyin.
7
Asla su haznesine maksimum göstergeden
fazla ya da minimum göstergeden az su koymayın.
3 Kapağı C yerine oturacak şekilde kapatın.
4 Su haznesini taban ünitesine H yerleştirin.
Cihazın dik ve sabit konumda olduğundan
emin olun.
5 Elektrik kablosunun fişini prize takın.
6 Açma/Kapama düğmesine G basın.
― Açma/Kapama düğmesi G mavi yanar ve
kaynatma işlemi başlar.
Not
7
Kapak C kaynatma işlemi süresince daima
kapalı olmalıdır; aksi takdirde su ısıtıcısı otomatik olarak kapanmayacaktır.
7 Birkaç dakika sonra, su kaynamaya başlar. Su
ısıtıcısı otomatik olarak kapanır ve açma/kapama düğmesi G yukarı hareket eder.
― Mavi ışık söner.
Not
7
Isıtma işlemini manuel olarak durdurmak isterseniz, Açma/Kapama düğmesine G yukarı
doğru bastırın.
8 Cihazın fişini prizden çekin.
9 Su haznesini taban ünitesinden H çıkarın. Ci-
hazı sadece tutamağından E tutun.
Dikkat
7
Sıcak su sıçrayabileceği için cihazın kapağını
C
açmayın. Taban ünitesine H su sıçramadı-
ğından emin olun.
10 Kaynamış suyu kullanmak istediğiniz kupaya
veya bardağa dolum ağzından A boşaltın.
Notlar
7
Kaynatmaya devam etmek için, sırayla 1 - 10
adımlarını takip ederek işlemi tekrarlayın.
7
Her bir ısıtma işlemi arasında ısıtıcının soğumasını bekleyin.
İpucu ve Öneriler
7
Isıtıcının içerisinde su doldurulurken kireç ve
diğer tortuları süzen bir kireçli su filtresi bulunmaktadır.
7
Kireç oluşumunu önlemek için yumuşak veya
filtrelenmiş su kullanın.
TÜRKÇE
27
Page 28

BİLGİLER _____________________________________
Temizleme ve bakım
Dikkat
7
Cihazı temizlemek için kesinlikle benzin, solventler ya da aşındırıcı temizleyiciler, metal
nesneler veya sert fırçalar kullanmayın.
7
Cihazı, taban ünitesini H ya da elektrik kablosunu asla suya veya bir başka sıvıya sokmayın.
1 Cihazı kapatın ve fişini prizinden çıkartın.
2 Cihazın tamamen soğumasını bekleyin.
3 Cihazın dış yüzeyini temizlemek için nemli bir
bez ve az miktarda yumuşak bir temizleyici kullanın.
4 Kireçli su filtresi temizlik amacıyla çıkarılabilir.
Filtreyi çıkarmak için:
― Mandalı aşağı doğru bastırın ve filtreyi çı-
karın.
― Biriken kireç seviyesine bağlı olarak, su ve
bir miktar limon suyu veya beyaz sirkeyle temizleyin. Yumuşak bir fırça kullanın.
― Filtreyi tekrar yukarıdan takın ve yuvasına
oturmasını sağlayın.
Not
7
Temizlik sonrasında cihazı kullanmadan önce
yumuşak bir havlu ile tüm parçalarını kurulayın.
Isıtıcının kirecinin sökülmesi
Isıtıcının kirecinin sökülmesi ömrünü uzatacaktır.
Kireç sökme işlemi, bölgenizdeki suyun sertliğine
bağlıdır.
1 Isıtıcıyı maksimum seviyenin dörtte üçü kadar
suyla doldurun.
2 Sonra maksimum seviyeye gelene kadar
beyaz sirke veya limon suyu ekleyin.
3 Bu çözeltiyi kaynatın (çalıştırma bölümüne
bakın.)
4 Isıtıcı kapandıktan sonra cihazın fişini prizden
çıkarın.
5 Çözeltiyi birkaç saat ısıtıcının içerisinde tutun.
6 Daha sonra dökün ve ısıtıcının içerisini iyice du-
rulayın.
7 Isıtıcıyı temiz suyla doldurun ve suyu kaynatın.
8 Isıtıcıyı boşaltın ve suyla tekrar durulayın.
Notlar
7
Hala çıkmamış kireç varsa, bu işlemi tekrar
edin.
7
Ayrıca, mutfak gereçleri için uygun olan bir
kireç çözücü de kullanabilirsiniz. Bir kireç çözücü kullanıyorsanız, lütfen bu kireç çözücünün talimatlarını uygulayın.
Uyarı
7
Uzun süre kullandıktan sonra ısıtıcının kirecini
çözmezseniz, su haznesinin tabanı tamamen
kireçle kaplanır ve cihaz çalışmaz hale gelir.
Bu durumda, bir servis merkezi tarafından
onarılması gerekir.
7
Hatalı kullanımın neden olduğu hasar için hiçbir garanti talebi kabul edilmez.
Saklama
7
Cihazı uzun süre kullanmayı düşünmüyorsanız,
lütfen dikkatli bir şekilde saklayın.
7
Cihazın fişinin çıkarıldığından ve tamamen
kuru olduğundan emin olun.
7
Cihazı serin ve kuru bir yerde saklayın.
7
Cihazın, çocukların ulaşamayacağı bir yerde
muhafaza edildiğinden emin olun.
7
Elektrik kablosunu taban ünitesinin H altındaki
elektrik kablosu yuvasına I sarın.
28
TÜRKÇE
Page 29

BİLGİLER _____________________________________
Çevre ile ilgili not
Bu ürün, tekrar kullanılabilir ve geri dönüşüme
uygun yüksek kaliteli parça ve malzemelerden
üretilmiştir.
Bu nedenle, hizmet ömrünün sonunda
ürünü normal evsel atıklarla birlikte
atmayın. Elektrikli ve elektronik donanımların geri dönüşümüne yönelik bir toplama noktasına götürün. Bu
husus ürünün üzerinde, kullanım kılavuzunda ve ambalaj üzerinde bulunan yandaki
simge ile gösterilir.
En yakın toplama noktasının yerini öğrenmek için
lütfen yerel makamlara danışın.
Kullanılmış ürünlerin geri dönüşümünü sağlayarak çevrenin korunmasına yardımcı olun.
Teknik veriler
Bu ürün, 2004/108/EC, 2006/95/EC,
2009/125/EC ve 2011/65/EI Avrupa
direktiflerine uygundur.
Güç kaynağı: 220-240 V ~, 50/60 Hz
Güç: 2550-3000 W
Teknik ve tasarım değişiklikleri yapma hakkı saklıdır.
TÜRKÇE
29
 Loading...