

Page 1
CYLINDER VACUUM CLEANER
VCC 7650
Page 2
________________________________________________________________________________
C
B
H
D
E
F
K
M
A
G
L
N
I
J
2
Page 3

________________________________________________________________________________
DEUTSCH 4 - 15
ENGLISH 16 - 27
FRANÇAIS 28 - 39
ITALIANO 40 - 51
PORTUGUÊS 52 - 63
ESPAÑOL 64 - 75
POLSKI 76 - 87
CESKY 88 - 99
TÜRKÇE 100 - 111
ΕΛΛΗΝΙΚA 112 - 123
3
Page 4

SAFETY
___________________________________________________________________
Please note the following when starting up the
appliance:
7
This appliance is intended for domestic use
only. All guarantee claims expire if it is used
for industrial or commercial purposes.
7
To avoid damage and risks due to improper
use, please read the instructions for use and
store in a safe place.
7
Do not clean wet surfaces and do not vacuum
up wet objects.
7
Do not use the appliance in a wet environment.
7
Do not use the appliance if your hands are wet.
7
The appliance is intended to be used for vacuuming dirt and dust particles. Do not use it to
vacuum large objects which block the appliance and can damage it as a result.
7
Do not sweep up cigarette butts, fireplace
ashes or matchsticks.
This could cause a fire.
7
Do not place the appliance upright while you
are cleaning.
7
Do not roll the appliance over the power cord.
7
Do not close any doors above the power cord.
7
Do not pull the power cord over sharp edges
and do not crush it.
7
If you move the appliance into another room,
always disconnect the plug at the wall socket
and carry the appliance by the handle.
7
Never move the appliance by pulling on the
power cord.
7
Never use the appliance without a dust bag or
filter.
7
Change the filter when necessary.
7
Always change the dust bag if the indicator
switches to red.
7
Use original accessories from GRUNDIG only
for the replacement.
7
The mains plug must always be disconnected at
the wall socket before changing the dust bag,
cleaning the appliance or other care measures.
7
The dust bag cover cannot be closed if there is
no dust bag in the appliance.
Do not use force.
7
If possible, plug the power cord plug directly
into the wall socket. Avoid using extension
cables or multiple extension sockets.
7
Remove mains plug from wall socket after use.
Do not remove the plug from the wall socket by
pulling on the cable.
7
Never start up the appliance if it or
the power cord shows signs of visible damage.
This also applies to an accidentally wettened
appliance.
In such cases, contact your local specialist
store.
7
Keep the appliance out of reach of children.
7
Never open up the appliance.
All rights to claim under the guarantee are
invalidated for damage caused by improper
interventions
16
ENGLISH
Page 5

AT A GLANCE
______________________________________________________
Dear Customer,
We hope you enjoy using your new GRUNDIG
floor vacuum cleaner with integrated Microban®
antibacterial protection.
To ensure this protection lasts, where possible,
please use vacuum cleaner bags with Microban®
technology only.
These are available from the dealer you purchased your GRUNDIG vacuum cleaner from.
If you do not want to use dust bags
with integrated Microban® antibacterial protection you can also use dust bags from Swirl, Type
Y 101 for VCC 7650.
However, please note that if you use this dust bag
in your GRUNDIG vacuum cleaner it will not have
full antibacterial protection.
Special features
– Working radius approx 12 metres
– Eleven level filtering with washable HEPA filter.
– Multi-step extendable telescopic vacuum tube
for adjusting to your individual height.
– Three different brushes and one cleaning roller
(Fabric Master)
– Small brush and narrow crevice tool for hard to
reach places.
– Automatic power cord rewinding.
– Five litre dust bag volume.
HEPA filter
HEPA stands for High Efficiency Particulate Air.
HEPA filters are particulate air filters, which filter
more than 99.9% of all dust particles larger than
0.1 to 0.3 micrometres out of the air. Viruses, respirable dusts, mite eggs and
mite excretions, pollen, smoke particles, asbestos,
bacteria, diverse toxic dusts and aerosols are
removed from the air.
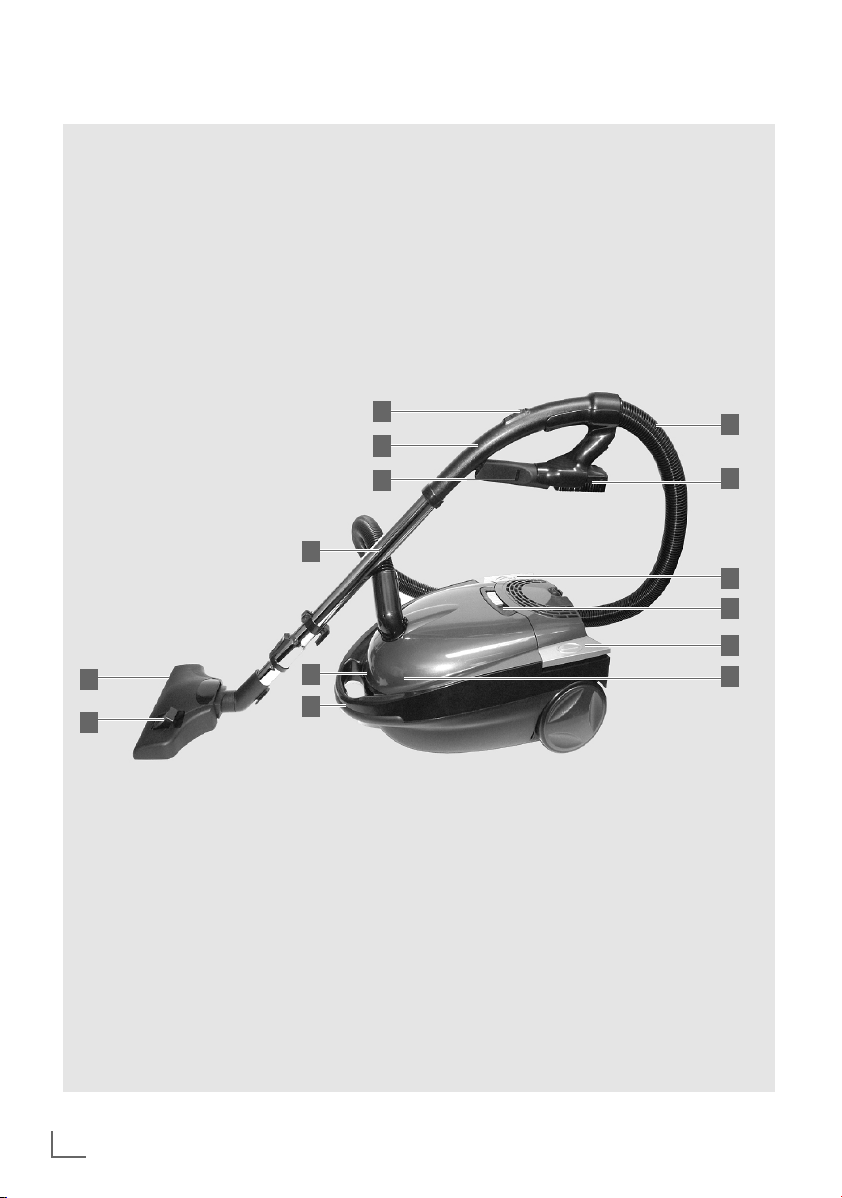
Controls
Fold out page 2 to clearly see the diagram at all
times.
A
Elastic vacuum hose.
B
Handle for guiding the telescopic vacuum
tube.
C
Suction power controller.
D
Multi-step extendable telescopic vacuum tube.
E
Floor brush.
F
Changeover switch for carpets or bare floors.
G
Small brush for hard to reach places.
H
Narrow crevice tool for hard to reach places.
I
Pushbutton for switching on and off.
J
Dust container.
K
Dust container release button.
L
Pushbutton for automatic rewinding of the
power cable.
M
Handle for carrying the appliance.
N
Switch for variable adjustment of the suction
power.
ENGLISH
17
Page 6

INDIVIDUAL PARTS
_____________________________________________
Multi-step extendable
telescopic vacuum tube
1 Extend telescopic vacuum tube ; do this by
pushing forward the latch and pulling the tube
to the required length.
2 To lock, release the latch.
D
Brushes
The vacuum cleaner is supplied
with three different brushes and
a cleaning roller (Fabric Master):
– Laminate brush: for cleaning wooden floors
such as laminate, parquet, etc.
– Turbo floor brush: ideal for removing stubborn
dirt or animal hairs and for cleaning upholstered furniture.
– Combi floor brush: Carpet brush with height
adjustment depending on the carpet thickness.
– Fabric Master: Cleaning roller for cleaning tex-
tiles and fabrics, e.g. curtains (does not suck in
the material).
1 Push the brush or Fabric Master directly onto
the guide handle for better control.
2 Push the brush or Fabric Master onto the
extendable telescopic vacuum tube for
greater reach.
3 Alter the switch on the combi-floor brush
E
depending on the carpet
thickness.
E
F
F
D
Use one of the three brushes above
or the Fabric Master depending on the requirements.
ENGLISH
18
Page 7

INDIVIDUAL PARTS
_____________________________________________
Narrow crevice tool
Use the narrow crevice tool to clean places
difficult to reach, e.g. crevices.
1 Push the narrow crevice tool directly onto the
guide handle for improved
control.
2 Push the narrow crevice tool onto telescopic
vacuum tube for greater reach.
D
H
H
Small brush
Use the small brush for cleaning e.g. upholstery.
1 Push the brush directly onto the guide handle
for improved control.
2 Push the small brush onto telescopic vacuum
D
tube for greater reach.
G
G
Storing the accessories
1 Fix the narrow vacuum tube and the small
brush in the holder on the guide handle .
B
B
ENGLISH
19
Page 8

USE
_________________________________________________________________________
Check whether the mains voltage given
on the rating plate (on the underside
of the appliance) matches the local mains voltage.
Preparation
IYour appliance is supplied with a dust bag
already fitted. Once you have assembled the individual parts the appliance is ready to use.
1 Push the plug-in contact of the flexible hose
in the socket provided on the dust container
until it latches into place.
Note
7
To remove the flexible hose , press the side
A
release buttons on the plug-in contact and then
pull out the hose.
A
J
Switching on and off
1 Pull out the required length of power cord.
Important
7
A yellow mark appears at the end of
the cable. The maximum cable length is indicated by a red mark.
Never try to pull out the power cord beyond
the red mark.
2 Plug the power cord plug into the wall socket.
3 Switch on the appliance by pressing
pushbutton .
4 Use the slide switch to set
the required suction power.
I
N
20
20
ENGLISH
A
J
I
5 After use, press pushbutton to switch off the
N
I
appliance and remove the power cord plug
from the wall socket.
Important
7
If the appliance is not being used, always disconnect the mains plug at the wall socket.
Page 9

USE
_________________________________________________________________________
Suction power controller
On the guide handle there is a suction power
controller , which you adjust with your thumb.
The maximum suction power is reached if the
controller is fully closed.
In some cases, e.g. for cleaning fabrics
or upholstery, reduced suction power is useful.
You should then open the controller as required.
C
B
B
C
Rewind power cord
1 Unplug the power cord plug from the wall
socket.
2 Hold the power cord in one hand and press
pushbutton , keep it pressed.
3 Carefully guide the power cord back into the
appliance.
Important
7
Always rewind the power cord with care as
pressing one side of pushbutton and a high
rewinding speed can cause unforeseeable
cable movements.
L
L
L
ENGLISH
21
Page 10

CLEANING AND CARE
Change dust bag
If the indicator on the dust container changes to
red you must change
the dust bag.
1 Unplug the power cord plug from the wall
socket.
2 Open the dust container by pressing the
release button of the dust container and lifting up the cover.
K
________________________________________
4 Seal the dust bag by pulling out the slide in the
direction indicated by the arrow.
K
3 Pull the dust bag out of the holder.
ENGLISH
22
2222
5 Dispose of the sealed dust bag.
Important
7
Do not try to empty and reuse the dust bag.
6 Insert a new dust bag in the holder.
7 Close the cover of the dust container.
Note
7
Test the appliance after changing the dust bag.
If the indicator is still red,
the tools, hoses or filter are blocked
(see following section).
Page 11

CLEANING AND CARE
Remove blockages
1 Unplug the power cord plug from the wall
socket.
2 Check the following parts for blockages:
– The plug-in contact of the flexible hose .
– The plug-in contact between
the flexible hose and the guide
B
handle .
– – The plug-in contact between the telescopic
vacuum tube and the floor brush.
B
A
C
B
________________________________________
Note
7
If you did not find any blockages it may be at
the end of the guide handle in the connector.
Pull off the holder for the tools and use a flat
screwdriver or similar tool to release the hooks.
Then dismantle the parts apart and remove the
dirt. Reassemble the parts again so that the
hooks latch into place.
ENGLISH
23
Page 12

CLEANING AND CARE
Clean the filter or
replace it ...
The filters must be cleaned at regular intervals
depending on use.
Important
7
The dust bag and filter must be inserted before
starting up the appliance as otherwise the
motor will be damaged.
... in the dust container
1 Open the dust container by pressing the
release button of the dust container and lifting up the cover.
2 Pull the dust bag out of the holder and remove.
3 Pull out the filter holder.
K
________________________________________
5 Clean the filter in hot soapy water, rinse well
and leave to air dry.
6 If necessary place a new filter in the holder
and insert the holder back into the cleaner.
... in the exhaust air fan
1 Remove the filter cover.
2 Take out the filter holder.
4 Remove the filter from the holder.
ENGLISH
24
2424
3 Clean the filter in hot soapy water, rinse well
and leave to air dry.
Page 13

CLEANING AND CARE
________________________________________
Correcting faults yourself
4 Remove the foam rubber filter
from the underside of the filter cover.
5 Clean the foam rubber filter in hot soapy
water, rinse well and leave to air dry.
6 Carefully replace all the parts.
Note
7
The filter in the dust container should be
changed every six months or sooner if neces-
sary.
The exhaust air filter should be replaced every
six to nine months or sooner if necessary.
Frequent washing results in filter wear and tear.
The appliance is equipped with a fuse disconnector, which automatically switches off the motor if it
overheats. In this case, complete the following
steps:
1 Switch off the appliance and disconnect the
mains plug from the wall socket.
2 Look for the cause of the overheating (blocked
hoses/tubes, dirty filter, etc.).
3 Remove any blockages, if necessary change
the dust bag or clean the filter.
4 Leave the motor to cool for approx 30 to 40
minutes.
5 Then reconnect the appliance and switch on. It
should now work.
6 If the appliance cannot be switched on, wait
for 20 minutes and then try again.
7 If the appliance still won't work, please contact
your dealer or the GRUNDIG service centre.
ENGLISH
25
Page 14

CLEANING AND CARE
Storage
You should store the appliance in one of the two
positions shown below.
________________________________________
26
26
ENGLISH
Page 15

INFORMATION
_____________________________________________________
Environmental information
This product has been made from
high-quality materials and parts, which are suitable for recycling and can be reused.
Therefore, at the end of its life, the product must
not be disposed of in the normal domestic waste
but must be taken to a collection point for recycling electrical and electronic appliances. This is
indicated by the following symbol on the product,
in the instructions for use or on the packaging.
Please contact your local authority to find out
where your local collection points are.
Reusing and recycling old appliances is an
important contribution to protecting our environment.
Technical specifications
This product fulfils
the European Directives
2004/108/EG and 2006/95/EG.
Serial number
GML 4700
Power supply
230~ 50 Hz
Power
maximum 2400 W
nominal 2100 W
Protection class
II
Subject to technical and visual changes!
ENGLISH
27
Page 16

Grundig Multimedia B.V.
Atrium, Strawinskylaan 3105 • NL-1077 ZX Amsterdam • http://www.grundig.com
 Loading...