

Page 1
CLOCK RADIO
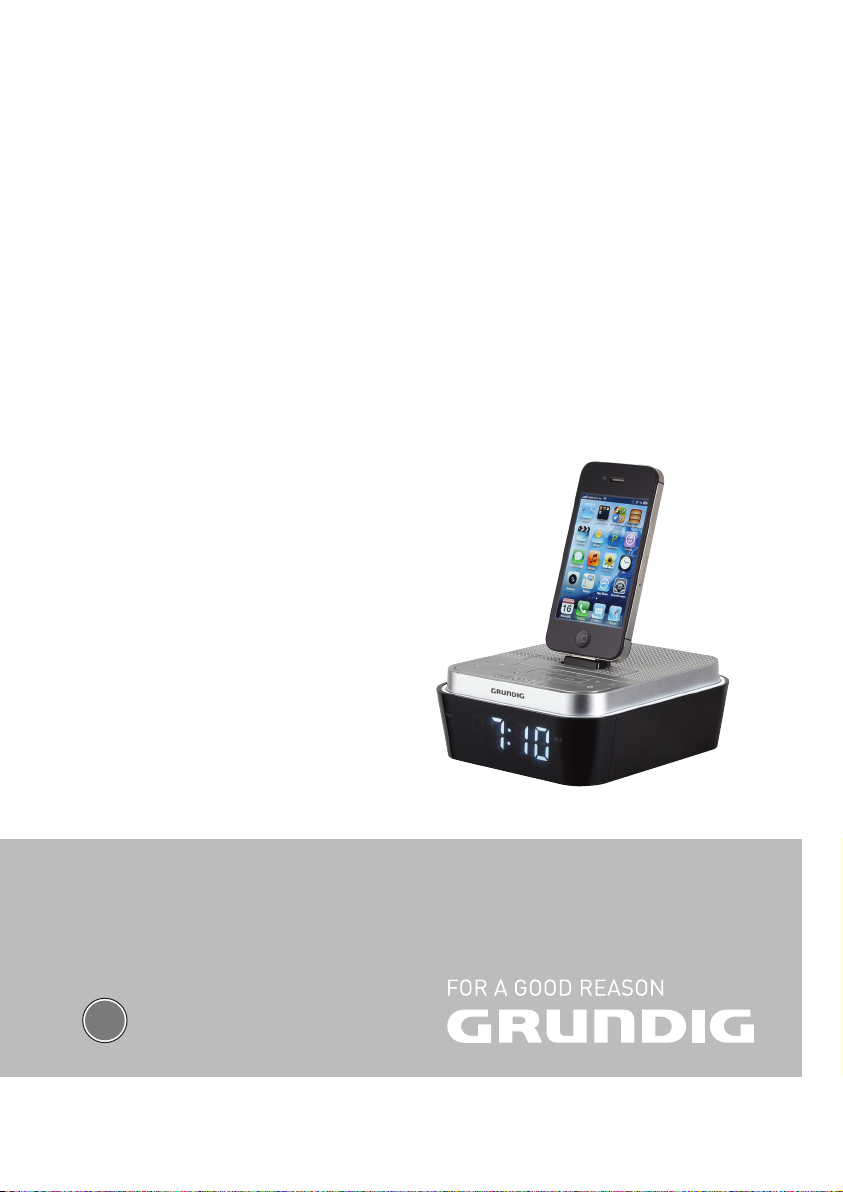
SONOCLOCK 930 IP
SONOCLOCK 935 IP
EN
Page 2

CONTENTS
----------------------------------------------------------------------------------------------------------------------------------
3 SET-UP AND SAFETY
4 POWER SUPPLY
4 Insert back-up battery (CR 2032)
4 Mains operation
5 OVERVIEW
7 IPOD/IPHONE MODE
7 Made for iPod/iPhone
7 Supported iPod/iPhone models with
SC 930 iP
7 Supported iPod/iPhone models with
SC 935 iP
7 Playing the contents of an iPod/iPhone
7 Repeating the current track
7 Selecting another track
7 Searching for a passage within a track
8 RADIO MODE
8 Antenna
8 Switching on/off
8 Selecting the input source
8 Searching for and saving radio stations –
automatically
8 Searching for and saving radio stations –
manually
8 Selecting stored stations
8 Adjusting the volume
8 Setting the brightness of the display
8 Switch on/off the night light
9 TIMER MODE
9 Setting the time
9 Alarm mode
9 Sleep timer
10 INFORMATION
10 Technical data
10 Environmental note
2
ENGLISH
Page 3

SET-UP AND SAFETY
-----------------------------------------------------------------------------------------------
7
The device is designed for the playback of audio
signals. Any other use is expressly prohibited.
7
Protect the device from moisture (water drops or
splashes). Do not place any vessels such as vases on the device. These may be knocked over
and spill fluid on the electrical components, thus
presenting a safety risk.
7
Do not place any naked flames such as candles
on the device.
7
Make sure the device is adequately ventilated.
Do not cover the ventilation slots with newspapers, table cloths, curtains, etc.
7
When deciding where to place the device,
please note that furniture surfaces are covered
by various types of varnish and plastic, most of
which contain chemical additives. These additives can corrode the device supports, leaving
residues on the furniture surfaces which can be
difficult or impossible to remove.
7
Do not use any cleaning agent, as this may damage the casing. Clean the device with a clean,
moist leather cloth.
7
Do not expose the back-up battery to extreme
heat, caused for example by direct sunlight,
heaters or fire.
7
This product contains a coin/button cell battery.
Keep the device and the battery away from children.
7
If the coin/button cell battery is swallowed, it
can cause severe internal burns in just 2 hours
and can may lead to death. If you think batteries might have been swallowed or placed inside
any part of the body, seek immediate medical
attention.
7
Keep new and used batteries away from children. If the battery compartment does not colse
securely, stop using the product and keep it
away from children.
7
Remove the batteries when they are flat or when
you know that the device will not be used for a
long period of time. The manufacturer accepts
no liability for damage caused by leaking batteries.
7
Batteries, including those which do not contain
heavy metal, should not be disposed of with
household waste. Always dispose of used batteries in accordance with local environmental
regulations.
7
Never open the device casing. No warranty
claims are accepted for damage caused by incorrect handling.
ENGLISH
3
Page 4

POWER SUPPLY
---------------------------------------------------------------------------------------------------------------
Insert back-up battery (CR 2032)
The back-up battery ensures that the stored settings
are not lost in the case of a power failure.
Caution:
7
Danger of explosion if battery is incorrectlyreplaced. Replace only with the same or
equivalent type.
1 Unscrew safety bolt of the battery compartment
cover panel and remove the cover panel.
2 Insert the included backup battery with the posi-
tive pole facing upwards.
3 Close the battery compartment cover panel and
screw in the safety bolt.
Mains operation
Check that the mains voltage on the type plate corresponds to your local mains supply. If this is not
the case, contact your specialist dealer.
1 Insert the plug of the supplied power adapter
cable into the »
2 Plug the power adapter into the wall socket.
Caution:
7
The device is connected to the mains with the
power adapter. Pull out the power adapter
plug if you want to completely disconnect the
device from the mains.
DC 5V > 2A
« socket.
4
ENGLISH
Page 5

OVERVIEW
o p
SLEEP
ON/OFF
AL 1
MODE/
R
PROG
e
II
AL 2
r e
– VOLUME +
----------------------------------------------------------------------------------------------------------------------------------
iPod dock
DC 5V
> 2A
SNOOZE
e
AL1
§
R
BATTERY
7 : 10
AL2
e
§
ANTENNA
5
Page 6

OVERVIEW
----------------------------------------------------------------------------------------------------------------------------------
iPod dock
o p
SLEEP
ON/OFF
switches the appliance to stand-
AL 1 AL 2
Ends the alarm for this day.
MODE / R In operation: Selects the program
Stand-by: To set the brightness of
PROG eII
In iPod/iPhone mode: Starts
Stand-by: Press and hold down
r e
Press it quickly to move the fre-
In USB/iPod/iPhone mode: Press
press and hold to search
Stand-by: To set the time and
To connect an iPod/iPhone.
Choose program places.
Activates the sleep timer;
displays the switch-off time.
Switches the appliance on from
stand-by;
by.
Press and hold down: activates
the alarm setting;
sources iPod/iPhone and FM.
the display.
In FM operation: Activates the
memory function for program
places and stores FM programs.
playback and switches to playback pause.
to activate the time setting.
In FM operation: Press and hold
to start the automatic search,
quency forwards or backwards
in steps.
quickly, select title forwards or
backwards;
forwards or backwards for a
particular section.
alarm time.
– VOLUME +
SNOOZE R
Switches on/off the appliance
AL 1 AL 2
BATTERY
7 : 10 Shows the time, the alarm time,
shows the frequency and the set
ANTENNA
DC 5V > 2A
Changes the volume.
Interrupts the alarm signal.
lighting (nightlight).
Light display; the alarm standby
for alarm time 1 or 2 is activated.
Battery compartment for the
back-up battery.
and the sleep timer time;
volume.
Cable antenna for FM reception.
Socket for the network adaptor
cable (5 V > 2 A).
6
ENGLISH
Page 7

IPOD/IPHONE MODE
------------------------------------------------------------------------------------------
Made for iPod/iPhone
“Made for iPod/iPhone” means that an electronic
accessory has been designed to connect specifically to an iPod/iPhone, and has been certified by
the developer to meet Apple performance standards. Apple is not responsible for the operation of
this device or its compliance with safety and regulatory standards.
iPhone, iPod, iPod classic, iPod nano, iPod shuffle,
and iPod touch are trademarks of Apple Inc., registered in the U.S. and other countries.
Notes:
7
The device is able to recharge the internal
battery of your iPod/iPhone. If you need to
recharge your iPod/iPhone, please power up
the device.
7
Your iPod/iPhone will use its backlight settings
as configured. If these need changing, use the
settings menu on your iPod/iPhone.
7
Using the menus of the iPod/iPhone, you can
select the existing structures (Playlists, Artists,
Albums, etc.) and tracks.
Supported iPod/iPhone models
with SC 930 iP
The software is made to support the following
iPod/iPhone models:
– iPhone 4S
– iPhone 4
– iPhone 3GS
– iPod touch (4th Generation)
– iPod touch (3rd Generation)
– iPod nano (6th Generation)
– iPod nano (5th Generation)
– iPod nano (4th Generation)
Supported iPod/iPhone models
with SC 935 iP
The software is made to support the following
iPod/iPhone models:
– iPhone 5
– iPod touch (5th Generation)
– iPod nano (7th Generation)
Playing the contents of an iPod/
iPhone
1 Connect your iPod/iPhone into the »
until it latches into its place.
2 Switch on the device from stand-by mode by
pressing »
3 Select the input source with »
– Display: »I P«.
– Playback starts automatically with the last
4 Adjust the volume with »
5 To pause playback, press »
6 To resume playback, press »
ON/OFF
played passage.
«.
– VOLUME +
iPod dock
MODE / R«.
PROG eII
PROG eII
«.
«.
« again.
Repeating the current track
1 During playback, press briefly »r« kurz drücken.
Selecting another track
1 During playback, press »r« or »e« repeatedly
until the track is reached.
– Playback of the selected track or file starts au-
tomatically.
Searching for a passage within
a track
1 During playback, press and hold »r« or »e« to
move through the current file.
2 Release »r« or »e« when the passage has been
found.
«
ENGLISH
7
Page 8

RADIO MODE
------------------------------------------------------------------------------------------------------------------------
Antenna
For the best FM (UHF) reception it is suffcient to
align the wire antenna accordingly.
Switching on/off
1 Switch the device from standby with »
OFF
«.
2 Switch the device to standby with »
ON/OFF
ON/
«.
Selecting the input source
1 Select the input source with »
MODE / R«.
Searching for and saving radio
stations – automatically
You can store 20 radio stations on presets.
1 Start the automatic station search by pressing
and holding down »
– The automatic station search searches and
stores the radio stations on presets.
PROG eII
«.
Searching for and saving radio
stations – manually
1 Activate the station search by pressing »r« or
»e« until the frequency display changes to rapid
runthrough.
– The search stops when a station is found.
Note:
7
To move the frequency forward in steps, briefly press »r« or »e« several times.
2 Press »
3 Select the preset with »o« or »p«.
4 Press »
5 To store more stations, repeat steps 1 to 4.
PROG eII
tion.
PROG eII
Note:
7
If stations are already stored on the presets,
they are overwritten when new stations are
stored.
« to activate the memory func-
« to save the station.
Setting the brightness of the
display
1 In Stand-by adjust the brightness in four levels
with »
MODE / R«.
Switch on/off the night light
1 Switch on/off the lighting with »
SNOOZE R
«.
Selecting stored stations
1 Select the preset with »o« or »p«.
Adjusting the volume
1 Adjust the volume with »
8
ENGLISH
– VOLUME +
«.
Page 9

TIMER MODE
--------------------------------------------------------------------------------------------------------------------------
Setting the time
1 Switch the device to standby with »
2 Press and hold »
ting.
– Display: The hour flashes.
3 Press »r« or »e« to set the hours and press
»
PROG eII
– Display: The minutes flashes.
4 Press »r« or »e« to set the minutes and press
»
PROG eII
Note:
7
If an iPod/iPhone is connected, the time on
the iPod/iPhone can be adopted, press and
hold »p« for this.
PROG eII
« to confirm the setting.
« to confirm the setting.
ON/OFF
« to activate the set-
«.
Alarm mode
Setting the alarm time
Note:
7
The time must be correctly set.
1 Switch the device to standby with »
2 Press and hold »
onds.
– Display: »e« and the hour flashes
3 Press »r« or »e« to set the hours and press »
1
« or »
AL 2
– Display: The minutes flashes.
4 Press »r« or »e« to set the minutes and press
»
AL 1
« or »
5 Select the desired sound source radio station
(»§«), buzzer (»e«) or iPod/iPhone (» «) with
»r« or »e« and press »
firm.
– The device wakes you up at the set time, in
addition, the Wake Up Light is activated, the
alarm duration is 59 minutes.
Note:
7
If the program source iPod/iPhone has been
selected but no iPod/iPhone has been connected, the device alarm uses a signal tone.
AL 1
« or »
« to confirm the setting.
AL 2
« to confirm the setting.
AL 1
AL 2
« for two sec-
« or »
AL 2
ON/OFF
« to con-
«.
AL
Interrupting the alarm
1 Press »
SNOOZE R
– The alarm signal (radio station or signal) stops
and the Wake Up Light disappear.
– The alarm signal goes on again at nine-minute
intervals.
« while the alarm is sound.
Cancelling the alarm
1 Press »
ON/OFF
« while the alarm is sound.
Activating and deactivating the alarm
1 Press »
AL 1
« or »
AL 2
« while the alarm is sound.
– Display: »e«, »§« or » « disappears.
Sleep timer
1 To set the switch-off time (»120« – »00« min-
utes), press »
2 To switch off the sleep timer before the set time
press »
SLEEP
« repeatedly.
SLEEP
« to set the switch-off time to »00«.
ENGLISH
9
Page 10

INFORMATION
------------------------------------------------------------------------------------------------------------------
Technical data
This device is noise–suppressed
according to the applicable EU
directives.
This product fulfils the European
directives 2004/108/EC, 2006/95/EC,
2009/125/EC and 2011/65/EU.
Power supply:
Power adapter 100 – 240V~, 50/60Hz,
5 V >, 2 A
Max. power consumption:
< 4 W (operation), < 1 W (standby)
Output power:
Sine wave power: 1.5 W
Audio power: 2 W
Reception range:
FM 87.5 ... 108.0 MHz
Dimensions:
W x H x L 127 x 75 x 143
Weight:
380 g
The type plate is located on the bottom of the
device.
Technical and design modifications reserved.
Environmental note
This product has been made from
high-quality parts and materials
which can be re-used and recycled.
Therefore, do not throw the product away with normal household waste at the end
of its service life. Take it to a collection point for
recycling electrical and electronic devices. This is
indicated by this symbol on the product, in the operating manual and on the packaging.
Please find out about collection points operated by
your local authority.
Help protect the environment by recycling used
products.
10
ENGLISH
Page 11

Grundig Intermedia GmbH
Beuthener Strasse 41
90471 Nürnberg
www.grundig.com
72011 412 2100 13/37
 Loading...