

Page 1
KITCHEN RADIO
Sonoclock 691 DAB+
NL
DE
PL
EN
DA
FR
SV
IT
TR
ES
FI
PT
Page 2

2
-----------------------------------------------------------------------------------------------------------------------------------------------------------------------------
Page 3
3
-----------------------------------------------------------------------------------------------------------------------------------------------------------------------------
ON/OFF DISPLAY
PRESETS
1 – 5
6 – 10
+ 5
SELECT/
INFO
+ VOL. –
SLEEP MENU
MODE
SCAN
ALARM
Page 4

4
-----------------------------------------------------------------------------------------------------------------------------------------------------------------------------
DEUTSCH
6 AUFSTELLEN UND SICHERHEIT
7 AUF EINEN BLICK
8 STROMVERSORGUNG/AUFSTELLEN
9 EINSTELLUNGEN
12 BETRIEB
14 TIMER-BETRIEB
15 SONDERFUNKTIONEN
16 INFORMATIONEN
ENGLISH
17 SET-UP AND SAFETY
18 OVERVIEW
19 POWER SUPPLY/INSTALLATION
20 SETTINGS
23 OPERATION
24 TIMER MODE
26 SPECIAL FUNCTIONS
27 INFORMATION
FRANCAIS
28 INSTALLATION ET SÉCURITÉ
29 APERÇU
30 ALIMENTATION ÉLECTRIQUE/
INSTALLATION
31 RÉGLAGES
34 FONCTIONNEMENT
35 MODE MINUTERIE
37 FONCTIONS SPÉCIALES
38 INFORMATIONS
ITALIANO
39 INSTALLAZIONE E SICUREZZA
40 PANORAMICA
41 ALIMENTAZIONE/INSTALLAZIONE
42 IMPOSTAZIONI
45 FUNZIONAMENTO
46 MODALITÀ TIMER
48 FUNZIONI SPECIALI
49 INFORMAZIONI
PORTUGUÊS
50 INSTALAÇÃO E SEGURANÇA
51 VISÃO GERAL
52 ALIMENTAÇÃO ELÉCTRICA/
INSTALAÇÃO
53 DEFINIÇÕES
56 FUNCIONAMENTO
57 MODO TIMER (TEMPORIZADOR)
59 FUNÇÕES ESPECIAIS
60 INFORMAÇÕES
ESPAÑOL
61 SEGURIDAD E INSTALACIÓN
62 INFORMACIÓN GENERAL
63 ALIMENTACIÓN/INSTALACIÓN
64 CONFIGURACIÓN
67 FUNCIONAMIENTO
68 MODO TEMPORIZADOR
70 FUNCIONES ESPECIALES
71 INFORMACIÓN
NEDERLANDS
72 INSTALLATIE EN VEILIGHEID
73 OVERZICHT
74 STROOMTOEVOER/INSTALLATIE
75 INSTELLINGEN
78 WERKING
79 TIMERMODUS
81 SPECIALE FUNCTIES
82 INFORMATIE
POLSKI
83 USTAWIENIE I BEZPIECZEŃSTWO
84 OPIS OGÓLNY
85 ZASILANIE/INSTALACJA
86 USTAWIENIA
89 OBSŁUGA
90 TRYB TIMER (PROGRAMATOR CZASOWY)
92 FUNKCJE SPECJALNE
93 INFORMACJA
Page 5

5
DANKS
94 OPSÆTNING OG SIKKERHED
95 OVERSIGT
96 STRØMFORSYNING/INSTALLATION
97 INDSTILLINGER
100 FUNKTION
101 TIMER
103 SPECIELLE FUNKTIONER
104 INFORMATION
SVENSKA
105 SÄKERHET OCH INSTALLATION
106 ÖVERSIKT
107 STRÖMFÖRSÖRJNING/INSTALLATION
108 INSTÄLLNINGAR
111 ANVÄNDNING
112 TIMERLÄGE
114 SPECIALFUNKTIONER
115 INFORMATION
SUOMI
116 TURVALLISUUS JA ASETUKSET
117 YLEISKATSAUS
118 VIRTALÄHDE/ASENNUS
119 ASETUKSET
122 TOIMINTA
123 AJASTINTILA
125 ERIKOISTOIMINNOT
126 TIETOJA
TÜRKÇE
127 KURULUM VE GÜVENLİK
128 GENEL BAKIŞ
129 GÜÇ KAYNAĞI/KURULUMU
130 AYARLAR
133 ÇALIŞTIRMA
134 ZAMANLAYICI MODU
136 ÖZEL FONKSİYONLAR
137 BİLGİLER
-----------------------------------------------------------------------------------------------------------------------------------------------------------------------------
Page 6

17
ENGLISH
7
This device is designed for the playback of
audio signals.
Any other use is expressly prohibited.
7
Make sure the device is protected from dripping or splashing water.
7
Do not place any vessels such as vases on the
device. These may be knocked over and spill
fluid on the electrical components, thus presenting a safety risk.
7
Do not place any naked flames such as candles
on the device.
7
Ensure that the device is adequately ventilated
by placing it at least 10 cm from any other object.
7
Do not cover the device with newspapers, table
cloths, curtains, etc.
7
Only use the device in a moderate climate.
7
If malfunctions occur due to static electricity
charges or fast transient (burst), reset the device. To do this, pull out the power plug and
connect it again after a few seconds.
7
When deciding where to place the device,
please note that furniture surfaces are covered
by various types of varnish and plastic, most of
which contain chemical additives. These additives can corrode the device supports, leaving
residues on the furniture surfaces which can be
difficult or impossible to remove.
7
Do not use any cleaning agent, as this may
damage the casing. Clean the device with a
clean, dry cloth.
7
Never open the device casing. The manufacturer will not accept any liability for damage
resulting from improper handling.
SET-UP AND SAFETY
-----------------------------------------------------------------------------------------------
Page 7

ENGLISH
18
OVERVIEW
---------------------------------------------------------------------------------------------------------------------------------
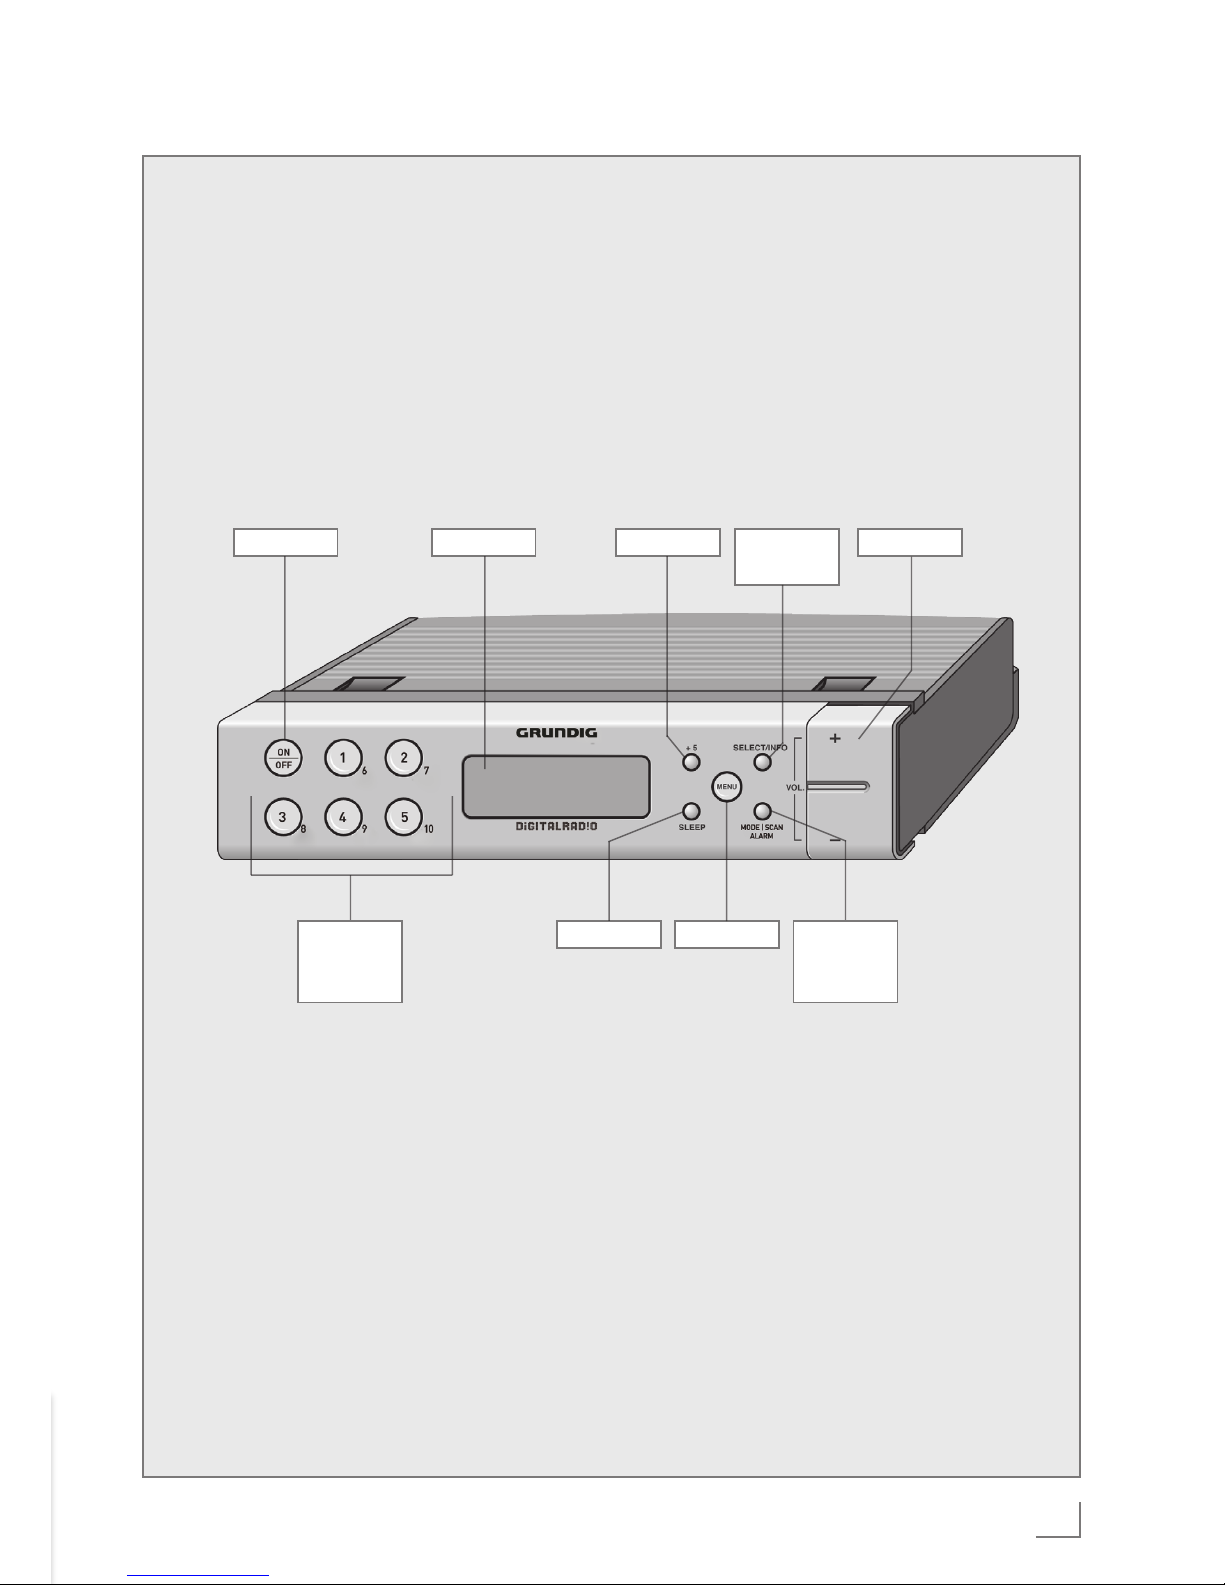
See the figure on page 3.
Controls on the front
ON/OFF Switches the device on and
off.
1 till 10 Preset buttons for storing
and selecting radio stations.
Display Shows various information
such as channel name, time,
alarm time, volume and the
menu.
+ 5 Activates the second level
(6 to 10) of preset buttons 1
to 5.
SLEEP Sets the sleep timer.
MENU Opens and closes the menu.
SELECT/INFO Confirms settings in the
menu.
MODE SCAN
ALARM
In standby mode: activates
and deactivates the alarm
function.
In operating mode: short
press selects the input
source DAB or FM radio;
when you press and hold
down, it starts auto tuning for
DAB and FM radio stations.
+
VOL. – Adjusts the volume;
selects menu options.
Controls on the back
AC ~ Power cable.
Pull out the power cable
when you want to disconnect the device from the
mains.
–
Wire antenna for DAB and
FM reception.
Controls on the bottom
USB USB socket for upgrading
the software of the device.
Page 8
19
ENGLISH
Connecting to the mains supply
Note:
7
Check that the mains voltage on the type
plate (on the bottom of the device) corresponds to your local mains supply. If this is
not the case, contact your specialist dealer.
1 Plug the power cable into the socket (230 V~,
50/60 Hz).
Caution:
7
The device is connected to the mains with the
power cable. Pull out the power cable when
you want to disconnect the device from the
mains.
7
Make sure the power plug is easily accessible during operation and not hindered by
other objects.
POWER SUPPLY/INSTALLATION
-------------------------------------------------
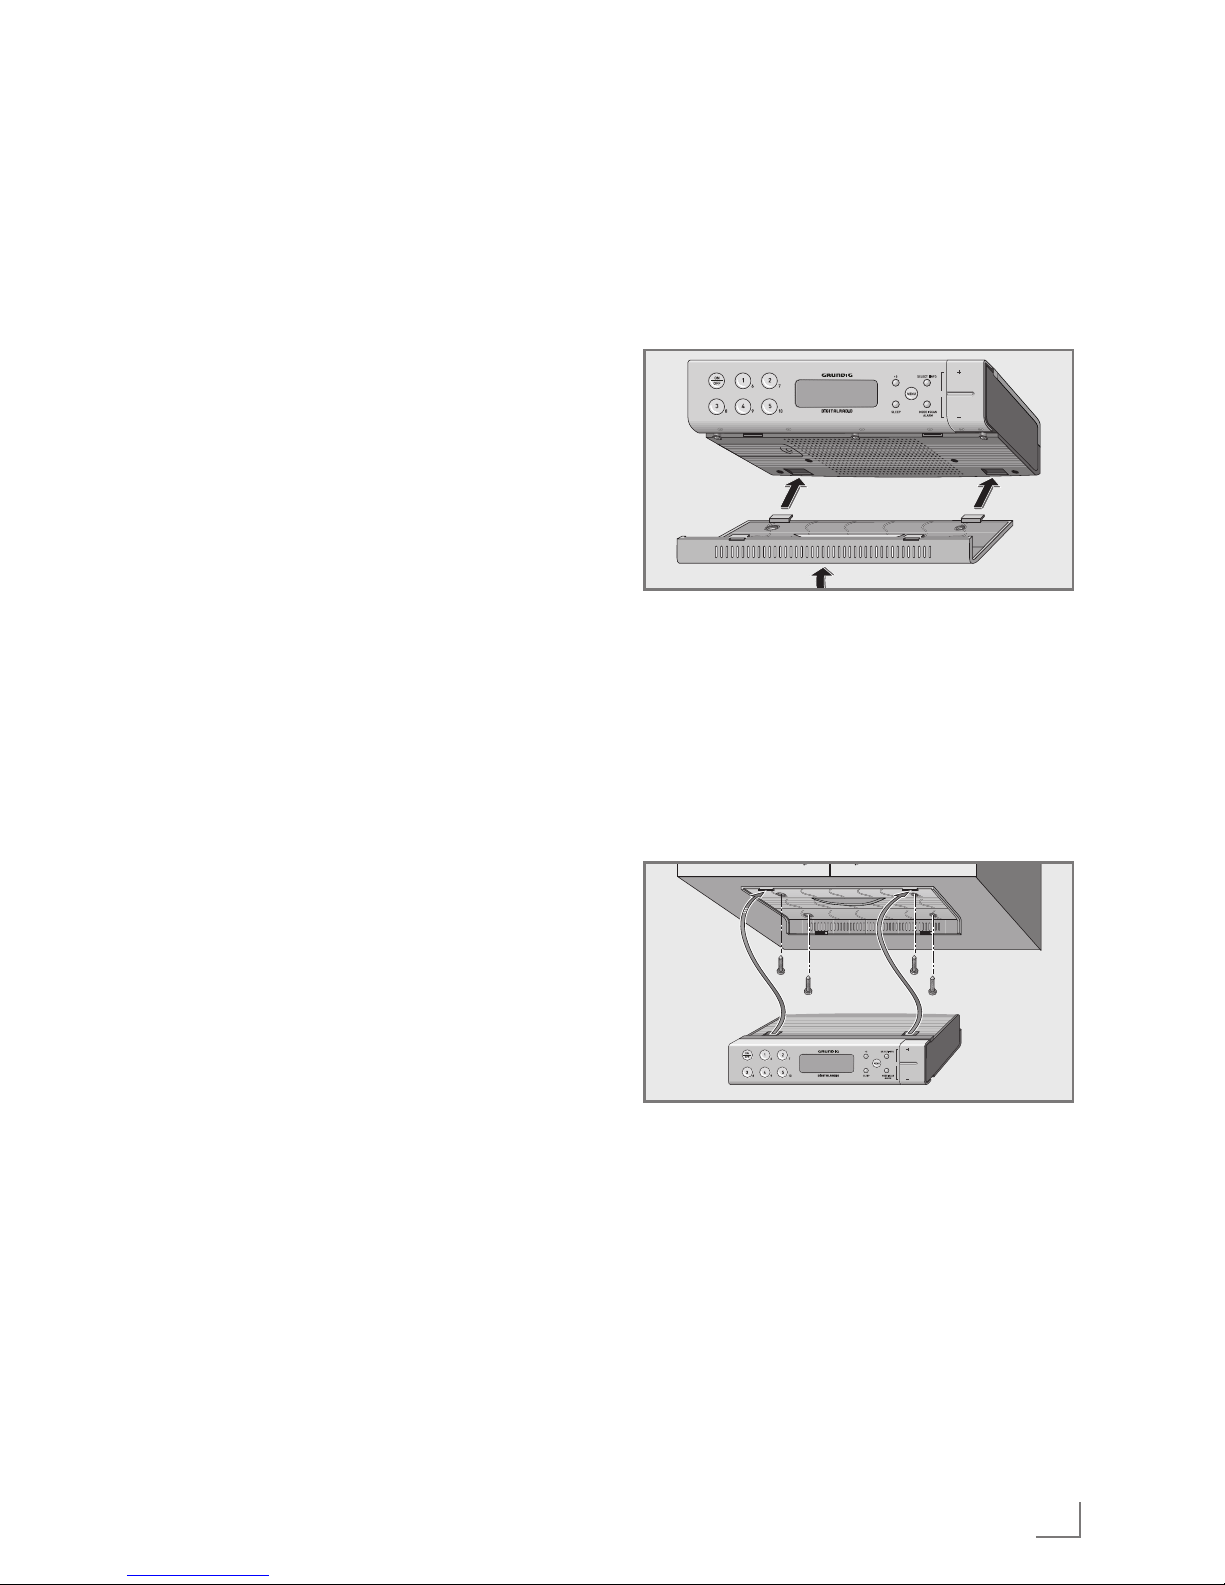
Setting up the device
The speaker of the device is located at the bottom
of the device. To optimise the sound, mount the
device holder on the bottom of the device.
1 Click the device holder in place in the recesses
on the bottom of the device.
VOL.
Mounting the device under the
cabinet
The fixing screws can be found in the side compartment of the packing.
1 Mark the locations for four mounting screws.
2 Screw the device holder under the cabinet with
four screws.
VOL.
3 Insert the device in the holder.
Note:
7
To remove the device, press the snap-catch
at the back and remove by pulling forwards.
Page 9

ENGLISH
20
Tuning and storing radio stations
(DAB and FM) – first installation
When the device is connected to the mains for
the first time or after factory reset, the Auto Tuning System will start to scan the whole DAB bandwidth and store in the program list.
The device will then scan the FM waveband and
store the first 10 radio stations as presets 1 to 10.
The time is updated automatically.
1 Press »ON/OFF« to switch on the device.
– Display: »WELCOME« and then »SCAN«.
– The automatic station search starts, searches
and stores the radio stations.
– After the automatic scan, the device switches
to standby, the current time lights up.
Tuning and storing DAB radio
stations – after a removal
You can activate the Auto Tuning System again.
That is reasonable, if you will use the device in
another place or search new DAB radio stations.
1 Press »ON/OFF« to switch on the device.
– Display: the name of the radio station, e.g.
»B5 AKT«.
2 Start the automatic station search by pressing
and holding down »MODE SCAN ALARM«.
– Display: »SCAN«.
– The automatic station search starts, searches
and stores the radio stations in the program
list.
Note:
7
You can also activate the automatic scan for
DAB and FM radio stations from the menu.
Open the menu with »MENU«.
Select the option »SYSTEM« with »+ VOL. -«
and confirm by pressing »SELECT/INFO«.
Select the option »ATS« with »+ VOL. -« and
press »SELECT/INFO« to confirm (display:
»N«).
Select »Y« with »+ VOL. -« and start the
automatic station search by pressing
»SELECT/INFO«.
SETTINGS
---------------------------------------------------------------------------------------------------------------------------------------
Storing DAB radio stations to
presets
After the automatic station search, all radio stations will be stored in the program list. You can
store your favored radio stations on presets 1 to
10.
1 Open the menu with »MENU«.
2 Select the option »STATION« with »+ VOL. -«
and press »SELECT/INFO« to confirm.
3 Select DAB radio stations with »+ VOL. -« and
press »SELECT/INFO« to confirm
4 For storing the DAB radio station on a preset,
press and hold down the required preset button »1« to »5«, until »STORED« appears.
Note:
7
Press »+5« for a short time and then the required preset buttons »1« to »5« change for
presets 6 to 10.
Programming DAB radio stations
– manually
1 Open the menu with »MENU«.
2 Select the option »MANUAL« with »+ VOL. -«
and press »SELECT/INFO« to confirm.
– Display: e.g. »I74.9 SA« (frequency and
channel of a DAB radio station).
3 Select the desired frequency/channel with
»+ VOL.« or »VOL. -«.
4 Press »SELECT/INFO« to confirm the frequen-
cy/channel.
– Display: the signal strength, the DAB radio
stations will be stored in the program list.
5 Press »MENU« to end the setting.
Page 10

21
ENGLISH
SETTINGS
---------------------------------------------------------------------------------------------------------------------------------------
Programming FM radio stations –
manually
1 To select FM radio as input source, press
»MODE SCAN ALARM« for a short time.
– Display: »FM«, then the name or the frequen-
cy of the FM radio station.
2 Open the menu with »MENU«.
3 Select the option »TUNE« with »+ VOL. -« and
press »SELECT/INFO« to confirm.
4 Press and hold down »+ VOL.« or »VOL. -« to
search the desired radio station.
– The automatic station search starts, and stops
at the next station with a strong signal;
or
briefly pressing »+ VOL.« or »VOL. -« until
you have found the frequency you want.
– The frequency changes in steps of 50 kHz.
5 To store the FM radio station on a preset, press
and hold down the required preset buttons »1«
to »5«, until »STORED« appears.
Press »+5« and the required preset buttons »1«
to »5« change for presets 6 to 10.
Note:
7
The device normally scans for FM radio stations which are strong enough to get good
reception. To scan radio stations with weak
signal:
Open the menu with »MENU«, select the
option »SCAN« with »+ VOL. -« and press
»SELECT/INFO« to confirm.
Select the option »DX« with »+ VOL. -« and
press »SELECT/INFO« to confirm.
Repeat the setting from point 2.
Setting the clock format
(12 or 24 hours)
1 Press »ON/OFF« to switch on the device.
– Display: e.g. »B5 AKT«.
2 Open the menu with »MENU«.
3 Select the option »SYSTEM« with »+ VOL. -«
and press »SELECT/INFO« to confirm.
4 Select the option »TIME« with »+ VOL. -« and
press »SELECT/INFO« to confirm.
– Display: »SET TIME«.
5 Select the option »12/24 HR« with »+ VOL. -«
and press »SELECT/INFO« to confirm.
– Display: »24«.
6 Select the desired clock format (12 or 24
hours) with »+ VOL. -«.
7 Press »SELECT/INFO« to confirm the setting.
8 Press »MENU« to end the setting.
Page 11

ENGLISH
22
SETTINGS
---------------------------------------------------------------------------------------------------------------------------------------
Updating the time –
automatically
The device will normally update the time automatically when a time signal is received. You can
select from which source (DAB or FM) the update
starts or you can disable this function.
1 Press »ON/OFF« to switch on the device.
– Display: e.g. »B5 AKT«.
2 Open the menu with »MENU«.
3 Select the option »SYSTEM« with »+ VOL. -«
and press »SELECT/INFO« to confirm.
4 Select the option »TIME« with »+ VOL. -« and
press »SELECT/INFO« to confirm.
– Display: »SET TIME«.
5 Select the option »UPDATE« with »+ VOL. -«
and press »SELECT/INFO« to confirm.
– Display: »ANY«.
6 Select the desired option (Any, DAB or FM)
with »+ VOL. -«;
or select the option »NONE«, if you want to dis-
able the update.
7 Press »SELECT/INFO« to confirm setting.
8 Press »MENU« to end the setting.
Updating the time – manually
1 Press »ON/OFF« to switch on the device.
– Display: e.g. »B5 AKT«.
2 Open the menu with »MENU«.
3 Select the option »SYSTEM« with »+ VOL. -«
and press »SELECT/INFO« to confirm.
4 Select the option »TIME« with »+ VOL. -« and
press »SELECT/INFO« to confirm.
– Display: »SET TIME«.
5 Activate the option »SET TIME« with »SELECT/
INFO«.
– Display: e.g. »I0: I6 PM«.
6 Set the hours with »+ VOL. -« and press
»SELECT/INFO« to confirm.
7 Set the minutes with »+ VOL. -« and press
»SELECT/INFO« to confirm.
8 Set the day with »+ VOL. -« and press
»SELECT/INFO« to confirm.
9 Set the month with »+ VOL. -« and press
»SELECT/INFO« to confirm.
10 Set the year with »+ VOL. -«.
11 Press »SELECT/INFO« to confirm setting.
– Display: »SAVED«.
12 Press »MENU« to end the setting.
Page 12

23
ENGLISH
OPERATION
------------------------------------------------------------------------------------------------------------------------------
General functions
Switching on and off
1 Press »ON/OFF« to switch the device on and
off.
Adjusting the volume
1 Adjust the volume using »+ VOL. –«.
DAB mode
For the best DAB reception, simply direct the wire
antenna accordingly.
Selecting the input source DAB
1 To select DAB radio as input source, press
»MODE SCAN ALARM« for a short time.
– Display: »DAB«, then the name of a DAB ra-
dio station.
Selecting stored stations
1 Select the station you want by using the preset
buttons »1, 2, 3, 4, 5« (presets 1 to 5) or using
»+ 5« and the preset buttons »1, 2, 3, 4, 5«
again (as changed to presets 6 to 10);
or
select the desired station from the station list.
Displaying DAB station information
1 To display information on the current DAB sta-
tion, press »SELECT/INFO« repeatedly.
– The following display appears in succession:
Information from the provider (e.g. actual
broadcast, title of the song, e-mail address),
signal strength, genre, current frequency, reference to signal interference (at optimum signal
display »ERR: 0«), bit rate, broadcasting for-
mat, current time and date.
Setting Dynamic Range Control
(DRC) for DAB stations
When you activate Dynamic Range Control, you
can hear lower sounds better in a loud environment.
1 Open the menu with »MENU«.
2 Select the option »DRC« with »+ VOL. -« and
press »SELECT/INFO« to confirm.
– Display: »DRC OFF«.
3 Select the option “DRC LOW” or “DRC HIGH”
with »+ VOL. -« and press »SELECT/INFO« to
confirm.
4 Press »MENU« to end the display.
Note:
7
The DAB station must support DRC.
FM mode
For the best FM reception, simply direct the wire
antenna accordingly.
Selecting the input source FM
1 To select FM radio as input source, press
»MODE SCAN ALARM« for a short time.
– Display: »FM«, then the frequency of a FM
radio station.
Selecting stored stations
1 Select the station you want by using the preset
buttons »1, 2, 3, 4, 5« (presets 1 to 5) or using
»+ 5« and the preset buttons »1, 2, 3, 4, 5«
(as changed to presets 6 to 10).
Displaying RDS station informations
RDS (Radio Data System) is an information system which is transmitted additionally by most FM
stations.
Notes:
7
It may take some time before all RDS information is available.
7
GRUNDIG has no responsibility for the accuracy of such information.
1 Press »SELECT/INFO« repeatedly.
– The following display appears in succesion:
radio text (if offered), station type (PTY),
name of the radio station, current time and
date.
Page 13

ENGLISH
24
TIMER MODE
--------------------------------------------------------------------------------------------------------------------------
Setting alarm times
1 Press »ON/OFF« to switch on the device.
– Display: e.g. »B5 AKT«.
2 Open the menu with »MENU«.
3 Select the option »SYSTEM« with »+ VOL. -«
and press »SELECT/INFO« to confirm.
4 Select the option »ALARM« with »+ VOL. -« and
press »SELECT/INFO« to confirm.
– Display: »ALARM« flash.
5 Press »SELECT/INFO«, set the hours by press-
ing »+ VOL. -« and press »SELECT/INFO« to
confirm.
6 Set the minutes with »+ VOL. -« and press »SE-
LECT/INFO« to confirm.
7 Select alarm (»BUZZER« = signal tone, »DAB«
= DAB station or »FM« = FM station) with »+
VOL. -« and press »SELECT/INFO« to con-
firm.
Note:
7
If the alarm is set to »DAB« or »FM«, then
select the desired station (only if stations
are stored on presets 1 to 10) by using »+
VOL. -« or select the option »DAB« (the last
listened station) and press »SELECT/INFO«
to confirm.
8 Select the desired alarm day (Daily, Once,
Weekends or Weekdays) with »+ VOL. -«.
Notes:
7
If the alarm is set to „Once“ continue with
step 9.
7
Otherwise, end settings with step 12.
9 Set the day with »+ VOL. -« and press
»SELECT/INFO« to confirm.
10 Set the month with »+ VOL. -« and press
»SELECT/INFO« to confirm.
11 Set the year with »+ VOL. -«.
12 Press »SELECT/INFO« to confirm the setting.
– Display: »ON«.
13 Press »SELECT/INFO« to confirm the alarm;
or
cancel the alarm, select the option »OFF« with
»+ VOL. -« and press »SELECT/INFO« to con-
firm.
– Display: »SAVED«.
Note:
7
You can also activate and deactivate the
alarm by pressing »AUTO TUNE«, if the device is switched off.
Pausing the alarm
1 Press any button (except »ON/OFF«) while
the alarm is sounding.
– Display: »Z
Z
Z
« and »e« or »§« will flash.
– The alarm (signal tone or radio) stops.
– The alarm goes on again with 5-minute inter-
vals (the total alarm time is 90 minutes).
Canceling alarm
1 Press »ON/OFF« while the alarm is sounding.
– Display: the current time and »e« or »§«.
– The alarm (signal tone or radio) stops, but
the alarm function remains activated for the
next day at the same time.
Activating and deactivating the
alarm
1 Press »ON/OFF« to switch off the device.
2 Press »MODE SCAN ALARM« to deacti-
vate the alarm.
– Display: »OFF« and »e« or »§« disap-
pears.
– The set alarm time is saved.
3 Press »MODE SCAN ALARM« to reactivate
the alarm.
– Display: »ON« and »e« or »§«.
Page 14

25
ENGLISH
Sleep Timer
The device has a sleep timer which switches off in
radio mode at a preset time. It is possible to adjust
the sleep time between 10 and 90 minutes in 10
minute increments.
Select the switch-off time for the
sleep timer
1 Press »ON/OFF« to switch on the device.
– Display: e.g. »B5 AKT«.
2 Open the menu with »MENU«.
3 Select the option »SYSTEM« with »+ VOL. -«
and press »SELECT/INFO« to confirm.
4 Select the option »SLEEP« with »+ VOL. -« and
press »SELECT/INFO« to confirm.
– Display: »OFF«.
5 Set the switch-off time with »+ VOL. -« and
press »SELECT/INFO« to confirm.
– Display: »
≤
« and the switch-off time.
Notes:
7
To check the remaining switch-off time press
briefly »SLEEP«.
7
You can set the switch-off time also by pressing »SLEEP« (in 10 minutes increments).
Switch off the sleep timer
1 To switch off the sleep timer earlier, select the
option »SLEEP« and »OFF« with »+ VOL. -« or
press »SLEEP« on the device repeatedly, until
»OFF« appears.
– Display: »
≤
« disappears.
TIMER MODE
--------------------------------------------------------------------------------------------------------------------------
Reminder Alarm
The device can be set to function as a reminder
by sounding the signal tone at a preset time.
1 Press »ON/OFF« to switch on the device.
– Display: e.g. »B5 AKT«.
2 Open the menu with »MENU«.
3 Select the option »SYSTEM« with »+ VOL. -«
and press »SELECT/INFO« to confirm.
4 Select the option »NAP« with »+ VOL. -« and
press »SELECT/INFO« to confirm.
– Display: » 000:00«.
5 Repeatedly press »+ VOL. -« to select the remin-
der time in 1-minute intervals (00 to 300 minutes)
and press »SELECT/INFO« to confirm.
– Display: » ¥« flash.
– After the time has expired, a signal tone
sounds.
6 Switch off the signal tone by pressing »ON/
OFF«.
Note:
7
You can cancel the function early by pressing »ON/OFF«.
Page 15

ENGLISH
26
Selecting software version
1 Open the menu with »MENU«.
2 Select the option »SYSTEM« with »+ VOL. -«
and press »SELECT/INFO« to confirm.
3 Select the option »SW VER« with »+ VOL. -«
and press »SELECT/INFO« to confirm.
– Display: current software version.
4 Press »MENU« to end the display.
Deleting all settings (Reset)
This function enables you to reset all the custom
settings back to the default settings. All customized settings are lost when you do this.
1 Open the menu with »MENU«.
2 Select the option »SYSTEM« with »+ VOL. -«
and press »SELECT/INFO« to confirm.
3 Select the option »RESET« with »+ VOL. -« and
press »SELECT/INFO« to confirm.
– A safety confirmation is displayed.
4 Select the option »Y« (Yes) with »+ VOL.«.
Note:
7
To cancel the function, select the option »N«
(No) with »VOL. -«.
5 Press »SELECT/INFO« to confirm setting.
– Display: »RESTART«.
Deleting program list for DAB
radio stations
If you move to a different part of the country,
some of the stored radio stations may no longer
be available.
1 Open the menu with »MENU«.
2 Select the option »PRUNE« with »+ VOL. -« and
press »SELECT/INFO« to confirm.
– A safety confirmation is displayed.
3 Select the option »Y« (Yes) with »+ VOL.«.
Note:
7
To cancel the function, select the option »N«
(No) with »VOL. -«.
4 Press »SELECT/INFO« to confirm setting.
– Display: »RESTART«.
5 Press »MENU« to end the setting.
– In the program list you will find only avail-
able radio stations.
SPECIAL FUNCTIONS
--------------------------------------------------------------------------------------------
Page 16
27
ENGLISH
Technical data
This device is noise-suppressed
according to the applicable EU
directives. This product fulfils the
European directives 2004/108/
EC, 2006/95/EC and 2009/125/EC.
The type plate is located on the bottom of the
device.
Power supply: 230 V~, 50/60 Hz
Max. power consumtion:
Operating < 5 W, Stand-by < 1 W
Output:
DIN 45324, 10% THD 1 W
Frequency band:
DAB/DAB+ 174,928 ... 239,200 MHz
FM 87.5 ... 108.0 MHz
Dimension and weight:
B x H x T 276 x 60 x 150 mm
Weight approx. 1.2 kg
Technical and design modifications reserved.
INFORMATION
------------------------------------------------------------------------------------------------------------------
Environmental note
This product has been manufactured with high quality parts and
materials which can be reused
and are suitable for recycling.
Therefore, do not dispose the product with normal domestic waste at the end of its service life.
Take it to a collection point for the recycling of
electrical and electronic equipment. This is indicated by this symbol on the product, in the operating manual and on the packaging.
Please consult your local authorities to learn the
nearest collection point.
Help protect the environment by recycling used
products.
Page 17

www.grundig.com
72011 411 5000 11/49
 Loading...