

GRUNDIG Sonoclock 660 PLL User manual
CLOCK RADIO
Sonoclock 660 PLL
EN

________________________________________________________
ON/OFF RDS/WEC
0
AUTO DIMMER
– P SNOOZE
DISPLAY
MEM/TIMEALARM 2ALARM 1
BATTERY
ANTENNA
RESET
Ü
COLOUR
P +
&TUNING%
DIMMERDISPLAYSLEEP/NAP
C
3
ENGLISH

_______________________________________________________
ENGLISH 05 -17
4
ENGLISH

SET-UP AND SAFETY
__________________________
7
This device is designed for the
playback of audio signals. Any
other use is expressly prohibited.
7
The only way to completely disconnect the device from the mains
is to pull out the mains plug. Pull
out the plug of the mains cable if
you know that the device will not
be used for a long period of time.
7
Make sure the device is protected
from dripping or splashing water.
Do not place any vessels such as
vases on the device. These may
be knocked over and spill fluid
on the electrical components, thus
presenting a safety risk.
7
Do not place any naked flames
such as candles on the device.
7
Only use the device in a moderate
climate.
7
Ensure that the device is adequately ventilated by placing it
at least 10 cm from any other object. Do not cover the device with
newspapers, table cloths, curtains,
etc.
7
If malfunctions occur due to brief
mains overloads or static electricity charges, reset the device. To
do this, pull out the power plug
and connect it again after a few
seconds.
7
When deciding where to place
the device, please note that furniture surfaces are covered by various types of varnish and plastic,
most of which contain chemical
additives. These additives may
cause corrosion to the feet of the
unit and leave stains on the surface of the furniture which could
be difficult or impossible to remove.
7
Do not use any cleaning agents
as they may damage the housing.
Clean the device with a clean, dry
cloth.
7
Never open the device casing.
No warranty claims are accepted
for damage caused by incorrect
handling.
7
The type plate is located on the
bottom of the device.
7
Note, prolonged lis-
tening at loud volumes
with the earphones
can damage your
hearing.
ENGLISH
5

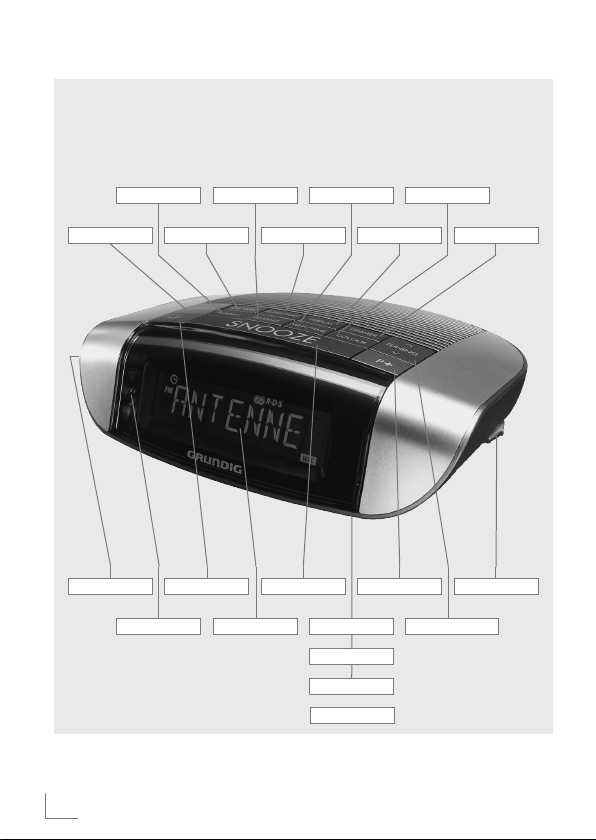
OVERVIEW
See the figure on page 3.
ON/OFF
Switches the radio to and from
standby mode.
ALARM1
Activates the setting for alarm
time 1.
RDS/WEC
Switches between different RDS
station information bulletins in
radio mode. Switches the alarm
standby off for the weekend and
on again.
ALARM2
Activates the setting for alarm
time 2.
SLEEP/NAP
Activates the setting for the sleep
timer;
activates the setting of the remind-
er timer.
MEM/TIME
Saves FM stations to presets;
activates the time setting.
DISPLAY
Switches the display between fre-
quency or station name and time
with week day.
_______________________________________
COLOUR
Switches between eight different
colours for the display backlight.
DIMMER
Adjusts the brightness of the dis-
play to one of three levels, switches off the backlight for the display.
C
Control dial for volume control.
&
TUNING %
For setting FM stations manually;
starts the automatic station search.
P +
Selects the next preset up.
Battery
Compartment for inserting two
back-up batteries compartment
(2 x 1.5 V LR 03/AM 4/AAA).
RESET
Resets the device.
Ü
Power cord.
ANTENNA
Wire antenna for FM reception.
SNOOZE
Interrupts the alarm function.
6
ENGLISH
 Loading...