

Page 1
CarAudio Service Manual
Allixx SCD 5410 DAB
GHN0400
Zusätzlich erforderliche Unterlagen für den Komplettservice
Additionally required Service Documents for the Complete Service
Service
Manual
Sicherheit
Safety
Materialnr./Part No.
720108000000
Materialnummer/Part Number 720107724000
Änderungen vorbehalten/Subject to alteration • Printed in Germany WÜ
H-S44 • 0902 • 9033
http://www.grundig.com
Grundig Service
Hotline Deutschland…
Technik:
TV
TV
SAT
VCR/LiveCam
HiFi/Audio
Car Audio
Telekommunikation
Planatron
Ersatzteil-Verkauf: Mo.-Fr. 8.00-19.00 Uhr
Kundendienst/Werkstätten:
gebührenpflichtig
(8.00-22.00 Uhr)
…Mo.-Fr. 8.00-18.00 Uhr
0180/52318-41
0180/52318-49
0180/52318-48
0180/52318-42
0180/52318-43
0180/52318-44
0180/52318-45
Fax:
Telefon: 0180/52318-40
Telefon:
Fax:
0180/52318-51
0180/52318-99
0180/52318-50Fax:
Mo.-Fr. 8.00-18.00 Uhr
0180/52318-52
0180/52318-46
Page 2

GRUNDIG Service Allixx SCD 5410 DAB
Es gelten die Vorschriften und Sicherheitshinweise gemäß dem Service Manual "Sicherheit",
Materialnummer 720108000000, sowie zusätzlich die eventuell abweichenden, landesspezifischen Vorschriften!
Inhaltsverzeichnis
Seite
Allgemeiner Teil ............................. 1 - 2 … 1 - 8
Servicehinweise ......................................................................... 1 - 2
Ausbauhinweise ......................................................................... 1 - 3
Bedienhinweise .......................................................................... 1 - 4
Schaltpläne und
Platinenabbildungen .................... 2 - 1 … 2 - 34
Schaltpläne:
HF-Teil ................................................................................... 2 - 1
RDS-Dekoder ......................................................................... 2 - 3
Prozessor ............................................................................... 2 - 4
Bedienteil-Anschluss, Beleuchtungs-Steuerung .................... 2 - 7
CD-Laufwerk .......................................................................... 2 - 9
DAB-Modul-Anschluss ......................................................... 2 - 11
Klangsteller .......................................................................... 2 - 12
NF-Teil ................................................................................. 2 - 14
DAB-Spannungsversorgung ................................................ 2 - 18
Bedienteil ............................................................................. 2 - 19
Anschluss-Platte .................................................................. 2 - 23
Platinenabbildungen:
Haupt-Platte ......................................................................... 2 - 25
Vergrößerte Abbildungen ................................................. 2 - 27
Bedien-Platte ........................................................................ 2 - 32
Anschluss-Platte .................................................................. 2 - 34
DAB-Spannungsversorgungs-Platte .................................... 2 - 34
The regulations and safety instructions shall be
valid as provided by the "Safety" Service Manual,
part number 720108000000, as well as the respective national deviations!
Table of Contents
Page
General Section ............................ 1 - 2 … 1 - 13
Service Hints .............................................................................. 1 - 2
Disassembly Instructions ........................................................... 1 - 3
Operating Hints .......................................................................... 1 - 9
Circuit Diagrams and
Layout of the PCBs ...................... 2 - 1 … 2 - 34
Circuit Diagrams:
RF Part ................................................................................... 2 - 1
RDS Decoder ......................................................................... 2 - 3
Processor ............................................................................... 2 - 4
Operating Board Connection, Illumination Control ................. 2 - 7
CD Drive ................................................................................. 2 - 9
DAB Module Connection ...................................................... 2 - 11
Sound Control ...................................................................... 2 - 12
AF Part ................................................................................. 2 - 14
DAB Power Supply ............................................................... 2 - 18
Operating Board ................................................................... 2 - 19
Connection Board ................................................................ 2 - 23
Layout of the PCBs:
Main Board ........................................................................... 2 - 25
Enlarged Layouts ............................................................. 2 - 27
Operating Board ................................................................... 2 - 32
Connection Board ................................................................ 2 - 34
DAB Power Supply Board .................................................... 2 - 34
Ersatzteilliste ...............................................3 - 1
Allgemeiner Teil
Servicehinweise
Achtung: ESD-Vorschriften beachten
Geräte, bei denen das Tunermodul, das DAB-Modul oder das EEPROM
(CIC802) getauscht werden muss, sowie Geräte die nach dem Einschalten die Meldung "INIT" im Display zeigen, müssen zur Zentralreparatur an GRUNDIG geschickt werden. Von dort erhalten Sie
umgehend ein Austauschgerät.
Adresse: GRUNDIG Central Service
Tor 8
Beuthener Str. 55
D-90471 Nürnberg
ESD
Spare Parts List ........................................... 3 - 1
General Section
Service Hints
Attention: Observe the ESD safety regulations
Units, on which the tuner module, the DAB module or the EEPROM
(CIC802) has to be replaced, or units which show the message "INIT"
in the display after switching on, must be sent to the Central Service
department of GRUNDIG. From there you will immediately obtain a
replacement unit.
Address: GRUNDIG Central Service
Tor 8
Beuthener Str. 55
D-90471 Nuernberg
ESD
1 - 2
Page 3
GRUNDIG Service Allixx SCD 5410 DAB
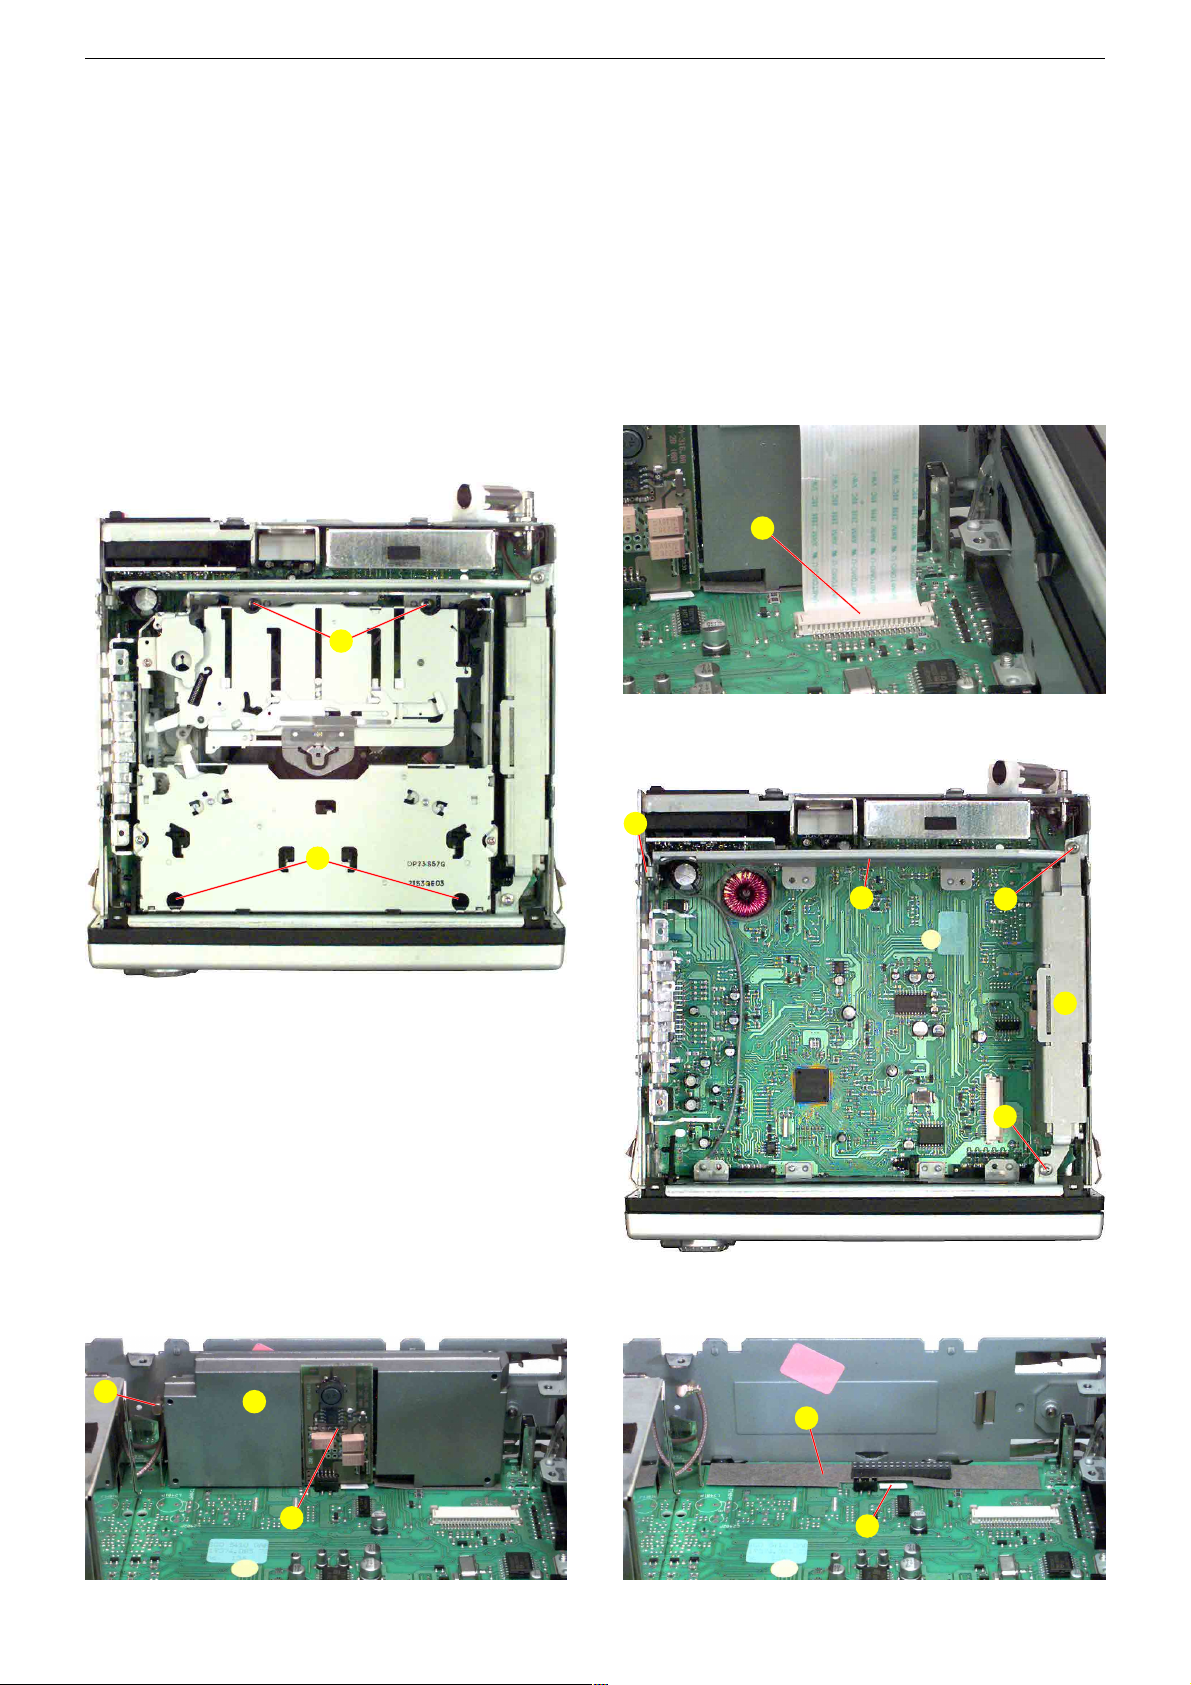
Ausbauhinweise
1. CD-Laufwerk ausbauen
- Deckel abnehmen und 4 Schrauben A (Fig. 1) herausdrehen.
- Laufwerk vorsichtig herausheben und Flexprintstecker B (Fig. 2)
öffnen.
2. DAB-Modul ausbauen
- CD-Laufwerk ausbauen (Pkt. 1).
- 2 Schrauben C herausdrehen und den Halter D (Fig. 3) herausnehmen.
- Schraube E herausschrauben und die Traverse F (Fig. 3) heraus-
nehmen.
- DAB-Spannungsversorgungs-Platte G herausziehen (Fig. 4).
- Antennenstecker H abziehen und DAB-Modul J herausziehen
(Fig. 4).
- Beim Wiedereinbau auf die Isolierungen K und L achten (Fig. 5)!
A
Disassembly Instructions
1. Removing the CD Drive
- Remove cover and undo 4 screws A (Fig. 1).
- Lift the CD Drive carefully and open the flexprint connector
(Fig. 2).
2. Removing the DAB Module
- Remove the CD Drive (para 1).
- Undo 2 screws C and remove the holder D (Fig. 3).
- Undo screw E and remove the cross arm F (Fig. 3).
- Pull out the DAB power supply board G (Fig. 4).
- Unplug the aerial connector H and pull out the DAB Module J
(Fig. 4).
- When refitting take care on the insulations K and L (Fig. 5)!
B
B
A
Fig. 1
E
Fig. 2
F
Fig. 3
C
D
C
H
J
K
G
Fig. 4 Fig. 5
1 - 3
L
Page 4
GRUNDIG Service Allixx SCD 5410 DAB
DEUTSCH
5
AUF EINEN BLICK
__________________________________________________________________________________________
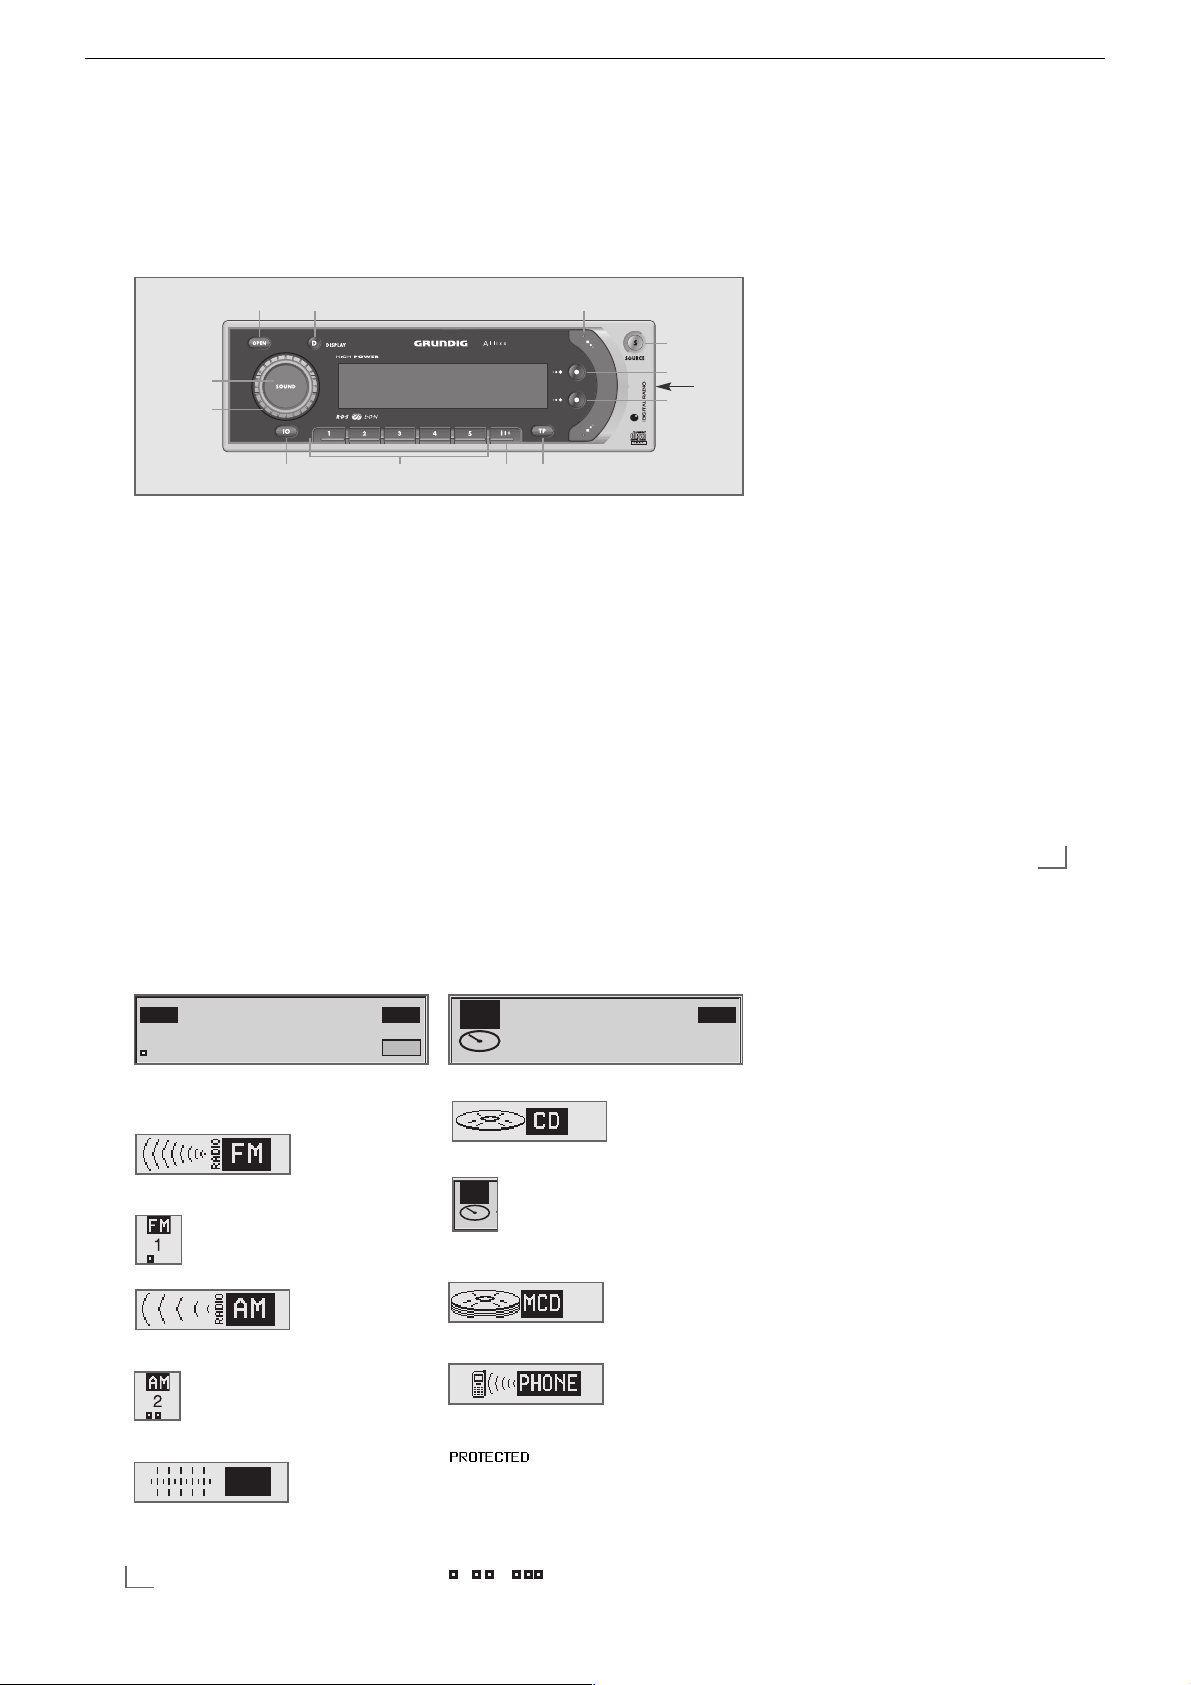
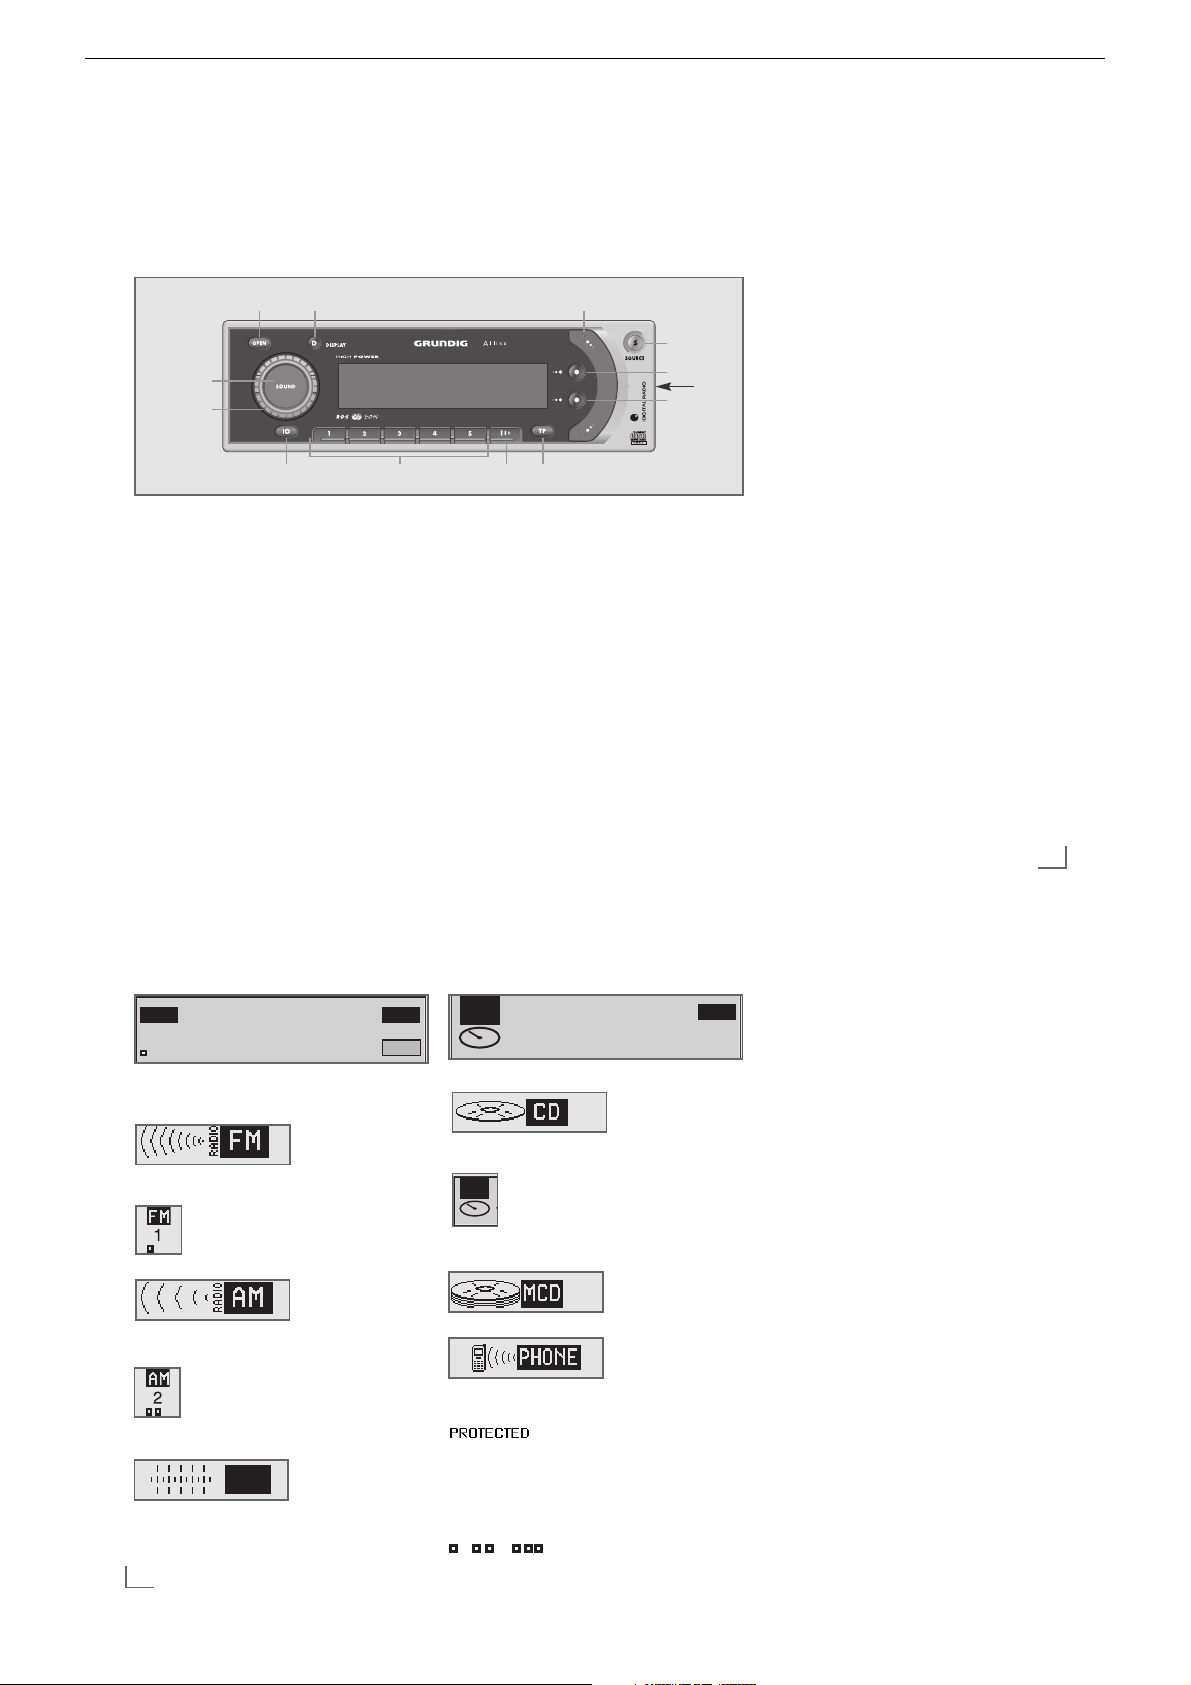
Bedienelemente
Allgemein
1
IO Ein/Aus.
2
Drehregler
Ändert die Lautstärke, SOUND und
EXPERT-Einstellungen.
3
SOUND
Kurzes Drücken: wählt Klangeinstellung
BASS, TREBLE, FADER oder BALANCE;
Längeres Drücken wählt EXPERT-Funktion.
4
SOURCE
Wählt die Programmquellen DAB, FM, AM,
CD oder CD-Changer.
5
OPEN
Entriegelt das Bedienteil, das Bedienteil
schwenkt nach vorne.
6
DISPLAY
Sie können die Display-Darstellung
umschalten zwischen Normalanzeige und
Datum- und Zeitanzeige, Radiotext oder
Zusatz-Durchsagen (DAB).
Radio-Betrieb
7
Oberer Softkey
wählt die Betriebsart »IS«, »SRC«, »MAN«,
»PTY«, »SCN«.
8
Unterer
Softkey
GO startet Suchlauf IS oder PTY.
CLR löscht die Auswahl, beendet die
Funktion.
9
Tastenwippe
startet gewählte Funktion, falls im EXPERTMode aktiviert (Seite 13), längeres Drücken
ruft Secondary Services (DAB) auf.
ßI
TP Kurzes Drücken: aktiviert
Durchsagebereitschaft für VerkehrsfunkDurchsagen.
ß?
1, 2, 3, 4, 5
Speichertasten für Programme,
Programmtypen und Sound-Einstellungen.
ß`
I
I
I
Speicherebene wechseln;
längeres Drücken schaltet AF-Funktion
(Alternativ-Frequenzen) ein oder aus, bzw.
Durchsagen (Announcements) ein oder aus
(DAB).
CD-Betrieb
7
Oberer Softkey
wählt die Abspielfunktion NRM, SCN, RND
und RPT.
8
Unterer Softkey
bestätigt die Auswahl (GO).
(CLR) löscht die Auswahl.
9
Tastenwippe
Wählen des CD-Titels, Starten des schnellen
Vor- und Rücklaufs (SEARCH) der CD.
bei geöffneter Frontblende:
ßQ
ə Zum Ausschieben der CD.
CD Wechsler-Betrieb
ß?
1, 2, 3, 4, 5, I
I
I
Auswahl der CDs 1 – 6.
ß`
I
I
I (
bei 10fach-Wechsler)
Schaltet auf 2. Auswahlebene (CDs 6 – 10).
6
9
¢
ə
ßQ
4
7
8
3
2
5
1 ß?
ß`
ßI
Symbole und Zeichen
Radio:
IS –> Intelligenter Suchlauf
(Intelligent Search) - RDS/DAB
SRC Suchlauf
MAN Manuelle Abstimmung
PTY Programmtypen-Wahl RDS/DAB
SCN Scan-Betrieb, kurzes Anspielen der
Sender RDS/DAB.
2S Secondary Services stehen zur Ver-
fügung (DAB).
ENS Ensembles auswählen.
NXT Schaltet zum nächsten Ensemble
AF FM Umschalten auf FM-Alternativ-
frequenz.
GO Startet Funktion.
CLR Beendet Funktion.
No DAB Program Zur Zeit kein DAB-Empfang
möglich (im DAB-Betrieb).
CD:
NRM Normale Wiedergabe-Funktion.
SCN Scan-Betrieb, Titel werden für jeweils
10 Sek. angespielt.
RND Random-Betrieb, Titel werden in zu-
fälliger Reihenfolge abgespielt.
RPT Repeat-Betrieb, Titel der CD werden
wiederholt gespielt.
6
DEUTSCH
AUF EINEN BLICK
__________________________________________________________________________________________________
Programmquellen (CD, AUX)
Quelle CD gewählt
CD Betrieb
CD-Changerbetrieb
(falls angeschlossen)
Telefonbetrieb
Symbole und Zeichen
Gerät codiert
TP Durchsagebereitschaft für
Verkehrsfunk-Durchsagen aktiviert.
AF Alternative Frequenzen aktiviert.
1…5 Speicherplatz des gewählten Senders
auf den Speichertasten 1, 2, 3, 4, 5.
Speicherebene 1, 2, 3
T
Anzeige
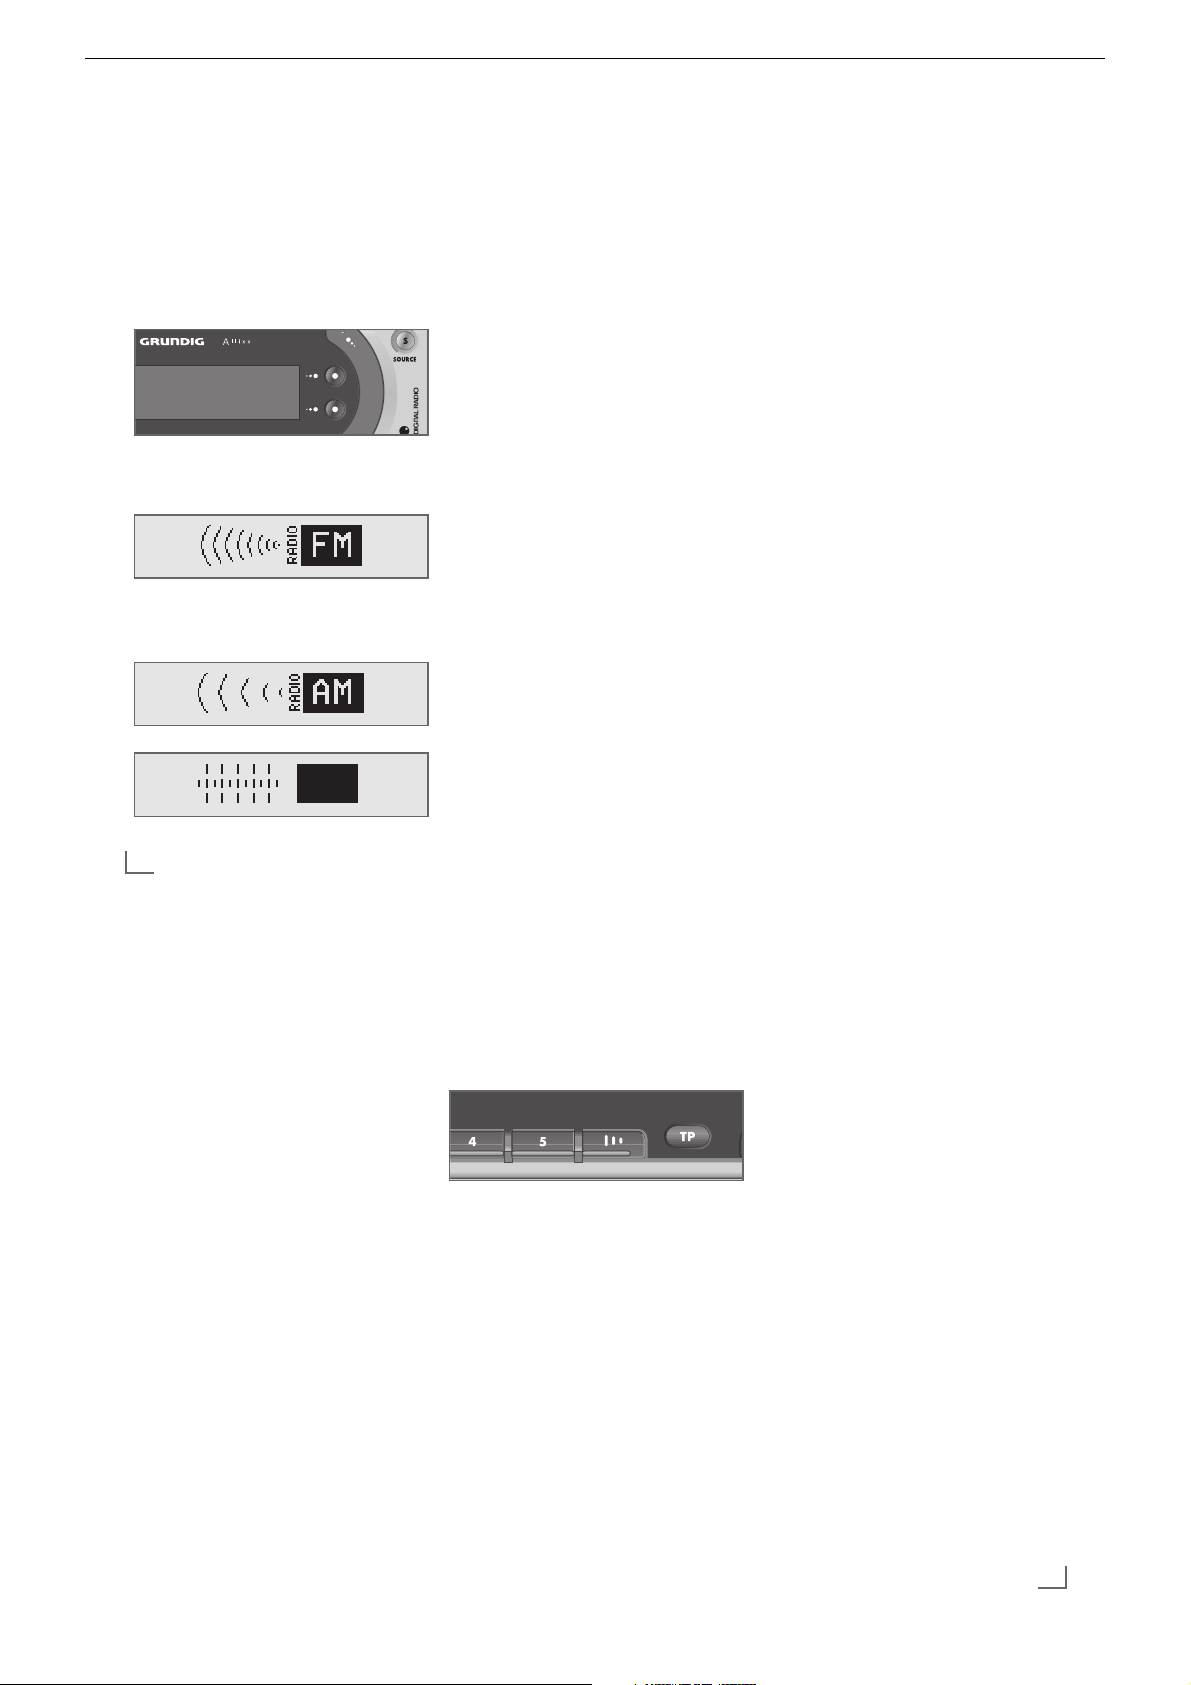
Programmquellen (Radio)
Quelle FM gewählt
FM-Bereich (1-3)
Speicherstaste 1, Speicherebene 1
Quelle AM gewählt
AM-Bereich (1-3)
Speicherstaste 2, Speicherebene 2
DAB-Bereich (1-3)
Bedienhinweise
Dieses Kapitel enthält Auszüge aus der Bedienungsanleitung. Weitergehende Informationen entnehmen Sie bitte der gerätespezifischen
Bedienungsanleitung, deren Materialnummer Sie in der entsprechenden Ersatzteilliste finden.
FM
1
DLF
DAB
RADIO
TPCD
IS
GO
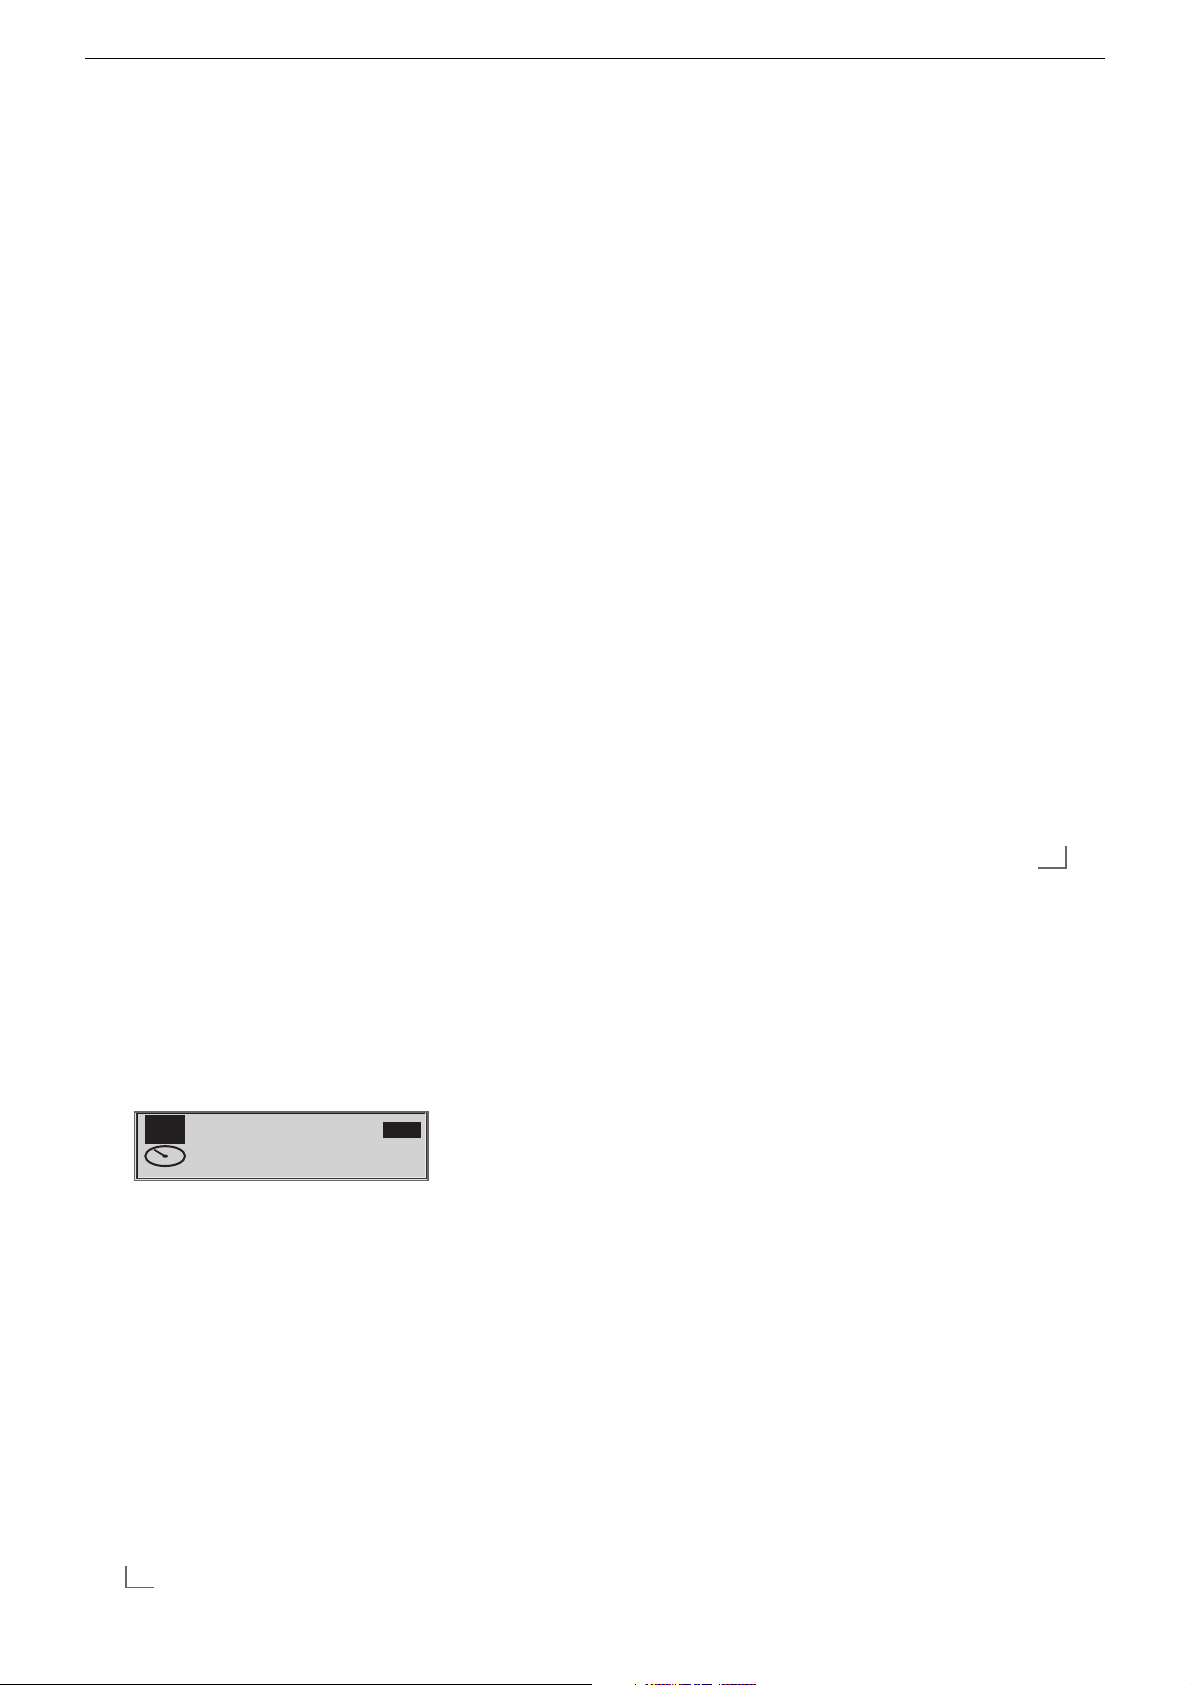
CD
TR 2 04:43
CD
1 - 4
CD
NRM
Page 5

GRUNDIG Service Allixx SCD 5410 DAB
8
DEUTSCH
2 Zum Speichern eines gewünschten
Programmes »1«, »2«, »3«, »4« oder »5«
so lange drücken, bis ein Signalton (Beep)
oder Stummschaltung hörbar ist.
Gespeicherte Programme
abrufen
1 »Speichertaste« kurz drücken.
– Anzeige: das gespeicherte Programm, z.B.
»ENERGY«.
Auch nach Abklemmen der Betriebsspannung bleiben die gespeicherten Programme
erhalten.
TP (Traffic Program) ein- und ausschalten
1 Zum Ein- und Ausschalten der Funktion »TP«
drücken.
– Anzeige: »TP«.
Hinweise:
Ist das eingestellte Programm kein Verkehrsfunk-Programm, startet nach kurzer Zeit
automatisch ein Suchlauf zum nächsten
Verkehrsfunk-Programm.
Ist TP eingeschaltet, wird auch der CDBetrieb für eine Verkehrsfunk-Durchsage
unterbrochen.
RADIO-BETRIEB
DAB nur bei SCD 5410 DAB
_________________________________________________________
Programmquelle Radio wählen
1 Mit »SOURCE« Programmquelle DAB,
RADIO-FM oder RADIO-AM wählen.
Hinweise:
Nach dem ersten Anschließen wird automatisch der FM-Suchlauf (IS) gestartet.
Beim Wählen eines neuen Bereiches wird
immer das zuletzt eingestellte Programm
angespielt (Last Station Memory).
Suchlauf
1 Tastenwippe drücken stellt neuen Sender
ein.
Im DAB-Betrieb nach dem ersten Ein-
schalten IS-Suchlauf starten:
2 Mit oberem Softkey IS wählen.
3 Mit unterem Softkey GO Suchlauf starten.
Nur bekannte Ensembles sind auswählbar.
Manuelle Sendersuche
1 Mit oberem Softkey MAN wählen.
2 Mit Tastenwippe Frequenz schrittweise
weiter schalten.
3 Tastenwippe länger drücken bewirkt die
Fortschaltung im Schnellgang. Wiederholtes
Drücken erhöht oder verringert die Frequenz
im FM-Bereich um jeweils 50 kHz.
Programme auf Speichertasten
ablegen
DAB- oder FM-Speicherebene wählen
1 »
I
I
I
« so oft drücken, bis die gewünschte
Speicherebene FM1 - FM3 oder DAB1 –
DAB3 aktiv ist.
DEUTSCH
9
RADIO (TUNER)-BETRIEB
_________________________________________________________________________________________
DEUTSCH
Weitere TP-Funktionen
1 Zum Unterbrechen der aktuellen Verkehrs-
funk-Durchsage kurz »TP« drücken.
– Durchsagebereitschaft für Verkehrsfunk
bleibt erhalten.
2 Nochmaliges Drücken von »TP« schaltet die
Durchsagebereitschaft aus. Das TP-Symbol
im Display erlischt.
3 Für Verkehrsfunk-Durchsagen kann die
Durchsage-Lautstärke voreingestellt werden.
Zum Einstellen EXPERT-Bedienebene wählen
(siehe Seite 13).
4 Sollen nur Verkehrsfunk-Durchsagen zu hö-
ren sein, die TP-Funktion mit »TP« aktivieren
und anschließend Drehregler auf Null drehen.
PAD/Radiotext ansehen
1 »DISPLAY« drücken.
2 Oberer Softkey schaltet auf Datum, Zeit und
einzeiligen PAD/Radiotext.
3 Unterer Softkey schaltet auf zweizeiligen
PAD/Radiotext.
Intelligenten Suchlauf (IS) starten
1 Mit oberem Softkey IS wählen.
2 Mit unterem Softkey (GO) Suchlauf starten.
– Anzeige: »IS---·«.
Hinweis:
Der Suchlauf lässt sich jedoch durch Drücken
einer der Stationstasten »1« – »5« oder der
Fortschalttaste abbrechen.
Inhalt des IS-Speichers abrufen
1 Nach erfolgreichem IS-Suchlauf gewünschtes
Programm mit Tastenwippe wählen.
– Anzeige: »IS-Scan«.
Programme mit Sendersuchlauf einstellen
1 Mit oberem Softkey SRC wählen.
2 Den Suchlauf mit Tastenwippe in die
gewünschte Richtung starten.
3 Ist ein Programm gefunden, erscheint dessen
Kennung in der Anzeige.
Scan Funktion
Empfangbare Sender können jeweils für 10
Sekunden angespielt werden.
1 Oberen Softkey sooft drücken, bis »SCN«
in der Anzeige zu sehen ist.
2 Mit unterem Softkey »CLR« oder mit
Tastenwippe Scanfunktion beenden, der
zuletzt gewählte Sender wird gespielt.
AF-Funktion ein- und ausschalten
1 Zum Ein- und Ausschalten »I
I
I
« so lange
drücken, bis in der Anzeige AF EIN oder
AF AUS zu sehen ist.
– Anzeige: bei eingeschalteter AF-Funktion
»AF«, bei ausgeschalteter AF: »AF AUS«.
Hinweis:
Die AF-Funktion lässt sich nur bei RDSProgrammen, die Alternativfrequenzen senden, ein- und ausschalten.
Intelligenter Suchlauf (IS)
Der intelligente Suchlauf speichert zuerst die
RDS-Programme, sortiert nach ProgrammKetten, dann die übrigen Sender sortiert nach
der Sendestärke. Sobald der IS-Suchlauf abgeschlossen ist, sind bis zu 30 Sender gespeichert.
Zu hören ist der Sender mit dem besten
Empfang. Der IS ist immer aktiviert, außer Sie
haben eine andere Suchlauffunktion gewählt.
Hinweis DAB
Kommen Sie in ein neues DAB-Sendegebiet,
können Sie mit Start des IS-Suchlaufs die
Empfangbarkeit von neuen Ensembles prü-
fen.
DAB
RADIO
1 - 5
Page 6
GRUNDIG Service Allixx SCD 5410 DAB
DEUTSCH
11
Unterprogramme aufrufen
Unterprogramme stehen zur Verfügung,
wenn in der Anzeige (obere Zeile, links) das
Zeichen »2S« erscheint.
Ist kein Secondary
Service verfügbar, erscheint kurz "NO 2S".
1 Mit oberem Softkey »IS«, »ENS« oder
»SCN« wählen.
2 Tastenwippe länger drücken aktiviert
Secondary Services, falls vorhanden.
Die obere Zeile zeigt den Sendernamen, die
untere Zeile zeigt den Namen des gewählten
Unterprogramms.
3 Tastenwippe ein weiteres Mal länger
drücken, wechselt zum nächsten ausgestrahlten Unterprogramm.
Werden keine Infos ausgestrahlt, erscheint
»No 2S«.
Unterprogramm verlassen
1 Der Modus Secondary Service wird verlas-
sen wenn mit der Tastenwippe (kurz drücken)
auf einen anderen Sender umgeschaltet
wird.
RADIO (TUNER)-BETRIEB
DAB nur bei SCD 5410 DAB
_____________________________________________________
DEUTSCH
Durchsagenmenü aufrufen
1 Zum Ein- und Ausschalten der Funktion
Durchsagenmenü (Announcements) im DABModus Taste
I
I
I
länger drücken.
– Anzeige: »Announcement«.
Hier können verschiedene Durchsagen einoder ausgeschaltet werden.
2 Mit Tastenwippe gewünschte Durchsageart
wählen.
3 Oberer Softkey schaltet Durchsageart ein,
unterer Softkey schaltet Durchsageart wieder
aus.
Folgende DAB-Durchsagearten können
senderseitig angeboten werden:
Reisen
Warnung
Aktuelles
Wetter
Service
Eilmeldung
Programm Info
Sport
Wirtschaft.
Ensemble wählen
Im DAB-Bereich werden immer mehrere Sender
auf einer Frequenz zu einem Ensemble zusammen gefasst.
1 Oberen Softkey sooft drücken, bis »ENS«
in der Anzeige zu sehen ist.
2 Mit unterem Softkey »NXT« gewünschtes
Ensemble wählen.
Nachdem Sie ein Ensemble gewählt haben,
können Sie einen Sender des Ensembles mit
der Tastenwippe wählen.
3 Mit Tastenwippe gewünschten Sender des
angewählten Ensembles wählen.
Die Anzeige zeigt in der oberen Zeile den
Namen des Ensembles, in der unteren Zeile
den Sendernamen.
Secondary Service (2S) wählen
Secondary Service ist eine Zusatzfunktion des
DAB-Betriebes. Ein DAB-Programm kann weitere Unterprogramme (Secondary Service
Components) enthalten, z.B. aktuelle Übertragungen oder Nachrichten in fremden Sprachen.
12
DEUTSCH
CD (DISC)-BETRIEB
_________________________________________________________________________________________
CD einlegen
1 »OPEN« drücken. Die Frontblende öffnet
sich.
2 CD ins CD-Fach einschieben.
–
Anzeige: »T01 00 00«.
Die Wiedergabe
startet automatisch.
3 Sind auf der eingelegten Disc CD-Textdaten
enthalten, werden diese automatisch eingeblendet. Als CD-Text werden z.B. der
Albumname, Interpret und Musikstück angezeigt.
4 Mit »DISPLAY« verschiedene Anzeigearten
wählen, kurz drücken startet den durchlaufenden Text, lang drücken schaltet auf TrackAnzeige um.
Signalquelle wählen
1 »SOURCE« sooft drücken, bis CD im
Display zu sehen ist.
Hinweis:
Die eingelegte CD wird automatisch wiederholt.
Titel in zufälliger Reihenfolge
wiedergeben
1 Mit oberem Softkey Funktion »RND«
wählen.
2 Mit unterem Softkey Auswahl bestätigen
(GO) oder verwerfen (CLR).
– Titel werden in zufälliger Reihenfolge wie-
dergegeben.
3 Zum Beenden Funktion »NRM« wählen.
CD-Wiedergabe beenden
1 Zum Wechseln z.B. in den RADIO-Betrieb
kurz »SOURCE« drücken, bis »RADIO FM«
im Display erscheint.
CD ausschieben
1 »OPEN« drücken, die Frontblende öffnet
sich.
2
ɯ drücken.
– Die CD wird ausgeschoben.
Hinweis:
Wird die ausgeschobene CD nicht innerhalb
von 6 Sekunden entnommen, zieht das Gerät
die CD aus Sicherheitsgründen wieder ein.
Titel wählen
1 Zum Wählen eines Titels Tastenwippe
oben oder unten so oft kurz drücken, bis in
der Anzeige die Nummer des gewünschten
Titels erscheint.
Passage eines Titels suchen
1 Während der Wiedergabe Tastenwippe
oben oder unten gedrückt halten, bis die
gewünschte Passage zu hören ist.
– Die Titel sind im Schnelldurchgang mit
reduzierter Lautstärke zu hören.
Titel wiederholen (RPT)
1 Mit oberem Softkey Funktion »RPT«
wählen.
2 Mit unterem Softkey Wiederholung starten
(GO).
– Titel wird wiederholt abgespielt.
3 Mit unterem Softkey »CLR« Funktion been-
den und zur normaler Wiedergabe zurückkehren.
Titel anspielen (SCAN)
1 Mit oberem Softkey Funktion »SCN«
wählen.
2 Mit unterem Softkey Scan starten (GO).
– Titel wird für ca. 10 Sekunden angespielt.
CD
TR 2 04:43
CD
NRM
1 - 6
Page 7
GRUNDIG Service Allixx SCD 5410 DAB
DEUTSCH
13
Damit die Bedienung des Gerätes so einfach wie
möglich bleibt, befinden sich viele Komforteinstellungen, die nur einmal oder gelegentlich
benötigt werden, auf einer zusätzlichen
Bedienebene (EXPERT).
EXPERT-Einstellungen ändern
1 Zum Aufrufen der Bedienebene »SOUND«
so lange drücken, bis »EXPERT« im Display
erscheint.
2 Mit »Drehregler« die gewünschte EXPERT-
Einstellung anwählen, z.B. Lautstärkebegrenzung beim Einschalten, Anzeige:
»3 Ein-Lautstärke«.
3 Zum Aktivieren kurz »SOUND« drücken.
– Anzeige »inverse Darstellung: das gewähl-
te Programm« ist in der angezeigten
Lautstärke zu hören.
4 Mit den Softkeys »<« oder »>« oder mit
»Drehregler« die gewünschte Lautstärke
einstellen.
5 Zum Beenden der Einstellung kurz
»SOUND« drücken.
CD-BETRIEB MIT CD-WECHSLER EXPERT-BEDIENEBENE
DEUTSCH
Programmquelle CD-Wechsler
wählen
Diese Funktion ist nur möglich, wenn ein CDWechsler angeschlossen ist.
1 »SOURCE« so oft drücken, bis in der An-
zeige »MCD« und danach die gerade
gewählte CD erscheint.
CD direkt anwählen
6fach-Wechsler:
1 Mit den Speichertasten 1…5 oder »
I
I
I
« die
CD anwählen.
10fach-Wechsler:
1 Mit den Speichertasten 1…5 die ersten 5
CDs anwählen.
2 Taste »
I
I
I
« schaltet auf die zweite Ebene um.
3 Mit den Speichertasten 1…5 die nächsten 5
CDs anwählen (CDs 6 – 10).
4 Nach einiger Zeit wird die Funktion automa-
tisch verlassen.
DEUTSCH
Track auswählen
1 Tastenwippe so oft kurz drücken, bis die
Nummer des gewünschten Tracks, z.B.
»Tr. 06«, in der Anzeige erscheint.
CD-Wiedergabefunktionen
Siehe hierzu den Abschnitt „CD-Betrieb“ auf
Seite 12.
Andere AUX-Anschlüsse
Ist kein GRUNDIG CD-Wechsler angeschlossen,
können auch andere CD-Spieler bzw. externe
Geräte über den Hadok/GRUNDIG CDPAdapter (im Zubehörprogramm erhältlich) mit
dem Autoradio verbunden werden.
1 »SOURCE« so oft drücken, bis in der An-
zeige »AUX« erscheint (nur bei angeschlossenem CDP-Adapter).
Hinweise:
Die Bedienung kann nur über die angeschlossenen Geräte selbst erfolgen. Beachten
Sie hierzu die entsprechenden Anleitungen.
14
DEUTSCH
EXPERT-BEDIENEBENE
_____________________________________________________________________________________________
6 Zum Durchführen der nächsten Einstellung
die Schritte 2 bis 5 wiederholen.
7 Zum Verlassen der Bedienebene »SOUND«
solange drücken, bis der Signalton zu hören
ist.
Die Einstellungen im einzelnen
1: S
prache
– Englisch, Deutsch, Französisch,
Italienisch: Wahl der Sprache des Displays.
2: Pr
otection
– Code-Einstellungen zur Diebstahlsicherung – Siehe hierzu die genaue
Anleitung ab Seite 16.
3:
Ein-Lautstärke
– Lautstärkebegrenzung beim
Einschalten.
– Anzeige: »Ein Lautstärke ––«, keine
Begrenzung.
– Anzeige: »Ein Lautstärke 00« bis »Ein
Lautstärke 30«, ein Begrenzungswert ist eingegeben.
4: Loudness
– Anhebung der tiefen Frequenzen
bei geringer Lautstärke
– Anzeige: »Loudness« »gering«, »normal«
oder »hoch«.
5: SCV
– Geschwindigkeitsabhängige
Lautstärke
– Anzeige: »SCV: Aus«; SCV 1…140.
9: T
asten
piep Ein
– Signalton Ein/Aus
– Anzeige: »Tastenpiep Ein«, Signalton als
Funktionsbestätigung.
– Anzeige: »Tastenpiep Aus«,
Funktionsbestätigung durch kurzes
Stummschalten der Lautsprecherausgänge.
1
0: AM-Ber
eich
– Ein/Aus
– Anzeige: »Ein«, der AM-Bereich kann
gewählt werden.
– Anzeige: »Aus«, der AM-Bereich wird abge-
schaltet.
1
1:
KW
-Ber
eich
– Ein/Aus
– Anzeige: »Ein«, der KW-Bereich kann
gewählt werden.
– Anzeige: »Aus«, der KW-Bereich wird abge-
schaltet.
1
2:
Suchlauf
– Suchlaufempfindlichkeit
– Anzeige: »Local«: zunächst geringere
Suchlaufempfindlichkeit
– Anzeige: »DX« sofort höhere
Suchlaufempfindlichkeit.
1
3: RDS Re
gional
– Automatischer Wechsel
des Regionalprogramms
– Anzeige: »Ein« oder »Aus«
– Anzeige: »RDS Regional Ein«,
Frequenzwechsel nur innerhalb des
Regionalprogrammes ist möglich.
– Anzeige: »RDS Regional Aus«, Programm-
wechsel nach automatischem Suchlauf.
Einstellung nur möglich, wenn am SCV-
Anschluss (A1) ein geschwindigkeitsabhängiges
Signal steht.
» SCV: Aus« : SCV ausgeschaltet
» SCV: 140 « : Maximale Wirkung
Die Lautstärkeveränderung während der Fahrt
wird im Display oben rechts angezeigt, z.B. +4.
6:
TP-Mode
– TP-Funktion Ein/Aus
– Anzeige: Ein/Aus
Bei TP: »Aus« ist die Taste »TP« außer Funktion.
7:
TP-Lautstärke
– Mindestlautstärke für
Verkehrsfunk-Durchsagen.
– Anzeige: »TP Lautstärke 5« bis »TP Lautstärke
30«, Lautstärke-Wert und Balkenanzeige.
8: Phone Mode
– Stummschaltung bei
Autotelefon-Betrieb.
– Anzeige: »Stumm«, Stummschaltung des
Autoradios ist aktiviert.
– Anzeige: »Aus«, Stummschaltung ist nicht
aktiviert.
– Anzeige: »Ein« Telefon ist über Lautsprecher
zu hören.
Hinweis:
Das Telefon-Mutesignal (siehe Seite 17) muss
angeschlossen sein.
1 - 7
Page 8

GRUNDIG Service Allixx SCD 5410 DAB
DEUTSCH
15
DEUTSCH
1
4:
Datumsfor
mat
–
Anzeige: »TTMMJJ« oder »JJMMTT
«
1
5:
Uhr
zeit-Anzei
ge
»
Ein«, »Aus« oder »RDS
«
(RDS-Synchronisation)
Hinweis: Bei RDS-Synchronisation werden die
Einstellungen 16 - 18 ausgeblendet, bei Uhrzeit
= Aus werden die Einstellungen
15-19 ausgeblendet.
1
6:
Uhr
zeit
einstellen
1
7:
Jahr
einstellen
1
8:
Datum
einstellen
1
9:
Standb
y Uhr
–
Ein oder Aus, Anzeige der
Uhrzeit bei eingeschalteter Zündung.
20:
Zündun
g – Ein- und Ausschalten
–
Anzeige: »Zündung Ein«, das Autoradio
lässt sich mit der Zündung des Fahrzeugs einund ausschalten.
–
Anzeige: »Zündung Aus«, Ein- und
Ausschalten des Geräts nur mit
»IO«
.
21: CD-Pe
gel
–
einstellen
Lautstärkeanpassung des CD-Teils.
22:
MCD/AUX/MP3-Pe
gel
–
einstellen
Lautstärkeanpassung des Zusatzgerätes
(falls angeschlossen).
23:
Dis
play – Positiv-, Negativdarstellung des
Displays einstellen
– Anzeige: »blau« oder »weiss«.
24:
Dis
pla
ykontrast
–
Kontrast des
Anzeigefeldes einstellen
–
Anzeige: »Displaykontrast«, Balkenanzeige
25:
T
a
g/Nach
t – Anpassung an die
Instrumenten-Beleuchtung
–
Anzeige: »Ein« oder »Aus
«
26: AF Enable
–
Ein oder Aus, DAB-Modul darf
Alternativfrequenzen verwenden, wenn diese
vorhanden sind.
27: DAB –> RDS
–
(wenn 26: Ein) – Ein oder
Aus. Bei schlechtem DAB-Empfang darf auf
einen entsprechenden RDS-Sender zurückgeschaltet werden.
28: RDS –> DAB
–
(wenn 26: Ein) – Ein oder
Aus, ist bei FM der gleiche Sender auf DAB verfügbar, wird auf DAB umgeschaltet.
29: DAB Linking
–
(wenn 26: Ein)
Programmnachführung bei schlechtem Empfang; Umschaltung auf Programme mit gleichem
Inhalt (hard), Umschalten auf Programme mit
ä
hnlichem Inhalt (soft), oder Aus (aus).
EXPERT-BEDIENEBENE
_____________________________________________________________________________________________
DEUTSCH
30: DRC
–
Ein oder Aus, Dynamic Range Control bewirkt bei Sendungen mit hoher Dynamik (z.B.
klassische Musik) eine natürliche Wiedergabe. Diese
Zusatzinformation muss der DAB-Sender anbieten.
31: Rec. Limit
– Ein oder Aus, Umschaltung der
Suchgeschwindigkeit, Überprüft die Empfangswür-
digkeit eines DAB-Ensembles.
Receive Limit = Aus: Es wird jede Frequenz auf
Empfangswürdigkeit getestet.
Receive Limit = Ein: Es wird nur die Feldstärke
geprüft. Dies beschleunigt im Allgemeinen den
Suchlauf.
32: Shor
t IS
– Ein oder Aus, nach dem Einschalten
wird immer der zuletzt gehörte Sender eingestellt.
Short IS = Ein: Nach dem Einschalten werden
zusätzlich die letzten 5 Ensembles auf
Empfangswürdigkeit geprüft.
Short IS = Aus: Es ist nur das letzte Ensemble
verfügbar.
16
DEUTSCH
CODIERUNG
___________________________________________________________________________________________________
Die Code-Nummer des Gerätes ist auf der
Identity-Card verzeichnet. Die Codierung wurde
nicht ab Werk aktiviert. Bei aktivierter
Codierung des Gerätes ist dieses elektronisch
gesichert. Nach Ausbau kann es nur durch
Eingabe der Code-Nummer wieder in Betrieb
genommen werden.
Codierung aktivieren
1 EXPERT-Bedienebene wählen, dazu
»SOUND« so lange drücken, bis EXPERT zu
sehen ist.
2 Mit Drehring die Anzeige
»Protection« auswählen.
3 Kurz »SOUND« drücken.
– Anzeige: »----« blinkt.
4 Code-Nummer durch mehrmaliges Drücken
der Speichertasten »1« - »4« eingeben.
Erneute Inbetriebnahme bei
aktivierter Codierung
1 Das Autoradio einschalten.
– Anzeige: vorübergehend »SAFE«, dann
»1----«.
– Die »1« kennzeichnet die Zahl der Ein-
gabeversuche.
2 Code-Nummer mit den Stationstasten »1«,
»2«, »3«, »4« eingeben.
3 Zum Bestätigen »SOUND« drücken,
– Das Radio ist in Betrieb.
Hinweis:
Nur die korrekte Code-Nummer eingeben!
Beachten Sie die zunehmenden Wartezeiten
zwischen den Versuchen.
Nach dem sechsten Fehlversuch empfiehlt es
sich, die entsprechenden Einstellungen von
einem Fachhändler durchführen zu lassen.
Beispiel: Code-Nummer 1703
»1« 1 x kurz drücken »1000«
»2« 7 x kurz drücken »1700«
»3« 10 x kurz drücken »1700«
»4« 3 x kurz drücken »1703«
5 Zum Bestätigen der Eingabe kurz
»SOUND« drücken.
– Anzeige: »SAFE«, Codierung ist aktiviert.
6 Zum Verlassen der EXPERT-Bedienebene
»SOUND« so lange drücken, bis der
Signalton zu hören ist.
Codierung deaktivieren
1 Soll das Gerät z.B. ausgebaut werden,
EXPERT-Bedienebene wählen und die Anzeige »SAFE« auswählen.
2 Zum Deaktivieren der Codierung die Schritte
3 bis 6 wiederholen.
1 - 8
Page 9
GRUNDIG Service Allixx SCD 5410 DAB
ENGLISH
5
OVERVIEW
______________________________________________________________________________________________________
Controls
General
1
IO On/off.
2
Volume regulator
Changes the volume and the SOUND and
EXPERT settings.
3
SOUND
Pressed briefly: selects the BASS, TREBLE,
FADER and BALANCE sound settings.
Hold down to select the EXPERT function.
4
SOURCE
Selects DAB, FM, AM, CD or CD changer
as the input source.
5
OPEN
Releases the control unit, which swivels outwards.
6
DISPLAY
For the display, you can choose between
normal display, date and time, radio text or
additional announcements (DAB).
Radio operation
7
The upper soft key
selects the »IS«, »SRC«, »MAN«, »PTY«
and »SCN« operating modes.
8
The lower
soft key
GO starts the IS or PTY search.
CLR deletes the selection and ends the
function.
9
Rocker switch
Starts the selected function when activated
in the EXPERT mode (page 13). Hold it
down to call up secondary services (DAB).
ßI
TP Pressed briefly: activates the standby
mode for traffic news.
ß?
1, 2, 3, 4, 5
Memory buttons for stations, programme
types and sound settings.
ß`
I
I
I
Changes the preset level.
Hold down to switch the AF (alternative frequencies) function on or off, or to switch the
announcements on or off (DAB).
CD mode
7
The upper soft key
selects the NRM, SCN, RND and RPT playback functions.
8
The lower soft key
confirms the selection (GO).
(CLR) deletes the selection.
9
Rocker switch
Selecting the CD track. Starting the rapid forward or reverse search of the CD.
When the front panel is open:
ßQ
ə To eject a CD.
CD changer mode
ß?
1, 2, 3, 4, 5, I
I
I
Selecting CDs 1 – 6.
ß`
I
I
I
(for 10 CD changer)
Switches to the second selection level
(CDs 6–10).
6
9
¢
ə
ßQ
4
7
8
3
2
5
1ß?
ß`
ßI
Radio:
IS Intelligent search – RDS
SRC Search
MAN Manual tuning
PTY Programme type selected
SCN Scan mode – RDS/DAB stations
heard briefly.
2S Secondary services are available
(DAB).
ENS Select ensembles.
NXT Switches to the next ensemble.
AF FM Switches to FM alternative frequency.
GO Starts function.
CLR Ends function.
No DAB Program DAB reception not possible
at present (in DAB mode).
CD:
NRM Normal playback function
SCN Scan mode – the first ten seconds of
each track are played
RND Random mode – the tracks are play-
ed back in random order.
RPT Repeat mode – all the tracks on the
CD are played repeatedly.
6
ENGLISH
OVERVIEW
___________________________________________________________________________________________________________
Input sources (CD, AUX)
CD input source selected
CD mode
CD changer mode
(if connected)
Phone mode
Symbols and abbreviations
Device is coded
TP Standby mode for traffic news is
activated
AF Alternative frequencies are activated
1...5 Preset button number of the selected
station: 1,2,3,4,5
Memory levels 1, 2, 3
T
Display
Input sources (Radio)
FM input source selected
FM band (1-3)
Memory button 1, memory level 1
AM input source selected
AM band (1-3)
Memory button 2, memory level 2
DAB band (1-3)
Operating Hints
This chapter contains excerpts from the operating instructions. For further particulars please refer to the appropriate user instructions the part number
of which is indicated in the relevant spare parts list.
FM
1
DLF
DAB
RADIO
TPCD
IS
GO
CD
TR 2 04:43
CD
1 - 9
CD
NRM
Page 10
GRUNDIG Service Allixx SCD 5410 DAB
8
ENGLISH
2 To store a station, press »1«, »2«, »3«, »4«
or »5« until you hear a signal or muting.
Selecting stored stations
1 Press the memory button briefly.
– Display: the stored station, e.g. »ENERGY«.
The stations remain stored even if the device
is disconnected from the power supply.
Activating and deactivating TP
(Traffic Program)
1 To switch this function on and off, press TP.
– Display: »TP«.
Note:
If you are tuned to a station which does not
broadcast traffic news, the device automatically searches for the next station which
does.
If the TP function is activated, the CD or Tape
mode is also interrupted for traffic news.
Search
1 Press rocker switch to select a new stati-
on.
Starting the IS search in DAB mode after
switching on the device for the first time:
2 Press the upper soft key to select IS.
3 Start the search with the lower soft key
(GO).
You can only select known ensembles.
Manual station search
1 Press the upper soft key to select MAN.
2 Use the rocker switch to change the fre-
quency in incremental steps.
3 Hold down the rocker switch for fast
tuning. Press it repeatedly to increase or
decrease the FM frequency by 50 kHz.
Storing stations in the memory
Selecting the DAB or FM memory level
1 Keep pressing »
I
I
I
« until the FM1 - FM3 or
DAB1 - DAB3 memory level is active.
RADIO (TUNER) MODE
_________________________________________________________________________________
Selecting the radio input source
1 With SOURCE you select the RADIO FM or
RADIO AM input source.
Note:
When the device is connected for the first
time, the RDS (IS) search starts automatically.
When you select a new frequency band, the
most recently selected station is played (Last
Station Memory).
RADIO (TUNER) MODE
___________________________________________________________________________________________
ENGLISH
9
Activating and deactivating the AF
function
1 To switch it on and off, press »I
I
I
« until AF
ON or AF OFF appears in the display.
– Display: »AF ON« when the AF function is
on.
Note:
You can only activate or deactivate the AF
function for RDS stations which broadcast
alternative frequencies.
Intelligent search (IS)
The intelligent search first stores RDS stations,
followed by the other stations in order of signal
strength. When the IS search is completed up to
30 stations are stored. You will hear the station
with the best reception. The IS is always activated, unless you have selected another search
function.
DAB note
If you enter a new DAB broadcasting region,
you can start the IS search to check whether
you are able to receive new ensembles.
Intelligent search (IS)
1 Press the upper soft key to select IS.
2
Start the search with the lower soft key (GO).
– Display: »IS---·«.
Note:
However, you can stop the search by pressing one of the station buttons »1« – »5« or
the advance button.
Viewing the IS memory
1 Once the IS search is complete, use the
rocker switch to select the station you
want to hear.
– Display: »IS-Scan«.
Tuning to stations with station
search
1 Press the upper soft key to select SRC.
2 Press the rocker switch to start the search
in the desired direction.
3 If a station is found, its code appears in the
display.
Scan function
You can hear stations which can be received for
10 seconds each.
1 Press the upper soft key until »SCN«
appears in the display.
2 Use the lower soft key (»CLR«) or the
rocker switch to end the scan function. The
last station selected is played.
Additional TP functions
1 To interrupt the current traffic news briefly
press the TP button.
– The device remains in standby mode for
the next announcement.
2 Press TP again to switch off the traffic news
standby. The TP symbol disappears from the
display.
3 You can preselect the volume for all traffic
announcements. To set it, select the EXPERT
level (see page 13).
4 If you only want to hear traffic news, press
TP to activate the TP function and then turn
the volume knob to zero.
Viewing the PAD/radiotext
1 Press DISPLAY.
2 The upper soft key switches to date, time and
one-line radiotext.
3 The lower soft key switches to two-line radio-
text.
DAB
RADIO
1 - 10
Page 11

GRUNDIG Service Allixx SCD 5410 DAB
RADIO (TUNER) MODE
DAB only for SCD 5410 DAB
_________________________________________________________
ENGLISH
11
Calling up the announcement menu
1 Press and hold down the I
I
I
button to switch
the announcement menu function on and off
in the DAB mode.
– Display: »Announcement«.
Here you can turn various announcements on
and off.
2 Use the rocker switch to select the announce-
ment.
3 The upper soft key switches the announce-
ment on and the lower soft key switches it off
again.
The following DAB announcements
may be broadcast:
Travel
Warning
News
Weather
Service
Special
Rad info
Sports
Finance
Calling up sub-programs
Sub-programs are available if the »2S« indicator appears in the display (top line, left).
If
secondary services are not available, “NO 2S”
appears briefly.
1 Press the upper soft key to select »IS«,
»ENS« or »SCN«.
2 Hold down the rocker switch to activate
secondary services, if available.
The top line shows the name of the station
and the bottom line shows the name of the
sub-program selected.
3 Hold down the rocker switch again to switch
to the next sub-program being broadcast.
If no information is being broadcast, »No 2S«
appears.
Leaving a sub-program
1 You leave the secondary service mode by
pressing the rocker switch briefly and switching to another station.
Selecting an ensemble
Within the DAB range, several stations on the
same frequency are always combined to make
up an ensemble.
1 Press the upper soft key until »ENS«
appears in the display.
2 Press the lower soft key (»NXT«) to select
an ensemble.
When you have selected an ensemble, you
can choose a station in the ensemble with the
rocker switch.
3 Use the rocker switch to choose a station in
the selected ensemble.
The display shows the name of the ensemble
in the top line and the name of the station in
the bottom line.
Selecting the secondary service
(2S)
The secondary service is an additional function
of the DAB mode. A DAB program can contain
other sub-programs (secondary service components), e.g. current broadcasts or foreign language news.
12
ENGLISH
CD (DISC) MODE
____________________________________________________________________________________________
Inserting a CD
1 Press OPEN. The front panel opens.
2 Insert a CD into the compartment.
–
Display: »T01 00 00«.
Playback starts
automatically.
3 If the disc inserted contains CD text data,
they are displayed automatically. CD texts
include, for example, the album name, the
artist and the piece of music.
4 With DISPLAY you can select various dis-
play types. Press it briefly to start the running
text, and longer to switch to the track display.
Selecting the signal source
1 Press SOURCE until CD appears in the dis-
play.
Note:
The inserted CD is repeated automatically.
Selecting a title
1 Keep pressing the top or bottom of the
rocker switch until the number of the track
you want to hear appears in the display.
Playing back tracks in random
order
1 Press the upper soft key to select the
»RND« function.
2 Confirm (GO) or delete (CLR) your selection
with the lower soft key.
– The tracks are played back in random
order.
3 To end this function, select »NRM«.
Stopping CD playback
1 To change, for example, to the RADIO mode,
press SOURCE briefly until »RADIO FM«
appears in the display.
Ejecting the CD
1 Press OPEN to open the CD compartment.
2 Press ɯ.
– The CD is ejected.
Note:
If you eject the CD and do not remove it within six seconds, the device will automatically
pull it back in again.
Searching for a passage within
a track
1 During playback, press the top or bottom of
the rocker switch and hold it down until
you find the desired passage.
– You can hear the tracks at fast speed and
reduced volume.
Repeating a track (RPT)
1 Press the upper soft key to select the
»RPT« function.
2 Start the repeat function with the lower soft
key (GO).
– The track is played back repeatedly.
3 Quit the function with the lower soft key
»CLR« and return to normal playback.
Playing the start of a track
(Scan)
1 Press the upper soft key to select the
»SCN« function.
2 Start the Scan with the lower soft key
(GO).
– The first 10 seconds of the track are played.
Note:
To play the current track to the end, briefly
press the lower soft key (OK, CLR).
CD
TR 2 04:43
CD
NRM
1 - 11
Page 12
GRUNDIG Service Allixx SCD 5410 DAB
ENGLISH
13
To make the use of the device as simple as possible, a number of custom settings which are only
required once or very occasionally are located
on a special operating level (EXPERT).
Changing EXPERT settings
1 Keep pressing »SOUND« until »EXPERT«
appears in the display.
2 Use the volume knob to select the
required EXPERT setting, e.g. volume limit
on switching on. Display: »ON Volume: 3«.
3 To activate it, briefly press the SOUND
button.
– Display: »the selected programme, display-
ed inversely«. It is played at the volume displayed.
4 Use the »<« or »>« soft keys or the volume
knob to select the required volume.
5 Briefly press SOUND to conclude the setting.
CD MODE WITH CD CHANGER
13
Selecting the CD changer input
source
This function is only possible if a CD changer is
connected.
1 Keep pressing the SOURCE button until you
see »MCD« in the display, followed by the CD
you have just selected.
Selecting a CD directly
6 CD changer:
1 Select the CD with the memory buttons 1...5
or with »
I
I
I
«.
10 CD changer:
1 Select the first 5 CDs with the memory
buttons 1...5.
2 The »
I
I
I
« button switches to the second level.
3 Select the next 5 CDs (CDs 6 – 10) with the
memory buttons 1...5.
4 After a short while the function ends auto-
matically.
ENGLISH
Selecting a track
1 Keep pressing the rocker switch until the
number of the track you want to hear, e.g.
»Tr. 06«, appears in the display.
CD playback functions
See the ”CD mode” section on page 12.
Other AUX connections
If you are not using a GRUNDIG CD changer,
you can also connect other CD players or external devices to the car radio using the
Hadok/GRUNDIG CDP adapter (available as
an accessory).
1 Keep pressing SOURCE until »AUX«
appears in the display (only if a CDP
Adapter is connected).
Note:
You must operate the connected devices themselves. See the relevant operating manuals.
EXPERT LEVEL
14
ENGLISH
14
EXPERT LEVEL
_______________________________________________________________________________________________________
6 To carry out the next setting repeat steps 2 to
5.
7 To quit expert level keep pressing SOUND
until you hear the signal.
The individual settings
1: Language
– English, German, French,
Italian: the selection of display languages.
2: Pr
otection – Code settings to prevent theft –
see the detailed instructions starting on page
16.
3:
ON Volume – Volume limit when switching
on.
– Display: »ON Volume ––«: no limit.
– Display: »ON Volume 00« to »ON Volume 30«:
a limit is entered.
4: Loudness
– Boosts low frequencies at low
volumes
– Display: »Loudness« »low«, »normal« or
»high«.
5: SCV
– Speed Controlled Volume
– Display: »SCV: Off«. SCV 1...140.
9: Beep – Signal tone on/off
– Display: »Beep On« – Signal tone for confirming
functions.
– Display: »Beep Off« – Functions are confirmed
by a brief muting of the loudspeakers.
1
0: AM Band – On/off
– Display: »On« – The AM range can be selected.
– Display: »Off« – The AM range is switched off.
1
1: SW Band – On/off
– Display: »On« – The SW range can be selected.
– Display: »Off« – The SW range is switched off.
1
2: Search level– Search sensitivity
– Display: »Local« – Reduced search sensitivity.
– Display: »DX« – Immediate increased sensitivity.
1
3: RDS Re
gional – Automatic changing of the
regional station
– Display: »On« or »Off«
– Display: »RDS Regional On« – Frequency
change only possible between regional stations.
– Display: »RDS Regional Off« – Station change
via automatic search.
1
4: Date Format
– Display: »DDMMYY« or »YYMMDD«
15: Clock »On«, »Off« or »RDS« (RDS synchro-
nisation)
Note: With RDS synchronisation, settings 16 18 disappear. When Time is Off, settings
15-19 disappear.
A setting is only possible if there is a speed controlled signal at the SCV connection (A1).
» SCV: Off« : SCV is switched off
» SCV: 140 « : Maximum effectiveness
The speed change while driving is shown in the
top right section of the display, e.g. +4.
6:
TP Mode – TP function on/off
- Display: on/off
When TP is »off«, the »TP« button is inactive.
7:
TP Volume – Minimum volume for radio traffic news.
– Display: »TP Volume 5« to »TP Volume 30«.
Volume level, bordered display.
8: Phone
– Muting in car phone mode.
– Display: »Mute« – Muting of the car radio is
activated.
– Display: »Off« – Muting of the car radio is
not activated.
– Display: »On« – You hear the phone via the
speakers.
Note:
The phone mute signal (see page 17) must be
connected.
1 - 12
Page 13

GRUNDIG Service Allixx SCD 5410 DAB
ENGLISH
1515
16: T
ime setting
1
7: Year setting
1
8: Date setting
19: Standby Clock – On or off. The time is displayed when the ignition is switched on.
20:
Ignition – Switching on and off
– Display: »Ignition On« – The car radio can be
switched on and off with the vehicle ignition.
– Display: »Ignition Off« – The device can only
be switched on and off by pressing »IO«.
21: CD Level
setting
CD unit volume adaptation.
22:
MCD/Aux/MP3 Level setting
CD changer volume adaptation
(if connected).
23:
Display – Setting the positive or negative
display.
– Display: »Blue« or »White«.
24:
Display contrast – Setting the contrast for
the display field.
– Display: »Disp Contrast«, bordered display.
25:
Day/Night – Adaptation to the instrument
illumination.
– Display: »On« or »Off«.
26: AF Enable – On or off. The DAB module can
use alternative frequencies if this is available.
27: DAB –> RDS
– (If 26: on) – On or off. If the
DAB reception is bad, you can switch back to an
appropriate RDS station.
28: RDS –> DAB
– (If 26: on) – On or off. If the
same station is available in FM on DAB, the
device switches to DAB.
29: DAB Linkin
g – (If 26: on). Program tracking
if reception is bad. Switches to programs with
the same content (hard), or to programs with
similar content (soft), or switches off (off).
30: DRC
– On or off. Dynamic range control - produces natural playback for programs with a high
volume dynamic (e.g. classical music). The DAB
station must be offering this additional information.
31: Rec. Limit
– On or off. Changing the search
speed. Checks the reception qualities of a DAB
ensemble.
Receive Limit = off: every frequency is tested as to its
reception quality.
Receive Limit = on: only the strength of the signal
is tested. This generally speeds up the search.
EXPERT LEVEL
_______________________________________________________________________________________________________
ENGLISH
32: Short IS – On or off.
When the device is switched on, the last station
you were listening to comes on.
Short IS = on: when the device is switched on, the
last 5 ensembles are also tested for their reception qualities.
Short IS = off: only the last station is available.
16
CODING
__________________________________________________________________________________________________________
ENGLISH
16
ENGLISH
The code number for the device can be found on
the identity card. Coding is not activated by
default. When the coding is activated, the device is electronically secure. Following removal, it
can only be switched on again if the code number is re-entered.
Activating coding
1 Select the EXPERT level by pressing SOUND
until EXPERT appears in the display.
2 Select »Protection« using the volume
knob.
3 Press SOUND briefly.
– Display: »----« flashes.
4 Enter the code number by pressing memory
buttons »1« – »4« repeatedly.
Renewed operation when
coding is active
1 Switch on the car radio.
– Display: temporarily »SAFE«, then
»1----«.
– The »1« indicates the number of attempts
at entering the code.
2 Enter the code number using the station but-
tons »1«, »2«, »3«, »4«.
3 Press SOUND to confirm your entry.
– The radio is in operating mode.
Note:
Only enter the correct code number! Take
note of the increasing waiting time between
attempts.
After the sixth failed attempt we recommend
that you have a specialist dealer enter the
code.
The waiting time not elapsed is displayed.
Example: Code number 1703
»1« Press briefly once »1000«
»2« Press briefly seven times »1700«
»3« Press briefly ten times »1700«
»4« Press briefly three times »1703«
5 Briefly press SOUND to confirm.
– Display: »SAFE« – Coding is activated.
6 To quit the EXPERT level hold down SOUND
until you hear the signal.
Deactivating coding
1 If, for example, you want to remove the dev-
ice, select the EXPERT level and select
»SAFE« on the display.
2 To deactivate the coding, repeat steps 3 to 6.
1 - 13
Page 14
GRUNDIG Service Allixx SCD 5410 DAB
4
8
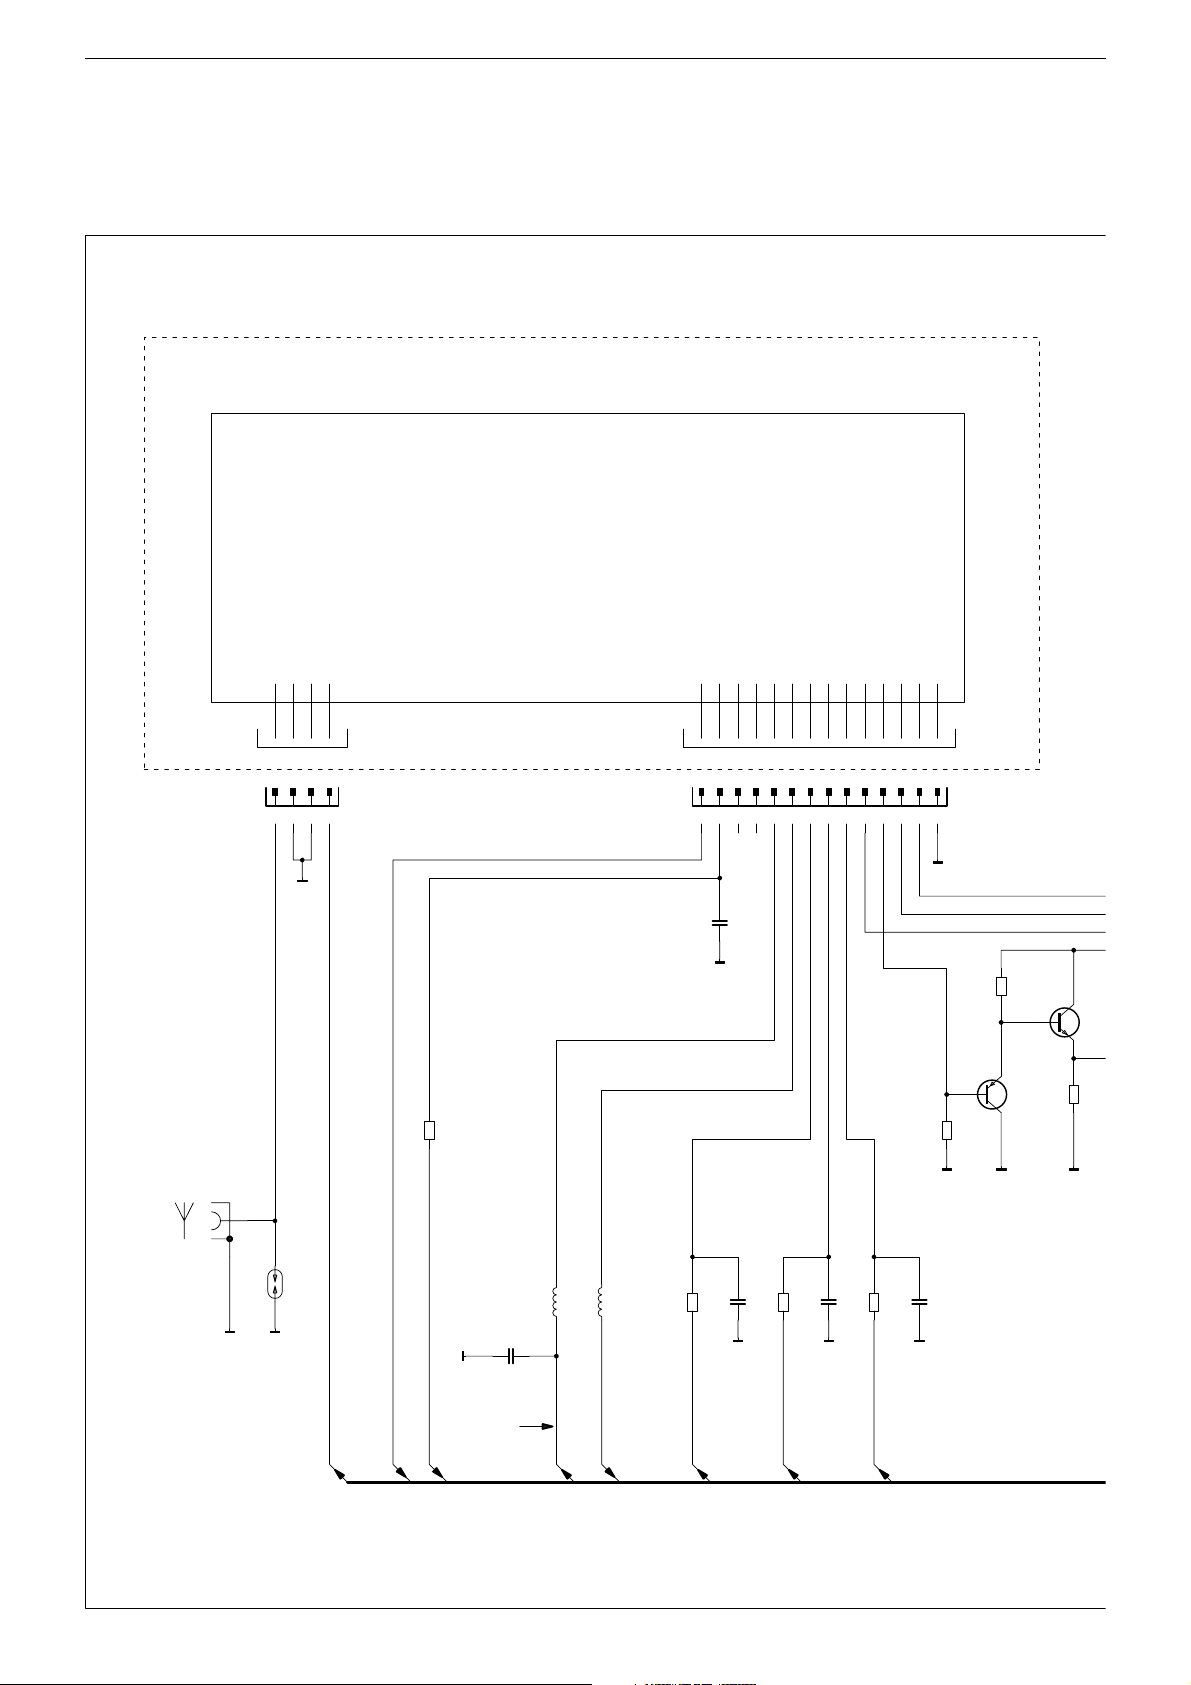
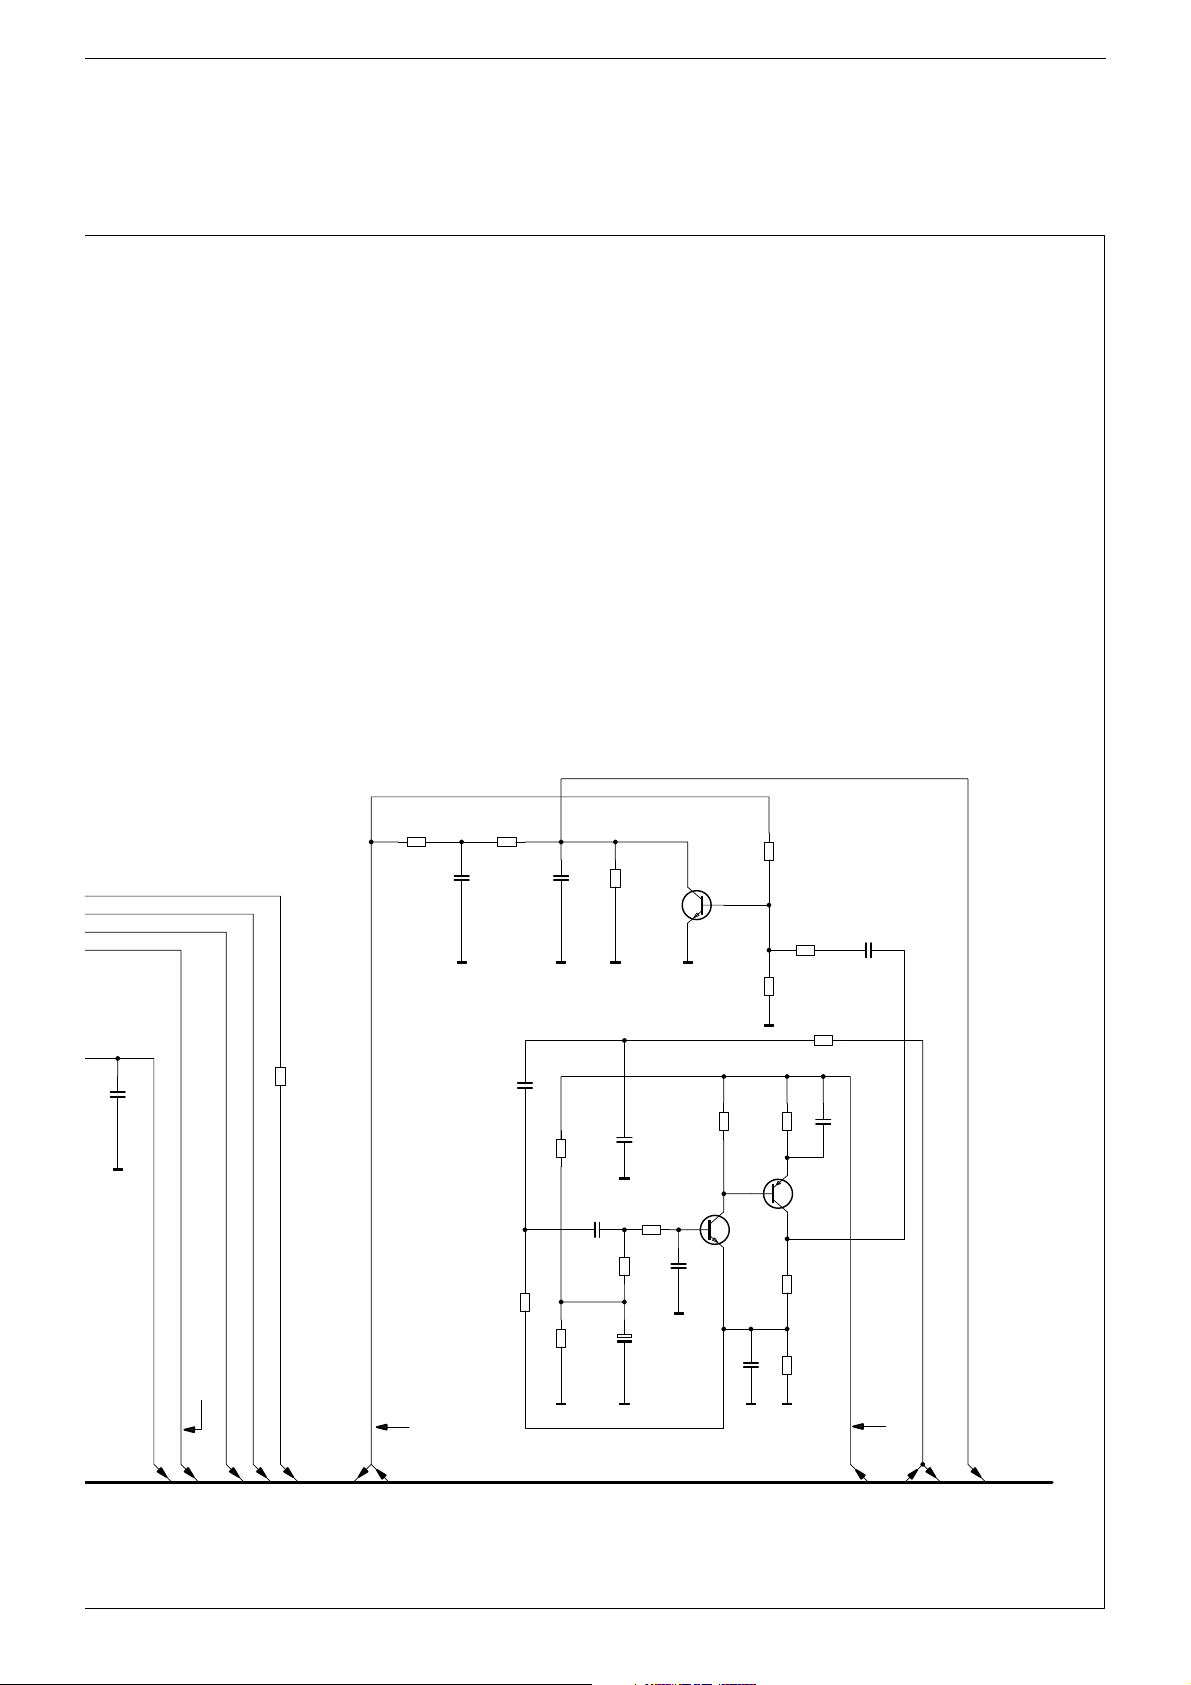
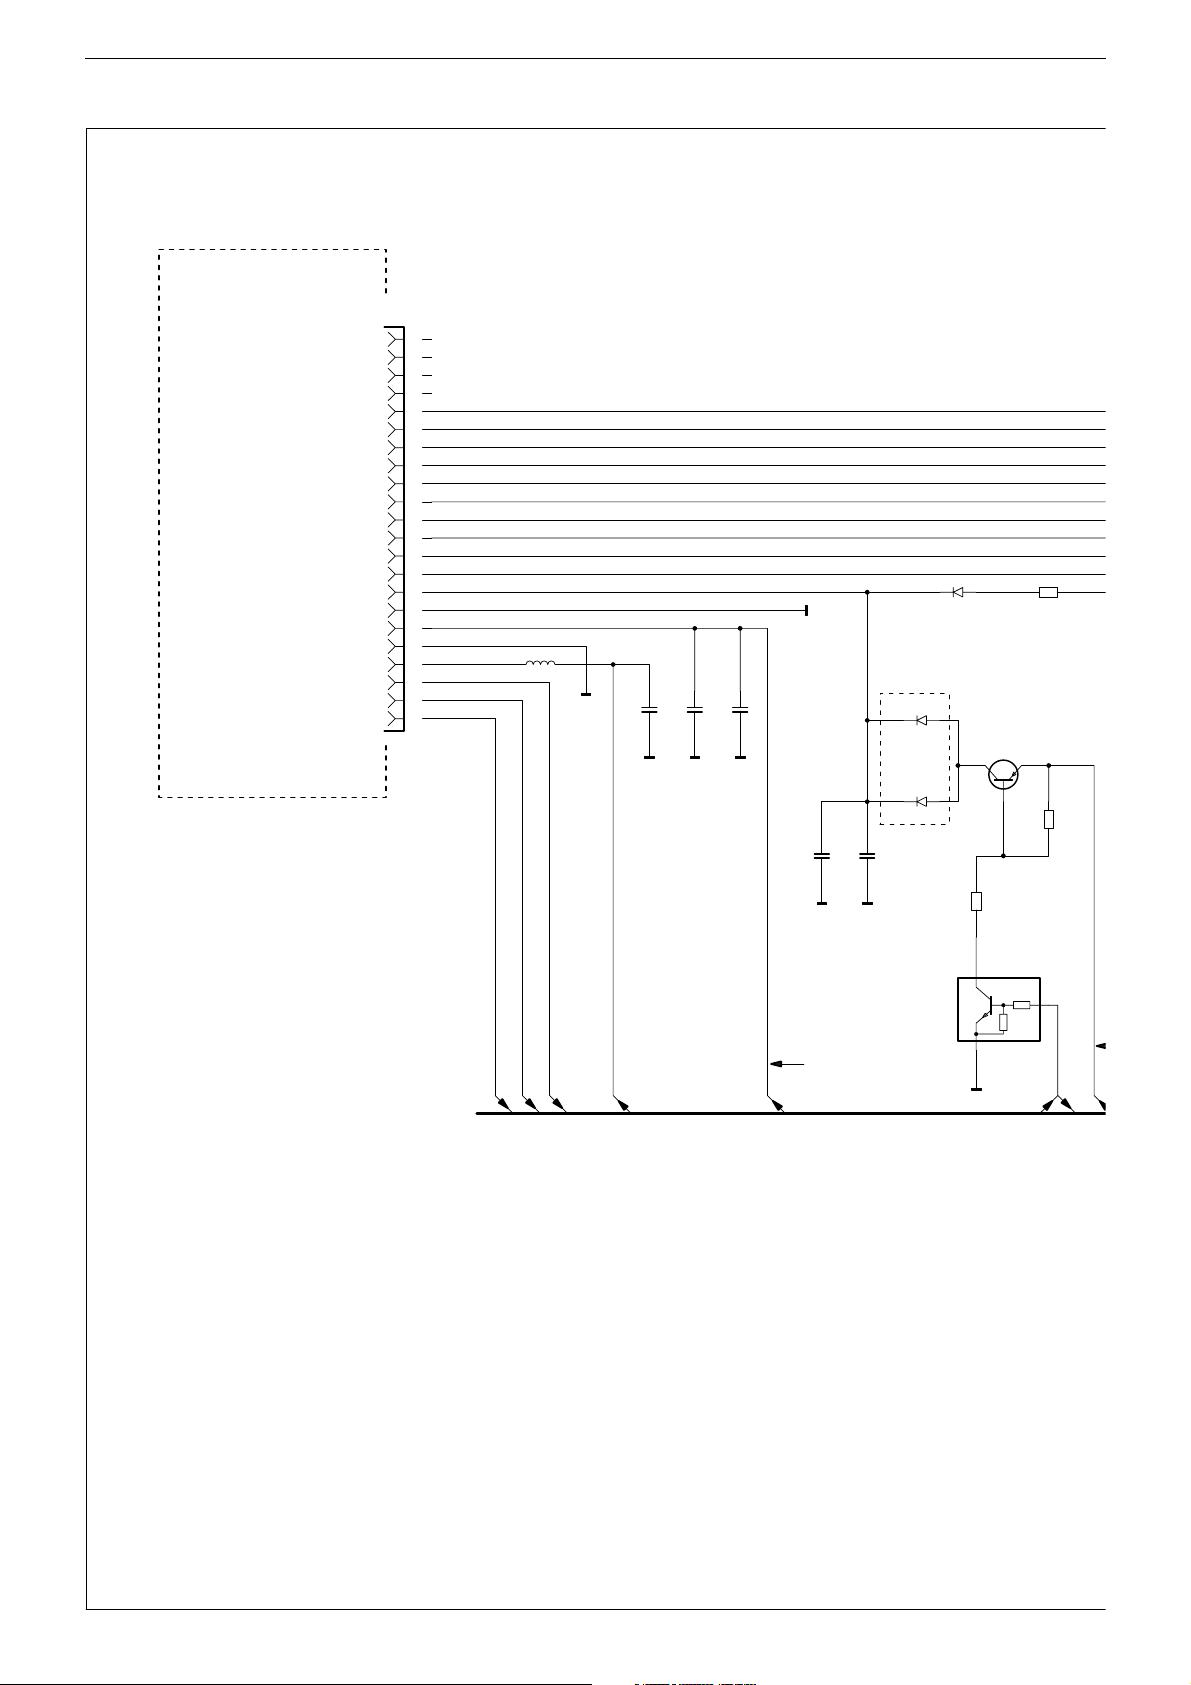
Schaltpläne und Platinenabbildungen / Circuit Diagrams and Layout of the PCBs
HF-Teil / RF Part
Tunermodul
ANT1
BU01
Ant.
1
GND
2
PGND
GND
3
Phantom
4
603
CR107
UREF
HUB_AD
IF2
10,7MHZ
+S
AM/FM-stopENSCL
BU02
2
1
CC805
603
PGND
0R
10P
6
5
4
3
MPX
FELDST_AD
NACHBAR_AD
SDA
9
8
7
MULTI_AD
GND
14
13
12
11
10
PGND
603
47K
CR105
PGND
603
270K
CR104
CT801
BC858C
PGND PGND
603
CR106
CT
BC8
100K
PGND
CFS03
PGND
PHANTOM+
HUB-AD
UREF-AD
PGND
CC806
603
100P
9V2
CL802
BLM21B272S
+S
CL803
2 - 1
BLM21B272S
AM/FM-STOP
603
120R
CR801
CC813
PGND
TUNER-EN
603
100P
120R
CR802
603
SCL-T
CC818
PGND
603
120R
CC819
PGND
100P
603
100P
CR803
603
SDA-T
Page 15
GRUNDIG Service Allixx SCD 5410 DAB
ALLE SPANNUNGEN GEMESSEN BEI UB=14V GEGEN MINUS
ALL VOLTAGES MEASURED AT UB=14V WITH RESPECT TO NEGATIV
HAUPTPLATTE
MAIN BOARD
T802
848C
CC109
PGND
CR322G
603
22R
603
100K
100N
603
CR809
CC311G
603
AGND
100N
CR323G
603
3K3
CC302B
603
603
CR302B
AGND
150P
10K
CC312G
603
603
CR304B
603
CR303B
5P6
47K
CC303B
150P
5K6
603
CR327G
AGND
CC301B
603
PGND
603
CR306B
C304B
100K
603
+
CT303G
BC848C
47P
CR307B
603
1K0
22K
10U/16V
AGND
603
CC306B
PGND
18P
603
CR308B
CT301B
BC848C
10K
CC307B
603
CR325G
603
CR324G
AGND
10N
603
100K
CR326G
10K
22K
603
CR309B
BC858C
CT302B
603
CR311B
603
CR312B
603
CR301B
2K2
10K
1K0
603
10K
CC308B
603
10N
CC310G
603
100N
9V2
+S
NACHBAR-AD
MPX
FELDST-AD
MULTIPATH-AD
+G
5V0
PGND
2 - 2
PGND
PGND
PGND
+S2+S2
9V2
MPX
BERGER-MP
15.01.02
Page 16

GRUNDIG Service Allixx SCD 5410 DAB
RDS-Dekoder / RDS Decoder
RDS-DECODER
DECODEUR RDS
RDS-CLK
603
CR503R
10K
RDS-DATA
603
CR504R
10K
MPX
805
CC504R
DGND
330P
DGND
+
CC506R
10U/16V
QUAL RDDA VREF MUX VDDA VSSA CIN SCOUT
DIFFERENTIAL
DECODER
ANTI
ALIASING
FILTER
COSTAS LOOP
VARIABLE AND
FIXED DIVIDER
OSZILLATOR
DEVIDER
QUALITY-
BIT
GENERATOR
BIPHASE
SYMBOL
DECODER
CLOCK
REGENERATION
AND SYNC
REFERENZ
VOLTAGE
CIC501R
SAA6581T
VP1
(8th ORDER)
RDCL T57 OSCO OSCI VDDD VSSD TEST TSTLD
603
3K9
CR502R
4.332MHz
XX
603
CR500R
CQ501R
1
3
2
603
CC507R
82P
603
CC509R
82P
CC503R
57KHZ
BANDPASS
DGND
603
100N
CLOCKED
COMARATOR
SELEKTOR SWITCH
CC502R
603
10N
RECONSTRUK.
TESTLOGIC AND
OUTPUT
DGND
87654321
FILTER
910111213141516
DGND
CR501R
603
12R
4V8
+G
603
CC501R
DGND
5V0
22N
+G
AIM-INT
CR2509
603
10K
DGND
DGND
DGND
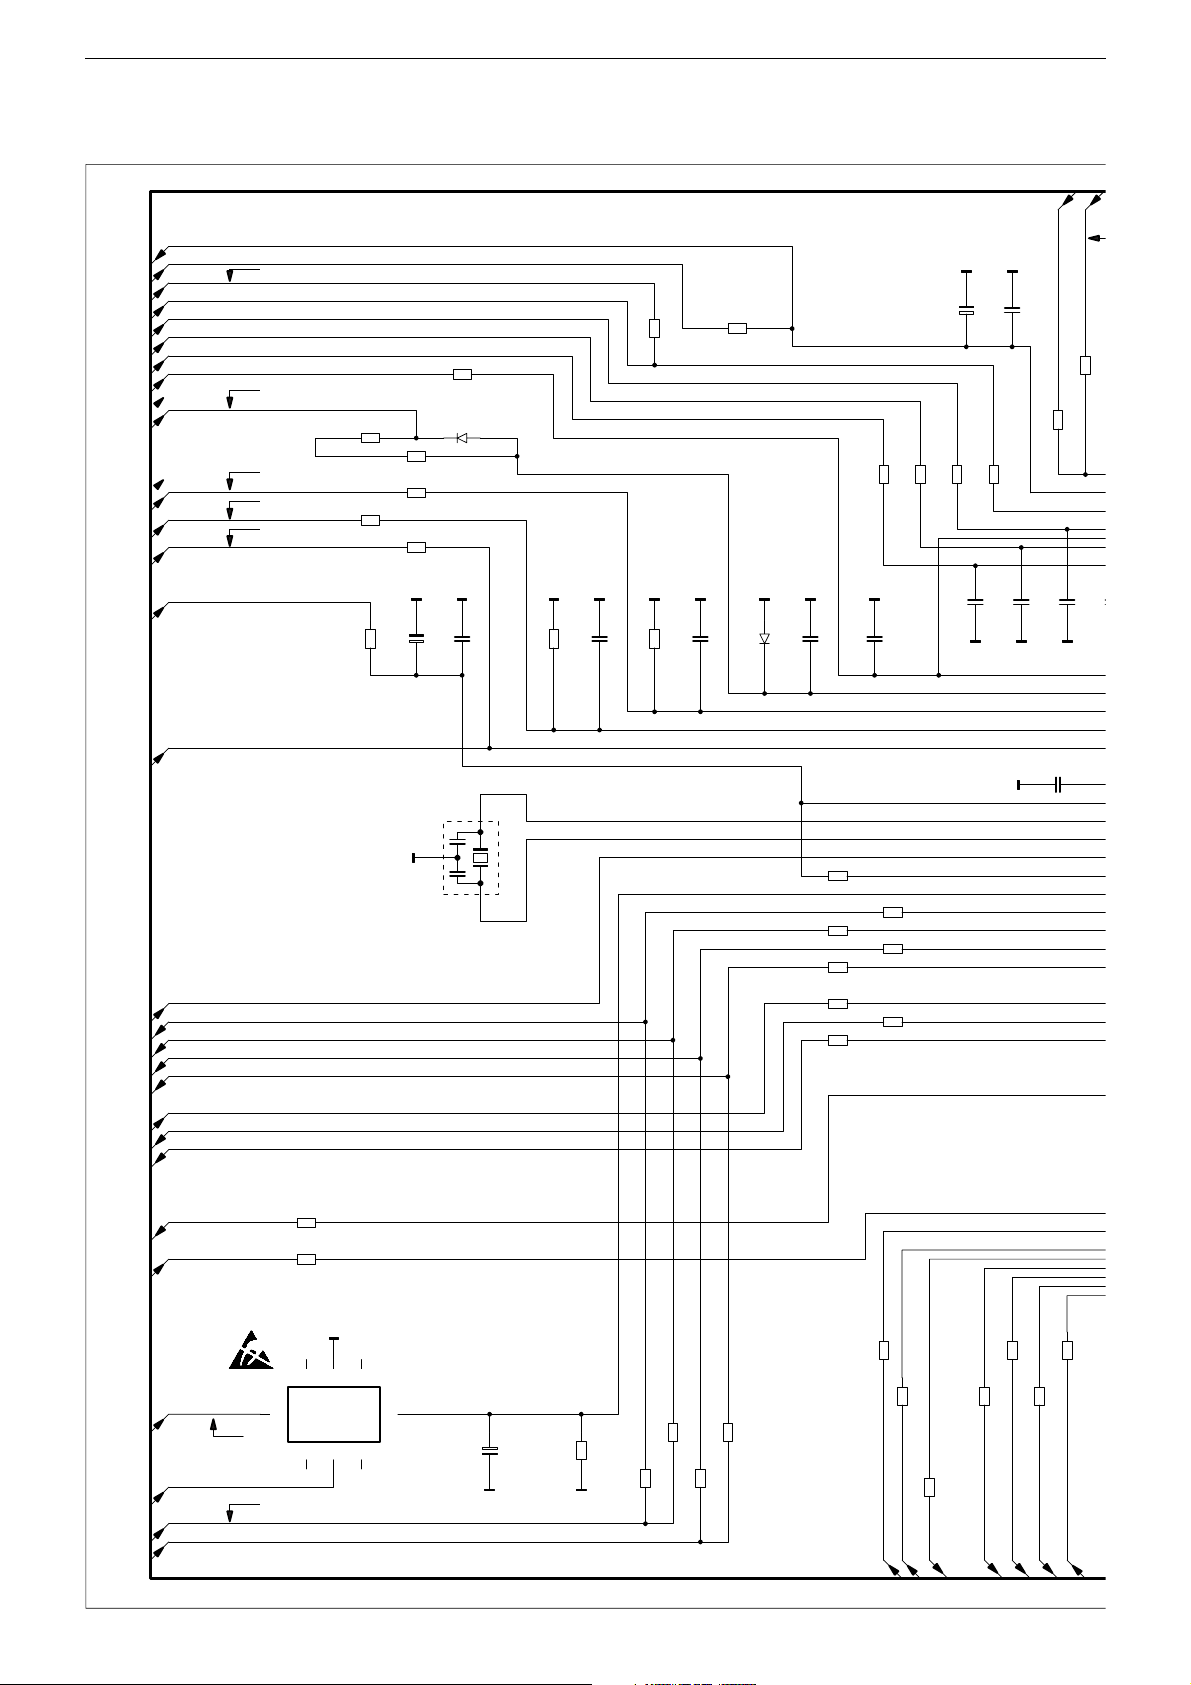
ALLE SPANNUNGEN GEMESSEN BEI UB=14V GEGEN MINUS
ALL VOLTAGES MEASURED AT UB=14V WITH RESPECT TO NEGATIV
HAUPTPLATTE
MAIN BOARD
2 - 3
15.01.02
Page 17
GRUNDIG Service Allixx SCD 5410 DAB
E
E
5
Prozessor / Processor
+5V-S
+5V
+G
UREF-AD
HUB-AD
NACHBAR-AD
FELDST-AD
MULTIPATH-AD
+G2
+U
+A
+G
+5V
AIM-DATA
5V0
5V0
14V0
14V0
5V0
CR807
603
4K7
CR812
603
120K
1%
CR814
+G
EGND EGND
AMP-TEMP-AD
603
10N
+
1N0
1K0
603
CR961
22K
C957
603
CR959
22K
CC962
CC956
22U/10V
603
CR958
603
1N0
3K3
CC961
DGND
603
100N
603
CR957
CC959
EGNDEGNDEGND
CC814
1U0/10V
805
CR956
3K3
603
1N0
603
47K
CR949
CC958
DGND
CR963
1%
CC809
805
22R
603
CR962
EGND EGND
EGNDEGNDEGNDEGND EGND
1N0
603
CC801
603
10N
CD802
BAR42
603
CC804
603
33K
CR964
CR804
603
1K0
CD801
CR808
BAR42
603
47K
CR811
603
120K
1%
CR813
603
10K
DGNDDGND
+
100U/6V3
CC812
603
10N
CR817
1
805
10R
C815
603
1%
603
47K
CC811
10N
603
CR818
47K
RESET
SDA-T
SCL-T
SDA-F
SCL-F
EJECT
+G/+S-ON
+U-ON
DAB-SELECT
BERGER-MP
+S
9V2
PROG-EN
5V0
+G
+5V
CR833QS
603
1K0
CR836
603
1K0
CIC803
1
UPC29S00
234
DGND
CQ821
DGND
2
3
16MHz
765
NCNC GND
OUTIN
8
603
NCON/OFFNC
CC816
+
10U/16V
CR820
DGNDDGND
603
CR843
CR844
3K3
603
3K3
3K3
CR846
603
3K3
CR847
603
3K3
CR830
603
10K
CR824
603
220R
CR827
603
220R
CR829
603
10K
CR832
603
1K0
CR823
603
220R
CR826
603
220R
CR831
603
1K0
603
CR850
CR848
RXD
AIM-INT
10K
DGND
603
603
1K0
CR854
603
1K0
CR853
PHONE-MUTE
AMP-MUTE
10K
CR852
603
10K
CR849
TXD
603
1K0
CR851
603
1K0
SCV-P
BEL-TAST-ON
2 - 4
Page 18

GRUNDIG Service Allixx SCD 5410 DAB
CC934
47K
DGNDDGND
5V0
EGND
603
CR949
CC958
EGND
603
18K
1N0
P80/ANI8
P81/ANI9
P82/ANI10
P83/ANI11
P00/NMI
VSS0
REGC
VDD
X2
X1
RESET
CLKOUT
VPP/MODE
P40/AD0
P41/AD1
P42/AD2
P43/AD3
P44/AD4
P45/AD5
P46/AD6
P47/AD7
VSS1
P10/SI0/SDA0
P11/SO0
P12/SCK0
25 24 23 22 21 20 19 18 17 16 15 14 13 12 11 10 9 8 7 6 5 4 3 2 1
SCL0
1N0
S1-AD
603
603
1K0
CR944
603
603
CR943
TUNER-EN
AM/FM-STOP
603
10K
CR942
603
100K
CR941
ANT-ON
SPS-CLK
603
1K
CR939QI
603
100R
CR938
AM-CUT
RDS-DATA
603
10K
1K0
CR936
S2-AD
603
CR948
1K0
CR947
603
220K
CC947
1N0
+5V-S
CR946
220K
EGND
CC946
603
EGND
9998979695949392919089888786858483828180797877
100
P27
P26
P31/TI3/TO3
P30/TI2/TO2
P77/ANI7
P76/ANI6
P75/ANI5
P74/ANI4
AVSS
AVDD
P73/ANI3
P72/ANI2
P71/ANI1
P70/ANI0
P07/INTP6
P34/VM45/TI71
P33/TI5/TO5
P32/TI4/TO4
CIC801
UPD703079
YGC-XXX-8EU
P114/CANTX0
P113
P112
P111
WAIT/P110
VSS2
P107/KR7/TO1
P106/KR6/TI11
P105/KR5/TI10
P104/KR4/TO0
P103/KR3/TI01
P102/KR2/TI00
P101/KR1/TI70
P100/KR0/TO7
ASCK0/SCK1/P15
P13/SI1/RXD0
P01/INTP0
26
P14/SO1/TXD0
28
27
39
38
37
36
35
34
33
32
31
30
29
43
42
41
40
NV861
5V0
+G
603
47K
CR940
P24/SO4
SCK4/P25
P06/INTP5
P116(/CANTX1)
P02/INTP1
P115/CANRX0
46
45
44
76
P23/SI4
S03/TXD1
ASCK1/SCK3/P22
P05/INTP4/ADTRG
XT2
XT1
P03/INTP2
P117(/CANRX1)
50
49
48
47
P21
P20
SI3/RXD1
P96/HLDRQ
P95/HLDAK
P94/ASTB
PORTVSS
P93/DSTB
P92/R/W
P91/UBEN
P90/LBEN
PORTVDD
P65/A21
P64/A20
P63/A19
P62/A18
P61/A17
P60/A16
P57/AD15
P56/AD14
P55/AD13
P54/AD12
P53/AD11
P52/AD10
P51/AD9
P50/AD8
P04/INTP3
CR881
603
330K
DGND
603
4N7
CC933
CR933
603
22K
CR931
603
100R
CR929
603
1K0
DGND
603
10N
+
C922
CC921
CR917
75747372717069686766656463626160595857565554535251
10K
603
22U/6V3
CR913
603
100R
CR911
603
10K
CR907
603
4K7
CR904
603
1K0
CR902
603
1K0
CR899
603
10K
CR897QI
603
1K0
CR895
603
1K0
CR889QI
603
1K0
CR887
603
10K
CC881
603
DGNDDGND
603
CQ881
32KHz
CC882
22P
22P
603
CR857
FELDST-UP
47K
603
CR858
ZUEND-P
603
CR859
10K
INFO-BEL
10K
CR861
+G
EGND
603
603
CR864
AUTO-ANT-ON
1K0
603
CR866
AMP-ON
10K
CT871
10K
47K
CAN-ERROR
DGND DGND
BCR135
CD871
Z10
2%
603
CR873
+5V
47K
603
CR874
CD-BUS
1K0
CR862
603
1K0
CR863
603
10K
5V0
BEL-ON
PROG-EN
1K0
603
10K
CR876
D-SWITCH
CR877
603
47K
603
CR879
0R
DGDGND
2 - 5
Page 19

GRUNDIG Service Allixx SCD 5410 DAB
DGND
603
4N7
CC934
CR934
603
22K
CR932
603
100R
CR935
603
100R
CR924
603
1K0
CL921
BLM21B272S
CR914
603
100R
CR912
603
10K
CR906
603
1K0
CR903
603
1K0
CR901
603
1K0
CR905
603
1K0
CR894
603
47K
CR926
603
10K
CR922
CR927
603
10K
CR909
603
1K0
CR896
603
47K
603
CR923
47K
CR908
603
1K0
603
47K
INKREM1
INK1-INIT
DIS-SCLK
DIS-SID
DIS-RST
RDS-CLK
BLINK
DAB-TXD
5V0
+G2
5V0
+5V
DAB-RXD
DIS-RS
DIS-CS
CD-MUTE
CD-STS
CD-SRQ
CD-IN
CD-STBY
CD-RESET
CD-CMD
CD-SCK
CD-CS
BED-ON/OFF
RDS-MUTE
SW-RF/DAB
5V0
RESET
+A
14V0
+5V
603
22K
CR971
+G
CT971
BC858B
CR973
603
5K6
CR974
TXD
603
CR972
75K
DGND
603
10K
CR976
CR977
EXT-TXD
805
100R
CT972
BC848C
603
2K2
DGND
+5V
603
603
47K
100K
CR983
CR982
RXD
+G
CR981
603
2K2
BC848B
CT981
CT982
BC848C
DGND
603
CR984
DGNDDGND
180K
CR986
603
680K
CR985
603
100K
14V0
+A
EXT-RXD
CR891QI
603
1K0
CR888
603
10K
18
GND
2
3
4
BR24C16F
CIC802
7
6
5
SCL-F
SDA-F
603
CR890
+5V
8K2
DAB-RESET
DAB-ON
ON/OFF
CLIP
NACHTABS
2 - 6
HAUPTPLATTE
MAIN BOARD
ALLE SPANNUNGEN GEMESSEN BEI UB=14V GEGEN MINUS
ALL VOLTAGES MEASURED AT UB=14V WITH RESPECT TO NEGATIV
15.01.02
Page 20

GRUNDIG Service Allixx SCD 5410 DAB
CR2672
DIS RS
CR2619
1K8
D
B
C
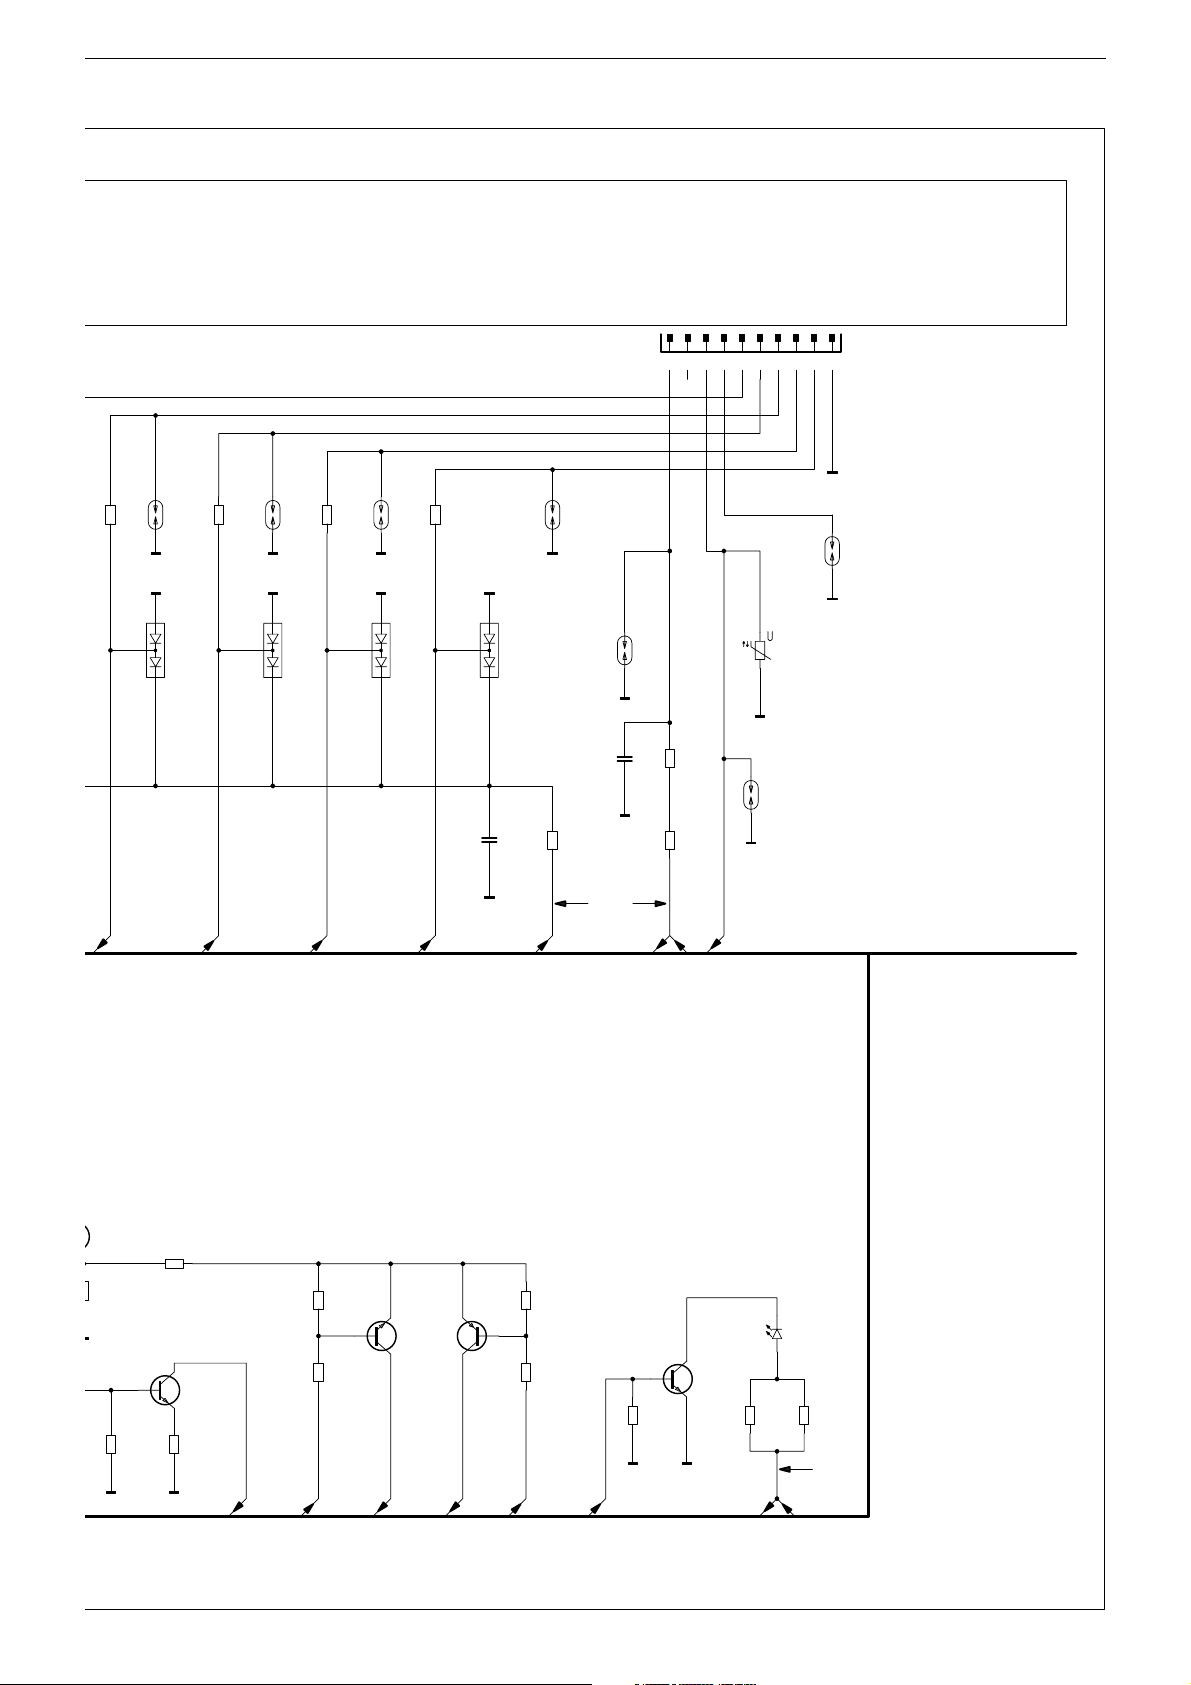
Bedienteil-Anschluss, Beleuchtungs-Steuerung / Operating Board Connection, Illumination Control
Seite / page
2 - 21
CST2642
9
8
7
6
5
4
3
2
1
10
S2201
EJECT
DGND
4
1
23
603
47K
CR2214
+5V
Eject-Taste
Eject Button
Schalter für abnehmbares Bedienteil
Switch for removable operating board
CS2641
DGND
BED-ON/OFF
PGND
BEL-DISPL
PGND
BEL-DISPL
RING-LED
BEL-TAST
RING-LED
BEL-TAST
ON/OFFON/OFF
INKREM1
INK1-INIT
S1-AD
+A-BED
P2651
Draht zu P2001
CR2653
INKREM1
S1-AD: 2V50
Display/Expert 4V24
Sound 3V67
1 3V05
2 1V81
3 1V20
4 0V62
5 0V0
Wire to P2001
2 - 16
Seite / page
CN0603K14G
INK1-INIT
CR2652
CN0603K14G
S1-AD
CR2649
PGNDPGND PGND
CR2671
CN0603K14G
603
2K2
DIS-CS
CFS2671
DGND
PGND
CD2643
BAV99
+A
CR2603
603
10K
14V0
10K
47K
BEL-ON
BC858C
603
CR2604
DGND
CT2602
6K8
BCR135
CT2609
NACHTABS
10K
47K
INFO-BEL
DGND
603
CR2606
+G
47K
5V0
CT2611
BCR135
603
CR2624
BEL-EXT-2
12K
CR2609
C2601
603
+
10K
CR2611
2U2/50V
BAS16
CD2602
603
10K
CR2613
BAS16
+
C2603
DGND
603
CR2612
DGNDDGND
603
47K
22K
CD2603
6U8/16V
DGND
CT2604
BC848C
CD2604
CR2614
BAS16
39K
603
603
603
39K
CR2616
DGND
CR2618
DGN
CR2617
603
39K
2 - 7
Page 21
GRUNDIG Service Allixx SCD 5410 DAB
603
603
CR2672
2K2
CFS2669
CD2644
BAV99
Bedien-Platte
Operating Board
603
2K2
CR2673
CFS2668
PGND PGNDPGND
CD2646
BAV99
603
CR2674
2K2
CFS2667
DGND DGNDDGNDDGND
PGND
CD2647
BAV99
603
CR2676
2K2
CD2648
CC2663
Seite / page
2 - 22
CST2641
9
8
7
6
5
432
1
CFS2666
BAV99
805
603
CR2663
22R
100N
CFS2664
DGND
CC2651
603
PGND
100N
+5V-BED
805
CR2658
805
CR2659
CR2651
PGND
0R
CFS2663
0R
DGND
DGND
CFS2662
DGND
CN0603K14G
10
S2-AD: 2V50
Preset Level 4V24
AIM/TP 3V67
Softkey 1 3V05
Softkey 2 1V81
Seek+ 1V20
Seek- 0V62
Source 0V0
ALLE SPANNUNGEN GEMESSEN BEI UB=14V GEGEN MINUS
ALL VOLTAGES MEASURED AT UB=14V WITH RESPECT TO NEGATIV
CD2601
LSL896-N1-P2
805
805
CR2602
2K2
CR2600
14V0
2K2
+A
HAUPTPLATTE
MAIN BOARD
603
CR2622
603
CR2623
BEL-TAST-ON
5V0 5V0
+G
10K
6K8
CR2601
DGND
BLINK
S2-AD
+G
CT2601
BC848C
603
33K
DGND
PGND
CR2620
603
470R
603
CR2621
DGNDDGND
DIS-RST
220R
RING-LED
DIS-RS
CT2606
BC848C
1K8
ND
CT2607
7
603
CR2619
BC818/40
33K
DIS-SID
603
10K
CR2626
603
6K8
CR2627
BEL-ON
CT2605
DIS-SCLK
BC848C
CT2608
BEL-DISPL
BC808/40
BEL-TAST
2 - 8
15.01.02
Page 22
GRUNDIG Service Allixx SCD 5410 DAB
5V0
CD-Laufwerk / CD Drive
CBU1471
DP-S
LAUFWERK
DP-S
CD-SINGLE
LRCK
BCK
DATA
DOUT
ZMUTE
IN-SW
STS
CMD
SCK
SRQ
CS
STBY
RST
B-GND
+ 5V
SL-GND
+ 7,5V
A-GND
+ 7,5V
NF-R
NF-GND
NF-L
1
2
3
4
5
6
7
8
9
10
11
12
13
14
15
16
17
18
19
20
21
22
CD-MUTE
CD-IN
CD-STS
CD-CMD
CD-SCK
CD-SRQ
CD-CS
CD-STBY
CD-RESET
PGND
+5V-STBY
PGND
+B
PGND
+B-AUDIO
TB-NF-R
TB-GND
TB-NF-L
CL1476
PGND
603
603
1N0
100N
CC1477
CC1476
PGND PGND PGND
CC1478
CT1481C
BC808/40
CR1484C
603
100R
603
CR1481C
10K
CD1481C
PGND
603
100N
BAS16
CD1484C
BAT720
w.w.
CD1483C
BAT60J
603
603
100N
CC1479
100P
CC1481
TB-GND
TB-NF-L
TB-NF-R
+B-AUDIO
+B
8V0
PGND
PGND
CR1482C
BCR135
CT1482C
PGND
603
1K0
10K
47K
+G
CD-STBY
2 - 9
Page 23

GRUNDIG Service Allixx SCD 5410 DAB
PGND
5V0
+5V
CD-RESET
CD-STBY
CD-CS
CD-SCK
CD-SRQ
CD-STS
CD-CMD
CD-IN
CR1476C
+G2
CD-MUTE
805
10K
5V0 14V0
IC1471C
12
7808
3
100N
CC1471C
603
PGND
+U
ALLE SPANNUNGEN GEMESSEN BEI UB=14V GEGEN MINUS
ALL VOLTAGES MEASURED AT UB=14V WITH RESPECT TO NEGATIV
CC1472C
603
100N
+
C1473C
PGNDPGNDPGND
47U/16V
+B
8V0
+
C1474
PGND
47U/16V
805
22R
CR1471C
+B-AUDIO
2 - 10
HAUPTPLATTE
MAIN BOARD
15.01.02
Page 24

GRUNDIG Service Allixx SCD 5410 DAB
DAB-Modul-Anschluss / DAB Module Connection
5V-WANDLER
FUER
DAB-MODUL
Seite / page
2 - 18
3
2
1
ST4102QI
DGND
SPS-CLK
5
4
+A
DAB-ON
14V0
DAB-5V
DAB-MODUL
DAB-ANT
D_GND
A_GND
LAUDIO
22
21
CNV4101QI
DAB-NF-L
VCC/5V
A_GND
24
23
DAB-5V
27
26
25
DGND
SCLK
SDWSSPDIF
9
8
7
6
5
4
3
2
1
RDC
RDO
13
12
11
10
DAB-RESET
DAPITXD
RESET*
15
14
603
CR4134QI
X-DAPI-TXD
OUT_1
DAPIRXD
17
16
100R
CR4136QI
X-DAPI-RXD
603
19
18
10K
DAB-NF-R
RAUDIO
20
A_GND
DAB_ST_REQ
D_GND
VCC/5V
T_GND
VCC/9V2
VCC/9V2
30
29
28
PGND PGNDAGND
CL4103QI
BLM21B272S
9V2
+S2
T_GND
31
CC4123QI
603
100P
PHANTOM
32
BU4101QI
DGND
+G2
47K
5V0
603
2K2
CR4201QI
DGND
CT4204QI
BC848C
BCR135
+G2
DAB-TXD
DAB-RXD
10K
603
10K
CR4202
ALLE SPANNUNGEN GEMESSEN BEI UB=14V GEGEN MINUS
ALL VOLTAGES MEASURED AT UB=14V WITH RESPECT TO NEGATIV
CT4201QI
DGND
603
4K7
CR4204QI
DGND
BAS16
CD4202QI
DGND
X-DAPI-RXD
X-DAPI-TXD
HAUPTPLATTE
MAIN BOARD
2 - 11
04.04.02
Page 25

GRUNDIG Service Allixx SCD 5410 DAB
+G2
Klangsteller / Sound Control
CD-NF-R
CD-NF-GND
CD-NF-L
MPX
RDS-MUTE
AM-CUT
CR1594
603
1K0
CR1593
603
0R
CR1592
603
1K0
CR1581
603
8K2
CC1582
680P
CC1507
+
4U7/25V
CC1504
+
CC1503
+
4U7/25V
603
603
603
1M0
CR1584
805
NP0
10K
47K
CR1586
CC1580
12N
BCR135
1M0
CR1591
AGNDAGNDAGND
603
CT1582
1M0
603
CR1582
AGND
CC1584
10K
22U/16V
603
100N
+
CC1574C
4U7/25V
AGND
CNV1584
+
CC1573C
4U7/25V
805
CC1592
220N
603
CR1587
10R
+
CC1593
AGND
47U/16V
TEL-AIM-NF
CR4021WN
603
4K7
AGND
AGND
CT4122QS
47K
10K
BCR135
MPX1
DAB-SELECT
DAB-TB-NF-L
TEL-AIM-NF
AGND
DAB-TB-NF-R
DAB-TB-NF-R
TB-GND
E
6
1Z
S1
11 12
2Z
15
S2
10
3Z
S3
9
16
CR4122
603
22K
CR4121
603
22K
DAB-TB-NF-L
CIC4121Q
74HC4053
VEE GNDVCC
78
CC4121QW
603
100N
1Y1
1Y0
2Y1
2Y0
3Y1
3Y0
AGND
1314
1
2
34
5
TB-NF-R
DAB-NF-R
AIM-NF
TELEFON
MPX1
CR4127QS
603
10K
+S2
DAB-NF-L
603
10K
CR4128QS
+
22U/16V
CC4122QS
AGND
9V2
5V0
CR4129QS
603
10K
2 - 12
Page 26
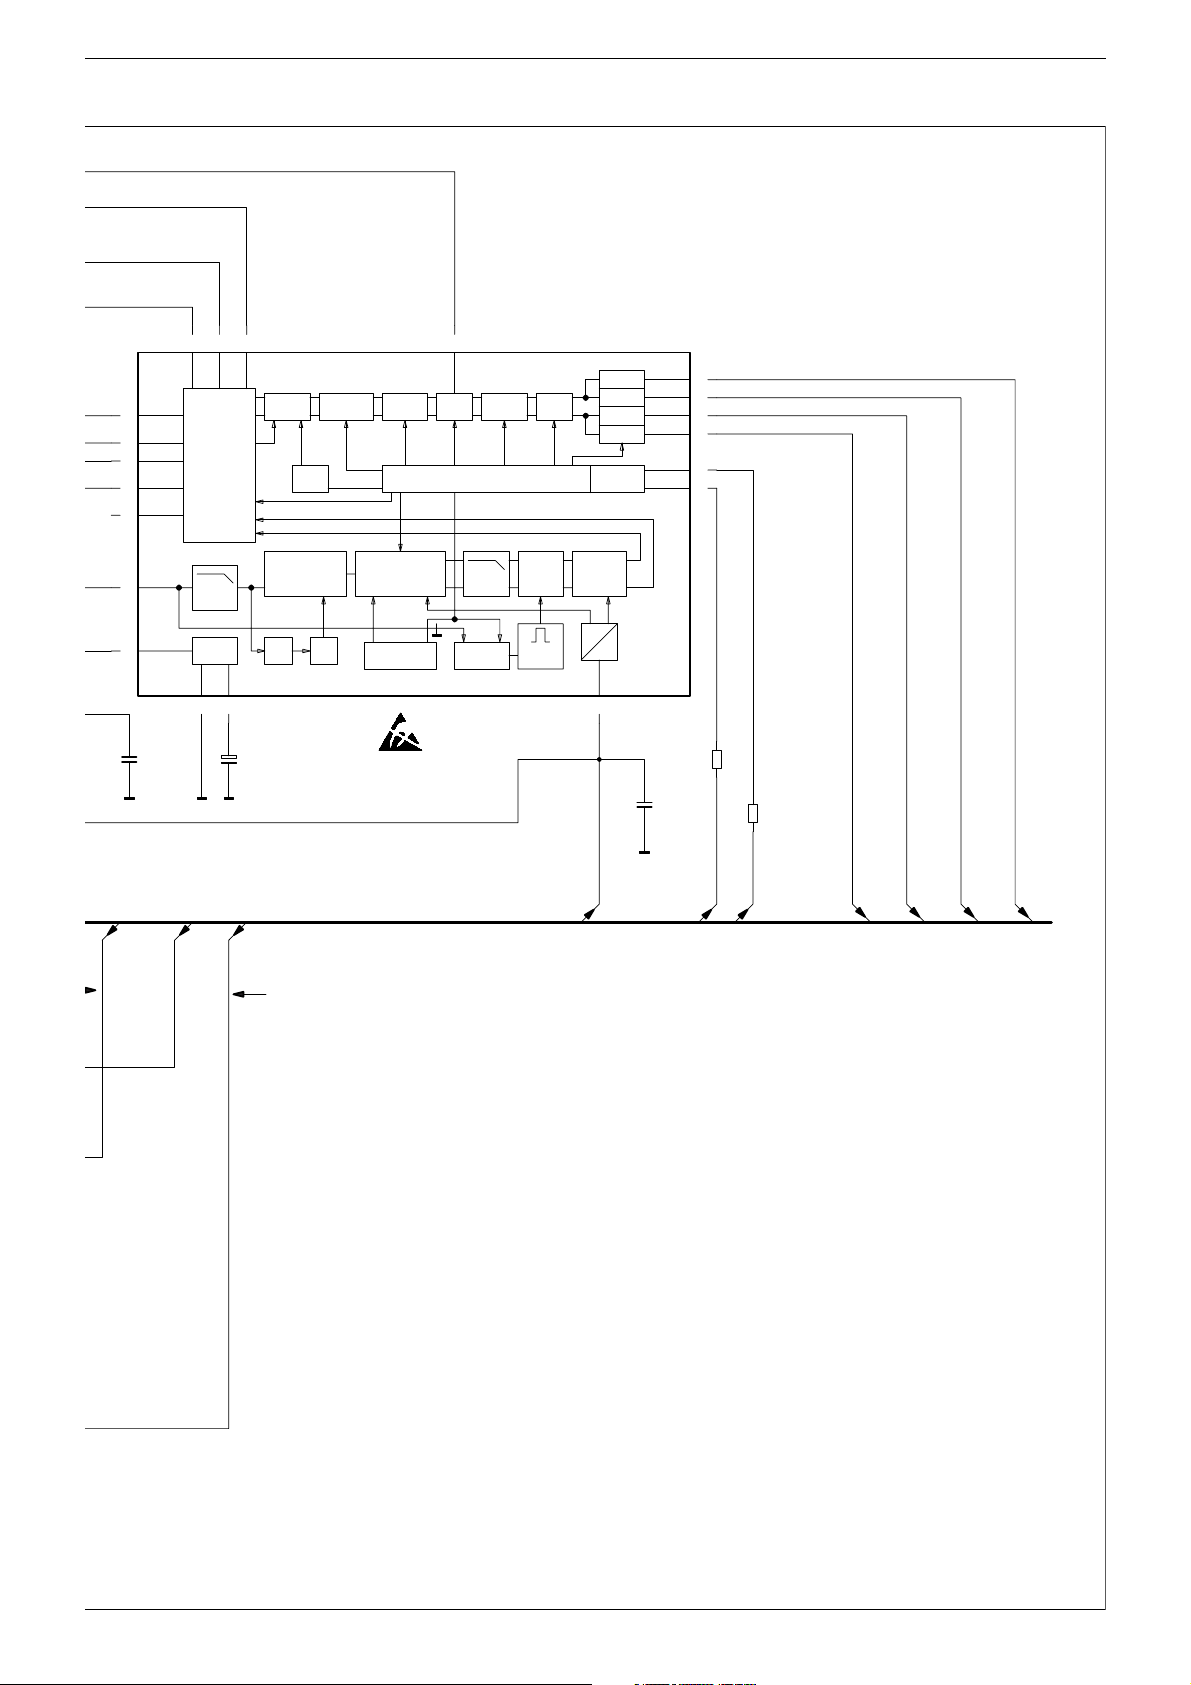
GRUNDIG Service Allixx SCD 5410 DAB
AM
8
CASS R
1
CASS L
2
PHONE
7
(MPIN)
PHGND
6
(MPOUT)
MPX
9
VDD
15
603
100N
CC1594
47U/16V
AGND AGND
543
CDR
CDG
CDL
MIXING
STAGE
INPUT
MULTIPLEXER
AUTO ZERO
GND
14
AGND
PHONE
+
FM R
FM L
PILOT
CREF
20
+
PLLSUPPLY
22U/16V
CANCELLATION
PIL
DET
800KHZ +STEREO BLEND
LP
CC1596
TDA7460CIC1581
VOLUMELOUDNESS
DEMODULATOR
+STEREO ADJUST
MULTIPATH
DETECTOR
11
SOFT
SOFT
MUTE
MUTE
25KHZ
LP
NOISE
BLANKER
BASSTREBLE
S & H
PULSE
FORMER
OUT LR
OUT LF
OUT RR
OUT RF
I2C BUSDIGITAL CONTROLBEEP
HIGH
CUT
CONTROL
D
A
LEVEL
10
FELDST-UP
805
CC1590
AGND
OUT LR
OUT LF
OUT RR
OUT RF
SCL
SDA
100N
17
19
16
18
12
13
603
CR1588
SDA-F
120R
603
CR1589
SCL-F
120R
FR
RR
FL
RL
+G2
TB-NF-L
+S
9V2
ALLE SPANNUNGEN GEMESSEN BEI UB=14V GEGEN MINUS
ALL VOLTAGES MEASURED AT UB=14V WITH RESPECT TO NEGATIV
HAUPTPLATTE
MAIN BOARD
2 - 13
15.01.02
Page 27
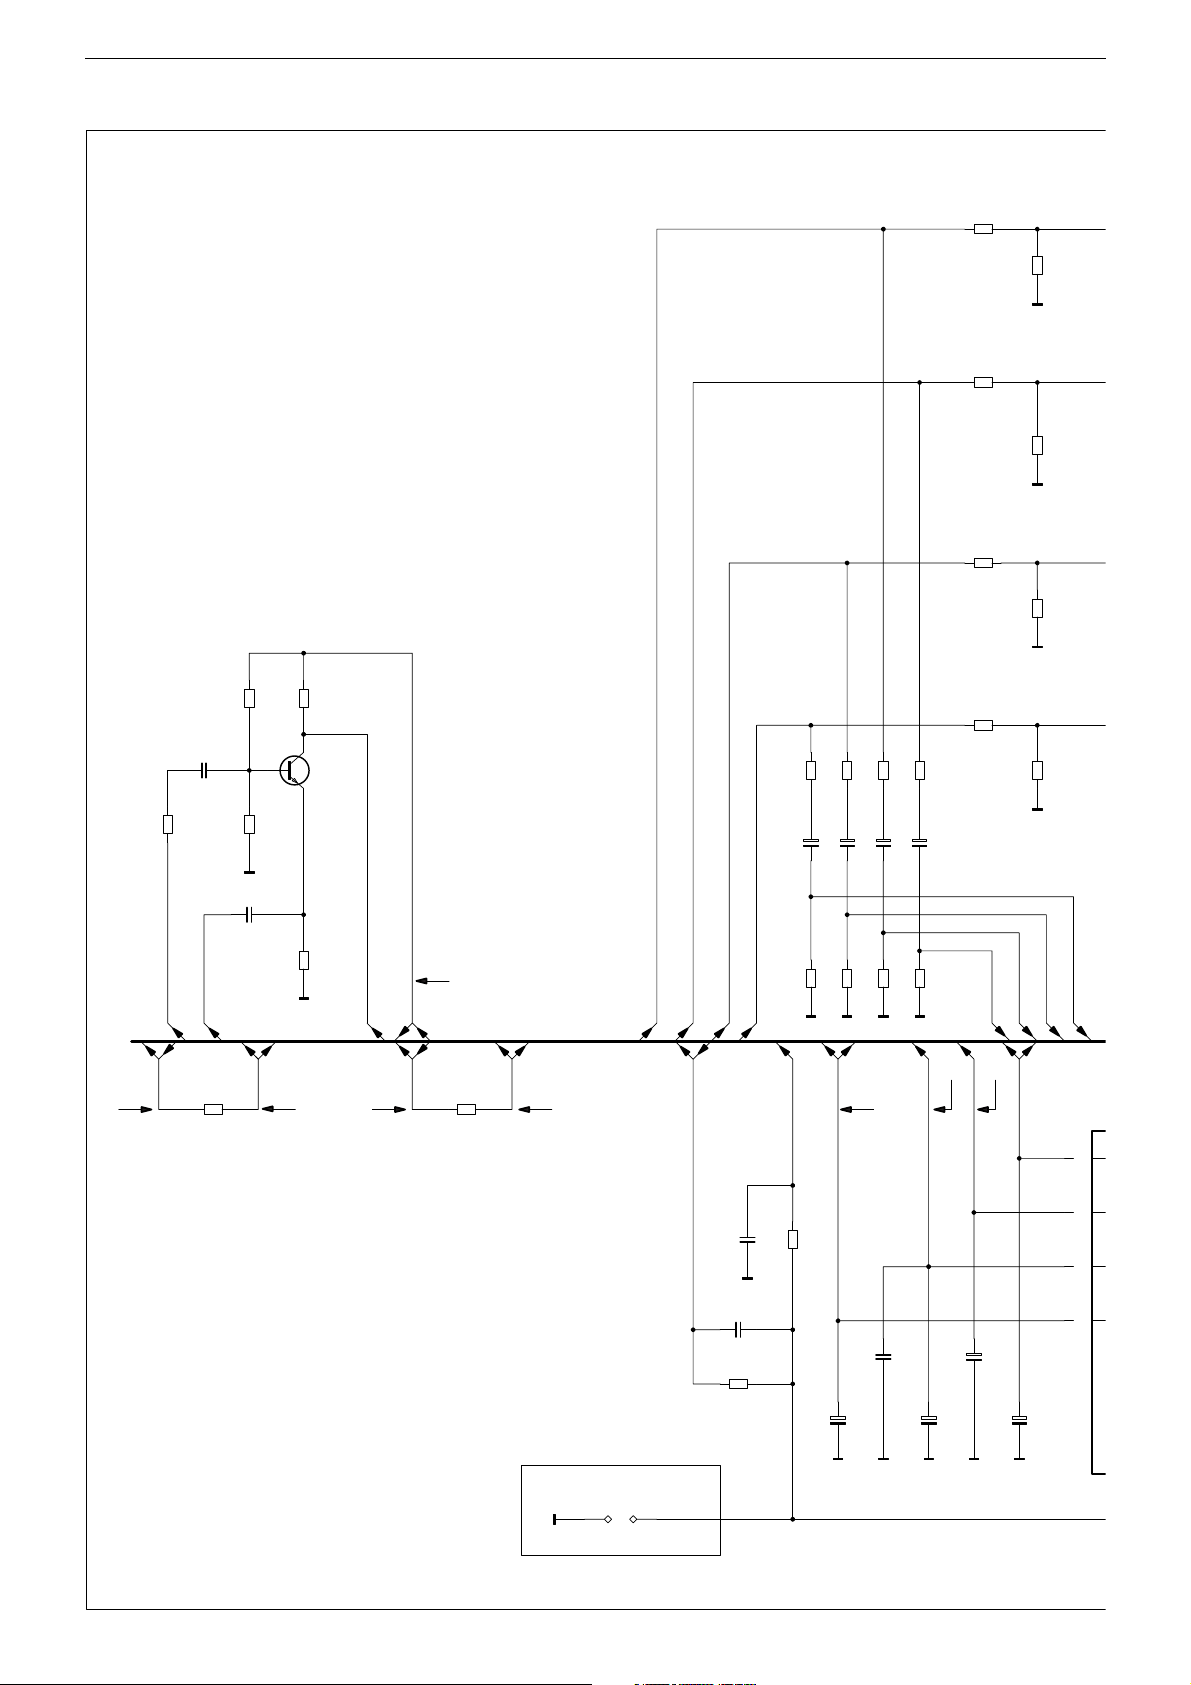
GRUNDIG Service Allixx SCD 5410 DAB
V
U
U
U
T
NF-Teil / AF Part
CR1601
603
3K3
603
5K6
CR1603
AGND
CR1602
603
3K3
603
5K6
CR1604
AGND
CR1606
603
3K3
603
5K6
CR1608
CC1811N
603
68K
CR1816N
TEL-NF+
+G
603
22N
TEL-NF-
CR2104WN
603
0R
603
CR1812N
603
CR1814N
AGND
CC1812N
603
22N
+G2
68K
68K
5V0
603
10K
CR1813N
CT1811N
BC848B
603
33K
CR1817N
AGND
TELEFON
+S2
9V25V0
+S
9V2
CR2103WN
AGND
CR1607
603
3K3
603
603
603
CR1803L
+
CC1803L
603
CR1808L
805
CC2011
NP0
680R
CR1804L
CC1804L
2U2/50V
100K
CR1809L
AGND
1N0
C2002
603
+
603
+S
+
680R
2U2/50V
100K
+G
9V2
+
C2003
10U/16V
680R
680R
CR1801L
CR1802L
+
2U2/50V
CC1801L+2U2/50V
CC1802L
603
603
100K
100K
CR1806L
CR1807L
FL
CC2008
PGND
CC2005
220N
CR2001
603
68K
RL
603
100N
805
AGND AGND AGND
RESET
603
4K7
CR2002
+
C2001
10U/16V
FR
RR
+S2
603
0R
9V2 14V0
+5V
603
5K6
CR1609
AGND
LINE-FR
LINE-RR+ULINE-RL
LINE-FL
+5V
5V0
S
11
5
O
10U/16V
9
O
10
O
4
10U/16V
C2004
+
PGND
naehe Frontplatte
AN1602
RESET
2 - 14
PGNDPGND PGNDPGNDPGND
AN1601
Page 28

GRUNDIG Service Allixx SCD 5410 DAB
CC1603
220N
CC1604
220N
CC1608
220N
CC1609
220N
7V7
C1615
PGND
1
TAB
+
-
+
-
+
-
+
-
ST-BY MUTE
10 4
+
10U/16V
AGNDAGND
IC1601
TA8275H
5V0
DIAG_ORIP
25
20
VCC1 VCC2
+
-
+
-
+
-
+
-
22
4V1
6
OUT1+
P-GND1
OUT1-
OUT2+
P-GND2
OUT2-
OUT3+
P-GND3
OUT3-
OUT4+
P-GND4
OUT4-
14V014V0
9
8
7
5
2
PGNDPGND PGND
3
17
18
19
21
24
PGND
23
805
805
805
AGND
805
220N
805
CC1619
1V6
1V6
1V6
1V6
1V6
F
C1613
PGND
100N
11
12
16
15
14
13
IN1
IN2
AUX_IN
IN3
IN4
PRE_GND
STAND-BY
5V
OUT 5V
OUT 9.V
OUT 16V
UNDERVOLTAGE
THERMAL PROT
VOLTAGE CLAMP
OVERVOLTAGE
RESET
5V, 100mA
REGULATOR
STAND-BY
5V, 1000MA
REGULATOR
SWITCHED
9.2V, 500MA
REGULATOR
SWITCHED
16V, 3A
SWITCHED
VREF1 LVW THRESHOLD
VREF2 RESET THRESHOLD
IGNITION THRESHOLD
IC2001
VCAP
REF
GEN
LOAD DUMP
AND REV
BATT PROT
PROT
VS
POW GND
EN 5V
STCAP
EN 10V
EN 16V
IGN INP
603
10K
CR1617
AMP-ON
14V0
7
3
1
12
2
15
5
603
CC1611
PGND
F
C2007
100N
+A
CL2003
BLM31P121SG
100N
603
10K
CR1618
AMP-MUTE
+G/+S-ON
PGND
C2006
PGND
+
603
100N
CC1612
PGND
+U-ON
100U/16V
ZUEND
PGND
ZUEND-P
Temp-Fuehler
CD1601
Temp Sensor
BAV99
CC1617
805
1N0
+5V
PHONE-MUTE
CR951M
CT951M
BC858C
CR953M
AMP-TEMP-AD
603
2K2
603
33K
CD951M
BAS16
CR1620
+G2
TEL-MUTE
603
8K2
CR952M
603
39N
CC951M
603
0R
5V0
SCV
CD1401S
CR1401S
BAS16
CLIP
603
SIG GND
L4953G
1314
IGN OUTRESET LVW/FAULT
6
8
PGND
DGNDDGND
2 - 15
Page 29

GRUNDIG Service Allixx SCD 5410 DAB
CLIP
PGNDPGND PGND
PGND
6V3
6V3
6V3
6V3
6V3
6V3
6V3
6V3
+A
14V0
14V0
+U
CR2153WN
603
0R
+U-ANT
805
805
4R7
CR1621
CR1622
805
100N
CC1621
CC1622
PGND
PGND PGND
805
805
4R7
CR1626
CR1627
805
100N
CC1627
CC1626
PGND PGND
4R7
805
100N
4R7
805
100N
805
4R7
CR1623
CR1624
805
100N
CC1624
CC1623
PGND
805
4R7
CR1628
CR1629
805
100N
CC1628
CC1629
PGND PGND
805
4R7
805
100N
LINE-FL
LINE-FR
LINE-RL
LINE-RR
EXT-RXD
EXT-TXD
805
4R7
805
100N
TEL-NF-
TEL-NF+
D-SWITCH
CD-NF-R
CD-NF-GND
CD-BUS
CD-NF-L
SCV
603
47K
CR1402S
603
47K
603
100N
CC1401S
DGND
603
2N2
CC1402S
CC1403S
603
100N
603
560K
CR1403S
CR1404S
CR1405S
603
56K
CR1406S
SCV
603
470K
603
47K
603
100K
CR1407S
CR1408S
CT1401S
BC848B
1K0
5V0
+G2
603
1K0
CR1411S
603
47K
CR1409S
603
CT1402S
BC848B
DGNDDGNDDGND DGND
+A
14V
SCV-P
2 - 7
Seite / page
R2011
RUE160
DGND
CD2002
MURS320T3
CNV2001 CNV2002
PGND
603
CR2019
BEL-EXT-2
Draht zu P2651
Wire to P2651
P2001
10K
805
CC2018
PGND
PGND
AGND
3N3
C2013
PGNDPGND
CC2017
100N
+
2M2/16V
ZUEND
805
CR2017
603
4K7
+U-ANT
L2001C
TEL-MUTE
CR2018
805
470R
CD2011
FS1D
PGND
2 - 16
Page 30

GRUNDIG Service Allixx SCD 5410 DAB
FR+
A14
FR+
FR-FR-
A16
FR-
RR+
A18
RR+
RR-
A20
RR-
A24
LINE-FL
A21
LINE-FR
A23
LINE-RL
A22
LINE-RR
A31
A12
A10
A25
LINE-GND
FL+
FL-
A8
RL+
A6
RL-
E-RXD
AGND
FL+
FL-
RL+
RL-
805
CC1404S
PGND
CR1412S
603
1K0
1N0
+AUT-ANT.
BEL-EXT-1
KL.15
A26
E-TXD
A36
TEL-NF-
A35
TEL-NF+
A37
D-SWITCH
A32
A34
A29
A33
A17
A19
A15
A11
CD-NF-R
CD-NF-GND
CD-BUS
CD-NF-L
SCV
TEL-MUTE
A9
+AUTOMATIK-ANTENNE
KL-15
+BEL
ANSCHLUSSPLATTE
CONNECTING BOARD
Seite / page
2 - 23
ALLE SPANNUNGEN GEMESSEN BEI UB=14V GEGEN MINUS
ALL VOLTAGES MEASURED AT UB=14V WITH RESPECT TO NEGATIV
+A-CD
+BATT.
+BATT.
+BATT.
PGND
PGND
A2
+A-CD
A5
A4
A3
A7
A1
+BATT.
+BATT.
+BATT.
GND
GND
HAUPTPLATTE
MAIN BOARD
15.01.02
2 - 17
Page 31

GRUNDIG Service Allixx SCD 5410 DAB
DAB-Spannungsversorgung / DAB Power Supply
Seite / page
2 - 11
CBU4101QI
5
4
3
2
1
+A
DAB-ON
SPS-CLK
14V0
DGND
DGND
DAB-5V
SPS-CLK
DAB-5V
603
100N
CC4101QI
DGND
T
+
E
220U/6V3
CC4102QI
DGND
CL4101QI
56UH
PRLL5818
CD4101QI
603
10N
CC4103QI
DAB-ON
DGNDDGND
65
VSW
8
CIC4101Q
LM2672/5.0
CB
FB SYNC SS
4312
CC4104QI
603
100P
603
1K0
CR4102QI
DGND
ON
/GND OFF
VIN
603
33N
CC4106QI
DGND
SPANNUNGSVERSORGUNG
DAB-MODUL
7
DGND
2
CF4101QI
3
1
4
DGND DGND
T
+
E
22U/35V
CC4107QI
DGND
+A
3R3
1218
CR4103QI
T
+
E
22U/35V
CC4108QI
2 - 18
04.04.02
Page 32

GRUNDIG Service Allixx SCD 5410 DAB
N
N
Bedienteil / Operating Board
DISPLAY7
CS1
RSTRSSCLK
4321
CIC1003
DGND
7654321
GND
891011121314
DGND
5
MC78L05ACD
6
CIC1001I
7
8
CC1001I
DGND
603
100N
4
3
2
1
DGND
603
CC1002I
DGND
22N
on/off
CS10181
CS1018
CD1032
LSL896
805
CR1035
820R
MC74HC14A
VDD
5K6
BAV99
603
CR1036
603
CR1037
1K0
2K2
CD1044
603
CR1038
5K6
BAV99
603
CR1032
603
CR1033
1K0
CD1043
2K2
603
1K0
CR1039
CD1046
603
603
2K2
CR1041
CR1042
DGND DGND DGND DGND DG
603
CR1034
5K6
BAV99
603
CR1028
603
CR1029
1K0
CD1042
DGNDDGNDDGNDDGND
2K2
603
CR1031
5K6
BAV99
603
CR1024
603
CR1026
1K0
2K2
CD1041
DG
603
CR1027
+A-BED
ON/OFF
+A-BED
DGND
RING-LED
2 - 19
DIS-CS
DIS-RST
DIS-RS
DIS-SCLK
DIS-SID
Page 33
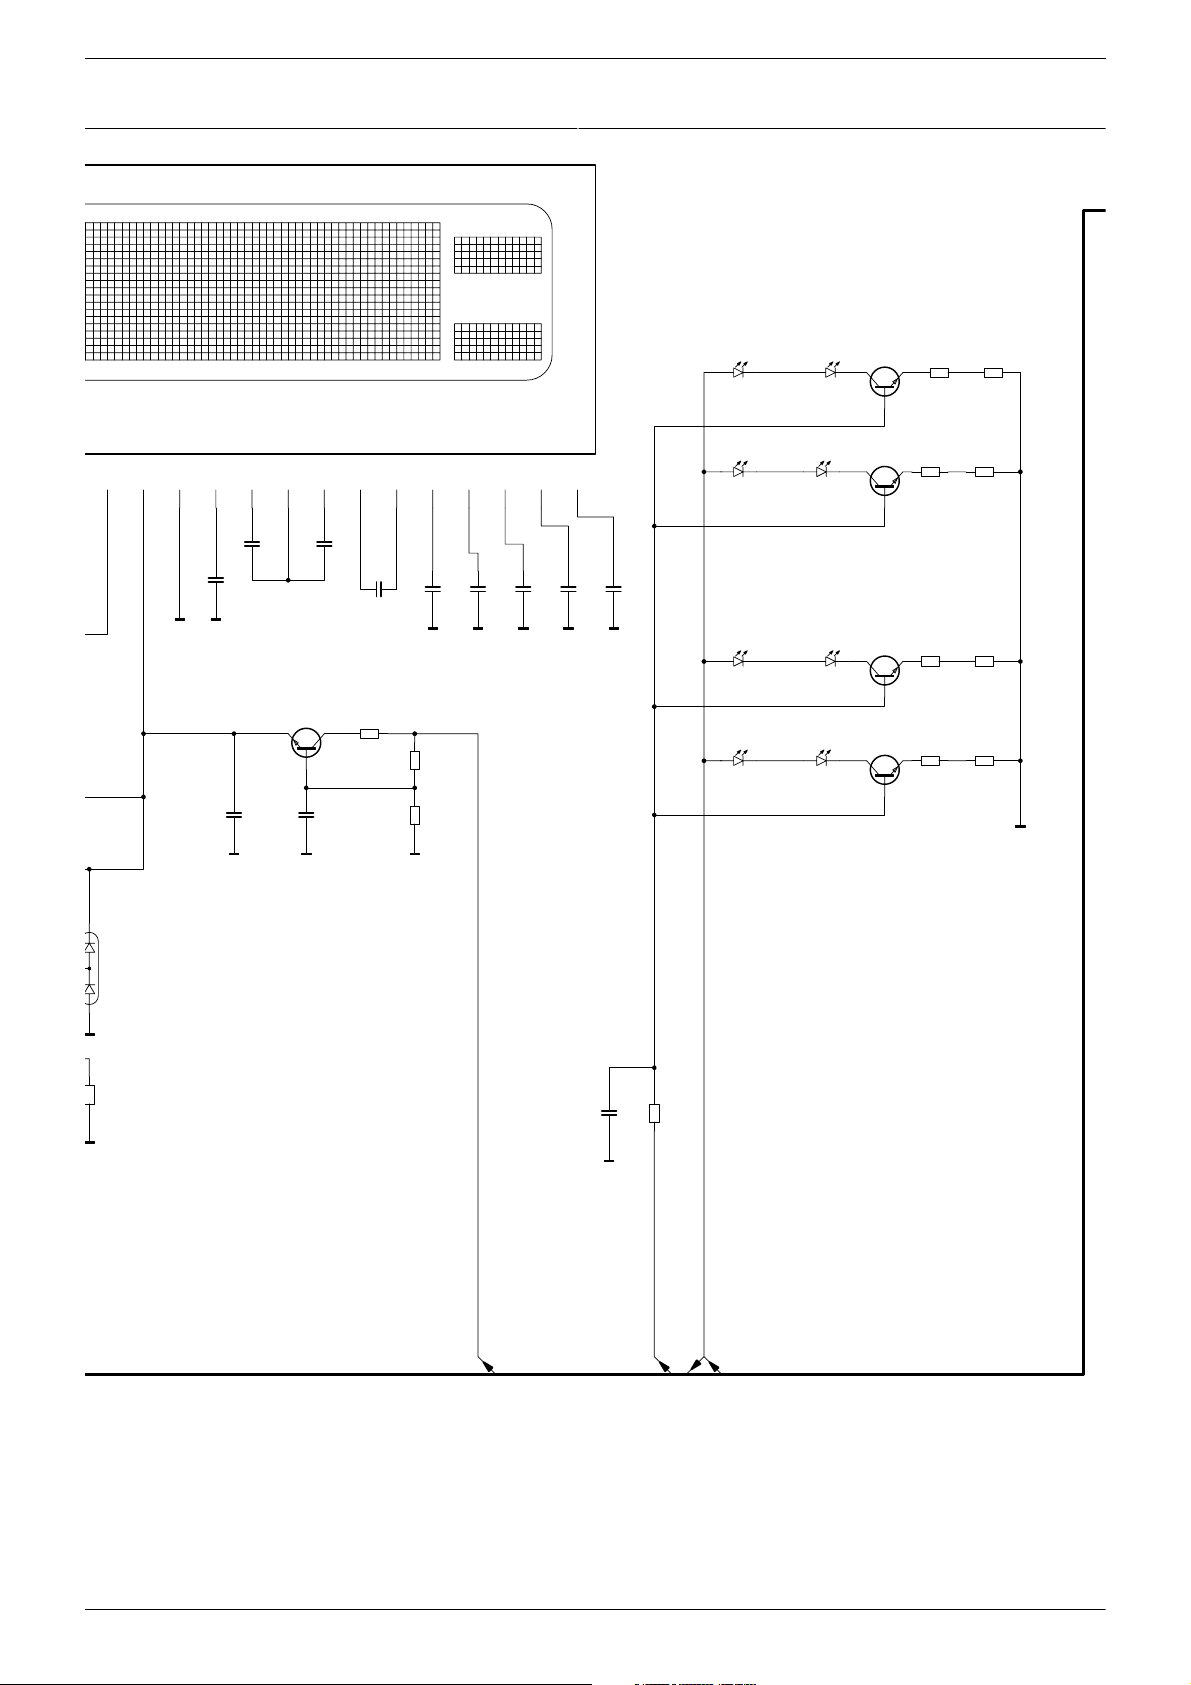
GRUNDIG Service Allixx SCD 5410 DAB
LCD1001
Beleuchtung Display
Illumination Display
CT1001
CD1003
LWA673-R1
CD1006
LWA673-R1
BC818/40
CT1002
BC818/40
CR1043
805
68R
CR1046
805
68R
CR1044
805
62R
CR1047
805
62R
SID
VDD
VSS
VOUT
CAP3+
CAP1-
CAP1+
CAP2+
CAP2-V1V2
V3
V4
CD1002
LWA673-R1
V0
18171615141312111098765
CD1004
LWA673-R1
GND
GND
CC1007
CT1011
BC818/40
805
CC1017
805
1U/10V
1U0/16V
1U0/16V
CR1021
33R
CC1008
805
805
1U/16V
CC1018
BGND
805
CC1014
DGNDDGNDDGNDDGNDDGND
805
1U/16V
10N
805
CR1018
1K0
CD1007
LWA673-R1
CD1009
LWA673-R1
I-LED = 15.6 mA
CD1008
LWA673-R1
CD1011
LWA673-R1
CT1003
BC818/40
CT1004
BC818/40
CR1048
805
68R
CR1051
805
68R
CR1049
805
62R
CR1052
805
62R
BGND
805
CC1009
603
1K0
CR1022
603
3K3
CR1023
1U/16V
CC1011
1U/16V
CC1012
1U/16V
CC1013
805
805
805
805
CC1006
1U0/16V
805
CC1004
1U0/16V
DGND
DGND
+3V
805
100N
CC1016
DGND DGND DGND
BAV99
603
5K6
+5V-BED
2 - 20
BEL-DISPL
+A-BED
Page 34

GRUNDIG Service Allixx SCD 5410 DAB
BGND
805
CC1019
10N
BEL-TAST
805
CR1019
1K0
+A-BED
CD1017
LSL896
CD1014
LSL896
INKREM1
G1001
INKREMENTAL
BA
C
DGND
Beleuchtung Tasten
Illumination Buttons
SoundDisplay
CD1016
LSL896
321
CD1018
LSL896
CD1019
LSL896
INK1-INIT
CT1012
BC818/40
CT1013
BC818/40
CR1063
805
150R
CR1066
805
150R
CR1064
805
150R
CR1067
805
150R
DGND
BEL-DISPL
BEL-TAST
4
3
2
1
CST02
Seite / page
S1-AD: 2V50
Display/Expert 4V24
Sound 3V67
1 3V05
2 1V81
3 1V20
4 0V62
5 0V0
RING-LED
ON/OFF
INKREM1
6
5
2 - 7
INK1-INIT
S1-AD
987
+A-BED
10
603
CR1070
BGND
47K
CD1021
LSL896
CD1024
LSL896
CD1028
LSL896
CD1022
LSL896
CD1026
LSL896
CD1029
LSL896
>>54
CD1023
LSL896
AIMSOFT2SOFT1
CD1027
LSL896
RADIO>>-<<+
CD1031
LSL896
CT1014
BC818/40
CT1016
BC818/40
CT1017
BC818/40
CR1068
CR1071
CR1073
CR1069
805
150R
805
150R
805
100R
805
150R
CR1072
805
150R
CR1074
805
120R
BGND
ALLE SPANNUNGEN GEMESSEN BEI UB=14V GEGEN MINUS
ALL VOLTAGES MEASURED AT UB=14V WITH RESPECT TO NEGATIV
2 - 21
Page 35

GRUNDIG Service Allixx SCD 5410 DAB
+5V-BED
S2-AD
4
3
2
1
CST01
Seite / page
2 - 8
S2-AD: 2V50
Preset Level 4V24
AIM/TP 3V67
Softkey 1 3V05
Softkey 2 1V81
Seek+ 1V20
Seek- 0V62
Source 0V0
DIS-CS
DIS-RST
6
5
DIS-RS
DIS-SID
Display/Expert
BGND
DIS-SCLK
987
10
S1-AD
Sound
603
CR1055
+5V-BED
3K3
CS1001
CS10011
CS1002
CS10021
CS1003
1
CS10031
CS1004
603
CR1001
603
CR1002
603
CR1003
2K7
3K0
6K2
CR1009
603
3K3
+5V-BED
Preset Level
S2-AD
AIM/TP
Softkey1
Softkey2
CS1009
CS10091
CS1011
CS10111
CS1012
CS1013
CS1014
603
CR1056
603
CR1057
603
CR1058
603
CR1059
2K7
3K0
6K2
3K0
2
3
4
5
CS10041
CS1006
CS10061
CS1007
CS10071
CS1008
CS10081
603
CR1004
603
CR1006
603
CR1007
3K0
2K7
2K7
Seek+
Seek-
Source
603
220K
DGND
CR1065
CS10141
CS1016
CS10161
CS1017
CS19171
603
CR1061
603
CR1062
DGND
2K7
2K7
DGND
220K
603
CR1008
Bedienplatte
OPERATING BOARD
DGND
07.01.02
2 - 22
Page 36

GRUNDIG Service Allixx SCD 5410 DAB
1N0
Anschluss-Platte / Connection Board
A12
FL+
A10
FL-
A14
FR+
A16
FR-
RL+
RL-
RR+
RR-
LINE-RL
LINR-RR
LINE-GND
LINE-FL
LINE-FR
A18
A20
A23
A22
A31
A24
A21
A8
CC1701
CC1707
805
805
1N0
1N0
CC1703
CC1702
805
805
1N0
1N0
CC1706
CC1709
805
805
1N0
1N0
CC1704
805
805
1N0
1N0
CC1708
805
805
805
CC1712
1N0
CC1714
1N0
CC1711
1N0
CC1713
805
EXT-TXD
TEL-NF+
TEL-NF-
EXT-RXD
2 - 17
Seite / page
CD-BUS
+A-CD
CD-NF-GND
CD-NF-L
CD-NF-R
D-SWITCH
TEL-MUTE
REMOTE-A
+AUT-ANT.
BEL-EXT
+BATT.
+BATT.
+BATT.
SCV
KL-15
GND
GND
A26
A35
A36
A25
A29
A34
A33
A32
A37
A17
A19
A13
A15
A11
805
3N3
CC1717N
CC1719N
805
A2
SCH2A6SCH-M
A9
A5
A3
A4
A7
A1
SI1701
10A/DIN72581/3C
CC1739
1N0
805
CC1731
1N0
CC1726
CC1732
805
805
3N3
100P
CC1722
805
805
1N0
3N3
CC1727
805
1206
1N0
1N0
CC1733
2 - 23
Page 37
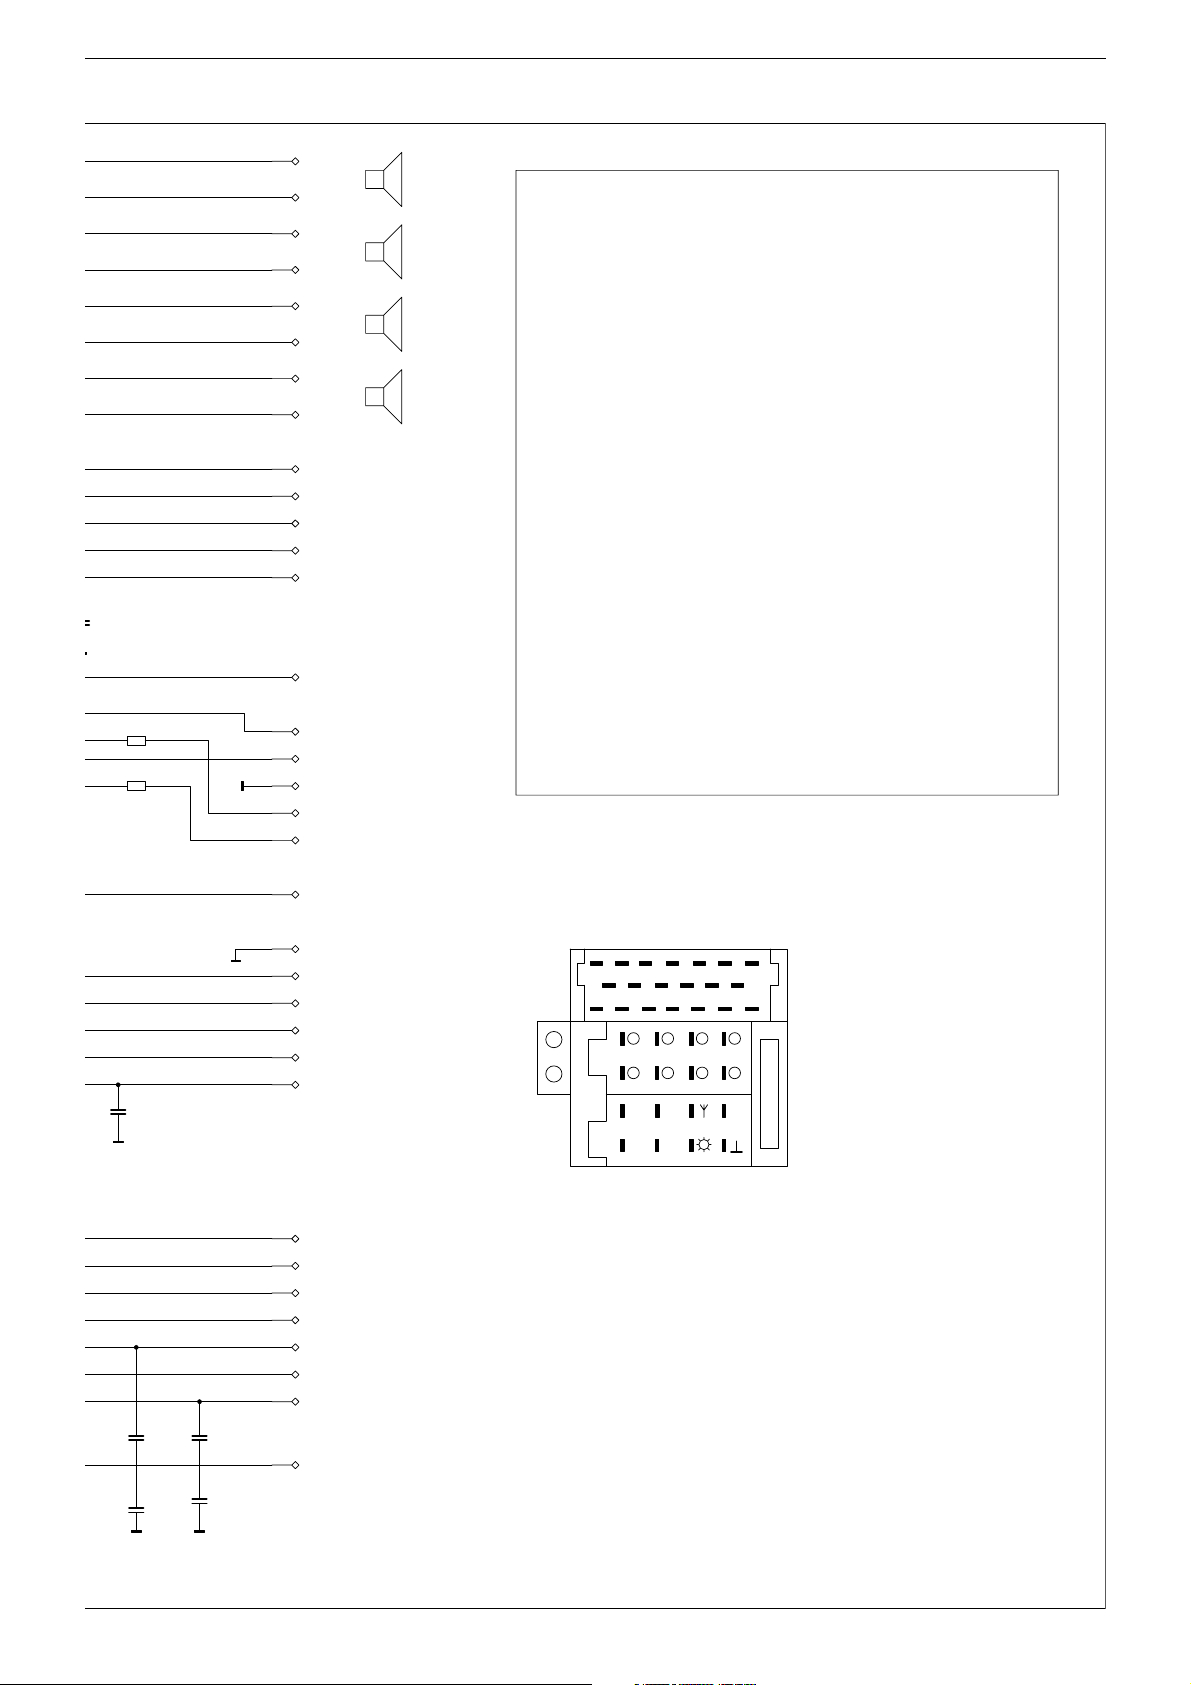
GRUNDIG Service Allixx SCD 5410 DAB
100P
1N0
805
1N0
II-5
II-6
II-3
II-4
II-7
II-8
II-1
II-2
I-1
I-2
I-3
I-4
I-5
1N0
I-6
CR1701N
805
1K0
CR1702N
805
68K
I-8
I-9
I-10
I-11
I-12
+
FL
-
+
FR
-
+
RL
-
+
RR
-
LINE-RL
LINE-RR
LINE-GND
LINE-FL
LINE-FR
SWITCHED PLUS
EXT-TXD
EXT-RXD
GND
TEL-NF+
TEL-NF-
KAMMER I / SECTION I
LINE-RL
1
LINE-RR
2
LINE-GND
3
LINE-FL
4
LINE-FR
5
SWITCHED PLUS
6
7
EXT-TXD
8
EXT-RXD
9
GND
10
RR+
1
RR-
2
FR+
3
FR-
4
FL+
5
FL-
6
RL+
7
RL-
8
TEl-NF+
11
TEL-NF-
12
CD-BUS
13
14
GND
15
+A-CD
16
SWITCHED PLUS
17
CD-NF-GND
18
CD-L-IN
19
CD-R-IN
20
KAMMER III / SECTION IIIKAMMER II / SECTION II
SCV
1
TEL-MUTE
2
3
KL 15 IGN
4
AUTOMATIK ANTENNE
5
ILLUMINATION CONTACT 58
6
PLUS CONTACT 30
7
GROUND CONTACT 31
8
805
CC1728
CC1737
CC1734
1N0
1206
1206
1N0
1N0
1206
CC1738
1206
CC1736
1N0
1N0
I-13
CD-BUS
I-15
GND
I-16
+A-CD
I-17
SWITCHED PLUS
I-18
CD-NF-GND
I-19
CD-L-IN
I-20
CD-R-IN
III-1
SCV
III-2
TEL-MUTE
III-3
R-Analog
III-4
Kl 15 Ignition
III-5
Aut.-Ant.
III-6
Illumination contact 58
III-7
Plus contact Kl 30
III-8
GND
FB1
FB2
ANSCHLUSSGEHAUESE
CONNECTION TERMINAL
13
16 19
10
7
12
63
9
8
5412
1
++++
FR
RR
2
4
-
1
3
2
1711
14
73
5
RLFL
8
5
7
KL
664
15
ANSCHLUSSPLATTE
CONNECTION BOARD
KAMMER I
1815
20
---
KL
SI T 10
30
SECTION I
KAMMER II
SECTION II
KAMMER III
SECTION III
18.12.01
2 - 24
Page 38

GRUNDIG Service Allixx SCD 5410 DAB
Haupt-Platte / Main Board (Sicht auf Bestückungsseite / View on Component Side)
170
160
150
140
130
120
110
100
90
80
70
60
50
40
30
20
10
IC1471C
CC1471C
AN1601
AN1602
C2603
CR2649
CR2652
CR2653
CST2642
CT2608
CR2622
CR878
110
1
CR879
CT2611
CR888
CR891QI
CR905
CR2641
CR894
CR896
CL921
CR907
CR923
CR922
CR908
CR912
CC501R
CS2641
CC506R
CR501R
CC503R
CC502R
CD2648
CD2647
CR2672
CD2644
CR2673 CR2674 CR2676
CD2646
CST2641
CR2671
CD2643
CR2662I
CR2651
110
CD2601
CC2651
CR2658
CR2617
CR2619
CR2621
CT2607
CD2604
C1474
CT2609
CR2627
CT871
CQ881
CR887
CR889QI
CR897QI
CR899
CR901
CR902
CR903
C922
CR924
CR929
CR935
CC504R
CD1481C
CR2616
CR874
CC881
CR933
CR932
CR503R
CR500R
CT1481C
CR1483E
CD1484C
CD2603
CT2602
CR2604
CR2603
CR869I
CR885
CC921
CR931
CR934
CR927
CC507R
CR502R
CC509R
CR2613
CR866
CR876
CC882
CC933
CR926
CD2602
CR864
CR881
CC934
CR936
CQ501R
CR1481C
CC1481
CD1483C
CR2611
+A-BED
CT2604
CR863
50
75 51
76
CR938
CR944
CR950
CR946
CR948
CT1482C
CR1482C
CC1479
CR2618
CR2614
CR2620
CT2606
CR2626
CT2605
CR2623
CR877
CR890
CD871
CIC802
CR873
CR2624
CR904
CR906
CR911
CR914
CR909
CR913
CR917
CR504R
+
CIC501R
CR2663
CR1484C
CR1476C
122
CBU1471
19373-505.00
4B (03)
CC2663
CR2659
S2201
CC1472C
CR2609
CR859
CR862
CR939QI
CR941
CR947
CR945
CC1477
CR2612
CC2602
CT2603
CR861
CR942
CC1478
CR1471C
CR2608
CR858
CC859
CIC801
CR943
CR940
CC946
CC1476
CL1476
CR2607
CR857
CR856
CR949
CC949P
CC947
CR4202
CT4204QI
CD4202QI
CC1483E
C1614
CR1472E
C1473C
CR1803L
C2601
CR853
CR854
CC956
CR958
CR956
CR957
C957
CR4204QI
CR2509
CC1482E
CR1617
CR1604
CR1602
CR1804L
CR1601
CR851
CR852
CC958
CR964
CR2601
CR2602
CR2600
CC1604
+
CC1804L
CR2606
CR850
CC849
26
25
1
100
CC959
CC961
CR959
CT4201QI
CR4201QI
CT2601
CC1602
CR1603
CR848
CR849
CR832
CR829
CC809
CC801
CR817
CR961
CR4136QI
2
1
+
CC1601
CC812
CC814
CR811
CR818
CC962
CR4134QI
CC1632
CR1809L
+
CC1803L
CR834W
CR833QS
CR895
CR819W
CC811
CR962
CR804
CR963
CR4129QS
CC1619
CC1603
CR830
CC831
CR812
CC804
CR1612
+
3
1
CR823
CD802
CR1581
CR1582
CC1611
CR1624
CC1624
CC1631
CR1808L
CR1411S
CR836
CR831
CR828W
CQ821
CC832
CC1582
CC4122QS
+
CR4127QS
CR4126QN
CR1623
CC1623
CR824
CR808
CR1589
CR1588
CC1594
CC1593
CC1596
CR1409S
CR1802L
CR813
CR843
CD801
CIC4121Q
CR1622
CR1621
C1615
CC1621
CC1622
CC1608
+
CC1606
CR1606
CR1608
+
CC1802L
CT1402S
CT1401S
CR1407S
CR1408S
CR827
CR844
CR814
CR807
+
+
CR1587
CR4120QW
CR4128QS
1
CR4122
8
916
BU4101QI
IC1601
CR1626
CC1626
CR1611
CC1633
CC1609
CR1609
CR1607
+
CC1801L
CR1807L
CR1801L
CR1404S
CR1405S
CR1406S
CR847
CR846
CR2214
CR826
CC833
CC834
CR820
C815
CR1583
CC1589
CC1597
CC1588
1120
CIC1581
CC1573C+CC1574C
+
CC1587E CC1586E
CC4121QW
CR2506W
CR4121
CR2507W
CT4122QS
CR2503W
CR2504W
CR2502W
CR2501W
CT4121W
CR4124QN
4
ST4102QI
5
CR1627
CC1627
CC1634
+
CC1607
CC1401S
CR1403S
10
1
2
CD1401S
CR1401S
CR981
CC817
1
32
31
CR1628
CC1628
CC816
CC1590
CC1592
CC1584
CR1629
CC1629
CR1619
CR1806L
CC1402S
CC1403S
CT982
CT981
CR982
CR972
+
+
CC1503
+
CC1504
+
CC1507
CC4123QI
CC1612
CR1610
251
CR1616
CC1618
CR1631
CR1402S
CR984
CT2502W
CR2511W
CL4103QI
CR1633
CR986
CR983
CT971
CR971
CIC803
CT1582
CR1618
CR985
CR1473E
1
14
CD1601
CR1614
CR1615
CR1632
CR1620
CR976
CT972
CR973
1
CC1580
CR4021WN
CR1586
CR1593
CR2512W
CC2501W
CIC2501W
CR977
CR974
CR1584
CR1592
CR1594
CR1591
CC2512W
CR2515W
CC1617
CR2106W
CR2107W
CR2514W
CT2504W
C1613
CC1812N
CC1404S
CC2503W
CR2513W
CR2524WQ
2815
CR1817N
CT1811N
CR1412S
CR953M
CT2103W
CC2506W
CC2509W
CR1814N
CT951M
CR2104WN
CT2104W
CC2511W
CR2517W
CD2501QI
CT2503W
CR1816N
CC1811N
CC111
CC2513QI
CR1812N
CR1813N
CR951M
CC951M
CR111
+
CC2504W
CD2502QI
CT2506W
CD951M
CR2102W
CR2101W
CT2101W
CC312G
CR327G
CT303G
CR323G
CT804
CD2002
CR952M
CT2102W
CC311G
CR107
CR109
CR2518QI
CR1519QI
CT2507QI
CR2523QI
L2001C
CR2103WN
CC310G
CT302B
CR324G
CR326G
CR325G
CR322G
CT803
CC1520QI
CR2521QI
CR2516W
CR2522QI
+
CC2514QI
C2013
CR2019
CR2152W
CR311B
CC308B
CC306B
CR108
CT2406P
C2402P
CC2401P
T2404P
CR2151W
CC2008
CR309B
CR308B
CT301B
CR307B
CR801
CC823
CR802
CC824
CR803
CC826
CC109
CR106
CC810
CR2407P
CT2407P
BE
L2401P
L2001E
CIC2151W
1
CR2153WN
CR2002
CR2001
CC2005
C2002
CC2011
CR312B
CC307B
CC806
CL803
CT802
CR809
CR806
CR2408P
CR2413P
CC2403P
CR2409P
CR2403P
CR2406P
CR2417P
CR2426P
CL2003
CR306B
CR302B
CC303B
CT2408P
C2012
C2004
C304B
CR303B
CR304B
CL802
CR104
CT801
CT2413P
CR2411PCR2412P
CR2416P
R2011
CC2018
C2007
C2001
C2003
C2006
CC301B
CC302B
CR301B
CC805
CC802
CC803
CC813
CC818
CC819
CC808
CR105
CC807
CR2405P
CR2414P
CR2404P
CT2409P
CT2412P
CR2420P
CR2415P
CT2411P
CD2402P
CR2436P
CR2018
CFS01
CR2017
CC2017
CD2011
IC2001
1
2
15
BU02
14 1
BU01
41
ANT1
CC821
Y
0
0
X
10 20 30 40 50 60 70 80 90 100 110 120 130 140 150
Für die tatsächliche Bauteilbestückung ist das Schaltbild maßgebend!
The circuit diagram is relevant for the actual component assembly!
2 - 25
Page 39

GRUNDIG Service Allixx SCD 5410 DAB
Koordinaten der Bauteile der Bestückungsseite / Coordinates of Components on Component Side
Pos.-Nr./ Koordinaten/
Pos. No. Coordinates
AN1601 15 163
AN1602 13 163
ANT01 148 11
BU01 146 29
BU02 146 61
BU4101QI 67 9
C304B 136 86
C815 72 93
C922 21 96
C957 49 75
C1473C 44 158
C1474 35 158
C1613 104 165
C1614 49 166
C1615 73 157
C2001 142 110
C2002 135 93
C2003 142 102
C2004 137 101
C2006 141 94
C2007 137 109
C2012 135 116
C2013 128 159
C2402P 126 33
C2601 40 148
C2603 19 152
CBU1471 33 34
CC109 130 58
CC111 109 66
CC301B 137 81
CC302B 137 79
CC303B 134 78
CC306B 124 78
CC307B 130 87
CC308B 124 84
CC310G 121 83
CC311G 116 77
CC312G 117 86
CC501R 16 74
CC502R 14 55
CC503R 14 58
CC504R 24 68
CC506R 18 68
CC507R 31 66
CC509R 31 60
CC801 54 92
CC802 137 73
CC803 137 69
CC804 59 85
CC805 136 74
CC806 133 71
CC807 136 52
CC808 136 60
CC809 52 98
CC810 127 46
CC811 56 91
CC812 55 106
CC813 136 66
CC814 55 104
CC816 86 97
CC817 82 97
CC818 136 65
CC819 136 62
CC821 148 9
CC823 129 66
CC824 129 64
CC826 129 61
CC831 59 98
CC832 61 98
CC833 73 101
CC834 71 101
CC849 49 119
CC859 40 124
CC881 31 116
CC882 31 122
CC921 31 106
CC933 32 93
CC934 33 93
CC946 42 86
CC947 42 87
CC949P 44 89
CC951M 114 115
CC956 45 95
CC958 48 95
CC959 49 95
CC961 51 91
CC962 53 85
CC1401S 80 131
CC1402S 79 135
CC1403S 77 135
CC1404S 101 127
CC1471C 33 163
CC1472C 41 163
CC1476 40 45
CC1477 37 42
CC1478 39 42
CC1479 36 42
CC1481 34 42
CC1482E 45 41
CC1483E 43 41
CC1503 88 74
CC1504 88 66
CC1507 88 59
CC1520QI 119 35
CC1573C 74 58
XY
Pos.-Nr./ Koordinaten/
Pos. No. Coordinates
CC1574C 80 58
CC1580 93 75
CC1582 64 77
CC1584 88 70
CC1586E 79 53
CC1587E 74 53
CC1588 79 75
CC1589 79 78
CC1590 86 78
CC1592 84 73
CC1593 66 63
CC1594 69 68
CC1596 65 56
CC1597 72 76
CC1601 56 148
CC1602 52 157
CC1603 58 149
CC1604 50 160
CC1606 69 144
CC1607 79 144
CC1608 68 147
CC1609 79 148
CC1611 59 164
CC1612 90 168
CC1617 98 166
CC1618 89 142
CC1619 57 167
CC1621 68 153
CC1622 66 153
CC1623 63 153
CC1624 61 153
CC1626 79 153
CC1627 81 153
CC1628 83 153
CC1629 85 153
CC1631 62 148
CC1632 56 158
CC1633 73 147
CC1634 83 147
CC1801L 80 140
CC1802L 70 140
CC1803L 57 142
CC1804L 52 152
CC1811N 108 132
CC1812N 103 132
CC2005 132 99
CC2008 127 99
CC2011 131 93
CC2017 152 126
CC2018 139 116
CC2401P 122 33
CC2403P 132 45
CC2501W 94 33
CC2503W 106 33
CC2504W 110 31
CC2506W 105 28
CC2509W 104 24
CC2511W 105 24
CC2512W 95 36
CC2513QI 110 36
CC2514QI 117 20
CC2602 40 143
CC2651 14 19
CC2663 18 24
CC4121QW 76 35
CC4122QS 63 39
CC4123QI 85 18
CD801 67 85
CD802 61 85
CD871 21 126
CD951M 114 118
CD1401S 83 135
CD1481C 25 44
CD1483C 32 42
CD1484C 30 42
CD1601 95 166
CD2002 117 165
CD2011 153 120
CD2402P 142 18
CD2501QI 109 26
CD2502QI 112 26
CD2601 8 12
CD2602 35 149
CD2603 34 146
CD2604 25 152
CD2643 14 28
CD2644 14 35
CD2646 14 32
CD2647 14 39
CD2648 14 42
CD4202QI 46 59
CFS01 143 5
CFS03 148 8
CFS2662 3 28
CFS2663 3 25
CFS2664 3 20
CFS2666 3 43
CFS2667 3 40
CFS2668 3 35
CFS2669 3 38
CFS2671 3 30
CIC501R 22 59
CIC801 43 108
CIC802 17 125
CIC803 91 97
CIC1581 76 67
XY
Pos.-Nr./ Koordinaten/
Pos. No. Coordinates
CIC2151W 129 113
CIC2501W 95 25
CIC4121Q 67 27
CL802 137 71
CL803 129 70
CL921 15 97
CL1476 41 42
CL2003 132 121
CL4103QI 87 18
CQ501R 37 63
CQ821 60 107
CQ881 25 119
CR104 133 55
CR105 136 58
CR106 130 57
CR107 116 68
CR108 121 66
CR109 116 66
CR111 111 66
CR301B 137 78
CR302B 134 80
CR303B 132 87
CR304B 132 84
CR306B 134 81
CR307B 128 78
CR308B 128 83
CR309B 125 84
CR311B 122 85
CR312B 128 87
CR322G 118 77
CR323G 115 78
CR324G 118 82
CR325G 120 77
CR326G 120 81
CR327G 117 84
CR500R 29 66
CR501R 14 62
CR502R 31 63
CR503R 27 66
CR504R 23 68
CR801 129 68
CR802 129 65
CR803 129 62
CR804 56 85
CR806 128 46
CR807 69 85
CR808 63 85
CR809 130 51
CR811 56 96
CR812 60 88
CR813 65 98
CR814 67 93
CR817 57 88
CR818 54 98
CR819W 54 101
CR820 80 97
CR823 60 98
CR824 63 100
CR826 74 103
CR827 71 109
CR828W 60 114
CR829 57 115
CR830 56 111
CR831 60 116
CR832 57 117
CR833QS 55 119
CR834W 55 120
CR836 62 118
CR843 63 96
CR844 66 98
CR846 74 106
CR847 73 108
CR848 54 122
CR849 51 120
CR850 51 125
CR851 48 124
CR852 47 119
CR853 45 124
CR854 44 121
CR856 43 124
CR857 42 127
CR858 40 127
CR859 39 126
CR861 39 130
CR862 37 126
CR863 36 126
CR864 34 126
CR866 31 126
CR869I 30 126
CR873 21 123
CR874 28 124
CR876 33 126
CR877 16 132
CR878 13 127
CR879 13 124
CR881 33 117
CR885 32 119
CR887 25 114
CR888 21 113
CR889QI 25 112
CR890 16 130
CR891QI 21 111
CR894 17 106
CR895 55 110
CR896 17 102
XY
Pos.-Nr./ Koordinaten/
Pos. No. Coordinates
CR897QI 25 110
CR899 25 108
CR901 25 107
CR902 25 105
CR903 25 103
CR904 22 102
CR905 21 109
CR906 22 101
CR907 16 93
CR908 18 86
CR909 19 83
CR911 20 93
CR912 20 86
CR913 21 83
CR914 22 86
CR917 23 82
CR922 20 89
CR923 20 90
CR924 27 88
CR926 32 83
CR927 30 83
CR929 24 86
CR931 30 93
CR932 29 83
CR933 30 88
CR934 32 88
CR935 27 83
CR936 34 90
CR938 35 90
CR939QI 37 93
CR940 39 88
CR941 38 90
CR942 39 92
CR943 40 92
CR944 40 84
CR945 41 77
CR946 40 81
CR947 41 78
CR948 40 79
CR949 44 91
CR950 40 83
CR951M 111 119
CR952M 117 115
CR953M 109 115
CR956 46 86
CR957 45 86
CR958 47 95
CR959 49 91
CR961 52 85
CR962 55 85
CR963 58 77
CR964 47 90
CR971 91 108
CR972 88 108
CR973 92 114
CR974 94 114
CR976 94 121
CR977 95 122
CR981 84 114
CR982 88 111
CR983 89 114
CR984 89 118
CR985 93 124
CR986 92 121
CR1401S 82 131
CR1402S 80 135
CR1403S 79 131
CR1404S 75 135
CR1405S 73 131
CR1406S 75 131
CR1407S 67 131
CR1408S 68 131
CR1409S 68 135
CR1411S 66 135
CR1412S 105 125
CR1471C 40 160
CR1472E 44 165
CR1473E 94 101
CR1476C 22 40
CR1481C 33 47
CR1482C 35 47
CR1483E 28 46
CR1484C 23 44
CR1519QI 116 34
CR1581 65 74
CR1582 65 73
CR1583 79 80
CR1584 93 72
CR1586 93 66
CR1587 70 56
CR1588 69 70
CR1589 69 72
CR1591 93 59
CR1592 93 71
CR1593 93 64
CR1594 93 61
CR1601 52 148
CR1602 49 157
CR1603 55 148
CR1604 51 157
CR1606 66 144
CR1607 76 144
CR1608 67 144
CR1609 78 144
CR1610 90 164
CR1611 76 148
XY
Pos.-Nr./ Koordinaten/
Pos. No. Coordinates
CR1612 58 153
CR1614 96 160
CR1615 92 144
CR1616 86 144
CR1617 49 161
CR1618 92 164
CR1619 88 147
CR1620 92 139
CR1621 68 158
CR1622 66 158
CR1623 63 158
CR1624 61 158
CR1626 79 158
CR1627 81 158
CR1628 83 158
CR1629 85 158
CR1631 90 140
CR1632 90 144
CR1633 91 147
CR1801L 76 141
CR1802L 66 141
CR1803L 52 147
CR1804L 48 153
CR1806L 84 141
CR1807L 73 141
CR1808L 61 143
CR1809L 57 153
CR1812N 108 129
CR1813N 108 127
CR1814N 106 132
CR1816N 108 135
CR1817N 104 132
CR2001 130 99
CR2002 128 99
CR2017 150 127
CR2018 143 117
CR2019 124 118
CR2101W 114 110
CR2102W 115 110
CR2103WN 119 108
CR2104WN 106 110
CR2106W 104 107
CR2107W 104 106
CR2151W 124 113
CR2152W 120 117
CR2153WN 132 109
CR2214 76 108
CR2403P 133 39
CR2404P 137 44
CR2405P 137 50
CR2406P 133 37
CR2407P 129 39
CR2408P 130 46
CR2409P 132 44
CR2411P 135 41
CR2412P 130 41
CR2413P 134 46
CR2414P 137 46
CR2415P 136 26
CR2416P 132 31
CR2417P 130 32
CR2420P 136 27
CR2426P 129 32
CR2436P 139 18
CR2501W 84 26
CR2502W 84 28
CR2503W 84 31
CR2504W 84 29
CR2506W 84 34
CR2507W 84 32
CR2509 48 44
CR2511W 88 32
CR2512W 94 36
CR2513W 106 31
CR2514W 98 38
CR2515W 98 33
CR2516W 115 25
CR2517W 106 24
CR2518QI 114 35
CR2521QI 116 32
CR2522QI 116 25
CR2523QI 115 29
CR2524WQ 106 30
CR2600 49 18
CR2601 49 26
CR2602 49 21
CR2603 32 136
CR2604 30 139
CR2606 48 140
CR2607 40 140
CR2608 41 143
CR2609 36 146
CR2611 36 143
CR2612 38 143
CR2613 32 142
CR2614 24 148
CR2616 26 146
CR2617 27 159
CR2618 20 149
CR2619 25 159
CR2620 20 147
CR2621 19 160
CR2622 16 139
CR2623 17 139
CR2624 16 119
CR2626 23 142
XY
Pos.-Nr./ Koordinaten/
Pos. No. Coordinates
CR2627 25 141
CR2641 21 108
CR2649 14 148
CR2651 14 22
CR2652 14 145
CR2653 14 143
CR2658 16 18
CR2659 19 18
CR2662I 14 24
CR2663 24 46
CR2671 11 30
CR2672 11 36
CR2673 11 33
CR2674 11 40
CR2676 11 43
CR4021WN 93 68
CR4120QW 69 36
CR4121QS 73 33
CR4122W 75 29
CR4124QN 72 28
CR4126QN 61 27
CR4127QS 61 31
CR4128QS 67 36
CR4129QS 57 42
CR4134QI 55 36
CR4136QI 53 36
CR4201QI 49 64
CR4202 44 67
CR4204QI 44 62
CS2641 10 71
CST2641 3 33
CST2642 3 140
CT301B 128 81
CT302B 122 81
CT303G 116 82
CT801 136 55
CT802 130 54
CT803 118 66
CT804 113 66
CT871 25 126
CT951M 108 118
CT971 91 111
CT972 95 118
CT981 86 114
CT982 86 118
CT1401S 71 131
CT1402S 71 135
CT1481C 31 46
CT1482C 38 47
CT1582 92 78
CT1811N 105 128
CT2101W 114 107
CT2102W 118 110
CT2103W 104 110
CT2104W 109 107
CT2406P 125 40
CT2407P 133 35
CT2408P 135 44
CT2409P 137 38
CT2411P 136 23
CT2412P 137 35
CT2413P 134 49
CT2502W 90 32
CT2503W 109 23
CT2504W 98 35
CT2506W 113 23
CT2507QI 118 30
CT2601 52 26
CT2602 32 138
CT2603 40 138
CT2604 37 138
CT2605 23 139
CT2606 24 144
CT2607 23 159
CT2608 13 139
CT2609 27 139
CT2611 16 116
CT4121W 76 27
CT4122QS 76 32
CT4201QI 48 68
CT4204QI 44 64
IC1471C 37 167
IC1601 74 166
IC2001 151 102
L2001C 122 135
L2001E 128 134
L2401P 129 25
P2001 132 168
P2651 13 151
R2011 134 166
S2201 16 11
ST4102QI 79 17
T2404P 122 26
XY
2 - 26
Page 40

GRUNDIG Service Allixx SCD 5410 DAB
L
6
CC833
CR847
CR140 S
CR1404S
Vergrößerte Abbildung, Teil 1/4
Enlarged Layout, Part 1/4
170
160
150
140
130
120
110
100
90
80
IC1471C
CC1471C
CR2621
C2603
CR2620
CR2626
CR2622
CR877
CR890
1
CIC802
CT2611
CR888
CR891QI
CR905
CR2641
CL921
CR923
CR922
CR908
CR912
AN1601
CT2607
CR2618
CT2606
CT2605
CR2623
CD871
CR873
CR2624
CR904
CR906
CR911
CR914
CR909
CR913
CR2617
CR2619
CD2604
CR2614
CT2609
CR2627
CT871
CQ881
CR887
CR889QI
CR897QI
CR899
CR901
CR902
CR903
C922
CR924
CR929
CR935
CR917
CD2603
CR2616
CR869I
CR874
CC881
CR931
CR933
CR932
C1474
CR2613
CT2602
CR2604
CR2603
CR866
CR876
CC882
CR885
CC921
CC933
CR934
CR927
CR926
CD2602
CR2611
+A-BED
CT2604
CR862
CR863
CR864
50
CR881
75 51
76
CC934
CR938
CR936
CR944
CR950
CR946
CR2609
CR859
CR939QI
CR941
AN1602
CR2649
CR2652
CR2653
CST2642
CT2608
CR878
110
CR879
CR894
CR896
CR907
CC1472C
CR1471C
CR2608
CR2612
CC2602
CT2603
CR861
CR858
CC859
CIC801
CR942
CR943
CR940
CC946
C2601
CR2607
CR857
CR856
CR854
CR949
CC949P
CC947
C1614
CR1472E
CR1617
CR1604
CR1602
CR1804L
CR1601
C1473C
CR1803L
CR851
CR853
CR852
CC956
CC958
CR958
CR964
CR956
CR957
CC1604
+
CC1804L
CR2606
CR850
CC849
26
25
1
100
CC959
CC961
CR959
CC1602
CC1601
CR1603
CR848
CR849
CR832
CR829
CC812
CC809
CC801
CR817
CC962
CR961
+
+
CC1803L
CC814
CR819W
CR811
CR818
CR962
CC1619
CC1632
CR1809L
CR1612
CC1603
CR834W
CR833QS
CR830
CR895
CC831
CC811
CR812
CD802
CC804
CR804
CC1611
1
CR1624
CC1624
CC1631
+
CR1411S
CR836
CR831
CR828W
31
CQ821
CC832
CR823
CR1623
CC1623
CR1808L
CR1802L
CR1409S
CR824
CR813
CR843
CR808
CD801
CR1622
CC1622
CC1608
CR1606
CR1608
+
CR1407S
CR844
CR814
CR1621
C1
CC1621
+
CC1606
CC1802
CT1402S
CT1401S
CR1408S
CR827
CR807
CC1
CC834
Y
X
0
10 20 30 40 50 60 70
Für die tatsächliche Bauteilbestückung ist das Schaltbild maßgebend!
The circuit diagram is relevant for the actual component assembly!
2 - 27
Page 41

GRUNDIG Service Allixx SCD 5410 DAB
Vergrößerte Abbildung, Teil 2/4
Enlarged Layout, Part 2/4
IC1601
CR1626
CR1627
CR1628
CR1629
CC1612
CR1610
25
CR1618
CD1601
CR1614
CD2002
CC1617
C1613
C2013
R2011
C1615
CC1633
+
802L
CR1807L
CR1404S
02S
01S
CR1405S
CR1406S
7
CR847
CR846
CC833
CC834
CC1626
CR1611
CR1609
CR1607
+
CC1801L
CR1801L
CR2214
CR826
CR820
C815
CC1627
CC1634
CC1609
+
CC1607
CD1401S
CC1401S
CR1403S
CC1628
CR1806L
CC1403S
CR1401S
CT982
CT981
CR981
CC816
CC817
CC1629
CR1619
CR1616
CC1618
CC1402S
CR1402S
CR982
CR972
+
CR1633
CR1631
CR984
CR983
CT971
CR971
CIC803
CR985
CR986
CR973
CR1473E
CR1615
CR1632
CR1620
CR976
CT972
CR974
1
CR977
CR2106W
CR2107W
CC1812N
CR1817N
CT1811N
CC1404S
CR1412S
CR953M
CT2103W
CR1816N
CR1814N
CT951M
CR2104WN
CT2104W
CC1811N
CR1812N
CR1813N
CR951M
CC951M
CR2101W
CT2101W
CC312G
CR327G
CD951M
CR952M
CR2102W
CT303G
L2001C
CT2102W
CR2103WN
CR324G
CR326G
CC310G
CT302B
CR2019
CR2152W
CR311B
CC308B
L2001E
CR2151W
CIC2151W
CC2008
CR2002
CR312B
CR309B
CR308B
CT301B
CL2003
1
CR2153WN
CR2001
CC2005
C2002
CC2011
CC307B
CR306B
C2012
C2004
C304B
CR303BCR304B
CR2018
CC2018
C2007
C2001
C2003
C2006
CC301B
1
15
CR2017
CD2011
IC2001
2
CC2017
80 90 100 110 120 130 140 150
Für die tatsächliche Bauteilbestückung ist das Schaltbild maßgebend!
The circuit diagram is relevant for the actual component assembly!
2 - 28
Page 42

GRUNDIG Service Allixx SCD 5410 DAB
Q
5
C
1120
2
C
Vergrößerte Abbildung, Teil 3/4
Enlarged Layout, Part 3/4
90
80
70
60
50
40
30
20
CS2641
CR501R
CC503R
CC502R
CD2648
CD2647
CR922
CR908
CR912
CC501R
CC506R
CR914
CR909
CR913
CR504R
+
CIC501R
CR2663
CR1484C
CR1476C
CR929
CR917
CC504R
CD1481C
CR933
CR924
CR935
CR932
CR503R
CR500R
CR502R
CT1481C
CR1483E
CD1484C
CR934
CR927
CR926
CC507R
CC509R
CR938
CR936
CR944
CR950
CR946
CR948
CR947
CR945
CQ501R
CT1482C
CR1481C
CR1482C
CR941
122
CC1477
CC1481
CR2672
CD2644
CR2673 CR2674 CR2676
CST2641
CR2671
CD2646
CD2643
CBU1471
19373-505.00
CR2662I
CC2663
CR2651
110
CC2651
CR2658
CR2659
4B (03)
CC1479
CD1483C
CR940
CC946
CL1476
CC1478
CC949P
CC947
CR4202
CT4204QI
CD4202QI
CC1476
CC1483E
CR964
CR956
CR957
C957
CR4204QI
CR2509
CC1482E
CR2602
CR2600
CT4201QI
CR4201QI
CT2601
CR2601
CR817
CC962
CR961
CR4136QI
CR4134QI
CR962
CR804
CR963
CR4129QS
CR812
CD802
CC804
CR1581
CR1582
+
CR4127QS
CR808
CC1582
CR1589
CR1588
CC1594
CC1593
CC1596
CC4122QS
CIC4121Q
CR4126QN
CD801
+
+
CR1587
CR4120QW
CR4128QS
1
8
916
CR807
CC1597
CC1
C
CR4121
CR41
CR4124QN
10
0
Y
X
0
CD2601
S2201
2
1
BU4101
10 20 30 40 50 60 70
Für die tatsächliche Bauteilbestückung ist das Schaltbild maßgebend!
The circuit diagram is relevant for the actual component assembly!
2 - 29
Page 43

CC1597
CR4121
CR4124QN
GRUNDIG Service Allixx SCD 5410 DAB
Vergrößerte Abbildung, Teil 4/4
Enlarged Layout, Part 4/4
C304B
CC307B
CR306B
CR302B
CC303B
CC806
CT802
CR2413P
CR2403P
CR2417P
CR2426P
CR303B
CR304B
CL802
CR104
CT801
CT2413P
CT2408P
CR2411PCR2412P
CR2416P
CC301B
CC302B
CR301B
CC805
CC802
CC803
CC813
CC818
CC819
CC808
CR105
CC807
CR2405P
CR2414P
CR2404P
CT2409P
CT2412P
CR2420P
CR2415P
CT2411P
CD2402P
CR2436P
BU02
14 1
41
CC821
BU01
ANT1
CR1583
CC1589
CC1588
1120
10
CIC1581
1
CC1573C+CC1574C
+
CC1587E CC1586E
CC4121QW
CR2506W
CT4121W
4
5
CR2507W
CR2503W
CR2504W
CR2502W
CR2501W
ST4102QI
2
CT4122QS
R4122
32
CC1590
CC1592
CC1584
1
+
CC1503
+
CC1504
+
CC1507
CR2511W
CC4123QI
CL4103QI
CT1582
CT2502W
1
14
CC1580
CR1584
CR1592
CR4021WN
CR1586
CR1593
CR1594
CR1591
CC2512W
CR2512W
CR2515W
CC2501W
CIC2501W
CR2514W
CT2504W
CR2524WQ
CC2503W
CR2513W
CC2506W
2815
CC2511W
CC2509W
CR2517W
CR111
CC111
CC2513QI
CC2504W
CD2501QI
CD2502QI
CT2503W
CT2506W
CC312G
CR327G
CR323G
CT804
+
CT303G
CC311G
CR107
CT803
CR109
CR2518QI
CR1519QI
CT2507QI
CR2523QI
CC2514QI
CC310G
CT302B
CR324G
CR326G
CR325G
CR322G
CR108
CC1520QI
C2402P
CC2401P
CR2521QI
CR2516W
CR2522QI
+
CR311B
CC308B
CR309B
CT301B
CC306B
CR801
CC823
CR802
CC824
CR803
CC826
CC109
CR106
CT2406P
CR2407P
BE
L2401P
T2404P
CR312B
CR308B
CR307B
CL803
CR809
CC810
CR806
CR2408P
CC2403P
CR2409P
CR2406P
CT2407P
CFS01
1QI
31
80 90 100 110 120 130 140 150
Für die tatsächliche Bauteilbestückung ist das Schaltbild maßgebend!
The circuit diagram is relevant for the actual component assembly!
2 - 30
Page 44
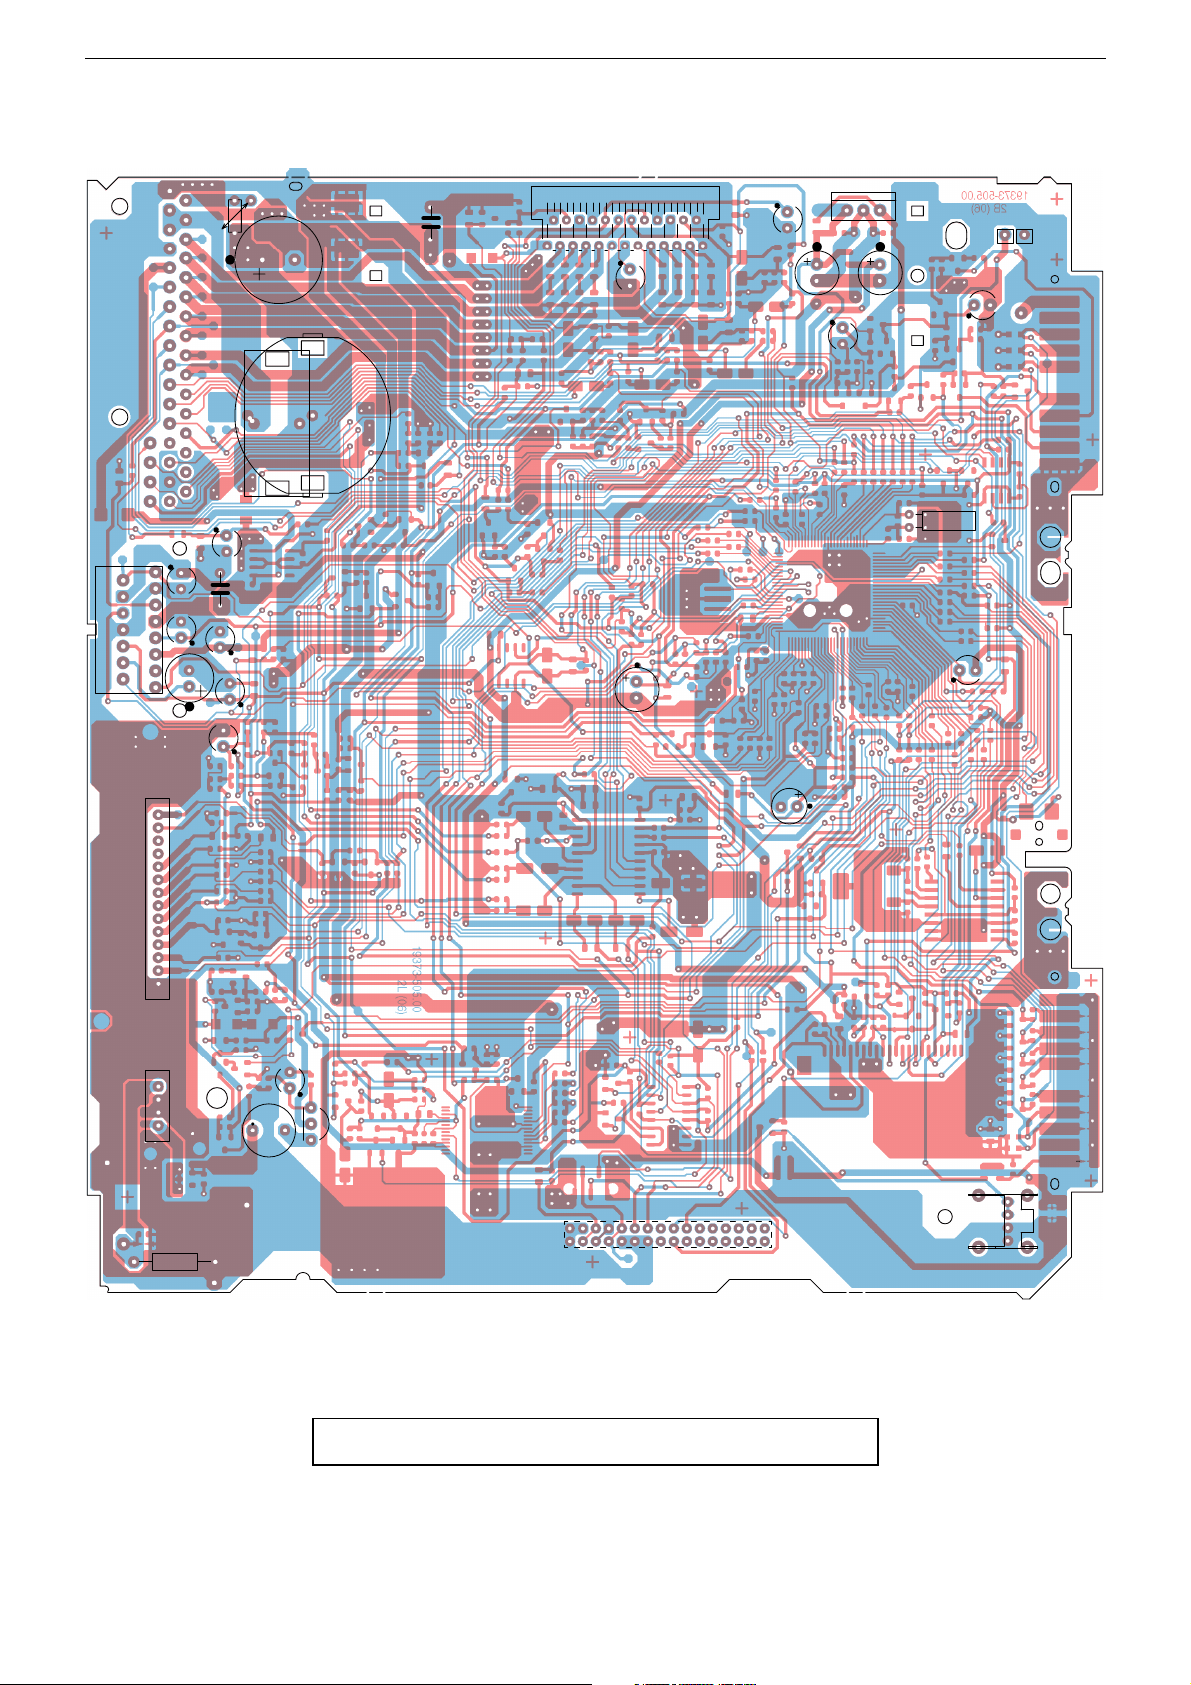
GRUNDIG Service Allixx SCD 5410 DAB
Haupt-Platte / Main Board (Bedrahtete Bauteile, Sicht auf Lötseite / Wired Components, view on solder Side)
IC2001
2
1
C2001
C2003
C2006
15
R2011
C2012
C2007
C2004
C2002
C304B
L2001E
C2013
L2001C
C1613
IC1601
25 1
C1615
C815
C1614
C1473C
C2601
IC1471C
AN16011AN1602
1
C2603
C1474
+A-BED
CQ881
C922
ANT1
BU02
BU01
141
41
CFS01
L2401P
C2402P
BE
T2404P
C957
19373-505.00
4B (03)
32
31
BU4101QI
2
1
S2201
Für die tatsächliche Bauteilbestückung ist das Schaltbild maßgebend!
The circuit diagram is relevant for the actual component assembly!
2 - 31
Page 45

0
0
10
20
30
40
10 20 30 40 50 60 70 80 90 100 110 120 130 140 150 160
Y
X
CD1023
CD1022
CD1026
CD1027
CD1032
CD1018
CD1019
CD1017
CD1014
CD1031
CD1024
CD1016
C
D
1
0
2
9
18 1
LCD1001
CS1004
CS1006
CS1014
CS1011
CS1016
CS19171
CS10161
CS1003
CS1009
CS10141
CS10111
CS10181
CS10091
CS10081
CS10071
CS1001
CS10061
CS10041
CS10031
CS1017
CS10021
CS1018
CS10011
CS1008
CS1007
B
A
G1001
CS1012
321
C
D
1
0
2
8
CD1011
CD1006
CD1007
CD1004
CD1003
CD1008
CD1009
CD1021
CS1002
CS1013
CD1002
GRUNDIG Service Allixx SCD 5410 DAB
Bedien-Platte / Operating Board (Sicht auf Bestückungsseite / View on Component Side)
Pos.-Nr./ Koordinaten/
Pos. No. Coordinates
CD1002 136 32
CD1003 136 27
CD1004 136 22
CD1006 136 17
CD1007 37 32
CD1008 37 27
CD1009 37 22
CD1011 37 17
CD1014 140 8
CD1016 151 25
CD1017 132 46
CD1018 118 46
CD1019 103 46
CD1021 89 46
CD1022 74 46
CD1023 60 46
CD1024 29 20
CD1026 29 31
CD1027 43 44
CD1028 23 9
CD1029 23 42
CD1031 4 8
CD1032 151 44
CIC1002I 151 7
CS1001 140 6
CS1002 151 23
CS1003 135 46
CS1004 121 46
CS1006 106 46
CS1007 92 46
CS1008 77 46
CS1009 63 46
CS1011 46 44
CS1012 29 46
CS1013 29 5
CS1014 29 18
CS1016 29 29
CS1017 4 6
CS1018 154 44
CS10011 140 9
CS10021 151 27
CS10031 129 46
CS10041 115 46
CS10061 100 46
CS10071 86 46
CS10081 71 46
CS10091 57 46
CS10111 41 44
CS10141 29 21
CS10161 29 33
CS10181 149 44
CS19171 4 9
G1001 152 25
LCD1001 87 21
XY
Für die tatsächliche Bauteilbestückung ist das
Schaltbild maßgebend!
The circuit diagram is relevant for the actual
component assembly!
2 - 32
Page 46
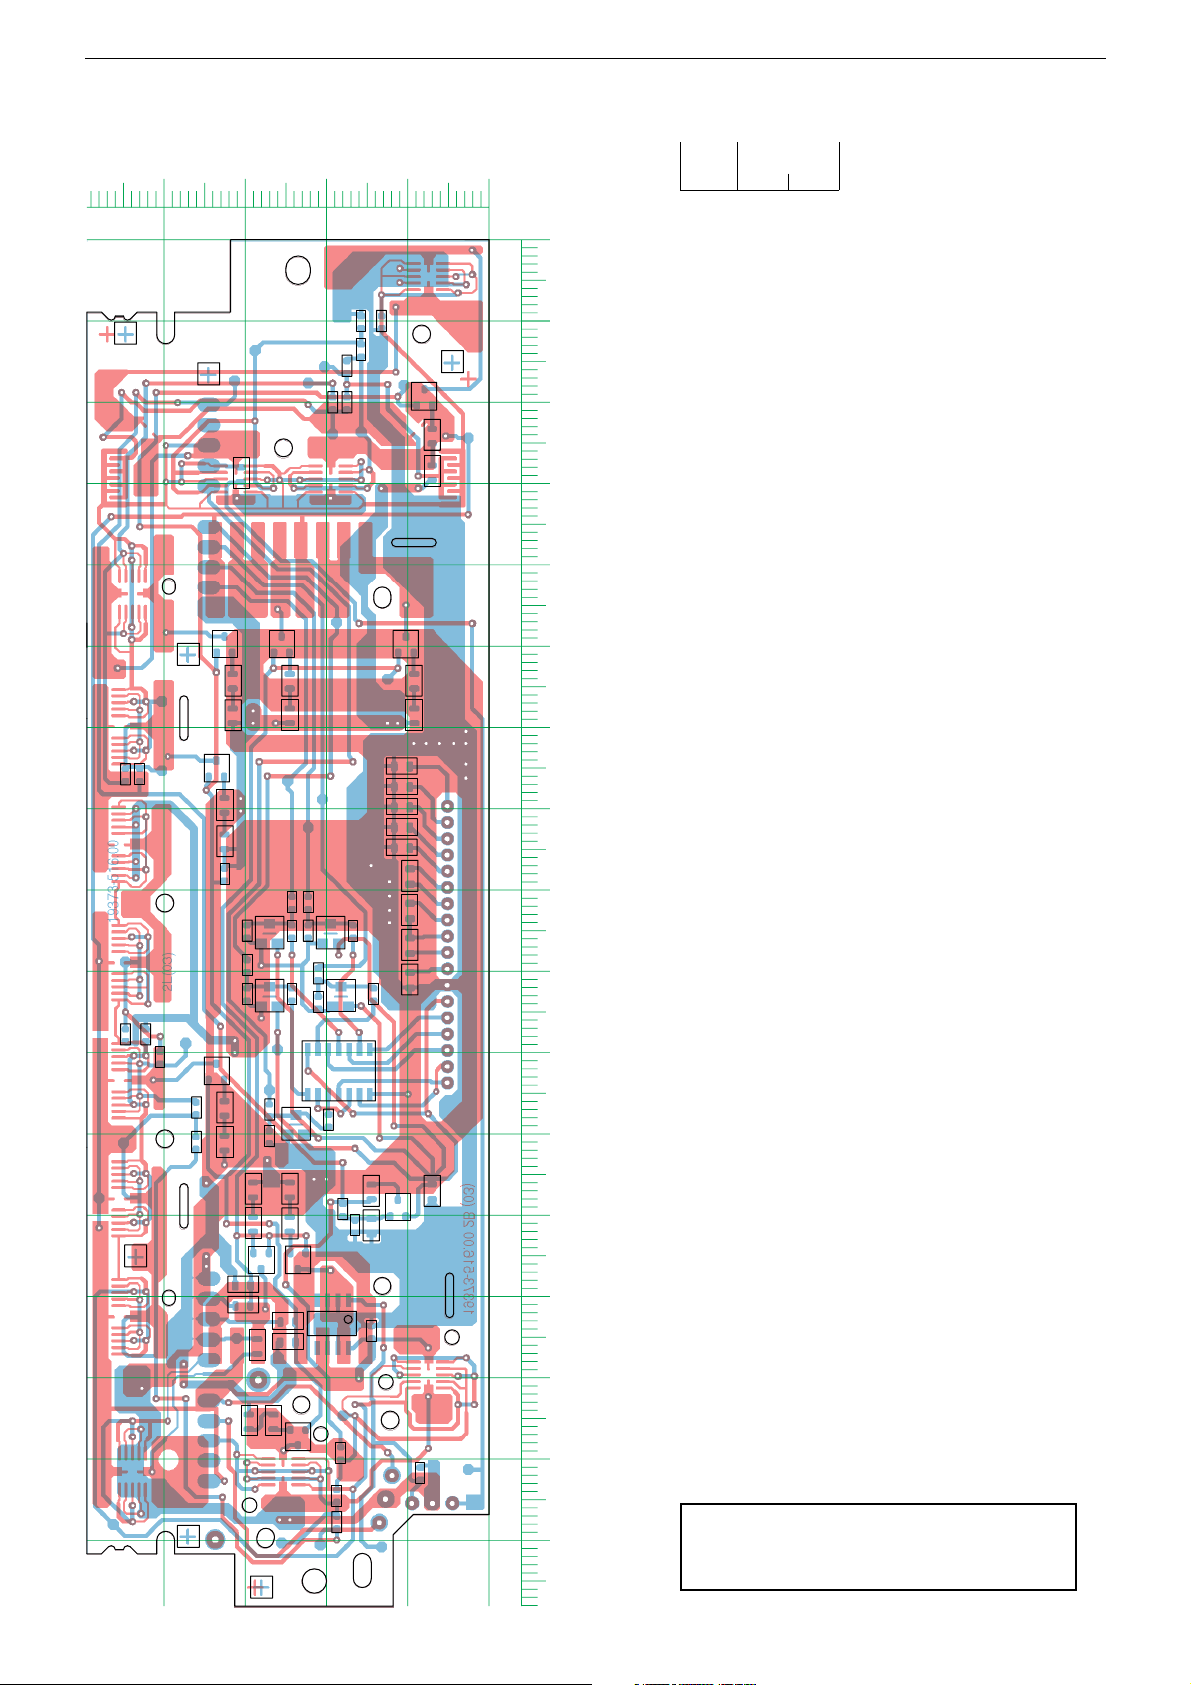
GRUNDIG Service Allixx SCD 5410 DAB
0
10
20
30
40
Y
0102030405060708090100110120130140150160
X
CC1002I
CC1001I
CR1044
CR1043
CR1047
CR1046
CR1052
CR1051
CR1048
CR1049
CR1068
CR1069
CR1064
CR1067
CR1063
CR1066
CR1072
CR1074
CR1071
CR1073
CR1019
10 1
CST01
10 1
CST02
CIC1001I
CC1008
CC1014
CC1006
CC1012
CC1011
CC1009
CC1004
CC1017
CC1016
CC1013
CC1019
CD1042
CD1041
CD1043
CD1044
CD1046
7
814
1
CIC1003
CR1041
CR1057
CR1061
CR1062
CR1056
CR1059
CR1058
CR1022
CR1026
CR1023
CR1003
CR1029
CR1039
CR1036
CR1037
CR1024
CR1028
CR1004
CR1002
CR1006
CR1007
CR1008
CR1065
CR1001
CR1042
CR1027
CR1033
CR1009
CR1055
CR1031
CR1034
CR1038
CR1032
CR1070
CT1003
CT1001
CT1017
CT1011
CT1004
CT1014
CT1016
CT1013
CT1012
CT1002
CC1018
CR1018
CR1002I
CR1035
CC1007
CR1021
Bedien-Platte / Operating Board (Sicht auf Lötseite / View on Solder Side)
Pos.-Nr./ Koordinaten/
Pos. No. Coordinates
CC1001I 134 15
CC1002I 152 9
CC1004 91 10
CC1006 87 10
CC1007 83 10
CC1008 78 10
CC1009 75 11
CC1011 72 11
CC1012 70 11
CC1013 67 11
CC1014 65 11
CC1016 117 7
CC1017 121 15
CC1018 128 30
CC1019 135 25
CD1041 85 20
CD1042 85 27
CD1043 93 18
CD1044 93 27
CD1046 109 24
CIC1001I 133 19
CIC1003 102 19
CR1001 155 19
CR1002 158 19
CR1002I 29 30
CR1003 111 36
CR1004 107 36
CR1006 100 41
CR1007 98 45
CR1008 98 42
CR1009 149 18
CR1018 131 30
CR1019 133 25
CR1021 117 15
CR1022 119 18
CR1023 121 16
CR1024 85 17
CR1026 81 22
CR1027 85 22
CR1028 85 24
CR1029 81 24
CR1031 85 30
CR1032 93 14
CR1033 90 21
CR1034 94 21
CR1035 136 28
CR1036 93 24
CR1037 89 30
CR1038 93 30
CR1039 108 20
CR1041 107 27
CR1042 110 27
CR1043 121 29
CR1044 117 29
CR1046 121 25
CR1047 117 25
CR1048 54 25
CR1049 58 25
CR1051 54 9
CR1052 58 9
CR1055 66 43
CR1056 66 45
CR1057 20 19
CR1058 20 18
CR1059 15 18
CR1061 14 16
CR1062 10 16
CR1063 145 27
CR1064 145 30
CR1065 10 13
CR1066 107 33
CR1067 111 33
CR1068 69 33
CR1069 74 33
CR1070 78 33
CR1071 54 32
CR1072 58 32
CR1073 24 7
CR1074 28 7
CST01 33 39
CST02 140 39
CT1001 125 28
CT1002 125 23
CT1003 50 25
CT1004 50 10
CT1011 119 11
CT1012 147 23
CT1013 102 33
CT1014 65 33
CT1016 50 33
CT1017 19 8
XY
Für die tatsächliche Bauteilbestückung ist das
Schaltbild maßgebend!
The circuit diagram is relevant for the actual
component assembly!
2 - 33
Page 47
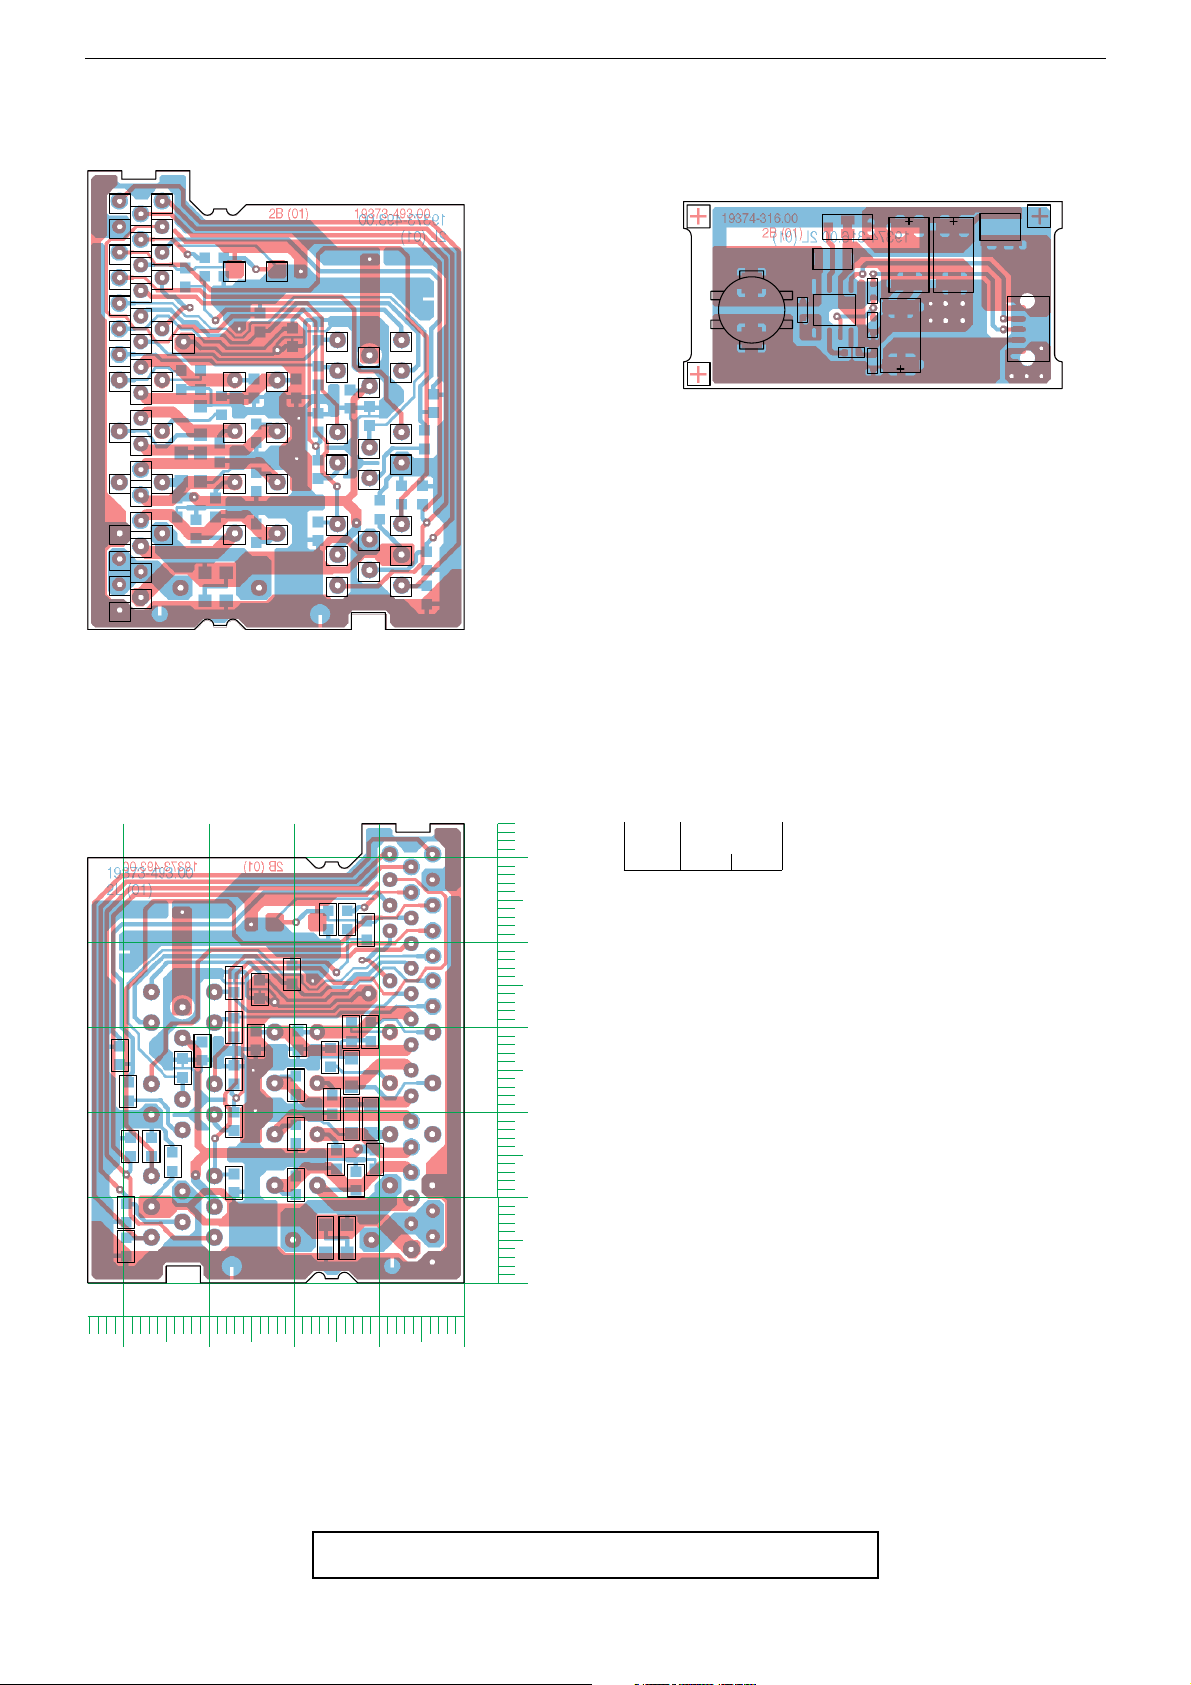
GRUNDIG Service Allixx SCD 5410 DAB
Anschluss-Platte / Connecting Board
Sicht auf Bestückungsseite / View on Component Side
A34A33
A32
A35
A31
A30
A36
A29
A27
A25
A23
A21
III-2
III-4
III-6
A5
A3
A1
A28
A26
A24
A22
A20
A18
A16
A14
A12
A10
A37
SCH2
SCH-M
III-1
III-3
III-5
A8
III-7III-8
A6
A4
1
SI1701
A2
FB1FB2
I-2
I-5 I-4
II-1
II-2
II-4
II-3
II-5II-6
II-8
II-7
2
I-8
I-14
I-17
I-20
I-12
I-15
I-18
I-1
I-3
I-6
I-7
I-9
I-10I-11
I-13
I-16
I-19
DAB-Spannungsversorgungs-Platte
DAB Power Supply Board
Sicht auf Bestückungsseite / View on Component Side
2
13
CL4101QI
CC4103QI
1
CF4101QI
CD4101QI
CIC4101Q
4
CC4106QI
CC4104QI
CR4102QI
CC4101QI
CC4107QI
CC4102QI
CR4103QI
CC4108QI
51
CBU4101Q
Anschluss-Platte / Connecting Board
Sicht auf Lötseite / View on Solder Side
CC1742
CR1704
CR1706
CC1711
CC1714
CC1712
CC1719N
CR1702N
CC1728
CC1726
CC1727
CC1739
CC1722
CC1723
CC1716
CC1713
CC1717N
CR1701N
CC1741
CC1706
CC1708
CC1702
CC1701
CC1707
CC1732
CC1704
CC1703
CC1736
CC1729
CC1733
CC1734
CC1709
CC1738
CC1731
CC1737
CC1724
Pos.-Nr./ Koordinaten/
50
Pos. No. Coordinates
CC1701 20 18
CC1702 20 23
CC1703 16 15
CC1704 16 21
40
30
20
10
0
Y
010203040
X
CC1706 25 28
CC1707 20 11
CC1708 20 28
CC1709 13 12
CC1711 21 36
CC1712 25 35
CC1713 28 30
CC1714 28 35
CC1716 31 27
CC1717N 28 25
CC1719N 41 27
CC1722 34 25
CC1723 35 14
CC1724 11 15
CC1726 40 8
CC1727 40 4
CC1728 40 16
CC1729 14 30
CC1731 12 30
CC1732 17 27
CC1733 14 25
CC1734 14 19
CC1736 17 5
CC1737 12 19
CC1738 15 5
CC1739 37 16
CC1741 28 12
CC1742 17 43
CR1701N 28 19
CR1702N 40 23
CR1704 15 43
CR1706 12 42
XY
Für die tatsächliche Bauteilbestückung ist das Schaltbild maßgebend!
The circuit diagram is relevant for the actual component assembly!
2 - 34
Page 48
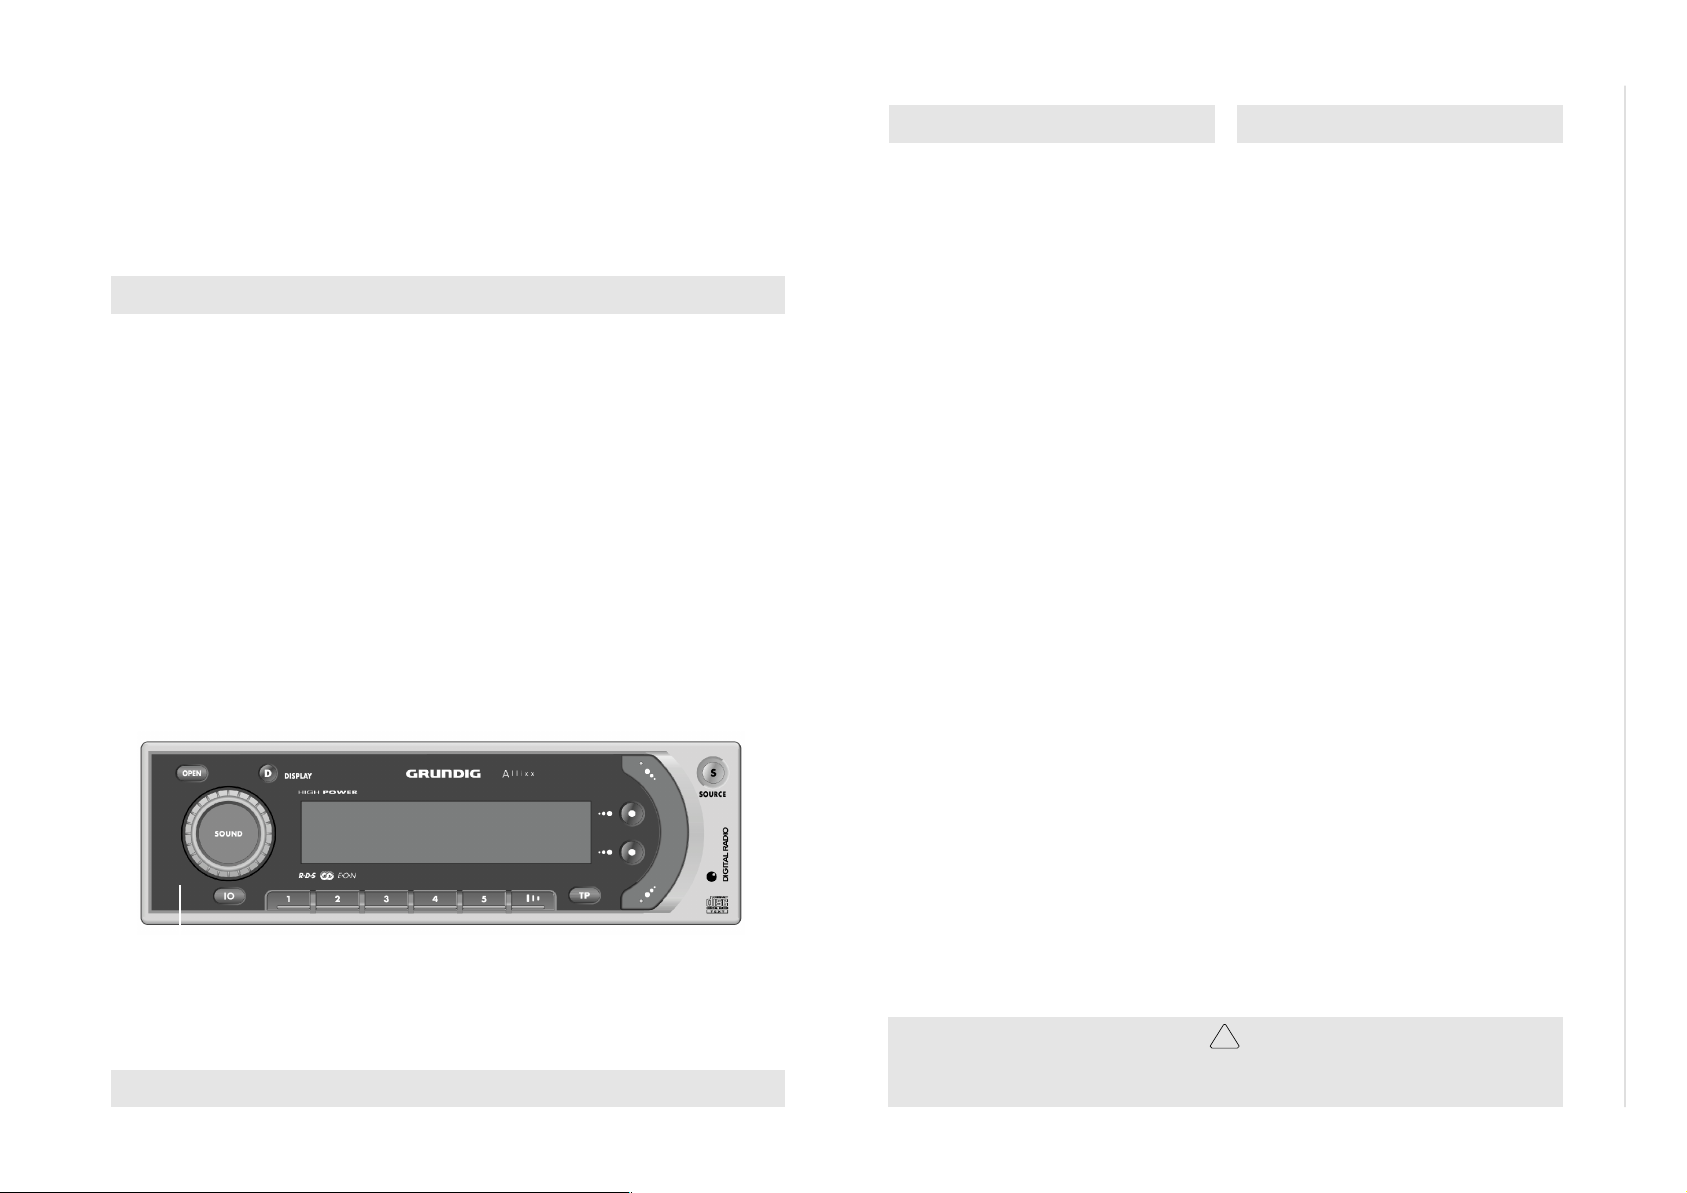
3 - 1
ǵ
Ersatzteilliste
Spare Parts List
9 / 2002
POS. NR. ABB. MATERIAL-NR. ANZ. BEZEICHNUNG DESCRIPTION
POS. NO. FIG. PART NUMBER QTY.
918408825000 ALLIXX SCD 5410 DAB ALLIXX SCD 5410 DAB
0001.000 720118619900 ALLIXX SCD 5410 DAB ALLIXX SCD 5410 DAB
0002.000 1 184080895000 BEDIENTEIL KPL S.ZCHNG. CONTROL UNIT CPL S.DRAWING
0006.000 396023500202 2 KONTAKTSATZ 10-POL MALE CONTACT SET 10 PLS MALE
0008.000 184070720200 SCHALTMATTE (SCX 54XX) SWITCH MAT (SCX 54XX)
0009.000 184070590004 LICHTLEITER DISPLAY LIGHT GUIDE DISPLAY
0010.000 197202840000 LC-DISPL STN BLUE MODE NEG TSD LC-DISPL STN BLUE MODE NEG TSD
0011.000 184070600003 REFLEKTOR DISPLAY REFLECTOR DISPLAY
0025.000 197716170117 ANSCHLUSSGEHAEUSE CONNECTION TERMINAL
0027.000 183000990103 ANTENNENBUCHSE KPL ANTENNA SOCKET CPL
0028.000 181470350000 ANTENNEN-ADAPTER ANTENNA-ADAPTER
0029.000 181470360000 ADAPTER-CLIPS ADAPTER-CLIPS
0032.000 197726320000 2 DEMONTAGEBUEGEL DISMOUNTING BOW
0033.000 182700210001 2 EINBAUFEDER MOUNTING SPRING
0040.000 120370400000 EINBAURAHMEN KPL GEN BP8-601-3 MOUNTING FRAME CPL GEN BP8-601
0045.000 193732930000 TUNER MODUL (3000/5000/6000) TUNER MODULE (3000/5000/6000)
0048.000 120601000200 MODUL DAB 300 A (SCD 5410 DAB) MODULE DAB 300 A (SCD 5410 DAB
0050.000 197230510001 LAUFWERK ALPINE DP23S57G DRIVE MECHANISM ALPINE DP23S57
184089412100 BEDIENUNGSANLEITUNG D/GB/F/I/NL/E/P OPERATING INSTRUCTION D/GB/F/I/NL/E/P
184089412300 BEDIENUNGSANLEITUNG SK/DK/N/S/SF OPERATING INSTRUCTION SK/DK/N/S/SF
720107724000 SERVICE MANUAL D /GB SERVICE MANUAL D/GB
184080895000
d©
KEIN E-TEIL NO SPARE PART
TAUSCHGERAET EXCHANGE SET
ALLIXX SCD 5410 DAB
ÄNDERUNGEN VORBEHALTEN / SUBJECT TO ALTERATION
CARAUDIO
MATERIAL-NR. / PART NO.: 918408825000
BESTELL-NR. / ORDER NO.: GHN0400
POS. NR. MATERIAL-NR. BEZEICHNUNG
POS. NO. PART NUMBER DESCRIPTION
C 02013 845324210700 ELKO 2200UF 16V 105C RM5 MA
CD 00801 830919504200 SMD DIODE BAR42 SGS / BAT54
CD 00802 830919504200 SMD DIODE BAR42 SGS / BAT54
CD 00871 830938410100 SMD Z-DIODE BZX84B10
CD 00951 832521001600 SMD-DIODE BAS 16 PHI
CD 01002 832603267300 SMD LE-DIODE LWA673-R1 Q627
CD 01003 832603267300 SMD LE-DIODE LWA673-R1 Q627
CD 01004 832603267300 SMD LE-DIODE LWA673-R1 Q627
CD 01006 832603267300 SMD LE-DIODE LWA673-R1 Q627
CD 01007 832603267300 SMD LE-DIODE LWA673-R1 Q627
CD 01008 832603267300 SMD LE-DIODE LWA673-R1 Q627
CD 01009 832603267300 SMD LE-DIODE LWA673-R1 Q627
CD 01011 832603267300 SMD LE-DIODE LWA673-R1 Q627
CD 01014 832602386900 SMD LE-DIODE LSL896-N1-P2
CD 01016 832602386900 SMD LE-DIODE LSL896-N1-P2
CD 01017 832602386900 SMD LE-DIODE LSL896-N1-P2
CD 01018 832602386900 SMD LE-DIODE LSL896-N1-P2
CD 01019 832602386900 SMD LE-DIODE LSL896-N1-P2
CD 01021 832602386900 SMD LE-DIODE LSL896-N1-P2
CD 01022 832602386900 SMD LE-DIODE LSL896-N1-P2
CD 01023 832602386900 SMD LE-DIODE LSL896-N1-P2
CD 01024 832602386900 SMD LE-DIODE LSL896-N1-P2
CD 01026 832602386900 SMD LE-DIODE LSL896-N1-P2
CD 01027 832602386900 SMD LE-DIODE LSL896-N1-P2
CD 01028 832602386900 SMD LE-DIODE LSL896-N1-P2
CD 01029 832602386900 SMD LE-DIODE LSL896-N1-P2
CD 01031 832602386900 SMD LE-DIODE LSL896-N1-P2
CD 01032 832602386900 SMD LE-DIODE LSL896-N1-P2
CD 01041 830931309900 SMD DIODE BAV99 AV215-G8
CD 01042 830931309900 SMD DIODE BAV99 AV215-G8
CD 01043 830931309900 SMD DIODE BAV99 AV215-G8
CD 01044 830931309900 SMD DIODE BAV99 AV215-G8
CD 01046 830931309900 SMD DIODE BAV99 AV215-G8
CD 01401 832521001600 SMD-DIODE BAS 16 PHI
CD 01481 832521001600 SMD-DIODE BAS 16 PHI
CD 01483 832531206000 SMD DIODE BAT60J STM
CD 01484 832531272000 SMD DIODE BAT720 PHI
CD 01601 830931309900 SMD DIODE BAV99 AV215-G8
CD 02002 832533000300 SMD DIODE ES3D GI/ MURS320
CD 02011 832532801000 SMD DIODE BYG10D TEMIC/ FS1
CD 02601 832602386900 SMD LE-DIODE LSL896-N1-P2
CD 02602 832521001600 SMD-DIODE BAS 16 PHI
CD 02603 832521001600 SMD-DIODE BAS 16 PHI
CD 02604 832521001600 SMD-DIODE BAS 16 PHI
CD 02643 830931309900 SMD DIODE BAV99 AV215-G8
CD 02644 830931309900 SMD DIODE BAV99 AV215-G8
CD 02646 830931309900 SMD DIODE BAV99 AV215-G8
CD 02647 830931309900 SMD DIODE BAV99 AV215-G8
CD 02648 830931309900 SMD DIODE BAV99 AV215-G8
CD 04101 833065581800 MELF DIODE PRLL5818 PHI AV2
CD 04202 832521001600 SMD-DIODE BAS 16 PHI
CF 04101 814054504100 SMD EMIFIL 1206 NFM4516P13C
CIC 00501 830582658100 SMD IC SAA6581T PHI AV215CIC 00801 720085385000 SMD IC UPD703078AYGC-PROG KPL.
CIC 00802 720085384900 SMD IC BR24C16F-E2 PROG.KPL
CIC 00803 830588027800 SMD IC UPC29S78GR-E2 NEC
CIC 01003 830577601400 SMD IC 74HC14ADR2 SOIC14 A
CIC 01581 830584746000 SMD IC TDA7460
CIC 04101 830576267300 SMD IC LM2672-5.0 NSC
CIC 04121 830578705300 SMD IC 74HC4053 AV215-G16
CL 04101 814052994600 SMD DR 56UH 20% 7B08N SAG
CQ 00501 838270404300 SMD QUARZ #43 4,332MHZ
Es gelten die Vorschriften und Sicherheitshinweise
gemäß dem Service Manual "Sicherheit", Mat.-Nummer 720108000000, sowie zusätzlich die eventuell abweichenden, landesspezifischen Vorschriften!
( ! )
POS. NR. MATERIAL-NR. BEZEICHNUNG
POS. NO. PART NUMBER DESCRIPTION
CQ 00821 860210360000 SMD KERRES #600 16MHZ CSCTV
CQ 00881 838220079700 SCHWINGQUARZ 32,768 KHZ /12
CR 02649 831150201400 SMD VDR 0603 SIOV-CN0603K14
CR 02651 831150201400 SMD VDR 0603 SIOV-CN0603K14
CR 02652 831150201400 SMD VDR 0603 SIOV-CN0603K14
CR 02653 831150201400 SMD VDR 0603 SIOV-CN0603K14
CS 02641 194011110000 SCHALTER SPVG21 ALPS
CT 00301 830100684800 SMD TRANS BC848C/ BC847C P
CT 00302 830100685800 SMD TRANS BC858C/ BC857C P
CT 00303 830100684800 SMD TRANS BC848C/ BC847C P
CT 00801 830100685800 SMD TRANS BC858C/ BC857C P
CT 00802 830100684800 SMD TRANS BC848C/ BC847C P
CT 00871 830116013500 SMD TRANS BCR135 SIE AV215
CT 00951 830100685800 SMD TRANS BC858C/ BC857C P
CT 00971 830100385800 SMD TRANS BC858B/ BC857B P
CT 00972 830100684800 SMD TRANS BC848C/ BC847C P
CT 00981 830100484800 SMD TRANS BC848B/ BC847B P
CT 00982 830100684800 SMD TRANS BC848C/ BC847C P
CT 01001 830100681800 SMD TRANS BC818-40/ BC817-4
CT 01002 830100681800 SMD TRANS BC818-40/ BC817-4
CT 01003 830100681800 SMD TRANS BC818-40/ BC817-4
CT 01004 830100681800 SMD TRANS BC818-40/ BC817-4
CT 01011 830100681800 SMD TRANS BC818-40/ BC817-4
CT 01012 830100681800 SMD TRANS BC818-40/ BC817-4
CT 01013 830100681800 SMD TRANS BC818-40/ BC817-4
CT 01014 830100681800 SMD TRANS BC818-40/ BC817-4
CT 01016 830100681800 SMD TRANS BC818-40/ BC817-4
CT 01017 830100681800 SMD TRANS BC818-40/ BC817-4
CT 01401 830100484800 SMD TRANS BC848B/ BC847B P
CT 01402 830100484800 SMD TRANS BC848B/ BC847B P
CT 01481 830100680800 SMD TRANS BC808-40/ BC807-4
CT 01482 830116013500 SMD TRANS BCR135 SIE AV215
CT 01582 830116013500 SMD TRANS BCR135 SIE AV215
CT 01811 830100484800 SMD TRANS BC848B/ BC847B P
CT 02601 830100684800 SMD TRANS BC848C/ BC847C P
CT 02602 830100685800 SMD TRANS BC858C/ BC857C P
CT 02603 830100684800 SMD TRANS BC848C/ BC847C P
CT 02604 830100684800 SMD TRANS BC848C/ BC847C P
CT 02605 830100684800 SMD TRANS BC848C/ BC847C P
CT 02606 830100684800 SMD TRANS BC848C/ BC847C P
CT 02607 830100681800 SMD TRANS BC818-40/ BC817-4
CT 02608 830100680800 SMD TRANS BC808-40/ BC807-4
CT 02609 830116013500 SMD TRANS BCR135 SIE AV215
CT 02611 830116013500 SMD TRANS BCR135 SIE AV215
CT 04122 830116013500 SMD TRANS BCR135 SIE AV215
CT 04201 830116013500 SMD TRANS BCR135 SIE AV215
CT 04204 830100684800 SMD TRANS BC848C/ BC847C P
G 01001 194110260000 ENCODER SRGP20 ALPS
IC 01471 830500780800 IC 7808 5% SGS
IC 01601 830540827500 IC TA8275H TOS
IC 02001 830520495300 IC L4953G SGS
L 02001 814052289000 DR 97UH 15% LIEGEND LIONS
R 02011 S 831510016000 SI POLYSWITCH 1,6A 30V RUE1
S 02201 194010770000 TASTSCHALTER 2-FACH SKHTLB
SI 01701 S 831570310000 FLACH-SI. 10 A
The regulations and safety instructions shall be valid
!
as provided by the "Safety" Service Manual, part
number 720108000000, as well as the respective
national deviations.
ÄNDERUNGEN VORBEHALTEN / SUBJECT TO ALTERATION
GRUNDIG Service Allixx SCD 5410 DAB
 Loading...