

Page 1

CLOCK RADIO
SC 990
DE
NL
EN
PL
FR
DA
IT
SV
PT
FI
ES
TR
Page 2

____________________________________________________________________________
DEUTSCH 03 -18
ENGLISH 19 - 34
FRANÇAIS 35 - 50
ITALIANO 51 -66
PORTUGUÊS 67 - 82
ESPAÑOL 83 - 98
NEDERLANDS 99 - 114
POLSKI 115 - 130
2
DANSK 131 - 146
SVENSKA 147 - 162
SUOMI 163 - 178
TÜRKÇE 179 - 197
Page 3

-----------------------------------------------------------------------------------------------
SC 990
--------------------------------------------------------------------------------------------------------------------------------------------------
Packing contents
SC 990
Remote control
1 battery (Lithium CR2032)
Mains adapter 5.9 V, 1500 mA
Operating manual
SET-UP AND SAFETY
Please note the following instructions when setting up the system:
7
The device is designed for the playback of
audio signals. Any other use is expressly prohibited.
7
If you want to set up the device on wall
shelves or in cupboards, please ensure that
it is adequately ventilated. There must be at
least 10 cm of space at the side, above and
behind the device.
7
Do not cover the device with newspapers,
table cloths, curtains, etc.
7
When setting up the device, remember that
furniture is often coated with various types of
varnish and plastic, which often contain chemical additives. These additives may cause corrosion to the feet of the unit. This may leave
stains on the surface of the furniture which can
be difficult or impossible to remove.
7
If the device is exposed to sudden changes in
temperature, for example when taken from the
cold into a warm room, wait at least two hours
before using it.
7
The device is designed for use in dry rooms. If
you use it outdoors, make sure it is protected
from moisture such as dripping or splashing
water.
7
Only use the device in a moderate climate.
7
Do not place the device close to heating units
or under direct sunlight, as this will impair cooling.
Special features
The device receives FM radio stations.
The MP3 music data format can played back
via the USB input using a MP3 Player, an USB
memory stick or a card reader.
Use the Aux input to connect any other audio
sources.
7
Do not place any vessels containing liquids,
such as vases, on the device.
7
Do not place any objects such as burning candles on the device.
7
Thunderstorms are a danger to all electrical
devices. Even if the device is switched off, it
can be damaged by a lightning strike to the
mains cable. Always disconnect the mains
cable during a storm.
7
Continuous use at high volume
level can cause damage to the
user’s hearing.
7
If malfunctions occur due to static electricity
charges or brief mains voltage surges, reset
the device. To do this, pull out the mains
adapter and connect it again after a few seconds.
7
Do not open the device casing under any circumstances. Warranty claims are excluded for
damage resulting from improper handling.
7
Do not connect any other equipment while the
device is switched on.
7
Switch off the other devices as well before connecting them.
7
Only plug the device into the mains socket after you have connected the external devices.
7
Make sure the power plug is freely accessible.
ENGLISH
19
Page 4
OVERVIEW
----------------------------------------------------------------------------------------------------------------------------------
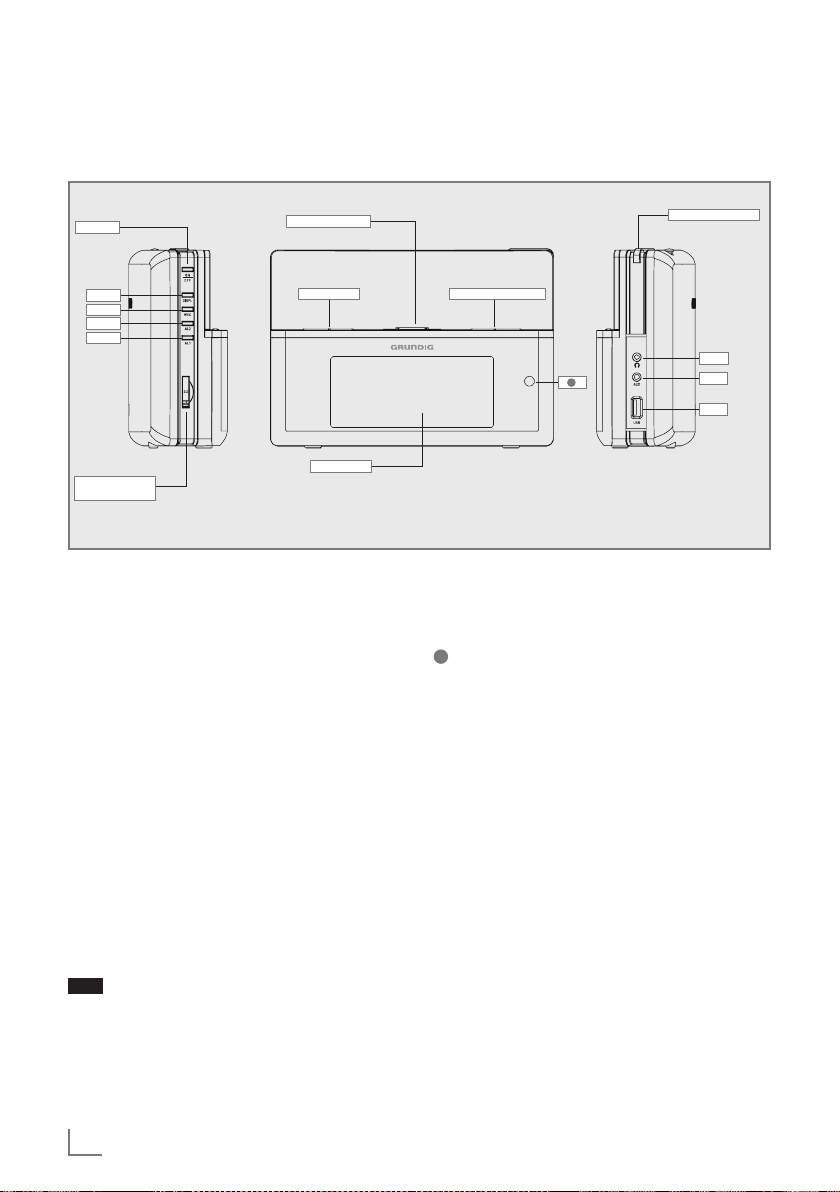
The device controls
The front, the right and the left side of the device
ON/OFF
DISPL
WEC
AL2
AL1
Back-up battery
compartment
Optical indicator
- VOLUME +
DISPLAY
ON/OFF Switches the device to and from
stand-by mode.
DISPL Displays information about the
FM radio stations as well as
when using an USB device.
WEC Deactivates and activates the
alarm function for the weekend.
AL1 AL2 Press and hold down to start set-
ting the alarm times.
Press to activate and deactivate
the alarm times.
- VOLUME + Adjusts the volume.
Back-up battery compartment
For inserting the back-up battery.
Optical
indicator
Lights up, if the Alarm timer
swiched on the device.
Display of the device; for more
details, please see “The display”
section.
SNOOZE/DIMMER
- PRESET/ ALBUM +
U
AUX
USB
– PRESET/
ALBUM +
In FM mode: Selects the presets.
In USB mode: Selects the file
folders.
Infrared sensor for remote control
signals.
SNOOZE/
DIMMER
Interrupts the alarm function.
Adjusts the brightness of the display to one of three levels (high,
medium, low).
U Headphone socket for connecting
a stereo headphone set with a
jack plug (ø 3.5 mm). This automatically switches off the loudspeakers.
AUX Audio signal input for connecting
an external device.
USB USB port type A. For connecting
MP3 player, a USB memory stick
or a card reader.
20
ENGLISH
Page 5
OVERVIEW
----------------------------------------------------------------------------------------------------------------------------------
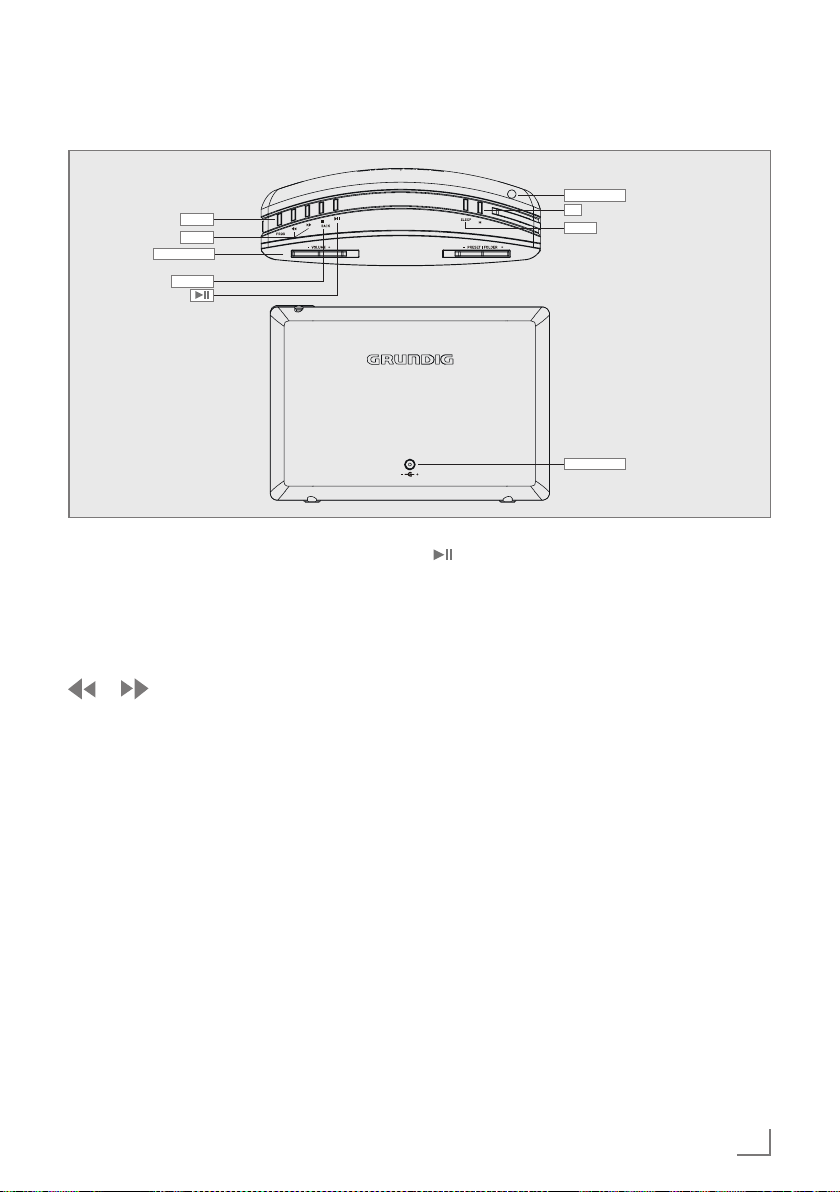
The top and the back of the device
PROG
§ $
- VOLUME +
7/BACK
ANTENNA
M
SLEEP
DC IN
PROG In FM radio mode: Press for acti-
vating the memory function and
confirming the selected station.
In stand by mode: Press and hold
down to start setting the time and
date.
In FM radio mode: Press to start
the station search. It stops when a
station is found.
In USB mode: Briefly press to
search backwards or forwards
for files or tracks. Press and hold
to search backwards and forwards for a certain passage of
a track.
7/BACK Interrupts the playback (in USB
mode).
Starts and pauses playback (in
USB mode).
M Selects the different audio sourc-
es for USB, FM and AUX modes.
SLEEP Activates the setting for the sleep
timer.
ANTENNA Antenna for FM reception.
DC IN For connecting the power supply
unit (5,9 V
>
1500 mA).
Note:
7
The only way to fully disconnect the device
from the mains is to pull out the plug.
ENGLISH
21
Page 6
OVERVIEW
----------------------------------------------------------------------------------------------------------------------------------
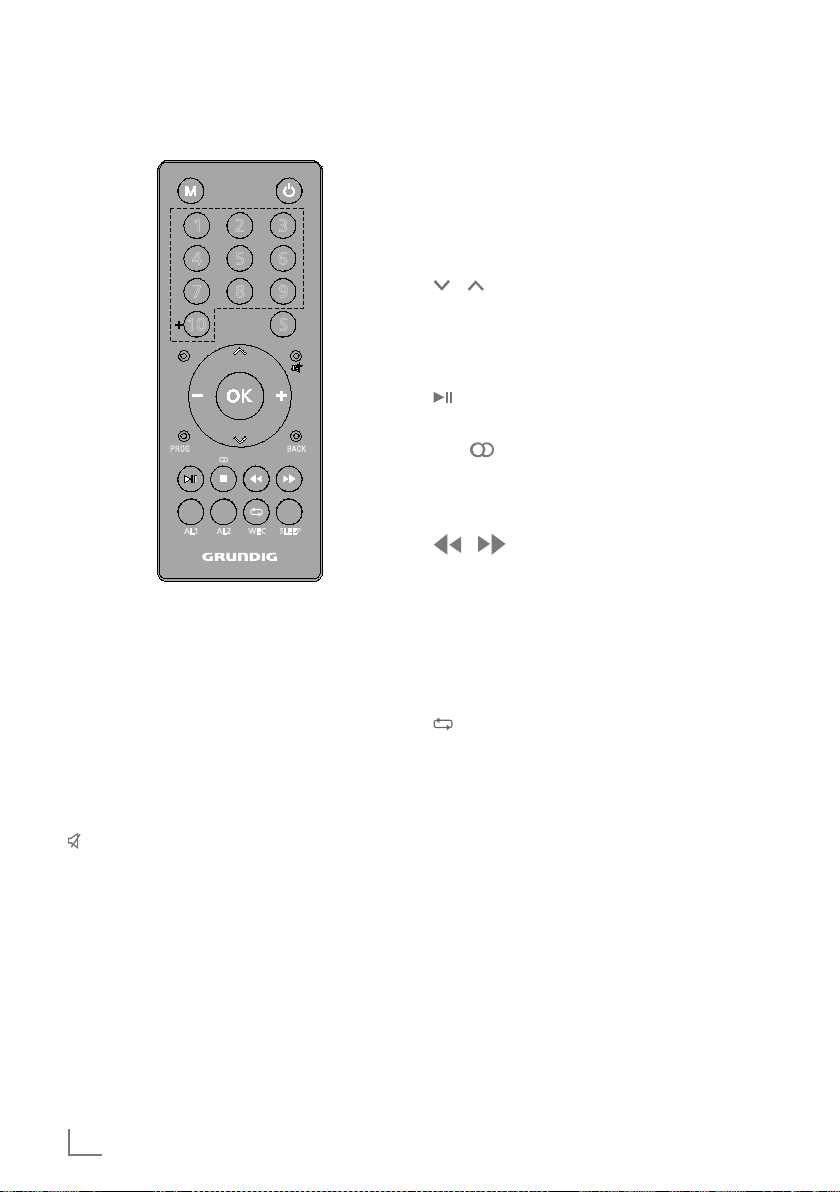
The remote control
31 2
54
6
7 8
10
PROG
AL1 AL2 WEC SLEEP
9
S
BACK
8 Switches the device to stand-by
mode and from stand-by mode to
the last input source selected.
M Selects the audio sources for USB,
FM and AUX In modes.
1-9, +10 Number buttons, selects presets for
FM stations (in FM radio mode).
S Adjusts the brightness of the display
to one of three levels.
Switches the loudspeaker of the de-
vice to mute and back on again.
DISPL Displays information on the FM radio
stations as well as when using the
USB.
PROG In FM radio mode: Press for activat-
ing the memory function and confirming the selected station.
In stand by mode: Press and hold
down to start setting the time and
date.
BACK No function.
/ In FM radio mode: Select presets.
In USB mode: Select folders.
OK No function.
– + Sets the volume.
Starts and pauses playback (in USB
mode).
7 / Interrupts the playback (in USB
mode).
In FM radio mode: Press to switch
between stereo and mono.
In FM radio mode: Press to start the
station search. It stops when a station is found.
In USB mode: Briefly press to skip
backwards or forwards for files or
tracks. Press and hold to search
backwards and forwards for a certain passage of a track.
WEC In USB mode: Repeats all files.
In timer mode: Deactivates and activates the alarm for the weekend.
AL1 AL2 Press and hold down to start setting
the alarm times.
Press to activate and deactivate the
alarm times.
SLEEP Sets and deactivates the sleep timer.
22
ENGLISH
Page 7

OVERVIEW
----------------------------------------------------------------------------------------------------------------------------------
The display
In stand-by: Displays the current
87.65 MHz
In USB mode: Displays informa-
In AUX mode: Displays current
f The device is receiving a RDS
time and date.
Displays the volume setting.
In FM radio mode: Displays the
frequency, the station name or
the station type, RDS information
if provided and the preset for a
saved radio station.
tion in the file.
time and date.
station.
) A stereo station is being re-
ceived.
e Playback.
II Pauses playback.
PROG The programmed presets.
The current album is repeated
(flashing).
The current file is repeated.
USB The selected source.
FM AUX
≤ The sleep timer is active.
WEC The alarm timer for the week-
end is deactivated.
AL1 AL2 The alarm timer is active.
e The switch on timer for the
buzzer is active.
§ The switch on timer for FM/USB
is active.
ENGLISH
23
Page 8

CONNECTION AND PREPARATION
---------------------------------------
Connecting external devices
Note:
7
Switch the device off before you connect
external devices.
1 Use a standard audio cable to connect the
audio output of the external device to the socket »AUX« on the right of the device.
Connecting an MP3 player, a
USB memory stick or a card
reader
The device supports most MP3 Players, USB
memory sticks or card readers.
Note:
7
The device must be switched off while the
USB connection is being made. If it is not
switched off, data could be lost.
1 Connect the USB interface of the MP3 player
or the card readers to the »USB« socket on
the device (on the right) using a standard
USB cable;
or
insert the USB plug of the USB memory stick in
the »USB« socket on the device (on the right).
Notes:
7
To remove the MP3 player, the USB
memory stick or the card readers, switch off
the device and pull out the data medium.
7
The USB socket on the device does not
support a connection for a USB extension
cable and is not designed for directly connecting to a computer.
Connecting the headphones
1 Insert the headphone plug (ø 3.5 mm) into
the »U« socket on the right side of the device.
– The loudspeaker of the device is switched
off.
Note:
7
Excessive sound pressure from the ear-
phones or headphones can cause hearing
loss.
Connecting to the mains
supply
Notes:
7
Check that the mains voltage on the type
plate (on the back of the power adapter)
corresponds to your local mains supply. If
this is not the case, contact your specialist
dealer.
7
Before connecting the power adapter plug
to the wall socket, ensure that all other connections have been made.
1 Insert the plug of the supplied power adapter
cable into the »DC IN« socket on the back of
the device.
2 Plug the power adapter into the wall socket.
Caution:
7
The device is connected to the mains with the
power adapter. Pull out the power adapter
plug if you want to completely disconnect
the device from the mains.
7
Make sure that the power adapter plug is
easily accessible during operation and not
hindered by other objects.
24
ENGLISH
Page 9

CONNECTION AND PREPARATION
3
---------------------------------------
Installing battery in the remote control
1
1
2
1
1 Open the battery compartment by pushing the
small latch to the left and at the same time sliding the battery tray out.
2 Insert one CR2032 battery into the battery
tray with the correct polarity as shown on the
battery tray.
3 Slide the battery tray into the battery compart-
ment until it clicks into its place.
Installing back-up battery in
the device
During mains operation, the back-up battery ensures that the stored settings are not lost in the
case of a power failure or when the device is
briefly disconnected from the mains.
1 Open the back-up battery compartment on
the left side of the device by pushing the small
latch upwards and at the same time sliding the
battery tray out.
2 Insert one CR2032 battery into the battery
tray with the correct polarity as shown on the
battery tray.
3 Slide the battery tray into the battery compart-
ment until it clicks into its place.
Notes:
7
Do not expose the batteries to extreme heat,
caused for example by direct sunlight, heaters or fire.
7
Remove the batteries when they are flat or
when you know that the device will not be
used for a long period of time.
Environmental note:
7
Batteries, including those which do not con-
tain heavy metal, should not be disposed
of with household waste. Always dispose
of used batteries in accordance with local
environmental regulations.
ENGLISH
25
Page 10

SETTINGS
---------------------------------------------------------------------------------------------------------------------------------------
Initial setup
When the device is connected to the mains
for the first time, »0:00« starts flashing and
»WELCOME TO ...« appears on the display.
Searching for and saving FM
stations
You can fill 20 presets with the FM radio stations
of your choice. If you assign the presets again,
the previously saved stations will be overwritten.
1 Switch on the device from stand-by mode
by pressing »8« on the remote control or
»ON/OFF« on the device.
2 Press »M« repeatedly until »FM« appears on
the display.
3 To tune stations automatically:
Press and hold » « or » «.
When you release the button, the automatic
search stops at the next station.
– If RDS information is transmitted by the
broadcaster, then the device shows the station name.
To tune stations manually
Move the frequency forward in brief steps by
repeatedly pressing » « or » «.
– The frequency goes up or down in 50 kHz
steps.
4 Press »PROG«.
– An available preset number flashes on the
display.
5 To select a preset number, press
»– PRESET/ALBUM +« on the device or
» « or » « on the remote control within
5 seconds.
6 To store the selected channel press »PROG«
within 5 seconds.
– Display: The stored station with the preset
number is shown.
7 To search and store more stations, repeat steps
3 to 6 as many times as necessary.
Setting the time and date
1 Switch off the device by pressing »8« on the
remote control or »ON/OFF« on the device.
2 Press and hold down »PROG«.
– Display: »12 H« or »24 H« flashes.
3 Press » « or » « to chose 12 H or 24 H
mode and press »PROG« to confirm.
– Display: The hour flashes.
4 Press » « or » « briefly to set the hours
step by step or hold down to run through the
hours continuously and press »PROG« to confirm.
– Display: The minutes flash.
5 Press » « or » « briefly to set the minutes
step by step or hold down to run through the
minutes continuously and press »PROG« to
confirm.
– Display: The year flashes.
Note:
7
When the minute displays changes from
»59« to »00«, this does not affect the hour
display.
6 Press » « or » « briefly to set the year
step by step or hold down to run through the
years continuously and press »PROG« to confirm.
– Display: The month flashes.
7 Press » « or » « briefly to set the month
step by step or hold down to run through the
months continuously and press »PROG« to
confirm.
– Display: The day flashes.
8 Press » « or » « briefly to set the day step
by step or hold down to run through the days
continuously and press »PROG« to confirm.
– Display: The current time and date.
26
ENGLISH
Page 11

SETTINGS
---------------------------------------------------------------------------------------------------------------------------------------
---------------------------------------------------------------------------------------
Adjusting the display brightness
1 Press repeatedly »SNOOZE/DIMMER« on
the device or »S« on the remote control to
change the brightness of the display in three
levels (high, medium, low).
Notes:
7
Minimum power consumption in stand-by
mode is only achieved if the backlight in the
display is switched to minimum.
7
Your device is equipped with a sensor which
measures the brightness of the environment
and adjust the brightness of the display.
GENERAL FUNCTIONS
Switching on and off
1 Switch on the device from stand-by mode
by pressing »8« on the remote control or
»ON/OFF« on the device.
– Display: The system switches to the last
source selected.
2 Switch the device to stand-by mode by press-
ing »8« on the remote control or »ON/OFF«
on the device.
– Display: The current time and date.
Note:
7
The only way to disconnect the device from
the mains supply is to pull out the plug from
the wall socket.
Selecting the input source
1 Press »M« repeatedly to select »USB«, »FM«
or »AUX« on the display.
Adjusting the volume
1 Adjust the volume by pressing »_« or »+« on
the remote control;
or
»– VOLUME +« on the device.
Muting
You can switch the device speaker to and from
mute mode using this function.
1 Activate mute with » « on the remote control.
– Display: »MUTE ON«.
2 Deactivate mute with » « on the remote control.
– Display: »MUTE OFF«.
ENGLISH
27
Page 12

USB MODE
----------------------------------------------------------------------------------------------------------------------------------
Playing the contents of an
USB data medium
1 Switch off the device from stand-by mode
by pressing »8« on the remote control or
»ON/OFF« on the device.
2 Connect the USB interface of the MP3 player
or the card reader to the »USB« socket on the
device (on the right side), using a standard
USB cable;
or
insert the USB plug of the USB memory stick
in the »USB« socket (on the right side) on the
device.
3 Switch on the device from stand-by mode
by pressing »8« on the remote control or
»ON/OFF« on the device.
4 Press »M« repeatedly until »USB« appears on
the display.
– Display: »READ« and then the content of the
USB (Album and Files).
5 Select the album by pressing »– PRESET/
ALBUM +« on the device or » « or » « on
the remote control.
6 Select the file or track by pressing » « or
» «.
7 Press » « to start playback.
– Display: Playback starts, file information ap-
pears on the display.
8 Press »7/BACK« on the device or »7/ «
on the remote control to stop playback.
Displaying information
1 During playback, press »DISPL« on the re-
mote control.
– Display: The album and file numbers, the
ID3 Tag, the title, the artist, the album is
shown.
Pausing and continue
playback
1 Press » « during playback to pause.
– Display: »II«.
2 Continue playback by pressing » «.
Repeating the current track
1 During playback, press » « or » «.
– Display: The current album and file numbers
appear, the track is played again from the
start.
Selecting another file or track
During playback
1 During playback, press » « or » « repeat-
edly until the desired track or file is reached.
– Playback of the selected file or track starts
automatically.
In stop mode
1 In stop mode, press » « or » « until the
desired track or file is reached.
2 Start playback of the file or track by pressing
» «.
Resume function
When the USB operation is resumed after switching the device off and then on, or if the program
source has been changed, playback continues
from the start of the last selected title.
This function is not possible if another MP3
player or USB memory stick is connected.
To initialise the new medium and to play the first
title press »7/BACK« twice on the device or
»7/ « on the remote control.
ENGLISH
28
Searching for a passage
within a file or track
1 During playback, press and hold » « or
» «.
2 Release » « or » « when the passage has
been found.
– Playback continues.
Page 13

USB MODE
----------------------------------------------------------------------------------------------------------------------------------
Repeating Album
1 During playback press » /WEC« once on
the remote control.
– Display: » « flashes.
– The current album is played back repeat-
edly.
2 To quit this function, press repeatedly
» /WEC« on the remote control until the
symbol disappears.
– Display: » « disappears.
Repeat file (one)
1 During playback press » /WEC« twice on
the remote control.
– Display: » «.
– The current file or track are played back re-
peatedly.
2 To quit this function, press repeatedly
» /WEC« on the remote control until the
symbol disappears.
– Display: » « disappears.
Notes:
7
The USB socket on the device does not sup-
port a connection for a USB extension cable
and is not designed for direct connection to
a computer.
7
The USB socket of this device is a standard
socket. Due to rapid advances in technology and new manufacturers appearing every
day, the compatibility of USB memory sticks
can only be partially guaranteed.
7
If USB operation is impaired or is not possi-
ble, this does not indicate a device malfunction.
7
Bi-directional data transfer as defined for ITE
devices in EN 55022/EN 555024 is not
possible.
7
USB transfer itself is not in an operating
mode. It is only an additional function.
7
Never remove USB data medium during
operation. This could damage the USB data
medium and the device. Any such damage
will invalidate your warranty.
ENGLISH
29
Page 14

FM MODE
--------------------------------------------------------------------------------------------------------------------------------------
--------------------------------------------------------------------------------------------------------------------------------
Selecting the tuner input
source
1 Press »M« repeatedly on the remote control
or on the device until »FM« appears on the
display.
Selecting stations – from presets
1 In the »FM« mode, press »1« to »+10« on the
remote control to select the presets from 1 to
20 or press »– PRESET/ALBUM +« on the
device repeatedly until the required preset is
found.
– The frequency of the station and the preset
number appear on the display and the station is played then.
Note:
7
To select presets from 10 to 20, press +10
and then the number button corresponding
to the ones' place. For example to select 18,
press »+10« and »8« consecutively.
Setting stereo or mono reception (only in FM radio mode)
1 Press »7/ « on the remote control to switch
between stereo and mono modes.
Displaying RDS station information
If the device is receiving a RDS station, the station name and »R.D.S« appear on the display
(if no information is available, the reception frequency appears on the display).
Station and track information appear as ticker
text (radio text). If radio text is not available,
other information can be displayed as an alternative.
1 To display information on the current RDS sta-
tion, press »DISPL« repeatedly.
– The following information appear:
The current programme type (PTY), e.g.
»POP MUSIC«. »NO PS«, »NO TEXT«, »NO
TYPE« appears if no information is available.
Note:
7
The information is displayed continuously
until »DISPL« is pressed again.
AUX MODE
Listening to an external
source
You can listen to the audio signal from the external device connected through your device
speaker.
1 Use a standard audio cable (not supplied) to
connect »AUX« on the right side of the de-
vice to an AUDIO OUT socket on the external
equipment.
2 Switch on the device from stand-by mode
by pressing »8« on the remote control or
»ON/OFF« on the device.
ENGLISH
30
3 Press »M« repeatedly until »AUX« appears on
the display.
4 Start playback on the external device.
Page 15

TIMER MODE
--------------------------------------------------------------------------------------------------------------------------
Your device has 2 timer modes:
– The alarm timer, which switches the device
on at the set time and wakes you with the
input source you selected.
– The sleep timer, which switches the device
off at a preset time.
Alarm timer
Setting the alarm time
1 Press and hold down »AL1«.
– Display: The last alarm time set and
»ON TIME« »AL1« and the hour flash alternately.
2 Press » « or » « briefly to set the hours
step by step or hold down to run through the
hours continuously.
Press »AL1« to confirm.
3 Press » « or » « briefly to set the minutes
step by step or hold down to run through the
minutes continuously.
Press »AL1« to confirm.
– Display: The alarm on time is set and
»OFF TIME« appears on display.
4 Press » « or » « briefly to set the hours
step by step or hold down to run through the
hours continuously.
Press »AL1« to confirm.
5 Press » « or » « briefly to set the minutes
step by step or hold down to run through the
minutes continuously.
Press »AL1« to confirm.
– Display: The alarm off time is set and
»SOURCE« appears on display.
6 Press » « or » « briefly to set the source
step by step or hold down to run through
»RADIO«, »BUZZ« and »USB« continuously.
Press »AL1« to confirm.
– Display: The alarm source is set and
»VOLUME« appears on display.
7 Press » « or » « briefly to set the volume
step by step or hold down to run through
»10-31« and »MAX« continuously.
Press »AL1« to confirm.
– Display: The alarm is set and »AL1« appears
on the display.
Notes:
7
To set the second alarm time (»AL2«) repeat
steps 1 to 7.
7
If no button is pressed for 10 seconds while
setting, the system will quit the process automatically, and you have to start again.
Interrupting the alarm timer
1 While the alarm is sounding, press
»SNOOZE/DIMMER«.
Viewing the alarm time
1 Press »AL1« or »AL2«.
Note:
7
If no other button is pressed, the device
switches back automatically to the current
time after 10 seconds.
Cancelling the alarm for the day
1 While the alarm is sounding, press
»ON/OFF« on the device or »8« on the
remote control.
– The alarm signal stops, the alarm remains at
the set time for the next day.
Deactivating and activating alarm
in stand-by
1 To deactivate the alarm, press »AL1« or
»AL2« once.
– Display: »AL1« or »AL2« disappears. The
set alarm time is stored.
2 To activate the alarm, press »AL1« or »AL2«
again.
– Display: »AL1« or »AL2« appears.
ENGLISH
31
Page 16

TIMER MODE
--------------------------------------------------------------------------------------------------------------------------
Deactivating and activating the
alarm for the weekend
1 In stand-by, press »WEC« on the remote con-
trol or on the device.
– Display: »WEC«. The alarm function is deac-
tivated for the weekend.
2 To activate the alarm, press »WEC« again.
– Display: »WEC« disappears. The alarm
function is activated for the weekend.
Sleep timer
Setting the sleep timer
1 Switch on the device by pressing »8« on the
remote control or »ON/OFF« on the device
and select the preferred sound source.
2 Press »SLEEP«.
3 To set the switch-off time from »90«, »75«,
»60«, »45«, »30«, »15«, »OFF« press »SLEEP«
repeatedly.
– Display: »≤« and the switch-off time ap-
pears.
– After the selected time has elapsed the
device switches off, »≤« disappears.
Cancelling the sleep timer
1 To switch off the sleep timer before the set
switch-off time, refer to previous section and
select »OFF« at step 3;
or
switch the device to stand-by mode by press-
ing »8« on the remote control or »ON/OFF«
on the device.
32
ENGLISH
Page 17

INFORMATION
------------------------------------------------------------------------------------------------------------------
Cleaning the device
Pull out the power cord from the wall socket.
Clean the device by using a soft cloth slightly
moistened with a mild detergent solution. Do not
use a solution containing alcohol, spirits, ammonia or abrasives.
Environmental note
This product has been manufactured with high quality parts and
materials which can be reused
and are suitable for recycling.
Therefore, do not dispose the product with normal domestic waste at the end of its service life.
Take it to a collection point for the recycling of
electrical and electronic equipment. This is indicated by this symbol on the product, in the operating manual and on the packaging.
Please consult your local authorities to learn the
nearest collection point.
Help protect the environment by recycling used
products.
Technical data
This device is noise–suppressed according to the applicable EU direc-
tives.
This product fulfils the European directives
2004/108/EC, 2006/95/EC and 2009/125/
EC.
The type plate is located on the bottom of the
device.
System
Operating voltage: 100 – 240 V~ , 50/60 Hz
with adapter
Output: 5.9 V > 1500 mA
Adapter model no: OH-1015A0591500U-VDE
Max. power
consumption: 9 W
Receiver unit
Reception range FM: 87.5 ...108.0 MHz
File format
MP3
USB
USB 2.0 compatible FAT 32
Dimensions and weight
Dimensions: W x H x D
200 x 140 x 70 mm
Weight: 0.77 kg
Technical and design modifications reserved.
ENGLISH
33
Page 18

INFORMATION
------------------------------------------------------------------------------------------------------------------
Troubleshooting
Not every kind of sound interference is caused
by a defect in your device. Cables that have
accidentally been disconnected and flat batteries for the remote control will impair functioning. If the following measures do not
resolve the problem satisfactorily, please visit
www.grundig.com, product range:audio, internet radios or contact your specialist dealer.
General Faults
Problem Possible cause/remedy
No sound. The volume setting is too low – increase the volume.
The headphones are plugged in – disconnect the headphones.
Power cable is not properly connected – connect the power cable properly.
Mute is activated – deactivate mute.
The device does
not react when the
buttons are pressed.
Static electrical discharge – switch off the device, disconnect the power
cable and plug it in again after a few seconds.
The remote control
does not work.
Poor radio
reception.
ENGLISH
34
The battery is flat – replace the battery.
The remote control is out of range of the device.
Weak antenna signal, check antenna.
Interference from electrical devices such as televisions, video recorders,
computers, neon lamps, thermostats or motors.
Keep the device away from such equipment.
Page 19

www.grundig.com
72011 411 5400 12/09
 Loading...