

Page 1

FINE ARTS AUDION
WIRELESS HIFI SYSTEM
Operating manual
ENGLISH
55404 941 1200
Page 2

2
CONTENTS
________________________________________________________________________
5 FineArts Audion
5 The system operation of your HiFi
7 Special features of your HiFi system
8 Packing contents/accessories
9 Set-up and safety
10 The wireless transmission system
11 Overview
11 The HiFi system controls
12 The back and bottom of the HiFi system
13 The remote control
15 The remote control menu system
Dear customers,
This operating manual assumes that your authorised dealer has provided you with your
FineArts Audion system in an assembled state, connected and ready for operation.
If you want to change the settings yourself or look for new radio stations, please read the
enclosed installation manual.
The operating manual also describes the digital radio operation (Digital Audio Broadcasting) and illustrates the display options for this operating mode. DAB operation is only
possible with an integrated DAB module (optional).
Page 3

ENGLISH
3
CONTENTS
__________________________________________________________________________________
17 General functions
17 Switching on
17 Switching off
18 Switching on from standby
18 Selecting the input source
19 Switching to standby
19 Organising the HiFi system display
20 Volume and tone
20 Adjusting the volume
20 Adjusting the treble, bass, balance and fader
21 Sound setting
22 Switching loudness on and off
22 Muting the HiFi system
22 Setting up additional pairs of loudspeakers
23 FM mode
23 Preparation
23 Selecting radio stations
25 Stereo/mono reception
26 RDS reception
30 DAB mode
30 Preparation
30 Selecting DAB stations
34 Additional functions in DAB mode
Page 4

4
CONTENTS
__________________________________________________________________________________
37 CD mode
37 General information about CDs
37 Preparation
38 Playing back a CD
41 Selecting a CD track
42 Additional functions
44 Playing back tracks in a selected order – creating a track memory
48 Sleep timer mode
49 Multi-room mode
49 Operating pairs of speakers in additional rooms
49 Switching the remote control to a pair of speakers in another room
50 Setting up different input sources for individual rooms
51 Information
51 Changing the remote control batteries
52 Other remote control operating modes
61 Rectifying minor problems
63 Technical data
64 GRUNDIG Service
Page 5
ENGLISH
5
FINE ARTS AUDION
________________________________________________
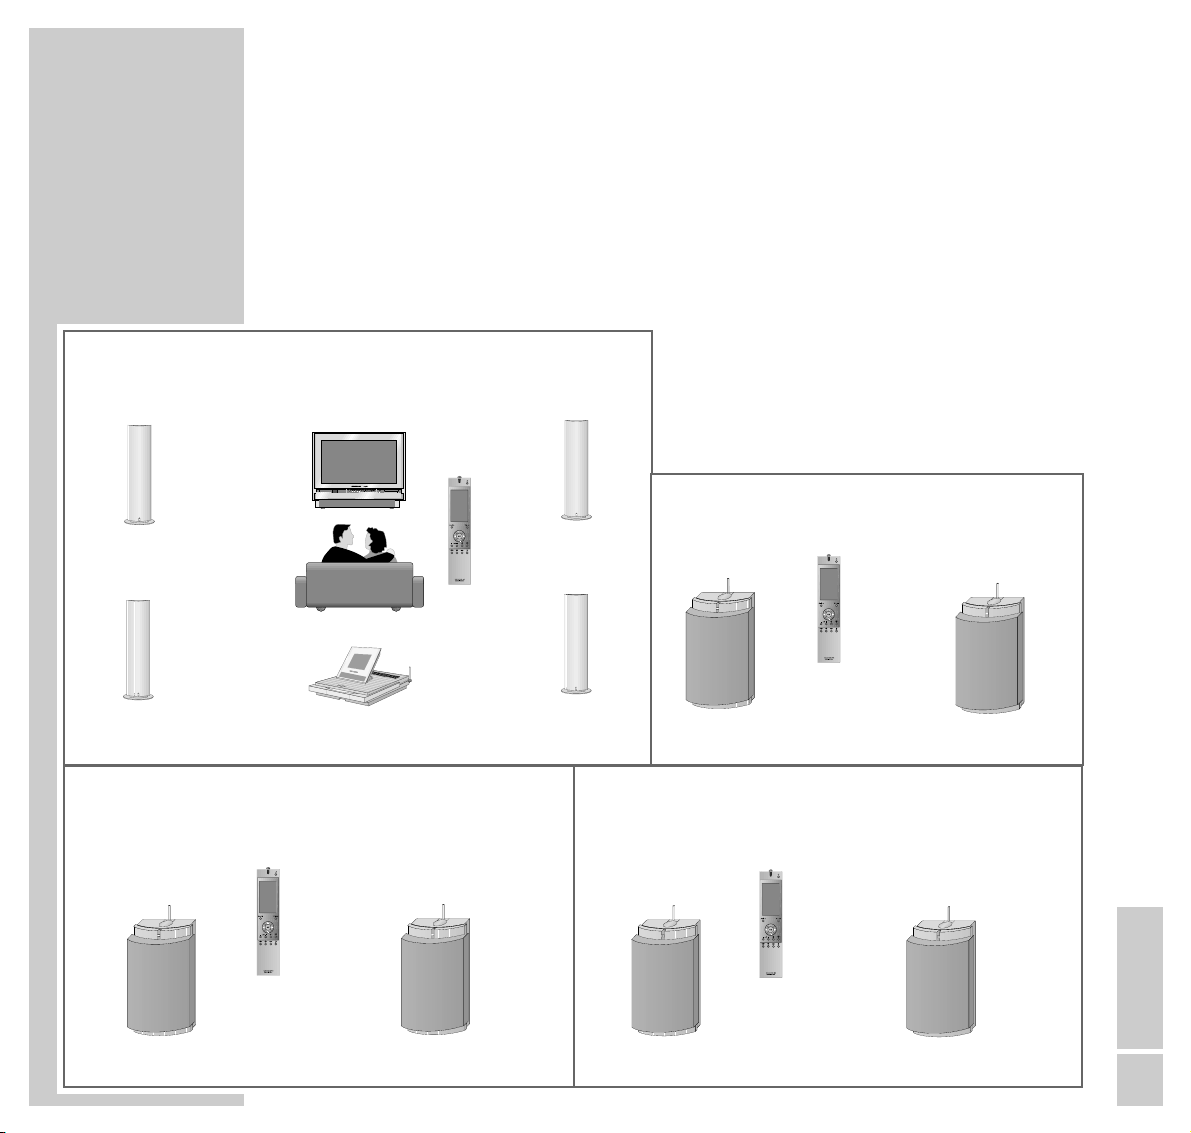
The system operation of your HiFi
The following illustration shows you the options for multi-room operation of
your HiFi system, and for operation in combination with other individual
Grundig components.
These options are explained on the following page.
LSP2
LSP2
RCD 8300 HiFi system
LSP2
LSP2
Television with WT2
I
Living room
LSP3
ǵ
LSP3
ǵ
LSP3
ǵ
LSP3
Study Bedroom
PR1
PR1
PR1
Guest room
LSP3
LSP3
PR1
TV operation
CD mode
CD mode
FM mode
Slider
Video in
Audio in
LR
Volume Program
S-VHS
ǵ
ǵ
ǵ
Page 6

6
FINE ARTS AUDION
__________________________________________________________________
The FineArts Audion system is made up of the following individual components:
– RCD 8300 HiFi system
– PR1 remote control
– LSP2 active loudspeaker
– LSP3 active loudspeaker
In multi-room mode, room 1 always refers to the room in which the HiFi system
is installed.
Within the framework of the overall system, the following operating modes are
possible:
– The HiFi system operates one or two pairs of loudspeakers in room 1.
– The HiFi system operates additional pairs of loudspeakers in other rooms (one
pair of speakers per room).
– In multi-room mode, two different input sources can be set for different rooms,
i.e. FM, CD and – if a DAB module is integrated – DAB.
– In multi-room mode, you can operate the HiFi system and the pairs of spea-
kers in the other rooms by means of a remote control or additional remote
controls.
– You can operate the HiFi system or a Grundig television (room 1) with a
remote control.
– Via the WT2 radio module, the television alternately operates the same louds-
peakers as the HiFi system (room 1). The WT2 radio module must be configured on the HiFi system.
Page 7

ENGLISH
7
FINE ARTS AUDION
__________________________________________________________________
Special features of your HiFi system
Perfect sound is not a question of size, but of quality. This system gives you clear
and vivid sound packaged in a timeless design.
The RCD 8300 is an elegant combination of tuner and CD operation, with the
added option of receiving digital radio stations (DAB). It can be used as a
standing device, or it can be mounted on the wall .
It uses a built-in transmitter to transfer data signals to the remote control and
audio signals to the loudspeakers.
All its components communicate without wires – even through walls.
The CD player has a CD text function. This means that if ”CD text” is provided
by a CD, the HiFi and remote control displays can show information on the artist
and the contents of the CD.
The large display of the RCD 8300 can be rotated by a motor in horizontal
mode, enabling you to read its information in comfort.
Up to nine pairs of loudspeakers – all in different rooms – can be operated with
the HiFi system. Their sound settings can be adjusted individually using the
remote control.
In combination with the WT2 radio module the RCD 8300 active loudspeakers
can also be used for operation with special Grundig televisions.
Page 8
8
PACKING CONTENTS/ACCESSORIES
____
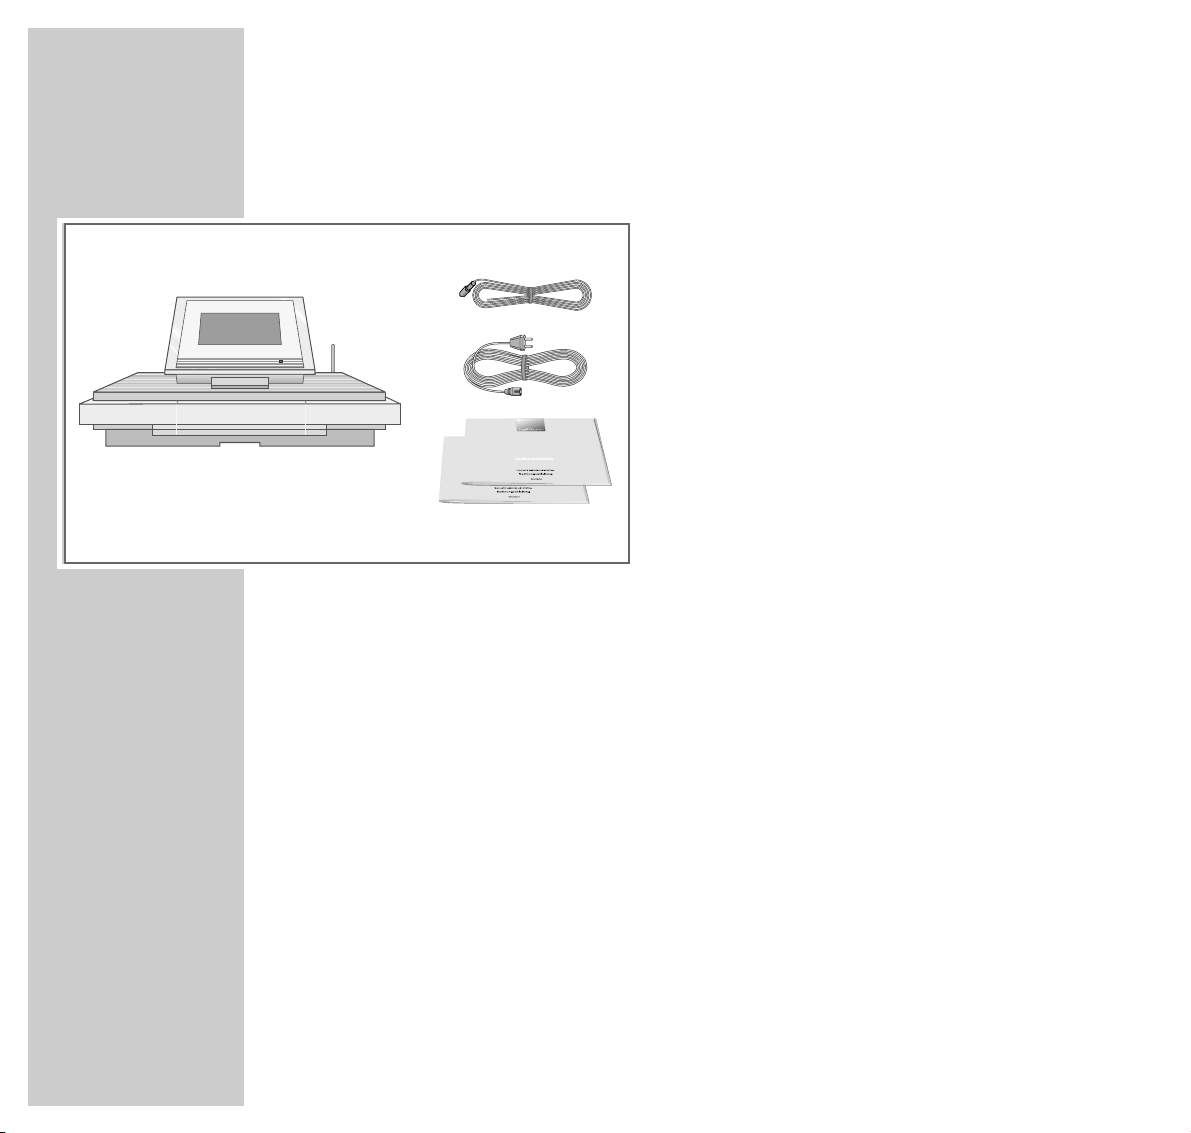
Packing contents
Accessories
Active loudspeakers (LSP2 or LSP3)
Personal Remote 1 remote control with
three 1.5 V mignon-type batteries
Wall bracket with cable channel
DAB module, DAB antenna
Ask your specialist dealer about
these modification options.
1 RCD 8300 HiFi system
2 Auxiliary antenna (Dipol)
3 Power cord
4 Operating manual
5 Installation manual
1
2
3
4
5
ǵ
FINE ARTS AUDION
FINE ARTS AUDION
Page 9
ENGLISH
9
SET-UP AND SAFETY
______________________________________________
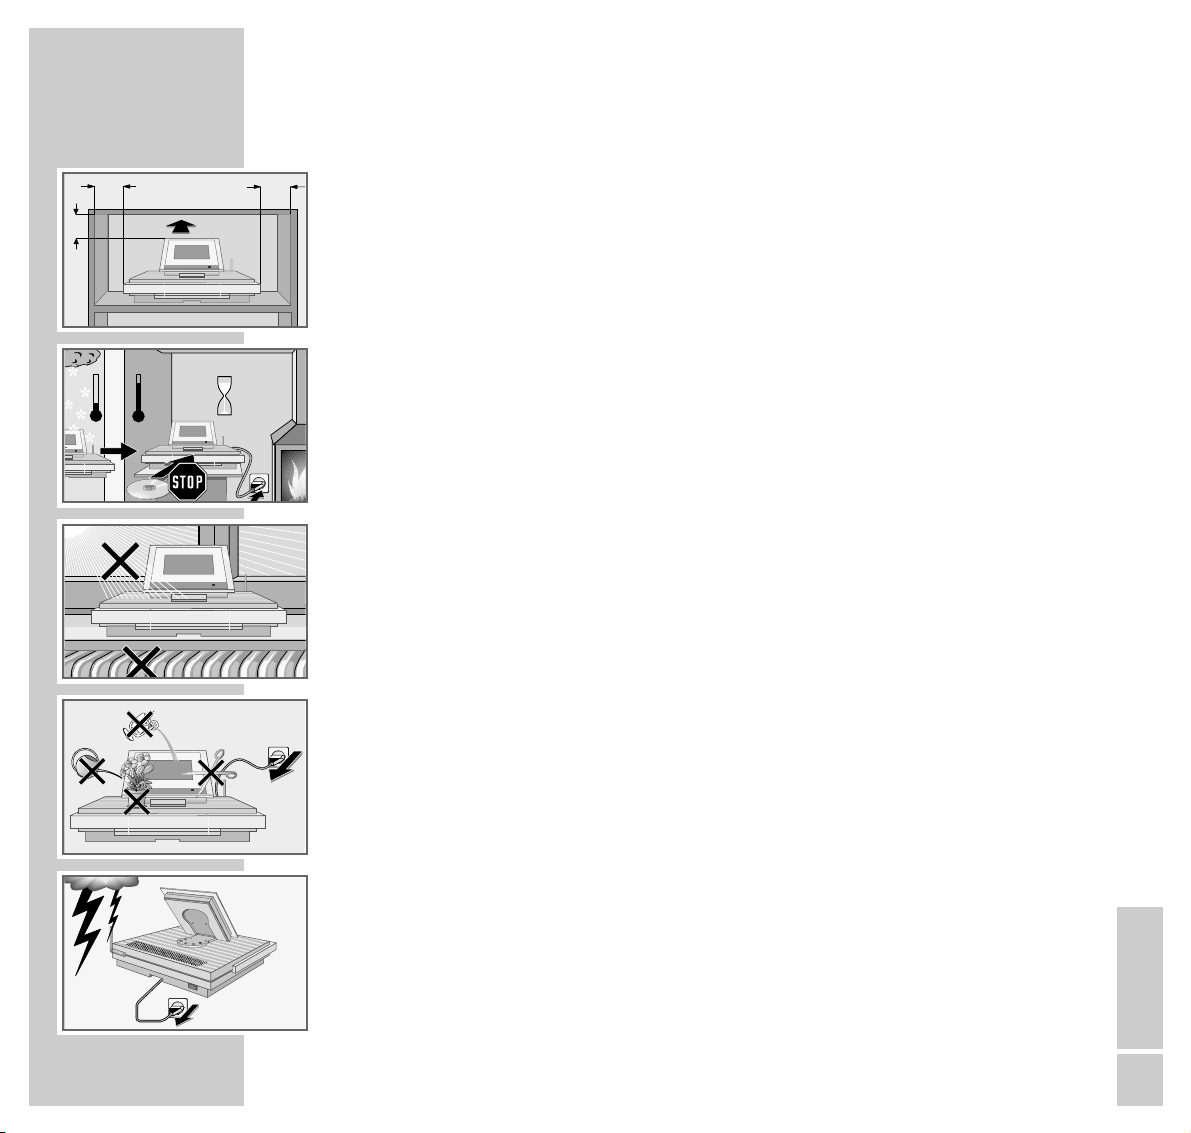
To ensure that this high-quality, easy-to-use HiFi system will provide lasting
satisfaction and enjoyment, please observe the following instructions when
setting it up.
This HiFi system is designed for the playback of audio signals.
Any other use is expressly prohibited.
Position your HiFi system as near as possible to the centre of the area of application. If you want to set up the HiFi system on wall shelves or in cupboards,
please ensure that the device is adequately ventilated. There must be at least
10 cm of space at the side, above and at the back of the device.
If the HiFi is subject to sudden changes in temperature, for example if it is
brought in from the cold to a warm room, do not connect it to the mains supply,
but let it stand for at least two hours before you insert a CD.
The HiFi system is designed for use in dry rooms. If you do use it in the open,
please ensure that it is protected from moisture, such as rain or water splashes,
and from direct sunlight. Do not place the HiFi system close to heating units or in
direct sunlight, as this will impair cooling.
To not insert foreign objects in the HiFi CD compartment. Do not place any vessels containing fluid, such as vases, on the HiFi system. These may be knocked
over and spill fluid on the electrical components, thus presenting a safety risk.
Do not place any objects such as burning candles on the HiFi system.
Never open the HiFi casing under any circumstances. Warranty claims are
excluded for damage resulting from improper handling.
Thunderstorms are a danger to all electrical devices. Even if the HiFi is switched
off, it can be damaged by a lightning strike to the mains. Always disconnect the
mains and antenna plugs during a storm.
10
cm
ǵ
10
cm
10
cm
10
cm
°C
2h
°C
ǵ
ǵ
ǵ
! SERVICE !! SERVICE !! SERVICE !
Page 10

10
SET-UP AND SAFETY
_________________________________________________________________
If the stereo system no longer scans CDs perfectly, use a standard cleaning CD
to clean the laser optics. Other cleaning methods may damage the laser optics.
Always keep the CD compartment closed to prevent dust from collecting on the
laser optics.
The wireless transmission system
Your HiFi system is equipped with a system which enables it to transmit and
receive audio and data signals Connection cables to the loudspeakers are no
longer necessary.
The transmission strength is limited by national and international regulations to
prevent radio interference from neighbouring devices.
The transmission power is <10 mW. This guarantees an unhindered reception
range of approximately 100 m. This range is restricted inside buildings, depending on the construction materials used.
Avoid placing the system near metal objects such as radiators or electrical devices which use radio signals, such as wireless headphones or cordless or mobile
phones.
Since the audio and data signals are not transmitted on an exclusive range we
cannot guarantee that this will not cause interference. To avoid interference you
can choose a different channel combination. Make sure that the same channel
combination is set on the HiFi system and the WT2 radio module, if there is one.
In some circumstances, people, walls and other surfaces can reflect radio signals. Reflected signals, mixed with direct (non-reflected) signals, can cause a
type of interference known as multi-path reception. This can lead to noise or a
temporary loss of sound. If such interference does occur, you can usually rectify
it by repositioning the active loudspeakers or the HiFi system.
Page 11
ENGLISH
11
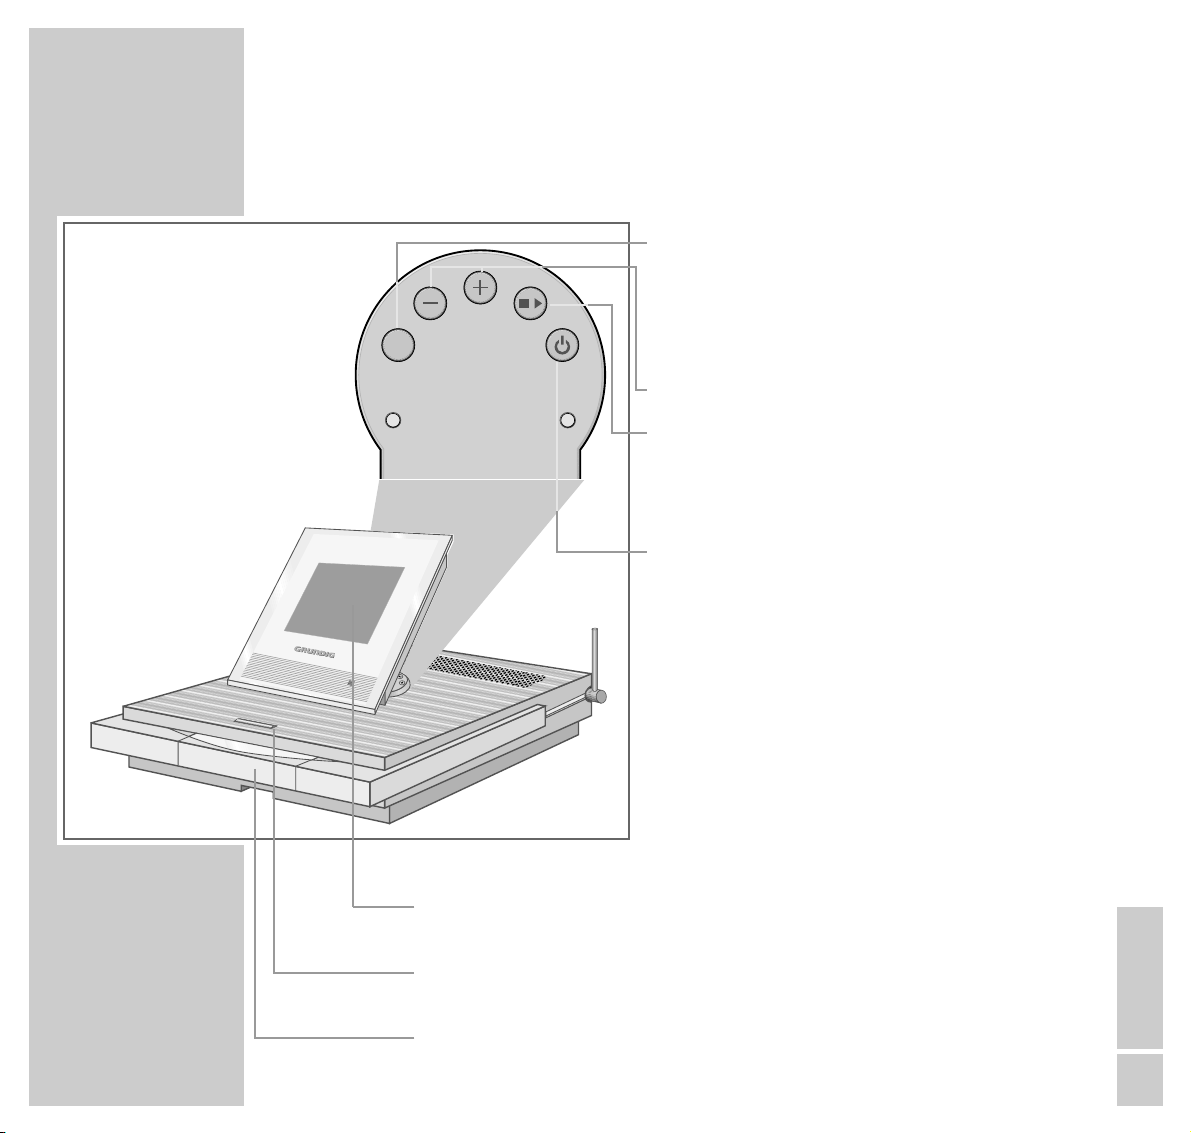
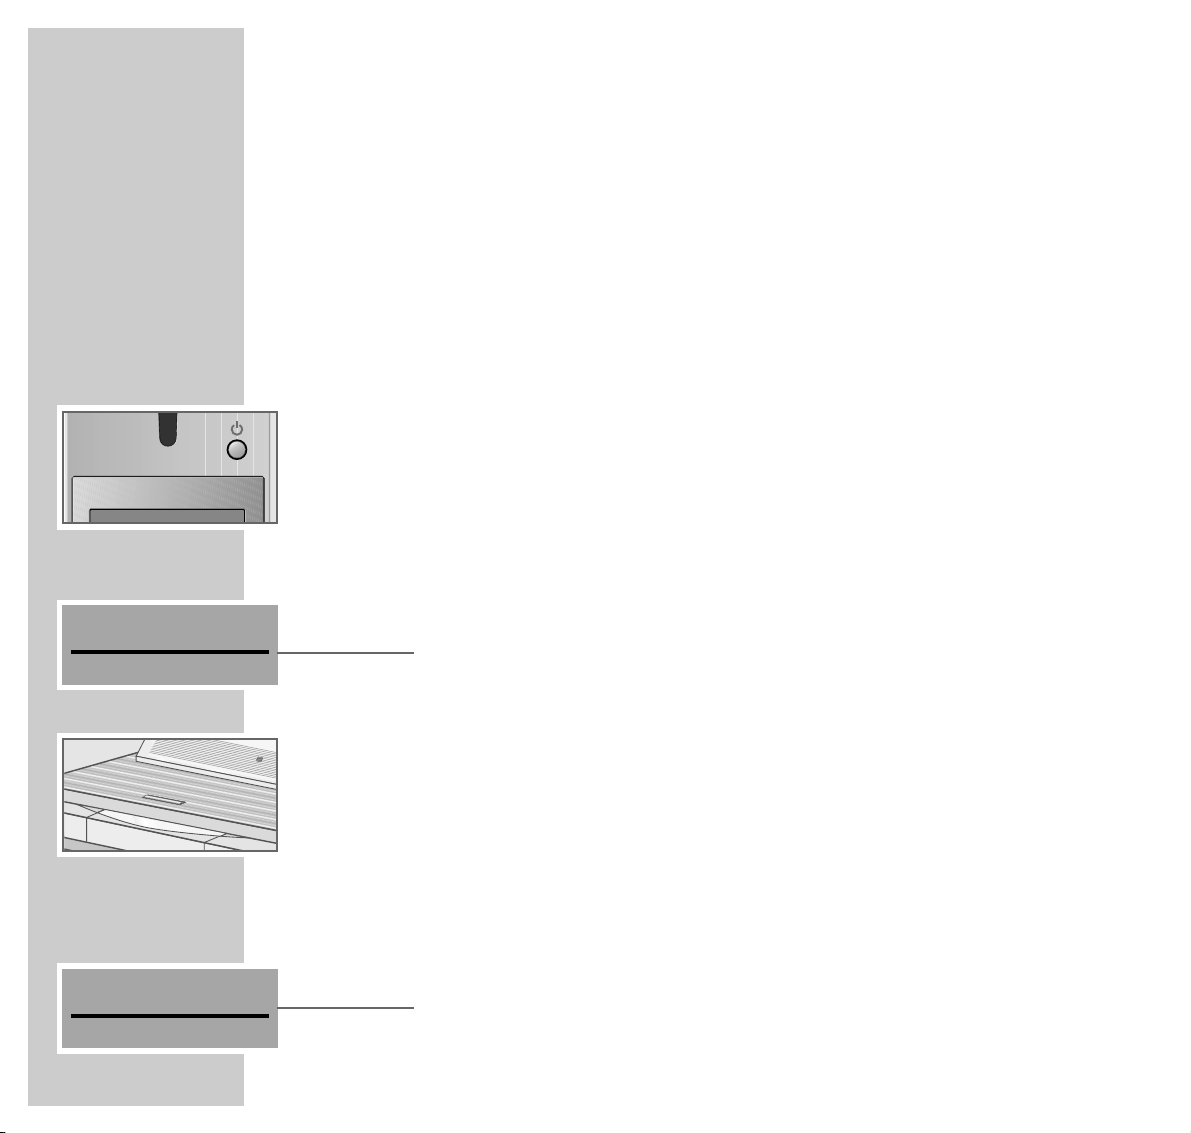
The HiFi system controls
SOURCE Selects the input sources in the order FM,
DAB (if a DAB module is integrated)
and CD.
Switches on the system in room 1 with
the last input source selected.
–
+
Adjusts the volume.
■
ı
In tuner or DAB mode: selects the
station positions.
In CD mode: starts playback and selects
playback stop.
Ǽ Switches the HiFi system in room 1 to
and from standby mode.
The CD compartment lighting is also
for indicating standby and operation.
Note:
The buttons on the HiFi system are only
designed for emergency operation. In
normal operation, please use the remote control.
Display Displays various information for the FM, DAB (optional) and
CD modes.
å Opens and closes the CD compartment. Switches the HiFi
system from standby to CD mode.
CD compart- Open by touching the »
å
« sensor button.
ment
OVERVIEW
_______________________________________________________________________
SOURCE
Page 12
12
OVERVIEW
__________________________________________________________________________________
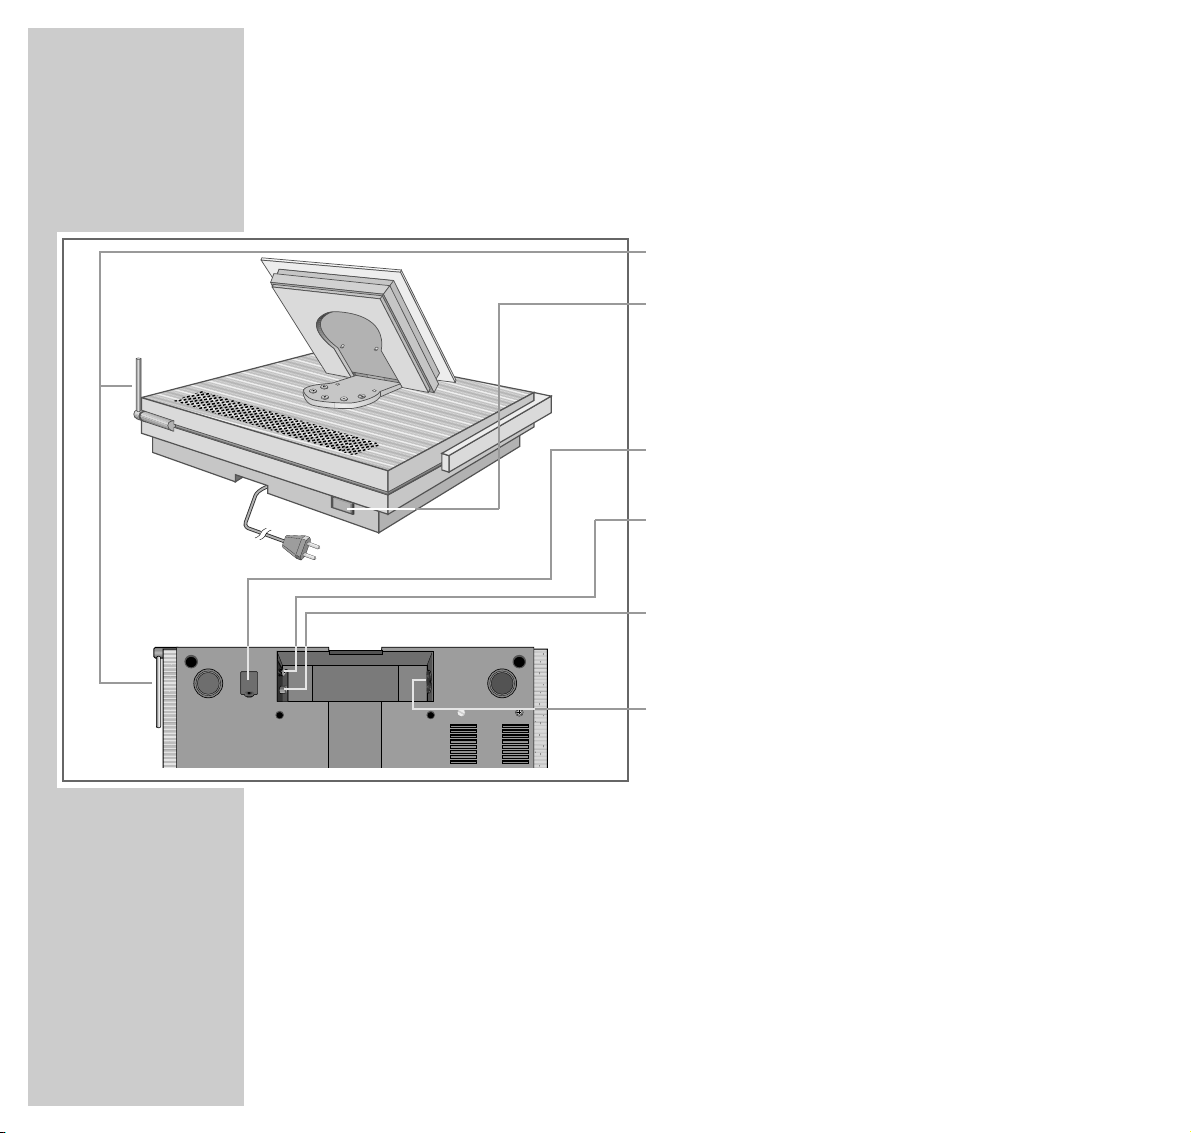
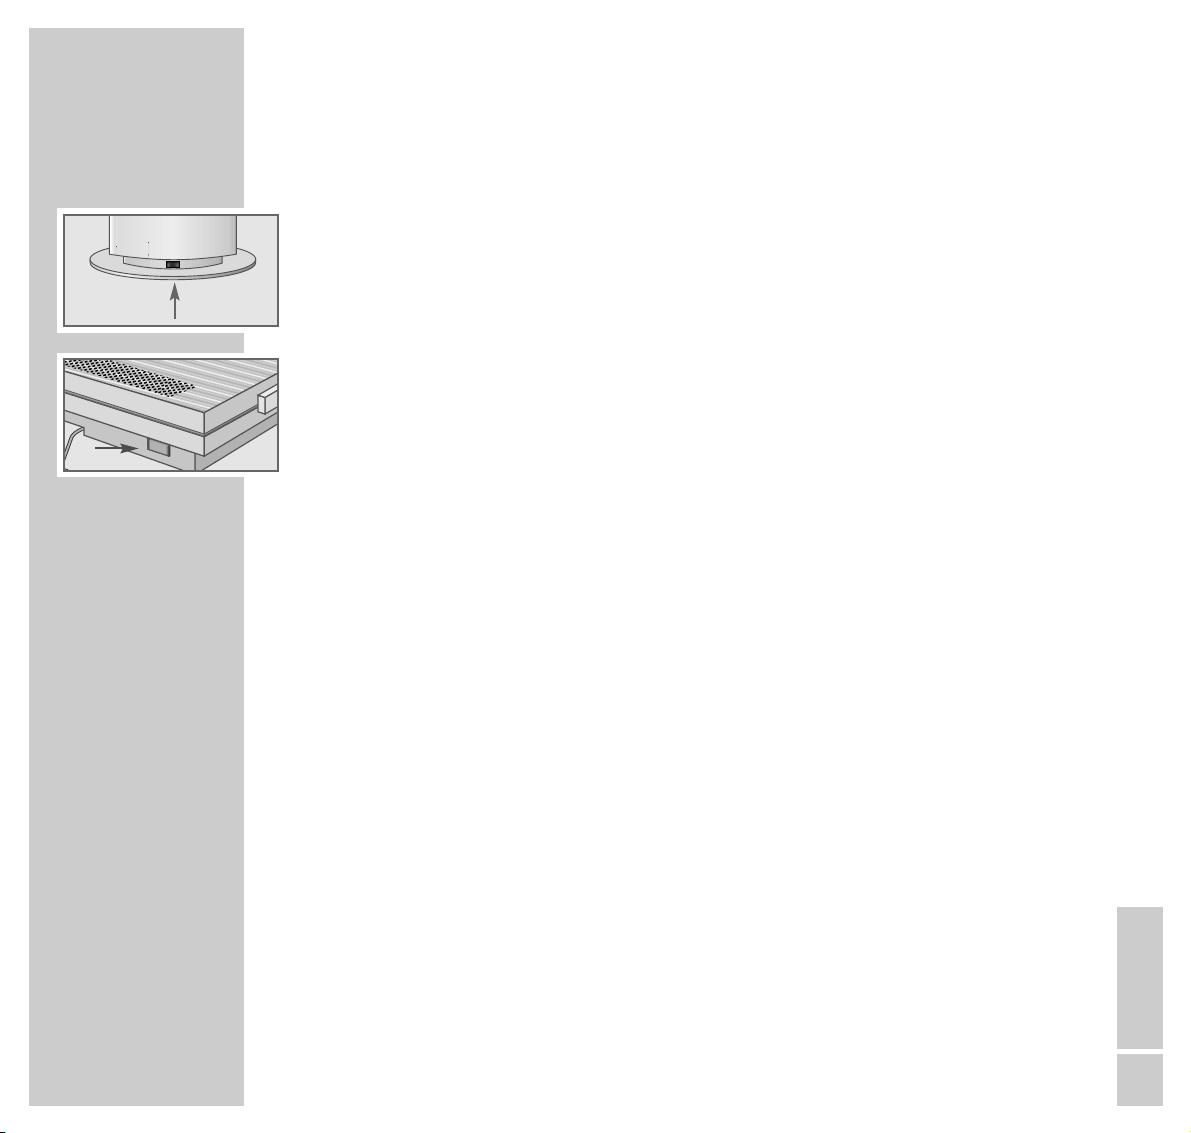
The back and bottom of the HiFi system
I
Radio antenna (must be perpendicular).
) Mains switch (back of device), switches the
HiFi on and off.
The only way to completely isolate the HiFi
system from the mains supply is to pull the
plug out.
Cover for the flash plug. Only for dealers for updating the system software (bottom of device).
Threaded connection (F plug connection) for the
DAB antenna (if a DAB module is integrated into the
HiFi system – recess on bottom of device).
Antenna socket for the rooftop antenna or the auxiliary antenna supplied (recess on bottom of device).
Socket for mains cable (recess on bottom of device).
Page 13
ENGLISH
13
OVERVIEW
__________________________________________________________________________________
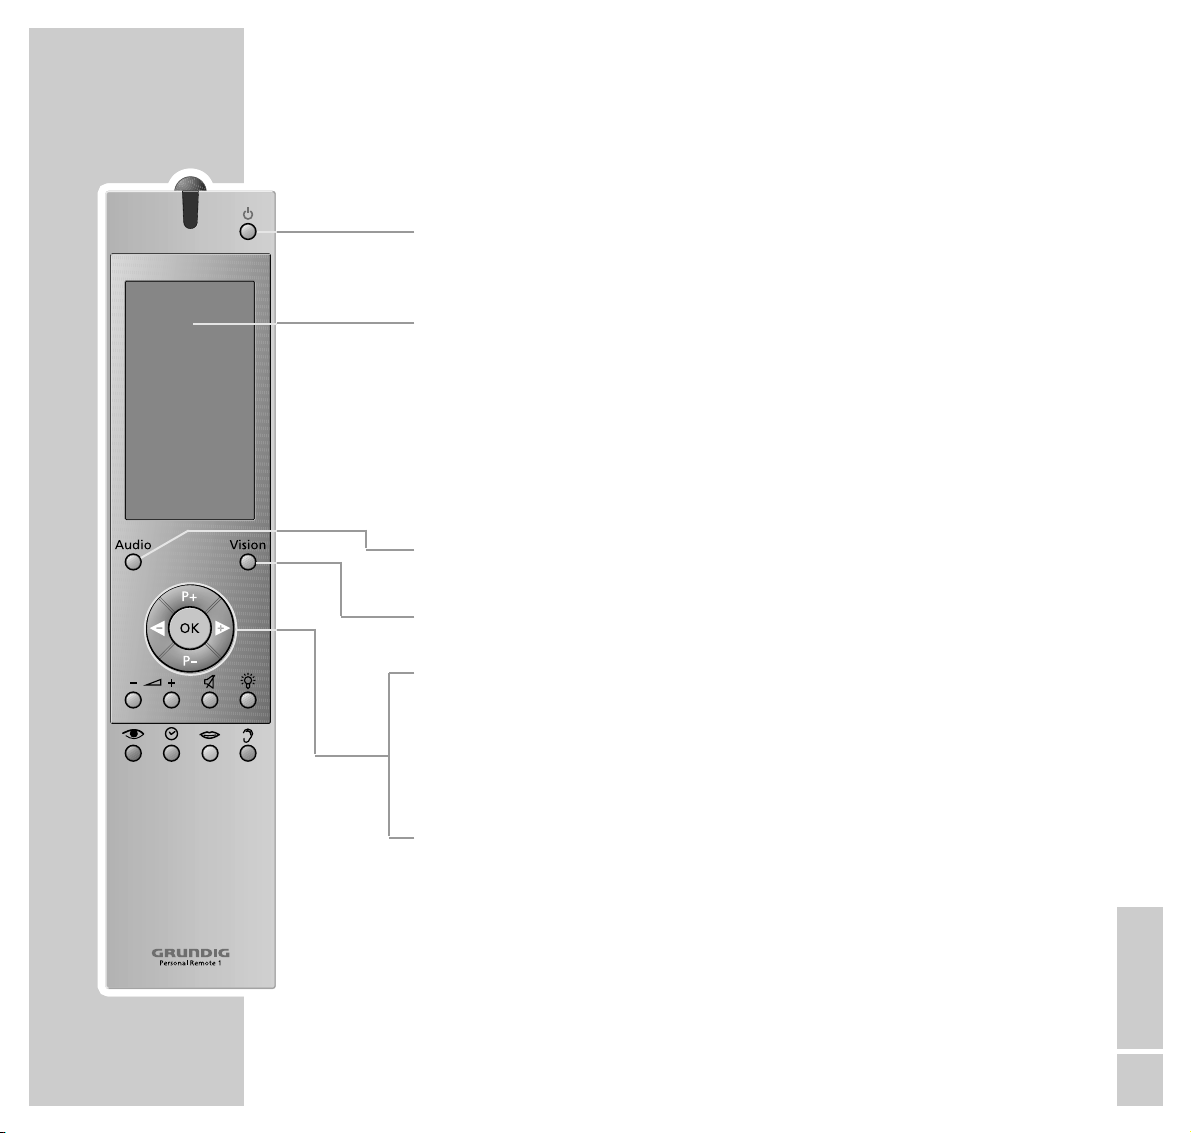
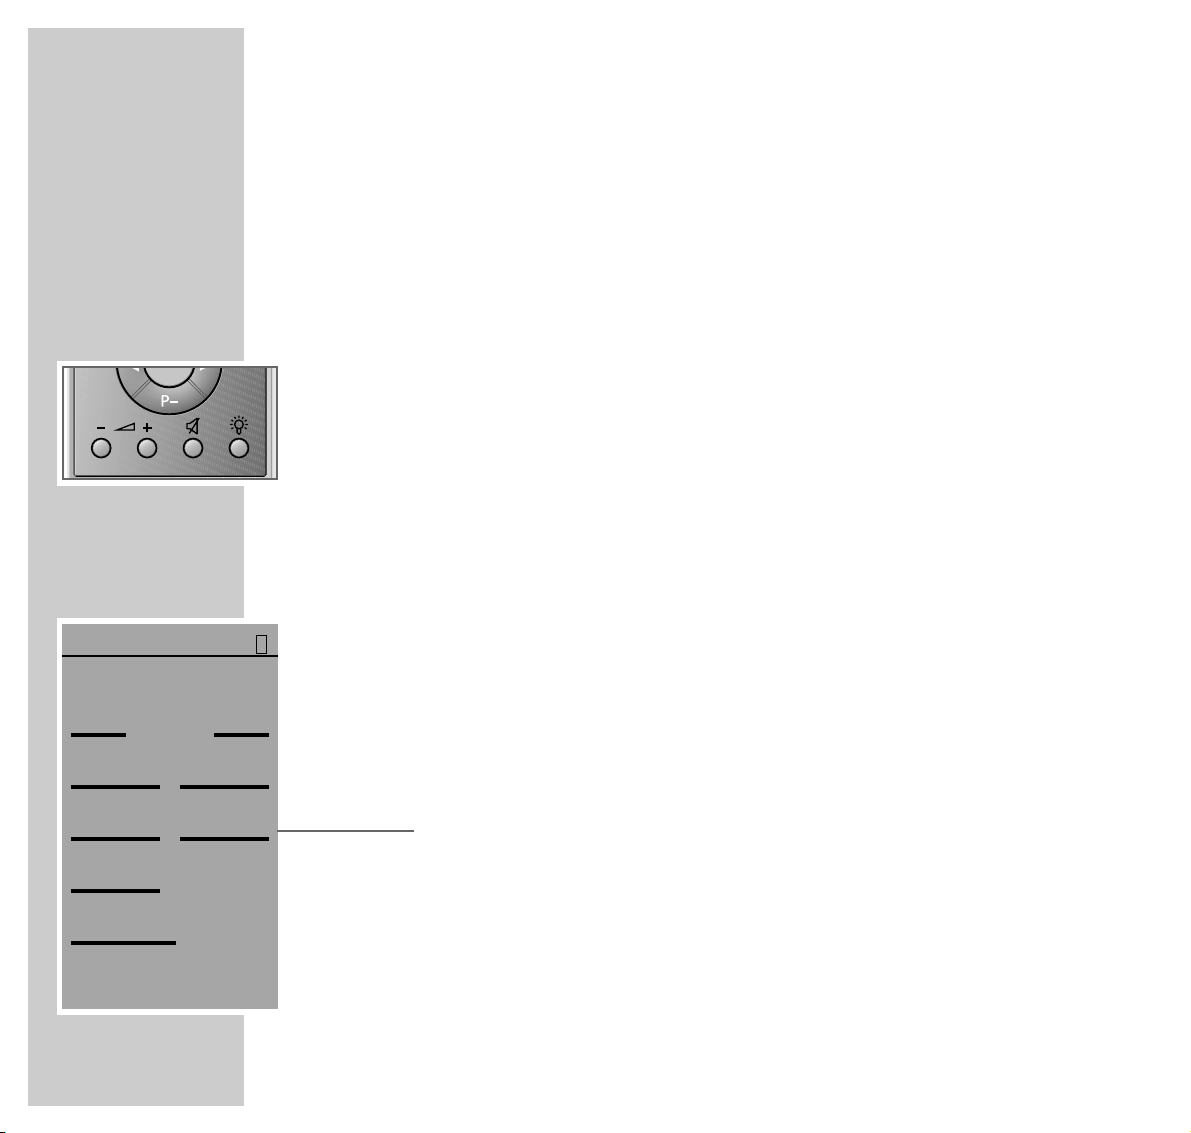
The remote control
9
Switches the HiFi system to and from standby mode.
In multi-room mode: switches only the loudspeakers in the current
room to standby. Hold down to switch the whole system to standby.
Display Display of the remote control and digital keypad (touchpad with
soft keys): guides the user through the operation and installation of
the system.
In FM, DAB and CD mode, it shows the relevant controls (soft keys)
and information.
If the keypad is not used for 30 seconds, the display switches off
automatically. To switch it on again, press the »OK« key (hard key)
on the remote control.
Audio Selects the HiFi mode (FineArts Audion). Switches the remote con-
trol on with the »AUDIO« menu.
Vision Selects the television mode (FineArts Vision). Selects other Vision
operating modes such as DVD and video (see pages 52 to 60).
P +P – In FM and DAB mode: selects the station positions in steps.
In CD mode: selects the previous or following CD track.
OK Switches the remote control display on.
Confirms the menu entries (primarily in Vision mode).
ǸǷ
In FM or DAB mode: changes the FM frequency or the DAB station
positions in steps. Hold down to start the automatic search.
In CD mode: press briefly for the next or previous track. Hold down
to search for a particular passage.
Page 14
14
OVERVIEW
__________________________________________________________________________________
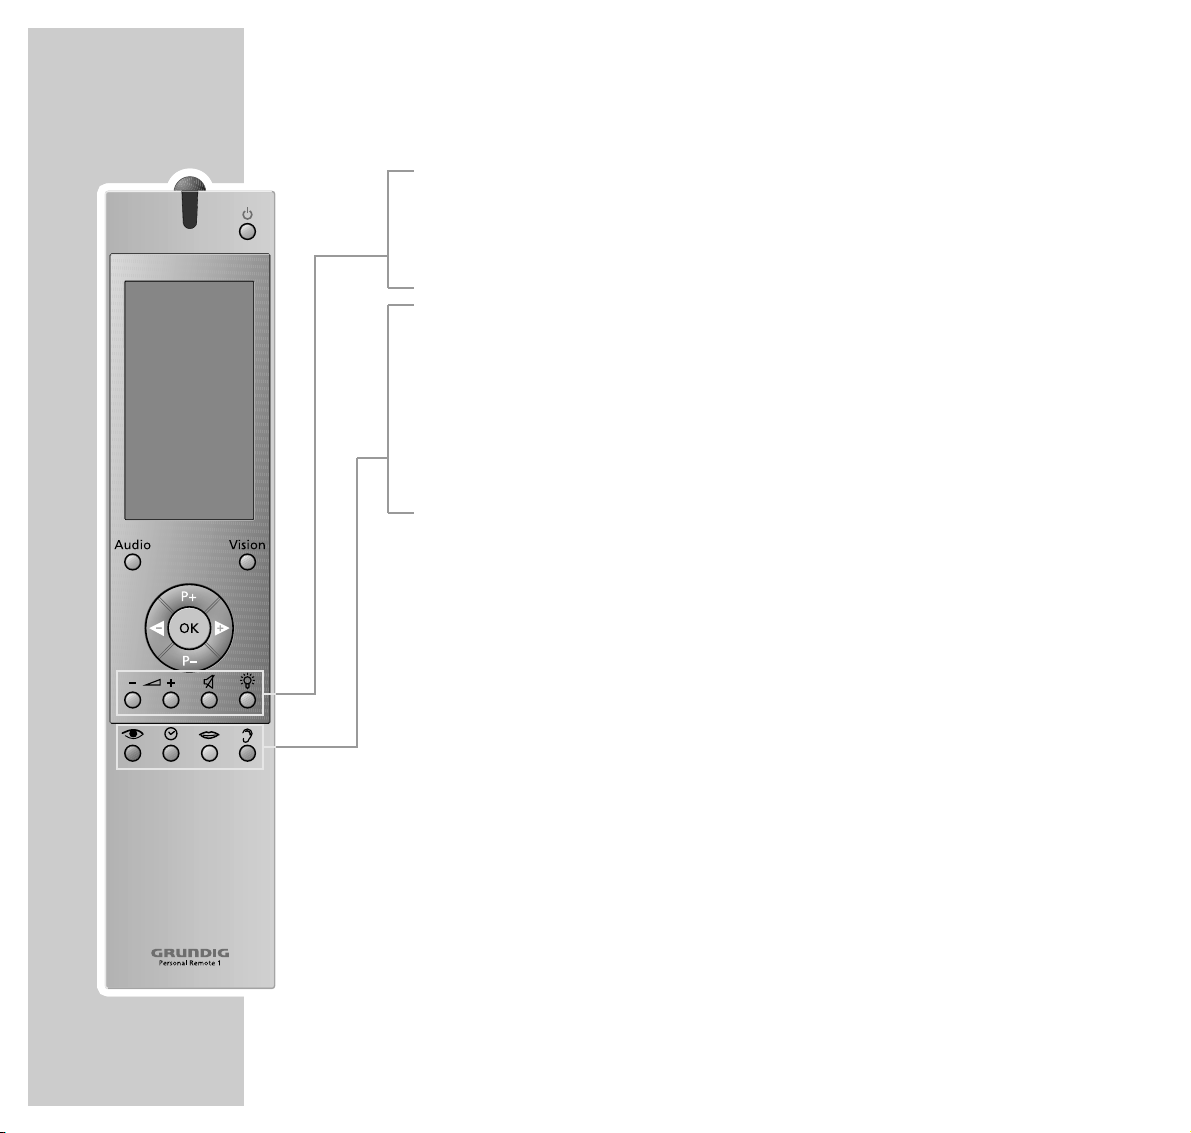
–
}
+ Adjusts the volume in the relevant room.
d Switches the loudspeakers to and from mute mode.
R Switches the lighting for the remote control display on and off.
z Not used.
w For displaying the current time.
In standby mode, switches the display lighting of the HiFi system on
(only in room 1).
M Calls up the sleep timer function.
F Calls up the »SOUND« menu.
Page 15
ENGLISH
15
OVERVIEW
__________________________________________________________________________________
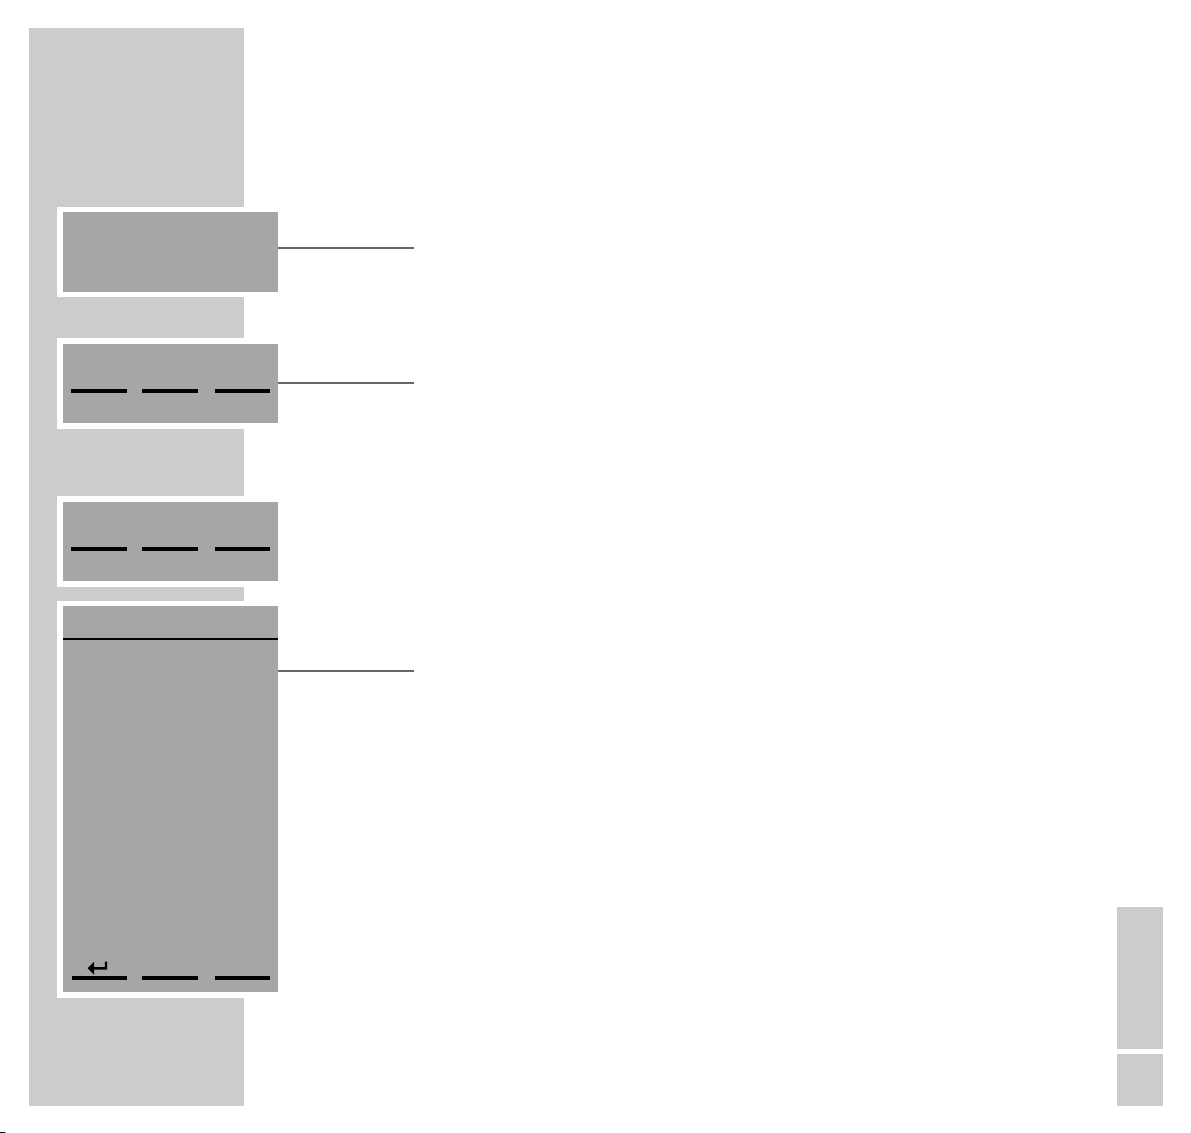
The remote control menu system
Your HiFi system’s remote control unit is equipped with a menu system.
The menus contain a wide range of information on setting up and operating the
system.
Press »Audio« to switch on the remote control. The »AUDIO« main menu
appears in the display. At the same time, the menu items also function as digital
keys (soft keys), with which you can call up different functions and other menus
directly. Some keys only appear when the relevant system components are
present.
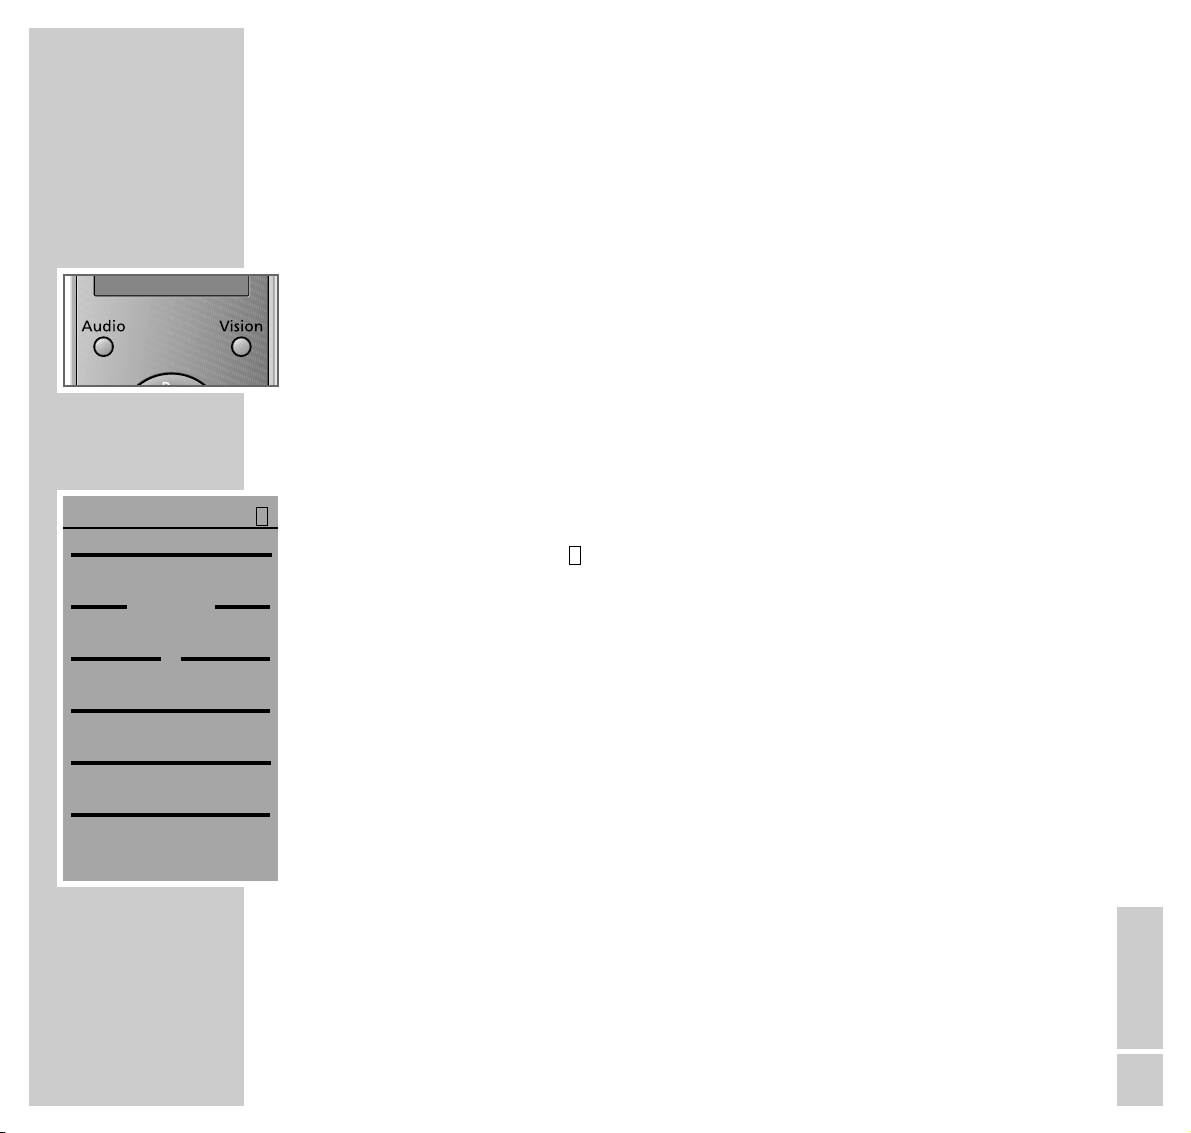
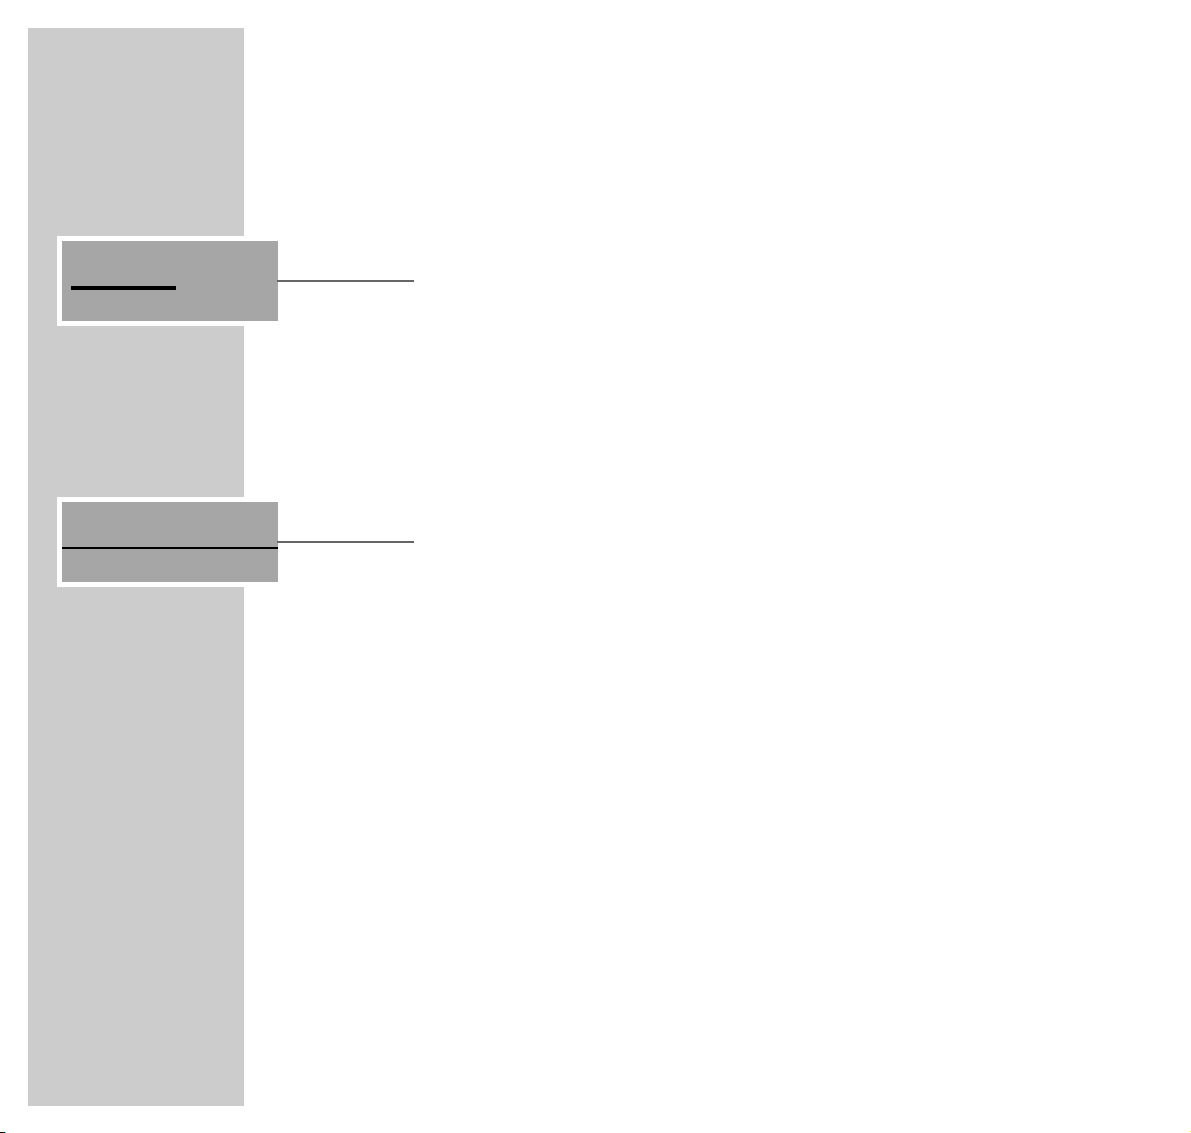
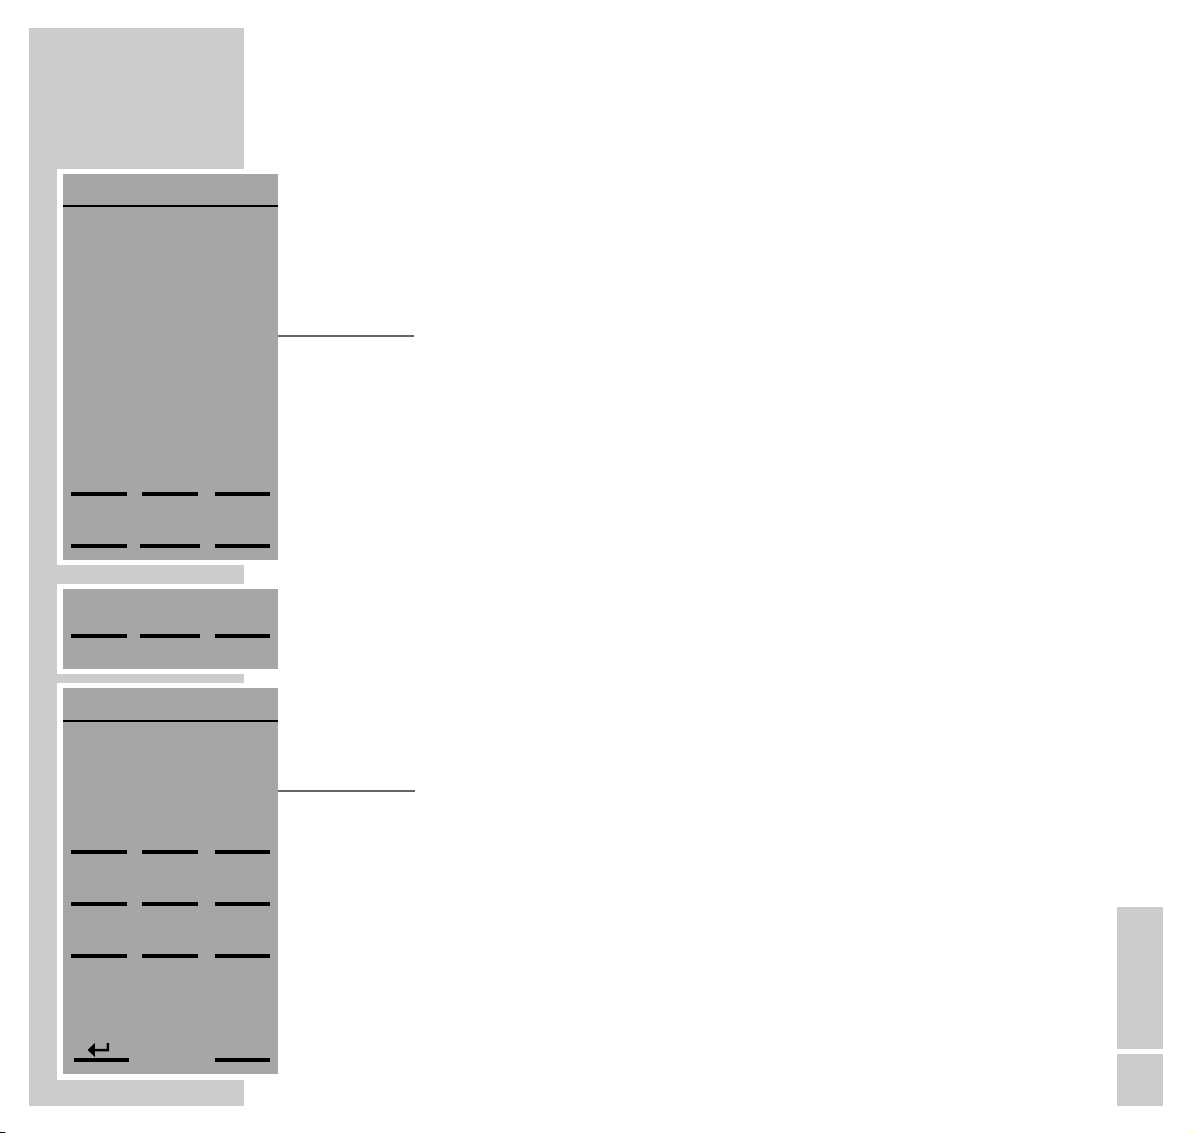
The Audio main menu
Display and key Meaning and function
AUDIO Audio mode has been selected. The remote control
is effective in room 1 (for multi-room operation).
SELECT ROOM For multi-room operation, this selects the room in
which the remote control should be effective.
< LCD > Rotates the display of the HiFi system to the right
or the left (only in horizontal mode).
SETUP Calls up the »SETUP« menu for different settings.
M-ROOM Activates the menu for switching the input sources
on and off in multi-room operation.
CD Selects the CD input source.
FM TUNER Selects the FM input source.
DAB TUNER Selects the DAB input source (if a DAB module is
integrated).
1
AUDIO
DAB TUNER
FM TUNER
CD
M-ROOM
SETUP
>>
LCD
<<
SELECT ROOM
1
Page 16

16
OVERVIEW
__________________________________________________________________________________
Note:
The room display » « does not appear if loudspeakers are installed in only
one room.
In order to prolong the life of the batteries, the remote control display
switches off after a short while if no function is selected. Press the »OK«
button to switch the display back on again.
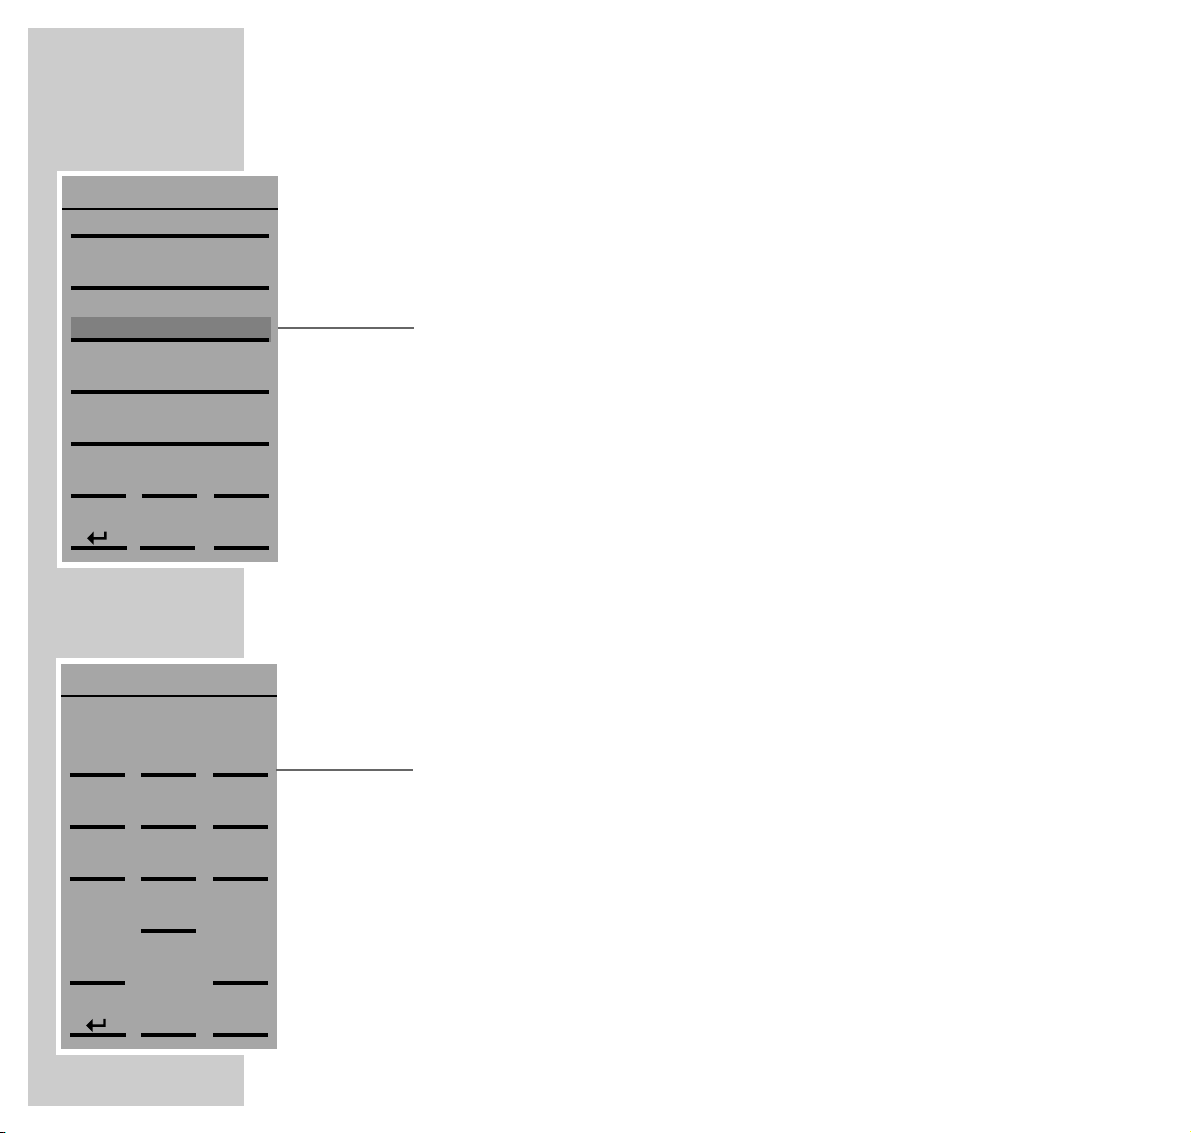
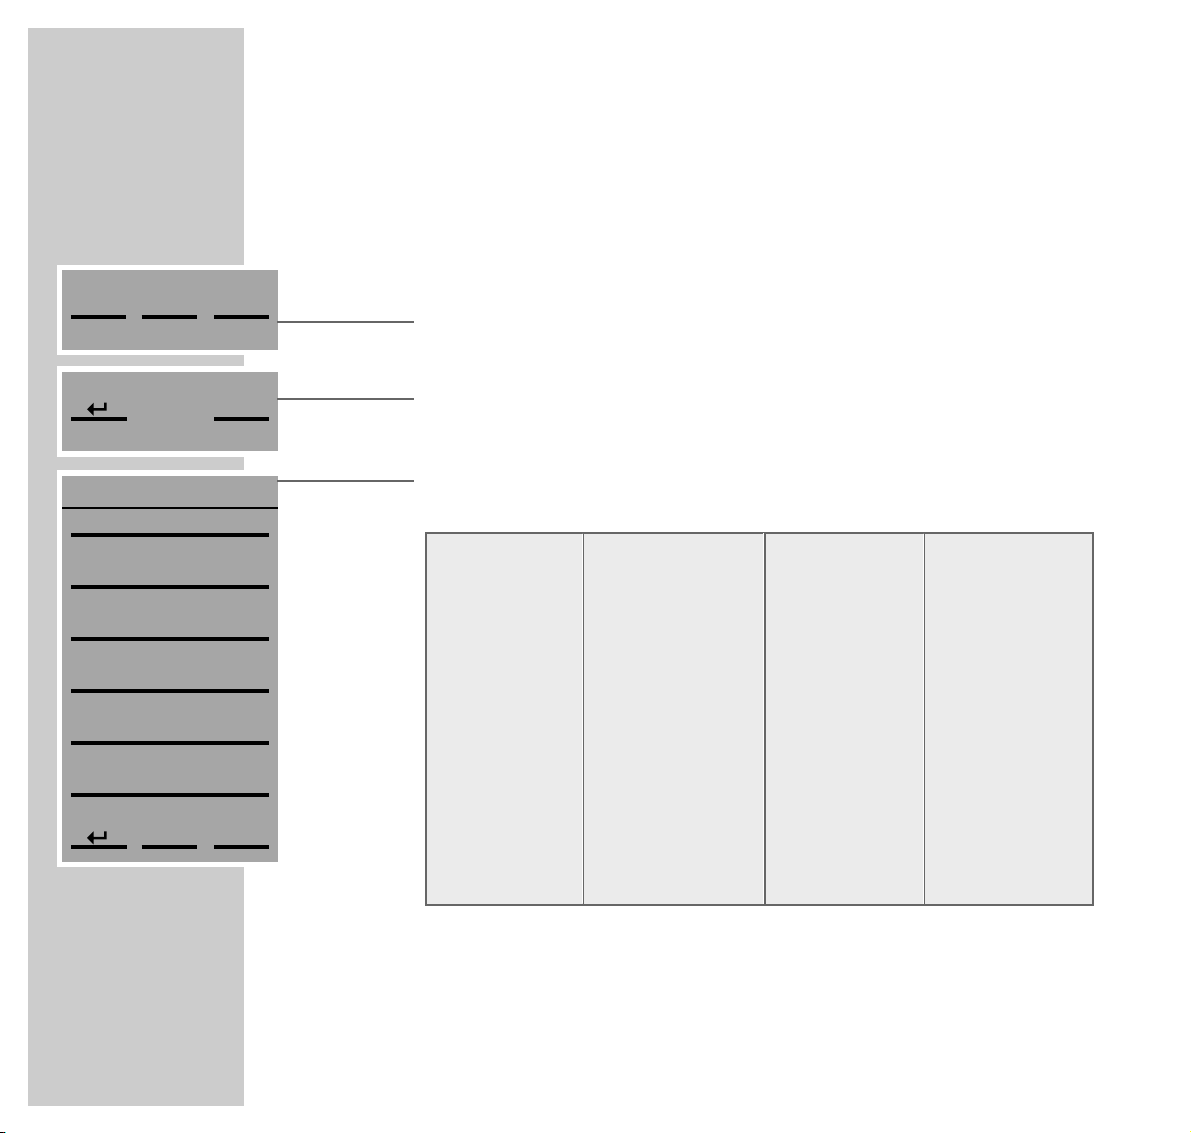
The different menus
Call up the »SETUP« menu by pressing »SETUP« in the »AUDIO« main menu.
However, before the »SETUP« menu opens you have to enter a PIN number
and confirm it with »END«. This prevents you from accidentally changing the
settings entered in the »SETUP« menu. The PIN number is »1« » 5« »9« »0«.
SERVICE Service menu for the authorised dealer.
INSTALLATION Selects the »INSTALLATION« menu.
LANGUAGE Selects the language options for the menus.
TIME/DATE For setting the time and the date.
CHANNELS For setting the channel combination for the
transmission of the audio signals.
Return to the »AUDIO« main menu.
The individual menu items are also shown in the display on the HiFi system. This
provides you with a clear, easy-to-follow menu system. In subordinate menus,
press » « to return to the previous menu.
These menus and submenus are explained in detail in the relevant sections of
this manual, with the aid of a number of examples.
1
SETUP
CHANNELS
TIME/DATE
LANGUAGE
INSTALLATION
SERVICE
1
M-ROOM
SETUP
PIN:
3
2
1
Page 17
ENGLISH
17
GENERAL FUNCTIONS
_________________________________________
Switching on
1 Use the mains switch on the loudspeakers to switch them into standby mode.
– The mode indicators on the loudspeakers light up orange.
2 Switch on the HiFi system by pressing the mains switch on the back of the
HiFi.
– The HiFi system switches on with the input source last selected.
– The loudspeakers in room 1 switch on automatically and the mode indica-
tors on the loudspeakers light up green.
Note:
If the HiFi system had been in standby mode before it was switched off using
the mains switch, it automatically returns to standby when you then press the
mains switch again.
The only way to isolate the HiFi system and the loudspeakers from the mains
supply is to pull the mains plugs.
Switching off
1 First turn off the loudspeakers with the mains switches, then turn off the HiFi
system with the mains switch.
Notes:
After you have installed the system, we recommend that you only use the
»9« button to switch the HiFi and the loudspeakers to standby, and to
switch them on from standby. You should not use the mains switches for switching on and off any more.
The following applies for multi-room mode: If, for example, the loudspeakers
in room 3 are switched to stand-by mode and are then switched on again,
the FM input source is always played instead of the last input source
selected.
Page 18
18
GENERAL FUNCTIONS
______________________________________________________________
Switching on from standby...
Note:
Your HiFi system is equipped with a volume limit. This restricts the volume to
a value of 25 when you switch it on.
... with the »9« button
This function only applies to the room for which the remote control is set (see
also page 49).
1 Switch the HiFi system on from standby mode by pressing »9«.
– This automatically switches on the loudspeakers.
– You hear the last input source that was selected.
... with the input source buttons
1 Call up the Audio menu with »Audio«.
2 In the »AUDIO« menu, select the »CD«, »FM TUNER« or »DAB TUNER«
input source.
... with the CD function
1 Touch the »
å
« sensor button on the HiFi system.
– The HiFi system switches on with the CD input source and the CD compart-
ment opens.
Selecting the input source
1 Call up the Audio menu with »Audio«.
2 In the »AUDIO« menu, select the »CD«, »FM TUNER« or »DAB TUNER«
input source.
FM TUNER
CD
Page 19

ENGLISH
19
GENERAL FUNCTIONS
______________________________________________________________
Switching to standby
1 Press »Ǽ« to switch the loudspeakers in the current room to standby mode.
– If you switch the loudspeakers in the last active room to standby, the HiFi
system also switches to standby.
– The mode indicators on the loudspeakers light up orange.
or
Press »Ǽ« for more than 3 seconds.
– The loudspeakers in all the rooms and the HiFi system are switched to
standby mode.
– The mode indicators on the loudspeakers light up orange.
– The CD compartment lighting on the HiFi system is also a standby indica-
tor which adjusts its brightness to the surrounding brightness in two steps.
The switching of the lighting is time-delayed and is controlled by a light-
sensitive sensor.
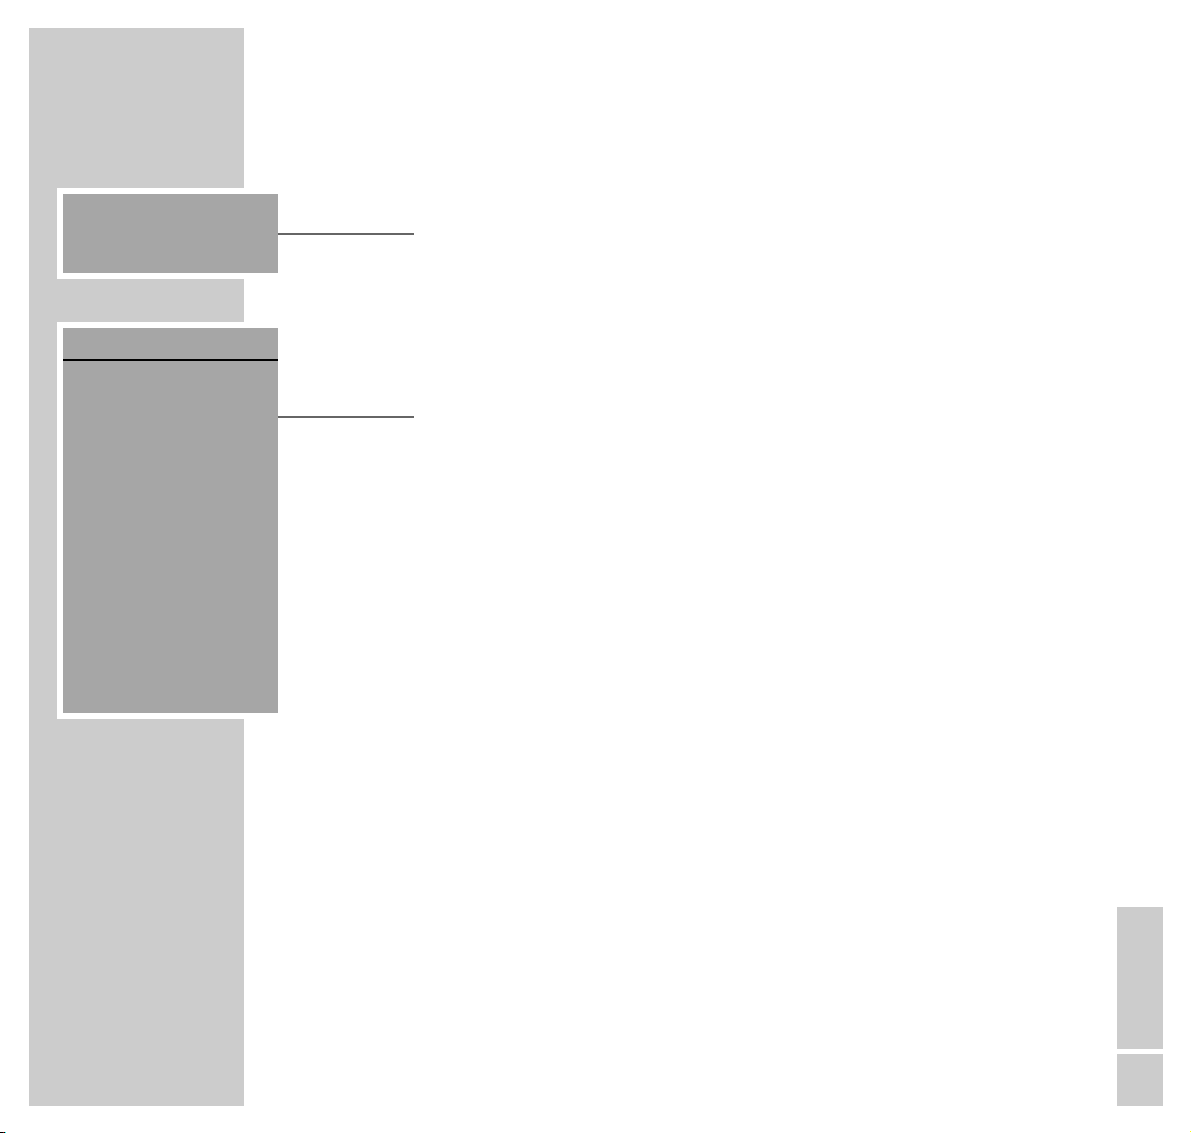
Organising the HiFi system display
You can turn the display of your HiFi system – when it is positioned horizontally –
by pressing a button. When it is positioned vertically, or wall-mounted, you can
only tilt the display upwards or downwards by hand.
1 Call up the »AUDIO« menu by pressing »Audio«.
2 In the »AUDIO« menu, press »< LCD« or »LCD >« to rotate the display of
the HiFi system to the left or the right.
>>
LCD
<<
Sensor
Page 20
20
VOLUME AND TONE
_____________________________________________
You can enter the volume, bass, treble and balance settings separately for the
loudspeakers in room 1 (and for other pairs of speakers in multi-room mode).
The loudspeakers in room 1 must be in the same room as the HiFi system.
Adjusting the volume
1 Adjust the volume with »
– }
«or»
} +
«.
– Display: »VOLUME« and the value (from »0« to »63«).
Note:
If you change the volume using »+« or »–« on the HiFi system, this only
affects the loudspeakers in room 1.
Adjusting the treble, bass, balance and fader
Note:
The »TREBLE« and »BASS« settings are only available if you previously
selected the »USER« (user-defined) sound setting.
»FADER« only appears if two pairs of loudspeakers are installed in room 1
and the remote control is set to this room (see the relevant section on page 49).
1 Call up the »SOUND« menu by pressing the »F« (blue) button.
2 In the »SOUND« menu, call up the »TREBLE«, »BASS« or »BAL.« setting.
3 Adjust the treble, bass or balance with »<« or »>«.
– The setting is saved automatically.
SOUND
||||||||I||||||||
USER
OFF
LOUDNESS
DSC
BAL.
FADER
BASS
TREBLE
>>
0
<<
1
Page 21

ENGLISH
21
VOLUME AND TONE
________________________________________________________________
4 In the »SOUND« menu, call up the »FADER« setting.
5 Adjust the volume distribution between the front and back loudspeakers with
»<« or »>«.
– The setting is saved automatically.
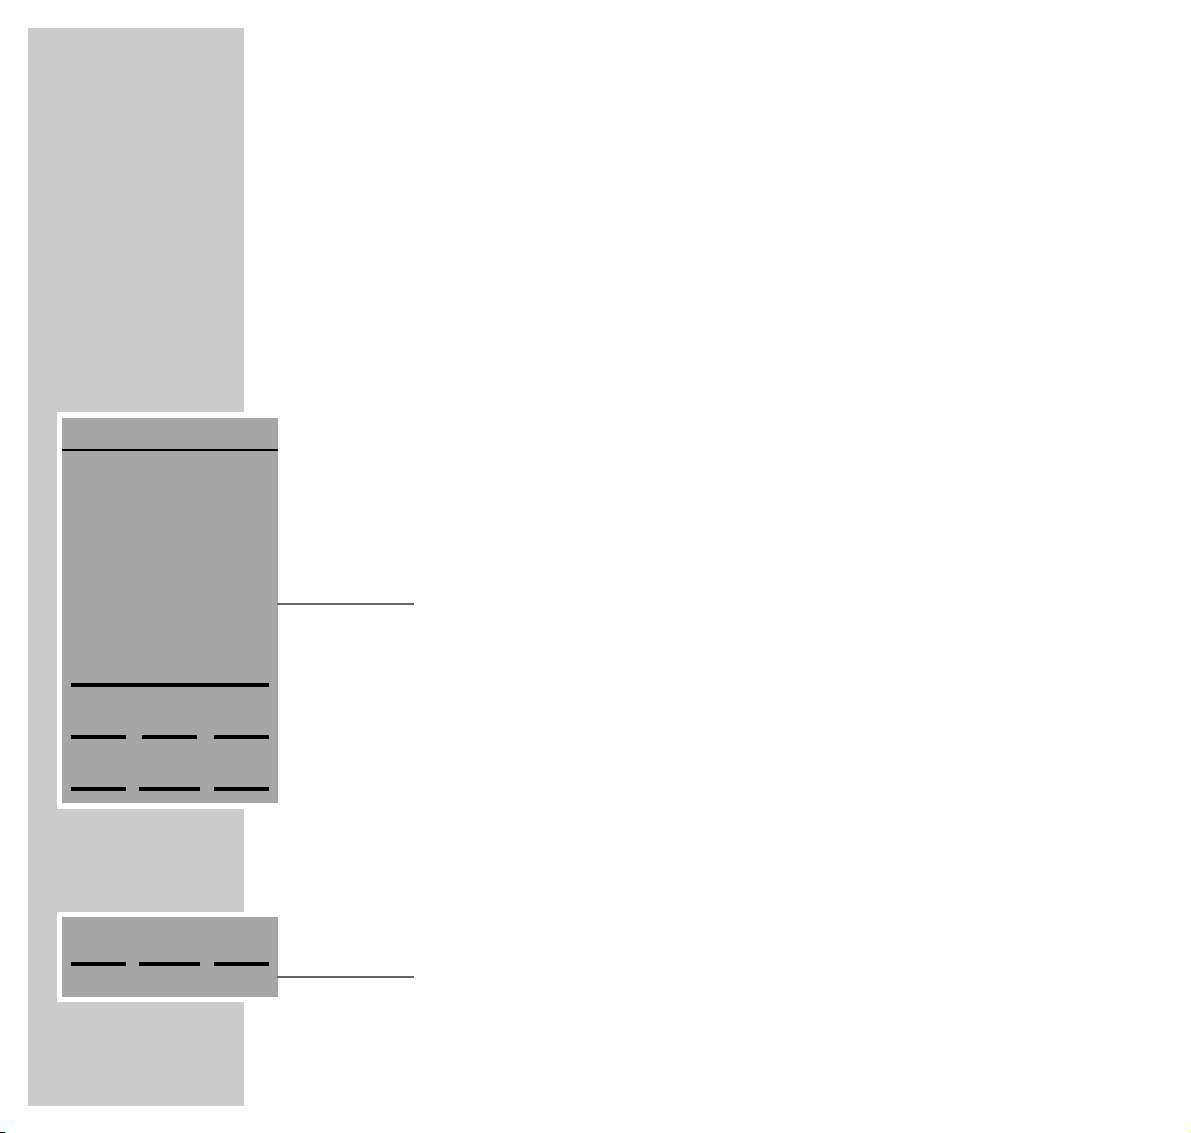
Sound setting
There are three different sound settings (FLAT, USER and VOCAL), which you
can select according to the type of music you are listening to.
1 Call up the »SOUND« menu by pressing the »F« (blue) button.
2 In the »SOUND« menu, press »DSC« to call up the »FLAT«, »USER« or
»VOC« setting.
Modifying the USER sound setting
You can modify the USER sound setting to suit your personal taste.
1 Call up the »SOUND« menu by pressing the »F« (blue) button.
2 In the »SOUND« menu, press »DSC« to select the »USER« setting.
3 Select the setting you desire (»TREBLE« or »BASS«).
4 Adjust the setting (e.g. »TREBLE«) with »
<
« or »>«.
– The selected level is automatically saved.
BAL.
FADER
FLAT
DSC
USER
DSC
BASS
TREBLE
Page 22
22
VOLUME AND TONE
________________________________________________________________
Switching loudness on and off
1 Call up the »SOUND« menu by pressing the »F« (blue) button.
2 In the »SOUND« menu, press »LOUDNESS«.
– The display changes from »OFF« to »ON«.
3 Press »LOUDNESS« again to switch it off.
– The display changes from »ON« to »OFF«.
Muting the HiFi system
1 To mute the HiFi press »d«.
– The display on the HiFi and on the remote control: »d«.
2 Press »d« to end the muting.
Setting up additional pairs of loudspeakers
In multi-room mode, if you want to adjust the volume and sound settings for
another room, you first have to reset the remote control to the applicable room
(see page 49).
OFF
LOUDNESS
FM d
Page 23
ENGLISH
23
FM MODE
__________________________________________________________________________
Preparation
Selecting the FM input source
1 Call up the »AUDIO« menu by pressing »Audio«.
2 In the »AUDIO« menu, press »FM TUNER«.
– Display: the »FM« menu with the station name or the frequency.
– You will hear the radio station last selected.
Selecting radio stations
Selecting radio stations (favourites) directly
During installation, you should allocate radio stations of your choice to station
positions 1 to 9. You will find instructions on how to allocate radio stations to
station positions 1 to 9 in the installation manual, in the section ”Allocating
radio stations (favourites) to station positions 1 to 9” on pages 16 and 17.
1 In the »FM« menu, press »1-9>«.
– Display: the »FM« menu with a numeric keypad.
2 In the »FM« menu, select the radio station with »1«to»9«.
– Display: the station position, name or frequency of the selected radio
station.
– The selected radio station is played.
Note:
If a station position is selected which has not had a station assigned to it,
»NO STATION STORED« appears briefly in the display.
FM
PRESET 8
ANTENNE
1-9>
LIS T
A-O>
MENU
INFO
TEXT
1-9>
LIS T
A-O>
FM
A-O>
9
8
7
6
5
4
3
2
1
Page 24
24
FM MODE
____________________________________________________________________________________
Selecting radio stations with the station list
The station list shows the radio stations stored on station positions 1 to 9, as well
as all the received radio stations.
1 In the »FM« menu, press »LIST«.
– Display: the »FM LIST«, with the station currently playing displayed on a
grey background.
Note:
You can switch to the next or previous page of the station list with »-5« or
»+5«.
Use »c« or »x« to move the FM list up or down.
2 Select a radio station by pressing the name or frequency of the station.
– Display: the name or frequency of the selected radio station.
– The selected radio station is played.
Selecting radio stations by name
1 In the »FM« menu, press »A-O>«.
– Display: the »FM« menu with an alphanumeric keypad.
2 Use »ABC2«, for example, to enter the first letter of the station name, in this
case »A«.
– You thus create an internal list of radio stations whose names begin with
»A«, »B«, »C« or »2«.
– Only the first radio station in this list is displayed.
– With each additional letter entered, the list of radio stations displayed is
narrowed down.
FM LIST
x
c
A-O>
+5
-5
SWR 3
P4 BAYERN 4
P3 BAYERN 3
P2 BAYERN 2
P1 BAYERN 1
FM
ANTENNE
x
c
ɲɲ
END
_-.
0
WXYZ 9
TUV8
PQRS 7
MNO6
JKL5
GHI4
DEF3
ABC2
1
Page 25
ENGLISH
25
FM MODE
____________________________________________________________________________________
3 Use »
c
« or »x« to select a radio station from the list created.
4 Call up the radio station with »END«.
– The display returns to the »FM« menu.
– The selected radio station is played.
Adding new radio stations or re-storing all the radio
stations
You will find instructions on how to add new radio stations to the existing ones,
or how to store a new station list (after moving house, for example), in the installation manual for the FineArts Audion on pages 19 to 21.
Stereo/mono reception
When the HiFi system is receiving FM stereo stations, »!« appears in the display. However, if the signal from the FM stereo station is weak, you can switch
off the stereo reception.
1 In the »FM« menu, press » MENU«.
– Display: the »FM MENU«.
2 In the »FM MENU«, press » STEREO«.
– The display changes from »ON« to »OFF«, and »!« disappears.
FM !
FM MENU
PRESET 6
ENERGY
ON
x
PRESETS
STEREO
DELETE
MEMORY
Page 26
26
FM MODE
____________________________________________________________________________________
RDS reception
RDS station service
RDS stations in the FM frequency band also transmit their station names.
Activating and deactivating the RDS time
synchronisation
Some RDS stations transmit RDS time information. The time display is updated
every minute. The accuracy depends on the information transmitted by the station. You must be tuned to the RDS station for several minutes before the time
information can be transmitted.
1 Call up the »AUDIO« menu by pressing »Audio«.
– Display: the »AUDIO« menu.
2 In the »AUDIO« menu, press » SETUP« and enter the code.
– Display: the »SETUP« menu.
3 In the »SETUP« menu, press » TIME/DATE«.
– Display: the »TIME/DATE« menu.
4 In the »TIME/DATE« menu, press » RDS UPD.« to switch to »OFF«.
– The display changes from »ON« to »OFF«.
5 In the »TIME/DATE« menu, press » RDS UPD.« to switch to »ON«.
– The display changes from »OFF« to »ON«.
PRESET 5
ENERGY
SETUP
TIME/DATE
OFF
RDS UP D .
Page 27
ENGLISH
27
FM MODE
____________________________________________________________________________________
Switching RDS time display on and off
1 Switch the time display on with »f« (green).
– Display: the date and time.
Calling up RDS station information
1 In the »FM« menu, press » INFO«.
– Display: the »FM INFO« menu with the station name, frequency, pro-
gramme type (PTY) and stereo or mono setting.
Radiotext
Some RDS stations transmit information known as Radiotext. This is additional
information about the station and its programmes.
As the station transmits this information character by character, it may take
some time before the text is displayed in full.
1 In the »FM« menu, press » TEXT«.
– Display: the »RADIOTEXT« menu.
– The Radiotext message of up to 64 characters appears. The text is updated
every three seconds.
– If reception is poor there may be gaps in the Radiotext message.
Note:
If Radiotext is not provided by the selected station, the »TEXT« button (soft
key) does not appear in the »FM« menu.
2 Use »
c
« or »x« to move the text up or down.
MENU
INFO
TEXT
MENU
INFO
TEXT
RADIOTEXT
MUSIC, NEWS
AND ENTERTAINMENT
LISTENERS PHONE
x
c
19.35
21.05.2002
Page 28
28
FM MODE
____________________________________________________________________________________
PTY programme type code
RDS enables you to select RDS stations according to the type of programme they
are transmitting.
A total of 31 programme types are defined.
1 In the »FM« menu, press »MENU«.
– Display: the »FM MENU«.
2 In the »FM MENU«, press »
x
« to go to the second menu page.
3 On the second menu page, press »PTY SEARCH«.
– Display: the »PTY SEARCH« menu.
– The following programme types are available:
NO PTY No programme type
NEWS News
AFFAIRS Current affairs
INFORMATION Information
SPORT Sport
EDUCATION Education
DRAMA Drama
CULTURE Culture
SCIENCE Science
VARIED Varied
POP MUSIC Pop music
ROCK MUSIC Rock music
EASY LISTENING Easy listening music
LIGHT CLASSICS Light classical music
CLASSICS Serious classical music
OTHER MUSIC Other music
WEATHER Weather
FINANCE Finance
CHILDREN Children’s programmes
SOCIAL Social affairs
RELIGION Religion
PHONE IN Phone in
TRAVEL Travel
LEISURE Leisure
JAZZ Jazz music
COUNTRY Country music
NATIONAL MUSIC National music
OLDIES Oldies music
FOLK MUSIC Folk music
DOCUMENTARY Documentary
TEST Alarm test
ALARM Alarm
x
PTY SEARCH
x
c
DRAMA
EDUCATION
SPORT
INFORMATION
AFFAIRS
NEWS
MENU
INFO
TEXT
Page 29
ENGLISH
29
FM MODE
____________________________________________________________________________________
4 In the »PTY SEARCH« menu, search for a programme type, e.g. »POP«,
with »c« or »x« and select it with »POP«.
– Display: »SEARCHING FOR:« and »POP«.
– The HiFi searches for a radio station with the code for the type of program-
me you select. If a radio station is found, the »FM« menu appears with the
programme name and you hear the programme type you selected.
Note:
If no station with the selected programme type is found, the message
»NO STATION FOUND IN THIS CATEGORY« appears briefly.
SEARCHING FOR:
POP
PTY SEARCH
NO STATION FOUND
IN THIS CATEGORY
Page 30
30
DAB MODE
_______________________________________________________________________
With the DAB (Digital Audio Broadcasting) input source you can receive a
radio station in CD quality, i.e. without hissing or crackling. DAB stations are
combined into ensembles at regional and national levels. An ensemble contains
several stations broadcast on the same frequency. Individual stations can combine other sub-stations (secondary service components), e.g. current broadcasts
or foreign language news.
You can only have DAB reception if there is a DAB module integrated into your
HiFi. Ask your specialist dealer.
Preparation
Selecting the DAB input source
1 Call up the »AUDIO« menu by pressing »Audio«.
2 In the »AUDIO« menu, press »DAB TUNER«.
– Display: the »DAB« menu with the station name.
– You will hear the DAB station last selected.
Selecting DAB stations
Selecting DAB stations (favourites) directly
During installation, you should allocate DAB stations of your choice to station
positions 1 to 9. You will find instructions on how to allocate DAB stations to station positions 1 to 9 in the installation manual, in the section ”Allocating DAB
stations (favourites) to station positions 1 to 9” on pages 22 and 23.
1 In the »DAB« menu, press »1-9>«.
– Display: the »DAB« menu.
DAB
PRESET 8
ANTENNE
1-9>
LIS T
A-O>
MENU
INFO
TEXT
SERVICE COMP
1-9>
LIS T
A-O>
Page 31

ENGLISH
31
DAB MODE
_________________________________________________________________________________
2 In the »DAB« menu, select the DAB station with »1«to»9«.
– Display: the station position and the name of the selected DAB station.
– The selected DAB station is played.
Note:
If a station position is selected which has not had a DAB station assigned to
it, »PRESET NOT AVAILABLE« appears briefly in the display. The HiFi
then returns to the most recently selected DAB station.
Selecting DAB stations with the station list
The station list shows the DAB stations stored on station positions 1 to 9, as well
as all the received DAB stations.
1 In the »DAB« menu, press »LIST«.
– Display: the »DAB LIST«.
Note:
Only DAB stations appear in the »DAB LIST« menu, i.e. no FM radio stations. The DAB station currently playing is displayed on a grey background.
You cannot switch directly to the (FM) TUNER input source.
Use »-5« or »+5« to switch to the previous or next page of the station list.
Use »c« or »x« to move the list up or down.
2 Select a DAB station by pressing the name of the DAB station.
– The display returns to the »DAB« menu.
– The selected DAB station is played.
DAB
A-O>
9
8
7
6
5
4
3
2
1
1-9>
LIS T
A-O>
DAB LIST
x
c
A-O>
+5
-5
SWR 3
P4 BAYERN 4
P3 BAYERN 3
P2 BAYERN 2
P1 BAYERN 1
Page 32

32
DAB MODE
_________________________________________________________________________________
Selecting DAB stations by name
1 In the »DAB« menu, press »A-O>«.
– Display: the »DAB« menu with an alphanumeric keypad.
2 Use »ABC2«, for example, to enter the first letter of the station name, in this
case »A«.
– You thus create an internal list of DAB stations whose names begin with
»A«, »B«, »C« or »2«.
– Only the first DAB station in this list is displayed.
– With each additional letter entered, the list of DAB stations displayed is
narrowed down.
3 Use »
c
« or »x« to select a DAB station from the list created.
4 Call up the DAB station with »END«.
– The display returns to the »DAB« menu.
– The selected DAB station is played.
Selecting DAB service components
DAB stations sometimes provide service components. These are local stations or
different programme categories.
1 In the »DAB« menu, press »SERVICE COMP«.
– Display: the service component provided.
Note:
The »SERVICE COMP« button (soft key) is only available if a sub-station is
provided.
DAB
ANTENNE
x
c
ɲɲ
END
_-.
0
WXYZ 9
TUV8
PQRS 7
MNO6
JKL5
GHI4
DEF3
ABC2
1
SERVICE COMP
Page 33

ENGLISH
33
DAB MODE
_________________________________________________________________________________
Calling up the Dynamic Label
Dynamic Label corresponds to Radiotext in FM mode.
1 In the »DAB« menu, press »TEXT«.
– Display: the »DYN. LABEL« menu.
Note:
If Dynamic Label is not provided by the selected DAB station, the »TEXT«
button (soft key) does not appear in the »DAB« menu.
2 Search for the passage you want using »c« or »x«.
Calling up DAB information
You can call up further information on the current DAB station.
1 In the »DAB« menu, press »INFO«.
– Display: the »DAB INFO« menu with the station name, ensemble, pro-
gramme type (PTY) and stereo or mono setting.
MENU
INFO
TEXT
MENU
INFO
TEXT
Page 34

34
DAB MODE
_________________________________________________________________________________
Additional functions in DAB mode
Calling up special news categories
If you have switched on one or more of the news categories listed below, then
any relevant messages provided will interrupt the current DAB station. At the
end of the message, the HiFi returns to the current DAB station.
1 In the »DAB« menu, press »MENU«.
– Display: the »DAB MENU«.
2 In the »DAB MENU«, press »ANNOUNCE«.
– Display: the »ANNOUNCE« menu.
– If they are provided by the current DAB station, the following news catego-
ries are available:
3 In the »ANNOUNCE« menu, press »
x
« to select a news category, and press
the relevant button (soft key) to switch it on and off.
– Display: e.g. »EVENT ON«.
TRAFFIC Traffic information
TRAVEL Information on timetables and flight times
WARNING General danger information
NEWS Current news
WEATHER Weather reports
EVENT Event announcement
SPECIAL Information on unforeseen occurrences
PROGRAM If the station provides this service, only the latest messages are broadcast
SPORTS Sports report
FINANCE Financial report
MENU
INFO
TEXT
ANNOUNCE
ANNOUNCE
OFF
OFF
ON
OFF
OFF
ON
x
EVENT
WEATHER
NEWS
WARNING
TRAVEL
TRAFFIC
Page 35

ENGLISH
35
DAB MODE
_________________________________________________________________________________
Switching Dynamic Range Control on and off
Dynamic Range Control produces natural playback for programs with a high
volume dynamic (e.g. classical music). The DAB station must be providing this
additional information.
1 In the »DAB« menu, press »MENU«.
– Display: the »DAB MENU«.
2 In the »DAB MENU«, press »
x
« to go to the second menu page.
3 Switch on Dynamic Range Control by pressing »DRC« on the second page
of the »DAB MENU«.
– The display changes from »OFF« to »ON«.
4 Switch the Dynamic Range Control off by pressing »DRC« again.
– The display changes from »ON« to »OFF«.
PTY programme type code
As with RDS reception in the FM mode, the DAB mode also provides the option
of searching for DAB stations by programme type. Only those programme
types than can be received at the present time are displayed.
1 In the »DAB« menu, press »MENU«.
– Display: the »DAB MENU«.
2 In the »DAB MENU«, press »
x
« to go to the second menu page.
DAB MENU
PRESET 3
BAYERN 4
OFF
c
PTY SEARCH
M-ROOM
DRC
MENU
INFO
TEXT
x
Page 36

36
DAB MODE
_________________________________________________________________________________
3 On the second page of the »DAB MENU«, press »PTY SEARCH«.
– Display: the »PTY SEARCH« menu.
– If they are provided by the station, the following programme types can be
selected:
4 In the »PTY SEARCH« menu, search for a programme type, e.g. »POP«,
with »c« or »x« and select it with »POP«.
– Display: »SEARCHING FOR:« and »POP«.
– The HiFi searches for a DAB station with the code for the type of program-
me you select. If a DAB station is found, the »DAB« menu appears with the
programme name and you hear the programme type you selected.
Note:
If no DAB station with the selected programme type is found, the message
»NO STATION FOUND IN THIS CATEGORY« appears briefly.
PTY SEARCH
NO STATION FOUND
IN THIS CATEGORY
PTY SEARCH
x
c
DRAMA
EDUCATION
SPORT
INFORMATION
AFFAIRS
NEWS
NO PTY No programme type
NEWS News
AFFAIRS Current affairs
INFORMATION Information
SPORT Sport
EDUCATION Education
DRAMA Drama
CULTURE Culture
SCIENCE Science
VARIED Varied
POP MUSIC Pop music
ROCK MUSIC Rock music
EASY LISTENING Easy listening music
LIGHT CLASSICS Light classical music
CLASSICS Serious classical music
OTHER MUSIC Other music
WEATHER Weather
FINANCE Finance
CHILDREN Children’s programmes
SOCIAL Social affairs
RELIGION Religion
PHONE IN Phone in
TRAVEL Travel
LEISURE Leisure
JAZZ Jazz music
COUNTRY Country music
NATIONAL MUSIC National music
OLDIES Oldies music
FOLK MUSIC Folk music
DOCUMENTARY Documentary
Page 37

ENGLISH
37
CD MODE
___________________________________________________________________________
General information about CDs
Your HiFi system is suitable for the playback of CD-DAs (Digital Audio) displaying the logo shown here, or for CD-Rs and CD-RWs with audio data. Sometimes
copy-protected CDs do not adhere to the compact disc standard, and they may
cause problems during playback.
Always hold CDs by the edge in order to avoid damaging them. Replace CDs in
their jewel cases after use. Do not attach adhesive labels to CDs. Keep the surfaces of CDs clean.
To clean CDs use a lint-free cloth and wipe them in a straight line from the
centre of the disc outwards. Do not use cleaning fluid for vinyl records or other
solvents or scouring agents.
When burning CD-R and CD-RWs with audio files, various problems may arise
which could lead to interference in playback. This can be caused by faulty software or hardware settings or by the CD being used. Should such problems
arise, contact the customer services of your CD burner or software manufacturer
or look for relevant information, for example on the Internet. When you are
making audio CDs, observe all legal guidelines and ensure that the copyright of
third parties is not infringed.
Preparation
Selecting the CD input source
1 Call up the »AUDIO« menu by pressing »Audio«.
2 In the »AUDIO« menu, press »CD«.
– Display: If CD text is available, the title of the CD is displayed, otherwise
the »CD« menu appears with the number of tracks and the total playing
time.
– If there is no CD in the CD compartment, »NO CD« appears in the display.
CD
12 TRACKS
ON THE DARK SIDE
OF THE MOON
0-9>
LIST
MENU
INFO
TEXT
9
8
ı
Page 38

38
CD MODE
____________________________________________________________________________________
Inserting a CD
Normal 12 cm CDs as well as 8 cm CDs can be played back. An adapter is not
necessary.
Do not put more than one CD in the compartment.
1 Press the »
å
« sensor button on the HiFi to open the CD compartment.
– The CD compartment opens.
– The HiFi display reads: »TRAY OPEN«.
2 Insert the desired CD in the compartment with its label facing upwards.
3 Press the »
å
« sensor button on the HiFi to close the CD compartment.
– The CD compartment closes. The display on the HiFi:
»CLOSING...«.
– The HiFi reads the contents of the CD. The display on the HiFi: »READING
CD...«.
– If the CD provides CD text, the number of tracks and the total playing time
appear in the display, followed by the name of the album. If the CD does
not have CD text you will only see the number of tracks and the total
playing time.
Playing back a CD
1 Press »
R
« to start playback.
– Playback begins with the first track.
– Display: »CD«, »TRACK 1« and the track playing time elapsed.
»R« (playback) changes to »5« (stop).
– Playback stops at the end of the CD.
CD
12 TRACKS
THE DARK SIDE
OF THE MOON
0-9>
LIST
MENU
INFO
TEXT
9
8
ı
Page 39

ENGLISH
39
Note:
The track playing time elapsed which is displayed on the remote control
is approx. 3 seconds behind that on the HiFi system. This is caused by the
normal delay in the transmission of radio data signals and has nothing to do
with technical faults.
If the CD provides CD text, instead of the elapsed playing time you will see
the name of the track in the remote control menu, (see the section ”calling up
CD text information”.)
Press »INFO« to call up further information.
2 Use »II« to switch to playback pause.
– Display: »II« (pause) changes to »R« (playback).
Press »R« to resume playback.
3 Press »
5
« to end playback.
Calling up CD text information
If it is available, CD text provides information about the artist, the composer, etc.
1 In the »CD« menu, press »TEXT«.
– Display: the »CD TEXT« menu.
2 Use »
c
« or »x« to move the text up or down.
3 Press »TEXT« to switch to the next information available.
4 If all the available information has been displayed, press » « to return to
the »CD« main menu.
MENU
INFO
TEXT
5
II
CD MODE
____________________________________________________________________________________
Page 40

40
CD MODE
____________________________________________________________________________________
Calling up CD information
1 In the »CD« menu, press »INFO«.
– Display: the »CD INFO« menu.
Depending on the operating conditions, the »CD INFO« menu provides the
following information:
In the STOP position, and during playback:
– e.g. »TRACKS: 19«, number of tracks on CD.
– e.g. »LENGTH: 77:38«, total playing time of the CD.
During playback:
– e.g. »T-LENGTH: 3:47«, playing time of the current track.
– e.g. »T 17: 1:32«, the current track number and the elapsed playing
time of the track.
– e.g. »REMAIN: 7:06«, remaining playing time of CD.
– e.g. »PLAYED: 70:32«, elapsed playing time of the CD.
2 Press » « to return to the »CD« menu.
CD INFO
TRACKS: 19
LENGTH: 77:38
T-LENGTH: --:--
T --: --:--
REMAIN: --:--
PLAYED: --:--
1
MENU
INFO
TEXT
Page 41

ENGLISH
41
CD MODE
____________________________________________________________________________________
Selecting a CD track
Selecting a track – in steps
1 Keep pressing »8« or »9« until you see the number or name of the
required track in the display.
– Playback of the selected track starts automatically.
Selecting a track – directly
1 In the »CD« menu, press »0-9>«.
– Display: the »CD« menu (numerical track selection).
2 Select the track with »0« to »9« and confirm it with »END«.
– Playback of the selected track starts.
Selecting tracks from the track list
You can only select a track by the track name if the CD provides CD text. For
CDs without CD text, the track selection is only possible by track number.
1 In the »CD« menu, press »LIST«.
– Display: the »TRACK LIST« menu.
2 Select the page you want with »-6« or »+6« and then select the track by
pressing the appropriate button.
– Playback of the selected track starts.
9
8
0-9>
LIS T
TRACK LIST
+6
-6
06 BLACKBIRD
05 NOWHERE M
04 WITH A LI
03 PENNY LAN
02 LET IT BE
01 SERGEANT
Page 42

42
CD MODE
____________________________________________________________________________________
Additional functions
Searching for a passage
1 During playback, press »8« or »9« and hold it down until you find the
passage you want to hear.
Playback begins as soon as you let go of the »8« or »9« button.
Note:
During the search the volume is reduced.
Playing back tracks in random order
1 When the CD is in the STOP position, press »MENU« in the »CD« menu.
– Display: the »CD MENU«.
2 In the »CD MENU« menu, press »SHUFFLE«.
– The display changes from »OFF« to »ON«. »s« appears to indicate
”SHUFFLE”.
3 Press » « to return to the »CD« menu and press »
R
« to start playback.
– Playback begins and the tracks on the CD are played back in random
order.
4 To quit this function, press »SHUFFLE« again.
– The display changes from »ON« to »OFF«. »s« indicating ”SHUFFLE” goes
out.
– The HiFi returns to normal operation.
Note:
If you open the CD compartment or switch off the HiFi, the shuffle function is
switched off.
9
8
CD MENU s
ON
SHUFFLE
PROGRAM
REPEAT
Page 43

ENGLISH
43
CD MODE
____________________________________________________________________________________
Repeating the current track
1 During playback, press »8«.
– The track is played back from the beginning.
Repeating a CD, a track or a track memory
The ”Repeat” function must be selected during CD playback.
1 In the »CD« menu, press » MENU«.
– Display: the »CD MENU«.
2 In the »CD MENU« menu, press » REPEAT«.
– Display: the »CD REPEAT« menu.
3 Press the button to select a function:
»REPEAT ALL«:
– »r« appears in the display to indicate ”REPEAT”.
– The entire CD or a track memory is repeated.
»REPEAT TRACK«:
– »r« appears in the display to indicate ”REPEAT”.
– The current CD track is repeated.
4 To quit this function, press »REPEAT OFF«.
– The »REPEAT OFF« button appears inverted. »r« – the symbol for
”REPEAT” disappears.
CD REPEAT r
REPEAT TRACK
REPEAT ALL
REPEAT OFF
MENU
INFO
TEXT
9
8
Page 44

44
CD MODE
____________________________________________________________________________________
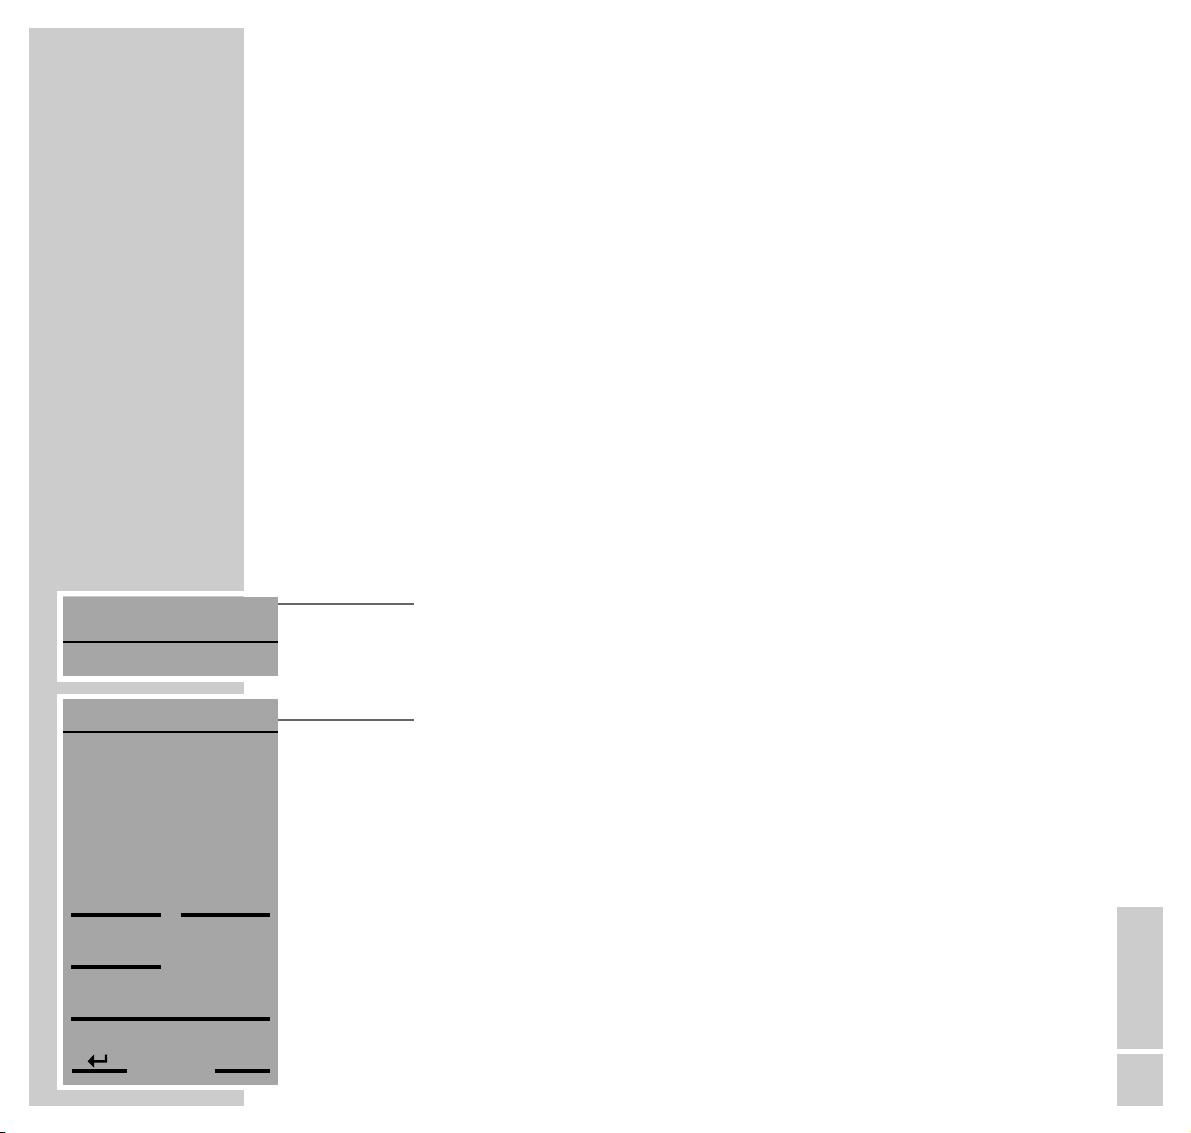
Playing back tracks in a selected order –
creating a track memory
You can store up to 30 tracks for the current CD in any order you choose and
then play them back in that sequence. The same track may be stored more than
once.
Selecting and storing tracks
1 In the »CD« menu, press » MENU«.
– Display: the »CD MENU«.
2 In the »CD MENU«, press » CD PROGRAM«.
– Display: the »CD PROGRAM« menu.
3 Select the desired track using »
+
« or »-« and press »MEM« to store it.
– Display: the stored track numbers.
or
Use »
0-9>
« for the numeric track selection, then select the track with »0« to
»9« and store it with »MEM«.
– Display: the currently stored track number.
Note:
To save more tracks, repeat step 3.
If the track memory is full (max. 30 tracks), »FULL MEMORY« appears in the
display.
CD PROGRAM P
TOTAL: 32:35
2 3 5 7 12
-
0-9>
ı
CLR
END
MEM
DEL.
+
8
-
>>
<<
MENU
INFO
TEXT
Page 45

ENGLISH
45
CD MODE
____________________________________________________________________________________
4 Press »END« to complete the entries.
– Playback of the track memory starts.
– The display shows the number of the first track, its playing time and »CD
PROGRAM« for the track memory.
Note:
The track memory is deleted when you open the CD compartment.
Playing the current track to be stored
1 In the »
CD PROGRAM
« menu, press »R«.
– The current track to be stored is played back, whereby you do not leave
the programming mode.
– The display changes from »R« (playback) to »5« (stop).
2 End the track playback with »5«.
Note:
The ”Create track memory” function can be interrupted with the »CLR«
button.
Deleting tracks from the memory
1 In the »CD« menu, press » MENU«.
– Display: the »CD MENU«.
2 In the »CD MENU«, press » CD PROGRAM«.
– Display: the »CD PROGRAM« menu.
3 Select the track to be deleted with »
>
« or »<«.
– The selected track is underlined.
4 Delete the track with »DEL.«.
ı
CLR
END
ı
CLR
END
5
CLR
END
MENU
INFO
TEXT
MEM
DEL.
CD PROGRAM
2 3 5 7 12
-
>>
<<
Page 46

46
CD PROGRAM
TOTAL: 32:35
2 3 5 7 12
-
0-9>
ı
CLR
END
MEM
DEL.
+
8
-
>>
<<
Replacing tracks
1 In the »CD« menu, press » MENU«.
– Display: the »CD MENU«.
2 In the »CD MENU«, press » CD PROGRAM«.
– Display: the »CD PROGRAM« menu.
3 Select the track to be replaced with »
>
« or »<«.
– The selected track is underlined.
4 Select the new track using »
+
« or »-« and press »MEM« to store it.
– Display: the currently stored track number.
Adding more tracks
1 In the »CD« menu, press » CD PROGRAM«.
– Display: the »CD PROGRAM« menu.
2 Select the desired track using »
+
« or »-« and press »MEM« to store it.
– Display: the currently stored track number.
or
Use »
0-9>
« for the numeric track selection, then select the track with »0« to
»9« and store it with »MEM«.
– Display: the currently stored track number.
CD MODE
____________________________________________________________________________________
CD PROGRAM
TOTAL: 32:35
2 3 5
7 12
-
0-9>
ı
CLR
END
MEM
DEL.
+
8
-
>>
<<
Page 47

ENGLISH
47
CD MODE
____________________________________________________________________________________
Deleting the track memory
1 In the »CD« menu, press » MENU«.
– Display: the »CD MENU«.
2 In the »CD MENU«, press » CD PROGRAM«.
– Display: the »CD PROGRAM« menu.
3 To delete the track memory, press »CLR«.
– Display: »CD PROGRAM DELETED«.
– All tracks have been deleted.
CD PROGRAM
TOTAL: 32:35
2 3 5 7 12
-
0-9>
ı
CLR
END
MEM
DEL.
+
8
-
>>
<<
Page 48

48
SLEEP TIMER MODE
_________________________________________________
With the ”Sleep timer” function you can enter a separate switch-off time for
every room installed. At the time entered, each pair of loudspeakers switches to
standby mode. When the last pair of loudspeakers switches off, the HiFi system
also switches to standby mode.
Setting the switch-off time
1 Press »M« (yellow).
– The »SLEEP« menu appears.
2 In the »SLEEP« menu, enter the switch-off time desired (in 10-minute steps
from 10 to 90 minutes) with »>« or »<«.
– If you do not press any button for more than 5 seconds, the remote control
display returns to the previous menu.
– At the switch-off time selected, the loudspeakers in the room selected switch
to standby mode.
Note:
If the sleep timer is activated, press »M« (yellow) to see the time remaining before switching off.
If the touch pad display of the remote control is activated while the sleep
timer is running, »SLEEP TIMER ACTIVE« and the time selected appear
briefly in the remote control display.
Ending the sleep timer prematurely
1 Press »M« (yellow).
– The »SLEEP« menu appears.
2 In the »SLEEP« menu, enter the switch-off time 0 with »<«.
– The sleep timer is deactivated.
SLEEP
IN
MINUTES
>>
60
<<
SLEEP
IN
MINUTES
>>
0
<<
Page 49

ENGLISH
49
MULTI-ROOM MODE
______________________________________________
Operating pairs of speakers in additional rooms
You can also use the remote control to operate pairs of loudspeakers in other
rooms. The remote control must be set to the relevant room. If you now enter settings for volume and tone (see the section ”Volume and tone” on pages 20 to
22), they will be saved for each room separately.
If you are listening to the same input source, e.g. FM, in a number of rooms and
you select a different radio station, this selection also applies to all the other
rooms in which the FM input source is active. The same applies if, for example,
you select another track in CD mode.
Switching the remote control to a pair of speakers in
another room
You can only select rooms in which loudspeakers are configured. They are
displayed in the »SELECT ROOM« menu.
1 Call up the »AUDIO« menu by pressing »Audio«.
– Display: the »AUDIO« menu.
2 In the »AUDIO« menu, press »SELECT ROOM«.
– Display: the »SELECT ROOM« menu.
3 In the »SELECT ROOM« menu, select the room, e.g. »ROOM 3«, by pres-
sing the buttons.
– The display returns to the Audio menu.
– The room selected is displayed with » «.
3
AUDIO
SELECT ROOM
1
SELECT ROOM
ROOM 5
ROOM 4
ROOM 3
ROOM 2
ROOM 1
3
Page 50

50
MULTIPLE ROOM OPERATION
________________________________________________
Setting up different input sources for individual rooms
You can listen to up to two input sources in a number of rooms at the same time.
If you also try to set a third input source, the following message appears in the
remote control display: »2 SOURCES ACTIVE. SWITCH ONE OFF OR
SELECT AN ACTIVE SOURCE.«
1 Call up the »AUDIO« menu by pressing »Audio« on the remote control.
– Display: the »AUDIO« menu.
2 In the »AUDIO« menu, press »M-ROOM«.
– Display: the »M-ROOM« menu.
3 In the »M-ROOM« menu, for example, use »ROOM 5« to switch between
»CD«, »DAB«, »FM« and »OFF«.
– The input source selected becomes active in room 5.
– Display: the input source selected (»CD«, »DAB«, »FM«) or »OFF« if the
room is switched off.
4 To set the input source in other rooms, repeat step 3.
Note:
You can also access the »M-ROOM« menu via the relevant input source.
You can only switch between »OFF« and the input source already active if
two input sources are active in other rooms.
M-ROOM
ROOM 5 CD
ROOM 4 FM
ROOM 3 OFF
ROOM 2 FM
ROOM 1 CD
2
M-ROOM
SETUP
Page 51

ENGLISH
51
INFORMATION
_____________________________________________________________
Changing the remote control batteries
If the message »ATTENTION: BATTERY LOW« appears in the remote control
display, you must change the batteries. Be sure to remove used batteries. The
manufacturer accepts no liability for damage resulting from used batteries.
1 Open the battery compartment by pressing on the catch at the back of the
remote control and removing the cover of the battery compartment.
2 When inserting the three batteries (3 x 1.5 V alkaline, mignon type
LR6/AA/AM3), adhere to the polarity on the bottom of the battery compartment.
3 Close the battery compartment by replacing the cover.
Environmental note:
Batteries, including those which contain no heavy metal, may not be disposed of with household waste. Please dispose of used batteries in an environmentally sound manner. Find out about the legal regulations which apply in
your area.
Page 52

52
INFORMATION
__________________________________________________________________________
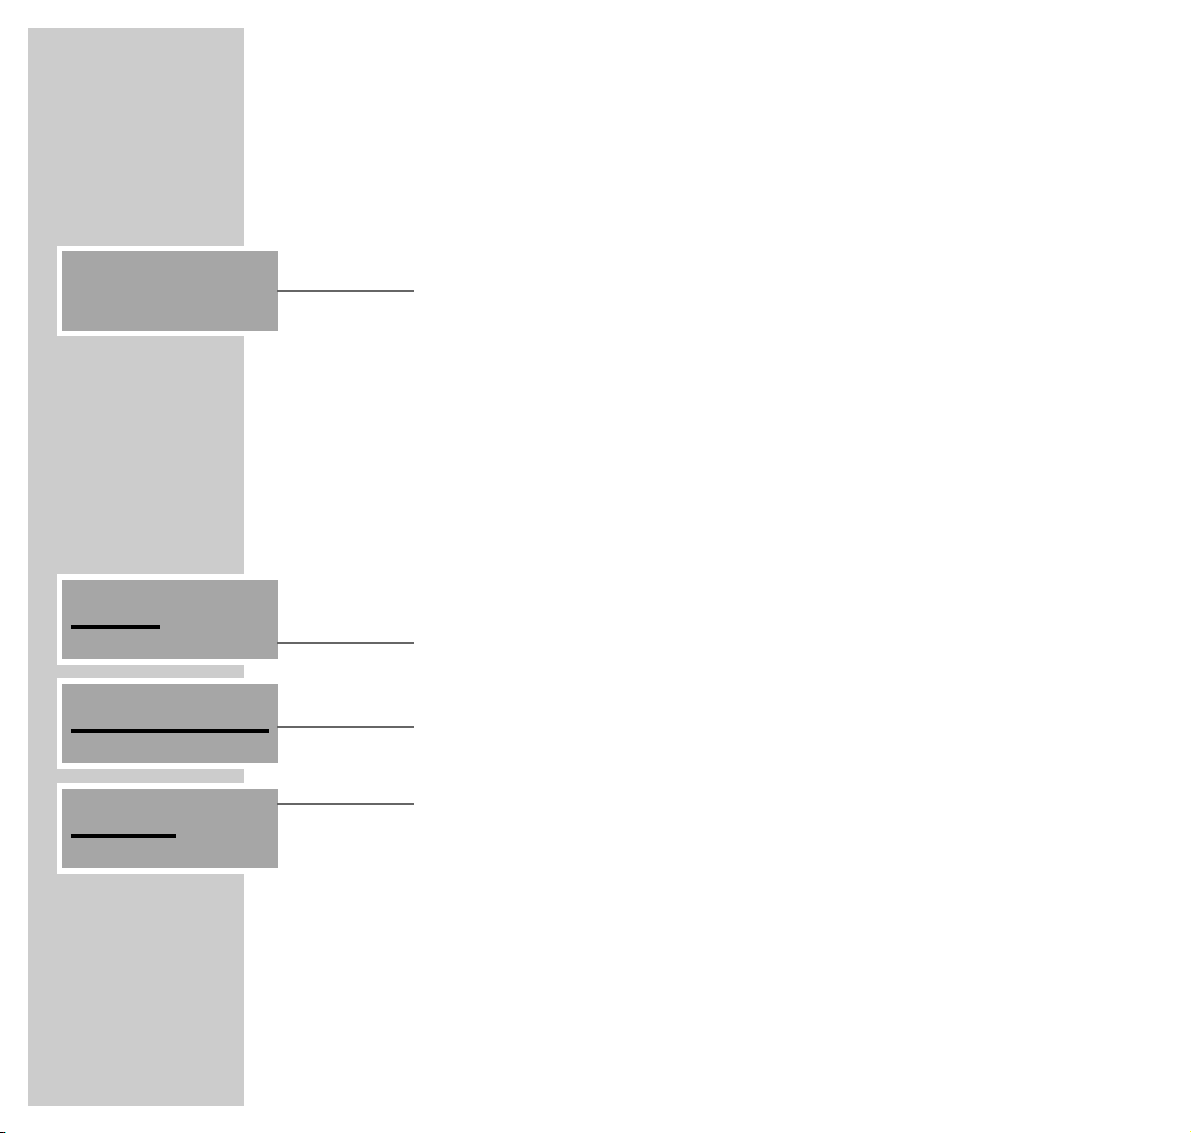
Other remote control operating modes
In addition to your HiFi system, you can also use your PR 1 remote control to
operate other Grundig devices such as TV, DVD, video and PDR.
If the remote control is in HiFi mode, press the »Vision« button (hard key) to
switch to the »VISION« menu. In the »VISION« menu, press the relevant button (soft key) to select the TV, DVD, video or PDR mode. To return to HiFi mode,
press the »Audio« button (hard key).
The remote control in TV mode
9
Switches the television into and out of standby mode.
Display Display of the remote control and digital keypad (touchpad). If
the keypad is not used for 30 seconds, the display switches off
automatically. To switch it on again, press the »OK« key (hard
key) on the remote control.
Audio Selects the HiFi mode (FineArts Audion).
Vision Selects the television mode. Selects other operating modes such
as DVD and video (see pages 53 to 60).
P+P– Switch the television on from standby. Select channels step-by-step.
Move the cursor up/down.
OK Switches the remote control display on.
Confirms menu entries.
Calls up the program list.
ǸǷ
Move the cursor to the left or right.
Page 53

ENGLISH
53
INFORMATION
__________________________________________________________________________
–
}
+ Adjusts the volume.
d Switches the loudspeakers to and from mute mode.
R Switches the lighting for the remote control display on
and off.
z Calls up the »PICTURE SETTINGS« menu.
w For displaying the current time.
M No function in television mode.
F Calls up the »SOUND SETTINGS« menu.
Display and buttons in TV mode (standard)
Display and key Meaning and function
TV Television mode is selected (no button).
FOR Changes the picture format.
PIP Switches the PIP function (picture in picture)
on and off.
AUX Preset button for various functions.
AKT Calls up information on the current programme
and the TV guide.
i Calls up the EASY DIALOG system.
? Calls up help information.
TXT Switches between the videotext and TV modes.
0-9> Switches the display to numerical buttons
(programme selection).
TV
0-9>
TXT
?
i
AKT
AUX
PIP
FOR
Page 54

54
INFORMATION
__________________________________________________________________________
Display and buttons in TV/DVD mode (Digi 100)
(extended)
Digi 100 televisions such as Lenaro have an integrated DVD player. It is
not necessary to change modes, because all the functions are in the keypad of
the remote control. The infrared code of the remote control must be set to
»EXTENDED« (see installation manual, page 55).
Display and key Meaning and function
TV Television mode is selected (no button).
DVD >> Switches to the DVD buttons.
FOR Changes the picture format.
TXT Switches between the videotext and TV modes.
PIP Switches the PIP function (picture in picture)
on and off.
i Calls up the EASY DIALOG system.
? Calls up help information.
TV+ Switches from DVD mode to TV mode.
Calls up the TV guide in TV mode.
z Activates the Zapp function.
A-0> Switches the display to alphanumerical buttons
(programme selection).
Note:
You will find details of the functions of the other buttons (hard keys) on the
remote control in the television menu and in the television operating manual.
TV
A-0>
z
TV+
?
i
PIP
TXT
FOR
DVD >>
Page 55

ENGLISH
55
INFORMATION
__________________________________________________________________________
Display and key Meaning and function
DVD DVD mode is selected (no button).
<< TV Switches to the TV buttons.
RETURN Return to Disc menu.
SUBTITLE Selects the language of the subtitles.
ANGLE Adjusts the camera angle.
ZOOM Activates the zoom function.
5 Press once to interrupt or resume playback.
Press twice to stop playback.
8
Starts playback.
If playback was interrupted (»7« pressed only
once), it is resumed from the point at which it
was interrupted.
QW Switch to forwards or backwards frame search
at various speeds during playback.
II Freeze-frame for DVDs and video CDs. Pause
for audio CDs.
56 Select the next/previous title or section during
playback.
0-9> Switches the display to numerical buttons.
Note:
You will find details of the functions of the other buttons (hard keys) on the
remote control in the television menu and in the DVD player operating manual.
DVD
0-9>
6
5
W
II
Q
8
7
ZOOM
ANGLE
SUBTITLE
RETURN
<< TV
Page 56

56
INFORMATION
__________________________________________________________________________
Display and buttons in DVD mode (standard)
The FineArts Vision televisions recommended for system operation have an integrated DVD player. If you want to operate it with your PR 1, the infrared code
of the remote control must be set to »STANDARD« (see installation manual,
page 55).
Display and key Meaning and function
DVD DVD mode is selected (no button).
i Calls up the DVD player main menu.
OSD For displaying and hiding the menu line.
SUBTITLE Selects the language of the subtitles.
ANGLE Adjusts the camera angle.
AUDIO Selects the sound language.
TXT To quit a TV menu.
? Displays TV help information.
QW Switch to forwards or backwards frame search
at various speeds during playback.
5 Press once to interrupt or resume playback.
Press twice to stop playback.
8
Starts playback.
If playback was interrupted (»7« pressed
once), it is resumed from the point at which it
was interrupted.
DVD
0-9>
II
8
7
W
Q
?
TXT
AUDIO
ANGLE
SUBTITLE
OSD
i
Page 57

ENGLISH
57
INFORMATION
__________________________________________________________________________
II Freeze-frame for DVDs and video CDs. Pause
for audio CDs.
0-9> Switches the display to numerical buttons.
Note:
You will find details of the functions of the other buttons (hard keys) on the
remote control in the television menu and in the DVD player operating manual.
Display and buttons in AUX mode (DVD player)
(extended)
Display and key Meaning and function
AUX AUX mode is selected (no button).
ZOOM Activates the zoom function.
SUBT Selects the language of the subtitles.
ANG Adjusts the camera angle.
TITLE Calls up the DVD title menu during playback.
AUDIO Selects the sound language.
DISC Calls up the DVD disc menu during playback.
Blacks the screen during CD Audio.
i Calls up the DVD player main menu.
RET Quits the menu or switches back one menu level.
5 Press once to interrupt or resume playback.
Press twice to stop playback.
AUX
0-9>
BOOKM.
6
5
REP.
W
II
Q
8
7
RET
i
DISC
AUDIO
TITLE
ANG
SUBT
ZOOM
Page 58

58
INFORMATION
__________________________________________________________________________
8
Starts playback.
If playback was interrupted (»7« pressed
once), it is resumed from the point at which it
was interrupted.
QW Switch to forwards or backwards frame search
at various speeds during playback.
II Freeze-frame for DVDs and video CDs. Pause
for audio CDs.
REP. For the repeated playback of sections from
DVDs and video CDs and tracks on audio CDs.
56 Select the next/previous title or section during
playback.
BOOKM. To select sections of DVDs and video CDs.
0-9> Switches the display to numerical buttons.
Note:
You will find details of the functions of the other buttons (hard keys) on the
remote control in the television menu and in the DVD player operating manual.
AUX
0-9>
BOOKM.
6
5
REP.
W
II
Q
8
7
RET
i
DISC
AUDIO
TITLE
ANG
SUBT
ZOOM
Page 59

ENGLISH
59
INFORMATION
__________________________________________________________________________
Display and buttons in Video mode
Display and key Meaning and function
VIDEO Video mode is selected (no button).
i Calls up the video recorder main menu.
TXT Selects videotext mode (TV function).
FOR Selects the format (TV function).
PIP Not used.
TIMER Switches the recording timer on and off.
QW Wind the video cassette backwards or forwards.
•
Start recording onto video cassette.
5 Stops playback.
8
Starts playback.
II Pauses playback.
0-9> Switches the display to numerical buttons.
Note:
You will find details of the functions of the other buttons (hard keys) on the
remote control in the video recorder menu and in the video recorder operating
manual.
VIDEO
0-9>
II
8
7
W
Q
•
TIMER
PIP
FOR
TXT
i
Page 60

60
INFORMATION
__________________________________________________________________________
Display and buttons in Personal Digital Recorder
(PDR) mode
Display and key Meaning and function
PDR PDR mode is selected (no button).
z Back to the menu.
PIP Not used.
FOR Selects the format (TV function).
i Calls up the main menu of the PDR.
? Calls up help information.
INFO Info.
8
Starts playback.
5 Stops playback.
QW Fast forward and rewind.
II Pauses playback.
•
Calls up the recording function.
I
ı Starts recording.
REP Starts repeating the last section viewed
(instant replay).
TV-G Calls up the Personal Program Guide.
0-9> Switches the display to numerical buttons.
Note:
You will find details of the functions of the other buttons (hard keys) on the
remote control in the Personal Digital Recorder menu and in the device’s operating manual.
PDR
0-9>
TV-G
REP
I
8
•
W
II
Q
8
7
INFO
?
i
FOR
PIP
z
Page 61

ENGLISH
61
GENERAL PROBLEMS
Problem Possible cause/remedy
Distorted or interfering signal in one or There is a radio-operated device being used in the immediate
more of the loudspeakers during vicinity of the HiFi (e.g. wireless headphones, mobile phone).
Tuner mode. Select a different transmission/reception channel. See page 48
of the installation manual. Position the antennas of the LSP3
and the HiFi system vertically.
The HiFi switches off. The HiFi may be overheated. Switch the HiFi system off. Let the
HiFi cool down for approx. 15 minutes before you switch it on
again.
The sleep timer was activated.
The HiFi system was switched onto standby with another installed
remote control.
The HiFi system does not work. Problems due to electrostatic discharge. Switch off the loudspea-
kers and the HiFi using the mains switch, then switch them on
again.
No sound. Check the volume setting. Check the mains plug and the mains
switch of the loudspeakers (the operating indicator should be lit
up green). Make sure the MUTING function is not activated.
Check the antenna connection.
The left and right channels are inverted. Check the location of the loudspeakers.
The remote control does not work. Change the batteries.
The remote control has been deinstalled.
INFORMATION
__________________________________________________________________________
Rectifying minor problems
Not every kind of sound interference is caused by a defect in your HiFi system. Impairment
can also be caused by leads having been accidentally pulled out, damaged CDs and worn
out batteries in the remote control.
If the following measures do not bring about satisfactory results, please consult an authorised dealer.
Page 62

62
INFORMATION
__________________________________________________________________________
RADIO RECEPTION
Problem Possible cause/remedy
No sound. The MUTING function is activated due to poor
stereo reception. Switch off FM STEREO to activate MONO
reception, or manually adjust the frequency. Check the Antenna/Cable setting.
Loud noise interference. Check antenna connection.
DAB MODE
Problem Possible cause/remedy
No DAB signal Reposition the DAB antenna.
CD MODE
Problem Possible cause/remedy
The CD compartment will not close. The CD is not properly inserted.
Playback does not work. The CD is dirty, scratched or upside-down.
A sudden temperature change has caused
condensation on the laser lens system. This will dry off by itself
after a short time.
The message “NO DISC“ is displayed. No disc is in the compartment, or the disc is dirty, scratched
or warped. No audio CD inserted. Try another CD.
You are using a CD which does not adhere to the compact disc
standard, or a CD-R or CD-RW which has not been burned
correctly.
Playback does not start with the first track. The HiFi is in PROGRAM or SHUFFLE mode.
Switch the function off.
MULTI-ROOM OPERATION
Problem Possible cause/remedy
You can not select the input source There are already two different input sources active.
you desire.
Page 63

ENGLISH
63
INFORMATION
__________________________________________________________________________
This device is noise-suppressed
according to the applicable EC
directives.
This product fulfils the European
directives 89/336/EEC, 73/23/
EEC and 93/68/EEC.
This device conforms to the safety
regulation DIN EN 60065 (VDE
0860) and therefore the international safety regulation IEC 60065.
The type plate with details on the
mains supply is located on the
bottom of the device.
Transmission range
Data transmission:
868 ... 870 MHz
Signal transmission:
863 ... 865 MHz
Transmission power:
< 10 mW
Amplifier unit
Input sensitivity /
impedance:
250 mV/22 kΩ
Receiver unit
Reception range:
FM 87.5 ...108.0 MHz
CD unit
Frequency response:
10 Hz ... 20 kHz
Non-linear distortion factor:
0.01 %
Noise-voltage ratio:
(wtd.) 100 dB
System
Power supply:
Operating voltage 230 V~
Mains frequency 50/60 Hz
Max. power consumption 29 W
Power consumption in
standby < 3 W
Dimensions and weight:
Device dimensions
W x H x L 310 x 100 x 325 mm
Weight 4.8 kg
Technical data
General instructions for laser devices
This device meets the requirements for a CLASS 1 LASER PRODUCT.
CLASS 1 LASER PRODUCT means that the laser is designed in such a way as to
ensure that the maximum permissible emission value cannot be exceeded under
any circumstances.
If operating devices or methods other than those specified here are employed, it
may lead to dangerous exposure to emissions.
Invisible laser radiation is emitted if the CD compartment is opened and the
safety locking mechanism is shorted. Do not expose yourself to this radiation.
The HiFi system and the remote control are intended for sale within the EU in the following countries: Belgium,
Denmark, Germany, UK, Finland, France, Ireland, Italy, Luxembourg, Netherlands, Norway, Austria, Portugal,
Sweden.
DFM 869
AFM 864
Page 64

64
INFORMATION
__________________________________________________________________________
GRUNDIG Service
S.A. GRUNDIG BELUX N.V.
Deltapark, Weihoek 3, Unit 3G
B-1930 Zaventem
+32/2-7 16 04 00
GRUNDIG UK LTD.
Elstree Business Centre,
Elstree Way, Borehamwood,
Hertfordshire, WD6 1RX
GB Großbritannien/
Great Britain
+44/20 83 24 94 00
Technical Service
Gts Intermedia Service Ltd,
Unit 36, Webb Ellis Business
Park, Woodside Park, Wood
Street, Rugby, Warwickshire,
CV21 2NP
Großbritannien/Great Britain
+44/1 78-8 57 00 88
GRUNDIG FRANCE S.A.
5 Boulevard Marcel Pourtout
F-92563 Rueil Malmaison
Cedex
+33/1-41 39 26 26
GRUNDIG SCHWEIZ AG
Steinacker Straße 28
CH-8302 Kloten
+41/1-8 15 81 11
GRUNDIG PORTUGUESA, LDA.
Rua Bento de Jesus Caraça 17
P-1495 Cruz Quebrada,
Lisboa
+3 51/2 14 15 67 05
GRUNDIG ESPAÑA S.A.
Solsonés, 2 planta baja B3
Edificio Muntadas (Mas Blau 1)
E-08820 El Prat De Llobregat (Barcelona)
+34/93-4 79 92 00
GRUNDIG NORGE A/S
Postboks 234
N-1402 Ski
+47/64 87 82 00
GRUNDIG DANMARK A/S
Lejrvej 19
DK-3500 Værløse
+45/44 48 68 22
GRUNDIG OY
Pihatörmä 1a, P.O. Box 25
FIN-02241 Espoo
+3 58/9 72 50 75 00
GRUNDIG SVENSKA AB
Esbogatan 18, Box 74
S-16494 Kista
+46/8-6 29 85 30
GRUNDIG POLSKA SP.Z.O.O.
Ul. Czéstochowska 140
PL-62800 Kalisz
+48/62-7 66 77 70
GRUNDIG AUSTRIA Ges.m.b.H.
Breitenfurter Straße 43-45
A-1120 Wien
+43/1-81 11 70
GRUNDIG NEDERLAND B.V.
Gebouw Amstelveste
Joan Muyskenweg 22
NL-1096 CJ Amsterdam
+31/20-5 68 15 68
GRUNDIG ITALIANA S.P.A.
Via G.B. Trener, 8
I-38100 Trento
+39/4 61-89 31 11
GRUNDIG Deutschland
Ihre regionale Kundendienst-Stelle in Deutschland erreichen Sie unter:
Telefon 0180/5 23 18 52* • Telefax 0180/5 23 1846*
*gebührenpflichtig
Page 65

ǵ
FINE ARTS AUDION
WIRELESS HIFI SYSTEM
Installation manual
ENGLISH
X
Page 66

2
CONTENTS
________________________________________________________________________
This installation manual is mainly intended for the authorised dealer who sets up and installs
the system and hands it over to the customer ready for operation.
4 System operation
4 Operation with the RCD 8300 HiFi system and Grundig televisions
5 Set-up
5 Setting up the HiFi system
7 Connection
7 Connecting the HiFi system
8 Additional information for units sold in the UK.
9 Installation
9 Different installation examples
11 Connecting and installing the active loudspeakers
16 Selecting the HiFi antenna setting
17 FM preset settings
17 Tuning radio stations
17 Assigning radio stations (favourites) to station positions 1 to 9
19 Deleting, adding and replacing radio stations
22 Automatic search program (ATS)
23 DAB preset settings
23 Setting the DAB presets
23 Assigning DAB stations (favourites) to station positions 1 to 9
25 Deleting, adding and replacing DAB stations
28 Automatic search program (ATS) for DAB stations
Page 67

CONTENTS
__________________________________________________________________________________
ENGLISH
3
29 Setup settings
29 Entering the installation PIN
30 Switching the HiFi system to horizontal or vertical mode
30 Resetting the menu language
31 Setting the time and date
32 Changing the communication channel of the HiFi and the loudspeakers
33 Second pair of speakers
33 Connecting and installing a second pair of speakers (room 1)
34 Deleting a pair of loudspeakers (room 1)
36 Multi-room mode
36 Special features of multi-room mode
36 Installing additional pairs of loudspeakers
38 Deleting pairs of loudspeakers
39 Installing additional remote controls
40 Checking the identification number of the remote control
41 Deleting additional remote controls
41 Replacing loudspeakers
43 Installing the WT2 module
43 ... in configuration with Digi 100 televisions, e.g. Lenaro
47 ... in configuration with the FineArts Vision and FineArts Planavision televisions
49 ... at a later date, in configuration with Digi 100 televisions, e.g. Lenaro
53 ... at a later date, in configuration with the FineArts Vision and FineArts Planavision
televisions
56 Information
56 Setting the infrared code of the remote control to the television
57 Resetting components to the original state
59 Updating the system software and the foreign languages of the user menu
Page 68

4
SYSTEM OPERATION
_____________________________________________
Operation with the RCD 8300 HiFi system and
Grundig televisions
With your RCD 8300 HiFi system you can operate one or two pairs of loudspeakers in room 1. We recommend using the LSP2 active loudspeakers as
front speakers and the LSP3 active loudspeakers as surround speakers.
If the WT2 wireless module is integrated into your Grundig television (FineArts
Vision, FineArts Planavision or Lenaro), it controls the same active loudspeakers
as your HiFi system.
If you want to operate the loudspeakers alternately via the HiFi or the WT2
wireless module, you first have to install the WT2 wireless module on the HiFi
system (see pages 42 to 54).
I
Front left LSP2
Surround left LSP3 RCD 8300 HiFi system Surround right LSP3
Front right LSP2
Television with WT2
Slider
Video in
Audio inLR
Volume Program
S-VHS
ǵ
ǵ
Page 69

ENGLISH
5
SET-UP
___________________________________________________________________________________
Setting up the HiFi system
There are two ways to position your HiFi:
– Placed horizontally in a suitable location
– Mounted vertically on the wall.
When the HiFi is operated horizontally, the display is lifted up manually. Then
you can turn it to the left or right by pressing buttons on the remote control. You
can thus easily read the information on the display.
When the HiFi is mounted vertically, you have to pull down and fix the display
manually. Then you can not turn the display any more.
Accessory packing contents for wall mounting
Bracket
Screws for fastening the bracket to the HiFi system
Screws and wall plugs for wall mounting
Cable channel
Screws and wall plugs for fastening the cable channel
Page 70

SET-UP
__________________________________________________________________________________________
6
Wall mounting
1 Select a suitable mounting location.
2 Hold the bracket to the selected mounting location and mark the holes.
3 Drill two holes for the screws.
4 Push in the wall plugs and screw in two screws.
5 Cut the lower part of the cable channel to the appropriate length and
screw it (3 screws) to the wall below the position intended for the HiFi
system.
6 Attach the bracket to the bottom of the HiFi system.
7 Connect the mains cable, the FM antenna cable and the DAB antenna
cable, if there is one, to the HiFi system (see page 7).
8 Mount the HiFi system on the two screws by means of the bracket.
9 Feed the mains and antenna cables down through the cable channel.
10 Cut the upper part of the cable channel to the appropriate length and clip
both sides onto the lower part of the cable channel.
11 When wall mounting is complete, align the communication antennae
vertically.
4
5
6
8
10
190 mm
ǵ
ǵ
Page 71

ENGLISH
7
CONNECTION
_______________________________________________________________
Connecting the HiFi system
Connecting the DAB antenna (1)
Note:
This connection is only used if there is a DAB module integrated into the
HiFi.
If you are using a standard DAB antenna, you require an FME adapter to
connect it.
1 Connect the DAB antenna cable with the threaded connection (F plug
connection) in the recess on the bottom of the HiFi system.
Connecting the FM antenna (2)
1 Insert the FM antenna cable into the antenna socket in the recess on the
bottom of the HiFi system.
Note:
If you do not have a rooftop antenna, use the auxiliary wire antenna supplied. This antenna provides reasonably good reception for local stations.
Do not shorten the auxiliary antenna.
Connecting the mains cable (3)
1 Insert the power cord plug into the socket in the recess on the bottom of the
HiFi system.
2 Insert the power cord plug into the socket.
Aligning the communication antenna (4)
1 Put the communication antenna in an upright position.
1
2
3
4
Page 72

CONNECTION
____________________________________________________________________________
8
Additional information for units sold in the UK.
Units sold in the UK are suitable for operation from a 240V ac, 50Hz mains supply.
The range of multi-system receivers is built to work in most European countries. However, the mains plug and
socket system for the UK differs from many European countries.
This appliance has been supplied with a fitted, non-removable, approved converter plug for use in the UK. This
converter plug is fitted with a 5A rated fuse.
In case this appliance is supplied with a moulded 2-pin Euro plug only, which is unsuitable for UK operation, this
must be cut off and immediately disposed of. An approved 13A, 3-pin UK plug should then be fitted by a
qualified electrician.
Note:
The severed Euro plug must be destroyed to avoid a possible shock hazard should it be inserted into a socket
elsewhere.
If a non-rewireable 3-pin plug or a rewireable 13A (BS1363) 3-pin plug is used, it must be fitted with a 5A ASTA
or BSI approved BS1362 fuse. If any other type of plug is used it must be protected by a 5A fuse either in the
plug, or at the distribution board. If this type of plug becomes defective, ensure that the fuse is removed before
disposal, to eliminate potential shock hazard.
If it is necessary to change the fuse in the non-rewireable plug, the correct type and rating (5A ASTA or BSI
approved BS1362) must be used and the fuse cover must be refitted. If the fuse cover is lost or damaged, the lead
and plug must not be used until a replacement is obtained. Replacement fuse covers should be obtained from
your dealer.
Important:
The wires in the mains lead are colour coded in accordance with the following code:
BLUE – NEUTRAL
BROWN – LIVE
As the colours of the wires in the mains lead of your appliance may not correspond with the coloured marking
identifying terminals in your plug, proceed as follows:
Connect the BLUE coloured wire to plug terminal marked with the letter “N” or coloured black.
Connect the BROWN coloured wire to the plug terminal marked with the letter “L” or coloured red.
In no circumstance must any of the wires be connected to the terminal marked with the letter “E”, earth symbol
“
z”, coloured green, or green & yellow.
Replacement mains lead sets can be obtained from your local dealer, or by contacting Grundig Consumer
Relations (01788 570088)
Moulded 3-pin lead set, suitable for UK use:
Ref: Leadset UK 8290-991-224
Moulded 2-pin Euro lead set, not suitable for UK use:
Ref: Leadset Euro 8290-991-316
Page 73

ENGLISH
9
You have ...
You want to install ...
INSTALLATION
______________________________________________________________
–
1
1
–
–
1
1
1
–
1
2
2
2
2
2
5
–
–
–
1
–
–
–
–
–
–
–
–
1
–
–
–
–
1
1
–
–
1
1
1
1
–
–
1
1
–
–
–
1
1
1
–
–
–
–
–
–
–
–
–
–
1
–
–
–
–
–
–
–
–
1
–
1
–
–
1
1
–
–
1
12
32
35
42
46
48
52
38
Different installation examples
This overview shows you device configuration examples and refers you to the
relevant descriptions in this installation manual. You will find a description of
the configuration of television with WT2 on the following page.
See page ...
PR1
FAV/FAP with WT 2
Digi 100 with WT 2
Pairs of loudspeakers
HiFi system
PR1
FAV/FAP with WT 2
Digi 100 with WT 2
Pairs of loudspeakers
HiFi system
Please note that during installation the remote control switches off when no button
has been pressed for 30 seconds, to conserve the batteries. Press »OK« to switch
the remote control on again. During installation it switches on with the display
that was previously switched off.
Page 74

10
INSTALLATION
___________________________________________________________________________
Television with WT2 configuration
The WT2 wireless module can be connected to Grundig televisions with a Digi
100, Basic 3 or similar chassis.
For the Digi 100, the data is exchanged by means of an I2C connection, and
the installation process is carried out via the relevant menu on the television
screen. This is the not the case with Basic 3 and other similar chassis. These
differences influence the procedure for installing the WT2 wireless module on
the RCD 8300 HiFi system.
Therefore, the following is a list of those Grundig televisions (as at December,
2002), which together with WT2 are suitable for the FineArts Audion system
operation:
Digi 100 – I2C:
Lenaro 82 MFW 82-6210/9 Dolby
82 MFW 82-6210/9 SDTV
82 MFW 82-6211/9 DVD
92 MFW 92-6110/9 DVD
FineArts Vision (FAV) MFW 82-725/9 DVD
MFW 82-730/9 DVD
Basic 3 or similar chassis:
FineArts Vision (FAV) MFW 82-710/9 DVD
MFW 82-720/9 DVD
FineArts Planavision (FAP)
Page 75

ENGLISH
11
INSTALLATION
___________________________________________________________________________
Connecting and installing the active loudspeakers
The HiFi transmits audio signals by radio to the loudspeakers. Speaker cables
are not required.
You can operate up to 2 pairs of loudspeakers in room 1, where the HiFi system
is located. To install pairs of loudspeakers in other rooms, see the ”MULTIROOM MODE” section starting on page 35.
The transmission power is <10 mW. This guarantees an unhindered reception
range of approximately 100 m. This range is restricted inside buildings, depending on the construction materials used.
The illustrations in the examples show the LSP2 active loudspeakers. The positioning of the loudspeakers and the function of the operation indicators are described in the LSP2 and LSP3 operating manuals.
Preparing the HiFi system and the loudspeakers for
installation
Note:
Please be sure to adhere to the sequence outlined here.
There must be no batteries in the battery compartment.
1 Insert the power cord plug (HiFi system and active loudspeakers) into the
socket.
Note:
The HiFi system and the loudspeakers must be switched off at their mains
switches.
Mains switch
Operation indicator
Page 76

12
INSTALLATION
___________________________________________________________________________
2 Switch on both loudspeakers with their mains switches.
– The operation indicators on the loudspeakers flash orange, i.e. they are at
their original settings.
Note:
If the indicators do not flash, press the »RESET« button on the bottom of the
loudspeaker casing (LSP2) or on the back (LSP3) with an implement such as
a paper clip.
You can press »RESET« for a longer period of time if the loudspeakers were
at the original settings and were not yet installed on the WT2 wireless module.
If the loudspeakers are already installed on WT2, you do not have to press
»RESET«.
3 Switch off both loudspeakers with their mains switches again.
RESET
230V
50/60Hz
RESET
Page 77

ENGLISH
13
INSTALLATION
___________________________________________________________________________
Installing the first pair of loudspeakers (room 1)
In this process you install for the first time a pair of loudspeakers which still has
its original settings, together with the PR1 remote control. To install a pair of
loudspeakers on the HiFi which were previously installed on WT2, see the
instructions starting on page 42.
1 Switch on the HiFi system by pressing the mains switch on the back of the
HiFi.
– The HiFi display reads: »INSERT BATTERIES INTO THE PR1 AND PRESS
”OK” FOR 2 SECONDS«.
2 Insert the three batteries supplied into the remote control battery compart-
ment, making sure the polarity is correct. Then press »OK« on the remote
control, holding it down for 2 seconds.
– The touchpad display on the remote control switches on. The display
shows the languages installed, e.g.: »INSTALLATION LANGUAGE:
ENGLISH DEUTSCH FRANCAIS ITALIANO«.
3 Select a menu language by pressing one.
– The remote control display reads: »INSTALLATION PLEASE CHOOSE
POSITION: HORIZONTAL VERTICAL«.
4 Press »HORIZONTAL« or »VERTICAL« to select the future operating mode.
– The remote control display reads: »INSTALLATION SWITCH ON THE
LEFT SPEAKER«.
Note:
Please note that during installation the remote control switches off when no
button has been pressed for 30 seconds, to conserve the batteries. Press
»OK« to switch the remote control on again. During installation it switches
on with the display that was previously switched off.
INSTALLATION
CANCEL
x
c
ITALIANO
FRANCAIS
DEUTSCH
ENGLISH
LANGUAGE:
INSTALLATION
CANCEL
VERTICAL
HORIZONTAL
POSITION.
PLEASE CHOOSE
Page 78

14
INSTALLATION
NO
YES
OF SPEAKERS?
SECOND PAIR
INSTALL
INSTALLATION
NO
YES
WT2 MODULE?
INSTALL
INSTALLATION
___________________________________________________________________________
5 Turn on the left loudspeaker with the mains switch.
– The operation indicator of the loudspeaker first flashes orange, then
green. The left loudspeaker has been detected.
– The remote control display reads: »INSTALLATION SWITCH ON THE
RIGHT SPEAKER«.
6 Turn on the right loudspeaker with the mains switch.
– The operation indicator of the loudspeaker first flashes orange, then the
indicators of both loudspeakers light up green. The right loudspeaker has
been detected.
– The remote control display reads: »INSTALL SECOND PAIR OF
SPEAKERS?«.
7 To install a second pair of loudspeakers in room 1, press »YES« on the
remote control. Then repeat steps 5 and 6.
or
To end the installation, press »NO« on the remote control.
– The remote control display reads: briefly, »INSTALLATION OF SPEA-
KERS IN CURRENT ROOM COMPLETED«.
– The remote control display then reads: »INSTALL WT2 MODULE?«.
Note:
The WT2 wireless module can only be installed by an authorised dealer in
the FineArts Vision, FineArts Planavision and Lenaro televisions. The authorised dealer will find the relevant information in the mounting instructions
and the operating manual of the WT2 wireless module.
Page 79

ENGLISH
15
INSTALLATION
___________________________________________________________________________
8 To install the WT2 wireless module, press »YES« on the remote control.
Note:
Note also the description of the reinstallion of the WT2 wireless module on
pages 48 to 54.
or
To end the procedure, press »NO« on the remote control.
– The HiFi has meanwhile started the automatic station search (ASP). If a
DAB module is integrated, the HiFi first searches for DAB stations, then
radio stations in the FM range. After the search is complete, the first
station found is played.
Note:
If no radio stations are found, the following appears briefly in the remote control display: »PLEASE CONNECT ANTENNA. THEN PRESS ”CONTI-
NUE”.«
You can only continue if you press »CONTINUE«. If no antenna has been
connected, the system will work without it. However, you now have to start
the ASP search manually by pressing »ATS SEARCH« in the »FM PRE-
SETS« menu (see page 21).
If you want to install more pairs of loudspeakers, see the ”MULTI-ROOM
MODE” section on pages 35 to 41 for instructions.
Please note that during normal operation the remote control switches off
when no button has been pressed for 30 seconds, to conserve the batteries.
Press »OK« to switch the remote control on again.
If there is interference in the transmission of radio signals, you can adjust the
communication channel (see the relevant section on page 31).
INSTALLATION
CONTINUE
“CONTINUE”
THEN PRESS
ANTENNA
PLEASE CONNECT
INSTALLATION
NO
YES
WT2 MODULE?
INSTALL
Page 80

16
INSTALLATION
___________________________________________________________________________
Selecting the HiFi antenna setting
This setting enables you to adapt the HiFi to the antenna used.
If you are using a cable connection from a public or private provider, select the
»CABLE« setting.
If you are using your own FM antenna or the auxiliary antenna supplied, select
the »ANTENNA« setting.
1 Call up the »AUDIO« menu by pressing »Audio« on the remote control.
– Display: the »AUDIO« menu.
2 In the »AUDIO« menu, select the »FM TUNER« input source.
– Display: the »FM« menu.
3 In the »FM« me nu, press » MENU«.
– Display: the »FM MENU« menu.
4 Press »
x
« to switch to the second page of the »FM MENU«.
5 On the second page of the »FM MENU«, press »CABLE~ANTENNA« to
switch to antenna.
– Display: »ANTENNA~CABLE«
or
In the »FM MENU«, press »ANTENNA~CABLE« to switch to cable.
– Display: »CABLE~ANTENNA«.
AUDIO
DAB TUNER
FM TUNER
CD
M-ROOM
SETUP
>>
LCD
<<
SELECT ROOM
MENU
INFO
TEXT
CABLE~ANTENNA
ANTENNA~CABLE
Page 81

ENGLISH
17
FM PRESET SETTINGS
____________________________________________
Tuning radio stations
Up to 300 stations can be stored in the memory.
To set them, use the automatic search (A
utomatic Search Program).
The search was started automatically when you first installed the loudspeakers.
You can restart it at any time after this, e.g. if you forgot to connect the antenna
cable during installation, or after moving house.
The HiFi automatically stores all radio stations which can be received at your
location.
Checking stored radio stations
1 In the »FM« menu, press »LIST«.
– Display: the »FM LIST« menu.
2 Check the »FM LIST« with »
c
« or »x«.
– The frequency appears in the display of the HiFi system. If the current stati-
on transmits RDS information you will also see the name of the station.
Note:
You can switch to the next or previous page of the station list with »-5« or
»+5«.
Assigning radio stations (favourites) to station
positions 1 to 9
You can assign your favourite radio stations to station positions 1 to 9 and then
call them up directly.
1-9>
LIS T
A-O>
A-O>
+5
-5
x
c
Page 82

18
FM PRESET SETTINGS
_______________________________________________________________
1 In the »FM« menu, press »LIST«.
– Display: the »FM LIST« menu.
2 In the »FM LIST« menu search for a radio station with »
c
« or »x« and
select it by pressing the button.
– The display returns to the »FM« menu.
– You will hear the selected radio station.
Note:
You can switch to the next or previous page of the station list with »-5« or
»+5«.
3 In the »FM« menu, press »MENU«.
– Display: the »FM MENU«.
4 In the »FM MENU« menu, press »MEMORY«.
– Display: the »MEMORY« menu.
Note:
In the »MEMORY« menu, the occupied station positions appear with the
station names (»P2 BAYERN 3«), while unoccupied ones display no information (»P2 ----«).
5 To store the radio station currently playing, press the station position number
of your choice, e.g. »P1 ----«.
– Display: the name or frequency of the stored radio station.
Note:
Use »c« or »x« to move the list of station positions up or down.
1-9>
LIS T
A-O>
MENU
INFO
TEXT
x
c
MEMORY
MEMORY
x
c
P6 ----
P5 ENERGY
P4 BAYERN 3
P3 BAYERN 2
P2 BAYERN 1
P1 ----
A-O>
+5
-5
Page 83

ENGLISH
19
FM PRESET SETTINGS
_______________________________________________________________
6 Press » « to return to the » FM« menu.
7 To store more radio stations, repeat steps 2 to 6.
Note:
You can also store the radio station currently playing on a station position
that is already occupied. The previous radio station is thus overwritten.
In the »FM LIST«, station positions 1 to 9 for your favourite stations appear, with »P1« to » P9« highlighted.
Deleting, adding and replacing radio stations
Deleting individual radio stations
1 In the »FM« menu, press »MENU«.
– Display: the »FM MENU«.
2 In the »FM MENU«, press »PRESETS«.
– Display: the »FM PRESETS« menu.
3 In the »FM PRESETS« menu, press »EDIT LIST«.
– Display: the »EDIT LIST« menu.
4 Select the station position you wish to delete using »
c
« or »x« and press
»DELETE« to delete it.
Note:
If you delete a station position by mistake, the radio station can be stored at
a station position again, as described on pages 16 to 18.
x
c
MENU
INFO
TEXT
PRESETS
EDIT LIST
DELETE
MEMORY
Page 84

20
FM PRESET SETTINGS
_______________________________________________________________
Deleting all the radio stations
1 In the »FM« menu, press »MENU«.
– Display: the »FM MENU«.
2 In the »FM MENU«, press »PRESETS«.
– Display: the »FM PRESETS« menu appears.
3 In the »FM PRESETS« menu, press »ERASE LIST«.
– Display: »PRESS THE ”ACCEPT” KEY TO ERASE FM LIST«.
4 Erase the FM list with »ACCEPT«.
– All the radio stations stored are deleted.
Adding new radio stations
1 In the »FM« menu, press »MENU«.
– Display: the »FM MENU«.
2 In the »FM MENU«, press »PRESETS«.
– Display: the »FM PRESETS« menu.
3 In the »FM PRESETS« menu, press »SEARCH NEW«.
– Display: »SEARCHING ... PLEASE WAIT«.
– The HiFi searches for new radio stations not already being received.
– When the automatic search has finished, the HiFi system switches to the
first radio station it finds.
MENU
INFO
TEXT
PRESETS
ERASE LIST
MENU
INFO
TEXT
PRESETS
SEARCH NEW
Page 85

ENGLISH
21
FM PRESET SETTINGS
_______________________________________________________________
Moving radio stations (favourites) on the station
positions
1 In the »FM« menu, press »MENU«.
– Display: the »FM MENU«.
2 On the first page of the »FM MENU«, press »PRESETS«.
– Display: the »FM PRESETS« menu.
3 In the »FM PRESETS« menu, press »EDIT LIST«.
– Display: the »EDIT LIST« menu.
4 Select the radio station you want to move by pressing on it, then press
»MOVE«.
5 Select the second radio station you want to move by pressing on it.
– The two radio stations swap station positions.
6 Press »END« to confirm this.
MENU
INFO
TEXT
+5
-5
END
PRESETS
EDIT LIST
DELETE
MOVE
Page 86

22
FM PRESET SETTINGS
_______________________________________________________________
Automatic search program (ATS)
Starting the automatic search program
1 Call up the »AUDIO« menu by pressing »Audio«.
– Display: the »AUDIO« menu.
2 In the »AUDIO« menu, press »FM TUNER«.
– Display: the »FM« menu.
3 In the »FM« menu, press »MENU«.
– Display: the »FM MENU«.
4 On the first page of the »FM MENU«, press »PRESETS«.
– Display: the »FM PRESETS« menu.
5 In the »FM PRESETS« menu, press »ATS SEARCH«.
– Display: »ATTENTION: ”START” WILL DELETE OLD LIST.«
6 To start the search, press »START«.
– The automatic search starts (the remote control display reads: »SEAR-
CHING... PLEASE WAIT«). The radio stations are stored automatically.
– The HiFi display shows: »SEARCHING...« and the current frequency.
– When the automatic search has finished, the HiFi system switches to the
first radio station it finds.
FM TUNER
ATS SEARCH
MENU
INFO
TEXT
PRESETS
START
Page 87

ENGLISH
23
DAB PRESET SETTINGS
________________________________________
Setting the DAB presets
Up to 300 stations can be stored in the memory.
To set them, use the automatic search (A
utomatic Search Program).
The search was started automatically when you first installed the loudspeakers.
You can restart it at any time after this, e.g. if you forgot to connect the antenna
cable during installation, or after moving house.
The following settings are only possible if there is a DAB module integrated into
the HiFi. To install the DAB module, see the installation manual included with the
module.
Checking stored DAB stations
1 In the »DAB« menu, press »LIST«.
– Display: the »DAB LIST« menu.
2 Check the »DAB LIST« with »
c
« or »x«.
– The station name appears in the display of the HiFi system.
Note:
You can switch to the next or previous page of the station list with »-5« or
»+5«.
Assigning DAB stations (favourites) to station
positions 1 to 9
You can assign your favourite DAB stations to station positions 1 to 9 and then
call them up directly.
1-9>
LIS T
A-O>
x
c
A-O>
+5
-5
Page 88

24
DAB PRESET SETTINGS
_____________________________________________________________
1 In the »DAB« menu, press »LIST«.
– Display: the »DAB LIST« menu.
2 In the »DAB LIST« menu search for a DAB station with »
c
« and »x« or
with »-5« and »+5« and select it by pressing the button.
– The display returns to the »DAB« menu.
– You will hear the selected DAB station.
Note:
You can switch to the next or previous page of the station list with »-5« or
»+5«.
3 In the »DAB« menu, press »MENU«.
– Display: the »DAB MENU«.
4 In the »DAB MENU« menu, press »MEMORY«.
– Display: the »MEMORY« menu.
Note:
In the »MEMORY« menu, the occupied station positions appear with the
station names (»P2 BAYERN1«), while unoccupied ones display no information (»P2 ----«).
5 To store the DAB station currently playing, press the station position
number of your choice, e.g. »P1 ----«.
– Display: the name of the stored DAB station.
Note:
Use »c« or »x« to move the list of station positions up or down.
1-9>
LIS T
A-O>
MENU
INFO
TEXT
x
c
MEMORY
MEMORY
x
c
P6 ----
P5 ENERGY
P4 BAYERN 3
P3 BAYERN 2
P2 BAYERN 1
P1 ----
A-O>
+5
-5
Page 89

ENGLISH
25
DAB PRESET SETTINGS
_____________________________________________________________
6 Press » « to return to the » DAB« menu.
7 To store more DAB stations, repeat steps 2 to 6.
Note:
You can also store the DAB station currently playing on a station position
that is already occupied. The previous DAB station is thus overwritten.
In the »DAB LIST«, station positions 1 to 9 for your favourite stations
appear, with »P1« to » P9« highlighted.
Deleting, adding and replacing DAB stations
Deleting individual DAB presets
1 In the »DAB« menu, press »MENU«.
– Display: the »DAB MENU«.
2 In the »DAB MENU«, press »PRESETS«.
– Display: the »DAB PRESETS« menu.
3 In the »DAB PRESETS« menu, press »EDIT LIST«.
4 Select the station position you wish to delete using »
c
« or »x« and press
»DELETE« to delete it.
Note:
If you delete a station position by mistake, the DAB station can be stored at
a station position again, as described on pages 22 to 24.
x
c
MENU
INFO
TEXT
PRESETS
EDIT LIST
DELETE
MOVE
Page 90

26
DAB PRESET SETTINGS
_____________________________________________________________
Deleting all DAB presets
1 In the »DAB« menu, press »MENU«.
– Display: the »DAB MENU«.
2 In the »DAB MENU«, press »PRESETS«.
– Display: the »DAB PRESETS« menu appears.
3 In the »DAB PRESETS« menu, press »ERASE LIST«.
– Display: »PRESS THE ”ACCEPT” KEY TO ERASE DAB LIST«.
4 Erase the DAB list with »ACCEPT«.
– All the DAB stations stored are deleted.
Adding new DAB presets
1 In the »DAB« menu, press »MENU«.
– Display: the »DAB MENU«.
2 On the first page of the »DAB MENU«, press »PRESETS«.
– Display: the »DAB PRESETS« menu.
3 In the »DAB PRESETS« menu, press »SEARCH NEW«.
– Display: »SEARCHING ... PLEASE WAIT«.
– The HiFi searches for new DAB stations not already being received.
– When the automatic search has finished, the HiFi system switches to the
first DAB station it finds.
MENU
INFO
TEXT
PRESETS
ERASE LIST
ACCEPT
MENU
INFO
TEXT
PRESETS
SEARCH NEW
Page 91

ENGLISH
27
DAB PRESET SETTINGS
_____________________________________________________________
Moving DAB presets (favourites) on the station
positions
1 In the »DAB« menu, press »MENU«.
– Display: the »DAB MENU«.
2 On the first page of the »DAB MENU«, press »PRESETS«.
– Display: the »DAB PRESETS« menu.
3 In the »DAB PRESETS« menu, press »EDIT LIST«.
– Display: the »EDIT LIST« menu.
4 Select the DAB station you want to move by pressing on it, then press
»MOVE«.
5 Select the second DAB station you want to move by pressing on it.
– The two DAB stations swap station positions.
6 Press »END« to confirm this.
MENU
INFO
TEXT
PRESETS
EDIT LIST
+5
-5
END
DELETE
MOVE
Page 92

28
DAB PRESET SETTINGS
_____________________________________________________________
Automatic search program (ATS) for DAB stations
Initiating the automatic search program
1 Call up the »AUDIO« menu by pressing »Audio«.
– Display: the »AUDIO« menu.
2 In the »AUDIO« menu, press »DAB TUNER«.
– Display: the »DAB« menu.
3 In the »DAB« menu, press »MENU«.
– Display: the »DAB MENU«.
4 On the first page of the »DAB MENU«, press »PRESETS«.
– Display: the »DAB PRESETS« menu.
5 In the »DAB PRESETS« menu, press »ATS SEARCH«.
– Display: »ATTENTION: “START” WILL DELETE OLD LIST.«.
6 To start the search, press »START«.
– The automatic search starts (the remote control display reads: »SEAR-
CHING... PLEASE WAIT«). The DAB stations are stored automatically.
– When the automatic search has finished, the HiFi system switches to the
first DAB station it finds.
DAB TUNER
ATS SEARCH
MENU
INFO
TEXT
PRESETS
START
Page 93

ENGLISH
29
SETUP SETTINGS
_________________________________________________________
Entering the installation PIN
After installing the system for the first time, you can only access the »SETUP«
menu by entering a PIN code. This is to prevent you making accidental changes
to the setup settings. The PIN number is »1« »5« »9« »0«.
1 Switch the HiFi system and the loudspeakers on from standby mode.
2 Call up the »AUDIO« menu by pressing »Audio« on the remote control.
– Display: the »AUDIO« menu.
3 In the »AUDIO« menu, press »SETUP«.
– Display: the »SETUP« menu with the PIN entry buttons.
Note:
If you enter the PIN incorrectly, »WRONG PIN« appears in the display for 5
seconds. You can then enter the PIN again.
4 Enter the PIN with the numeric buttons and complete your entry with »END«.
– Display: the »SETUP« menu.
M-ROOM
SETUP
PIN:
3
2
1
SETUP
CHANNELS
TIME/DATE
LANGUAGE
INSTALLATION
SERVICE
Page 94

30
SETUP SETTINGS
________________________________________________________________________
Switching the HiFi system to horizontal or vertical
mode
1 Switch the HiFi system and the loudspeakers on from standby mode.
2 Call up the »AUDIO« menu by pressing »Audio« on the remote control.
– Display: the »AUDIO« menu.
3 In the »AUDIO« menu, press »SETUP« and enter the PIN.
– Display: the »SETUP« menu.
4 In the »SETUP« menu, press »INSTALLATION«.
– Display: the »INSTALLATION« menu.
5 In the »INSTALLATION« menu, press »POSITION«.
– Display: the »INSTALLATION« (Position) menu.
6 In the »INSTALLATION« (Position) menu, press »HORIZONTAL« or
»VERTICAL«.
7 Press » « to return to the »SETUP« menu.
Resetting the menu language
The menu language is set during the first installation of the system, but it can
also be changed at a later date.
1 Switch the HiFi system and the loudspeakers on from standby mode.
2 Call up the »AUDIO« menu by pressing »Audio« on the remote control.
– Display: the »AUDIO« menu.
M-ROOM
SETUP
INSTALLATION
POSITION
VERTICAL
Page 95

ENGLISH
31
SETUP SETTINGS
________________________________________________________________________
3 In the »AUDIO« menu, press »SETUP« and enter the PIN.
– Display: the »SETUP« menu.
4 In the »SETUP« menu, press »LANGUAGE«.
– Display: the »LANGUAGE« menu.
5 In the »LANGUAGE« menu, select a language.
– The setting is saved automatically.
– The display returns to the »SETUP« menu.
Note:
If you are using a number of remote controls you have to set the language
on each remote control separately. The last language selected is valid for the
HiFi system.
Setting the time and date
1 Switch the HiFi system and the loudspeakers on from standby mode.
2 Call up the »AUDIO« menu by pressing »Audio« on the remote control.
– Display: the »AUDIO« menu.
3 In the »AUDIO« menu, press »SETUP« and enter the PIN.
– Display: the »SETUP« menu.
4 In the »SETUP« menu, press »TIME/DATE«.
– Display: the »TIME/DATE« menu with a numeric keypad.
5 In the »TIME/DATE« menu, press »TIME« and enter the time with the
numeric buttons.
– Display: the »TIME« button disappears and the »DATE« button appears.
6 Press »DATE« and enter the date with the numeric buttons.
– Display: the »DATE« button disappears and the »TIME« button appears.
M-ROOM
SETUP
LANGUAGE
FRANCAIS
TIME/DATE
24.09.2002
OFF
END
RDS UPD.
0
TIME
9
8
7
6
5
4
3
2
1
Page 96

32
SETUP SETTINGS
________________________________________________________________________
7 Press »END« to confirm the entries.
8 Press » « to return to the »SETUP« menu.
Note:
If the date is displayed, only the »TIME« button appears, and if the time is
displayed, only the »DATE« button appears.
Changing the communication channel of the HiFi
and the loudspeakers
If interference occurs during sound transmission, which can happen if another
device is using the same frequency, you can change the communication channel.
There are 16 channels available. When you first set up the system Channel 2 is
selected by default.
If you are also operating WT2, make sure that the HiFi system and the wireless
module are always set to the same channel.
1 Switch the HiFi system and the loudspeakers on from standby mode.
2 Call up the »AUDIO« menu by pressing »Audio« on the remote control.
– Display: the »AUDIO« menu.
3 In the »AUDIO« menu, press »SETUP« and enter the PIN.
– Display: the »SETUP« menu.
4 In the »SETUP« menu, press »CHANNELS«.
– Display: the »CHANNELS« menu, with the active channel indicated.
5 Set a new transmission channel by pressing it.
6 Press » « (several times) to return to the »AUDIO« menu.
CHANNELS
TIME/DATE
10:32
OFF
END
RDS UPD.
DATE
0
9
8
7
6
5
4
3
2
1
Page 97

ENGLISH
33
SECOND PAIR OF SPEAKERS
________________________
Connecting and installing a second pair of speakers
(room 1)
Operation with two pairs of loudspeakers is only possible in room 1. You must
have installed one pair of loudspeakers and one remote control on the HiFi
system.
1 Insert the mains plug of the new active loudspeakers in the socket. If neces-
sary, switch off the loudspeakers with their mains switches.
2 Switch the HiFi system and the existing loudspeakers on from standby mode.
3 Call up the »AUDIO« menu by pressing »Audio« on the remote control.
Display: the »AUDIO« menu.
4 In the »AUDIO« menu, press »SETUP« and enter the PIN.
– Display: the »SETUP« menu.
5 In the »SETUP« menu, press »INSTALLATION«.
– Display: the »INSTALLATION« menu.
6 In the »INSTALLATION« menu, press »LSP«.
– Display: the »LSP« menu.
7 In the »LSP« menu, press »INSTALL LSP«.
– Display: the »INSTALL LSP« menu.
8 In the »INSTALL LSP« menu, press »ROOM 1«.
– Display: »INSTALL SECOND PAIR OF SPEAKERS?«.
9 Press »YES« to continue.
– Display: »SWITCH ON THE LEFT SPEAKER«.
INSTALL LSP
ROOM 1
YES
Page 98

34
SECOND PAIR OF SPEAKERS
__________________________________________________
10 Turn on the left loudspeaker with the mains switch.
– The operation indicator of the loudspeaker first flashes orange, then
green. The left loudspeaker has been detected.
– Display: »SWITCH ON THE RIGHT SPEAKER«.
11 Turn on the right loudspeaker with the mains switch.
– The operation indicator of the loudspeaker first flashes orange, then the
indicators of both loudspeakers light up green. The right loudspeaker has
been detected.
– Display: briefly, »INSTALLATION OF SPEAKERS IN CURRENT
ROOM COMPLETED«.
Deleting a pair of loudspeakers (room 1)
The HiFi system must be switched on for the data transmission to be carried out.
At least one pair of speakers must always be installed on the HiFi system.
1 Call up the »AUDIO« menu by pressing »Audio« on the remote control.
– Display: the »AUDIO« menu.
2 In the »AUDIO« menu, press »SETUP« and enter the PIN.
– Display: the »SETUP« menu.
3 In the »SETUP« menu, press »INSTALLATION«.
– Display: the »INSTALLATION« menu.
4 In the »INSTALLATION« menu, press »LSP«.
– Display: the »LSP« menu.
5 In the »LSP« menu, press »DELETE LSP«.
– Display: the »DELETE LSP« menu.
LSP
DELETE LSP
Page 99

ENGLISH
35
SECOND PAIR OF SPEAKERS
__________________________________________________
6 In the »DELETE LSP« menu, press »ROOM 1«.
– Display: the »DELETE LSP« menu.
7 To delete the front speakers, press »FRONT LSP«.
– Display: »FRONT/REAR LSP DELETED«.
or
To delete the rear speakers, press »REAR LSP«.
– Display: »FRONT/REAR LSP DELETED«.
FRONT LSP
REAR LSP
ROOM 1
Page 100

36
MULTI-ROOM MODE
______________________________________________
Special features of multi-room mode
In addition to the two pairs of active loudspeakers in room 1 you can operate
up to eight additional pairs of loudspeakers – distributed in different rooms –
with the HiFi system. The various options are described on pages 5 and 6 of the
operating manual.
If you do not want to carry the remote control from room to room in order to set
the input source, volume and tone for the individual pairs of loudspeakers, you
have the option of using more than one remote control (accessories). In this
case, pressing »9« on a remote control only switches the speakers in the
applicable room to standby.
Installing additional pairs of loudspeakers
1 Insert the mains plug of the new active loudspeakers in the socket. If neces-
sary, switch off the loudspeakers with their mains switches.
2 Switch the HiFi system and the existing loudspeakers on from standby mode.
3 Call up the »AUDIO« menu by pressing »Audio« on the remote control.
Display: the »AUDIO« menu.
4 In the »AUDIO« menu, press »SETUP« and enter the PIN.
– Display: the »SETUP« menu.
5 In the »SETUP« menu, press »INSTALLATION«.
– Display: the »INSTALLATION« menu.
6 In the »INSTALLATION« menu, press »LSP«.
– Display: the »LSP« menu.
7 In the »LSP« menu, press »INSTALL LSP«.
– Display: the »INSTALL LSP« menu with »ROOM 1« to »ROOM 9«.
INSTALL LSP
M-ROOM
SETUP
INSTALLATION
 Loading...