

Page 1

ǵ
ENGLISH
DANSK
SVENSKA
SUOMI
NORSK
DIGITAL MULTIMEDIA CAMERA
PICCA
DMC 5100
Page 2

CONTENTS
____________________________________________
ENGLISH
4 Special features/safety
Special features, Packing contents
Safety, Cleaning
6 Overview
The front of the camera
The back of the camera
Function buttons
Rotary switch for operating modes
Connections on the camera
Display elements
10 Power supply
Battery operation
Mains operation (with mains adapter)
12 Preparation
Switching on/off
The storage media of the camera
Inserting a multimedia card or SD-Card
Formatting the memory card
Setting the time and the date
17 Installing the software
2
Page 3

CONTENTS
___________________________________________
20 Taking photos
Automatic operating mode
Manual operating mode
Additional functions
28 Photos in series
31 Movie recording
34 Sound recording/playback
36 Deleting all recordings
37 Music playback
41 Operation on the television set
43 Operating with a PC
USB operation
Operation as a Webcam
45 Information
Technical data
Troubleshooting
Grundig service
ENGLISH
3
Page 4

SPECIAL FEATURES/SAFETY
_______________
Special features
Multi-functional camera
– Photos and movies
– MP3 player
– Webcam
– Dictaphone
Packing contents
Camera
USB connection cable
Adapter cable for operation on the television set
CD-ROM with driver for PC
2 batteries
Safety
To ensure that this camera provides you with long-term satisfaction and
enjoyment, please observe the following instructions.
This device is designed to record and play back video and audio signals.
Any other use is expressly prohibited.
4
Page 5
SPECIAL FEATURES/SAFETY
ǵ
ǵ
! SERVICE !! SERVICE !! SERVICE !
2h
°C
°C
ǵ
ǵ
________________________
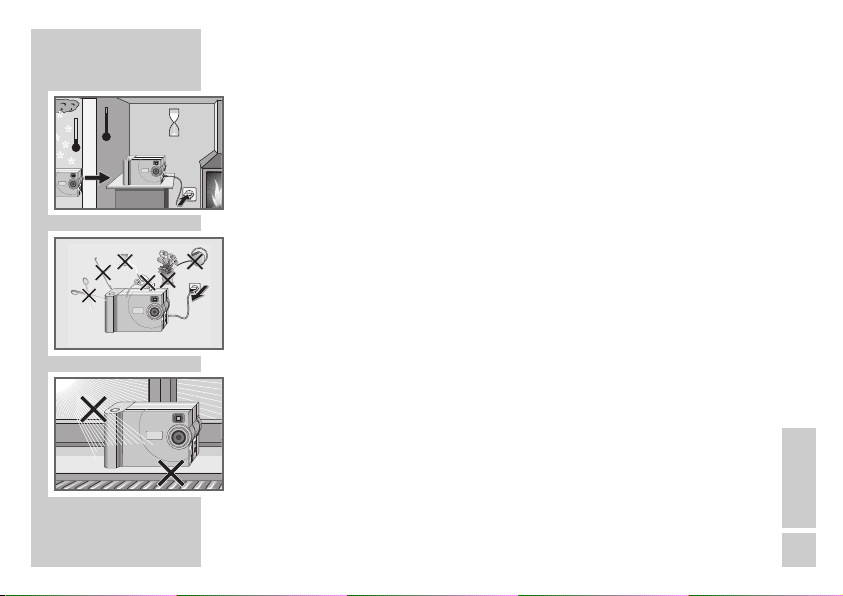
If the camera is subjected to sudden changes in temperature, for example
when taken from the cold into a warm room, condensation may appear.
Switch off the camera for one hour before using it.
You must make sure that the device is protected from moisture such as rain
or water splashes.
Do not touch the objective of the camera with your bare fingers!
Never open the camera casing. The manufacturer will not accept any
liability for damage resulting from improper handling.
Cleaning
Clean the device with a clean, moist leather cloth. Do not use any cleaning
agent, as this may damage the casing!
Use a hot air brush to remove dust from the objective, the viewfinder and the
display, wiping them afterwards with a soft, dry cloth.
ENGLISH
5
Page 6
ǵ
1
124
ǵ
6
2 3 4
3
OPEN
5
OVERVIEW
___________________________________________
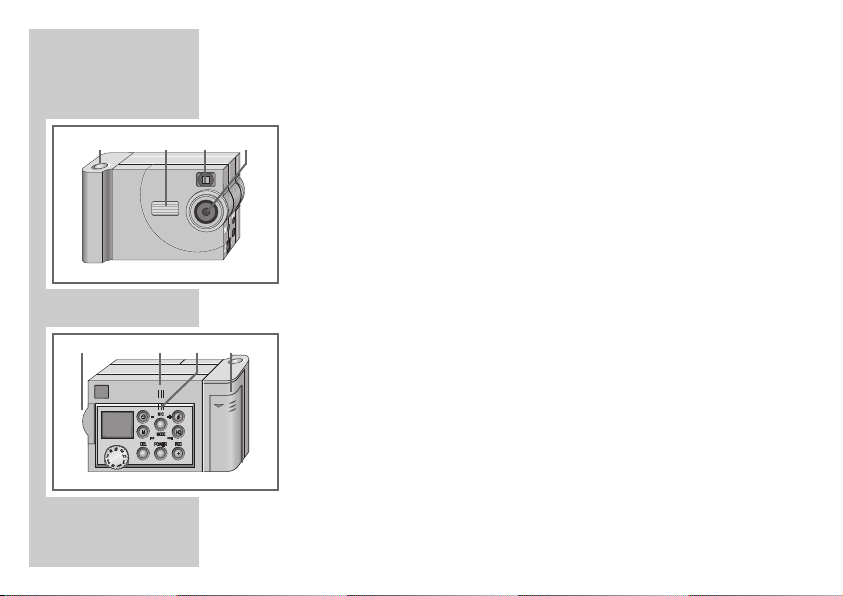
The front of the camera
1 Shutter release button
2 Flash
3 Viewfinder
4 Objective
The back and the bottom of the camera
1 Card slot
2 Speaker
3 Microphone
4 Battery compartment cover
5 Threaded socket for a tripod (bottom of camera)
Page 7

ǵ
OVERVIEW
___________________________________________
Function buttons
8 – Activates the delayed shutter release
For selecting photos and movie recordings
For settings (e.g. time and date)
MODE For formatting the multimedia card
Selects the White Balance and Exposure Adjustment functions
In MP3 mode, selects the Repeat and Random functions
+ 6 Switches the flash between on/automatic/off
For selecting photos and movie recordings
For settings (e.g. time and date)
s6 High resolution image quality on/off
HQ
REC Starts and stops sound recording
POWER Switches the camera on/off
DEL Deletes photos, video recordings and MP3 music recordings
5a Selects the manual operating mode
M
Selects various functions and settings
Selects various functions and settings
ENGLISH
7
Page 8

OVERVIEW
___________________________________________
Rotary switch for the operating modes
There is a selection of nine different operating modes:
0 Taking photos
& Photos in series
9 Movie recording
TV Image playback on TV
PC Webcam operating mode
/ Operating with a PC
SET Settings
$ Voice recording
% MP3 sound playback
Connections on the camera
DC > Socket for mains adapter (DC 5 V/2A)
TV Video output socket
( USB socket
y Socket for earphones (3.5 mm jack)
8
Page 9

8
ıII
3
$7
PL
ONE
HQ
!
00:00
ALL
5
CARD
M
OVERVIEW
___________________________________________
Display elements
8 Delayed shutter release on
$ Sound recording on
7 Flash on
! Red-eye reduction on
»00:00«: Display for various information (e.g. number of photos or
movie recordings)
M Manual photo taking, Random or Repeat function selected
CARD Memory card inserted
5 Random
4ALL Repeat all
4ONE Repeat 1
HQ High image quality on
PL Playback list (MP3)
3 Charge level of the batteries
ı II Playback/pause
ENGLISH
9
Page 10
POWER SUPPLY
OPEN
OPEN
___________________________________
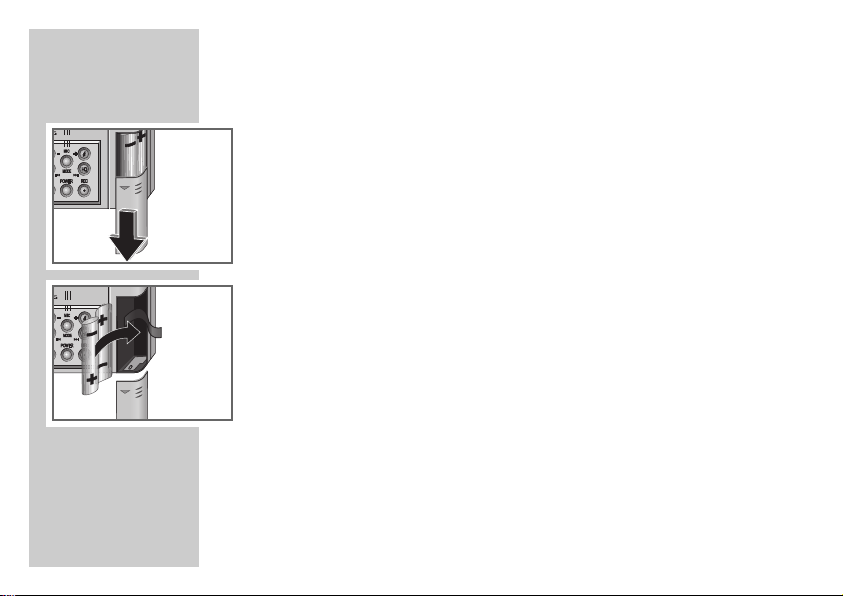
Battery operation
1 Open the cover of the battery compartment.
2 Insert two batteries, observing the polarity on the bottom of the battery
compartment (Mignon type, e.g. 2x1.5V, LR6, AM3, AA).
3 Close the cover of the battery compartment.
Note:
The camera display tells you about the state of the batteries:
– »3« batteries charged
– »2« batteries weak
– »1« batteries empty
Remove the batteries when they are flat or when you know that the
camera will not be used for a long period of time.
No liability is accepted for damage resulting from leaking batteries.
The batteries are switched off during mains operation.
10
Page 11

DC IN 5 V
POWER SUPPLY
____________________________________
Operating with NiCd, NiMH or lithium batteries
You can also operate the camera using standard batteries. If you use
rechargeable batteries, do not let them charge up in the camera while using
a mains adapter. Use an external charging device for this purpose.
Mains operation
(with mains adapter, 5V DC/2A – accessories)
Note:
Check if the mains voltage on the mains adapter type plate corresponds to
your local mains supply.
The only way to disconnect the camera from the mains supply is to pull the
mains adapter. Only unplug the mains adapter from the socket when you
are not using the camera.
1 Plug the mains adapter cable into the »DC
2 Plug the mains adapter into the mains socket.
>« socket on the camera.
ENGLISH
11
Page 12

3
TIME
PREPARATION
Switching on/off
Switching on
1 Press »POWER« to switch on the camera.
– The operating mode depends on the setting of the rotary switch.
Note:
If »TIME/DATE« is flashing in the display, the time and the date must be
set. See chapter “Setting the time and date“ on page 16.
If the time and date are not set, »12:00« and »01.01.2001« appear.
Switching off
1 Switch off the camera by pressing »POWER«.
– Brief display: »OFF«.
______________________________________
12
3
OFF
Note
The camera switches off automatically if no button has been pressed for
more than 3 minutes.
Page 13

PREPARATION
______________________________________
The storage media of the camera
Your camera is equipped with internal flash storage. It enables you to take
approx. 58 photos in HQ mode or approx. 107 in normal mode. Movie
recordings of up to 1:45 minutes in HQ mode or 7:15 minutes in normal
mode are also possible.
The photographing or recording capacity can be increased with an additional memory card. Only use memory cards labelled “multimedia card” or
“SD card”.
If a multimedia card or SD card is installed in the camera, the internal flash
memory is not used. Recordings are only stored on the memory card.
ENGLISH
13
Page 14

14
3
00:00
CARD
PREPARATION
______________________________________
Inserting a multimedia card or SD-Card
1 Press »POWER« to switch off the camera.
2 Open the cover of the card slot.
3 Push the memory card – with the contacts facing downwards – as far in
as it will go.
Note:
Do not exert force when inserting the card. Apply only slight pressure.
The memory cards are resistant to dirt and moisture, but must only be inserted into the camera in a dry and clean condition.
Never remove memory cards during operation. This can damage the
memory card.
This type of damage will invalidate your warranty.
4 Close cover.
– When the camera is switched on, the display »CARD« appears.
Page 15

3
3
CARD
CARD
DONE
CARD
PREPARATION
Formatting the memory card
If you have been using the multimedia card or SD card in another device, it
has to be reformatted for your camera.
Note:
In reformatting the card you delete its contents.
1 Switch on the camera by pressing »POWER«.
2 Select the »SET« operating mode with the rotary switch.
– Display: The current time (e.g. »14:30«).
3 Press and hold down »MODE«.
– Display: »CARD« and »FRMT« flash alternately.
4 Press and hold down »DEL«.
– Display: »DONE«, and completion of the formatting is confirmed by a
signal tone.
Note:
If »ERR« is displayed, the memory card could not be formatted. Repeat
the formatting procedure with the same card or with a new one.
______________________________________
ENGLISH
15
Page 16

16
3
3
3
14:30
CARD
DD:01
CARD
YY:01
CARD
PREPARATION
______________________________________
Setting the time and the date
Note:
If you make an incorrect entry, you can reverse it by pressing »M 5a «.
Setting can be interrupted at any time using the »MODE« button.
1 Set the rotary switch to the »SET« operating mode.
– Display: The current time (for example »14:30«).
2 Press »HQ
– Display: for example »14:30«, the minutes display flashes.
3 Enter the minutes with »+6« or » 8– « and confirm them with
»HQ s6 «.
– Display: for example »14:32«, the hours display flashes.
4 Enter the hours with »+6« or » 8– « and confirm them with »HQ s6 «.
– Display: for example »DD:01«, the day display flashes.
5 Enter the day with »+
– Display: for example »MM:01«, the month display flashes.
6 Enter the month with »+6« or » 8– « and confirm it with »HQ s6 «.
– Display: for example »YY:01«, the year display flashes.
7 Enter the year with »+
– Display: the current time (for example »14:45«) and the setting is
confirmed by a signal tone.
s6 « to enter the minutes.
6« or »8– « and confirm it with »HQ s6 «.
6« or »8– « and confirm it with »HQ s6 «.
Page 17

INSTALLING THE SOFTWARE
_______
System requirements
Windows 98/ME/2000;
PC with 90 MHz CPU minimum;
USB 1.1 connection;
64 MB RAM;
50 MB free hard disk space;
Monitor and graphic card supporting 256 colours (16-bit colour support).
Software
The software package on the accompanying CD-ROM contains:
– Device driver;
– Music Loader (MP3);
– the Amcap application (Webcam);
– IrfanView (screen adjustment).
Installation
1 Close all other applications on the PC.
2 Insert the provided CD-ROM in the CD-ROM drive.
ENGLISH
17
Page 18

18
INSTALLING THE SOFTWARE
3 In the Start menu, click on the dialog window ”Execute” and enter the
installation format, e.g. »d:\install\setup.exe«.
4 To install the software, follow the instructions on the monitor;
or
3 In the ”My computer” or the ”Windows Explorer” menu, click on the
CD-ROM drive.
4 Open the ”Install” folder and click on the »Setup.exe« symbol.
5 To install the software, follow the instructions on the monitor.
Note:
When the ”Setup Type” window appears on the monitor, you can
choose between three different options:
”Typical” - driver, Amcap application and Music Loader are
installed;
”Compact” - driver and Amcap application are installed;
”Custom” - You can choose between drivers with Amcap applica-
tion and Music Loader or install both.
____________________
Page 19

INSTALLING THE SOFTWARE
Note:
After the software has been installed, the camera appears as a removable
disk drive in ”My computer” on the PC.
The Amcap application and the Music Loader appear in the Start menu
on the PC in ”Program/DMC 5100”.
The screen adjustment option IrfanView must be installed separately. To
do this, open the appropriate folder in the software package and click on
the »Irfan View« symbol.
You can find more information on the software applications in the corresponding read-me files.
____________________
ENGLISH
19
Page 20

20
3
ı
3
3
3
001
HQ
0002
4
HQ
L023
HQ
C23
HQ
CARD
CARD
CARD
CARD
TAKING PHOTOS
________________________________
Automatic operating mode
Selecting the automatic photographing mode
1 Set the rotary switch to the »0« operating mode.
– Display: the number of photos possible, for example »001«.
Starting automatic photographing
1 Frame the motif in the viewfinder and press the shutter release button.
– Display: the number of the photo, for example »0002« and »4«,
and the »ı « symbol flashes.
– A signal tone confirms that the photo has been taken. The picture is
stored either in the internal memory or on the multimedia card, if one is
installed.
Note:
You can call up the number of the last picture or the total number of pictures stored by pressing »MODE«.
»L023« = last picture, »C 23« = number of pictures stored.
If you previously deleted one or more pictures, the display shows, for
example:
»L023« = last picture, »C 19« = number of pictures stored.
Page 21

3
3
DEL
HQ
ERAS
HQ
CARD
CARD
TAKING PHOTOS
Deleting the last picture
1 To delete the picture, press »DEL«.
– Display: »DEL« and the number of the picture (for example »0018«)
flash alternately.
Note:
Deleting can be interrupted by pressing any button apart from »DEL«.
2 Press »DEL« again.
– Display: »ERAS« and the picture is deleted.
__________________________________
Manual operating mode
In automatic mode, it may happen that the white balance is not set correctly
when close-ups are being taken in certain lighting conditions (e.g. in neon
light).
In addition, the brightness may be too weak for motifs where there is a
sharp contrast between the object and the background.
3
14:30
HQ
CARD
Settings
1 Set the rotary switch to the »SET« operating mode.
– Display: the current time (e.g. »14:30«).
ENGLISH
21
Page 22

22
3
3
3
3
MANL
CARD
WB:AU
CARD
O.0E
CARD
MANL
CARD
TAKING PHOTOS
2 Select the manual settings with »MODE«.
– Display: »MANL«.
3 Select the manual white balance with »HQ
– Display: »WB:AU« = automatic (White Balance AUtomatic).
4 Select the light source being used with »+6« or » 8– «.
– Display: »WB:DL« = daylight (White Balance Day Light)
»WB:O1« = neon/artificial light
»WB:O2« = electric lamp light
»WB:SL« = bright sunlight
5 Confirm selected light source with »HQ s6 «.
– Display: »0.0E« (exposure value).
Note:
Switch back to manual white balance with »M
6
Selected the desired exposure value (from -2 to +2) with »+6« or »8– «.
7 Save the settings for white balance and exposure value with »HQ«.
– Display: »MANL«.
8 Press »MODE« to conclude the manual setting.
– Display: »IQ«.
Note:
These settings are only effective in »manual« mode.
__________________________________
s6 «.
5a«.
Page 23

3
ı
3
001
CARD
002
4
CARD
TAKING PHOTOS
Selecting the Manual operating mode
1 Set the rotary switch to the »0« (automatic) operating mode, then press
»M 5a«.
– Display: »M« and the number of possible pictures, for example »001«.
M
Starting manual photographing
1 Frame the motif in the viewfinder and press the shutter release button.
– Display: the number of the photo, for example »002« and »4«, and
the »ı « symbol flashes.
– A signal tone confirms that the photos have been taken. The picture is
M
stored either in the internal memory or on the memory card, if one is
installed.
__________________________________
ENGLISH
23
Page 24

24
3
3
3
DEL
CARD
M
ERAS
CARD
M
004
CARD
TAKING PHOTOS
Deleting the last picture
1 To delete the picture, press »DEL«.
– Display: »DEL« and the number of the picture, for example »0018«,
flash alternately.
Note:
Deleting can be interrupted by pressing any button apart from »DEL«.
2 Press »DEL« again.
– Display: »ERAS« and the picture is deleted.
Switching off the Manual operating mode
1 Press »M 5a«.
– The »M« indicator disappears.
__________________________________
Page 25

3
3
3
HQ
001
CARD
IQ
CARD
HQ
CARD
TAKING PHOTOS
__________________________________
Additional Functions
Switching the image quality on and off
1 After the camera is switched on, the high resolution image quality (HQ) is
activated.
– Display: »HQ«.
2 Switch the high resolution image quality on and off with »HQ
Setting the image quality resolution
1 Set the rotary switch to the »SET« operating mode.
– Display: the current time (e.g. »14:30«).
2 Select the settings by pressing »MODE« twice.
– Display: »IQ«.
3 Display the resolution by pressing »HQ
– Display: for example »HQ«.
4 Select the desired resolution (»S«, »HQ«, »S-HQ«) with »+
and confirm it with »HQ s6 «.
– Display: »IQ«.
5 Press »MODE« to conclude the setting.
s6 « twice.
s6 «.
6« or »8– «
ENGLISH
25
Page 26

26
3
3
8
HQ
HQ
7
001
CARD
002
CARD
TAKING PHOTOS
Note:
Depending on the selected resolution, the camera produces pictures in
JPEG or TIFF format (»S«: JPEG, »HQ« and »S-HQ«: TIFF).
__________________________________
Taking photos with the flash
1 Select the desired flash setting with
– »7«: the camera switches the flash on automatically when the
ambient light is too weak (automatic).
– »6«: the flash is activated for each picture.
Note:
While the flash is loading, the »6« indicator flashes in the display.
When the flash is switched on “red-eye reduction” is automatically activated. The »!« symbol appears in the display.
2 Switch off the flash by pressing
indicator disappears.
»+
6«
.
»+6«
repeatedly until the »7« or »6«
Delayed shutter release
1 Activate the function by pressing » 8– «.
– Display: the »8« symbol.
Page 27

ı
3
3
3
HQ
$
0012
HQ
$
00:14
HQ
08
CARD
CARD
CARD
TAKING PHOTOS
2 Frame the motif in the viewfinder and activate the function by pressing the
shutter release button.
– Display: the »ı « symbol and the interval (from »10« to »0 « seconds)
before the picture is taken.
– A signal tone confirms that the photo has been taken.
Note:
The function can be prematurely interrupted by pressing »
»8« symbol disappears. Before activating the automatic shutter release
button, you can activate the desired flash setting.
Recording commentaries on photos
After taking a picture, you can record a commentary (up to 20 seconds).
1 Activate the sound recording function with »REC«.
– Display: the number of the last photo, for example »0012«, and the
»$« symbol.
2 Start sound recording by pressing »REC« again.
– Display: the duration of the recording, for example »00:14«.
3 Sound recording stops automatically after 20 seconds.
It can be interrupted earlier by pressing »REC«.
__________________________________
8–«. The
ENGLISH
27
Page 28

28
3
3
3
HQ
HQ
HQ
53
CARD
SQ:05
CARD
SQ:02
CARD
PHOTOS IN SERIES
With this function you can take from 2 to 5 pictures one after another at
intervals of half a second.
Selecting the photo series mode
1 Press »POWER« to switch on the device.
2 Set the rotary switch to the »&« operating mode.
– Display: the number of photos possible, for example »53«.
Defining the number of photos in the series
1 Press »+6« once.
– Display: The number of photos in the series, in this example »SQ:05«.
2 Set the desired number (from 2 to 5) with »+
Note:
If the setting is not completed within 2 seconds, the camera ends this
function. The number of pictures possible is displayed.
If there is not enough memory left, the serial photograph function will not
start.
______________________________
6«.
Page 29

ı
3
3
3
0008
HQ
CARD
L023
HQ
C23
HQ
CARD
CARD
PHOTOS IN SERIES
Taking photos in series
1 Frame the motif in the viewfinder and press the shutter release button.
– Display: the »ı « symbol flashes.
– A signal tone confirms that the photo has been taken. The pictures are
stored either in the internal memory of the device or on the multimedia
card, if one is installed.
– The picture numbers are counted in ascending order, for example
»0008« to »0012«.
Note:
In this operating mode, you cannot use the flash or the delayed shutter
release.
You can call up the number of the last picture or the total number of
pictures stored by pressing »MODE«.
»L023« = last picture, »C 23« = number of pictures stored.
If you previously deleted a picture series, the display shows, for example:
»L023« = last picture, »C 19« = number of pictures stored.
________________________________
ENGLISH
29
Page 30

30
3
3
DEL
HQ
ERAS
HQ
CARD
CARD
PHOTOS IN SERIES
Deleting photos in series
1 Select the photo with »+6« or » 8– «.
– Display: »DEL« and the number of the photo, for example »0012«, flash
alternately.
2 To delete the photo, press »DEL«.
– Display: »DEL« and the number of the photo, for example »-07-«, flash
alternately.
3 Press »DEL« again.
– Display: »ERAS«, and the picture is deleted.
________________________________
Page 31

3
HQ
03:30
CARD
MOVIE RECORDING
With this function you can record moving pictures – with or without sound.
The duration of the recording is open, or it can be preset to between
5 seconds and 5 minutes. This also depends on the memory card used.
The pictures are stored in 320 x 240 pixel format (AVI).
Selecting the movie recording format
1 Press »POWER« to switch on the device.
2 Set the rotary switch to the »
– Display: the time available for movie recording, for example »03:30«
minutes.
Note:
You can call up the number of the last movie recording or the total number
of movie recordings stored by pressing »MODE«.
»L023« = last movie recording, »C 23« = number of recordings stored.
If you previously deleted one or more movies, the display shows, for
example:
»L023« = last recording, »C 19« = number of recordings stored.
9« operating mode.
____________________________
ENGLISH
31
Page 32

32
3
3
00:10
HQ
$
00:10
HQ
CARD
CARD
MOVIE RECORDING
Setting the recording time
1 Press »MODE«, and then select the desired duration (from 5 seconds to
5 minutes) with »+6«.
– Display: for example »00:10« (= 10 seconds’ recording time) »FREE«
(= open recording time).
Note:
The minimum recording length is displayed. This depends on the selected
settings and the size of the picture file.
Movie recording with sound
You can choose whether to make your recording with or without sound.
Recording is preset to be without sound.
1 Activate the sound recording function with »REC«.
– Display: »$«.
2 Deactivate the sound recording function with »REC«.
– The »$« indicator disappears.
_______________________________
Page 33

ı
3
3
3
00:01
HQ
DEL
HQ
ERAS
HQ
CARD
CARD
CARD
MOVIE RECORDING
Starting and stopping movie recording
1 Frame the motif in the viewfinder and press the shutter release button.
– Display: The duration of the movie recording (for example »00:01«) and
the »ı « indicator flashes.
Note:
In this operating mode, you cannot use the flash or the delayed shutter
release.
2 Movie recording stops automatically when the preset time has elapsed.
It can be interrupted earlier by pressing the shutter release button.
Deleting a movie recording
1 To delete the most recent video recording, press »DEL«.
– Display: »DEL« and the number of the recording, for example »-07-«,
flash alternately.
2 Press »DEL« again.
– Display: »ERAS«, and the video recording is deleted.
_______________________________
ENGLISH
33
Page 34

SOUND RECORDING/PLAYBACK
_____
34
3
3
ı
3
$
CARD
$
00:01
CARD
$
00:01
CARD
2
Selecting the sound recording/playback mode
1 Switch on the camera by pressing »POWER«.
2 Set the rotary switch to the »$« operating mode.
– Display: the number of the recording (for example »2«) and the »$«
indicator.
Sound recording
1 Press »REC« to start recording.
– Recording starts. The recording time (for example »0=:01«) is displayed,
and the »$« symbol flashes.
2 Press »REC« to stop recording.
Sound playback
1 Select the recording with »HQ s6 « or »M 5a«.
– Display: the number of recordings (for example »0004«).
2 Start playback with the shutter release button.
– Playback starts. The elapsed playing time for the track (for example
»0=:01«) is displayed and the »
ı « indicator flashes.
Page 35

SOUND RECORDING/PLAYBACK
______________
II
3
3
3
$
00:05
CARD
$
DEL
CARD
$
ERAS
CARD
3 Press the shutter release button to pause playback.
– Display: »II«.
4 Resume playback with the shutter release button.
5 To stop playback, press and hold down the shutter release button.
Setting the volume
1 Set the volume with »+6« or » 8– «.
Deleting a sound recording
1 To stop playback, press and hold down the shutter release button.
2 Select the recording with »HQ
3 To delete the recording, press »DEL«.
– Display: »DEL« and the number of the recording, for example »-07-«,
flash alternately.
4 Press »DEL« again.
– The recording is deleted.
s6 « or »M 5a«.
ENGLISH
35
Page 36

36
3
3
3
14:30
CARD
ALL
CARD
ERAS
CARD
DELETING ALL RECORDINGS
You can use this function to simultaneously delete all images, series photos,
video and sound recordings.
1 Set the rotary switch to the »SET« operating mode.
– Display: The current time (e.g. »14:30«).
2 To delete all recordings, press »DEL«.
– Display: »DEL« and »ALL« flash in alternation.
Note:
Deleting can be interrupted by pressing any button apart from »DEL«.
3 Press »DEL« again.
– Display: »ERAS«.
– All recordings are deleted.
Note:
If there is a large number of stored recordings, the deletion procedure
may require some time for completion.
_______
Page 37

MUSIC PLAYBACK
______________________________
MP3 mode
MP3 has become a standard format for saving digital music, particularly in
the Internet. Numerous Web sites offer MP3 music files that can be downloaded free of charge or for a fee. The MP3 files that are stored on your PC’s
hardisk are sent to the device via the USB interface using the enclosed adapter cable.
The music is played back from an integrated flash memory or from the
memory card. These cards are small in size, lightweight yet sturdy. There is
also a pre-recorded, write-protected variety of this card, the ROS card
(record on silicon).
Copying music files onto the memory card
1 Switch on the camera by pressing »POWER«.
2 Set the rotary switch to the »/« operating mode.
3 Plug the enclosed USB cable into the »
USB socket of the computer.
4 Click on the »Music Loader« symbol on the PC in “Programs” and copy
MP3 files on to the memory card in the camera.
(« socket of the camera and the
ENGLISH
ENGLISH
37
Page 38

38
ı
3
II
3
00:01
CARD
02:06
CARD
MUSIC PLAYBACK
Selecting the music playback mode
1 Switch on the camera by pressing »POWER«.
2 Set the rotary switch to the »%« operating mode.
– Playback starts automatically.
– Display: the number of the track, for example »-01-«, briefly, then the
playing time of the track, and the »
Pause, playback, stop
1 Press the shutter release button to pause playback.
– Display: »II«.
2 Resume playback with the shutter release button.
3 To stop playback, press and hold down the shutter release button.
Setting the volume
1 Set the volume with »+6« or » 8– «.
Index forwards/reverse
1 Briefly press »HQ s6 « or »M 5a« during playback.
2 Select the desired tracks (or the installed multimedia card/ROS card) by
pressing »HQ
s6 « or »M 5a« repeatedly.
_________________________________
ı « indicator flashes.
Page 39

ı
3
ı
3
01:26
01:27
ONE
4
CARD
CARD
MUSIC PLAYBACK
_________________________________
Additional playback functions
Continuous playback (Repeat)
With this function the current track or all the tracks can be played back continuously.
1 Press »MODE« during playback.
M
– Display: »M«.
2 While »M« is displayed, select the desired function with »HQ
– Display: »4« and »ONE«, and the current track is repeated
– Display: »4« and »ALL«, and all the tracks are repeated.
3 End function by repeating from step 1 and pressing »HQ
until the »4« indicator disappears.
s6 «:
s6« repeatedly
ENGLISH
ENGLISH
39
Page 40

40
ı
3
3
03:1 1
5
CARD
DEL
CARD
MUSIC PLAYBACK
Playing back tracks in random order
1 Press »MODE« during playback.
– Display: »M«.
2 While »M« is displayed, select the Random function with »HQ
– Display: »5«.
– The tracks are played back in random order.
3 End function by repeating from step 1 and pressing »HQ
ly until the »5« indicator disappears.
Deleting tracks from the flash memory or the memory
card
1 To stop playback, press and hold down the shutter release button.
2 Select the track using the »HQ
3 To delete the track press »DEL«.
– Display: »DEL« and the number of the track, for example »-07-«, flash
alternately.
4 Press »DEL« again.
– The track is deleted.
_________________________________
s6 «:
s6 « repeated-
s6 « and »M 5a« buttons.
Page 41

3
3
245
CARD
0250
CARD
OPERATION ON THE TELEVISION SET
Connecting the camera to the TV
1 Switch off the camera by pressing »POWER«.
2 Plug the enclosed adapter cable into the »TV« socket of the camera and
the cinch socket of the TV (red/white = sound, yellow = picture).
Selecting the television operating mode
1 Set the rotary switch to the »TV« operating mode.
2 Switch on the camera by pressing »POWER«.
– Display: the number of all the stored (movie) recordings, e.g. »245«,
then the number of the last recording, e.g. »0250«.
– The last 9 pictures are displayed as inset pictures on the TV screen.
Viewing inset pictures and individual pictures on the TV
1 Select the desired inset picture with »+6«, » 8– «, »HQ s6« or
»M 5a «.
2 Enlarge the selected inset picture with »MODE«.
3 Select the previous/next picture using »HQ
Note:
Switch back to the inset picture mode with »MODE«.
s6 « and »M 5a«.
41
_
ENGLISH
ENGLISH
Page 42

OPERATION ON THE TELEVISION SET
Viewing the individual pictures automatically
1 Enlarge the selected inset picture with »MODE«.
2 Activate the function by holding down »HQ
Note:
To stop on an individual picture, press the shutter release button.
s6 « or »M 5a«.
________
42
ı
3
II
3
$
ı
3
00:01
CARD
06:25
CARD
00:01
CARD
Movie playback on TV
1 Start playback with the shutter release button.
– Playback starts. The elapsed playing time for the track (for example
»0=:01«) is displayed.
2 Press the shutter release button to pause playback.
– Display: »
3 Resume playback with the shutter release button.
4 To stop playback, press and hold down the shutter release button.
Sound recording
1 During video playback or while the selected frame is being displayed,
start the sound recording by pressing »REC«.
– The recording time (for example »0=:01«) is displayed, and the »$«
indicator flashes.
2 Press »REC« to end the recording.
II«.
Page 43

USB
CARD
OPERATING WITH A PC
_____________________
USB operation
Selecting the USB mode
Note:
When the camera is operated with a PC, the power supply is via the USB
interface.
1 Set the rotary switch to the »/« operating mode.
2 Plug the enclosed USB cable into the »
USB socket of the computer.
– The camera switches on automatically.
– Display: »USB«.
Note:
You can now record or delete images, videos, voice recordings and music
on the PC, view images and videos on the monitor and also process and
print images.
(« socket of the camera and the
ENGLISH
43
Page 44

44
PC
CARD
OPERATION WITH A PC
__________________________
Operation as a Webcam
Selecting the Webcam operating mode
1 Set the rotary switch to the »PC« operating mode.
2 Plug the enclosed USB cable into the »
USB socket of the computer.
– The camera switches on automatically.
– Display: »PC«.
3 Click on the »Amcap« symbol in ”Program” on the PC.
– You can now transfer images from the camera onto your homepage.
(« socket of the camera and the
Page 45

INFORMATION
This device is noise-suppressed according to the applicable EC directives.
This product fulfils the European directives 89/336/EEC, 73/23/EEC and
93/68/EEC.
This device conforms to the safety regulation DIN EN 60065 (VDE 0860) and therefore
the international safety regulation IEC 60065.
The type plate is located on the bottom of the device.
_____________________________________
Technical data
Power supply:
AC mains adapter: DC 5V, 2A
Battery operation: 2 x 1.5 Volt
(LR6, AM3, AA)
PC mode – via USB socket
Ambient temperature:
+50°C to -10°C
Relative humidity: up to 60%
Memory: Internal memory: 16 MByte
Slot for external multimedia card
Computer interface: USB 1.1
Driver: Win 98/98SE/ME/2000
Camera:
Image sensor: CMOS
Resolution: 1280 x 960 for taking pictures,
320 x 240 for movie recording
Data format: JPEG and TIFF for photographs, AVI for video recordings
Flash: on/automatic/off
Delayed shutter release: duration from
10 to 0 seconds
White balance: automatic,
5 manual settings
Lighting: 9 settings
Audio:
MP3 Player: MP3 music decoder (MPEG 1,
layer 3)
Scanning frequency 44.1 kHz,
Bit rate 32-320 kbps, CBR, VBR
Sound recording: 4 min./MB
(1hr./16 MB),
Output format ADPCM 32 kbps
ENGLISH
ENGLISH
45
Page 46

INFORMATION
_____________________________________
Troubleshooting
If a problem occurs, first refer to this information before you take the device
for repair.
If you are unable to rectify the fault using the information given here, contact
your local dealer or service specialist.
Under no circumstances should you attempt to repair the device yourself, as
this would invalidate the guarantee.
46
PROBLEM
Power supply
The device cannot be
switched on.
The device switches
off.
POSSIBLE CAUSE
Batteries not inserted correctly.
Batteries are flat.
Batteries are too weak.
The automatic switching off
function is activated.
REMEDY
Check the polarity of the
batteries.
Change the batteries.
Change the batteries.
Switch the device on again.
Page 47

INFORMATION
_____________________________________
PROBLEM
Taking photos
No photo taken when
shutter release button
is pressed.
The flash is not working.
Poor colour quality of
pictures.
Time and date are not
accurate when storing
files.
POSSIBLE CAUSE
The internal memory or the multimedia card is full.
The device is overwriting the
memory.
The flash is being charged.
The flash is switched off.
The batteries are too weak.
The photos in series mode or
the movie recording mode is
set.
The device is in the manual
operating mode and the white
balance setting is too low.
The device has not been
switched on for a long time.
REMEDY
Delete photos or movies
from the memory or the
multimedia card.
Install a new multimedia
card.
Wait for the procedure to
finish.
Wait until the lightning
symbol in the display stops
flashing.
Set the flash to »On« or
»Auto«.
Change the batteries.
Set the device to the automatic operating mode.
Select the »WB-01« setting.
Reset the time and date.
ENGLISH
47
Page 48

INFORMATION
_____________________________________
48
PROBLEM
USB
The device is not in
standby mode or a
connection cannot be
made.
Data transfer
Data transfer not
working.
Multimedia card
Card error.
When the device is
switched on, »CARD«
does not appear in
the display.
POSSIBLE CAUSE
USB is not properly connected.
Error in the USB data transfer.
The hardware is not compatible.
The operating system is not
installed correctly.
Poor cable connection.
The device is not switched on.
The multimedia card has not
been formatted.
The multimedia card has not
been inserted correctly.
The multimedia card is not formatted.
REMEDY
Check the USB cable connection.
Plug out the USB cable and
reconnect it.
Ask your computer specialist dealer.
Ask your computer specialist dealer.
Reconnect the cable.
Switch on the device.
Format the multimedia card.
Remove the multimedia
card and reinsert it.
Format the multimedia card.
Page 49

GRUNDIG Service
_________________
GRUNDIG BELUX N.V.
Deltapark, Weihoek 3, Unit 3G
B-1930 Zaventem
+32/2-7 16 04 00
GRUNDIG UK LTD.
Elstree Way, Borehamwood, Herts, WD6
1RX
GB Großbritannien/
Great Britain
+44/1 81-3 24 94 00
Ihre regionale Kundendienst-Stelle in Deutschland erreichen Sie unter:
Telefon 0180/5 23 18 52* • Telefax 0180/523 18 46*
Technical Service
Unit 35, Woodside Park, Wood Street
Rugby, Warwickshire, CV21 2NP
Großbritannien/
Great Britain
+44/1 78-8 57 00 88
GRUNDIG IRELAND LTD.
2 Waverley Office Park,
Old Naas Road
EIR Dublin 12
+3 53/1-4 50 97 17
GRUNDIG FRANCE S.A.
5 Boulevard Marcel Pourtout
F-92563 Rueil
Malmaison Cedex
+33/1-41 39 26 26
GRUNDIG Deutschland
*gebührenpflichtig
GRUNDIG SCHWEIZ AG
Steinacker Straße 28
CH-8302 Kloten
+41/1-8 15 81 11
GRUNDIG PORTUGUESA
Comércio de Artigos
Electrónicos, Lda.
Rua Bento de Jesus Caraça 17
P-1495 Cruz Quebrada, Lisboa
+3 51/1-4 19 75 70
GRUNDIG ESPAÑA S.A.
Solsonés, 2 planta baja B3
Edificio Muntadas (Mas Blau)
E-08820 El Prat De
Llobregat (Barcelona)
+34/93-4 79 92 00
GRUNDIG NORGE A.S.
Glynitveien 25, Postboks 234
N-1401 Ski
+47/64 87 82 00
GRUNDIG DANMARK A/S
Lejrvej 19
DK-3500 Værløse
+45/44 48 68 22
GRUNDIG OY
Luoteisrinne 5
SF-02271 Espoo
+3 58/9-8 04 39 00
GRUNDIG SVENSKA AB
Albygatan 109 d, Box 4050
S-17104 Solna
+46/8-6 29 85 30
GRUNDIG POLSKA SP.Z.O.O.
Ul. Czéstochowska 140
PL-62800 Kalisz
+48/62-7 66 77 70
GRUNDIG AUSTRIA Ges.m.b.H.
Breitenfurter Straße 43-45
A-1120 Wien
+43/1-81 11 70
GRUNDIG NEDERLAND B.V.
Gebouw Amstelveste
Joan Muyskenweg 22
NL-1096 CJ Amsterdam
+31/20-5 68 15 68
GRUNDIG ITALIANA S.P.A.
Via G.B. Trener, 8
I-38100 Trento
+39/4 61-89 31 11
ENGLISH
ENGLISH
49
49
Page 50

Grundig AG • Beuthener Str. 41 • D-90471 Nürnberg • http://www.grundig.com 72011-601.5600
 Loading...