


SPACE FIDELITY
PA 6
1
ENGLISH
55403-941.1100

2
CONTENTS
________________________________________________________________________
4 PA 6 HiFi System
Special features of your HiFi system
Packing contents
5 Set-up and safety
7 Overview
The HiFi system controls
The HiFi display
The remote control
14 Preparation and connection
Inserting batteries in the remote control
Connecting the loudspeaker module
Installing the speaker caps
Attaching the wing panels to the HiFi
Connecting the antenna
Connecting an external device
Connecting headphones
Connecting the mains cable
Selecting the HiFi antenna setting
19 Settings
Tuning to radio stations
Automatic search programme (ASP)
Tuning to a radio station using the manual station search
Sorting and deleting preset stations
Manually entering and deleting names for radio stations
Adjusting the brightness of the display

CONTENTS
__________________________________________________________________________________
25 General functions
Basic functions
28 Tuner mode
Basic Tuner mode functions
RDS reception
32 CD mode
Basic CD mode functions
Special CD mode features
Playing back tracks in a selected order – creating a track memory
Entering or deleting CD names
40 Cassette mode
General information about cassette mode
Playback
Recording
Recording a CD on to cassette (CD COPY)
47 Information
Technical data
Rectifying minor problems
General instructions for laser devices
GRUNDIG customer service locations
ENGLISH
3
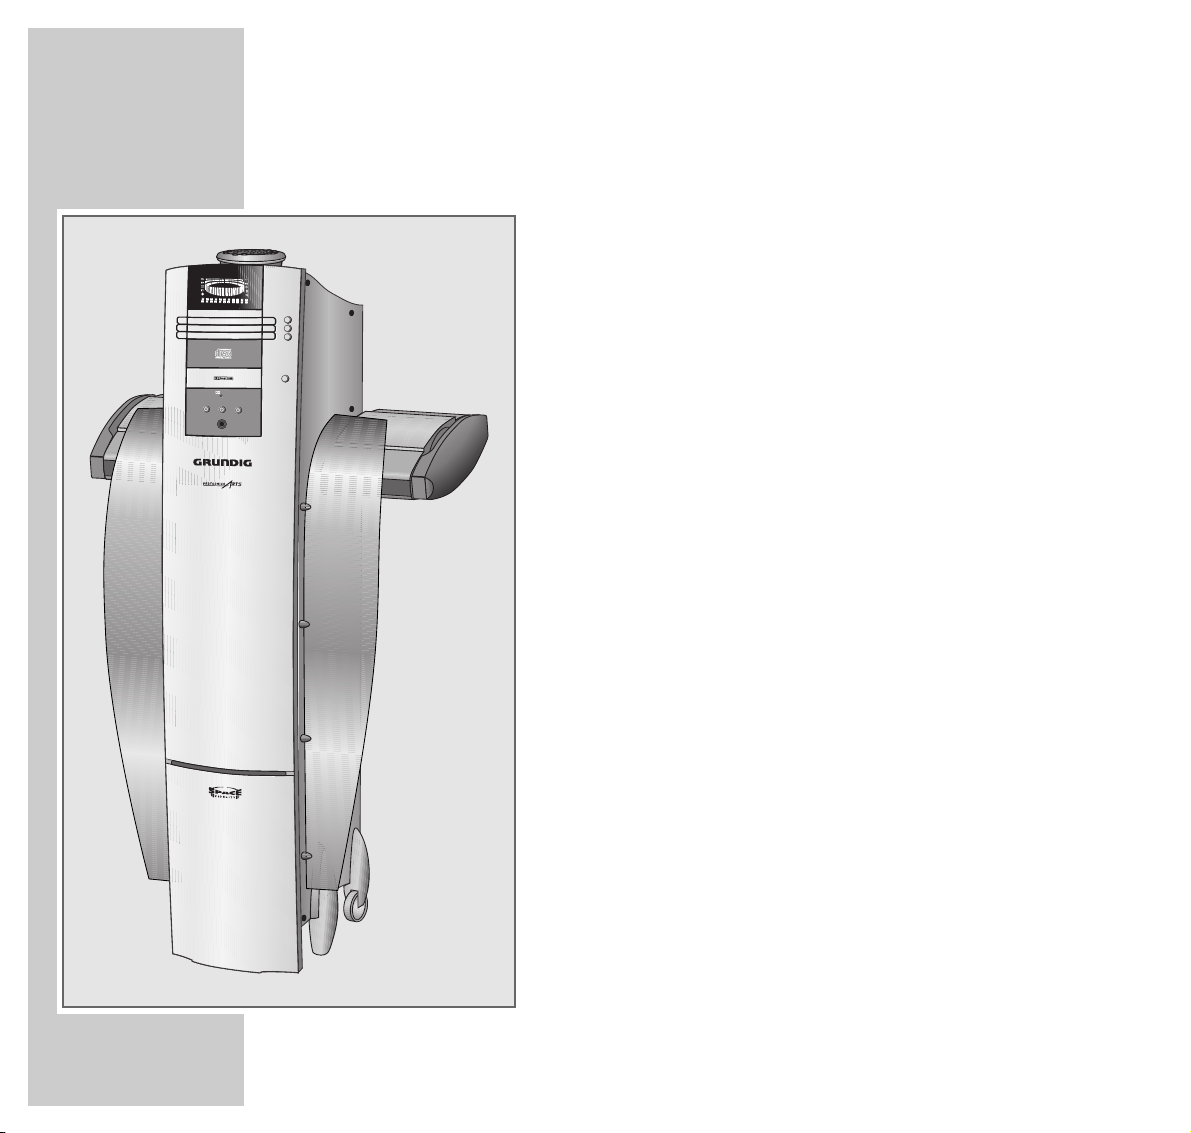
PA 6 HIFI SYSTEM
_____________________________________________________
4
Special features of your HiFi system
Perfect sound is not a question of size, but of quality. This system gives you clear
and vivid sound for any kind of musical style, packaged in a timeless design.
The PA 6 is an elegant combination with RDS tuner, CD and cassette function.
The CD player has a CD text function. This means that if such a fuction is offered
by the CD, the CD player can show the artist and the contents of the CD on the
display of the HiFi system.
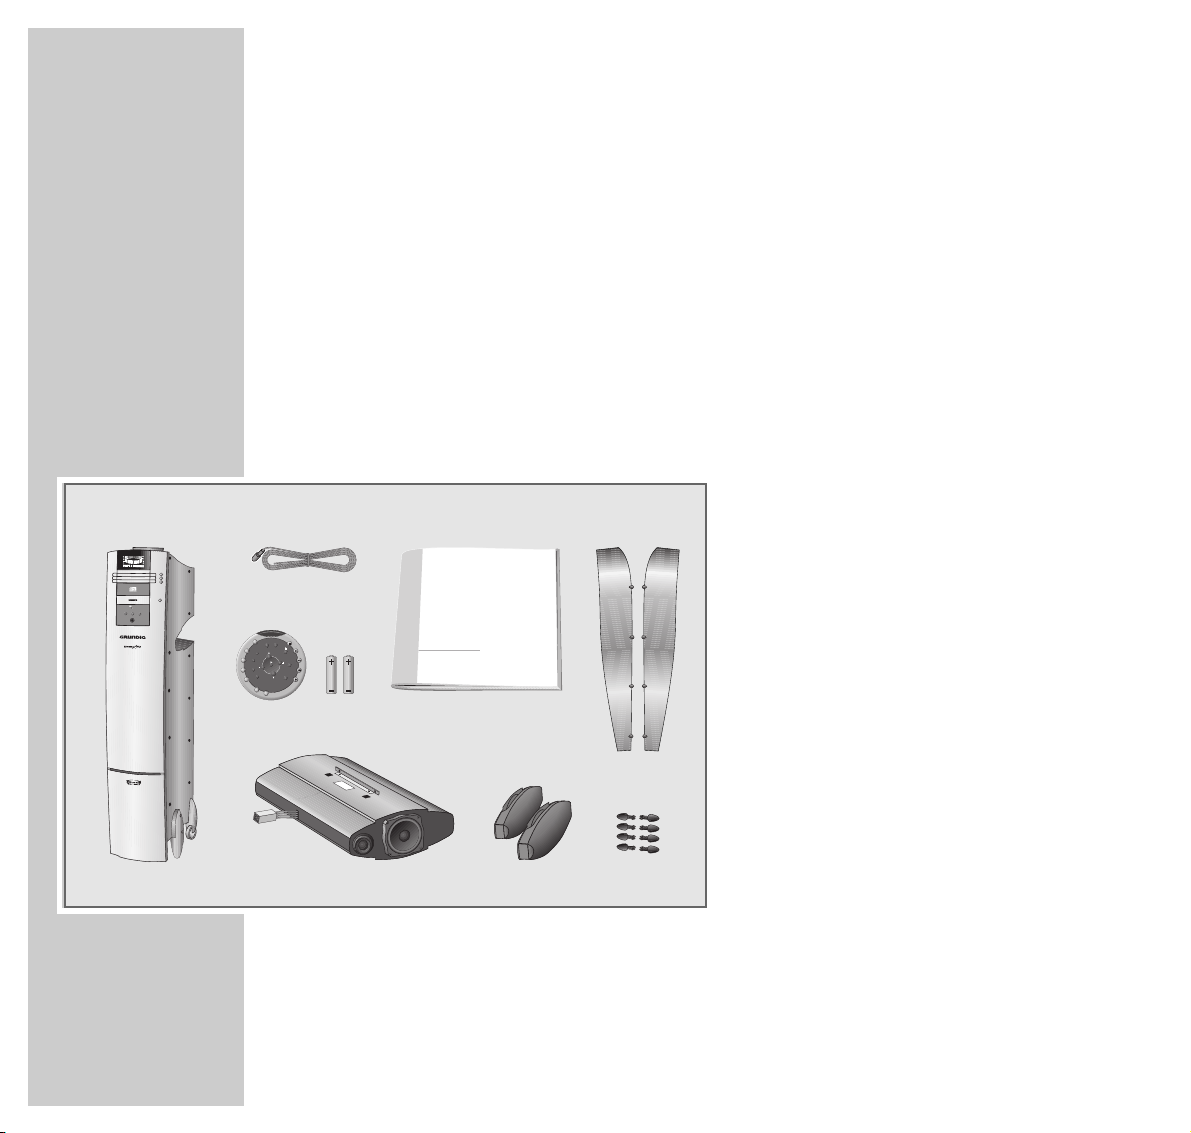
Packing contents
1 PA 6 HiFi system
2 Loudspeaker module
3 Remote control
4 2 batteries, 1.5 V–, micro type
5 Wire antenna
6 Operating manual
7 Wing panels (PA 6/II, PA 6/III only)
8 Eight cover caps
9 Two loudspeaker covers
1
2
3
65
4
7
9 8
DISC
OPEN/CLOSE
1
2
3
TAPE
OPEN/CLOSE
B NR
DISC SELECT
1
2
3
U
8
CD-COPY
CD
MEMORY
TUNER
CANCEL
SOUND
TAPE
CTRL
MODE
AUX
1
1
1
DISC
POWER
SOUND
PTY
RECORD
PAUSE
BASS
TREBLE
1
SPACE FIDELITY
TOP SIDE
OBEN
ENGLISH
5
SET-UP AND SAFETY
______________________________________________
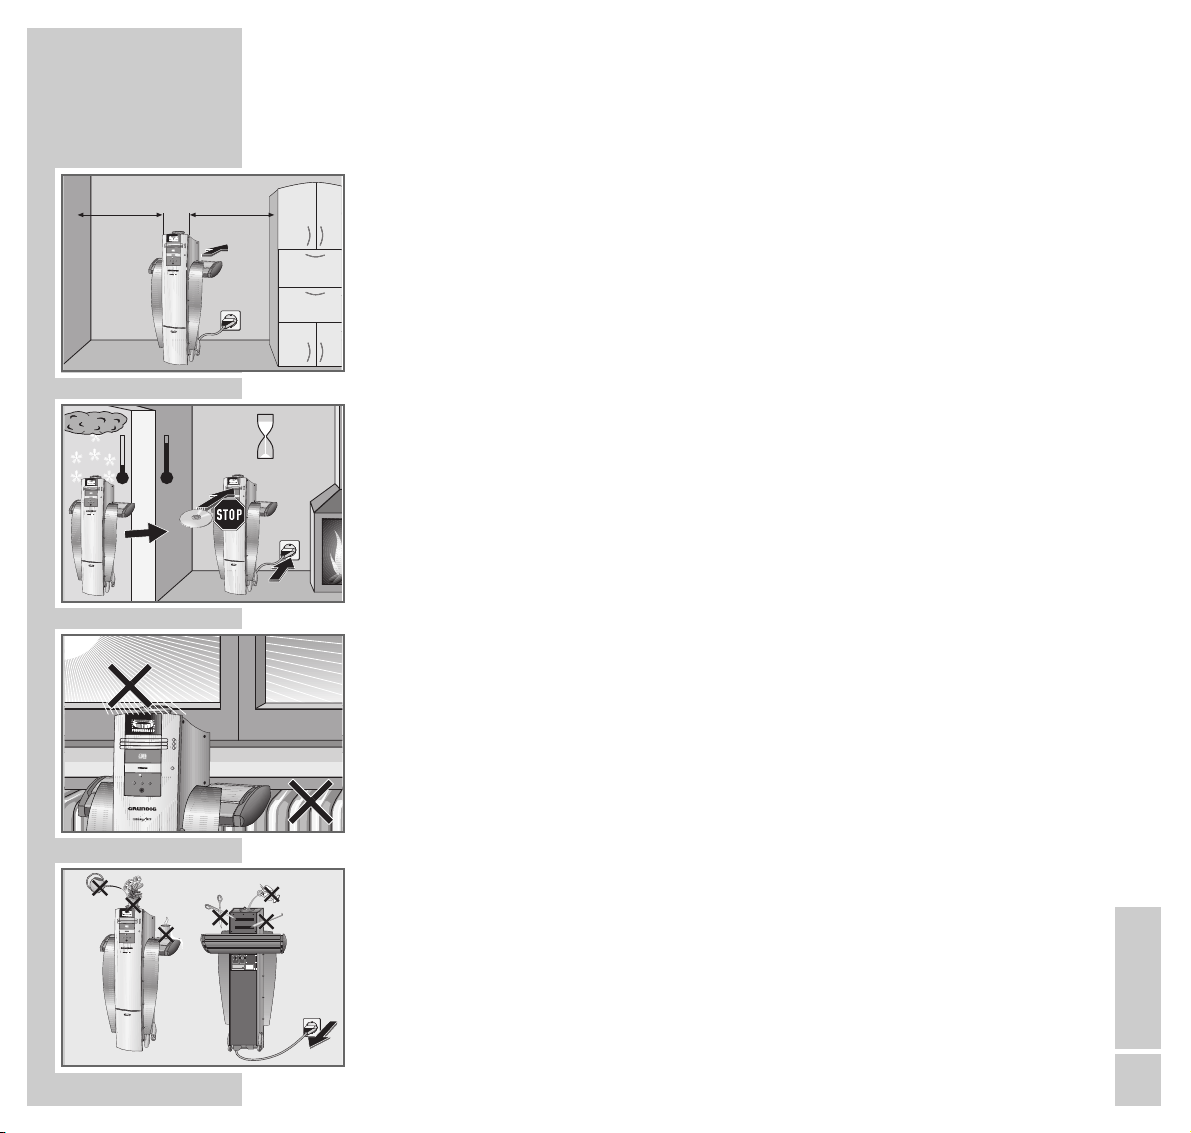
To ensure that this high-quality, easy-to-use HiFi system will provide lasting
satisfaction and enjoyment, please observe the following instructions when
setting it up:
This HiFi system is designed for the playback of audio signals.
Any other use is expressly prohibited.
Select the location of the system in a way that leaves about 1.5 to 3 m of room
on either side of the HiFi system.
Set up the system about 30 cm from the wall.
If the stereo system is subjected to extreme variation in temperature,
for example if brought in from the cold to a warm room, connect the mains
supply and let it stand for at least two hours before inserting a CD or cassette.
The HiFi is designed for use in dry rooms. Make sure to protect your HiFi system
from moisture.
Do not place the HiFi system close to heating units or in direct sunlight, as this
will impair cooling.
Do not insert foreign objects into the CD or cassette compartments.
Never open the HiFi casing under any circumstances. The manufacturer accepts
no liability for damage resulting from improper handling.
°C
°C
2h
OPEN/CLOSE
DISC
OPEN/CLOSE
TAPE
U
B
N
R
D
IS
C
S
E
L
E
C
T
1
2
3
3
2
1
OPEN/CLOSE
DISC
OPEN/CLOSE
TAPE
U
B
N
R
D
IS
C
S
E
LE
C
T
1
2
3
3
2
1
AUX
CLASS 1
LASER PRODUCT
IN OUT
FM 75Ω
D
IS
C
O
PEN
/
C
LO
S
E
TA
P
E
O
PEN
/
C
LO
S
E
3
2
1
DISC SELECT
1
2
3
U
B N
R
! SERVICE !! SERVICE !! SERVICE !
30cm
1,5 - 3m 1,5 - 3m
DISC
O
PEN
/CLO
SE
TA
PE
O
PEN
/CLO
SE
3
2
1
DISC SELECT
1
2
3
U
B
N
R
B NR
DISC SELECT
1
2
3
U
OPEN/CLOSE
1
2
3
TAPE
OPEN/CLOSE
DISC
6
SET-UP AND SAFETY
_________________________________________________________________
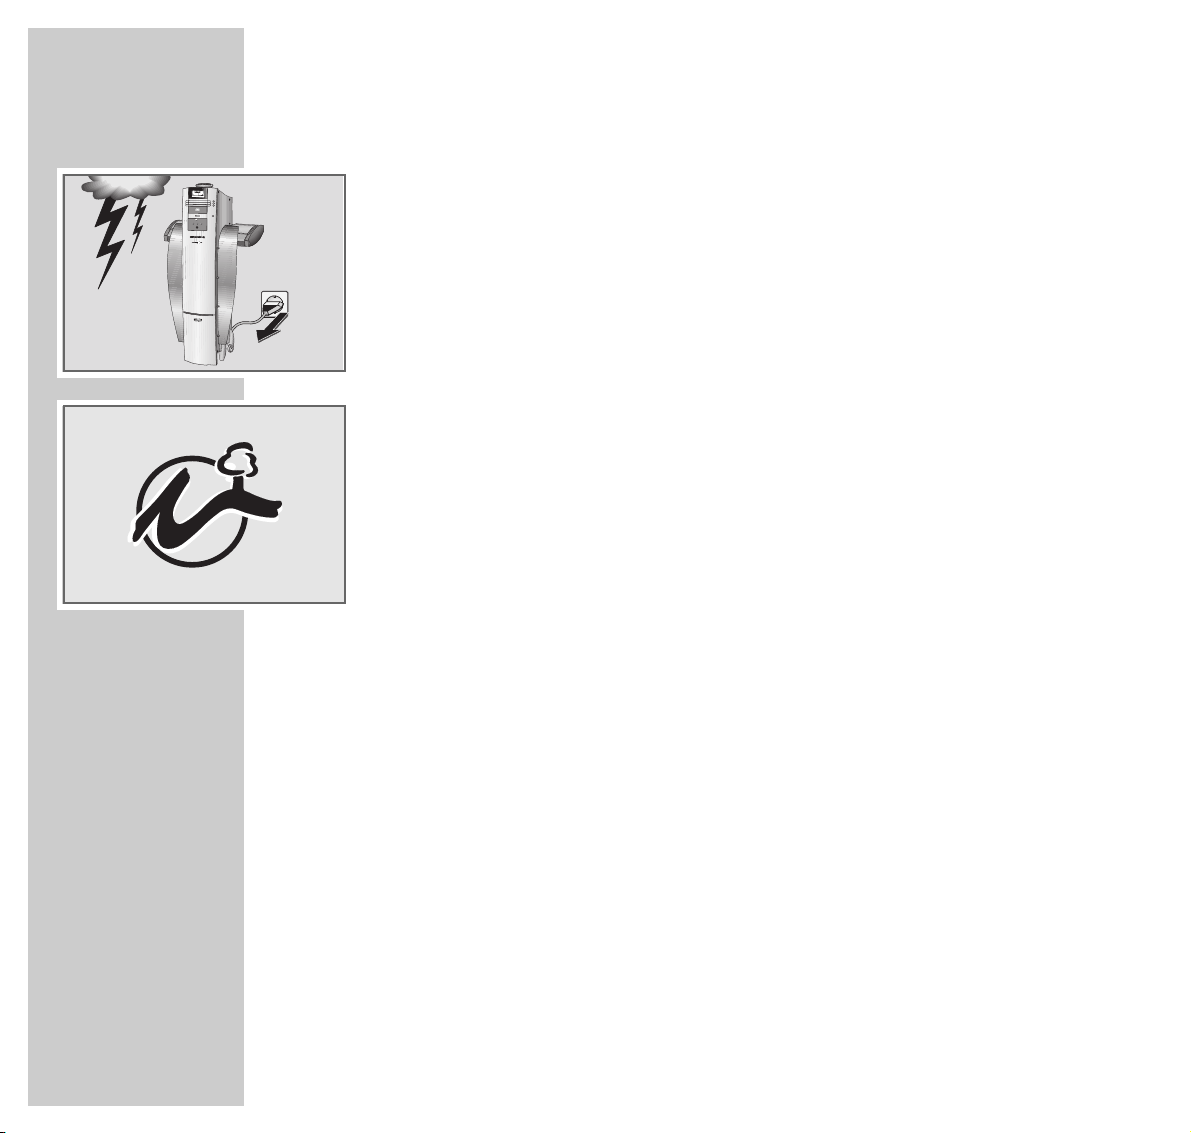
Thunderstorms present a danger to all electrical devices. Even if the HiFi is
switched off, it can be damaged by a lightning strike to the mains. Always
disconnect the mains and antenna plugs during a storm.
If the stereo system no longer scans CDs perfectly, use a commercially available
cleaning CD to clean the laser optics. Other cleaning methods may damage the
laser optics.
Always keep the disc compartment closed to prevent dust from collecting on the
laser optics.
This HiFi system sucessfully fuses technology and environmental friendliness into
a coherent package. Only ecologically compatible, high quality materials have
been used. The packaging consists of almost 100 % recycled paper and the
amount of plastic used has been reduced to a minimum. The batteries delivered
do not contain mercury or cadmium, and for environmental reasons, back-up
batteries have not been used. The range of materials used has been deliberately
restricted and all the larger plastic parts have been labelled. In order to optimise
recycling and to facilitate servicing, this HiFi system can be disassembled easily.
D
ISC
O
PEN
/
C
LO
SE
1
2
3
TA
P
E
O
PE
N
/C
LO
SE
B NR
DISC SELECT
1
2
3
U
The HiFi system controls
Operating controls on the top side of the system
POWER Switches the HiFi system on and off.
The HiFi is completely disconnected from the
power supply.
The button contains a stand-by and mode
indicator.
POWER Switches »POWER SOUND« (Loudness) on/off.
SOUND
•
Receiver for remote conrol signals.
Operating elements under the
remote control
SOURCE Switches the HiFi on from Stand-by;
Selects the input source and muting in the
following order: »CD «, »TUNER«, »TAPE«,
»AUX«, »MUTE«, »CD«.
E
Begins CD or cassette playback.
§§
Ends CD or cassette playback.
+ – Changes the volume within a range from »0« to
»63 «.
ENGLISH
7
OVERVIEW
________________________________________________________________________
SOURCE
POWER
POWER
SOUND
OVERVIEW
__________________________________________________________________________________
8
Operating controls on the front
DISC Opens and closes the CD compartments.
OPEN/CLOSE
TAPE Opens and closes the tape compartment.
OPEN/CLOSE
DISC SELECT Selects the CD in compartment 1, 2
1 2 3 or 3 for playback.
0
Headphone jack for connecting a stereo
headphone set with a jack plug
(ø 6,3 mm).
The loudspeakers of the HiFi system are
automatically switched off.
Display Stand-by and mode indicator.
DISC
OPEN/CLOSE
1
2
3
TAPE
OPEN/CLOSE
B NR
DISC SELECT
1
2
3
U
ENGLISH
9
OVERVIEW
__________________________________________________________________________________
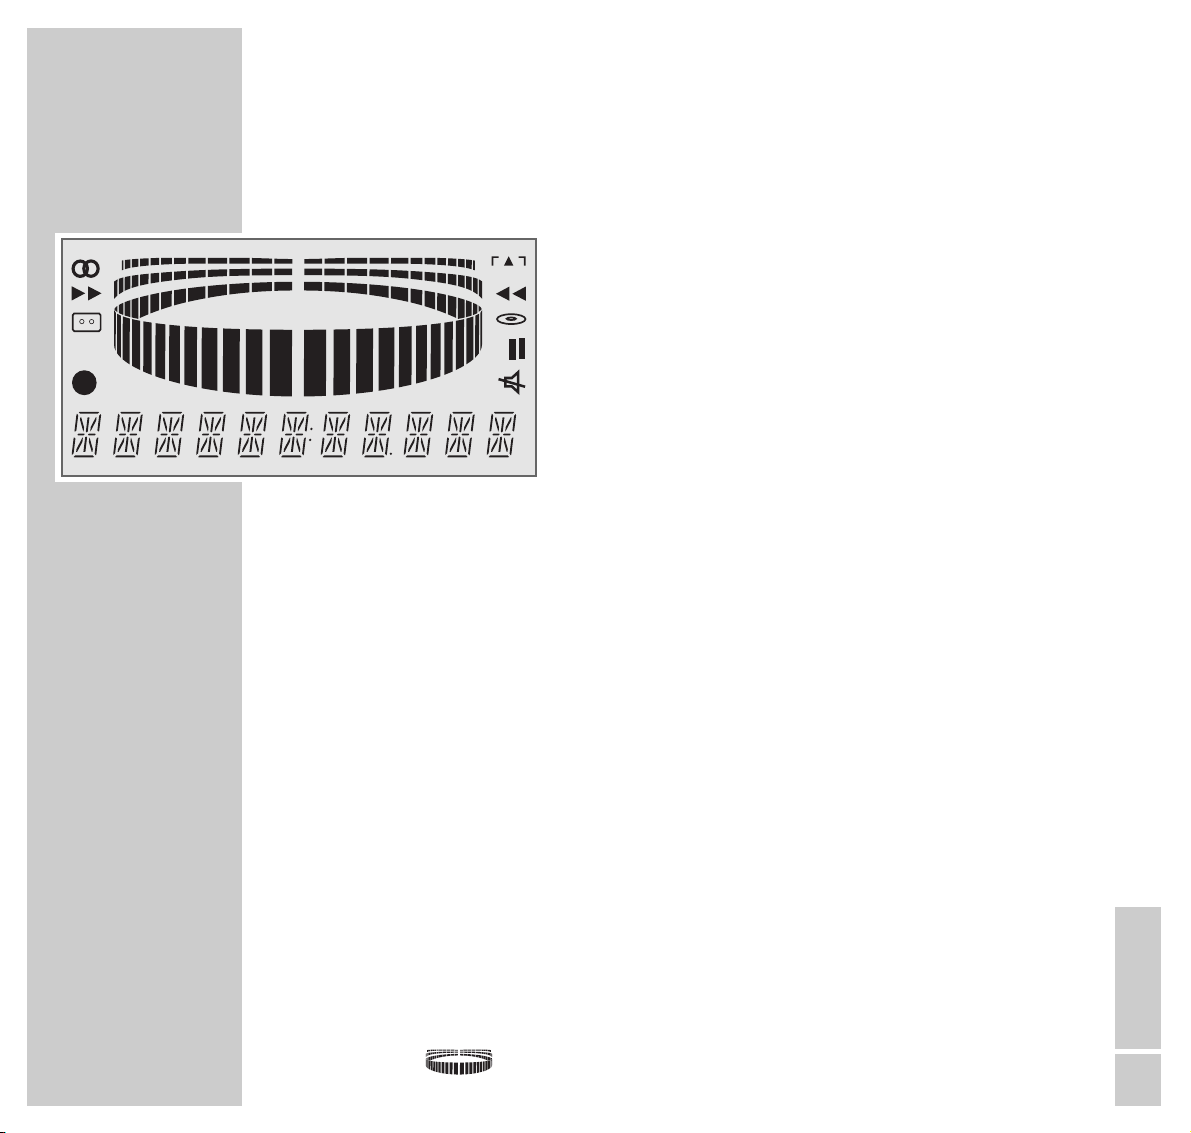
The HiFi display
! Stereo indicator.
W Fast forward/rewind of cassette, depending on
the running direction.
R Playback of a CD or cassette.
/ Cassette deck mode selected.
Cassette deck functions:
G – Playback/recording stops at the end of each
side of the cassette.
H – Playback/recording on both sides of the
cassette and the tape stops at the end of the
second side of the cassette.
J Continuous playback of both sides of the cassette and
all CDs in the HiFi.
) Recording.
% Fine tuning indicator.
Q Fast forward/rewind of the cassette, depending on the
running direction.
E Playback of a cassette in reversed running direction.
& CD mode.
$ Pause during CD and cassette mode.
S HiFi is muted.
Station frequency in MHz.
Display for operating mode, station name, volume, etc.
Output signal.
888888:88.888
MHz
J
rec
MHz
10
OVERVIEW
__________________________________________________________________________________
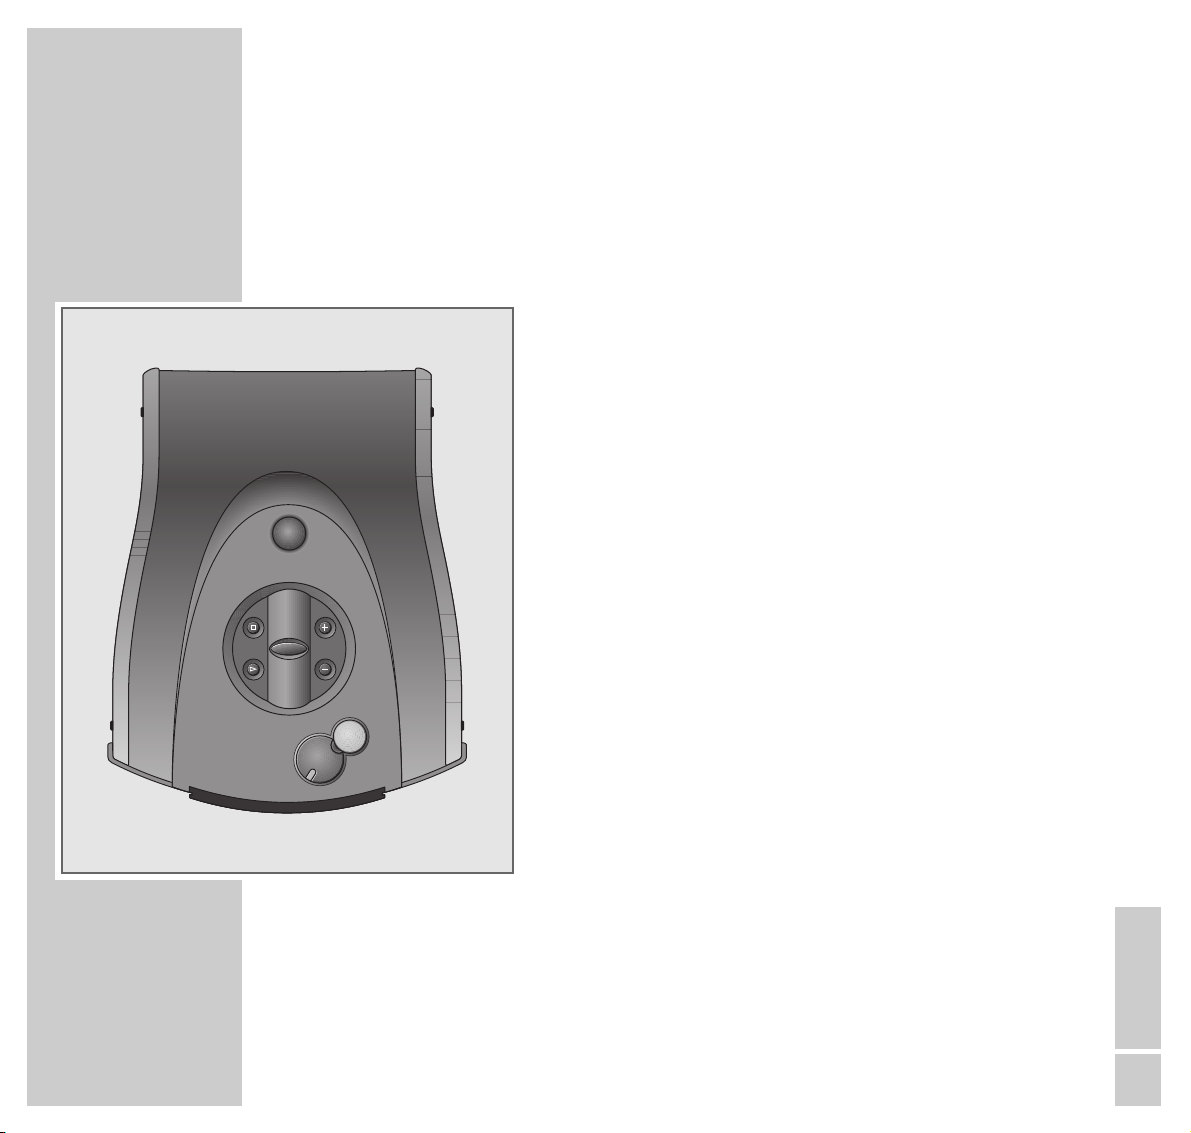
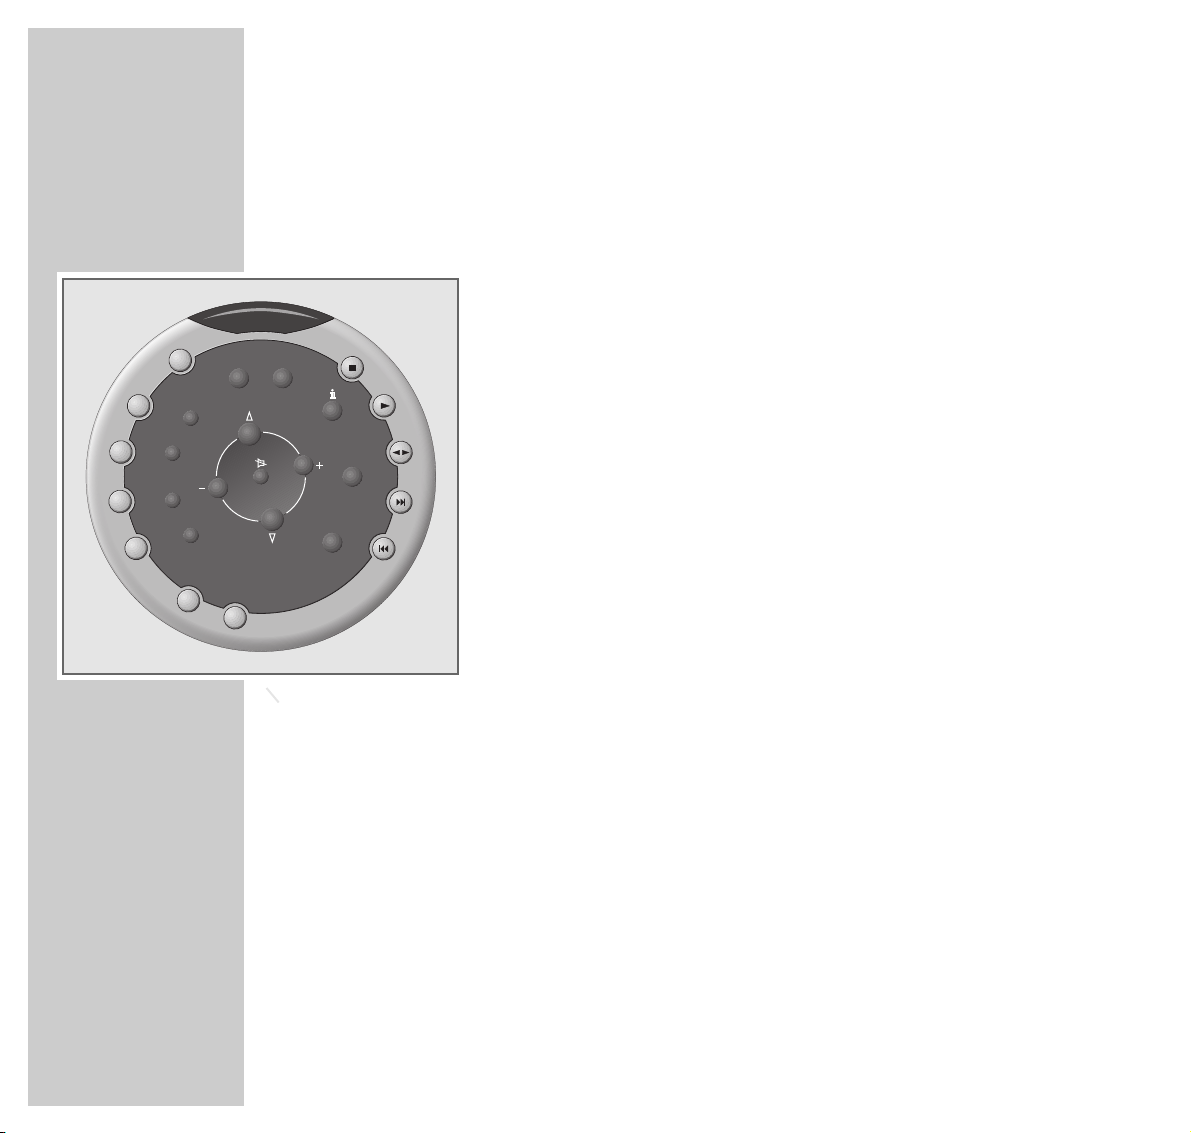
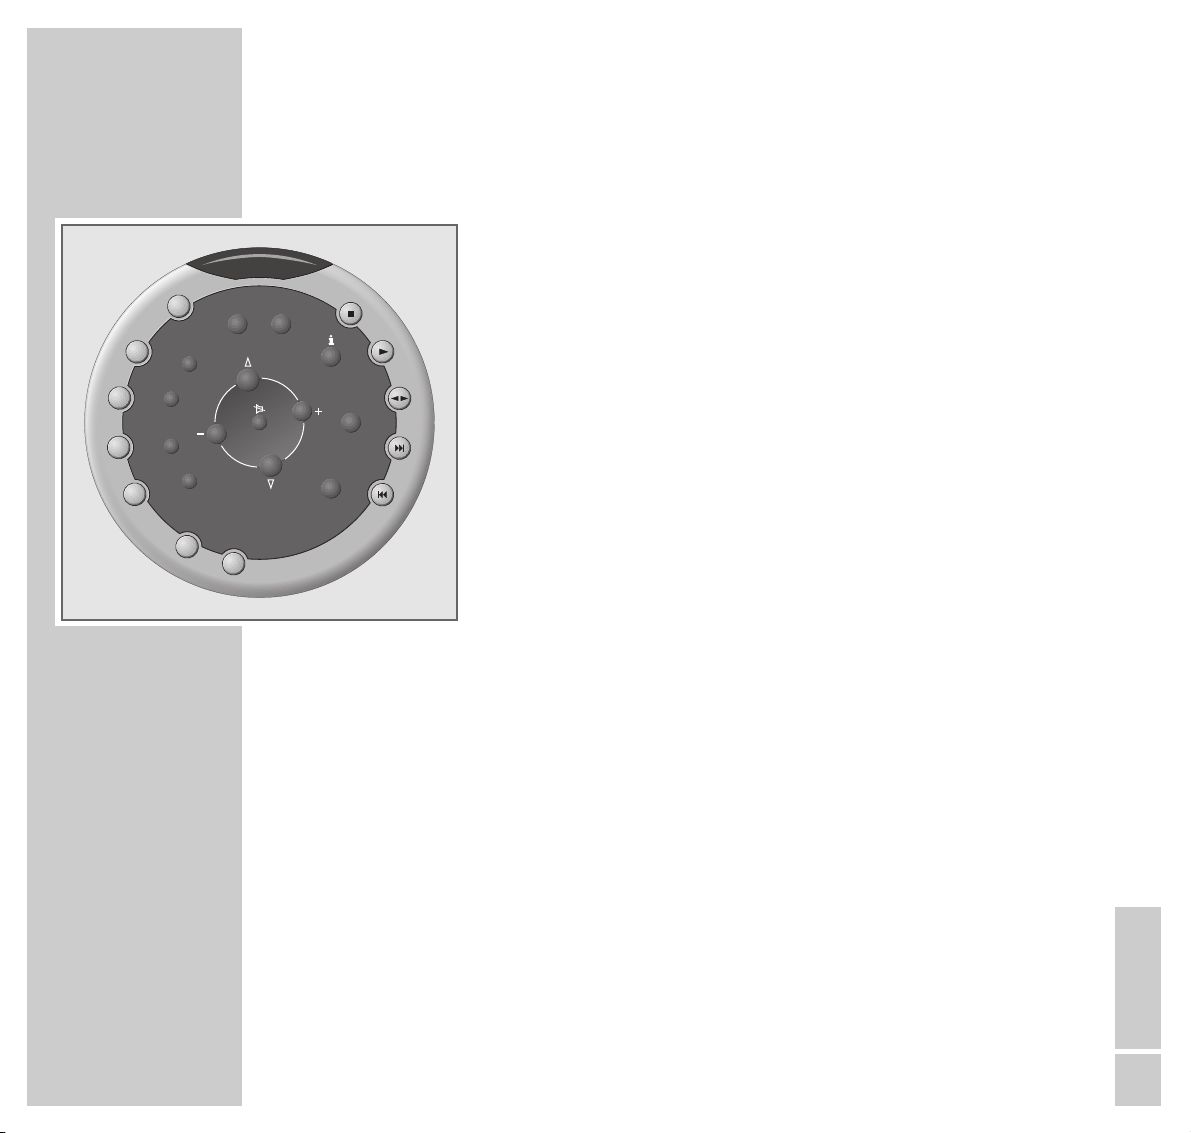
The remote control
Buttons for general functions
99
Switches the HiFi to Stand-by.
The green indicator in the button and the green light on the
front of the system are lit.
CD Switches the HiFi on from Stand-by mode and selects ”CD”
operating mode.
TUNER Switches the HiFi on from Stand-by mode and selects
”Tuner” operating mode.
TAPE Switches the HiFi on from Stand-by mode and selects the
”Tape” operating mode.
AUX Switches the HiFi on from Stand-by mode and selects
”AUX” operating mode.
MODE To activate the brightness setting function for the display,
press this button three times, then press »1« or »2« to
adjust the brightness.
Buttons for sound settings
POWER Switches »POWER SOUND« (Loudness) on/off.
SOUND
TREBLE Selects the Set treble function, then adjust with »1« »2«.
BASS Selects the Set bass function; then adjust with »1« »2«.
MEMORY Stores the ”USER” sound settings.
CANCEL Deletes the ”USER” sound settings.
+ – Changes the volume within a range of »0« to »63«.
aa
Switches the HiFi to and from mute mode.
SOUND Calls up various sound types.
CONTROL
TUNER
TAPE
CD-COPY
RECORD
8
CD
MEMORY
CANCEL
SOUND
CTRL
AUX
MODE
PTY
PAUSE
BASS
TREBLE
1
1
DISC
1
POWER
SOUND

ENGLISH
11
OVERVIEW
__________________________________________________________________________________
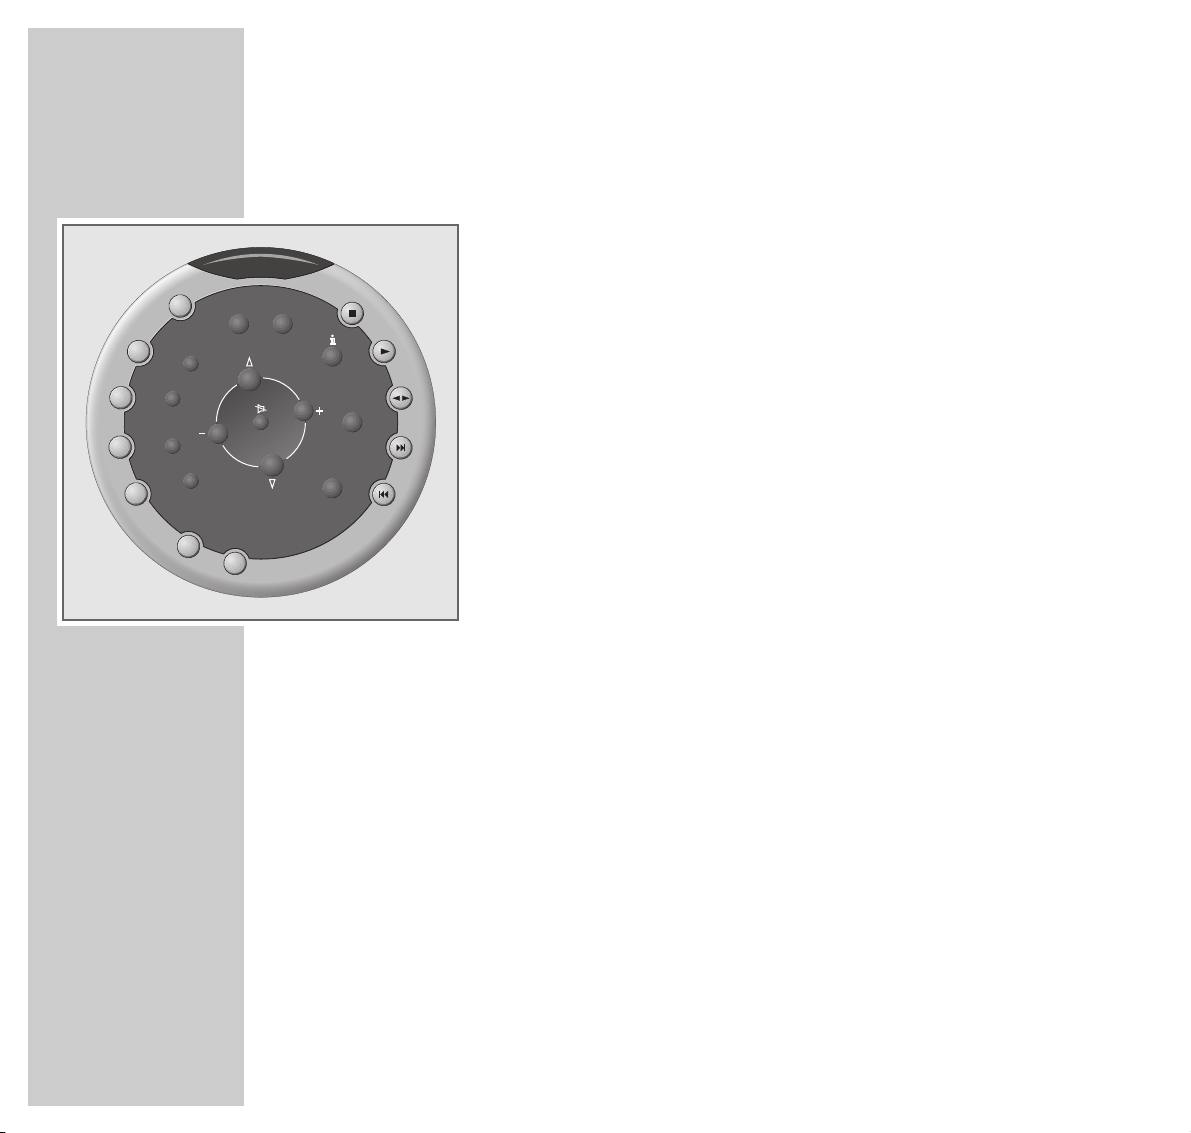
Tuner mode buttons
MEMORY Press this button and briefly hold it down to activate
the automatic station search (AUTO STORE).
Stores radio stations for the AUTO TUNING and
MANUAL TUNING functions.
8 9
Press briefly to change the frequency in incremental
steps (MANUAL TUNING).
Press and then hold down briefly to initiate a manual
station search (AUTO TUNING).
1 2 Call up the next or previous preset station.
i Changes the display of the HiFi:
Station name, RDS time, radio text (RDS stations only)
and frequency.
CANCEL Press briefly to delete individual preset stations.
Hold down to delete all preset stations.
MODE Press once to select the FM stereo or FM mono setting
function, then select the setting with »1« or »2«.
Press twice to select the Antenna setting function, then
select the setting with 1« or »2«.
PTY Calls up the programme type code PTY,
select the programme type with »1« or »2«.
TUNER
TAPE
TREBLE
PTY
PAUSE
BASS
8
CD
MEMORY
CANCEL
SOUND
CTRL
AUX
MODE
DISC
RECORD
CD-COPY
1
1
1
POWER
SOUND
OVERVIEW
__________________________________________________________________________________
12
CD mode buttons
DISC Selects the CD compartments 1, 2 and 3.
5 Ends CD playback.
4 PAUSE Starts CD playback.
Pauses CD playback.
8 9
Search for particular passages during CD playback.
1 2 Select desired track.
MODE Press once to call up the SHUFFLE function,
then activate or deactivate with »1« or »2«.
Press twice to call up the Repeat function then activate
or deactivate with »1« or »2«.
CANCEL Press briefly to delete tracks from the track memory.
Press and hold down briefly to delete the entire track
memory.
MEMORY Calls up the ”Create track memory” function.
i Press briefly to switch from displaying the playing
time to information about CD title and artist.
Press and briefly hold down to enter a custom name
for a CD.
TUNER
TAPE
TREBLE
PTY
BASS
PAUSE
CD-COPY
RECORD
8
CD
MEMORY
CANCEL
SOUND
CTRL
AUX
MODE
1
1
DISC
1
POWER
SOUND
OVERVIEW
__________________________________________________________________________________
ENGLISH
13
Tape mode buttons
5 Ends playback of the cassette.
4 PAUSE Starts and pauses playback of the cassette.
z t
Starts playback of the cassette and reverses the
running direction.
8 9
Fast forward or rewind.
Press during playback to search forwards or
backwards for a particular passage.
MODE Press once to call up the Dolby NR function,
then activate or deactivate the function with »1« or
»2«.
Press twice: calls up the REVERSE function,
then select with »1« or »2«.
CD-COPY Press and briefly hold down to start recording from
CD to cassette.
RECORD Press and hold down to start recording.
Select the input source beforehand with »CD«,
»TUNER« or »AUX«.
i Switches the cassette display between the tape
counter and real time.
MEMORY Marks a position on the cassette.
CANCEL Sets the tape counter to »0000«.
TUNER
TAPE
8
CD
MEMORY
CANCEL
SOUND
CTRL
AUX
MODE
RECORD
CD-COPY
1
1
1
PTY
PAUSE
BASS
TREBLE
DISC
POWER
SOUND
14
PREPARATION AND CONNECTION
_______
Preparation
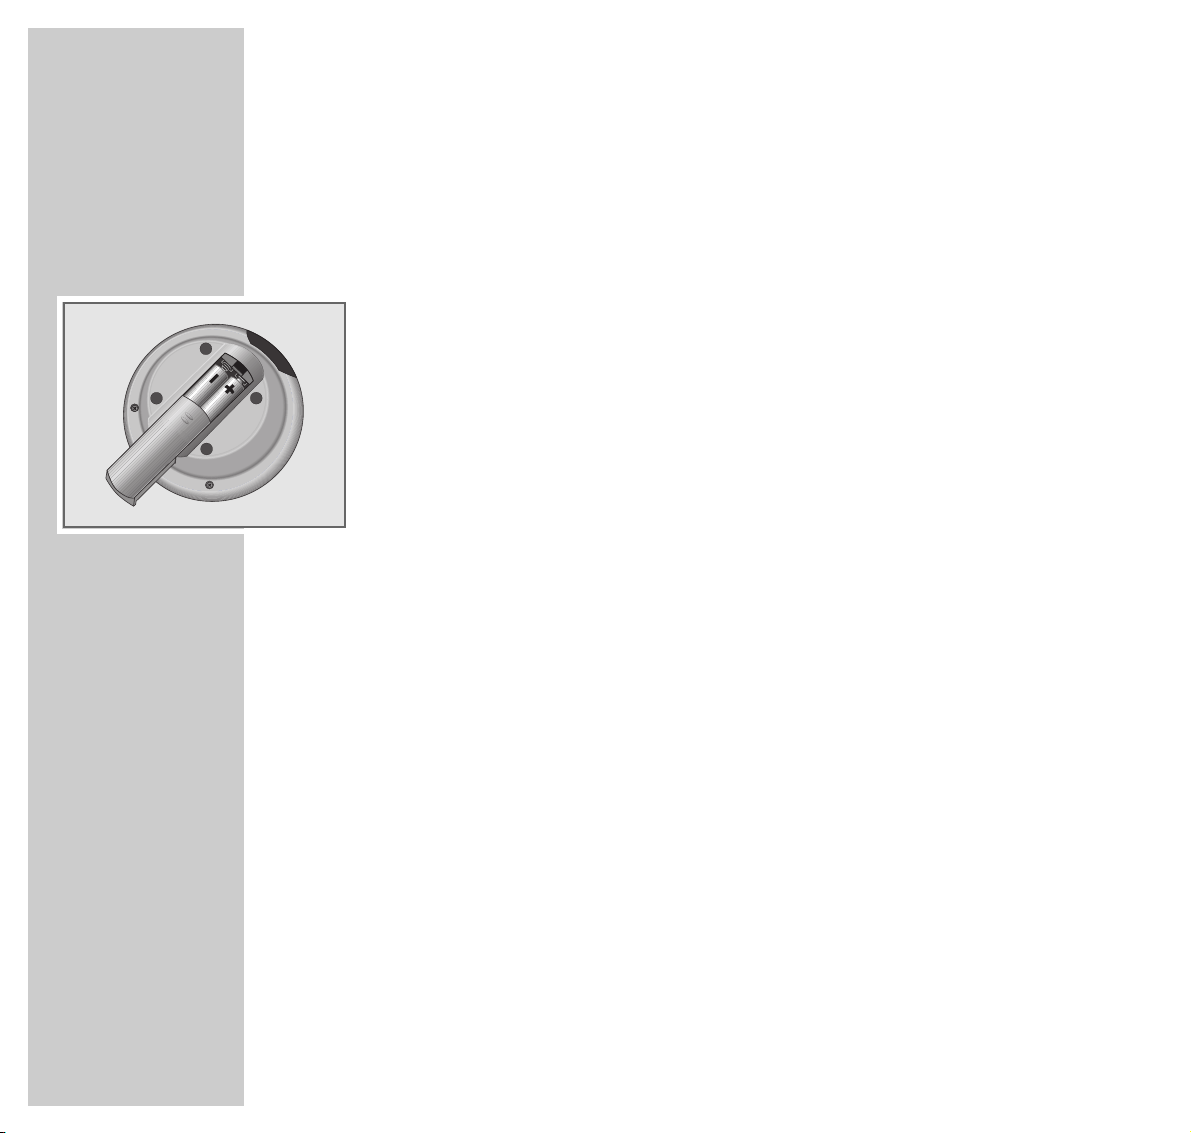
Inserting batteries in the remote control
1 Open the battery compartment by pushing back and removing the lid.
2 When inserting batteries (micro type LR 03, 2 x 1.5 V) make sure the
polarity is correct.
Note:
If the HiFi no longer reacts properly to remote control commands, the
batteries may be flat. Always remove flat batteries. No liability is accepted
for damage resulting from leaking batteries.
Environmental note
Batteries, including those which are heavy metal-free, may not be disposed
of with household waste. Please dispose of used batteries in and
environmentally sound way, for example at public collection points. Find out
about the legal regulations which apply in your area.

ENGLISH
15
PREPARATION AND CONNECTION
_______________________________________
Connecting the loudspeaker module
1 Connect the plug of the loudspeaker module with the plug of the HiFi.
Note:
The connecting cables need to be placed behind the loudspeaker module.
Please note that the top side of the loudspeaker module is marked
appropriately.
2 Insert the loudspeaker module into the recess in the HiFi until it engages.
Note:
To remove the loudspeaker module, push the two catches supplied into the
openings (see illustration), lift the loudspeaker module out of the HiFi and
disconnect the lead.
TOP SIDE
OBEN

16
PREPARATION AND CONNECTION
_______________________________________
Installing the speaker caps
1 Attach the speaker caps supplied to both sides of the loudspeaker module.
Attaching the wing panels to the the HiFi
The wing panels are only standard parts for the PA 6/II and PA 6/III.
They are also available as additional accessories for the PA 6/I at your
authorised dealer (order No. G 0I 01-52).
1 Attach the wing panels on the left and right sides of the system as shown in
the illustration.
Note:
If you do not wish to install the wing panels you can plug the openings with the
cover caps supplied.
DISC
OPEN/CLOSE
1
2
3
TAPE
OPEN/CLOSE
B NR
DISC SELECT
1
2
3
U

ENGLISH
17
PREPARATION AND CONNECTION
_______________________________________
Connecting the antenna
1 Plug the rooftop antenna connector into the »
FM 75« socket on the HiFi.
Note:
If you do not have a rooftop antenna, use the auxiliary wire aerial supplied.
This antenna provides a reasonably good reception for local stations.
Do not shorten the auxiliary antenna.
Connecting an external device
Note:
Switch off the HiFi before you connect external devices.
Make sure the left and right stereo channels are correctly connected:
R: right (red), L: left (white).
1 Use cinch cables to connect the audio output sockets of the external device
(television, DVD player, etc.) to the »R AUX IN L« sockets on the stereo
system.
2 Use cinch cables to connect the audio input sockets of the external device to
the »R AUX OUT L« sockets on the HiFi.
Connecting headphones
1 Insert the headphone plug (ø 6,3 mm) into the »0« jack on the HiFi.
– This switches off the HiFi loudspeakers.
TV R
IN OUT
FM 75Ω
AUX
CLASS 1
LASER PRODUCT
IN OUT
FM 75Ω
AUX
CLASS 1
LASER PRODUCT
DISC
OPEN/CLOSE
1
2
3
TAPE
OPEN/CLOSE
B NR
DISC SELECT
1
2
3
U

18
PREPARATION AND CONNECTION
_______________________________________
Connecting the mains cable
1 Plug the mains cable into the socket.
Selecting the HiFi antenna setting
This setting enables you to adapt the HiFi to the antenna used.
If you are using a cable connection from a public or private provider, select the
»CABLE« setting.
If you are using your own rooftop antenna or the auxiliary antenna supplied,
select »ANTENNA«.
1 Switch on the HiFi by pressing the »POWER « button on the HiFi.
2 Select the input source »TUNER« with the »TUNER« button.
3 Call up the antenna setting function by pressing »MODE« twice and select
the setting »CABLE« or »ANTENNA« with »1« or »2«.
– The setting is saved automatically.
CABLE
ANTENNA

ENGLISH
19
SETTINGS
____________________________________________________________________________
Tuning to radio stations
There are 59 preset positions for storing radio stations.
There are two ways to set the preset stations:
The first method is to initiate an automatic search.
The HiFi automatically stores all stations which can be received at your location.
The second method allows you to search for a station directly and then store it
manually with the preset number of your choice.
Option 1 (Page 20)
Automatic Search Programming.
With this option the HiFi system first looks for RDS stations, then for other
stations with strong signals and finally for weak signals.
The radio stations are automatically stored at the next free preset number.
Option 2 (Page 21)
Manual station search.
This option enables you to search for individual stations.

20
Automatic search programme (ASP)
Initiating the automatic search programme
Note:
The automatic search deletes all previously stored channels.
1 Switch on the HiFi by pressing the »POWER « button on the HiFi.
2 Select the input source »TUNER« with the »TUNER« button.
3 Start the automatic station search by pressing and holding down
»MEMORY«,until »A S « appears in the display.
– The automatic station search begins and searches for radio stations in the
following order: RDS stations, stations with strong signals without RDS and
stations with a weak signal.
– The radio stations are stored automatically.
– If RDS information is transmitted by a station, the HiFi will store the station
name.
Note:
If all the preset station numbers are occupied the message »MEM FULL«
briefly appears in the display.
Selecting preset radio stations
1 Select the preset station number by pressing »1« or »2«.
– The preset station number and the frequency appear in the display. If the
current station transmits RDS information you will also see the name of the
station.
Note:
You cannot select a preset number that has not yet been assigned to a
station.
However, you can delete station assignments which are no longer needed.
For more information on this, see Page 22.
SETTINGS
____________________________________________________________________________________
AS 87.50
MEM FULL
I FM 97.90
I BAYERN 3
I BAYERN 3

SETTINGS
____________________________________________________________________________________
ENGLISH
21
Tuning to a radio station using the manual station
search
1 Switch on the HiFi by pressing the »POWER« button on the HiFi.
2 Select the input source »TUNER« with the »TUNER« button.
3 Begin the station search by pressing and holding down »
8
« or »9«.
– The search stops as soon as a radio station with a sufficiently
strong signal is found.
– »%« appears in the display. The HiFi checks whether the station is
already assigned to one of the preset station numbers and displays the
name and frequency of the station.
If the radio station is not already stored in the memory, store it now – see
Step 4.
Note:
If the search did not locate the radio station you wanted, press »8« or
»9« to resume the search.
By briefly pressing »8« or »9« the frequency is changed step-by-step
(by 25 kHz each time the button is pressed).
4 Select »MEMORY« to store the station.
– The radio station is assigned the next free preset number.
Note:
If all the preset station numbers are occupied, the message »MEM FULL«
briefly appears in the display.
To search for and store other radio stations, repeat steps 3 and 4.
Each time you start the station search, the HiFi switches to FM stereo.
The MONO/STEREO setting is stored for every channel position.
MEM FULL
FM 106.45
39 FM 106.45

22
SETTINGS
____________________________________________________________________________________
Sorting and deleting preset stations
Deleting preset stations
You can delete individual stations or, for example after moving house, all of
them at once.
1 Switch on the HiFi by pressing the »POWER « button on the HiFi.
2 Select the input source »TUNER« with the »TUNER« button.
3 Select the number of the station to be deleted using »1« or »2«.
– The display shows the name of the station or the frequency.
4 Delete station by briefly pressing »CANCEL«.
– The preset station number disappears from the display.
or
Delete all preset stations by pressing »CANCEL« for five seconds.
– »ERASE ALL ?« appears briefly in the display.
Keep »CANCEL« pressed for five more seconds until »ERASE ALL ?«
disappears.
– All preset stations are deleted.
Sorting preset stations
You can move stored radio stations to other channel positions in the memory. In
the following example, we will move the Bayern 3 station from preset number 5
to preset number 1.
1 Switch on the HiFi by pressing the »POWER « button on the HiFi.
2 Select the input source »TUNER« by pressing the »TUNER« button.
ERASE ALL ?

ENGLISH
23
SETTINGS
____________________________________________________________________________________
3 Select the number of the station to be deleted (in this case 1) with »1« or
»2« and press »CANCEL« to delete it.
4 Select the station that is to be moved (Bayern 3) with »1« or »2« and press
»MEMORY«.
– The station is now stored at positions 1 and 5.
5 Select the old preset number (5) by pressing »1« or »2« and delete the
station with »CANCEL«.
Note:
To sort other stations repeat steps 3 to 5.
Manually entering and deleting names for radio
stations
You can enter your own names for radio stations whose names are not automatically
displayed. Eight spaces are available for this.
1 Switch on the HiFi by pressing the »POWER« button on the HiFi.
2 Select the input source »TUNER« by pressing the »TUNER« button.
3 Select the preset station for which you want to enter a name by pressing
»1« or »2«.
– The display shows the preset station number and the frequency of the radio
station.
4 To enter the name, press »i« until a cursor »–« flashes in the display.
5 Select digits, letters or characters with »1« or »2«.
15 FM 94.10
TUNER
15 __
15 P

24
SETTINGS
____________________________________________________________________________________
6 Move on to the next space with »+« and continue your entry.
You can move the cursor back one space by pressing »–«.
7 Press »MEMORY« to store the setting.
Note:
To enter additional names repeat steps 3 to 7.
If you want to delete the name, press »CANCEL« after Step 4. The name is
deleted and the cursor returns to the first space.
Adjusting the brightness of the display
The brightness of the display can be either reduced or switched off entirely.
1
Activate the setting by pressing
»MODE« three times.
– The display reads: »INTENSITY«.
2 Select the brightness with »1« or »2«.
– normal brightness
– reduced brightness
– switch off display
Note:
After switching the HiFi on or off, the display appears at normal brightness.
15 POP 1
15 __
INTENSITY
15 P__

ENGLISH
25
GENERAL FUNCTIONS
_________________________________________
Basic functions
Switching on/off
1
Switch on the system at the HiFi by pressing
»POWER«.
– The green indicator in the »POWER« button and the green light on the
front of the HiFi are lit.
– When you first switch on the HiFi system it is muted for approximately
three seconds. The display reads: »
WELCOME TO GRUNDIG SPACE
FIDELITY
«.
– The input source which was selected before the HiFi was switched off is auto-
matically activated.
Note:
If the HiFi system had been in Stand-by mode before it was turned off using
the »POWER« button, it automatically returns to Stand-by if you then press
the »POWER« button again.
2 Press »POWER« to switch off the HiFi
.
Switching the HiFi to Stand-by
1 The HiFi can be switched to Stand-by with »
88
«.
2 To turn the system on from the Stand-by mode, select the desired programme
source with »CD«, »TUNER«, »TAPE« or »AUX«.
Selecting the input source
1
Select the desired input source
with the »CD«, »TUNER«, »TAPE« or
»AUX« button on the remote control
.
or
Select the desired programme source by pressing »SOURCE« at the
HiFi system.
– The display reads: »CD«or »
TUNER
«or »
TAPE
«or »
AUX
«.
WELCOME TO GRUN
CD
TUNER
TAPE
AUX

26
GENERAL FUNCTIONS
_____________________________________________________________
Adjusting the volume
1
Adjust the volume with either the
remote control »+« or »– « on the HiFi.
– The display reads: »
VOLUME
« from »0« to »63«.
Adjusting the bass and treble
1
Activate the setting with
»BASS« or »TREBLE«
.
2
Adjust the setting with
»1« or »2«.
– The display reads: »
TREBLE
«or »
BASS
«from »
- I 4
« to »
+ I 4
«.
Note:
The s
ettings
are not stored.
Setting the sound type
This HiFi system offers various sound types.
Four of them are permanently stored (»
FLAT
«, »
JAZZ
«, »
DISCO
«, »
VOCAL
«) and
you can set three more according to your own preferences.
1 To enter the desired
sound type, press
»BASS« or »TREBLE« and
set it with
»1« or »2«.
– The display reads: »
TREBLE
«or »
BASS
«from »
- I 4
« to »
+ I 4
«.
2
Press
»MEMORY«
to store the setting
.
– The display reads: »
USER 1
«.
3 For
setting
»
USER 2
«and »
USER 3
«repeat Steps 1 and 2.
Note:
Sound types »
USERI
«, »
USER2
«, »
USER3
«can be deleted.
In order to do this, select them with »SOUND CTRL« and delete them with
»CANCEL«.
BASS + 4
TREBLE + I4
TREBLE + I4
USER 1
VOLUME 16

ENGLISH
27
GENERAL FUNCTIONS
_____________________________________________________________
Selecting sound types
1 Select the desired sound type
by using the
»SOUND CTRL« button.
– The display reads: »
FLAT
«, »
JAZZ
«, »
DISCO
«, »
VOCAL
«, »
USER I
«, »
USER2
«
or »
USER3
«.
Selecting the Power Sound
1 Press »POWER SOUND«.
– The display reads: »
POWER SOUND
«.
Muting the HiFi system
1 Mute the HiFi by pressing »s« on the remote control,
or
Press »SOURCE« on the HiFi until the display shows »
MUTE
«.
– The display shows: »S«.
2 Deactivate muting with »s«.
Note:
Recordings from the cassette deck are not affected, as you are only switching
off the loudspeakers.
POWER SOUND
MUTE
FLAT

28
TUNER MODE
________________________________________________________________
Basic Tuner mode functions
Selecting the Tuner as the source
1 Select the input source by pressing »TUNER« on the remote control,
or
press »SOURCE« on the HiFi repeatedly until »TUNER« is shown in the
display.
– The display reads: »
TUNER
«, then the name of the station and the
frequency of the most recently selected preset station.
Selecting the preset station number
1 Select the station by pressing »1« or »2«.
Note:
You cannot select a preset number that has not been assigned to a radio
station.
Stereo/Mono reception
Radio programmes transmitted in FM stereo are indicated in the display by »!«.
However, if the signal from the FM stereo station is weak, you can improve the
sound quality by switching to mono reception.
1 Activate the setting by pressing »MODE« once.
– The display reads: »
FM - STEREO
«.
2 Select FM mono with »1« or »2«.
– The display reads: »
FM - MONO
«.‚
TUNER
I BAYERN 3
FM - STEREO
FM - MONO
I BAYERN 3
3 ANTENNE
2 BAYERN 5

ENGLISH
29
TUNER MODE
_____________________________________________________________________________
RDS reception
Changing the HiFi system display
1 To switch the display press »i« repeatedly.
– The display will show, in the following order: the RDS time, Radiotext, the
frequency and the name of the station.
RDS programme service
RDS stations in the VHF (FM) frequency band also transmit their station names.
RDS time
Some RDS stations transmit RDS time information.
1 To call up the RDS time information, keep pressing »i« until the RDS time is
displayed.
Note:
The time display is updated every minute. The accuracy depends on the
information transmitted by the station itself. You must be tuned to the RDS
station for several minutes before the time information can be transmitted.
If no time information is transmitted, Radiotext will appear.
Radiotext
Some RDS stations transmit information known as Radiotext. This is additional
information about the station and its programmes. Radiotext appears as a ticker
in the display. As this information is transmitted character by character, it may
take some time before the text is received in full.
1 To call up Radiotext, keep pressing »i« until the information is displayed.
Note:
If reception is poor there may be gaps in the Radiotext message.
15 : 00
I BAYERN 3
MUSIK NEWS UND

30
TUNER MODE
_____________________________________________________________________________
PTY programme type code
RDS provides the option of selecting FM stations according to programme type.
A total of 29 programme types are defined.
1 Call up the programme type with »PTY«.
2 Select the desired programme type with »1« or »2«.
– The following programme types are available:
– The HiFi searches for a preset station transmitting the type of programme
that you select.
Note:
If no station with the selected programme type was found, »NONE« will
briefly appear in the display and you will hear the most recently selected
station.
NONE
12 Nachrich
NACHRICH News
AKTUELL Politics and current affairs
SERVICE Specialist speech programmes
SPORT Sport
BILDUNG Education
HOER+LIT Radio plays and literature
KULTUR Culture, religion and society
WISSEN Science
UNTERH Entertainment
POP Pop music
ROCK Rock music
U-MUSIK Light music
L-MUSIK Light classical music
E-MUSIK Serious classical music
-- MUSIK Miscellaneous music
WETTER Weather reports
WIRTSCH Finance and economics
coverage
KINDER Children’s programmes
SOZIALES Social issues
RELIGION Religion
ANRUF Phone-ins
REISE Travel
FREIZEIT Leisure
JAZZ Jazz
COUNTRY Country music
LANDES M National music
OLDIES Oldies
FOLKLORE Folk music
FEATURE Documentaries

ENGLISH
31
TUNER MODE
_____________________________________________________________________________
Selecting the language for programme information
You can choose between German and English as the language for the display of
the programme types.
1 Switch off the HiFi by pressing the »POWER« button.
2 Press and hold »PTY« and press the »POWER« button on the HiFi.
– The display shows the selected language.
3 Select the language with »1« or »2« and store by pressing »MEMORY«.
– The display shows the selected language.
ENGLISH
DEUTSCH

32
CD MODE
___________________________________________________________________________
Basic CD mode functions
General information about CDs
Always hold CDs by the edge in order to avoid damaging them.
Replace CDs in their jewel cases after use.
Do not attach adhesive labels to CDs.
Keep the surfaces of CDs clean.
To clean CDs use a lint-free cloth and wipe them in a straight line from the centre
of the disc outwards. Do not use cleaning fluid for vinyl records or other solvents
or scouring agents.
Selecting the CD player as the source
1 Select the input source by pressing »CD« on the remote control,
or
press »SOURCE« on the top side of the HiFi until »CD« is shown in the
display.
– The display shows »CD«, then »&«followed by information on the CD.
– If there is no CD in the CD compartment, »NO DISC DI« appears in the
display.
Inserting a CD
Normal 12 cm CDs as well as 8 cm CDs can be played back. An adapter is
not necessary.
Do not put more than one CD in the compartment.
1 Open the CD compartment (1 to 3) by pressing the corresponding
»DISC OPEN/CLOSE« button on the HiFi.
– The CD compartment opens and the display reads: »OPEN«.
14 40: 45 D I
NO DISC D I
OPEN
12 cm
8 cm

ENGLISH
33
CD MODE
____________________________________________________________________________________
2 Place the CD in the compartment with the label facing upwards.
3 Press »DISC OPEN/CLOSE« on the HiFi to close the CD compartment.
– The CD compartment closes, the display shows: »CLOSing«.
– The HiFi reads the contents of the CD and the message: »READING D I «
appears in the display.
– CDs with CD Text will show the name of the album, while CDs without CD
Text will display the number of tracks, the total playing time and the
selected CD compartment.
Note:
You can also close the CD compartment by pressing »4 PAUSE«.
Playback begins automatically.
The yellow indicators in the »DISC SELECT« buttons on the HiFi
indicate: dimly lit, a CD has been inserted; brightly lit, the compartment was
selected.
CD playback
1 Select the desired CD compartment (1 to 3) by pressing »DISC« on the
remote control
or
select the desired CD compartment (1 to 3) by pressing »DISC SELECT 1«,
»DISC SELECT 2« or »DISC SELECT 3« on the HiFi.
2 Press »4 PAUSE« to start playback.
– Playback begins with the first track and the display shows the current track
number and the expired playback time of the track, or for CDs with CD
Text the name of the track.
– Playback stops automatically at the end of the CD.
Note:
If all CD compartments are occupied, the system will select the next CD and
will continue playback.
3 To pause playback, press »4 PAUSE«.
To resume playback, press »4 PAUSE« again.
4 To end playback, press »5«.
closing
reading d 1
1 00: 00 D I

34
CD MODE
____________________________________________________________________________________
Selecting a particular track
1 Keep pressing »1« or »2« until you see the number or name of the required
track in the display.
– Playback of the selected track starts automatically.
Repeating the current track
1 Press »1« during playback.
– The track is played back from the beginning.
Searching for a passage
1 During playback, press »
9
« or »8« until the desired passage has been
found.
Playback begins as soon as you let go of the »9« or »8« button.
Note:
During the search the volume is reduced.
6 00: 00 D I
5 00: 00 D I
5 0 1:35 D I

ENGLISH
35
CD MODE
____________________________________________________________________________________
Special CD mode features
Playing back tracks in random order (Shuffle function)
This function allows the tracks to be played back in random order.
1 Select the function by pressing »MODE« once. The message »SHUFFLE
OFF« is displayed.
2 Select the »SHUFFLE ON« function with »1« or »
2
«.
– Playback begins and the tracks on all inserted CDs or music programmes
are played in random order.
3 To terminate this function, press »5«,
or
open the CD compartment by pressing »DISC OPEN/CLOSE« on the HiFi.
Repeating a CD or track memory
1 Select this function by pressing »MODE« twice. The display shows the
message »REPEAT ON« or »REPEAT OFF«.
2 Select the »REPEAT ON« function with »1« or »
2
«.
– The track memory or all tracks of the CDs contained in the CD
compartments are played back repeatedly. The following symbol appears
in the display: »
J
«.
3 To terminate the function, repeat the setting procedure and select the
»REPEAT OFF« option in the display.
repeat ON
repeat OFF
shuffle ON
shuffle OFF

36
CD MODE
____________________________________________________________________________________
Playing back tracks in a selected order – creating a
track memory
This function allows you to store and play back up to 50 tracks of the three CDs
in any chosen order.
Note:
The track memory is deleted if the CD compartment is opened.
Selecting and storing tracks
1
Switch on the system by pressing the »POWER« button on the HiFi.
2 Place a CD in the CD compartment.
3 Select the function by pressing »MEMORY«.
4 Select the desired track using »1« or »2« and then select »MEMORY«
to store it.
– The display shows: »2« the number of stored tracks, »5 P« the selected
track, »D 1« the CD compartment.
Note:
To store more tracks, repeat steps 3 and 4.
If the tracks are to be selected from various CDs, select the respective CD
with »DISC«.
»MEM FULL« appears in the display after the 50th track.
5 Press »i« to conclude the setting.
0 1 D I
1 3 D I
2 5 p D I
MEM FULL

ENGLISH
37
Checking the track selection
1
To check the stored tracks, press »MEMORY« for 2 seconds.
2 Select the track with »1« or »2«.
Playing back the track memory
1 To start the playback of the track memory press »4 PAUSE«.
– Playback begins with the first track.
Deleting tracks from the memory
1 Select the track memory by pressing »MEMORY« and briefly holding it
down.
2 Select the title that is to be deleted with »1« or »2« and delete it with
»CANCEL«.
Deleting the track memory
1
Select the track memory by pressing »MEMORY« and briefly holding it down.
– The saved track numbers appear in the display.
2 To delete the music programme press and hold down »CANCEL«.
– Display: »PRG ERASED«,
or
open the CD compartment.
CD MODE
____________________________________________________________________________________
3 00:00 p
1 4 p D I
prg erased

38
Entering or deleting CD names
Entering names for CDs
You can enter up to 100 CD names. The names can be up to 11 characters long.
The name will then appear each time the CD is placed in the CD compartment
or selected.
1 Switch on the HiFi by pressing the »POWER« button on the HiFi.
2 Select »CD« as the input source with the »CD« button.
3 Place the CD in the CD compartment.
4 To enter a name, press and hold »i« for a moment.
– The display reads: »NO NAME« briefly, then a cursor »_« appears.
5 Select digits, letters or characters with »1« or »2«.
6 Move on to the next space with »+« and continue your entry.
With »–« you can move the cursor back by one space.
7 Press »MEMORY« to store the setting.
Note:
To enter additional names, repeat steps 3 to 7.
Deleting the name of a CD
1 Place the CD in the CD compartment.
2 To delete the name, keep »i« pressed for a moment.
– The display shows the name of the CD and the cursor »_« flashes.
3 Delete the name by pressing »CANCEL«.
CD MODE
____________________________________________________________________________________
__
A
A __
Abba live
Abba live __

ENGLISH
39
Deleting the names of all CDs
1 To delete the names of all CDs, keep »i« pressed for a moment.
– The display shows the name of the CD.
2 Press »CANCEL« until »ERASE ALL ?« appears in the menu.
By letting go of the »CANCEL « button, the names will not be deleted. Keep
»CANCEL« pressed, until »ERASE ALL ?« disappears from the menu.
– The names of all CDs are deleted.
CD MODE
____________________________________________________________________________________
Abba live
erase all ?

40
CASSETTE MODE
_________________________________________________________
General information about cassette mode
Protect your cassettes from humidity, dust, heat and cold.
Do not store your cassettes near devices with strong magnetic fields such as
television sets or stereo speakers.
After using a cassette, put it back in its protective case.
Keep tape-guiding parts such as pich roller, capstan, magnetic heads and erase
heads free of dirt and dust to maintain a good recording and playback quality.
Clean these parts occasionally using special cleaning cassettes.
Selecting the Cassette input source
1 Select the input source by pressing »TAPE« on the remote control,
or
press »SOURCE« on the top of the HiFi until »TAPE« is shown in the display.
– If there is no cassette in the cassette compartment, the display will show the
message »NO CASS«.
Inserting a cassette
Note:
We suggest that you use only ferric oxide (I/Fe), chrome (II/Cr) or metal
(IV/ME) cassettes. The HiFi will automatically adapt to the type of cassette used.
For recording we suggest the use of ferric oxide (I/Fe) or chrome (II/Cr)
cassettes.
1 Open the cassette compartment by pressing »TAPE OPEN/CLOSE« on the
top of the HiFi.
– The CD compartment opens and the display reads: »OPEN«.
NO CASS
OPEN
TAPE

ENGLISH
41
CASSETTE MODE
________________________________________________________________________
2 Insert the cassette into the compartment with the open side facing the back.
Note:
If you insert a cassette into the cassette compartment with side A facing
upwards, »4 PAUSE« will begin the playback/recording on side A,
»
z t
« will begin the recording on side B.
3 Close the cassette compartment by pressing »TAPE OPEN/CLOSE« on the
HiFi.
– The cassette compartment closes and the display reads: »CLOSE«.
Noise reduction system (Dolby NR)
For optimum playback quality, always play back the cassettes the way they were
recorded, meaning either with or without DOLBY B NR.
The advantage of recording with DOLBY NR is the improved noise voltage ratio.
Dolby Noise Reduction was manufactured under license from Dolby
Laboratories Licensing Corporation. DOLBY and the Double-D symbol g are
registered trademarks of the Dolby Laboratories Licensing Corporation.
NR stands for noise reduction.
1 Select this function by pressing »MODE« once. The display will show the
message »DOLBY ON« or »DOLBY OFF«.
2 Select the function »DOLBY ON« with »1« or »
2
«.
– The message »g B NR« is shown in the display under the cassette
compartment as long as the Dolby system is activated.
Note:
To deactivate the Dolby system, repeat the setting procedure and select
»DOLBY OFF«.
CLOSE
DOLBY ON
DOLBY OFF
A

42
CASSETTE MODE
________________________________________________________________________
Playback
Selecting the playback mode
1 Select this function by pressing »MODE« twice. The display will show the
message »CONT PLAY«, »AUTOREVERSE« or »REVERSE OFF«.
2 Select function with »1« or »
2
«.
– »CONT. PLAY« – playback of both sides of the cassette is repeated
indefinitely. The display shows the symbol: »
J
«.
– »AUTOREVERSE« – playback stops at the end of the second side of the
cassette. The display shows the symbol: »
H
«.
– »REVERSE OFF« – playback stops at the end of one side of the cassette.
The display shows the symbol: »G«.
Playback
1 Press »4 PAUSE« to start playback.
Note:
The running direction of the cassette can be changed by pressing »
z t
«.
2 To pause playback, press »4 PAUSE«.
To resume playback, press »4 PAUSE« again.
3 To end playback, press »5«.
– When you start playback again the cassette will run in the direction last
chosen.
Fast forward/rewinding the cassette
1 From the STOP position, press »
9
« or »8«.
– The display shows »W« or »Q«.
autoreverse
reverse OFF
cont. play
0000

ENGLISH
43
CASSETTE MODE
________________________________________________________________________
Track search
This function allows you to search for individual tracks on the cassette. Up to 15
tracks can be skipped in either direction.
1 Press »
9
« or »8« repeatedly during playback.
– The display shows »W« or »Q«.
– The system will wind the tape to the beginning of each track. Playback
begins at that point.
Note:
At least four seconds of pause must be recorded in between titles, so that the
track search function can detect individual tracks.
Very quiet passages in songs or live recordings may be identified as pauses
by the track search.
Switching the tape counter to real time
1 To switch between the two, press »i«.
– The display shows the four-digit tape counter or real time in minutes and
seconds.
Note:
The real time measurement first needs to adjust to the thickness of the tape
material used.
Once playback is started, the colon between the minutes and seconds
display (--:--) will flash for a short while.
The thickness of the tape and other values are calculated during this time.
Once this process is completed, the real time is also shown during fast
forward and rewind.
Resetting the counter
1 Press »CANCEL «.
– The display reads: »0000«. The counter is reset.
0 I50
00 : 25
0000

44
CASSETTE MODE
________________________________________________________________________
Storing a position on the cassette
1 To mark a position on the cassette, press »MEMORY« during playback at
the desired point of the tape.
– The display shows: »X«.
2 Press »
8
« after playback is stopped. The tape is wound to the marked spot
and stops there.
3 Exit the function by pressing »MEMORY«.
Recording
Erase protection
Every new recording overwrites the existing recording on the tape.
You can protect your own cassettes against accidental erasure by breaking the
safety tabs on the top of the cassette.
If you want to record on to a protected cassette, cover the opening with adhesive
tape.
Selecting the recording mode
1 Select this function by pressing »MODE« twice. The display will show the
message »CONT PLAY«, »AUTOREVERSE« or »REVERSE OFF«.
2 Select the function by pressing »1« or »
2
«.
– »AUTOREVERSE« – recording stops at the end of the second side of the
cassette. The display shows: »
H
«.
– »REVERSE OFF« – recording stops at the end of the current side of the
cassette. The display shows: »G«.
Note:
If you have selected the »CONT PLAY« function, this will be automatically
switched to »AUTOREVERSE«.
autoreverse
reverse OFF
1

ENGLISH
45
CASSETTE MODE
________________________________________________________________________
Recording
Activate Dolby Noise Reduction if required.
The setting procedure is described in the ”Noise reduction system (Dolby NR)”
section on Page 41.
1 Insert a cassette with the protection tabs intact into the cassette compartment,
select the running direction of the cassette with »
z t
« and search for the
desired position on the cassette with either »9« or »8«.
2 Select the input source from which you want to record by pressing »CD«,
»TUNER« or »AUX«.
3 Start recording by keeping »RECORD« pressed for a short moment.
– The display shows: »)«, and recording begins.
Note:
If you are using a cassette on which the protection tabs are removed,
recording is not possible and the display shows the message »CASS«. The
cassette compartment opens.
4 To stop recording, press »
5
«.
1050
tuner
105 1
CASS

46
Recording a CD on to cassette (CD COPY)
You can start the recording process from CD on to cassette by pressing only
one button.
Individual tracks of a CD or music programme can be distributed on
both sides of the cassette in this manner, so that long, empty passages at the end
of a cassette are avoided.
1 Insert the cassette into the cassette compartment and put a CD into the CD
compartment.
2 Wind the cassette to the desired point.
3 Select the desired track on the CD.
4 Start the recording by pressing the »CD-COPY« button and briefly holding
it down.
– Recording starts. The CD player will begin playback after about four
seconds.
Note:
If you begin recording at the start of the cassette, the HiFi will play the leadin tape for about six seconds. Playback of the CD is then automatically
started.
During recording, the only buttons that can be used are »5«, »DISC
OPEN/CLOSE« or »TAPE OPEN/CLOSE«. All other functions are
blocked.
If playback of the CD is stopped, recording stops as well.
If one side of the cassette is full, CD playback is set to pause.
If the Reverse function is selected, recording is automatically continued on the
second side of the cassette.
CASSETTE MODE
________________________________________________________________________

ENGLISH
47
INFORMATION
_____________________________________________________________
Technical data
This device is noise-suppressed according to the applicable EC directives.
This product fulfills the European directives 89/336/EEC, 73/23/EEC and 93/68/EEC.
This device conforms to the safety regulation DIN EN 60065 (VDE 0860) and therefore the international safety
regulation IEC 60065.
The type plate with details on the mains supply is located on the back of the device.
Amplifier unit
Output (DIN45500)
Sine wave power 200 W
Music signal power 360 W
Non-linear distortion factor
Sine wave power -1dB,
1 kHz ≤ 0.01 %
Noise voltage ratio
≥ 100 dB
Output range
10 Hz ... 80 kHz
Transmission range
AUX 5 Hz ... 100 kHz
Input sensitivity/
impedance
180 mV/47 kΩ
Receiver unit
Sensitivity
Mono (S/N = 26 dB) 1.5 µV
Stereo (S/N = 46 dB) 31 µV
Distortion
Mono (1 kHz, 40/75 kHz dev.)
0.2/0.4%
Stereo (1 kHz, 40/75 kHz dev.)
0.4/0.7%
Frequency range (-3 dB)
10 Hz ... 15 kHz
Stereo Crosstalk (1 kHz)
40 dB
Dynamic tuning precision
(mono, stereo, ± 300 kHz) –
??/??dB
Noise voltage ratio
Mono 40 kHz dev., DIN A 72 dB
Stereo 40 kHz dev., DIN A 68 dB
Reception range
FM (25 kHz) 87.5 ...108.0 MHz
CD unit
Number of CDs
3
Frequency response (± 0.5 dB)
20 Hz ... 20 kHz
Non-linear distortion factor
(0 dB, 1 kHz)
0.01%
Intermodulation
DIN A 60 Hz/7 kHz, 4:1), 0.02%
Noise voltage ratio
≥ 104 dB
Cassette unit
Frequency range
40 Hz ... 16 kHz
Noise voltage ratio
(IEC wtd., Cr)
Dolby B 64 dB
Dolby off 56 dB
Band speed fluctuation
(IEC wtd.)
0.13 %
Stereo crosstalk (1 kHz)
40 dB
Input voltage/
Input resistance
500 mV/270 kOhm
Output voltage/
Output resistance
100 mV/270 kOhm
System
Voltage supply:
Operating voltage 230 V~
Frequency 50/60 Hz
Max. power consumption < 400 W
Power consumption in Stand-by
< 2 W
Dimensions and weight
B x H x T 65 x 121 x 46,5 cm
Weight of device 5,6 kg
Wing panels 0,8 kg

48
INFORMATION
__________________________________________________________________________
Rectifying minor problems
Not every kind of sound interference is caused by a defect in your HiFi system. Impairment
can also be caused by leads having been accidentally pulled out, damaged CDs and worn
out batteries in the remote control. If the following measures do not bring about
satisfactory results, consult an authorised dealer.
GENERAL PROBLEMS
Problem
The HiFi switches itself off.
The HiFi does not function.
No output signal.
The left and right channels are inverted.
Bass sound missing.
The remote control is not functioning.
RADIO RECEPTION
Problem
No output signal.
Loud noise interference.
The reception signal is weak.
Possible cause/remedy
The transformer could be overheated. Switch of the HiFi
and remove all objects that could possibly cover the air
vents on the rear side of the HiFi and let it cool down for
approximately 15 minutes before you switch it on again.
Problems due to electrostatic discharge. Switch the HiFi
off and on again using the POWER button or pull out
the mains plug and then plug it in again.
Increase the volume (+). Disconnect the headphones.
Check the connection to the loudspeaker module. Make
sure the MUTING function is not activated.
Check the connection to the loudspeaker module.
Check the connection to the loudspeaker module.
Change batteries.
Wrong angle or distance to the device too great.
Possible Cause/Remedy
The MUTING function is activated due to poor stereo
reception. Select FM MONO or correct the frequency
manually.
Adjust the antenna.
Connect an external antenna for better reception.

ENGLISH
49
RECTIFYING MINOR PROBLEMS
____________________________________________
General instructions for laser devices
You will find a similar sign to the one shown here on the bottom of the unit.
CLASS 1 LASER PRODUCT means that the laser is designed in such a way as to
ensure that the maximum permissible emission value cannot be exceeded under
any circumstances.
Caution:
If operation devices or methods other than those specified here are
employed, it may lead to dangerous exposure to emissions.
CLASS 1
LASER PRODUCT
CD MODE
PROBLEM
The CD compartment does not close.
Playback is not functioning.
”NO DISC” appears in the display.
Playback does not begin with the first
track.
The system does not function.
Possible cause/remedy
CD not inserted correctly.
The CD is dirty, scratched or upside down. A sudden
temperature change has caused condensation on the
laser lens system.
This will dry off by itself after a short time.
No CD has been inserted, the CD is dirty, scratched or
warped. Try another disc.
PROGRAMME or SHUFFLE mode is activated. Press
5 and then 4 PAUSE.
Press
5, then CANCEL and then 4 PAUSE.

50
INFORMATION
__________________________________________________________________________
GRUNDIG customer service locations
GRUNDIG
Kundendienst Nord
Kolumbusstraße 14
D-22113 Hamburg
+49/40-7 33 31-0
GRUNDIG BELUX N.V.
Deltapark, Weihoek 3, Unit 3G
B-1930 Zaventem
+32/2-7 16 04 00
GRUNDIG UK LTD.
Elstree Way, Borehamwood,
Herts, WD6 1RX
GB Großbritannien/Great
Britain
+44/1 81-3 24 94 00
Technical Service
Unit 35, Woodside Park, Wood
Street
Rugby, Warwickshire, CV21
2NP
Großbritannien/Great Britain
+44/1 78-8 57 00 88
GRUNDIG
Kundendienst West
Horbeller Straße 19
D-50858 Köln
+49/22 34-95 81-2 51
GRUNDIG IRELAND LTD.
2 Waverley Office Park, Old
Naas Road
EIR Dublin 12
+3 53/1-4 50 97 17
GRUNDIG FRANCE S.A.
5 Boulevard Marcel Pourtout
F-92563 Rueil Malmaison
Cedex
+33/1-41 39 26 26
GRUNDIG SCHWEIZ AG
Steinacker Straße 28
CH-8302 Kloten
+41/1-8 15 81 11
GRUNDIG
Kundendienst Mitte
Dudenstraße 45-53
D-68167 Mannheim
+49/6 21-33-76-70
GRUNDIG PORTUGUESA
Comércio de Artigos
Electrónicos, Lda.
Rua Bento de Jesus Caraça 17
P-1495 Cruz Quebrada,
Lisboa
+3 51/1-4 19 75 70
GRUNDIG ESPAÑA S.A.
Solsonés, 2 planta baja B3
Edificio Muntadas (Mas Blau)
E-08820 El Prat De
Llobregat (Barcelona)
+34/93-4 79 92 00
GRUNDIG NORGE A.S.
Glynitveien 25, Postboks 234
N-1401 Ski
+47/64 87 82 00
GRUNDIG
Kundendienst Süd
Beuthener Straße 65
D-90471 Nürnberg
+49/9 11-7 03-0
GRUNDIG DANMARK A/S
Lejrvej 19
DK-3500 Værløse
+45/44 48 68 22
GRUNDIG OY
Luoteisrinne 5
SF-02271 Espoo
+3 58/9-8 04 39 00
GRUNDIG SVENSKA AB
Albygatan 109 d, Box 4050
S-17104 Solna
+46/8-6 29 85 30
GRUNDIG POLSKA SP.Z.O.O.
Ul. Czéstochowska 140
PL-62800 Kalisz
+48/62-7 66 77 70
GRUNDIG
Kundendienst Ost
Wittestraße 30e
D-13509 Berlin
+49/30-4 38 03-21
GRUNDIG AUSTRIA Ges.m.b.H.
Breitenfurter Straße 43-45
A-1120 Wien
+43/1-81 11 70
GRUNDIG NEDERLAND B.V.
Gebouw Amstelveste
Joan Muyskenweg 22
NL-1096 CJ Amsterdam
+31/20-5 68 15 68
GRUNDIG ITALIANA S.P.A.
Via G.B. Trener, 8
I-38100 Trento
+39/4 61-89 31 11
Grundig AG • Kurgartenstraße 37 • D-90762 Fürth • http://www.grundig.com
 Loading...