

Page 1
HAIR CLIPPER
MC 3320
DEFREN
HR
TRPLES
Page 2

Page 3
_________________________________________________________
A
B
E
D
C
F
3
Page 4
_________________________________________________________
DEUTSCH 05-15
ENGLISH 16-24
TÜRKÇE 25-33
ESPAÑOL 34-42
FRANÇAIS 43-52
HRVATSKI 53-61
POLSKI 62-71
4
Page 5

SICHERHEIT UND AUFSTELLEN
_______________
Lesen Sie diese Bedienungsanleitung sorgfältig, bevor Sie dieses Gerät benutzen! Befolgen
Sie alle Sicherheitshinweise, um Schäden
wegen falscher Benutzung zu vermeiden!
Bewahren Sie die Bedienungsanleitung zum
späteren Nachschlagen auf. Sollte das Gerät
an Dritte weitergegeben werden, muss diese
Bedienungsanleitung ebenfalls mit ausgehändigt werden.
▪ Dieses Gerät ist nur für den privaten
Gebrauch bestimmt.
▪ Um Schäden und Gefahren durch nicht
sachgemäßen Gebrauch zu vermeiden,
bitte die Bedienungsanleitung beachten
und sicher aufbewahren.
▪ Das Gerät nie im Badezimmer, unter der
Dusche oder über einem mit Wasser gefüllten Waschbecken benutzen oder aufladen;
nicht mit feuchten Händen verwenden.
DEUTSCH
5
Page 6

SICHERHEIT UND AUFSTELLEN
_______________
▪ Das Gerät nicht in Wasser tauchen oder mit
Wasser in Berührung kommen lassen; auch
nicht während der Reinigung.
▪ Das Gerät nicht fallen lassen.
▪ Nach jeder Benutzung den Netzstecker zie-
hen. Den Netzstecker nicht am Kabel aus
der Steckdose ziehen.
▪ Bei Verwendung des Gerätes im
Badezimmer: Nach jeder Benutzung den
Netzstecker ziehen, da Wasser in der
Nähe des Gerätes eine Gefahr darstellen
kann, selbst wenn das Gerät ausgeschaltet
ist.
▪ Zur zusätzlichen Absicherung sollte
dieses Gerät an einen Stromkreis mit
Fehlerstromschutzschalter (FI oder RCD)
mit einem Auslösungsstrom von maximal
30 mA angeschlossen werden. Bitte einen
Elektriker kontaktieren.
▪ Das Gerät immer von Kindern fernhalten.
DEUTSCH
6
Page 7

SICHERHEIT UND AUFSTELLEN
_______________
▪ Das Gerät unter keinen Umständen öff-
nen. Für Schäden aufgrund von falscher
Benutzung wird keine Haftung übernom-
men.
▪ Falls das Netzkabel beschädigt ist, muss
es zur Vermeidung von Gefahren vom
Hersteller, seinem Kundencenter oder ver-
gleichbar qualifizierten Personen ersetzt
werden.
▪ Dieses Gerät darf nur dann von Kindern
(ab acht Jahren) oder von Personen bedient
werden, die unter körperlichen oder geisti-
gen Einschränkungen leiden oder denen
es an der nötigen Erfahrung im Umgang
mit solchen Geräten mangelt, wenn solche
Personen aufmerksam und lückenlos beauf-
sichtigt werden, zuvor gründlich mit der
Bedienung des Gerätes vertraut gemacht
wurden und sich der damit verbundenen
Gefahren voll und ganz bewusst sind.
Kinder dürfen nicht mit dem Gerät spielen.
Reinigung und Benutzerwartung dürfen von
Kindern nicht ohne Aufsicht durchgeführt
werden.
DEUTSCH
7
Page 8

SICHERHEIT UND AUFSTELLEN
_______________
▪ Ihre Haarschneidemaschine wurde vor
Verlassen unseres Werkes sorgfältig
geprüft, damit sichergestellt ist, dass die
Klingen geölt und ausgerichtet wurden.
▪ Die Klingen müssen neu ausgerichtet
werden, wenn Sie zum Reinigen oder
Auswechseln entfernt wurden.
▪ Bringen Sie zur Neuausrichtung der
Klingen einfach Punkt für Punkt die oberen
und unteren Klingen in Übereinstimmung,
wobei die Zähne nach oben zeigen. (Ende
der Zähne der oberen Klinge sollte sich
circa 1,2 mm hinter der unteren Klinge
befinden. Vergleichen Sie die Klingen Ihrer
Haarschneidemaschine mit der Skizze.)
8
DEUTSCH
Page 9

SICHERHEIT UND AUFSTELLEN
_______________
▪ Falls die Klingenausrichtung nicht stimmt,
geben Sie einige Tropfen Öl auf die Klingen,
schalten die Haarschneidemaschine einen
Moment lang ein, schalten sie wieder aus
und ziehen den Netzstecker. Schraubben
leicht lösen und neu anpassen. Schrauben
nach Klingenausrichtung festziehen.
▪ Zur Aufrechterhaltung des einwandfreien
Zustands Ihrer Haarschneidemaschine soll-
ten die Klingen alle paar Haarschnitte geölt
werden.
▪ Verwenden Sie kein Haaröl, Fett, mit
Kerosin vermischtes Öl oder Lösungsmittel.
Lösungsmittel verflüchtigen sich und hinter-
lassen dickes Öl, das die Klingenbewegung
verlangsamen kann.
DEUTSCH
9
Page 10
AUF EINEN BLICK
________________________________
Sehr geehrte Kundin, sehr geehrter
Kunde,
herzlichen Glückwunsch zum Kauf
der neuen GRUNDIG-Haarschneidemaschine MC 3320.
Bitte lesen Sie die folgenden Hinweise sorgfältig, um sicherzustellen, dass Sie Ihr Qualitätsprodukt
von GRUNDIG viele Jahre lang
benutzen können.
Verantwortungs
bewusstes Handeln!
GRUNDIG setzt intern wie auch
bei unseren Lieferanten auf vertraglich
zugesicherte soziale
Arbeitsbedingungen
mit fairem Lohn. Zu-
sätzlich legen wir
größten Wert auf den nachhaltigen
Einsatz von Rohmaterialien und
ständige Abfallreduktion von mehreren Tonnen Plastik pro Jahr. Darüber hinaus sorgen wir dafür, dass
Ersatzteile mindestens fünf Jahre
lang erhältlich bleiben.
Für eine lebenswerte Zukunft.
Aus gutem Grund. Grundig.
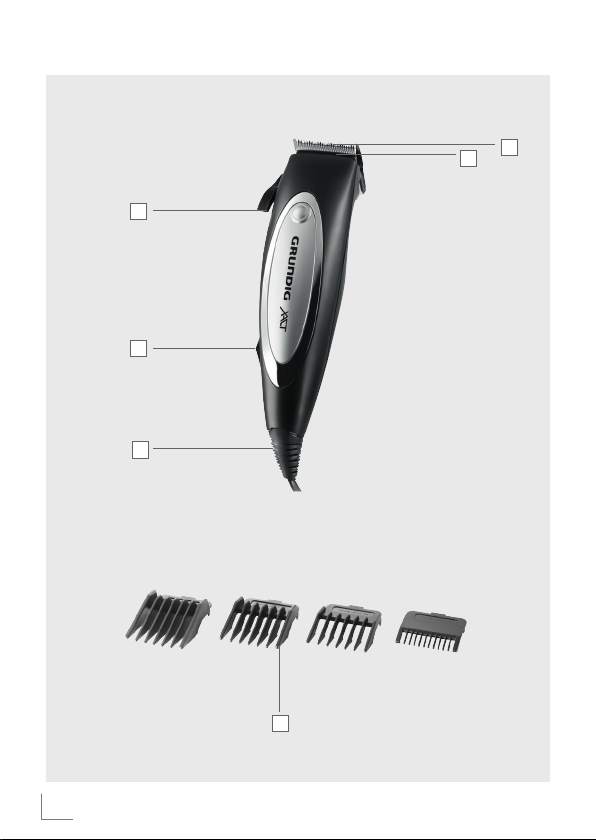
Bedienelemente und
Teile
Siehe Abbildung auf Seite 3.
A
Untere Klinge aus
Carbon-Edelstahl
B
Obere Klinge aus Carbon-
Edelstahl
C
Netzkabel
D
Ein-/Ausschalter
E
Klingenhebel
Zubehör
F
Vier Kammaufsätze mit verschie-
denen Größen für verschiedene
Schnittlängen (1 bis 4).
Kammaufsatz 1
Kammaufsatz 2
Kammaufsatz 3
Kammaufsatz 4
3 mm
6 mm
9 mm
12 mm
Sonstiges Zubehör
Klingenschutzkappe
Reinigungspinsel
Öl für Schneidsatz
10
DEUTSCH
Page 11

BETRIEB _______________________
Vorbereitung
1 Alle Verpackungsmaterialien ent-
fernen und zum zukünftigen Einsatz sicher aufbewahren.
2 Gerät vor jedem Gebrauch prüfen,
um sicherzustellen, dass die Klingen frei von Fusseln und Schmutz
etc. sind.
3 Prüfen Sie, ob die Spannung am
Typenschild mit der Spannung der
örtlichen Stromversorgung übereinstimmt.
4 Den Netzstecker an eine Steck-
dose anschließen.
Haare schneiden
1 Einen Kammaufsatz F der ge-
wünschten Schnittlänge anbringen (siehe Bedienelemente und
Teile).
2 Dazu Zähne des Schneidsatzes in
die mittige Kerbe des Kammaufsatzes einstecken und sanft bis zum
Einrasten auf die Klinge drücken.
3 Ein Handtuch um Hals und Schul-
tern der Person legen, deren Haare
geschnitten werden. Sicherstellen,
dass die Person in etwa auf Augenhöhe sitzt. Dies ermöglicht bessere
Sicht beim Schneiden und eine komfortablere Haltung des Gerätes.
4 Gerät mit dem Ein-/Ausschalter
D
einschalten und mit dem
Schneiden beginnen.
5 Gerät nach dem Schneiden
mit dem Ein-/Ausschalter D
abschalten.
6 Kammaufsatz abnehmen. Unte-
ren Riegel sanft vom Schneidsatz
abziehen, bis er sich löst. Dann
den Kammaufsatz abnehmen.
Klingenhebel
verwenden
Hinweise
7
Der Hebel ermöglicht die stufenweise Einstellung der Schnittlänge
ohne Kammaufsatz, was der
Schneidemaschine zusätzliche
Vielseitigkeit verleiht.
7
Wenn sich der Hebel in der obers-
ten Position befindet, sind die Klingen auf die kürzeste Schnittlänge
eingestellt; die Haare werden
sehr kurz geschnitten. Durch Herunterdrücken des Hebels erhöht
sich die Schnittlänge stufenweise.
7
In der niedrigsten Position wird
das Haar etwa auf dieselbe
Länge wie mit Kammaufsatz 1
geschnitten.
DEUTSCH
11
Page 12

BETRIEB _______________________
7
Der Hebel verlängert außerdem
die Nutzungsdauer der Klingen,
da je nach Einstellung unterschiedliche Schneidkanten verwendet
werden.
7
Falls zudem übermäßig viele
geschnittene Haare die Klingen
blockieren, kann das zwischen
den beiden Klingen eingeklemmte Haar ohne Entfernen der
Klingen beseitigt werden.
7
Klingen nach dem Schnitt durch
schnelles Bewegen des Klingenhebels E von der maximalen
zur minimalen Position von Haaren befreien, während das Gerät
noch eingeschaltet ist.
Schnittlängen der
Kammaufsätze
Hinweis
7
Siehe Tabelle auf Seite 7. Alle
Längen in der Tabelle sind
Näherungswerte.
Hilfreiche Tipps
7
Gerät entspannt und bequem in
der Hand halten.
7
Immer gegen die natürliche Wuchs-
richtung des Haares schneiden.
7
Beim Schneiden regelmäßige
Pausen einlegen. Es lassen sich
immer Korrekturen vornehmen,
jedoch nicht an bereits geschnittenen Haaren.
7
Beim ersten Einsatz des Gerätes
mit einem längeren Kammaufsatz
beginnen, um ein Gefühl für das
Gerät zu bekommen. Anschließend
kann ein kürzerer Kammaufsatz
angebracht werden.
7
Kammaufsatz nicht kraftvoll durch
das Haar schieben, sondern gleiten lassen.
7
Haar kontinuierlich durchkämmen.
Nur nach Haaren suchen, die zu
lang sind, und aus den geschnittenen Haaren heraus kämmen.
7
Zur Sicherstellung guter Ergebnisse
sollte das Haar trocken sein.
12
DEUTSCH
Page 13

INFORMATIONEN
_______________________________
Reinigung und Pflege
7
Gerät abschalten und Netzteil
aus der Steckdose ziehen.
7
Kammaufsatz abnehmen,
Schneidsatz mit dem mitgelieferten Pinsel reinigen.
7
Nur Gehäuse und Kammaufsatz
mit einem feuchten, weichen Tuch
reinigen.
Achtung
7
Weder Gerät noch sein Netzkabel
C
in Wasser oder andere Flüssig-
keiten tauchen
7
Vor erneutem Einsatz des Gerätes
alle Teile gründlich mit einem weichen Tuch trocknen.
7
Keine Reinigungsmittel verwen-
den.
Hinweis
7
Haare am Gerät nach jedem
Einsatz entfernen.
Klingen anpassen
Nach dem Kauf sind die Klingen optimal ausgerichtet. Möglicherweise
müssen die Klingen jedoch neu angepasst werden, wenn sie ausgewechselt oder die untere Klinge A vor der
Reinigung entfernt wurde.
1 Schrauben lösen.
2 Zähne der unteren A und oberen
Klinge B ausrichten. Die Punkte
der Zähne an der unteren Klinge
A
sollten sich etwa 1,2 mm hinter
denen der oberen Klinge B befinden.
3 Falls die Klingen nicht richtig aus-
gerichtet sind, Gerät abschalten,
Schrauben noch einmal lösen und
Klingen erneut anpassen.
4 Schrauben festziehen, sobald
die Klingen ausgerichtet sind.
Hinweis
7
Damit der Originalzustand des
Schneidsatzes möglichst lange erhalten bleibt, sollte er in regelmäßigen Abständen geölt werden.
Lagerung
Wenn das Gerät längere Zeit nicht
benutzt wird, sollte es sorgfältig
aufbewahrt werden.
7
Sicherstellen, dass es von der
Stromversorgung getrennt und
vollständig trocken ist.
7
Teile in der Originalverpackung
verstauen und an einem kühlen,
trockenen Ort lagern.
7
Das Gerät sollte sich immer
außerhalb der Reichweite von
Kindern befinden.
DEUTSCH
13
Page 14
INFORMATIONEN
_______________________________
Umwelthinweis
Dieses Produkt wurde aus hochwertigen Materialien und Teilen hergestellt, die für das Recycling tauglich
sind und wiederverwendet werden
können.
Deshalb dürfen Geräte
am Ende ihrer Lebensdauer nicht über den normalen Hausmüll entsorgt
werden. Das Gerät zur
Entsorgung bei einer Sammelstelle
zum Recycling von elektrischen und
elektronischen Altgeräten abgeben.
Dies wird durch dieses Symbol auf
dem Produkt, in der Bedienungsanleitung und auf der Verpackung
angegeben.
Bitte über die örtlichen Sammelstellen bei der Gemeindeverwaltung
informieren.
Die Wiederverwertung und das Recycling von Altgeräten ist ein wichtiger Beitrag zum Schutz unserer
Umwelt.
Technische Daten
Dieses Produkt stimmt
mit den europäischen
Richtlinien
2004/108/EC,
2006/95/EC,2009/125/EC
und 2011/65/EU überein.
Spannungsversorgung:
230 V Wechselspannung, 50
Hz
Leistung: 7 W
KB/MAX 20MIN.
Technische und optische
Änderungen vorbehalten.
Diese Bedienungsanleitung kann
unter www.grundig.com eingesehen und heruntergeladen werden
14
DEUTSCH
Page 15
INFORMATIONEN
_______________________________
Service und Ersatzteile
Unsere Geräte werden nach den
neuesten technischen Erkenntnissen entwickelt, produziert und geprüft. Sollte trotzdem eine Störung
auftreten, so bitten wir Sie, sich mit
Ihrem Fachhändler bzw. mit der
Verkaufsstelle in Verbindung zu
setzen. Sollte dies nicht möglich
sein, wenden Sie sich bitte an das
GRUNDIG-Service-Center unter
folgenden Kontaktdaten:
Montag bis Freitag von 08.00
bis 18.00 Uhr
Telefax: 0911/59059729
http://service.grundig.de
E-Mail: service@grundig.com
Unter den obengenannten Kontaktdaten erhalten Sie ebenfalls Auskunft über den Bezug möglicher
Ersatz- und Zubehörteile.
GRUNDIG
Kundenberatungszentrum
Montag bis Freitag von 8.00
bis 18.00 Uhr
Deutschland: 0911 / 59 059 730
Österreich: 0820 / 220 33 22*
*gebührenpflichtig (0,145 €/Min. aus
dem Festnetz, Mobilfunk: max. 0,20 €/
Min.)
Haben Sie Fragen?
Unser Kundenberatungszentrum
steht Ihnen werktags stets von 8.00
– 18.00 Uhr zur Verfügung.
DEUTSCH
15
Page 16

SAFETY AND SET-UP
____________________________
Please read this instruction manual thoroughly
before using this appliance! Follow all safety
instructions in order to avoid damages due to
improper use!
Keep the instruction manual for future reference. Should this appliance be given to a third
party, then this instruction manual must also be
handed over.
▪ The appliance is designed for domestic use
only.
▪ Observe these instructions in order to pre-
vent damage to the appliance or danger
arising from improper use. Keep them in a
safe place.
▪ Never use the appliance in the bath, show-
er or over a wash basin filled with water;
nor should it be operated with wet hands.
16
ENGLISH
Page 17

SAFETY AND SET-UP
____________________________
▪ Do not immerse the appliance in water or
let it come into contact with water, even dur-
ing cleaning.
▪ Do not drop the appliance.
▪ Pull out the power plug after use. Do not
disconnect the plug by pulling on the cable.
▪ If the appliance is used in the bathroom, it
is essential that the power plug is pulled out
after use, as water close to the appliance
can still constitute a danger, even if the
appliance is switched off.
▪ If not already present, for additional pro-
tection it is recommend to install a residual-
current-operated protective device (RCD)
with a rated residual operating current not
exceeding 30 mA in the electrical circuit
of your bathroom. Ask your plumber for
advice.
▪ Keep the appliance away from children.
▪ Do not open the appliance under any
circumstances. No warranty claims are
accepted for damage resulting from improp-
er handling.
ENGLISH
17
Page 18
SAFETY AND SET-UP
____________________________
▪ If the power cord is damaged, it must be
replaced by the manufacturer, its service
centre or a similarly qualified person to pre-
vent danger arising.
▪ This appliance can be used by children
aged from 8 years and above and persons
with reduced physical, sensory or men-
tal capabilities or lack of experience and
knowledge if they have been given super-
vision or instruction concerning use of the
appliance in a safe way and understand
the hazards involved. Children shall not
play with the appliance. Cleaning and user
maintenance shall not be made by children
without supervision.
▪ Your clippers were carefully examined
to ensure that the blades were oiled and
aligned before leaving our factory.
▪ Blades must be realigned if they have been
removed for cleaning or replacement.
ENGLISH
18
Page 19

SAFETY AND SET-UP
____________________________
▪ To realign the blades, simply match the
upper and bottom blades teeth up, point
for point. (End of top blade teeth should be
approximately 1.2mm back from bottom
blade. Compare your clipper blades with
the sketch.)
▪ If blade alignment is incorrect, add a few
drops of oil to the blades, turn clipper on
for a few moments, turn off and unplug.
Loosen screws slightly and adjust. Tighten
screws after blade is aligned.
▪ To maintain your clipper in peak condition,
the blades should be oiled every few hair-
cuts.
▪ Do not use hair oil, grease, oil mixed with
kerosene or any solvent. As the solvent will
evaporate and leave the thick oil which
may slow down the blades motion.
ENGLISH
19
Page 20

AT A GLANCE
_____________________________________
Dear Customer,
Congratulations on the purchase
of your new GRUNDIG Hair
Clipper MC 3320.
Please read the following user
notes carefully to ensure you can
enjoy your quality GRUNDIG product for many years to come.
A responsible
approach!
GRUNDIG focuses
on contractually
agreed social working conditions with
fair wages for both
internal employees
and suppliers. We also attach
great importance to the efficient
use of raw materials with continuous waste reduction of several tonnes of plastic every year.
Furthermore, all our accessories
are available for at least 5 years.
For a future worth living.
For a good reason. Grundig.
Controls and parts
See the figure on page 3.
A
Carbon stainless steel
bottom blade
B
Carbon stainless steel top
blade
C
Power cord
D
On/Off switch
E
Blade lever
Accessories
Four combs of various sizes for
F
different trimming grades (#1 to
#4).
Comb #1
Comb #2
Comb #3
Comb #4
3 mm
6 mm
9 mm
12 mm
Other accessories
Blade protection cap
Cleaning brush
Oil for cutting head
20
ENGLISH
Page 21

OPERATION ____________________
Preparation
1 Remove all packaging and keep
safe for future storage.
2 Inspect the appliance before use
to ensure the blades are free of
hair, debris etc.
3 Check if the mains voltage of
the type plate of the appliance
corresponds to your local mains
supply.
4 Plug the power cord into the
wall socket.
Trimming hair
1 Put on a comb F for the cutting
grade you need (see Controls
and parts).
2 To do this, put the teeth of the cut-
ting head in the central groove of
the comb and gently press on the
bottom blade A of the top blade
B
until it catches.
3 Place a towel around the neck
and shoulder of the person whose
hair you are trimming. Make sure
the person is seated so that their
head is roughly at your eye level.
This allows ease of visibility while
cutting and a relaxed hold on the
appliance.
4 Switch on the appliance using
the switch D and start trimming.
5 Turn off the appliance using the
switch D when you have finished trimming.
6 Take off the comb. Gently pull
the bottom catch away from the
cutting head until it comes loose.
Then lift off the comb.
Using the blade lever
Notes
7
The lever adds versatility to
your clipper by allowing you to
gradually change the closeness
of your cut without an attachment
comb.
7
When the lever is in the uppermost
position, the blades will give
you the closest cut and leave the
hair very short. Pushing the lever
downward gradually increase the
cutting length.
7
In its lowest position, the lever
will leave the hair approximately
the same length as comb #1.
7
The lever will also extend the use
of your blades since the different
cutting edge is used in each
setting.
ENGLISH
21
Page 22

OPERATION ____________________
7
In addition, if extremely heavy
hair cutting has jammed the
blades, it will help you remove
hair that has become wedged
between the two blades without
removing the blades.
7
When you have finished
trimming, clean the blades
of hair clippings by quickly
moving the blade lever F from
maximum to minimum with the
appliance still on.
Comb attachment
grades
Note
7
All the lengths here are
approximate. (see the table on
page 15)
Useful tips
7
Hold the appliance with a
relaxed and comfortable grip.
7
Always cut against the natural
direction of the hair.
7
As you cut, take a break at
regular intervals. You can
always make a correction, but
not once the hair has been cut.
7
When you first use it, begin
with a longer comb for trimming so that you get a good
feel for the appliance. Then
you can attach a shorter comb.
7
Do not force the comb through
the hair. Let it guide you.
7
Keep combing the hair. Only
look for hair which is too long
and comb out clippings.
7
To ensure good results, the hair
should be dry.
22
ENGLISH
Page 23

INFORMATION
___________________________________
Cleaning and care
7
Turn the appliance off and
unplug it from the mains socket.
7
Take off the comb and clean
the cutting head with the brush
supplied.
7
Only clean the housing and the
comb with a damp, soft cloth.
Caution
7
Never put appliance or power
cord C in water or any other
liquid.
7
Before using the appliance again,
dry all parts properly using a soft
towel.
7
Do not use cleaning agents.
Note
7
Remove any clippings after each
use.
Adjusting the blades
When new, the blades are optimally aligned. However, you need to
readjust the blades if you replace
them or if you have removed the
bottom blade A for cleaning.
1 Loosen the screws.
2 Align the teeth of the bottom blade
A
and the top blade B.
The points of the teeth on the bottom blade A should be roughly
1.2 mm behind those of the top
blade B.
3 If the blades are not correctly
aligned, switch off the appliance,
loosen the screws again and
readjust the blades.
4 Tighten the screws once you
have aligned the blades.
Note
7
If you want to maintain the
original condition of the cutting
head for as long as possible, it is
worth oiling the cutting head at
regular intervals.
Storage
If you do not want to use the
appliance for a long period of
time, please store it carefully.
7
Ensure that it is unplugged and is
completely dry.
7
Pack the parts in the original
packaging and store them in a
cool, dry place.
7
Make sure the appliance is kept
out of reach of children.
ENGLISH
23
Page 24

INFORMATION
___________________________________
Environmental note
This product has been manufactured
with high-quality parts and materials
which can be re-used and are
suitable for recycling.
Therefore, do not dispose
of the product with
normal domestic waste at
the end of its service life.
Take it to a collection
point for the recycling of electrical
and electronic appliances. This is
indicated by this symbol on the
product, in the operating manual
and on the packaging.
Please consult your local
authorities to find out where the
nearest collection point is.
Help protect the environment by
recycling used products.
Technical data
This product conforms
to the European
directives
2004/108/EC,
2006/95/EC,2009/125/EC
and 2011/65/EU.
Power supply:
230 V~, 50 Hz
Power: 7W
KB/MAX 20MIN.
Technical and design modifications
reserved.
This user manual is available for
review and download at
www.grundig.com
24
ENGLISH
Page 25

GÜVENLİK VE KURULUM
_____________________
Lütfen cihazı kullanmadan önce bu kullanma kılavuzunu tam olarak okuyun! Hatalı
kullanımdan kaynaklanan hasarları önlemek
için tüm güvenlik talimatlarına uyun!
Kullanma kılavuzunu daha sonra başvurmak
üzere saklayın. Bu cihaz üçüncü bir şahsa
verildiğinde bu kullanma kılavuzu da teslim
edilmelidir.
▪ Bu cihaz yalnızca evde kullanım için
tasarlanmıştır.
▪ Yanlış kullanım sonucu cihazda hasar veya
tehlike oluşmasını önlemek amacıyla bu
talimatları dikkate alın. Güvenli bir yerde
muhafaza edin.
▪ Cihazı asla banyoda, duşta ya da su dolu
bir lavabo üzerinde kullanmayın; ayrıca
alet ıslak elle de kullanılmamalıdır.
TÜRKÇE
25
Page 26

GÜVENLİK VE KURULUM ______________
▪ Cihazı temizleme sırasında bile suya
sokmayın ve suyla temas etmesine izin ver-
meyin.
▪ Cihazı düşürmeyin.
▪ Kullandıktan sonra elektrik fişini çekin. Fişi,
kablodan tutarak prizden çekmeyin.
▪ Alet banyoda kullanılmışsa, kullandıktan
sonra fişi çekilmelidir. Çünkü alete yakın
yerde su bulunması, alet kapalı olsa da teh-
like yaratabilir.
▪ İlave koruma için bu cihaz, maksimum 30
mA anma değerine sahip bir ev aletleri
artık akım cihazına bağlanmalıdır. Öneri
için elektrik teknisyeninize danışın.
▪ Cihazı daima çocukların erişemeyecekleri
bir yerde saklayın.
▪ Cihazı hiçbir şekilde parçalarına ayırmayın.
Hatalı kullanımın neden olduğu hasarlar
için hiçbir garanti talebi kabul edilmez.
26
TÜRKÇE
Page 27

GÜVENLİK VE KURULUM ______________
▪ Elektrik kablosu, kablonun hasar görme-
si durumunda tehlike oluşmasını önlemek için üretici, üreticinin servis merkezi
veya benzeri bir ehliyetli kişi tarafından
değiştirilmelidir.
▪ Bu cihaz, denetim sağlanması veya
cihazın güvenli bir şekilde kullanılması
ve karşılaşılan tehlikelerin anlaşılması
ile ilgili bilgi verilmesi koşuluyla, yaşları
8 ve üzerinde olan çocuklar ile fiziksel,
duyusal veya akli yetenekleri azalmış
veya tecrübe ve bilgi eksikliği olan kişiler
tarafından kullanılabilir. Çocuklar cihaz
ile oynamamalıdır. Temizleme ve kullanıcı
bakımı çocuklar tarafından gözetimsiz
olarak yapılmamalıdır.
▪ Kırpıcınız, bıçakların yağlandığından ve
ayarlandığından emin olmak için fabrikadan çıkmadan önce dikkatli bir şekilde
kontrol edilmiştir.
TÜRKÇE
27
Page 28

GÜVENLİK VE KURULUM ______________
▪ Bıçaklar, temizlik veya değiştirme sebebiyle
çıkartılmışlarsa tekrar ayarlanmalıdır.
▪ Bıçakları tekrar ayarlamak için üst ve
alt bıçak dişlerini yukarı doğru uç uca
eşleştirmeniz yeterlidir. (Üst bıçak dişinin
ucu alt bıçaktan yaklaşık 1,2 mm geride
durmalıdır. Kırpıcı bıçaklarını resimdekiyle
karşılaştırın.)
▪ Bıçak ayarı yanlışsa bıçaklara birkaç
damla yağ damlatın, kırpıcıyı kısa bir
süreliğine çalıştırıp kapatın ve fişini çekin.
Vidaları hafifçe gevşetip ayarlayın. Bıçaklar
hizalandıktan sonra vidaları sıkın.
▪ Kırpıcınızı en iyi durumda tutmak için
bıçaklar birkaç saç tıraşından sonra
yağlanmalıdır.
▪ Saç yağı, gres, kerosen veya herhangi bir
çözücü katkılı yağ kullanmayın. Çözücü
buharlaşacağından, geride bıraktığı kalın
yağ bıçakların hareketini yavaşlatabilir.
28
TÜRKÇE
Page 29

GENEL BAKIŞ __________________________
Değerli Müşterimiz,
GRUNDIG MC 3320 Saç Kesme
makinesini satın aldığınız için sizi
kutlarız.
Kaliteli GRUNDIG ürününüzü yıllarca tam verim alarak kullanabilmek için lütfen aşağıdaki kullanıcı
notlarını dikkatli bir şekilde okuyun.
Sorumlu yaklaşım!
GRUNDIG hem
çalışanlar hem de
tedarikçiler için adil
ücretlendirme sunan
sözleşmeyle kabul
edilmiş sosyal çalışma koşulları sağlamayı hedef alır.
Hammaddelerin etkin kullanımı ve
her yıl düzenli olarak plastik atık
miktarını birkaç ton azaltmak da
öncelikli hedeflerimiz arasında yer
alıyor. Ayrıca, tüm aksesuarlarımız
en az 5 yıl boyunca kullanılabilir.
Yaşamaya değer bir gelecek için.
İyi bir amaç için. Grundig.
Kontroller ve parçalar
Sayfa 3'teki şekle bakın.
A
Karbon paslanmaz
çelik alt bıçak
B
Karbon paslanmaz çelik üst
bıçak
C
Elektrik kablosu
D
Açma/Kapama düğmesi
E
Bıçak kolu
Aksesuarlar
Farklı kesme seviyeleri için çeşitli
F
boyutlarda (1 'den 4'e kadar)
dört adet tarak.
1 numaralı tarak
2 numaralı tarak
3 numaralı tarak
4 numaralı tarak
3 mm
6 mm
9 mm
12 mm
Diğer aksesuarlar
Bıçak koruma kapağı
Temizleme fırçası
Kesme başlığı için yağ
TÜRKÇE
29
Page 30

ÇALIŞTIRMA ____________________
Ön Hazırlık
1 Ambalajı tümüyle çıkarın ve
cihazı daha sonra saklamak için
güvenli bir şekilde muhafaza
edin.
2 Bıçaklarda saç, kir vs. bulunma-
dığından emin olmak için her
kullanımdan önce cihazı kontrol
edin.
3 Aygıtın tip plakası üzerinde belir-
tilen şebeke geriliminin yerel
şebeke gerilimiyle uyumlu olup
olmadığını kontrol edin.
4 Elektrik kablosunun fişini prize
takın.
Saç tıraşı
1 İhtiyaç duyduğunuz kesme sevi-
yesi için bir tarak takın F (bkz.
Kontrol ve parçalar).
2 Bu işlemi yapmak için, kesme
başlığının dişini tarağın merkezi
yuvasına takın ve nazik bir şekil-
de alt bıçağı A ve üst bıçağı
oturana kadar bastırın.
3 Tıraş edeceğiniz kişinin boynuna
ve omuzlarına bir havlu yerleştirin. Tıraş olacak kişiyi başı kabaca göz hizanızda olacak şekilde oturtun. Bu, kesim sırasında
görüş kolaylığı ve cihazı rahat
bir tutuş olanağı sağlar.
TÜRKÇE
30
B
4 Açma/Kapama düğmesini D
kullanarak cihazı açın ve saçı
kesmeye başlayın.
5 Saç kesme işlemini bitirdiğiniz-
de, Açma/Kapama düğmesini
D
kullanarak cihazı kapatın.
6 Tarağı çıkarın. Alt mandalı gev-
şeyene kadar kesme başlığından
yavaşça çekin. Ardından tarağı
kaldırıp çıkarın.
Bıçak kolunu kullanma
Notlar
7
Cihazın kolu, tarak aksesuarı
olmaksızın kesiminizin yakınlığını aşamalı olarak değiştirmenizi
sağlayarak kesme makinenize
esneklik sağlar.
7
Kol en üst konumda iken, bıçaklar en kısa kesimi sağlar ve saçınızı çok kısa bir şekilde keser.
Kolun aşağı itilmesi kesme uzunluğunu aşamalı olarak arttırır.
7
En alt konumda, bu kol saçın
uzunluğunu yaklaşık olarak 1
numaralı tarak ile aynı uzunlukta
bırakır.
7
Her ayarda farklı bir kesme ucu
kullanıldığından, bu kol ayrıca
bıçaklarınızın kullanım ömrünü
artırır.
Page 31

ÇALIŞTIRMA ___________________________
7
7
Ayrıca, fazla miktarda kesilmiş
saç bıçakları tıkarsa, bıçakları
çıkarmaksızın iki bıçak arasında
sıkışmış kılları çıkarmanıza yardımcı olur.
7
Saç kesme işlemini tamamladığınızda, cihaz açık bir halde
iken bıçak kolu E yi maksimum
konumdan minimum konuma
hızlıca hareket ettirerek kesilmiş
kılları temizleyin.
Tarak aksesuarı
seviyeleri
Not
7
Sayfa 22'deki tabloya bakın.
Tablodaki tüm uzunluklar yaklaşıktır.
Faydalı ipuçları
7
Cihazı gevşek ve rahat bir şekil-
de tutun.
7
Daima saçın doğal büyüme
yönünün tersine kesin.
7
Keserken düzenli aralıklarla
ara verin. Her zaman düzeltme
yapabilirsiniz, ama saçı kestikten
sonra değil.
Cihazı ilk defa kullandığınızda,
saç kesimi için uzun taraklardan
biri ile başlayın. Böylece cihazı daha iyi tanımış olursunuz.
Ardından daha kısa bir tarak
takabilirsiniz.
7
Saçı keserken tarağı zorlamayın.
Onun sizi yönlendirmesine izin
verin.
7
Saçı taramaya devam edin.
Sadece çok uzun saçlara dikkat
edin ve kestiğiniz parçaları tarayarak ayırın.
7
İyi sonuçlar almak için saçın kuru
olması gerekir.
TÜRKÇE
31
Page 32

BİLGİLER ______________________________
Temizleme ve bakım
7
Cihazı kapatın ve elektrik kablosu-
nun fişini şebeke prizinden çekin.
7
Tarağı çıkarın ve cihazla beraber
verilen fırçayla kesici başlığı temizleyin.
7
Muhafazayı ve tarağı yalnızca
nemli, yumuşak bir bezle silin.
Dikkat
7
Cihazı ya da elektrik kablosunu
asla C suya veya bir başka sıvıya sokmayın.
7
Cihazı tekrar kullanmadan önce,
yumuşak bir havlu ile tüm parçalarını kurulayın.
7
Temizlik maddeleri kullanmayın.
Not
7
Her kullanımdan sonra cihazın üze-
rinde kalan kesilmiş kılları temizleyin.
Bıçakların ayarlanması
Bıçaklar yeni iken, en iyi şekilde
hizalanmıştır. Bununla birlikte, değiştirmeniz durumunda veya alt bıçağı
A
temizlik amacıya çıkarmışsanız,
yeniden ayarlamanız gerekir.
1 Vidaları gevşetin.
2 Alt bıçak A ve üst bıçak B diş-
lerini hizalayın. Alt bıçak A üzerindeki dişlerin noktaları kabaca
üst bıçağın B 1,2 mm arkasında
olmalıdır.
3 Bıçaklar doğru bir şekilde hiza-
lanmamışsa, cihazı kapatın, vidaları tekrar gevşetin ve bıçakları
yeniden hizalayın.
4 Bıçakları hizaladığınızda vidala-
rı sıkın.
Not
7
Kesici başlığınızın ilk durumunu
mümkün olduğunca uzun süre
korumak istiyorsanız, kesme başlığını düzenli aralıklarla yağlamak
iyi olur.
Saklama
Cihazı uzun süre kullanmayı düşünmüyorsanız, lütfen dikkatli bir şekilde saklayın.
7
Fişin çekili olduğundan ve cihazın
tamamen kuru olduğundan emin
olun.
7
Parçaları orijinal ambalajında
tutun, serin ve kuru bir yerde
muhafaza edin.
7
Cihazın, çocukların ulaşamayaca-
ğı bir yerde muhafaza edildiğinden emin olun.
32
TÜRKÇE
Page 33
BİLGİLER ______________________________
Çevre ile ilgili not
Bu ürün, yeniden kullanılabilen ve
geri dönüşüme uygun olan, yüksek
kaliteli parçalardan ve malzemelerden üretilmiştir.
Bu nedenle, hizmet ömrünün sonunda ürünü normal evsel atıklarla birlikte
atmayın. Elektrikli ve
elektronik cihazların geri
dönüşümü için bir toplama noktasına götürün. Bu husus ürünün üzerinde, kullanım kılavuzunda ve
ambalaj üzerinde bulunan yandaki
simge ile gösterilir.
En yakın toplama noktasını öğrenmek için lütfen yerel makamlara
danışın.
Kullanılmış ürünlerin geri dönüşümünü sağlayarak çevrenin korunmasına yardımcı olun.
Teknik veriler
Bu ürün
2004/108/EC,
2006/95/EC,
2009/125/EC ve
2011/65/EU Avrupa direktiflerine uygundur.
Güç kaynağı:
230 V~, 50 Hz
Güç: 7W
KB/MAX 20MIN.
Teknik ve tasarım değişiklikleri
yapma hakkı saklıdır.
Bu kullanım kılavuzunu
www.grundig.com adresinden de
indirip inceleyebilirsiniz
TÜRKÇE
33
Page 34

SEGURIDAD Y PREPARACIÓN
_______________
Lea este manual de instrucciones detenidamente antes de utilizar el aparato. Observe
todas las instrucciones de seguridad para evitar daños debidos a un uso indebido.
Guarde el manual de instrucciones como referencia para el futuro. Si le entrega el aparato a
un tercero, incluya también el presente manual
de instrucciones.
▪ Este aparato ha sido diseñado exclusiva-
mente para uso doméstico.
▪ Siga y conserve estas instrucciones para
evitar daños y peligros debido a una utilización incorrecta del aparato. Guárdelas
en un lugar seguro.
▪ Jamás utilice el aparato en la bañera, la
ducha o sobre un lavabo lleno de agua.
Tampoco lo utilice con las manos mojadas.
▪ No sumerja el aparato en agua ni deje que
entre en contacto con ella, incluso cuando
lo limpie.
ESPAÑOL
34
Page 35

SEGURIDAD Y PREPARACIÓN ________
▪ No deje caer el aparato.
▪ Desenchufe el aparato tras cada uso. No
tire del cable para desenchufar el aparato.
▪ Si va a utilizar el aparato en el cuarto de
baño, es muy importante que lo desenchufe tras cada uso, ya que la presencia de
agua cerca del aparato puede implicar un
riesgo de seguridad, incluso con el aparato
apagado.
▪ Para una mayor protección, conecte el
aparato a un dispositivo de corriente residual para uso doméstico con una corriente
nominal no superior a 30 mA. Consulte a
su electricista.
▪ Mantenga el aparato fuera del alcance de
los niños.
▪ No desmonte el aparato bajo ninguna cir-
cunstancia. No se admitirá reclamación de
garantía alguna por daños causados por
un manejo inadecuado.
▪ El fabricante, el servicio de atención al
cliente o una persona con la cualificación
adecuada deberá sustituir el cable de red
cuando presente daños para así evitar peligros resultantes de ello.
ESPAÑOL
35
Page 36

SEGURIDAD Y PREPARACIÓN ________
▪ Los niños a partir de 8 años y las personas
con las capacidades físicas, sensoriales o
mentales limitadas o bien carentes de la
experiencia y conocimientos necesarios
pueden usar el aparato siempre que lo
hagan bajo supervisión o instrucciones de
uso seguro y comprendan los riesgos que
el uso implica. No deje que los niños jueguen con el aparato, ni que lleven a cabo
su limpieza o mantenimiento sin vigilancia.
▪ Su maquinilla cortapelo se ha examinado
cuidadosamente para garantizar que las
cuchillas se lubricaron y alinearon antes de
salir de fábrica.
▪ Las cuchillas deben volverse a alinear si se
retiran para su limpieza o mantenimiento.
36
ESPAÑOL
Page 37

SEGURIDAD Y PREPARACIÓN ________
▪ Para volver a alinear las cuchillas, basta
con que haga coincidir los dientes de
las cuchillas superior e inferior punto por
punto. (Las puntas de los dientes de la
cuchilla superior deben estar situadas
aproximadamente 1,2 mm más atrás que la
cuchilla inferior. Compare las cuchillas de
su maquinilla cortapelo con el croquis.)
▪ Si las cuchillas no están correctamente ali-
neadas, vierta unas pocas gotas de aceite sobre las cuchillas, ponga en marcha la
maquinilla durante unos instantes, apáguela y desenchúfela. Afloje los tornillos ligeramente y ajuste. Apriete de nuevo los tornillos una vez la cuchilla esté alineada.
▪ Para mantener su maquinilla cortapelo
en condiciones óptimas, debe lubricar las
cuchillas regularmente cada pocos cortes
de pelo.
▪ No use brillantina, grasa, aceite mezcla-
do con queroseno ni disolventes, ya que
estos se evaporarán dejando un residuo
que puede ralentizar el movimiento de las
cuchillas.
ESPAÑOL
37
Page 38

REFERENCIA RÁPIDA ___________________
Estimado cliente:
Enhorabuena por la compra de
la máquina cortapelo GRUNDIG
MC 3320.
Le rogamos lea con atención las
siguientes notas de uso para disfrutar al máximo de la calidad de
este producto GRUNDIG durante
muchos años.
Una estrategia
responsable
GRUNDIG aplica
condiciones de trabajo sociales acordadas por contrato
y con salarios justos
tanto a sus propios
empleados como a los proveedores, y damos una gran importancia
al uso eficiente de las materias
primas con una reducción continua
de residuos de varias toneladas
de plástico al año. Además, todos
nuestros accesorios están disponibles por lo menos durante cinco
años.
Para un futuro mejor.
Por una buena razón. Grundig.
Controles y piezas
Vea la ilustración de la pág. 3.
A
Cuchilla inferior de
acero inoxidable al
carbono
B
Cuchilla superior de acero
inoxidable al carbono
C
Cable de alimentación
D
Interruptor de encendido/apa-
gado
E
Palanca de las cuchillas
Accesorios
Cuatro peines de diferentes
F
tamaños para las distintas posiciones de corte (nº1 a nº4).
Peine nº1
Peine nº2
Peine nº3
Peine nº4
3 mm
6 mm
9 mm
12 mm
Otros accesorios
Tapa de protección de la cuchilla
Cepillo de limpieza
Aceite para el cabezal de corte
38
ESPAÑOL
Page 39

FUNCIONAMIENTO ____________________
Preparación
1 Retire el embalaje y guárdelo
para un posterior almacenamiento.
2 Examine el aparato antes de
usarlo para asegurarse de que
las cuchillas estén libres de
cabellos, suciedad, etc.
3 Compruebe si la tensión indi-
cada en la placa de datos del
aparato se corresponde con la
de la red de alimentación de su
domicilio.
4 Enchufe el cable de alimenta-
ción en una toma de pared.
Corte de cabello
1 Coloque un peine F para la
longitud de corte necesaria
(consulte Controles y piezas).
2 Para esto, inserte los dientes del
cabezal de corte en la ranura
central del peine y presione ligeramente sobre la cuchilla infe-
rior A y la cuchilla superior
hasta que enganche.
B
3 Coloque una toalla sobre el
cuello y los hombros de la persona cuyo cabello vaya a cortar.
Asegúrese de que la persona esté
sentada de forma que su cabeza
le quede más o menos a la altura
de los ojos. Gozará así de una
buena visibilidad durante el corte
y de una postura cómoda con el
aparato.
4 Encienda el aparato con el inte-
rruptor On/Off D y comience a
cortar.
5 Apague el aparato con el inte-
rruptor On/Off D cuando haya
terminado de cortar.
6 Retire el peine. Separe suave-
mente el enganche inferior del
cabezal de corte hasta que
quede suelto. A continuación,
levante el peine.
Uso de la palanca de las
cuchillas
Notas
7
La palanca añade versatilidad a
la máquina, permitiéndole cambiar gradualmente la longitud
de corte sin un peine accesorio.
ESPAÑOL
39
Page 40

FUNCIONAMIENTO ____________________
7
Con la palanca en la posición
superior, las cuchillas dejarán
el pelo muy corto. Presione
la cuchilla hacia abajo para
aumentar gradualmente la longitud de corte.
7
En la posición más baja, la
cuchilla dejaré el pelo con una
longitud aproximada al peine
nº1.
7
La palanca también prologará
la vida útil de las cuchillas porque se utiliza un borde de corte
diferente en cada posición.
7
Además, si un corte muy intenso ha atascado las cuchillas, le
ayudará a retirar el pelo enganchado si tener que soltar las
cuchillas.
7
Cuando haya terminado de cortar, limpie las cuchillas moviendo
rápidamente la palanca E del
máximo al mínimo con el aparato encendido.
Posiciones de los peines
accesorios
Nota
7
Consulte la tabla de la página
29. Todas las longitudes de la
tabla son aproximadas.
Consejos prácticos
7
Sostenga el aparato de forma
cómoda y relajada.
7
Corte siempre contra la direc-
ción natural de crecimiento del
cabello.
7
Durante el corte, realice para-
das con regularidad. Siempre
es posible realizar un retoque,
pero no una vez se ha cortado
el cabello.
7
Cuando vaya a utilizar el apa-
rato por primera vez, comience con un peine más largo par
acostumbrarse. A continuación,
puede utilizar un peine más
corto.
7
No fuerce el peine a través del
cabello. Permita que el peine le
guíe.
7
No deje de peinar el cabello.
Busque los mechones que sean
demasiado largos y retire los
cabellos una vez cortados con
el peine.
7
Para garantizar buenos resulta-
do, el cabello debe estar seco.
40
ESPAÑOL
Page 41

INFORMACIÓN ________________________
Limpieza y cuidados
7
Apague el aparato y desconéc-
telo de la toma de corriente de
la pared.
7
Retire el peine y limpie el
cabezal de corte con el cepillo
incluido.
7
Utilice únicamente un paño
suave y húmedo para la limpieza de la carcasa y el peine.
Atención
7
Nunca sumerja el aparato o el
cable de alimentación C en
agua o cualquier otro líquido,
7
Antes de utilizar de nuevo el
aparato, seque con cuidado
todas las piezas con una toalla
suave.z
7
No utilice productos de limpie-
za.
Nota
7
Retire los restos de cabellos cor-
tados tras cada uso.
Ajuste de las cuchillas
Las cuchillas nuevas están perfectamente alineadas. Sin embargo,
deberá reajustarlas tras cambiarlas
o tras retirar la cuchilla inferior A
para su limpieza.
1 Afloje los tornillos.
2 Alinee los dientes de la cuchilla
inferior A y la cuchilla superior
B
. Las puntas de los dientes de
la cuchilla inferior A deberán
quedar aproximadamente 1,2
mm detrás de las puntas de los
dientes de la cuchilla superior
B
.
3 Si las cuchillas no se han ali-
neado correctamente, apague
el aparato, afloje los tornillos
de nuevo y vuelva a ajustar las
cuchillas.
4 Apriete los tornillos cuando
haya alineado las cuchillas.
Nota
7
Si desea que el cabezal de
corte se mantenga como nuevo
el mayor tiempo posible, merece
la pena engrasarlo con regularidad.
Almacenaje
Si no va a utilizar el aparato
durante un periodo prolongado de
tiempo, guárdelo cuidadosamente.
7
Asegúrese de que el aparato
esté desenchufado y completamente seco.
7
Guarde las piezas en su bolsa
de almacenamiento original y
deposite la bolsa en un lugar
fresco y seco.
7
Mantenga el aparato fuera del
alcance de los niños.
ESPAÑOL
41
Page 42

INFORMACIÓN ___________________
Nota sobre el medio
ambiente
En la fabricación de este producto
se han empleado piezas y
materiales de alta calidad, que
pueden reutilizarse y reciclarse.
Por lo tanto, no arroje
este aparato a la basura
junto con sus residuos
domésticos normales al
final de su vida útil.
Llévelo a un punto de
recogida para el reciclado de
aparatos eléctricos y electrónicos.
Este símbolo, presente en el
producto, en el manual de
funcionamiento y en el embalaje,
indica tal circunstancia.
Consulte a las autoridades locales
para averiguar el punto de
recogida más cercano.
Ayude a proteger el medio
ambiente reciclando los productos
usados.
Datos técnicos
Este producto cumple
con las directivas
europeas
2004/108/EC,
2006/95/EC,2009/125/EC y
2011/65/EU.
Alimentación:
230 V~, 50 Hz
Potencia: 7W
KB/MAX 20MIN.
Queda reservado el derecho a rea-
lizar modificaciones técnicas y de
diseño.
Este manual del usuario puede examinarse y descargarse en
www.grundig.com
42
ESPAÑOL
Page 43

SÉCURITÉ ET INSTALLATION __________
Veuillez lire attentivement le présent manuel
d'utilisation avant d'utiliser cet appareil !
Respectez toutes les consignes de sécurité
pour éviter des dommages dus à une mauvaise
utilisation !
Conservez le manuel d'utilisation car vous
pourriez en avoir besoin ultérieurement. Dans
le cas où cet appareil change de propriétaire,
remettez également le manuel d'utilisation au
nouveau bénéficiaire.
▪ Cet appareil a été conçu à des fins domes-
tiques uniquement.
▪ Respectez ces instructions pour empêcher
des dégâts à l'appareil ou des dangers liés
à des utilisations impropres. Conservez-les
dans un endroit sûr.
▪ Ne jamais utiliser l'appareil dans une salle de
bains, sous une douche, ni au-dessus d'une
bassine remplie d'eau ; évitez également de
le manipuler avec des mains mouillées.
FRANÇAIS
43
Page 44

SÉCURITÉ ET INSTALLATION __________
▪ Évitez de plonger l'appareil dans l'eau ou
de l'y mettre en contact, même pendant le
nettoyage.
▪ Évitez de laisser tomber l'appareil.
▪ Débranchez l'appareil après utilisation.
Évitez de débrancher l'appareil en tirant sur
le câble.
▪ En cas d'utilisation dans une salle de bains,
il convient de débrancher à la fin de l'opé-
ration car toute eau proche de l'appareil
peut encore lui être dangereuse, même si
ce dernier est débranché.
▪ Pour plus de protection, l'appareil devrait
également être branché à un dispositif de
courant résiduel à usage domestique d'une
valeur nominale ne dépassant pas 30 mA.
Demandez conseil à votre électricien.
▪ Veillez à toujours tenir l'appareil hors de
portée des enfants.
▪ N'ouvrez en aucun cas l'appareil. Aucune
réclamation au titre de la garantie ne sera
acceptée pour les dégâts résultats d'une
manipulation incorrecte.
44
FRANÇAIS
Page 45

SÉCURITÉ ET INSTALLATION __________
▪ Si le câble d'alimentation est endomma-
gé, faites-le remplacer par le fabricant, un
centre de service agréé ou toute autre personne qualifiée pour éviter tout danger.
▪ Cet appareil peut être utilisé par des enfants
de 8 ans et plus et par des personnes
dont les capacités physiques, sensorielles
ou mentales sont réduites ou par celles
n'ayant pas suffisamment d'expérience ou
de connaissances, si une personne chargée
de la sécurité les surveille ou leur apprend
à utiliser le produit en toute sécurité et en
étant conscient des dangers y afférents. Les
enfants ne doivent pas jouer avec cet appareil. Cleaning and user maintenance shall
not be made by children without supervision.
▪ Votre tondeuse a été spécialement étudiée
pour vous garantir l’utilisation de lames
parfaitement lubrifiées et alignées avant la
mise du produit sur le marché.
FRANÇAIS
45
Page 46

SÉCURITÉ ET INSTALLATION __________
▪ Si vous avez déplacé les lames lors de leur
nettoyage ou de leur remplacement, veillez
à bien les aligner à nouveau.
▪ Pour bien aligner les lames, veillez sim-
plement à faire se coïncider chacune des
dents de la lame du haut avec celles du
bas. (L’extrémité finale des dents de la lame
supérieure doit se placer approximative-
ment à 1,2 mm en retrait par rapport à la
lame inférieure. Comparez les lames de
votre tondeuse avec ce schéma.)
▪ Si l’alignement des lames est incorrect,
ajoutez quelques gouttes d’huile sur les
lames, activez un petit moment votre ton-
deuse, puis éteignez-la et débranchez-la.
Dévissez légèrement les vis et ajustez les
lames. Resserrez les vis, une fois l’aligne-
ment des lames exécuté.
▪ Pour que votre tondeuse conserve un
excellent état, ses lames doivent être lubri-
fiées environ toutes les deux ou trois coupes.
46
FRANÇAIS
Page 47

SÉCURITÉ ET INSTALLATION __________
▪ N’utilisez pas d’huile capillaire, de graisse,
de mélange d’huile et d’essence, ni aucun
solvant. En s’évaporant, le solvant laisse
une épaisse couche d’huile sur les lames,
ce qui risque de ralentir leur action.
FRANÇAIS
47
Page 48

APERÇU ________________________
Cher client,
Félicitations, vous venez d'acheter
votre nouvelle tondeuse à cheveux
GRUNDIG MC 3320.
Veuillez lire attentivement les
recommandations ci-après pour
pouvoir profiter au maximum de la
qualité de votre appareil
GRUNDIG pendant de nombreuses années à venir.
Une approche
responsable !
GRUNDIG est attaché à des conditions
de travail négociées
sur contrat avec des
salaires équitables
pour les employés
internes et les fournisseurs. Nous
accordons également une grande
importance à l'utilisation efficace
des matières brutes avec une
constante réduction des déchets
de plusieurs tonnes de plastique
chaque année. En outre, tous nos
accessoires sont disponibles au
moins 5 ans.
Pour un avenir valant la peine
d’être vécu.
Pour une bonne raison. Grundig.
Commandes et pièces
Voir l'image en page 3.
A
Lame carbone inférieure en
acier inoxydable
B
Lame carbone supérieure en
acier inoxydable
C
Câble d'alimentation
D
Bouton Marche/Arrêt
E
Levier de commande de la lame
Accessoires
Pour des niveaux de coupure
F
différents, utiliser quatre peignes
de différentes tailles (#1 to #4).
Peigne #1
Peigne #2
Peigne #3
Peigne #4
3 mm
6 mm
9 mm
12 mm
Autres accessoires
Capuchon de protection de la
lame
Brosse de nettoyage
Huile de rasage
48
FRANÇAIS
Page 49

FONCTIONNEMENT ____________________
Préparation
1 Retirez l'emballage et conservez
en lieu sûr pour une utilisation
ultérieure.
2 Inspectez l'appareil avant de
l'utiliser, afin d'être sûr que les
lames ne contiennent ni cheveux, ni débris, etc.
3 Assurez-vous que la tension de
secteur figurant sur la plaque
signalétique correspond à votre
alimentation secteur locale.
4 Branchez le câble d'alimentation
dans la prise murale.
Rasage
1 Fixez un peigne F pour la
coupe qui vous convient (voir
Commandes et pièces).
2 Pour ce faire, insérez les dents de
la tête de coupe dans la rainure
centrale du peigne, puis appuyez
doucement sur les lames inférieure
A
et supérieure
qu'elles s'enclenchent.
3 Placez une serviette autour du
cou et sur les épaules de la
personne dont vous coupez les
cheveux. Assurez-vous que ce
dernier est assis de sorte que sa
tête soit pratiquement au niveau
de vos yeux.
B
jusqu'à ce
Ces mesures garantissent une
bonne visibilité pendant la
coupe et permettent de tenir
l'appareil en toute commodité.
4 Allumez l'appareil via la touche
Marche/Arrêt D puis procédez
au rasage.
5 Éteignez l'appareil via la touche
Marche/Arrêt D une fois le
rasage terminé.
6 Retirez le peigne. Retirez dou-
cement le cliquet inférieur de la
tête de coupe jusqu'à ce qu'il
se détache. Ensuite, enlevez le
peigne.
Comment utiliser le
levier de commande de
la lame
Remarques
7
Le levier rend votre tondeuse
polyvalente en vous permettant
de modifier de manière progressive le resserrement de votre
rasage sans aucun sabot à cheveux.
7
Lorsque le levier est sur la position
supérieure, les lames effectuent un
rasage très près et vous laissent les
cheveux très courts. Lorsque vous
poussez le levier vers le bas, vous
augmentez progressivement la longueur de coupe.
FRANÇAIS
49
Page 50

FONCTIONNEMENT ____________________
7
Sur la position inférieure, le
levier, tout comme le peigne #1,
laisse les cheveux à peu près à
la même longueur.
7
Le levier prolongera également la durée d'utilisation de
vos lames car l'extrémité de
coupe différente est utilisée pour
chaque réglage.
7
De plus, si un rasage extrêmement intense serre les lames, il
vous aidera à retirer les cheveux
coincés entre les deux lames
sans toutefois enlever les lames.
7
Une fois le rasage terminé, nettoyez les lames des tondeuses à
cheveux en passant rapidement
le levier de commande de la
lame E du maximum au minimum, sans éteindre l'appareil.
Niveaux du sabot à
cheveux
Remarque
7
Voir le tableau à la page 36.
Toutes les longueurs figurant
dans le tableau sont approximatives.
Conseils utiles
7
Tenez l'appareil en le saisissant
de manière décontractée et
confortable.
7
Toujours raser en allant dans le
sens contraire de la poussée des
cheveux.
7
Faites des pauses à intervalles
réguliers pendant le rasage. Il
est toujours possible de corriger
une erreur. Cependant, vous ne
pouvez le faire une fois les cheveux coupés.
7
Lorsque vous utilisez l'appareil
pour la première fois, pour effectuer le rasage, commencez par
un peigne long pour bien vous
habituer à l'appareil. Vous pourrez ensuite fixer un peigne plus
court.
7
Ne forcez pas le passage du
peigne à cheveux. Laissez-le
vous guider.
7
Continuez à peigner les che-
veux. Recherchez uniquement
les cheveux trop longs et débarrassez la tête des cheveux déjà
coupés à l'aide d'un peigne.
7
Les cheveux doivent être secs
pour un bon rasage.
50
FRANÇAIS
Page 51

INFORMATIONS _______________________
Nettoyage et entretien
7
Éteignez l'appareil et débran-
chez le câble d'alimentation de
la prise secteur.
7
Retirez le peigne et nettoyez la
tête de coupe avec la brosse
fournie.
7
Nettoyez le boîtier et le peigne
uniquement à l'aide d'un chiffon
humide et doux.
Attention
7
Ne jamais introduire l'appap-
reil ou le câble d'alimentation
dans de l'eau ou tout autre
C
liquide.
7
Avant d'utiliser l'appareil une
nouvelle fois, séchez soigneusement toutes ses parties à l'aide
d'une serviette douce.
7
N'utilisez pas de détergent.
Remarque
7
Enlevez les cheveux coupés
après chaque utilisation.
Réglage des lames
Lorsqu’elles sont neuves, les lames
sont alignées de façon optimale.
Toutefois, vous devez les régler de
nouveau lorsque vous les remplacez ou si vous enlevez la lame inférieure A pour la nettoyer.
1 Desserrez les vis.
2 Alignez les dents de la lame infé-
rieure A et de la lame supérieure
B
. Les points des dents qui se
trouvent sur la lame inférieure A
doivent être pratiquement d’1,2
mm derrière ceux de la lame supérieure
B
.
3 Si les lames ne sont pas
correctement alignées, éteignez
l’appareil, desserrez à nouveau
les vis et réajustez les lames.
4 Serrez les vis une fois les lames
alignées.
Remarque
7
Cependant, si vous souhaitez
conserver l’état original de la
tête de coupe le plus longtemps
possible, il est conseillé de la
lubrifier à intervalles réguliers.
Rangement
Veuillez conserver soigneusement
votre appareil si vous ne comptez
pas l’utiliser pendant une période
prolongée.
7
Veillez également à ce qu’il soit
débranché et entièrement sec.
7
Rangez les pièces dans l’embal-
lage original et entreposez-les
dans un lieu frais et sec.
7
Assurez-vous de tenir l’appareil
hors de portée des enfants.
FRANÇAIS
51
Page 52

INFORMATIONS _______________________
Remarque à caractère
environnemental
Le présent appareil a été fabriqué
avec des pièces et du matériel de
qualité supérieure susceptibles d'être
réutilisés à des fins de recyclage.
Ne le mettez donc pas
au rebut aux côtés des
déchets domestiques à la
fin de sa durée de vie.
Nous vous conseillons de
l'apporter à un point de collecte
pour le recyclage du matériel électrique et électronique. Cette recommandation est indiquée par le symbole de poubelle barrée qui figure
sur le produit, dans le manuel d'utilisation, et sur l'emballage.
Veuillez contacter les autorités de
votre localité pour en savoir plus
sur le point de collecte le plus
proche.
Aidez-nous à protéger l'environnement en recyclant les produits
usagés.
Données techniques
Ce produit est
conforme aux
Normes européennes
2004/108/EC,
2006/95/EC,2009/125/EC et
2011/65/EU.
Alimentation :
230 V~, 50 Hz
Puissance : 7W
KB/MAX 20MIN.
Modifications relatives à la tech-
nique et à la conception réservées.
Vous pouvez consulter ou télécharger ce manuel d’utilisation à
l’adresse : www.grundig.com
52
FRANÇAIS
Page 53

SIGURNOST I POSTAVLJANJE ___________
Molimo pažljivo pročitajte ovaj korisnički
priručnik prije uporabe uređaja! Slijedite sve
sigurnosne upute da biste izbjegli oštećenje
zbog nepravilne uporabe!
Sačuvajte korisnički priručnik za kasniju uporabu. Ako se ovaj uređaj da trećoj strani, mora
se predati i korisnički priručnik.
▪ Ovaj uređaj je samo za uporabu u
kućanstvu.
▪ Pridržavajte se ovih uputa da biste spriječili
oštećenje uređaja ili pojave opasnosti zbog
nepravilne uporabe. Držite ih na sigurnom
mjestu.
▪ Nikada ne koristite uređaj u kadi, tušu ili
iznad umivaonika punog vode; niti radite s
njim mokrim rukama.
▪ Ne uranjajte uređaj u vodu i pazite da
ne dođe u kontakt s vodom, čak i tijekom
čišćenja.
HRVATSKI
53
Page 54

SIGURNOST I POSTAVLJANJE ________
▪ Pazite da vam uređaj ne padne.
▪ Nakon uporabe, isključite utikač napajanja.
Ne isključujte uređaj iz struje povlačenjem
za kabel.
▪ Ako se uređaj koristi u kupaonici, važno
je da ga isključite nakon uporabe, jer
bilo kakva voda blizu uređaja još uvijek
predstavlja opasnost, čak i ako je uređaj
isključen.
▪ Za dodatnu zaštitu, ovaj se uređaj treba
spojiti na osigurač za kućanstva s jačinom
od maksimalno 30 mA. Za savjet, obratite
se električaru.
▪ Uređaj uvijek držite podalje od dosega
djece.
▪ Ne rastavljajte uređaj ni pod kakvim okol-
nostima. Svi jamstveni zahtjevi će biti
odbačeni u slučaju nepravilnog rukovanja.
▪ Ako je kabel napajanja oštećen, mora ga
zamijeniti proizvođač, servis ili jednako
kvalificirana osoba da bi se izbjegla svaka
opasnost od strujnog udara.
HRVATSKI
54
Page 55
SIGURNOST I POSTAVLJANJE ________
▪ Ovaj uređaj mogu koristiti djeca starija od
8 godina, osobe smanjenih tjelesnih, osjetilnih ili mentalnih sposobnosti ili osobe bez
dovoljno iskustva i znanja ako su pod nadzorom ili su im pružene upute o sigurnom
rukovanju uređajem te razumiju uključene
rizike. Djeca se ne smiju igrati uređajem.
Čišćenje i korisničko održavanje ne smiju
obavljati djeca bez nadzora.
▪ Vaši su šišači pažljivo provjereni kako bi se
osiguralo da su oštrice nauljene i poravnane prije napuštanja tvornice.
▪ Oštrice se moraju ponovno poravnati ako
su izvađene zbog čišćenja ili zamjene.
▪ Da biste poravnali oštrice, jednostavno
poravnajte zupce gornje i donje oštrice,
jedan po jedan. (Završetak zupca gornje
oštrice trebao bi biti otprilike 1,2 mm iza
donje oštrice. Usporedite oštrice šišača s
crtežom.)
HRVATSKI
55
Page 56

SIGURNOST I POSTAVLJANJE ________
▪ Ako je poravnanje oštrice nepravilno,
dodajte nekoliko kapi ulja na oštrice, nakratko uključite šišač, a potom ga isključite i
izvucite utikač. Lagano odvrnite vijke i prilagodite oštricu. Pritegnite vijke nakon poravnanja oštrice.
▪ Da biste održali šišač u vrhunskom stanju,
oštrice bi se trebale nauljiti nakon svakih
par šišanja.
▪ Ne koristite ulje za kosu, mast, parafinsko
ulje ili bilo koje otapalo. Budući da otapalo
isparava, ostavit će tanki sloj ulja što može
usporiti pokrete oštrice.
56
HRVATSKI
Page 57

BRZI PREGLED _________________________
Poštovani kupci,
Čestitamo Vam na kupnji vašeg
novog GRUNDIG šišača za
kosu MC 3320.
Pažljivo pročitajte sljedeće napomene za korisnika da biste puno
godina potpuno uživali u vašem
kvalitetnom proizvodu marke
GRUNDIG.
Odgovoran pristup!
GRUNDIG se usredotočuje na ugovorom određene socijalne radne uvjete s
korektnim plaćama
za svoje zaposlenike
i dobavljače. Također pridajemo
veliku važnost učinkovitoj uporabi
sirovina sa stalnim smanjenjem otpada od nekoliko tona plastike svake
godine. Nadalje, svi naši dodaci
dostupni su najmanje 5 godina.
Za budućnost vrijednu življenja.
Zbog dobrog razloga. Grundig.
Kontrole i dijelovi
Pogledajte sliku na 3. stranici.
A
Donja oštrica od nehrđajućega
ugljičnog čelika
B
Gornja oštrica od nehrđajuće-
ga ugljičnog čelika
C
Kabel napajanja
D
Sklopka za uključivanje/isklju-
čivanje
E
Poluga za oštricu
Dodaci
Četiri češlja različite veličine za
F
različite stupnjeve šišanja (#1 to
#4).
Češalj br.1
Češalj br.2
Češalj br.3
Češalj br.4
3 mm
6 mm
9 mm
12 mm
Drugi dodaci
Zaštitni poklopac za oštricu
Četka za čišćenje
Ulje za glavu za rezanje
HRVATSKI
57
Page 58

RAD __________________________________
Priprema
1 Uklonite svu ambalažu i sačuvaj-
te ju za buduće skladištenje.
2 Prije uporabe uređaja, provjeri-
te ima li dlaka, ostataka i sl. na
oštricama.
3 Provjerite odgovara li napon na
tipskoj pločici uređaja naponu
vaše lokalne mreže.
4 Uključite kabel napajanja u
zidnu utičnicu.
Podrezivanje kose
1 Pričvrstite češalj F za stupanj
šišanja koji želite (vidi Kontrole i
dijelovi).
2 Da biste to učinili, stavite zupce
glave za rezanje na središnji
utor češlja i nježno pritisnite na
donju oštricu A i gornju oštricu
B
dok ne sjedne na mjesto.
3 Stavite ručnik oko vrata i ramena
osobe čiju kosu šišate. Pripazite
da osoba sjedi tako da je njegova/njezina glava približno u
razini vaših očiju. To omogućuje
dobru preglednost tijekom šišanja i ležerno držanje uređaja.
4 Uključite uređaj pomoću sklopke
za uključivanje/isključivanje D i
započnite sa šišanjem.
5 Isključite uređaj pomoću sklopke
za uključivanje/isključivanje D
kad završite sa šišanjem.
6 Skinite češalj. Nježno povucite
donju kvačicu dalje od glave za
rezanje dok se ne olabavi. Zatim
podignite češalj.
Pomoću ručice za oštricu
Napomene
7
Poluga šišaču dodaje raznovrsnost, jer Vam omogućuje postupnu promjenu blizine reza bez
češlja.
7
Kad je poluga u najvišem položaju, oštrice će vam omogućiti
najbliže rezanje i ostavit će kosu
vrlo kratkom. Pomicanje poluge nadolje postupno povećava
duljinu rezanja.
7
U najnižem položaju poluga će
ostaviti kosu otprilike jednake
duljine kao i češalj.
7
Poluga će također produljiti
trajanje oštrica, jer se u svakoj
postavci koristi drugi rezni rub.
7
Osim toga, ako uslijed intenzivnog rezanja kose oštrice zablokiraju, pomoći će vam ukloniti
prikliještenu kosu bez skidanja
oštrica.
58
HRVATSKI
Page 59

RAD __________________________________
7
7
Kad ste završili sa šišanjem, očistite oštrice od odrezanih dlaka
pomicanjem poluge E od maksimuma do minimuma kad je uređaj još uključen.
Stupnjevi dodataka za
češalj
Napomena
7
Pogledajte tablicu na 44. strani-
ci. Sve duljine navedene u tablici
su približne.
Korisni savjeti
7
Držite uređaj opušteno i ugodno.
7
Uvijek režite u suprotnom smjeru
od rasta dlake.
7
Dok režete, redovito pravite
pauzu. Uvijek možete popraviti,
ali ne kad je kosa već ošišana.
7
Kad prvi put koristite uređaj,
započnite s duljim češljem za
šišanje tako da dobijete osjećaj
za uređaj. Nakon toga možete
pričvrstiti kraći češalj.
7
Nemojte na silu vući češalj kroz
dlake. Pustite da vas on vodi.
7
Nastavite češljati kosu. Tražite
samo kosu koja je preduga i iščešljajte odrezano.
Kako biste polučili dobre rezulta-
te kosa mora biti suha.
HRVATSKI
59
Page 60

INFORMACIJE _________________________
Čišćenje i održavanje
7
Isključite uređaj i isključite ga iz
mrežne utičnice.
7
Skinite češalj i očistite glavu za
rezanje priloženom četkom.
7
Očistite kućište i češalj samo
navlaženom, mekom krpom.
Pažnja
7
Nemojte nikada stavljati uređaj
ili kabel za napajanje C u vodu
ili neku drugu tekućinu.
7
Prije ponovne uporabe uređa-
ja osušite sve dijelove do kraja
pomoću ručnika.
7
Ne koristite sredstva za čišćenje.
Napomena
7
Uklonite odrezane dlake nakon
svake uporabe.
Podešavanje oštrica
Kad su nove, oštrice su optimalno
poravnate. Međutim, morat ćete
ponovno podešavati oštrice ako ih
zamijenite ili ako ste izvadili donju
oštricu A zbog čišćenja.
1 Otpustite vijke.
2 Poravnajte zupce donje oštrice
A
i gornje oštrice B.
Vrhovi zubaca na donjoj oštrici
A
trebaju biti otprilike 1,2 mm
iza onih na gornjoj oštrici B.
3 Ako oštrice nisu pravilno porav-
nate, isključite uređaj, ponovno
odvijte vijke i podesite oštrice.
4 Pritegnite vijke nakon poravna-
nja oštrica.
Napomena
7
Ako želite očuvati izvorni stanje
glave za rezanje što je dulje
moguće, dobro je podmazivati
je u redovitim intervalima.
Čuvanje
Ako ne planirate koristiti uređaj
dulje vrijeme, pažljivo ga odložite.
7
Pripazite da je isključen i da je
potpuno suh.
7
Držite dijelove u originalnoj kutiji
na hladnom, suhom mjestu.
7
Pripazite da se uređaj nalazi
izvan dosega djece.
60
HRVATSKI
Page 61

INFORMACIJE _________________________
Napomena o zaštiti
okoliša
Ovaj proizvod je proizveden od
kvalitetnih dijelova i materijala koji
se mogu ponovno koristiti i pogodni su za recikliranje.
Stoga ne odlažite proi-
zvod s uobičajenim kućanskim otpadom na kraju
radnog vijeka. Odnesite
ga na odlagalište za reciklažu električne i elektroničke opreme. To je naznačeno ovim simbolom
na proizvodu, u korisničkom priručniku i na pakovanju.
Konzultirajte se s lokalnim vlastima
da biste saznali o najbližem odlagalištu.
Pomozite zaštiti okoliša reciklažom
proizvoda.
Tehnički podaci
Ovaj proizvod usklađen
je s europskim
direktivama
2004/108/EC,
2006/95/EC,2009/125/EC i
2011/65/EU.
Napajanje:
230 V~, 50 Hz
Snaga: 7W
KB/MAX 20MIN.
Zadržavamo pravo na tehničke i
dizajnerske izmjene.
Ovaj korisnički priručnik je dostupan za pregledavanje i preuzimanje na www.grundig.com
HRVATSKI
61
Page 62

BEZPIECZEŃSTWO I USTAWIANIE _______
Przed użyciem tego urządzenia prosimy uważnie przeczytać tę instrukcję obsługi! Prosimy
przestrzegać wszystkich instrukcji zachowania
bezpieczeństwa, aby uniknąć szkód z powodu nieprawidłowego użytkowania!
Instrukcję tę należy zachować do wglądu w
przyszłości. Przy przekazaniu tego urządzenia komuś innemu należy przekazać także tę
instrukcję.
▪ Urządzenie to przeznaczone jest wyłącz-
nie do użytku domowego.
▪ Należy przestrzegać wszystkich instrukcji,
aby uniknąć uszkodzenia urządzenia lub
niebezpieczeństwa z powodu jego niewłaściwego użytkowania. Instrukcje przechowywać w bezpiecznym miejscu.
▪ Nie wolno używać tego urządzenia w
kąpieli, pod prysznicem, ani nad wypełniona wodą umywalką, a także nie należy go
obsługiwać mokrymi dłońmi.
POLSKI
62
Page 63

BEZPIECZEŃSTWO I USTAWIANIE _______
▪ Urządzenia nie wolno zanurzać w wodzie
ani dopuszczać do jego kontaktu z wodą,
nawet podczas jego czyszczenia.
▪ Nie wolno upuszczać maszynki na podło-
gę.
▪ Po użyciu wyjmij wtyczkę zasilającą z
gniazdka. Nie wolno wypinać z gniazda
ciągnąc za przewód zasilający.
▪ Gdy urządzenie jest używane w łazience,
należy pamiętać, aby po jego użyciu wyjąć
wtyczkę zasilania z gniazdka, ponieważ
zawsze, gdy znajduje się w pobliżu wody,
powstaje niebezpieczeństwo, nawet gdy
się je wyłączy.
▪ Dodatkową ochronę zapewni podłączenie
urządzenia do domowego wyłącznika różnicowo-prądowego, o mocy znamionowej
nie większej niż 30 mA. Należy skorzystać
z pomocy elektryka.
▪ Urządzenie to należy chronić przed dostę-
pem dzieci.
POLSKI
63
Page 64

BEZPIECZEŃSTWO I USTAWIANIE _______
▪ W żadnym przypadku nie należy rozbie-
rać tego urządzenia. Gwarancja na to
urządzenie nie obejmuje uszkodzeń spowodowanych nieprawidłowym obchodzeniem się z nim.
▪ W razie uszkodzenia przewodu zasilają-
cego, aby uniknąć zagrożenia porażeniem
elektrycznym, należy zlecić jego wymianę
producentowi, punktowi serwisowemu lub
wykwalifikowanej osobie.
▪ Urządzenie to mogą używać dzieci ośmio-
letnie i starsze oraz osoby o ograniczonej
sprawności fizycznej, zmysłowej i umysłowej lub bez doświadczenia i wiedzy, jeśli
są pod nadzorem lub poinstruowano je co
do jego użytkowania w bezpieczny sposób
i rozumieją związane z tym zagrożenia.
Dzieci nie mogą bawić się tym urządzeniem. Dzieci bez nadzoru nie mogą czyścić
ani konserwować tego urządzania.
64
POLSKI
Page 65

BEZPIECZEŃSTWO I USTAWIANIE _______
▪ Ta maszynka do strzyżenia została dokład-
nie zbadane, aby upewnić się, że ostrza
zostały naoliwione i wyrównane przed
opuszczeniem fabryki.
▪ Ostrza trzeba na nowo wyrównać, jeżeli
były wyjęte do czyszczenia lub wymiany.
▪ Aby wyrównać ostrza, po prostu dopasuj
ostrza górne i dolne zębami do góry, jeden
ząb do drugiego. (Końce zębów ostrza
górnego powinny znajdować się 1,2 mm
z tyłu za ostrzem dolnym. Porównaj ostrza
maszynki z tym szkicem.)
▪ Jeśli ostrza nie są prawidłowo wyrówna-
ne, dodaj na nie kilka kropli olejku, załącz
maszynkę na kilka chwil, wyłącz i odłącz
od zasilania. Lekko poluźnij śruby i dopasuj. Po wyrównaniu ostrzy dokręć śruby.
▪ Aby utrzymać maszynkę w najlepszym sta-
nie, trzeba oliwić ostrza co kilka strzyżeń.
▪ Nie używaj oleju do włosów, smaru, oleju
zmieszanego z naftą lub jakiegokolwiek
rozpuszczalnika. Gdy rozpuszczalnik
wyparuje i pozostanie gęsty olej, może to
spowolnić ruch ostrzy.
POLSKI
65
Page 66

W SKRÓCIE ____________________________
Drodzy Klienci,
Gratulujemy zakupu naszego
nowego trymera do włosów
GRUNDIG MC 3320.
Prosimy uważnie przeczytać następującą instrukcję, aby na wiele lat
zapewnić sobie pełną satysfakcję
z użytkowania tego wysokiej jakości wyrobu firmy GRUNDING.
Odpowiedzialna
postawa!
GRUNDIG przywiązuje dużą wagę
do przestrzegania podpisanych
umów dotyczących
warunków pracy za
godziwe wynagrodzenie, zarówno wobec naszych pracowników,
jak i dostawców. Zwracamy również dużą uwagę do efektywnego
wykorzystywania surowców, stałego zmniejszania ilości odpadów
o kilka ton rocznie. Ponadto z
wszystkich produkowanych przez
nas urządzeń można korzystać
przez co najmniej pięć lat.
Regulacja i budowa
Patrz rysunek na str. 3.
A
Ostrze dolne ze stali weglowej
B
Ostrze górne ze stali weglowej
C
Przewód zasilający
D
Przełącznik Zał./Wył.
E
Dźwignia ostrza
Akcesoria
Cztery grzebienie w różnych
F
rozmiarach do cięcia różnej
długości (nr 1 do nr 4).
Grzebień 1
Grzebień 2
Grzebień 3
Grzebień 4
3 mm
6 mm
9 mm
12 mm
Inne akcesoria
Nasadka ochronna na ostrze
Szczoteczka do czyszczenia
Olej do głowicy do strzyżenia wło-
sów
Dla przyszłości, dla której warto
żyć.
Dla dobrej sprawy. Grundig.
POLSKI
66
Page 67

OBSŁUGA _____________________________
Przygotowanie
1 Zdejmij całe opakowanie i
zabezpiecz je do przyszłego
przechowania.
2 Przed użyciem sprawdzaj, czy
na ostrzach nie ma włosów,
brudu itp.
3 Sprawdź, czy napięcie na
tabliczce znamionowej jest takie
samo, jak w sieci domowej.
4 Wsadź wtyczkę przewodu zasi-
lającego do gniazdka w ścianie.
Strzyżenie włosów
1 Załóż grzebień F o potrzeb-
nej długości cięcia (patrz
„Regulacja i budowa").
2 Wsuń zaczep głowicy cięcia w
środkowy rowek grzebienia i
delikatnie naciskaj dolne ostrze
A
i górne
3 Ułóż ręcznik wokół szyi i
na ramionach osoby, której
będziesz strzyc włosy. Osoba
ta powinna siedzieć, tak aby
jej głowa była mniej więcej
na wysokości Twoich oczu. To
umożliwia dogodną widoczność podczas strzyżenia i luźny
uchwyt maszynki.
B
, aż wskoczą.
4 Załącz przyrząd naciskając
przełącznik Zał./Wył. D i rozpocznij strzyżenie.
5 Po skończeniu strzyżenia wyłącz
przyrząd naciskając przełącznik
Zał./Wył.
D
6 Zdejmij grzebień. Ostrożnie
odciągnij dolny zaczep od
głowicy cięcia. Następnie unieś
grzebień.
Korzystanie z dźwigni
ostrza
Uwagi
7
Dzięki tej dźwigni trymer jest
bardziej funkcjonalny, ponieważ
pozwala stopniowo zmieniać bliskość cięcia bez grzebienia.
7
Po ustawieniu dźwigni w położeniu najwyższym, ostrza
będą strzyc jak najbliżej skóry
- włosy będą bardzo krótkie.
Naciśnięcie dźwigni w dół stopniowo zwiększa długość włosów..
7
Po ustawieniu dźwigni w położeniu najniższym, ostrza będą
strzyc w przybliżeniu na długość, jak przy użyciu grzebienia
nr 1.
POLSKI
67
Page 68

OBSŁUGA _____________________________
7
Dźwignia pozwala również
przedłużyć okres użyteczności
ostrzy, ponieważ przy każdym
ustawieniu wykorzystywana
inna krawędź tnąca.
7
Ponadto w przypadku zablokowania ostrzy włosami, dźwignia
pomaga usunąć włosy zaklinowane między dwoma ostrzami i
to bez zdejmowania ostrzy.
7
Po zakończeniu strzyżenia, usunąć włosy z ostrzy szybko przesuwając dźwignię ostrza E z
położenie maksymalnego na
minimalne, gdy trymer jest włączony.
Rozmiary przystawek
grzebieniowych
Uwaga
7
Patrz tabela na str. 51. Podane w
niej długości są przybliżone.
Przydatne wskazówki
7
Przyrząd trzymaj w dłoni luźno i
wygodnie.
7
Strzyż zawsze w kierunku prze-
ciwnym do naturalnego kierunku
wzrostu włosów.
7
Przerywaj strzyżenie w regu-
larnym rytmie. Zawsze można
poprawić, ale nie wtedy, gdy
włosy są już przycięte.
7
Podczas pierwszego używania
trymera, rozpocznij od dłuższego grzebienia, aby wyczuć
sposób jego działania. Potem
możesz używać krótszego grzebienia.
7
Podczas przesuwania grzebie-
nia przez włosy nie używaj siły.
Grzebień sam sie przesuwa.
7
Przez cały czas rozczesuj włosy
grzebieniem. Szukaj tylko włosów zbyt długich i wyczesuj grzebieniem ścinki.
7
Aby uzyskać najlepsze rezultaty
włosy muszą być suche.
68
POLSKI
Page 69

INFORMACJA __________________________
Czyszczenie i
konserwacja
7
Wyłącz urządzenie i wyjmij
wtyczkę z gniazdka.
7
Zdejmij grzebień i oczyścić gło-
wicę cięcia dostarczoną szczoteczką.
7
Obudowę i grzebień należy czy-
ścić wyłącznie wilgotną, miękką
ściereczką.
Ostrożnie
7
Urządzenia tego, ani przewodu
zasilającego C nie wolno wkładać do wody ani żadnego innego płynu.
7
Przed użyciem tak oczyszczo-
nego urządzenia dokładnie
wytrzyj do sucha wszystkie jego
części miękkim ręcznikiem.
7
Nie stosuj środków czyszczą-
cych.
Uwaga
7
Po każdym użyciu usuwaj ścinki
włosów.
Regulacja ostrzy
Nowe ostrza są wyrównane.
Jednak po każdej wymianie ostrzy
lub po zdjęciu dolnego ostrza A
do czyszczenia wymagają one
regulacji.
1 Odkręć śrubki.
2 Wyrównaj zęby dolnego ostrza
A
i górnego B. Punkty zębów
dolnego ostrza A powinny być
około 1.2 mm za zębami górnego ostrza B.
3 Jeśli wyrównanie jest nieprawidło-
we, wyłącz urządzenie, ponownie odkręć śrubki i wykonaj regulację ostrzy.
4 Po wyrównaniu ostrzy dokręć
śrubki.
Uwaga
7
Jeśli chcesz zachować głowi-
cę tnącą w pierwotnym stanie
przez jak najdłuższy czas,
warto ją oliwić z regularną częstotliwością.
Przechowywanie
Jeśli jest planowane nieużywanie
tego urządzenia przez dłuższy
czas, należy starannie je przechować.
7
Upewnij się, że jest wypięte z
gniazdka i zupełnie suche.
7
Zapakuj części w oryginalne
opakowanie i przechowuj je w
chłodnym, suchym miejscu.
7
Urządzenie to należy chronić
przed dostępem dzieci.
POLSKI
69
Page 70
INFORMACJA __________________________
Uwaga dot. ochrony
środowiska
Wyrób ten wykonano z części i
materiałów wysokiej jakości, które
mogą być odzyskane i użyte jako
surowce wtórne.
Po zakończeniu użytkowania nie należy zatem
pozbywać sie go razem
z innymi odpadkami
domowymi. Należy przekazać je do punktu zbiórki urządzeń elektrycznych i elektronicznych. Wskazuje na to ten symbol
umieszczony na wyrobie, instrukcji
obsługi i opakowaniu.
Gdzie jest najbliższy taki punkt
zbiórki. można dowiedzieć się od
władz miejscowych.
Odzyskując surowce z używanych
wyrobów pomagamy chronić środowisko naturalne.
Dane techniczne
Wyrób ten jest zgodny z
Dyrektywami Europejskimi 2004/108/EC,
2006/95/EC,
2009/125/EC oraz 2011/65/EU.
Zasilanie:
230 V~, 50 Hz
Moc: 7 W
KB/MAX 20MIN.
Zastrzega się prawo do wprowa-
dzania modyfikacji konstrukcji i
danych technicznych.
Niniejszą instrukcję użytkowania
można przejrzeć i pobrać na
www.grundig.com
70
POLSKI
Page 71

Page 72

Grundig Intermedia GmbH
Beuthener Strasse 41
Nürnberg 90471,Germany
www.grundig.com
72011 9088 600 14/42
AUS GUTEM GRUND
 Loading...