

Page 1
EPILATOR
WITH INTERCHANGEABLE SHAVING HEAD
LE 7940
Page 2
------------------------------------------------------------------------------------------------------------------------------------------------------------------
A
J
G
B
H
C
C
D
E
F
I
2
Page 3

------------------------------------------------------------------------------------------------------------------------------------------------------------------
DEUTSCH 4-17
ENGLISH 18-30
FRANÇAIS 31-43
ITALIANO 44-56
PORTUGUÊS 57-69
ESPAÑOL 70-82
POLSKI 83-95
ČESKY 96-108
MAGYAR 109-121
TÜRKÇE ??-??
TÜRKÇE 122-134
ΕΛΛΗΝΙΚΑ 135-147
3
Page 4
SAFETY
------------------------------------------------------------------------------------------------------------------------------------
Please note the following instructions when using the appliance:
7
This appliance is designed for
domestic use only.
7
This appliance is designed for
the removal of human body hair.
Any other use is expressly prohibited, particularly for the removal of hair on the head.
7
Do not immerse the appliance in
water.
7
Only use the KG3B-030-1000D
power supply unit provided.
7
Do not drop the appliance.
7
Disconnect the power supply
unit after use or charging.
7
Never use the appliance if it or
the power supply unit show
signs of damage.
7
Do not use the appliance if you
have varicose veins.
7
Removing hair from the roots
can cause reddening or irritation of the skin. This is a normal
reaction and only lasts a short
time. If irritation persists longer
than three days, consult your
doctor.
7
We recommend epilating in the
evenings. This gives any skin
irritations that might occur a
chance to wear off overnight.
7
To avoid accidents, keep the appliance away from the hair on
your head, eyebrows and eye
lashes, and also from clothes,
brushes, wires, cords, laces, etc.
7
Keep the appliance out of the
reach of children.
7
If the power cord from the
charging unit is damaged, it
must be replaced by the manufacturer, its service centre or a
similarly qualified person to prevent danger arising.
18
ENGLISH
Page 5

SAFETY
7
The appliance may not be used
------------------------------------------------------------------------------------------------------------------------------------
by the following people, including children: those with limited
physical, sensory or mental capabilities and also those with a
lack of experience and knowledge. This does not apply to the
latter if they were instructed in
the use of the appliance or if
they use it under the supervision
of a person responsible for
safety. Children should always
be supervised to ensure that
they do not play with the appliance.
7
Do not open the appliance
under any circumstances. No
warranty claims are accepted
for damage caused by improper
handling.
ENGLISH
19
Page 6

OVERVIEW
----------------------------------------------------------------------------------------------------------------------
Dear customer,
Congratulations on the purchase
of your LE 7940 epilator. Read the
following user notes carefully to
ensure you can enjoy your quality
product from Grundig for many
years to come.
Special features
– Your appliance is suitable for
any type of skin. The patented,
innovative rotating head removes even the shortest of hairs
of 0.5 mm or more.
– The device will remove your hair
right down to the root for four to
six weeks.
– To prepare for epilating, you
can trim longer hairs with the
replaceable shaving head.
– The replaceable shaving head
enables the appliance to also be
used as a lady shaver, which is
ideal for sensitive areas such as
the armpits or bikini zone.
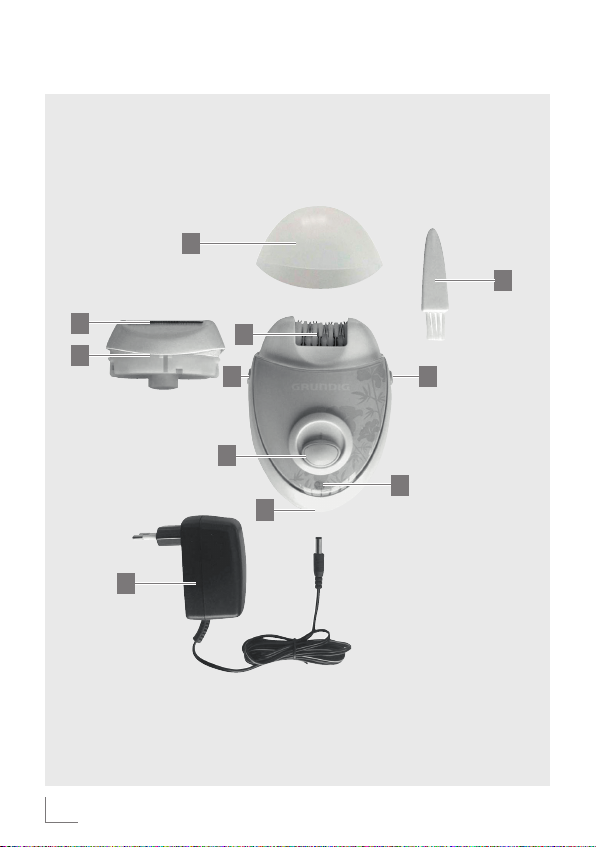
Controls
See the illustrations on page 2.
A
Protective cap.
B
Epilator head with rotating
part.
C
Side catches. These open
the catch for removing the
epilator or shaving head.
D
Switch for switching on and
off, and for selecting the two
speed settings.
E
Charging display.
F
Power cord socket.
G
Blade foil.
H
Shaving head.
Accessories
I
Power supply unit.
J
Cleaning brush.
20
ENGLISH
Page 7

POWER SUPPLY
----------------------------------------------------------------------------------------------------
Rechargeable battery
operation
When operating the appliance
with the built-in nickel metal
hydride battery, only use the
power unit supplied for charging.
Check if the type plate on the
power supply unit corresponds to
your local mains supply.
1 Press the button to switch off
the appliance.
2 Plug the power cord into the ap-
pliance socket and the power
supply unit into the wall socket.
– During the charging process,
the display lights up red.
– Once the appliance is fully
charged, the charging display
does not switch off or change
its colour.
3 Pull the power cord out of the
the appliance socket and the
power supply unit out of the wall
socket.
D
F
E
F
Notes
7
Charge up the batteries completely (for at least 12 hours) before you first use them or if you
have not used them for a long
time.
7
Never charge the appliance for
longer than 24 hours.
7
The ambient temperature should
be between 5 °C and 40 °C.
7
Once you have used the appliance, charging time is approx.
8 hours.
7
In its fully charged state, the appliance can run for approx. 60
minutes. It is not advisable to
charge the batteries after each
use. Only charge the batteries
when they are completely discharged. This increases their
service life. Do not charge them
every day.
ENGLISH
21
Page 8

POWER SUPPLY
----------------------------------------------------------------------------------------------------
Mains operation
Only operate the appliance with
the power supply unit provided.
Check that the voltage indicated
on the type plate of the power supply unit corresponds to your local
power supply.
The only way to disconnect the appliance from the power supply is to
unplug the power supply unit.
1 Insert the power cord into the
2 Plug the power supply unit
F
socket on the appliance.
into the power socket.
I
Caution
7
Only use the appliance in
battery mode when in the
bathroom or beside a water
connection; never run it from the
mains.
22
ENGLISH
Page 9

USE
--------------------------------------------------------------------------------------------------------------------------------------------------
Trimming/shaving hair
If you want to epilate hairs which
are longer than 10 mm, it is advisable to trim these with the shaving
head beforehand.
Caution
7
The shaving head can only be
used with speed setting »
1 Press the button to switch off
the appliance.
2 Remove the epilator head .
To do this, press the side catches
C
and take off the epilator
head with the other hand.
1«.
D
B
3 Attach the shaving head and
H
press it down until it latches in
place.
4 Insert the power cord into the
F
socket on the appliance
and plug the power supply unit
I
into the mains socket.
5 Switch the appliance to position
»
1« using .
D
6 Trim hairs by moving the appli-
ance gently over the parts of
skin.
ENGLISH
23
Page 10

USE
--------------------------------------------------------------------------------------------------------------------------------------------------
Hair removal
To achieve best results, take a
warm bath or shower to open the
pores.
This way your skin will be clean
and smooth and thus in the best
condition for epilating.
Make sure your skin is clean, not
greasy and completely dry before
epilating.
1 Remove the protective cap
from the appliance.
2 Press the button to switch on
D
the appliance.
3 Adjusting the speed.
– Low (»
– High (»
1«) for fine hair.
2«) for coarser hair.
A
Warning
7
Do not use the appliance on
moles or birthmarks. Birthmarks should never be
scratched, ruptured or depilated. If this is the case, your
health could be at risk.
4 We recommend holding the ap-
pliance in your hand at a 100°
angle to your skin. Do not exert
any pressure, just touch the skin.
24
ENGLISH
Page 11

USE
--------------------------------------------------------------------------------------------------------------------------------------------------
5
Use short, circular movements as
if you were brushing or wiping –
in the direction the hair grows.
7 You can also remove hairs on
your thigh or bikini area.
8 You can remove individual
hairs on your top lip or cheek.
9 Hold out your arm to stretch
the skin when removing armpit
hairs.
Note
7
If you have not removed the
hairs from your bikini area or
under your armpits for a longer
6 Pull the skin taut with your other
hand, if necessary. Stretch out
your leg when removing hair behind your knee.
period, start by trimming them
with the replaceable shaving
H
head .
10 Press the button to switch off
D
the appliance after use.
11 Disconnect the power supply
unit from the wall socket.
ENGLISH
25
Page 12

USE
--------------------------------------------------------------------------------------------------------------------------------------------------
7
Useful tips
7
The first time you use the appliance, it may feel slightly unpleasant, as you are removing
hairs by the roots. This feeling
subsides after several uses, even
If you have varicose veins or
other health problems, you must
consult your doctor before use.
7
For reasons of hygiene, the appliance may only be used by
one person.
if you have sensitive skin.
7
The first time you use the epilator, the results will last four to six
weeks. After each further use,
your hair will grow slower and
thinner.
7
Hold the appliance with a relaxed and comfortable grip. Do
not exert any pressure. For your
safety, the appliance slows
down or stops rotating if you
press too hard on your skin.
26
ENGLISH
Page 13

CLEANING AND CARE
----------------------------------------------------------------------------
Cleaning the epilator
head
1 Turn the appliance off and un-
plug the cable. Pull the power
supply unit out of the mains
socket.
2 Remove the epilator head .
To do this, press the side catches
C
and take off the epilator
head with the other hand.
B
3 Use the cleaning brush supplied
J
to remove all hairs from the
mechanism, the housing and the
appliance.
4 Put the epilator head back on
again. Push down the head until
it catches.
Note
7
Note the position of the guide
groove on the bottom of the epilator head housing. It must be
aligned with the guide slot on
the appliance housing.
5 Replace the protective cap .
A
ENGLISH
27
Page 14

CLEANING AND CARE
----------------------------------------------------------------------------
Note
7
You do not have to clean the
discs of the epilator mechanism.
However, to maintain hygiene,
you can wipe them from time to
time with alcohol. Use a cotton
bud which you have first soaked
in alcohol and then squeezed
out. The cotton bud must not be
wet.
Caution
7
Never hold the appliance in water or any other liquid.
7
Do not use any household
cleaning agents.
Cleaning the shaving
head
1 Turn the appliance off and un-
plug the cable. Pull the power
supply unit out of the mains
socket.
2 Remove the shaving head. To
do this, press the side catches
and take off the whole shaving
head with the other hand.
3 Remove the blade foil from
the shaving head by pulling the
part up.
4 Knock the bottom of the blade
G
foil gently against a flat
surface.
G
C
28
ENGLISH
Page 15

CLEANING AND CARE
----------------------------------------------------------------------------
Caution
7
Never clean the blade foil of the
shaving head with the cleaning
brush supplied.
5 Clean the bottom of the shaving
head with the cleaning brush
supplied .
J
6 Insert the blade foil in the
shaving head again.
7 Put the shaving head back on
again. Push down the shaving
head until it catches.
Storage
If you do not want to use the appliance for a long period of time,
please store it carefully.
1 Ensure that it is switched off and
is dry.
2 Ensure that the epilator head
and the shaving head are completely clean.
3 Store the appliance, the shaving
head and the power supply unit
in a cool, dry place.
4 Make sure the appliance is kept
out of reach of children.
ENGLISH
29
Page 16

INFORMATION
------------------------------------------------------------------------------------------------------
Environmental note
This product is manufactured from
high-quality parts and materials
which can be reused and recycled.
Therefore, do not dispose of the
product along with normal household waste at the end of its service
life. Take it to a collection point for
the recycling of electrical and electronic equipment. This is indicated
by this symbol on the product, in
the operating manual and on the
packaging.
Please find out about collection
points operated by your local
authority.
Help protect the environment by
recycling used products.
Technical data
This product conforms to the European directives
2004/108/EC
and 2006/95/EC.
Power supply
Power supply unit
KG3B-030-1000D
230 V ~, 50 Hz
Batteries: Nickel metal hydride
Ni-MH
Technical and design modifications reserved.
30
ENGLISH
Page 17

Grundig Multimedia B.V.
Atrium, Strawinskylaan 3105 • NL-1077 ZX Amsterdam • http://www.grundig.com
72011 905 1500
Cat. No.: 74154400
 Loading...