

Page 1

DAB+ Micro System
with Dock for iPod
GMS558DABIP
The Gold Technical Support Line:1902 215 259
Personal Product Support
(Charges will apply at $2.95 per minute)
Page 2

Introduction
Thank you for buying this Grundig product, which is designed to give you many
years of trouble-free service.
You may already be familiar with using a similar unit, but please take time to read
these instructions. They are designed to familiarise you with the unit’s many
features and to ensure you get the very best from your purchase.
Safety is important
Your safety and the safety of others is important.
Please therefore, ensure you read the “Safety Instructions” before you operate
this unit.
Warranty
In the unlikely event that your product fails to work normally, please call the below
free phone number to discuss the problem with one of our qualified service
engineers.
Australia.
Grundig Warranty: 1800 509 394
New Zealand
Grundig Warranty: 0800 450 259
Page 3

General Safety
This micro system has been designed and manufactured to meet Australian safety standards, but
like any electrical equipment care must be taken if you are to achieve the best results and safety
is to be assured.
Please read these operating instructions before you attempt to use this device..
Ensure that all electrical connections (including the mains plug, extension leads and intercon-
nections between pieces of equipment) are correct and in accordance with the manufacturer’s
instructions.
Switch off and remove the mains plug when connecting or disconnecting any devices.
Consult your retailer if you are ever in doubt about the installation, operation or safety of your
equipment.
Do not continue to operate the equipment if you are in doubt about whether it is working nor-
mally, or if it is damaged in any way. Switch it off, disconnect the mains plug and consult your
retailer.
Do not remove any fixed covers as this may expose you to dangerous voltages.
Do not leave the equipment switched on when unattended for long preriod of time.
Do not obstruct the ventilation vents on the equipment, e.g. with curtains or soft furnishings,as
this may can the unit to over heat.
Overheating will cause damage and shorten the life of the product.
Do not allow this unit to be exposed to rain , moisture or any type of liquid.
Do not install this unit in a confined space such as a book case
or cabinet. Make sure there is plenty of ventilation room around the unit.
WARNING:To reduce the risk of fire or electric shock, do not expose this apparatus
to rain or moisture. The unit shall not be exposed to dripping or splashing liquid and
objects filled with liquids, such as vases, shall not be placed on or near the unit.
WARNING: Do not expose the batteries or unit to source of excessive heat ,heater,
direct sunlight fires.
Correct Disposal of this product. This marking indicates that this product
should not be disposed of with other household wastes . To prevent
possible harm to the environment or human health from uncontrolled waste disposal,
recycle it responsibly to promote the sustainable reuse of material resources.
Page 4

4
Contents
Your Micro System...................................................................................................................5
Quick Start...............................................................................................................................7
Using the DAB+ Radio ............................................................................................................8
Using the FM Radio................................................................................................................11
Using the CD......................................................................................................................... 13
Using the Clock and Timer..................................................................................................... 16
Other functions...................................................................................................................... 18
Troubleshooting..................................................................................................................... 19
Specifications......................................................................................................................... 19
Warranty.................................................................................................................................20
Page 5
Your Micro System
Front
1
Rear
2
3
4
5
6
7
8
18
21
9
10
11
12
13
14
15
16
17
22
19
20
5
Page 6

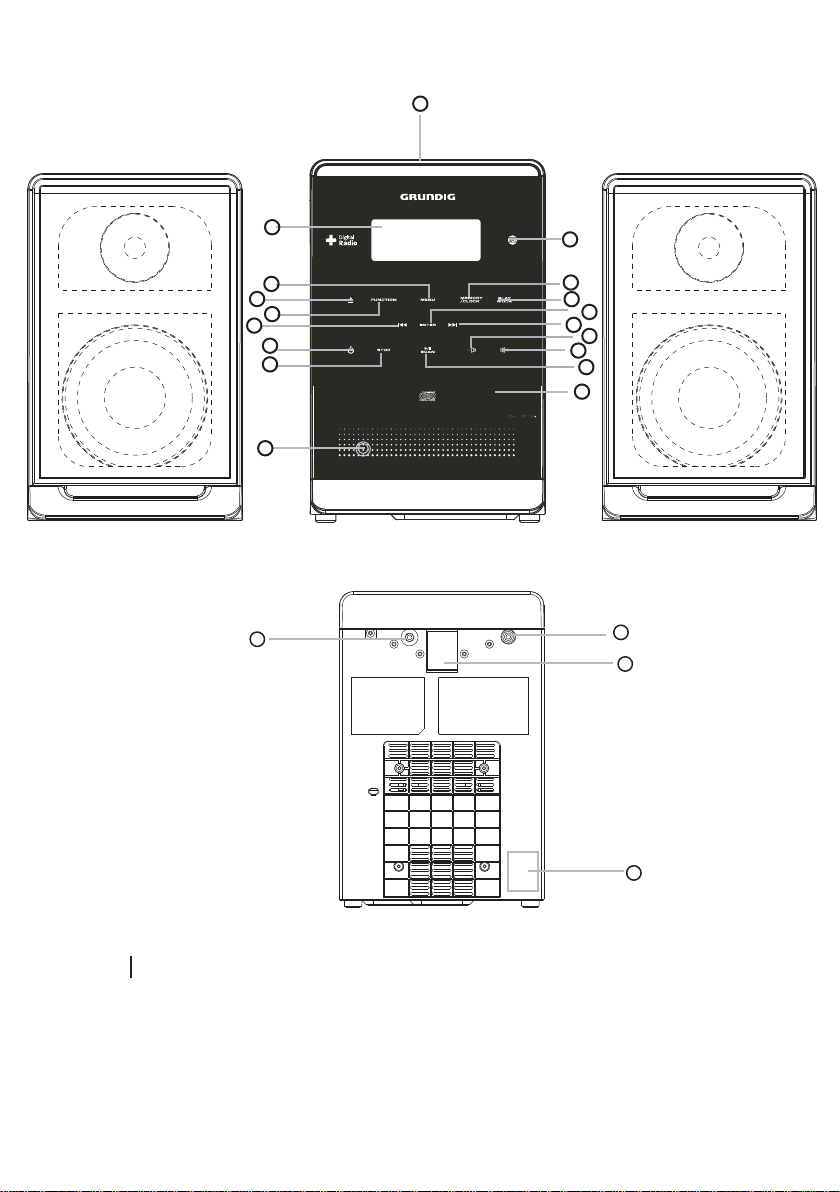
CONTROLS
Top and Front Panels
1.iPod Dock:The iPod Dock connects,plays charges your iPod through this.
2.LCD Display:The LCD display will show scrolling text information,song titles,
menu option
3.MENU Button:The MENU Button allows you to enter the main menu.
4.EJECT Button:The EJECT Button will open and close the CD tray.
5.FUNCTION Button:Press the FUNCTION Button to select which mode you
wish to play (DAB+,FM,CD,AUX IN,iPod)
6.Skip Backward Button:Press the skip backward button to select the
previous track or replay a section of the song you are listening to.
7.STANDBY/ON Button: Press the STANBY/ON Button to turn on or off the unit.
8.Stop Button:Press the STOP Button to stop play CD, MP3,iPod,Radio station
you are listening to.
9.Remote Control Sensor:Press the Remote Control Sensor connects your remote
to the unit.
10.MEMORY/CLOCK Button: Press the MEMORY/CLOCK Button to slare a track
into the uint memory or to set the clock.
11.PLAY MODE Button:Press the PLAY MODE Button to select the repeat mode.
12.ENTER Button:Press the ENTER Button to confirm the menu selections and settings
13.SKIP FORWARD Button:Press the SKIP FORWARD Button
14.VOLUME - Button:Press the VOLUME - Button to decrease the VOLUME.
15.VOLUME+
16.PLAY/SCAN Button:Press the PLAY/SCAN Button to play CDs,iPod,MP3 track
or to scan for designed radio station.
17.CD Tray:The CD tray is where you will enter your CD.
18. AUX IN Jack:The AUX IN Jack allows you to connect your MP3 player.
Button:Press the VOLUME - Button to increase the VOLUME.
Back Panel
19.Speaker Terminal:The speaker terminal connect your speaker to the unit.
20
.Mains Power Socket:The Mains Power Socket is where the mains power
lead to the unit.
21
.Headphone
Socket:The Headphone Socket allows you to connect Headphone
to the unit.
.Antenna:The antenna is use to find reception for DAB+/FM Radio modes.
22
6
Page 7
7
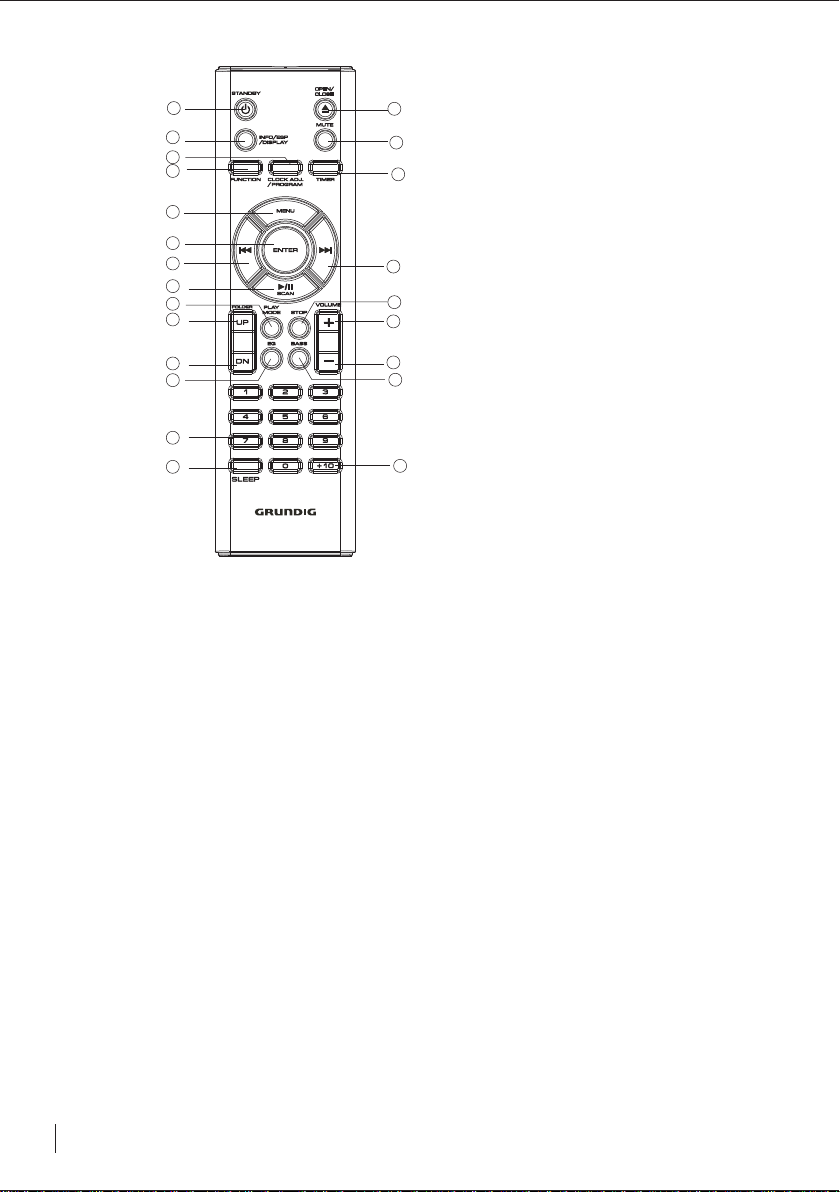
REMOTE CONTROL
1
2
3
4
5
6
7
8
9
10
11
12
13
14
15
16
17
18
19
20
21
22
23
1.STANDBY Button:Press the STANDBY Button to turn on or off (standby) the unit.
2.INFO/ESP/DISPLAY Button:In tuner mode,press INFO to change display mode/Press ESP to
anti-shock feature for CD playback/In MP3 mode, press DISPLAY repeatedly to show tracks of
different genre.
3.CLOCK/PROGRAM Button:Press the CLOCK/PROGRAM Button to store a track into the unit
memory or to set clock.
4.FUNCTION Button:Press the FUNCTION Button to select source of sound
(DAB+/FM/CD/AUX IN/IPOD).
5.MENU Button:Press the MENU Button to access the setup menu.
6.ENTER Button:Press the ENTER Button to make selection in menus.
7.SKIP I<< Backward Button:Press the SKIP BACKWARD Button to select the previous track or replay a
section of the song you are listening to.
8.PLAY/SCAN Button:Pressthe PLAY/SCAN Button to play or pause the CD or iPod or MP3
play,to scan the DAB+/FM stations.
9.PLAY MODE Button:Press the PLAY MODE Button to select the repeat mode.
10.FOLDER UP Button:Press the FOLDER UP Button to folder up the MP3 files.
11.FOLDER DN Button:Press the FOLDER DN Button to folder down the MP3 files.
12.EQ Button:Press the EQ Button to select an equalizer mode
13.NUMBER Button:Press the NUMBER Button to select a track in CD mode or iPod stations.
14.SLEEP Button:Press the SLEEP Button to set amout of time before auto shut off.
15.OPEN/CLOSE Button :Press the OPEN/CLOSE Button to open or close the CD tray.
16.MUTE Button:Press the MUTE Button to cut or restore audio output.
17.TIMER Button:Press the TIMER Button to switch the system on or off at a specified time.
18.SKIP >>I FORWARD Button:Press the SKIP FORWARD Button to skip forward to another track
or section of the music being played
19.STOP Button:Press the STOP Button to stop play in CD mode only.
20.VOLUME+ Button:Press the VOLUME+ Button to increase the VOLUME.
21.VOLEME- Button:Press the VOLUME- Button to decrease the VOLUME.
22.BASS Button: press theBASS Button to turn on or off the bass boost sound.
23.FILE +10:Press the FILE +10 Button to select the next 10th track.
Page 8

8
Quick start
Using the Remote Control
Insert two AAA batteries into the remote control while observing the correct (+) and (-)
polarities as shown. (Batteries not included).
Using Headphones
To listen to your Grundig DAB+ Micro System via the Headphone Jack,you need Headphones
(not included) with a 3.5mm stereo plug with 8-32 ohm impedance.
Plug your Headphones into the Headphone Socket on the back of your Micro System. Be
sure to have the volume low before putting on your Headphones,then increase to the desired
level once on.When the Headphones are connected the speakers are automatically turn off.
Page 9

9
Using the DAB+ Radio
Introduction
found are stored.
program type, network provider, signal strength, current time and date, and scrolling text
information.
Turning on the DAB+ Radio
Extend the wire aerial on the rear of the DAB+ Radio.
Press the YBDNATS Button to switch on your DAB+ MICRO System.
Scanning for DAB+ Radio Stations
To scan for DAB+ station available ,press the PLAY/SCAN Button on the remote or unit.
The DAB+ radio will automatically scan and store all available stations in the memory.
When the scan is complete, the DAB+ stations will be displayed in alphanumeric order.
The first station on the list will be selected.
BAD ruoY + Radio automatically scans for radio stations within your region. All radio stations that are
oidua latigid ot noitidda nI ,your DAB+ Radio can display information such as program name,
Welcome to
DAB/FM Radio
Scanning...
2 CH
Connecting...
Press the Buttons to scroll through the available stations. Press the ENTER Button to
select your desired station.
Using the DAB+ Radio
Manual Tuning
Press the MENU Button on the remote control and press the Buttons until the required
station is displayed.
Page 10

The MENU Options will be displayed as follows
< >
DAB
the Button
DAB
< >
Full scan
the Button
DAB
DRC
< >
the Button
DAB
< >
Prune
the Button
DAB
< >
System
Press the
Press the ENTER Button
Press the ENTER Button
Press the ENTER Button
Press the ENTER Button
ENTER Button
Manual tune
< >
DRC
< >
DRC off
Press >>
DRC
< >
DRC High
Press >>
DRC
< >
DRC Low
Prune?
No Yes
< >
System
< >
SW version
DRC (Dynamic Range Control) Value
The default setting is set off and is the recommended setting for this unit.However if you
are listenning to your radio in a noisy area, you can set the DRC to high. It will make the
softer tones easier to hear.
SW Version
Displays the software version of this DAB
Prune
This MENU option allows to delete all the unavailable weak reception
+
radio.
radio station.
10
Page 11

Displaying DAB+ information
To display DAB+ information, press the INFO Button on the remote control or on the unit to
the information desired. The display will show the information on the bottom line
select
of the LCD display.
The following screens show typical examples:
Program Name
Scrolling Text Information
Program Type
Multiplex Name
Current Time and Date
Channel and Frequency
Bit Rate and Mode
Signal Strength
ABC Radio 4
he Bank of
ABC Radio 4
Current Affairs
ABC Radio 4
BBC National DAB
ABC Radio 4
08:44 20-10-2009
ABC Radio 4
12B 225.64MHz
ABC Radio 4
128 kbps Stereo
ABC Radio 4
AUStr
Scrolling Text information:
The Scrolling text information may show information on music titles or details of the p
ogram
r
being played. This information is provided by the broadcaster.
Program Type
This is a description of the type of program provided by the broadcaster.
Multiplex Name
This will show the network that is broadcasting the program you are listening to.
Time and Date
This displays the time and date information provided by the broadcaster.
Channel and Frequency
This displays the channel number and the transmission frequency.
Signal Information
This shows the digital bit rate and the mode.
Signal Strength
This displays the signal strength of a DAB+ station.
The LCD screen will show a bar
graph indicating the strength of the signal - the more squares, the stronger the signal.
The open square indicates the minimum signal strength required for good reception.
ABC Radio 4
11
Page 12

Storing FM DAB+ Stations
There are 20 DAB+/FM Station Presets available on this unit. To store your favourite stations, press
and hold the NUMBER Button you wish to set. Hold until preset stored is showed on the display
continue until all presets are set.
To set preset 10 , press and hold "0" Button on the remote control.
To Play a preset station :
Press the NUMBER button of the preset you wish to recall. The LCD display will show the selected
station and begin to play.
If the Preset number has not been previously assigned to a station, the LCD display would
show ‘Preset ’ Empty.
Factory Reset
To reset the DAB+ radio, press and hold theMEMORY/CLOCK button for 5 seconds.
“ FACTORY RESET” will be displayed on the screen. Then press the PLAY/SCAN button to confirm.
Note: Any previously stored preset stations or settings will be lost.
Using the FM Radio
Basic operation
1. Press the STANDBY button to turn on the unit .
2.
3. Tune to the station you want by pressing the buttons.To manually tune to the
station you desire press the button,the frequency will change by o.os increments.
4. To scan automatically to the next available station, press and hold
button and then press
the PLAY/SCAN button.
.edoMMF tceles ot tinu eht no nottubFUNCTIONeht sserP
Antenna
There is an antenna wire on the back of the unit. Move the wire around to find the best possible
reception. For the best DAB+ reception make sure the antenna wire is streched out and is
not interfered with in anyway.
12
Page 13

RDS
Displaying Data Information in FM Mode.
To display data informations repeatedly press the INFO button to select the data information
required. The display will show the data information on the bottom line of the LCD display.The
following LCD display screens show typical examples of data information shown on the bottom
line of each screen:
Program Name
Scrolling Text Information
Program Type
Current Time and Date
Frequency
ABC Radio 4 RDS
he Bank of Australia
ABC Radio 4 RDS
Current Affairs
ABC Radio 4 RDS
08:44 03-06-2006
ABC Radio 4 RDS
91.80 MHz FM
Scrolling Text Information
Scrolling text information is supplied by the FM station broadcaster. It may show information
such as
titles or details of the program.
music
“No Radio Text”
will be displayed if the FM
station does not broadcast RDS.
Program Type
This is a description of the type of program provided by the
broadcaster.
“NO PTY” will be shown if the FM station does not broadcast RDS.
Time and Date
This displays the time and date and is provided by the broadcaster.
“NO CT” will be shown if
the FM station does not broadcast RDS.
Frequency
This displays the transmission frequency of the station playing.
13
Page 14

Using the CD
Please Note: Keep the disc compartment closed when not in use to prevent dirt and
dust from entering the unit. Never place more than one disc in the disc compartment
at any time.
Loading and Unloading CDs
1. Press the YBDNATS Button to turn on the unit.
2. Press the FUNCTION Button to select CD mode.
3. Open the disc compartment by pressing the OPEN/CLOSE Button.
4. When the disc compartment has opened, remove a disc from its case and place it carefully
onto the tray with the label side facing upwards.
5. Press the OPEN/CLOSE Button to close the tray.
6. When the compartment is closed, Press the play button to begin plays.
The total number of tracks on the CD will appear on the LCD display.
Please Note: Do not insert anything except a compact disc into the compartment. Other
objects will damage the unit.
Playing CDs
1. Press the Button to play the CD from the first track.
2. Press the Button to pause play of the CD . The
on the display.
3. To stop play, press the Button.If you press play to begin, the CD will play from the start.
Selecting a Different CD Track
1. Press the Buttons to skip forwards or backwards through the tracks on the CD.
Also you can press NUMBER buttons to input the desired track directly.
ess and hold the Buttons to fast forward or backward through the current track.
2. Pr
When the desired part of the track is reached, release the button and playback will resume.
indicator will appear
14
Page 15

Play Mode
1.To repeat the current track, press the PLAY MODE button . will be displayed on the LCD
screen,and the track will repeat.
2.To repeat the entire disc, press the
3. To cancel repeat play, press thePLAY MODE button until the repeat indicator disappears.
Shuffle CD Playback
1. Press the PLAY MODE button thtee times during play
tracks will be played at radom.
2.To cancel shuffle play, press the PLAY MODE button until the shuffle indicator disappears.
Playing MP3 and WMA CDs
This unit is compatible to play MP3/WMA files.When playing a CD encoded with MP3 or WMA
files, the functions available and operations are similar to those of a standard CD.
Unit Memory
Up to 64 tracks can be programmed to the internal memory in any order. You can also store the
same track more than once.
1.
Whilst play a track you wish to share,Press theMEMORY/CLOCK button and P-01 will
be displayed.
2.
. Select the desired track or folder by pressing the buttons.
3
. When the desired track is selected, press the MEMORY/CLOCK button to store the track
P-02 will be displayed.
. Repeat Steps 2 and 3 to select and store up to 64 tracks.
4
. To listen to stored tracks, press thePLAY/PAUSE button. Use the buttons to skip
5
through the tracks.
6.
To clear the memory, press theSTOP button twice.
PLAY MODE button twice.
.
ALL will be displayed.
will be displayed and the
15
Page 16

Searching MP3/WMA Tracks
While listening to the MP3/WMA track,repeatlly press the INFO button to select the desired track.
1.Press the INFO Button to display the names of the song with initial letter “A”.
2.Press the or Button to select the desired initial letter.
3.Press the INFO Button repeatedly to select the desired folder.
4.When the desired folder is displayed on the screen, press and hold for 3 seconds to confirm
the selection.
5.Press the or Button to select the track you want to listen to.
6.To play the selected track, press PLAY/SCAN button.
Searching MP3/WMA Tracks
F
press the INFO Button
F
Press the >>I button
press the INFO Button
F
press the >>I button
Press the PLAY/SCAN Button to confirm the selection.
F
02
F
16
Page 17

Using the Clock ,Timer and Sleep Function
Setting the Clock
Please Note: This unit has its own digital clock when in standby mode. The clock displayed will
be synchronised by the DAB+ signal when the unit is in DAB+ mode.
To Adjust The Clock (in STANDBY mode)
1.Press and hold the MEMORY/CLOCK button for a few seconds and select either 24-hour or
12-hour mode by using the buttons.
2. Press the MEMORY/CLOCK button to confirm.
3. The hour digits will begin to flash. Adjust the hours by pressing the buttons.
4. Press the MEMORY/CLOCK button again, and the minute digits will begin to flash.
5. Adjust the minutes by pressing the buttons. Press the MEMORY/CLOCK button to
confirm.
6. The unit’s clock is synchronised when the unit is ON and in DAB+ mode.
Setting the Sleep Function
Please Note:
The Sleep Timer is a countdown timer for switching the system to Standby mode after a specified
time. The Sleep Timer can be set from 10 to 90 minutes.
1. Press the SLEEP button to set the sleep time. SLEEP icon is displayed. The system will
play for 90 minutes or will play until your set time.
2. To decrease the sleep time, continually press the SLEEP button until the desired sleep time is
displayed.
3. To cancel the sleep timer, press the SLEEP button repeatedly until the sleep icon disappears.
You need to use the remote control for this function.
now
4. To switch off the system before the sleep time has elapsed, press the STANDBY button.
Please Note:Pressing the SLEEP button at any time will display the time remaining before the
unit turns off.
17
Page 18

Setting the Timer
Please Note:You need to use the remote control for this function.
The Timer is used to switch the system ON and OFF at a specified time. It enables you to listen to
the DAB/FM radio, CD or iPod device for a set amount of time.
1. In STANDBY mode press and hold the TIMER button.ON TIME will be displayed and
the hour digits will begin to flash. Adjust the hour by pressing the buttons.
2. Press the TIMER button to confirm and the minute digits will begin to flash.
Adjust the minutes by pressing the buttons.
3. Press the TIMER button to confirm and OFF TIME will be displayed.
Follow the same procedure as in Steps 1 and 2 to set the OFF time.
Then press the TIMER button to confirm.
4. The function mode will follow the cycle below:
DAB FM CD iPod
Select the desired source by pressing the buttons and pressing the TIMER button to
confirm.
5. The volume level will be displayed. Select the level r
and pressing the TIMER button to confirm
Please note: Once a TIMER is set completely, all the settings will be re-presented for one time for
your viewing.
Please note:You can turn OFF the Timer by pressing Timer button until Timer icon disappears.
equired by pressing the buttons
18
Page 19

Other functions
ESP(for CD only)
Electronic Shock Protection
Press the INFO/ESP/DISPLAY button to activate/deactivate this function.
This feature helps to eliminate any break in the playback of the disc due to errors or imperfections.
Mute
ess the MUTE button on the remote control to turn off the sound. MUTE will flash on the
1. Pr
display.
2. Press the MUTE button again to restore the sound to the previous level.
Preset Equaliser
You choose from: CLASSIC, ROCK, POP, JAZZ, and FLAT. Press the EQ button to navigate
through the settings and press enter to select.
Bass
Press the BASS button on the remote control to turn the bass boost ON/OFF.
Resetting
If you experience any abnormal operation when using the Micro System, follow the procedure
below to perform a system reset:
1. Remove the Mains Power lead from the wall socket.
2. Leave the unit disconnected from the power supply for 1 minute, then reconnect the power
on the unit.
Please Note:The clock time will be lost if the power supply is disconnected.You will have to
reset the time.
ID3 Tag (Title/Artist/Album) Function
This Grundig product can support Version 1 and 2 of ID3 tag. ID3 is information supplied by MP3,
WMA or CD files.
ID3 tag information (Title/Artist/Album) can be displayed when playing an MP3 or WMA CD
automatically.
Aux In Device
For music playback from an Auxiliary Device.
1. Press the FUNCTION button repeatedly to select AUX mode.
2. Connect your device to the AUX IN socket on the front of the unit.
3. Control your device as per the CD instructions for audio playback.
19
Page 20

Playing your iPod
Using the iPod dock you can play music from the iPod through the unit’s speakers and
operate with the remote control or the front panel. The unit comes with four removable
dock adapters to ensure the proper fit for your iPod and to help reduce stress on the
connector when operating the iPod.
Docking an iPod
Before docking your iPod, you must first select the correct adaptor, then fit it into the iPod
dock. There are 4 adaptors supplied, each has an adaptor number printed on the side.
Refer to the compatibility table below and select the correct dock adapter for your iPod.
Once you have located the correct adaptor for your iPod, press it gently into the iPod dock
before attempting to connect your iPod.
iPod Description Capacity
5th iPod (iPod video)
1st iPod touch 8GB, 16GB ×
2nd iPod touch 8GB, 16/32GB ×
4th iPod nano 8GB, 16GB ×
60GB, 80GB,iPod classic 160GB
Universal Dock Adapter Number:
10 14 16 17
×
Please Note : If you connect an iPod without fitting the correct adaptor, you may damage
the iPod and your Music System.
Basic operation:
1. To select iPod operation, press the FUNCTION button repeatedly to go to iPod mode.
2. To skip backward or forward to other tracks, press the
buttons
repeatedly.
3. To fast search through tracks, press and hold the
buttons.
4. MENU and ENTER buttons will allow you to enter the menu options and confirm/select.
5. To scroll through the menu, press UP/DN on remote control.
Charging your iPod
Your iPod will be charging at all times when it is docked to the system. Both in standby and
operation mode.
20
Page 21

Trouble Shooting and Technical Specifications
Problem Possible cause What to do
+
DAB
Not functioning correctly Microprocessor malfunction Refer to reset procedure
Garbled sound Poor signal Move aerial wire
Radio
Noise or sound distorted on FM Station not tuned properly for FM Fine-tune FM broadcast station
The FM antenna wire is not extended Extend FM wire antenna
No sound in FM mode Unit not in radio mode Press the function button to
Volume is at the minimum position Adjust the volume level
CD/MP3 Player
CD Player will not play Unit not in CD mode Select CD mode
CD is not installed correctly check that it is inserted correctly
select radio mode
CD skips while playing Disc is dirty or scratched Wipe the disc with a cloth or use
MP3 disc not playing correctly Poor quality data, wrong type of Try making a new copy.
file i e. aac, flac, ogg, m4a Check the file type is .MP3 or .WMA
Title/Artist/Album (ID3 Tag) Data not correct on the CD Re-record the disc, or try another.
not working correctly
MP3 on computer has correct ID3 Version of ID3 not supported Get ID3 data in ID3 Version 1
info, but unit does not display it
another disc
Aux In
Sound is quiet Volume too low on connected device Increase the volume on connected
Power Supply (Input) 100 - 240V ac ~ 50 /60 Hz
Power Output 2 x 10W RMS
Radio Frequency Coverage FM 87.5-108 MHz, DAB 174.928 - 239.200MHz
Power consumption 50W
Dimension unit W150mm X D225mm X H230mm
Dimension speaker W142mm X D160mm X H230mm
Remote control 2 X 1.5 Volt AAA batteries
IMPORTANT! This manual contains for-reference-only graphics and information that are subject to change without
prior notice.
device
21
Page 22

Warranty
Please keep your receipt as proof of purchase. This product is warranted
for any defect in materials or workmanship for one year after the original
date of purchase. This product is for normal domestic and office use only.
This warranty does not cover damage from misuse or neglect, accidental
damage, vermin infestation, excessive voltages such us lightning or power
surges or any alteration that affects the performance or reliability of the
product.
In the unlikely event that your product fails to work normally, please
contact Grundig Warranty on 1800 509 394 (Australia) or 0800 450 259
(New Zealand) and have your receipt of purchase on hand.
This warranty is subject to the following provisions:
● It is only valid within boundaries of the country of purchase
● The product must be correctly assembled and operated in
accordance with the instructions contained in this manual
● This product must be used solely for domestic purposes
● The warranty does not cover accidental damage
● The warranty will be rendered invalid if the product is resold or has
been damaged by inexpert repair
● The manufacturer disclaims any liability for incidental or
consequential damaged.
This warranty is in addition to, and does not diminish, your statutory
or legal rights.
PO BOX 6287
Silverwater NSW 1811
www.grundig.net.au
Grundig Warranty: 1800 509 394 Australia
Grundig Warranty: 0800 450 259 New Zealand
Page 23

(Remark: print below info onto bottom right hand corner of rear cover page)
PO BOX 6287
Silverwater NSW 1811
www.grundig.net.au
 Loading...