

Page 1

DVD-PLAYER
GDV 200
1
ENGLISH
72010-540.4000
3104 125 23661
Page 2

2
CONTENTS
________________________________________________________________________
4 GDV 200 DVD player
Special features of your DVD player
Packing contents
5 Set-up and safety
7 Overview
The front of the DVD player, the DVD player display
The back of the DVD player, the remote control
13 The OSD menu
The menu line
The dialog line
The status display
Using the OSD menu
17 Connection and preparation
Connecting to a television
Connecting to a HiFi system with analog two-channel stereo sound
Connecting the mains cable
Inserting batteries in the remote control
20 DVD/Video CD playback
DVD and Video CD features
Special features of DVDs
Before playback
Calling up the function display
Playing back a title
Selecting titles or chapters
Interrupting and resuming playback
Ending playback
Removing the DVD/Video CD
Additional playback functions
Programming titles or chapters
Page 3

ENGLISH
3
CONTENTS
__________________________________________________________________________________
32 Audio CD playback
Audio CD features
Before playback
Audio functions
Creating a music program
37 Parental control system
Activating and switching off the DVD player’s parental control system
Changing the code number
Enabling the DVD or Video CD for playback
Authorising the content of a DVD, changing the country setting
42 Using external devices
Connecting to a HiFi system with digital two-channel stereo sound (PCM)
or to a digital multi-channel audio receiver
Connecting to an analog multi-channel audio/video amplifier
44 Sound settings
49 Picture settings
52 Custom settings
54 Remote control of external devices
television or video recorder remote control
satellite receiver remote control
Programming the remote control for other manufacturers’ devices
60 Information
Technical data
General instructions for laser devices
Cleaning DVDs and CDs
Additional Information for Units sold in Great Britain
Rectifying minor problems
GRUNDIG customer service locations
Page 4
4
GDV 200 DVD PLAYER
________________________________________
Special features of your DVD player
Your DVD player gives you perfect digital video playback in studio quality.
It also provides superb cinema-quality audio playback – in stereo or with digital
multi-channel sound – depending on the type of DVD and the HiFi system or
stereo television.
Other features of DVD video include the choice of audio channel and language,
choice of subtitle language, and various camera recording angles.
In addition to DVDs, your DVD player can also play all other video and audio
CDs.
DVDs and CDs can be identified by one of the logos shown to the left.
Your DVD player is designed for DVDs with region code 2.
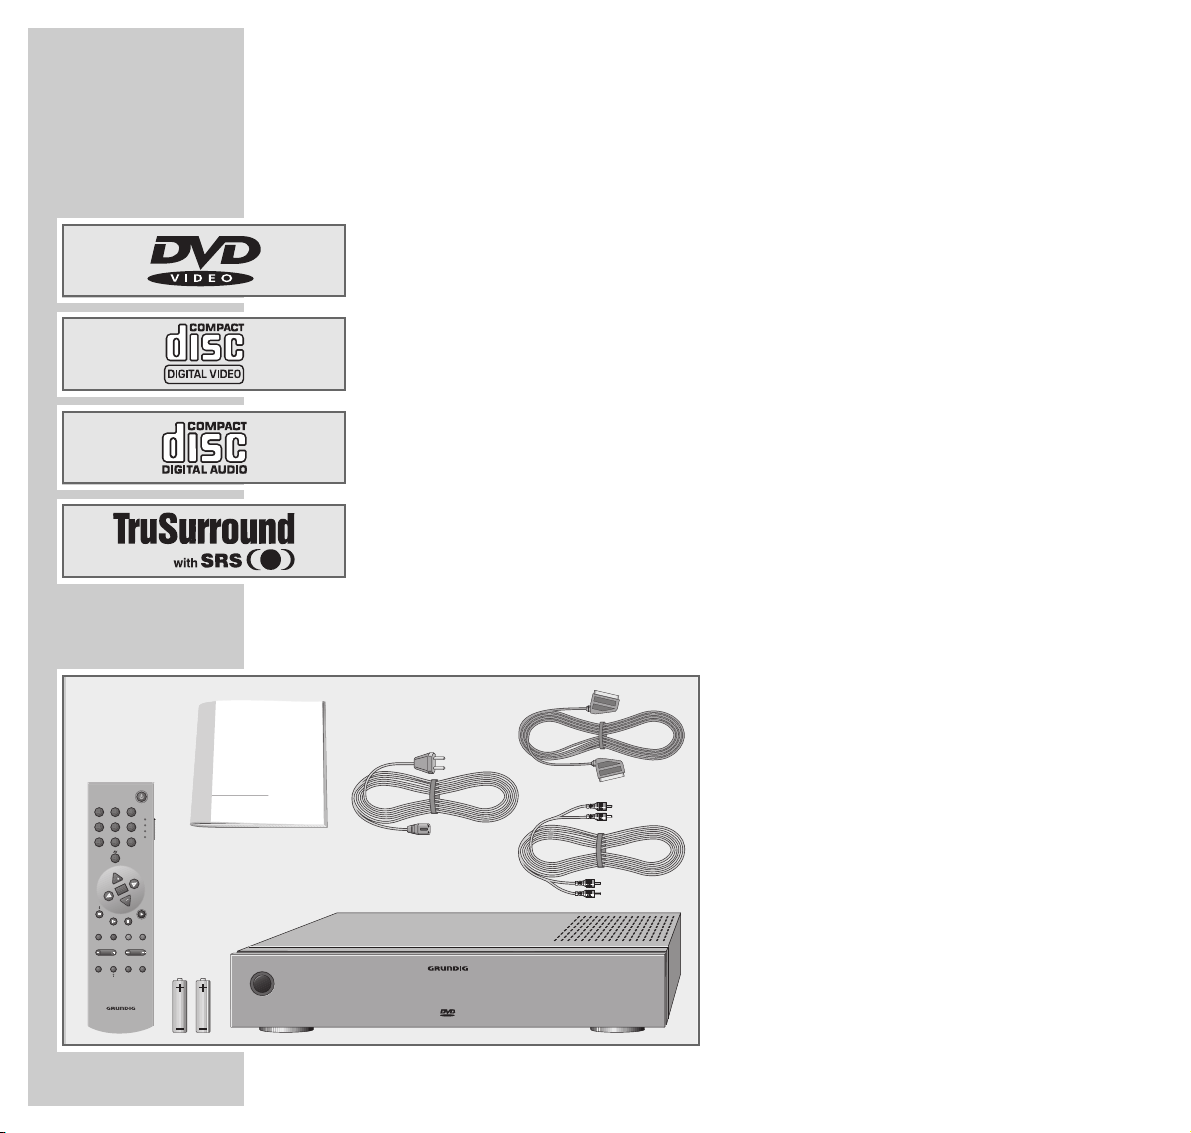
Packing contents
1
DVD-PLAYER
OK
P
P
DVD
TV
VCR
EXT
31 2
4 5 6
7
8 9
0
TV-GUIDE
VOL
REPEATANGLE
TELEPILOT 80V
RETURNSHUFFLE
SUBTITLEOSD AUDIOMENU
SHOWVIEWVCR-MENURECORD
FORMAT AUXPIP
TXT
MUTE
GDV 200
VIDEO
1 GDV 200 DVD player
2 2 Batteries, 1.5 V, type AA
3 TP 80 V remote control
4 Operating manual
5 Mains cable
6 EURO-AV cable
7 Cinch cable
1
3
2
7
5
4
6
Page 5
ENGLISH
5
SET-UP AND SAFETY
______________________________________________
°C
2h
°C
GDV 200
TRACKTITLE
SCAN
TIMETRACKTOTAL
CHAPTER
CD
SHUFFLE
CHAPTER
TITLE
TRACK
V
REPEAT
ON / OFF
OPEN / CLOSE
DVD / VIDEO CD / CD PLAYER
To ensure that this high-quality, easy-to-use DVD player provides you with
lasting satisfaction and enjoyment, please observe the following instructions
when setting it up:
This DVD player set is designed to play video and audio signals from compact
discs (DVD and CD).
Any other use is expressly prohibited.
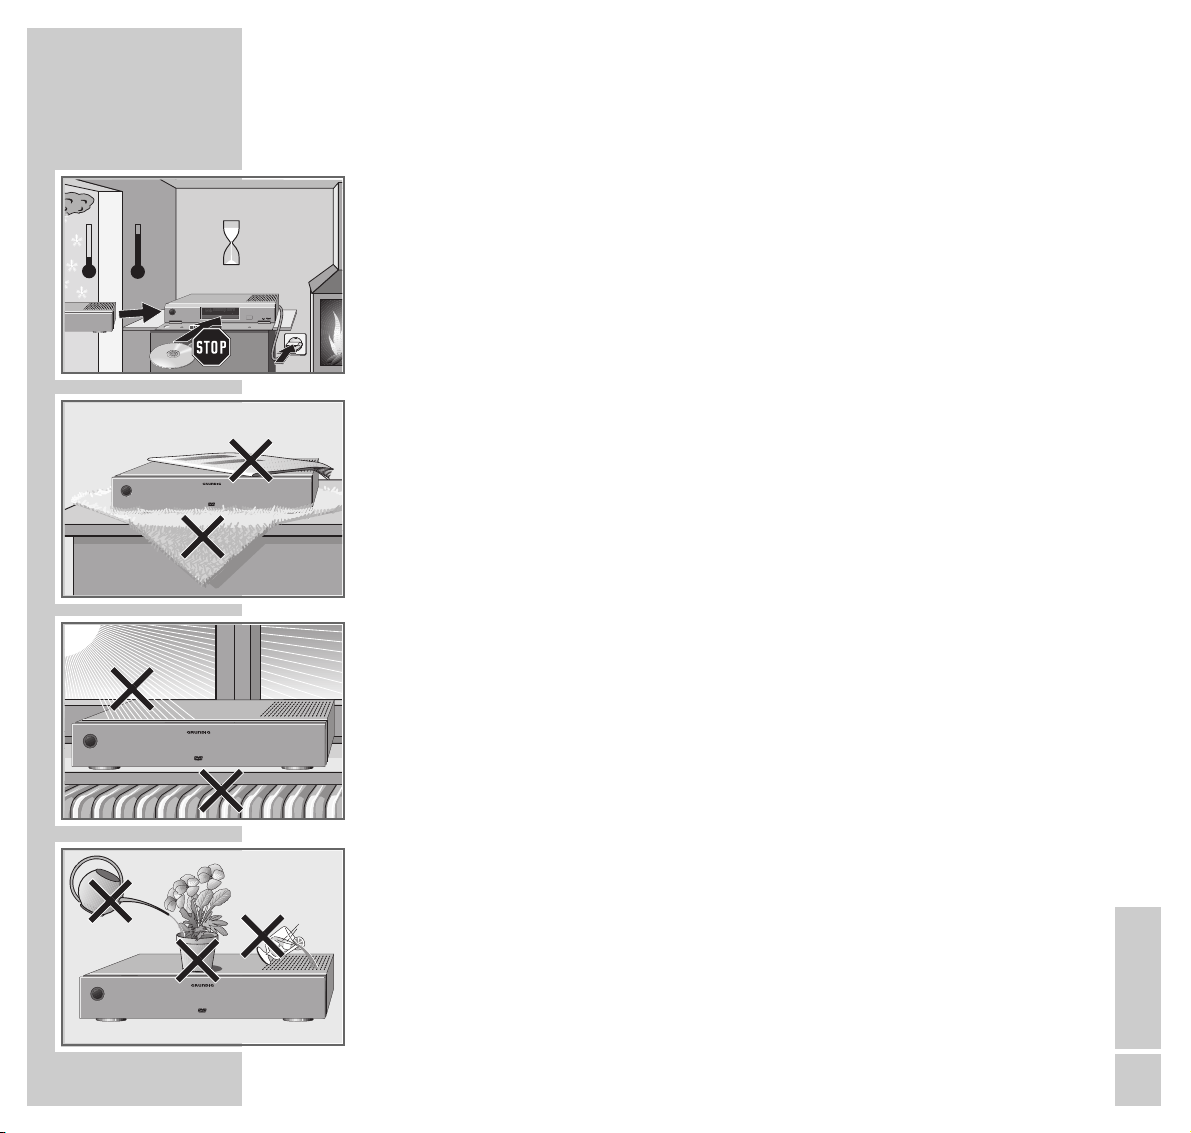
If the DVD player is subject to sudden changes in temperature, for example if it
is brought in from the cold to a warm room, connect it to the mains supply and
let it stand for at least two hours before you insert a DVD.
The DVD player is designed for use in dry rooms. If you do use it in the open,
please ensure that it is protected from moisture, such as rain or lawn sprinklers.
Place the DVD player on a hard, level surface. Do not place any objects such as
newspapers on the DVD player or any cloth or similar articles underneath it.
Do not place the DVD player close to heating units or in direct sunlight, as this
will impair cooling.
Do not insert foreign objects in the air vents or the disc compartment.
Never open the DVD player casing under any circumstances. The manufacturer
accepts no liability for damage resulting from improper handling.
Do not place any containers filled with liquids (such as vases) on the DVD
player. The container could fall over and the liquid may present an electrical
safety risk.
GDV 200
VIDEO
Krieg im Balkan
GDV 200
VIDEO
VIDEO
GDV 200
Page 6
6
SET-UP AND SAFETY
_________________________________________________________________
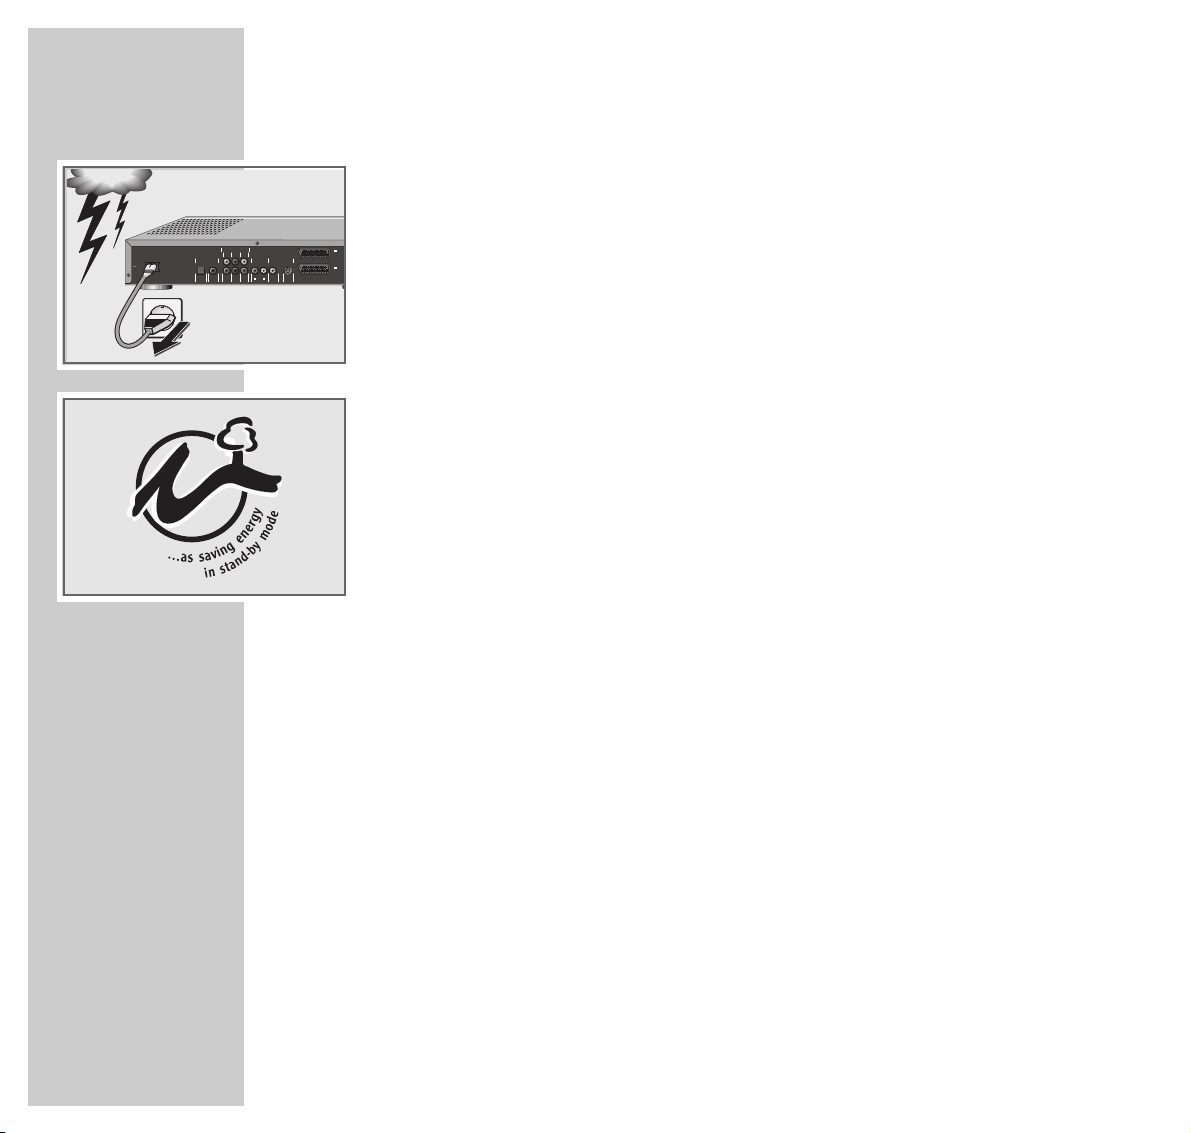
Thunderstorms present a danger to all electrical devices. Even if the DVD player
is switched off, it can be damaged by a lightning strike to the mains. Always
remove the mains plug during an electrical storm.
If the DVD player is unable to scan DVDs or CDs perfectly, use a standard
commercial cleaning CD to clean the laser optics. Other cleaning methods may
damage the laser optics.
Always keep the disc compartment closed to prevent dust from collecting on the
laser optics.
This DVD player is designed to the highest technological and environmental
standards. Only ecologically compatible, high quality materials have been
used. The batteries included are free of mercury and cadmium.
The range of materials used has been deliberately restricted and all the larger
plastic parts have been labelled. This means that the DVD player is easily
disassembled to make servicing easier and optimise recycling.
MULTICHANNEL AUDIO OUT
LEFT CENTER
LEFT
REAR
FRONT
DIGITAL AUDIO OUT
STEREO OUT VIDEO OUT
MAINS
OPT OUT
PCM/MPEG2/AC3/DTS
L
R
(CVBS) (Y/C)
RIGHT SUBW.
RIGHT
DIG OUT
VIDEO OUT S-VIDEO OUT
REAR
FRONT
AUDIO OUT
I
AUX/VCR
IN
II
TV OUT
Page 7
ENGLISH
7
OVERVIEW
________________________________________________________________________
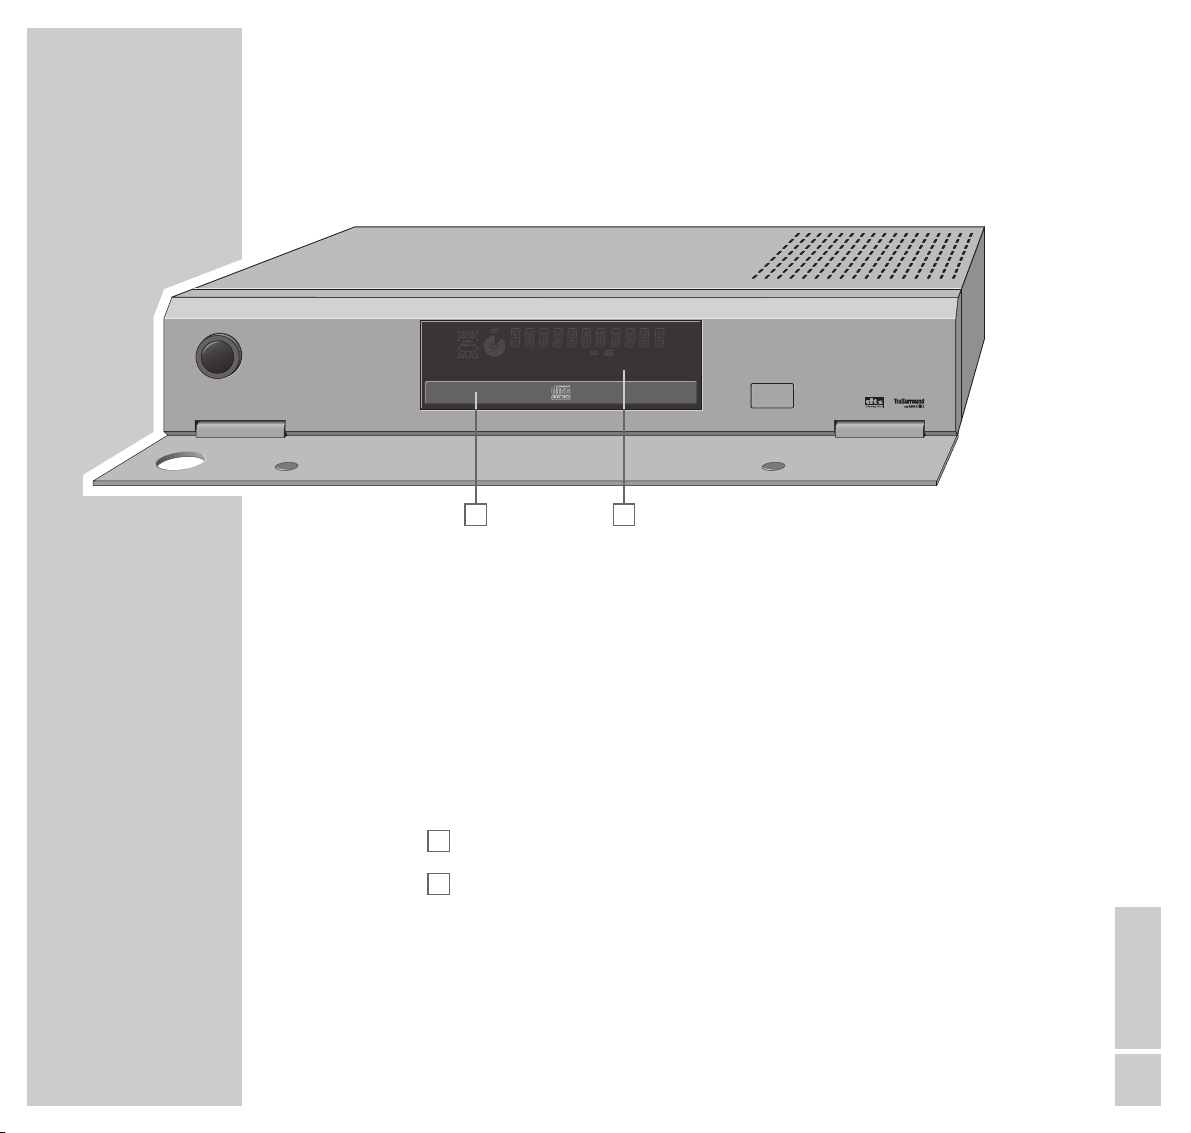
The controls of the DVD player are located behind a cover panel.
ON/OFF Switches the DVD player to and from Stand-by mode.
The LED around the button displays the current operating
status:
Red – Stand-by; Green – On.
Caution:
Switching the DVD player off does not completely separate
it from the mains.
Compartment for DVDs/CDs.
Display.
OPEN/CLOSE Opens and closes the disc compartment.
B
A
The front of the DVD player
A B
ON / OFF
DVD / VIDEO CD / CD PLAYER
TITLE
CHAPTER
TRACK
SCAN
SHUFFLE
CD
V
REPEAT
CHAPTER
TIMETRACKTOTAL
TRACKTITLE
OPEN / CLOSE
Page 8
8
OVERVIEW
__________________________________________________________________________________
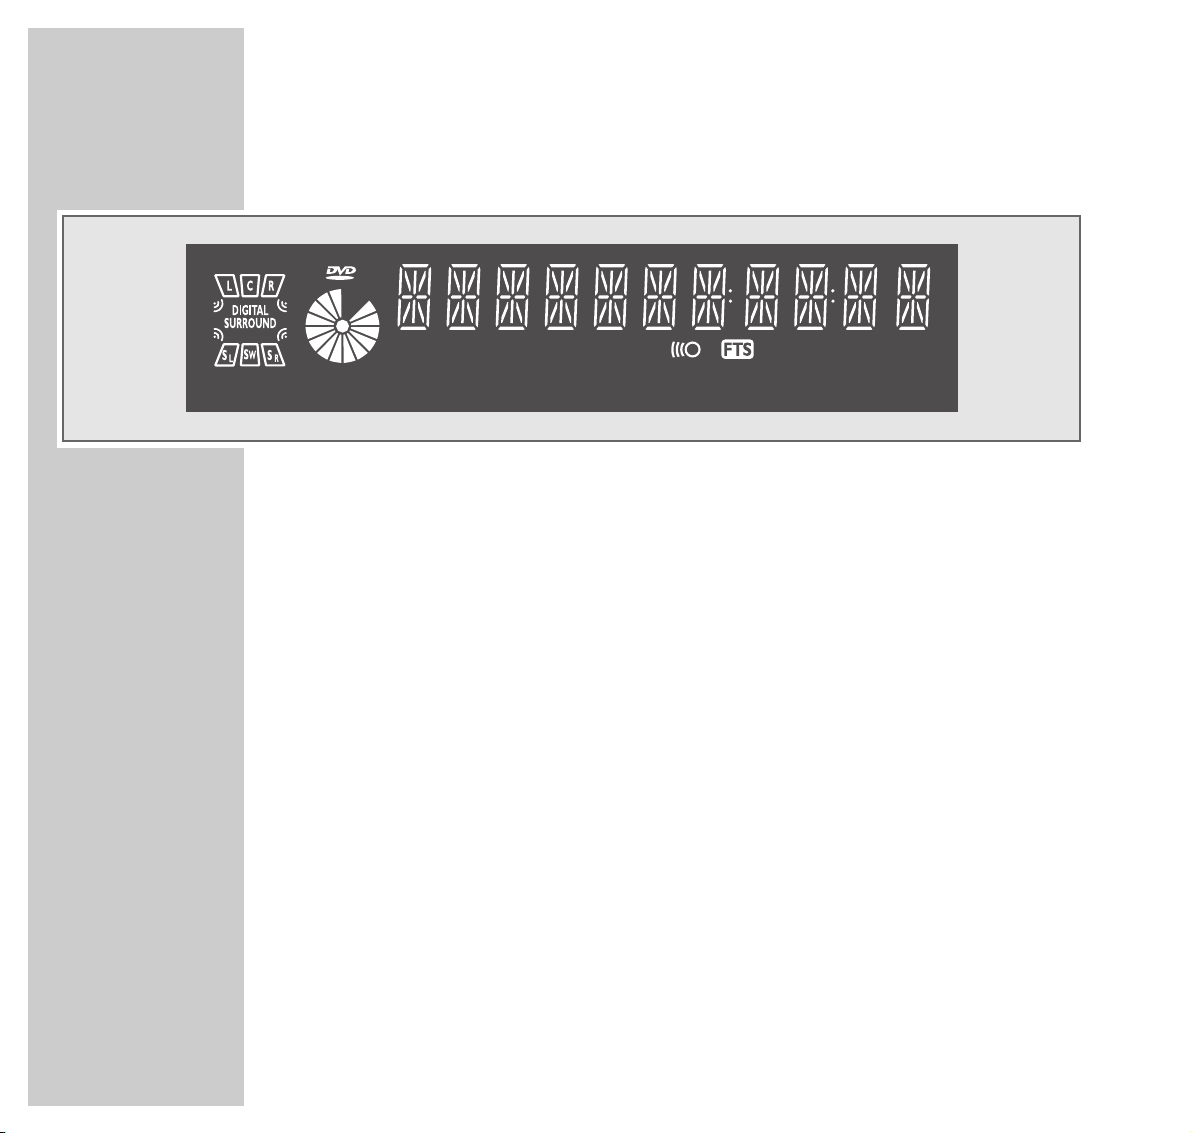
The display elements of the DVD player
»ƒª« Activates the left/right front loudspeaker.
»©« Activates the middle loudspeaker.
» « Activates test sound.
»DIGITAL SURROUND« Activates the Digital Surround function.
»ÏÓ« Activates the left/right surround loudspeaker.
»Ì« Activates the subwoofer.
»/« DVD inserted.
»,« Function display for playback, pause, search etc.
»(V)CD« Video or audio CD inserted.
»
I
TITLE« Number of the title on a DVD.
»
0I
CHAPTER« Number of the chapter on a DVD or CD.
»
I
TRACK« Number of the scene on a DVD or the track on a music CD.
»(
(
(
1 « Lights up when a remote control command is received.
»FTS« Function is activated.
»TOTAL TIME
0:00:00
« Total playing time in hours, minutes and seconds.
»TRACK TIME
0:00:00
« Length of the track in hours, minutes and seconds.
»REPEAT« Repeat function is activated.
»SHUFFLE« Shuffle function is activated.
»CHAPTER TITLE TRACK« One of the functions (chapter, title or track) is activated.
å ‚
Å Í
TIMETRACKTOTAL
TRACKTITLE
V
CD
TITLE
CHAPTER
REPEAT
TRACK
SHUFFLE
CHAPTER
Page 9
ENGLISH
9
OVERVIEW
__________________________________________________________________________________
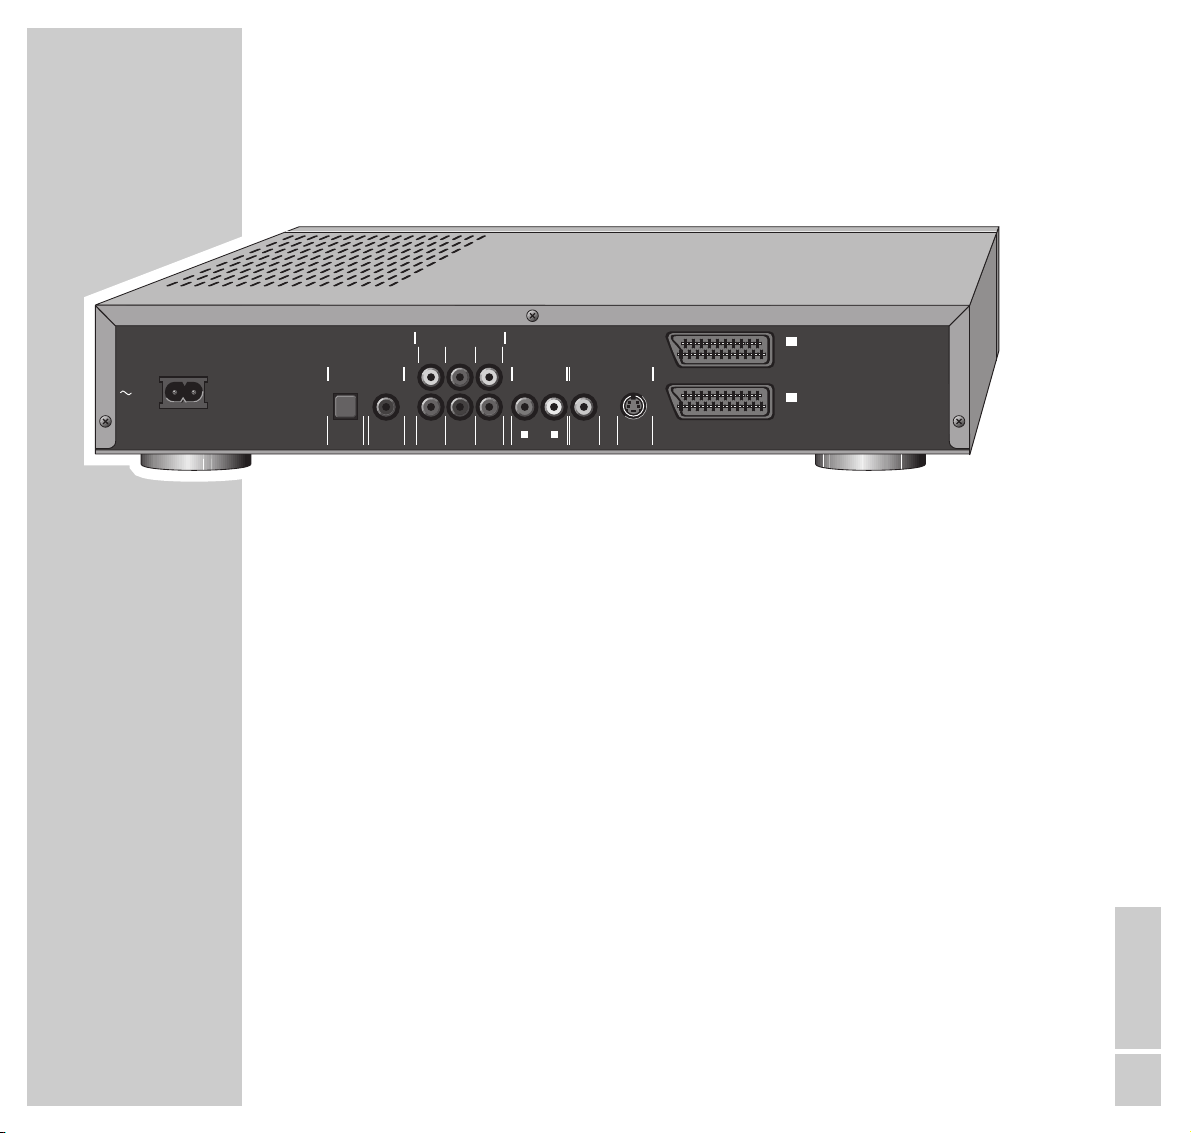
~
MAINS Socket for mains cable
Digital audio connections (PCM/MPEG2/AC3/DTS)
OPT OUT Audio output socket (optical), for connecting to a
digital HiFi system using a standard OPTICAL
cable.
DIG OUT Audio output socket,
for connecting to a digital HiFi system.
Multichannel connections
(MULTICHANNEL AUDIO OUT)
LEFT REAR Audio output sockets for connecting to
RIGHT REAR Surround loudspeakers.
CENTER Audio output socket for connecting to a middle
loudspeaker.
SUBW. Audio output socket for connecting to a
subwoofer.
LEFT FRONT Audio output sockets for connecting to
RIGHT FRONT front loudspeakers.
MAINS
(CVBS) (Y/C)
VIDEO OUT S-VIDEO OUT
DIG OUT
OPT OUT
RIGHT SUBW.
REAR
RIGHT
FRONT
L
R
AUDIO OUT
LEFT CENTER
MULTICHANNEL AUDIO OUT
REAR
LEFT
FRONT
DIGITAL AUDIO OUT
PCM/MPEG2/AC3/DTS
STEREO OUT VIDEO OUT
I
AUX/VCR
IN
II
TV OUT
The back of the DVD player
Page 10

10
OVERVIEW
__________________________________________________________________________________
Audio and video connections
STEREO OUT Audio output sockets (right/left channel),
■
R AUDIO OUT ■L for connecting to a HiFi system.
VIDEO OUT
(CVBS) VIDEO OUT Video output socket, for connecting to a television
with a video socket.
(Y/C) S-VIDEO OUT Video output socket, for connecting to a
television with an S-VHS socket.
■
I
AUX/VCR IN Audio/video input/output socket, for connecting
a video recorder.
■
II
TV OUT Video/audio output socket for connecting to a
television.
Caution:
Do not connect any devices while the DVD player is switched on.
Never touch the inside of the sockets and plugs of the connecting cables. An
electrostatic discharge can damage the DVD player.
Page 11
ENGLISH
11
OVERVIEW
__________________________________________________________________________________
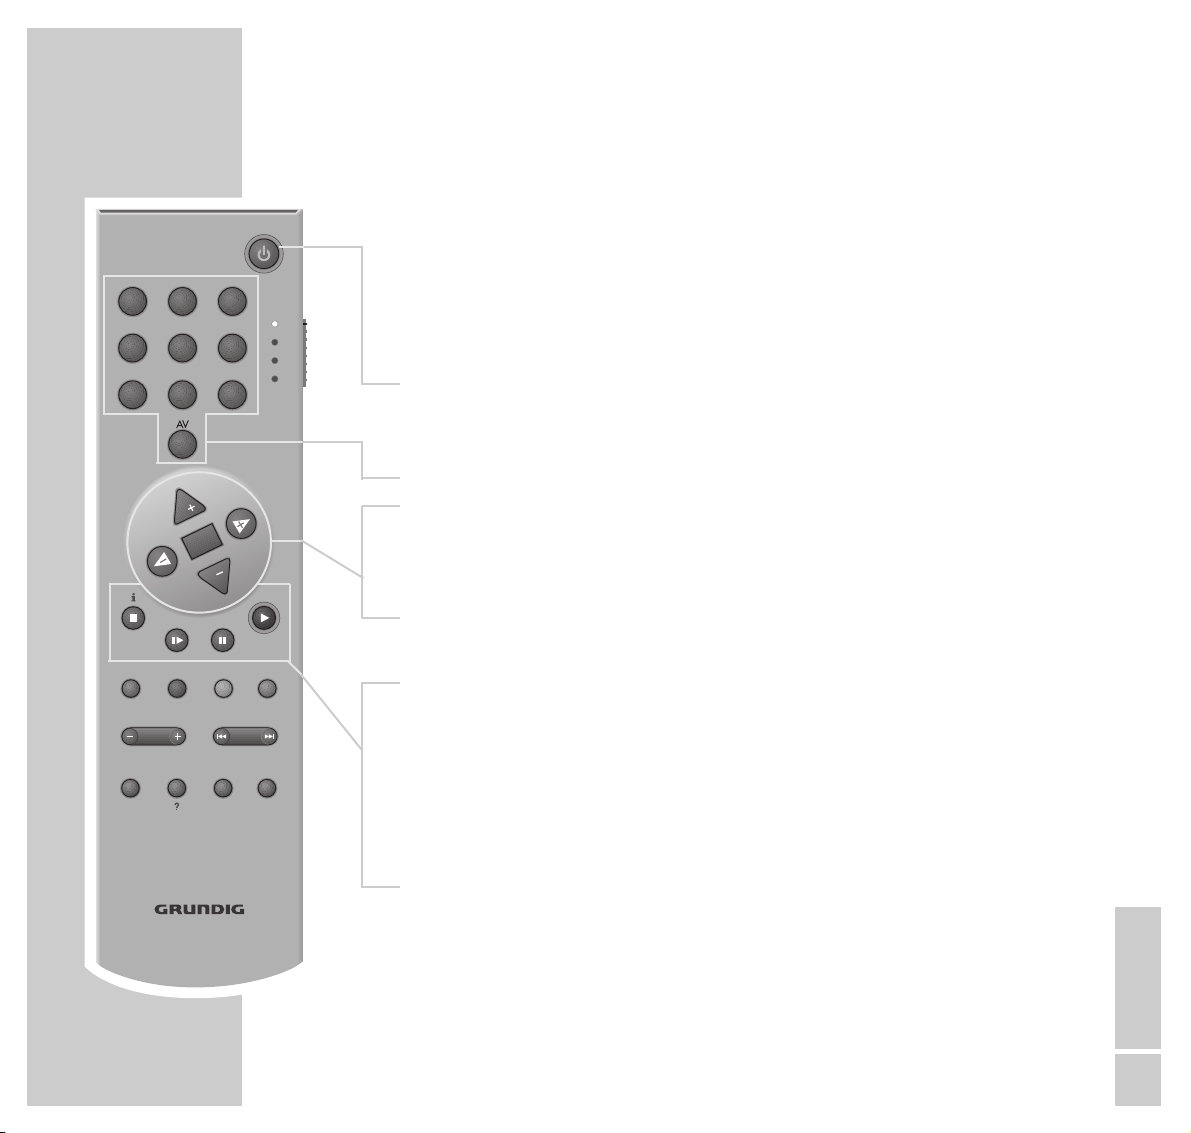
Using the TP 80 V remote control you can not only operate the DVD player, but
also Grundig televisions, video recorders and satellite receivers.
To operate the DVD player, push the »DVD TV VCR EXT« switch to the
»DVD« position. The yellow LED briefly lights up.
9
Switches the DVD player to and from Stand-by mode.
The LED around the button on the DVD player indicates the
current operating status: Red – Stand-by; Green – On.
1 ... 0 AV Numeric keys for various inputs.
,, ..
Select various functions in the menus.
OK Confirms menu entries.
FF EE
During playback, switch the video search forwards or
backwards at different speeds.
Select various menu functions.
7
Terminates all functions, switches the DVD player to ”STOP”.
%
Slow motion for DVDs and video CDs.
I I Freeze-frame for DVDs and video CDs;
Pause for audio CDs.
8
Starts playback;
when pressed twice activates the ”Resume” function.
The remote control
TE LE PI LOT 80V
4 5 6
7
8 9
0
P
OK
P
TV-GUIDE
SUBTITLEOSD AUDIOMENU
SHOWVIEWVCR-MENURECORD
VOL
REPEATANGLE
FORMAT AUXPIP
31 2
DVD
TV
VCR
EXT
MUTE
TXT
RETURNSHUFFLE
Page 12
12
OVERVIEW
__________________________________________________________________________________
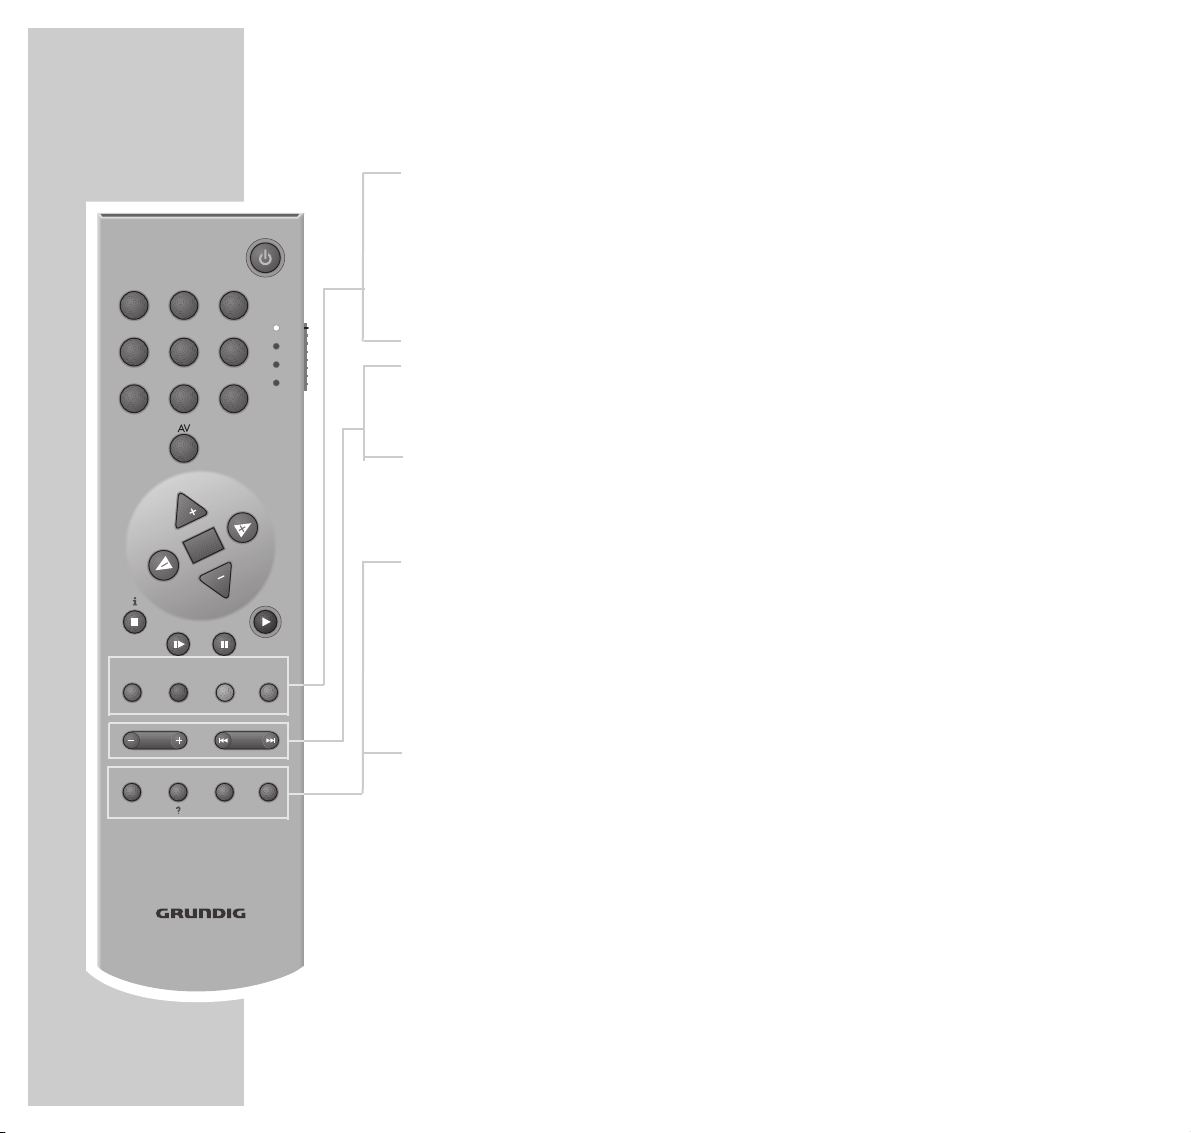
MENU Calls up the DVD/video CD title menu during playback.
OSD Displays/conceals the menus on the television screen.
SUBTITLE Displays subtitles during DVD playback.
AUDIO Switches between the original and the dubbed language
during DVD playback.
– VOL + Increases/reduces volume on GRUNDIG televisions with
TP 590 remote control or later.
5a s6
When pressed briefly during playback select the next or
previous title or chapter;
when pressed longer activates the forwards or backwards
picture search.
SHUFFLE Plays back all titles on a DVD or CD in random order.
ANGLE Selects various camera angles for certain scenes or passages
on the DVD during playback.
REPEAT Repeats chapters or titles, DVDs or CDs during playback.
RETURN Returns to the previous DVD menu.
Note:
For details on operating Grundig televisions, video recorders and satellite
receivers, see Page 54 onwards.
TE LE PI LOT 80V
4 5 6
7
8 9
0
P
OK
P
TV-GUIDE
TXT
SUBTITLEOSD AUDIOMENU
SHOWVIEWVCR-MENURECORD
VOL
REPEATANGLE
FORMAT AUXPIP
31 2
DVD
TV
VCR
EXT
MUTE
RETURNSHUFFLE
Page 13

ENGLISH
13
THE OSD MENU
__________________________________________________________
The OSD menu – which is displayed on the television screen – enables you to
select any function and carry out the necessary settings.
Icons, buttons and dialog lines indicate the available options.
The menu line
1 Press »OSD« to call up the menu line, and »
3
« to scroll to the right.
– The illustrations show the options presented by the menu line.
»Ö« = »Settings« menu.
»P« = Select title.
»K« = Select chapter.
»(« = Select audio track.
»I« = Select subtitles language.
»R« = Select camera angle.
»k« = Activate zoom function.
»B« = Select colour settings.
»_« = For programming scenes.
»Z« = Select sound type.
»;« = Select slow motion speed.
»N« = Select video search speed.
»L« = Select section to the nearest minute.
BB
_
ZZ
;
NN
LL
off st
ÖÖ PP KK (( II RR kk
//
1 2 1 off no off
A
S
sa
>
sa
<
S
Page 14
14
THE OSD MENU
_________________________________________________________________________
The »Settings« menu
»O« = »Picture menu« containing the following functions:
– TV Shape,
– Black level shift,
– Video shift,
– Colour settings,
– Personal colour.
»>« = »Sound menu« containing the following functions:
– Digital output,
– Analogue output,
– Night mode,
– Karaoke vocal,
– Speakers.
»U« = »Language menu« containing the following functions:
– Audio,
– Subtitle,
– Menu.
»Ü« = »Special functions« menu containing the following
functions:
– Access control,
– Status window,
– Low power standby.
The dialog line
The dialogue line displays information about the operating condition.
» « = Function not available.
» « = Parental lock activated.
» « = Parental lock off.
» « = Camera angle for scenes.
» « = Playback resumed.
resume
%
2/2
R
safe
H
locked
G
x
ÖÖ PP
//
1
a
ÖÖ
P K ( I R k
/ 1 2 1 off no off
O
>>
U
Ü
TV Shape
Black level shift
Video shift
Colour settings
Personal colour
A
S
8
>
16:9
On
■■××■■■■■■
1 Personal
Settings...
Page 15

ENGLISH
15
THE OSD MENU
_________________________________________________________________________
» « = Repeating DVDs/CDs.
» « = Repeating titles.
» « = Repeating chapters.
» « = Repeating tracks.
» « = Titles selected and played back at random.
The status display
The status display shows information on the current DVD or video CD, the
total running time and the elapsed running time of the DVD or video CD.
»2 : 05 : 30« = Total running time.
»0 : 15 : 00« = Elapsed running time.
The current function is also displayed:
»..DVD« = DVD inserted.
»..VCD« = Video CD inserted.
»,,reading« = Reading DVD.
»{ no disc« = No DVD or video CD inserted.
»] opened« = Disc compartment open.
»[ closing« = Disc compartment closed.
»
1
!
error« = Error message.
»
8
play« = Playback.
»
7
stop« = End playback.
»I I pause« = Pause playback.
»
E W
x 4 x 32« = Video search forwards/backwards.
»& 1/8 1/4 1/2 « = Slow motion forwards/backwards.
shuffle
track
p
chapter
p
title
p
repeat
p
..
!
DVD pause
2 : 04 : 26
0 : 00 : 21
&
Page 16

16
THE OSD MENU
_________________________________________________________________________
Using the OSD menu
The following example shows how the OSD menu is structured and how to select
the various menus and settings.
Press the »OSD« button to select the menu line, then select individual menu
items with the »,,« or »..«, »4« or »3« buttons.
The active menu item is highlighted in blue. Menu items which have no function
on the current DVD are greyed out and cannot be selected.
To scroll along the menu line press »3«.
1 Press »OSD« to call up the menu line.
– The menu line is displayed.
2 Select the required menu item (in the example, »
Ö
«) by pressing »4« or
»3« and then press »..« to activate it.
– The main menu is displayed.
3 Select the desired menu (in the example, »U«) by pressing »
,,
« or
»..« and then press »3« to open it.
– The language menu is displayed.
4 Select the function (in the example, »Subtitle«) by pressing »
,,
« or »..«
and then press »3« to activate it.
5 Select desired setting using the »
,,
« or »..« buttons.
Note:
You can switch back to the previous menus and menu items by pressing
»OK«.
6 To exit the menu line press the »OSD« button.
– The functions or values you set are automatically saved.
Ö
PP
K ( I R k
/ 1 2 1 off no off
P
E
>
sa
A
S
ÖÖ
P K ( I R k
/ 1 2 1 off no off
O
>>
U
Ü
Audio
Subtitle
Menu
S
a
A
>
ÖÖ
P K ( I R k
/ 1 2 1 off no off
O
>>
U
Ü
Audio
Subtitle
Menu
A
S
8
>
English
English
English
English
English
English
OK
P
MUT
Page 17
ENGLISH
17
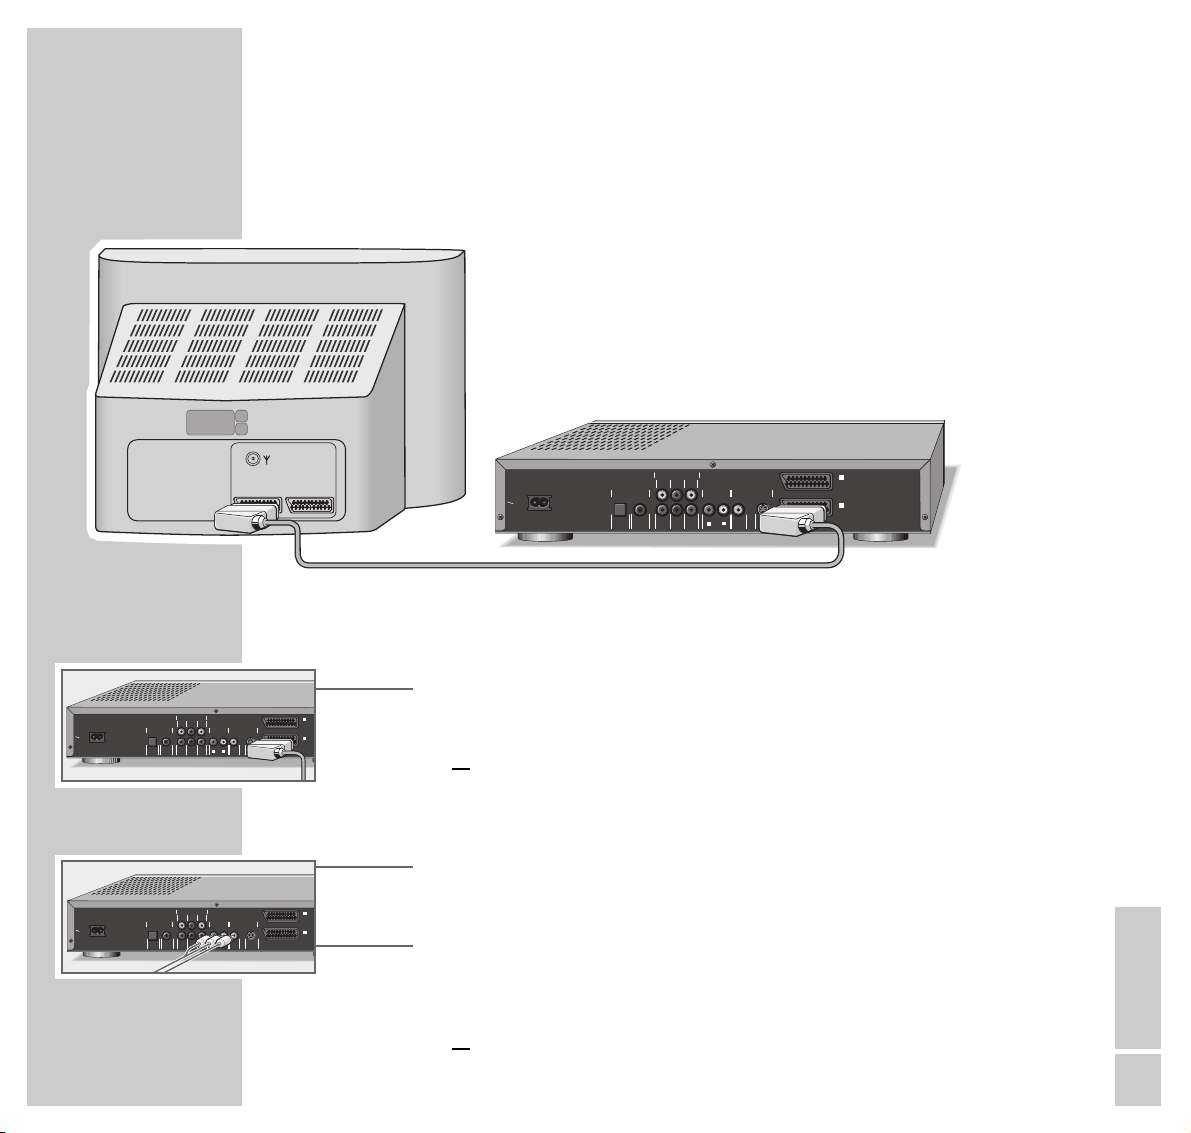
Connecting to a television...
... using a EURO-AV cable
1 Plug the EURO-AV cable supplied into the »
■
II
TV OUT« socket on the DVD
player and into the appropriate socket (AV 1) on the television,
or
... using a cinch cable
1 Plug a standard cinch cable into the »(CVBS) VIDEO OUT« socket on the
DVD player and into the appropriate socket (VIDEO IN) on the television.
2 Plug the cinch AV cable supplied into the »
■
R AUDIO OUT ■L « sockets on
the DVD player and into the appropriate sockets (AUDIO IN) on the
television,
or
CONNECTION AND PREPARATION
_______
MAINS
(CVBS) (Y/C)
VIDEO OUT S-VIDEO OUT
DIG OUT
OPT OUT
RIGHT SUBW.
REAR
RIGHT
FRONT
L
R
AUDIO OUT
LEFT CENTER
MULTICHANNEL AUDIO OUT
REAR
LEFT
FRONT
DIGITAL AUDIO OUT
PCM/MPEG2/AC3/DTS
STEREO OUT VIDEO OUT
I
AUX/VCR
IN
II
TV OUT
AV1 AV2
MULTICHANNEL AUDIO OUT
LEFT CENTER
LEFT
REAR
DIGITAL AUDIO OUT
MAINS
PCM/MPEG2/AC3/DTS
OPT OUT
FRONT
STEREO OUT VIDEO OUT
L
R
RIGHT SUBW.
DIG OUT
REAR
(CVBS) (Y/C)
RIGHT
VIDEO OUT S-VIDEO OUT
FRONT
AUDIO OUT
I
AUX/VCR
IN
II
TV OUT
MULTICHANNEL AUDIO OUT
LEFT CENTER
LEFT
REAR
FRONT
DIGITAL AUDIO OUT
MAINS
PCM/MPEG2/AC3/DTS
OPT OUT
DIG OUT
RIGHT SUBW.
REAR
RIGHT
FRONT
STEREO OUT VIDEO OUT
L
R
(CVBS) (Y/C)
VIDEO OUT S-VIDEO OUT
AUDIO OUT
I
AUX/VCR
IN
II
TV OUT
Page 18
18
CONNECTION AND PREPARATION
_______________________________________
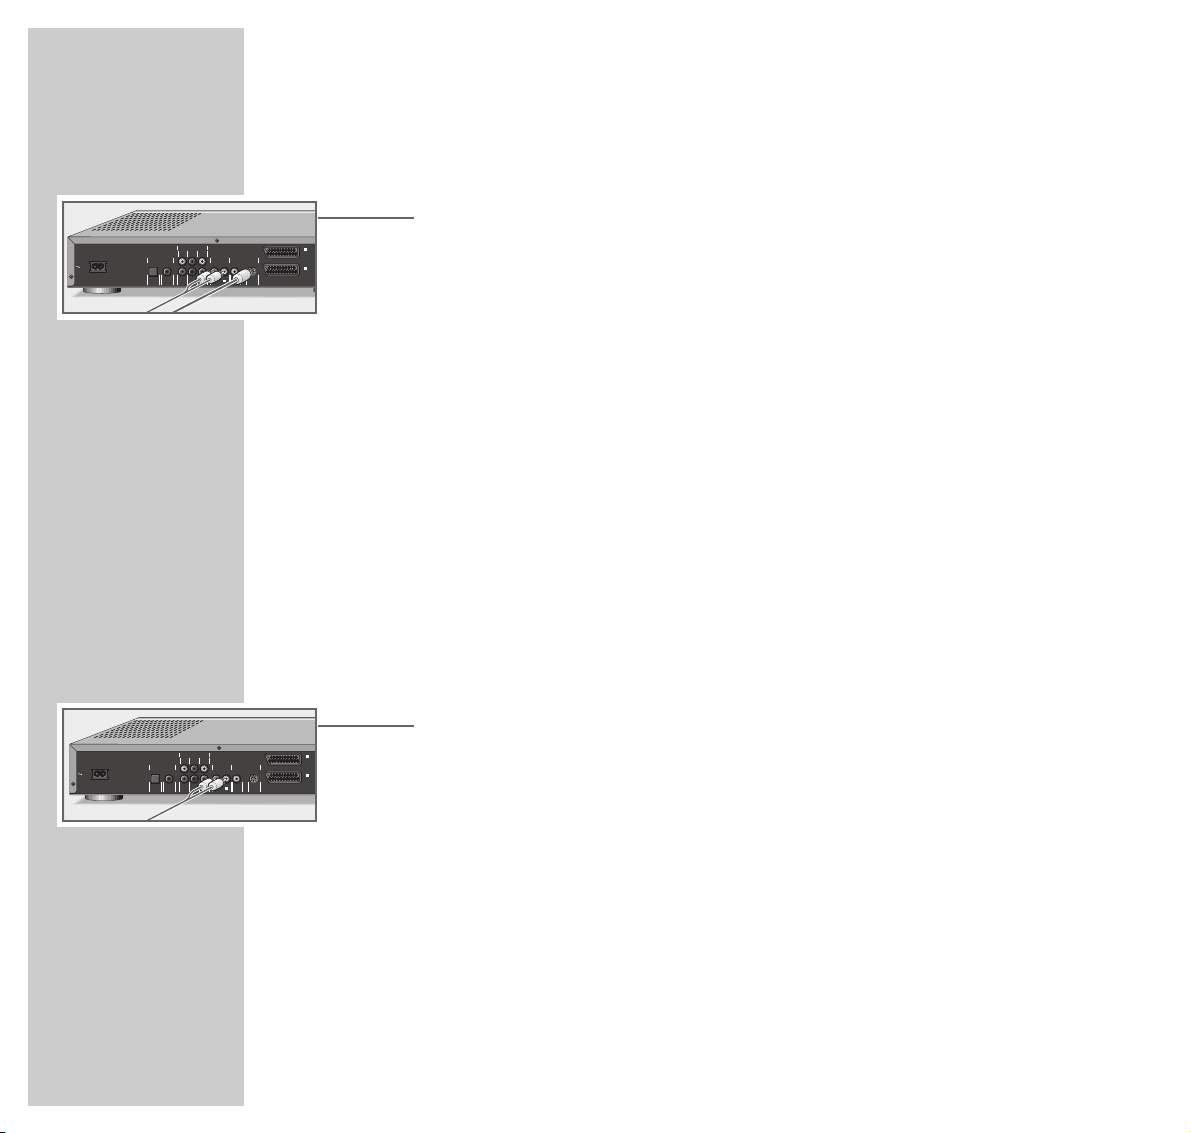
... using a cinch cable (S-VHS)
1 Plug a standard cinch cable into the »(Y/C) S- VIDEO OUT« socket on the
DVD player and into the appropriate socket (S-VIDEO) on the television.
2 Plug the cinch AV cable supplied into the »
■
R AUDIO OUT ■L « sockets on
the DVD player and into the appropriate sockets (AUDIO IN) on the
television.
Note:
If the DVD player is connected to a television set with a 16:9 format, observe
the settings described in the ”Setting the television format” section on Page
49.
Connecting to a HiFi system with analog
two-channel stereo sound
As an alternative to using the television’s speakers, the sound can also be played
back through a HiFi system.
1 Plug the cinch cable supplied into the »
■
R AUDIO OUT ■L « socket on the
DVD player and into the appropriate sockets on the HiFi.
Caution:
Do not connect the DVD player’s »■R AUDIO OUT ■L « sockets to the
PHONO sockets (record player input) on the HiFi system.
Note:
For information on connecting to a HiFi system with digital two-channel
stereo sound or a digital multi-channel receiver, see Page 42 onwards.
MULTICHANNEL AUDIO OUT
LEFT CENTER
LEFT
REAR
FRONT
DIGITAL AUDIO OUT
MAINS
PCM/MPEG2/AC3/DTS
OPT OUT
STEREO OUT VIDEO OUT
L
R
(CVBS) (Y/C)
RIGHT SUBW.
RIGHT
DIG OUT
VIDEO OUT S-VIDEO OUT
REAR
FRONT
AUDIO OUT
I
AUX/VCR
IN
II
TV OUT
MULTICHANNEL AUDIO OUT
LEFT CENTER
LEFT
REAR
FRONT
DIGITAL AUDIO OUT
MAINS
PCM/MPEG2/AC3/DTS
OPT OUT
STEREO OUT VIDEO OUT
L
R
(CVBS) (Y/C)
RIGHT SUBW.
RIGHT
DIG OUT
VIDEO OUT S-VIDEO OUT
REAR
FRONT
AUDIO OUT
I
AUX/VCR
IN
II
TV OUT
Page 19
ENGLISH
19
CONNECTION AND PREPARATION
_______________________________________
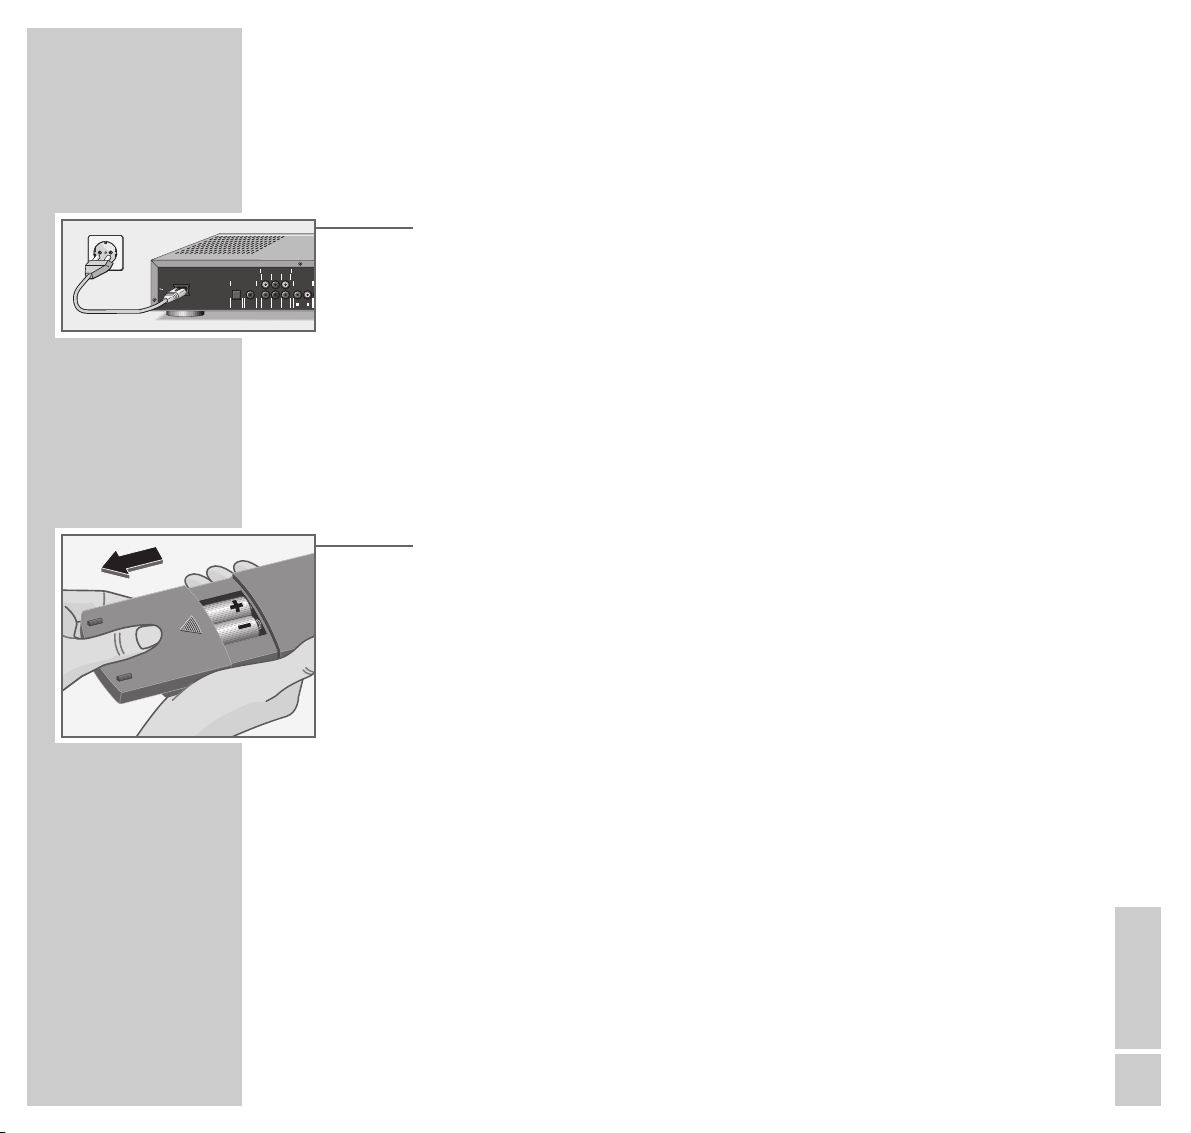
Connecting the mains cable
1 Plug the mains cable supplied into the »
~
MAINS« socket on the DVD
player.
2 Insert the mains cable plug into the mains socket.
Caution:
The only way to separate the DVD player from the mains supply is to pull the
plug.
Inserting batteries in the remote control
1 Open the battery compartment by pressing the arrow and pulling back the
lid.
2 When inserting the batteries (UM-3 or AA, 2 x1.5 V), observe the polarity
marked on the base of the battery compartment.
Note:
If the DVD player no longer reacts properly to remote control commands, the
batteries may be flat. Always remove flat batteries. No liability is accepted
for damage resulting from leaking batteries.
Environmental note:
Batteries, including those which are heavy metal-free, may not be disposed
of with household waste. Please dispose of used batteries in and environmentally sound way, for example at public collection points. Find out about
the legal regulations which apply in your area.
V
MULTICHANNEL AUDIO OUT
LEFT CENTER
LEFT
REAR
FRONT
DIGITAL AUDIO OUT
MAINS
PCM/MPEG2/AC3/DTS
OPT OUT
STEREO OUT
L
R
RIGHT SUBW.
RIGHT
DIG OUT
REAR
FRONT
AUDIO OUT
Page 20

20
DVD/VIDEO CD PLAYBACK
____________________________
DVD and Video CD features
You can recognise DVDs and video CDs by their labels, which are shown here.
Depending on the contents the DVD or video CD (films, music videos etc.), they
may carry one or more titles.
Each title may contain one or more chapters. Titles and chapters can be selected
easily and comfortably.
You can control and direct playback of a DVD or video CD using the menu of
the DVD player on the television screen.
Special features of DVDs
DVDs may contain titles and passages which have been arranged in fixed order
by the manufacturer. You can also select individual titles and passages and then
play them back.
DVDs have a title menu which provides an overview of the titles available and
the passages they contain.
Some of the DVD player’s functions, such as slow motion, freeze-frame and
auto-play, can also be controlled by the DVD itself. It is therefore possible that
the freeze-frame function, for example, cannot be selected during certain
scenes.
Many DVDs have audio tracks recorded in up to eight languages.
This enables you to select the language you prefer.
Many DVDs are recorded by the manufacturer with subtitles in several languages.
You can select subtitle superimposition from up to 32 different languages.
Since films are released in different parts of the world at different times, all DVD
players world-wide are given a regional code. Your DVD player is designed for
region code 2.
DVDs can also be given a supplementary regional code. If you insert a DVD
with different code to that of the DVD player, a reference to the regional code
appears on the television screen. The DVD player will not be able to play back
the DVD.
Page 21

ENGLISH
21
DVD/VIDEO CD PLAYBACK
_____________________________________________________
Before playback
Preparation
1 Switch on the television and select the channel for the DVD player.
2 Switch on the HiFi system and select the audio input for the DVD player.
3 Press »ON/OFF« to switch the DVD player on.
– The DVD player display reads: »NO DISC«
Inserting a DVD/video CD
1 Press »OPEN/CLOSE« on the DVD player.
– The disc tray opens.
2 Insert the DVD/video CD into the compartment, with the labelling facing
upwards.
3 Press »OPEN/CLOSE«, or
gently push the front of the disc tray.
– The status display reads: »,,reading« and »,,READ« appears on the
DVD player, playback starts automatically.
– After a short time a menu appears containing information on the DVD.
Note:
If the parental control lock is activated and the DVD/video CD has not been
authorised (see the chapter entitled ”PARENTAL CONTROL SYSTEM”), you
must enter the code number.
,,
7
reading stop
- : -- : --
- : -- : --
TITLE
CHAPTER
TRACK
SCAN
SHUFFLE
REPEAT
CD
V
CHAPTER
TIMETRACKTOTAL
TRACKTITLE
Page 22

22
DVD/VIDEO CD PLAYBACK
_____________________________________________________
Calling up the function display
Each function you have selected (for example, running time, current title etc.)
can be displayed on the screen.
1 Press the »OSD« button to call up the function display.
2 To hide the function display, press »OSD« again.
Playing back a title
When you close the disc tray, playback starts automatically.
1 To pause playback (freeze-frame), press »I I«.
2 Resume playback by pressing »8«.
3 To end playback, press »7«.
Note:
Depending on the DVD or video CD you are using, you may have to select
a title or chapter from the DVD or video CD’s table of contents.
Use the »,,« or »..« button to select it and then press »OK« to confirm.
If the selections are numbered, use the »1 ... 0« keys.
..
8
DVD play
2 : 04 : 26
0 : 11 : 30
..
8
DVD play
2 : 04 : 26
0 : 15 : 00
Page 23

ENGLISH
23
DVD/VIDEO CD PLAYBACK
_____________________________________________________
Selecting titles or chapters ...
If a DVD or video CD contains several titles and/or chapters, you can select
from among them.
... using the menu of the DVD player
1
Display the menu line by pressing »OSD«.
2 Select »
P
« (for title) using »4« or »3«,
or
select »K« (for chapter) using »4« or »3«.
3 Select the next title or chapter by pressing »
,,
« or »..«.
Note:
You can also select titles or chapters directly by entering the number of the
title or chapter using »1 ... 0«.
... using the title menu of the DVD/video CD
The title menu of the DVD/video CD may contain selection options for titles,
sections or scenes.
1 Call up the contents of the DVD/video CD by pressing »MENU«.
– If the DVD/video CD has a title menu it will appear on the screen.
2 If the selection options are numbered, select the desired title and section
using »1 ... 0«.
3 If the selection options are not numbered, select the titles and scenes using
»,,« or »..« and then press »OK« to confirm.
Ö
PP
K ( I R k
/ 1 2 1 off no off
>
s
a
A
S
Ö P
KK
( I R k
/ 1 2 1 off no off
>
s
a
A
S
Ö
PP
K ( I R k
/ 2 2 1 off no off
>
s
a
A
S
Page 24

24
DVD/VIDEO CD PLAYBACK
_____________________________________________________
Selecting a section to the nearest minute
1 Display the menu line by pressing »OSD«.
2 Select »L« towards the right end of the menu line by pressing »
4
« or
»3« and then press »..« to confirm.
– The DVD player switches to pause.
3 Enter the desired playing time as five digits (hours, minutes, seconds) using
»1 ... 0« and press »OK« to confirm.
– The DVD player locates the section and starts playback.
Interrupting and resuming playback
Playback of a DVD or video CD can be interrupted at any point and then
resumed from the same place.
This function can be used with the last four DVD or video CDs that you have
played.
1 Press »7« to interrupt playback.
2 Resume playback at the point where it was interrupted by pressing »8«
twice.
Ending playback
Playback of a DVD or video CD automatically stops at the end of a title.
You can also end playback at any time by pressing »7«.
Removing the DVD/video CD
1 Press »OPEN/CLOSE« on the DVD player to open the disc compartment.
B _
ZZ
; N
LL
1 off st
a
S
BB
_
ZZ
; N
LL
1 off st
<
a
0:57:15
s
A
..
7
DVD stop
1 : 00 : 30
1
resume
[
<
Page 25

ENGLISH
25
DVD/VIDEO CD PLAYBACK
_____________________________________________________
Additional playback functions
Selecting playback speed (slow motion)
Eight different playback speeds are available.
1 Display the menu line by pressing »OSD«.
2 Select »
;
« towards the right end of the menu line by pressing »4« or
»3« and then press »..« to confirm.
– The DVD player switches to pause.
3 Select the desired playback speed using »
4
« or »3« and press »OK« to
confirm.
4 To resume playback, press »8«.
Frame-by-frame playback
1 Press »II« to switch to freeze-frame (playback pause).
2 During the freeze-frame (playback pause), press »I I « repeatedly.
– The picture is advanced to the next frame.
3 To resume playback, press »8«.
Playing back all chapters of a title (Shuffle)
If the title contains several chapters, these are played back in random order.
1 Press »SHUFFLE« during playback.
– The DVD player display reads: »SHUFFLE«.
2 Resume playback by pressing »SHUFFLE« again.
BB
_
ZZ
; N L
1 off st
<
s
S
a
- I - I/2 - I/4 - I/8 a 0sI/8 I/4 I/2 I
BB
_
ZZ
; N L
1 off st
<
A
shuffle
Page 26

26
DVD/VIDEO CD PLAYBACK
_____________________________________________________
Video search
The video search can be activated directly using the »4« or »3« buttons, or
from the menu line.
1 During playback, press »
3
« (for 4/32 frames forwards) or »4« (for 4/32
frames backwards) one or two times.
2 To resume playback, press »8«;
or
1 Display the menu line by pressing »OSD«.
2 Select »N« towards the right end of the menu line by pressing »
4
« or
»3« and then press »..« to confirm.
3 Select the video search speed using »
4
« or »3«.
4 To resume playback, press »8«.
Note:
When the ”slow motion”, ”freeze frame” and ”video search” functions are
employed, the sound is muted.
Repeating a chapter, a title or a DVD
These functions repeat the currently chapter, title, or the entire contents of the
DVD.
1 Press »REPEAT« once, twice or three times during playback.
– The DVD player display reads »REPEAT CHAPTER« (chapter), »REPEAT TITLE« (title)
or »REPEAT« (entire DVD).
2 To quit this function press »REPEAT« a fourth time.
BB
_
ZZ
; N L
1 off st
<
s
S
a
-32 -8 -4 a Is4 8 32
BB
_
ZZ
; N L
1 off st
A
<
chapter
p
title
p
repeat
p
Page 27

ENGLISH
27
Selecting the camera angle for particular scenes or
passages
Many DVDs contain scenes or passages which were filmed several times from
different camera locations at different angles.
You can choose from among these different angles.
When you play a DVD which offers these functions, a display appears on the
screen. The »R1/3 « indicates how many different camera angles are
available (in this example 3), as well as the angle which is currently set (in the
example 1).
1 Start playback by pressing »8«.
2 Press »ANGLE« to select the angle function.
– »R1/3« in the dialog line and » R1/3« in the menu bar show the
camera angle, in this example 1.
3 To directly select another angle, enter the number of the appropriate angle
using »1...0«, »,,« or »..«.
4 Quit the function by pressing the »OSD« button.
– The »R2/3« icon disappears.
DVD/VIDEO CD PLAYBACK
_____________________________________________________
1/3 Ö
PP
K ( I R k
R 1 2 1 off 1/3 off
>
a s
A
S
2/3 Ö
PP
K ( I R k
R 1 2 1 off 2/3 off
>
a s
A
S
Page 28

28
Enlarging freeze-frames and moving the screen
section (Zoom)
1 Start playback by pressing »8«.
2 Display the menu line by pressing »OSD«.
3 Select the »k« item towards the right of the menu line using »
4
« or »3«
and press »..« to confirm.
– The DVD player switches to pause.
– The enlargement factor (»1.33«, »2«, »4«) is displayed under the zoom
symbol.
4 Select the desired enlargement using »
,,
« or »..« and press »OK« to
confirm.
– A cursor appears in the centre of the screen.
5 Move the screen section using »
,,
« or »..«, »4« or »3«.
Note:
The display can be hidden by pressing »OK«.
6 To resume playback, press »8«.
Selecting colour settings
1 Start playback by pressing »8«.
2 Display the menu line by pressing »OSD«.
3 Select the »B« item (colour settings) towards the right of the menu line
using »4« or »3« and press »..« to confirm.
4 Select the desired colour setting using »
,,
« or »..« and press »OK« to
confirm.
DVD/VIDEO CD PLAYBACK
_____________________________________________________
Ö
PP
K ( I R k
/ 1 2 1 off no off
A
S
sa
Ö
PP
K ( I R k
/ 1 2 1 off no 2
A
S
sa
Press OK to pan
BB
_
ZZ
; N L
1 off st
<
sa
A
S
Page 29

ENGLISH
29
Selecting and displaying subtitles
If the current DVD provides subtitles, they can be displayed on your TV screen.
If subtitles in several languages are available, you can select your language of
choice.
1 During playback, press »SUBTITLE« until the menu line appears.
– The »I« menu item is active.
2 Select the desired language for the subtitles by pressing »
,,
« or »..«.
3 Quit the menu line by pressing »OSD«.
– The menu line automatically disappears after a short time.
Note:
To switch off the subtitles, repeat steps 1 to 3 and select the »off« option by
pressing »,,« or »..«.
Changing the dubbed language
If the current DVD offers alternatives, you can change the preset dubbed
language.
1 Display the menu line by pressing »AUDIO«.
– The »(« menu item is active.
2 Select the desired dubbed language with »
,,
« or »..«.
3 Quit the menu line by pressing »OSD«.
– The menu line automatically disappears after a short time.
Note:
When the playback sound is changed (from Dolby Surround Sound to
Stereo, for example), this is also displayed.
DVD/VIDEO CD PLAYBACK
_____________________________________________________
Ö
PP
K ( I R k
/ 1 2 1de off no off
>
a s
A
S
Ö
PP
K ( I R k
/ 1 2 1de off no off
>
a s
A
S
Ö
PP
K ( I R k
/ 1 2 1de off no off
>
a s
A
S
Ö
PP
K ( I R k
/ 1 2 1en off no off
>
a s
A
S
Page 30

30
Programming titles or chapters
If a DVD/video CD contains several titles and/or chapters, you can assemble
them to create your own program.
The program may contain up to 20 titles, which are displayed in a list.
Selecting titles or chapters
1 Open the disc compartment, insert the CD and close the disc compartment
again.
2 Switch DVD the player to ”STOP” by pressing »7«.
3 Call up the menu line with the »OSD« button.
4 Select the »
_
« item (Favourite Track Selection) towards the right of the
menu line using »4« or »3« and press »..« to confirm.
5 Select the »title« or »chapter« line by pressing »
,,
« or »..«.
6 Select the titles or chapters which you wish to save in the title memory using
»4« or »3« and press »OK« to confirm.
– The numbers of the titles and chapters are shown in the »program« and the
»Off« display changes to »On«.
7 Quit the title memory by pressing »OSD«.
Playing back titles or chapters
1 Open the disc tray, insert the DVD or video CD and close the tray again.
2 Start playback of the program by pressing »8«.
3 End playback of program by pressing »7«.
DVD/VIDEO CD PLAYBACK
_____________________________________________________
Favourite Track Selection
On
s
Off
title 1 2
chapter
program ( )
Clear all
BB
_
ZZ
; N L
1 off st
<
A
S
Favourite Track Selection
On Off
title 1 2
chapter 1
s
2 3 4 5 6 >
program ( )
Clear all
BB
_
ZZ
; N L
1 off st
<
AA
Favourite Track Selection
On Off
title 1 2
chapter 1 2 3 4
a
5 s6 >
program ( )
Clear all
BB
_
ZZ
; N L
1 off st
<
AA
Page 31

ENGLISH
31
Deleting individual titles or chapters
1 Switch the DVD player to ”STOP” by pressing »7«.
2 Call up the menu line with the »OSD« button.
3 Select the »
_
« item (Favourite Track Selection) towards the right of the
menu line using »4« or »3« and press »..« to confirm.
4 Select the »program« line using »
,,
« or »..«.
5 Select the titles or chapters to be deleted using »
4
« or »3« and press
»OK« to delete.
6 Conclude the setting by pressing »OSD«.
– The menu display is switched off.
Deleting all titles or chapters
1 Switch the DVD player to ”STOP” by pressing »7«.
2 Call up the menu line with the »OSD« button.
3 Select the »
_
« item (Favourite Track Selection) towards the right of the
menu line using »4« or »3« and press »..« to confirm.
4 Select the »Clear all« line using »
..
«.
5 Delete the titles/chapters by pressing »OK«.
– All titles/chapters are deleted from the title list.
6 Conclude the setting by pressing »OSD«.
– The menu display is switched off.
DVD/VIDEO CD PLAYBACK
_____________________________________________________
Favourite Track Selection
On Off
title 1 2
chapter 1 2 3 4 5 6 >
program 1.1 1.4
a
1.5
Clear all
BB
_
ZZ
; N L
1 off st
<
A
S
Favourite Track Selection
On Off
title 1 2
chapter 1 2 3 4 5 6 >
program 1.1 1.4
a
1.5
Clear all
BB
_
ZZ
; N L
1 off st
<
A
Page 32

32
AUDIO CD PLAYBACK
________________________________________________
Audio CD features
An audio CD is identified by the label on the left.
Audio CDs contain only music recordings. They can be played in the normal
manner on a HiFi system.
With the help of the DVD player menu – which is displayed on your TV screen –
you can organise your own music programme by selecting or deleting certain
titles.
Before playback
Preparation
1 Switch on the television and select the channel for the DVD player.
2 Switch on the HiFi system and select the audio input for the DVD player.
3 Press »ON/OFF« to switch the DVD player on.
– The DVD player display reads: »NO DISC«.
Inserting a DVD/video CD
1 Press »OPEN/CLOSE« on the DVD player.
2 Insert the audio CD in the disc compartment, with the labelling facing
upwards.
3 Press »OPEN/CLOSE«, or
gently push the front of the disc tray.
– The status display reads: »,,reading«, the DVD player display reads
»,,READ«, playback starts automatically and the »Audio Disc Mode« menu
appears on the screen.
,,
7
reading stop
- : -- : --
- : -- : --
TITLE
CHAPTER
TRACK
SCAN
SHUFFLE
REPEAT
CD
V
CHAPTER
TIMETRACKTOTAL
TRACKTITLE
Page 33

ENGLISH
33
AUDIO CD PLAYBACK
______________________________________________________________
Audio functions
Information in the »Audio Disc Mode« menu
This menu provides you with information about the CD:
– »8 play« –- Playback
– »II pause« – Playback pause
– » 1 track« – Selected title
– » 0.01.07 time« – Elapsed playing time of the title
– » 16 total tracks« – Number of titles
– » 1.16.58 total time« – Total CD playing time
Playing back a title
1 Press »8« to start playback.
– Playback stops automatically at the end of the CD.
2 To pause playback, press »II«.
To resume playback, press »8« again.
3 To end playback, press »7«.
Selecting a different title
1 To select the next title, press »
s6
« briefly during playback.
2 To select the beginning of the current title, briefly press »
5a
«.
3 To select the previous title, press »
5a
« briefly again during playback.
4 To directly select a title, enter the number of the title in question as one or two
digits using »1 ... 0«.
Audio Disc Mode
8
1 0.01.07 16 1.16.58
play track time total tracks total time
fts On Off
track 1 2 3 4 5 6 7 8 9 >
program
Clear all
Audio Disc Mode
8
2 0.05.14 16 1.16.58
play track time total tracks total time
fts On Off
track 1 2 3 4 5 6 7 8 9 >
program
Clear all
Audio Disc Mode
7 -- -.--.- - 16 1.16.58
stop track time total tracks total time
fts On Off
track 1 2 3 4 5 6 7 8 9 >
program
Clear all
S
Page 34

34
AUDIO CD PLAYBACK
______________________________________________________________
Ending playback
Playback stops automatically at the end of the CD.
You can also end playback at any time by pressing »7«.
Playing back all chapters of a title (Shuffle)
If the title contains several chapters, these are played back in random order.
1 Press »SHUFFLE« during playback.
– The DVD player display reads »SHUFFLE« followed by the number of the
track.
2 Resume playback by pressing »SHUFFLE« again.
Repeating a title or a CD (Repeat)
These functions repeat the title which is currently running or the entire CD.
1 Press »REPEAT« during playback.
– The DVD player display reads »REPEAT TRACK« and the current title is
repeated.
2 During playback, press »REPEAT« twice.
– The DVD player display reads »REPEAT« and the entire CD is repeated.
3 To quit this function, press »REPEAT« again.
Removing the CD
1 Press »OPEN/CLOSE« on the DVD player.
track
p
repeat
p
shuffle Audio Disc Mode
8
1 0.01.07 16 1.16.58
play track time total tracks total time
fts On Off
track 1 2 3 4 5 6 7 8 9 >
program
Clear all
Page 35

ENGLISH
35
Creating a music program
This function allows you to select your favourite titles from audio CDs in order to
create your own music program.
The program may contain up to 20 titles, which are displayed in a program list.
When a title is played back it appears in the first place in the program list. If you
add a new title and the program list is already full, the last title in the list is
automatically deleted.
Selecting a title
1 Open the disc compartment, insert the CD and close the disc compartment
again.
2 Switch DVD the player to ”STOP” by pressing »7«.
3 Select the »track« line by pressing »
..
«.
4 Select the titles which you wish to save in the title memoryy using »
4
« or
»3« and press »OK« to confirm.
– The title numbers (»program 2 4 6«), the total number of titles (» 3 total tracks«)
and the playing time of the music program (»0.15.32 total time«) are
displayed.
5 Save the music program by pressing »
8
«. Playback starts automatically.
Playing back a music program
1 Open the disc compartment, insert the CD and close the disc compartment
again.
2 Press »8« to start playback of the music program.
3 End playback of the program by pressing »7«.
AUDIO CD PLAYBACK
______________________________________________________________
Audio Disc Mode
7 -- -.--.- - 16 1.16.58
stop track time total tracks total time
fts On Off
track 1s2 3 4 5 6 7 8 9 >
program
Clear all
A
Audio Disc Mode
7 -- -.--.- - 3 0.15.32
stop track time total tracks total time
fts On Off
track 1 2 3 4 5 6 a7s8 9 >
program 2 4 6
Clear all
A
Page 36

36
AUDIO CD PLAYBACK
______________________________________________________________
Deleting individual titles
1 Switch the DVD player to ”STOP” by pressing »7«.
2 Select the »program « line using »
..
«.
3 Select the titles you wish to delete using »
4
« or »3« and delete them by
pressing »OK«.
– The titles are deleted from the title memory.
4 Save music program by pressing »
8
«. Playback starts automatically.
Deleting all titles
1 Switch the DVD player to ”STOP” by pressing »7«.
2 Select the »Clear all« line using »
..
«.
3 Delete the titles by pressing »OK«.
– All titles are deleted from the title memory.
Audio Disc Mode
7 -- -.- -.-- 3 0.15.32
stop track time total tracks total time
fts On Off
track 1 2 3 4 5 6 7 8 9 >
program 2 a4s6
Clear all
A
S
Audio Disc Mode
7 -- -.- -.-- 3 0.15.32
stop track time total tracks total time
fts On Off
track 1 2 3 4 5 6 7 8 9 >
program 2 a4s6
Clear all
A
Page 37

ENGLISH
37
PARENTAL CONTROL SYSTEM
_____________________
The parental control system enables you to:
– Prevent the DVD player from being used;
– Release or block particular DVDs or video CDs for playback;
– Block scenes which are not appropriate for children from DVDs or video CDs,
or select alternative scenes.
Activating and switching off the DVD player’s
parental control system
Activating the child lock of the DVD player
1 Call up the menu line by pressing »OSD AUX«.
2 Select the »
ÖÖ
« item (Settings) using »4« or »3« and press »..« to
confirm.
3 Select the »
Ü
« line (Special functions) using »..« and press »3« to
confirm.
4 Select the »Access control« line using »
,,
« or »..« and press »3« to
confirm.
5 Enter the four-digit code number using the »1...0« buttons.
Note:
When the code number is entered for the first time, the display changes to
»Confirm code«.
Enter the four-digit code number again using the »1...0« buttons.
6 Select the »Child lock« line using »
,,
« or »..« and confirm by pressing
»3«.
ÖÖ
P K ( I R k
/ 1 2 1 off no off
O
>>
U
Ü
Access control
Status window
Low power standby
>
a
( ) ( ) ( ) ( )
Enter code
ÖÖ
P K ( I R k
/ 1 2 1 off no off
O
>>
U
Ü
Access control
Status window
Low power standby
>
S
s
a
Enter code…
On
Off
Page 38

38
PARENTAL CONTROL SYSTEM
________________________________________________
7 Select the »
DD
« icon using »,,« or »..«.
8 Press »OSD« to conclude the setting.
– The DVD player is locked.
Note:
If a DVD or video CD is now inserted in the disc tray, the message »locked«
appears and the four-digit code number must be entered.
Deactivating the parental control system of the DVD
player
1 To de-activate the parental control system, repeat steps 1 to 8 from the
section entitled ”Activating the parental control system of the DVD player”
and select the »FF« item by pressing »,,« or »..«.
– The parental control system is de-activated.
Note:
If you forget or lose the code number, read the section entitled ”Rectifying
minor problems” on Page 63.
Changing the code number
1 To change the code number, repeat steps 1 to 5 from the section entitled
”Activating the parental control system of the DVD player”.
2 Select the »Change code« line using »
,,
« or »..« and confirm by
pressing »3«.
3 Enter the new four-digit code number using the »1...0« buttons.
Enter the four-digit code number again using the »1...0« buttons.
4 Press »OSD« to conclude the setting.
ÖÖ
P K ( I R k
/ 1 2 1 off no off
O
>>
U
Ü
Access control
Status window
Low power standby
>
Child lock
Parental level
Change country
Change code
D
F
a
S
ÖÖ
P K ( I R k
/ 1 2 1 off no off
O
>>
U
Ü
Access control
Status window
Low power standby
>
Child lock
Parental level
Change country
Change code
D
F
a
A
ÖÖ
P K ( I R k
/ 1 2 1 off no off
O
>>
U
Ü
Access control
Status window
Low power standby
>
Child lock
Parental level
Change country
Change code
( )
( )
( )
( )
s
A
S
Page 39

ENGLISH
39
PARENTAL CONTROL SYSTEM
________________________________________________
Enabling a DVD or video CD for playback
Permitting use of the DVD player
When the parental control system is activated, the »Access control« menu
appears on the screen. You may choose if you want the DVD or video CD to be
played once only or unrestrictedly.
If you select the »Play always« function, the DVD or video CD is saved in a list
and playback of this DVD or video CD is unlimited. Up to 50 DVDs or video CDs
can be saved in this list.
1 Insert the DVD or video CD in the disc tray.
– The »Access control« menu is displayed on the screen.
2 Select the »Play one« line using »
,,
« or »..« (for once-only playback),
or
select the »Play always« line using »,,« or »..«.
3 Enter the four-digit code number using the »1...0« buttons.
– Playback starts automatically.
De-activating the »Play always« function
1 Insert the DVD or video CD in the disc tray.
– Playback starts automatically.
2 Press the »7« button, while the »
HH
« icon is visible.
– Permission to play back this DVD or video CD is revoked.
locked Access control
G
Choose ‘Play always‘ to insert the disc in
the child-safe list
Play one ( ) ( ) ( ) ( )
Play always ( ) ( ) ( ) ( )
S
locked Access control
G
Choose ‘Play always‘ to insert the disc in
the child-safe list
Play one • • • ( )
Play always ( ) ( ) ( ) ( )
S
Page 40

40
PARENTAL CONTROL SYSTEM
________________________________________________
Authorising the contents of a DVD
Films on DVD may be wholly or partially unsuitable for children. Such DVDs
contain information which identifies these scenes, providing them with ratings from
1 to 8. You can select one of the ratings and thereby authorise alternative scenes
for playback.
1 Call up the menu line by pressing »OSD«.
2 Select the »
ÖÖ
« item (Settings) using »4« or »3« and press »P –« to
confirm.
3 Select the »
Ü
« line (Special functions) using »..« and press »3« to
confirm.
4 Select the »Access control« line using »
,,
« or »..« and press »3« to
confirm.
5 Enter the four-digit code number using the »1...0« buttons.
6 Select the »Parental level« line using »
,,
« or »..« and activate by
pressing »3«.
7 Select the rating (from 1 to 8) using »
,,
« or »..«.
8 Conclude the setting by pressing »OSD«.
Access control
Status window
Low power standby
Enter code…
On
Off
ÖÖ
P K ( I R k
/ 1 2 1 off no off
>
O
>>
U
Ü
ÖÖ
P K ( I R k
/ 1 2 1 off no off
O
>>
U
Ü
Access control
Status window
Low power standby
>
Child lock
Parental level
Change country
Change code
5
a
S
ÖÖ
P K ( I R k
/ 1 2 1 off no off
O
>>
U
Ü
Access control
Status window
Low power standby
>
a
( ) ( ) ( ) ( )
Enter code
A
s
S
a
Page 41

ENGLISH
41
PARENTAL CONTROL SYSTEM
________________________________________________
Changing the country setting
1 Call up the menu line by pressing »OSD«.
2 Select the »
Ö
« item (Settings) using »4« or »3« and press »P –« to
confirm.
3 Select the »
Ü
« line (Special functions) using »..« and press »3« to
confirm.
4 Select the »Access control« line using »
,,
« or »..« and press »3« to
confirm.
5 Enter the four-digit code number using the »1...0« buttons.
6 Select the »Change country« line using »
,,
« or »..« and activate by
pressing »3«.
7 Select the country using »
,,
« or »..«.
8 Conclude the setting by pressing »OSD«.
ÖÖ
P K ( I R k
/ 1 2 1 off no off
O
>>
U
Ü
Access control
Status window
Low power standby
>
Child lock
Parental level
Change country
Change code
5
a
S
ÖÖ
P K ( I R k
/ 1 2 1 off no off
O
>>
U
Ü
Access control
Status window
Low power standby
>
S
s
a
ÖÖ
P K ( I R k
/ 1 2 1 off no off
O
>>
U
Ü
Access control
Status window
Low power standby
>
a
( ) ( ) ( ) ( )
Enter code
A
Enter code…
On
Off
Page 42

42
USING EXTERNAL DEVICES
____________________________
Connecting to a HiFi system with digital two-channel
stereo sound (PCM) or a digital multi-channel audio
receiver
1 Plug the cinch cable supplied into the »DIG OUT« socket on the DVD
player and into the appropriate socket on the HiFi,
or
2 Plug a standard optical cable into the »OPT OUT« socket on the DVD
player and the appropriate socket on the HiFi system.
Note:
The digital output must be activated on the DVD player. When doing this,
observe the settings in the chapter entitled ”Adapting the digital or analog
outputs on the DVD players to connected audio devices” on Pages 44 to 47.
C
T
MULTICHANNEL AUDIO OUT
LEFT CENTER
DIGITAL
AUDIO
INPUT
MULTICHANNEL AUDIO OUT
LEFT CENTER
LEFT
REAR
FRONT
DIGITAL AUDIO OUT
MAINS
PCM/MPEG2/AC3/DTS
OPT OUT
STEREO OUT VIDEO OUT
L
R
(CVBS) (Y/C)
RIGHT SUBW.
RIGHT
DIG OUT
VIDEO OUT S-VIDEO OUT
REAR
FRONT
AUDIO OUT
I
AUX/VCR
IN
II
TV OUT
MAINS
DIGITAL AUDIO OUT
PCM/MPEG2/AC3/DTS
OPT OUT
LEFT
REAR
FRONT
STEREO OUT VIDEO OUT
L
R
RIGHT SUBW.
RIGHT
DIG OUT
REAR
(CVBS) (Y/C)
VIDEO OUT S-VIDEO OUT
FRONT
AUDIO OUT
AUX/VCR
TV OUT
I
IN
II
MULTICHANNEL AUDIO OUT
LEFT CENTER
LEFT
REAR
FRONT
DIGITAL AUDIO OUT
MAINS
PCM/MPEG2/AC3/DTS
OPT OUT
STEREO OUT VIDEO OUT
L
R
(CVBS) (Y/C)
RIGHT SUBW.
RIGHT
DIG OUT
VIDEO OUT S-VIDEO OUT
REAR
FRONT
AUDIO OUT
I
AUX/V
IN
II
TV OU
Page 43

ENGLISH
43
USING EXTERNAL DEVICES
_____________________________________________________
Connecting to an analog multi-channel audio/video
amplifier
Your DVD player has an integrated multi-channel decoder. This enables you to
play DVDs which use the multi-channel surround system. A decoder is not
necessary.
The connection is made at the »MULTICHANNEL AUDIO OUT« sockets.
1 Plug a standard cinch cable into the »LEFT FRONT« and »RIGHT
FRONT« sockets on the DVD player and the appropriate sockets on the
amplifier for the front loudspeaker.
2 Plug a standard cinch cable into the »LEFT REAR« and »RIGHT REAR«
sockets on the DVD player and the appropriate sockets on the amplifier for
the surround loudspeakers.
3 Plug a standard cinch cable into the »CENTER« socket on the DVD player
and the appropriate socket on the amplifier for the middle loudspeaker.
4 Plug a standard cinch cable into the »SUBW.« socket on the DVD player
and the appropriate socket on the amplifier for the subwoofer.
– If the subwoofer is equipped with its own amplifier, then use that socket.
Note:
Suitable sound settings must be selected on the DVD player. When doing
this, observe the settings in the chapter entitled ”Adapting the digital or
analog outputs on the DVD players to connected audio devices” on Pages 44
to 47.
MULTICHANNEL AUDIO OUT
LEFT CENTER
LEFT
REAR
FRONT
DIGITAL AUDIO OUT
MAINS
MAINS
PCM/MPEG2/AC3/DTS
OPT OUT
DIGITAL AUDIO OUT
PCM/MPEG2/AC3/DTS
OPT OUT
STEREO OUT VIDEO OUT
L
R
(CVBS) (Y/C)
RIGHT SUBW.
RIGHT
DIG OUT
DIG OUT
REAR
MULTICHANNEL AUDIO OUT
LEFT CENTER
REAR
RIGHT SUBW.
REAR
FRONT
LEFT
FRONT
RIGHT
FRONT
VIDEO OUT S-VIDEO OUT
AUDIO OUT
STEREO OUT VIDEO OUT
L
R
(CVBS) (Y/C)
VIDEO OUT S-VIDEO OUT
AUDIO OUT
I
AUX/VCR
IN
II
TV OUT
I
AUX/VCR
IN
II
TV OUT
MULTICHANNEL AUDIO OUT
LEFT CENTER
LEFT
REAR
FRONT
DIGITAL AUDIO OUT
MAINS
PCM/MPEG2/AC3/DTS
OPT OUT
STEREO OUT VIDEO OUT
L
R
(CVBS) (Y/C)
RIGHT SUBW.
RIGHT
DIG OUT
VIDEO OUT S-VIDEO OUT
REAR
FRONT
AUDIO OUT
I
AUX/VCR
IN
II
TV OUT
MULTICHANNEL AUDIO OUT
LEFT CENTER
LEFT
REAR
FRONT
DIGITAL AUDIO OUT
MAINS
PCM/MPEG2/AC3/DTS
OPT OUT
STEREO OUT VIDEO OUT
L
R
(CVBS) (Y/C)
RIGHT SUBW.
RIGHT
DIG OUT
VIDEO OUT S-VIDEO OUT
REAR
FRONT
AUDIO OUT
I
AUX/VCR
IN
II
TV OUT
Page 44

44
SOUND SETTINGS
____________________________________________________
Selecting the sound menu
1 Display the menu line by pressing »OSD«.
2 Select the »
ÖÖ
« item (Settings) using »4« or »3« and press »P –« to
confirm.
3 Select the »
>>
« line (Sound menu) using »,,« or »..« and press »3«
to confirm.
Note:
For further operation, see the following sections, each one starting from
Step 1.
Adapting the digital or analog outputs on the DVD
player to connected audio devices
You must adapt the output sockets on the DVD player and the type of signal
according to the television or audio device to which it is connected.
These settings are carried out in the »Tonmenü« (>>). The necessary settings
are listed in the table.
1 Select the »Digital output« line using »
,,
« or »..« and activate by
pressing »3«.
Note:
Select the required setting (see the table) by pressing »,,« or »..«.
2 Select the »Analogue output« line using »
,,
« or »..« and activate by
pressing »3«.
Note:
Select the required setting (see the table) by pressing »,,« or »..«.
ÖÖ
P K ( I R k
/ 1 2 1 off no off
O
>>
U
Ü
A
S
8
>
Digital output
Analogue output
Night mode
Karaoke vocal
Speakers
Off
Dolby Surround
Off
Off
Settings...
ÖÖ
P K ( I R k
/ 1 2 1 off no off
O
>>
U
Ü
Digital output
Analogue output
Night mode
Karaoke vocal
Speakers
>
Stereo
Dolby Surround
Virt. Surround (3D)
Multichannel (6 ch)
a
A
S
ÖÖ
P K ( I R k
/ 1 2 1 off no off
O
>>
U
Ü
Digital output
Analogue output
Night mode
Karaoke vocal
Speakers
>
Off
On - PCM only
On - All formats
a
S
Page 45

ENGLISH
45
SOUND SETTINGS
_____________________________________________________________________
3 Switch off the menu with the »OSD« button.
Settings for active loudspeakers
You must adapt the output channels of the DVD player according to the
loudspeakers connected and the acoustic characteristics of their location.
1 Select the »Speakers« line using »
,,
« or »..« and activate by pressing
»3«.
2 Select the loudspeaker by pressing »
,,
« or »..«.
– The selected loudspeakers are highlighted in the menu.
»Front L & R« – Front loudspeakers
»Centre« – Middle loudspeaker
»Surround L« – Surround loudspeaker
»Surround R« – Surround loudspeaker
»Subwoofer« – Bass loudspeaker
Connected television/ Setting in »>>« menu (Sound)
audio device Digital output Analog output
Television or amplifier with »Off« »Stereo« or
analog two-channel stereo sound »Virt. Surround (3D)«
Television or amplifier with »Off« »Dolby Surround«
analog Dolby Surround
Amplifier with digital
»On-PCM only«
»Stereo«
two-channel stereo sound
Digital amplifier with multi-channel
»On-All formats«
»Stereo«,
Decoder (Dolby AC3, MPEG,DTS) »Dolby Surround«,
Multi-channel AV receiver with »Off« »Virt. Surround (3D)«
analog 6 channel connection »Multichannel (6 ch)«
ÖÖ
P K ( I R k
/ –– ––– off no off
O
>>
U
Ü
Digital output
Analogue output
Night mode
Karaoke vocal
Speakers
>
a
a
a
Off
Dolby Surround
Off
Off
Settings...
ÖÖ
P K ( I R k
/ –– ––– off no off
Speakers
Front L & R
Centre
Surround L
Surround R
Subwoofer
OK to exit
>
a
a
S
L
S
Page 46

46
SOUND SETTINGS
_____________________________________________________________________
3 Select the required setting using »
4
« or »3« and adapt the loudspeakers
by pressing »,,« or »..«:
»
u
« – Volume setting
» L« (large) – The loudspeakers are suitable for audio signals below
120 Hz
» S« (small)– The loudspeakers are not suitable for audio signals
below 120 Hz
»On« – Center/Surround loudspeakers or a subwoofer are
connected
»Off« – Center/Surround loudspeakers or a subwoofer are not
connected
»Å« – Set delay time
Note:
See the next chapter for how to calculate the delay time.
4 Click »OK« to save the setting.
5 Press »OSD« to quit the menu.
Calculating the delay time
The DVD player is set by the manufacturer to play back correctly synchronised
Digital Surround Sound. The listening range is defined so that the Surround
loudspeakers are located approximately 150 cm closer to the listener than the
front loudspeakers, and that the middle loudspeaker is on a line with the front
loudspeakers.
If you change the position of the loudspeakers you must also adjust the delay
time.
Choose the setting closest to the calculated value.
ÖÖ
P K ( I R k
/ –– ––– off no off
Speakers
Front L & R
Centre
Surround L
Surround R
Subwoofer
OK to exit
>
a
a
a
0dB
u
Å
S
L
S
0ms
♦
♦
Page 47

ENGLISH
47
SOUND SETTINGS
_____________________________________________________________________
Delay time for Digital Surround
The distances are calculated in centimetres.
Measure the distance from the front loudspeakers and the Surround loud-
speakers to the listener’s central position.
Subtract the distance to the Surround loudspeakers from the distance to the
front loudspeakers and divide the result by 30. This gives you the necessary
delay time in milliseconds for the Surround channel.
Example:
Distance to front loudspeakers 180 cm
– Distance to Surround loudspeakers 120 cm
= 060 cm
60 cm : 30 = 2 milliseconds
If the middle loudspeaker is on a line with the front loudspeaker, then no further
setting is necessary.
If the middle loudspeaker is nearer to the listener’s central position, then
measure the distance from the front loudspeakers to the middle loudspeaker and
divide the result by 30. This gives you the necessary delay time in milliseconds
for the middle channel.
Delay time for Dolby Surround
With Dolby Surround 15 milliseconds are added to the delay time for the
Surround channel.
If the centre channel is also switched on, then 15 milliseconds are also added to
the delay time for the centre channel.
Page 48

48
SOUND SETTINGS
_____________________________________________________________________
Switching night-time mode on/off
This function optimises the sound dynamics at low playback volume.
1 Select the »Night mode« line using »
,,
« or »..« and activate by
pressing »3«.
2 Switch night-time mode on/off by pressing »
,,
« or »..«.
3 Quit the menu with the »OSD« button.
Switching karaoke on and off
Activate this function when you are playing a DVD with multi-channel karaoke
sound.
1 Select the »Karaoke vocal« line using »
,,
« or »..« and activate by
pressing »3«.
2 Press »
,,
« or »..« to switch karaoke on or off.
3 Quit the menu with the »OSD« button.
ÖÖ
P K ( I R k
/ 1 2 1 off no off
O
>>
U
Ü
Digital output
Analogue output
Night mode
Karaoke vocal
Speakers
>
On
Off
a
A
ÖÖ
P K ( I R k
/ 1 2 1 off no off
O
>>
U
Ü
Digital output
Analogue output
Night mode
Karaoke vocal
Speakers
>
On
Off
a
A
Page 49

ENGLISH
49
PICTURE SETTINGS
___________________________________________________
Selecting the picture menu
1 Display the menu line by pressing »OSD«.
2 Select the »
ÖÖ
« item (Settings) using »4« or »3« and press »P –« to
confirm.
3 Select »
OO
« (Picture menu) using »,,« or »..« and then press »3« to
confirm.
Note:
For further operation, see the following sections, each one starting from
Step 1.
Adapting the television format
If your television has a 16:9 screen format, then select the 16:9 setting.
If you have a standard television (screen format 4:3) you can select:
– »4:3 letterbox« for wide-screen playback with black bars on the top and
bottom edges of the screen,
or
– »4:3 panscan« for wide-screen playback using the full height of the screen,
but with the left and right edges of the picture cropped.
1 Select the »TV Shape« line using »
,,
« or »..« and activate by pressing
»3«.
2 Select the picture format »16:9«, »4:3 panscan« or » 4:3 letterbox« by
pressing »,,« or »..«.
3 Quit the menu with the »OSD« button.
ÖÖ
P K ( I R k
/ 1 2 1 off no off
O
>>
U
Ü
TV Shape
Black level shift
Video shift
Colour settings
Personal colour
A
S
8
>
16:9
On
■■××■■■■■■
1 Personal
Settings...
ÖÖ
P K ( I R k
/ 1 2 1 off no off
O
>>
U
Ü
TV Shape
Black level shift
Video shift
Colour settings
Personal colour
A
S
8
>
16:9
On
■■××■■■■■■
1 Personal
Settings...
Page 50

50
PICTURE SETTINGS
____________________________________________________________________
Black level setting (for NTSC transmissions only)
This setting adjusts the colour dynamics to create a better picture contrast.
1 Select the »Black level shift« line using »
,,
« or »..« and activate by
pressing »3«.
2 Switch the function on or off with »
,,
« or »..«.
3 Quit the menu with the »OSD« button.
Adjusting the picture position
The ex-works setting centres the picture on the screen.
This option enables you to move the picture on the screen to the left or right.
1 Select the »Video shift« line using »
,,
« or »..« and activate by pressing
»3«.
2 Shift the screen position using »
4
« or »3« press »OK« to save.
3 Quit the menu with the »OSD« button.
ÖÖ
P K ( I R k
/ 1 2 1 off no off
O
>>
U
Ü
TV Shape
Black level shift
Video shift
Colour settings
Personal colour
A
S
8
>
16:9
On
■■××■■■■■■
1 Personal
Settings...
ÖÖ
P K ( I R k
/ 1 2 1 off no off
O
>>
U
Ü
TV Shape
Black level shift
Video shift
Colour settings
Personal colour
A
S
8
>
16:9
On
■■××■■■■■■
1 Personal
Settings...
Page 51

ENGLISH
51
PICTURE SETTINGS
____________________________________________________________________
Colour settings
This function enables you use pre-set values (colour, brightness, contrast) for the
playback image.
1 Select the »Colour settings« line using »
,,
« or »..« and activate by
pressing »3«.
2 Select the desired setting using the »
,,
« or »..« buttons.
3 Quit the menu with the »OSD« button.
Custom colour settings
This function enables you to choose your own colour, brightness and contrast
settings.
1 Select the »Personal colour« line using »
,,
« or »..« and activate by
pressing »3«.
2 Choose the setting (saturation, brightness, contrast) using »
,,
« or »..«
and press »3« to confirm.
3 Set the saturation, brightness or contrast using »
,,
« or »..« and press
»OK« to save the setting.
4 Switch off menu with the »OSD« button.
ÖÖ
P K ( I R k
/ 1 2 1 off no off
O
>>
U
Ü
TV Shape
Black level shift
Video shift
Colour settings
Personal colour
A
S
8
>
16:9
On
■■××■■■■■■
1 Personal
Settings...
ÖÖ
P K ( I R k
/ 1 2 1 off no off
O
>>
U
Ü
TV Shape
Black level shift
Video shift
Colour settings
Personal colour
A
S
8
>
16:9
On
■■××■■■■■■
1 Personal
Settings...
Page 52

52
CUSTOM SETTINGS
__________________________________________________
Selecting the language menu
1 Display the menu line by pressing »OSD«.
2 Select the »
ÖÖ
« item (Settings) using »4« or »3« and press »..« to
confirm.
3 Select »
M
M
« (Language menu) with »,,« or »..« and activate with
»3«.
Note:
For further operation, see the following sections, each one starting from
Step 1.
Selecting the dubbed language
If several languages are available on the current DVD, the sound is played back
in the language you have selected.
If the language you select is not on the DVD, the first dubbed language
available is automatically selected.
1 Select the »Audio« line using »
,,
« or »..« and activate by pressing
»3«.
2 Select the desired dubbed language by pressing »
,,
« or »..«.
3 Quit the menu with the »OSD« button.
Selecting the language of the DVD player’s screen menus
1 Select the »Menu« line using »
,,
« or »..« and activate by pressing
»3«.
2 Select the desired language for the screen menus by pressing »
,,
« or
»..«.
3 Quit the menu with the »OSD« button.
ÖÖ
P K ( I R k
/ 1 2 1 off no off
O
>>
U
Ü
Audio
Subtitle
Menu
A
S
8
>
ÖÖ
P K ( I R k
/ 1 2 1 off no off
O
>>
U
Ü
Audio
Subtitle
Menu
>
Português
Italiano
English
S
a
English
English
English
ÖÖ
P K ( I R k
/ 1 2 1 off no off
O
>>
U
Ü
Audio
Subtitle
Menu
>
Português
Italiano
English
S
a
Page 53

ENGLISH
53
CUSTOM SETTINGS
___________________________________________________________________
Selecting the language for the subtitles
When subtitles are available on the current DVD, they are played back in the
language you have selected.
If the language you have selected for the subtitles is not on the DVD, the first
language available is automatically selected.
1 Select the »Subtitle« line using »
,,
« or »..« and activate by pressing
»3«.
2 Select the desired language by pressing »
,,
« or »..«.
3 Quit the menu with the »OSD« button.
Note:
Subtitles can be switched on and off during playback by pressing
»SUBTITLE«.
Switching on/off the DVD player’s status display
1 Display the menu line by pressing »OSD«.
2 Select the »
ÖÖ
« item (Settings) using »4« or »3« and press »P –« to
confirm.
3 Select »
ÜÜ
« (Special functions) using »,,« or »..« and then press »3«
to confirm.
4 Select the »Status window« line using »
,,
« or »..« and then press »3«
to confirm.
5 Switch the status display on or off by pressing »
,,
« or »..«.
6 Quit the menu by pressing the »OSD« button.
ÖÖ
P K ( I R k
/ 1 2 1 off no off
O
>>
U
Ü
Audio
Subtitle
Menu
>
Português
Italiano
English
S
a
ÖÖ
P K ( I R k
/ 1 2 1 off no off
O
>>
U
Ü
Access control
Status window
Low power standby
>
A
s
ÖÖ
P K ( I R k
/ 1 2 1 off no off
O
>>
U
Ü
Access control
Status window
Low power standby
>
a
On
Off
S
Enter code…
On
Off
Page 54

54
REMOTE CONTROL OF EXTERNAL DEVICES
_____
Television remote control
You can also operate GRUNDIG televisions with the remote control of the DVD
player.
The functions available to you depend on the model of the GRUNDIG television.
Note:
Slide the »DVD TV VCR EXT« switch to the »TV« position.
Point the remote control at the television set.
88
Switches off the television set (stand-by).
1 ... 0 Direct channel selection,
» 0 « selects the »AV« channels.
In teletext mode: enter the three-figure page number.
FF EE
Volume setting, » – « lower, »+« higher.
In menu mode: » – « cursor left, »+« cursor right.
OK Activates and changes functions, calls up data, confirms and
saves data.
..,,
Select TV channels, »+« up, » – « down.
In menu mode: »+« cursor up, » – « cursor down.
i
7
Calls up the ”DIALOG CENTER” or switches to menu mode.
TV-GUIDE Switches on the TV Guide for information on the current
programe.
TXT Switches between teletext and TV mode.
MUTE Switches the sound on or off (mute).
- VOL + Volume setting, » – « lower, »+« higher.
TE LE PI LOT 80V
4 5 6
7 8 9
0
P
OK
P
TV-GUIDE
SUBTITLEOSD AUDIOMENU
SHOWVIEWVCR-MENURECORD
VOL
REPEATANGLE
31 2
DVD
TV
VCR
EXT
MUTE
TXT
RETURNSHUFFLE
FORMAT AUXPIP
Page 55

ENGLISH
55
REMOTE CONTROL OF EXTERNAL DEVICES
________________________
MENU Calls up the » Bildeinstellungen« menu.
In teletext mode: returns to previous pagen.
OSD In teletext mode: advances to next pagen.
SUBTITLE In teletext mode: calls up the next chapter.
AUDIO Calls up the » Toneinstellungen« menu.
In teletext mode: Calls up the next topic.
5
a s
6
Brightness setting, »
5
a
« darker, »
s
6
« brighter.
PIP Press once = Double Window Funktion (TV picture and teletext
in separate halves of the screen);
Press twice = Picture in Picture.
? Call up Help.
FORMAT Change picture format.
AUX Preset button for various functions.
TE LE PI LOT 80V
4 5 6
7 8 9
0
P
OK
P
TV-GUIDE
SUBTITLEOSD AUDIOMENU
SHOWVIEWVCR-MENURECORD
VOL
REPEATANGLE
FORMAT AUXPIP
31 2
DVD
TV
VCR
EXT
MUTE
TXT
RETURNSHUFFLE
Page 56

56
REMOTE CONTROL OF EXTERNAL DEVICES
________________________
Video recorder remote control
You can also operate GRUNDIG video recorders with the remote control of the
DVD player.
The functions available to you depend on the model of the GRUNDIG video
recorder.
Note:
Slide the »DVD TV VCR EXT« switch to the »VCR« position.
Point the remote control at the video recorder.
88
Switches off the video recorder (stand-by).
FF EE
In menu mode: » – « cursor left, »+« cursor right.
OK Activates and changes functions, calls up data, confirms and
saves data.
..,,
Select TV channels, »+« up, » – « down.
In menu mode: »+« cursor up, » – « cursor down.
■ Stop.
l1 Pause during recording, freeze-frame during playback.
e Playback.
RECORD Recording.
VCR-MENU Switches between the menu and the TV image.
SHOWVIEW Activates ShowView recording.
5
a
Backward frame search during playback;
Tape rewind in ”Stop” mode.
s
6
Forward frame search during playback;
Fast forward in ”Stop” mode.
REPEAT FORMAT Activates and deactivates TIMER recording.
RETURN AUX Deletes data, activates settings, sets the playing time indicator
to »
0:00:00
«.
TE LE PI LOT 80V
4 5 6
7 8 9
31 2
DVD
TV
VCR
EXT
VOL
0
TV-GUIDE
P
OK
P
MUTE
TXT
SUBTITLEOSD AUDIOMENU
SHOWVIEWVCR-MENURECORD
REPEATANGLE
RETURNSHUFFLE
FORMAT AUXPIP
Page 57

ENGLISH
57
REMOTE CONTROL OF EXTERNAL DEVICES
________________________
Satellite receiver remote control
You can also operate GRUNDIG satellite receivers with the remote control of the
DVD player.
The functions available to you depend on the model of the GRUNDIG satellite
receiver.
Note:
Slide the »DVD TV VCR EXT« switch to the »EXT« position.
Point the remote control at the satellite receiver.
88
Switches the satellite receiver on and off (stand-by).
FF EE
In menu mode: » – « cursor left, »+« cursor right.
OK Activates and changes functions, calls up data, confirms and
saves data.
..,,
Select TV channels, »+« up, » – « down.
In menu mode: »+« cursor up, » – « cursor down.
OSD VCR-MENU Switches between the menu and the TV image.
RETURN AUX Deletes data, activates settings.
TE LE PI LOT 80V
4 5 6
7
8 9
31 2
DVD
TV
VCR
EXT
VOL
0
TV-GUIDE
P
OK
P
MUTE
TXT
SUBTITLEOSD AUDIOMENU
SHOWVIEWVCR-MENURECORD
REPEATANGLE
RETURNSHUFFLE
FORMAT AUXPIP
Page 58

58
REMOTE CONTROL OF EXTERNAL DEVICES
________________________
Programming the remote control for other
manufacturers’ devices
The remote control of the DVD player can also be used to operate equipment
from other manufacturers, as long as they work with infrared beams. You need
to have the remote control belonging to the other device.
The remote control is supplied programmed for GRUNDIG and similar devices.
Note:
The DVD function level is permanently set for the GRUNDIG DVD-Player and
cannot be reprogrammed.
In exceptional cases it is possible that the TP 80 V cannot learn the functions
of the other device.
Programming function levels
1 Slide the switch to the function level (TV, VCR, EXT) that you want to
program.
– The indicator for the selected function level lights up for about three
seconds.
2 Simultaneously press »AUX« and »3« until the indicator for the selected
level lights up continuously.
3 Point the two remote controls at each other at a distance of about five
centimetres.
4 Press the button on the TP 80 V which you want to program.
– The selected function level indicator flashes once.
5 On the original remote control, press the button of the function to be learnt
until the selected function level indicator on the TP 80 V flashes twice.
V
=
000
SV
LP
DVD
VTR
5 cm
4 5 6
7 8 9
0
31 2
DVD
TV
VCR
EXT
Page 59

ENGLISH
59
REMOTE CONTROL OF EXTERNAL DEVICES
________________________
Note:
If the TP 80 V is unable to learn the function, all four indicators will flash
twice. In this case, repeat Steps 3 to 5.
6 When you have finished the setting, press »AUX« and »3« together.
– The indicator flashes twice.
Resetting a function level
You can restore the remote control to the condition it was delivered in.
1 Slide the switch to the function level (TV, VCR, EXT) that you want to reset.
2 Simultaneously press »AUX« and »6« until the indicator for the selected
level flashes twice.
Resetting all function levels (except DVD)
1 Slide the switch to the DVD position.
2 Simultaneously press »PIP« and »6« until the indicators for the »TV«,
»VCR« and »EXT« function levels flash twice.
Page 60

60
INFORMATION
_____________________________________________________________
Technical data
This DVD player corresponds to the DIN EN 60065 (VDE 0860) safety
regulations and thus the international safety regulations IEC 60065 or CEE 1.
You may not open the DVD player. The manufacturer accepts no liability for
damage resulting from improper handling.
Mains voltage:
230 V ~ +/– 15 %, 50/60 Hz
Power consumption:
Operating: approx. 20 W
Stand-by: ≤ 10 W
Energy-saving mode: ≤ 5 W
Ambient temperature:
+10 °C to +35 °C
Relative humidity:
up to 80%
Playback standard:
PAL, 50 Hz, 625 lines/NTSC, 60 Hz, 525 lines
Playback system:
DVD-Video, Video CD, Audio CD/Multi-standard
PAL/NTSC, CD-R, CD-RW
DVD disc format:
Diameter ø 12 cm and ø 8 cm
Playing times (ø 12 cm)
One layer one-sided ,approx. 2:15 hours
two-sided, approx. 4:00 hours
Two layer one-sided, approx. 4:30 hours
two-sided, approx. 8:00 hours
Video format:
Signal: Digital
Digital compression: MPEG2 for DVD
MPEG1 for VCD
DVD 50 Hz
Horiz. resolution: 720 pixels
Vert. resolution: 576 lines
VCD
Horiz. resolution: 352 pixels
Vert. resolution: 288 lines
Audio format:
Digital: MPEG/AC-3
Compressed Digital
PCM 16, 20, 24 bit
48/96 kHz
Analog: Stereo sound, Dolby
Surround, 3D Sound
Audio:
Signal: Analog
DVD: 96 kHz 4Hz-44 kHz
48 kHz 4Hz-22 kHz
Video CD: 48 kHz 4Hz-22 kHz
CD: 44,1 kHz 4Hz-20 kHz
Signal-to-noise ratio
(at 1 kHz): 110 dB
Sound volume
(at 1 kHz): 100 dB
Crosstalk attenuation
(at 1 kHz): 115 dB
Page 61

ENGLISH
61
INFORMATION
__________________________________________________________________________
General instructions for laser devices
You will find a similar sign to the one shown here on the back of your unit.
CLASS 1 LASER PRODUCT signifies that the laser is safeguarded in such a way
that the maximum allowed radiation value can never be exceeded under any
circumstances.
Caution:
If operation devices or methods other than those specified here are
employed, this may lead to dangerous exposure to emissions.
This device emits laser radiation. Because of the danger of eye injuries, the unit
may only be opened or serviced by trained personnel.
This product contains components which are covered by certain U.S.
patents or for other reasons are considered intellectual property of the
Macrovision Corporation and other proprietors. Use of this protected
technology must be approved by the Macrovision Corporation and is only
permissible for private presentation at home or for other limited
applications, where no special permission has been granted by
Macrovision. Reproduction or disassembly of the device is prohibited.
The TRUSURROUND and SRS labels and the T logo are trademarks
of SRS Labs, Inc.
The TRUSURROUND technology is a licensed product of SRS Labs, Inc.
LASER
Type Semiconductor laser AlGaAs
Wavelength 650 nm (DVD)
780 nm (VCD/CD)
Output 7 mW (DVD)
10 mW (VCD/CD)
Angle of radiation 60 degrees
CLASS 1
LASER PRODUCT
Page 62

62
INFORMATION
__________________________________________________________________________
Cleaning DVDs/CDs
Wipe the dirty DVD/CD with a cloth from the centre outwards in a straight line.
Do not use any solvents such as benzene, flux, conventional cleaner or anti-static spray for
analogue records.
Additional Information for Units sold in Great Britain
Units sold in GB are suitable for operation from a 240 V AC, 50 Hz mains supply.
In case this appliance is supplied with a Safety Standard Approved mains lead fitted with a non-rewireable 13
Amp mains plug which, if unsuitable for your socket, should be cut off and an appropriate plug fitted by a
qualified electrician. The fuse and fuse holder must be removed from the plug as accidental insertion of the
redundant plug into a 13 Amp socket is likely to cause an electrical hazard.
Note:
The severed plug must be destroyed to avoid a possible shock hazard should it be inserted into a 13 Amp socket
elsewhere.
If it is necessary to change the fuse in the non-rewireable plug, the correct type and rating (5 Amp ASTA or BSI
approved BS 1362) must be used and the fuse cover must be refitted. If the fuse cover is lost or damaged the lead and
plug must not be used until a replacement is obtained. Replacement fuse covers should be obtained from your dealer.
If a non-rewireable plug or a rewireable 13 Amp (BS 1363) plug is used, it must be fitted with a 5 Amp ASTA or
BSI approved BS 1362 fuse. If any other type of plug is used it must be protected by a 5 Amp fuse either in the
plug or at the distribution board.
Important:
The wires in the mains lead are coloured in accordance with the following code:
BLUE – NEUTRAL
BROWN – LIVE
As the colours of the wires in the mains lead of your appliance may not correspond with the coloured marking
identifying the terminals in your plug, proceed as follows:
Connect the BLUE coloured wire to plug terminal marked with the letter "N" or coloured black.
Connect the BROWN coloured wire to the plug terminal marked with a letter "L" or coloured red.
In no circumstance must any of the wires be connected to the terminal marked with a letter "E", earth symbol ,
coloured green or green and yellow.
Replacement mains lead can be obtained from your dealer, or by contacting Grundig Consumer Relations on
01788 570056.
Manufactured under license from Dolby Laboratories. ”Dolby”, ”Pro Logic”
and the double-D logo ”g ” are trademarks of Dolby Laboratories.
©1992-1997 Dolby Laboratories, Inc. All rights reserved.
Page 63

ENGLISH
63
INFORMATION
__________________________________________________________________________
Rectifying minor problems
Not every picture or sound problem is caused by a defect in your DVD player. Impairment
can also be caused by leads having been accidentally pulled out, damaged DVDs/CDs
and worn-out batteries in the remote control.
If the following measures do not bring about satisfactory results, consult an authorised
dealer.
Cause/Remedy
Switch the DVD player off and back on.
Check if another DVD/CD needs to be inserted
for the program.
Point the remote control directly at the DVD player.
Remove all obstacles which may interfere with the path of the
remote control signal.
Check or replace the remote control batteries.
Switch the remote control to »DVD«.
Check the video connection.
Make sure that there are no fingerprints on the DVD/CD,
follow the cleaning instructions on Page 62.
Check if the DVD/CD labelling is facing upwards.
Clean the DVD/CD.
Check if the DVD/CD is damaged by testing out another
DVD/CD.
Check the audio connections.
Try another playback source.
Ensure that the audio connections have not been connected
at the phono input on the amplifier.
Deactivate parental control; instead of entering the code
number, press the » ■« key four times.
Problem
No return to start-up screen when the
DVD/CD is removed
DVD player does not respond to remote
control
No picture
Distorted image
DVD/CD cannot be played
No sound
Distorted sound from HiFi system
Parental control is active but you do not
know the four-digit code number.
Page 64

64
INFORMATION
__________________________________________________________________________
GRUNDIG customer service locations
Grundig AG
• Kurgartenstraße 37 • D-90762 Fürth • http://www.grundig.de
GRUNDIG
Kundendienst Nord
Kolumbusstraße 14
D-22113 Hamburg
+49/40-7 33 31-0
GRUNDIG BELUX N.V.
Deltapark, Weihoek 3, Unit 3G
B-1930 Zaventem
+32/2-7 16 04 00
GRUNDIG UK LTD.
Elstree Way, Borehamwood,
Herts, WD6 1RX
GB Großbritannien/Great
Britain
+44/1 81-3 24 94 00
Technical Service
Unit 35, Woodside Park, Wood
Street
Rugby, Warwickshire, CV21
2NP
Großbritannien/Great Britain
+44/1 78-8 57 00 88
GRUNDIG
Kundendienst West
Horbeller Straße 19
D-50858 Köln
+49/22 34-95 81-2 51
GRUNDIG IRELAND LTD.
2 Waverley Office Park, Old
Naas Road
EIR Dublin 12
+3 53/1-4 50 97 17
GRUNDIG FRANCE S.A.
5 Boulevard Marcel Pourtout
F-92563 Rueil Malmaison
Cedex
+33/1-41 39 26 26
GRUNDIG SCHWEIZ AG
Steinacker Straße 28
CH-8302 Kloten
+41/1-8 15 81 11
GRUNDIG
Kundendienst Centre
Dudenstraße 45-53
D-68167 Mannheim
+49/6 21-33-76-70
GRUNDIG PORTUGUESA
Comércio de Artigos
Electrónicos, Lda.
Rua Bento de Jesus Caraça 17
P-1495 Cruz Quebrada,
Lisboa
+3 51/1-4 19 75 70
GRUNDIG ESPAÑA S.A.
Solsonés, 2 planta baja B3
Edificio Muntadas (Mas Blau)
E-08820 El Prat De
Llobregat (Barcelona)
+34/93-4 79 92 00
GRUNDIG NORGE A.S.
Glynitveien 25, Postboks 234
N-1401 Ski
+47/64 87 82 00
GRUNDIG
Kundendienst Süd
Beuthener Straße 65
D-90471 Nürnberg
+49/9 11-7 03-0
GRUNDIG DANMARK A/S
Lejrvej 19
DK-3500 Værløse
+45/44 48 68 22
GRUNDIG OY
Luoteisrinne 5
SF-02271 Espoo
+3 58/9-8 04 39 00
GRUNDIG SVENSKA AB
Albygatan 109 d, Box 4050
S-17104 Solna
+46/8-6 29 85 30
GRUNDIG POLSKA SP.Z.O.O.
Ul. Czéstochowska 140
PL-62800 Kalisz
+48/62-7 66 77 70
GRUNDIG
Kundendienst Ost
Wittestraße 30e
D-13509 Berlin
+49/30-4 38 03-21
GRUNDIG AUSTRIA Ges.m.b.H.
Breitenfurter Straße 43-45
A-1120 Wien
+43/1-81 11 70
GRUNDIG NEDERLAND B.V.
Gebouw Amstelveste
Joan Muyskenweg 22
NL-1096 CJ Amsterdam
+31/20-5 68 15 68
GRUNDIG ITALIANA S.P.A.
Via G.B. Trener, 8
I-38100 Trento
+39/4 61-89 31 11
 Loading...