

Page 1
COLOR TELEVISION
T 70-740 text
Page 2

Contents
15
ķ Page ............................................................................ 15
ĸ
Page ........................................................................... 28
ƴ
Pagina......................................................................... 41
ń
Pagina......................................................................... 54
ł Página ........................................................................ 67
ɾ Sidan........................................................................... 80
Ƒ
Side ............................................................................ 93
ї
Sivu........................................................................... 106
į
Página....................................................................... 119
Notes on Safety and Setting up......................................... 16
Switching On/Off and Channel Selection
Remote Control Buttons - Short Description..................... 17
Video Recorder Remote Control
Assigning Channel Positions............................................. 18
– Selecting a Language
– Assigning Television Stations to Channel Positions
Assigning Channel Positions............................................. 19
– Changing the Channel Sequence
– Entering Station Identification
Assigning Channel Positions............................................. 20
– by directly entering the Channel Number
Timer Functions ................................................................ 21
– Sleep Timer
– Channel Lock
Special Functions .............................................................. 22
– Connection of a Descrambler or other external Device
– Bar Displays On/Off
– Changing a Channel Volume
– Programmer HP
Picture Adjustments
Teletext Mode - Short Description..................................... 23
Teletext Mode.................................................................... 24
– General
– Operation
– Switching Teletext On/Off
– Calling up Pages
– FLOF Teletext
– Multiple Pages
Teletext Mode.................................................................... 25
– Calling up Subpages directly
– Calling up the Overview Page
– Increasing the Size of the Letters
– Answer Function
– Watching Television in Teletext Mode
– Page Catching
Connection Capabilities and Operation.............................. 26
– Headphones
– Video, Camera Recorders or satellite receiver
– Video- or Camera Recorder connected to Antenna
Socket
É.
Technical Data................................................................... 27
Additional Information for Units sold in Great Britain
Units sold in GB are suitable for operation from a 240 V AC, 50 Hz mains
supply.
In case this appliance is supplied with a Safet
y Standard Approved
mains
lead fitted with a non-rewireable 13 Amp mains plug which, if unsuitable
for your socket, should be cut off and an appropriate plug fitted by a qualified electrician. The fuse and fuse holder must be removed from the
plug as accidental insertion of the redundant plug into a 13 Amp socket
is likely to cause an electrical hazard.
Note: The severed plug must be destroyed to avoid a possible shock
hazard should it be inserted into a 13 Amp socket elsewhere.
If it is necessary to change the fuse in the non-rewireable plug, the correct type and rating (5 Amp ASTA or BSI approved BS 1362) must be
used and the fuse cover must be refitted. If the fuse cover is lost or
damaged the lead and plug must not be used until a replacement is
obtained. Replacement fuse covers should be obtained from your dealer.
If a non-rewireable plug or a rewireable 13 Amp (BS 1363) plug is used,
it must be fitted with a 5 Amp ASTA or BSI approved BS 1362 fuse. If any
other type of plug is used it must be protected by a 5 Amp fuse either in
the plug or at the distribution board.
Important:
The wires in the mains lead are coloured in accordance with the following code:
BLUE – NEUTRAL
BROWN – LIVE
As the colours of the wires in the mains lead of your appliance may not
correspond with the coloured marking identifying the terminals in your
plug, proceed as follows:
Connect the BLUE coloured wire to plug terminal marked with the letter
"N" or coloured black.
Connect the BROWN coloured wire to the plug terminal marked with a
letter "L" or coloured red.
In no circumstance must any of the wires be connected to the terminal
marked with a letter "E", earth symbol , coloured green or green and
yellow.
Replacement mains lead can be obtained from your dealer.
Page 3
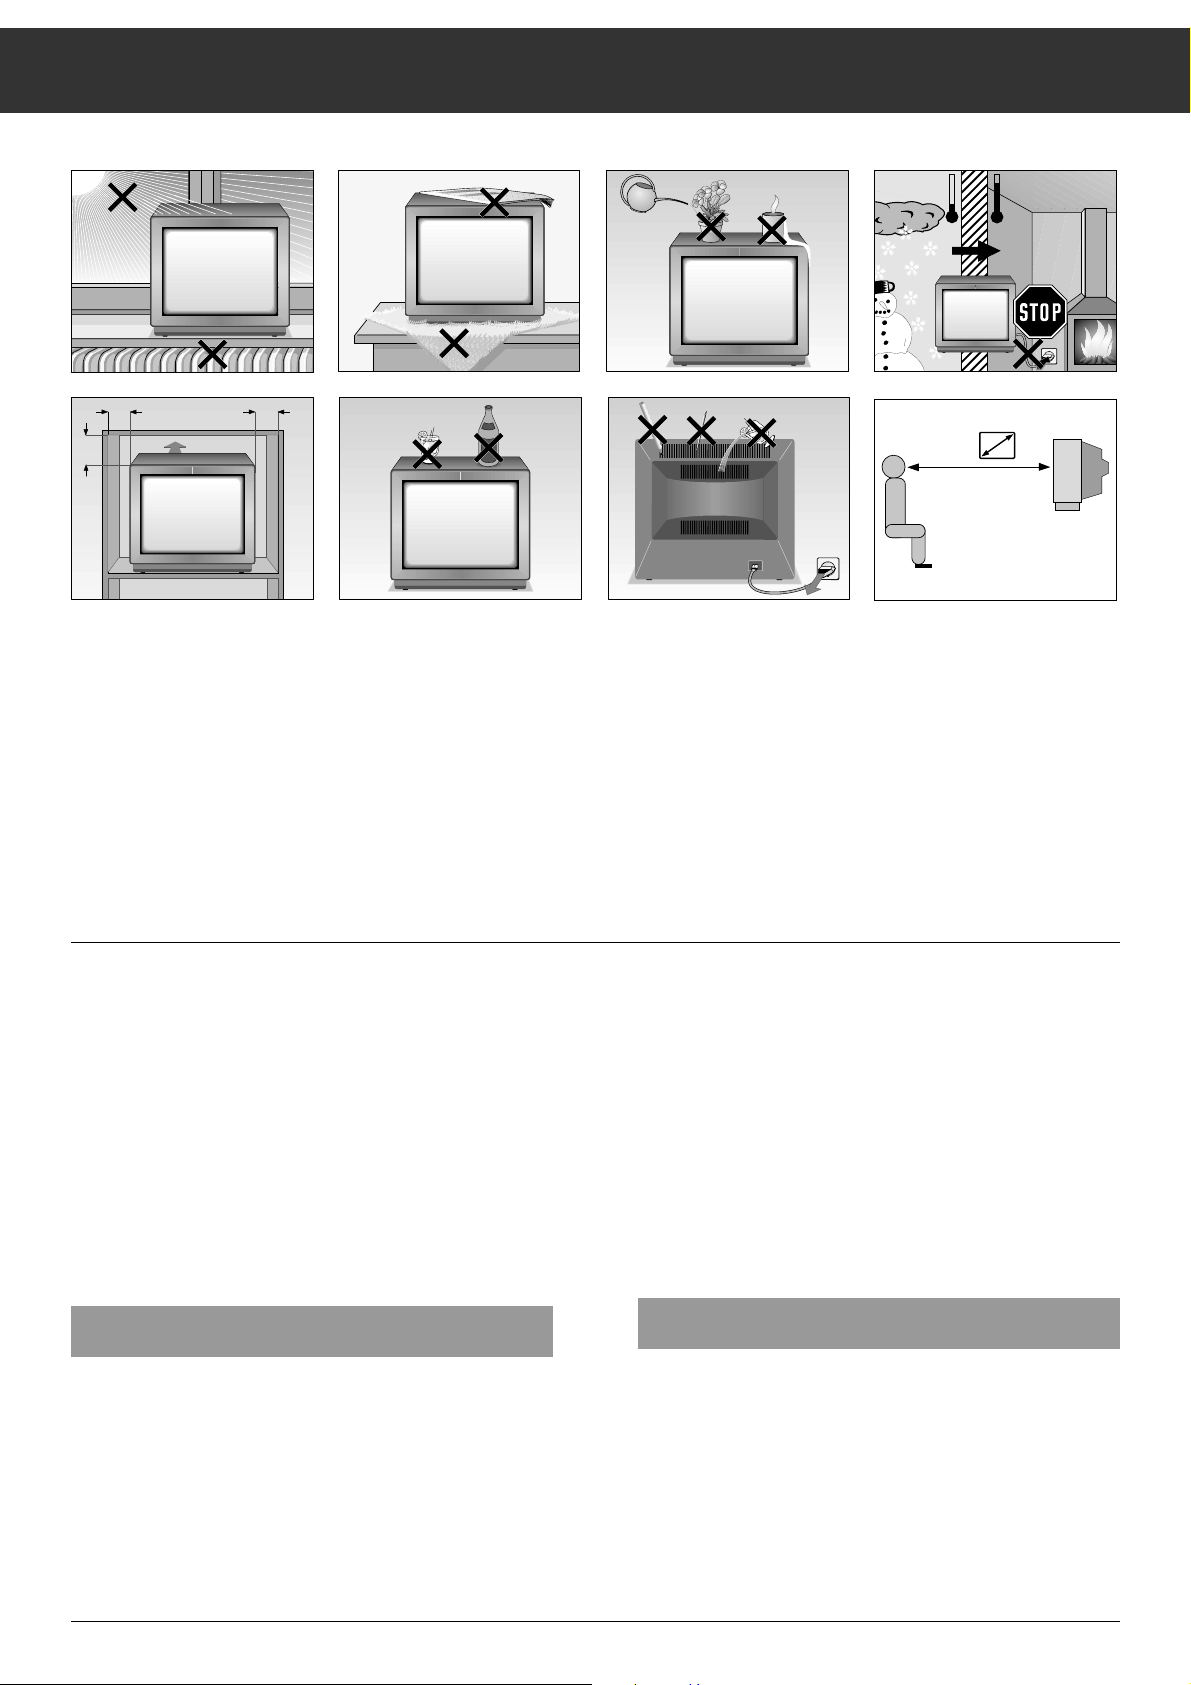
Notes on Safety and Setting Up
16
Even if your television is switched off, it can be damaged if
lightning directly strikes your antenna and/or power supply
system.
You should therefore always remove the antenna and television plugs from their sockets in the event of a thunder storm.
Do not place speakers beside the set.
Please make sure the mains cable is not trapped between or
under anything, or damaged, when setting up and operating
the set.
Never set your television up beside heaters or radiators.
Heat build-ups are dangerous and affect the service life of
your television.
If the television is set up in a shelf compartment, minimum
clearances must be observed.
Make sure the ventilation slots in the rear panel of the television are not blocked or covered.
Protect your television from damp or moisture.
Never insert foreign objects in the ventilation slots in the rear
panel of the television.
Danger – High Voltage !
The remote control is the central control unit for your television set.
All functions and basic settings can be carried out with the
remote control.
Insert the enclosed battery. Note the markings in the battery
compartment. Replace the cover.
When the battery is dead, » BATTERY TELEPILOT « appears
on the screen.
Replace dead batteries in good time. We can assume no liability for damage which may result from dead batteries.
Switching On / Off
Switch the television on with the power switch
¢
IO
.
Channel position 1 is automatically selected, and P1 briefly
appears together with the station identification.
During breaks in your television viewing, you can switch your
television to standby with the
ǼǼ
button.
The television set automatically switches to stand by about
ten minutes after closedown or transmission failure (if no test
chart is transmitted).
You can switch your television back on from stand by by
pressing one of the numerical buttons or by pressing the button P+, or with button
ǼǼ
.
If you do not intend watching television for some time (e.g.
overnight), switch it off with the power switch
¢
IO
.
You thus use less electricity and make a contribution to environmental conservation.
Channel Selection
Channels are selected using the numerical buttons or the P+
,P-buttons of the remote control, or the buttons P+ or P- on
the television set.
If you hold down one of the remote control buttons P+ or P
-
the channel positions and station identifications scroll at a
higher speed.
The television automatically switches to the selected channel
position when you release the button.
Krieg am Golf
10
cm
20
cm
20 cm
10
cm
°C
°C
2 Std
5 x
! SERVICE !
Page 4
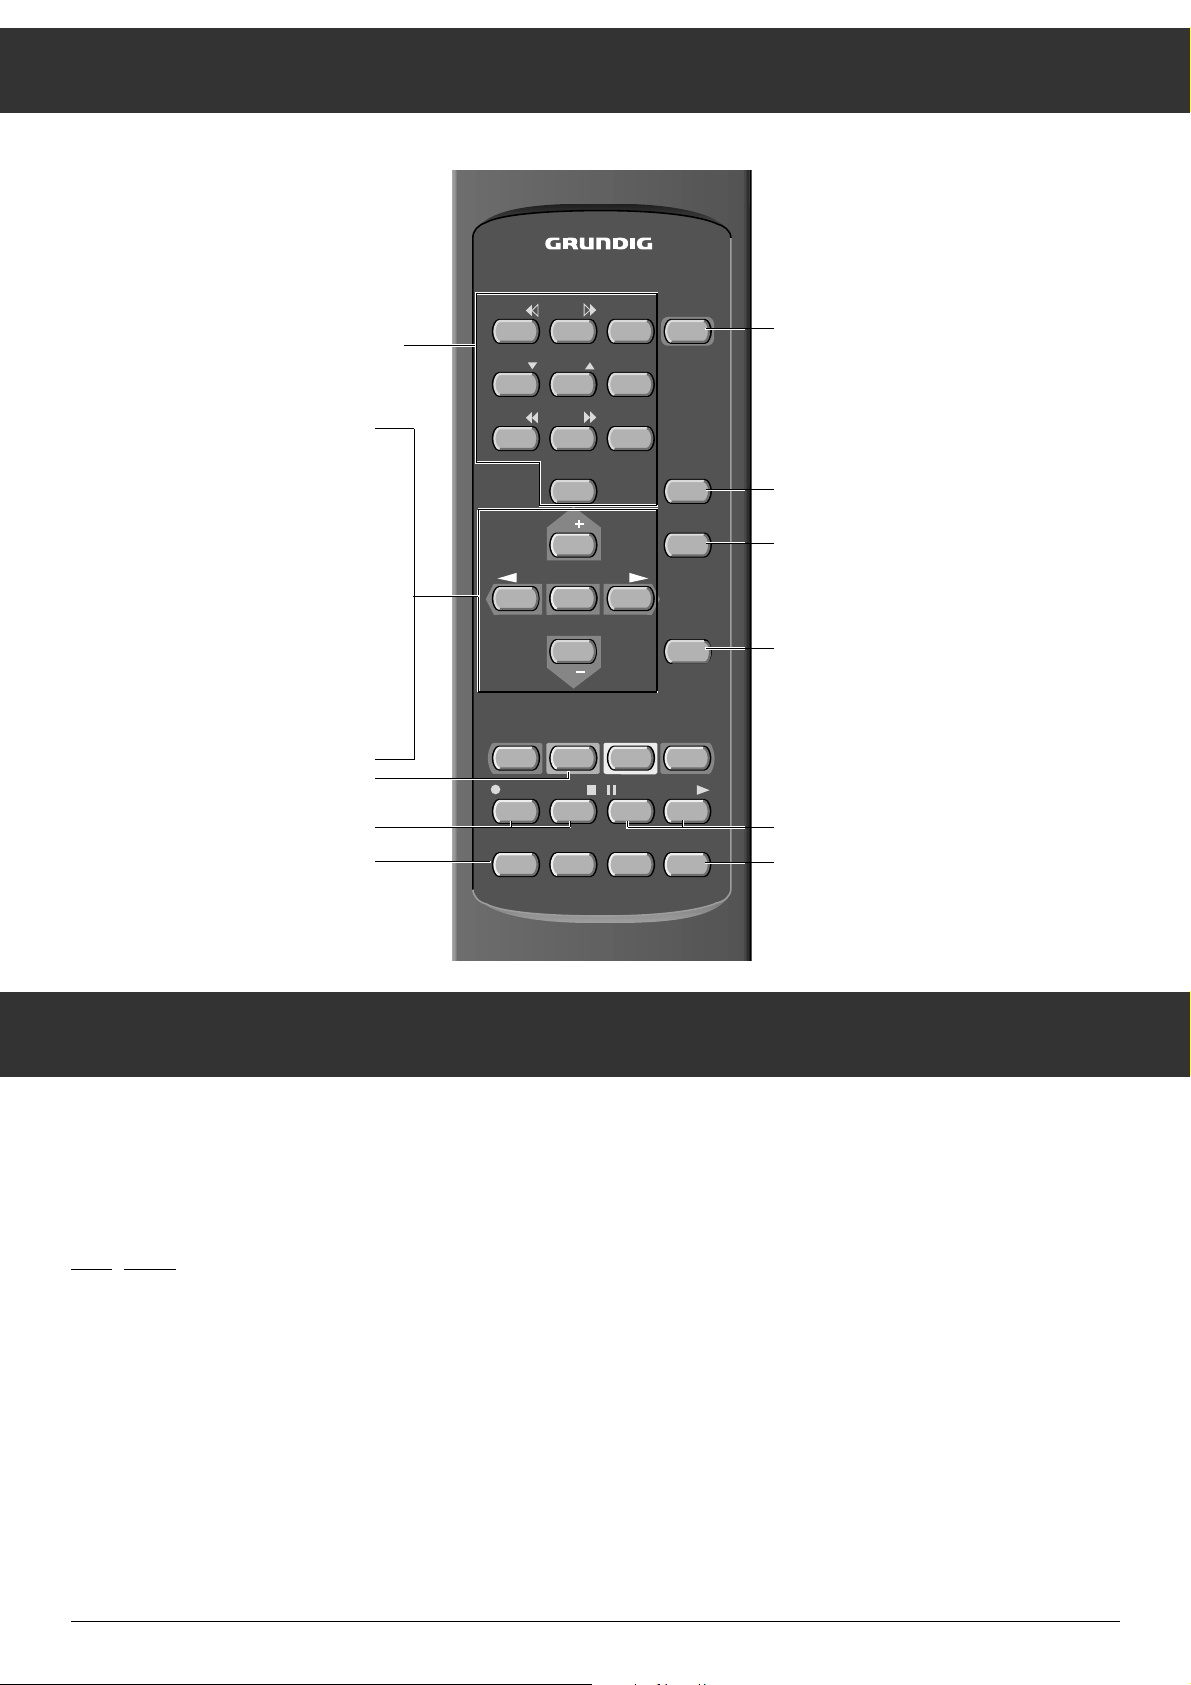
The Remote Control
17
Video Recorder Remote Control
The following is a list of the buttons used to operate a video
recorder:
ĵķ (Numeric button 1) = Picture search, reverse
ĶŁ (Numeric button 2) = Picture search, forward
l (Button –
i) = Record start
n (Button +
i) = Stop
ĵĵ (Numeric button 7) = Quick reverse
ŁŁ (Numeric button 8) = Quick forward
II (Button –
v) = Pause
ı (Button + v) = Play
Ļ (Numeric button 4) = Channel position -
ļ (Numeric button 5) = Channel position+
Your television´s remote control also allows you to control a
video recorder. Consult your dealer for models which offer
this function.
To operate:
Keep the VIDEO button depressed.
This switches the remote control to video mode. Press the
desired function button.
1 … 9 Channel selection and switching on
the television from stand by
0/AV or – Selection of AV position
P+/P
-
Individually switch channels,
forward (1, 2, 3 …)
Individually switch channels,
reverse (… 3, 2, 1)
or
Cursor movement up and down
OK Changing and activating various
functions.
ņ
-
,+
ŀ
Volume adjustment (or the button
– z + on the set)
or
Move cursor to the left, to the right
Ȅ Time on/off
i
+/-Contrast
VIDEO Video recorder remote control
(keep VIDEO button depressed)
ǼǼ
Switch to stand byand switch on with last,
selected programme position.
ʀ
Ton on/off (mute)
Ǻ To enter the menu. When menu appears,
press the OK button
TXT Teletext mode ɫTV mode
v
+/-Brightness
SAT S
atellite receiver remote control
(keep SAT button depressed)
TP 712
123
456
89
7
AV
0
P
OK
–
+
P
Ȅ
Ǽ
ʀ
Ǻ
TXT
VIDEO AUX P/C SAT
+
–
iv
–
+
Page 5
Assigning Channel Positions
18
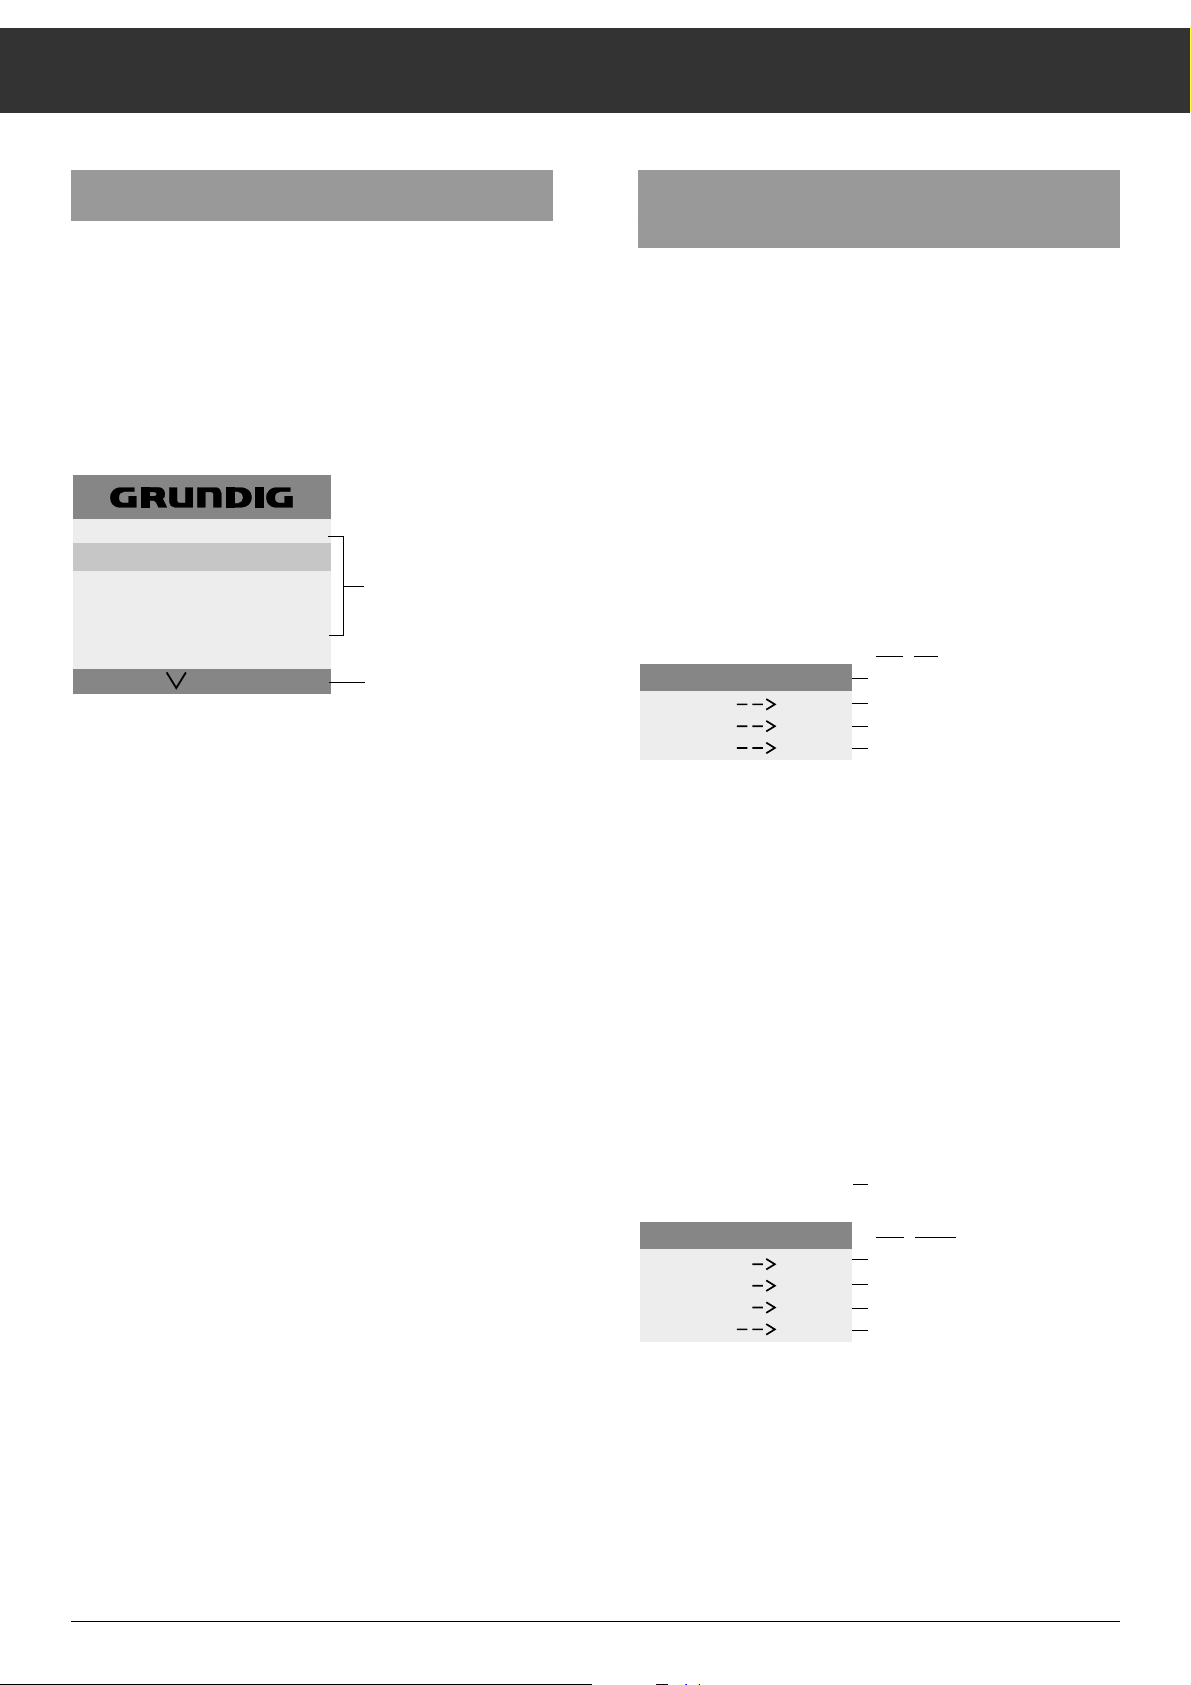
Language Selection
You can choose between a number of languages for the dialogue with your television set.
At the factory, D (German) is preset. If you wish to change
the language, you should do so before proceeding.
Press the
Ǻ button, and then the OK button.
The MENU appears.
You can leave the menu by pressing the
Ǻ button.
Select the first line of the menu by pressing P
-
.
– The menu line - with the country code - is highlighted in
bright blue.
Press the OK button.
– Language selection is activated.
The selected country code appears in red.
Press the
ņ
-
or + ŀbutton to select the desired language.
– All subsequent information which appears on the screen
will be in the language you have selected.
Press the OK button.
– The country code of the desired language is now stored and
is displayed in yellow.
You can switch to the next setting from this page; refer to
Chapter
"Assigning Channel Positions for Television Channels".
Assigning Channel Positions for Television
Channels
Television stations broadcast programmes on different channels. For example, Dillberg station broadcasts ARD (the 1st
state channel in Germany) on channel 6.
The channels must be assigned to the channel positions of
your television.
It is only necessary to make these settings once, when you
set up your television for the first time, or if reception conditions change (for example, if you move to another location, or
if you are subsequently connected to a cable television
source).
By pressing the P
-
button, select the ATS line from the menu
and press OK to confirm.
The ATS page appears.
Starting ATS
Press the OK button,
ATS starts and the channel search begins at C01 and stops
wherever a station is broadcasting, regardless of the reception picture quality.
Channel position P1 is automatically selected.
Storing channels
Only store the channel numbers of those channels with good
picture quality. To do so, press the OK button.
If you find a channel with poor picture quality, restart the
automatic channel search by pressing the P+ button.
– Once the channel number is stored, channel position P2 is
automatically called up. The channel search continues until
the next channel is found. In this way you can store all further channels.
D - F - I - E - P - GB
PICTURE - MENU
TIMER - FUNCTIONS
STATION TABLE
SPECIAL FUNCTION
AT S
OK
i
The menu
selection possibilities
Dialog line (inputs can
only be entered with
the displayed buttons
(symbols)
FP000128
START
SORT
TV
AT S
Dialog line
Auto Tuning System
OK
ʺ
OK button - starts ATS
P _ button - sorts channel position
i button - returns to TV programme
i
FP000242
STORE
SEARCH
SORT
TV
P 1
C 06
AT S
OK
ɶ
ʺ
for example, P 1 and the C 06
channel found with ATS
Dialog lines :
OK button - store
P+ button - does not store, but searches
P _ button - sorts channel position
i button - returns to TV programme
i
FP000243
Page 6

Assigning Channel Positions
19
Changing the sequence of the channels
You can sort the channels as you desire and, for example,
store the channel you view the most often as position P1.
If you have exited ATS, please call it up again.
Press P+ or P
-
and select the channel position you want to
move (the line is highlighted in red).
Press the OK button, (the line is highlighted in yellow),
and you can now move the channel position data. Proceed as
follows:
Press P+ or P
-
and move the channel position data to the
new channel position you desire(for example, P1 = 01).
Continue to press the OK button until all the channel location
data change from yellow to red. The data are stored
Entering station identification
A station´s identification abbreviation makes if easier for you
to find a channel. You can enter a station identification abbreviation as desired.
You can also take advantage of the pre-programmed station
identification abbreviations which your television offers as a
special service.
ARD EURO NED2 RAI2 SRG TVE2
ARTE FILM NED3 RAI3 SR3 VERK
BBC F2 NRK RTL4 SUPE WDR3
BRT1 HR3 N3 RTL SVT2 ZDF
BRT2 ITB ODR3 RTP1 SWF3 1PLU
BR3 LIFE ORF1 RTP2 TF1 3SAT
CANP MDR ORF2 SAT1 TV4 ---CNN MTV PRO7 SDR3 TV5
DSF NED1 RAI1 SPOR TVE1
Please note the dialog lines. Inputs are possible with the
button symbols displayed.
Using P+ or P-, select the channel position in which you
want to enter a new identification abbreviation or wish to
change.
Press the OK button (the line is highlighted in yellow).
Press the OK button again.
(The channel number is red and the four input places for the
station identification abbreviation are highlighted in yellow).
Press P+ or P
-
the first abbreviation appears.
Press P+ or P
-
until you find the correct abbreviation (when
the button is kept depressed, it goes throught the list in
order).
Press the OK button (the entire line is highlighted in red), the
line is stored.
If the list of abbreviations does not contain an abbreviation
you desire, you can enter your own abbreviation.
Four places per channel position (i.e. letters/numbers) are
available for your own station identification abbreviation.
These places can be occupied by any combination of letters
(A-Z), numbers (0-9), or blank spaces (----).
Select a channel position with P+ or P
-
.
Press the OK button (line is highlighted in yellow).
Press the OK button again (the channel is highlighted in red).
Use P+ or P
-
to search for the dashes (----).
Press the OK button. (The first input place is highlighted in
red).
Call up the desired letter or number with P+ or P
-
.
Select the next place with the +
ŀ
button and repeat this pro-
cedure until the abbreviation is complete.
Press the OK button (the entire line is highlighted in red), the
channel position data are now stored.
Switch back to the TV channel by pressing the Ǻ button.
By briefly pressing the Ǻ button you can call up or cancel
the channel display.
ATS SORT
01
C06
02
C21
03
C30
04
C34
05
C36
06
C40
----
----
----
----
----
----
OK
sorted channel positions
--- identification
(abbreviation)
dialog line
i
positions for station
FP000126
ATS SORT
01
02
03
04
05
06
C06
C21
C30
C34
C36
C40
ARD
VAT1
----
----
----
----
OK
-
Offer of station names
Your own abbreviation
no function
i
FP000127
Page 7

Assigning Channel Positions
20
Assigning Channel Positions by Entering
Channel Numbers Directly
This is only of use when you are familiar with the channel
numbers of the channels.
Calling up the menu
Press Ǻ.
MENU ɮ OK appears.
While this is still visible, press the OK button;
the MENU appears.
Selecting a channel position
Select the fourth menu line with P-.
– The menu line – STATION TABLE – is highlighted in bright
blue.
Press the OK button.
– The data of the current channel position appears.
– The active position is shown in red.
Select channel position with P+ or P
-
.
Entering the channel number
Press the + ŀbutton.
– You can now switch between a channel and a special chan-
nel by proceeding as follows:
Press the P+ or P
-
button.
– S (= special channel) is displayed.
– Pressing the P+ or P-button once more switches back to
C (C = channel).
Press the +
ŀ
button.
Enter the two-place number with the numeric buttons.
– If you want to make no further inputs (for instance, station
identification, fine-tuning (FT), etc.), proceed as follows:
Press the OK button (store).
If you used the ATS channel search to assign channel
posi-tions, it is not necessary to follow this procedure.
Setting the channel number can also be done step-by-step
with the P+ and P-buttons. If you keep the P+ or P-button
depressed, channel search will start. Channel search stops at
every channel you are able to receive.
Entering station identification
– Each channel position can be assigned a four-place station
identification name. This name can consist of any combination of letters, numbers or symbols (for example, empty
space "–" for spacing between the letters or numbers).
Press the +
ŀ
button.
– This selects the first place of the station identification.
Press either P+ or P
-
(P+ up from 0-9, A-Z, P-down from Z-
A, 9-0, space) until the desired symbols appears.
Press the +
ŀ
button.
You thus select the next entry position.
Repeat this procedure until the desired station identification
has been entered.
– If no other inputs are required, (for example, fine-tuning),
press the OK button.
– The channel number and station identification are now sto-
red.
Fine tuning the picture (FT)
The television set is automatically adjusted to the best possible picture quality. In difficult reception conditions it may be
necessary to adjust the picture by manual fine tuning.
Press the +
ŀ
button until the numbers beneath FT are shown
in green.
Press the P+ or P
-
button to select the best picture and
sound quality. A value between +63 and –64 can be selected.
Press the OK button to store the changed values.
– After storing, the channel data of the next channel position
are shown.
Press the
Ǻ button to return to TV mode.
0
PR CH NAME FT
02 C21 PRO 7 00
Dialog line
i
OK
Fine-tuning
station identification
/
special channel
channel
Programmes
PR CH NAME FT
03 C59 BBC 1 00
i
OK
FP00013
Page 8

Timer Function
21
Sleep Timer
When the Sleep Timer is set, the television automatically
switches to stand-by mode after a pre-selected period of 10
to 90 minutes.
Call up the menu.
Press the P
-
button to select the menu item "TIMER-
FUNCTIONS."
Press the OK button; the "TIMER-FUNCTIONS" menu
appears.
Press the OK button.
Use the P
-
button to enter the desired value (10 minute inter-
vals).
Store with the OK button. The main menu appears.
– After the set time has elapsed, the television switches to
stand-by.
– Entering "00 MIN." interrupts the count-down sequence.
Press the
Ǻ button to return to TV mode.
Programme Lock
The programme lock prevents unauthorized persons from
switching the set on.
Call up the menu.
Press the P
-
button to select the menu item "TIMER-FUNC-
TIONS."
Press the OK button; the "TIMER-FUNCTIONS" menu
appears.
Press the P
-
button; this selects the menu line
ttt
.
Press the OK button.
Enter the four-place code with the numeric buttons 1 … 9
(for example, 1111).
Press the OK button.
– Your identification code is saved. The main menu appears.
Press the
Ǻ button to return to TV mode.
Memorize your personal identification code!
If you should forget your personal identification code, refer to
the key (
É) on the last page (of the cover).
Clearing the programme lock
If the television is switched on while the programme lock is
activated, the following appears:
This prompts you to enter your personal identification code.
Enter the code with the numeric buttons 1 … 9.
– The television automatically switches to TV mode.
Deleting the program lock
Call up the menu.
Press the P
-
button to select the menu item "TIMER-
FUNCTIONS."
Press the OK button; the "TIMER-FUNCTIONS" menu
appears.
Press the P
-
button; this selects the menu line
ttt
.
Press the OK button.
Enter the stored four-place number with the buttons
1 … 9
(for example, 1111).
– The code is deleted.
Press the
Ǻ button to return to TV mode.
TIMER - FUNCTIONS
SLEEP - TIMER
00 MIN.
_ _ _ _
OK
i
FP000131
TIMER - FUNCTIONS
SLEEP - TIMER
00 MIN.
_ _ _ _
0-9
FP000245
TIMER - FUNCTIONS
SLEEP - TIMER
00 MIN.
1111
0-9
OK
FP000244
i
Page 9

Special Functions
22
Connecting a Descrambler (Decoder) or an
External Unit (Video Recorder)
Certain television station which broadcast via cable or satellite receiver scramble their programmes, meaning that the
sound and picture signals your television receives are purposely distorted. You can unscramble such transmissions
with a decoder.
Procedure:
Connect your descrambler/video recorder to the EURO-AV-
socket .
Descrambler:
Select a scrambled channel position.
Video recorder:
Select the programme position you want your video recorder
to play back on.
Call up the menu.
Press the P
-
button to select the menu line – SPECIAL FUNC-
TIONS –.
Press the OK button.
– The menu – SPECIAL FUNCTIONS – appears.
Press the +
ŀ
button.
– This switches to DESCRAMBLER ON.
Pressing the +
ŀ
button switches back to DESCRAMBLER
OFF.
Pressing the
Ǻ button switches back to the TV mode.
– Display on the screen
P7
ň PREM
Turning scale display On and Off
In the menu line – OSD ON –, you can choose between
OSD ON and OSD OFF.
OSD ON: The scale display for volume and station identifica-
tion is shown.
OSD OFF: The scale display for volume and station identifica-
tion is not shown.
Changing the Volume of a Channel Position
If you receive a programme whose volume deviates from
other channels (too loud or low), this volume can be adjusted
as follows.
Call up the special functions menu.
Use the P
-
button to select the menu line – VOL 00 PROG. 01 –.
Use
ņ
-
or + ŀto change the volume. Only the volume of the
channel currently being viewed (e.g. PROG. 01) is changed.
Use the Ǻ button to switch back to the TV mode.
Programmer HP
The menu line – PROGRAMMER HP – serves to automatically
programme the television set.
Only an authorized dealer can access the IR DATA-PRO-
GRAMMER.
Picture Correction
All picture settings can be adjusted to your individual desires.
If you want to change picture values, press the - or + side of
the button as long as required for
Color contrast
+
i
-
Brightness
+
v
-
If you want to change black-white contrast:
Call up the menu.
Press the OK button.
The PICTURE MENU is displayed.
Select contrast with button P
-
.
Asjust the contrast with the ņ-
or + ŀ.button.
– Each setting is displayed by highlighted bars on the screen.
DESCRAMBLER OFF
OSD ON
VOL 00
PROGRAMMER
SPECIAL FUNCTION
PROG. 01
HP
i
FP000134
SPECIAL FUNCTION
DESCRAMBLER OFF
OSD ON
VOL 00
PROGRAMMER
PROG. 01
HP
i
FP000136
Page 10

Teletext Mode – Short Description
23
1 … 9 Page selection
AUX Call up the dialog line
To call up the following:
Increase
character size
Bypass
waiting time
Direct call up
subpage
Give
answer
Page
STOP
Select functions with
ņ
-
or + ŀbutton.
Call up with
OK button.
ķ
ʄʄ
ķX /00 ķ ? STOP
Ǻ Call up info page 100
TXT Teletext mode ɫ TV mode
¶(red)
Current page -1 page
Ȅ
(green) Current page +1 page
¶(yellowb) no function
¶(bueu) no function
P/C Teletext – Displayed the most previously
viewed page
Floftext
The colored buttons are for the topics
listed in the dialouge lines.
TP 712
123
Ǽ
456
89
7
AV
0
P
OK
–
+
P
ʀ
Ǻ
TXT
Ȅ
+
–
iv
VIDEO AUX P/C SAT
+
–
Page 11

Teletext Mode
24
General
Teletext is the name of the additional information transmitted
together with the television signal (program) by television
stations.
With a teletext decoder integrated in your telvision, you can
view this information on your screen.
Teletext is transmitted in the form of texts and graphic representations or as subtitles for certain television programs.
Subtitles are often transmitted as a service for the hard-ofhearing.
Teletext information is transmitted in the form of pages,
page by page.
These pages are numbered and are selected with the remote
control.
Operation
Select the channel whose teletext pages you wish to call up.
Switching teletext on and off
Press the
¢
TXT
button on the remote control.
The info page 100, or the most previously viewed teletext
page, will appear.
Press the
¢
TXT
button; this switches off teletext.
Calling up teletext pages
Enter the three-place number of the desired page with the
numeric buttons 1 … 9.
– The page number is located at the top of the screen, and
after a brief interval, the page will appear.
You can select the following page by pressing the green
button (current page number +1 page)
or
the previous page with the red button
(current page number -1 page).
Using the P/C button, you can view the most previously viewed page.
FLOF teletext
If FLOF teletext is offered by the television station, your unit
automatically switches to FLOF mode. A range of topics
appears in coloured letters. The coloured buttons guide you
to the topics.
Multiple pages
Several subpages can be combined under a single page
number, and these pages are automatically scrolled at an
interval determined by the television station.
The presence of subpages under a single page number is
indicated by, for example, 3/6 beneath the time, which means
that you are looking at the 3rd page of a total of 6 pages.
If you want to look at a page for a longer period of time,
select Stop.
Press the AUX button.
The dialog line appears.
Select STOP with the
ņ
-
or + ŀSTOP button.
Press the OK button.
º
appears in the upper screen. The contents of the diplayed
page are now "fixed", which means that this page is no
longer updated and the following pages are not switched to.
Press the OK button.
The "Stop" function is deactivated, and the following subpages are displayed.
WeatherNewsSportTV Guide
yellowgreenred
blue
Page 12

Teletext Mode
25
Unterseite direkt abrufen
Press the AUX button (dialog line appears).
Select /00 with the ņ-
or + ŀbutton.
Press the OK button.
---- appears in the top line.
Using the numeric buttons, enter the four-place number of
the desired subpage; for example, the second page, sequence
0002. The desired page is sought and displayed.
Press the OK button.
The function is cancelled.
Calling up the overview (info) page
You can directly call up the overview page of the respective
television station.
Press the
Ǻ button.
The contents page appears.
Doubling character size
Press the AUX button (the dialog line appears).
Using the
ņ
-
or + ŀbutton, select ķʄ.
Repeatedly pressing the OK button doubles the character
size in the following order:
upper half of the picture,
lower half of the picture,
return to normal picture.
Answer
This function can be used on certain teletext pages to solve
riddles given during a televised program, for instance, or for
programming a video recorder via VPS pages.
Press the AUX button (dialog line appears).
Using the
ņ
-
or + ŀbuttion, select ķ?.
Press the OK button,
the hidden information becomes visible.
Press the OK button,
The "Answer" function is cancelled.
Watching television in teletext mode
Updating pages –
Bypassing waiting times
Certain teletext pages are constantly updated, such as stock
market reports and sporting events, as well as the latest
news.
If you want to watch television and nevertheless remain informed, first select a page of your choice, and then
press the AUX button (dialog line appears).
Select
ķX with the
ņ
-
or + ŀbutton.
Press the OK button.
The television program is still visible for viewing, and at the
top of the screen, the teletext symbol appears.
If, for example, S143 appears in the info line,
press the AUX button.
The updated teletext page appears.
You can also use this function to bypass waiting times while
the your teletext decoder searches for a page. As soon as the
page is found, S143, as in the example, appears in the info
line.
Page catching,
This function allows you to select a page without entering
the corresponding page number. Using the cursor, you can
select specific teletext pages from the overview pages (pages
designated with a three-place page number). You can use
this function to dispense with entering the three-place number.
Press the P+ or P
-
buttons.
»Page Catching« appears in the upper part of the screen.
A highlighted square (cursor) blinks on the first or last page
number of the overview.
Using the P+ or P
-
buttons, move the cursor to the desired
page number.
Press the OK button.
The desired page appears on the screen.
Page 13

Connection Capabilities and Operation ...
26
... Headphones
Insert the headphone jack (3.5 mm ∅) into socket ɧ (the
integrated speaker is automatically switched off).
Operation:
Adust the volume with the ņ-
,+ ŀbuttons.
The adjustment is shown by means of a scale on the screen
(provided that OSD ON).
... Camera Recorder
Connecting the Picture Signal
Connect the camera recorder to the VIDEO IN socket with a
suitable cable.
Connecting the Sound Signal
Connect the camera recorder to the AUDIO IN socket.
Operation
Press 0/AV.
Start camera recorder playback.
The camera recorder playback appears on the screen. (Make
sure any devices connected to the EURO AV are not in use.)
... Video Recorder or Satellite Receiver
Connect video recorder or SAT receiver to the EURO-AV
socket (universal connection, DIN en 50049 e.g. video) (rear
panel of television) with a suitable cable or to the antenna
socket É (rear panel of television) with an antenna cable
(75Ω, coaxial, DIN 45325 IEC).
Video Recorder or SAT Receiver connected to
Euro AV Socket.
Press 0/AV on the remote control.
AV is displayed in the top right of the screen.
Switch on video playback or satellite transmission.
(make sure any devices connected to the clinch sockets are
not in us.)
… Video or Camera Recorder connected to
Antenna Socket É.
Programme the presribed playback channel of the recorder
(between 30 and 40) to the desired television channel position (see operating instructions for recorder).
If you do not knnow the playback channel of your recorder,
start playback and find the recorder channel with the television´s channel search function.
EURO-AV
AUDIO
_
_
g
+
VIDEO IN AUDIO IN
+
P
y
_
_
g
+
VIDEO IN AUDIO IN
+
P
y
Page 14

Technical Data
27
Mains voltage:
220 – 240 V ~, 50/60 Hz
(Power supply control range 165 … 265 V)
"This unit may only be operated with the power supply
cable set which has been supplied. It prevents interference
from the mains, and is considered an obligatory component of this unit.
For a replacement, contact the nearest customer service
center and order only the power supply cable set with the
following designation: GWN 9.22/article number
8290.991-316."
Power consumption:
approx. 70 W
In stand by approx. 6 W.
Reception range:
Channels 01 … 69
Special channels S 01 … S 41
Sound output:
8 W musical output (4 W sinus)
This unit conforms to VDE safety regulations and the directives of the Deutschen Bundespost (German Federal Post
Office; see the certification mark on the type sticker on the
rear of the unit), and also all relevant regulations concerning
X-ray emission. The picture tube, which emits X-rays, is sufficiently shielded, and therefore represents no danger.
Accelerating voltage is a max. 29 kV/with a mean beam current of 1.5mA. This unit is equipped with an intrinsically safe
cathode ray tube in accordance with Appendix III of the applicable X-ray regulations.
Unauthorized tampering with the unit, especially adjustments to
the high voltage system or the installation of a dif- ferent type of
picture tube, can considerably increase X-ray emission. Units
altered in this way no longer conform to the operating permission conditions and may not be operated.
All rights reserved.
EURO-AV pin assignment
If you wish to connect additional appliances to your television
(e.g. computer or amplifier), your dealer can provide you with
a normed standard connection by referring to the following
table:
Pin Signal
01 = Audio output, right
02 = Audio input, right
03 = Audio output, left
04 = Audio earth
05 = Blue earth
06 = Audio input, left
07 = RGB blue, input
08 = Switching voltage
09 = Green, earth
10 = –
11 = RGB green, input
12 = –
13 = Red earth
14 = Earth
15 = RGB red, input
16 = RGB switching voltage
17 = Video earth
18 = RGB switching voltage, earth
19 = Video output
20 = Video input
21 = Shielding/earth
220
21
119
Page 15

GRUNDIG AG ••D-90762 FÜRTH Printed in Germany
0 1 2 3 4 5 6 7 8 9
21426-941.05
 Loading...