

Page 1
COLOR TELEVISION
ST 63-760/8 TOP
Page 2

Contents
29
Notes on Safety and Installation........................................ 30
The Buttons and Connections on the TV Receiver............. 30
The Buttons of the Remote Control Handset ..................... 31
Tuning TV Channels
(allocating channel positions) ...................................... 32-35
– General........................................................................... 32
– 1st possibility (with the ATS channel search)................. 33
– Select location................................................................ 33
– Starting the channel search............................................ 33
– Finetuning (F-TUNE)....................................................... 34
– Changing the sequence of the channel positions
(sorting)......................................................................... 34
– Entering the station identification................................... 35
The Menu..................................................................... 36-42
– Menu Overview .............................................................. 36
– Calling up the menu ....................................................... 37
– Selecting a language ...................................................... 37
– 2nd possibility to allocate channel positions .................. 37
– Entering the station identification................................... 38
– Selecting a TV standard ............................................ 39-40
– Finetuning the picture..................................................... 40
– SLEEP TIMER ........................................................... 40-41
– The security code........................................................... 41
– Special functions............................................................ 42
Tuning TV Channels
(allocating channel positions) ........................................... 43
3rd Possibility (entering the channel number directly)...... 43
Picture and Sound Adjustments........................................ 43
– Audio menu.................................................................... 44
NICAM Digital Stereo Broadcasts...................................... 45
Calling Up the Channel Indication...................................... 46
Switching the TV Set to Standby; Switching Off
Remote Control of a Video Recorder................................. 46
Teletext Mode .............................................................. 47-50
Connection and Operation............................................ 51-53
... of video recorder, camcorder ........................................ 51
... of satellite receiver, ... of stereo headphone. ................. 52
Copying video recordings
– Selecting a channel position for external units ............... 53
... of descrambler (Decoder) ............................................. 53
Specifications.................................................................... 54
Channel Tables......................................................... 211-212
Additional Information for Units sold in Great Britain
Units sold in GB are suitable for operation from a 240 V AC,
50 Hz mains supply.
In case this appliance is supplied with a Safet
y Standard
A
pproved mains lead fitted with a non-rewireable 13 Amp
mains plug which, if unsuitable for your socket, should be
cut off and an appropriate plug fitted by a qualified electrician. The fuse and fuse holder must be removed from the
plug as accidental insertion of the redundant plug into a 13
Amp socket is likely to cause an electrical hazard.
Note: The severed plug must be destroyed to avoid a possi-
ble shock hazard should it be inserted into a 13 Amp
socket elsewhere.
If it is necessary to change the fuse in the non-rewireable
plug, the correct type and rating (5 Amp ASTA or BSI
approved BS 1362) must be used and the fuse cover must
be refitted. If the fuse cover is lost or damaged the lead and
plug must not be used until a replacement is obtained.
Replacement fuse covers should be obtained from your
dealer.
If a non-rewireable plug or a rewireable 13 Amp (BS 1363)
plug is used, it must be fitted with a 5 Amp ASTA or BSI
approved BS 1362 fuse. If any other type of plug is used it
must be protected by a 5 Amp fuse either in the plug or at
the distribution board.
Important:
The wires in the mains lead are coloured in accordance
with the following code:
BLUE – NEUTRAL
BROWN – LIVE
As the colours of the wires in the mains lead of your appliance may not correspond with the coloured marking identifying the terminals in your plug, proceed as follows:
Connect the BLUE coloured wire to plug terminal marked
with the letter "N" or coloured black.
Connect the BROWN coloured wire to the plug terminal
marked with a letter "L" or coloured red.
In no circumstance must any of the wires be connected to
the terminal marked with a letter "E", earth symbol ,
coloured green or green and yellow.
Replacement mains lead can be obtained from your dealer.
Page 3
Notes on Safety and Installation
30
The ideal viewing distance is five times the diagonal width of
the screen. See illustration.
Switch the television off with the mains switch
1 if you are
not watching it for a longer period of time (e.g., night).
This saves energy.
The unit can also be damaged even when it is turned off if
lightning strikes the power supply system and/or the aerial
cable.
For this reason, you should always disconnect your television
from the mains plug and the aerial plug during thunderstorms.
Never expose the unit to moisture.
Do not insert foreign objects into the ventilation openings on
the back.
Caution! High voltage!
The TV receiver is provided with a Megatron-picture tube with
a special surface layer.
This has the advantage of an antistatic effect, i.e. the surface
does not attract dust particles.
When the set is switched on, static charges of the picture
screen are avoided to a large degree by the special surface
layer.
Clean the picture screen of your TV set only with a moistened
soft cloth.
Use clear and clean water only.
When cleaning the picture screen, do not apply pressure
(abrasion, scratches).
Do not stick labels of any kind onto the picture screen.
Unit front
1 IO = Mains switch. When switching the TV set
on, programme position 1 is automatically
selected.
2 –z + = Volume setting buttons.
3 – P + = Programme position select buttons.
4 • = Unit in standby mode, indication lit.
5 m = Headphone socket, 3.5 mm ∅.
Unit rear
6 EURO- = Standard connection for a video unit.
AV socket
(blue)
7 EURO- = Universal connection, DIN EN 50049
AV socket Video and RGB connection possible.
(black)
8 É = Aerial socket 75 Ω, coaxial, DIN 45325
IEC 169-2.
9 S-VIDEO = Connection (video) for S-video recorder
Socket or S-camcorder.
ßI FBAS = Connection (video) for units with Cinch
Cinch FBAS output (e.g., camcorder, computer).
socket
ß? Cinch- = Connections for audio input signals
sockets with FBAS.
R = input, right channel
L = input, left channel
The Buttons and Connections on the TV Receiver
Krieg am Golf
10
cm
20
cm
20 cm
cm
10
°C
°C
2 Std
5 x
! SERVICE !
Page 4
The Buttons of the Remote Control Handset
31
The Remote Control Handset is the primary control unit for
your TV receiver.
It allows you to operate all control functions and basic settings of the TV receiver.
Insert the supplied battery, observing the polarity indications
on the bottom of the battery compartment. Close the cover of
the compartment.
The following warning appears when the battery is exhausted:
"BATTERY TELEPILOT".
Change exhausted batteries immediately.
No responsibility will be taken for damage caused by leaking
batteries.
Adhesive labels are supplied with the remote control handset
on which you can enter the allocation of the channel positions.
On the back of the remote control handset there is a recess
where you can affix the label.
1…0
Channel selection and switching on
0
AV the television from standby
or
selection of AV position.
Direct channel selection (after pressing
the
m
button).
m
Programme/channel/special channel
preselection. Keep button pressed for
approx. 4 seconds to activate ATS.
-
Preselect button for different functions.
]
Step-by-step programme selection
(1, 2, 3 ...)
|
Step-by-step programme selection
(...3, 2, 1)
or
]
cursor up
|
down.
“
OK
– Modification and activation of different
functions.
xc
Volume up/down
or
xc
cursor to the left,
to the right.
¢ʀ
Sound on/off (muting)
Access to "Audio menu".
b
Switching to standby.
®
Brightness
™
Colour contrast
,
Teletext mode ɫ TV mode
.
Access to main menu.
When "Menu ɮOK" is displayed,
press the
“
OK
button.
¢
Ȅ Clock time on/off.
¢SAT Satellite receiver remote control
(keep pressed the SAT button).
¢VIDEO Video recorder remote control
(keep pressed the VIDEO button).
1 2 3
4 5 6
7 8 9
P/C 0
ATS
AUX
AV
ķ
R
+
P
OK
+
-
P
SAT
VIDEO
TP 720
Page 5
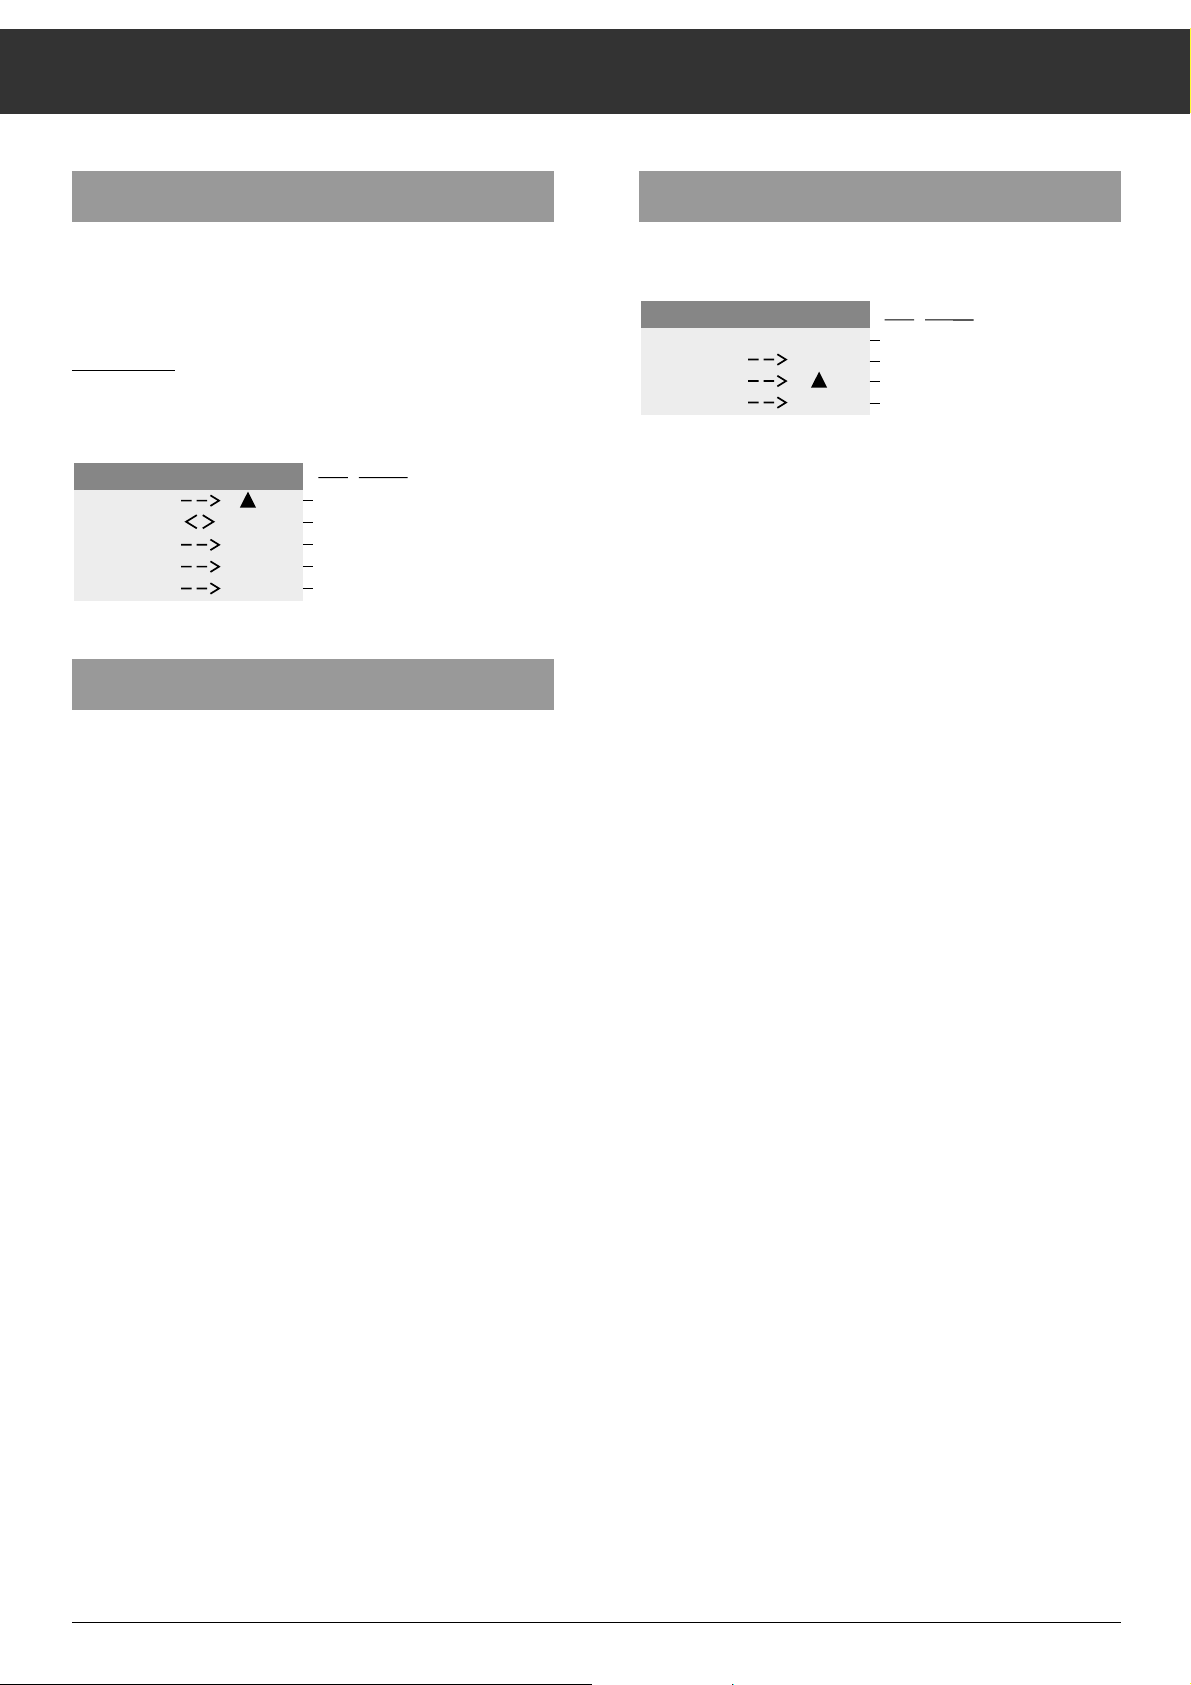
Tuning TV Channels (allocating channel positions)
32
This TV set can reproduce programmes which are transmitted with different sound and colour standards (also from
satellites, cable TV systems, video recorders; amongst
others, in the standards PAL, SECAM, NICAM)
NICAM is a new method to transmit the sound from the TV
station to the television receiver.
For NICAM broadcasts, see the table "NICAM Digital Stereo"
TV stations transmit their programmes on different channels.
e.g. the German TV station Dillberg transmits the "First Programme" (ARD) on channel 6.
These channels must be allocated to the channel positions of
the TV set.
The adjustments required for this must only be carried out
when setting up the TV set the first time or when the reception conditions have changed (e.g. in the case of relocation or
connection to a cable TV system).
Information about the channel/special channel numbers and
TV standards can be obtained from your post office, your
specialised dealer, or our after-sales service stations.
There are different methods possible to allocate TV channels to the channel positions of the TV set:
With the automatic
channel search ATS
(Auto Tuning System)
This method is recommended
if you do not know the channel
numbers of the stations which
are broadcasting the respective
TV channels. You can also sort
channel positions and add the
station identification.
or or
1st possibility
By entering the channel
numbers in the menu.
In this case it is possible to
enter the station identification
and to prepare channel
positions for descrambler
operation.
In the menu, it is also possible
to select the TV standard
(Standard) and to perform
fine tuning.
2nd possibility
By directly entering the
channel numbers.
This method is recommended
if you know the channel
numbers.
3rd possibility
It is sufficient to use just one of the channel allocation methods. If you have decided on the method of your choice, leave the
remaining methods out of consideration.
Volume
If the factory preset volume is too low or too high, adjust the
volume to the desired level with the
xc
buttons of the
remote control handset.
Switching on
Switch on the TV set with the mains switch IO 1.
Channel position 1 is selected automatically.
On the picture screen, the indication P1 and a station identification (if programmed) are displayed briefly.
Page 6
Tuning TV Channels (allocating channel positions)
33
Starting the channel search
Press the
“
OK
button.
The channel search starts with programme position 1 and
channel number C00.
It stops on each channel on which a TV station is transmitting, even stations with insufficient signal strength.
If you do not want to save (STORE):
Press the ]button (SEARCH)
The channel search restarts, channel position 1 remains
activated.
If you want to store:
Press the
“
OK
button
The channel you have found is stored on channel position 1,
the next channel position is called up, and the channel search
restarts.
In this way you can allocate channel positions for German
stations.
To stop the channel search:
Press the
.
button twice.
If you can receive programmes from other countries, you
must call up ATS again with the
m
button and select the
appropriate country code.
The following are available:
D, DK, E, F, GB, GR, H, I, L, N, NL, P, PL, S, SF, A, B, CH, CS
Then start the channel search with the
“
OK
button as already
described.
1st possibility
With the ATS channel search
(Auto Tuning System)
Pr
ocedure:
Calling up ATS;
Press the
m
button for approx. 3 seconds
Select location
For example, if the unit is being used in Germany, select the
country code D.
To do this press the ]button until D appears.
Now you can allocate channel positions for all programmes
from German TV stations in your reception area.
For programmes which are received through cable systems,
you must also switch over from AIR to CABLE.
To do this press button xor c.
COUNTRY
AIR
START
SORT
TV
AT S
P
D
CABLE
OK
AUX
i
Dialogue lines :
Location (country)
Reception through aeriel or cable
system
OK button - starts ATS
AUX button - starts sorting programme
i button - back to TV picture
P 1 C 06
STORE
SEARCH
STOP
AT S
OK
i
Dialogue lines :
Channel position and channel indicator
OK button - store
P
P+ button - do not store, search
i button - back to ATS start
Page 7
Tuning TV Channels (allocating channel positions)
34
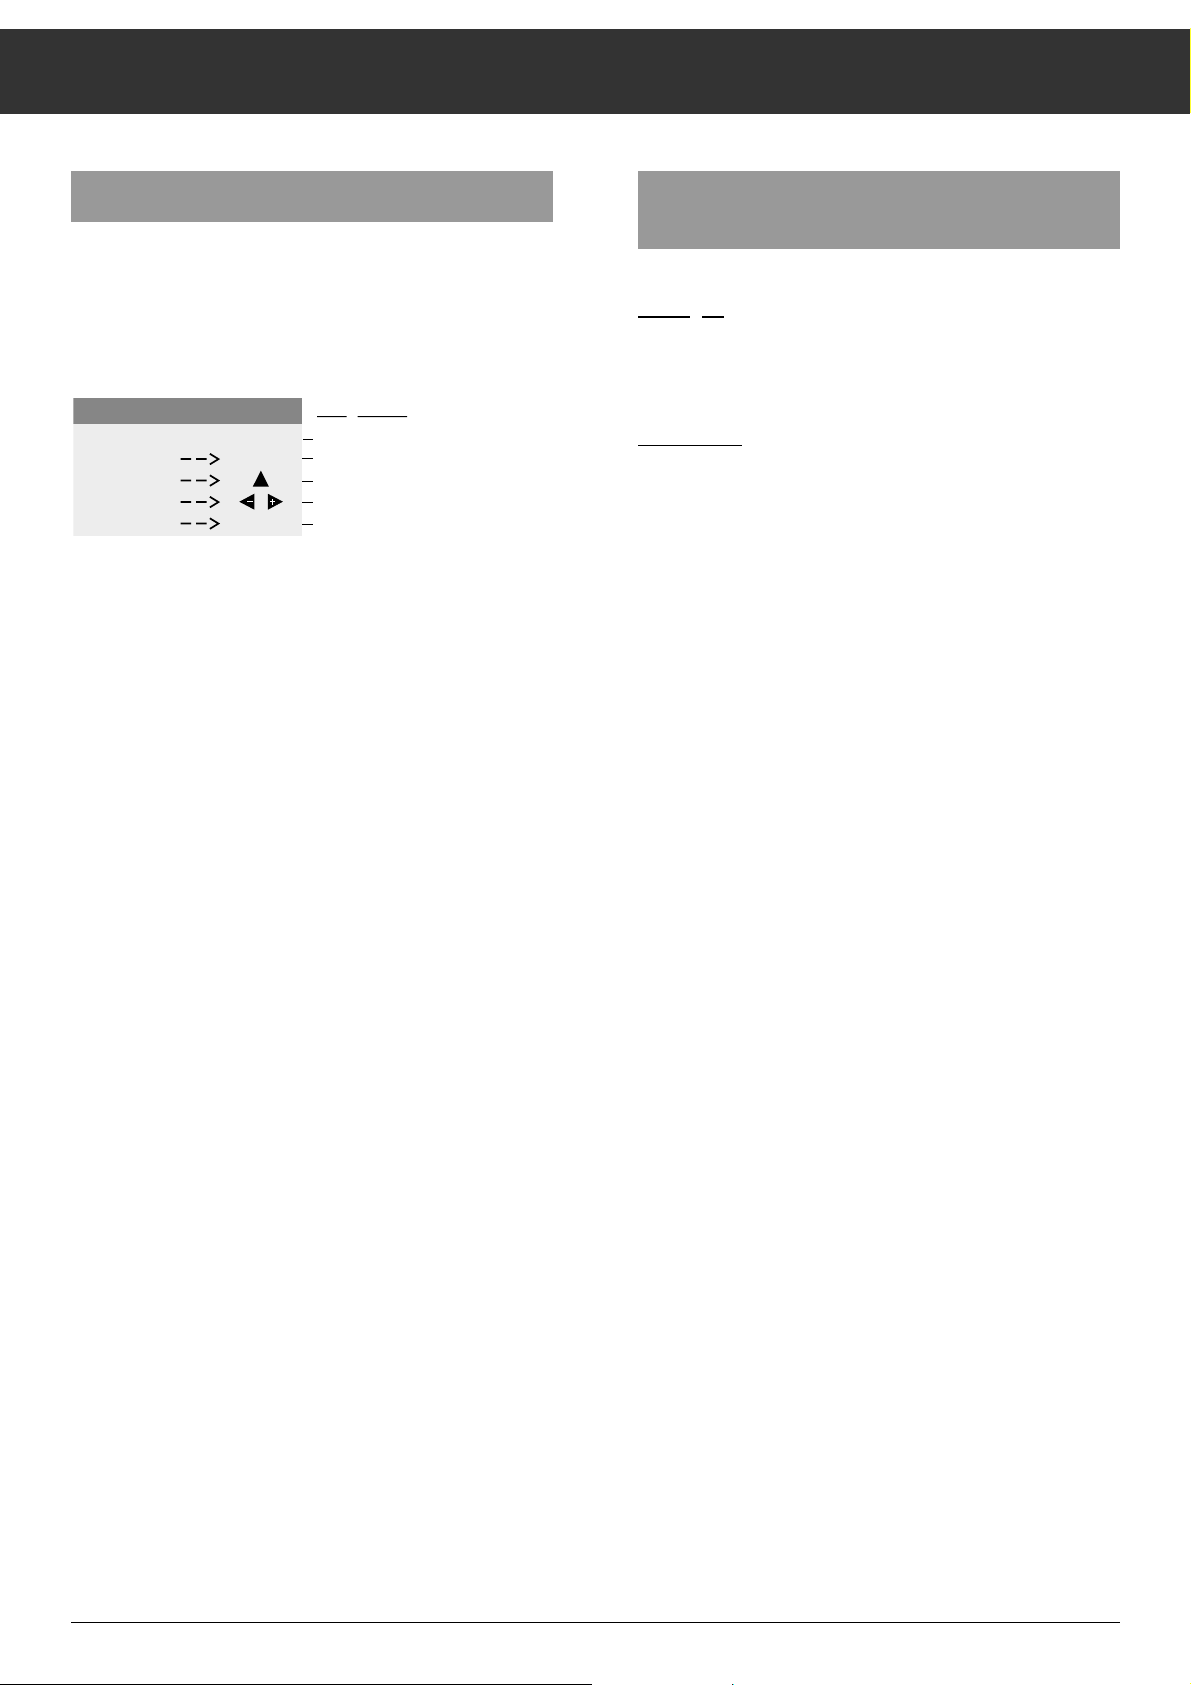
Finetuning (F-TUNE)
If your programmes are received through a cable system it
may – according to the cable system – be necessary to correct the picture. With finetuning the picture can be optimized.
To do this – after the channel search has found the desired
channel – press the xor cbutton as indicated.
Return to TV picture;
Press the
.
– button twice
Return to ATS starting page to sort channels;
Press the
.
button once
Changing the sequence of the channel positions
(sorting)
Exam
ple:
On channel position P6 there is a channel which you would
like to have on channel position P3.
Procedure:
Make the ATS starting page appear; by
Pressing the
m
button for about three seconds.
Call up the channel position table;
Press the
-
button
Activate channel position 6;
Press the |button until P6 is blue.
Press the
“
OK
button, P6 becomes red
Transfer channel position contents from P6 to P 3;
Press the ]button until P3 is red
Store channel position contents from P6 to P 3;
Press the
“
OK
button
Start the sorting procedure;
Return to TV picture;
Press the
.
– button twice
The contents of channel position P6 are now on channel
position 3.
All following channel positions are moved one place "down".
AT S
P 1 C 06
STORE
SEARCH
F-TUNE
STOP
OK
i
Dialogue lines :
Channel position and channel indicator
OK button - store
P
P+ button - do not store, search
Finetuning
i button - return to TV picture
Page 8
Tuning TV Channels (allocating channel positions)
35
Entering the station identification
You can enter the station identification according to your personal wishes.
But you can also use the programmed station names (or
abbreviations).
The following station names are available as
abbreviations:
ANT2 EURO ORF1 RTP2 TV4 ODR3
ARD FILM ORF2 SAT1 TV5 SDR3
BBC ITB PRO7 SRG TVE1 VERK
BRT1 LA5 RAI1 SPOR TVE2 ZDF
BRT2 MTV RAI2 SWF3 WDR3 1PLU
BR3 NED1 RAI3 SUPE N3 3SAT
CAN+ NED2 RTL4 SVT2 MDR3 ---LIFE NED3 RTL+ TEL5 SR3
CNN NRK RTP1 TF1 HR3
Call up the ATS-starting page; by
Pressing the
m
button.
Press the
-
button.
Select the channel position for which you wish to enter or
change the station identification, with the |or ]button.
Press the
“
OK
button (the display line has a "red" backgro-
und)
Press the
“
OK
button again
(channel position and channel are "blue", the four entry positions for the station identification have a "red" background).
Press the |or ]button, so the first station identification
abbreviation appears.
Press the |or ]button (or hold it down – the names from
the table appear in order) until you have found the appropriate abbreviation.
Press the
“
OK
button (whole display line has a "red" back-
ground), the display line is stored.
If the desired abbreviation is not amongst the programmed
station names you can enter one according to your own
wishes.
Per channel position there are four spaces available for the
station identification.
These can be filled with whichever letters (A-Z), or numbers
(0-9) you wish or with blanks (––––).
Select channel position with |or ].
Press the
“
OK
button (display line has a "yellow" backgro-
und).
Press the
“
OK
button again (channel position and channel
have a "red" background).
Locate the four blanks –––– with the |or ]button.
Press the
“
OK
button. (The first entry space has a "red" back-
ground).
Call up the desired letter or number with the |or ]button.
Select the next space with the
c
button and repeat the pro-
cedure until the station name abbreviation is complete.
Press the
“
OK
button (display line has a "red" background),
the channel position data is saved.
Return to the TV programme with the ķ button or with
.
button.
By pressing the ķ or .button, the channel posi-tion data
from 1 to 49 is saved automatically. After the saving procedure is finished the unit switches automatically to channel
ATS SORT
P1
C06
P2
C21
P3
C30
P4
C34
P
P
ARD
VAT1
----
----
-
OK
station names offer
own abbreviated term
no entry
i
Page 9
36
Menu Overview
Entry :
i
MENÜ - > OK
_ _ _ _
SLEEP - TIMER
30 MIN
P
P
0 - 9
PR CH NAME FT
03 C59 BR 3 S 00
P
P
AV
OK
STANDARD
CCIR FM STEREO
P
P
P
P
STANDARD
F 6.5 MHZ AM
P
P
OK
- TIMER
i
STATION TABLE
OK
0 - 9
1111
0 - 9
i
D - DK - E - F - GB - I - NL - >
SPECIAL FUNCTION
P
P
i
P
: Select menu
P
: Call up menu line (part)
OK
i
: Back to main menu
i
OK
i
SPECIAL FUNCTION
PROG. 1-9 1-49
OSD ON OFF
PROG HP
P
P
OK
i
or to picture
i
STANDARD
GB NICAM
P
P
STANDARD
OIRT 6.5 MHZ FM
i
P
P
i
STANDARD
S NICAM
P
P
ii
STANDARD
CCIR NICAM
P
P
Page 10

The Menu
37
With the menu you can select various functions and make
adjustments with the help of dialogue lines. You have the
choice between four main menu options:
Timer Ȅ, Security code t
Channel position allocation with station identification, norm
(standard), and finetuning (FT)
Language selection
Special functions
Calling up the menu
Press the .button until MENÜ → OK appears.
Press the
“
OK
button while MENÜ → OK is displayed, the
menu will appear.
You can exit the menu by pressing the
.
or ķ button.
While the menu appears, the controls for brightness, volume,
and colour contrast are out of operation.
Selecting a language
For the dialogue with the TV set you can choose between
several languages. The instructions and information will
appear in the language you select. It is therefore advisable,
first of all, to select the desired language.
All the factory D (German) has been preset. If you wish to
make a different choice, do this first.
Procedure:
Select the third menu option with the |or ]button.
The menu option – with the country codes – has a light blue
background.
Press the
“
OK
button.
The language selection function is activated.
The selected language code is diplayed in red.
2nd possibility for allocating channel positions
Allocating channel positions in the menu
You can allocate 49 channel positions
Exam
ple:
The 3rd Programme is broadcast on channel 59. You wish to
allocate this station to channel position 3 and give it the station identification BR3. Ask your specialist dealer on which
channels stations can be received in your area.
Procedure:
Selecting the channel position
Select the second menu option with the |or ]button.
The menu option PROGRAMME has a light blue background.
Press the
“
OK
button.
The information for the currently selected channel position
appears.
The activated position appears in red.
Select the desired channel position 03 with the |or
]
button.
Entering a channel number
Press the cbutton once.
You can now switch between channel and special channel, to
do this
Press the |or ]button.
The letter S (S = Special channel) appears.
Press the |or
]
button again to switch back to
C (C = channel) zurück.
Press the
c
button.
Use the numbered buttons to enter the desired two-digit
channel number – in the example 59.
STATION TABLE
D - DK - E - F - GB - I - NL - >
SPECIAL FUNCTION
P
- TIMER
P
Selected menu option
Further options
OK
i
Dialogue line (entries are only
possible with the shown buttons
(symbols)).
PR CH NAME FT
02 C21 PRO 7 S 00
P
P
AVAV
OK
i
Fine tuning
Standard
Station identification
Channel/special channel
Programmes
Page 11

The Menu
38
Setting the channel number can also be carried out step by
step using the |or ]button.
Holding down the
|
or
]
button starts the automatic
channel search. The channel search stops at every channel
that you can receive.
You have now allocated channel 59 to channel position 3.
Entering the station identification
In the example BR3 (Bavarian Broadcasting 3).
For the station identification each channel position has four
spaces available (NAME).
The TV set provides there a selection of station names (abbreviations). Select from these the abbreviation BR3.
Procedure:
Press the cbutton until the abbreviation under the word
NAME is red,
Press the |or ]button until the desired abbreviation BR3
appears.
You have, as described in the example, allocated to channel
position P 3 the channel number C 59 and the station identification BR3.
If no further entries (e.g. selecting a different TV standard or
finetuning) are necessary, press the
“
OK
button.
The channel number and station identification have been
saved.
The information for the next channel position appears.
With the
.
button you can return to the main menu.
Press the
.
button again to return to the TV picture.
Apart from the abbreviations offered, whichever letters, numbers, or symbols (e.g. blank n for spaces) can be entered in
the four spaces.
Procedure for the example CAM 1:
Press the cbutton until the abbreviation under the word
NAME is red.
Press the
“
OK
button.
The first position of the station identification is selected and
appears red.
Press the |or ](]forwards 0-9, +, A-Z, |backwards
9-0, +, Z-A, blank) until the letter C appears.
Press the
c
button.
In doing so you select the next entry position, for the letter A.
Press the |or ]button until the letter A appears.
Repeat this procedure until CAM 1 is displayed.
PR CH NAME FT
03 C59 BR 3 S 00
P
P
OK
i
Page 12

The Menu
39
Selecting a TV standard
The TV stations of different countries transmit their programmes with different TV standards, and the corresponding
sound transmission modes. The figures show which different
picture/soundstandards can be selected.
If you wish to allocate channels of such stations to channel
positions, you must first select the appropriate standard.
Procedure:
Call up the menu
Press the
.
button until MENÜ → OK appears.
While it appears, press the
“
OK
button.
(cursor bar is on menu option PROGRAMME).
Press the |button once.
Press the
“
OK
button.
Press the
c
button repeatedly until S (for standard) appears
in red.
Press the |or
]
button until desired picture/sound
standard is selected.
Press the
.
button once (return to programme menu).
Storing the selected standard in memory:
Press the
“
OK
button.
e.g. Federal
Republic of Germany,
Austria, Switzerland
Italy
only France
e.g. Great Britain,
Ireland, Hong Kong
(BFN)
e.g. Eastern Europe,
China, CIS (USSR)
Sweden, Norway
Portugal,
Spain, Belgium,
Denmark,
Finland
STANDARD
CCIR FM STEREO
P
P
P
P
STANDARD
F 6.5 MHZ AM
P
P
STANDARD
GB NICAM
P
P
STANDARD
OIRT 6.5 MHZ FM
P
P
STANDARD
S NICAM
P
P
i
i
i
i
i
STANDARD
CCIR NICAM
P
P
i
Page 13

The Menu
40
Selecting the TV standard
If only stations operating with the same standard can be
received at the operating location, it is recommended to pre-
select this TV standard for all channel positions.
When allocating channel positions it is then unnecessary to
repeatedly select the TV standard.
Procedure:
Switch off the unit with the mains switch 1
Hold down the ]button on the remote control handset and
Switch the unit on again with the mains switch
1.
While doing so, point the remote control handset at the TV
set.
Dis
play:
Select the appropriate country code with the x, cbuttons
of the remote control handset; e.g. E for Spain (indicated red)
Finally press the
“
OK
button to store.
All 49 channel positions are now set to receive programmes
which are broadcast according to the CCIR NICAM standard.
Any channel positions which were preset for descrambler
operation (P.R) are cleared.
When the standard is selected for the countries I and F all
channel positions are automatically set for the connection of
external units (see Connection and Operation..., section Selecting channel positions for external units).
Finetuning the picture (FT = Finetuning)
The TV set will automatically tune to the best possible picture. However, when reception conditions are poor, it can be
necessary to correct tuning manually.
Procedure:
Call up the menu (see section Selecting the TV standard)
Press the
c
button repeatedly until the numbers under FT
are red.
Press the |or
]
button to select the best picture and
sound quality. You can adjust between the values
63...00...63-.
Store the altered values by pressing the
“
OK
button.
After the values are stored, the information for the next channel position appears.
Return to the main menu by pressing the
.
button.
SLEEP-TIMER
If you activate the Timer the TV set switches automatically to
stand by after a period of your choice between 01 and 99
minutes.
Procedure:
Select the first option in the menu.
If you are not yet in the menu and must first call it up, the first
menu option will be selected automatically (highlighted in
blue).
Press the
“
OK
button.
The
Ȅ-Timer symbol is red.
Press the
“
OK
button,
the SLEEP-TIMER menu appears.
Enter the desired value with the numbered buttons
0…9
or
the |or ]buttons (15 minuten steps).
Press the
.
button.
The main menu appears.
When the time entered has elapsed, the TV set switches to
standby.
By entering the value "00 MIN." the timer function is cancelled
without switching off the TV set.
STANDARD P1 - P49
D - DK - E - F - GB - I - P - S
i
SLEEP - TIMER
30 MIN
P
0 - 9
P
i
Page 14

The Menu
41
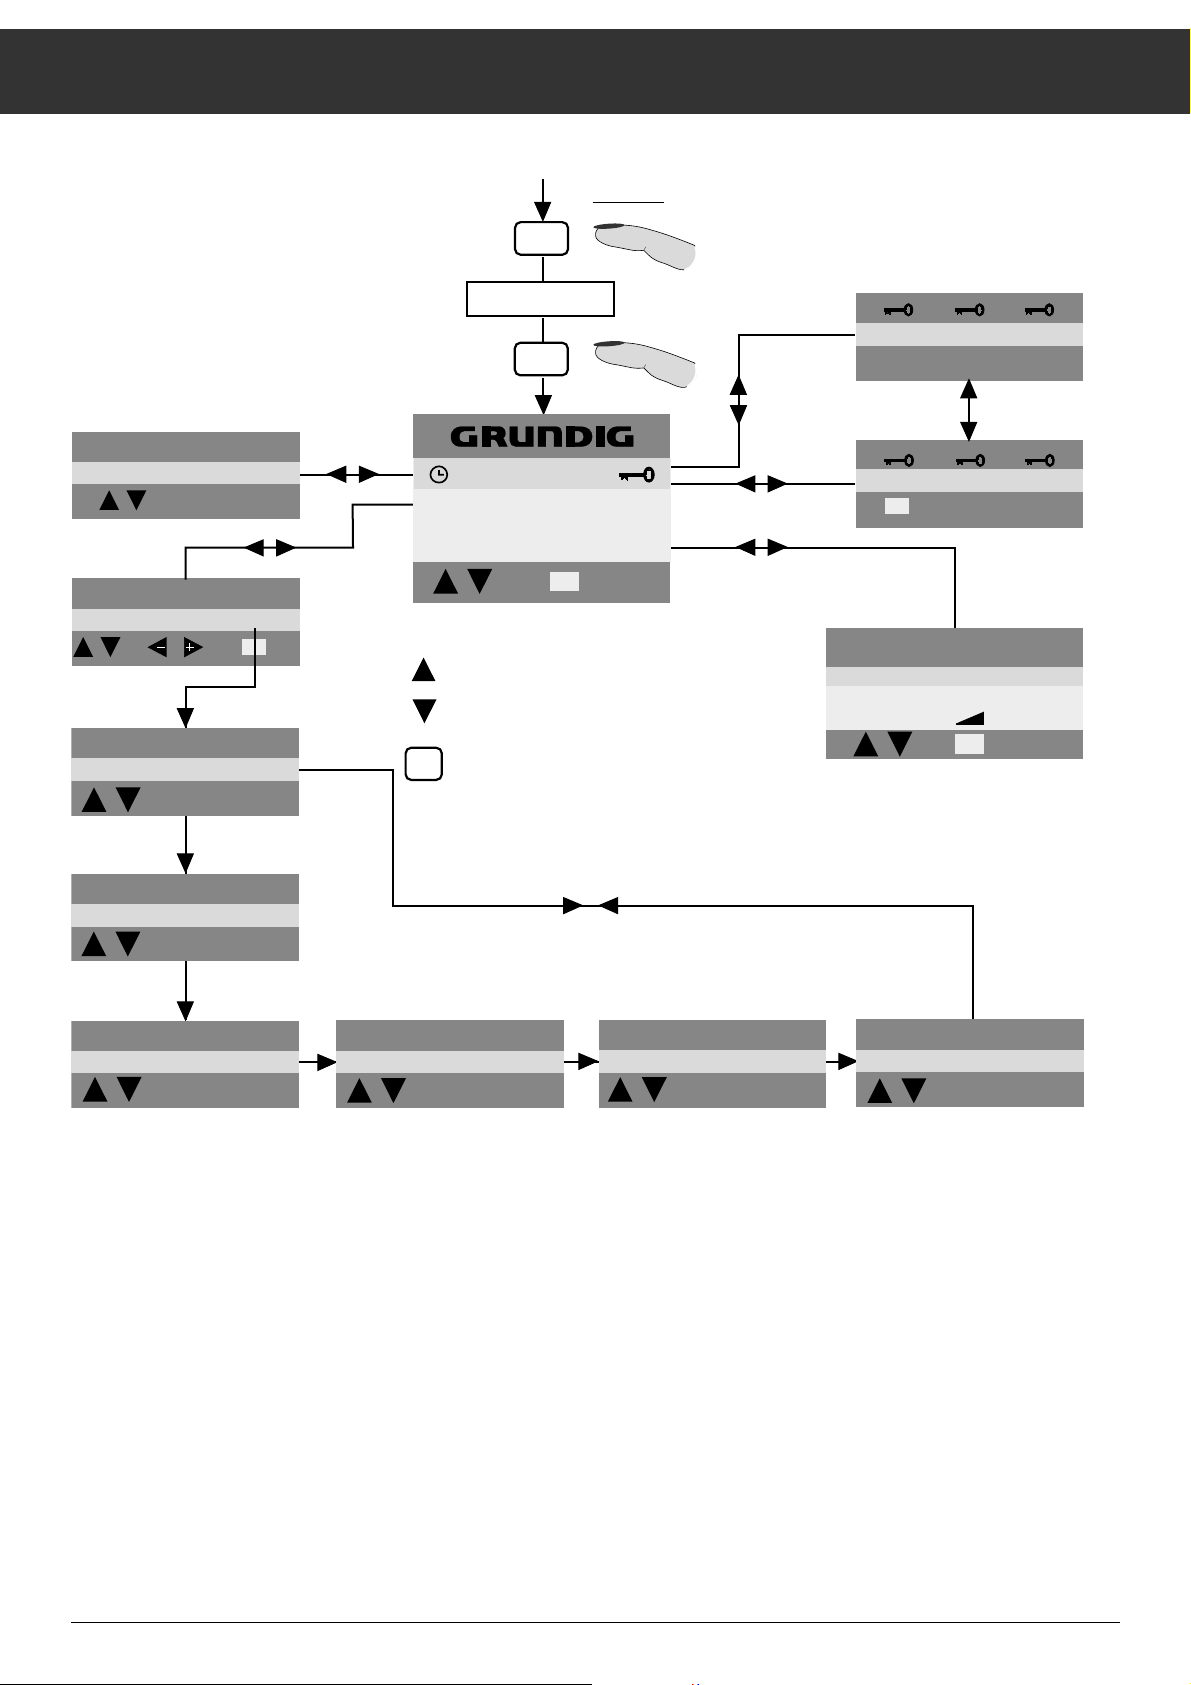
The security code
With the security code you can protect your TV set against
unauthorised use.
Procedure:
Call up the menu (first menu option selected).
Press the
“
OK
button.
With the
x
or cbutton select the t symbol in the first
menu option.
Press the
“
OK
button, the tttmenu appears.
Enter a four-digit code number using the
0…9
buttons
(e.g. 1111).
Press the
“
OK
button.
The code number is stored.
Please note down your personal code number!
If you should forget your personal code number the key (
É)
on the last page will help you. Pressing this button combination cancels the code number and so puts the unit into operation again.
Entering the security code, "unlocking" the unit
If the "locked" TV set is switched on, the following display
appears.
This requires you to enter your personal code number.
Procedure:
Enter the code number with the numbered buttons 0…
9
(hidden entry x x x x )
The unit switches automatically to TV operation.
Erasing the security code
Call up the menu.
Press the
“
OK
button.
Use the
x
or cbutton to select the t symbol in the first
menu option.
Press the
“
OK
button, the tttmenu appears.
Enter your stored four-digit code number
0…9
buttons
(e.g. 1111).
The security code is erased.
OK
1111
0 - 9
i
_ _ _ _
0 - 9
Page 15

The Menu
42
Special functions
Channel selection one or two positions
If you only require the positions 1 to 9 out of the 49 channel
positions, you can reduce the channel position selection.
Pr
ocedure:
Use the |and ]button to select the menu option
SPECIAL FUNCTIONS.
Press the
“
OK
button.
The SPECIAL FUNCTIONS menu appears.
The first menu option PROG. is selected.
Press the
“
OK
button; 1-49 iss red.
Press the
x
or cbutton.
This switches to one-position channel selection
(channel positions 1 to 9).
Pressing the
x
or cbutton again switches back to two-
posi-tion channel selection (1 to 49).
Press the
“
OK
button.
Your choice is stored.
This adjustment has no effect when the channel position is
selected with the |and ]button.
Switching the bar displays on/off
In the menu option OSD ON OFF, you can select OSD ON or
OSD OFF.
OSD ON: The bar displays for volume, headphone volu-
me, colour contrast, brightness, black/white
contrast, and tint, as well as the station identification are displayed when these are changed.
OSD OFF: The bar displays and station identification are
not displayed.
Procedure:
Use the |or ]buttons to select the menu option OSD ON
OFF.
Press the OK button.
Press the
x
or cbutton.
This switches to OSD OFF.
Pressing the
x
or cbutton again switches back to OSD ON.
Press the
“
OK
button
Your choice is stored.
Changing the volume of a channel position
If you receive a station where the volume is different from the
other stations (too loud, too quiet), you can adjust the volume of the channel position.
Procedure:
If you are not in the menu, first call up the menu and select
menu option SPECIAL FUNCTIONS.
If you are already in this menu option, then
use the |or ]button to select the third menu option
(light blue background),
Press the
“
OK
button twice.
The bar display VOLUME appears.
Adjust the volume with the
x, c
buttons.
Only the volume of the currently selected channel position is
adjusted!
Press the
“
OK
button twice.
The chosen value is stored, and is selected automatically
when that channel position is selected.
SPECIAL FUNCTION
PROG. 1-9 1-49
OSD ON OFF
PROG HP
P
P
OK
i
SPECIAL FUNCTION
PROG. 1-9 1-49
OSD ON OFF
PROG HP
P
P
OK
i
Page 16

Tuning TV Channels (allocating channel positions)
43
3rd possibility for allocating channel positions
Directly entering the channel number
Exam
ple:
The "Second Programme" (ZDF) is broadcast on channel 34
and you wish to allocate it to channel position 2.
Procedure:
Select the channel position
Press the numbered button 2 or use the |or ]buttons to
select the desired channel position 2.
P2_ appears on the screen (for two-digit entry). If no twodigit entry is made the indicator will switch to one-digit entry
after a short time.
Select the channel function
Press the mbutton.
C (C for channel) and a number between 00 and 99 appear on
the screen for approximately three seconds.
If you receive cable programmes on special channels, and
you wish to adjust these, press the mbutton again.
S (S for special channel) appears on the screen for approx.
three seconds.
Enter the channel number
Having pressed the mbutton, the unit is ready to accept a
channel number. The full channel number entry should be
made within four seconds.
Press the numbered button 3, then 4.
The channel number 34 is now entered.
Only make two-digit entries (e.g. 06).
Store the channel number
Press the
“
OK
button while still appears.
MEMO → OK appears for approx. three seconds.
While this appears, press the
“
OK
button again.
The channel number is stored.
If the display disappears before the
“
OK
button is pressed,
the channel number must be entered again.
P2
C34
Picture and Sound Adjustments
You can adjust all picture and sound settings to suit your
personal taste.
Adjusting the volume
Pr
ocedure:
Press the x(volume down) or c(volume up) buttons as
long as required.
The adjustment is illustrated by a bar display on the screen
(assumes OSD ON, see menu option SPECIAL FUNCTIONS).
Adjusting the picture settings
If you wish to adjust the picture settings, press on the – or +
side of the rocker button for
Colour contrast
™
Brightness
®
Black/white contrast:
Press the -button, then the
®
rocker button
The adjustments are illustrated by bar displays on the screen
(assumes OSD ON).
This setting from before the adjustment can be called back
by pressing the
“
OK
button after the bar display has disap-
peared.
Storing the adjustment
To make the adjustment permanent, press the
“
OK
button
while the bar display appears.
While it appears press the
“
OK
button again.
Then newly-adjusted setting is stored.
appears.
MEMO → OK
Page 17

Picture and Sound Adjustments
44
Switching off the TV sound
The TV sound can be switched on and off by pressing the
¢ʀ
button.
The
ĭ
symbol appears in the top right corner when – among
other things – the TV sound is switched off.
The sound is also switched back on when the volume button
c
is pressed or the channel changed.
Audio menu
Callin
g up:
Press the ¢ʀbutton, Audio → OK appears.
Press the
“
OK
button.
Pay attention to the dialogue line (last line of the menu).
The symbols there represent the buttons of the remote control handset (e.g.
.
, -,
“
OK
etc.).
Only the buttons which appear can be used for adjustments.
Menu option 1
Base width
Broadens the sound of stereo broadcasts, and improves the
sound of mono broadcasts.
Select with the |or ](blue background).
Adjust with the
“
OK
button.
Menu option 2
General
Different displays can appear in menu option 2. They depend
on the sound carrier signal of the station.
E.g. NICAM, MONO, STEREO etc.
The following displays are possible:
Broadcast in ... Display
Stereo STEREO MONO
Two-channel MONO A B
Mono MONO
For NICAM broadcasts see the table on the nex page.
Stereo or two-channel broadcasts
If the unit receives two-channel broadcasts e.g. a film with
the original sound track on channel A and the local language
dubbed on channel B, you can switch between the two channels.
Select with the |or ]button,
Change with the
“
OK
button (from A to B).
If the headphone is being used the
-
button must also be
pressed.
If the unit receives stereo broadcasts, it switches automatically to stereo sound reproduction.
STEREO appears on the screen.
If the stereo sound is poor you can switch to mono sound by
pressing the
“
OK
button.
(so-called forced mono)
Menu options 3,4,5
Treble, bass, balance
The sound settings can be adjusted to suit your personal
taste.
Select with the |or ]button.
Press the
“
OK
button;
the appropriate bar display appears.
Adjust with the
x, c
buttons.
Store by pressing the
“
OK
button twice.
Make the menus disappear with the
.
or ,button.
ʀǁ ʀ
STEREO MONO
ɦ
ɼ
f
P
TREBLE
BASS
BALANCE
P
OK
---
AUX
ǁ
y
i
Page 18

NICAM Digital Stereo Broadcasts
45
With NICAM broadcasts the sound signals are transmitted in
digital (as opposed to analogue) form, and are "processed" in
the TV set.
This TV set can receive, process, and reproduce both signal
forms.
In the audio menu you can choose between various types of
sound reproduction – as long as they are offered by the station.
If the NICAM sound signal is weak (e.g. when the TV station
is far away) the unit switches repetedly between digital and
analogue sound (the sound buzzes crackles etc.).
In this case inhibit the automatic NICAM mode as follows:
Enter MONO instead of the station identification in the main
menu.
All programmes are now heard in analogue sound.
Enter a different station identification instead of MONO to
return to automatic NICAM mode.
Type of sound Press the
“
OK
button Result Explanation;
transmitted in the audio menu Displays have a red background
Digital stereo NICAM STEREO ɫ FM STEREO off, recommended when the
Analogue sound in mono stereo signal is too weak
e.g. sound crackles
Display: FM
STEREO on again Display: STEREO NICAM
Digital two-channel NICAM A ɫ FM Sound channel B Display: NICAM B
NICAM B ɫ FM Analogton in Mono Display: FM, recommended
when sound quality is poor
Sound channel A Display: NICAM A
Digital mono NICAM MONO ɫ FM Analogue sound in mono recommended when sound
Digital sound in mono quality is poor
Analogue mono
Analogue mono NICAM FM Digital sound Display: STEREO NICAM
e.g. NICAM STEREO ɫ FM (e.g. STEREO NICAM (not related to picture
NICAM in green letters) e.g. a different language, music)
Analogue sound in mono Display: FM (original soundtrack)
Page 19

Calling Up the Channel Indication
46
Briefly pressing the .button displays the information for the
channel position as an abbreviation (e.g. MONO P2 SAT 1) on
the screen.
Press the
.
button again to remove the information.
Switching the TV Set to Standby; Switching Off
In viewing pauses you can switch the TV set to standby.
Procedure:
Press the bbutton on the remote control handset.
The TV set is switched to standby,
a dot 4 on the TV set indicates standby mode.
Automatic standby
At the end of transmission (when the test pattern is no longer
transmitted), during transmission failure, and when the aeriel
is disconnected the TV set switches automatically to standby
after approximately ten minutes.
Pressing one of the numbered buttons 1 ... 9, AV switches
the TV set on again.
You can also switch the TV set on again by pressing the
]
button. The last selected channel appears.
If the TV set is not in use for a longer period (e.g. at night)
switch it off at the mains switch
1 – on the TV set –.
This saves energy.
Remote Control of a Video Recorder
This televison´s remote control can also be used to operate a
video recorder. Ask your dealer which models are approbriate for this.
How to pr
oceed:
Press and hold the ¢VIDEO button.
Then press the button for the desired function.
The following list shows the buttons used for video recorder
functions.
ĵķ (Numeric button 1)= picture search, reverse
ĶŁ (Numeric button 2)= picture search, forward
l (Button ™) = recording start
n (Button ™) = stop
ĵĵ (Numeric button 7)= fast rewind
ŁŁ (Numeric button 8)= fast forward wind
ll ll (Button ®) = pause
ı (Button ®) = play start
Ľ (Numeric button 4)= programme position –
Ń (Numeric button 5)= programme position +
Page 20

47
Teletext Mode
1…0
Page selection
Call up dialog line with -
To call up the following:
Increase
character size
Bypass
waiting time
Direct call up
subpage
Give
answedr
Page
STOP
Select functions with
x
or
c
button
Call up with
“
OK
button
ķ
ʄʄ
ķX /00 ķ? STOP
,
Teletext mode ɫ TV mode
Blue Switch to the next block
button
Yellow Switch to the next group with overrun
button to the next block
Green flip to the next page with overrun
button to the next block
Red flip back
button
Fasttext (Flof)
The colour buttons access the topics
faded into the dialogue line.
.
call up Overview page 100 in normal text
calls up Overview page 100 or the
Program Preview block in Toptext.
1 2 3
4 5 6
7 8 9
P/C 0
ATS
AUX
AV
ķ
+
P
OK
+
-
P
SAT
VIDEO
R
TP 720
Page 21

Teletext Mode
48
General
Teletext is an additional information that is broadcast by the
TV station along with your TV programme.
The built-in Teletext decoder of your set enables you to display this additional information on the screen.
Teletext is transmitted in the form of texts or graphic representa-tions, or as subtitles to the TV programme.
The latter is intended to help the hard of hearing.
By means of information pages and dialogue lines, Teletext
opera-tion is made very easy. The indication in the dialogue
lines denote the functions with the allocated buttons to use.
TOP/FLOF-Teletext
TOP (Table of Pages) and FLOF (Full Level One Features)
are new methods for quick and easy selection of Teletext
pages.
Using TOP and FLOF you can select Teletext pages without
knowing the page numbers. This is possible since all Teletext
pages are transmitted ordered according to topics - also called blocks - as if they were in a "filing box".
For example, the latest news are grouped in the block "Actualities". Further topics are for example the blocks "Sports", "TV
Programmes" and "Service". In the case of TOP Teletext, the
blocks are subdivided into several groups, eg: "Actualities"
into the groups politics, economics, culture, etc. Within the
groups you will find the normal Teletext pages.
With the help of the user’s guide on the picture screen, Teletext operation is very simple and fool-proof. A coloured command line is visible on the bottom edge of the screen. The
shown colours are the same as those on the remote control
handset.
In the case of TOP operation, the yellow field denotes the selected block and the following group. The blue field indicates
the next block.
The blue button of the remote control handset is used to
advance from one block to the other, the yellow button is
used to go from one group to the next, and the green button
is used to go to the next page. To return to the page the red
button is used.
In the case of FLOF operation, a choice of subjects appears
in coloured characters. The required subject is selected by
pressing the corresponding coloured button on the remote
control.
In this way, TOP and FLOF lead you quickly, easily, and surely to the goal - the desired Teletext page.
If no TOP or FLOF Teletext is transmitted by the station, a red
colour bar with a - and a green colour bar with a + will appear in the commentary line.
Note
If the aerial signal is poor, eg: noisy, it may happen that the
Teletext pages are not correctly reproduced. - If fine tuning
on the TV set brings no improvement, we recommend you to
let check your aerial system by a specialist.
What you should know
For the Teletext mode "Top", additional information is required from the TV station. - For this reason, after having switched on the TV set or after having changed the programme,
please wait some moments until the GRUNDIG Top decoder
has read the data into its memory and all of the information is
at your disposal.
By pressing the button
, you can immediately return from
each operating mode back to normal TV operation.
Please observe the currently displayed user’s guide with the
dia-logue lines on the bottom edge of the picture screen.
Operation
Using the numeric buttons 1…0, select a channel whose
teletext pages you would like to view.
WeatherNewsSportTV Guide
yellowgreenred
blue
- +
NEWS
next group
SPORTS
next block
Page 22

Teletext Mode
49
Switching on/off Teletext
Press button , on the remote control handset.
The contents page 100 or the Teletext page viewed last will
appear.
Press button
, - Teletext terminating.
TOP mode
A red, green, yellow and blue field is shown at the bottom of
the screen. Buttons of the same colors are found on the
remote control.
With the red button of the remote control, you scroll backwards one page.
With the green button of the remote control, you scroll to the
next available page (with overrun to the next group).
With the yellow button of the remote control, you switch to
the next group. After the last group of the selected block,
your are automatic-ally taken to the next block (overrun).
With the blue key of the remote control, you switch from
block to block.
Selecting pages directly
Select the number of the desired page as three figures with
the numbered buttons
1…0
.
The number of the selected page appears at the top of the TV
screen and the page appears after a short time.
Programme preview
You can switch directly to the programme preview of the station you are currently viewing.
Press the
.
button.
Page 100 (overview) appears.
Press the
.
button again.
The programme preview block appears.
Press the
.
button again.
Page 100 (overview) re-appears.
In FLOF mode, this function takes you to the overview page
chosen by the TV station.
Multiple pages/page stop
Several subpages can be combined under a single page number and these pages are automatically scrolled at an interval
determined by the television station.
The presence of subpages under a single page number is
indicated by, for example, 3/6 beneath the time, which means
that you are looking at the 3rd page of a total of 6 pages.
If you want to look at a page for a longer period of time, select Stop.
Press the
-
button.
The dialogue line appears.
Select STOP with the
x
or cbutton.
Press the
“
OK
button.
"STOP" appears at the top of the screen. The contents of the
page shown are kept on the screen and are no longer updated
or switched to other subpages.
Press the
“
OK
button.
The STOP function is cancelled and the current subpage
appears.
Calling up a subpage directly
Press the -button (the dialogue line appears).
Select the /00 symbol with the
x
or cbutton.
Press the
“
OK
button.
The selected page number, e.g., S155/---- appears in the info
line.
Enter the four-place subpage number that you want to call up
with the numeric buttons, for example, the second page,
sequence 0002. The desired subpage is sought and displayed.
Press the
“
OK
button.
The function is cancelled.
Doubling character size
Press the -button (dialogue line is displayed).
With the
x
or cbutton, select the ķʄ symbol.
Repeatedly pressing the
“
OK
button doubles the character
size in the following order:
Upper half of the picture,
lower half of the picture,
return to normal picture.
Page 23

Teletext Mode
50
Answer
This function can be used on certain teletext pages to reveal
the solution of riddles, or for programming a video recorder
via VPS times.
Press the
-
button (dialogue line appears).
With the
x
or cbutton, select the ķ? symbol.
Press the
“
OK
button.
The hidden information is revealed.
Press the
“
OK
button.
The reveal function is cancelled.
Watching television during teletext mode
Updating a page –
Bypassing waiting times
Certain teletext pages are continually updated, for example,
stock market reports, sports announcements, and the latest
news.
If you want to watch television and stay informed at the same
time, first select a page of your choice, then
press the
-
button (dialogue line is displayed).
With the
x
or cbutton, select the ķX symbol.
Press the
“
OK
button.
The regular programme is still visible and the teletext symbol
appears at the top of the screen.
If, for example, P143 appears in the info line, then
press the
“
OK
button.
The teletext page appears with the updated information.
This function can also be used to bypass waiting times while
the teletext decoder searches for a page. When the page has
been found, the indication P143, for example, appears in the
info line.
Calling up the clock
It is only possible to call up the clock in TV mode and during
Teletext broadcasts.
For stations without the Teletext service, only a rectangle will
fade in.
Press the
Ȅ button to fade the time in or out.
Page 24

Connection and Operation...
51
... for video recorder, camcorder
Exam
ple 1:
Video recorder connected to black
EURO-AV socket
7.
Operation:
Press the
0
AV button on the remote control handset once.
AV1 appears on the screen.
Start playback on the video recorder.
On the screen you see the video playback picture.
Example 2:
Video recorder connected to blue
EURO-AV socket
6.
Operation:
Press the
0
AV button on the remote control handset twice.
Channel position AV2 appears on the screen.
Start playback on the video recorder.
On the screen you see the video playback picture.
Example 3:
Video recorder connected to the aeriel socket 8.
Allocate the playback channel of the video recorder (between
30 and 40) to a channel position of your choice on the TV set
(see operating instructions of the video recorder).
If you do not know the playback channel of the video recorder, start playback on the recorder and search the channel
with the ATS search mode of the TV set.
Procedure:
Select the menu option
PROGRAMME in the menu.
Select the required channel position e.g. P15
Enter the playback channel of the video recorder e.g. C38.
Enter the four-position abbreviation AV_ _ under the NAME
indication. (time-constantswitch-over!)
Store with the
“
OK
button.
Return to the TV picture with the
.
button (press twice).
Note the channel position for later video playback.
Picture and sound adjustment during
video playback
If there are discrepancies in picture and sound between the
TV picture you are accustomed to and the video playback picture (e.g. sound too loud, colour too intense), you can adjust
these with the remote control handset, and store the adjusted
values.
Such a correction only affects channel AV positions.
... of a satellite receiver
Connection:
Connect the satellite receiver to the black EURO-AV socket
6 with an appropriate cable.
Operation:
Select channel position AV1-with the
0
AV button.
Press and hold down the
¢SAT
button and enter the required
channel position for the satellite receiver with the numbered
buttons
1…0
.
... of stereo headphone
Connection:
Insert the headphone plug (3,5mm ∅ jack plug) in the
socket 5.
Operation:
Press the -button and then adjust the volume with the
x
or cbutton.
The adjustment is illustrated by a scale on the TV screen.
If you want to store this adjustment permanently, then
press the
“
OK
button twice.
PR CH NAME FT
15 C38 AV S 00
<
<>
<
OK
i
Page 25

52
Connection and Operation...
Sound channel selection for two-channel-sound
broadcasts with headphones:
call up the audio menu
activate menu option 2.
press the -button
select between MONO A and MONO B with the
“
OK
button.
Copying recordings via the television
(Transfer mode)
You can record from one video to another, or from a camcorder to a video recorder, or from a S-VHS video recorder to
another video recorder.
Proceed as follows:
Connection:
Connect the playback recorder or camcorder to the black
EURO AV socket 7.
Connect the camcorder to the cinch sockets
ßI and ß?.
(ßI = picture input (Video) , ß? = sound input (Audio), left
and right channel).
Connect the S-VHS camera or Hi 8 camcorder to the
S-VIDEO socket
9 and the phono sockets ß?.
Connect the recording recorder to the blue EURO AV socket
6.
Operation:
Select the input socket with the
0
AV button.
AV 1 = lower Euro AV socket (black)
7
AV 3 = FBAS socket ßI
AV 3 = S-VIDEO socket 9
For AV 3, the sound must be separately connected via the
two cinch sockets ß?.
Press the
-
and then press the
0
AV button.
Displayed on the screen is:
… if channel position AV 1 is selected:
COPY AV 1
ɦ AV 2
… if channel position AV 3 is selected:
COPY AV 3
ɦ AV 2
You can now watch any channel without disturbing the
recording.
To cancel the COPY function, press the
0
AV and the
-
but-
ton and then the
0
AV button.
... of descrambler (Decoder)
Certain stations broadcast coded programmes via cable
systems. This makes picture and sound unintelligible. Programmes of this type can be decoded with a descrambler.
Procedure:
Always connect the descrambler to the black EURO-AV
socket.
Select the channel position to which the coded programme
(channel) is allocated.
Adjust as described in "Selecting channel positions for external units".
The coded programmes (signals) are passed from the TV set
to the descrambler, decoded, and returned to the TV set,
where they can be viewed normally.
The descrambler can also be connected via the video recorder (if a connection is available).
This allows a different external unit (e.g. satellite receiver) to
be connected to the black socket
7.
Page 26

Connection and Operation...
53
Selecting channel positions for external units
All channel positions can be allocated to external units (e.g.
descrambler or video recorder with switching voltage at PIN
8 of the EURO-AV socket) – which are connected to the
black EURO-AV socket –.
Example:
You receive three TV stations, and wish to allocate the video
recorder to channel position 4.
Select channel position 4 with the numbered button 4 or with
the |or ]buttons.
"P4" appears on the screen.
Select the second menu option
STATION TABLE from the menu (see the section "Allocating
channel positions in the menu"), then
Press the
“
OK
button.
Press the AV button once.
In the first line of the display PR changes to P.R.
Additionally, the word AUTOMATIC appears.
– = Automatic switching
of the MONO-STEREO-TWO-CHANNEL-
BROADCAST sound mode to descrambler
mode. This depends on the TV station
received via the aeriel.
By pressing the AV button again, more than once if necessary, the following functions can be selected.
– = Forced STEREO,
the left and right sound channels are –
when an external unit (e.g. video recorder
operation) is connected to the black
EURO-AV socket – switched through to
the loudspeakers.
STEREO
AUTOMATIC
– = Forced MONO positions
With MONO L the left-hand sound
channel is switched through to both loudspeakers.
With MONO R the right-hand sound
channel is switched through to both loudspeakers.
Pressing the AV button again cancels the settings for operation of external units (e.g. descrambler).
Press the
“
OK
button to store the required setting.
Return to the TV programme with the
.
button (press twice)
MONO R
MONO L
PR/P.R
P.R CH NAME FT
04 C59 BR 3 S 00
AUTOMATIC
P
P
AV
OK
i
Page 27

Specification
54
Mains Voltage:
220-240 V, 50/60 Hz
(Power supply control range 190 … 264 V)
Power consumption:
approx. 100 W
In standby approx. 5 W
Channel coverage:
Channels 01 … 99
Special channels S 01 … S 99
Sound output:
2 x 20 W music power (2 x 10 W sine power)
Service note for the dealer:
This unit is provided with a pluggable power supply cable.
For replacements, contact the nearest customer service
centre and always indicate the following order number:
8290-991-307.
This unit conforms to VDE safety regulations and the directives of the Deutsche Bundespost (German Federal Post
Office; see the certification mark on the type sticker on the
rear of the unit), and also all relevant regulations concerning
X-ray emission. The picture tube, which emits X-rays, is sufficiently shielded, and therefore represents no danger. Accelerating voltage is a max. 34 kV, with a mean beam current of
1.6 mA. This unit is equipped with an intrinsically safe
cathode ray tube in accordance with Appendix III of the applicable X-ray regulations.
Unauthorized tampering with the unit, especially adjustments to
the high voltage system or the installation of a different type of
picture tube, can considerably increase X-ray emission. Units
altered in this way no longer conform to the operating permission conditions and may not be operated.
Alterations reserved!
Pin assignment of EURO-AV socket 7
If you want to connect other units to your television (for
example, a computer or amplifier), your dealer can provide
you with a standard connection by means of the following
table:
Pin Signal
11 = Audio output, right
12 = Audio input, right
13 = Audio output, left
14 = Audio earth
15 = Blue earth
16 = Audio input left
17 = RGB blue input
18 = Switching voltage
19 = Green earth
10 = –
11 = RGB green input
12 = –
13 = Red earth
14 = Earth
15 = RGB red input
16 = RGB switching voltage
17 = Video earth
18 = RGB switching voltage, earth
19 = Video output
20 = Video input
21 = Shielding/Earth
220
21
119
Page 28

Service
28
GRUNDIG Germany
GRUNDIG Europe
GRUNDIG
Kundendienst Nord
Kolumbusstraße 14
Hamburg
22113
0 40/7 33 31-0
GRUNDIG
Kundendienst West
Horbeller Straße 19
Köln
50858
0 22 34/95 81-2 51
GRUNDIG
Kundendienst Mitte
Dudenstraße 45-53
Mannheim
68167
06 21/33 76-70
GRUNDIG BELUX N.V.
Deltapark, Weihoek 3, Unit 3G
B-1930
Zaventem
7 16 0
00 32/2-
4 00
GRUNDIG
Kundendienst Ost
Wittestraße 30e
Berlin
13509
0 30/4 38 03-21
GRUNDIG
Kundendienst Süd
Beuthener Straße 65
Nürnberg
90471
09 11/7 03-0
GRUNDIG NORGE A.S.
Glynitveien 25, Postboks 234
N-1401
Ski
00 47/64 87 82 00
GRUNDIG UK LTD.
Elstree Way, Borehamwood, Herts, WD6 1RX
GB
Großbritannien/Great Britain
00 44/1 81-3 24 94 00
Technical Service
Unit 35, Woodside Park, Wood Street
Rugby, Warwickshire, CV21 2NP
Großbritannien/Great Britain
00 44/1 78-8 57 00 88
GRUNDIG IRELAND LTD.
2 Waverley Office Park, Old Naas Road
EIR
Dublin 12
0 03 53/1-4 50 97 17
GRUNDIG FRANCE S.A.
5 Boulevard Marcel Pourtout
F-92563
Rueil Malmaison Cedex
00 33/1-41 39 26 26
GRUNDIG SCHWEIZ AG
Steinacker Straße 28
CH-8302
Kloten
00 41/1-8 15 81 11
GRUNDIG PORTUGUESA
Comércio de Artigos Electrónicos, Lda.
Rua Bento de Jesus Caraça 17
P-1495
Cruz Quebrada, Lisboa
0 03 51/1-4 19 75 70
GRUNDIG ESPAÑA S.A.
Solsonés, 2 planta baja B3
Edificio Muntadas (Mas Blau)
E-08820
El Prat De Llobregat (Barcelona)
00 34/93-4 79 92 00
GRUNDIG DANMARK A/S
Lejrvej 19
Værløse
DK-3500
00 45/44 48 68 22
GRUNDIG OY
Luoteisrinne 5
Espoo
SF-02271
0 03 58/9-8 04 39 00
GRUNDIG SVENSKA AB
Albygatan 109 d, Box 4050
S-17104
Solna
00 46/8-6 29 85 30
GRUNDIG POLSKA SP.Z.O.O.
Ul. Czéstochowska 140
PL-62800
Kalisz
00 48/62-7 66 77 70
GRUNDIG AUSTRIA Ges.m.b.H.
Breitenfurter Straße 43-45
A-1120
Wien
00 43/1-81 11 70
GRUNDIG NEDERLAND B.V.
Gebouw Amstelveste
Joan Muyskenweg 22
NL-1096
CJ Amsterdam
00 31/20-5 68 15 68
GRUNDIG ITALIANA S.P.A.
Via G.B. Trener, 8
I-38100
Trento
00 39/4 61-89 31 11
Page 29

GRUNDIG AG ••D-90762 FÜRTH Printed in Austria
1 2 3 4 5 6 7 8 9
21172-941.02
 Loading...