

Page 1
COLOR TELEVISION
wien S ST 1663 TOP
Page 2

ķ
2
Buttons and Connections on the Unit.................................. 3
– Unit front
– Unit rear
Safety Instructions and Setting up ...................................... 4
– The Remote Control
The Remote Control Buttons............................................... 5
Assigning Channel Positions............................................ 6-8
– Language selection .......................................................... 6
– Starting the ATS EURO PLUS search function ................. 7
– Changing the sequence of the automatically
sorted channel positions
– Entering station names..................................................... 8
The Menu....................................................................... 9-12
– Calling up the menu ......................................................... 9
– The timer functions
– The programme lock................................................... 9-10
– The TV station table.......................................................... 9
– Adding new TV channels
– Fine tuning ..................................................................... 11
– Language selection
– Special functions ...................................................... 11-12
Entering Channels Directly ................................................ 12
Picture and Sound Adjustments........................................ 13
– Switching off the TV sound
– The audio menu
– Adjusting the Picture Values
Teletext Mode .............................................................. 14-17
Connection Capabilities and Operation......................... 18-20
– … of stereo headphones................................................ 18
– … of a satellite receiver
– … of a decoder
– When additional units are connected …
– of a video recorder/camcorder ....................................... 19
– … of S-VHS video recorders, S-VHS camcorders
or Hi8 camcorders
– Copying recordings via the television (transfer mode) ... 20
– Video recorder remote control
– Adjusting the picture and sound during
video playback
Technical Data................................................................... 21
Additional Information for Units sold in Great Britain
Units sold in GB are suitable for operation from a 240 V AC,
50 Hz mains supply.
In case this appliance is supplied with a Safet
y Standard
A
pproved mains lead fitted with a non-rewireable 13 Amp
mains plug which, if unsuitable for your socket, should be cut
off and an appropriate plug fitted by a qualified electrician.
The fuse and fuse holder must be removed from the plug as
accidental insertion of the redundant plug into a 13 Amp
socket is likely to cause an electrical hazard.
Note: The severed plug must be destroyed to avoid a possible
shock hazard should it be inserted into a 13 Amp socket
elsewhere.
If it is necessary to change the fuse in the non-rewireable
plug, the correct type and rating (5 Amp ASTA or BSI approved BS 1362) must be used and the fuse cover must be refitted. If the fuse cover is lost or damaged the lead and plug
must not be used until a replacement is obtained. Replacement fuse covers should be obtained from your dealer.
If a non-rewireable plug or a rewireable 13 Amp (BS 1363)
plug is used, it must be fitted with a 5 Amp ASTA or BSI
approved BS 1362 fuse. If any other type of plug is used it
must be protected by a 5 Amp fuse either in the plug or at the
distribution board.
Important:
The wires in the mains lead are coloured in accordance with
the following code:
BLUE – NEUTRAL
BROWN – LIVE
As the colours of the wires in the mains lead of your appliance may not correspond with the coloured marking identifying the terminals in your plug, proceed as follows:
Connect the BLUE coloured wire to plug terminal marked with
the letter "N" or coloured black.
Connect the BROWN coloured wire to the plug terminal marked with a letter "L" or coloured red.
In no circumstance must any of the wires be connected to the
terminal marked with a letter "E", earth symbol , coloured
green or green and yellow.
Replacement mains leads can be obtained from your dealer.
Contents
GB
F
I
NL
Page 3

ķ
3
Buttons and Connections on the Unit
Unit rear
6 EURO- = Standard connection for a video unit.
AV socket
(blue)
7 EURO- = Universal connection, DIN EN 50049
AV socket Video and RGB connection possible.
(black)
8 É = Aerial socket 75 Ω, coaxial, DIN 45325
IEC 169-2.
9 S-VIDEO = Connection (video) for S-video recorder
Socket or S-camcorder.
ßI FBAS = Connection (video) for units with Cinch
Cinch FBAS output (e.g., camcorder, computer).
socket
ß? Cinch- = Connections for audio input signals
sockets with FBAS.
R = input, right channel
L = input, left channel
Unit front
1 IO = Mains switch. When switching the TV set
on, programme position 1 is automatically
selected.
2 –
z
+ = Volume setting buttons.
3 – P + = Programme position select buttons.
4
•
= unit in standby position, indication lit.
5 m = 3.5mm ∅ headphone socket behind flap.
Pull flap open.
Page 4
ķ
4
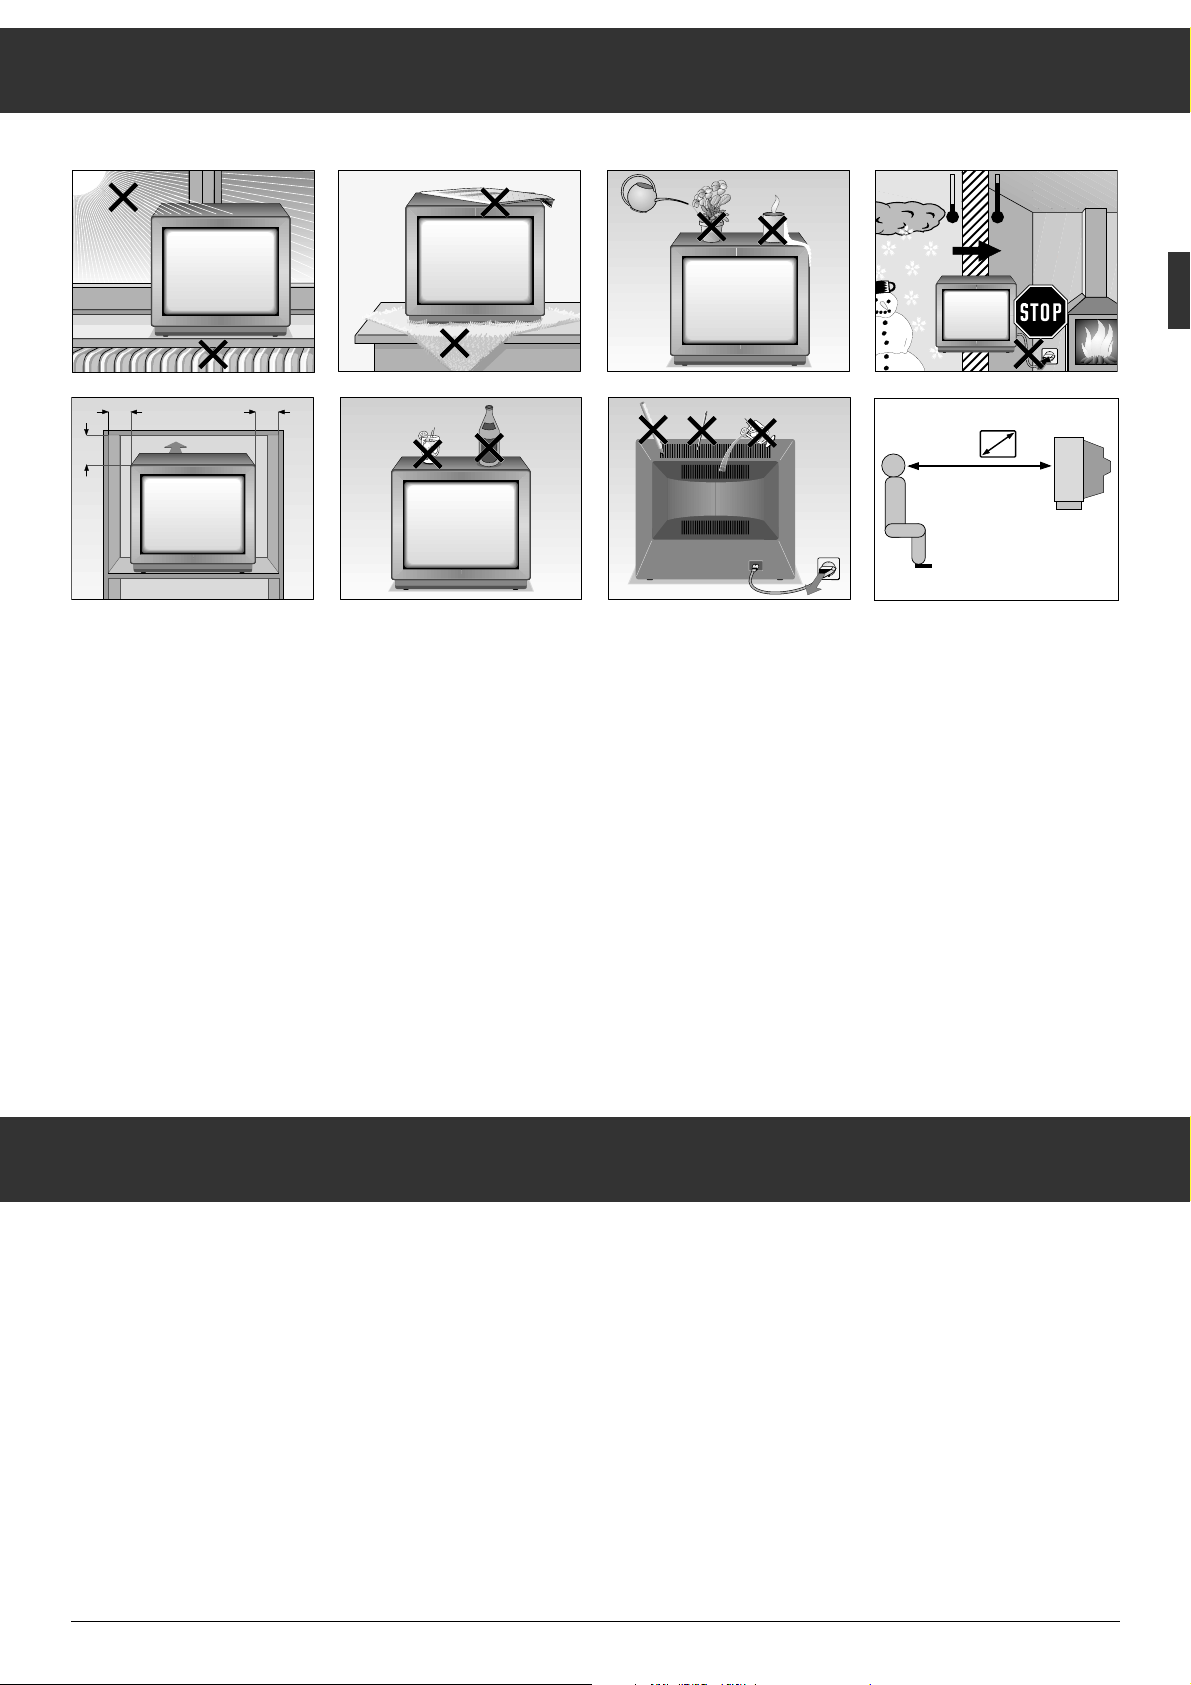
Safety Instructions and Setting Up
The ideal viewing distance is five times the diagonal width of
the screen. See illustration.
Switch the television off with the mains switch
1 if you are
not watching it for a longer period of time (e.g., night).
This saves energy.
The unit can also be damaged even when it is turned off if
lightning strikes the power supply system and/or the aerial
cable.
For this reason, you should always disconnect your television
from the mains plug and the aerial plug during thunderstorms.
Never expose the unit to moisture.
Do not insert foreign objects into the ventilation openings on
the back.
Caution! High voltage!
The remote control is the central control unit for your television set.
All operational functions and basic settings are carried out
with the remote control.
Insert the battery supplied. Note the markings inside the battery compartment! Close the cover.
When the battery is dead, "BATTERY TELEPILOT" appears on
the screen.
The Remote Control
Replace weak batteries promptly. We cannot assume liability
for damages which may result from damaged batteries.
The remote control is supplied with stickers on which you
can note down the assignment of the channel positions.
At the back of the remote control there is a recess for attaching a sticker.
Krieg am Golf
10
cm
20
cm
20 cm
10
cm
! SERVICE !
°C
5 x
°C
2 Std
Page 5
ķ
5
The Remote Control Buttons
1…0
Channel selection and switching on
0
AV the television from standby
or selection of AV position,
or direct channel selection (after
pressing the
m
button).
m
Programme/channel/special channel
preselection. Keep button pressed for
approx. 4 seconds to activate ATS euro
plus.
-
Preselect button for different functions.
]
Step-by-step programme selection
(1, 2, 3 ...)
|
Step-by-step programme selection
(...3, 2, 1)
or
]
cursor up
|
down.
“
OK
– Modification and activation of different
functions.
xc
Volume up/down
or
xc
cursor to the left,
to the right.
¢ʀ
Sound on/off (muting)
Access to "Audio menu".
b
Switching to standby.
®
Brightness
™
Colour contrast
,
Teletext mode ɫ TV mode
.
Access to main menu.
When "Menu ɮOK" is displayed,
press the
“
OK
button.
¢
Ȅ Clock time on/off.
¢SAT Satellite receiver remote control
(keep pressed the SAT button).
¢VIDEO Video recorder remote control
(keep pressed the VIDEO button).
1 2 3
4 5 6
7 8 9
P/C 0
ATS
AUX
AV
+
P
OK
P
ķ
R
+
-
SAT
VIDEO
TP 720
Page 6

ķ
6
Assigning Channel Positions
Assigning channel positions for television
channels
Different television stations broadcast programmmes on different channels. For example, the television station Dillberg
(in the Nürnberg area) broadcasts the first programme (ARD)
on channel 6.
These channels must be assigned to channel ("programme")
positions in the television.
It is only necessary to make these settings once when you set
up your television for the first time or if reception conditions
change (for example, if you move to another location or if you
are connected to a cable TV system at a later date).
In addition to the 49 channel positions, the programme
positions AV1, AV2 and AV3 are available.
Your television can receive channels from television stations
(as well as from satellites, cable television networks, and
video recorders) which broadcast in the colour norm
PAL-BG.
Television channels can be assigned channel positions with
the automatic channel search function (ATS euro plus = Auto
Tuning System).
A special feature of this new system is the automatic station
programming function.
This so-called station memory system scans the entire reception range, stores the channels found, and enters them into a
table with their respective station identification abbreviations.
The channels found are then evaluated according to the
quality of reception. This means that those channels with
poor reception quality are entered at the end of the table.
In this way, only channels with good picture quality are
assigned to the beginning of the table.
The search procedure is accompanied by helpful information
in the form of a channel number.
During the search procedure, the channels, which can be called up later, are sorted according to language and country
and read into the TV station table.
In this table, you can arrange the automatically assigned
channels (without their station identification) according to
your specific needs and give them a name of your choice or
their respective station identification abbreviation.
Switching on
Switch the televison on with the mains switch 1 .
The start menu "ATS euro plus" will be displayed.
If this menu does not appear, you can call it up by pressing
the
m
button (for approx. 4 seconds).
At the bottom of the displayed menu, as with all other displays, there is a dialogue line consisting of words and symbols. These symbols correspond to the symbols on the
buttons of the remote control handset.
The symbols
∨, ∧, <, > designate the following buttons:
∨, ∧ = programme select buttons
|
and
].
<, > = volume
x
and c.
Only the symbols (buttons) actually shown on the screen can
be used to call up functions. This system is called on-screen
user guide and is referred to in the following sections when
required.
Selecting a language and location (country)
For the dialogue with your television, you can select between
several languages. After having made a choice, all displays
will be in this language.
German is preset at the factory.
If you wish to select a different language, press the
x
or
c
button.
Press the
“
OK
button to confirm the selected language.
09:28:35
GRUNDIG
ATS euro plus
Language
D F GB I NL
Select
< >
Confirm
OK
Cancel
Ǻ
Page 7

ķ
7
Assigning Channel Positions
The next page for selecting the location of installation (country) will be displayed.
Germany is preset at the factory.
The buttons xand callow you to select a different country.
Starting the ATS euro plus station search
Press the
“
OK
button to start the ATS euro plus automatic
station search. This search function automatically sorts the
available channels.
When the search function is completed, the TV station table
is displayed on the screen.
If the following note does not apply in your case, continue
assigning channel positions with the chapter "Changing the
sequence of the automatically sorted channel positions".
Note for users in Switzerland, the Netherlands,
Belgium and others:
After having selected the country code CH, NL, B or others
and confirmed this choice with the
“
OK
button, the following
page will be displayed.
If you use a common cable or aerial system, select (highlight
by blue background) the menu line "Cable/Aerial" with the
|
or ]button.
09:20:35
GRUNDIG
ATS euro plus
Reception VIA
Cable/Aerial
Cable Offset
Select
ɶɶ
ʺʺ
Start ATS
OK
Cancel
Ǻ
09:23:35
GRUNDIG
ATS euro plus
Country
A B CH D I NL – others
Select
< >
Confirm
OK
Cancel
Ǻ
Start the ATS search function with the
“
OK
. button. When the
search function is completed, the TV station table will immediately be displayed.
If your TV set is connected to a cable system which does not
transmit the channels with the common channel offset, you
must select the menu item "Cable Offset".
In case of doubt, consult your dealer.
Press the |or ]button.
Press the
“
OK
button. ATS starts and stops at each channel
on which a programme with sufficient signal strength is
received.
If necessary, you can adjust the picture quality to suit your
preferences with the
x
or cbutton.
Press the
“
OK
button. The channel is added to the TV sta-
tions table and the ATS channel search is started again.
If you do not
want to add the channel to the TV station table,
press the ]button to restart the ATS channel search.
When the search function is completed, the TV station table
is displayed in sorted order.
Changing the sequence of the automatically sorted channel positions
Press the |or ]button to select the channel position that
you wish to displace.
Press the
¢(yellow) button.
Press the |or ]button to move the channel position data
to the desired channel position.
Confirm the new position by the
“
OK
button.
09:28:35
GRUNDIG
ATS euro plus
TV-Station table
Prog Chan. Station
1 C 06 ARD
2 C 34 ZDF
3 C 47 BR 3
4 C 40 SAT 1
5 C 36 RTL +
6 C 21 PRO 7
7 C 53 DSF
8 C 59 BR 3
9 C 06 ––––
10 C 32 ––––
Select programme
ɶɶ
ʺʺ
< >
Select station name
OK
Check picture n
Move n
Delete n
Terminate
Ǻ
TUNE
C 06 182,25 MHz
STORE – –> OK
SEARCH – –>
ǵ
F-TUNE – –> ǸǷ
Page 8

ķ
8
Assigning Channel Positions
Entering station names
Use button |or ]to select the channel position on which
you want to enter or change a station name.
Press the
“
OK
button.
A list of station names (or their abbreviations) is displayed on
the screen.
Repeatedly press the |or ]button until the desired name
(abbreviation) is selected.
Press the
“
OK
button. The selected name is entered.
If there is no name of your choice in the list, proceed as follows.
Press the
c
button once to select the first position of the sta-
tion name.
Press the |or ]button until the desired letter (character)
appears.
Press the
c
button to select the next position of the station
iname. Repeat these steps until the complete name (abbreviation) is entered.
Conclude (confirm) the entry with the
“
OK
button.
Terminating the ATS search function
Press the .button.
Press the
“
OK
button. Channel assignment is stored in
memory.
The menu is displayed on the screen.
If you do not wish to store the assigned channels, press the
-
button.
The TV station table disappears from the screen.
GRUNDIG
ATS euro plus
TV-Station table
Prog Chan. Station
1 C 06 ARD
2 C 34 ZDF
3 C 47 BR 3
4 C 40 SAT 1
5 C 36 RTL +
6 C 21 PRO 7
7 C 53 DSF
8 C 59 BR 3
9 C 06 ––––
10 C 32 ––––
Select station name
Input channel number
Select position
Stop input
Check picture n
ARD
– – – –
BRT 1
BRT 2
CAN +
CNN
FILM
F2
F3
INFO
ITB
LIFE ʺʺ
ɶɶ
ɶɶ
ʺʺ
ʺʺ
<
>
OK
09:28:35
ʺʺ
Page 9

ķ
9
The Menu
Using the menu, it is possible to carry out different functions
and settings with the help of dialogue lines.
All parts of the menu will be described on the following
pages. If you have already carried out one or more of the following settings, it is not necessary to repeat these steps.
Calling up the menu
Press the .button. The message "MENU ɮɮOK" is displayed.
Press the
“
OK
button.
The menu appears on the screen.
Follow the on-screen user guide!
The timer functions
By programming the timer, it is possible to automatically
switch the TV set to standby within a delay of 01 to 99 minutes.
Calling up the TIMER submenu
Call up the main menu.
Press the
“
OK
button Ȅ – TIMER and OK change to red.
Press the
“
OK
button again.
The SLEEP-TIMER submenu is displayed on the screen.
ǵ
Ȅ
- TIMER
tt
STATION TABLE
GB - I - NL - D - F
SPECIAL FUNCTION
ǵǶ O
Ǻ
Enter the desired time delay with the numeric buttons
1…0
or the |or ]button (15-minutes steps).
Press the
.
button.
The main menu is displayed.
When the entered time period has elapsed, the TV set is automatically switched to standby.
If you enter "00 MIN.", the function will be aborted without
switching the TV set to standby.
Programme lock (security system)
The programme lock allows you to protect your TV against
unauthorized use.
How to proceed
Call up the main menu.
Press the
“
OK
button.
Use the
c
button to select the t symbol.
The symbol is highlighted in red.
Press the
“
OK
button.
The
tttmenu will be displayed.
Enter a four-place code number with the buttons 1…
0
(e.g., 1111).
Press the
“
OK
button.
Your personal code number is stored in memory and the
main menu appears on the screen.
Memorize your personal identification code!
If you should forget your personal identification code, refer to
the
É key on the last page (cover).
SLEEP - TIMER
30 MIN
P
P
0 - 9
i
1111
OK
0 - 9
i
Page 10

ķ
10
The Menu
Clearing the programme lock, unlocking the unit
Each time the locked TV set is switched on, the following display appears on the screen:
This invites you to enter your personal identification code.
Enter your personal code with the numeric buttons
1…0
(hidden entry x x x x ).
The TV set is automatically switched to TV mode.
Clearing your personal code number
Call up the main menu.
Press the
.
and the
“
OK
button.
Press the
“
OK
button (Ȅ – TIMER changes to red).
Press the
c
button. t changes to red.
Press the
“
OK
button.
The
tttmenu appears on the screen.
Enter your four-digit identification code with the buttons
1…0
(e.g., 1111).
Your personal identification code is cleared.
The TV station table
ATS euro plus registers all programmes which can be
received. If other channels are added to the frequency range
at a later time, they can easily be assigned to the TV station
table. You can check their assignment at any time by calling
up the TV station table.
Adding new TV channels
Calling up the main menu:
Press the
.
button. The message "MENU →OK" appears.
Press the
“
OK
button.
The main menu is displayed.
With the |button, highlight the line STATION TABLE in
blue.
Press the
“
OK
button.
The "TV-Station table" appears.
With the |or ]button, select the channel (programme)
position where you wish to store another channel.
Press the
“
OK
button.
Press the
x
button.
If you wish to receive programmes which are transmitted via
cable on special channels, press the |or
] button.
(S = special channel,C = channel).
Press the
c
button.
With the numeric buttons
1…0
, enter the channel number
as two digits.
To enter the station name, refer to the on-screen user guide
or to the chapter "Assigning Channel Positions".
Press the
“
OK
button to conclude entry.
You can assign up to 49 programme (channel) positions.
Pressing the
.
button removes the TV station table from the
screen and calls up the main menu.
09:28:35
GRUNDIG
ATS euro plus
TV-Station table
Prog Chan. Station
1 C 06 ARD
2 C 34 ZDF
3 C 47 BR 3
4 C 40 SAT 1
5 C 36 RTL +
6 C 21 PRO 7
7 C 53 DSF
8 C 59 BR 3
9 C 06 ––––
10 C 32 ––––
Select programme
ɶɶ
ʺʺ
< >
Select station name
OK
Check picture n
Move n
Delete n
Terminate
Ǻ
_ _ _ _
0 - 9
Page 11

ķ
11
The Menu
Fine tuning
The television automatically adjusts the best possible picture.
However, in difficult reception conditions, it may be necessary to adjust the picture with the fine tuning facility as
follows:
How to proceed:
Call up the TV station table.
Select the programme position where fine tuning is to be
adjusted.
Press the
¢(blue) button.
Press the
x
or cbutton.
Adjust the picture to suit your personal preferences.
Press the
.
button.
The TV station table appears.
Follow the on-screen user guide!
Language selection
The whole text is available in several languages.
D (German) is factory-preset.
Special functions
The submenu "Special Functions" is divided into 3 items. With
these, you can carry out different basic settings.
Call up the main menu.
Press the
.
button. MENU →OK is displayed.
Press the
“
OK
button.
The main menu is displayed.
Repeatedly press the |or ]button until the menu line
SPECIAL FUNCTION is highlighted in blue.
Press the
“
OK
button.
The submenu SPECIAL FUNCTION appears.
SPECIAL FUNCTION
PROG. 1-9 1-49
OSD ON OFF
PROG.
z
HP
ǵǶ O
Ǻ
PROG. 1–9 1–49
Restricting programme selection.
Press the
“
OK
button.
Press the
x
or cbutton; 1–9 changes to red.
This restricts programme selection to one-digit programme
position numbers (programme positions 1 to 9).
Pressing the
x
or cbutton once again switches back to se-
lection of the programme positions 1 to 49 (e.g., P 10 ).
Press the
“
OK
button.
The setting is stored in memory.
This setting has no effect when the programme positions are
selected with the |or ]button.
If, for example, the channel 00 is entered and saved in the
channel position P 12, you can only select the channel positions from P01 to P11 by using the |or ]buttons.
The setting has no effect on input using the numeric buttons
1…0
.
OSD ON OFF
Switching on/off the on-screen bar displays.
In the menu line "OSD ON OFF", you can choose between
OSD ON: The bar displays for volume, black/white contrast,
colour contrast, brightness, and the station
identification are displayed when changing the
settings.
OSD OFF: The bar displays for volume, black/white contrast,
colour contrast, brightness, and the station identification are not
displayed.
How to proceed:
Use the |or ]button to select the menu line "OSD ON
OFF".
Press the
“
OK
button.
Press the
x
or cbutton.
This switches to OSD OFF.
Press the
x
or c button again to switch back to OSD ON.
Press the
“
OK
button.
The setting is stored in memory.
Page 12

ķ
12
The Menu
Entering Channels Directly
PROG.
ѕѕ
Changing the volume on a channel position
If you receive a programme whose volume differs from other
channels (too loud or too soft), this volume can be adjusted
as follows.
How to proceed:
If you do not use this function at the moment, you must first
call up the submenu SPECIAL FUNCTION.
With the |or ]button, select the third menu line (highlight it in blue).
Press the
“
OK
button twice.
The ѕϧVOLUME bar graph display appears.
Adjust the volume with the
x
or cbutton.
Only the volume level of the currently selected programme
position is changed!
The set volume level is stored in memory and will be recovered when selecting the same programme position again.
PROG. HP
The "HP" function is used for automatic programming of the
TV set. This programming can only be carried out by your
dealer which is in the possession of an IR DATA PROGRAM-
MER.
It is also possible to assign channels this way if you already
know the channel numbers.
If you have already assigned the channels using "ATS euro
plus", it is not necessary to assign them again.
Example:
The second channel (ZDF) is broadcast on channel 34 and
you want to re-assign it to channel position 2.
Selecting the channel position
Press the numeric button 2 (or use the
|
or ]button for
step-by-step selection) to select the desired programme
position 2.
Selecting the channel function
Press the mbutton.
C (stands for channel) and a number between 00 and 99
appear for approx. 3 seconds.
If you wish to receive programmes which are broadcast via
cable on special channels, press the
m
button once again.
S (= special channel) is displayed for approx. 3 seconds.
Entering the channel number
Press the numeric button 3 then 4 .
The channel number 34 is entered.
Storing the channel number
Press the ]button.
"TUNE" is displayed on the picture screen.
Press the
“
OK
button to store the channel number in memory.
For further settings, refer to the on-screen user guide.
Page 13

ķ
13
Picture and Sound Adjustments
Adjusting the Picture Values
Switching off the TV sound
You can switch off the sound of your TV set by pressing the
¢ʀ
button.
When the sound is switched off, the
ĭ symbol and
AUDIO ɮ OK are displayed on the screen.
Pressing the
¢ʀ
button switches the TV sound on again.
It is also possible to switch the TV sound on again by pressing the
c
– button, or by selecting a different programme
position.
The audio menu
Calling up the audio menu:
Press the
¢ʀ
button.
AUDIO ɮɮOK is displayed on the screen.
Press the
“
OK
button.
Menu item 1
Base width
This function enlarges the sound base in the case of stereo
broadcasts and improves the sound pattern of mono broadcasts.
Adjust with the
“
OK
button.
ʀǁ ʀ
– – –
ǁ
MONO
ɦ
TREBLE
ɼ
BASS
f BALANCE
ǵǶ O
Ǻ
Menu item 2
General
With menu item 2, there are different displays possible.
These displays are function of the sound signals broadcast by
the stations, e.g., MONO, STEREO, etc.
Stereo or two-channel sound transmissions
If your TV set receives a two-channel sound transmission,
e.g., a film with the original sound track on channel B and the
synchronised version on channel A, you can select the desired channel
with the |or ]button (highlight in blue).
To switch from A to B, press the
“
OK
button.
If you use headphones, you must additionally press the
-
button.
If the TV set receives stereo broadcasts, it switches automatically to stere sound.
STEREO is displayed on the picture screen.
If the stereo sound is poor, you can improve the sound
impression by switching to mono with the
“
OK
button.
If you wish permanently mono sound on a programme position, enter "Mono" as station name (see chapter "Entering station identifications").
Menu items 3, 4, 5
Treble, bass, and balance
The sound settings can be adjusted to suit your personal preferences.
Select with the |or ].button.
Press the
“
OK
button.
The respective bar graph will be displayed.
Adjust with the
x
or cbutton.
Press the
.
button to return to the main menu. After a short
time, the main menu is automatically displayed.
If you want to adjust the picture values, press the – or + side
of the rocker switch for
colour contrast
™
brightness
®
For the black/white contrast:
First press the -button, then the rocker button
®
.
The changed values are indicated by bar graphs on the
screen, provided the OSD ON function has been selected.
The last set value is retained.
To check the reliability of the components, the TV set has
been tested with maximum contrast. However, we recommend to slightly reduce the contrast setting according to
the room illumination (ambient light) to obtain the best
picture impression
Page 14

ķ
14
Teletext mode
1…0
Select pages100-899
Display dialogue line with
-
button
Display:
Enlarge character
size
Bypass
waiting time
(current
mode)
Directly call
up sub-page
Reveal
answer
Page
STOP
Select functions with the xor
c
button.
Call up with the
“
OK
button.
ķ
ʄʄ
ķX /00 ķ? STOP
.
Call up contents page.
,
Teletext mode ɫ TV mode
¢(blue)
Go to next block
¢(yellow) Go to next group with overrun to
next block.
¢(green) Go to next page with overrun to next
group.
¢(red) Scroll backward
Floftext
T
he coloured buttons
guide you to the topics shown
in the dialogue line.
1 2 3
4 5 6
7 8 9
P/C 0
ATS
AUX
P
+
OK
AV
ķ
R
+
-
P
SAT
VIDEO
TP 720
Page 15

ķ
15
Teletext Mode
General
Additional information that is broadcast at the same time as a
TV programme from a TV station is called teletext.
You can make this information visible on your screen with
the teletext decoder that is built into your television.
Teletext is transmitted in the form of texts and graphic
representations, or sub-titles for a TV programme.
Subtitles aid persons with hearing disabilities.
With the help of information pages and dialogue lines, your
TV set makes teletext easy to use. The indications given in the
dialogue lines denote the different functions and the buttons
provided for them.
TOP-FLOF teletext
TOP and FLOF are two new innovations that allow quick and
easy selection of teletext pages.
TOP and FLOF make it possible to select telext pages without
knowing their page numbers. All teletext pages are broadcast
arranged by topics - also called blocks - similar to a filing
cabinet.
For example, all news items are listed under "Current Topics".
Other topics include the blocks "Sports", "TV Programmes"
and "Services" These blocks are then normally divided further, for example, "Current Topics" is divided into politics,
economics and culture. The normal pages are located within
these groups.
The on-screen user guide makes using TOP and FLOF easy.
A comment line in different colours is shown at the bottom
of the screen. These colours are the same as the ones on the
remote control. During TOP mode, the yellow field indicates
the next group in the current block. The blue field indicates
the next block.
To switch from block to block, use the blue button, from
group to group, the yellow button, and to scroll forward, use
the green button. To return to the previous page of a group
or block, press the red button.
In FLOF mode, the topics are displayed in colour. Use the
correspondingly coloured buttons of the remote control to
go to the displayed topics.
TOP and FLOF take you quickly, easiliy, and reliably to the
teletext page you want.
If no TOP or FLOF teletext is broadcast from the TV station, a
red bar will appear with a - and a green bar with a + in the
dialogue line.
Note
If the aerial signal is not perfect, for example, if it fades
away, teletext pages may also display disturbances. If you
cannot improve the signal with the fine-tuning function of the
TV set, have your aerial system checked.
Important
The TV station needs additional information for the teletext
mode. This is why it is necessary to wait after switching the
TV on or changing the channel until the TOP decoder has
read this information in its memory and the information is
available.
With the
,
button, you can directly return to normal TV
mode.
Please observe the user guide displayed on the bottom of the
picture screen.
WeatherNewsSportTV Guide
yellowgreenred
blue
- +
NEWS
next group
SPORTS
next block
Page 16

ķ
16
Teletext Mode
Operation
Select the TV programme whose teletext pages you wish to
call up by pressing the numeric buttons 1…0.
Switching teletext on/off
Press the ,button on the remote control handset.
The overview page 100 or the last viewed teletext page
appears on the screen.
Press the
,
button to switch teletext off.
TOP mode
A red, green, yellow, and blue field is shown at the bottom of
the screen. Buttons of the same colour are found on the
remote control.
To scroll backward, press the
¢(red) button.
To scroll forward to the next available page (with overrun to
the next group), press the
¢(green) button.
To switch to the next group, press the
¢(yellow) button.
After the last group in the selected block, you come automatically to the next block (overrun).
To switch from block to block, press the
¢(blue) button.
Calling up pages
– Enter the number of the desired page with the numeric but-
tons 1…0as three digits.
– The page number is indicated at the bottom edge of the pic-
ture screen and the page appears after a few seconds.
Programme preview
You can switch directly to the programme preview of the station you are currently viewing.
Press the
.
button.
Page 100 (overview) appears.
Press the
.
button again.
The programme preview block appears.
Press the
.
button again.
Page 100 (overview) re-appears.
In FLOF mode, this function takes you to the overview page
chosen by the TV station.
Multiple pages/page stop
Several subpages can be combined under a single page number.These are then automatically scrolled at an interval determined by the TV station. This is indicated by a symbol under
the time, for example, 3/6 means that you are viewing page 3
of 6 subpages.
If you want to view a subpage for a longer time, press the
-
button.
The dialogue line is displayed.
Select the STOP symbol with the
x
or cbutton.
Press the
“
OK
button.
"STOP" appears at the top of the screen. The contents of the
page shown are kept on the screen and are no longer updated
or switched to other subpages.
Press the
“
OK
button.
The STOP function is cancelled and the current subpage
appears.
Calling up a subpage directly
Press the -button (the dialogue line appears).
Select the /00 symbol with the
x
or cbutton.
Press the
“
OK
button.
The selected page number, e.g., S155/---- appears in the info
line.
Enter the four-place subpage number that you want to call up
with the numeric buttons, for example, the second page,
sequence 0002. The desired subpage is sought and displayed.
Press the
“
OK
button.
The function is cancelled.
Page 17

ķ
17
Teletext Mode
Doubling character size
Press the -button (dialogue line is displayed).
With the
x
or cbutton, select the ķʄ symbol.
Repeatedly pressing the
“
OK
button doubles the character
size in the following order:
Upper half of the picture,
lower half of the picture,
return to normal picture.
Reveal
This function can be used on certain teletext pages to reveal
the solution of riddles, or for programming a video recorder
via VPS times.
Press the
-
button (dialogue line appears).
With the
x
or cbutton, select the ķ? symbol.
Press the
“
OK
button.
The hidden information is revealed.
Press the
“
OK
button.
The reveal function is cancelled.
Watching television during teletext mode
Updating a page –
Bypassing waiting times
Certain teletext pages are continually updated, for example,
stock market reports, sports announcements, and the latest
news.
If you want to watch television and stay informed at the same
time, first select a page of your choice, then
press the
-
button (dialogue line is displayed).
With the
x
or cbutton, select the ķX symbol.
Press the
“
OK
button.
The regular programme is still visible and the teletext symbol
appears at the top of the screen.
If, for example, P143 appears in the info line, then
press the
“
OK
button.
The teletext page appears with the updated information.
This function can also be used to bypass waiting times while
the teletext decoder searches for a page. When the page has
been found, the indication P143, for example, appears in the
info line.
Page 18

ķ
18
Connection Capabilities and Operation
... of stereo headphones
Connection:
Insert the headphone jack (3.5mm ∅) into the socket 5
Operation:
Press the -button, then adjust the volume with the xor
c
button.
The adjusted value is displayed on a scale (OSD).
For individually selecting a sound channel on headphone operation, refer to the audio menu.
... of a satellite receiver
Connection:
Connect your satellite receiver with an appropriate cable to
the EURO-AV socket 7 .
Operation:
Repeatedly press the
0
AV button until AV 1 is displayed.
Press and hold the
¢SAT
button and enter the desired programme position of the satellite receiver with the numeric
buttons
1…0
.
... of a decoder (descrambler)
Certain television stations that broadcast via cable scramble
their programmes, i.e. the sound and picture signals are purposefully distorted. You can unscramble these kinds of transmissions with a decoder ("descrambler").
Connect your descrambler to the EURO-AV socket 7 and
switch it on.
On the TV set, select the programme position on which the
scrambled programme is received. Press the buttons -and
0
AV.
"DESCRAMBLER OFF" is displayed.
By repeatedly pressing the
0
AV button, the following func-
tions can be selected:
"DESCRAMBLER ON AUTOMATIC
Switches automatically to mono, stereo, or two-channel
sound broadcasts. Switching depends on the kind of broadcast received via the aerial.
"DESCRAMBLER ON STEREO"
The left and right sound channels of additional units attached
to the EURO AV socket are switched through to the speakers.
"DESCRAMBLER ON MONO L"
For "Mono L", the left sound channel is switched to both
speakers.
"DESCRAMBLER ON MONO R"
For "Mono R", the right sound channel is switched to the
speakers.
The scrambled programmes are passed from the television
to the decoder, are descrambled, and are then passed back
to the television where the unscrambled signals can be
viewed as a normal television programme.
When additional units are connected...
Every channel position can be used for playback from other
connected units, such as a video recorder with the switching
voltage to PIN 8 of the Euro AV socket, that is connected to
the EURO AV socket.
Exam
ple
If you receive several television channels and would like to
assign the video recorder to channel position 16, select
channel position 16 with the numeric buttons.
Set as described in "… of a decoder".
Page 19

ķ
19
Connection Capabilities and Operation
... of a video recorder
Connection:
Connect the video recorder with AV cable to the black 7 or
blue 6 AV socket or with an aerial cable (75 Ohm) to the
aerial socket 8.
Operation:
Video recorder connected to the black
Euro AV socket
7
Press the
0
AV button until AV 1 appears on the screen.
The picture/sound signal of the video recorder that is connected to the black AV socket can be switched to any channel
position (see "Channel positions for additional units").
Start video recorder playback.
Video recorder connected to the blue
Euro AV socket
6
Press the
0
AV
until AV 2 appears on the screen.
Start video recorder playback.
Video recorder connected to the aerial socket 8
Assign the playback channel specified by your video recorder
(between 30 and 40) to any channel position (for example,
P16) (see "Assigning channel positions manually"). If you
enter the symbol AV on this channel position as the station
identification, possible deviations from the playback channel
of the recorder via the television can be compensated for.
If you do not know the playback channel of your video
recorder, start the video recorder playback and search for the
channel using the channel search of your television (see
chapter "Assigning channel positions").
Note the channel position for subsequent video playback.
You can adjust the sharpness of the video picture, if desired
(see chapter "Fine-tuning").
... of a camcorder
Connection:
Connect the camcorder with a suitable cable to the FBAS
socket ßI. The sound must be separately passed via the two
phono sockets ß?. If mono units are used, connect the audio
cable to the socket L ß? .
Operation:
Repeatedly press the
0
AV button until AV 3 is displayed on
the picture screen.
Start playback of the camcorder.
Playback from the camcorder is visible on the picture screen.
... of S-VHS video recorders, S-VHS cameras
or Hi 8 camcorders
The picture quality for an S-VHS video recorder, an S-VHS
camcorder or a Hi 8 camcorder is even better when connec-
ted to the S-Video socket 9.This is because the colour and
brightness signals can be processed separately from each
other. This ensures that they cannot influence each other;
cross-colour luminance, for example, is eliminated. However,
the sound must separately be passed via the two phono
sockets ß?. If mono units are used, connect the audio cable to
the socket L ß? .
Operation:
Repeatedly press the
0
AV button until AV 3 is displayed on
the picture screen.
Start playback on the camcorder, camera or video recorder.
Video playback is visible on the picture screen.
Page 20

Connection Capabilities and Operation
Copying recordings via the television
(Transfer mode)
You can record from one video to another, or from a camcorder to a video recorder, or from a S-VHS video recorder to
another video recorder.
Proceed as follows:
Connection:
Connect the playback recorder or camcorder to the black
EURO AV socket 7.
Connect the camcorder to the cinch sockets
ßI and ß?.
(ßI = picture input (Video) , ß? = sound input (Audio), left
and right channel).
Connect the S-VHS camera or Hi 8 camcorder to the
S-VIDEO socket
9 and the phono sockets ß?.
Connect the recording recorder to the blue EURO AV socket
6.
Operation:
Select the input socket with the
0
AV
button.
AV 1 = lower Euro AV socket (black)
7
AV 3 = FBAS socket ßI
AV 3 = S-VIDEO socket 9
For AV 3, the sound must be separately connected via the
two cinch sockets ß?.
Press the
-
and then press the
0
AV button.
Displayed on the screen is:
… if channel position AV 1 is selected:
COPY AV 1
ɦ AV 2
… if channel position AV 3 is selected:
COPY AV 3
ɦ AV 2
You can now watch any channel without disturbing the
recording.
To cancel the COPY function, press the
0
AV and the
-
button and then the
0
AV button.
Video recorder remote control
This televison´s remote control can also be used to operate a
video recorder. Ask your dealer which models are approbriate for this.
How to proceed:
Press and hold the ¢VIDEO button.
Then press the button for the desired function.
The following list shows the buttons used for video recorder
functions.
ĵķ (Numeric button 1)= picture search, reverse
ĶŁ (Numeric button 2)= picture search, forward
l (Button ™) = recording start
n (Button ™) = stop
ĵĵ (Numeric button 7)= fast rewind
ŁŁ (Numeric button 8)= fast forward wind
ll ll (Button ®) = pause
ı (Button ®) = play start
Ľ (Numeric button 4)= programme position –
Ń (Numeric button 5)= programme position +
Adjusting the picture and sound during video
playback
If there are deviations in the picture and sound during video
playback in comparison to the picture and sound you are
normally accustomed to (for example, the sound is too loud
or the colours are too bright), you can change these settings
and store them with the remote control (this does not
change the basic setting of the television picture).
ķ20ķ
Page 21

21
Pin assignment of EURO-AV socket 7
If you want to connect other units to your television (for
example, a computer or amplifier), your dealer can provide
you with a standard connection by means of the following
table:
Pin Signal
11 = Audio output, right
12 = Audio input, right
13 = Audio output, left
14 = Audio earth
15 = Blue earth
16 = Audio input left
17 = RGB blue input
18 = Switching voltage
19 = Green earth
10 = –
11 = RGB green input
12 = –
13 = Red earth
14 = Earth
15 = RGB red input
16 = RGB switching voltage
17 = Video earth
18 = RGB switching voltage, earth
19 = Video output
20 = Video input
21 = Shielding/Earth
Technical Data
Mains Voltage:
220-240 V, 50/60 Hz
(Power supply control range 190 … 264 V)
Power consumption:
approx. 90 W
In standby approx. 15 W
Channel coverage:
Channels 01 … 99
Special channels S 01 … S 99
Sound output:
2 x 25 W music power (2 x 12.5 W sine power)
Service note for the dealer:
This unit is provided with a pluggable power supply cable.
For replacements, contact the nearest customer service
centre and always indicate the following order number:
8290-991-307.
This unit conforms to VDE safety regulations and the directives of the Deutsche Bundespost (German Federal Post
Office; see the certification mark on the type sticker on the
rear of the unit), and also all relevant regulations concerning
X-ray emission. The picture tube, which emits X-rays, is sufficiently shielded, and therefore represents no danger. Accelerating voltage is a max. 29 kV, with a mean beam current of
1.5 mA.
Unauthorized tampering with the unit, especially adjustments to
the high voltage system or the installation of a different type of
picture tube, can considerably increase X-ray emission. Units
altered in this way no longer conform to the operating permission conditions and may not be operated.
Alterations reserved!
220
21
119
Page 22

Service
23
GRUNDIG Germany
GRUNDIG Europe
GRUNDIG
Kundendienst Nord
Kolumbusstraße 14
Hamburg
22113
0 40/7 33 31-0
GRUNDIG
Kundendienst West
Horbeller Straße 19
Köln
50858
0 22 34/95 81-2 51
GRUNDIG
Kundendienst Mitte
Dudenstraße 45-53
Mannheim
68167
06 21/33 76-70
GRUNDIG BELUX N.V.
Deltapark, Weihoek 3, Unit 3G
B-1930
Zaventem
7 16 0
00 32/2-
4 00
GRUNDIG
Kundendienst Ost
Wittestraße 30e
Berlin
13509
0 30/4 38 03-21
GRUNDIG
Kundendienst Süd
Beuthener Straße 65
Nürnberg
90471
09 11/7 03-0
GRUNDIG NORGE A.S.
Glynitveien 25, Postboks 234
N-1401
Ski
00 47/64 87 82 00
GRUNDIG UK LTD.
Elstree Way, Borehamwood, Herts, WD6 1RX
GB
Großbritannien/Great Britain
00 44/1 81-3 24 94 00
Technical Service
Unit 35, Woodside Park, Wood Street
Rugby, Warwickshire, CV21 2NP
Großbritannien/Great Britain
00 44/1 78-8 57 00 88
GRUNDIG IRELAND LTD.
2 Waverley Office Park, Old Naas Road
EIR
Dublin 12
0 03 53/1-4 50 97 17
GRUNDIG FRANCE S.A.
5 Boulevard Marcel Pourtout
F-92563
Rueil Malmaison Cedex
00 33/1-41 39 26 26
GRUNDIG SCHWEIZ AG
Steinacker Straße 28
CH-8302
Kloten
00 41/1-8 15 81 11
GRUNDIG PORTUGUESA
Comércio de Artigos Electrónicos, Lda.
Rua Bento de Jesus Caraça 17
P-1495
Cruz Quebrada, Lisboa
0 03 51/1-4 19 75 70
GRUNDIG ESPAÑA S.A.
Solsonés, 2 planta baja B3
Edificio Muntadas (Mas Blau)
E-08820
El Prat De Llobregat (Barcelona)
00 34/93-4 79 92 00
GRUNDIG DANMARK A/S
Lejrvej 19
Værløse
DK-3500
00 45/44 48 68 22
GRUNDIG OY
Luoteisrinne 5
Espoo
SF-02271
0 03 58/9-8 04 39 00
GRUNDIG SVENSKA AB
Albygatan 109 d, Box 4050
S-17104
Solna
00 46/8-6 29 85 30
GRUNDIG POLSKA SP.Z.O.O.
Ul. Czéstochowska 140
PL-62800
Kalisz
00 48/62-7 66 77 70
GRUNDIG AUSTRIA Ges.m.b.H.
Breitenfurter Straße 43-45
A-1120
Wien
00 43/1-81 11 70
GRUNDIG NEDERLAND B.V.
Gebouw Amstelveste
Joan Muyskenweg 22
NL-1096
CJ Amsterdam
00 31/20-5 68 15 68
GRUNDIG ITALIANA S.P.A.
Via G.B. Trener, 8
I-38100
Trento
00 39/4 61-89 31 11
Page 23

Printed in Austria
0 1 2 3 4 5 6 7 8 9
GRUNDIG
+
!
P
+
P
 Loading...