

Page 1
%OXUD\3OD\HU
*%3'
(1
Page 2

ENGLISH
2
CONTENTS
----------------------------------------------------------------------------------------------------------------------------------
3 SET-UP AND SAFETY
4 GBP 7000 3D
4 Packing contents
4 Special features
6 OVERVIEW
6 The Blu-ray player controls
7 The remote control
9 CONNECTION AND PREPARATION
9 Connecting the LED/LCD TV using an
HDMI cable
9 Connecting the LED/LCD TV using RCA
cables
9 Connecting a digital audio system with a
coaxial cable
10 Connecting an MP3 player or a USB
memory stick
10 Connecting to the internet with ethernet
cable
10 Connecting to the internet with wireless
antenna
11 Connecting to the mains supply
11 Putting batteries in the remote control
12 INITIAL SETUP
12 Switching on the Blu-ray player
12 Menu navigation
12 First installation by using the Quick Setup
13 First installation by using the functions in
the main menu
13 Selecting the language of the screen
menu
13 Adapting the Blu-ray player to the LED/
LCD-TV
14 Selecting the Blu-ray mode
15 Network settings by using wired
connection
16 Network settings by using wireless
connection
18 BD/DVD PLAYBACK
18 Special features of Blu-ray Discs
18 Special features of the DVD
18 Preparation
18 Inserting the disc
19 Playback
19 Removing the disc
19 Adjusting the volume
19 Muting
19 Additional playback functions
22 BD LIVE
22 Adding BD-Live memory to the player
22 Setting up the player for BD-Live internet
access
23 Using BD-Live
23 BD-Live notes
24 PLAYING AUDIO/VIDEO FILES
24 Playing the contents of a data device or a
USB memory stick
25 Playing picture CDs
26 Playing audio CDs
27 NetFusion MODE
27 About NetFusion
27 Setting NetFusion function
28 Preparation
28 Using NetFusion function
29 SPECIAL SETTINGS
29 Audio settings
29 Existing settings in the Audio menu
30 Language settings
30 Existing settings in the Language menu
31 Parental control
31 Existing settings in the Parental menu
32 System settings
32 Existing settings in the System menu
33 INFORMATION
33 Licence conditions
33 Environmental note
34 Cleaning the device
34 Cleaning the disc
34 Technical data
34 System
35 Troubleshooting
Page 3

3
ENGLISH
SET-UP AND SAFETY
-----------------------------------------------------------------------------------------------
Please note the following instructions when setting up the system:
7
The device is designed for the playback of
video and audio signals from compact discs,
USB and similar data devices. Any other use is
expressly prohibited.
7
If you want to set up the device on wall shelves
or in cupboards, please ensure that it is adequately ventilated. There must be at least 10
cm of space at the side, above and behind the
device.
7
Do not cover the device with newspapers,
table cloths, curtains, etc.
7
When setting up the device, remember that
furniture is often coated with various types of
varnish and plastic, which often contain chemical additives. These additives may cause corrosion to the feet of the unit. This may leave
stains on the surface of the furniture which can
be difficult or impossible to remove.
7
If the device is exposed to sudden changes in
temperature, for example when taken from the
cold into a warm room, wait at least two hours
before using it.
7
The device is designed for use indoors. If you
use it outdoors, make sure it is protected from
moisture such as dripping or splashing water.
7
Use the device only in a moderate climate.
7
Do not place the device close to heating units
or in direct sunlight, as this will impair cooling.
7
Do not place any vessels containing liquids,
such as vases, on the device. Do not insert any
foreign objects in the disc compartment.
7
Do not place any objects such as burning candles on the device.
7
Do not open the device casing under any circumstances. Warranty claims are excluded for
damage resulting from improper handling.
7
Thunderstorms are a danger to all electrical
devices. Even if the device is switched off, it
can be damaged by a lightning strike to the
mains. Always disconnect the mains plug during a storm.
7
Always keep the disc compartment closed to
prevent dust from collecting on the laser optics.
7
Do not use cleaning agents as they may damage the housing. Clean the device with a
clean and dry cloth.
Notes:
7
Do not connect any other equipment while
the device is switched on. Switch off the other devices as well before connecting them.
7
Only plug the device into the mains socket
after you have connected the external devices. Make sure the power plug is freely
accessible.
Page 4

ENGLISH
4
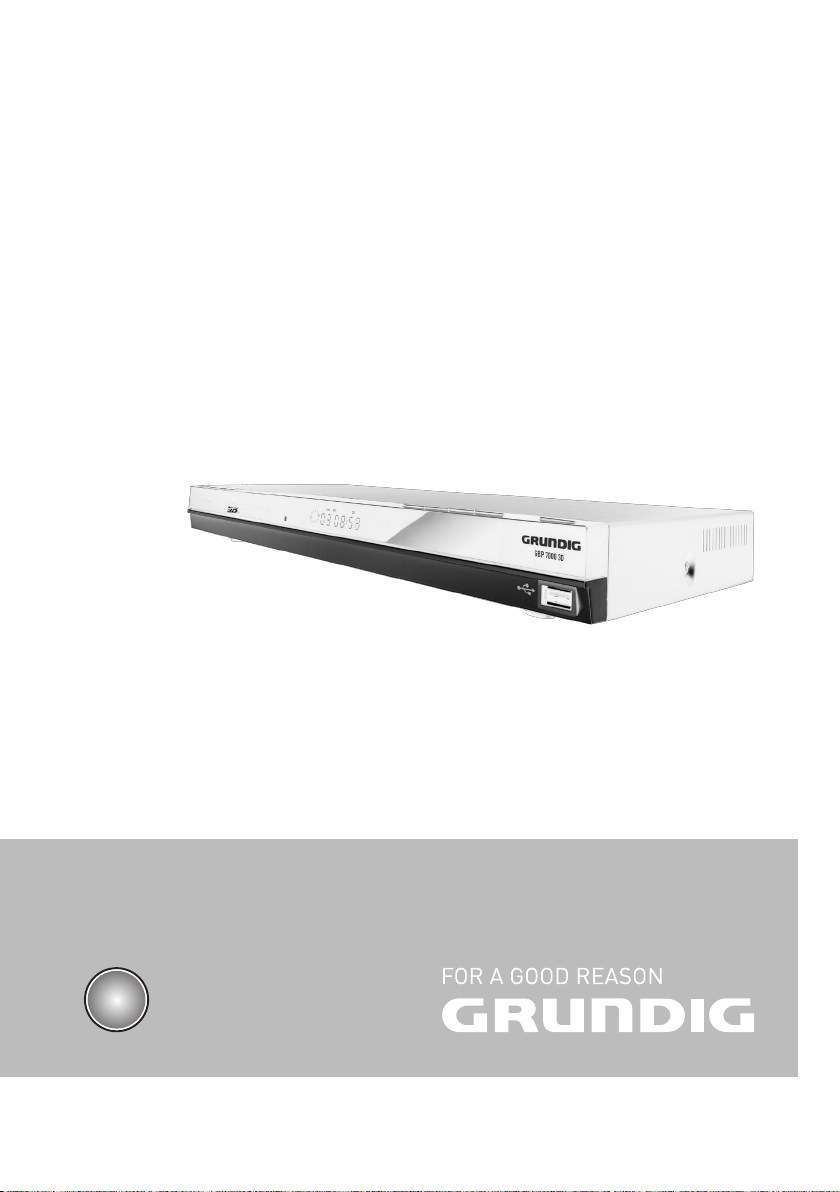
GBP 7000 3D
-------------------------------------------------------------------------------------------------------------------------
Packing contents
Blu-ray disc player
Remote control
2 batteries
(Micro, R03/UM 4/AAA, 2 x 1,5 V)
User manual
HDMI cable
GBP 7000 3D
BD Player
Remote ControlUser manual
HDMI cable
Two batteries
Special features
7
Grundig Blu-ray Disc player provides high definition video playback at up to 1080 p resolution for an amazing viewing experience.
7
3D playback with the latest technology in 3D
Blu-ray Discs when connected to a 3D compatible LED/LCD-TV.
7
Upconversion of standard definition DVDs for
enhanced picture quality at up to 1080 p over
an HDMI connection.
7
Rich multi channel surround sound.
7
Easy and simple HDTV connection using a single HDMI cable.
7
Digital and analogue outputs for connecting
your home theater system or amplifier.
7
PIP functionality that lets you display primary
and secondary video at the same time (if
available on the Blu-ray Disc).
7
Pop-up menu display without interrupting playback (if available on the Blu-ray Disc).
7
HDMI 1080 p /50 fps output (Blu-ray Disc
only) that provides smooth playback of video
with a frame rate of 50 frames per second (TV
must be connected with an HDMI cable and
be compatible with 1080 p 50 frame).
7
Access to BD-Live functions, with internet connection and an additional memory (if available on the Blu-ray Disc).
7
The device supports NetFusion. This allows
you to combine media streaming with controlling a connected media receiver while streaming content to it from another PC on a network.
7
The MP3 and WMA music data formats can
also be played back via USB input or Audio
CDs.
7
It is possible to display digital photograph
files that have been burned onto a data disc,
DVD+/-R, DVD+/-R/(W) or a Blu-ray Disc.
7
The DIGI LINK
Your player is equipped with the DIGI
LINK function. This function uses the
CEC (Consumer Electronics Control)
protocol.
CEC allows external devices which are connected to the »HDMI« sockets by an HDMI
cable (e.g. Blu-ray Disc player and LCD/LED-TV)
to be operated with a remote control.
Prerequisite is that the devices connected support CEC. Read the user manual for the LCD/
LED-TV to find out how to activate the corresponding function.
Page 5
5
ENGLISH
GBP 7000 3D
-------------------------------------------------------------------------------------------------------------------------
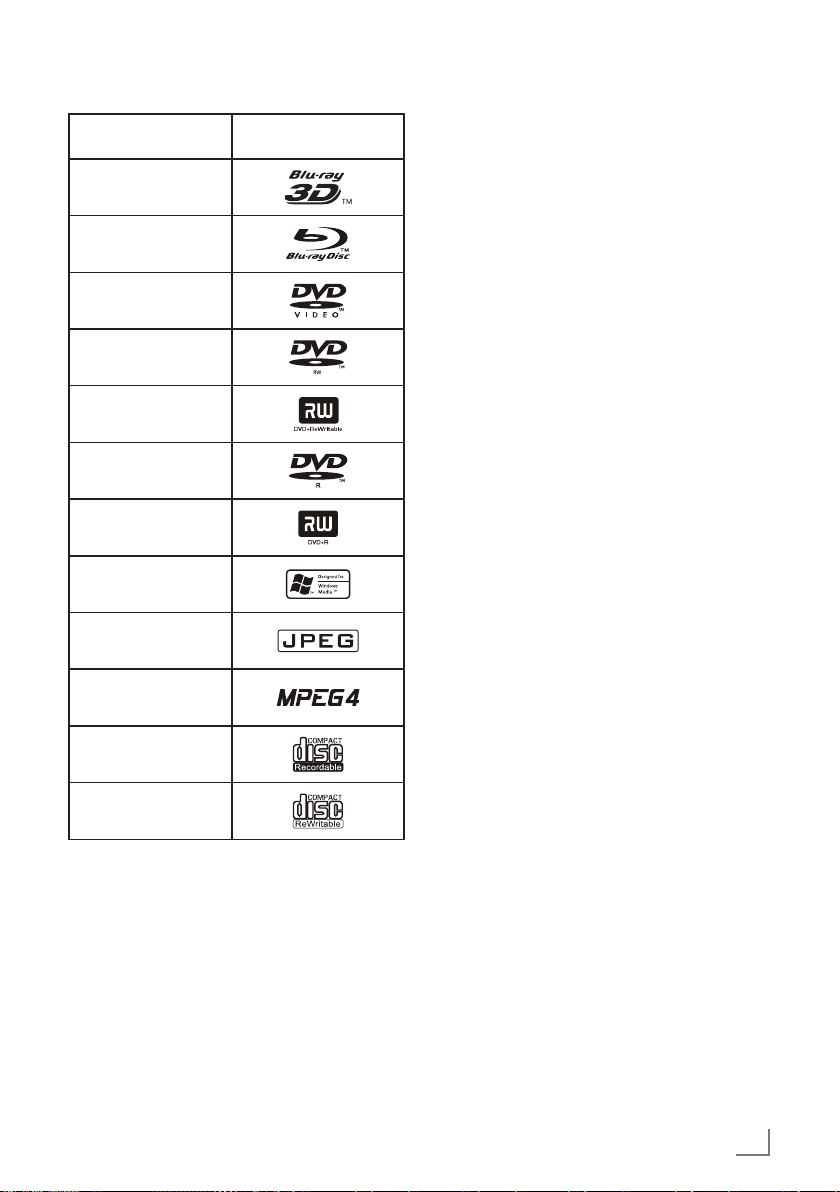
LogoDisc type
3D Blu-ray Disc
Blu-ray Disc
DVD-video Disc
(DVD-ROM)
DVD-RW
DVD+RW
DVD-R
DVD+R
WMA
JPEG
MPEG4
CD-R
CD-RW
Notes:
7
Writable DVD discs (DVD-RW, DVD-R) must
be finalized; only VR-mode is allowed. Playback may not work for some types of discs,
or when specific operations, such as angle
change and aspect ratio adjustment, are being performed. Information about the discs
is written in detail on the box. Please refer to
this if necessary.
7
Do not allow the disc to become dirty or
scratched. Fingerprints, dirt, dust, scratches
or deposits of cigarette smoke on the recording surface may make it impossible to use
the disc for playback.
7
CD-R/-RW, DVD-RW/-R recorded with UDF
or ISO9660 format can be played back.
7
Windows Media Audio (WMA) files must
be written to the disc with a .wma file extension in order to be recognized and played
back properly.
7
JPEG picture files must be written to the disk
with an .jpeg or .jpg file extension in order
to be recognized and played back properly.
Page 6
ENGLISH
6
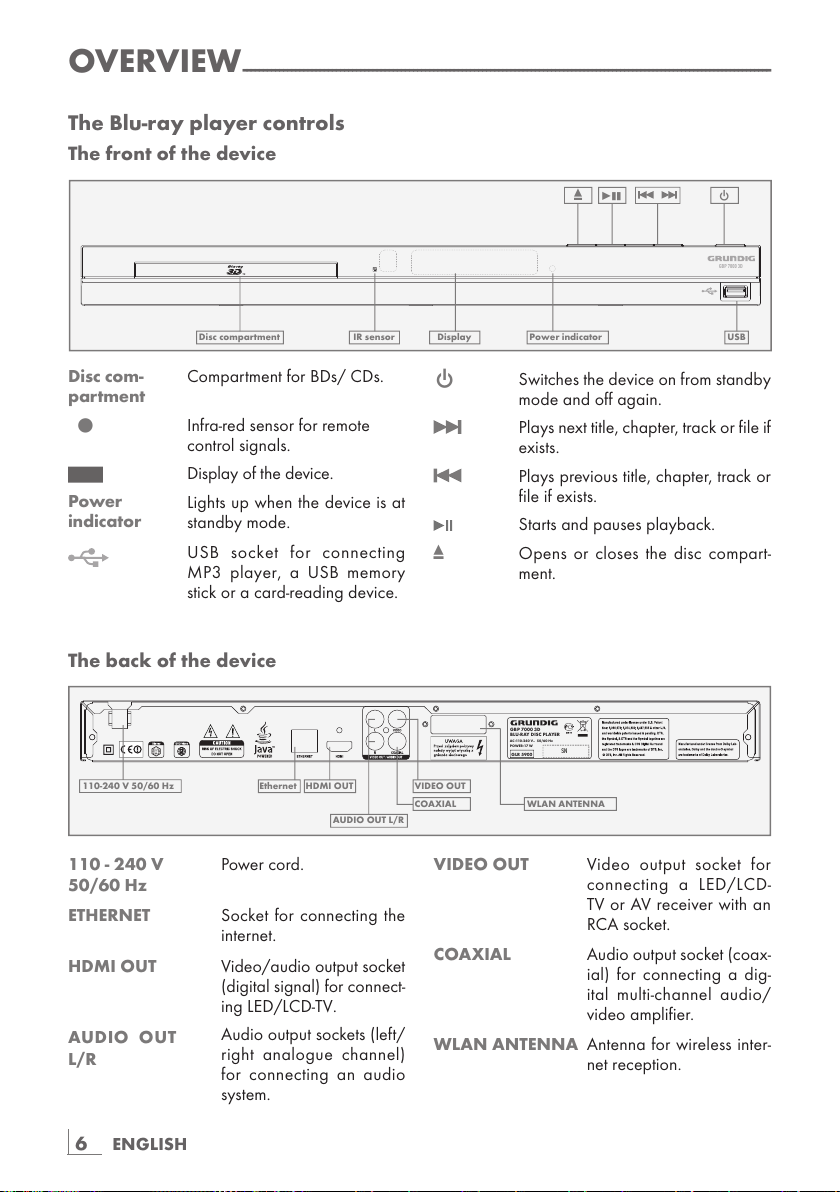
The back of the device
110 - 240 V Power cord.
50/60 Hz
ETHERNET Socket for connecting the
internet.
HDMI OUT Video/audio output socket
(digital signal) for connect-
ing LED/LCD-TV.
AUDIO OUT
L/R
Audio output sockets (left/
right analogue channel)
for connecting an audio
system.
OVERVIEW
----------------------------------------------------------------------------------------------------------------------------------
The Blu-ray player controls
The front of the device
Disc com-
partment
Compartment for BDs/ CDs.
•
Infra-red sensor for remote
control signals.
Display of the device.
Power
indicator
Lights up when the device is at
standby mode.
USB socket for connecting
MP3 player, a USB memory
stick or a card-reading device.
9 Switches the device on from standby
mode and off again.
Plays next title, chapter, track or file if
exists.
Plays previous title, chapter, track or
file if exists.
Starts and pauses playback.
. Opens or closes the disc compart-
ment.
VIDEO OUT Video output socket for
connecting a LED/LCD-
TV or AV receiver with an
RCA socket.
COAXIAL Audio output socket (coax-
ial) for connecting a dig-
ital multi-channel audio/
video amplifier.
WLAN ANTENNA Antenna for wireless inter-
net reception.
GBP 7000 3D
Disc compartment Display Power indicator USB
.
e
!
9
IR sensor
GBP 7000 3D
BLU-RAY DISC PLAYER
GLR 5900
AC:110-240 V 50/60 Hz
POWER:17 W
~
SN
110-240 V 50/60 Hz
Ethernet HDMI OUT
AUDIO OUT L/R
VIDEO OUT
COAXIAL WLAN ANTENNA
Page 7
7
ENGLISH
OVERVIEW
----------------------------------------------------------------------------------------------------------------------------------
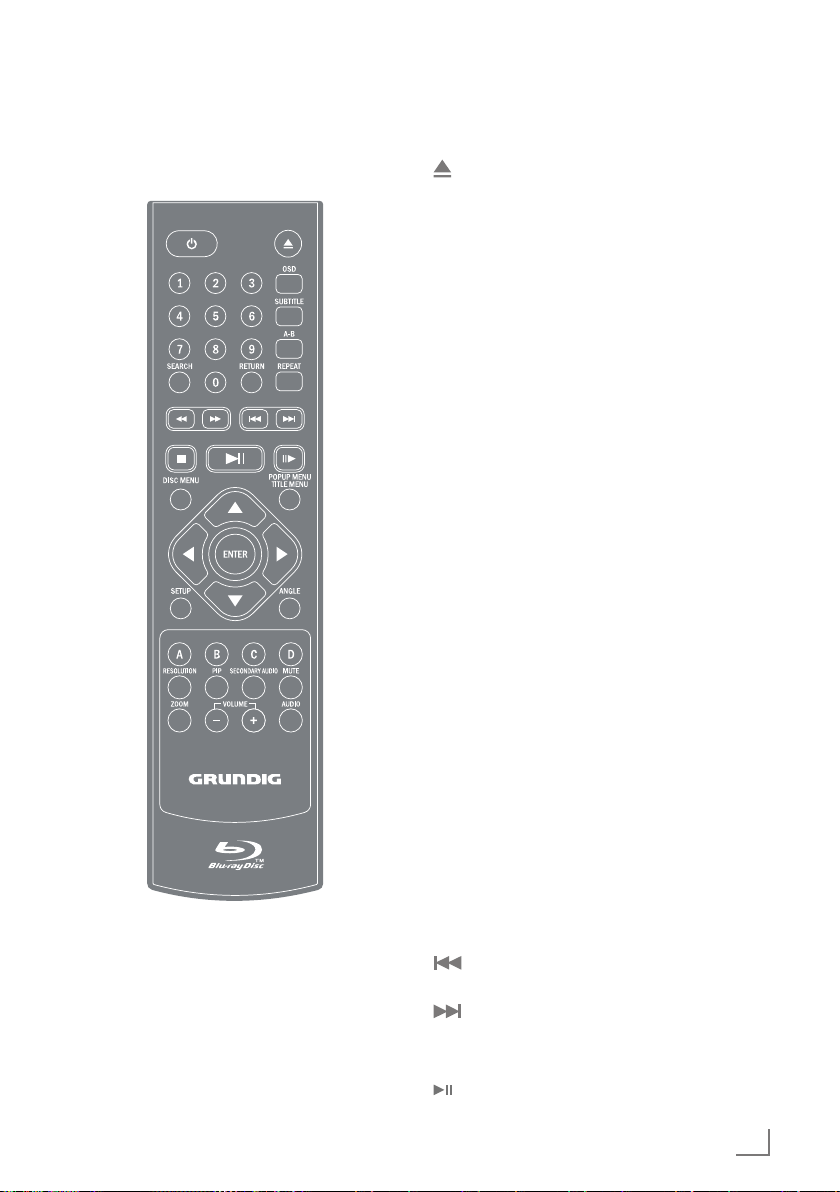
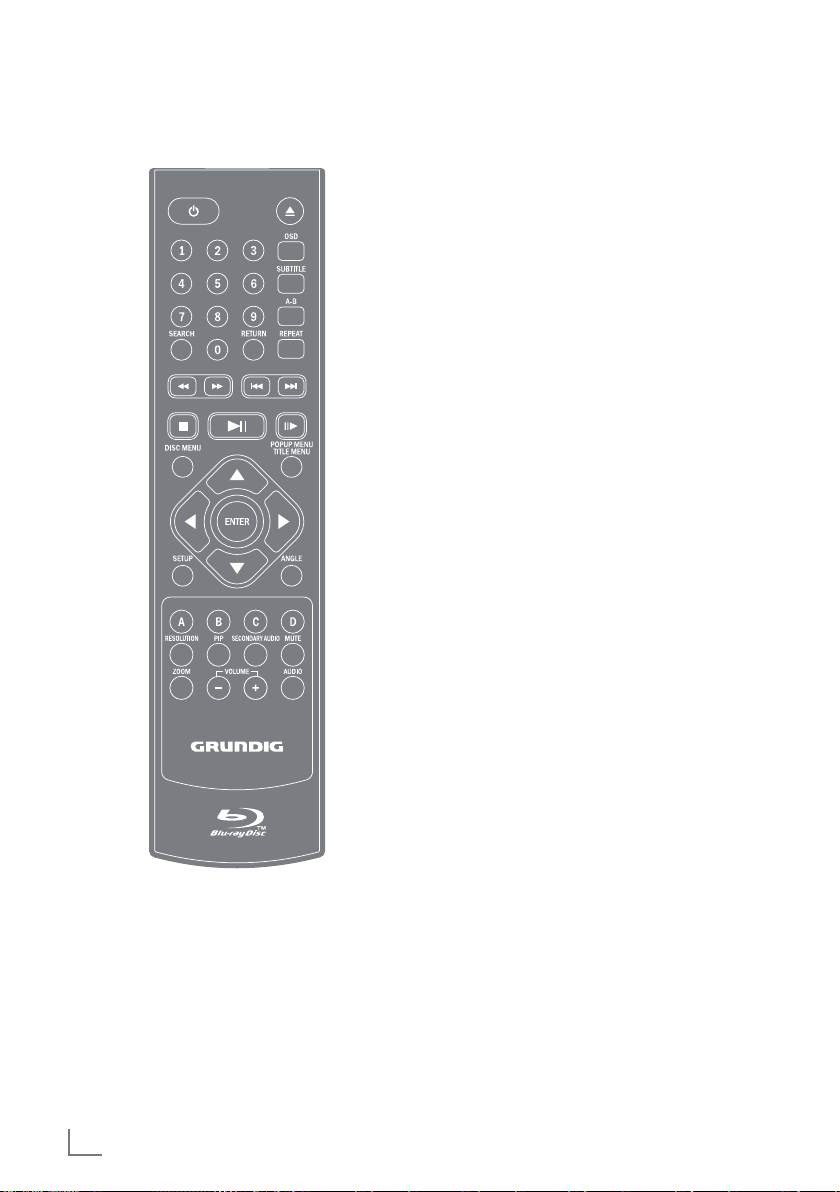
The remote control
9 Switches the device on from
standby mode and off again.
Opens or closes the disc com-
partment.
1 - 0 Number buttons for various data.
SEARCH Press repeatedly to switch be-
tween search modes: title, chapter and time. Then use number
buttons and »ENTER« button to
select the point you want to play.
RETURN Press to return to the previous
menu during the settings or the
folder or menus when playing a
WMA/MP3/JPEG disc.
OSD Shows current playback status
and time information.
SUBTITLE Press to enable/disable subtitles
during BD/DVD playback. If the
disk has more than one subtitle
language, use the cursor buttons
to select the subtitle languages
and press »ENTER« to confirm.
A-B During playback, press once to
store a “start point” for repeating
playback. Press again to select
an “end point”, then the playback repeats from the beginning
to the end (not available on all
disks). The third press cancels
this function.
REPEAT Cycles through the possible re-
peat modes based on content
played.
3 Rewinds the playback to the be-
ginning.
4 Fast forwards the playback to
the end.
Plays previous title, chapter, track
or file if exists.
Plays next title, chapter, track or
file if exists.
7 Stops the playback.
Starts or pauses playback.
Page 8
ENGLISH
8
OVERVIEW
----------------------------------------------------------------------------------------------------------------------------------
!8 Frame-by-frame playback.
DISC MENU Immediately stops playback and
brings up the main or 'top' menu
of the BD or DVD disc. (Not
available on all discs). In the
main menu, you can typically
choose subtitle language, audio
track, or different scene etc.
POPUP MENU
TITLE MENU
On BD discs: to bring up the
main movie menu (not available
on all discs).
aASs Cursor buttons, select various
functions in the menus.
ENTER Confirms selected functions in
the menus.
SETUP Opens the settings menu of the
device.
ANGLE Selects various camera angles
for certain scenes or passages
on the BD and DVD during playback (not available on all discs).
COLOR
BUTTONS
The red, green, yellow and blue
buttons start disc-specific features on some BD discs (if available on the Blu-ray Disc).
RESOLUTION At stop mode, sets the video out-
put resolution (your TV should
support setting the resolution.
Please refer to your TV's user
manual).
PIP Opens the PIP function.
SECONDARY
AUDIO
During PIP playback, press to set
the audio of the second video.
MUTE Mutes the sound.
ZOOM Zooms in on scenes during play-
back (only DVD).
– VOLUME + Sets the volume.
AUDIO During playback, press to set the
audio channel.
Page 9
9
ENGLISH
CONNECTION AND PREPARATION
---------------------------------------
Notes:
7
Do not connect any other equipment while
the device is switched on.
Switch off the other equipment as well be-
fore connecting it.
7
Only plug the device into the mains socket
after you have connected the external devices.
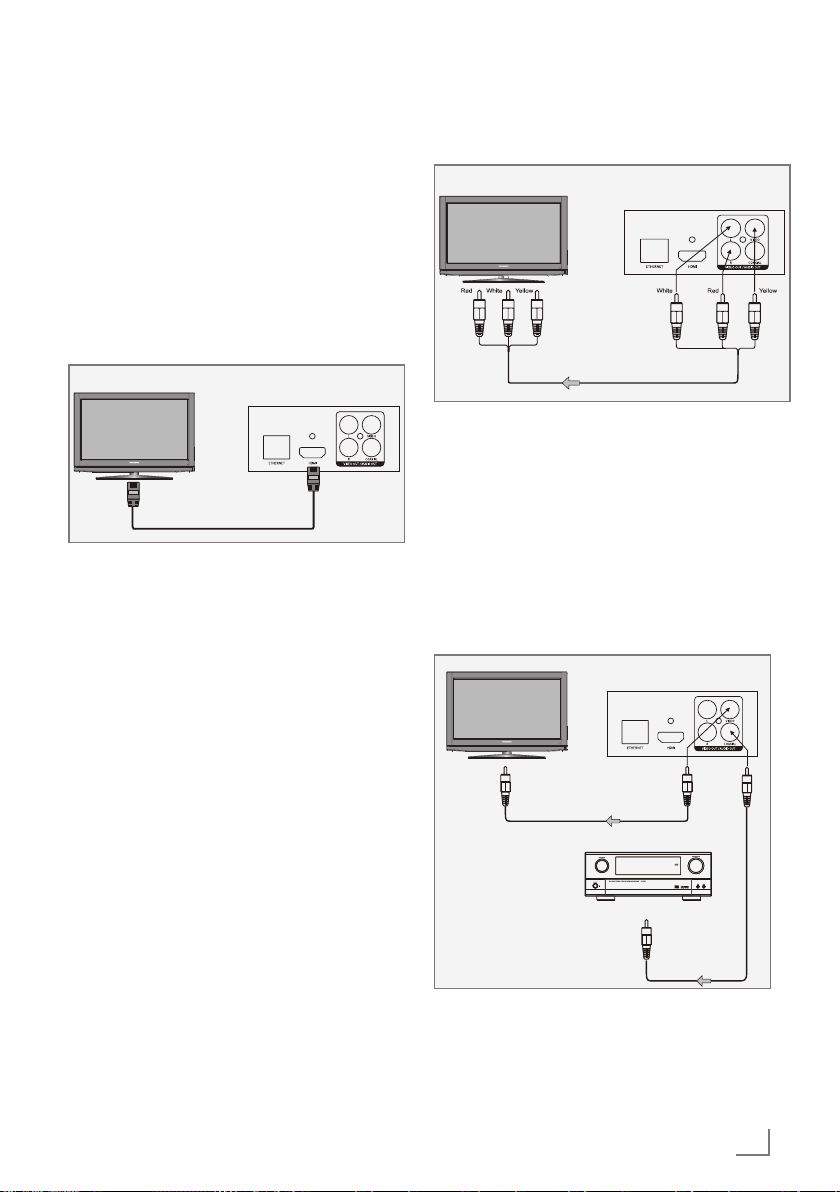
Connecting the LED/LCD TV using
an HDMI cable
Television
BD Player
1 Connect the HDMI cable enclosed into the
»HDMI« socket on the back of the device and
the corresponding socket (HDMI) on the LED/
LCD TV.
Connecting the LED/LCD TV using
RCA cables
To video input (yellow)
To audio inputs (red,white)
BD Player
Television
1 Connect a standard cinch cable into the
»VIDEO OUT« socket on the back of the
device and the corresponding socket (VIDEO
IN) on the LED/LCD TV.
2 Connect standard cinch cables into the
»AUDIO OUT L/R« sockets on the back of
the device and the appropriate sockets
(AUDIO IN) on the LED/LCD TV.
Connecting a digital audio
system with a coaxial cable
BD Player
Amplifier
To Video input
To Coaxialdigital audio
input
Coaxial cable
Television
1 Connect a coaxial digital cable into the
digital output »COAXIAL« on the back of the
device and into the corresponding socket of
the digital amplifier.
Page 10

ENGLISH
10
CONNECTION AND PREPARATION
---------------------------------------
Connecting an MP3 player or a
USB memory stick
GBP 7000 3D
Note:
7
The device must be switched off while the
USB connection is being made. If it is not
switched off, data can be lost.
1 Switch off the device by pressing »9«.
2 Connect the USB interface of the MP3 player
to the » « socket on the device, using a
standard USB cable;
or
insert the USB plug of the USB memory stick in
the » « socket on the device.
Notes:
7
To remove the MP3 player or the USB mem-
ory stick, switch off the device and pull out
the cable for the data medium.
7
The USB socket on the device does not sup-
port a connection for a USB extension cable
and is not designed for directly connecting
to a computer.
Connecting to the internet with
ethernet cable
GBP 6000 2D
BLU-RAY DISC PLAYER
GLR 5800
AC:110-240 V 50/60 Hz
POWER:17 W
~
SN
BD Player
Splitter
Telephone socket
Modem Router
1 Connect the Ethernet socket of the modem/
router to the »ETHERNET« socket of the device using a standard network cable (Twisted
pair, RJ45 plug).
– The data throughput level is 10/100 Mbit.
Connecting to the internet with
wireless antenna
1 To activate the »WLAN ANTENNA«, unplug
the network cable from the »ETHERNET«
socket.
– The leds on the »WLAN ANTENNA«
start blinking.
Note:
7
The network configuration and connection
method may vary depending on the equipment in use and the network environment.
The player is equipped with an IEEE 802.11n
wireless module, which also supports the
802.11b/g standards. For the best wireless
performance, you should use IEEE 802.11n
certified WLAN network (access point or wireless router).
Page 11
11
ENGLISH
CONNECTION AND PREPARATION
---------------------------------------
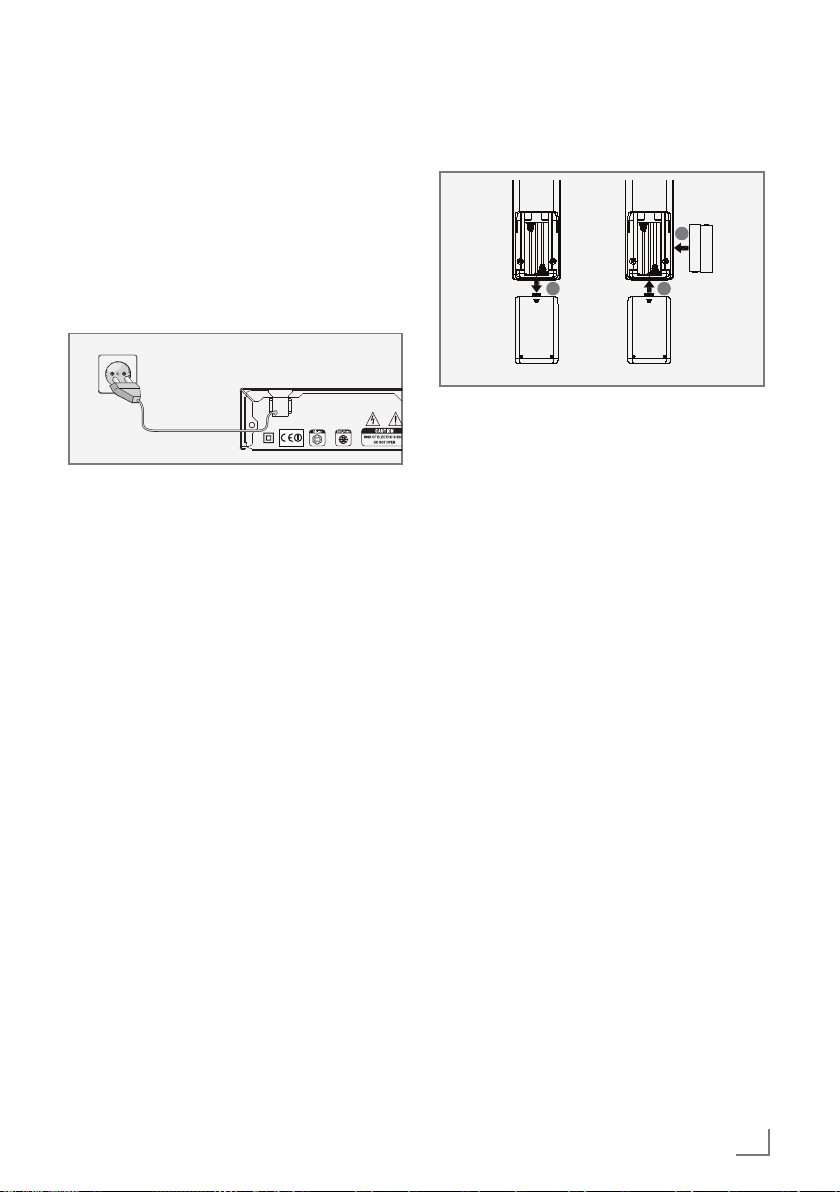
Connecting to the mains supply
Notes:
7
Check that the mains voltage on the type
plate (on the back of the device) corresponds to your local mains supply. If this is
not the case, contact your specialist dealer.
7
Before connecting the AC power cord to the
wall socket, ensure that all other connections have been made.
GBP 6000 2D
BLU-RAY DISC PLAYER
GLR 5800
AC:110-240 V 50/60 Hz
POWER:17 W
~
SN
1 Plug the power cord into the wall socket.
Caution:
7
The device is connected to the mains with
the power cord. Pull out the power plug if
you want to completely disconnect the device from the mains.
7
Make sure the power plug is easily acces-
sible during operation and not hindered by
other objects.
Putting batteries in the remote
control
1 Open the battery compartment by pressing
down on the catch and then remove the lid.
2 Observe the polarity marked on the base of
the battery compartment when inserting the
batteries (micro batteries, 2 x 1.5 V, R 03/
UM 4/AAA).
3 Close the lid of the battery compartment.
Notes:
7
Do not expose the batteries to extreme heat,
caused for example by direct sunlight, heaters or fire.
7
Remove the batteries when they are flat or
when you know that the device will not be
used for a long period of time. The manufacturer accepts no liability for damage caused
by leaking batteries.
Environmental note:
7
Batteries, including those which do not con-
tain heavy metal, should not be disposed
of with household waste. Always dispose
of used batteries in accordance with local
environmental regulations.
Page 12
ENGLISH
12
INITIAL SETUP
----------------------------------------------------------------------------------------------------------------------
Switching on the Blu-ray player
If you connect the device to the mains, it
switches to standby.
1 Plug the power cord into the wall socket.
– The power indicator turns on.
2 Press »9«.
– The power indicator turns off.
– Display: »HELLO«.
3 Switch on the LED/LCD-TV, select the input
setting on the LED/LCD-TV that matches the
connection method you used to connect the
Blu-ray player.
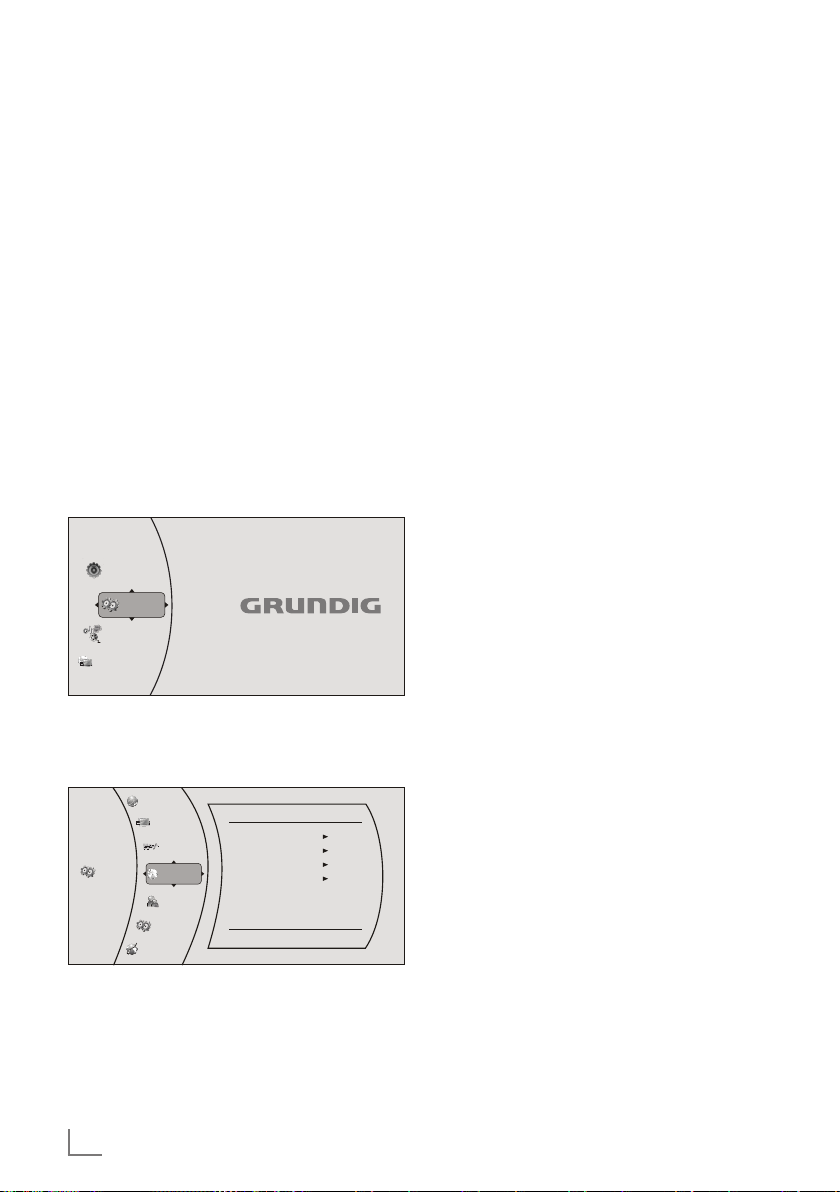
Menu navigation
When you switch on the device, the main menu
of the device automatically appears on the
screen.
6HWWLQJV
0HGLD
1HW)XVLRQ
4XLFN6HWXS
1HW)XVLRQ
1 Use the cursor buttons »A«, »S«, »s« or
»a« to move through the menu.
2 Confirm your selection by pressing »ENTER«.
6HWWLQJV
3DUHQWDO
6\VWHP
/DQJXDJH
26'
0HQX
$XGLR
6XEWLWOH
(QJOLVK
$XWR
$XWR
1RQH
'LVSOD\
$XGLR
/DQJXDJH
1HWZRUN
%'/LYH
3 Press »RETURN« to return to the main menu.
First installation by using the
Quick Setup
Use the »Quick Setup« function to make the initial settings.
If you need more settings, refer to the chapter
"First installation by using the functions in the
main menu", see next page.
1 Press »SETUP« to open the main menu.
2 In the main menu select »Quick Setup« by us-
ing »A« or »S« and press »ENTER« to confirm.
– Display: »Would you like to do Quick Setup?
Yes - No« appears.
3 Select »Yes« by using »a« or »s« and press
»ENTER« to confirm.
– Display: »OSD Language Settings« menu
appears.
4 Select your language by using »A« or »S«
and press »ENTER« to confirm.
– Display: »Resolution« menu appears.
5 Depending on the type of the TV connected to
the device, select resolution by using »A« or
»S« and press »ENTER« to confirm.
– Display: »TV Aspect« menu appears.
6 Depending on the type of the TV connected to
the device, select TV Aspect by using »A« or
»S« and press »ENTER« to confirm.
– Display: »Quick Setup Complete! Exit« ap-
pears.
7 Press »ENTER« to exit the Quick Setup.
Page 13

13
ENGLISH
First installation by using the
functions in the main menu
Selecting the language of the
screen menu
1 Press »SETUP« to open the main menu.
2 In the main menu select »Settings« by using
»A« or »S« and press »ENTER« to con-
firm.
3 Select »Language« by using »A« or »S«
and press »ENTER« to confirm.
6HWWLQJV
3DUHQWDO
6\VWHP
/DQJXDJH
26'
0HQX
$XGLR
6XEWLWOH
(QJOLVK
$XWR
$XWR
1RQH
'LVSOD\
$XGLR
/DQJXDJH
1HWZRUN
%'/LYH
4 Select »OSD« by using »A« or »S« and
press »ENTER« to confirm.
5 Select your language by using »A« or »S«
and press »ENTER« to confirm.
6 Press »RETURN« to return to the »Settings«
menu.
Adapting the Blu-ray player to
the LED/LCD-TV
Setting the TV system (TV norm)
Select »PAL« for LED/LCD-TV with the PAL system
or »NTSC« for those with the NTSC system.
1 In the »Settings« menu select »Display« by
using »A« or »S« and press »ENTER« to
confirm.
2 Select »TV Type« by using »A« or »S« and
press »ENTER« to confirm.
INITIAL SETUP
----------------------------------------------------------------------------------------------------------------------
6HWWLQJV
3DUHQWDO
6\VWHP
'LVSOD\
+'0,6WDWXV
+'0,SUHIHUUHG)RUPDW
797\SH
5HVROXWLRQ
79$VSHFW
)LOP0RGHS
'HHS&RORU
%OXUD\'0RGH
&RQQHFWHG
3
176&
+'0,$XWR
:LGH
2II
$XWR
$XWRPDWLF
'LVSOD\
$XGLR
/DQJXDJH
1HWZRUN
%'/LYH
3 Choose the setting (»PAL« or »NTSC«) by using
»A« or »S« and press »ENTER« to confirm.
Setting the HDMI resolution
You can select the ideal setting for the connected LED/LCD-TV. The abbreviation behind
the number means: »p« = progressive, »i« = interlace.
The function can only be selected once the LED/
LCD-TV is connected to the »HDMI« socket.
1 In the »Display« menu select »Resolution« by
using »A« or »S« and press »ENTER« to
confirm.
3DUHQWDO
6\VWHP
'LVSOD\
$XGLR
/DQJXDJH
1HWZRUN
%'/LYH
L
S
S
L
+'0,$XGLR
S
3OHDVHFKRRVHDQHZ5HVROXWLRQVHWWLQJ
¦
2 Choose the setting (»HDMI Auto«, »1080p«,
»1080i«, »720p«, »576p«, »576i« ) by using
»A« or »S« and press »ENTER« to confirm.
Page 14

ENGLISH
14
INITIAL SETUP
--------------------------------------------------------------------------------------------------------------------
Note:
7
The output resolution is based on the type
of LED/LCD-TV connected to the device, as
described in the table below:
LED/LCD-TV TYPE
Correct
Resolution
Setting
If your TV is a standard-definition PAL TV (SD TV)
576i/480i
If your TV is an enhanced-definition TV (EDTV)
576p/480p
If your TV is a high-definition TV
(HDTV) capable of 720p only
720p
If your TV is a high-definition TV
(HDTV) capable of 1080i only
1080i
If your TV is HDMI equipped,
and if your TV is a high-definition TV (HDTV) capable of
1080p [any frame rate], and
you are connected to your TV
via HDMI,
1080p
(HDMI)
If your TV is HDMI equipped,
and you are connected to
your TV via HDMI, and you
wish the BD player to set the
output based on information
exchanged between the TV
and the player over the HDMI
cable.
HDMI auto
Selecting the TV format
The setting depends on your LED/LCD-TV. If you
have a LED/LCD-TV with a 4:3 format, select the
4:3 setting; if you have a LED/LCD-TV with a
16:9 format, select the 16:9 setting.
1 In the »Display« menu select »TV Aspect« by
using »A« or »S« and press »ENTER« to
confirm.
2 Choose the setting (»16: 9 Wide«, »16 :9 Pillar-
box«, »4:3 Pan and Scan«, »4:3 Letterbox«)
by using »A« or »S« and press »ENTER«
to confirm.
Selecting the film mode
The movies are recorded on film at a rate of 24
frames per second. However not all televisions
can display 24 frames per second. Off can be
selected for 50 frames per second format.
Only the HDMI output of the player is capable
of supporting1080 p video output at any frame
rate.
1 In the »Display« menu select »Film Mode
(1080p24)« by using »A« or »S« and
press »ENTER« to confirm.
2 Choose the setting (»Auto«, »Off«) by using
»A« or »S« and press »ENTER« to confirm.
Setting deep color
HDMI 1.3 supports 10-bit, 12- bi t and 16- bit
(RGB or YCbCr) color depths while 8-bit was
supported in previous versions. This expands the
colors displayed from millions to billions, which
is much more vivid than the previous.
1 In the »Display« menu select »Deep color« by
using »A« or »S« and press »ENTER« to
confirm.
2 Select »Auto« or »Off« by using the cursor but-
tons and press »ENTER« to confirm.
Selecting the Blu-ray mode
There are two options:
– Automatic: If you select »Automatic«, 3D Blu-
ray disc plays in 3D effect or 2D Blu-ray disc
plays in 2D effect automatically.
– Forced 2D: If you select »Forced 2D«, disc
plays in 2D, regardless of whether it is 3D or
2D.
1 In the »Display« menu select »Bluray 3D
Mode« by using »A« or »S« and press
»ENTER« to confirm.
2 Choose the setting (»Automatic«, »Forced
2D«) by using »A« or »S« and press »EN-
TER« to confirm.
End settings for the LED/LCD-TV
1 Press »SETUP« to return to the main menu.
Page 15
15
ENGLISH
INITIAL SETUP
----------------------------------------------------------------------------------------------------------------------
6 Select »IP address« by using »A« or »S«
and press »ENTER«.
Enter the IP address by using the number but-
tons.
Select »Ok« by using »S« and press
»ENTER« to confirm,
or select »Cancel« by using »s« and press
»ENTER« to cancel the setting.
7 Select »Subnet Mask« by using »A« or »S«
and press »ENTER«.
Enter the Subnet Mask by using the number
buttons.
Select »Ok« by using »S« and press
»ENTER« to confirm,
or select »Cancel« by using »s« and press
»ENTER« to cancel the setting.
8 Select »Gateway« by using »A« or »S«
and press »ENTER«.
Enter the Gateway address by using the
number buttons.
Select »Ok« by using »S« and press
»ENTER« to confirm,
or select »Cancel« by using »s« and press
»ENTER« to cancel the setting.
Note:
7
The primary and secondary DNS (Domain
Name System) in the next setting are the
network adresses of the server allocated by
the provider.
9 Select »Primary DNS« by using »A« or
»S« and press »ENTER«.
Enter the Primary DNS by using the number
buttons.
Select »Ok« by using »S« and press
»ENTER« to confirm,
or select button »Cancel« by using »s« and
press »ENTER« to cancel the setting.
Network settings by using
wired connection
The device must be connected to a wired router
with an ethernet cable.
Please see chapter "CONNECTION AND PREPARATION".
1 Press »SETUP« to open the main menu.
2 In the main menu select »Settings« by using
»A« or »S« and press »ENTER« to con-
firm.
3 Select »Network« by using »A« or »S«
and press »ENTER« to confirm.
6HWWLQJV
3DUHQWDO
6\VWHP
1HWZRUN
,QWHUIDFH
/LQN6WDWXV
0$&$GUHVV
,30RGH
,3$GUHVV
6XEQHW0DVN
*DWHZD\
3ULPDU\'16
6HFRQGDU\'16
6LJQDO6WUHQJWK
1HWZRUN1DPH66,'
:LUHG
/LQN'RZQ
IEFF
0DQXDO
*RRG
JULQWHUQHW
'LVSOD\
$XGLR
/DQJXDJH
1HWZRUN
%'/LYH
4 Select »IP Mode« by using »A« or »S« and
press »ENTER« to confirm.
5 Choose the setting (»Dynamic« or »Manual«)
by using »A« or »S« and press »ENTER«
to confirm.
Notes:
7
The IP Mode option provides two configura-
tion modes for IP:
– Dynamic – Enables DHCP, the addresses
are automatically assigned by the router.
– Manual – Requires user to config-
ure network settings such as IP address, subnet mask, gateway, etc.
It is able to show subnet mask, gateway,
primary DNS, secondary DNS when "IP
Mode" is set as "Manual".
7
If you choose the option "Dynamic", go to
step 11 .
If you choose the option "Manual", continue
with step 6).
Page 16
ENGLISH
16
INITIAL SETUP
----------------------------------------------------------------------------------------------------------------------
10 Select »Secondary DNS« by using »A« or
»S« and press »ENTER«.
Enter the Secondary DNS by using the
number buttons.
Select »Ok« by using »S« and press
»ENTER« to confirm,
or select »Cancel« by using »s« and press
»ENTER« to cancel the setting.
11 Select »Apply« by using »S« and press
»ENTER« to confirm the setting;
or
select »Cancel« by using »s« and press
»ENTER« to cancel the setting.
12 If the connection is successful, »Network Test«
appears.
End setting by using »ENTER«.
Network settings by using
wireless connection
The device must be connected to a wireless
router with the WLAN Antenna.
Please see chapter "CONNECTION AND PREPARATION".
Note:
7
The red led of the »WLAN Antenna« blinks
when the antenna is active and the blue led
blinks when the wireless connection is active.
1 Press »SETUP« to open the main menu.
2 In the main menu select »Settings« by using
»A« or »S« and press »ENTER« to confirm.
3 Select »Network« by using »A« or »S«
and press »ENTER« to confirm.
6HWWLQJV
3DUHQWDO
6\VWHP
'LVSOD\
$XGLR
/DQJXDJH
1HWZRUN
%'/LYH
1HWZRUN/LVW
0DQXDO
,36HWWLQJV
:LUHOHVV
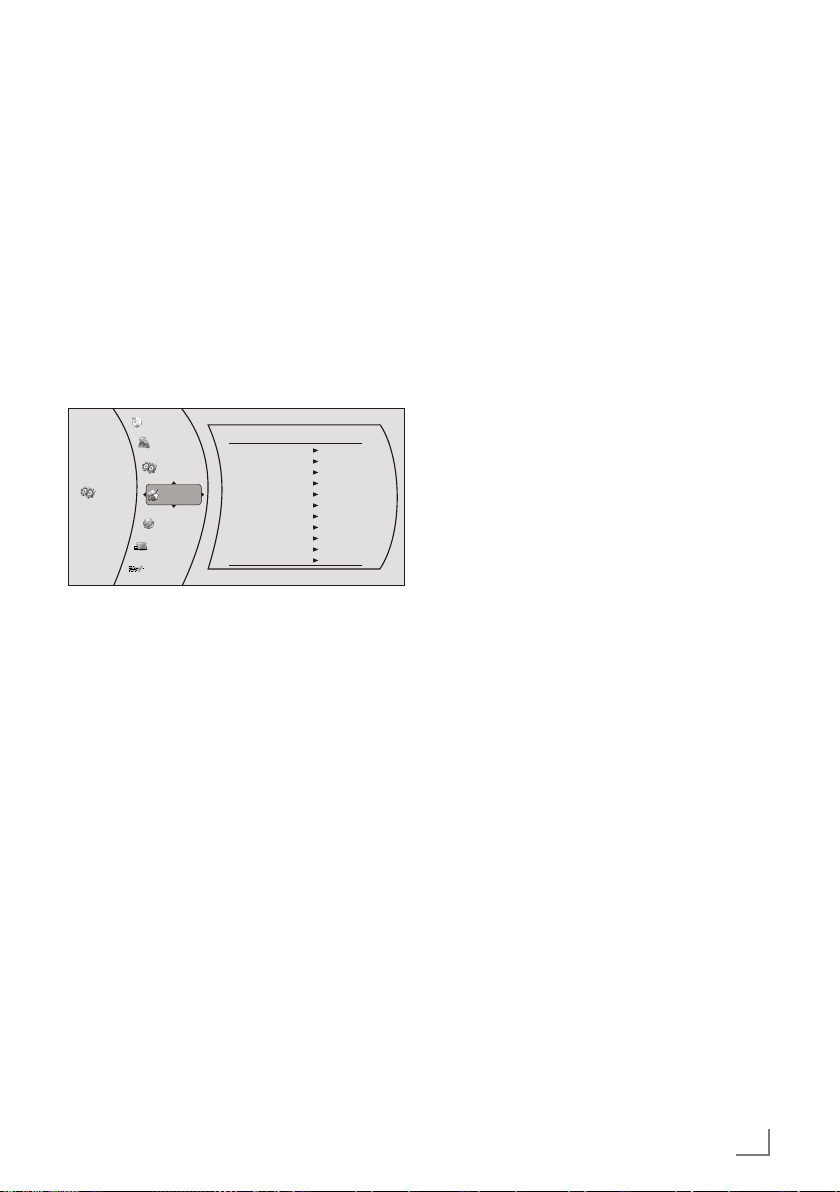
4 Select »Network List« by using »A« or »S«
and press »ENTER« to confirm.
– Display: The list of available wireless net-
works appears.
6HWWLQJV
3DUHQWDO
6\VWHP
'LVSOD\
$XGLR
/DQJXDJH
1HWZRUN
%'/LYH
1HWZRUN/LVW
:L)L3URWHFWHG6HWXS:36
0DQXDO
1HWZRUN7HVW
:LUHOHVV
1HWZRUN/LVW
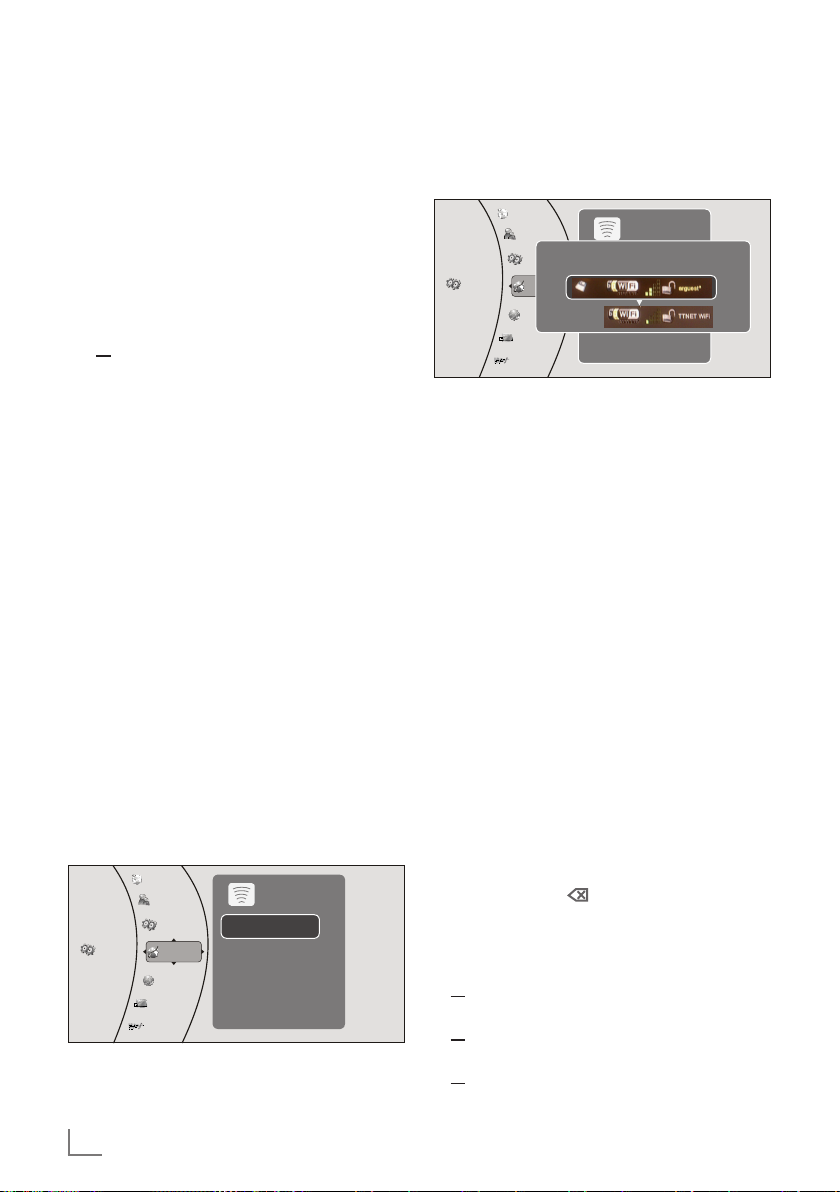
5 Select the wireless network you like by using
»A« or »S« and press »ENTER« to confirm.
Note:
7
If the network is encrypted, the wireless
network password (security code WEP or
WPA) screen appears.
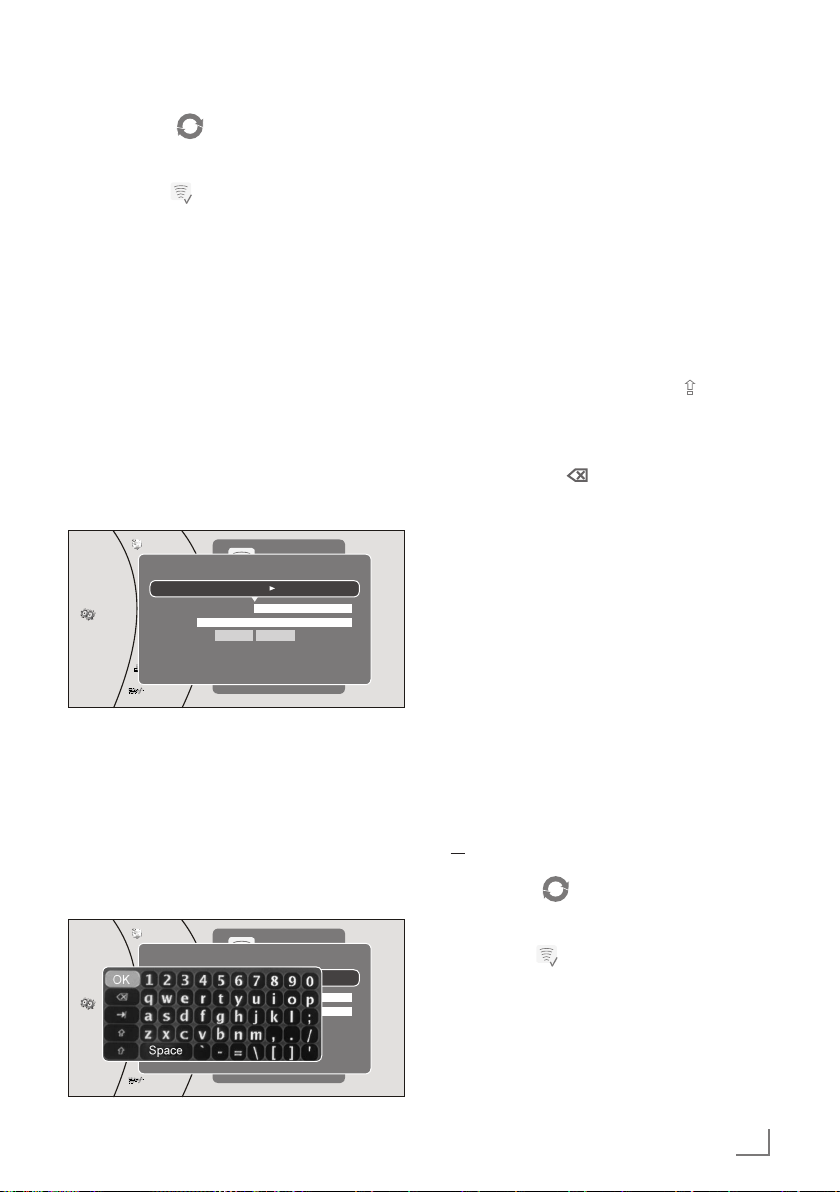
6 Press »ENTER«, the keyboard appears.
Select the first character of the password
(capital and small letters, numbers, symbols)
by pressing »A«, »S«, »a« or »s« and
confirm by pressing »ENTER«. Repeat the procedure for all characters.
After you finish entering all characters, select
the push button »OK« on the keyboard by
pressing »A«, »S«, »a« or »s« and press
»ENTER« to confirm.
Notes:
7
You can choose between numbers, lower and
upper case letters, and special characters.
7
If you make a mistake during entry, press
»A«, »S«, »a« or »s« to select the
push button » « and press »ENTER« to
confirm. The last character is deleted.
7 Select »Connect« to connect to the wireless
network by using »A« or »S«,
or select »Delete« by using »a« or »s« to de-
lete the wireless network from the list;
or select »Cancel« by using »a« or »s« to
cancel the setting;
or select »Disconnect« by using »a« or »s«
to disconnect from the wireless network;
and press »ENTER« to confirm.
Page 17
17
ENGLISH
INITIAL SETUP
----------------------------------------------------------------------------------------------------------------------
– Display: ”» « Connection to (WLAN
network name), Verifying Internet
Connection…” appears.
– Display: » «, if the connection is success-
ful.
8 Press »SETUP« to return to the main menu.
Note:
7
For the »IP Settings« and »Network test« settings, see “Network settings by using wired
connection” section.
Manual settings in wireless
connection
1 At step 4 in “Network settings by using wireless
connection” section, select »Manual« by using
»A« or »S« and press »ENTER« to confirm.
– Manual setting menu opens.
6HWWLQJV
3DUHQWDO
6\VWHP
'LVSOD\
$XGLR
/DQJXDJH
1HWZRUN
%'/LYH
1HWZRUN/LVW
:L)L3URWHFWHG6HWXS:36
0DQXDO
,36HWWLQJV
:LUHOHVV
0DQXDO
3UHVV(17(5WRRSHQNH\ERDUG
(QFU\SWLRQ 'LVDEOHG
1DPH
3DVVZRUG
&RQQHFW &DQFHO
1DPHLVFDVHVHQVLWLYH
2 Select »Encryption« by using »A« or »S«
and press »ENTER« to confirm.
3 Select the encryption from your wireless net-
work by using »A« or »S« and press
»ENTER« to confirm.
4 Select »Name« by using »A« or »S« and
press »ENTER« to confirm.
– The keyboard appears.
6HWWLQJV
3DUHQWDO
6\VWHP
'LVSOD\
$XGLR
/DQJXDJH
1HWZRUN
%'/LYH
1HWZRUN/LVW
:L)L3URWHFWHG6HWXS:36
0DQXDO
,36HWWLQJV
:LUHOHVV
0DQXDO
3UHVV(17(5WRRSHQNH\ERDUG
(QFU\SWLRQ 'LVDEOHG
1DPH
3DVVZRUG
&RQQHFW &DQFHO
1DPHLVFDVHVHQVLWLYH
5 Select the first character of the network name
(capital and small letters, numbers, symbols)
by pressing »A«, »S«, »a« or »s« and
confirm by pressing »ENTER«.
Repeat the procedure for all characters.
After you finish entering all characters, select
the push button »OK« on the keyboard by
pressing »A«, »S«, »a« or »s« and press
»ENTER« to confirm.
Notes:
7
You can choose between numbers, lower
and upper case letters, and special characters by using the push buttons » « and »×«
in the keyboard.
7
If you make a mistake during entry, press
»A«, »S«, »a« or »s« to select the
push button » « and press »ENTER« to
confirm. The last character is deleted.
6 Select »Password« by using »A« or »S«
and press »ENTER« to confirm.
– The keyboard appears.
7 Select the first character of the password
(capital and small letters, numbers, symbols)
by pressing »A«, »S«, »a« or »s« and
confirm by pressing »ENTER«. Repeat the pro-
cedure for all characters.
After you finish entering all characters, select
the push button »OK« on the keyboard by
pressing »A«, »S«, »a« or »s« and press
»ENTER« to confirm.
8 Select »Connect« by using »S« and press
»ENTER« to confirm,
or select »Cancel« by using »s« and press
»ENTER« to cancel the setting.
– Display: ”» « Connection to (WLAN
network name), Verifying Internet
Connection…” appears.
– Display: » «, if the connection is success-
ful.
9 Press »SETUP« to return to the main menu.
IP Settings
Please refer to "Network settings by using wired
connection".
Page 18
ENGLISH
18
BD/DVD PLAYBACK
------------------------------------------------------------------------------------------------
This item incorporates
copyright protection
technology that is protected by U.S. patents
and other intellectual
property rights. Use of this copyright protection
technology must be authorized by Rovi Corporation, and is intended for home and other limited
viewing uses only unless otherwise authorized
by Rovi Corporation. Reverse engineering or disassembly is prohibited.
You can recognise a 3D
Blu-ray disc by the logo
on the label. The same
copyright protection for
Blu-ray Disc logo which
is described above is also effective for Blu-ray
3D Discs.
Special features of Blu-ray Discs
The massive storage capacity of a Blu-ray (BD)
Disc allows a far higher standard of picture and
audio quality and a wealth of special effects and
enhanced features.
BLU-RAY AND JAVA
This player features Java support, enabling you
to get the most out of the latest Blu-ray Discs.
When a BD disc is loaded, always explore the
title menu to enjoy these extra features.
BLU-RAY AND HDMI
HDMI is the only domestic medium capable of
transmitting the huge volumes of data required
by the very high picture resolutions and advanced digital audio codecs that make Blu-ray
such an exciting medium.
PLAYING A BLU-RAY DISC
Blu-ray Discs play very much like standard DVDs
but with a very much higher level of interactivity.
All the standard features of DVD player operate
exactly the same but there are some differences.
Special features of the DVD
You can recognise a
DVD by the logo on the
label.
The discs have one or
more tracks depending
on the content of the DVD.
Each track can contain one or more chapter. Se-
lecting the track and chapter is simple and convenient.
You can control and direct playback of a DVD
using the menu of the DVD player on the television screen.
Preparation
1 Switch on the LED/LCD TV, select the input
setting on the LED/LCD TV that matches the
connection method you used to connect the
Blu-ray player.
2 If an audio system or an AV receiver is con-
nected to the Blu-ray player, switch it on and
select the audio input for the Blu-ray player.
3 Switch on the Blu-ray player.
– If there is no disc in the compartment,
»NO DISC« appears after a short time.
– If a disc has been inserted, it is scanned and
»LOAD« appears.
Inserting the disc
1 Press » « to open the disc compartment.
– Display: »OPEN«.
2 Insert the disc in the compartment with its label
facing upwards.
3 Press » « to close the disc compartment.
– Display: »CLOSE« and then »LOAD«; the disc
is scanned and then the total duration of the
disc is shown.
– The disc menu opens automatically.
Note:
7
Some disc menus direct you to set the menu
language first. If that happens, select the
language by using cursor buttons and press
»ENTER«.
Page 19

19
ENGLISH
BD/DVD PLAYBACK
------------------------------------------------------------------------------------------------
Additional playback functions
Viewing information
You can view information about the title, chapter,
playing time and much more on the screen.
1 Press »OSD« on the on the remote control.
– Display: The information line appears.
2 Press »OSD« on the on the remote control to
deactivate the function.
– Display: The information line disappears.
Disc menu navigation
The disc may contain several titles and chapters
you can choose from.
1 Press »DISC MENU« on the remote control.
– Main menu of the disc opens.
2 Select the title that you want by using the cur-
sor buttons and press »ENTER« to confirm.
3 In the selected title, choose the chapter or part
that you want by using the cursor buttons and
press »ENTER« to confirm.
4 Press »DISC MENU« on the remote control to
return to the main menu of the disc.
Fast forward and fast reverse
1 During playback, press »3« on the remote
control to fast reverse,
or press »4« on the remote control to fast
forward through the disc.
Note:
7
When you repeatedly press the button, each
time the fast forward or fast reverse motion speed changes. The speed increases
through the following sequence: Fast x 2,
Fast x 4, Fast x 8, Fast x 16, Fast x 32, Fast
x 64, Fast x 128.
2 Press » « to resume normal playback.
– Playback continues.
Playback
1 Select »Play« if this option is available by using
the cursor buttons and press »ENTER«;
or
press » « to start playback.
– The playback starts.
Note:
7
If the message »Prohibited« appears on the
television screen, the selected function is not
possible with this disc.
2 Press » « to pause playback (freeze frame).
3 Press » « to resume playback.
4 Press »7« to interrupt playback.
5 Press » « to resume normal playback.
6 To stop playback, press »7« twice.
Removing the disc
1 Press » « to open the disc compartment.
2 Remove the disc from the compartment.
3 Press » « to close the disc compartment.
Adjusting the volume
1 Adjust the volume by pressing »– VOLUME «
or » VOLUME +« on the remote control.
Muting
1 Activate the mute with »MUTE« on the remote
control.
– Display: » X Off«.
2 Deactivate the mute with » MUTE « on the re-
mote control.
– Display: » On«.
Page 20

ENGLISH
20
Repeating a chapter or a track
(controlled by the Blu-ray Disc)
1 During playback, press »REPEAT« repeatedly
to select a repeat mode: »Repeat Title«, »Repeat Chapter«, »Repeat Off«.
– Display: » Repeat Title«, the current title
is repeated.
– Display: » Repeat Chapter«, the current
chapter is repeated.
2 To quit the function, press again »REPEAT«
until »Repeat Off« appears on display.
– Display: » Repeat Off «.
Repeating a selected section
(controlled by the Blu-ray Disc)
1 During playback, press »A-B« to select a start
point for a section to be repeated.
– Display: » Repeat A-«, the start point of
the section is selected.
2 At the point you want to be the end point, press
»A-B « again to set the end point for the section to be repeated.
– Display: » Repeat A-B«, the end point of
the section is selected. The selected section
starts to be repeated.
3 To quit the function, press again »A-B« until
»Repeat Off« appears on display.
– Display: » Repeat Off «.
Selecting and displaying subtitles
If the disc provides subtitles, they can be displayed on your TV screen.
If the subtitles are available in several languages, you can select the one you want.
1 During playback, press »SUBTITLE« on the re-
mote control.
– »Subtitle« and »PIP Subtitle« menu appears.
2 Select the Subtitle menu that you want by us-
ing the cursor buttons and press »ENTER« to
confirm.
BD/DVD PLAYBACK
------------------------------------------------------------------------------------------------
Selecting previous and next
chapters
1 During playback, press » « to play the pre-
vious chapter or press » « to play the next
chapter.
– When you release the button, the device
skips the current chapter and playback starts
from the selected chapter.
Search functions
1 Press »SEARCH« repeatedly to switch be-
tween search modes: »Goto Title«, »Goto
Chapter« and »Goto Time«.
2 In the selected mode, press number buttons
and »ENTER« button to select the point you
want to play.
Note:
7
For example to select title 4, you should
press respectively the buttons »0«, »0«, »0«,
»4«, »ENTER«.
– Playback of the selected point starts au-
tomatically.
Enlarging or reducing the picture
(only DVD)
1 Press »ZOOM« repeatedly to switch be tween
»Zoom Off«, »Zoomx2 « and »Zoomx4«.
– Display: » Zoom x2 «, the selected part
of the picture is enlarged 2 times.
– Display: » Zoom x4 «, the selected part
of the picture is enlarged 4 times.
Note:
7
You can move the picture with »a«, »s«,
»A« or »S« on the screen.
2 To quit the function, press again »ZOOM«
until »Zoom Off« appears on display.
– Display: » Zoom Off «.
Frame-by-frame playback
1 During playback, press »!8« to advance
the scene frame by frame.
2 Press » «to resume playback.
Page 21

21
ENGLISH
BD/ DVD PLAYBACK
----------------------------------------------------------------------------------------------
3 In the selected Subtitle menu, select the options
that you want by using the cursor buttons and
press »ENTER« to confirm.
– Display: for example » 01/02 DEU«.
4 To switch of the subtitles, select »Subtitle Off«
at step 3 by using the cursor buttons and
press »ENTER« to confirm.
Notes:
7
You can set the subtitle from the disc menu
also. Please see "Disc menu navigation" section.
7
While playing video files from a USB or an
optical disc, to clearly obtain all the characters in subtitles, the subtitle file must be in
UTF-8 format. The name of the video file and
the subtitle file should be the same.
In order to prepare UTF-8 format, you
should do the following method:
1 Open the .srt file in the NotePad applica-
tion.
2 Go to the "File" drop-down menu and se-
lect "Save As...".
3 The file name and file type will remain the
same.
4 Under the Encoding section of this win-
dow, select the "UTF-8" option from the
drop-down menu.
5 Click "Save" to keep your changes.
Selecting the dubbed language or
the audio format
These settings allow you to listen to a dubbed
language other than the default one if the disc
provides alternatives.
1 During playback, press »AUDIO« on the re-
mote control.
– »Audio« and »PIP Audio« menu appears.
2 Select the dubbed language that you want by
using the cursor buttons and press »ENTER« to
confirm.
Pop-up menu/Title menu
If the disc provides pop-up or title menus, you
can use this function.
1 During playback, press »POPUP MENU/
TITLE MENU« to open pop-up or title menu.
2 Select the option that you want by using the
cursor buttons and press »ENTER« to confirm.
3 To quit the function, press »POPUP MENU/
TITLE MENU« again.
Selecting the camera angle for particular scenes or passages
Some discs provide scenes or passages which
were filmed several times from different camera
angles.
1 During playback, press »ANGLE« on the re-
mote control.
– Angle menu appears.
2 Select the angle that you want by using the
cursor buttons and press »ENTER« to confirm.
– Display: for example »01/03«.
Playing secondary video (Picture in
picture / PIP)
(controlled by the Blu-ray Disc)
1 During playback, press »PIP« on the remote
control to turn on secondary video (picture in
picture / PIP) function.
– The secondary video playback appears on
display.
2 To quit function press »PIP« again.
Selecting the dubbed language for
the PIP function
(controlled by the Blu-ray Disc)
1 During PIP playback, press »SECONDARY
AUDIO« on the remote control.
– The secondary audio menu opens.
2 Select »On« or »Off« by using the cursor but-
tons and press »ENTER« to confirm.
Using the color buttons
The RED, GREEN, YELLOW and BLUE buttons
are used with interactive menus when operating a BD-Video disc that includes JavaTM applications (BD-J). For more information about
operating this kind of a disc, please read the
instructions that came with the disc.
Page 22

ENGLISH
22
BD LIVE
---------------------------------------------------------------------------------------------------------------------------------------------
Some Blu-ray discs contain additional features
that are made available to players that are connected to the internet, and have additional memory added.
These additional features may include things like:
– the ability to download new movie trailers,
– additional "commentary" by actors and di-
rectors,
– multiperson game play and chat.
In order to access BD-Live functions, the player
must be properly configured for BD-Live internet
access, and it must be equipped with additional
memory.
Adding BD-Live memory to the
player
1 Insert an at least 1Gbyte USB memory stick
into a PC drive, and make sure that it is formatted as FAT32.
2 Insert the USB plug of the USB memory stick in
the » « socket on the device (see "CONNECTION AND PREPARATION" section).
Setting up the player for BD-Live
internet access
1 Press »SETUP« to open the main menu.
2 In the main menu select »Settings« by using
»A« or »S« and press »ENTER« to confirm.
3 Select »BD-Live« by using »A« or »S« and
press »ENTER« to confirm.
4 Select »BD-Live Internet Access« by using
»A« or »S« and press »ENTER« to confirm. Make sure that the option »Limit Access«
or »Always Allow Access« is selected.
5 Select »Limit Access« or »Always Allow Access«
by using »A« or »S« and press »ENTER« to
confirm.
Note:
7
Once the USB memory stick has been inserted, if there is not at least 100 Mbyte of
free space on the device, you should choose
»Erase Blu-ray Storage« from the »BD-Live«
setup menu item.
6 Press »RETURN« and select »Network« by
using »A« or »S« and press »ENTER« to
confirm.
Select »Network Test« by using the cursor but-
tons and press »ENTER« to confirm.
Note:
7
The "Link Status" must show that you are con-
nected to the internet, otherwise you cannot access BD-Live content on the web (see
"CONNECTION AND PREPARATION/
Connecting to the internet with ethernet cable" section).
7 Press »RETURN« to return to the main menu.
Page 23

23
ENGLISH
BD LIVE
---------------------------------------------------------------------------------------------------------------------------------------------
Using BD-Live
1 Press » « to open the disc compartment.
2 Insert the Blu-ray Disc in the compartment with
its label facing upwards.
3 Press » « to close the disc compartment.
4 Press » « to start playback.
5 During playback, press »POPUP MENU/
TITLE MENU« to open the pop-up or title
menu.
6 Select »BD LIVE« by using »A«, »S«, »a«
or »s« and press »ENTER« to confirm.
– In a few minutes, the BD-Live Menu appears.
7 Select the content to download from the »Pre-
views« sub menu. The download is depending
on the content size and network speed.
– The downloaded content is stored under
»Media« – »USB« on the external USB
memory stick. You can choose to either playback or delete the downloaded content.
BD-Live notes
7
The Broadcom Reference system only supports
the connection of USB memory in order to fulfill the BD 2.0 1GByte memory requirement.
7
You must have the BD-Live disc in the player
to play any related (already downloaded)
content.
7
Some BD-Live content could expire and will
not play. You may need to manually delete the
contents in storage in order to have free space.
To do this, select respectively: »Settings«, »BDLive«, »Erase Blu-ray Storage«.
7
A clock is not used to manage the expiration
of downloaded BD-live content. Instead, time
and expiration of content is managed by the
BD-Live server on the internet.
Page 24

ENGLISH
24
PLAYING AUDIO/VIDEO FILES
--------------------------------------------------------
Playing the contents of a data
device or a USB memory stick
Preparation
1 Switch off the Blu-ray player with »8«.
2 Connect a data device to the » « socket
using a standard USB cable;
or
insert the USB plug of the USB memory stick in
the » « socket on the device.
3 Switch on the LED/LCD-TV, select the input
setting on the TV that matches the connection
method you used to connect the Blu-ray player.
4 Switch on the Blu-ray player with »8«.
5 Press »SETUP« to open the main menu.
6 Select »Media« by using »A« or »S« and
press »ENTER« to confirm.
– The external device menu opens.
0HGLD 86%
3LFWXUH
0XVLF
9LGHRV
7 Confirm »USB« with »ENTER«;
or
select »USB« (if a disc is inserted – display
»Optical Disc«) by using »A« or »S« and
press »ENTER« to confirm.
Playing a title, a track or a picture
1 Select »Videos«, »Music« or »Pictures« by us-
ing »A« or »S« and press »ENTER« to
confirm.
2 Chose the file from the selected option by us-
ing »A« or »S« and press »ENTER« to confirm.
3 Press » « to start playback.
– The selected file starts playing.
)LOHVRQJPS
7LWOH&RRO7UDFN
$UWLVW5LFDUGR)XQLFFLR
$OEXP'HDG'X[
2II 2II
3OD\
4 To stop playback, press »7«.
Additional playback functions
7
Press » « to pause playback.
Press » « again to resume playback.
7
Select the playback speed during playback
by pressing »3« or »4«.
7
During playback, select the next track/picture
you want with » « or select the previous
track/picture with » «.
7
During playback, press »REPEAT« repeatedly
to select a repeat/random mode:
– »Repeat All«,
– »Random On«,
– »Repeat File«,
– »Repeat Off«.
7
While playing back the picture, to enlarge the
picture press »ENTER« repeatedly.
Move the picture with »A«, »S«, »a« or
»s« on the screen.
7
To set slide show effects and slide show delay
for pictures:
press »POPUP MENU TITLE MENU«,
select »Slide Show Effects« or »Slide Show
Delay« with »A« or »S«, press »ENTER«
to confirm, select the required effect or the de-
lay with »A« or »S« and press »ENTER«
to confirm.
Page 25
25
ENGLISH
PLAYING AUDIO/VIDEO FILES
--------------------------------------------------------
Playing picture CDs
It is possible to display digital picture files or music files that have been burned onto a data disc,
DVD+/-R, DVD+/-R/(W) or a Blu-ray Disc.
Preparation
1 Press » « to open the disc compartment.
– Display: »OPEN«.
2 Insert the disc with pictures into the disc com-
partment.
3 Press » « to close the disc compartment.
– Display: »CLOSE«.
4 Select »Media« by using »A« or »S« and
press »ENTER« to confirm.
5 Confirm »Optical Disc« with »ENTER«.
6 Confirm »Pictures« with »ENTER«.
– The picture summary opens.
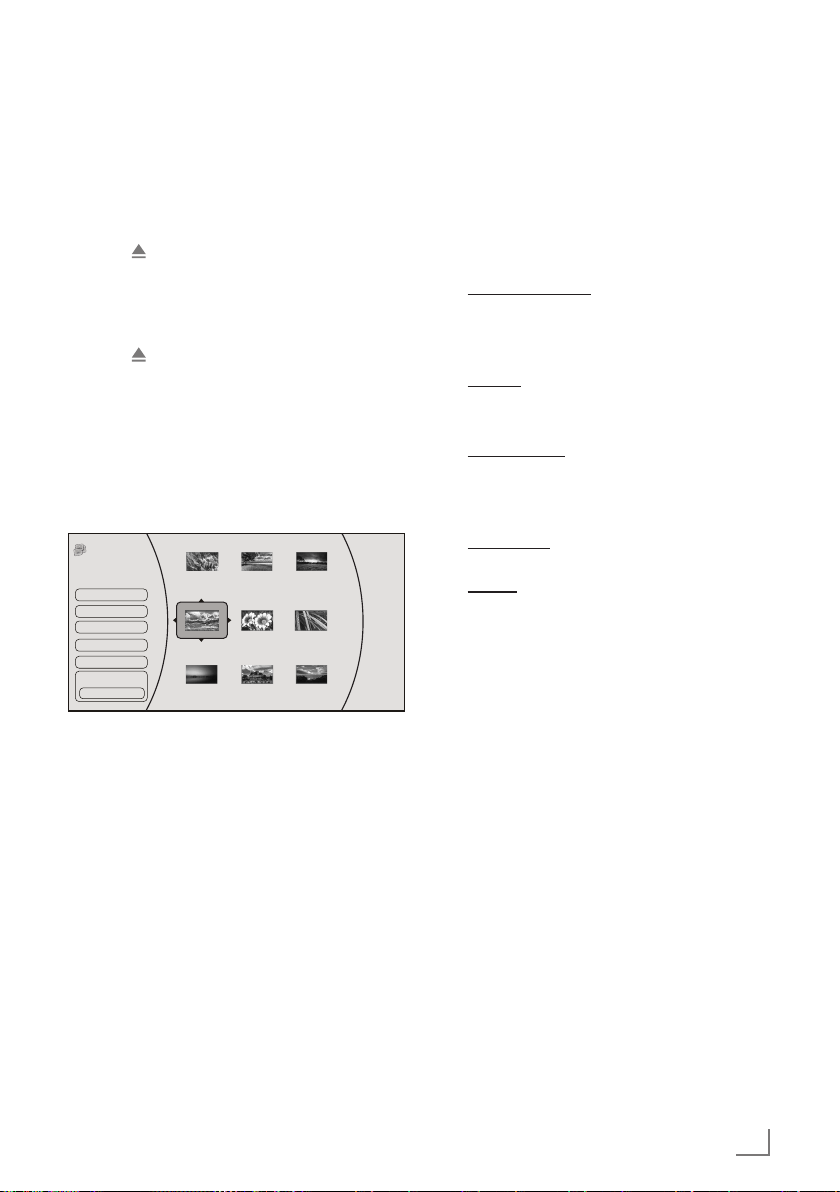
3LFWXUH
2SWLFDO'LVF
6HWWLQJV
0DLQ0HQX
:DOOSDSHUMSJ
:DOOSDSHUMSJ
:DOOSDSHUMSJ
:DOOSDSHUMSJ
:DOOSDSHUMSJ
:DOOSDSHUMSJ
:DOOSDSHUMSJ
:DOOSDSHUMSJ
:DOOSDSHUMSJ
6WDUW6OLGH6KRZ
%URZVH0XVLF
1RZ3OD\LQJ
LWHPV
Displaying a picture
1 Chose the required picture from the summary
by using »A«, »S«, »a« or »s« and press
»ENTER« to display.
2 Press »7« to stop playback.
Additional functions
7
Start a slide show
Select »Start Slide Show« by using »A« or
»S« and press »ENTER« to confirm. All
pictures will be displayed.
7
Settings
Select slide show effects and slide show de-
lay.
7
Browse Music
Opens the music playing menu where you
can select music files to play while you view
pictures.
7
Main Menu
Switches to the main menu.
7
Repeat
During playback, press »REPEAT« to select
the repeat mode:
– »Repeat All«,
– »Repeat Off«.
Page 26

ENGLISH
26
PLAYING AUDIO/VIDEO FILES
--------------------------------------------------------
Playing audio CDs
Preparation
1 Press » « to open the disc compartment.
– Display: »OPEN«.
2 Insert the disc with audio files into the disc
compartment.
3 Press » « to close the disc compartment.
– Display: »CLOSE«.
4 Select »Media« by using »A« or »S« and
press »ENTER« to confirm.
5 Confirm »Optical Disc« with »ENTER«.
6 Confirm »Music« with »ENTER«.
– The folder summary opens.
Playback
1 Chose the required folder from the summary
by using »A« or »S«, »a« and press »EN-
TER« to confirm.
2 Press » « to start playback.
– The selected folder starts playing.
)LOHVRQJPS
7LWOH&RRO7UDFN
$UWLVW5LFDUGR)XQLFFLR
$OEXP'HDG'X[
2II 2II
3OD\
3 Press »7« to stop playback.
Additional playback functions
7
Press » « to pause playback.
Press » « again to resume playback.
7
Select the playback speed during playback
by pressing »3« or »4«.
7
During playback, select the next title you
want with » « or select the previous title
with » «.
7
During playback, press »REPEAT« repeatedly
to select a repeat/random mode:
– »Repeat All«,
– »Random On«,
– »Repeat File«,
– »Repeat Off«.
7
Confirm »Previous folder« by pressing
»ENTER«, to select the summary.
7
During playback, press »ENTER« and select
»Main Menu«, to switch to the main menu.
Page 27

27
ENGLISH
NetFusion MODE
-----------------------------------------------------------------------------------------------------------
About NetFusion
7
The device supports NetFusion. This allows
you to com bine media streaming with controlling a con nected media receiver while
streaming content to it from another PC on
a network.
7
You can easily access the Video, music and
image files on the server through the NetFusion menu of your player.
7
You can share your video, music and image
files through devices such as PC, mobile
phone or NAS (Network Attached Storage)
that function as DMS (Digital Media Server)
compatible with NetFusion.
7
The player can also operate with DMS soft-
ware that can be installed on a computer
but, it is not guaranteed that it will run in full
compatibility with software without a DMS
certificate.
7
If you use a computer running with Windows
operating system, it can be configured as
Windows Media Player (Version 11) Digital
Media server.
Settings to be made depend on the relevant
software.
In order not to encounter any problems with
media sharing, check the firewall settings of
your modem and computer.
Setting NetFusion function
1 Switch on the Blu-ray player with »8«.
2 Press »SETUP« on the remote control to open
the main menu.
3 In the main menu select »Settings« by using
»A« or »S« and press »ENTER« to confirm.
4 Select »System« by using »A« or »S« and
press »ENTER« to confirm.
– The System menu opens.
6HWWLQJV
3DUHQWDO
6\VWHP
6\VWHP
2SWLFDO'LVF$XWR3OD\
1HW)XVLRQ
6FUHHQ6DYHU'XUDWLRQ
$XWR3RZHU'RZQ
'LJLOLQN
8SGDWH9LD1HWZRUN
5HVWRUHIDFWRU\GHIDXOWV
6\VWHP,QIRUPDWLRQ
(QDEOH
2Q
0LQXWHV
0LQXWHV
2II
'LVSOD\
$XGLR
/DQJXDJH
1HWZRUN
%'/LYH
5 Select »NetFusion« by using »A« or »S«
and press »ENTER« to activate.
Select »On« by using »A« or »S« and
press »ENTER« to confirm.
6 Press »RETURN« and select »Network« by us-
ing »A« or »S«.
Check the network connection.
7 Press »RETURN« to return to the main menu.
Page 28

ENGLISH
28
NetFusion MODE
-----------------------------------------------------------------------------------------------------------
Preparation
1 Switch on the Blu-ray player with »8«.
2 Press »SETUP« on the remote control to open
the main menu.
3 In the main menu select »NetFusion« by using
»A« or »S« and press »ENTER« to confirm.
– Display: » Discovering«.
4 Select the shared media from the menu by
using »A« or »S« and press »ENTER« to
confirm.
1RUW$
'LVFRYHULQJ
1HW)XVLRQ
1HW)XVLRQ 1HW)XVLRQ
3LFWXUH
0XVLF
9LGHRV
Using NetFusion function
1 Select »Videos«, »Music« or »Pictures« by us-
ing »A« or »S« and press »ENTER« to
confirm.
2 Depending on the configuration of the shared
media choose the file/title from the selected
option by using »A« or »S« and press
»ENTER« to confirm.
3 Press » « to start playback.
– The selected folder/file starts playing.
)LOHVRQJPS
7LWOH&RRO7UDFN
$UWLVW5LFDUGR)XQLFFLR
$OEXP'HDG'X[
2II 2II
3OD\
4 To stop playback, press »7«.
Note
7
File and folder structure of the DMS device
in menu may vary depending on the Digital
Media Server software in use.
7
Subtitles are not supported on video files
that are played through the DMS device.
7
Video files played through DMS device
support following formats that have ob-
tained NetFusion certificate: »MPEG_PS_
PAL«, »MPEG_TS_SD_EU«, »MPEG_TS_
SD_ EU_T« and »MPEG_TS_SD_EU_ISO«.
7
Audio files played through DMS device sup-
port following formats that have obtained
NetFusion certificate: »LPCM« and »MP3«.
7
Image files played through DMS device sup-
port following formats that have obtained
NetFusion certificate: »JPEG_SM«.
Additional playback functions
7
See chapter "Playing Audio/Video files",
depending on the file in use.
Page 29

29
ENGLISH
SPECIAL SETTINGS
-----------------------------------------------------------------------------------------------------
Audio settings
1 Press »SETUP« on the remote control to open
the main menu.
2 In the main menu select »Settings« by using
»A« or »S« and press »ENTER« to confirm.
3 Select »Audio« by using »A« or »S« and
press »ENTER« to confirm.
– The audio menu opens.
6HWWLQJV
3DUHQWDO
6\VWHP
$XGLR
3&0'RZQVDPSOLQJ
'LJLWDO2XWSXW
'\QDPLF5DQJH&RQWURO
6WHUHR'RZQPL[
N+]
3&0
2II
$XWR
'LVSOD\
$XGLR
/DQJXDJH
1HWZRUN
%'/LYH
4 Select the required function by using »A« or
»S« and press »ENTER« to activate.
5 Select your required settings by using »A« or
»S« and press »ENTER« to confirm.
6 Press »RETURN« or »a« to close the sub-
menu;
or
press »SETUP« to return to the main menu.
Existing settings in the Audio
menu
PCM Downsampling
Sets the player’s digital output PCM sampling
rate.
Options: 48 kHz, 96 kHz, Off.
Incorrectly setting the digital audio output’s
PCM sampling rate may result in unpredict-
able audio playback.
Digital Output
Sets the player’s digital audio output sockets.
Options:
– PCM: Mixed digital audio sent over HDMI
in PCM (if supported by HDMI device) and
SPDIF in two channel PCM format.
– Bitstream HD: Original bitstream from disc is
passed over HDMI and SPDIF using highest
quality possible. HDMI has higher quality
capabilities with advanced audio codecs
like TrueHD and DTS-HD. BD audio limited
to soundtrack for main movie (i.e. no PiP audio, no effects audio).
– Bitstream Legacy: Original bitstream from
disc is passed over HDMI and SPDIF using
legacy audio formats. BD audio limited to
soundtrack for main movie (i.e. no PiP audio, no effects audio).
– Bitstream Mixed: BD audio streams are
mixed and encoded into a single bitstream.
Primarily intended for customers with SPDIF
5.1CH receivers who want to enjoy mixed
BD audio in surround sound.
Dynamic Range Control
Is only active when a Dolby Digital signal is
detected.
Options:
– Off: you can enjoy the movie with the stand-
ard Dynamic Range.
– On: when movie soundtracks are played at
low volume or from smaller speakers, the system can apply appropriate compression to
make low-level content more intelligible and
prevent dramatic passages from getting too
loud.
– Auto: the system turns on the Dynamic range
control for all BD movie soundtracks except
Dolby TruHD. If you have selected a Dolby
TruHD track on the BD disc, Auto tells the
player to only turn on dynamic range control
if information embedded in the Dolby TruHD
sound track tells it to do so.
Stereo Downmix
Sets »AUDIO OUT L/R« output to Auto,
Stereo (LoRo) or Surround Encoded (LtRt).
Page 30

ENGLISH
30
Language settings
1 Press »SETUP« on the remote control to open
the main menu.
2 In the main menu select »Settings« by using
»A« or »S« and press »ENTER« to con-
firm.
3 Select »Language« by using »A« or »S«
and press »ENTER« to confirm.
– The language menu opens.
6HWWLQJV
3DUHQWDO
6\VWHP
/DQJXDJH
26'
0HQX
$XGLR
6XEWLWOH
(QJOLVK
$XWR
$XWR
1RQH
'LVSOD\
$XGLR
/DQJXDJH
1HWZRUN
%'/LYH
4 Select the required function by using »A« or
»S« and press »ENTER« to activate.
5 Select your required settings by using »A« or
»S« and press »ENTER« to confirm.
6 Press »RETURN« or »a« to close the sub-
menu;
or
press »SETUP« to return to the main menu.
SPECIAL SETTINGS
-----------------------------------------------------------------------------------------------------
Existing settings in the Language
menu
Note:
7
Not all languages are available on all discs.
Most discs only have one menu, audio or
subtitle language available.
OSD Language
Sets the language of the player’s screen menu.
You can choose between several languages.
Menu Language
Sets the preferred menu language as the default language for the disc.
Audio Language
Sets the preferred audio language as the default language for the disc.
Some discs do not allow the user to select the
audio language from the player setup menus.
The audio language can only be selected from
the BD/DVD disc setup menu (the menu that
appears after the disc has been inserted).
Subtitle Language
Sets the preferred subtitle language as the default language for the disc.
Some discs do to not allow the user to select
the subtitle language from the player setup
menus. The subtitle language can only be selected from the BD/DVD disc setup menu (the
menu that appears after the disc has been inserted).
Page 31

31
ENGLISH
SPECIAL SETTINGS
-----------------------------------------------------------------------------------------------------
Parental control
1 Press »SETUP« on the remote control to open
the main menu.
2 In the main menu select »Settings« by using
»A« or »S« and press »ENTER« to con-
firm.
3 Select »Parental« by using »A« or »S« and
press »ENTER« to confirm.
– The Parental Password menu opens.
3DUHQWDO
6\VWHP
1HWZRUN
$XGLR
%'/LYH
'LVSOD\
3DUHQWDO&RQWURO
/DQJXDJH
3DUHQWDO3DVVZRUG
2II
3OHDVHHQWHUQHZSDUHQWDOFRQWUROSDVVZRUG
3DUHQWDO
2N &DQFHO
4 Enter your password with the numeric button
»0« »0« »0« »0«, select »Ok« with »S« and
press »ENTER« to confirm.
6HWWLQJV
3DUHQWDO
6\VWHP
1HWZRUN
$XGLR
%'/LYH
'LVSOD\
3DUHQWDO
/DQJXDJH
3DUHQWDO&RQWURO
3DUHQWDO/HYHO
3DUHQWDO3DVVZRUG
2Q
$GXOW
5 Select the required function by using »A« or
»S« and press »ENTER« to activate.
6 Select your required settings by using »A« or
»S« and press »ENTER« to confirm.
7 Press »RETURN« or »a« to close the sub-
menu;
or
press »SETUP« to return to the main menu.
Existing settings in the Parental
menu
Parental Control (On/Off)
The parental control function works in conjunction with the different censorship classes assigned to discs. These classes help to control
the types of disc that the family watches. There
are up to 8 censorship classes for discs.
Parental Level
Sets different censorship classes assigned to
discs such as:
– 1[Kid Safe]: Suitable for all children.
– 2[G]: General audiences.
– 3[PG]: Parental guidance suggested.
– 4[PG-13]: Not suitable for anyone under 13.
– 5[PG-R]: Parental guidance recommended.
– 6[R]: Not suitable for anyone under 17 un-
less supervised by a parent or adult guard-
ian.
– 7[NC-17]: Not suitable for anyone under 17.
– 8[Adult]: All discs can be played.
Parental Password
Sets the password as a 4 digit number.
Enter your new password with the numeric buttons »1...0«, select »Ok« with »S« and press
»ENTER« to confirm.
Please do not forget the password you choose.
Page 32

ENGLISH
32
SPECIAL SETTINGS
-----------------------------------------------------------------------------------------------------
System settings
1 Press »SETUP« on the remote control to open
the main menu.
2 In the main menu select »Settings« by using
»A« or »S« and press »ENTER« to confirm.
3 Select »System« by using »A« or »S« and
press »ENTER« to confirm.
– The System menu opens.
6HWWLQJV
3DUHQWDO
6\VWHP
6\VWHP
2SWLFDO'LVF$XWR3OD\
1HW)XVLRQ
6FUHHQ6DYHU'XUDWLRQ
$XWR3RZHU'RZQ
'LJLOLQN
8SGDWH9LD1HWZRUN
5HVWRUHIDFWRU\GHIDXOWV
6\VWHP,QIRUPDWLRQ
(QDEOH
2Q
0LQXWHV
0LQXWHV
2II
'LVSOD\
$XGLR
/DQJXDJH
1HWZRUN
%'/LYH
5 Select the required function by using »A« or
»S« and press »ENTER« to activate.
6 Select your required settings by using »A« or
»S« and press »ENTER« to confirm.
7 Press »RETURN« or »a« to close the sub-
menu;
or
press »SETUP« to return to the main menu.
Existing settings in the System
menu
Optical Disc AutoPlay
There are two options:
– Disable: Once you have inserted the disc,
press » « or »ENTER« to start the playback.
– Enable: Once you have inserted the disc,
the playback starts automatically or the
discmenu is diplayed automatically.
NetFusion
Activates the access to the Digital Media
Server.
Screen Saver Duration
Sets the time of entering screen saver status
(Black screen). If the screen saver duration is
off, there will not be black screen.
Auto Power Down
Automatically turns the player off if no settings
are changed after a selected period of time
(5, 10, 20 or 30 minutes).
Digilink (CEC)
Can be used to allow the LED/LCD TV remote
control to control certain functions of the BluRay player and for the Blu-Ray player to control certain functions of the LED/LCD TV.
Not all LED/LCD TVs are compatible with your
player.
– On: allows mutual control of devices
through HDMI.
– Off: does not allow CEC control.
Update Via Network
Downloads and installs product updates for
your player.
If there is a new software available, the device
updates itself if it is connected to network.
Restore Factory Defaults
Resets your player to the default factory settings.
After presing »ENTER« a warning message
appears. Select »Ok« to confirm or »Cancel«
to cancel the function and press »ENTER« to
close the menu.
Restore function does not reset the "Parental
Control Password".
System Information
Indicates information about the player.
Page 33

33
ENGLISH
INFORMATION
------------------------------------------------------------------------------------------------------------------
Licence conditions
Manufactured under license
from Dolby Laboratories.
Dolby and the double-D
symbol are trademarks of
Dolby Laboratories.
Manufactured under license
under U.S. Patent Nos:
5,956,674; 5,974,380;
6,487,535 & other U.S.
and worldwide patents issued & pending. DTS,
the Symbol, & DTS and the Symbol together are
registered trademarks and the & DTS Digital Surround and the DTS logos are trademarks of DTS,
Inc. Product includes software. DTS, Inc. All
Rights Reserved.
This item incorporates copy-
right protection technology
that is protected by U.S. pat-
ents and other intellectual
property rights. Use of this
copyright protection technology must be authorized by Rovi Corporation, and is intended for
home and other limited viewing uses only unless
otherwise authorized by Rovi Corporation. Reverse engineering or disassembly is prohibited.
You can recognise a 3D Blu-
ray disc by the logo on the
label. The same copyright
protection for Blu-ray Disc
logo which is described
above is also effective for Blu-ray 3D Discs.
Environmental note
This product has been manufactured with high quality
parts and materials which
can be reused and are suitable for recycling.
Therefore, do not dispose the product with normal domestic waste at the end of its service life.
Take it to a collection point for the recycling of
electrical and electronic equipment. This is indicated by this symbol on the product, in the user
manual and on the packaging.
Please consult your local authorities to learn the
nearest collection point.
Help protect the environment by recycling used
products.
General information on laser devices
LASER RADIATION
DO NOT STARE INTO BEAM
CLASS 2 LASER PRODUCT
Pmax0,093mW (h405nm)
IEC 60825-1:2007
This device is a
CLASS 2 LASER
PRODUCT. This
means that the de-
vice emits laser
radiation which is safe for momentary exposures, but can be hazardous for deliberate staring into the beam.
Caution:
7
Do not stare into beam.
7
If operating devices or
methods other than those
specified here are employed, it may lead to
dangerous exposure to emissions.
7
This device emits laser radiation. Because of
the danger of eye injuries, the unit may only be
opened or serviced by trained personnel.
7
If settings other than those stated here are used
or other procedures are carried out, this may
lead to dangerous exposure to radiation.
Cleaning the device
Pull out the power cord from the wall socket.
Clean the device by using a soft cloth slightly
moistened with a mild detergent solution. Do not
use a solution containing alcohol, spirits, ammonia or abrasives.
Cleaning the disc
If the device is unable to
scan CDs perfectly, use
a standard, commercially available cleaning
CD to clean the laser
optics.
Other cleaning methods
may damage the laser optics.
Use a lint-free cloth for cleaning the CD and always wipe it from the inside out in a straight line.
Do not use cleaning agents for conventional vinyl
discs, nor any solvents or abrasive cleaners.
Page 34

ENGLISH
34
INFORMATION
------------------------------------------------------------------------------------------------------------------
Technical data
This device is noise-suppressed according to the
applicable EU directives.
This product fulfils the European directives
1999/5/EC and 2009/125/EC.
To obtain a copy of the Declaration of Conformity (Doc), please submit your request by using
the contact information at
www.grundig.com/download/doc.
The type plate is located on the back of the device.
This appliance can be operated in the following
European countries.
AT BE BG CH CY CZ DE DK
EE ES FI FR GB GR HU IE
IS IT LI LT LU LV MT NL
NO PL PT RO SE SI SK TR
This appliance can be operated in countries outside Europe.
For customers in France;
Outdoor use limited to 10 mW e.i.r.p. within the
band 2454-2483,5 MHz. Military Radiolocation
use. Refarming of the 2.4 GHz has been ongoing
in recent years to allow current relaxed regulation. Full implementation planned 2012.
WLAN
Network standard IEEE 802.11b IEEE 802.11g
Transfer rate 802.11b:11, 5.5, 2,1 Mbps
802.11g: 54, 48, 36, 24, 18, 12, 9, 6 Mbps
Operating channels: 13 (based on the router)
Safety: Hardware-WEP-Engine (64/128 Bit);
WEP-Weak- Key-Avoidance (WEPplus), TKIP,
Hardware-AES-Engine with support for CCM and
OCB, 802.1x, SSN.
System
Power supply
Operating voltage: 110 - 240 V
~
Mains frequency: 50/60 Hz
Max. power consumption: 17 W
Power consumption in standby: ≤ 1 W
Playback standard
PAL, 50 Hz, 625 lines
NTSC, 60 Hz, 525 lines
Disc types
3D BD, 2D BD, DVD- video Disc (DVD-ROM),
DVD-RW, DVD+RW, DVD-R, DVD+R, WMA,
JPEG, MPEG4, CD-R, CD-RW
USB
USB 2.0 compatible FAT 32/16
Laser
Semiconductor laser
Wavelength for BD 400 - 410 nm
Wavelength for DVD 650 - 663 nm
Wavelength for CD 770 - 800 nm
Audio format
Digital MPEG4, Dolby Digital, Dolby Digital Plus,
Dolby TrueHD, DTS Advance Digital out
Audio
BD/DVD 192 kHz
Signal to Noise ratio: 90 dB
Dimensions and weight
Device dimensions:
W x H x D : 430 x 44 x 230 mm
Device weight: 2.1 kg
Technical and design modifications reserved.
Page 35

35
ENGLISH
INFORMATION
------------------------------------------------------------------------------------------------------------------
Troubleshooting
Not every picture or sound problem is caused
by a defect in your device. Cables that have
accidentally been disconnected, damaged discs
and flat batteries for the remote control will
impair functioning.
If the following measures do not resolve the
problem satisfactorily, please contact your
specialist dealer.
To reset this unit
To return all settings other
than some settings to the
factory preset.
Select Yes in Restore Default Settings in the Setup menu. This returns
all values in the Setup menu and the on-screen menu, except for
parental setting to the default settings.
Power
No power.
Insert the AC power supply cord securely into a known active AC
outlet.
The player switches to
standby mode.
This is a power saving feature.
The Auto Power Down function is activated. Press »8« on the player
to turn the device on.
Operation
The remote control doesn’t
work properly.
The batteries are depleted. Replace them with new ones.
You are not pointing the remote control at the main unit’s remote con-
trol signal sensor during operation.
Colored glass may obstruct the signal reception/transmission.
Don’t place the signal sensor in direct sunlight or in areas that may be
subject to sunlight exposure.
The player is on but cannot
be operated.
Select the correct playback source (BD-ROM or Media).
Some operations may be prohibited by the disc.
Reset the device as follows:
1. Press »8« on the device to switch the device to standby. If the device doesn’t switch to standby, alternatively, disconnect the AC power
supply cord, wait one minute, then reconnect it.
2. Press »8« on the device to switch it on. If the device still cannot be
operated, consult the dealer.
Condensation has formed: Wait 1 to 2 hours for it to evaporate.
Play fails to start even when
(PLAY) is pressed. Play
starts but then stops immediately.
Insert the disc correctly with the label facing up.
The disc is dirty.
You tried to play a blank disc or unplayable disc on this device.
Startup is slow. When the
player is turned on, audio
and video output takes a
long time.
Startup takes time in the following situations.
Immediately after a power failure or the AC power supply cord is
connected.
When the unit is connected with an HDMI cable.
Page 36

ENGLISH
36
Auto open while reading
the disc.
The disc is dirty or any scratched.
The format of the disc is not supported.
Try to reset the device. To do so, press "8", wait for 5 seconds and
then press this button again.
Audio and video momentarily pause while reading
disc.
The disc is dirty or scratched.
Check the TV system setting, switch PAL/NTSC TV system in setup menu.
Try to reset the device. To do so, press "8", wait for 5 seconds and
then press this button again.
The player is on with start
logo and menu but has no
image from the disc.
The disc is dirty or any scratch.
Try to reset the device. To do so, press "8", wait for 5 seconds and
then press this button again.
The unit freezes while reading CD-R/DVD-R disc
Reset the device, when you see “ loading ” on the screen, press » « to
take out the disc, clean the disc and try it again.
If the device freezes again, the disc may have some contents the device can't support. Please stop playing the disc in this device.
Audio and video momentarily pause.
This occurs between playlist chapters or scenes ([AVCHD]).
When playing a title recorded on both layers, the unit automatically
switches between layers and plays the title in the same way as a
normal program. However, video and audio may momentarily cut out
when the unit is switching layers.
BD-Video or DVD-Video is
not played.
Ensure the disc is for the correct BD-Video region code or DVD-Video
region number, and is not defective.
You have set a parental level to limit BD-Video or DVD-Video play.
Change this setting.
Some BD-Video can only be output with HDMI.
Picture-in-picture is not played with BD-Video.
Confirm whether the disc supports picture-in-picture.
No subtitles.
Subtitles are not recorded on the disc.
Turn the subtitles on. Set “Subtitle” on the on-screen menu to “ On ”.
Angle cannot be changed.
Angles can only be changed during scenes where different angles are
recorded.
The resume play function
does not work.
Memorized positions are canceled when
– pressing »7« several times.
– opening the disc tray.
The resume play function may not work depending on the disc.
INFORMATION
------------------------------------------------------------------------------------------------------------------
Page 37

37
ENGLISH
INFORMATION
------------------------------------------------------------------------------------------------------------------
TV screen and video
The images from this player
do not appear on the television.
Picture is distorted.
Make sure that the LED/LCD-TV is connected to the VIDEO OUT socket or HDMI OUT socket on this device.
Make sure that the LED/LCD-TVs input setting (e.g., VIDEO 1) is correct.
The device is likely to enter screen saver status.
Try to reset the device. To do so, press "8", wait for 5 seconds and
then press this button again.
Video is not output in highdefinition.
High definition video cannot be output through the VIDEO OUT.
Confirm that the HDMI Resolution in the Setup menu is set properly.
The 4:3 aspect ratio picture
expands left and right.
Use the LED/LCD-TV to change the aspect. Refer to your LED/LCD-TVs
operating instructions.
When it is playing BD-LIVE
disc, Video output is a
black screen.
Insert a USB memory stick with a free space. Select BD-Live Storage
from the BD-Live Menulist. Then restart the device.
Please check the internet is available or not. Some of the disc need the
support of internet.
Please check the connection cable to the router. If it is loose, please
insert again.
Internet
Desired WLAN network not
found.
– WLAN network is deactivated, switch on the WLAN network.
– SSID is suppressed on the router; display SSID on the router.
– Distance to router is too large; reduce distance to router.
Connection to router not
established.
– MAC adress of the device is not enabled on the router;
enable MAC address on the router.
– Data transfer from the router is encrypted; Enter the network key
(WEP orWPA) on the device.
If this does not help, check the entire router configuration.
Sound
No sound. Low volume.
Distorted sound.
Cannot hear the desired
audio type.
Check the connections and the “Digital Output” settings. Check the
input mode on the amplifier/receiver if you have connected one.
Press »AUDIO« to select the audio signal.
The sound effects (Re-master, V. Surround, etc.) will not work when the
bitstream signal is output from the HDMI OUT socket or the
»COAXIAL« socket.
When “BD-Video Secondary Audio” is set to “Off”, Dolby Digital
Plus, and Dolby TrueHD are output from the »COAXIAL« terminal as
Dolby Digital or DTS Digital Surround bitstream.
Cannot switch dubbed language or the audio format .
Try to reset the device. To do so, press "8", wait for 5 seconds and
then press this button again.
There are discs for which audio cannot be changed because of how
the disc was created.
When connecting an amplifier/receiver using a coaxial cable or an
HDMI cable, you cannot switch the audio if “Digital Output” is set to
“Bitstream”. Set “Digital Output” to “PCM” or connect using audio
cables.
Page 38

ENGLISH
38
HDMI connections
The 4:3 aspect ratio picture
expands left and right.
Screen size is wrong.
Change “TV Aspect ” type to “16:9 Wide”.
BD-Live and USB connections
Cannot connect network
Check if the disc is a legal copy.
Confirm whether the network connection is ok.
After network connection,
cannot download file
Check if the capacity of Storage is full. if it is full, please clear storage
in the BD-Live menu and reset the device.
Confirm whether the network connection is ok.
Change USB device and then test it.
Succeed in downloading
file, but playback pause.
Confirm the device is USB 2.0. if it is USB 1.1, playing may pause.
Pause playing the file in the
USB device
Change USB device and then test it.
INFORMATION
------------------------------------------------------------------------------------------------------------------
Page 39

ZZZJUXQGLJFRP
Page 40

%OXUD\3OD\HU
*%3'
'(
Page 41

DEUTSCH
2
INHALT
------------------------------------------------------------------------------------------------------------------------------------------------
3 AUFSTELLEN UND SICHERHEIT
4 BLU-RAY PLAYER GBP 7000 3D
4 Lieferumfang
4 Besonderheiten des Blu-ray Players
6 AUF EINEN BLICK
6 Die Bedienelemente des Blu-ray Player
7 Die Fernbedienung
9 ANSCHLIESSEN/VORBEREITEN
9 LED/LCD TV anschließen – mit einem
HDMI Kabel
9 LED/LCD TV anschließen – mit Cinch-
Kabel
9 Digitales Audiosystem anschließen – mit
einem Cinch-Kabel
10 MP3 Player oder USB Memory Stick
anschließen
10 LAN-Verbindung zum Internet
10 Über Funkantenne mit dem Internet
verbinden
11 Netzkabel anschließen
11 Batterien in die Fernbedienung einlegen
12 INBETRIEBNAHME
12 Blu-ray Player einschalten
12 Navigieren in den Menüs
12 Erstinstallation mit dem Menü
„Quick Setup”
13 Erstinstallation mit dem Menü
„Einstellungen”
13 Sprache der Bildschirmmenüs wählen
13 Blu-ray Player an den LED/LCD-TV
anpassen
14 Blu-ray-Modus wählen
15 Netzwerkeinstellungen bei LAN-
Verbindung
16 Netzwerkeinstellungen bei WLAN-
Verbindung
17 Manuelle Einstellungen bei WLAN-
Verbindung
19 WIEDERGABE EINER BD/DVD
19 Merkmale der Blu-ray Disc
19 Merkmale der DVD
19 Vorbereiten
19 Disc einlegen
20 Wiedergabe
20 Disc entnehmen
20 Lautstärke einstellen
20 Ton aus- und einschalten
20 Zusätzliche Wiedergabe-Funktionen
23 DIE BD LIVE-FUNKTIONEN
23 Externen Speicher anschließen
23 BD Live-Funktion aktivieren
24 BD Live anwenden
24 BD Live Hinweise
25 WIEDERGABE VON AUDIO/VIDEO
DATEIEN
25 Inhalte eines Datenspeichers oder eines
USB-Memory Sticks wiedergeben
26 Bild-CDs wiedergeben
27 Audio CDs wiedergeben
28 NETFUSION MODUS
28 Was ist NetFusion
28 NetFusion Funktion aktivieren
29 Vorbereiten
29 Wiedergabe vom Digitalen Medien
Server
30 SONDEREINSTELLUNGEN
30 Ton Einstellungen
30 Die Einstellungen im Menü Audio
32 Spacheinstellungen
32 Die Einstellungen im Menü Sprache
33 Jugendschutz-Einstellungen
33 Die Einstellungen im Menü Jugendschutz
34 Systemeinstellungen
34 Die Einstellungen im Menü System
35 INFORMATIONEN
35 Lizenzbedingungen
35 Umwelthinweis
35 Allgemeine Hinweise für Geräte mit Laser
36 Blu-ray Player reinigen
36 Disc reinigen
36 Technische Daten
38 Störungen selbst beheben
Page 42

3
DEUTSCH
AUFSTELLEN UND SICHERHEIT
---------------------------------------------------------
Beachten Sie beim Aufstellen des Blu-ray Players
bitte die folgenden Hinweise:
7
Der Blu-ray Player ist für die Wiedergabe von
Bild- und Tonsignalen von Blu-ray Discs, DVDs
und externen USB-Datenträgern bestimmt.
Jede andere Verwendung ist ausdrücklich aus-
geschlosen.
7
Soll das Gerät in Wandregalen oder Schränken aufgestellt werden, auf ausreichende
Belüftung achten. 10 cm Freiraum seitlich,
oberhalb und hinter dem Blu-ray Players nicht
unterschreiten.
7
Blu-ray Player nicht mit Zeitungen, Deckchen
oder ähnlichen abdecken.
7
Beim Aufstellen des Blu-ray Players beachten, dass Oberflächen von Möbeln mit den
verschiedensten Lacken und Kunststoffen
beschichtet sind. Diese enthalten meistens
chemische Zusätze die u. a. das Material
der Gerätefüße angreifen können. Dadurch
können Rückstände auf der Möbeloberfläche
entstehen, die sich nur schwer oder nicht mehr
entfernen lassen.
7
Wenn der Blu-ray Player starken Temperaturschwankungen ausgesetzt ist, zum Beispiel
beim Transport vom Kalten ins Warme, den
Blu-ray Player an das Stromnetz anschließen
und ihn mindestens zwei Stunden ohne eingelegte Disc stehen lassen.
7
Der Blu-ray Player ist für den Betrieb in trockenen Räumen bestimmt. Sollte er dennoch im
Freien betrieben werden, das Gerät vor Feuchtigkeit (Tropf- und Spritzwasser) schützen.
7
Gerät nur in gemäßigtem Klima betreiben.
7
Blu-ray Player nicht in unmittelbare Nähe der
Heizung oder in die pralle Sonne stellen, dadurch wird die Kühlung beeinträchtigt
7
Keine mit Flüssigkeiten gefüllten Gefäße (Vasen oder ähnliches) auf den Blu-ray Player
stellen. Das Gefäß kann umkippen und die
Flüssigkeit kann die elektrische Sicherheit be-
einträchtigen.
7
Keine Fremdkörber in die Disc-Schublade stecken.
7
Keine offenen Brandquellen, wie z.B. Kerzen
auf das Gerät stellen.
7
Der Blu-ray Player darf auf keinen Fall geöffnet werden. Bei Schäden, die durch unsachgemäße Eingriffe entstehen, geht der Anspruch
auf Gewährleistung verloren.
7
Gewitter stellen eine Gefahr für jedes elektrische Gerät dar. Auch wenn der Blu-ray Player
ausgeschaltet ist, kann er durch einen Blitzschlag in das Stromnetz beschädigt werden.
Bei einem Gewitter immer den Netzstecker
ziehen.
7
Die Disc-Schublade des Blu-ray Players immer
geschlossen halten, damit sich kein Staub auf
der Laseroptik ansammelt.
7
Keine Reinigungsmittel verwenden, diese können das Gehäuse beschädigen. Den Blu-ray
Player mit einem sauberen, trockenen Tuch
reinigen.
Hinweise:
7
Schließen Sie keine Geräte an, wenn der
Blu-ray Player eingeschaltet ist. Schalten Sie
vo dem Anschließen auch die anderen Geräte aus.
7
Stecken Sie den Netzstecker des Blu-ray
Players erst dann in die Steckdose, wenn Sie
die externen Geräte angeschlossen haben.
Sorgen Sie dafür, dass der Netzstecker frei
zugänglich ist!
Page 43

DEUTSCH
4
BLU-RAY PLAYER GBP 7000 3D
------------------------------------------------------
Lieferumfang
Blu-ray Player GBP 7000 3D
Fernbedienung
2 Batterien (Micro, R03/UM 4/AAA, 2 x 1,5 V)
Bedienungsanleitung
HDMI Kabel
GBP 7000 3D
Blu-ray Player
Fernbedienung
Bedienungsanleitung
HDMI Kabel
Zwei Batterien
Besonderheiten des Blu-ray
Players
7
Der Grundig Blu-ray Player bietet hochauflösende Videowiedergabe mit einer Auflösung
von bis zu 1080 p.
7
3D-Wiedergabe mit der neuesten Technologie
auf 3D Blu-ray Discs bei Anschluss an einen
3D-kompatiblen LED/LCD-TV.
7
Hochskalierung der SD DVDs für verbesserte
Bildqualität auf bis zu 1080 p über die HDMI
Buchse.
7
Multikanal Surround Sound.
7
Einfacher Anschluss an den LED/LCD TV über
ein HDMI-Kabel.
7
Digitaler und analoger Tonausgang zum Anschluss Ihres Audiosystems oder Verstärkers.
7
PIP Funktionalität: Damit können zum abgespielten Film zusätzliche Videoinhalte in einem
Kleinbild angezeigt werden, wenn unterstützt
von der Blu-ray Disc.
7
Pop-up Menüanzeige ohne Unterbrechung
der Wiedergabe (wenn unterstützt von der
Blu-ray Disc).
7
HDMI 1080 p /50 fps Ausgang (nur Bluray Disc) bietet problemlose Wiedergabe
mit einer Bildfrequenz von 50 Bildern pro
Sekunde. (Der LED/LCD TV muss mit einem
HDMI Kabel angeschlossen werden und mit
1080 p 50 Bilder kompatibel sein.)
7
Zugriff auf BD-Live Funktionen über den Internetanschluss und einem zusätzlichen Speicher
(wenn unterstützt von der Blu-ray Disc).
7
Das Gerät unterstützt NetFusion. Dadurch
können Sie das Streaming von Medieninhalten mit der Steuerung eines angeschlossenen
Medienreceivers kombinieren, während Sie
Inhalte von einem anderen PC im Netzwerk
darauf übertragen.
7
MP3 und WMA Musikdatenformate können
ebenfalls über die USB Buchse oder eine
Audio CD abgespielt werden.
7
Digitale Photodateien, die auf eine Datendisc
(DVD+/-R, DVD+/-R/W) oder auf eine Blu-ray
Disc gespeichert wurden können angezeigt
werden.
7
DIGI LINK-Funktion
Ihr Blu-ray Player ist mit einer DIGI
LINK Funktion ausgestattet. Diese
Funktion verwendet das CEC (Consumer Electronics Control) Protokoll.
CEC ermöglicht, externe Geräte, die mit einem
HDMI-Kabel an die »HDMI« Buchsen angeschlossen sind (z.B. Blu-ray Player und LED/LCDTV), mit einer Fernsteuerung zu bedienen.
Voraussetzung ist, die angeschlossenen Geräte
unterstützen CEC. Lesen Sie in der Bedienungsanleitung des LED/LCD-TVs nach, wie die entsprechenden Funktionen hier aktiviert werden.
Page 44

5
DEUTSCH
BLU-RAY PLAYER GBP 7000 3D
------------------------------------------------------
Hinweise:
7
Beschreibbare DVDs (DVD-RW, DVD-R) müs-
sen finalisiert werden; nur der VR Modus ist
zulässig. Bei einigen Disctypen kann es sein,
dass die Wiedergabe nicht funktioniert,
wenn bestimmte Funktionen, wie eine Änderung des Blickwinkels und des Bildformats
durchgeführt werden. Informationen über
die Disc finden Sie auf deren Verpackung.
7
Achten Sie darauf, dass die Discs nicht
verschmutzen oder verkratzen. Fingerabdrücke, Schmutz, Staub, Kratzer oder
Ablagungen von Zigarettenrauch auf der
Aufnahmefläche können die Wiedergabe
verhindern.
7
CD-R/-RW, DVD-RW/-R, die im UDF- oder
ISO9660 Format aufgezeichnet werden,
können wiedergegeben werden.
7
Windows Media Audio (WMA) Dateien
müssen mit der Dateiendung .wma versehen
sein, um korrekt erkannt und wiedergegeben zu werden.
7
JPEG Bilddateien müssen mit der Datei-
endung .jpeg oder .jpg versehen sein, um
korrekt erkannt und wiedergegeben zu werden.
Kennzeichnung
Disc Typ
3D Blu-ray Disc
Blu-ray Disc
DVD-video Disc
(DVD-ROM)
DVD-RW
DVD+RW
DVD-R
DVD+R
WMA
JPEG
MPEG4
CD-R
CD-RW
Page 45

DEUTSCH
6
Die Rückseite des Blu-ray Players
110 - 240 V Netzkabel.
50/60 Hz
ETHERNET Buchse zum Anschließen an
das Heimnetzwerk über LAN-
Kabel.
HDMI OUT HDMI-Ton-/Bildsignal-Aus-
gangsbuchse zum Anschlie-
ßen eines LED/LCD-TV.
AUDIO OUT
L/R
Ton-Ausgangsbuchsen (links/
rechts, analog) zum Anschlie-
ßen einer HiFi-Anlage.
AUF EINEN BLICK
---------------------------------------------------------------------------------------------------------
Die Bedienelemente des Blu-ray Player
Die Vorderseite des Blu-ray Players
Disc-Fach
Fach für Blu-ray Discs, DVDs
und CDs.
•
Infrarotsensor für die Signale
der Fernbedienung.
Anzeige des Blu-ray Players.
Stand-by
Anzeige
Leuchtet, wenn sich das Gerät
im Stand-by Modus befindet.
USB Buchse zum Anschließen
von MP3 Player, USB Memory
Stick oder Kartenlesegerät.
9 Schaltet das Gerät aus Stand-by ein
und wieder aus.
Wählt den nächsten Titel, das
nächste Kapitel, den nächsten Track
oder die nächste Datei, wenn vor-
handen.
Wählt den vorherigen Titel, das vor-
herige Kapitel, den vorherigen Track
oder die vorherige Datei, wenn vor-
handen.
Startet die Wiedergabe und schaltet
auf Wiedergabe-Pause.
. Öffnet oder schließt das Disc-Fach.
VIDEO OUT Bild-Ausgangsbuchse zum An-
schließen eines LED/LCD-TV
oder AV Receivers mit einer
Cinch-Buchse.
COAXIAL Ton-Ausgangsbuchse
(digital) zum Anschließen
eines digitalen Mehrkanal Au-
dio-/Video verstärkers.
WLAN
ANTENNA
Antenne zum kabellosen Inter-Antenne zum kabellosen Inter-
netempfang.
GBP 7000 3D
Disc-Fach Anzeige Stand-by Anzeige USB
.
e
!
9
IR Sensor
GBP 7000 3D
BLU-RAY DISC PLAYER
GLR 5900
AC:110-240 V 50/60 Hz
POWER:17 W
~
SN
110-240 V 50/60 Hz
Ethernet HDMI OUT
AUDIO OUT L/R
VIDEO OUT
KOAXIAL
WLAN ANTENNA
Page 46

7
DEUTSCH
AUF EINEN BLICK
---------------------------------------------------------------------------------------------------------
Die Fernbedienung
9 Schaltet das Gerät aus Stand-by
ein und wieder aus.
Öffnet oder schließt das Disc-
Fach.
1 - 0 Zifferntasten für verschiedene
Eingaben.
SEARCH Wiederholtes Drücken wählt
den Suchlauf-Modus (Titel, Kapitel und Zeit). Danach mit den
Zifferntasten Titel, Kapitel oder
Zeit eingeben und mit »ENTER«
bestätigen.
RETURN Schaltet zum übergeordneten
Menüpunkt bei den Einstellungen oder dem übergeordneten
Ordner/Menü beim Abspielen
einer WMA/MP3/JPEG-Datei.
OSD Zeigt den aktuellen Wiederga-
bestatus und die Spielzeit an.
SUBTITLE Zum Einblenden des Untertitel-
menüs während der Wiedergabe von Blu-ray Disc oder DVD,
danach mit den Cursortasten die
gewünschte Untertitelsprache
wählen und mit »ENTER« bestätigen.
A-B Markiert Anfang und Ende einer
Szene, diese wird wiederholt
abgespielt. Taste noch einmal
drücken beendet die Funktion
(abhängig von der verwendeten
Disc).
REPEAT Wählt die Wiederhol-Funktionen
(Titel, Kapitel, Aus).
3 Schaltet während der Wieder-
gabe auf Bildsuchlauf rückwärts
in verschiedenen Geschwindigkeiten.
4 Schaltet während der Wieder-
gabe auf Bildsuchlauf vorwärts
in verschiedenen Geschwindigkeiten.
Wählt den nächsten Titel, das
nächste Kapitel, den nächsten
Track oder die nächste Datei,
wenn vorhanden.
Wählt den vorherigen Titel, das
vorherige Kapitel, den vorherigen Track oder die vorherige
Datei, wenn vorhanden.
Page 47

DEUTSCH
8
AUF EINEN BLICK
---------------------------------------------------------------------------------------------------------
7 Beendet die Wiedergabe.
Startet die Wiedergabe oder
schaltet auf Wiedergabe-Pause.
!8 Schaltet das Bild schrittweise
weiter.
DISC MENU Unterbricht die Wiedergabe
und blendet das Discmenü der
Blu-ray Disc oder der DVD ein
(der Inhalt ist abhängig von der
verwendeten Disc).
POPUP
MENU
TITLE MENU
Blendet das Titelmenü der Blu-
ray Disc oder der DVD ein (der
Inhalt ist abhängig von der verwendeten Disc).
aASs Wählen in den Menüs verschie-
dene Funktionen.
ENTER Bestätigt in den Menüs ange-
wählte Funktionen
SETUP Ruft das Hauptmenü des Blu-ray
Players auf.
ANGLE Wählt während der Wieder-
gabe verschiedene Kamerawinkel für bestimmte Szenen oder
Passagen der Blu-ray Disc oder
der DVD (abhängig von der verwendeten Disc).
FARBTASTEN
Die roten, grünen, gelben und
blauen Tasten starten Bonusfunktionen auf einigen BD Disks der
Blu-ray Disc (abhängig von der
verwendeten Disc).
RESOLUTION Im Stoppmodus, zur Anwahl der
HDMI Auflösung (der LED/LCD
TV muss die Einstellung unterstützen. Siehe auch Bedienungsanleitung des LED/LCD TV s).
PIP Aktiviert die PIP Funktion (Klein-
bild).
SECONDARY
AUDIO
Wählt während der PIP Wieder-
gabe die Synchronsprache oder
das Tonformat des Kleinbildes.
MUTE Schaltet den Ton aus und wieder
ein.
ZOOM Vergrößert Szenen während der
Wiedergabe (nur für DVD).
– VOLUME + Ändern die Lautstärke.
AUDIO Wählt während der Wieder-
gabe die Synchronsprache oder
das Tonformat.
Page 48

9
DEUTSCH
ANSCHLIESSEN/VORBEREITEN
-------------------------------------------------------
Hinweise:
7
Schließen Sie keine anderen Geräte an,
während der Blu-ray Players eingeschaltet
ist.
Schalten Sie die anderen Geräte ebenfalls
aus, bevor Sie diese anschließen.
7
Stecken Sie den Netzstecker des Blu-ray
Players erst dann in die Steckdose, wenn Sie
die externen Geräte angeschlossen haben!
LED/LCD TV anschließen – mit
einem HDMI Kabel
LED/LCD TV
Blu-ray Player
1 Beiliegendes HDMI-Kabel in die Buchse
»HDMI« des Blu-ray Players und in die entsprechende Buchse (HDMI) des LED/LCD TVs
stecken.
LED/LCD TV anschließen – mit
Cinch-Kabel
Zum Videoeingang (gelb)
Zu den Audioeingängen (rot,weiß)
Blu-ray Player
LED/LCD TV
GelbRotWeiss
GelbRot Weiss
1 Handelsübliches Cinch-Kabel in die Buchse
»VIDEO OUT« des Blu-ray Players und in die
entsprechende Buchse (VIDEO IN) des LED/
LCD TVs stecken.
2 Handelsübliches Cinch-Kabel in die Buchsen
»AUDIO OUT L/R« des Blu-ray Players und
in die entsprechende Buchsen (AUDIO IN)
des LED/LCD TVs stecken.
Digitales Audiosystem anschließen – mit einem Cinch-Kabel
Blu-ray Player
Audiosystem
Zum Videoeingang
Zum Audioeingang (digital)
Koaxialkabel
Fernsehgerät
1 Handelsübliches Cinch-Kabel in die Buchse
»COAXIAL« des Blu-ray Players und in die
entsprechende Buchse des Audiosystems stek-ken.
Page 49

DEUTSCH
10
ANSCHLIESSEN/VORBEREITEN
-------------------------------------------------------
MP3 Player oder USB Memory
Stick anschließen
GBP 7000 3D
Hinweis:
7
Der Blu-ray Player muss während des An-
schließens eines USB Gerätes ausgeschaltet
sein. Ist dies nicht der Fall, kann es zu einem
Datenverlust führen.
1 Blu-ray Player mit »9« ausschalten.
2 USB-Schnittstelle des MP3 Players über ein
handelsübliches USB-Kabel mit der Buchse
» « des Blu-ray Players verbinden;
oder
USB-Stecker des USB-Memory Sticks in die
Buchse » « des Blu-ray Players stecken.
Hinweise:
7
Zum Entfernen des MP3 Players oder des
USB-Memory Sticks den Blu-ray Player ausschalten und das Kabel bzw. den Datenträger abziehen.
7
Die Buchse » « des Blu-ray Players ist
nicht geeignet zum Anschließen eines USBVerteilers oder eines Computers.
LAN-Verbindung zum Internet
GBP 6000 2D
BLU-RAY DISC PLAYER
GLR 5800
AC:110-240 V 50/60 Hz
POWER:17 W
~
SN
Blu-ray Player
Splitter
Telefondose
Modem/Router
1 Ethernet Buchse des Modems/Routers mit
einem handelsüblichen Standard-Netzwerkkabel (Twistedpair, RJ45 Stecker) an die
Buchse »ETHERNET« des Blu-ray Players anschließen.
– Der Datendurchsatz beträgt 10/100 Mbit.
WLAN-Verbindung zum Internet
Modem/Router
Blu-ray Player
WLAN
1 Zum Aktivieren der »WLAN ANTENNA« das
Netzwerkkabel von der Buchse »ETHERNET«
abziehen.
– Die LEDs an der »WLAN ANTENNA« be-
ginnen zu blinken.
Hinweis:
7
Die Netzwerkkonfiguration und Anschluss-
methode kann je nach verwendetem Zubehör und der Netzwerkumgebung variieren.
Der Blu-ray Player ist mit einem kabellosen
IEEE 802.11n-Modul ausgestattet, das
auch die 802.11b/g-Standards unterstützt.
Für eine optimale Verbindung sollten Sie
ein IEEE 802.11n-zertifiziertes WLANNetzwerk (Zugangspunkt oder WLANRouter) verwenden.
Page 50

11
DEUTSCH
ANSCHLIESSEN/VORBEREITEN
-------------------------------------------------------
Netzkabel anschließen
Hinweise:
7
Prüfen Sie, ob die Spannungsangabe auf
dem Typenschild (an der Rückseite des
Gerätes) mit Ihrer örtlichen Netzspannung
übereinstimmt. Ist dies nicht der Fall, wenden
Sie sich an Ihren Fachhändler.
7
Bevor Sie das Netzkabel in die Steckdose
stecken, stellen Sie sicher, dass alle anderen
Geräte angeschlossen sind.
GBP 6000 2D
BLU-RAY DISC PLAYER
GLR 5800
AC:110-240 V 50/60 Hz
POWER:17 W
~
SN
1 Netzkabel in die Steckdose stecken.
Achtung:
7
Der Blu-ray Player ist über das Netzkabel mit
dem Stromnetz verbunden. Wenn Sie den
Blu-ray Player vollständig vom Stromnetz
trennen wollen, müssen Sie den Netzstecker
ziehen.
7
Sorgen Sie dafür, dass der Netzstecker wäh-
rend des Betriebes frei zugänglich bleibt
und nicht durch andere Gegenstände behindert wird.
Batterien in die Fernbedienung
einlegen
1 Batteriefach öffnen, dazu auf den Verschluss
des Batteriefachs drücken und den Deckel abnehmen.
2 Zwei Batterien einlegen (2 x 1,5 V, Typ
Mikro, z.B. R 03/UM 4/AAA). Dabei Polung
beachten, im Batteriefachboden markiert
3 Deckel des Batteriefachs aufsetzen.
Hinweise:
7
Setzen Sie die Batterien keiner extremen Hit-
ze aus, die z.B. durch direktes Sonnenlicht,
Heizgeräte oder Feuer verursacht wird.
7
Entfernen Sie die Batterien, wenn sie ver-
braucht sind oder das Gerät über einen längeren Zeitraum nicht verwendet wird. Für
Schäden, die durch ausgelaufene Batterien
entstehen, kann nicht gehaftet werden.
Umwelthinweis:
7
Die Batterien – auch schwermetallfreie –
dürfen nicht im Hausmüll entsorgt werden.
Verbrauchte Batterien müssen in die Altbatteriesammelgefäße bei Handel und öffentlich-rechtlichen Entsorgungsträgern gegeben werden.
Page 51

DEUTSCH
12
INBETRIEBNAHME
------------------------------------------------------------------------------------------------------
Blu-ray Player einschalten
Wenn Sie den Blu-ray Player an die Stromversorgung anschließen, schaltet er in den Stand-by
Modus.
1 Netzkabel in die Steckdose stecken.
– Die Stand-by-Anzeige leuchtet.
2 Blu-ray Player mit »9« einschalten.
– Die Stand-by-Anzeige erlischt.
– Anzeige: »HELLO«.
3 LED/LCD TV einschalten und den Programm-
platz für den Blu-ray Player wählen.
Navigieren in den Menüs
Wenn Sie den Blu-ray Player einschalten, wird
das Haupt-Menü eingeblendet.
6HWWLQJV
0HGLD
1HW)XVLRQ
4XLFN6HWXS
1HW)XVLRQ
1 Mit »A«, »S«, »s« oder »a« kann das
gewünschte Menü angewählt werden.
2 Mit »ENTER« wird das gewählte Menü akti-
viert und Einstellungen bestätigt.
6HWWLQJV
3DUHQWDO
6\VWHP
/DQJXDJH
26'
0HQX
$XGLR
6XEWLWOH
(QJOLVK
$XWR
$XWR
1RQH
'LVSOD\
$XGLR
/DQJXDJH
1HWZRUN
%'/LYH
3 Mit »RETURN« wird eine Menüebene zurück-
geschaltet.
Erstinstallation mit dem Menü
„Quick Setup”
Verwenden Sie die »Quick Setup« Funktion, um
die ersten Einstellungen vorzunehmen.
Weitere Einstellungen finden Sie im Menü »Einstellungen« siehe Kapitel „Erstinstallation mit
dem Menü Einstellungen” auf der folgenden
Seite.
1 Hauptmenü mit »SETUP«aufrufen.
2 Zeile »Quick Setup« mit »A« oder »S«
wählen und mit »ENTER« bestätigen.
– Anzeige: »Would you like to do Quick Se-
tup? Yes-No«.
3 Schaltfläche »Yes« mit »a« oder »s« wählen
und mit »ENTER« bestätigen.
– Anzeige: Das Menü »OSD Language Set-
tings«.
4 Gewünschte Sprache mit »A« oder »S«
wählen und mit »ENTER« bestätigen.
– Anzeige: Das Menü »Auflösung«.
5 Abhängig vom LED/LCD TV, an das der Blu-
ray Player angeschlossen wurde, die Auflösung mit »A« oder »S« wählen und mit
»ENTER« bestätigen.
– Anzeige: Das Menü »Bildformat«.
6 Abhängig vom LED/LCD TV, an das der Blu-
ray Player angeschlossen wurde, das Bildformat mit »A« oder »S« wählen und mit
»ENTER« bestätigen.
– Anzeige: »Quick-Setup abgeschlossen!«.
7 Einstellungen mit »ENTER«beenden.
Page 52

13
DEUTSCH
Erstinstallation mit dem Menü
„Einstellungen”
Sprache der Bildschirmmenüs
wählen
1 Hauptmenü mit »SETUP«aufrufen.
2 Zeile »Settings« mit »A« oder »S« wählen
und mit »ENTER« bestätigen.
3 Zeile »Language« mit »A« oder »S« wäh-
len und mit »ENTER« bestätigen.
6HWWLQJV
3DUHQWDO
6\VWHP
/DQJXDJH
26'
0HQX
$XGLR
6XEWLWOH
(QJOLVK
$XWR
$XWR
1RQH
'LVSOD\
$XGLR
/DQJXDJH
1HWZRUN
%'/LYH
4 Menüoption »OSD« mit »A« oder »S«
wählen und mit »ENTER« bestätigen.
5 Gewünschte Sprache mit »A« oder »S«
wählen und mit »ENTER« bestätigen.
6 Mit »RETURN« zum Menü »Einstellungen«
zurückschalten.
Blu-ray Player an den LED/LCDTV anpassen
TV System (TV Norm) einstellen
Abhängig vom LED/LCD-TV wählen Sie entweder die TV Norm »PAL« oder »NTSC«.
1 Im Menü »Einstellungen« die Zeile »Anzeige«
mit »A« oder »S« wählen und mit
»ENTER« bestätigen.
2 Menüoption »TV Norm« mit »A« oder
»S« wählen und mit »ENTER« bestätigen.
INBETRIEBNAHME
------------------------------------------------------------------------------------------------------
(LQVWHOOXQJHQ
-XJHQGVFKXW]
6\VWHP
$Q]HLJH
+'0,6WDWXV
+'0,%HYRU]XJWHV
)RUPDW791RUP
$XIO|VXQJ
%LOGIRUPDW
)LOP0RGXV
)DUEWLHIH
%OXUD\'0RGH
9HUEXQGHQ
3
3$/
+'0,$XWR
%UHLWELOG
$XV
$XWRPDWLVFK
':LHGHUJDEH
$Q]HLJH
$XGLR
6SUDFKH
1HW]ZHUN
%'/LYH
3 Benötigte Einstellung (»PAL« oder »NTSC«)
mit »A« oder »S« wählen und mit »EN-
TER« bestätigen.
HDMI Auflösung einstellen
Abhängig vom angeschlossenen LED/LCD TV
kann hiermit die optimale Anpassung eingestellt
werden. Die Abkürzung hinter der Zahl bedeutet: »p« = Progressive, »i« = Interlace.
Diese Funktion kann nur ausgewählt werden,
wenn der LED/LCD-TV an die »HDMI« Buchse
angeschlossen wurde.
1 Im Menü »Anzeige« die Menüoption »Auflö-
sung« mit »A« oder »S« wählen und mit
»ENTER« bestätigen.
-XJHQGVFKXW]
6\VWHP
$Q]HLJH
$XGLR
6SUDFKH
1HW]ZHUN
%'/LYH
L
S
S
L
+'0,$XGLR
S
%LWWHZlKOHQ6LHHLQHQHXH$XIO|VXQJ
¦
2 Benötigte Einstellung (»HDMI Auto«, »1080p«,
»1080i«, »720p«, »576p«, »576i«) mit »A«
oder »S« wählen und mit »ENTER« bestätigen.
Page 53

DEUTSCH
14
INBETRIEBNAHME
------------------------------------------------------------------------------------------------------
Hinweis:
7
Die benötigte Auflösung – abhängig vom
LED/LCD TV – entnehmen Sie bitte der folgenden Aufstellung:
LED/LCD-TV
empfohlene
Einstellung
LED/LCD-TV mit Standardauflösung (SD TV)
576i/480i
LED/LCD-TV mit verbesserter
Auflösung (ED TV)
576p/480p
Hochauflösender LED/LCD-TV
(HDTV) mit 720p
720p
Hochauflösender LED/LCD-TV
(HDTV) mit 1080i
1080i
Hochauflösender LED/LCD-TV
(HDTV) mit 1080p, Anschluss
an Buchse HDMI
1080p
Automatische Anpassung HDMI Auto
Bildformat wählen
Diese Einstellung ist abhängig von Ihrem LED/
LCD-TV.
Haben Sie einen LED/LCD-TV mit dem Format
4:3, wählen Sie die Einstellung »4:3«, Haben
Sie einen LED/LCD-TV mit dem Format 16:9 ,
wählen Sie die Einstellung »16:9«.
1 Im Menü »Anzeige« die Menüoption »Bild-
format« mit »A« oder »S« wählen und mit
»ENTER« bestätigen.
2 Benötigte Einstellung (»16:9 Breitbild«, »16:9
Pillarbox«, »4:3 Pan & Scan«, »4:3 Letterbox«)
mit »A« oder »S« wählen und mit »EN-
TER« bestätigen.
Filmmodus wählen
Es gibt Discs, die im Kinoformat mit 24 Bildern
(24p) pro Sekunde aufgezeichnet wurden.
Diese können jedoch nicht auf allen LED/LCD
TVs abgespielt werden.
Wenn Ihr LED/LCD TV dies nicht unterstützt,
wählen Sie die Einstellung »Aus«.
Die Auflösung1080 p wird nur unterstützt, wenn
der Blu-ray Player über die HDMI-Buchse mit
dem LED/LCD TV verbunden ist.
1 Im Menü »Anzeige« die Menüoption »Film-
modus« mit »A« oder »S« wählen und mit
»ENTER« bestätigen.
2 Funktion mit »A« oder »S« einschalten
(»Automatisch«) und mit »ENTER« bestätigen.
Farbtiefen Einstellung
HDMI 1.3 unterstützt 10 Bit, 12 Bit und 16 Bit
(RGB oder YCbCr) Farbtiefen während 8 Bit von
älteren Versionen unterstützt wurde. Dies erweitert die angezeigten Farben von Millionen auf
Billionen und wirkt damit lebendiger.
1 Im Menü »Anzeige« die Menüoption
»Farbtiefe« mit »A« oder »S« wählen und
mit »ENTER« bestätigen.
2 Funktion mit »A« oder »S« einschalten
(»Automatisch«) und mit »ENTER« bestätigen.
Blu-ray-Modus wählen
Es stehen zwei Optionen zur Auswahl:
– Automatisch: Wenn Sie »Automatisch« wäh--
len, wird eine 3D Blu-ray Disc automatisch
mit 3D-Effekt bzw. eine 2D Blu-ray Disc mit
2D-Effekt wiedergegeben.
– 2D Wiedergabe: Wenn Sie »2D Wieder--
gabe« wählen, werden Medien in 2D abge-spielt, unabhängig vom Format.
1 Im Menü »Anzeige« die Menüoption »Bluray
3D Modus« mit »A« oder »S« wählen und
mit »ENTER« bestätigen.
2 Die gewünschte Einstellung (»Automatisch«
oder »2D Wiedergabe«) mit »A« oder
»S«wählen und mit »ENTER« bestätigen.
Einstellungen beenden
1 Mit »SETUP« zum Hauptmenü zurückschal-
ten.
Page 54

15
DEUTSCH
INBETRIEBNAHME
------------------------------------------------------------------------------------------------------
6 Menüoption »IP Adresse« mit »A« oder
»S« wählen und mit »ENTER« bestätigen.
Daten für die IP Adresse mit den Zifferntasten
eingeben.
Die Schaltfläche »OK« mit »S« wählen
und Eingabe mit »ENTER« bestätigen, oder
zum Abbrechen der Einstellung die Schaltfläche »Abbrechen« mit »s« wählen und mit
»ENTER« bestätigen.
7 Menüoption »Netzmaske« mit »A« oder
»S« wählen und mit »ENTER« bestätigen.
Daten für die Netzmaske mit den Zifferntasten
eingeben.
Die Schaltfläche »OK« mit »S« wählen
und Eingabe mit »ENTER« bestätigen, oder
zum Abbrechen der Einstellung die Schaltfläche »Abbrechen« mit »s« wählen und mit
»ENTER« bestätigen.
8 Menüoption »Gateway« mit »A« oder »S«
wählen und mit »ENTER« bestätigen.
Daten für das Gateway mit den Zifferntasten
eingeben.
Die Schaltfläche »OK« mit »S« wählen
und Eingabe mit »ENTER« bestätigen, oder
zum Abbrechen der Einstellung die Schaltfläche »Abbrechen« mit »s« wählen und mit
»ENTER« bestätigen.
Hinweis:
7
Die Primäre und Sekundäre DNS (Domain
Name System) sind Netzwerkadressen des
Servers, die vom Provider zugewiesen wur-
den.
9 Menüoption »Primäre DNS« mit »A« oder
»S« wählen und mit »ENTER« bestätigen.
Daten für die Primäre DNS mit den Zifferntas-
ten eingeben.
Die Schaltfläche »OK« mit »S« wählen
und Eingabe mit »ENTER« bestätigen, oder
zum Abbrechen der Einstellung die Schaltfläche »Abbrechen« mit »s« wählen und mit
»ENTER« bestätigen.
Netzwerkeinstellungen für LANVerbindung
Der Blu-ray Player muss am Modem/Router mit
einem Ethernet Kabel angeschlossen sein, siehe
Kapitel „ANSCHLIESSEN/VORBEREITEN”.
1 Hauptmenü mit »SETUP«aufrufen.
2 Zeile »Einstellungen« mit »A« oder »S«
wählen und mit »ENTER« bestätigen.
3 Zeile »Netzwerk« mit »A« oder »S« wäh-
len und mit »ENTER« bestätigen.
(LQVWHOOXQJHQ
-XJHQGVFKXW]
6\VWHP
1HW]ZHUN
6FKQLWWVWHOOH
/LQN6WDWXV
0$&$GUHVVH
,30RGXV
,3$GUHVVH
1HW]PDVNH
*DWHZD\
3ULPlUH'16
6HNXQGlUH'16
6LJQDOVWlUNH
66,'1HW]ZHUNQDPH
NDEHOJHEXQGHQ
/LQN'RZQ
IEFF
'\QDPLVFK
*XW
JULQWHUQHW
$Q]HLJH
$XGLR
6SUDFKH
1HW]ZHUN
%'/LYH
4 Menüoption »IP-Modus« mit »A« oder »S«
wählen und mit »ENTER« bestätigen.
5 Benötigte Einstellung (»Dynamik« oder »Ma-
nuell«) mit »A« oder »S« wählen und mit
»ENTER« bestätigen.
Hinweise:
7
Sie haben zwei Möglichkeiten, Ihren Blu-ray
Player am Heimnetzwerk anzumelden:
– Die automatische Anmeldung (Dyna-
misch) – dabei werden alle notwendigen
Einstellungen vom Router automatisch vergeben.
– Die manuelle Anmeldung – hier müssen
alle notwendigen Einstellungen (IP Adresse, Netzmaske, Gateway, usw) von
Hand eingegeben werden.
7
Wenn Sie die Option „Dynamisch” verwen-
den, setzen Sie die Einstellung bei Pkt. 11
fort .
Wenn Sie die Option „Manuell” verwen-
den, dann weiter mit Pkt. 6.
Page 55

DEUTSCH
16
INBETRIEBNAHME
------------------------------------------------------------------------------------------------------
10 Menüoption »Sekundäre DNS« mit »A«
oder »S« wählen und mit »ENTER« bestätigen.
Daten für die Sekundäre DNS mit den Zif-
ferntasten eingeben.
Die Schaltfläche »OK« mit »S« wählen
und Eingabe mit »ENTER« bestätigen, oder
zum Abbrechen der Einstellung die Schaltfläche »Abbrechen« mit »s« wählen und mit
»ENTER« bestätigen.
11 Die Schaltfläche »Anwenden« mit »S« an-
wählen und mit »ENTER« bestätigen;
oder
die Schaltfläche »Abbrechen« mit »s« an-
wählen (wenn die Einstellungen nicht gespeichert werden sollen) und mit »ENTER«
bestätigen.
12 Wurde die Verbindung zum Heimnetzwerk
aufgebaut, wird »Netzwerktest« angezeigt.
Einstellungen mit »ENTER« beenden.
Netzwerkeinstellungen für
WLAN-Verbindung
Das Gerät muss über die WLAN-Antenne mit
einem WLAN-Router verbunden werden.
Siehe Kapitel „ANSCHLIESSEN/VORBEREITEN“.
Hinweis:
7
Die rote LED der »WLAN-Antenne« blinkt,
wenn die Antenne aktiv ist; die blaue LED
blinkt, wenn die WLAN-Verbindung aktiv ist.
1 Hauptmenü mit »SETUP«aufrufen.
2 Zeile »Einstellungen« mit »A« oder »S«
wählen und mit »ENTER« bestätigen.
3 Zeile »Netzwerk« mit »A« oder »S« wäh-
len und mit »ENTER« bestätigen.
(LQVWHOOXQJHQ
-XJHQGVFKXW]
6\VWHP
$Q]HLJH
$XGLR
6SUDFKH
1HW]ZHUN
%'/LYH
1HW]ZHUNOLVWH
0DQXHOO
1HW]ZHUNHLQVWHOOXQJHQ
'UDKWORV
4 Menüoption »Netzwerkliste« mit »A« oder
»S« wählen und mit »ENTER« bestätigen.
– Anzeige: Die verfügbaren Netzwerke.
(LQVWHOOXQJHQ
-XJHQGVFKXW]
6\VWHP
$Q]HLJH
$XGLR
6SUDFKH
1HW]ZHUN
%'/LYH
1HWZRUN/LVW
:L)L3URWHFWHG6HWXS:36
0DQXDO
1HW]ZHUNHLQVWHOOXQJHQ
'UDKWORV
1HW]ZHUNOLVWH
5 Das gewünschte WLAN-Netzwerk mit »A«
oder »S« wählen und mit »ENTER« bestätigen.
Hinweis:
7
Wenn das Netzwerk verschlüsselt ist, erscheint ein Menü für die Kennworteingabe
(WEP- oder WPA-Sicherheitscode).
6 »ENTER« drücken, die Tastatur wird einge-
blendet.
Mit »A«, »S«, »a« oder »s« das erste
Zeichen des Kennwortes (Groß- und Kleinbuchstaben, Ziffern, Symbole) wählen und mit
»ENTER« bestätigen. Eingabe für die weiteren
Zeichen wiederholen.
Nach Eingabe aller Zeichen die Schaltfläche
»OK« mit »A«, »S«, »a« oder »s« wählen und mit »ENTER« bestätigen.
Page 56

17
DEUTSCH
INBETRIEBNAHME
------------------------------------------------------------------------------------------------------
Hinweise:
7
Sie können zwischen Ziffern, Groß- und
Kleinbuchstaben sowie Sonderzeichen
wählen.
7
Bei Fehleingaben mit »A«, »S«, »a«
oder »s« die Schaltfläche » « wählen
und mit »ENTER« bestätigen. Das letzte Zeichen wird gelöscht.
7 Zum Verbinden mit dem WLAN-Netzwerk
die Schaltfläche »Verbinden« mit »A« oder
»S« wählen;
oder wenn das WLAN-Netzwerk aus der Li-
ste gelöscht werden soll die Schaltfläche »Lö-
schen« mit »a« oder »s« wählen;
oder wenn die Einstellung abgebrochen wer-
den soll die Schaltfläche »Abbruch« mit »a«
oder »s« wählen;
oder wenn die WLAN-Verbindung getrennt
werden soll, die Schaltfläche »Trennen« mit
»a« oder »s« wählen.
Auswahl mit »ENTER« bestätigen.
– Anzeige: » « Verbindung zu (WLAN-
Netzwerkname), Überprüfung der
Internetverbindung…“ erscheint.
– Anzeige: » «, wenn die Verbindung erfolg-
reich hergestellt wurde.
8 Mit »SETUP« zum Hauptmenü zurückschal-
ten.
Hinweis:
7
Weitere Hinweise zu den Optionen »Netzwerkeinstellungen« und »Netzwerktest«
finden Sie im Kapitel „Netzwerkeinstellungen für LAN-Verbindung“.
Manuelle Einstellungen für die
WLAN-Verbindung
1 Bei Pkt. 4 im Kapitel „Netzwerkeinstellungen
für WLAN-Verbindung“ die Option »Manuell« mit »A« oder »S« wählen und mit
»ENTER« bestätigen.
– Das Menü »Drahtlos Netzwerkeinstellungen«
wird eingeblendet.
(LQVWHOOXQJHQ
-XJHQGVFKXW]
6\VWHP
$Q]HLJH
$XGLR
6SUDFKH
1HW]ZHUN
%'/LYH
1HWZRUN/LVW
:L)L3URWHFWHG6HWXS:36
0DQXDO
:LUHOHVV
0DQXHOO
(17(5GUFNHQXP7DVWDWXU]X|IIQHQ
9HUVFKOVVHOXQJ 'HDNWLYLHUW
1DPH
3DVVZRUW
9HUELQGHQ $EEUXFK
%HLP1DPHQ*URXQG.OHLQVFKUHLEXQJEHDFKWHQ
2 Die Option »Verschlüsselung« mit »A« oder
»S« wählen und mit »ENTER« bestätigen.
3 Die Verschlüsselung Ihres WLAN-Netzwer-
kes mit »A« oder »S« wählen und mit
»ENTER« bestätigen.
4 Die Option »Name« mit »A« oder »S«
dwählen und mit »ENTER« bestätigen.
– Die Tastatur wird eingeblendet.
(LQVWHOOXQJHQ
-XJHQGVFKXW]
6\VWHP
$Q]HLJH
$XGLR
6SUDFKH
1HW]ZHUN
%'/LYH
1HWZRUN/LVW
:L)L3URWHFWHG6HWXS:36
0DQXDO
:LUHOHVV
0DQXHOO
(17(5GUFNHQXP7DVWDWXU]X|IIQHQ
9HUVFKOVVHOXQJ 'HDNWLYLHUW
1DPH
3DVVZRUW
9HUELQGHQ $EEUXFK
%HLP1DPHQ*URXQG.OHLQVFKUHLEXQJEHDFKWHQ
5 Mit »A«, »S«, »a« oder »s« das erste
Zeichen des Netzwerknamens (Groß- und
Kleinbuchstaben, Ziffern, Symbole) wählen
und mit »ENTER« bestätigen.
Eingabe für die weiteren Zeichen wiederho-
len.
Nach Eingabe aller Zeichen die Schaltfläche
»OK« mit »A«, »S«, »a« oder »s« wählen und mit »ENTER« bestätigen.
Page 57

DEUTSCH
18
Hinweise:
7
Mit den Schaltflächen » « und »×« auf der
Tastatur können Sie zwischen Ziffern, Kleinund Großbuchstaben sowie Sonderzeichen
wählen.
7
Bei Fehleingaben mit »A«, »S«, »a«
oder »s« die Schaltfläche » « wählen
und mit »ENTER« bestätigen. Das letzte Zeichen wird gelöscht.
6 Die Option »Passwort« mit »A« oder »S«
wählen und mit »ENTER« bestätigen.
– Die Tastatur erscheint.
7 Mit »A«, »S«, »a« oder »s« das erste
Zeichen des Kennwortes (Groß- und Klein-
buchstaben, Ziffern, Symbole) wählen und mit
»ENTER« bestätigen. Eingabe für die weiteren
Zeichen wiederholen.
Nach Eingabe aller Zeichen die Schaltfläche
»OK« mit »A«, »S«, »a« oder »s« wäh-
len und mit »ENTER« bestätigen.
8 Die Schaltfläche »Verbinden« mit »S« wäh-
len und mit »ENTER« bestätigen,
oder die Schaltfläche »Abbruch« mit »s«
wählen und mit »ENTER« bestätigen.
– Anzeige: » « Verbindung mit (WLAN-
Netzwerkname), Überprüfung der
Internetverbindung…“ erscheint.
– Anzeige: » «, wenn die Verbindung erfolg-
reich hergestellt wurde.
9 Mit »SETUP« zum Hauptmenü zurückschal-
ten.
Netzwerkeinstellungen
Siehe Kapitel „Netzwerkeinstellungen für LANVerbindung“.
INBETRIEBNAHME
------------------------------------------------------------------------------------------------------
Page 58

19
DEUTSCH
WIEDERGABE EINER BD/DVD
-------------------------------------------------------------
Diese Position umfasst
die Urheberrechtstechnologie, die von U.S.
Patenten und anderen
Rechten geistigen Eigentums geschützt wird. Der Gebrauch dieser durch
Urheberrecht geschützten Technologie muss von
der Rovi Corporation genehmigt werden und ist
nur für die private Nutzung vorgesehen, es sei
denn, dies ist von der Rovi Corporation anderweitig genehmigt. Zurückbauen oder Auseinanderbauen des Gerätes ist untersagt.
Sie erkennen eine 3D
Blu-ray Disc anhand
des Logos auf dem
Label. Derselbe oben
beschriebene Urheberrechtsschutz zum Blu-ray Disc-Logo gilt auch für
3D Blu-ray Discs.
Merkmale der Blu-ray Disc
Die große Speicherkapazität einer Blu-ray (BD)
Disc bietet einen hohen Standard der Bild- und
Tonqualität sowie eine Vielzahl von Spezialeffekten und Bonusmaterial.
BLU-RAY und JAVA
Ihr Blu-ray Player unterstützt Java Support mit
dem Sie größtenteils alle Features der aktuellen
Blu-ray Discs nutzen können.
Nach dem Laden der Blu-ray Disc rufen Sie das
Titelmenü auf, hier bekommen Sie einen Überblick über die vorhandenen Zusatzangebote.
BLU-RAY und HDMI
HDMI ist die einzige Übertragungsart, die große
Datenmengen unterstützt und damit die hohe
Bildauflösung und verbesserte Digitalaudiocodes überträgt, die Blu-ray zu einem spannenden
Medium machen.
Eine BLU-RAY DISC abspielen
Blu-ray Discs werden vergleichbar den Standard
DVDs abgespielt, jedoch mit wesentlich mehr interaktiven Funktionen. Alle Standardfunktionen
eines DVD Players gleichen denen des Blu-ray
Players, aber es gibt einige Unterschiede.
Merkmale der DVD
DVDs erkennen Sie am
Logo auf dem Label.
Je nach Inhalt der DVD
sind ein oder mehrere
Titeln vorhanden.
Jeder Titel kann ein oder mehrere Kapitel (Chapter) enthalten. Einfach und komfortabel können
Titel und Kapitel angewählt werden.
Die Wiedergabe der DVD kann über das Menü
des Blu-ray Players – am Bildschirm des LED/
LCD TVs – kontrolliert und gesteuert werden.
Vorbereiten
1 LED/LCD TV einschalten und den Programm-
platz für den Blu-ray Player wählen.
2 Wenn eine Audio-Anlage oder ein AV-Re-
ceiver an den Blu-ray Player ange schlossen
wurde, diese(n) einschalten und den entsprechenden Toneingang für den Blu-ray Player
wählen.
3 Blu-ray Player mit »9« einschalten.
– Wenn sich keine Disc im Fach befindet,
wird nach kurzer Zeit »NO DISC« angezeigt.
– Wenn eine Disc eingelegt wurde, wird diese
abgetastet und »LOAD« angezeigt.
Disc einlegen
1 Disc-Fach mit » « öffnen.
– Anzeige: »OPEN«.
2 Gewünschte Disc – mit dem Aufdruck (Label-
seite) nach oben in das Disc-Fach einlegen.
3 Disc-Fach mit » « schließen.
– Anzeige: »CLOSE« und dann »LOAD«; die
Disc wird abgetastet, danach wird die Gesamtspielzeit der Disc angezeigt.
– Das Discmenü wird automatisch eingeblen-
det.
Hinweis:
7
Bei einigen Discmenüs wird zuerst die
Sprachauswahl angeboten. In diesem Fall
wählen Sie die Sprache mit den Cursortasten und bestätigen diese mit »ENTER«.
Page 59

DEUTSCH
20
WIEDERGABE EINER BD/DVD
-------------------------------------------------------------
Zusätzliche WiedergabeFunktionen
Informationen einblenden
Sie können Informationen über Titel, Kapitel und
Spielzeit auf dem Bildschirm einblenden.
1 Informationen mit »OSD« der Fernbedienung
einblenden.
– Anzeige: Die Informationszeile.
2 Informationen mit »OSD« der Fernbedienung
ausblenden.
–Anzeige: Die Informationszeile erlischt.
Titel und Kapitel über das DiscMenü wählen
Die Disc kann verschiedene Titel und Kapitel enthalten, die Sie auswählen können.
1 Menü mit »DISC MENU« der Fernbedienung
aufrufen.
– Das Hauptmenü der Disc wird eingeblendet.
2 Gewünschten Titel mit den Cursortasten wäh-
len und mit »ENTER« bestätigen.
3 Beinhaltet der Titel verschiedene Kapitel, das
gewünschte Kapitel mit den Cursortasten wählen und mit »ENTER« bestätigen.
4 Mit »DISC MENU« der Fernbedienung zum
Hauptmenü der Disc zurückkehren.
Schnell vorwärts und rückwärts
spulen
1 Während der Wiedergabe die gewünschte
Geschwindigkeit mit »3« der Fernbedienung (rückwärts) oder »4« der Fernbedienung (vorwärts) wählen.
Hinweis:
7
Wenn Sie wiederholt die Tasten drücken,
ändert sich bei jedem Tastendruck die Geschwindigkeit vorwärts oder rückwärts.
Folgende Geschwindigkeiten sind möglich:
x 2, x 4, x 8, x 16, x 32, x 64, x 128.
2 Wiedergabe mit » « fortsetzen.
Wiedergabe
1 Wenn die Schaltfläche »Abspielen« einge-
blendet wird, diese mit den Cursortasten wäh-
len und mit »ENTER« bestätigen;
oder
Wiedergabe mit » « starten.
– Die Wiedergabe beginnt.
Hinweis:
7
Wenn die Meldung »Verboten« auf dem
Bildschirm angezeigt wird, ist die gewählte
Funktion mit dieser Disc nicht möglich.
2 Auf Wiedergabe-Pause (Standbild) mit » «
schalten.
3 Wiedergabe mit » « fortsetzen.
4 Wiedergabe mit »7« unterbrechen.
5 Wiedergabe mit » « fortsetzen.
6 Wiedergabe beenden, dazu zweimal »7«
drücken.
Disc entnehmen
1 Disc-Fach mit » « öffnen.
2 Disc aus dem Disc-Fach entnehmen.
3 Disc-Fach mit » « schließen.
Lautstärke einstellen
1 Lautstärke mit »– VOLUME « oder »VOLU-
ME +« einstellen.
Ton aus- und einschalten
1 Ton mit »MUTE« stummschalten.
– Anzeige: » X Aus«.
2 Ton mit »MUTE« wieder einschalten.
– Anzeige: » Ein«.
Page 60

21
DEUTSCH
Einen Titel oder ein Kapitel wiederholen
(abhängig von der Blu-ray Disc)
1 Wiederhol-Modus (Titel oder Kapitel) wählen,
dazu »REPEAT« wiederholt drücken.
– Anzeige: » Wdh. Titel«, der aktuelle Titel
wird wiederholt.
– Anzeige: » Wdh. Kapitel«, das aktuelle
Kapitel wird wiederholt.
2 Wiederhol-Funktion beenden, dazu »REPEAT«
so oft drücken, bis »Wdh. Aus« angezeigt
wird.
– Anzeige: » Wdh. Aus«.
Einen ausgewählten Szene wiederholen
(abhängig von der Blu-ray Disc)
1 Während der Wiedergabe den Anfang der
Szene mit »A-B« markieren.
– Anzeige: » Wdh. A –«, der Startpunkt
der Szene wird gespeichert.
2 Am Ende der Szene »A-B « erneut drücken.
– Anzeige: » Wdh. A – B«, der Endpunkt
der Szene wird gespeichert. Die ausgewählte Szene wird andauernd wiederholt.
3 Funktion beenden, dazu »A-B« so oft drücken,
bis »Wdh. Aus« angezeigt wird.
– Anzeige:» Wdh. Aus«.
Untertitel auswählen und anzeigen
Wenn auf der Disc Untertitel zur Verfügung stehen, können Sie diese am Bildschirm des LED/
LCD TVs einblenden.
Wenn die Untertitel in mehreren Sprachen verfügbar sind, dann können Sie die gewünschte
Sprache wählen.
1 Während der Wiedergabe »SUBTITLE« der
Fernbedienung drücken.
– Das Menü »Untertitel« und »BiB-Untertitel«
wird angezeigt.
2 Die Menüoption »Untertitel« oder »BiB-Unter-
titel« mit »A« oder »S« wählen und mit
»ENTER« bestätigen.
WIEDERGABE EINER BD/DVD
-------------------------------------------------------------
Kapitel schrittweise wählen
1 Vorheriges Kapitel wählen, dazu während der
Wiedergabe » « drücken, nächstes Kapitel
wählen, dazu während der Wiedergabe » «
drücken.
Such-Funktionen
1 Suchlauf-Modus (Titel, Kapitel oder Zeit) wäh-
len, dazu »SEARCH« wiederholt drücken.
2 Mit den Zifferntasten Titel, Kapitel oder Zeit
eingeben und mit »ENTER« bestätigen.
Hinweis:
7
Um z.B. Titel 4 auszuwählen, die Zifferntasten »0«, »0«, »0«, »4« und danach »EN-
TER« drücken.
– Die Wiedergabe startet automatisch.
Bild vergrößern oder verkleinern
(nur bei DVD)
1 Vergrößerungsfaktor mit »ZOOM« wählen.
– Anzeige: » Zoom x2 «, der gewählte Bild-
ausschnitt wird im Faktor 2 vergrößert.
– Anzeige: » Zoom x4 «, der gewählte Bild-
ausschnitt wird im Faktor 4 vergrößert.
Hinweis:
7
Der Bildausschnitt kann mit »a«, »s«,
»A« oder »S« auf dem Bildschirm verschoben werden.
2 Zoomfunktion beenden, dazu »ZOOM« so
oft drücken, bis »Zoom Aus« angezeigt wird.
– Anzeige:» Zoom Aus«.
Standbilder schrittweise vorschalten
1 Während der Wiedergabe »!8« drücken.
2 Wiedergabe mit » « fortsetzen.
Page 61

DEUTSCH
22
WIEDERGABE EINER BD/DVD
-------------------------------------------------------------
3 Im Untertitelmenü die gewünschten Optionen
mit den Cursortasten wählen und mit »ENTER«
bestätigen.
– Anzeige: z. B. » 01/02 DEU«.
4 Untertitel abschalten, dazu im Untertitelmenü
mit den Cursortasten die Option »Untertitel
Aus« wählen und mit »ENTER« bestätigen.
Hinweise:
7
Sie können die Untertitel auch im Disc- oder
Titelmenü der Disc anwählen.
7
Bei der Wiedergabe einer Videodatei (über
USB-Memory Stick oder Disc) muss die Untertiteldatei im UTF-8 Format abgelegt sein,
damit alle Zeichen in den Untertiteln korrekt
angezeigt werden können. Die Namen der
Video- und der Untertiteldatei sollten gleich
sein.
Mit folgender Methode werden Dateien in
UTF-8 am PC konvertiert:
1 Die .srt Datei über die Anwendung "Edi-
tor" (Note-Pad) öffnen.
2 Im Dropdown Menü die Option “Datei”
und anschließend “Speichern unter…“
wählen.
3 Dateiname und Dateityp beibehalten.
4 Im Menü "Codierung" die Option "UTF-8"
wählen.
5 Einstellung speichern, dazu die Schaltflä-
che “Speichern” anklicken.
Synchronsprache oder Tonformat
wählen
Bei diesen Einstellungen wird die voreingestellte
Synchronsprache umgeschaltet, wenn die Disc
Alternativen dazu bietet.
1 Während der Wiedergabe »AUDIO« der
Fernbedienung drücken.
– Das Menü »Audio« und »BiB-Audio« wird
eingeblendet.
2 Die gewünschte Synchronsprache mit den Cur-
sortasten anwählen und mit »ENTER« bestätigen.
Pop-up Menü/Titelmenü aufrufen
Wenn die Disc Pop-up- oder Titelmenüs anbietet,
können Sie diese Funktion verwenden.
1 Während der Wiedergabe »POPUP MENU
/TITELMENU« drücken.
2 Die gewünschte Option mit den Cursortasten
anwählen und mit »ENTER« bestätigen.
3 Menü mit »POPUP MENU/TITELMENU«
abschalten.
Kamerawinkel für bestimmten
Szenen oder Passagen wählen
Einige Discs enthalten Szenen oder Passagen,
die von unterschiedlichen Kamera-Standorten
(verschiedene Blickwinkel) mehrmals aufgenommen wurden.
1 Während der Wiedergabe »ANGLE« der
Fernbedienung drücken.
– Das Menü wird angezeigt.
2 Den gewünschten Kamerawinkel mit den Cur-
sortasten anwählen und mit »ENTER« bestätigen.
– Anzeige: zum Beispiel »01/03«.
Kleinbild einblenden (Bild-in-Bild/
PIP)
(wenn von der Blu-ray Disc angeboten)
1 Während der Wiedergabe »PIP« der Fernbe-
dienung drücken, um das Kleinbild einzublenden.
2 Funktion mit »PIP« beenden.
Tonspur für das Kleinbild wählen
(wenn von der Blu-ray Disc angeboten)
1 Drücken Sie während der PIP Wiedergabe
»SECONDARY AUDIO« auf der Fernbedienung.
– Das Menü »Audio« und »BiB-Audio« wird
eingeblendet.
2 Die gewünschte Synchronsprache mit den Cur-
sortasten anwählen und mit »ENTER« bestätigen.
Zusatzfunktionen mit den Farb-tasten
Blu-ray Discs enthalten vielfälltige Zusatzfunktionen mit interaktiven Menüs (JavaTM-Anwendungen), die mit den Farbtasten Rot, Grün, Gelb und
Blau angewählt werden können.
Weitere Informationen über die Möglichkeiten
mit diesen Discs finden Sie auf der Verpackung
der jeweiligen Disc.
Page 62

23
DEUTSCH
DIE BD LIVE-FUNKTIONEN
------------------------------------------------------------------------
Einige Blu-ray Discs enthalten zusätzliches
Bonusmaterial (BD LIVE). Um diese Funktionen
nutzen zu können, muss der Blu-ray Player mit
dem Internet verbunden sein und ein zusätzlicher
Speicherplatz z.B. durch einen USB-Memory
Stick zur Verfügung stehen.
Die BD Live-Funktionen bieten:
– das Laden von neue Filmtrailern,
– zusätzliche „Kommentare” von Schauspie-
lern und Regisseuren,
– Spiele und Chats.
Damit Sie die BD Live-Funktionen nutzen können,
muss die Funktion im Menü »BD-Live Internet-Zugang« aktiviert werden.
Externen Speicher anschließen
1 USB-Memory Stick (min. 1 Gbyte Speicher-
größe) am PC prüfen, ob der Stick FAT 32
formatiert ist.
2 USB Stecker des USB-Memory Sticks in die
Buchse » « des Blu-ray Players stecken.
(siehe Kapitel „ANSCHLIESSEN/VORBEREITEN”).
BD Live-Funktion aktivieren
1 Hauptmenü mit »SETUP« aufrufen.
2 Zeile »Einstellungen« mit »A« oder »S«
wählen und mit »ENTER« bestätigen.
3 Zeile »BD-Live« mit »A« oder »S« wählen
und mit »ENTER« bestätigen.
4 Zeile »BD-Live Internet-Zugang« mit »A«
oder »S« wählen und mit »ENTER« bestätigen.
5 Die Option »Internetzugriff immer zulassen«
oder »Internetzugriff beschränken« mit »A«
oder »S« wählen und mit »ENTER« bestätigen.
Hinweis:
7
In diesem Menü können Sie auch den vorhandenen freien Speicher des USB-Memory
Sticks prüfen, es sollten mindestens 100
Mbyte zur Verfügung stehen.
Ist dies nicht der Fall, die Option »Blu-ray-
Speicher löschen« mit »A« oder »S«
wählen und mit »ENTER« bestätigen.
6 Mit »RETURN« eine Menüebene zurück-
schalten, die Zeile »Netzwerk« mit »A« oder
»S« wählen und mit »ENTER« bestätigen.
Die Schaltfläche »Netzwerktest« mit den Cur-
sortasten wählen und mit »ENTER« bestätigen.
Hinweis:
7
Der Netzwerktest infomiert Sie, ob der Blu-
ray Player mit dem Internet verbunden ist,
ist dies nicht der Fall, kann der Player nicht
auf den BD-Live Inhalt im Internet zugreifen.
7 Mit »RETURN« zum Hauptmenü zurückschal-
ten.
Page 63

DEUTSCH
24
DIE BD LIVE-FUNKTIONEN
------------------------------------------------------------------------
BD Live anwenden
1 Disc-Fach mit » « öffnen.
– Anzeige: »OPEN«.
2 Gewünschte Blu-ray Disc – mit dem Aufdruck
(Labelseite) nach oben in das Disc-Fach einlegen.
3 Disc-Fach mit » « schließen.
4 Wiedergabe mit » « starten.
5 Während der Wiedergabe mit »POPUP MENU
TITELMENU« das Pop-Up oder Titelmenü der
Disc öffnen.
6 Die Option »BD LIVE« mit »A« oder »S«
wählen und mit »ENTER« bestätigen.
– Nach kurzer Zeit wird das BD-Live Menü ein-
geblendet.
7 Den Inhalt, der heruntergeladen werden soll
mit den Cursortasten wählen und mit »ENTER«
bestätigen.
– Der Download beginnt, die Dauer ist ab-
hängig von der Größe des Inhalts und der
Internetgeschwindigkeit.
– Der heruntergeladene Inhalt wird auf dem
externen USB-Memory Stick gespeichert.
– Der heruntergeladene Inhalt kann im Menü
»Medien« – »USB« angewählt und wiedergegeben werden.
BD Live Hinweise
7
Das Broadcom Referenzsystem unterstützt nur
den Anschluss eines USB-Memory Sticks, um
die BD 2.0 1GByte Speicheranforderung zu
erfüllen.
7
Bei der Wiedergabe von bereits heruntergeladenen Inhalten von BD Live muss sich die
entsprechende Blu-ray Disc im Disc-Fach befinden.
7
Es kann vorkommen, dass ein BD Live Inhalt
aufgerufen werden kann, jedoch die Wiedergabe nicht mehr erlaubt ist. Löschen Sie dann
den Titel vom USB-Memory Stick: »Einstellungen«, »BD-Live«, »Blu-ray Speicher löschen«.
7
Es wird keine Zeitanzeige verwendet, um den
Ablauf heruntergeladener BD Live Inhalte zu
verwalten. Die Zeit und der Ablauf des Inhalts
werden vom BD Live Server im Internet verwaltet.
Page 64

25
DEUTSCH
WIEDERGABE VON AUDIO/VIDEO DATEIEN
------
Inhalte eines Datenspeichers
oder eines USB-Memory Sticks
wiedergeben
Vorbereiten
1 Blu-ray Player mit »8« ausschalten.
2 Datenspeicher mit einem Standard USB Kabel
an die Buchse » « des Blu-ray Players anschließen;
oder
USB Stecker des USB-Memory Sticks in die
Buchse » « des Blu-ray Players stecken.
3 LED/LCD TV einschalten und den Programm-
platz für den Blu-ray Player wählen.
4 Blu-ray Player mit »8« einschalten.
5 Hauptmenü mit »SETUP« aufrufen.
6 Zeile »Medien« mit »A« oder »S« wählen
und mit »ENTER« bestätigen.
– Das Menü »USB« wird eingeblendet.
0HGLHQ 86%
%LOGHU
0XVLN
9LGHRV
7 »USB« mit »ENTER« bestätigen;
oder
Zeile »USB« mit »A« oder »S« wählen
(wenn eine Disc eingelegt ist – Anzeige »Optische Disk«) und mit »ENTER« bestätigen.
Einen Titel, einen Track oder ein Bild
wiedergeben
1 Gewünschte Option »Videos«, »Musik« oder
»Bilder« mit »A« oder »S« wählen und mit
»ENTER« bestätigen.
2 Datei mit »A« oder »S« wählen und mit
»ENTER« bestätigen.
3 Wiedergabe mit » « starten.
– Die Wiedergabe beginnt.
)LOHVRQJPS
7LWOH&RRO7UDFN
$UWLVW5LFDUGR)XQLFFLR
$OEXP'HDG'X[
2II 2II
3OD\
4 Wiedergabe mit »7« beenden.
Zusätzliche Wiedergabe-Funktionen
7
Wiedergabe mit » « unterbrechen.
Wiedergabe mit » « fortsetzen.
7
Wiedergabegeschwindigkeit während der
Wiedergabe ändern, dazu »3« oder
»4« drücken.
7
Während der Wiedergabe den folgenden
Track, das folgende Bild mit » « wählen,
oder den vorherigen Track, das vorherige Bild
mit » « wählen.
7
Während der Wiedergabe den Wiederhol-/
Zufallsmodus anwählen, dazu »REPEAT« wie-
derholt drücken.
– »Wdh. Alles« (alle Dateien wiederholen),
– »Zufällige Wiedergabe ein«,
– »Wdh. Datei« (gewählte Datei wiederholen)
– »Wdh. Aus« (Funktion abschalten).
7
Während der Wiedergabe das Bild vergrö-
ßern, dazu »ENTER« wiederholt drücken.
Der Bildausschnitt kann mit »A«, »S«, »a«
oder »s« verschoben werden.
7
Diashow Effekt und Anzeigedauer für Bilder
einstellen:
Während der Wiedergabe »POPUP MENU
TITLE MENU«, drücken, die Zeile »Diashow
Effekte« oder »Anzeigedauer« mit »A« oder
»S« wählen und mit »ENTER« bestätigen.
Gewünschten Effekt oder Anzeigedauer mit
»A« oder »S« wählen und mit »ENTER«
bestätigen.
Page 65

DEUTSCH
26
WIEDERGABE VON AUDIO/VIDEO DATEIEN
------
Bild-CDs wiedergeben
Sie können digitale Foto- oder Musikdateien
wiedergeben, die auf eine Datendisc DVD+/-R,
DVD+/-R/(W) oder auf einer Blu-ray Disc gespeichert wurden.
Vorbereiten
1 Disc-Fach mit » « öffnen.
– Anzeige: »OPEN«.
2 Gewünschte Disc in das Disc-Fach einlegen.
3 Disc-Fach mit » « schließen.
– Anzeige: »CLOSE«.
4 Zeile »Medien« mit »A« oder »S« wählen
und mit »ENTER« bestätigen.
– Das Menü »USB« wird eingeblendet.
5 Zeile »CD« mit »ENTER« bestätigen.
6 Die Option »Bilder« mit »ENTER« bestätigen.
– Die Bilddateien werden eingeblendet.
%LOGHU
&'
(LQVWHOOXQJHQ
+DXSWPHQ
:DOOSDSHUMSJ
:DOOSDSHUMSJ
:DOOSDSHUMSJ
:DOOSDSHUMSJ
:DOOSDSHUMSJ
:DOOSDSHUMSJ
:DOOSDSHUMSJ
:DOOSDSHUMSJ
:DOOSDSHUMSJ
'LDVKRZVWDUWHQ
0XVLNGXUFKVXFKHQ
(LQWUDJ(LQWUlJH
Bilder anzeigen
1 Das gewünschte Bild mit»A«, »S«, »a«
oder »s« wählen und mit »ENTER« bestäti-
gen.
2 Bildwiedergabe mit »7« beenden.
Zusätzliche Wiedergabe-Funktionen
7
Diashow starten
Die Option »Diashow starten« mit »A«
oder »S« wählen und mit »ENTER« aktivieren. Die Bildwiedergabe beginnt, alle
Bilder werden angezeigt.
7
Einstellungen
Im Untermenü »Einstellungen« die Optionen
»Diashow Effekte« oder »Anzeigedauer«
mit »A« oder »S« wählen und mit
»ENTER« aktivieren, danach mit den Cursortasten die gewünschte Einstellung wählen und mit »ENTER« bestätigen.
7
Musik durchsuchen
Öffnet die Ordnerübersicht, aus dieser Sie
Musikdateien auswählen und wiedergeben
können, während Sie Bilder ansehen.
7
Hauptmenü
Schaltet zum Hauptmenü zurück.
7
Wiederholen
Wiederholmodus wählen, dazu während
der Wiedergabe wiederholt »REPEAT«
drücken:
– »Wdh. alles«,
– »Wdh Aus«.
Page 66

27
DEUTSCH
WIEDERGABE VON AUDIO/VIDEO DATEIEN
------
Audio CDs wiedergeben
Vorbereiten
1 Disc-Fach mit » « öffnen.
– Anzeige: »OPEN«.
2 Gewünschte Disc in das Disc-Fach einlegen.
3 Disc-Fach mit » « schließen.
– Anzeige: »CLOSE«.
4 Zeile »Medien« mit »A« oder »S« wählen
und mit »ENTER« bestätigen.
– Das Untermenü wird eingeblendet.
5 Zeile »CD« mit »ENTER« bestätigen.
6 Die Option »Musik« mit »ENTER« bestätigen.
– Die Musikdateien werden eingeblendet.
Wiedergabe
1 Den gewünschten Ordner/Titel mit »A«,
»S«, »a« oder »s« wählen und mit
»ENTER« bestätigen.
2 Wiedergabe mit » « starten.
– Die Wiedergabe wird gestartet.
)LOHVRQJPS
7LWOH&RRO7UDFN
$UWLVW5LFDUGR)XQLFFLR
$OEXP'HDG'X[
2II 2II
3OD\
3 Wiedergabe mit »7« beenden.
Zusätzliche Wiedergabe-Funktionen
7
Wiedergabe mit » « unterbrechen.
Wiedergabe mit » « fortsetzen.
7
Wiedergabegeschwindigkeit während der
Wiedergabe ändern, dazu »3« oder
»4« drücken.
7
Während der Wiedergabe den folgenden
Track, das folgende Bild mit » « wählen,
oder den vorherigen Track, das vorherige Bild
mit » « wählen.
7
Während der Wiedergabe den Wiederhol-/
Zufallsmodus anwählen, dazu »REPEAT« wie-
derholt drücken.
– »Wdh. Alles« (alle Dateien wiederholen),
– »Zufällige Wiedergabe ein«,
– »Wdh. Datei« (gewählte Datei wiederholen)
– »Wdh. Aus« (Funktionen abschalten).
7
Zur Ordnerübersicht schalten, dazu die Option »Vorheriger Ordner« wählen und mit
»ENTER« bestätigen.
7
Zum Hauptmenü zurückschalten, dazu während der Wiedergbe »ENTER« drücken und
die Option »Hauptmenü« wählen.
Page 67

DEUTSCH
28
NETFUSION MODUS
---------------------------------------------------------------------------------------------
Was ist NetFusion
7
Das Gerät unterstützt NetFusion. Dadurch
können Sie das Streaming von Medieninhalten mit der Steuerung eines angeschlossenen Medienreceivers kombinieren, während Sie Inhalte von einem anderen PC im
Netzwerk darauf übertragen.
7
Sie können auf Videos, Musik und Fotos
von z.B. einem PC, Smartphone oder NAS
(Network Attached Storage) zugreifen, die
kompatibel zum DNLA-Standard sind und
als Digitaler Medien Server (DMS) dienen.
7
Ihr Blu-ray PLayer kann auch auf einen PC
zugreifen, der über Software als Digitaler
Medien Server eingerichtet wurde. Ein problemloser Zugriff bei nicht DMS-zertifizierter Software kann nicht garantiert werden.
7
Wenn Sie einen PC mit einem Windows
Betriebssystem verwenden, können Sie den
Windows Media Player so konfigurieren,
dass er als Digitaler Media Player verwendet werden kann (ab Version 11).
Die notwendigen Einstellungen sind abhän-
gig von der jeweiligen Softwareversion.
Damit keine Probleme auftreten, prüfen Sie
die Firewalleinstellungen Ihres Routers und
des PCs.
NetFusion Funktion aktivieren
1 Blu-ray Player mit »8« einschalten.
2 Hauptmenü mit »SETUP« aufrufen.
3 Zeile »Einstellungen« mit »A« oder »S«
wählen und mit »ENTER« bestätigen.
4 Zeile »System« mit »A« oder »S« wählen
und mit »ENTER« bestätigen.
– Das Menü »System« wird eingeblendet.
(LQVWHOOXQJHQ
-XJHQGVFKXW]
6\VWHP
6\VWHP
'LVN$XWRSOD\
1HW)XVLRQ
'DXHU%LOGVFKLUPVFKRQHU
$XWRPDWLVFKH$EVFKDOWXQJ
'LJLOLQN
8SGDWHEHU1HW]ZHUN
:HUNVHLQVWHOOXQJHQ
*HUlWHHLQVWHOOXQJHQ
$NWLYLHUHQ
$NWLYLHUHQ
0LQXWHQ
0LQXWHQ
'HDNWLYLHUHQ
$Q]HLJH
$XGLR
6SUDFKH
1HW]ZHUN
%'/LYH
5 Die Menüoption »NetFusion« mit »A« oder
»S« wählen und mit »ENTER« bestätigen.
Die NetFusion-Funktion aktivieren, dazu mit
»A« oder »S« die Zeile »Aktivieren« wählen und mit »ENTER« bestätigen.
6 Mit »RETURN« eine Menüebene zurück-
schalten, die Zeile »Netzwerk« mit »A« oder
»S« wählen und mit »ENTER« bestätigen.
Die Schaltfläche »Netzwerktest« mit den Cur-
sortasten wählen und mit »ENTER« bestätigen.
7 Mit »RETURN« zum Hauptmenü zurückschal-
ten.
Page 68

29
DEUTSCH
NetFusion MODUS
----------------------------------------------------------------------------------------------------
Vorbereiten
1 Blu-ray Player mit »8« einschalten.
2 Hauptmenü mit »SETUP« aufrufen.
3 Zeile »NetFusion« mit »A« oder »S« wäh-
len und mit »ENTER« bestätigen.
– Anzeige: » Auffinden«.
4 Den Digitalen Medien Server mit »A« oder
»S« wählen und mit »ENTER« bestätigen.
1RUW$
$XIILQGHQ
1HW)XVLRQ
1HW)XVLRQ 1HW)XVLRQ
%LOGHU
0XVLN
9LGHRV
Wiedergabe vom Digitalen
Medien Server
1 Eine der Optionen »Videos«, »Musik« oder
»Bilder« mit »A« oder »S« wählen und mit
»ENTER« bestätigen.
2 Gewünschten Ordner oder Titel mit »A«
oder »S« wählen und mit »ENTER« bestätigen. Diese Anwahl ist abhängig von der Struk-tur des Digitalen Medien Servers.
3 Wiedergabe mit » « starten.
– Die Wiedergabe des gewählten Ordners/
Titels wird gestartet.
)LOHVRQJPS
7LWOH&RRO7UDFN
$UWLVW5LFDUGR)XQLFFLR
$OEXP'HDG'X[
2II 2II
3OD\
4 Wiedergabe mit »7« beenden.
Hinweise:
7
Die Struktur der Dateien und der Ordner
des Digitalen Medien Servers im Menü ist
abhängig vom Server, den Sie verwenden.
7
Werden vom Digitalen Medien Server Filme
mit Untertiteln angeboten, so können diese
Untertitel nicht angezeigt weden.
7
Nur Video-Dateiformate mit einem NetFusion Zertifikat (»MPEG_PS_PAL«, »MPEG_
TS_SD_EU«, »MPEG_TS_SD_ EU_T« und
»MPEG_TS_SD_EU_ISO«) werden unterstützt.
7
Nur Audio-Dateiformate mit einem NetFusi-
on Zertifikat (»LPCM« und »MP3«) werden
unterstützt.
7
Nur Bild-Dateiformate mit einem NetFusion
Zertifikat (»JPEG_SM«) werden unterstützt.
Zusatzfunktionen der Wiedergabe
7
Siehe Kapitel „Wiedergabe Audio-/Videodateien″, die Funktionen sind abhängig von
der verwendeten Datei.
Page 69

DEUTSCH
30
SONDEREINSTELLUNGEN
---------------------------------------------------------------------------
Ton Einstellungen
1 Hauptmenü mit »SETUP« aufrufen.
2 Zeile »Einstellungen« mit »A« oder »S«
wählen und mit »ENTER« bestätigen.
3 Zeile »Audio« mit »A« oder »S« wählen
und mit »ENTER« bestätigen.
– Das Menü »Audio« wird angezeigt.
(LQVWHOOXQJHQ
-XJHQGVFKXW]
6\VWHP
$XGLR
3&0'RZQVDPSOLQJ
'LJLWDODXVJDQJ
'\QDPLNUHJHOXQJ
6WHUHR'RZQPL[
N+]
3&0
$XV
$XWR
$Q]HLJH
$XGLR
6SUDFKH
1HW]ZHUN
%'/LYH
4 Gewünschte Funktion mit »A« oder »S«
wählen und mit »ENTER« aktivieren.
5 Gewünschte Einstellung mit »A« oder »S«
wählen und mit »ENTER« bestätigen.
6 Untermenü mit »RETURN« oder »a« schlie-
ßen;
oder
mit »SETUP« zum Hauptmenü zurückschalten.
Die Einstellungen im Menü Audio
Abtastrate einstellen
(Downsampling)
Bei dieser Einstellung wird die Abtastrate des
Digitalausgangs eingestellt.
Optionen: 48 kKHz, 96 kHz, Aus.
Eine falsche Einstellung der Abtastrate des digitalen Audioausgangs kann zur Verfälschung
des Tons führen.
Digitaler Ausgang
Stellt das digitale Tonsignal an den Buchsen
»HDMI OUT« und »COAXIAL« des Players
ein.
Optionen:
– PCM: Gemischte digitale Audiodaten wer-
den im Zweikanal PCM Format über den
HDMI-Anschluss in PCM und SPDIF ausgegeben (wenn vom LED/LCD TV unterstützt).
– Bitstream HD: Über die Buchsen HDMI oder
COAXIAL erhalten Sie die bestmögliche
Tonqualität, die auf der Disc vorhanden ist.
HDMI bietet – durch die weiter entwickelten
Audiocodecs wie TrueHD und DTS-HD die
höchste Tonqualität.
Das Audiosignal einer Blu-ray Disc ist be-
grenzt auf die Tonspur des Hauptfilmes (nicht
unterstützt bei der PIP-Funktion oder bei Bonusmatrial).
– Bitstream Legacy: Über die Buchsen HDMI
oder COAXIAL werden Legacy Tonformate
ausgegeben, die auf der Disc vorhanden sind.
Das Audiosignal einer Blu-ray Disc ist be-
grenzt auf die Tonspur des Hauptfilmes
(nicht unterstützt bei der PIP-Funktion oder
bei Bonusmatrial).
– Bitstream Mixed: Die Audio-Datenströme
werden gemischt und in einen Datenstrom
codiert. Dies kann bei SPDIF 5.1CH Receivern verwendet werden.
Page 70

31
DEUTSCH
SONDEREINSTELLUNGEN
---------------------------------------------------------------------------
Dynamik Regelung
Ist nur aktiviert, wenn ein Dolby Digital Signal
erkannt wird.
Optionen:
– Aus: Wiedergabe mit Standard Dynamik
Regelung.
– Ein: Aktiviert die Dynamik-Regelung. Dolby
Digital-Soundtracks haben einen sehr großen Dynamik-Umfang zwischen leisen und
lauten Tönen. Bei großer Lautstärke ist dies
ein faszinierendes Erlebnis, das aber bisweilen störend wirken kann.
Einfach die Lautstärke zu reduzieren, führt
zu keinem befriedigenden Ergebnis, die Dialoge wären kaum zu verstehen. Sie müssten
die lauten Effekte leiser stellen, die leisen
Passagen lauter stellen und die Lautstärke
von Dialogen beibehalten. Die DynamikRegelung behebt dies.
– Auto: Der Player schaltet die Dynamik Re-
gelung für jedes Tonformat der Blu-ray Disc
ein, mit Ausnahme Dolby TruHD. Wurde das
Tonformat Dolby TruHD ausgewählt, dann
wird die Funktion nur dann aktiviert, wenn
das Tonformat Dolby TruHD dies zulässt.
Stereo Downmix
Stellt das Tonsignal an Buchse »AUDIO OUT
L/R« auf Auto, Stereo (LoRo) oder Surround
Encoded (LtRt) ein.
Page 71

DEUTSCH
32
Spacheinstellungen
1 Hauptmenü mit »SETUP« aufrufen.
2 Zeile »Einstellungen« mit »A« oder »S«
wählen und mit »ENTER« bestätigen.
3 Zeile »Sprache« mit »A« oder »S« wählen
und mit »ENTER« bestätigen.
– Das Menü »Sprache« wird eingeblendet.
(LQVWHOOXQJHQ
-XJHQGVFKXW]
6\VWHP
6SUDFKH
26'
'LVN0HQ
$XGLR
8QWHUWLWHO
'HXWVFK
$XWRPDWLVFK
$XWRPDWLVFK
.HLQH
$Q]HLJH
$XGLR
6SUDFKH
1HW]ZHUN
%'/LYH
4 Gewünschte Funktion mit »A« oder »S«
wählen und mit »ENTER« aktivieren.
5 Gewünschte Einstellung mit »A« oder »S«
wählen und mit »ENTER« bestätigen.
6 Untermenü mit »RETURN« oder »a« schlie-
ßen;
oder
mit »SETUP« zum Hauptmenü zurückschalten.
SONDEREINSTELLUNGEN
---------------------------------------------------------------------------
Die Einstellungen im Menü
Sprache
Hinweis:
7
Nicht alle Sprachen sind auf allen Discs
verfügbar. Die meisten Discs haben nur ein
Menü, in welchem Audio- oder Untertitelsprachen verfügbar sind.
OSD Sprache (OSD)
Stellt die Sprache der Bildschirmmenüs des
Blu-ray Players ein. Sie können zwischen verschiedenen Sprachen wählen.
Sprache der Disc-Menüs (Disk-Menü)
Wenn auf der eingelegten Disc Menüs in verschiedenen Sprachen zur Verfügung stehen,
kann die gewünschte Sprache gewählt werden.
Synchronsprache (Audio)
Stellt die bevorzugte Synchronsprache als
Standardsprache für die Disc ein.
Einige Discs gestatten es nicht, die Audiosprache aus diesem Menüs auszuwählen. Die Synchronsprache kann dann nur aus dem Discmenü der BD/DVD gewählt werden.
Untertitelsprache (Untertitel)
Stellt die bevorzugte Untertitelsprache als
Standardsprache für die Disc ein.
Einige Discs gestatten es nicht, die Untertitelsprache aus diesem Menüs auszuwählen. Die
Untertitelsprache kann dann nur aus dem Disc-
menü der BD/DVD gewählt werden.
Page 72

33
DEUTSCH
SONDEREINSTELLUNGEN
---------------------------------------------------------------------------
Jugendschutz-Einstellungen
1 Hauptmenü mit »SETUP« aufrufen.
2 Zeile »Einstellungen« mit »A« oder »S«
wählen und mit »ENTER« bestätigen.
3 Zeile »Jugendschutz« mit »A« oder »S«
wählen und mit »ENTER« bestätigen.
– Das Untermenü für die Jugendschutz-PIN
wird eingeblendet.
6\VWHP
1HW]ZHUN
$XGLR
%'/LYH
$Q]HLJH
.LQGHUVLFKHUXQJ
6SUDFKH
-XJHQGVFKXW]3,1
$XV
%LWWHYLHUVWHOOLJHQ-XJHQGVFKXW]3,1HLQJHEHQ
-XJHQGVFKXW]3,1
2N $EEUXFK
4 Passwort (PIN) »0« »0« »0« »0« mit Ziffernta-
ste eingeben, die Schaltfläche »OK« mit »S«
wählen und mit »ENTER« bestätigen.
(LQVWHOOXQJHQ
6\VWHP
1HW]ZHUN
$XGLR
%'/LYH
$Q]HLJH
6SUDFKH
.LQGHUVLFKHUXQJ
$OWHUVIUHLJDEH
-XJHQGVFKXW]3,1
(LQ
>(UZDFKVHQH@
-XJHQGVFKXW]
-XJHQGVFKXW]
5 Gewünschte Funktion mit »A« oder »S«
wählen und mit »ENTER« aktivieren.
6 Gewünschte Einstellung mit »A« oder »S«
wählen und mit »ENTER« bestätigen.
7 Untermenü mit »RETURN« oder »a« schlie-
ßen;
oder
mit »SETUP« zum Hauptmenü zurückschalten.
Die Einstellungen im Menü
Jugendschutz
Kindersicherung ein-/ausschalten
Discs können Spielfilme anbieten, deren Inhalt
oder auch Szenen nicht für Kinder geeignet
sind.
Diese Discs enthalten Informationen, die diesen Inhalt oder diese Szenen markieren und
sind mit Altersfreigaben versehen. Wird die
Kindersicherung eingeschaltet, dann ist eine
der folgend aufgeführten Altesklassen gültig.
Altersfreigabe
Stellt die verschiedenen Freigaben ein, die auf
der Disc vorhanden sind:
– 1 [Kindersicher]: Für alle Kinder geeignet.
– 2 [G]: Für alle Altersgruppen.
– 3 [PG]: nur im Beisein von Erwachsenen.
– 4 [PG-13]: nur unter strenger Aufsicht der
Eltern.
– 5 [PG-R]: nur unter strengster Aufsicht der
Eltern.
– 6 [R]: nur unter Vorbehald
– 7 [NC-17]: Nicht geeignet für Personen
unter 17 Jahren.
– 8 [Erwachsene]: Nur für Erwachsene.
Jugendschutz-PIN
Zum Eingeben eines eigenen 4-stelligen
Passwortes (Jugendschutz-PIN).
Neues Passwort mit »1...0« vierstellig einge-
ben, die Schaltfläche »OK« mit »S« wählen
und mit »ENTER« bestätigen.
Neues Passwortes nicht vergessen!
-XJHQGVFKXW]
Page 73

DEUTSCH
34
SONDEREINSTELLUNGEN
---------------------------------------------------------------------------
Systemeinstellungen
1 Hauptmenü mit »SETUP« aufrufen.
2 Zeile »Einstellungen« mit »A« oder »S«
wählen und mit »ENTER« bestätigen.
3 Zeile »System« mit »A« oder »S« wählen
und mit »ENTER« bestätigen.
– Das Menü »System« wird eingeblendet.
(LQVWHOOXQJHQ
-XJHQGVFKXW]
6\VWHP
6\VWHP
'LVN$XWRSOD\
1HW)XVLRQ
'DXHU%LOGVFKLUPVFKRQHU
$XWRPDWLVFKH$EVFKDOWXQJ
'LJLOLQN
8SGDWHEHU1HW]ZHUN
:HUNVHLQVWHOOXQJHQ
*HUlWHHLQVWHOOXQJHQ
$NWLYLHUHQ
$NWLYLHUHQ
0LQXWHQ
0LQXWHQ
'HDNWLYLHUHQ
$Q]HLJH
$XGLR
6SUDFKH
1HW]ZHUN
%'/LYH
4 Gewünschte Funktion mit »A« oder »S«
wählen und mit »ENTER« aktivieren.
5 Gewünschte Einstellung mit »A« oder »S«
wählen und mit »ENTER« bestätigen.
6 Untermenü mit »RETURN« oder »a« schlie-
ßen;
oder
mit »SETUP« zum Hauptmenü zurückschalten.
Die Einstellungen im Menü
System
Automatische Wiedergabe der Disc
(Disk Autoplay)
Zwei Optionen stehen zur Auswahl:
– Deaktiveren: Nach dem Einlegen der
Disc muss die Wiedergabe mit » « oder
»ENTER« gestartet werden.
– Aktivieren: Nach dem Einlegen der Disc
startet die Wiedergabe automatisch oder
das Discmenü wird automatisch geladen.
NetFusion
Gibt den Zugriff auf den Digitalen Medien
Server frei oder sperrt ihn.
Dauer des Bildschirmschoners
Stellt die Zeit ein, nach der der Bildschirmschoner (schwarzer Bildschirm) eingeschaltet wird.
Der Bildschirmschoner kann auch ausgeschaltet werden.
Automatisches Ausschalten
Schaltet den Blu-ray Player zu der gewählten
Zeit (5, 10, 20 oder 30 Minuten) automatisch
aus, wenn während dieser Zeit keine Funktion
gewählt wurde.
Digilink (CEC)
Zum Ein-/Ausschalten der Digilink-Funktion.
Ist die Digilink-Funktion aktiviert, können der
Blu-ray Player und der LED/LCD TV mit einer
Fernbedienung gesteuert werden.
Nicht alle LED/LCD TVs sind mit Ihrem Player
kompatibel.
Aktualisierung über das Netzwerk
Startet die Suche nach neuer, aktueller Software für den Blu-ray Player über das Heimnetzwerk.
Auf Werkseinstellungen zurücksetzen
Setzt Ihren Blu-ray Player in den Auslieferungszustand zurück, die Jugendschutz-PIN wird
nicht zurückgesetzt.
Funktion mit »ENTER« bestätigen, eine Warnmeldung wird angezeigt. Die Schaltfläche
»OK« mit den Cursortasten wählen und mit
»ENTER« bestätigen; oder die Schaltfläche
»Abbrechen« mit den Cursortasten wählen
und mit »ENTER« bestätigen (wenn die Einstellung abgebrochen werden soll).
Systeminformation
Zeigt Informationen über den Blu-ry Player an.
Page 74

35
DEUTSCH
INFORMATIONEN
-------------------------------------------------------------------------------------------------------
Lizenzbedingungen
Hergestellt unter Lizenz
der Dolby Laboratories.
Dolby und das Doppel-D
Symbol sind Warenzeichen der Dolby Laboratories.
Hergestellt unter Lizenz
unter den U.S. Patent
Nummern: 5,956,674;
5,974,380; 6,487,535
und andere U.S. und welt-
weiten ausgegebener und
eingereichter Patente. DTS, das Symbol sowie
DTS und das Symbol zusammen mit allen eingetragenen Warenzeichen und dem DTS Digital
Surround und den DTS Logos sind Warenzeichen der DTS, Inc. Product inklusive Software.
DTS, Inc. Alle Rechte vorbehalten.
Diese Position umfasst die
Urheberrechtstechnologie,
die von U.S. Patenten und
anderen Rechten geistigen
Eigentums geschützt wird.
Der Gebrauch dieser durch Urheberrecht geschützten Technologie muss von der Rovi Corporation genehmigt werden und ist nur für die
private Nutzung vorgesehen, es sei denn, dies
ist von der Rovi Corporation anderweitig genehmigt. Zurückbauen oder Auseinanderbauen des
Gerätes ist untersagt.
Sie erkennen eine 3D Bluray Disc anhand des Logos
auf dem Label. Derselbe
oben beschriebene Urheberrechtsschutz zum Blu-ray
Disc-Logo gilt auch für 3D Blu-ray Discs.
Umwelthinweis
Dieses Produkt wurde aus
hochwertigen Materialien
und Teilen hergestellt, die
für das Recycling tauglich
sind und wieder verwendet
werden können.
Das Produkt darf daher am Ende seiner Lebens-
dauer nicht über den normalen Hausmüll entsorgt
werden, sondern muss an einem Sammelpunkt für
das Recycling von elektrischen und elektronischen
Geräten abgegeben werden. Nebenstehendes
Symbol am Produkt, in der Bedienungsanleitung
oder auf der Verpackung weist darauf hin.
Bitte informieren Sie sich über die örtlichen Sammelstellen bei Ihrer Gemeindeverwaltung.
Mit der Verwertung von Altgeräten leisten Sie
einen wichtigen Beitrag zum Schutze unserer
Umwelt.
Allgemeine Hinweise für Geräte
mit Laser
LASER RADIATION
DO NOT STARE INTO BEAM
CLASS 2 LASER PRODUCT
Pmax0,093mW (h405nm)
IEC 60825-1:2007
Ihr Gerät ist ein
CLASS 2 LASER
PRODUCT. Dies
bedeutet, dass das
Gerät Laserstrahlungen emittiert, die für momentanen Augenkontakt ungefährlich, jedoch bei dauerhaftem
Augenkontakt gefährlich sein können.
Vorsicht:
7
Schauen Sie nicht direkt
in den Laserstrahl.
7
Wenn andere als die
hier spezifizierten Bedie-
nungseinrichtungen
benutzt oder andere Verfahrensweisen ausgeführt werden, kann es zu gefährlicher
Strahlungs exposition kommen.
7
Dieses Gerät sendet Laserstrahlen aus. Da die
Gefahr von Augenverletzungen besteht, darf
das Gerät nur von qualifiziertem Fachpersonal
geöffnet oder gewartet werden.
7
Wenn andere als die hier spezifizierten Einstellungen verwendet oder ANDERE VERFAHRENS WEISEN ausgeführt werden, kann
es zu gefährlicher Strahlungs exposition kommen.
Page 75

DEUTSCH
36
INFORMATIONEN
-------------------------------------------------------------------------------------------------------
Blu-ray Player reinigen
Netzkabel aus der Steckdose ziehen. Zum Reinigen ein feuchtes Tuch und ein mildes Reinigungsmittel verwenden. Verwenden Sie keine
Reinigungsmittel, die Alkohol, Spiritus, Ammoniak
oder Scheuermittel enthalten.
Disc reinigen
Wenn das Gerät Discs
nicht einwandfrei lesen
kann, benutzen Sie
eine handelsübliche
Reinigung-CD, um die
Laseroptik zu reinigen.
Andere Reinigungsmethoden können die
Laseroptik beschädigen.
Zum Reinigen der CD ein fusselfreies Tuch benut-
zen und immer von innen nach außen in einer
geraden Linie wischen. Keine Reinigungsmittel für
herkömmliche Schallplatten und keine Lösungs-
oder Scheuermittel verwenden.
Technische Daten
Dieses Gerät ist funkentstört entsprechend den
geltenden EU Richtlinien.
Dieses Produkt erfüllt
die europäischen Richtlinien 199 9/5/ EC und
2009/125/EC.
Den genauen Wortlaut der Konformitätserklärung (DOC) finden Sie auf der GRUNDIG Homepage www.grundig.com/download/doc
Das Typenschild befindet sich an der Rückseite
des Gerätes.
Dieses Gerät kann ohne Einschränkung in den
folgend aufgeführten Ländern betrieben werden.
AT BE BG CH CY CZ DE DK
EE ES FI FR GB GR HU IE
IS IT LI LT LU LV MT NL
NO PL PT RO SE SI SK TR
Dieses Gerät kann auch in Ländern außerhalb
Europas betrieben werden.
Für Kunden in Frankreich:
Die Benutzung im Freien ist auf 10 mW e.i.r.p.
innerhalb des Frequenzbandes von 2454 bis
2483,5 MHz beschränkt. Einsatz zur militärischen Funkortung. Zur Lockerung der Richtlinie
erfolgte während der letzten Jahre eine kontinuierliche Umstrukturierung von 2,4 GHz. Vollständige Implementierung ist 2012 geplant.
WLAN
Netzwerkstandard IEEE 802.11b IEEE 802.11g
Transferrate 802.11b:11, 5.5, 2,1 Mbps
802.11g: 54, 48, 36, 24, 18, 12, 9, 6 Mbps
Betriebskanäle: 13 (basierend auf dem Router)
Sicherheit: Hardware-WEP-Engine (64/128 Bit);
Vermeidung schwacher WEP-Schlüssel (WEPplus), TKIP, Hardware-AES-Engine mit Unterstützung für CCM und OCB, 802.1x, SSN
Page 76

37
DEUTSCH
INFORMATIONEN
-------------------------------------------------------------------------------------------------------
Montag bis Freitag von 8.00 bis
18.00 Uhr
Deutschland: 0180 / 523 18 80 *
Österreich: 08 20 / 220 33 22 **
* gebührenpflichtig (0,14 €/Min. aus dem
Festnetz, Mobilfunk: max. 0,42 €/Min.)
** gebührenpflichtig (0,145 €/Min. aus dem
Festnetz, Mobilfunk: max. 0,20 €/Min.)
System
Stromversorgung
Betriebsspannung: 11 0 - 240 V
~
Netzfrequenz: 50/60 Hz
Max. Leistungsaufnahme: 17 W
Leistungsaufnahme in Stand-by: ≤ 1 W
Wiedergabe Norm
PAL, 50 Hz, 625 Zeilen
NTSC, 60 Hz, 525 Zeilen
Disctypen
BD, DVD- Videodisc (DVD-ROM), DVD-RW,
DVD+RW, DVD-R, DVD+R, Video-CD (VCD),
WMA, JPEC, MPEG4, CD-R, CD-RW, MP3
USB
USB 2.0 FAT 32/16 kompatibel
Laser
Halbleiter-Laser
Wellenlänge für BD 400 - 410 nm
Wellenlänge für DVD 650 - 663 nm
Wellenlänge für CD 770 - 800 nm
Audio Format
Digital MPEG4, Dolby Digital, Dolby Digital Plus,
Dolby TrueHD, DTS Advance Digital out
Audio
BD/DVD 192 kHz
Signal-Rausch-Verhältnis: 90 dB
Abmessungen und Gewicht
Abmessungen:
B x H x T 430 x 44 x 230 mm
Gewicht: 2,1 kg
Technische und optische Änderungen
vorbehalten.
GRUNDIG
Kundenberatungszentrum
Haben Sie Fragen?
Unser Kundenberatungszentrum steht Ihnen
werktags stets von 8.00 – 18.00 Uhr zur
Verfügung.
Page 77

DEUTSCH
38
INFORMATIONEN
-------------------------------------------------------------------------------------------------------
Störungen selbst beheben
Nicht jede Bild- und Tonstörung ist auf einen
Defekt Ihres Blu-ray-Players zurückzuführen.
Auch versehentlich herausgezogene Anschlusskabel, beschädigte Discs, sowie verbrauchte
Batterien der Fernbedienung führen zu Funktionsstörungen.
Wenn die folgenden Maßnahmen zu keinem befriedigenden Ergebnis führen, dann wenden Sie
sich bitte an den Fachhandel!
Das Gerät zurücksetzen
Alle Einstellungen auf
die Werkseinstellungen
zurücksetzen.
Im Menü »Einstellungen« – »System« – »Werkseinstellungen« – die Option »Ja« wählen und bestätigen. Dadurch werden ale Einstellungen auf
die Werkseinstellungen zurückgesetzt, mit Ausnahme der JugendschutzEinstellungen.
Netzspannung
Keine Netzspannung. Netzkabel überprüfen, ggf. eine andere Steckdose verwenden
Der Blu-ray-Player schaltet
in den Stand-by Modus.
Dies ist ein Stromsparmodus.
Die »Automatische Abschaltung« ist aktiviert. Blu-ray-Player mit »8«
wieder einschalten.
Betrieb
Der Blu-ray-Player reagiert
nicht auf die Fernbedienung.
Die Batterien sind verbraucht, neue Batterien einsetzen.
Fernbedienung direkt auf den Blu-ray-Player richten.
Farbiges Glas kann den Signalempfang/die Signalübertragung behin-
dern.
Den Blu-ray-Player so aufstellen, dass kein direktes Sonnenlicht auf
den Infrarotsensor für die Fernbediensignale gelangt.
Der Blu-ray-Player ist einge-schaltet, liefert jedoch kein
Bild, keinen Ton.
Die richtige Signalquelle wählen (BD-ROM oder Medien).
Einige Betriebsarten sind bei der Disc nicht zulässig.
Blu-ray-Player zurücksetzen:
1.»8« drücken, der Blu-ray-Player schaltet in den Stand-by Modus.
Wenn sich der Blu-ray-Player nicht in den Stand-by Modus schalten
lässt, das Netzkabel aus der Steckdose ziehen, eine Minute warten
und das Netzkabel wieder in die Steckdose stecken.
2. Blu-ray-Player mit »8« einschalten. Wenn es noch immer nicht möglich ist, das Gerät zu betreiben, kontaktieren Sie Ihren Fachhändler.
Es hat sich Kondenswasser gebildet, 1 bis 2 Stunden warten, damit es
verdunsten kann.
Disc lässt sich nicht abspielen, obwohl die Wiedergabe gestartet wurde. Die
Wiedergabe startet, stoppt
aber sofort wieder.
Überprüfen, ob das Etikett der Disc nach oben zeigt.
Die Disc ist verschmutzt, Disc reinigen.
Eine leere Disc oder eine Disc mit dem falschen Format verwendet.
Page 78

39
DEUTSCH
Es dauert länger, bis der
Player betriebsbereit ist.
Nach dem Einschalten des
Players, dauert es lange,
bis Bild und Ton zu sehen/
hören sind.
Dies kann systembedingt nach einem Stromausfall der Fall sein oder
wenn das Netzkabel angeschlossen wurde.
Wenn der Player mit einem HDMI Kabel an den LED/LCD TV angeschlossen ist.
Das Disc-Fach wird automatisch geöffnet, während die
Disc gelesen wird.
Die Disc ist schmutzig oder verkratzt.
Das Discformat wird nicht unterstützt.
Player zurücksetzen, danach mit »8« ausschalten, 5 Sekunden warten
und Player mit »8« wieder einschalten.
Die Audio- und Videowiedergabe ist vorübergehend unterbrochen während die Disc gelesen wird.
Die Disc ist schmutzig oder verkratzt.
Die Einstellung der TV Norm (PAL/NTSC) im Menü »Anzeige« prüfen.
Player zurücksetzen, danach mit »8« ausschalten, 5 Sekunden warten
und Player mit »8« wieder einschalten.
Der Player ist eingeschaltet
und zeigt das Hauptmenü
an, aber es wird kein Bild
von der Disc angezeigt.
Die Disc ist schmutzig oder verkratzt.
Player zurücksetzen, danach mit »8« ausschalten, 5 Sekunden warten
und Player mit »8« wieder einschalten.
Das Gerät friert die Anzeige ein, während die
CD-R/DVD-R Disk gelesen
wird.
Player zurücksetzen, wenn "Laden" auf dem Bildschirm angezeigt wird,
» « drücken, Disc entnehmen, reinigen und noch einmal versuchen.
Wenn das Gerät die Anzeige erneut einfriert, kann es sein, dass auf der
Disc Inhalte vorhanden sind, die vom Gerät nicht unterstützt werden.
Die Audio- und Videowiedergabe ist vorübergehend unterbrochen.
Dies geschieht zwischen den Kapiteln oder Szenen der Wiedergabeliste ([AVCHD]).
Bei der Wiedergabe eines Titels, der auf beiden Schichten aufgezeichnet ist, wechselt das Gerät automatisch zwischen den Schichten
und spielt den Titel ebenso wie ein normales Programm ab. Die Videound Audiowiedergabe wird jedoch kurzzeitig unterbrochen, während
das Gerät die Schichten wechselt.
BD-Video oder DVD-Video
wird nicht abgespielt.
Sicherstellen, dass die Disc den richtigen BD-Video- bzw. DVD-VideoRegionalcode aufweist und nicht defekt ist.
Sie haben eine Kindersicherungsstufe zur Beschränkung der Wiedergabe von BD-Video- oder DVD-Video-Medien eingestellt. Diese
Einstellung ändern.
Einige BD-Video-Medien können nur mit HDMI ausgegeben werden.
Bild-in-Bild wird mit BDVideo nicht wiedergegeben.
Prüfen, ob die Disc die Funktion Bild-in-Bild unterstützt.
Keine Untertitel.
Es sind keine Untertitel auf der Disc vorhanden.
Untertitel einschalten. Gewünschten Untertitel im Menü "Untertitel"
wählen.
Der Blickwinkel kann nicht
geändert werden.
Blickwinkel können während Szenen nur dann geändert werden,
wenn verschiedene Blickwinkel aufgezeichnet sind.
Die Fortsetzung der Wiedergabe funktioniert nicht.
Gespeicherte Positionen werden abgebrochen, wenn
– »7« mehrmals betätigt wird;
– die Disc-Schublade geöffnet wird.
Je nach Disc funktioniert die Fortsetzung der Wiedergabe möglicher-
weise nicht.
INFORMATIONEN
-------------------------------------------------------------------------------------------------------
Page 79

DEUTSCH
40
INFORMATIONEN
-------------------------------------------------------------------------------------------------------
TV Bildschirm und Video
Die Bilder des Players werden nicht auf dem Fernsehgerät angezeigt.
Das Bild ist verzerrt.
Der LED/LCD-TV muss an der VIDEO OUT Buchse oder an der HDMI
OUT Buchse des Players angeschlossen sein.
Am Fernsehgerät den richtigen Programmplatz für den Player wählen.
Der Bildschirmschoner ist aktiviert.
Player zurücksetzen, danach mit »8« ausschalten, 5 Sekunden warten
und Player mit »8« wieder einschalten.
Videos werden nicht hoch-
auflösend wiedergegeben.
Die Ausgabe eines hochauflösenden Signals ist nur an Buchse HDMI
OUT möglich.
HDMI Auflösung im Menü »Anzeige« prüfen.
Das Bildformat ist nicht
korrekt.
Bildformat am LED/LCD-TV ändern, siehe auch Bedienungsanleitung
des LED/LCD-TVs.
Kein Bild bei der Wiedergabe einer BD Live Disc.
USB-Memory Stick mit ausreichend Speichervolumen anschließen und
dann die Funktion »BD live« im Menü der Blu-ray Disc wählen.
Prüfen, ob das Internet verfügbar ist. Einige Discs benötigen Unterstüt-
zung vom Internet.
Ethernet-Verbindung zwischen Player und Router prüfen.
Internet
Das gewünschte WLANNetzwerk wird nicht gefunden.
– Das WLAN-Netzwerk ist deaktiviert, WLAN-Netzwerk einschalten.
– SSID wird am Router unterdrückt; SSID am Router anzeigen.
– Entfernung zum Router ist zu groß; Entfernung zum Router reduzieren.
Verbindung zum Router
wird nicht hergestellt.
– MAC-Adresse des Gerätes ist am Router nicht aktiviert;
MAC-Adresse am Router aktivieren.
– Datenübertragung vom Router ist verschlüsselt; Netzwerkschlüssel
(WEP oder WPA) am Gerät eingeben.
Falls dies nicht hilft, die gesamte Router-Konfiguration überprüfen.
Page 80

41
DEUTSCH
INFORMATIONEN
-------------------------------------------------------------------------------------------------------
Ton
Kein Ton. Geringe Lautstärke. Verzerrter Ton.
Der gewünschte Audiotyp
kann nicht gehört werden.
Anschlüsse prüfen und die Toneinstellungen im Menü »Audio« prüfen.
Eingangmodus am Verstärker/Receiver prüfen, wenn einer ange-
schlossen ist.
Tonsignal mit Taste »Audio« anwählen.
Die Toneffekte (Re-master, V. Surround, usw.) funktionieren nicht, wenn
das Bitstreamsignal von Buchse HDMI OUT oder Buchse COAXIAL
ausgegeben wird.
Wenn “BD-Video Secondary Audio” auf “Aus” eingestellt ist, werden
Dolby Digital Plus und Dolby TrueHD von als Dolby Digital oder DTS
Digital Surround Bitstream ausgegeben.
Synchronsprache oder Tonformat kann nicht gewählt
werden.
Player zurücksetzen, danach mit »8« ausschalten, 5 Sekunden warten
und Player mit »8« wieder einschalten.
Es gibt Discs, bei welchen die Synchronsprache oder das Tonformat
nicht geändert werden können,.
Ist ein Verstärker/Receiver mit einem Coaxialkabel oder einem HDMI
Kabel angeschlossen, kann die Synchronsprache oder das Tonformat
nicht geändert werden, wenn der “Digital Ausgang” auf “Bitstream”
eingestellt ist. Den “Digital Ausgang” auf “PCM” stellen oder das
Gerät mit Audiokabel anschließen.
HDMI Anschlüsse
Das 4:3 Verhältnis von
Bildbreite zu Bildhöhe verbreitert das Bild links und
rechts. Das Bildformat ist
falsch.
Im Menü »Anzeige« die Einstellung “16:9 Breitbild” wählen.
BD-Live und USB Anschluss
Kene Verbindung zum
Internet.
Prüfen, ob es sich bei der Disc um eine legale Kopie handelt.
Prüfen, ob die LAN-Verbindung zum Internet besteht.
Datei kann nicht herunterge-
laden werden.
Prüfen, ob der USB-Memory Stick voll ist. Den Inhalt des Sticks im
Menü »BD-Live« löschen.
Prüfen, ob die LAN-Verbindung zum Internet besteht.
Anderen USB-Memory Stick verwenden und erneut versuchen.
Die Datei wurde erfolgreich
heruntergeladen, aber die
Wiedergabe wurde unterbrochen.
Prüfen, ob der USB-Memory Stick USB 2.0 unterstützt. Wird nur USB
1.1 unterstützt, kann es sein, dass die Wiedergabe unterbrochen wird.
Die Wiedergabe der Datei
auf dem USB Gerät wird
unterbrochen
Anderen USB-Memory Stick verwenden und erneut versuchen.
Page 81

ZZZJUXQGLJFRP
 Loading...