

Grundig GBP 6000 2D User Manual
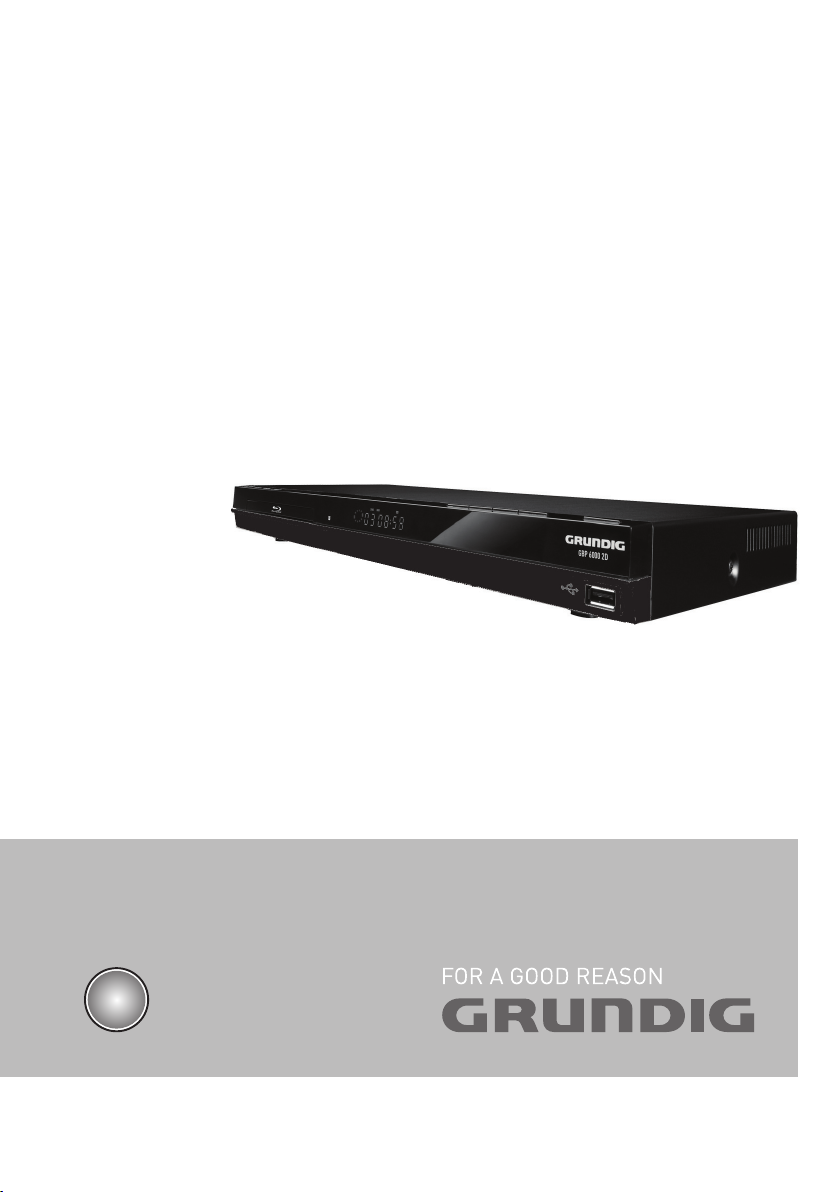
Blu-ray Player
GBP 6000 2D
EN

CONTENTS
----------------------------------------------------------------------------------------------------------------------------------
3 SET-UP AND SAFETY
4 GBP 6000 2D
4 Packing contents
4 Special features
6 OVERVIEW
6 The Blu-ray player controls
7 The remote control
9 CONNECTION AND PREPARATION
9 Connecting the LED/LCD TV using an
HDMI cable
9 Connecting the LED/LCD TV using RCA
cables
9 Connecting a digital audio system with a
coaxial cable
10 Connecting an MP3 player or a USB
memory stick
10 Connecting to the internet with ethernet
cable
10 Connecting to the mains supply
11 Putting batteries in the remote control
12 INITIAL SETUP
12 Switching on the Blu-ray player
12 Menu navigation
12 First installation by using the Quick Setup
13 First installation by using the functions in
the main menu
13 Selecting the language of the screen
menu
13 Adapting the Blu-ray player to the LED/
LCD-TV
15 Network settings
17 BD/DVD PLAYBACK
17 Special features of Blu-ray Discs
17 Special features of the DVD
17 Preparation
17 Inserting the disc
18 Playback
18 Removing the disc
18 Adjusting the volume
18 Muting
18 Additional playback functions
21 BD LIVE
21 Adding BD-Live memory to the player
21 Setting up the player for BD-Live internet
access
22 Using BD-Live
22 BD-Live notes
23 PLAYING AUDIO/VIDEO FILES
23 Playing the contents of a data device or a
USB memory stick
24 Playing picture CDs
25 Playing audio CDs
26 NetFusion MODE
26 About NetFusion
26 Setting NetFusion function
27 Preparation
27 Using NetFusion function
28 SPECIAL SETTINGS
28 Audio settings
28 Existing settings in the Audio menu
29 Language settings
29 Existing settings in the Language menu
30 Parental control
30 Existing settings in the Parental menu
31 System settings
31 Existing settings in the System menu
32 INFORMATION
32 Licence conditions
32 Environmental note
33 Cleaning the device
33 Cleaning the disc
33 Technical data
33 System
34 Troubleshooting
2
ENGLISH

SET-UP AND SAFETY
-----------------------------------------------------------------------------------------------
Please note the following instructions when setting up the system:
7
The device is designed for the playback of
video and audio signals from compact discs,
USB and similar data devices. Any other use is
expressly prohibited.
7
If you want to set up the device on wall shelves
or in cupboards, please ensure that it is adequately ventilated. There must be at least 10
cm of space at the side, above and behind the
device.
7
Do not cover the device with newspapers,
table cloths, curtains, etc.
7
When setting up the device, remember that
furniture is often coated with various types of
varnish and plastic, which often contain chemical additives. These additives may cause corrosion to the feet of the unit. This may leave
stains on the surface of the furniture which can
be difficult or impossible to remove.
7
If the device is exposed to sudden changes in
temperature, for example when taken from the
cold into a warm room, wait at least two hours
before using it.
7
The device is designed for use indoors. If you
use it outdoors, make sure it is protected from
moisture such as dripping or splashing water.
7
Use the device only in a moderate climate.
7
Do not place the device close to heating units
or in direct sunlight, as this will impair cooling.
7
Do not place any vessels containing liquids,
such as vases, on the device. Do not insert any
foreign objects in the disc compartment.
7
Do not place any objects such as burning candles on the device.
7
Do not open the device casing under any circumstances. Warranty claims are excluded for
damage resulting from improper handling.
7
Thunderstorms are a danger to all electrical
devices. Even if the device is switched off, it
can be damaged by a lightning strike to the
mains. Always disconnect the mains plug during a storm.
7
Always keep the disc compartment closed to
prevent dust from collecting on the laser optics.
7
Do not use cleaning agents as they may damage the housing. Clean the device with a
clean and dry cloth.
Notes:
7
Do not connect any other equipment while
the device is switched on. Switch off the other devices as well before connecting them.
7
Only plug the device into the mains socket
after you have connected the external devices. Make sure the power plug is freely
accessible.
ENGLISH
3
GBP 6000 2D
-------------------------------------------------------------------------------------------------------------------------
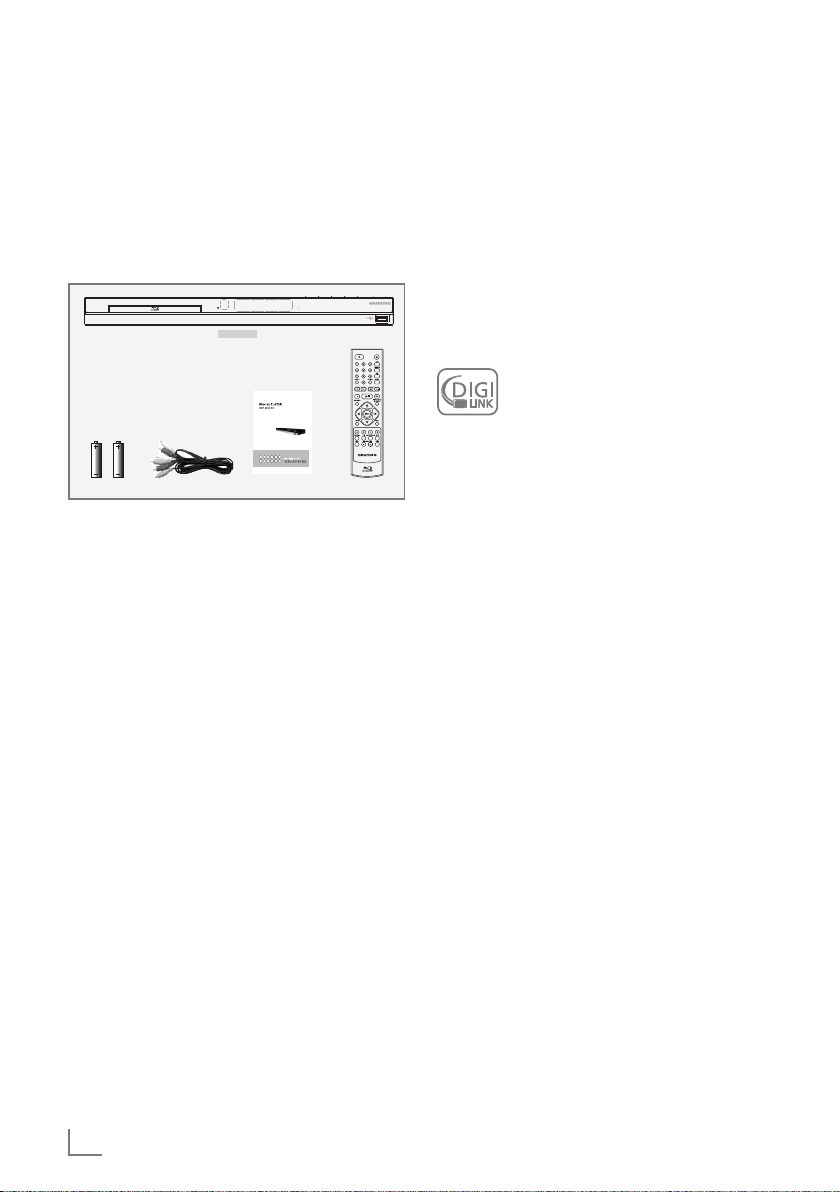
Packing contents
Blu-ray disc player
Remote control
2 batteries
(Micro, R03/UM 4/AAA, 2 x 1,5 V)
User manual
Audio/Video cable
BD Player
Two batteries
Audio/Video cable
Remote ControlUser manual
Special features
7
Grundig Blu-ray Disc player provides high definition video playback at up to 1080 p resolution for an amazing viewing experience.
7
Upconversion of standard definition DVDs for
enhanced picture quality at up to 1080 p over
an HDMI connection.
7
Rich multi channel surround sound.
7
Easy and simple HDTV connection using a single HDMI cable.
7
Digital and analogue outputs for connecting
your home theater system or amplifier.
7
PIP functionality that lets you display primary
and secondary video at the same time (if
available on the Blu-ray Disc).
7
Pop-up menu display without interrupting playback (if available on the Blu-ray Disc).
7
HDMI 1080 p /50 fps output (Blu-ray Disc
only) that provides smooth playback of video
with a frame rate of 50 frames per second (TV
must be connected with an HDMI cable and
be compatible with 1080 p 50 frame).
7
Access to BD-Live functions, with internet connection and an additional memory (if available on the Blu-ray Disc).
7
The device supports NetFusion. This allows
you to combine media streaming with controlling a connected media receiver while streaming content to it from another PC on a network.
7
The MP3 and WMA music data formats can
also be played back via USB input or Audio
CDs.
7
It is possible to display digital photograph
GBP 6000 2D
files that have been burned onto a data disc,
DVD+/-R, DVD+/-R/(W) or a Blu-ray Disc.
7
The DIGI LINK
Your player is equipped with the DIGI
LINK function. This function uses the
CEC (Consumer Electronics Control)
protocol.
CEC allows external devices which are connected to the »HDMI« sockets by an HDMI
cable (e.g. Blu-ray Disc player and LCD/LED-TV)
to be operated with a remote control.
Prerequisite is that the devices connected support CEC. Read the user manual for the LCD/
LED-TV to find out how to activate the corresponding function.
4
ENGLISH
GBP 6000 2D
-------------------------------------------------------------------------------------------------------------------------
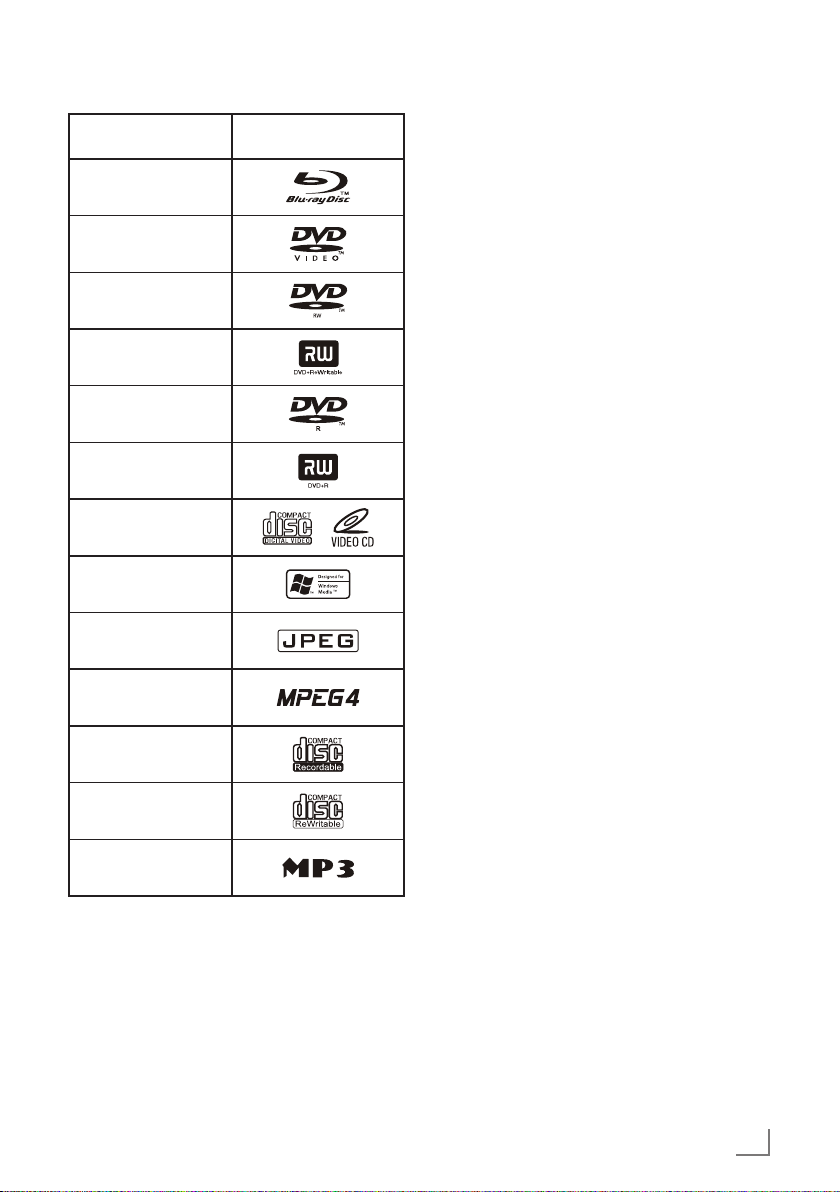
Blu-ray Disc
DVD-video Disc
(DVD-ROM)
DVD-RW
DVD+RW
DVD-R
DVD+R
Video-CD(VCD)
WMA
JPEG
MPEG4
LogoDisc type
Notes:
7
Writable DVD discs (DVD-RW, DVD-R) must
be finalized; only VR-mode is allowed. Playback may not work for some types of discs,
or when specific operations, such as angle
change and aspect ratio adjustment, are being performed. Information about the discs
is written in detail on the box. Please refer to
this if necessary.
7
Do not allow the disc to become dirty or
scratched. Fingerprints, dirt, dust, scratches
or deposits of cigarette smoke on the recording surface may make it impossible to use
the disc for playback.
7
CD-R/-RW, DVD-RW/-R recorded with UDF
or ISO9660 format can be played back.
7
Windows Media Audio (WMA) files must
be written to the disc with a .wma file extension in order to be recognized and played
back properly.
7
JPEG picture files must be written to the disk
with an .jpeg or .jpg file extension in order
to be recognized and played back properly.
CD-R
CD-RW
MP3
ENGLISH
5
OVERVIEW
----------------------------------------------------------------------------------------------------------------------------------
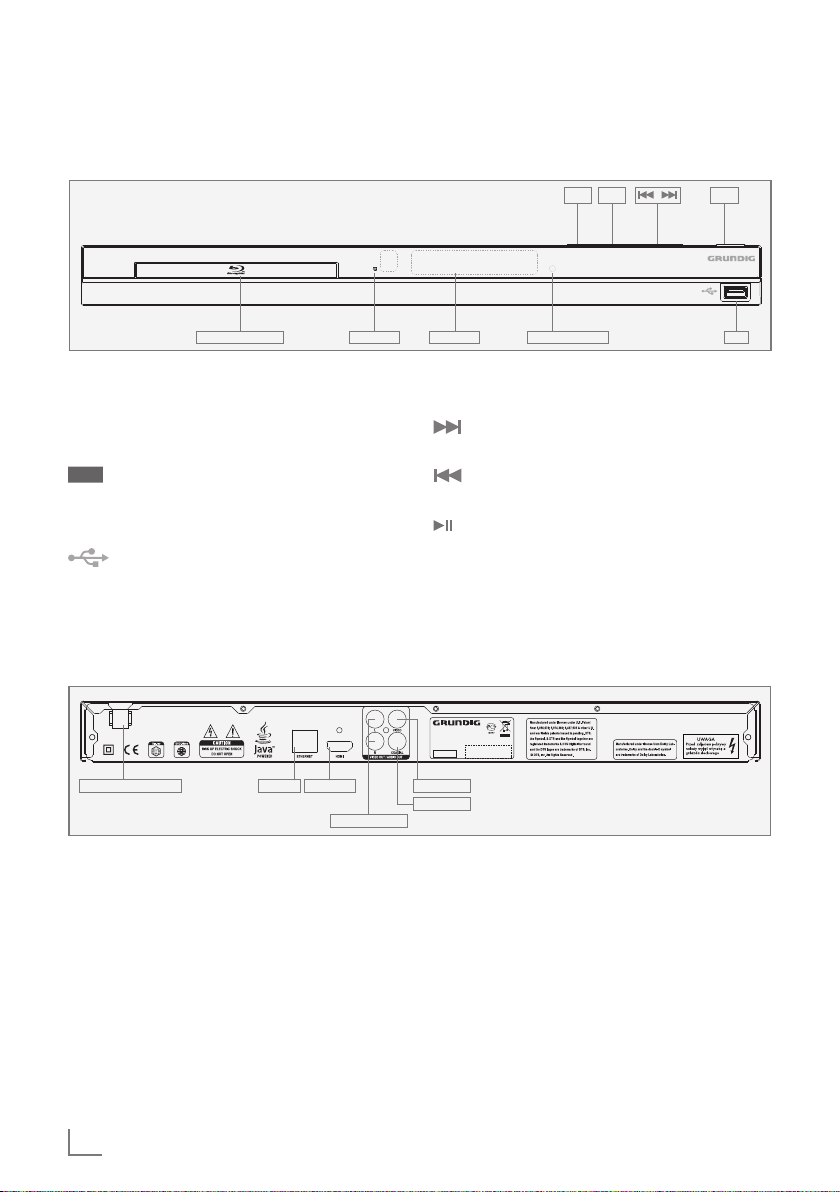
The Blu-ray player controls
The front of the device
!
e
.
9
GBP 6000 2D
Disc compartment Display Power indicator USB
Disc compartment
Infra-red sensor for remote
•
Display of the device.
Power
indicator
Compartment for BDs/ CDs.
control signals.
Lights up when the device is at
standby mode.
IR sensor
USB socket for connecting
MP3 player, a USB memory
stick or a card-reading device.
The back of the device
110-240 V 50/60 Hz
110 - 240 V Power cord.
50/60 Hz
ETHERNET Socket for connecting the
HDMI OUT Video/audio output socket
AUDIO OUT
Audio output sockets (left/
L/R
Ethernet HDMI OUT
AUDIO OUT L/R
internet.
(digital signal) for connecting LED/LCD-TV.
right analogue channel)
for connecting an audio
system.
9 Switches the device on from standby
mode and off again.
Plays next title, chapter, track or file if
exists.
Plays previous title, chapter, track or
file if exists.
Starts and pauses playback.
. Opens or closes the disc compart-
ment.
GBP 6000 2D
BLU-RAY DISC PLAYER
AC:110-240 V 50/60 Hz
~
POWER:17 W
SN
GLR 5800
VIDEO OUT
COAXIAL
VIDEO OUT Video output socket for
connecting a LED/LCDTV or AV receiver with an
RCA socket.
COAXIAL Audio output socket (coax-
ial) for connecting a digital multi-channel audio/
video amplifier.
6
ENGLISH
OVERVIEW
----------------------------------------------------------------------------------------------------------------------------------
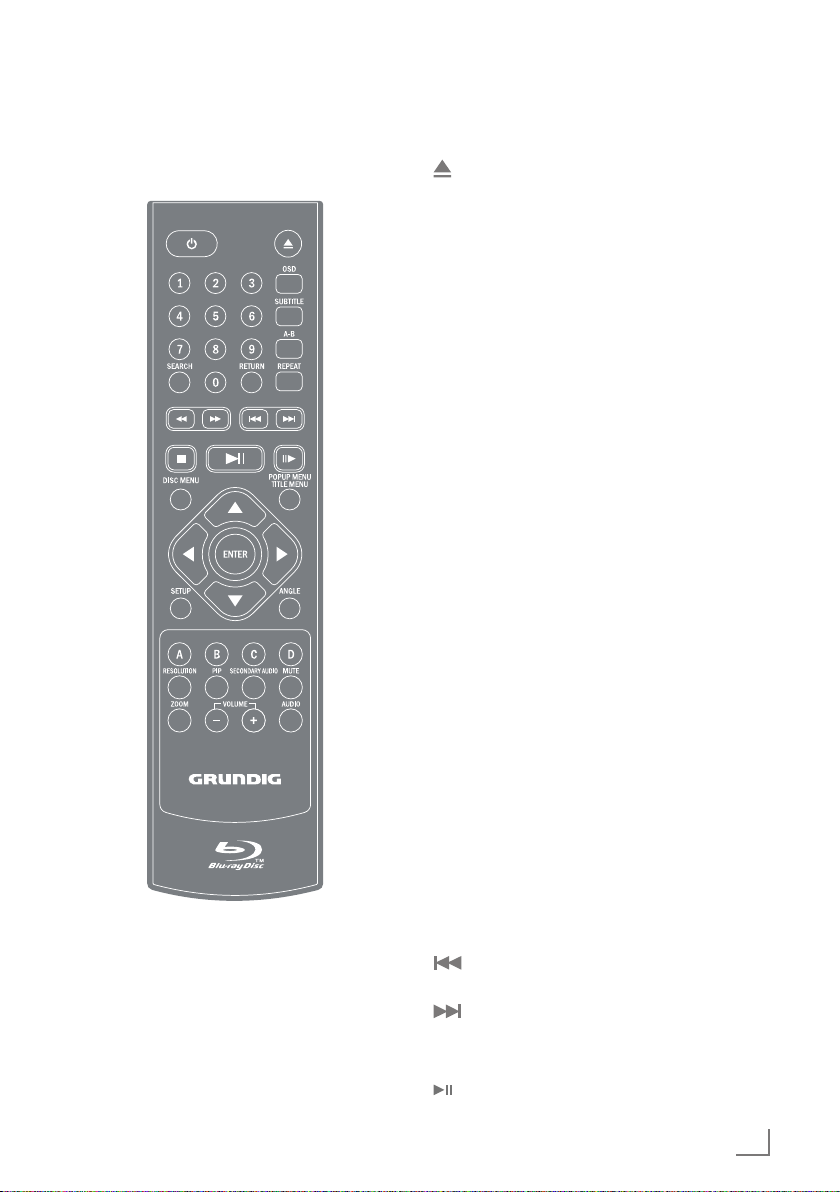
The remote control
9 Switches the device on from
standby mode and off again.
Opens or closes the disc com-
partment.
1 - 0 Number buttons for various data.
SEARCH Press repeatedly to switch be-
tween search modes: title, chapter and time. Then use number
buttons and »ENTER« button to
select the point you want to play.
RETURN Press to return to the previous
menu during the settings or the
folder or menus when playing a
WMA/MP3/JPEG disc.
OSD Shows current playback status
and time information.
SUBTITLE Press to enable/disable subtitles
during BD/DVD playback. If the
disk has more than one subtitle
language, use the cursor buttons
to select the subtitle languages
and press »ENTER« to confirm.
A-B During playback, press once to
store a “start point” for repeating
playback. Press again to select
an “end point”, then the playback repeats from the beginning
to the end (not available on all
disks). The third press cancels
this function.
REPEAT Cycles through the possible re-
peat modes based on content
played.
3 Rewinds the playback to the be-
ginning.
4 Fast forwards the playback to
the end.
Plays previous title, chapter, track
or file if exists.
Plays next title, chapter, track or
file if exists.
7 Stops the playback.
Starts or pauses playback.
ENGLISH
7
OVERVIEW
----------------------------------------------------------------------------------------------------------------------------------
!8 Frame-by-frame playback.
DISC MENU Immediately stops playback and
brings up the main or 'top' menu
of the BD or DVD disc. (Not
available on all discs). In the
main menu, you can typically
choose subtitle language, audio
track, or different scene etc.
POPUP MENU
TITLE MENU
aASs Cursor buttons, select various
ENTER Confirms selected functions in
SETUP Opens the settings menu of the
ANGLE Selects various camera angles
COLOR
BUTTONS
RESOLUTION At stop mode, sets the video out-
PIP Opens the PIP function.
SECONDARY
AUDIO
MUTE Mutes the sound.
ZOOM Zooms in on scenes during play-
– VOLUME + Sets the volume.
AUDIO During playback, press to set the
On BD discs: to bring up the
main movie menu (not available
on all discs).
functions in the menus.
the menus.
device.
for certain scenes or passages
on the BD and DVD during playback (not available on all discs).
The red, green, yellow and blue
buttons start disc-specific features on some BD discs (if available on the Blu-ray Disc).
put resolution (your TV should
support setting the resolution.
Please refer to your TV's user
manual).
During PIP playback, press to set
the audio of the second video.
back (only DVD).
audio channel.
8
ENGLISH
CONNECTION AND PREPARATION
---------------------------------------
Notes:
7
Do not connect any other equipment while
the device is switched on.
Switch off the other equipment as well be-
fore connecting it.
7
Only plug the device into the mains socket
after you have connected the external devices.
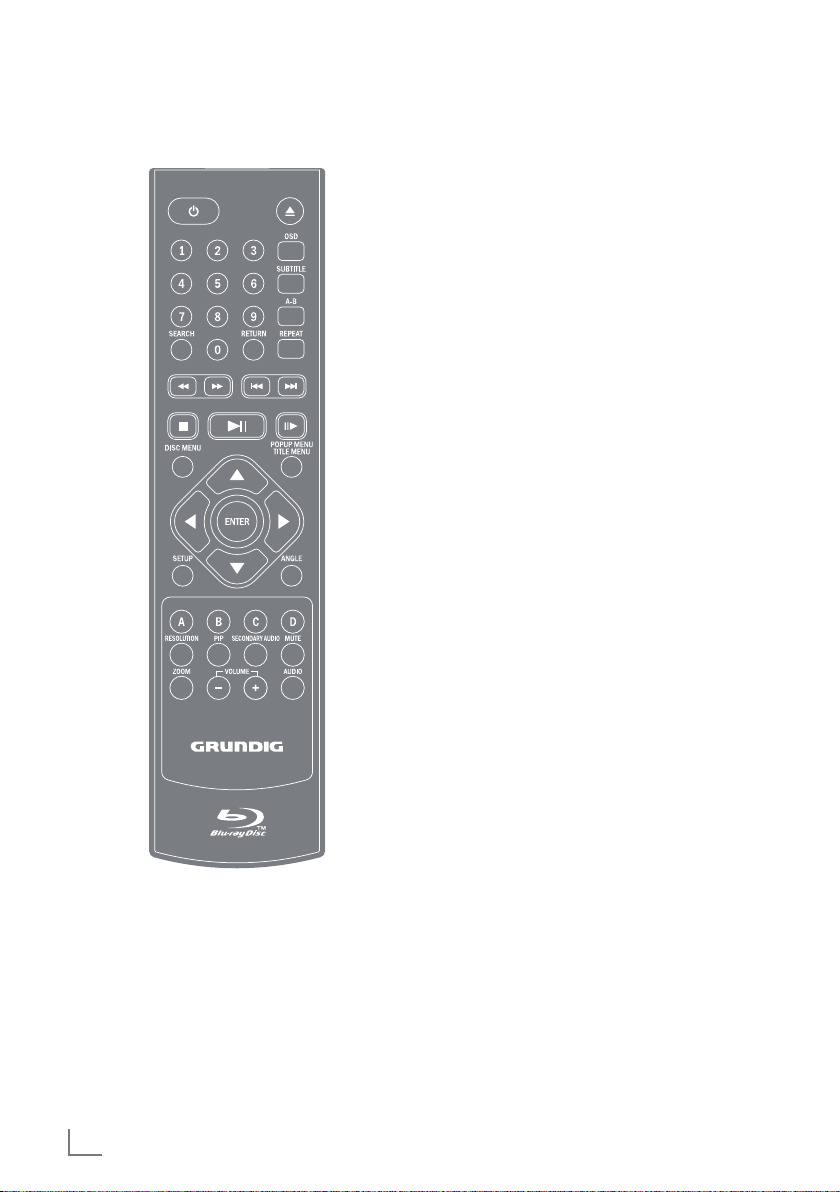
Connecting the LED/LCD TV using
an HDMI cable
Television
1 Connect an HDMI cable (not supplied) into
the »HDMI« socket on the back of the device
and the corresponding socket (HDMI) on the
LED/LCD TV.
BD Player
Connecting the LED/LCD TV using
RCA cables
Television
To video input (yellow)
To audio inputs (red,white)
1 Connect a standard cinch cable into the
»VIDEO OUT« socket on the back of the
device and the corresponding socket (VIDEO
IN) on the LED/LCD TV.
2 Connect standard cinch cables into the
»AUDIO OUT L/R« sockets on the back of
the device and the appropriate sockets
(AUDIO IN) on the LED/LCD TV.
BD Player
Connecting a digital audio
system with a coaxial cable
Television
BD Player
To Video input
Amplifier
To Coaxialdigital audio
input
Coaxial cable
1 Connect a coaxial digital cable into the
digital output »COAXIAL« on the back of the
device and into the corresponding socket of
the digital amplifier.
ENGLISH
9
CONNECTION AND PREPARATION
GBP 6000 2D
BLU-RAY DISC PLAYER
GLR 5800
AC:110-240 V 50/60 Hz
POWER:17 W
~
SN
GBP 6000 2D
BLU-RAY DISC PLAYER
GLR 5800
AC:110-240 V 50/60 Hz
POWER:17 W
~
SN
---------------------------------------
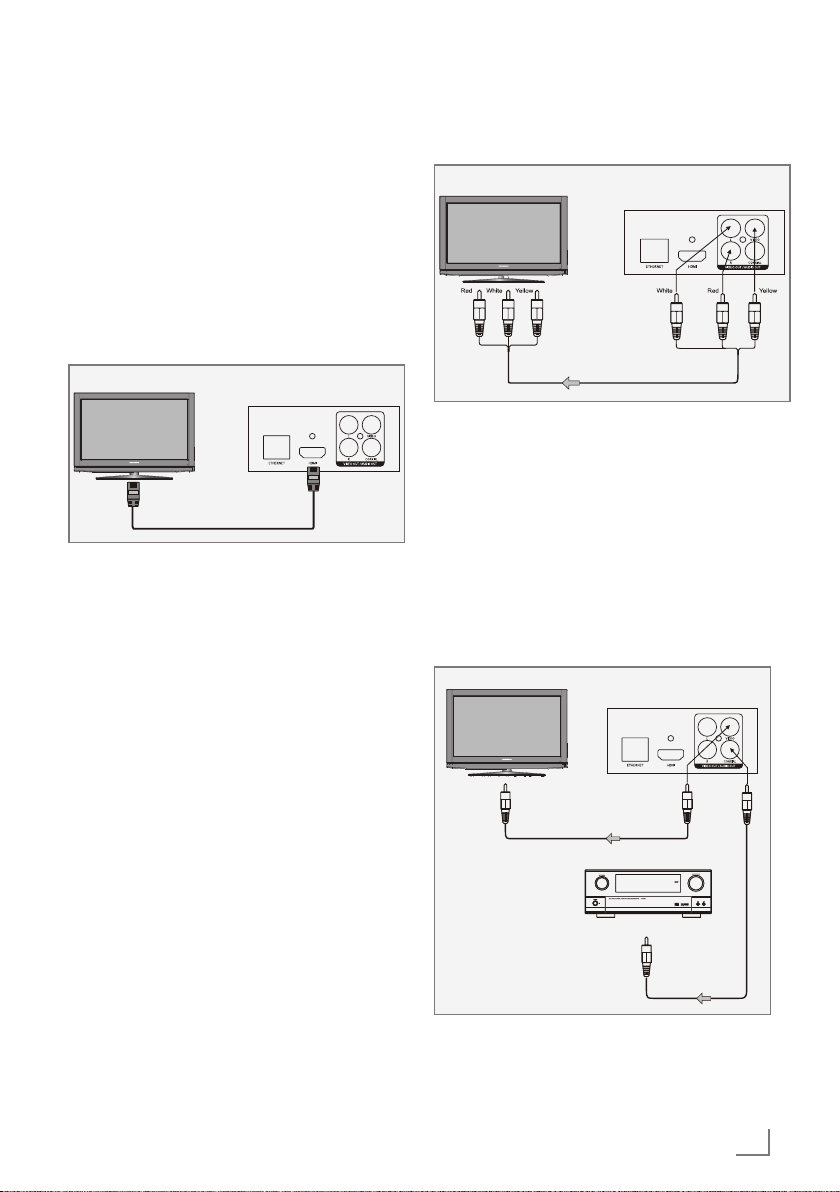
Connecting an MP3 player or a
USB memory stick
GBP 6000 2D
Note:
7
The device must be switched off while the
USB connection is being made. If it is not
switched off, data can be lost.
1 Switch off the device by pressing »9«.
2 Connect the USB interface of the MP3 player
to the » « socket on the device, using a
standard USB cable;
or
insert the USB plug of the USB memory stick in
the » « socket on the device.
Notes:
7
To remove the MP3 player or the USB mem-
ory stick, switch off the device and pull out
the cable for the data medium.
7
The USB socket on the device does not sup-
port a connection for a USB extension cable
and is not designed for directly connecting
to a computer.
Connecting to the internet with
ethernet cable
Splitter
Modem Router
Telephone socket
BD Player
1 Connect the Ethernet socket of the modem/
router to the »ETHERNET« socket of the device using a standard network cable (Twisted
pair, RJ45 plug).
– The data throughput level is 10/100 Mbit.
Connecting to the mains supply
Notes:
7
Check that the mains voltage on the type
plate (on the back of the device) corresponds to your local mains supply. If this is
not the case, contact your specialist dealer.
7
Before connecting the AC power cord to
the wall socket, ensure that all other connections have been made.
10
ENGLISH
1 Plug the power cord into the wall socket.
Caution:
7
The device is connected to the mains with
the power cord. Pull out the power plug if
you want to completely disconnect the device from the mains.
7
Make sure the power plug is easily acces-
sible during operation and not hindered by
other objects.
CONNECTION AND PREPARATION
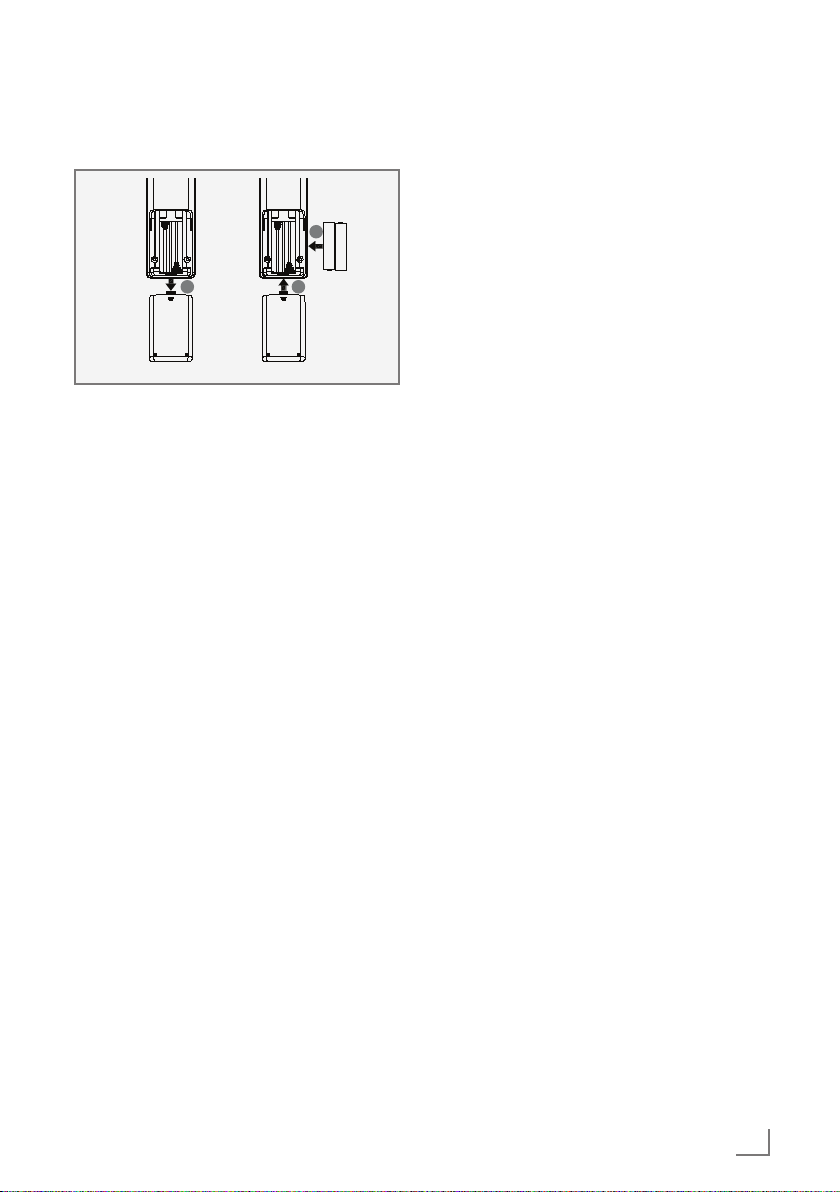
Putting batteries in the remote
control
2
---------------------------------------
1
3
1 Open the battery compartment by pressing
down on the catch and then remove the lid.
2 Observe the polarity marked on the base of
the battery compartment when inserting the
batteries (micro batteries, 2 x 1.5 V, R 03/
UM 4/AAA).
3 Close the lid of the battery compartment.
Notes:
7
Do not expose the batteries to extreme heat,
caused for example by direct sunlight, heaters or fire.
7
Remove the batteries when they are flat or
when you know that the device will not be
used for a long period of time. The manufacturer accepts no liability for damage caused
by leaking batteries.
Environmental note:
7
Batteries, including those which do not con-
tain heavy metal, should not be disposed
of with household waste. Always dispose
of used batteries in accordance with local
environmental regulations.
ENGLISH
11
INITIAL SETUP
----------------------------------------------------------------------------------------------------------------------
Switching on the Blu-ray player
If you connect the device to the mains, it
switches to standby.
1 Plug the power cord into the wall socket.
– The power indicator turns on.
2 Press »9«.
– The power indicator turns off.
– Display: »HELLO«.
3 Switch on the LED/LCD-TV, select the input
setting on the LED/LCD-TV that matches the
connection method you used to connect the
Blu-ray player.
Menu navigation
When you switch on the device, the main menu
of the device automatically appears on the
screen.
Quick Setup
Settings
Media
NetFusion
NetFusion
1 Use the cursor buttons »A«, »S«, »s« or
»a« to move through the menu.
2 Confirm your selection by pressing »ENTER«.
Settings
BD-Live
Display
Audio
Language
Parental
System
Network
OSD
Menu
Audio
Subtitle
Language
English
Auto
Auto
None
First installation by using the
Quick Setup
Use the »Quick Setup« function to make the initial settings.
If you need more settings, refer to the chapter
"First installation by using the functions in the
main menu", see next page.
1 Press »SETUP« to open the main menu.
2 In the main menu select »Quick Setup« by us-
ing »A« or »S« and press »ENTER« to confirm.
– Display: »Would you like to do Quick Setup?
Yes - No« appears.
3 Select »Yes« by using »a« or »s« and press
»ENTER« to confirm.
– Display: »OSD Language Settings« menu
appears.
4 Select your language by using »A« or »S«
and press »ENTER« to confirm.
– Display: »Resolution« menu appears.
5 Depending on the type of the TV connected to
the device, select resolution by using »A« or
»S« and press »ENTER« to confirm.
– Display: »TV Aspect« menu appears.
6 Depending on the type of the TV connected to
the device, select TV Aspect by using »A« or
»S« and press »ENTER« to confirm.
– Display: »Quick Setup Complete! Exit« ap-
pears.
7 Press »ENTER« to exit the Quick Setup.
3 Press »RETURN« to return to the main menu.
12
ENGLISH
 Loading...