

Page 1

ǵ
COLOR TELEVISION
ARCANCE 37 P 37-5211
ARCANCE 55 T 55-5211
ARCANCE 55 FLAT TF 55-5211
ARCANCE 72 FLAT TF 72-5211
ENGLISH
FRANÇAIS
РУССКИЙ
Page 2

CONTENTS
________________________________________________________________________
3 Set-up and safety
4 Connection and preparation
Connecting the antenna and the mains cable
Inserting batteries in the remote control
4 Overview
Operating controls on the television set
The remote control
6 Settings
Automatic tuning (using the ATS search)
Sorting TV channels
Entering the date and time
Setting the brightness, colour, contrast and sharpness
Selecting picture settings
8 TV operation
Switching on and off
Selecting channels
Zap function
Adjusting the volume
Muting
Showing and hiding the clock
Displaying the channel number
9 Convenience functions
Entering the switch-off time
Timer function
Displaying the clock and timer continuously
Programme scan – overview of the programmes currently showing
Entering a message
Skipping channels
11 Child lock
Blocking individual channels
Blocking operation on the device
Blocking all channels
12 Using external devices
Connecting a video recorder
Camcorder
13 Special settings
Tuning TV stations
Selecting the colour and audio standard
Selecting the screen background
14 Information
Technical data
2
Page 3
ENGLISH
3
SET-UP AND SAFETY
______________________________________________
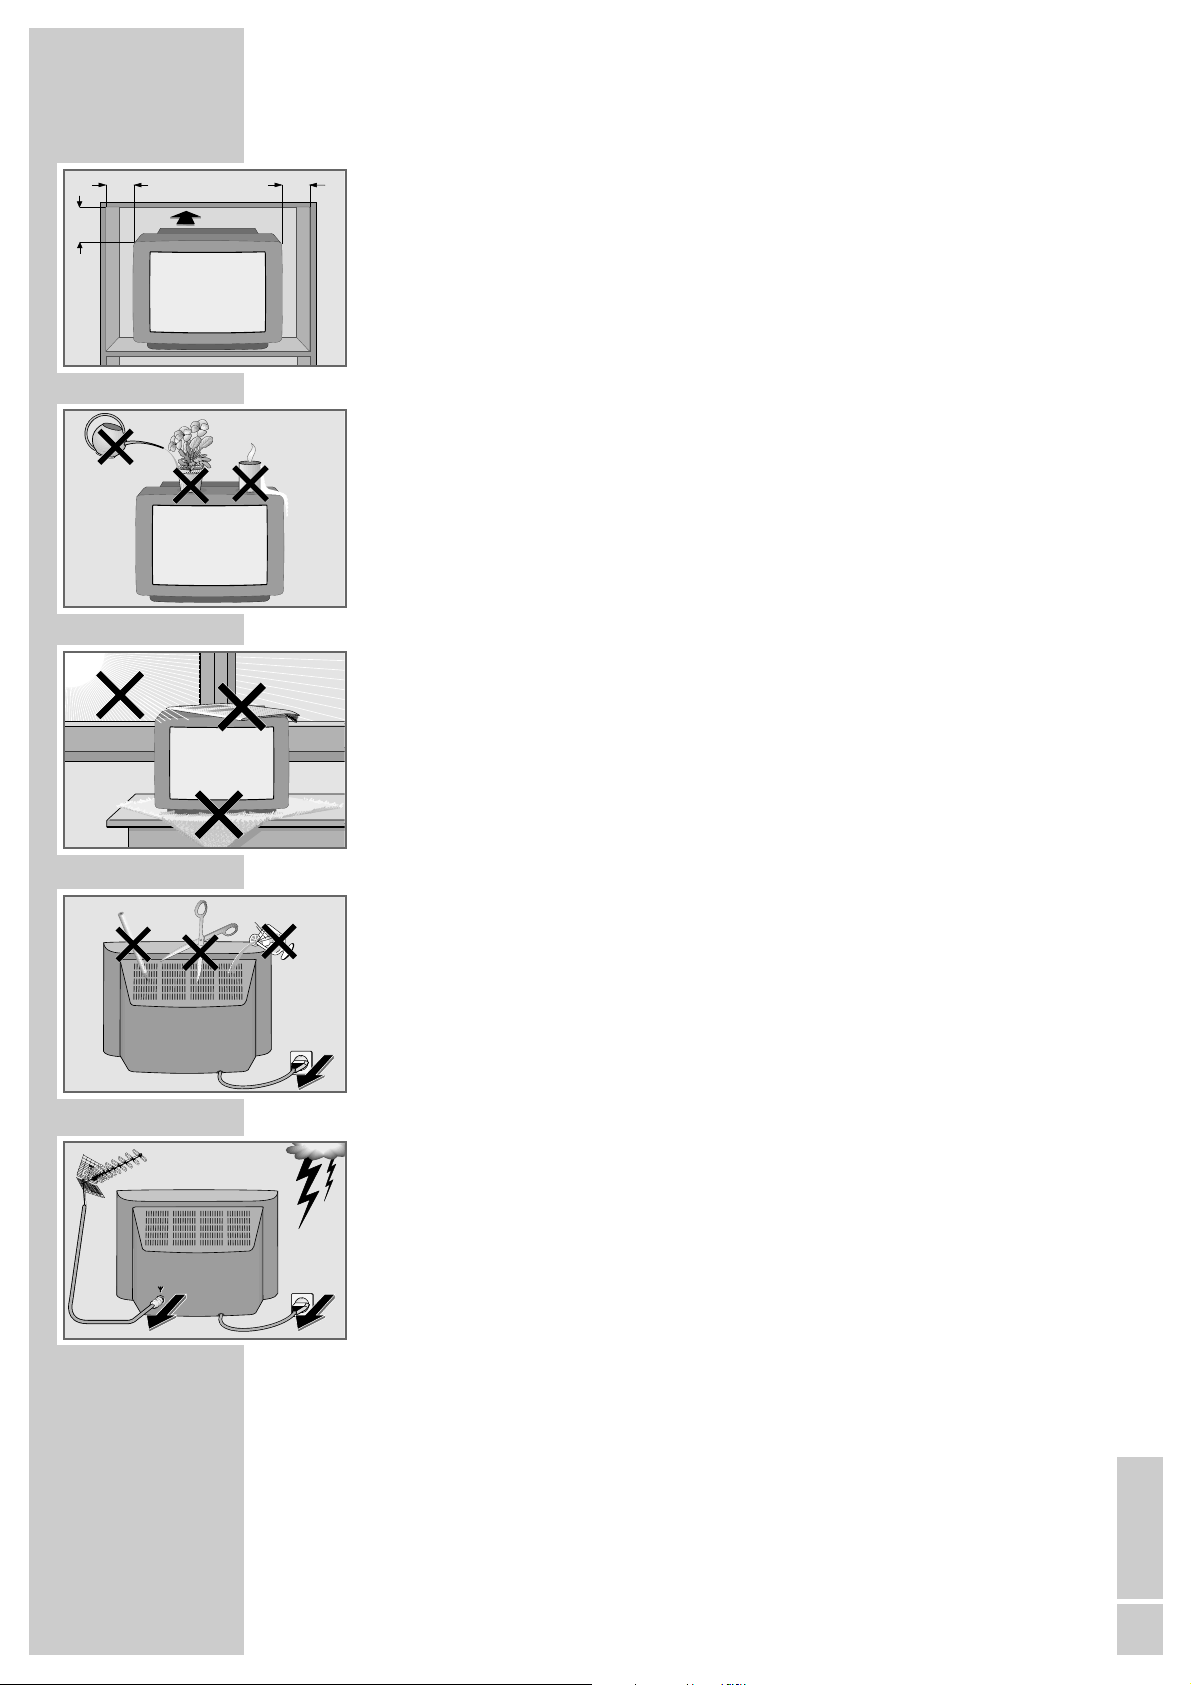
Please note the following information when setting up your television set:
This television set is designed to receive and display video and audio signals.
Any other use is expressly prohibited.
The ideal viewing distance is 5 times the screen diagonal.
External light falling on the screen impairs picture quality.
Ensure sufficient clearance between the TV and the wall cabinet.
The television set is designed for use in dry rooms. If you do use it in the open,
please ensure that it is protected from moisture, such as rain or splashing water.
Do not expose the television set to any moisture.
Do not place any vessels such as vases on the television, as they may spill liquid,
thus presenting a safety risk.
Place the television set on a solid, level surface. Do not place any objects such as
newspapers on the television set or cloth or similar items beneath it.
Do not place the television set close to heating units or in direct sunlight, as this
will impair cooling.
Heat build-up can be dangerous and shortens the operating life of the television
set. For reasons of safety, have a specialist remove any dirt deposits in the set
from time to time.
Keep the television set away from magnetic fields (loudspeaker boxes, for
example).
Do not open the television set under any circumstances. The manufacturer will
not accept any liability for damage resulting from improper handling.
Ensure that the mains cable is not damaged.
The television set may only be operated with the mains cable supplied.
Thunderstorms are a danger to all electrical devices. Even if the television set
is switched off, it can be damaged by a lightning strike to the mains or the
antenna cable. Always disconnect the mains and antenna plugs during a storm.
Clean the screen with a soft, damp cloth. Only use plain water.
10
cm
10
cm
20
cm
20 cm
K
rie
g
a
m
G
o
lf
! SERVICE !! SERVICE !! SERVICE !
Page 4
4
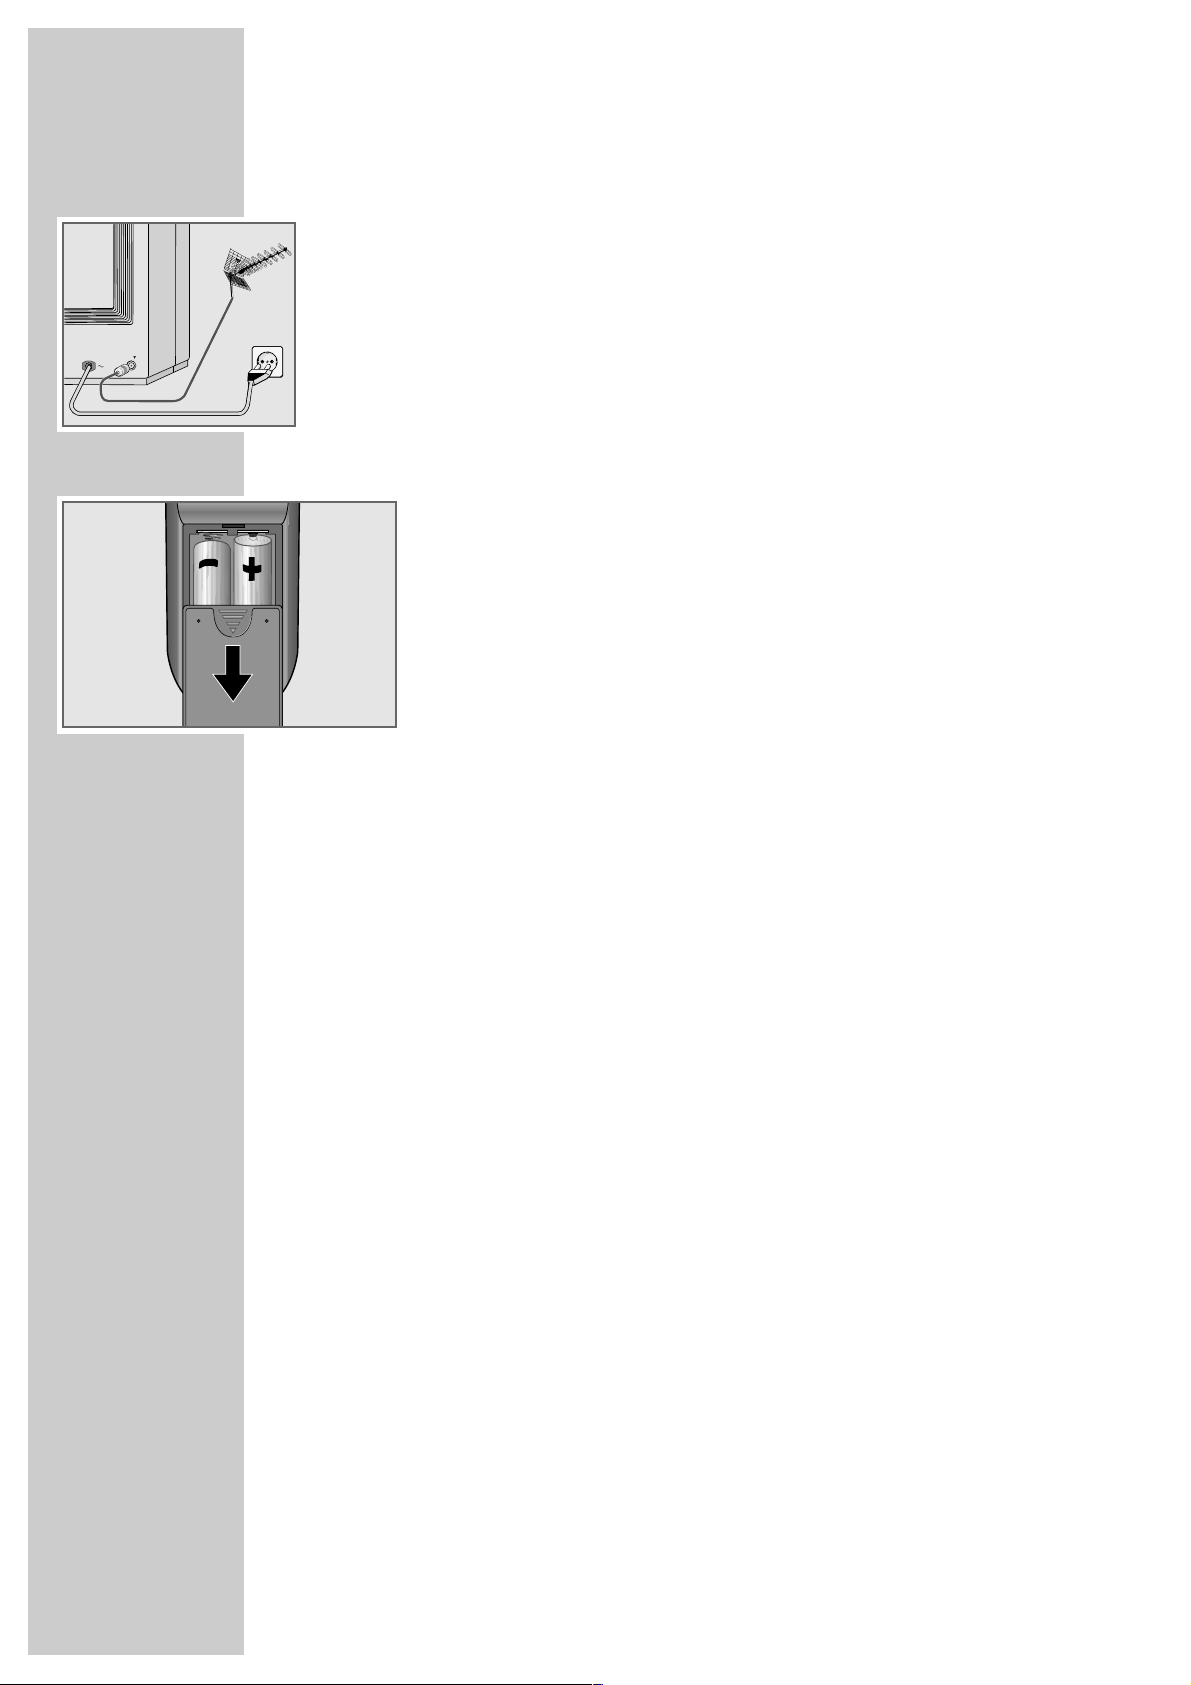
Connecting the antenna and the mains cable
1 Insert the telescopic antenna in the recess in the rear panel
(only for ARCANCE 37 P 37-5211).
2 Plug the roof antenna cable or the telescopic antenna into the antenna socket
»
–II–
« on the television set.
3 Insert the power cord plug into the socket.
Inserting batteries in the remote control
1 Open the battery compartment by removing the lid.
2 Insert batteries (UM-3 or AA, 2 x1.5 V).
Observe the polarity (marked on the base of the battery compartment).
Note:
If the television no longer reacts properly to remote control commands, the
batteries may be flat. Always remove flat batteries. No liability is accepted
for damage resulting from leaking batteries.
CONNECTION AND PREPARATION
_______
OVERVIEW
_______________________________________________________________________
Operating controls on the television set
Ȃ
Switches the television to stand-by mode
P+, P- Switch on the television from stand-by mode
Channel selection up and down
V+, V- Increase volume, decrease volume
MENU Opens the »TIME«, »SETUP« and »PRESET« menus in succession
TV/AV Selects the AV channels AV1 and AV2
AUDIO Audio signal input on the left side or the front
VIDEO Video signal input on the left side or the front
Page 5
ENGLISH
5
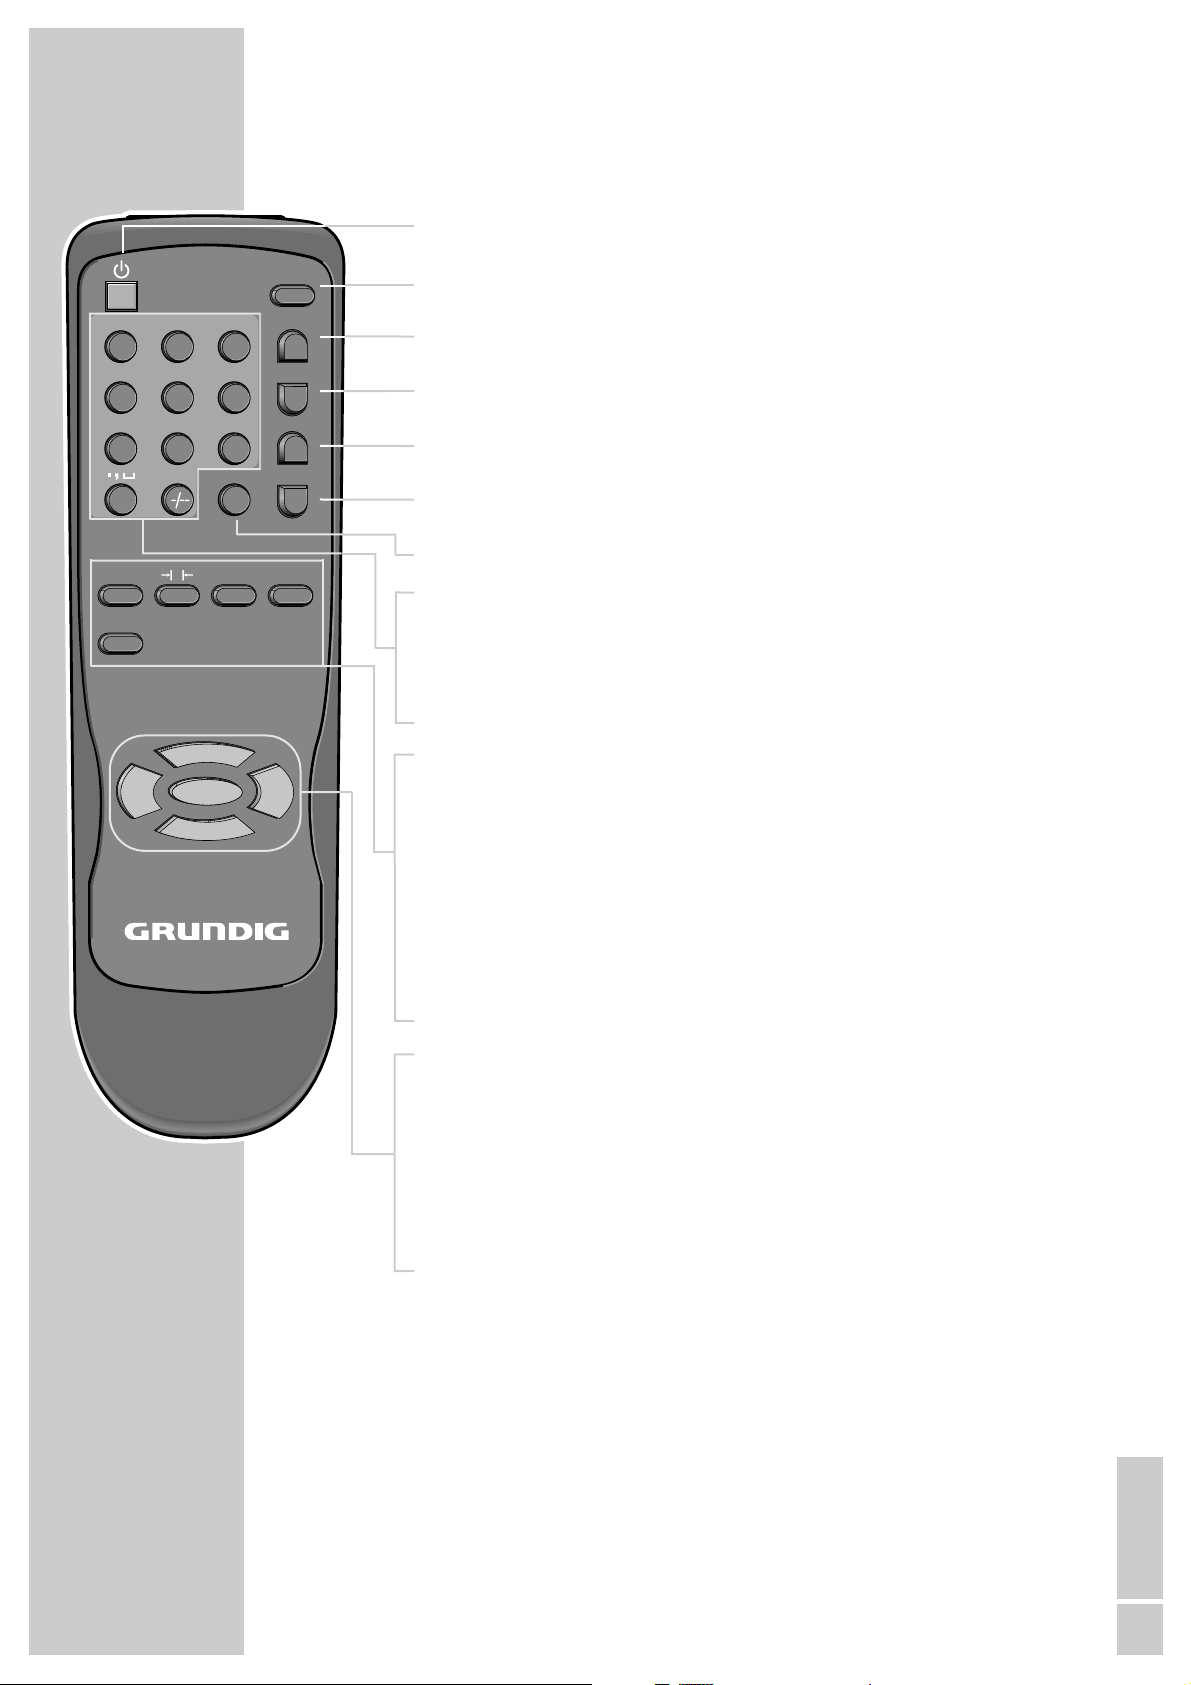
The remote control
Ǽ Switches off the television (stand-by)
TV/AV Selects the AV channels AV1 and AV2
LOCK Opens the »Child lock« menu
MUTE Sound on/off (mute)
CALL Shows channel information
ZOOM Changes the picture format
QV Switches to the previously selected television station and back
1…0 Switch the television on from stand-by mode
Select channels directly
–/– – Switches between single-digit, two-digit and three-digit station
selection
PIC Opens the picture menu
→
|P|
←
Selects picture settings
SCAN Starts programme scan
MSG Calls up message
SLEEP Sleep timer
Press again to enter the switch-off time
P+, P- Switch the television on from stand-by mode
Select stations step by step
Move the cursor in the menus up and down
V+, V- Adjust the volume
Move the cursor left/right
MENU Opens the »TIME«, »SETUP« and »PRESET« menus in succession
OVERVIEW
__________________________________________________________________________________
ABC2DEF3GHI
1
JKL5MNO6PQR
4
STU8VWX9YZ–
7
P
+
P
MENU
-
P
QV
V
0
PIC SCAN MSG
SLEEP
-
V
TV/AV
LOCK
MUTE
CALL
ZOOM
+
Tele Pilot 741 C
Page 6

6
SETTINGS
____________________________________________________________________________
Automatic tuning (using the ATS search)
The television set is equipped with an automatic channel search system.
Channels 0-129 are provided, to which you can assign television stations from
the antenna or from the cable connection.
1 Switch on the television by pressing the »Ȃ« button on the television set.
Note:
When you switch the television on, the word ”MESSAGE” automatically
appears. You can change this text, see page 10.
2 Select the »SETUP« menu by pressing »MENU« twice.
3 Press »V-« or »V+« to select the language.
– The »LANGUAGE« line is already selected.
4 Open the »PRESET« menu by pressing »MENU« and then press »V-« or
»V+« to start the station search.
– The automatic search may last a minute or longer, depending on the
number of television stations received.
– After the search the television switches to channel 1.
Sorting television channels
If the same station was stored more than once during the automatic search or if
you want to move certain stations to different channel numbers you can do this
in the »EXCHANGE« menu.
1 Select the television station to move to a different channel number by pressing
»P+«, »P-« or »0...9«.
2 Open the »PRESET« menu by pressing »MENU« three times.
3 Select »EXCHANGE« by pressing »P+« and then press »V-« or »V+« to
open the »PROGRAM EXCHANGE« menu.
4 Select »PROGRAM B« by pressing »P-« and enter the channel position using
»1…0«.
5 Select »EXCHANGE« by pressing »P-« and then press »V-« or »V+« to
swap the stations.
6 Press »MENU« again to finish the setting.
SETUP
LANGUAGE : ENGLISH
B/B : ON
C-SYS : AUTO
S-SYS : B/G
ĵ
–––––––––
Ł
PRESET
■■■■■■■■■■■■■
_______________
_
ATS
PROGRAM : 1
BAND : UHF
SKIP : OFF
AFT : OFF
FINE
SEARCH
EXCHANGE
ĵ
–––––––––––––––––––
Ł
PRESET
■■■■■■■■■■■■■
_______________
_
ATS
PROGRAM : 1
BAND : UHF
SKIP : OFF
AFT : OFF
FINE
SEARCH
EXCHANGE
ĵ
–––––––––––––––––––
Ł
PROGRAM EXCHANGE
PROGRAM A : 5
PROGRAM B : 1
EXCHANGE :
ĵ
–––––––
Ł
Page 7

ENGLISH
7
SETTINGS
____________________________________________________________________________________
Entering the time
1 Open the »TIME« menu by pressing »MENU«.
– »TIME« is already selected.
2 Enter the time using »V-« (hours) and »V+« (minutes).
3 Press »MENU« again to finish the setting.
Note:
The time remains stored as long as the television is in operation or stand-by.
If you switch off the television with the mains switch, you must repeat this
setting when you switch it on again.
Setting the brightness, colour, contrast and sharpness
1 Select the »PICTURE« menu by pressing »P/C«.
2 Select »BRIGHT«, »CONTRAST«, »COLOR« or »SHARP« by pressing »P-«
or »P+«.
3 Set the level you require by pressing »V-« or »V+«.
4 Press »P/C« again to finish the setting.
Selecting picture settings
You can choose from among three standard picture settings and one custom
setting.
1 Press »
→
|P|←« repeatedly. The picture settings are selected in succession.
Note:
The »PERSONAL« setting contains the levels you select in the »PICTURE«
menu.
PICTURE
v
BRIGHT 63
{
CONTRAST 48
i
COLOR 32
Ƕ
SHARP +13
■■■■■■■■■■■■■
_______________
_
+13
ĵ
––––––––––
Ł
TIME
TIME 11 : 25
SLEEP ––
DISPLAY OFF
ON-TIME –– : ––
OFF-TIME –– : ––
PROGRAM –
ALARM OFF
ĵ
––––––––––––––––
Ł
Page 8

8
TELEVISION OPERATION
___________________________________
Switching on and off
1 Press »Ȃ« on the television set to switch to stand-by mode.
2 Press »1…0« or »P+« or »P-« to switch on the device from stand-by mode.
– The television switches on to the most recently selected channel.
3 Press the »Ǽ« button to switch the television to stand-by mode.
4 Press »Ȃ « on the television set to switch off the television completely.
– This saves electricity.
Selecting channels
1 Use »1…0« to select channels directly.
2 Press »P+« or »P-« to move up and down channels.
3 Select the »AV1« and »AV2« channels by pressing »TV/AV«.
Zap function
This function allows you to switch back and forth between two television
channels (zapping).
1 Press »1 … 0« to select a television channel.
2 Press »1 … 0 « to select another television channel.
3 By pressing »QV« you can switch (zap) between these two channels.
Adjusting the volume
1 Press »V-«or»V+« to change the volume.
Muting
1 Press »MUTE« to switch the sound on or off (mute).
Displaying the channel number
1 Press »CALL« to show or hide the channel number.
– The colour system, the status of the switch-off timer and the clock are also
displayed.
ABC2DEF3GHI
1
JKL5MNO6PQR
4
STU8VWX9YZ–
7
ZOOM
P
+
P
MENU
-
P
QV
V
0
PIC SCAN MSG
SLEEP
-
V
TV/AV
LOCK
MUTE
CALL
+
Tele Pilot 741 C
Page 9

ENGLISH
9
CONVENIENCE FUNCTIONS
__________________________
Entering the switch-off time
You can enter a switch-off time. After this time has elapsed, the television
switches to stand-by mode.
1 Open the »TIME« menu by pressing »MENU«.
2 Select »SLEEP« by pressing »P-« or »P+«.
3 Enter the required time (in 10 or 30 minute intervals from 10 to 120 minutes)
by pressing »V-« or »V+«.
4 Press »MENU« again to finish the setting.
Note:
Press »CALL« to see the time remaining before the device switches off.
To deactivate the switch-off timer, repeat steps 1 and 3 and at step 2 press
»V-« or »V+« to select the display »--«.
Timer function
You can enter a switch-on time or a switch-off time. After the set time has
elapsed, the television switches on or switches to stand-by mode.
1 Open the »TIME« menu by pressing »MENU«.
2 Select »ON-TIME« by pressing »P-« or »P+« and then enter the switch-on
time using »V-« (hours) and »V+« (minutes).
3 Select »OFF-TIME« by pressing »P-« or »P+« and then enter the switch-off
time using »V-« (hours) and »V+« (minutes).
4 Select »PROGRAM« by pressing »P-« or »P+« and then enter the channel
to be selected after switching on by pressing »V-«, »V+« or »1…0«.
Note:
To save the switch-on time and the switch-off time, select »ON« in the
»ALARM« line by pressing »V-« or »V+«.
5 Press »MENU« again to finish the setting.
Note:
To deactivate the timer, repeat steps 1 and 3 and in steps 2 and 3 press
»V-« or »V+« to select the display »--«.
TIME
TIME 11 : 25
SLEEP ––
DISPLAY OFF
ON-TIME –– : ––
OFF-TIME –– : ––
PROGRAM –
ALARM OFF
ĵ
––––––––––––––––
Ł
TIME
TIME 11 : 25
SLEEP ––
DISPLAY OFF
ON-TIME –– : ––
OFF-TIME –– : ––
PROGRAM –
ALARM OFF
ĵ
––––––––––––––––
Ł
Page 10

10
CONVENIENCE FUNCTIONS
___________________________________________________
Displaying the clock and timer continuously
1 Open the »TIME« menu by pressing »MENU«.
2 Select »DISPLAY« by pressing »P-« or »P+« and then press »V-« or »V+«
to select »ON«.
3 Press »MENU« again to finish the setting.
Programme scan – overview of the programmes
currently showing
All channels are selected in succession. This gives you an overview of the programmes currently showing.
1 Press »SCAN« to select all the channels in succession.
2 Press »SCAN« to quit the function.
Entering a message
You can enter a message to appear on the screen when the television is
switched on.
1 Open the »MESSAGE« menu by pressing »MSG«.
2 Press »P-« or »P+« to select the first line.
– You can enter up to 16 characters per line.
3 Select the characters by pressing »1...0« and move to the next character by
pressing »V+«.
4 Press »MSG« to finish the entry.
Skipping channels
The channels you select are skipped when you press »P-« or »P+«.
1 Open the »PRESET« menu by pressing »MENU« three times.
2 Select »PROGRAM« by pressing »P-« and then press »1…0« to select the
channel to be skipped.
3 Select »SKIP« by pressing »P-« and then press »V-« or »V+« to select »ON«.
4 Press »MENU« to finish the entry.
TIME
TIME –– : ––
SLEEP ––
DISPLAY OFF
ON-TIME –– : ––
OFF-TIME –– : ––
PROGRAM –
ALARM OFF
ĵ
––––––––––––––––
Ł
MESSAGE
WELCOME TO
GRUNDIG
TV WORLD
PRESET
■■■■■■■■■■■■■
_______________
_
ATS
PROGRAM : 1
BAND : UHF
SKIP : OFF
AFT : OFF
FINE
SEARCH
EXCHANGE
ĵ
–––––––––––––––––––
Ł
Page 11

ENGLISH
11
CHILD LOCK
____________________________________________________________________
Blocking individual channels
1 Press »P-«, »P+« or »1…0« to select the channel to be blocked.
2 Open the »CHILD LOCK« menu by pressing »LOCK« and holding it down
for three seconds.
– CHILD LOCK is already selected.
3 Press »V-« or »V+« to select »ON«. The channel is now blocked.
4 Press »LOCK« again to finish the setting.
Note:
To unblock the channel, select it using »1...0« and repeat steps 2 to 4, selecting »OFF« during step 3.
Blocking operation on the device
1 Open the »CHILD LOCK« menu by pressing »LOCK« and holding it down
for three seconds.
2 Select »PANEL LOCK« by pressing »P-« or »P+«.
3 Press »V-« or »V+« to select »ON«. Operation on the device is now
blocked.
4 Press »LOCK« again to finish the setting.
Note:
To reverse the block, repeat steps 1 to 4 and select »OFF« in step 3.
Blocking all functions
1 Open the »CHILD LOCK« menu by pressing »LOCK« and holding it down
for three seconds.
2 Select »TV LOCK« by pressing »P-« or »P+«.
3 Press »V-« or »V+« to select »ON«. All channels are now blocked.
4 Press »LOCK« again to finish the setting.
Note:
To reverse the block, repeat steps 1 and 4.
CHILD LOCK
CHILD LOCK : OFF
PANEL LOCK : OFF
TV LOCK : OFF
ĵ
–––––––
Ł
CHILD LOCK
CHILD LOCK : OFF
PANEL LOCK : OFF
TV LOCK : OFF
ĵ
–––––––
Ł
CHILD LOCK
CHILD LOCK : OFF
PANEL LOCK : OFF
TV LOCK : OFF
ĵ
–––––––
Ł
Page 12

12
USING EXTERNAL DEVICES
____________________________
Connecting a video recorder
Connecting a video recorder
1 Connect the »AUDIO IN«/»AUDIO OUT« and »VIDEO IN«/»VIDEO
OUT« sockets on the television and the corresponding sockets on the video
recorder using a standard cinch cable.
Operation with a video recorder
1 Switch on the video recorder and select the function you wish to use.
2 Select the »AV1« channel by pressing »TV/AV«.
– The video and audio information from the video recorder can now be seen
and heard on the television set.
Camcorder
Connecting a camcorder
1 Connect the »AUDIO« and »VIDEO« sockets on the side of the device to
the corresponding sockets on the camcorder using a standard cinch cable.
Using a camcorder
1 Switch on the camcorder and select the function you wish to use.
2 Select the »AV2« channel by pressing »TV/AV«.
– The video and audio information from the camcorder can now be seen
and heard on the television set.
AUDIO
LR
VIDEO
OUT
IN
2 EXTERNAL / DEC. - AV 2
AUDIO
L
L
O
I
U
T
R
1 EXTERNAL / EURO - AV 1
N
R
VIDEO
ń
Page 13

ENGLISH
13
SPECIAL SETTINGS
____________________________________________________
Tuning TV stations
This setting is only necessary if a new station comes on air and you do not want
to change the order of your channels.
1 Open the »PRESET« menu by pressing »MENU« three times.
2 Select »PROGRAM« by pressing »P-« and then press »V-« or »V+« to select
the channel number.
3 Select »BAND« by pressing »P-« and then press »V-« or »V+« to select the
frequency band.
4 Select »SEARCH« by pressing »P-« and then press »V-« or »V+« to start the
search.
Note:
Repeat the search until the channel you want appears on the screen.
The colour standard is automatically selected. For the audio standard, see
the next section.
Keep the »ON« setting for the »AFT« function, as this guarantees that the
television is always tuned to the best picture.
5 Fine-tune the picture (if necessary) by selecting » FINE« using »P+«or»P-«,
then press »V-« or »V+« to adjust the fine tuning.
Note:
To tune in more television stations, repeat steps 2 to 4.
6 Press »MENU« to finish the setting.
Selecting the colour and audio standard
This setting is only necessary if the picture or sound is not correctly reproduced.
1 Select the »SETUP« menu by pressing »MENU« twice.
2 Select »C-SYS« (colour standard) or »S-SYS« (audio standard) by pressing
»P-« or »P+«.
3 Select the required colour or audio standard by pressing »V-« or »V+«.
4 Press »MENU« twice to finish the setting.
Selecting the screen background
This setting switches to a blue screen when the picture is grainy.
1 Select the »SETUP« menu by pressing »MENU« twice.
2 Select »B/B« by pressing »P-« or »P+« and then press »V-« or »V+« to
select »ON«.
3 Press »MENU« twice to finish the setting.
PRESET
■■■■■■■■■■■■■
_______________
_
ATS
PROGRAM : 1
BAND : UHF
SKIP : OFF
AFT : OFF
FINE
SEARCH
EXCHANGE
ĵ
–––––––––––––––––––
Ł
PRESET
■■■■■■■■■■■■■
_______________
_
ATS
PROGRAM : 1
BAND : UHF
SKIP : OFF
AFT : OFF
FINE
SEARCH
EXCHANGE
ĵ
–––––––––––––––––––
Ł
SETUP
LANGUAGE : ENGLISH
B/B : ON
C-SYS : AUTO
S-SYS : B/G
ĵ
–––––––––
Ł
SETUP
LANGUAGE : ENGLISH
B/B : ON
C-SYS : AUTO
S-SYS : B/G
ĵ
–––––––––
Ł
Page 14

14
INFORMATION
_____________________________________________________________
Technical data
ARCANCE 37 P37-5211:
Mains voltage: 110 – 220 V, 50/60 Hz
(power unit control range 99 ... 265 V)
Power consumption: during operation 75 W, in stand-by <15 W
Sound output: 5 Watts (RMS)
Reception ranges: C01 ... C99, special channels S01 ... S41
Channel positions: 0-129 and 2 AV
ARCANCE 55 T 55-5211:
Mains voltage: 110 – 220 V, 50/60 Hz
(power unit control range 99 ... 265 V)
Power consumption: during operation 100 W, in stand-by <15 W
Sound output: 5 Watts (RMS)
Reception ranges: C01 ... C99, special channels S01 ... S41
Channel positions: 0-129 and 2 AV
ARCANCE 55 FLA
T TF 55-5211:
Mains voltage: 110 – 220 V, 50/60 Hz
(power unit control range 99 ... 265 V)
Power consumption: during operation 110 W, in stand-by <15 W
Sound output: 5 Watts (RMS)
Reception ranges: C01 ... C99, special channels S01 ... S41
Channel positions: 0-129 and 2 AV
ARCANCE 72 FLA
T TF 72-5211:
Mains voltage: 165 – 220 V, 50/60 Hz
(power unit control range 150 ... 265 V)
Power consumption: during operation 160 W, in stand-by <15 W
Sound output: 5 Watts (RMS)
Reception ranges: C01 ... C99, special channels S01 ... S41
Channel positions: 0-129 and 2 AV
Page 15

ENGLISH
15
Possible cause
Antenna cable
No station is set
Picture settings incorrectly set
Problem at station
Interference by other devices
Channel setting
Antenna
Audio standard setting
Colour intensity at minimum
TV standard setting (if
setting option is available)
Problem at station
Strong magnetic field due for example
to loudspeakers
Volume set to minimum
Problem at station
Television station (has no teletext) or
antenna system
Station signal too weak
No optical connection
Remote control batteries
Operating condition undefined
Remedy
Is the antenna cable connected?
Start the station search
Adjust the brightness, contrast or
colour setting
Test with another channel
Move the devices
Automatic or manual
channel setting/fine tuning
Have antenna cable or system
checked
Set correct audio standard
Turn up the colour
Select the correct colour standard
Test with another channel
Move the loudspeakers away from the
television.
If colour spots remain, switch off the television set at the mains and switch on
again after 10 minutes.
Turn up or switch on the volume
Test with another channel
Test another channel for fine tuning
and ghosting
Check the antenna system
Point the remote control at the television set
Check the batteries, change if
necessary
Switch off the television with the main
power button for approx. 2 min.
Fault
Screen lit (snow), but no station
visible
Poor picture contrast
Interference to picture and/or sound
Ghosting, reflection
No sound
No colour
Inappropriate colour, colour spots
Picture but no sound
Teletext missing or faulty
Remote control does not work
Rectifying minor problems
If the remedies given below do not work, please consult an authorised GRUNDIG dealer.
Please bear in mind that malfunctions can also be caused by external devices such as
video recorders.
INFORMATION
__________________________________________________________________________
Page 16

Grundig AG •
Beuthener Str. 41 • D-90471 Nürnberg • http://www.grundig.com 72011-700.4000
 Loading...