

Page 1

Bedienungsanleitung
Operating Instructions
Grundig SAT SystEms
Digital Satellite Receiver
DRS 100 CI
English
Operating Instructions
GSS
Grundig SAT Systems GmbH
Beuthener Strasse 43
Bedienungsanleitung
D-90471 Nuremberg, Germany
Phone: +49 (0) 911 / 703 8877
Fax: +49 (0) 911 / 703 9210
E-mail: [email protected]
Internet: http://www.gss.tv
Page 2

- 2 -
Contents
Index .............................................................................................................................4
1 General information ..................................................................................................5
1.1 Package contents ........................................................................................5
1.2 Accessories for satellite receivers..................................................................5
1.3 Digital satellite reception .............................................................................5
1.4 Special features of your digital receiver ........................................................5
1.5 The common interface .................................................................................6
2 Set-up and safety ......................................................................................................6
3 Your device at a glance .............................................................................................7
3.1 The digital receiver .....................................................................................7
3.2 The SAT mouse ...........................................................................................8
3.3 The remote control ......................................................................................8
4 Connecting the device ..............................................................................................10
4.1 Connecting the satellite antenna .................................................................11
4.2 Connecting the television ........................................................................... 11
4.3 Connecting the AV recorder/player ............................................................ 11
4.4 Connecting the SAT mouse ........................................................................ 11
4.5 Connecting the hifi system .........................................................................12
4.6 Connecting the digital multi-channel amplifier (SPDIF) ..................................12
4.7 Connecting the mains adapter ...................................................................12
5 Preparations ...........................................................................................................13
5.1 Switching the receiver on and off ............................................................... 13
5.2 General menu information .........................................................................13
5.3 Setting the menu language ........................................................................ 14
5.4 Setting the local time ................................................................................14
5.5 Adjusting the digital receiver to the television set .......................................... 15
Setting the video signal for the Euro-AV output .............................................15
Setting the screen format for the television ..................................................15
Automatic picture format identification ........................................................16
Setting the teletext style .............................................................................16
Cinch audio output level ............................................................................16
5.6 Adjusting the digital receiver to the satellite antenna .....................................17
5.7 Reception of signals from encoded satellite channels .................................... 19
6 Editing channel lists .................................................................................................20
6.1 Creating lists of favourites..........................................................................20
6.2 Deleting channels .....................................................................................21
6.3 Moving channels ...................................................................................... 21
6.4 Locking channels ......................................................................................21
6.5 Undoing the channel lock ..........................................................................22
- 2 -
Page 3

- 3 -
7 Basic functions ........................................................................................................22
7.1 Adjusting the volume .................................................................................22
7.2 Muting ....................................................................................................22
7.3 Selecting channels – numerical preset channel selection................................22
7.4 Preset AV channel .....................................................................................23
7.5 Selecting channels from the TV/radio channel lists ........................................23
7.6 Selecting channels from the list ...................................................................23
7.7 Alphanumerical program selection – entering letters .....................................23
7.8 Selecting locked channels .........................................................................24
7.9 Zapping function ......................................................................................24
7.10 Selecting the audio channel .......................................................................24
7.11 Teletext ...................................................................................................25
8 Updating the channel list .........................................................................................26
9 Electronic programme guide (EPG) ...........................................................................28
9.1 Displaying programme information .............................................................28
9.2 Entering programmes in the timer ...............................................................28
10 Timer functions ........................................................................................................29
10.1 Entering the switch-off time for the sleep timer ..............................................29
10.2 Automatically setting the timer ...................................................................29
10.3 Manually setting the timer .........................................................................29
10.4 Setting (lead time / follow-up time) options .................................................. 31
10.5 Ending the active timer ..............................................................................31
10.6 Deleting a timer position ...........................................................................31
11 Special functions .....................................................................................................32
11.1 Hotel mode ..............................................................................................32
11.1.1 Locking the menu ............................................................................32
11.1.2 Limiting the volume ..........................................................................32
11.1.3 Removing the menu lock ...................................................................33
11.2 Changing the password ............................................................................33
11.3 Restoring the factory settings......................................................................33
11.4 Updating software ....................................................................................34
11.5 Deleting channel lists ................................................................................35
12 Information .............................................................................................................35
12.1 Displaying information on reception of channels ..........................................35
12.2 Querying device information .....................................................................35
12.3 Technical data .........................................................................................36
12.4 Warranty ................................................................................................36
12. 5 Troub l es ho ot i ng ........................................................................................37
ENGLISH
- 3 -
Page 4

- 4 -
Index
A
Application of data ............ 29
B
Backward ..........................31
Batteries low ....................... 9
Blocking channels ...............21
Blocking the menu ............. 32
C
Change channel name ........18
Channel lists .................20, 35
Cinch output level ...............16
CI module ..........................19
Cinch sockets .....................16
Common interface ............5, 7
Condition on delivery ......... 33
CVBS ................................15
D
Degree of longitude ............14
Deleting channel lists .......... 35
Device information ............. 35
DVB receivers ...................... 5
E
Electronic programme guide 28
Encoded channels ...............19
Entering letters ................... 23
Environmental note ............... 6
EPG ..................................28
Euro-AV .............................15
Euro-AV cable ....................11
F
F-co nnector ........................ 11
Factory settings ................. 33
Frequency ......................... 27
G
GMT .................................14
I
Information on reception..... 35
L
Language...........................14
Lead time ...........................31
Limiting the volume ............. 32
Lists of favourites ................ 20
LNB power supply ..............17
Local time ..........................14
M
Main menu ........................13
Mains adapter ....................12
Main menu ....................... 20
Menu information ...............13
Menu language ..................14
Moving channels ................21
Multi-channel amplifi er ........12
Multi-channel sound ........... 22
O
Operating software ........... 34
Optical connection .............. 7
P
Picture quality.....................15
PIN ............................. 21, 32
Polarisation ....................... 27
Power consumption .............. 6
Preset AV channel .............. 23
R
Radio station ..................... 27
Range of accessories ........... 5
Remote control..................... 8
Remote control level ............. 9
RGB ..................................15
S
Satellite antenna .................11
Satellite antennas................17
Satellite s ............................18
SAT mouse ..................... 8, 11
Scart cable ......................... 5
Screen format .....................15
Sleep timer ........................ 29
Smartc ard ..........................19
Software update ................ 34
Station search ................... 27
Stereo sound ..................... 22
Summer time ......................14
System settings ...................15
T
Teletext ........................ 16, 25
Time ..................................14
Time difference ...................14
Timer .................................31
Timer functions .................. 29
Timer setting ...................... 29
Transponder data .............. 27
V
Volume ............................. 22
W
Wide-Screen-Signaling........16
Winter time ........................14
Y
YUV ................................ 15
Z
Zapping ........................... 24
- 4 -
Page 5

- 5 -
1 General information
1.1 Package contents
• DRS 100 CI
• SAT mouse (infrared receiver)
• Remote control incl. 2 batteries (2 x 1.5 V, Mignon, e.g. UM-3 or AA)
• Euro-AV cable ( scart cable)
• Mains adapter
• Operating instructions
1.2 Accessories for satellite receivers
You can find out more about the extensive GSS range of accessories for satellite receiving devices at your specialist dealer or at the website of
Grundig SAT Systems GmbH: http://www.gss.tv.
1.3 Digital satellite reception
To use this device you need a satellite receiving device that must be prepared for receiving digital signals. Unlike analogue satellite broadcasting, digital TV or radio channels
are not all assigned their own frequencies; instead, several TV and/or radio channels
are transmitted by a single transponder using the same frequency.
To help you with the choice and settings for satellite stations, a selection of TV and radio
stations have already been programmed for this device. You can use the channel search
to find new satellite channels that are not yet in the channel list of your device.
You can also compile your favourite channels and store them in four separate channel
lists.
1.4 Special features of your digital receiver
This digital receiver can receive free satellite channels as well as certain encoded digital
satellite channels via common interface.
To ensure that your digital receiver always uses the latest software, we recommend that
you update the operating software (see page 34).
The electronic programme guide provides an overview of all the stations‘ programmes
for the next few hours. You can call up detailed information on each TV programme at
the touch of a button.
This digital receiver has a comprehensive, easy-to-use menu system. It is displayed on
the television screen and the functions of the remote control buttons are explained.
1.5 The common interface
Common interface (CI) is the interface for DVB receivers (digital receivers, set top boxes
etc.) for decoding encoded channels. The smart card required for decoding is available
at the broadcasting station. This device has a common interface (CI) slot for this smart
card and the corresponding CI module.
- 5 -
ENGLISH
Page 6

- 6 -
2 Set-up and safety
• This digital receiver set is designed to receive and display video and audio signals.
Any other use is expressly prohibited.
• When setting up the device, make sure the mains socket is easily accessible.
• If the digital receiver is subject to a sudden change in temperature, for example when
brought in from the cold to a warm room, let it stand for at least two hours before you
connect it to the mains supply.
• Do not expose the digital receiver to any moisture. The digital receiver is designed
for use in dry rooms. If you do use it outdoors, please ensure that it is protected from
moisture, such as rain or splashing water.
• Make sure that the digital receiver is ventilated adequately.
• Do not use the device close to heating units or in direct sunlight.
• Place the device on a flat, solid surface for use.
•
If placed in a cabinet, make sure there is a minimum space of approx. 10 cm
around it!
• Thunderstorms are a danger to all electrical devices. Even if the device is switched off,
it can be damaged by a stroke of lightning to the mains or the antenna cable. Therefore always disconnect the device from the mains and from the antenna unit during a
thunderstorm.
• Never open the device under any circumstances. No liability is accepted for any damage caused by incorrect handling.
Environmental note
If you do not intend to use the digital
recommend that you switch it with
approx. 0.5 Watts.
receiver
for some time (for example at night), we
to stand by. Power consumption is reduced to
- 6 -
Page 7

- 7 -
3 Your device at a glance
3.1 The digital receiver
CI MODULE Common interface slot.
INPUT SAT Antenna socket for the satellite antenna.
12-24 V DC Socket for the supplied mains adapter.
RECORDER Euro AV socket (input and output) for the video or DVD recorder
TV Euro AV (output) socket for the television.
DIGITAL AUDIO OUT Optical connection for digitally encoded audio signals to the dig-
ital multi-channel amplifier (SPDIF).
AUDIO OUT R L Left/right stereo output sockets (cinch) for the hifi system.
SOFTWARE/MOUSE Socket for SAT mouse or for a PC cable.
- 7 -
ENGLISH
Page 8

- 8 -
3.2 The SAT mouse
3.3 The remote control
ABC DEF
1 2 3
JKL MNOGHI
4 5 6
TUV WXYZPQRS
7 8 9
AV
Fav
TV/RA/B
0
Ton e
i
Channel
OK
TXT
SAT LIST
F
MENU
Exit
z
Timer
EPG
The SAT mouse receives the infrared signals for the remote control and forwards the commands via cable to the receiver.
• Position the SAT mouse visibly so that it can receive the commands by the remote control.
Note:
– The red operation indicator goes out in standby mode.
–
The operation indicator flashes if a timer has been set and
the
receiver
is in standby mode.
Switches to standby, and from standby to the
channel last selected.
1 … 0 Select channels.
0 AV mode
Switches between digital receiver mode and the
audio and video signals from the device connected to the “RECORDER” socket.
Switches the sound to mute and back on again.
TV/R Switches between radio mode and the channel
lists and lists of favourites.
MENU Opens the main menu, ends settings.
i Displays channel information.
Z Zapping function.
In menu mode: returns to the previous menu.
A/B Switches between audio channels A, B and
stereo.
◀▶ Changes the volume, controls the cursor in the
menus .
▲▼ Switches channels up and down one by one, se-
lects menu items.
OK Opens the channel list, confirms entries.
TXT Opens teletext.
EPG
SAT Switches to remote control level SAT 2.
(Controlling of a second
Opens the electronic programme guide.
receiver)
Freeze frame.
RCR 100
Note:
Not described functions are used for operating a
digital recorder.
F has no function.
- 8 -
Page 9

- 9 -
Inserting batteries in the remote control
Î
• Open the battery compartment and remove the lid.
• Insert the batteries (Mignon, e.g. UM-3 or AA, 2 x 1.5 V).
Observe the polarity marked in the battery compartment
base.
• Close the battery compartment.
Notes:
2
1
– If the digital receiver no longer reacts properly to remote
control commands or if the message “Low Battery!” appears, we recommend that the batteries are changed.
– Always remove used batteries.
The manufacturer accepts no liability for damage result-
ing from leaking batteries.
– The first time you use the digital receiver after changing
batteries, the message “Low Battery!” appears. Ignore
this message.
Environmental note
Do not throw away used batteries with your normal household waste. Instead take
them to a battery collection box in a shop or a public collection point.
Selecting remote control level SAT 1 or SAT 2
If you wish to use an RCR 100 remote control to operate two
DRS 100 CI digital
control level for one of the two digital
receiver
, you must select a different remote
receiver
.
TV Setup
TV
Picture Format
WSS
Teletext
IR Level
Cinch Audio
OK
Select
RGB
Auto
On
West
SAT 1
SAT 1
SAT 2
Fixed
Connect the device and switch it on
(see chapters 4 and 5, pages 10 … 19).
• Press the MENU button to open the main menu.
• Use
▼/▲
in the main menu to select “System Setup” and
press OK to confirm.
• Use
▼/▲
to activate “TV Setup” and press OK to confirm.
MENU
• Select “IR Level” with
Exit
Z
Back
• Use
▼/▲
to select remote control level “SAT 1” or “SAT 2”
and press OK to confirm.
▼/▲
and press OK to confirm.
•
– If you wish to use the digital receiver with remote control
level “SAT 2” press and hold the button SAT button and
at the same time press the desired function button on the
remote control.
ENGLISH
- 9 -
Page 10

- 10 -
Switching the remote control to SAT 2 level
VCR,
.
O
O
U
L
You can switch the remote control permanently to the SAT 2
remote control level.
• Press the button SAT and hold.
• At the same time press the buttons 4, 5, 6.
To return to SAT 1 remote control level
• Press the button SAT and hold.
• At the same time press the buttons 1, 2, 3.
• To finish your setting: press MENU.
4 Connecting the device
Overview
AUDIO OUT
RL
SOFTWARE/
MOUSE
RECORDER TV
DIGITAL
AUDIO
OUT
SAT
TV R
AUDIO
AUDI
L
O
U
T
T
R
VCR, DVD etc.
DVD etc
DEC. - AV 2
DEC. -
- 10 -
L
Page 11

- 11 -
4.1 Connecting the satellite antenna
1
4.2 Connecting the television
2
4.3 Connecting the AV recorder/player
3
• Connect the antenna cable to the
the digital receiver (screw connector, F-connector).
• Plug the Euro-AV cable into the TV 2 socket on the digital
receiver and into the corresponding Euro-AV socket on the
television.
• Plug the commercial Euro-AV cable into the RECORDER 3
socket on the digital receiver and into the Euro-AV socket on
the AV recorder/player (e.g. video or DVD recorder).
INPUT SAT 1 socket on
4.4 Connecting the SAT mouse
4
Note:
To view a video or DVD recording, switch on the digital
receiver and press the 0 button to select AV mode.
• Insert the plug of the SAT mouse into the SOFTWARE/
MOUSE
4 socket.
- 11 -
ENGLISH
Page 12

- 12 -
4.5 Connecting the hifi system
5
4.6 Connecting the digital multi-channel amplifier (SPDIF)
6
4.7 Connecting the mains adapter
7
• Plug a commercial cinch cable into the AUDIO OUT R L
(right/left)
responding input sockets on the hifi system.
• Remove the socket cover.
• Plug a commercial optical cable (SPDIF) into the DIGITAL
AUDIO OUT
responding socket on the digital multi-channel amplifier.
• Plug the jack plug of the supplied mains adapter into the
12-
24 V DC 7 socket on the digital receiver.
• Plug the mains adapter into the socket.
5 sockets on the digital receiver and the cor-
6 socket on the digital receiver and the cor-
- 12 -
Page 13
- 13 -
5 Preparations
Note:
Your digital receiver was set at the factory so that it is ready for operation once you
have connected it and to receive Astra channels. If required, you only need to correct the local time difference, adjust the LNB settings for receiving more satellites and
select the menu language (default is “German”, “Single LNB”).
5.1 Switching the receiver on and off
• Switch the television to AV.
• Press on stand by to switch on the digital receiver (operation indicator lights up red) or to switch it to stand by (operation indicator goes out).
– If a recording timer has been set, the operation indicator
flashes.
Note:
The only way to disconnect the digital receiver from the
mains supply is to unplug the mains adapter.
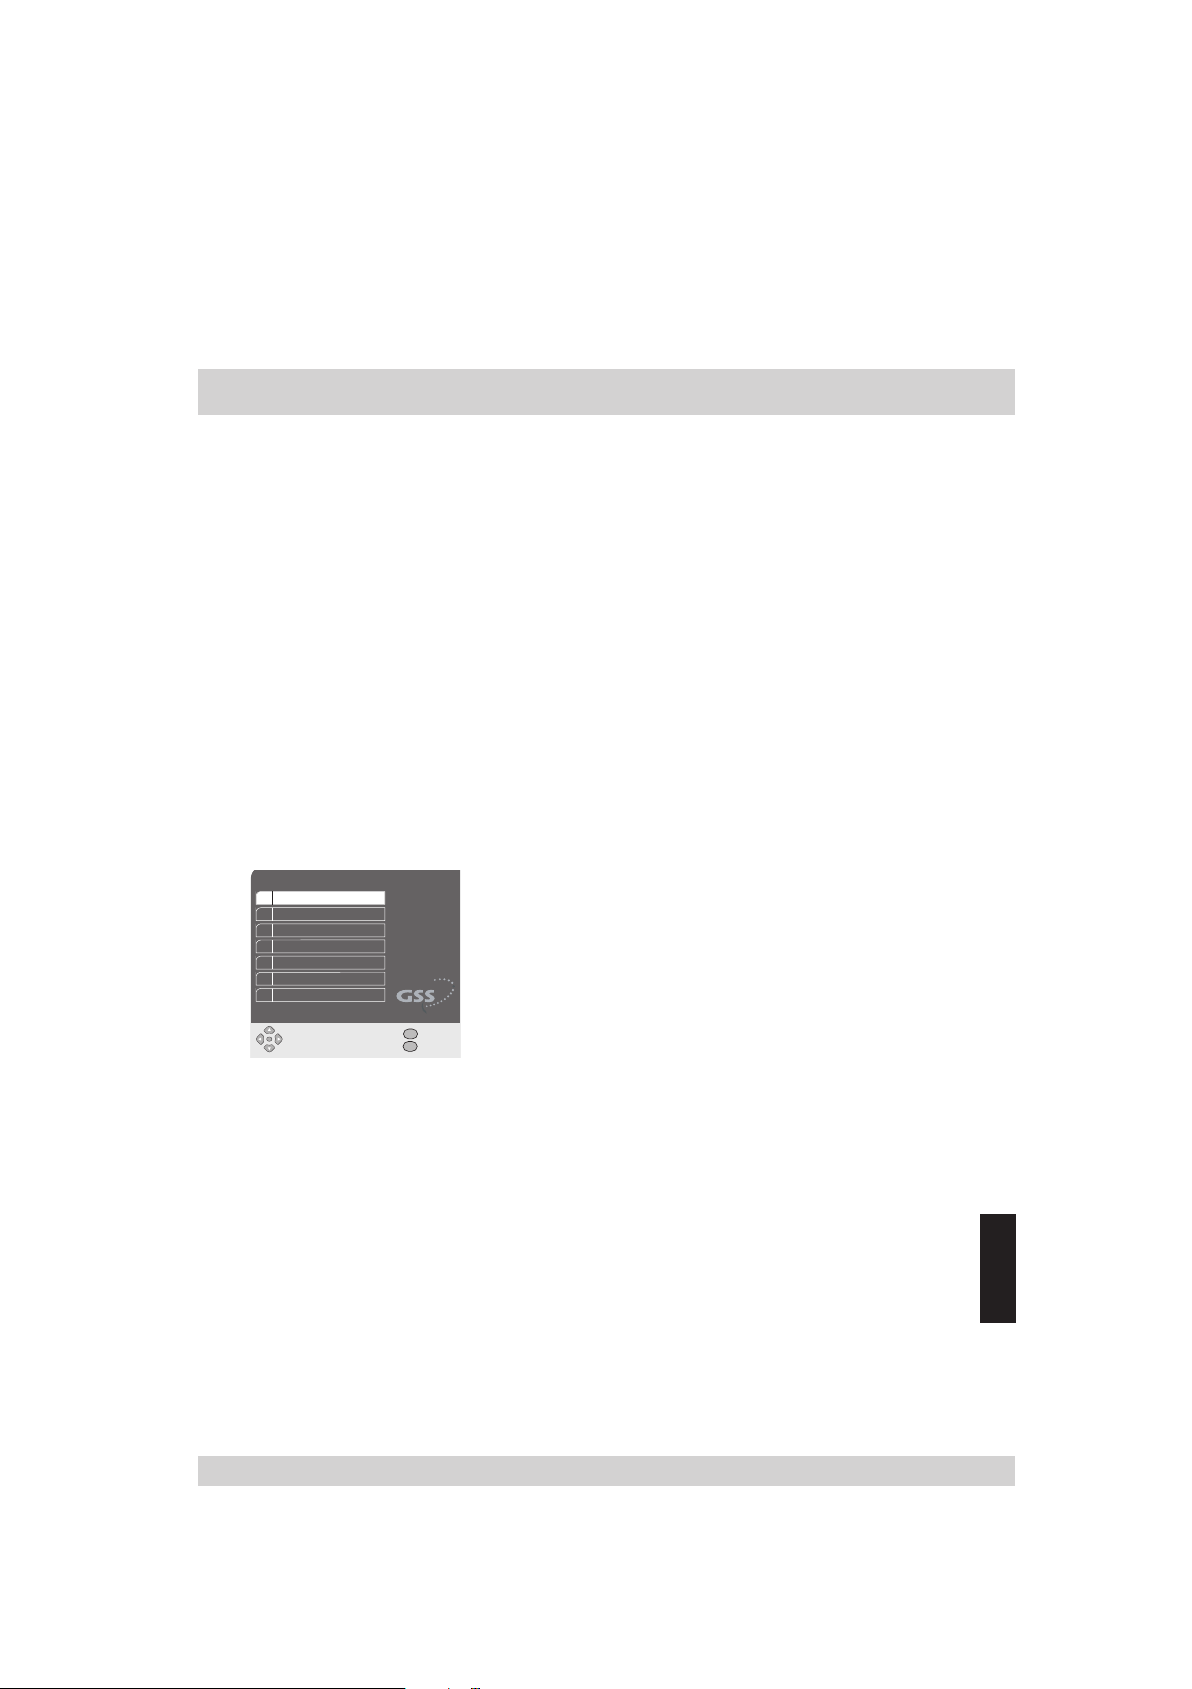
5.2 General menu information
Main Menu
1 Channel List
2 System Setup
3 Channel Search
4 Timer
5 Sleep-Timer
6 Software Update
7 CI-Module
OK
Select
MENU
Exit
Z
Back
– This device has a comprehensive, easy-to-use menu system.
The menus are displayed on the television screen.
– The digital receiver responds to many functions that you
can select on the remote control with informative menus and
icons on the screen. It enables you to select many different
settings and it contains information on using your digital
receiver.
– The buttons on the remote control for using the menu are
explained in the menus.
– The main menu contains the most important controls for your
digital receiver. The menu system controls the dialogue between you and the digital receiver.
–
Press the MENU button on the remote control and press
▼/▲ to select the desired menu item. It is displayed on a
light background.
–
Press OK to confirm your selection. Use ▼/▲ in the cor-
responding sub-menu that is now displayed to select the
desired menu item. It is displayed on a light background.
– Press OK to confirm your selection. Normally another menu
then appears. There you can press
▼/▲ to select the de-
sired menu item.
– You can also select the numbered menu items directly using
the numerical buttons 1 … 0.
– The
◀/▶ buttons are control buttons.
- 13 -
ENGLISH
Page 14
- 14 -
– On closing the menu function, your settings are automati-
cally saved.
–
You return to the previous menu via Z.
– To close the menu function press MENU.
Note:
In menu mode, you cannot press
to switch the digital
receiver to standby.
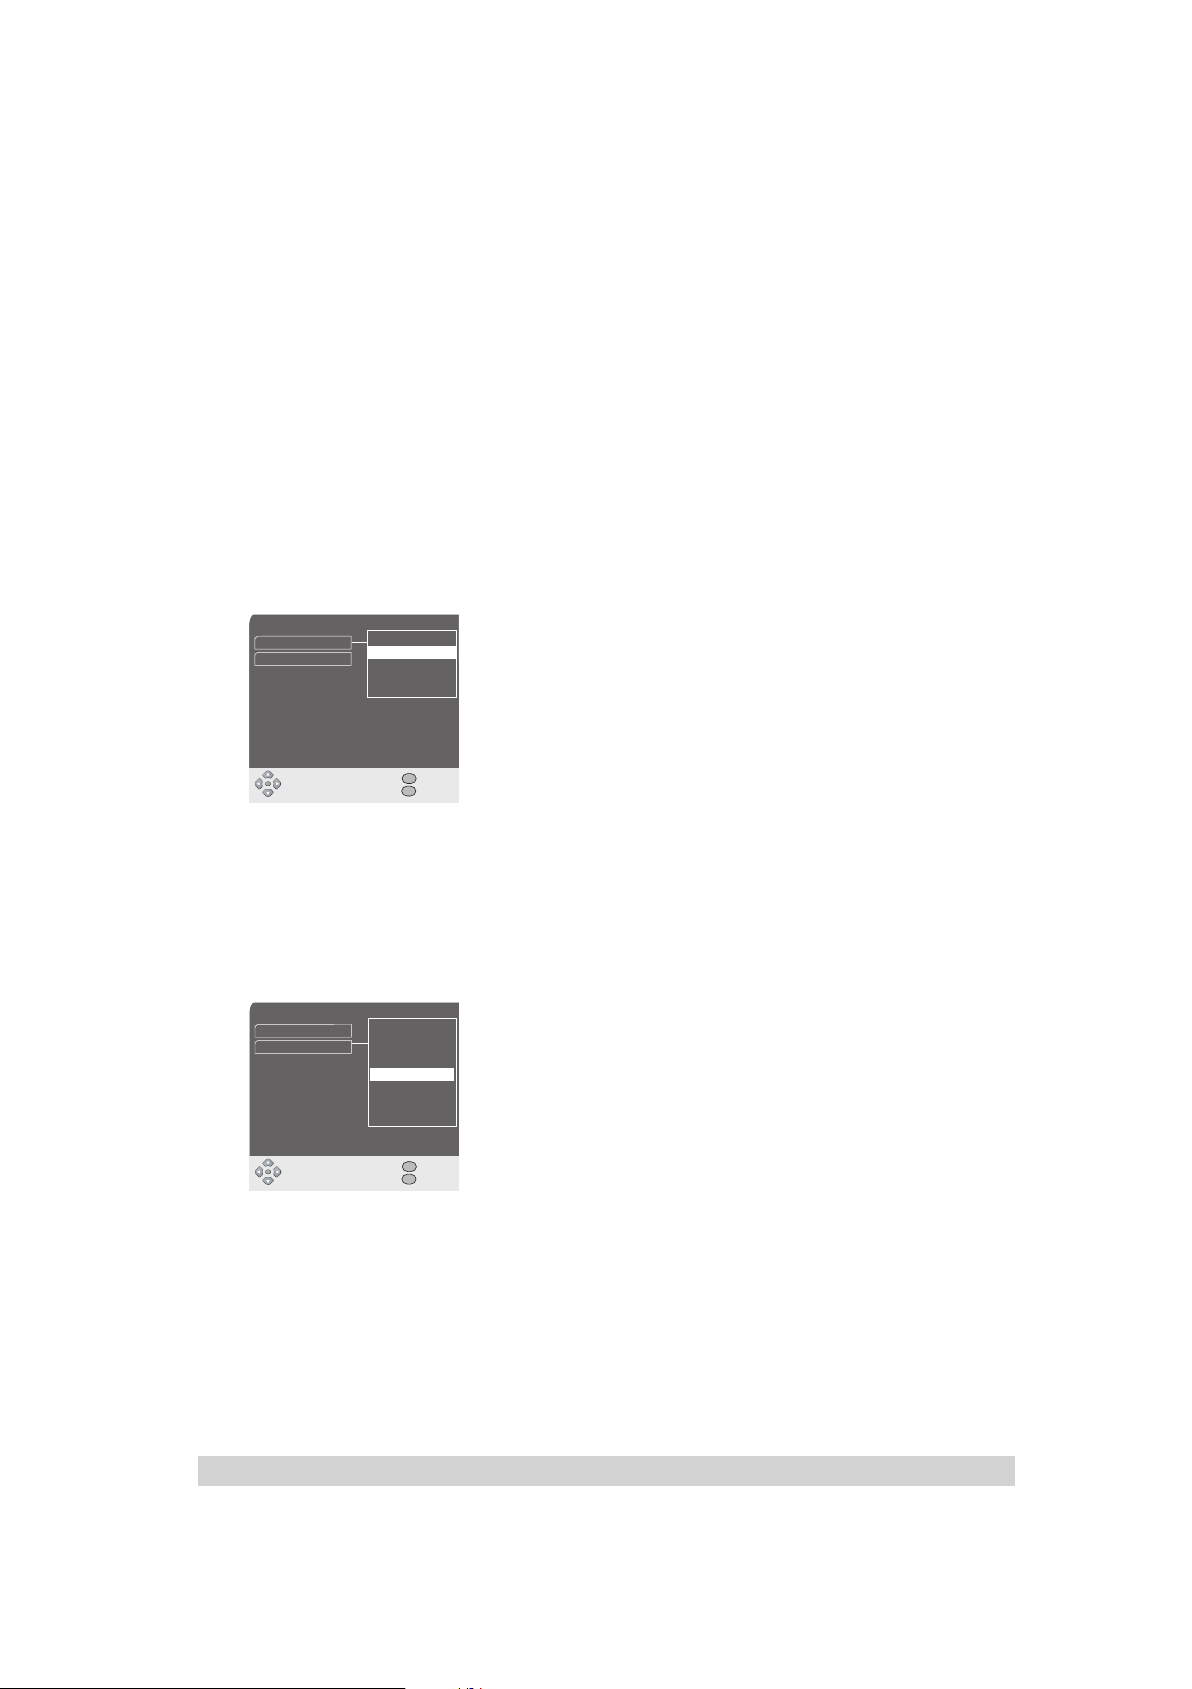
5.3 Setting the menu language
Language, Time
Language
Time Offset
Deutsch
Deutsch
English
GMT +1 Stunde
Cesky
Türkce
Español
• Press MENU to open the main menu.
• Select “System Setup” with ▼/▲ and press OK to confirm.
• Select “Language, Time” with
▼/▲ and press OK to con-
firm.
• Open “ Language” with “OK”.
• Use ▼/▲ to select the desired language and press OK to
confirm.
MENU
OK
Select
Exit
Z
Back
•
To return to the previous menu: press the Z button.
• To finish your setting: press MENU.
5.4 Setting the local time
To ensure that the electronic programme guide always shows the current programmes
at the right time, you must enter the difference between your local time and GMT
(Greenwich Mean Time, degree of longitude “0”). All times given by the electronic
programme guide are then adapted to your local time.
Language, Time
Language
Time Offset
OK
Select
GMT -3 hr
GMT -2 hr
GMT -1 hr
GMT
GMT +1 hr
GMT +2 hr
GMT +3 hr
GMT +4 hr
MENU
• Press “MENU” to open the main menu.
• Select “System Setup” with ▼/▲ and press OK to confirm.
• Select “Language, Time” with ▼/▲ and press OK to con-
firm.
• Select “Time Offset” with ▼/▲ and press OK to confirm.
• Use ▼/▲ to change the time difference in one-hour steps.
Exit
Z
Back
Note:
For Germany: GMT + 1 hour.
“ Summer time/winter time” conversion is carried out auto-
matically.
• Confirm the setting: press OK.
•
To return to the previous menu: press the Z button.
• To finish your setting: press MENU.
- 14 -
Page 15
- 15 -
5.5 Adjusting the digital receiver to the television set
Setting the video signal for the Euro-AV output
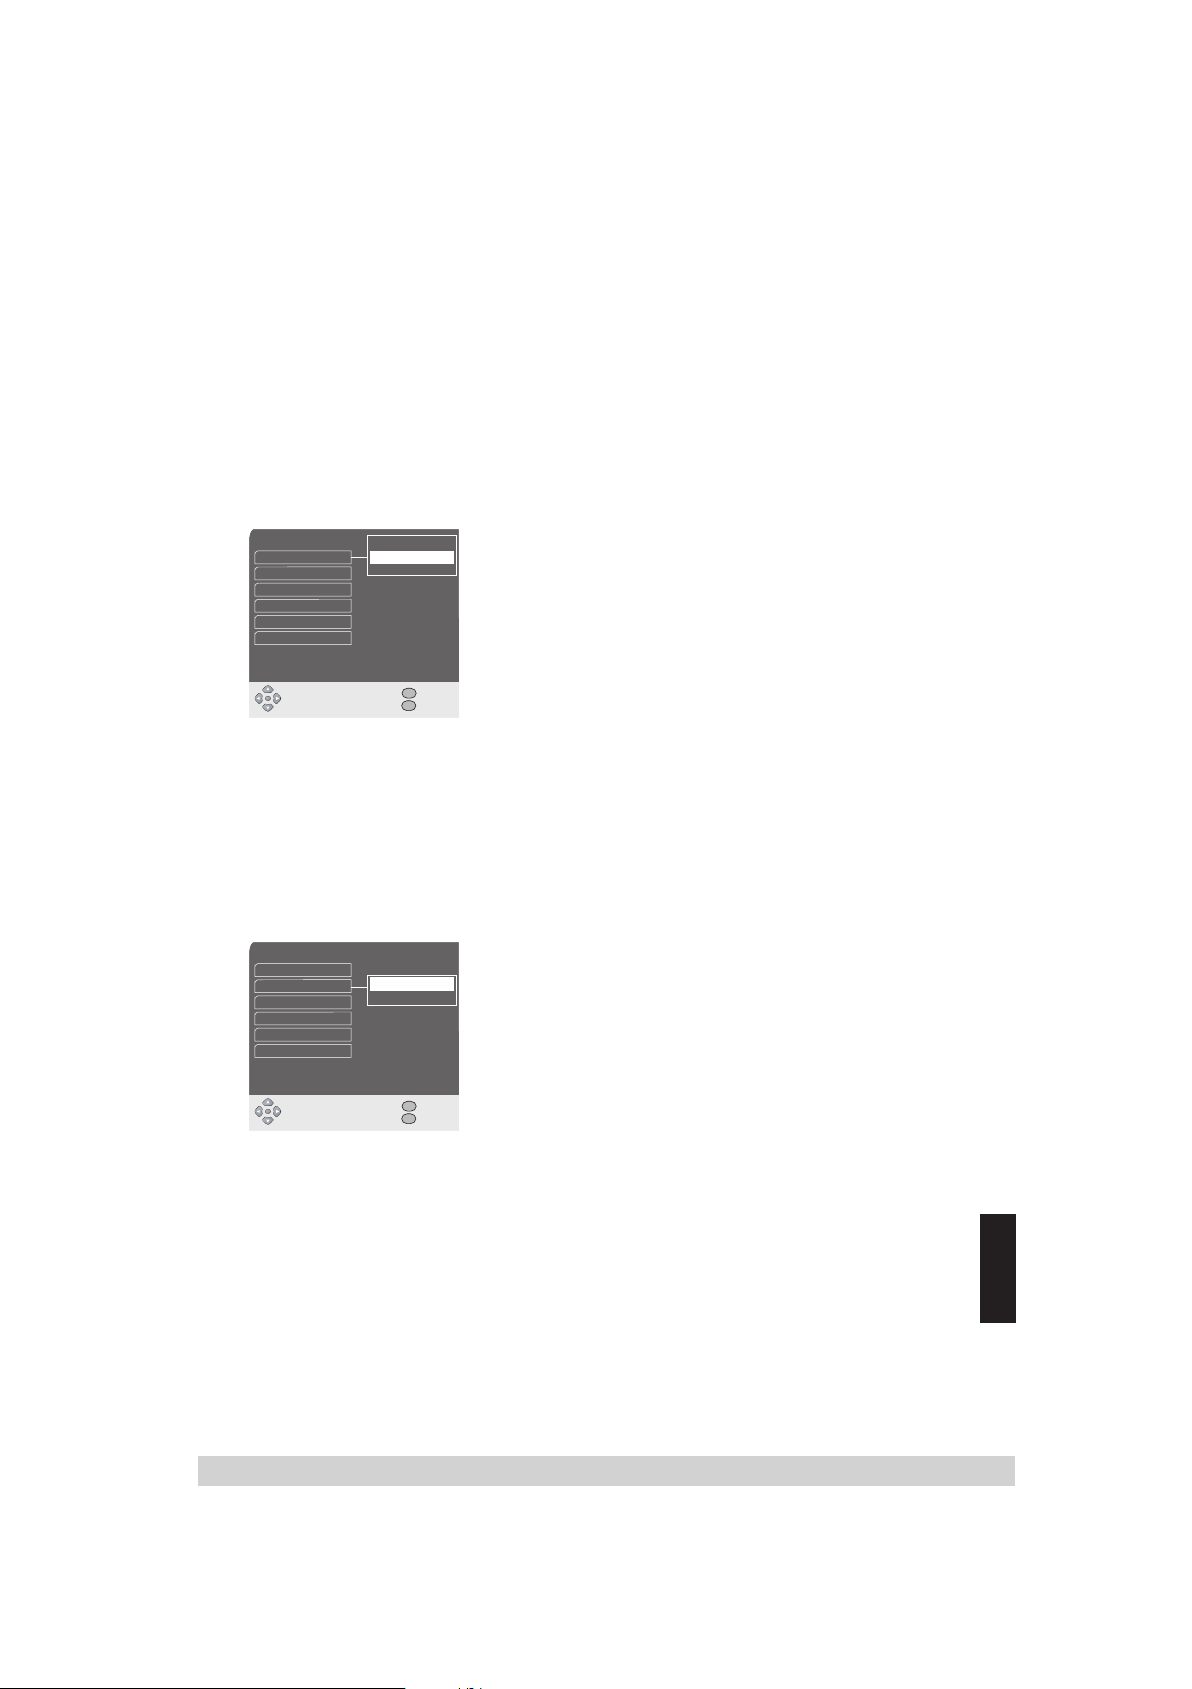
You can choose between the settings “ CVBS” (normal pic-
ture quality, factory setting), “ RGB” (high picture quality)
and “ YUV” (e.g. for a connected beamer or LCD TV set).
TV Setup
TV
Picture Format
WSS
Teletext
IR Level
Cinch Audio
OK
Select
TV Setup
TV
Picture Format
WSS
Teletext
IR Level
Cinch Audio
OK
Select
RGB
RGB
CVBS
YUV
Auto
On
West
SAT 1
Fixed
• Select “ System Setup” in the main menu with ▼/▲ and
press OK to confirm.
• Select “TV Setup” with
• Select “TV” with
• Use
▼/▲ to select “RGB”, “ CVBS” or “ YUV” and press OK
to confirm.
MENU
Exit
Z
Back
Note:
For the settings “RGB” and “ YUV” the TV set has to be pre-
pared appropriately.
• To return to the previous menu: press the Z button.
• To finish your setting: press MENU.
Setting the screen format for the television
If you have a “standard” 4:3 format television, select the
“4:3” setting. If you have a 16:9 format screen, select the
“Auto” setting.
• Select “System Setup” in the main menu with ▼/▲ and
RGB
4:3
Auto
Auto
SAT 1
West
SAT 1
Fixed
MENU
Exit
Z
Back
press OK to confirm.
• Select “TV Setup” with
• Select “Picture Format” with
confirm.
• Use
▼/▲ to select the desired screen format and press OK
to confirm.
• To return to the previous menu: press the Z button.
• To finish your setting: press MENU.
▼/▲ and press OK to confirm.
▼/▲ and then press OK to confirm.
▼/▲ and press OK to confirm.
▼/▲ and then press OK to
- 15 -
ENGLISH
Page 16
- 16 -
Automatic picture format identification
If problems with the automatic picture format switchover
(e.g. 4:3, 16:9, Letterbox) arise with the connected device,
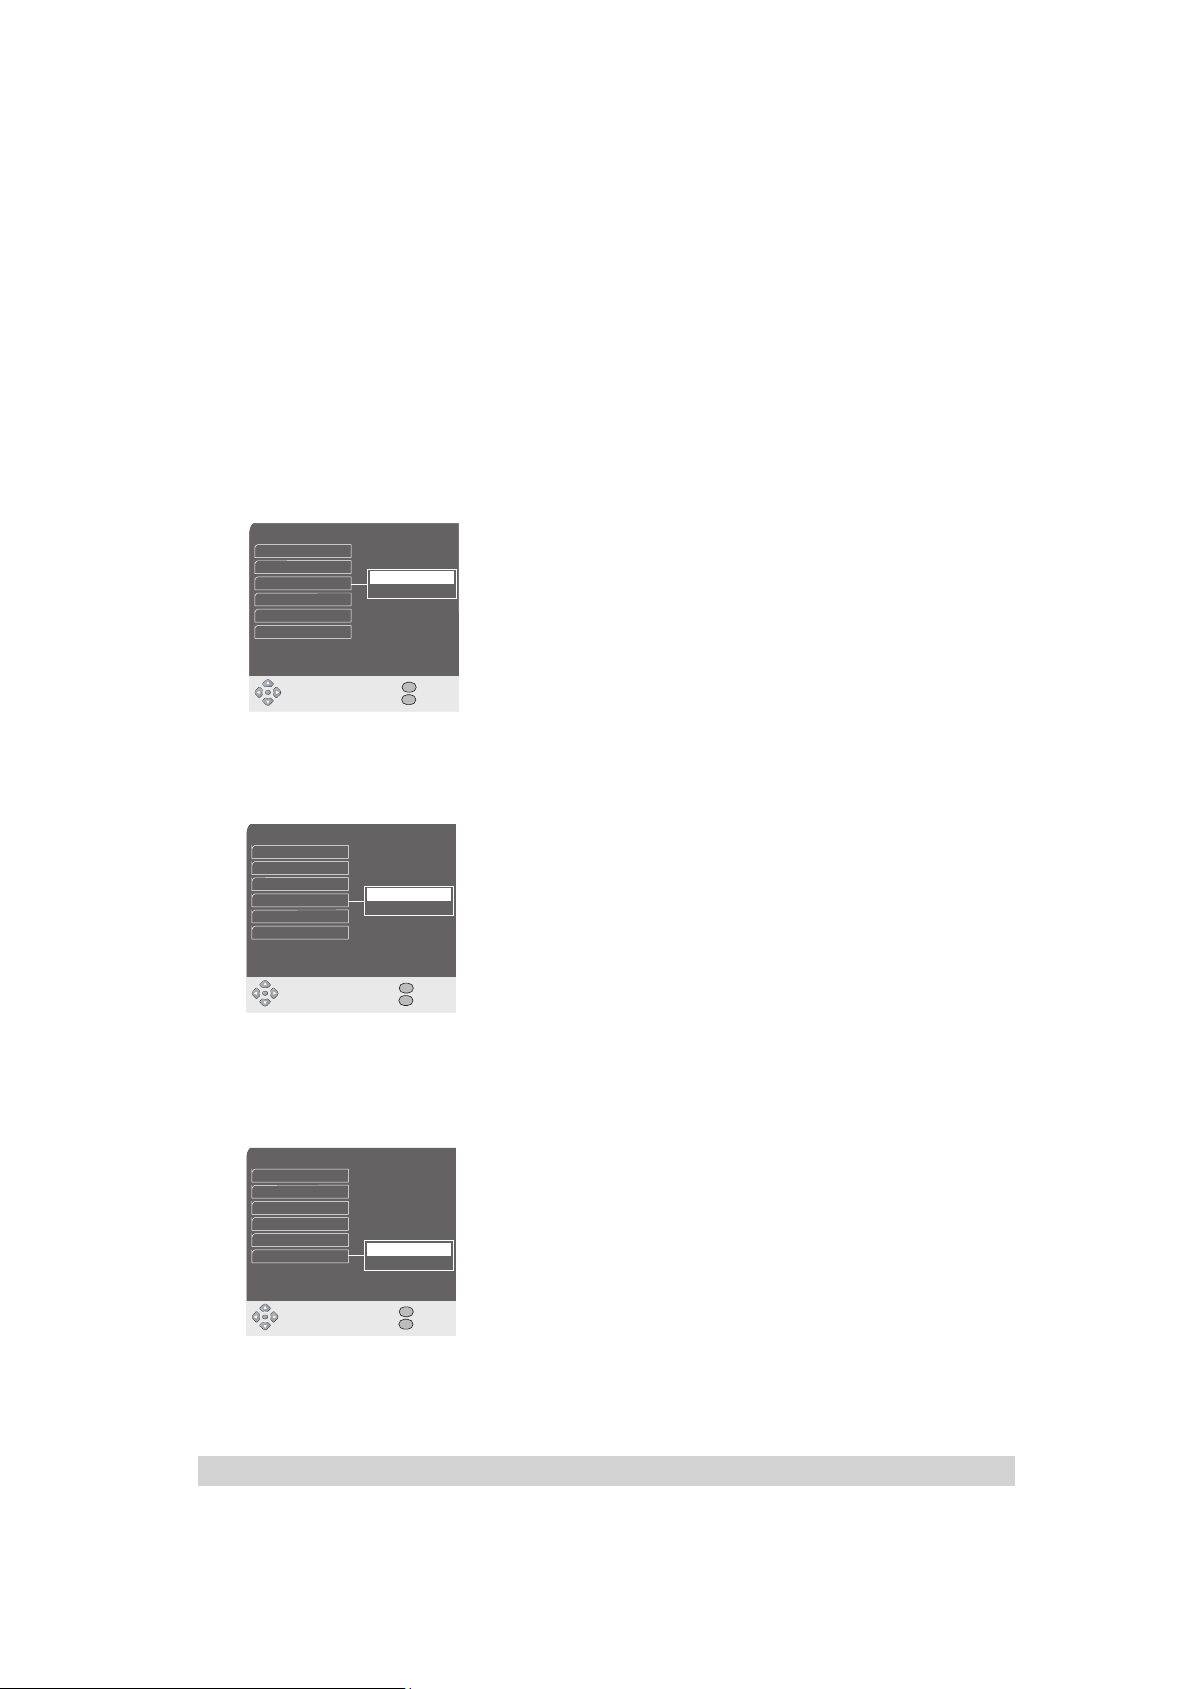
you can switch off Wide-Screen-Signaling (WSS) in this
menu.
TV Setup
TV
Picture Format
WSS
Teletext
IR Level
Cinch Audio
OK
Select
TV Setup
TV
Picture Format
WSS
Teletext
IR Level
Cinch Audio
OK
Select
RGB
Auto
On
SAT 1
Off
West
SAT 1
Fixed
MENU
Exit
Z
Back
Setting the teletext style
RGB
Auto
On
West
West
SAT 1
East
SAT 1
Fixed
MENU
Exit
Z
Back
Cinch audio output level
• Use ▼/▲ in the main menu to select “System Setup” and
press OK to confirm.
• Select “TV Setup” with
• Use
▼/▲ to select “WSS” and press OK to confirm.
• Use
▼/▲ to switch WSS on/off.
▼/▲ and press OK to confirm.
• To return to the previous menu: press the Z button.
• To finish your setting: press MENU.
This menu is for setting the parameters required to display
West European or Slavic characters.
• Use ▼/▲ in the main menu to select “System Setup” and
press OK to confirm.
• Select “TV Setup” with
• Use
▼/▲ to select “Teletext” and press OK to confirm.
• Use
▼/▲ e.g. for Germany to select “West” and press OK
▼/▲ and press OK to confirm.
to confirm.
• To return to the previous menu: press the Z button.
• To finish your setting: press MENU.
This menu is for determining whether the cinch socket output
level is to be controlled via remote control or fixed.
TV Setup
TV
Picture Format
WSS
Teletext
IR Level
Cinch Audio
OK
Select
RGB
Auto
On
West
SAT 1
Fixed
Fest
Adjustable
MENU
• Use ▼/▲ in the main menu to select “System Setup” and
press OK to confirm.
• Select “TV Setup” with
• Use
▼/▲ to select “Cinch Audio” and press OK to confirm.
• Use
▼/▲ to select “Fixed” or “Adjustable” and press OK to
▼/▲ and press OK.
confirm.
• To return to the previous menu: press the Z button.
Exit
Z
Back
• To finish your setting: press MENU.
- 16 -
Page 17
- 17 -
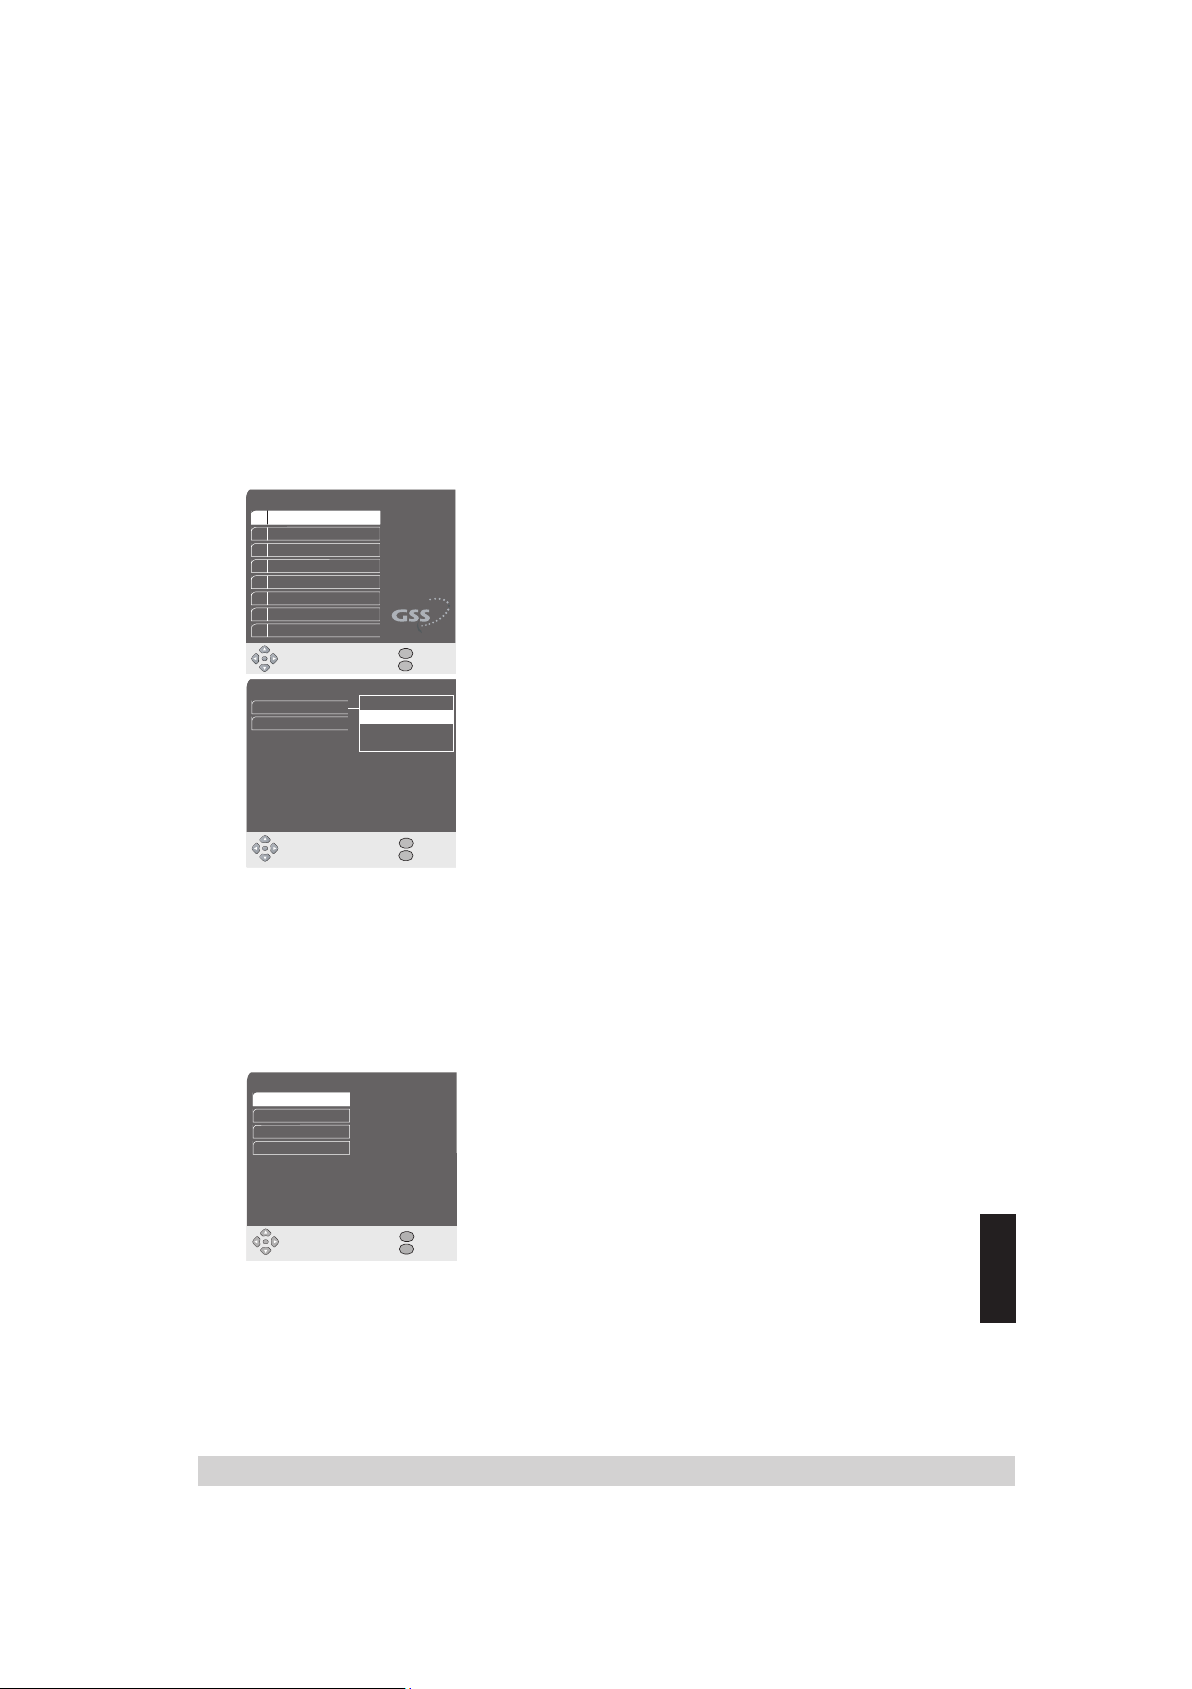
5.6 Adjusting the digital receiver to the satellite antenna
This digital receiver was factory set so that it is ready for operation with most satellite antennas and LNB configurations. Changes in this menu have a direct effect on the reception
characteristics of the digital receiver and should therefore only be made by an expert.
System Setup
1 LNB Settings
2 TV Setup
3 Language, Time
4 Hotel Mode
5 Information
6 Password Setting
7 Clear Channel List
8 Factory Settings
OK
Select
LNB Settings
LNB System
SAT System 1
OK
Select
SAT System 1
Name
LNB Type
Oscillator Low
Oscillator High
OK
Select
MENU
Exit
Z
Back
Off
Einzeln
Single
Astra
Tone Burst
DiSEqC 1.0
MENU
Exit
Z
Back
Receiving signals from a single satellite
Astra
Low + High Band
09750 MHz
10600 MHz
MENU
Exit
Z
Back
• Select “System Setup” in the main menu with ▼/▲ and
press OK to confirm.
• Select “LNB Settings” in the “System Setup” menu with
▼/▲
and press OK to confirm.
– The “LNB Settings” menu appears.
• Select “LNB System” in the “LNB Settings” menu with ▼/▲
and press OK to confirm.
– The following is displayed in the sub-menu:
“Off”:
“Single”:
For switching off the LNB power supply.
A single satellite is used for reception.
“Tone Burst”: Signals from two satellites can be re-
ceived.
“DiSEqC 1.0”: Signals can be received from up to 4
satellites.
• Select “LNB System” in the “LNB Settings” menu with
▼/▲
and press OK to confirm.
• Use
▼/▲ to select “Single” and press OK to confirm.
• Select “SAT System 1” with
• Use
▼/▲ to select the menu item to be changed and press
▼/▲ and press OK to confirm.
OK to confirm:
– “Name“ Change the satellite name.
• Use
◀/▶ to place the cursor under
the letter to be changed.
• Use
▼/▲ to set letters.
• Press OK to confirm.
– “LNB Type”
• Use ▼/▲ to select the LNB that is used.
• Press OK to confirm.
– “Oscillator Low” • Set the LNB oscillator frequency
(Low band).
• Use
◀/▶ to place the cursor un-
der the number to be changed.
—> Enter value with 1 … 0.
• Press OK to confirm.
– “Oscillator High“ • Set the LNB oscillator frequency
(High band).
ENGLISH
- 17 -
Page 18
- 18 -
LNB Settings
LNB System
SAT System 1
OK
Select
SAT System 1
Name
LNB Type
Oscillator Low
Oscillator High
Tone Burst
OK
Select
• Press OK to confirm.
• To return to the previous menu: press the Z button.
• To finish your setting: press MENU.
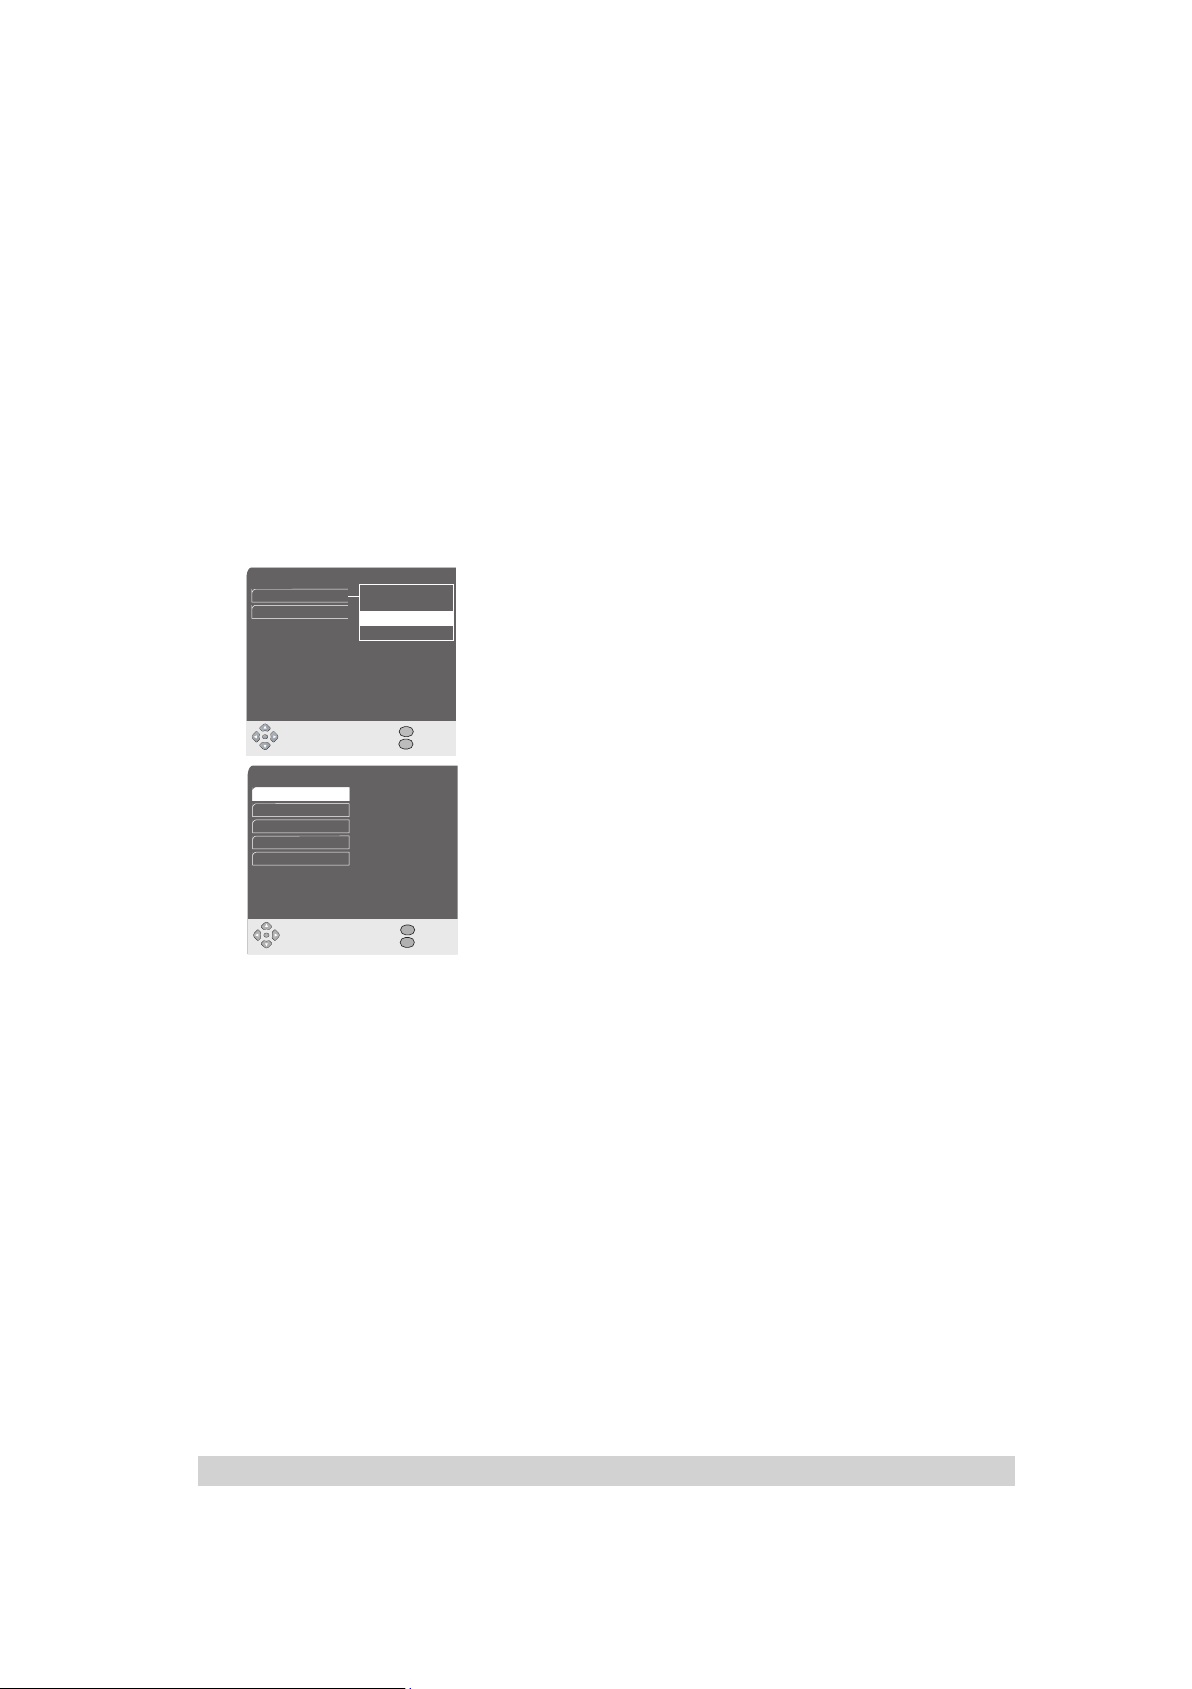
Receiving signals from two or more satellites
Off
Einzeln
Single
Astra
Tone Burst
DiSEqC 1.0
• Select “LNB System” in the “LNB Settings” menu with
and press OK to confirm.
• Use
▼/▲ to select “Tone Burst” for 2 satellites or
“DiSEqC 1.0” for up to 4 satellites and press OK to confirm.
• Select “SAT System 1” with
• Use
▼/▲ to select the item to be changed and press OK to
MENU
Exit
Z
Back
confirm:
– “Name“ Change satellite name.
• Use
Astra
Low + High Band
09750 MHz
10600 MHz
A
• Use
• Press OK to confirm.
– “LNB Type“ • Use
• Press OK to confirm.
MENU
Exit
Z
Back
– “Oscillator Low“ • Set the oscillator frequency
(Low band).
• Use
—> Enter value with 1 … 0.
• Press OK to confirm.
– “Oscillator High“ • Set the oscillator frequency
(High band).
• Use
—> Enter value with 1 … 0.
• Press OK to confirm.
– “Tone Burst“ or “DiSEqC”
• Use
DiSEqC switch (A … D).
• Press OK to confirm.
• Use ◀/▶ to place the cursor under the
number to be changed.
—> Enter value with 1 … 0.
▼/▲
▼/▲ and press OK to confirm.
◀/▶ to place the cursor under
the letter to be changed.
▼/▲ to set letters.
▼/▲ to select the LNB that is
used.
◀/▶ to place the cursor under
the number to be changed.
◀/▶ to place the cursor under
the number to be changed.
▼/▲ to assign the LNB to the
input for the Tone Burst (A/B) or
• Repeat the setting for all satellites “SAT System 2” etc.
• To return to the previous menu: press the Z button.
• To finish your setting: press MENU.
- 18 -
Page 19
- 19 -
5.7 Reception of signals from encoded satellite channels
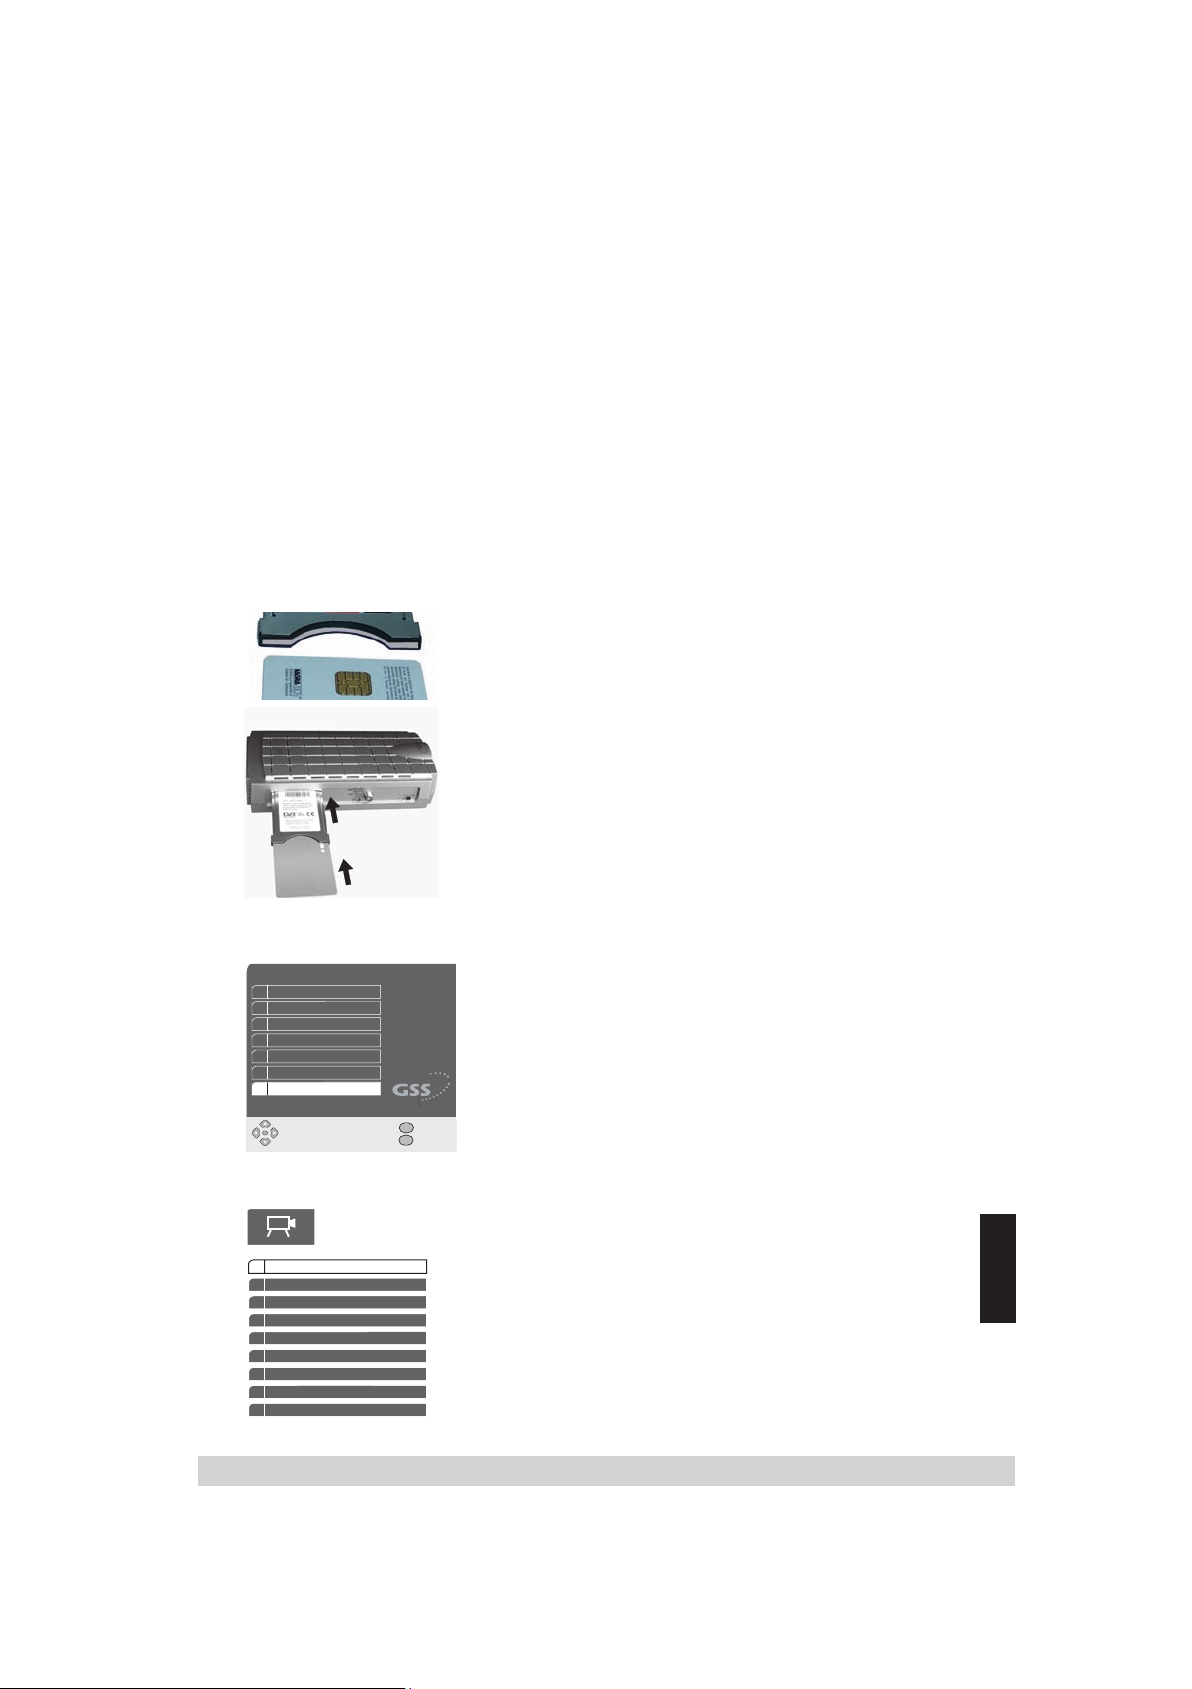
This digital receiver has a common interface (CI) slot. It allows you to connect a CI
module for various encryption systems and broadcasting stations. Encoded channels
can only be viewed with a CI module suitable for the encoding system and the corresponding smart card. The smart card has all the functions for authorization, decoding
and subscription.
Note:
Follow the operating instructions of the corresponding manufacturer for the CI
module.
• Insert the smart card into the CI module in such a way that
the chip on the smart card faces the thicker side (top) of the
CI module (1.).
• Rotate CI module with inserted smart card 180° around the
longitudinal axis (bottom facing upwards, see illustration opposite).
• Insert the CI module with the bottom facing upwards into the
common interface slot “CI-MODULE” (2.).
2.
1.
Main Menu
1 Channel List
2 System Setup
3 Channel Search
4 Timer
5 Sleep-Timer
6 Software Update
7 CI-Module
OK
Select
1 General information
2 Film 1 – 10:10
3 Film 2 – 11:00
4 Film 3 – 10:30
5 Film 4 – 10:40
6 Film 5 – 10:00
7 Film 6 – 13:00
8 Film 7 – 10:30
9 Film 8 – 10:00
• Use ▼/▲ in the main menu to select “CI-Module” and press
OK to confirm.
– A menu generated by the CI-module appears on the
screen. For information on how to use the CI-module, see
its operating instructions.
• To return to the previous menu: press the Z button.
• To finish your setting: press MENU.
MENU
Exit
Z
Back
Note:
If “Camera” is displayed in a channel window, this means
that sub-programmes are available.
• To open sub-programmes: press OK.
• Select the desired channel with
▼/▲ and ◀/▶ and
ENGLISH
press OK to open.
- 19 -
Page 20
- 20 -
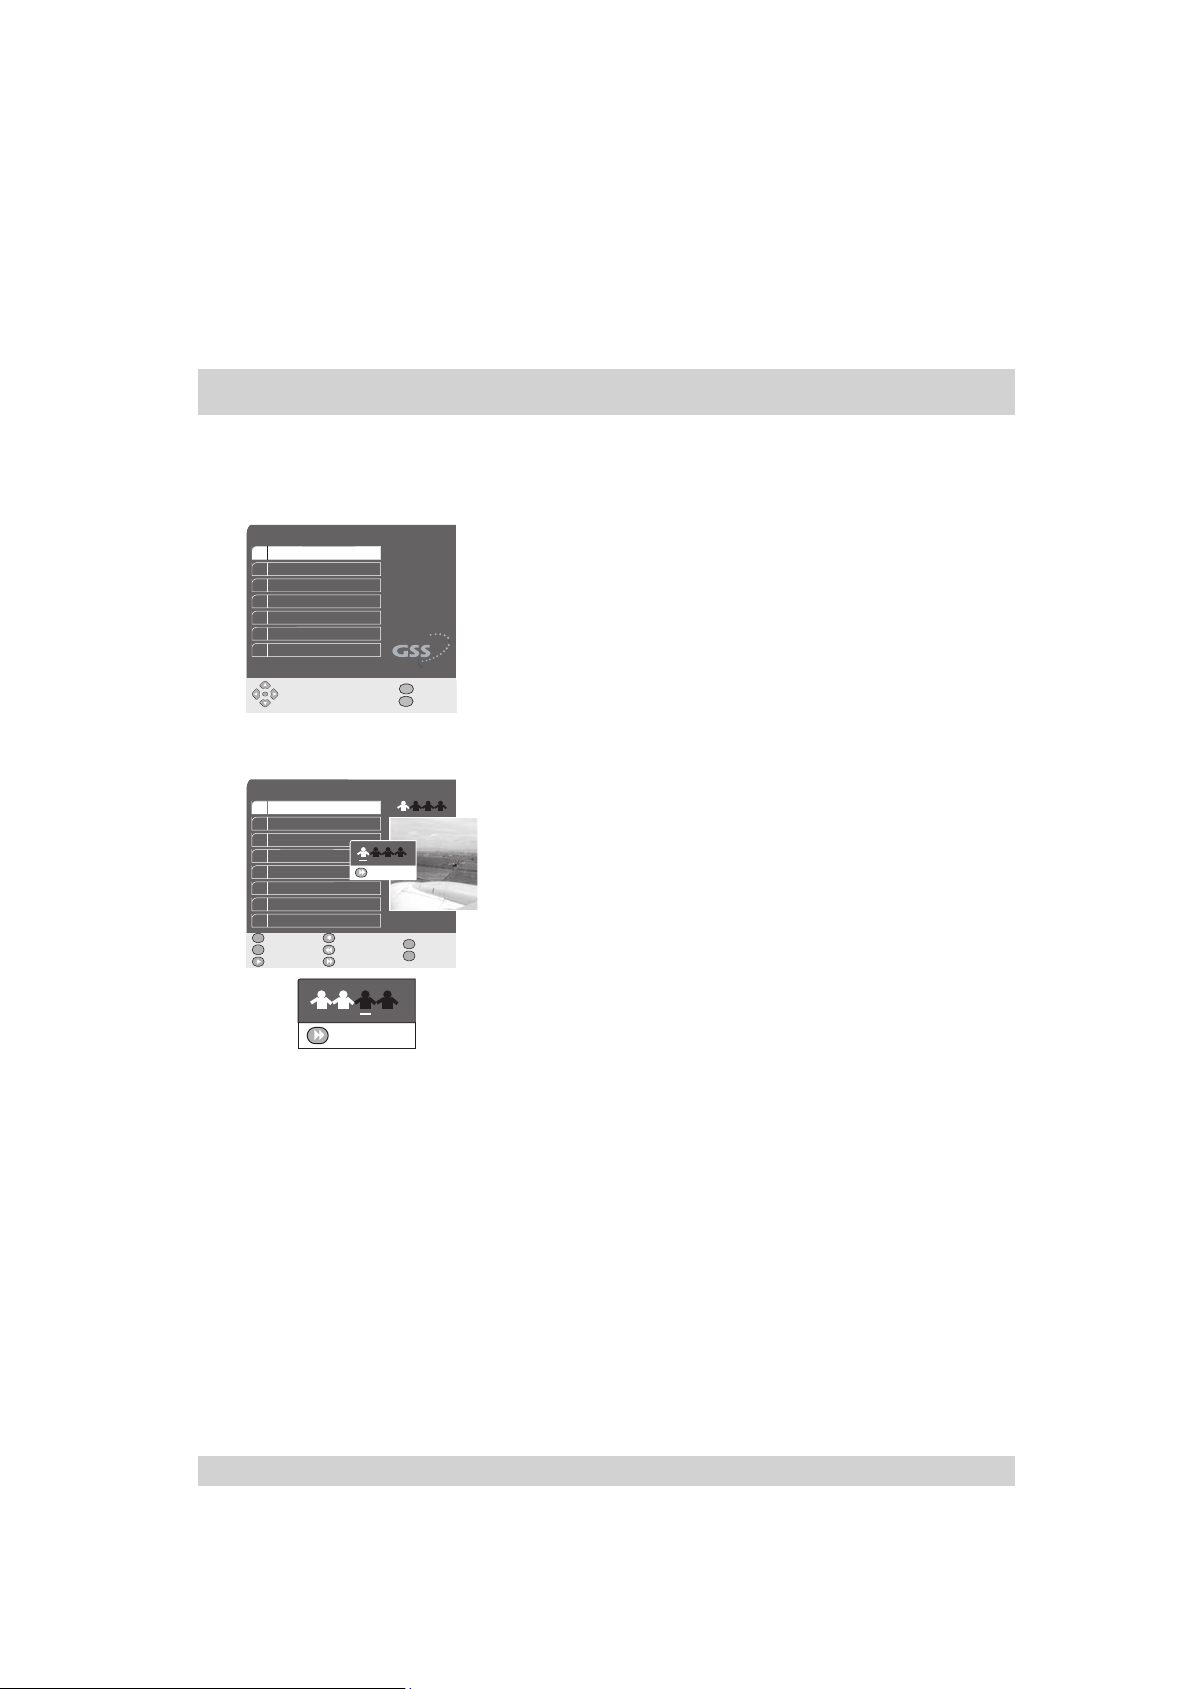
6 Editing channel lists
This menu is for changing the order of the preset TV and RA (Radio) channels as
desired, deleting channels you do not need and locking channels. You can select
your favourite channels and save them in four separate lists of favourites.
Main Menu
1 Channel List
2 System Setup
3 Channel Search
4 Timer
5 Sleep-Timer
6 Software Update
7 CI-Module
MENU
OK
Select
Exit
Z
Back
6.1 Creating lists of favourites
Channel List TV
1 Das Erste
2 SAT.1
3 RTL Television
4 RTL2
5 ZDF
6 Super RTL
7 VOX
8 Pro Sieben
TVR
TV/RA... Delete
i
Info Sort
Protect List 1...
2 34
1
Insert
1 234
Insert
1 234
MENU
Exit
Z
Back
• Select “Channel List” in the “ Main Menu” with ▼/▲ and
press OK to confirm.
– The TV Channel list appears.
• To change channel lists: press the TV/R button repeatedly.
Channel List TV —> Channel List RA —>
Channel List 1 —> Channel List 2 —> Channel List 3 —>
Channel List 4 —> Channel List TV.
• Select “Channel List TV” with TV/R.
• Select the channel to be entered into the list of favourites
with
▼/▲ or ▼/▲ and
◀/▶
press the (yellow) button to
open the “List of favourites” menu.
• Select the desired list of favourites with ◀/▶ and press OK
to highlight in white the selection.
• To enter a channel in the list of favourites: press the (yellow)
button.
– The selected channel is stored in the list of favourites
(white).
– The next channel is automatically selected in the TV chan-
nel list
.
• If you wish to enter the automatically selected channel in
the list of favourites, press the (yellow) button, otherwise use
▼/▲ and
◀/▶
to select the channel to be moved and
proceed as described above.
Notes:
– You can enter the selected channels in several lists of
favourites at the same time:
•
Use ◀/▶ to place the cursor in succession under the
icons to be activated from the lists of favourites and
press
OK each time to confirm.
– To deactivate an active
list of favourites
use ◀/▶ to place
the cursor under the icon for this list and press OK to confirm.
- 20 -
Page 21
- 21 -
6.2 Deleting channels
Note:
If a channel is deleted from a TV or radio channel (RA) list,
it is also deleted from the list of favourites.
If a channel is deleted from one of the lists of favourites, the
channels still remain in the TV / radio channel list.
Channel List
1 Das Erste
2 SAT.1
3 RTL Television
4 RTL2
5 ZDF
6 Super RTL
7 VOX
8 Pro Sieben
TVR
TV/RA... Execute
i
Info Sort
Protect
1
Are you sure?
Yes No
MENU
Exit
Z
Back
• Select a channel list with TV/R.
• Select the channel to be deleted with
▼/▲ and press
the (red) button to highlight it.
– The channel entry is highlighted in red.
• If you wish, select any other channel with
▼/▲.
• To delete channels: press the (red) button again.
• Use
◀/▶ to select “Yes” in the security query that appears
and press OK to confirm the “Delete channel” action.
6.3 Moving channels
Channel List TV
1 Das Erst e
2 SAT.1
3 RTL Television
4 RTL2
5 ZDF
6 Super RTL
7 VOX
8 Pro Siebe n
TVR
TV/RA... Delete
i
Info Dest.
Protect
1
Are you sure?
Yes No
MENU
Exit
Z
Back
• Select the desired channel list with TV/R.
• Select the channel to be moved with
▼/▲ and press the
(green) button to highlight it.
• Any other channels are selected with
▼/▲.
• Press the (green) button to confirm the selected channels.
• Use
▼/▲ to select the channel in front of which the selected
channel is to be inserted.
• To move channels: press the (green) button.
• Use
◀/▶ to select “Yes” in the security query that appears
and press OK to confirm.
– The highlighted channels are moved.
• To return to the previous menu: press the Z button.
• To finish your setting: press MENU.
6.4 Locking channels
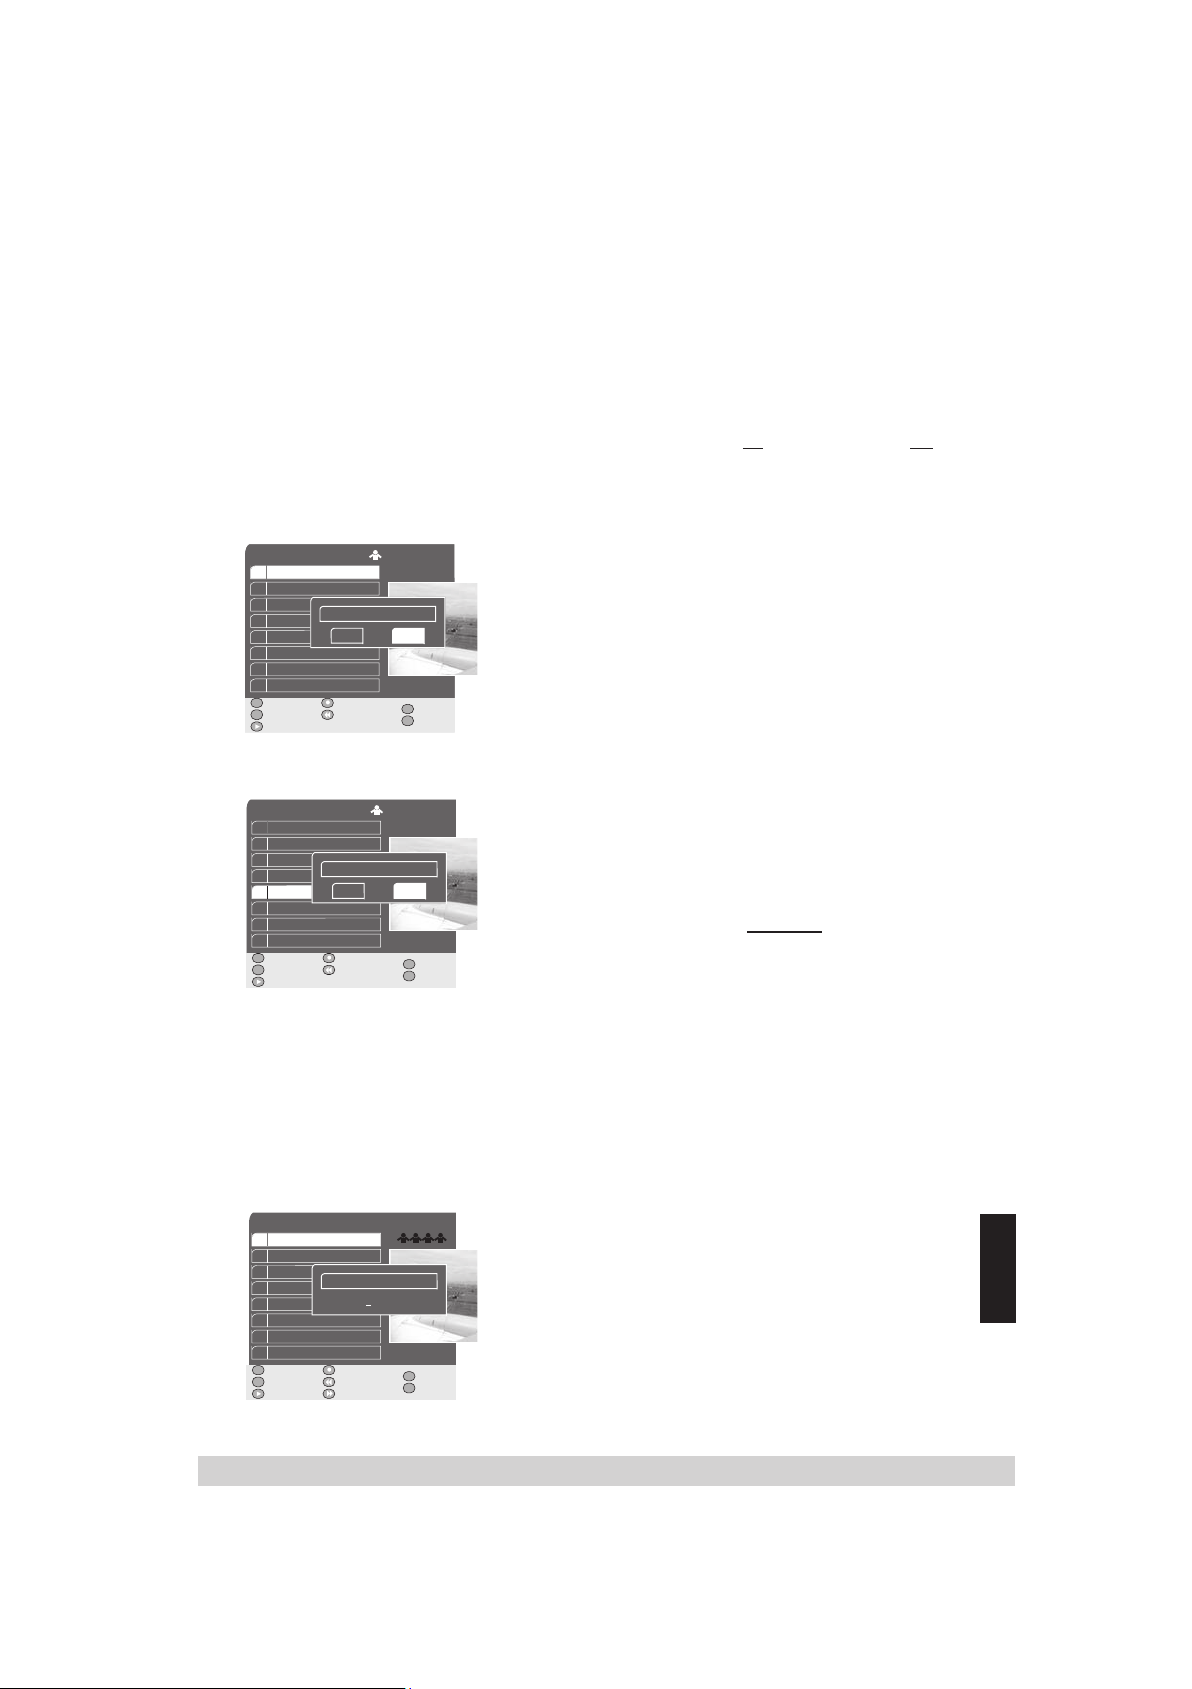
This menu is for locking channels with a password that is valid for all protected chan-
nels.
Channel List TV
1 Das Erste
2 SAT.1
3 RTL Television
4 RTL2
5 ZDF
6 Super RTL
7 VOX
8 Pro Sieben
TVR
TV/RA... Delete
i
Info Sort
Protect List 1…
Input Password
* * * *
1
MENU
Z
234
Exit
Back
• To open the desired channel list: press TV/R.
• Select the channel to be locked with
▼/▲ and press the
(blue) button to confirm.
– “ Input Password” appears.
• Enter the password with 1 … 0.
– The default password is “0 0 0 0”.
– Locked channels are marked with a key.
• Confirm the channel lock with MENU.
- 21 -
ENGLISH
Page 22

- 22 -
6.5 Undoing the channel lock
• Select the locked channel in the channel list with TV/R and
▼/▲
.
• Press the (blue)
• Enter the password with 1 … 0.
•
Confirm the “undo” channel lock action with
button
– “Input Password” appears.
7 Basic functions
7.1 Adjusting the volume
Notes:
– You cannot adjust the volume in menu mode.
–
The changes in volume refer to the level of the audio signals at the “TV” output socket of the receiver.
• Use ◀/▶ to set the volume.
– A volume scale is displayed on the screen.
7.2 Muting
• Muting: press the button on the remote control.
• To end muting: press the button .
7.3 Selecting channels – numerical preset channel selection
• Enter single-digit or multi-digit preset channel numbers by
pressing 1
• Switch preset channels up and down one by one: press
… 0 on the remote control.
▼/▲ as often as required.
• To “scroll” quickly through preset channels: press ▼/▲ and
hold as long as is necessary.
MENU
.
Note:
After each change of channel, a short screen text is dis-
played with the following information:
– Preset channel number
– Name of the channel
– Time
– Title and start time of the current programme and the fol-
lowing programme
–
Information on the audio signal of the current channel:
Used symbols:
p Digital multi-channel sound
1/2 For example, 2 languages are transmitted;
language 1 is selected
eng The selected language is e.g. English
Stereo sound / Dual sound / Mono sound
- 22 -
Page 23

- 23 -
7.4 Preset AV channel
As soon as the set connected to the socket “
activated and provides a switching voltage the Digital Receiver switches to AV operation.
• To select a preset AV channel manually: press the 0 button.
– The device switches to the external signal at the
“RECORDER” input.
• To switch back to TV mode: press the 0 button again.
7.5 Selecting channels from the TV/radio channel lists
You can choose between the channel lists
– TV (TV channels),
– RA (radio channels) and
– 4 lists of favourites.
Lists of favourites without channels are not displayed.
• Select the desired channel list with TV/R.
• Use
▼/▲ and ◀/▶ to select a channel and press OK to
open.
7.6 Selecting channels from the list
• Open the channel list with OK.
• Use
▼/▲ and ◀/▶ to select a channel and press OK to
open.
7.7 Alphanumerical program selection – entering letters
You can select channels by entering their channel names.
For this purpose the numbers 2 … 9 on the remote control
are assigned to groups of letters.
RECORDER
” is
• Open the channel list with OK.
• Press 0 to activate the input of letters.
• Press 2 … 9 to enter the first letter of the channel name
(e.g. 9 for the letter Z, 3 for the letter D etc.).
– A list of all the channels beginning with the letters W, X,
Y or Z appears on the screen.
– With each additional letter entered, the list of channels
displayed is reduced.
• Select the desired channel with
OK to open it.
- 23 -
▼/▲ and ◀/▶ and press
ENGLISH
Page 24

- 24 -
7.8 Selecting locked channels
7.9 Zapping function
If you select a locked channel, you will only see the chan-
nel name with a key symbol. By entering the password, you
can activate locked channels until the next time the device is
switched off (see also page 22, chapter “Undoing the channel lock”).
• Use ▼/▲ or 1 … 0 to select a preset channel.
– “Input Password” appears.
– If “Input Password” is not displayed, press OK to call the
text message.
• Enter the password with 1 … 0.
– All locked channels are activated until you switch the dig-
ital receiver off again.
This function allows you to save the channel you are cur-
rently watching and switch to and between this channel and
other channels (zapping).
• To save a channel in the zapping memory: press 1 … 0 or
▼/▲ to select the channel and save it with Z.
– The channel name appears on the screen, e.g. “TV 8”.
• Press 1 … 0 or
• Press Z to switch to the saved channel and back to the chan-
nel last seen.
• Press i to finish your setting.
▼/▲ to select a different channel.
7.10 Selecting the audio channel
For channels broadcasting in several languages you can se-
• Press i.
• Press i repeatedly to select the desired audio type:
Mono sound
1/2 For example, 2 languages or audio channels
• Press OK to save your setting.
lect a different language, the audio type and digital sound
(AC 3), if provided. Digital sound is only available at the
optical SPDIF output.
– The channel information is displayed.
p Digital multi-channel sound (AC 3)
Stereo sound
Dual sound
are transmitted; language 1 is selected.
- 24 -
Page 25

- 25 -
7.11 Teletext
Note:
If a stereo transmission is faulty, the left stereo channel might
transmit a different language than the right one.
• Use A/B to change stereo channels.
Teletext is a service offered by some broadcasters that is
provided along with the video and audio signals. These
signals are converted by the digital receiver and can be
displayed on the TV screen as teletext.
• Select the TV channel for which you wish to view teletext
with 1 … 0 or
• To open teletext: press TXT.
– Text page 100 appears on the screen.
• Enter the three-digit number of a text page with 1 … 0 or use
▼/▲.
▼/▲ to “scroll” between text pages.
• To close teletext: press TXT.
- 25 -
ENGLISH
Page 26
- 26 -
8 Updating the channel list
Preset channel lists
This digital receiver was programmed at the factory with
most digital TV and RADIO channels on the Astra 19.2°
East, EutelSat/Hotbird 13° East and Turksat 1C satellites.
You can open the corresponding lists in the “Channel List”
by pressing
every now and then or because satellite data is changed, it
is advisable to occasionally start an automatic search on the
digital receiver and update the channel lists.
Automatic channel search
Main Menu
1 Channel List
2 System Setup
3 Channel Search
4 Timer
5 Sleep-Timer
6 Software Update
7 CI-Module
OK
Select
MENU
Exit
Z
Back
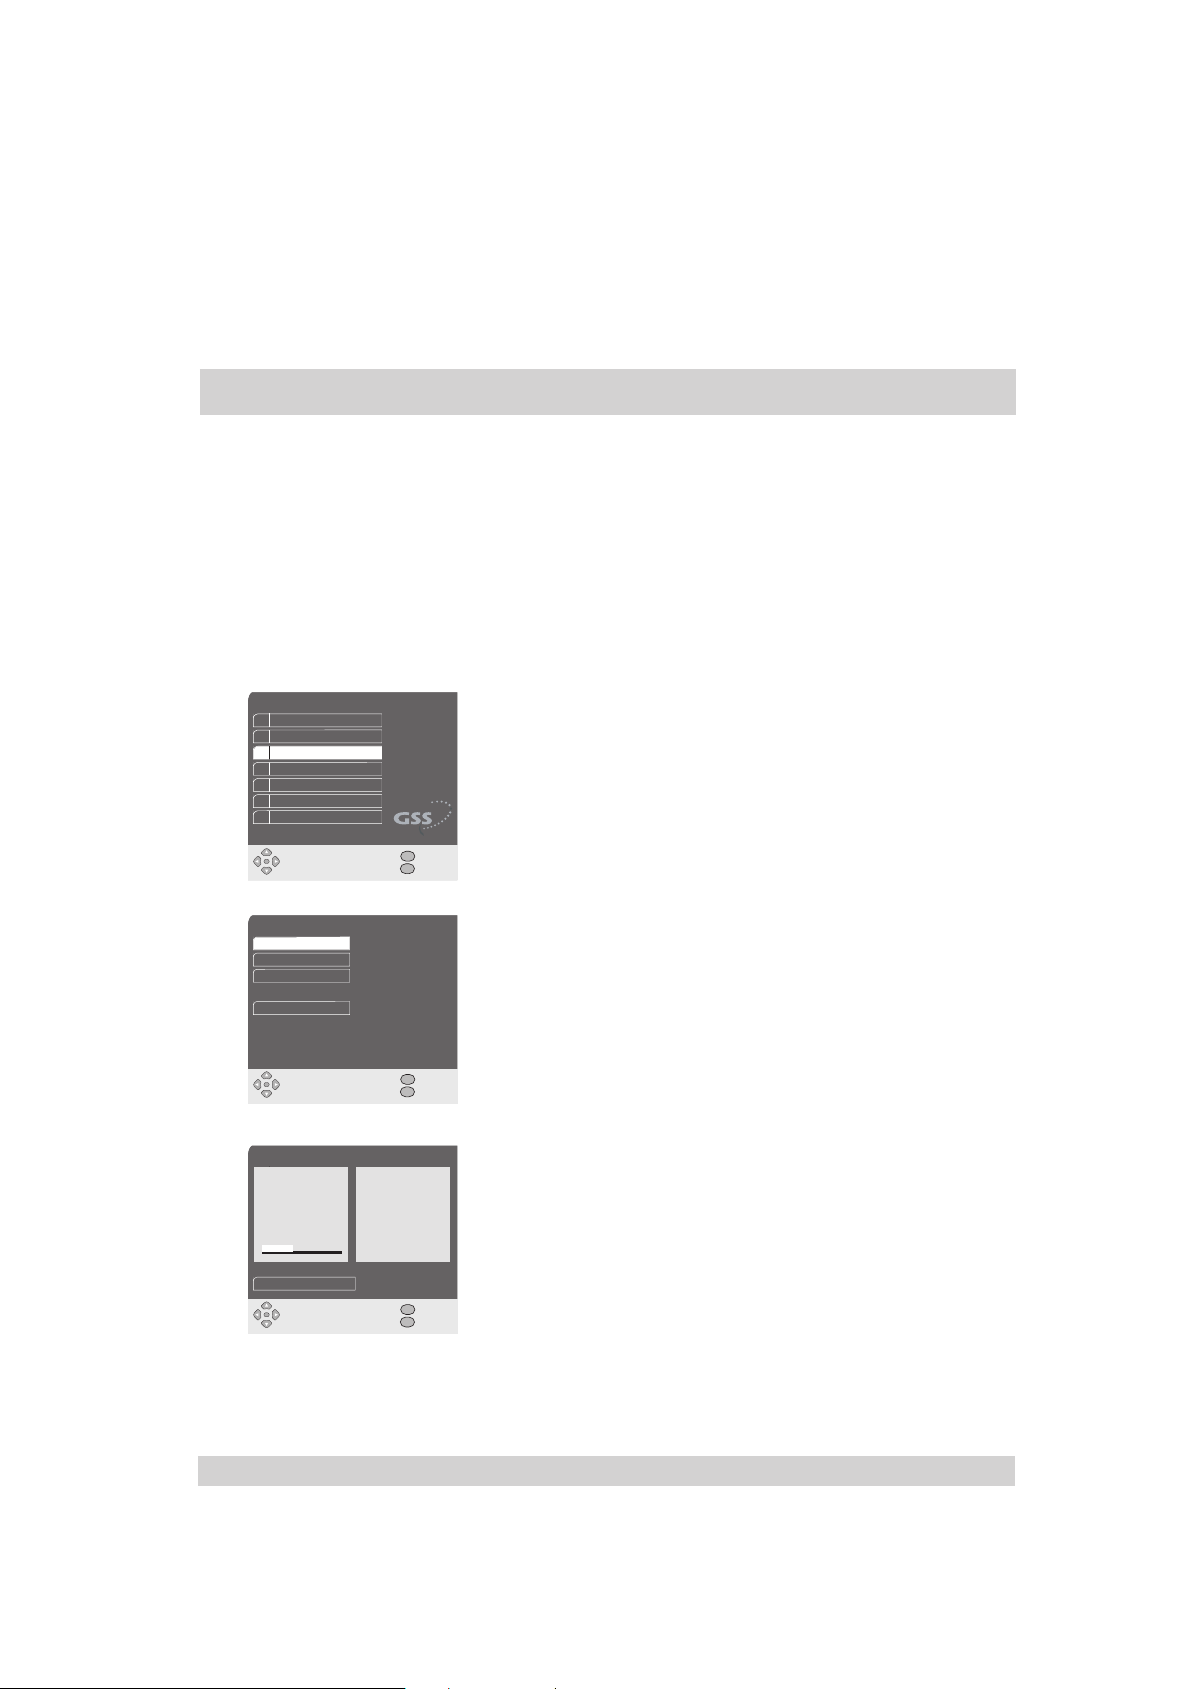
During the automatic channel search, the selected satellite is
scanned for new channels.
• Select “Channel Search” in the “Main Menu” with
press OK to confirm.
◀/▶. Because there are new satellite channels
▼/▲ and
Channel Search
Method
Satellite
Option
Start
OK
Select
Channel Search
Astra V high
11828 MHz 22000
3 Suchlauf
TV: 25
4 Timer
RA: 1
5 Sleep-Timer
Cancel
OK
Select
Satellite
Astra
Free
MENU
Exit
Z
Back
80 Pro Sieben
250 Radio S25
444 TERRA NOVA
993 ASTRA HD
10 SR1
1 Bayern 1
9 NDR Info
MENU
Exit
Z
Back
• Select “Method” with ▼/▲ and press OK to confirm.
• In the menu use
▼/▲ to select “Satellite” and press OK to
confirm.
• Use
▼/▲ to select “Satellite” and press OK to confirm.
• Use
▼/▲ to select the desired satellite and press OK to
confirm.
• Select “Option” with
• Use
▼/▲ to set “Free” or “All” (encoded channels are also
▼/▲ and press OK to confirm.
searched for) and press OK to confirm.
• Select “Start” with
▼/▲ and press OK to start the search.
– The window on the left shows the current transponder
settings and the number of TV channels (black) and radio
channels (blue) found. The window on the right shows the
channels last found and the channel number.
– New TV or radio channels are added to the end of the
channel list.
– To cancel the search: press OK (reaction time approx.
3 seconds).
• To return to the previous menu: press the Z button.
• To finish your setting: press MENU.
- 26 -
Page 27
- 27 -
Main Menu
1 Channel List
2 System Setup
3 Channel Search
4 Timer
5 Sleep-Timer
6 Software Update
7 CI-Module
OK
Select
Manual Channel search
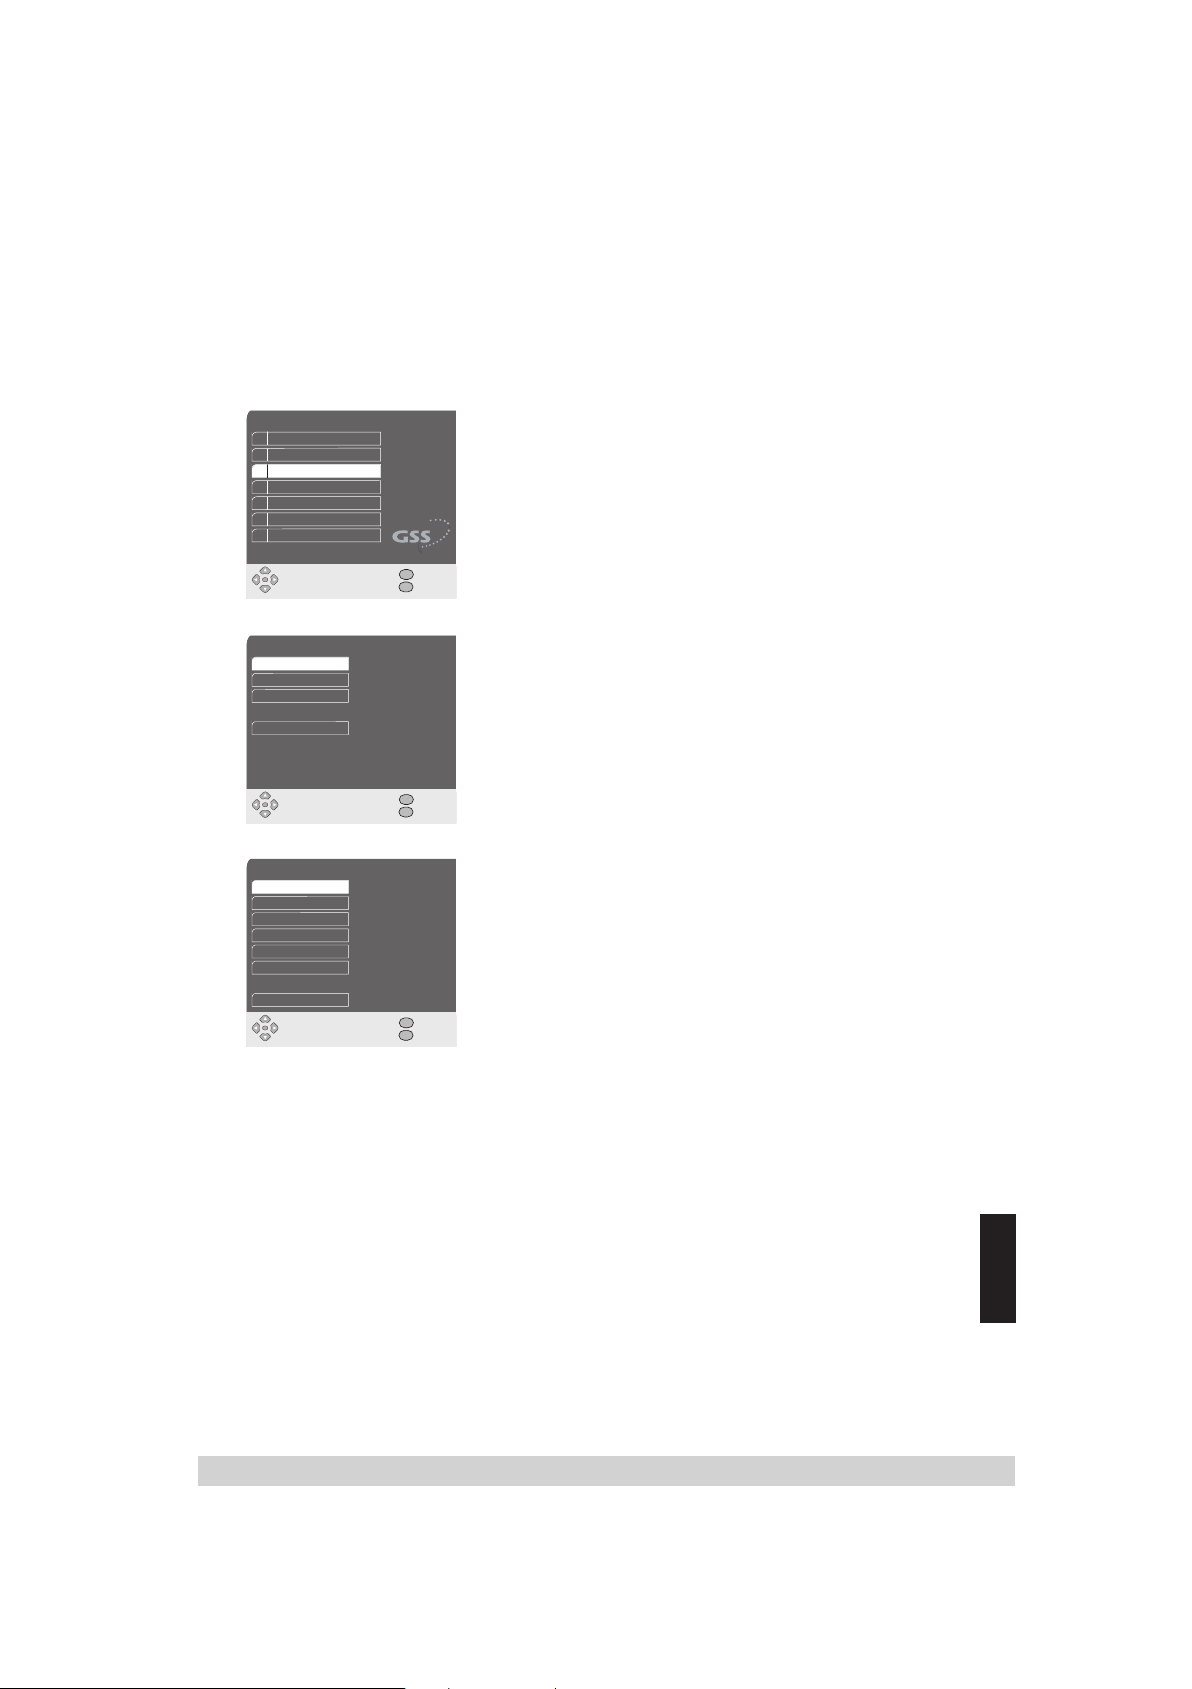
If the channel search does not automatically find a particu-
lar channel, you can set it using the manual search. To do
so, enter all the parameters of the channel you are looking
for. You can find the latest transponder data on the teletext
pages of various broadcasters, in a new satellite TV magazine or on the Internet.
MENU
Exit
Z
Back
• Select “Channel Search” in the “Main Menu” with
press OK to confirm.
▼/▲ and
Channel Search
Method
Satellite
Option
Start
OK
Select
Channel Search
Method
Satellite
Frequency
Pol.
Symbolrate
Option
Start
OK
Select
Satellite
Astra
Free
MENU
Z
Transponder
Astra
11836 MHz
Horizontal
27500
Free
MENU
Z
Exit
Back
Exit
Back
• Select “Method” with ▼/▲ and press OK to confirm.
• In the menu use
▼/▲ to select “Transponder” and press OK
to confirm.
• Use ▼/▲ to select the item to be set and press OK to con-
firm.
• Use
▼/▲ to set the parameters and press OK each time to
confirm.
If required, use
◀/▶ to place the cursor under the number
to be set:
– “Satellite“: Satellite selection.
– “ Frequency”: Enter the five-digit channel frequency
with 1 … 0.
– “ Pol.”: For setting the polarization of the
channel
(“Horizontal” or “Vertical”).
– “Symbol rate”: Enter five-digit channel symbol rate
with 1 … 0.
– “Option”: Set “Free” or “All” (encoded channels
are also searched for).
• Select “Start” with
▼/▲ and press OK to start the search.
– The new TV or radio channel is automatically added to
the end of the channel list.
• To return to the previous menu: press the Z button.
• To finish your setting: press MENU.
ENGLISH
- 27 -
Page 28
- 28 -
9 Electronic programme guide (EPG)
The electronic programme guide provides information on
the current programme such as the title and a short description. You can also list the following programmes and call up
the corresponding descriptions.
9.1 Displaying programme information
• To display information on the current programme: Press the
EPG button.
• Press EPG again.
– The first table with the following programmes is dis-
played.
• Use
◀/▶ to open other tables.
• Use
▼/▲ to select a programme.
• Press OK to call up information on the selected pro-
gramme.
• To return to the table with today‘s programmes: press the Z
button.
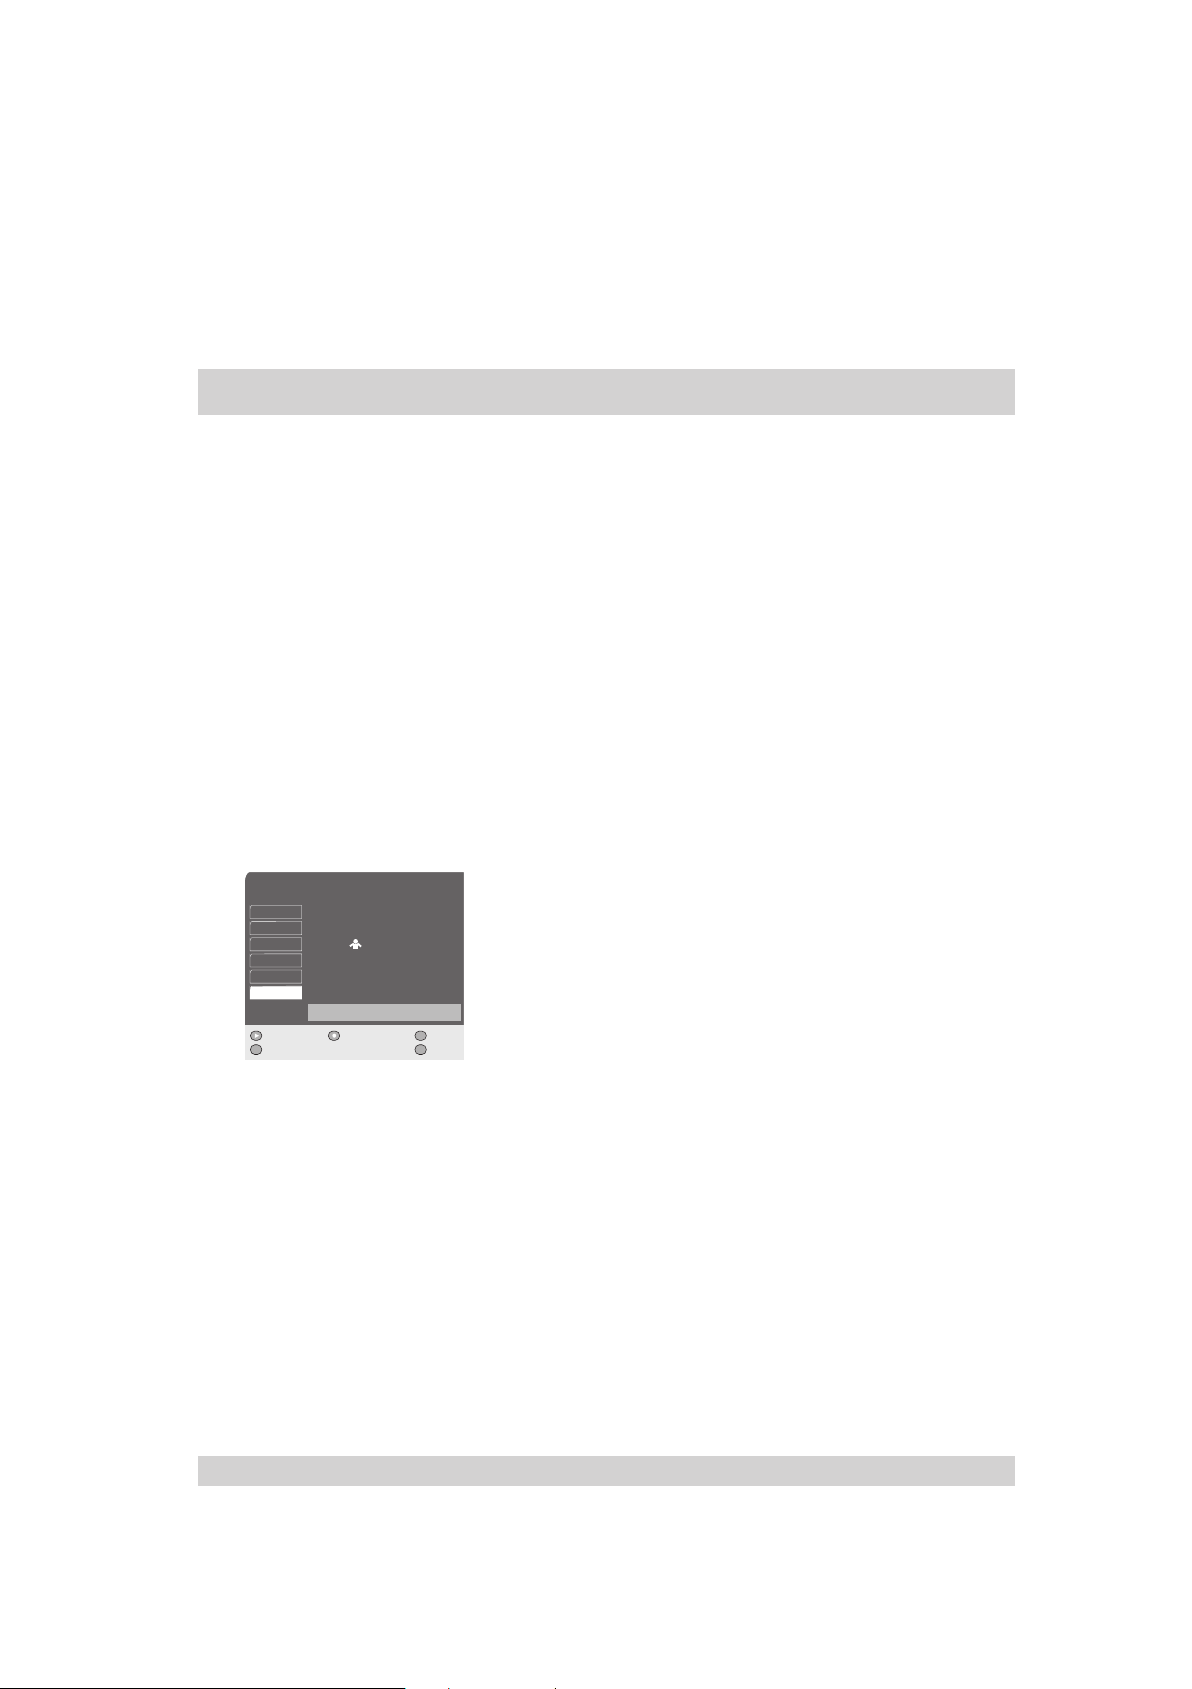
9.2 Entering programmes in the timer
TIMER
Date Prog Start Stop
Timer 1
22/07 TV 0001 22:00 – 23:00
Timer 2
Mon TV 0012 17:15 – 18:00
Mo – Fr 0008 18:45 – 19:00
Timer 3
Mo – Sa RA 0001 06:00 – 08:00
Timer 4
Mo – Su TV 0006 20:00 – 20:15
Timer 5
24/07 TV 0001 22:00 – 23:00
Timer 6
Pro Sieben
Options Delete
OK
Select
1
MENU
Z
• Press the EPG button twice.
• Select the programme with
• Press the (green) button.
– The displayed programme is entered in the timer with all
relevant data, such as date, start and finish times, channel name etc.
– The “TIMER” menu is displayed (see also chapter “Timer
Exit
Back
functions”, pa ge 29 ).
• To close the electronic programme guide: press MENU.
▼/▲ ◀/▶.
- 28 -
Page 29
- 29 -
10 Timer functions
Your digital receiver has a sleep timer for switching off your
device at a defined time.
Furthermore your digital receiver has 6 timer positions that
you can set manually or automatically by applying the data
selected in the EPG.
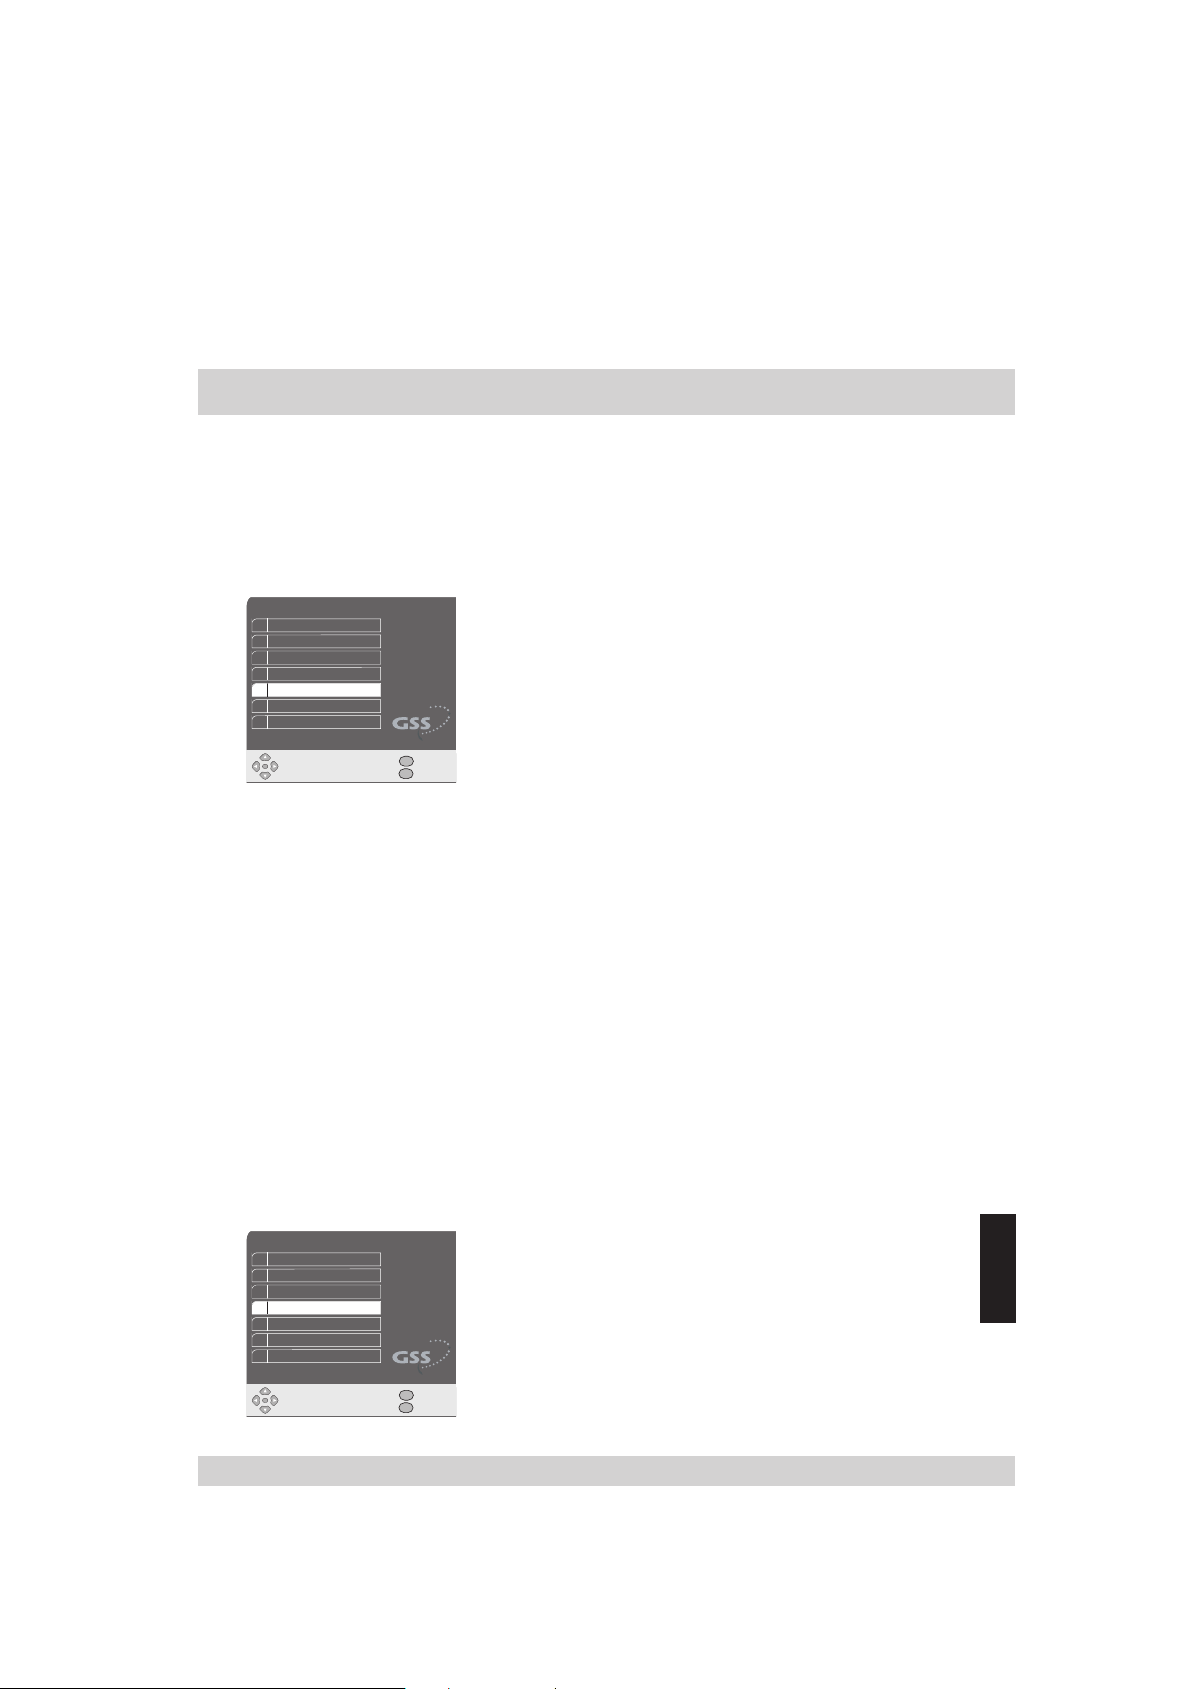
10.1 Entering the switch-off time for the sleep timer
Main Menu
1 Channel List
2 System Setup
3 Channel Search
4 Timer
5 Sleep-Timer
6 Software Update
7 CI-Module
MENU
OK
Select
Exit
Z
Back
10.2 Automatically setting the timer
10.3 Manually setting the timer
• Select “Sleep-Timer” in the “Main Menu” with
press OK to confirm.
• Confirm “Time” with OK.
• Select the switch -off time in 30 minute steps (sleep timer “OFF”,
30 … 240 minutes) with
• To finish your setting: press MENU.
– The digital receiver switches to standby mode after the
set time.
Data is adapted from the EPG for the automatic setting of
the timer (chapter “Electronic programme guide”, p age 28 ).
This data can be changed manually (chapter “Manually set-
ting the timer”).
The manual timer setting enables you to let your digital
receiver switch on …
… on a particular date,
… on particular weekdays,
… every day from Monday to Friday,
… every day from Monday to Saturday,
… every day from Monday to Sunday,
… from a TV or radio channel that can be freely selected
from the channel lists,
… at a particular time.
▼/▲ and
▼/▲ and press OK to confirm.
Main Menu
1 Channel List
2 System Setup
3 Channel Search
4 Timer
5 Sleep-Timer
6 Software Update
7 CI-Module
OK
Select
• Select “Timer” in the “Main Menu” with ▼/▲ and press OK
to confirm.
ENGLISH
• Select timer position (Timer 1…6) with ▼/▲ and press OK
MENU
Exit
Z
Back
to confirm.
– The current date is displayed.
- 29 -
Page 30

- 30 -
TIMER
Timer 1
22/07 TV 0001 22:00
23:00
Date Prog Start Stop
Timer 1
22/07 TV 0001 22:00 – 23:00
Timer 2
Mon TV 0012 17:15 – 18:00
Mo – Fr 0008 18:45 – 19:00
Timer 3
Mo – Su RA 0001 06:00 – 08:00
Timer 4
Mo – Sa TV 0006 20:00 – 20:15
Timer 5
24/ 07 - - - - - - - - : - - – - - : - -
Timer 6
Pro Sieben
Daily
• Use ▼/▲ or 0 … 9 to set the day of switching on. Move the
cursor on (month) and use
▼/▲ or 0 … 9 to set the month.
– Instead of the date you can set:
1
Mo – Monday
Tu – Tuesday
We – Wednesday
Th – Thursday
MENU
End
Z
Back
Fr – Friday
Sa – Saturday
Su – Sunday
Mo–Fr – Monday to Friday
Mo–Sa – Monday to Saturday
Mo–Su – Monday to Sunday
• Press
– use
◀/▶ to move the cursor on (Prog),
▼/▲ to activate the desired channel list
(TV, RA, list of favourites).
– Move the cursor on with
◀/▶ and use ▼/▲ or 0 … 9 to
select the preset channel. The channel name is displayed
in the menu.
• Use
◀/▶ to move the cursor on (Start/Stop) and use ▼/▲
or 0 … 9 to set the switching on and switching off time.
• Make your entries and press OK to confirm.
Example:
Timer 2
Mon TV 0012 17:15 – 18:00
–
Timer 2:
The device switches on channel no. 0012 of the TV channel
list every Monday from 17:15 – 18:00.
• To delete entries of an active timer (white background):
press the (red) button.
• To return to previous menu: press the Z button.
• To finish your setting: press MENU.
– The digital receiver switches on the specified programme
at the set time.
- 30 -
Page 31

- 31 -
Note:
– If you want to record channels via your video or DVD re-
corder, these devices must be programmed accordingly.
– If you use the electronic programme guide (EPG), the data is
transferred automatically.
10.4 Setting ( lead time / follow-up time) options
This menu enables the individual shifting of the actual
switch-on and switch-off times in both directions (lead time
and follow-up time), regardless of the preset switch-on and
switch-off times.
Options
Lead time
Follow-up time
OK
Select
00 Min.
10 Min.
MENU
Exit
Z
Back
10.5 Ending the active timer
10.6 Deleting a timer position
• To activate the function “Options” in the “Timer” menu: press
the (blue) button.
• Use
▼/▲ to select “Lead time” or “Follow-up time” and
use
◀/▶ to set the forward or backward time (0 … 60
minutes).
• To return to previous menu: press the Z button.
• To finish your setting: press MENU.
Once the timer starts a channel, the selection of channels is
locked.
• To prematurely stop the timer: press the MENU button.
– The screen shows:
Cancel Timer?
• Confirm with OK.
• Use ▼/▲ to select the timer position to be deleted.
• Press the (red) button.
- 31 -
ENGLISH
Page 32
- 32 -
11 Special functions
4 Hotel Mode
11.1 Hotel mode
11.1.1 Locking the menu
System Setup
1 LNB Settings
2 TV Setup
3 Language, Time
5 Information
6 Password Setting
7 Clear Channel List
8 Factory Settings
OK
Select
Input Password
* * * *
MENU
Exit
Z
Back
–
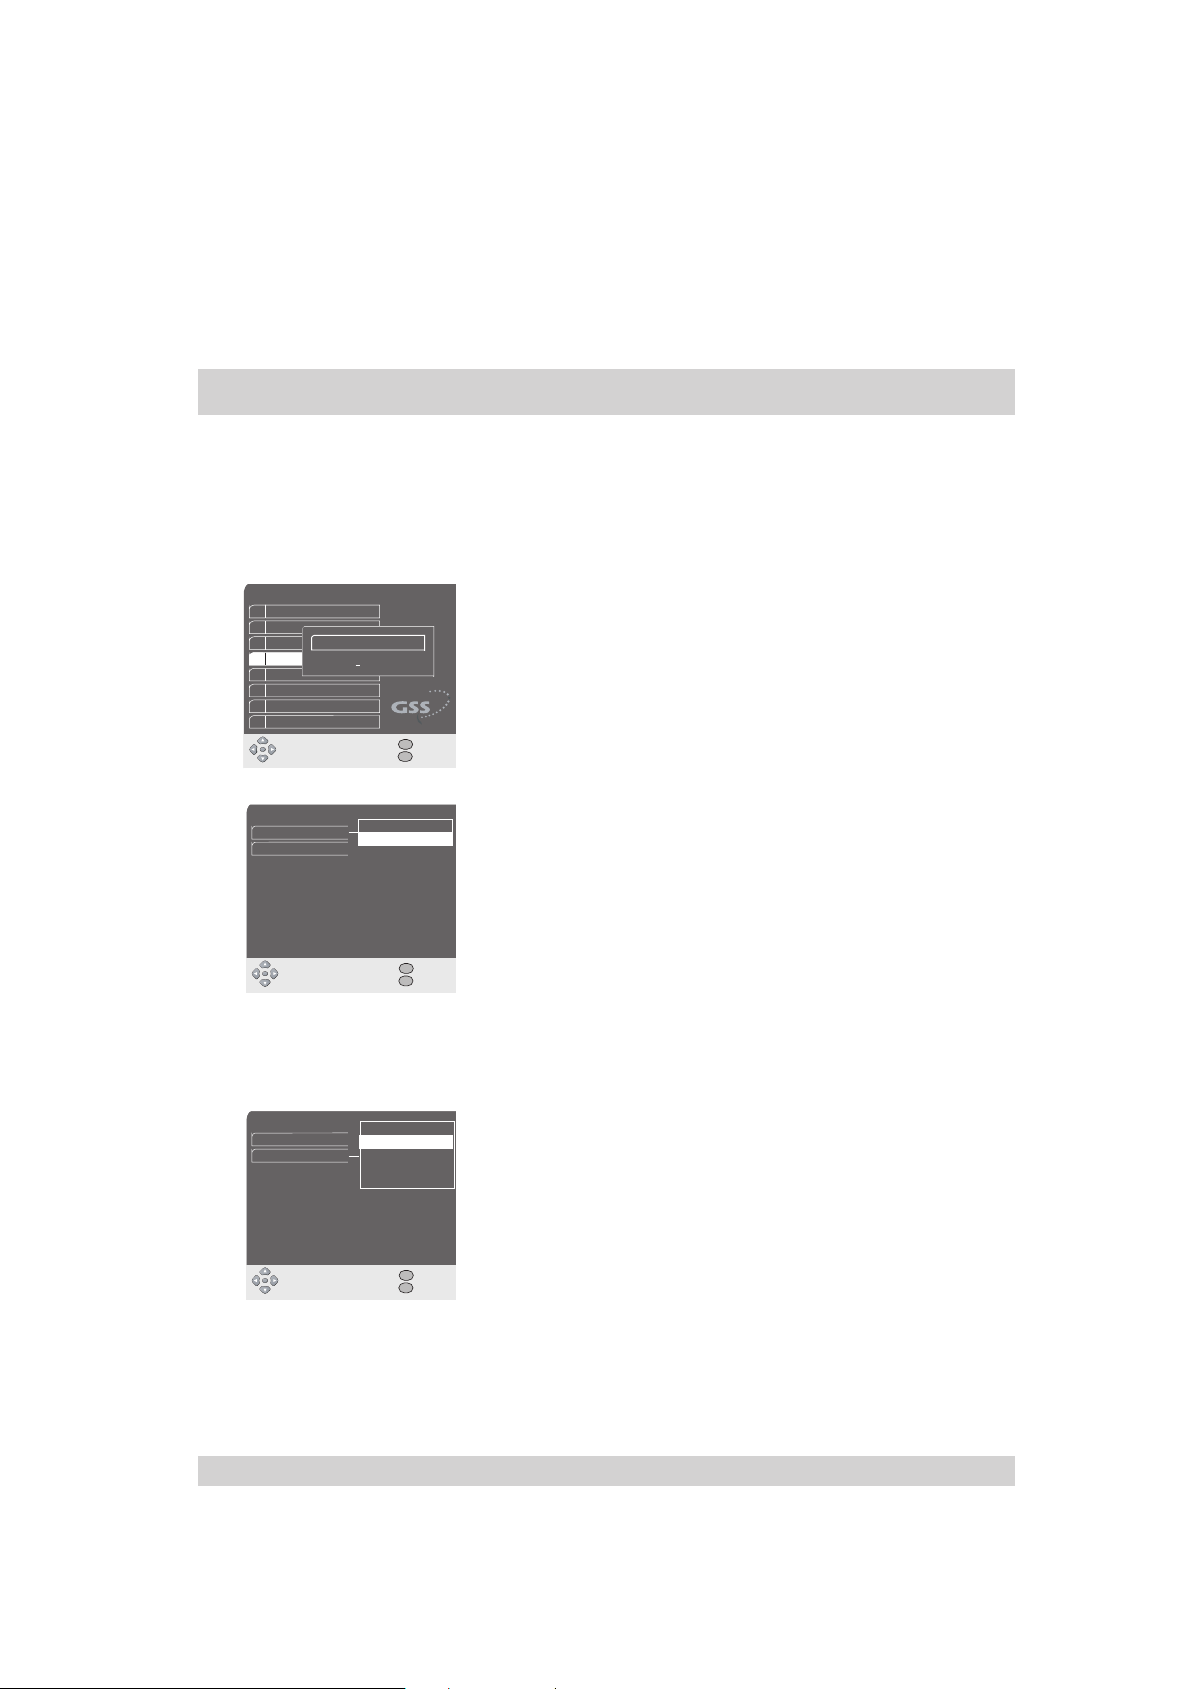
The “Hotel Mode” menu is for locking all access to the
menus and limiting the volume to a maximum level
.
– The default password is “0 0 0 0”.
• Use
▼/▲ in the main menu to select “System Setup” and
press OK to confirm.
• Use
▼/▲ to activate “Hotel Mode” and press OK to
confirm.
• Enter the 4-digit password.
Hotel Mode
Menu
Loudness
OK
Select
Normal
Locked
MENU
Exit
Z
Back
11.1.2 Limiting the volume
Hotel Mode
Menu
Loudness
OK
Select
Normal
– 1
Astra
– 2
– 3
– 4
MENU
Exit
Z
Back
• In the “Hotel Mode” menu confirm “Menu” with OK or select
“Menu” with
• Use
▼/▲ to activate “Locked” and press OK to confirm.
▼/▲ and press OK to confirm.
• To save and finish your setting: press MENU.
• Use
▼/▲ in the main menu to select “System Setup” and
press OK to confirm.
• Use
▼/▲ to activate “Hotel Mode” and press OK to
confirm.
• Enter the 4-digit password.
• Use
▼/▲ in the “Hotel Mode” menu to select “Loudness”
and press OK to confirm.
• Use
▼/▲ to set the desired volume (“Normal” … “– 4”) and
press OK to confirm.
• To save and finish your setting: press MENU.
- 32 -
Page 33
- 33 -
11.1.3 Removing the menu lock
4 Hotel Mode
11.2 Changing the password
• Press the Menu button for approx. 5 seconds.
• Enter the 4-digit password.
• In the main menu that appears use
▼/▲ to select “System
Setup” and press OK to confirm.
• Use
▼/▲ to activate “Hotel Mode” and press OK to
confirm.
• Enter the 4-digit password.
• Confirm “Menu” in the “Hotel Mode” menu with OK
or select “Menu” with
• Use
▼/▲ to activate “Normal” and press OK to confirm.
▼/▲ and press OK to confirm.
• To save and finish your setting: press MENU.
The default password is “0 0 0 0”. We recommend that you
replace it with your own personal password.
System Setup
1 LNB Settings
2 TV Setup
3 Language, Time
5 Information
6 Password Setting
7 Clear Channel List
8 Factory Settings
OK
Input Password
Select
* * * *
MENU
Exit
Z
Back
• Use ▼/▲ in the main menu to select “System Setup” and
• Use
• Enter the current password with 0 … 9 and then enter the
• Enter the new password again to confirm it.
• To save and finish your setting: press MENU.
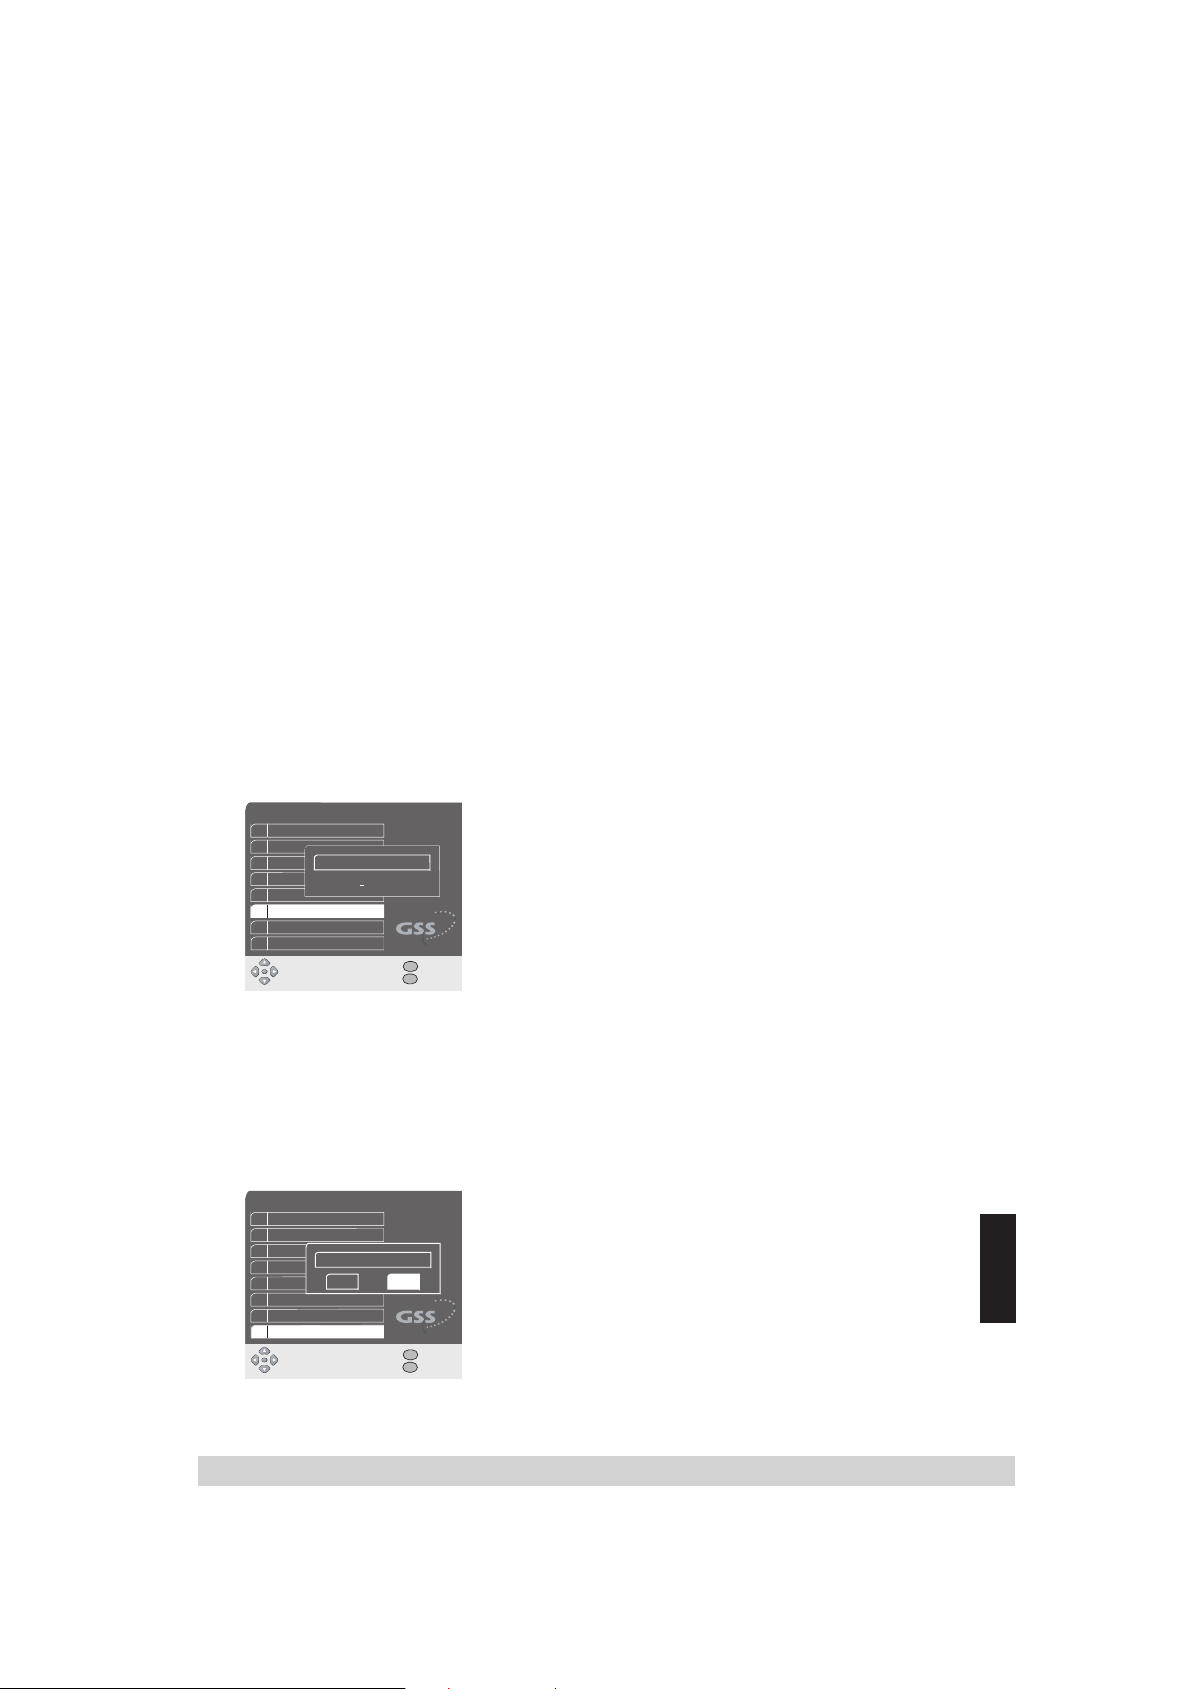
11.3 Restoring the factory settings
Note:
With this function you delete all your own settings includ-
System Setup
1 LNB System
2 TV Setup
3 Language, Time
4 Hotel Mode
5 Informationen
6 Password Setting
7 Clear Channel List
8 Factory Settings
OK
Are you sure?
Yes No
Select
MENU
Exit
Z
Back
• Use ▼/▲ in the main menu to select “System Setup” and
• Use
• Use
– All your settings are deleted.
• To return to previous menu: press the Z button.
• To finish your setting: press MENU.
press OK to confirm.
▼/▲ to activate “Password setting” and press OK to
confirm.
new password.
ing the lists of favourites and reset the digital receiver to its
original state.
press OK to confirm.
▼/▲ to activate “Factory Settings” and press OK to
confirm.
◀/▶ to select “Yes” and press OK to confirm.
ENGLISH
- 33 -
Page 34
- 34 -
11.4 Updating software
The software for the digital receiver is provided by the Astra
19.2° East satellite. The digital receiver is designed so that
you can update its operating software and certain channel
information directly using this satellite.
Main Menu
1 Channel List
2 System Setup
3 Channel Search
4 Timer
5 Sleep-Timer
6 Software Update
7 CI-Module
OK
Select
Software Update
Modell
New Version
Cancel
OK
Select
MENU
Z
DRS 100 CI
up to date
MENU
Z
Exit
Back
Exit
Back
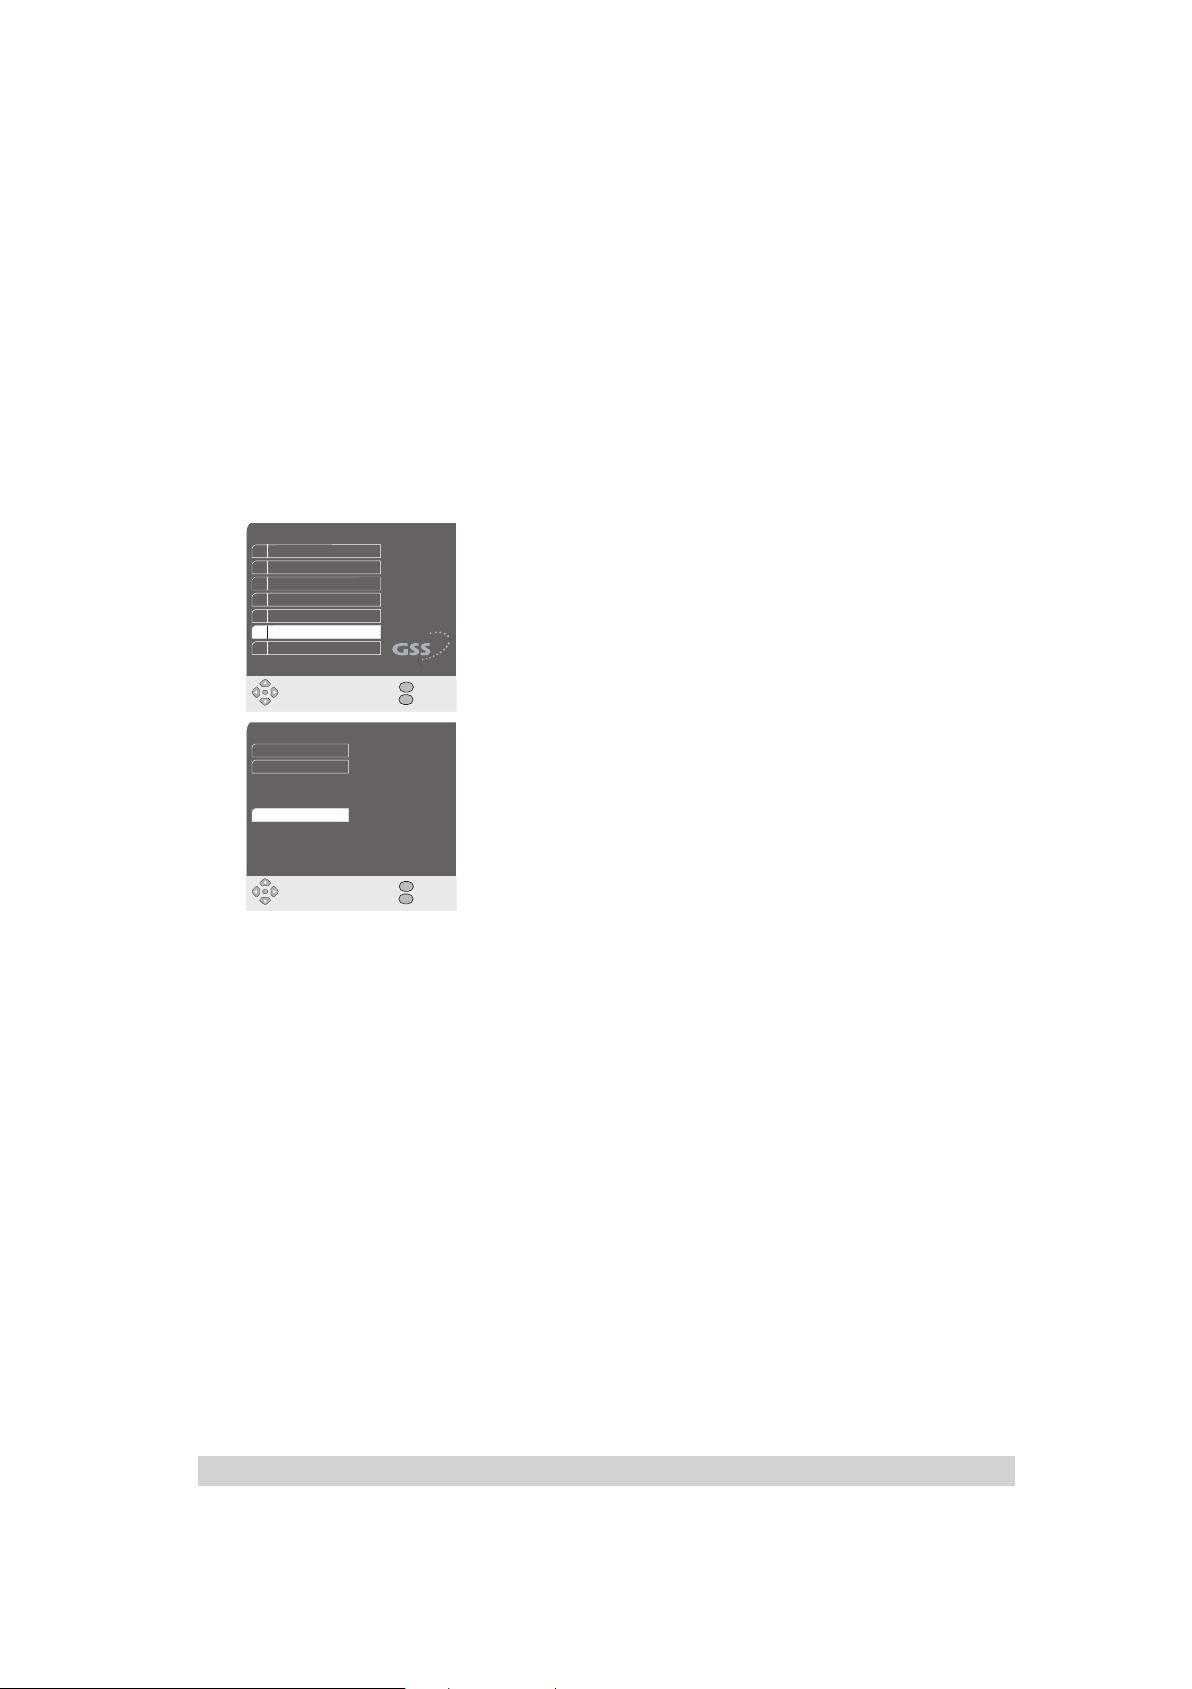
• Select “Software Update” in the main menu with ▼/▲ and
press OK to confirm.
– The digital receiver starts the search for new and then
checks whether the software used in the digital receiver
needs to be updated.
This process may take several minutes.
Please wait until the search is finished. The information
received on the available files and versions is displayed
in the “ Software Update” menu (“New Version”, e.g . “9”
or “up to date”).
• If a “New Version” is displayed (e.g. “9”), press OK to start
the software update.
– Display shows: “Search… (-15 min.)”.
A thin yellow bar displays the progress of scan and
download. A wide yellow bar displays the status of the
updates.
Note:
– You can cancel the download at any time with OK or Z.
– An interruption during the downloading process (for exam-
ple by pulling out the mains plug) can damage the operating software of the digital receiver!
– After updating the software, the receiver switches to preset
channel 1.
Note:
In exceptional cases, the software can be updated using a
PC via “SOFTWARE/MOUSE” RS232 interface. You can find
the required software and the corresponding instructions on
the Internet under: http://www.gss.tv.
- 34 -
Page 35
- 35 -
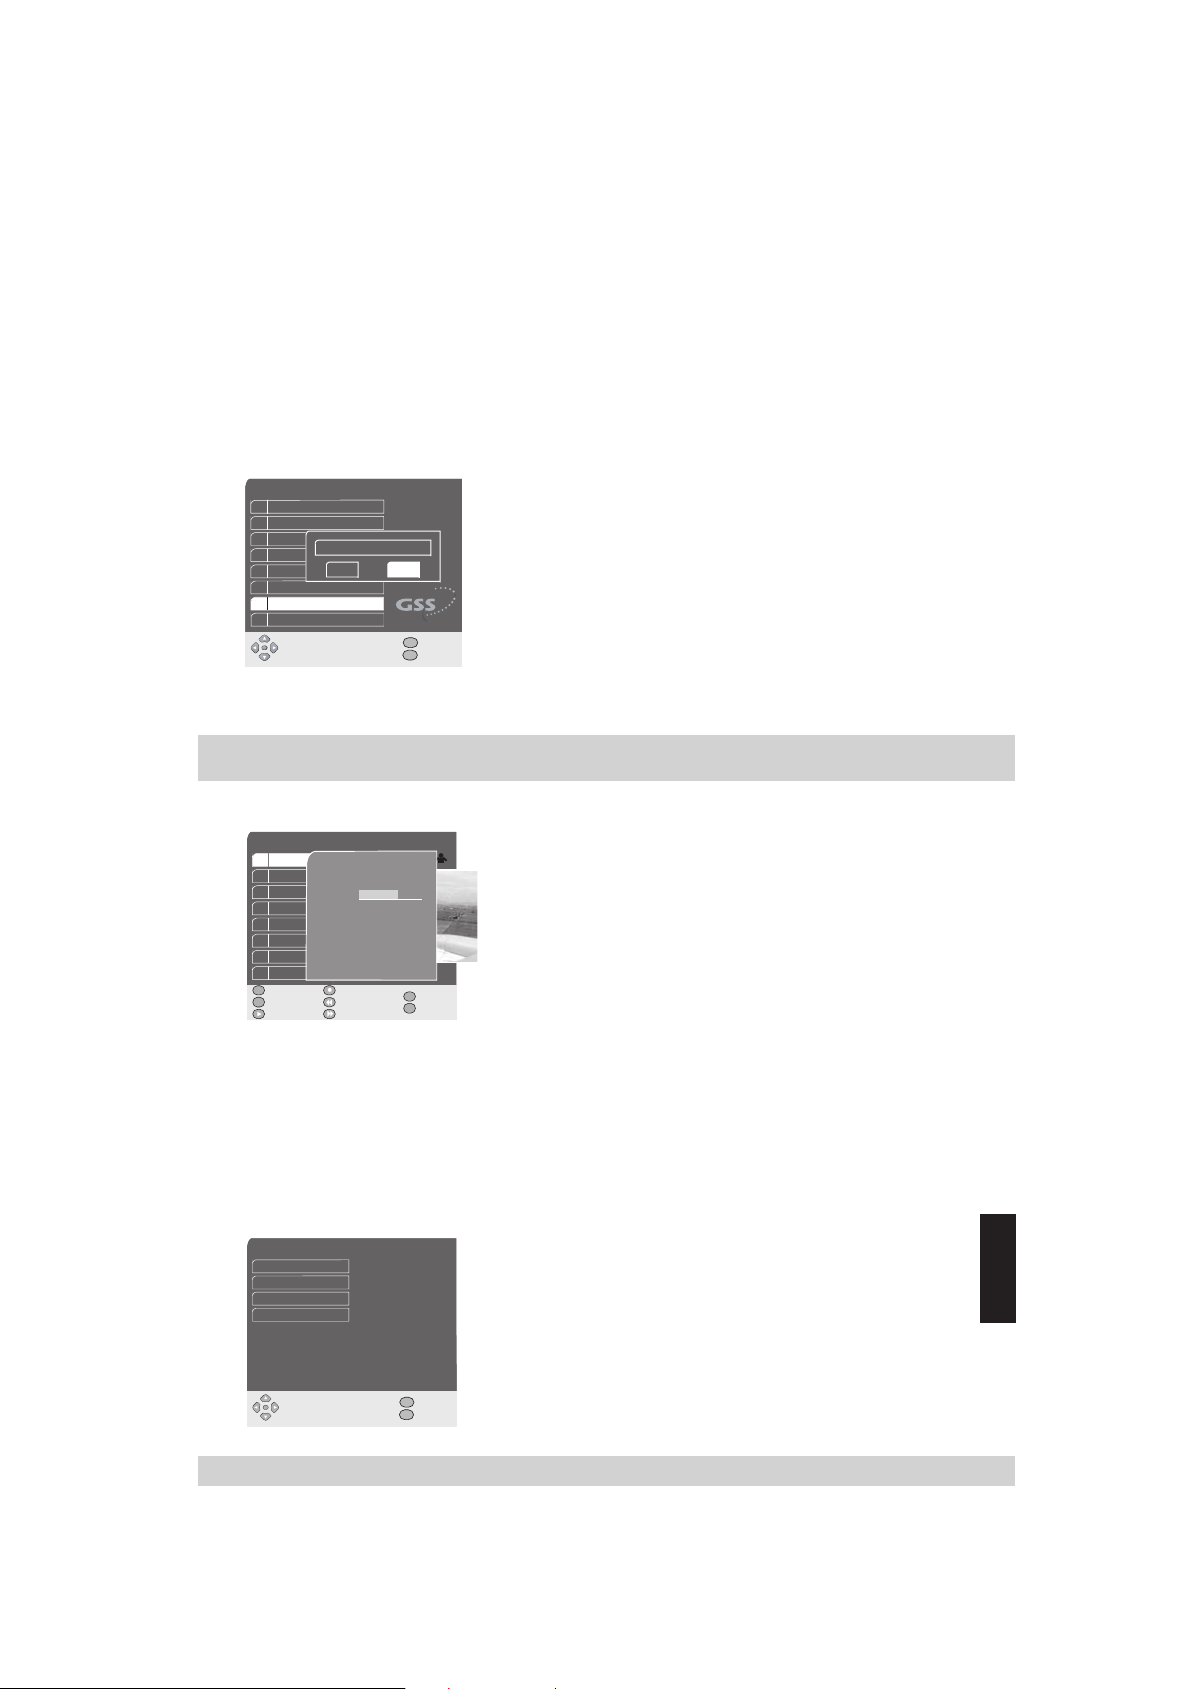
11.5 Deleting channel lists
You can completely delete channels from the channel lists
and lists of favourites.
System Setup
1 LNB System
2 TV Setup
3 Language, Time
4 Hotel Mode
5 Information
6 Password Setting
7 Clear Channel List
8 Factory settings
OK
Are you sure?
Yes No
Select
MENU
Exit
Z
Back
• Use ▼/▲ in the main menu to select “System Setup” and
press OK to confirm.
• Use ▼/▲ to activate “Clear Channel List” and press OK to
confirm.
• Use
◀/▶ to select “Yes” and press OK to confirm.
– To interrupt deleting select “No”.
• To finish the procedure: press MENU.
12 Information
12.1 Displaying information on reception of channels
• Use
Channel List TV
1 Das Erste
Input: Astra H high
Freq.: 11835 MHz
2 SAT.1
Symbolrate: 27500
3 RTL Television
Signal:
BER,CN: 5.4e-5 12.7dB
4 RTL2
5 ZDF
PRG6DCA
VID 0065 AUD 0066
6 Super RTL
TXT 0068 AC3 0000
7 VOX
PMT 0064 PCR 006
8 Pro Sieben
TVR
TV/RA... Delete
i
Info Sort
Protect List 1...
1
1 234
MENU
Exit
Z
Back
▼/▲ in the main menu to select “Channel List” and
press OK to confirm.
• Use
▼/▲ to select a channel and press OK to confirm.
• Display and hide reception information with i.
Note:
– The displayed signal level not only depends on the set-
tings of your receiver unit, but also on the channel that is
currently active.
Remember this when aligning your antenna using the sig-
nal level display.
• To exit the menu: press MENU.
12.2 Querying device information
The “Information” menu contains information …
– on the manufacturer of the product
– on the product designation
– on the software version
Information
Manufacturer
Modell
Software Version
Internet
GSS
DRS 100 CI
9
http://www.gss.tv
– on the Internet address of the manufacturer
• Use ▼/▲ in the main menu to select “System Setup” and
• Use
• To exit the menu: press MENU.
MENU
OK
Select
Exit
Z
Back
press OK to confirm.
▼/▲ to select “Information” and press OK to
activate.
- 35 -
ENGLISH
Page 36
- 36 -
12.3 Technical data
This product complies with the following EU directives:
73/23/EEC and 89/336/EEC.
It complies with the standard required for CE labelling
EN 55013: 1990 incl. A12: 1994, A13: 1996, A14: 1999,
EN 55020: 1994 incl. A11: 1996, A12, A13, A14: 1999,
EN 60065: 1998, EN 61000-3-2: 1995 incl. A14: 2000,
EN 61000-3-3: 1995.
TV channels/radio stations: 3000 TV / 1500 radio
Number of satellite levels: Max. 16
Reception range: 950 … 2150 MHz
Input symbol rate: 1 … 45 megasymbols per second
SAT-IF input: 1 F-connector
LNB power supply: 13 V / 18 V, max. 300 mA
LNB switching signal: 0 / 22 kHz, 0.5 V
Tone burst
pp
DiSEqC: DiSEqC 1.0 control
OSD: Display and programming functions in 5 languages
(German, English, Czech, Turkish, Spanish)
Search: Automatic / manual
Last station memory: Switches on with the last station selected
Teletext: Teletext decoder installed, supports the teletext of the
television set
Software download: Via satellite Astra 19.2° East
Mains adapter: 12 … 24 V DC
Power consumption: Operation: approx. 6 W without LNB and
common interface,
standby: approx. 0.5 W
Ambient temperature: +5 °C … +40 °C
Dimensions (W x H x D): 219 x 53.5 x 119 mm
12.4 Warranty
Our devices are developed, manufactured and tested according to the latest technological standards.
If a malfunction should nevertheless occur, please consult your specialist dealer or contact the point of sale where you purchased the device. Therefore always keep your sales
receipt.
Warranty claims cannot be made directly to GSS - Grundig SAT Systems GmbH!
- 36 -
Page 37
- 37 -
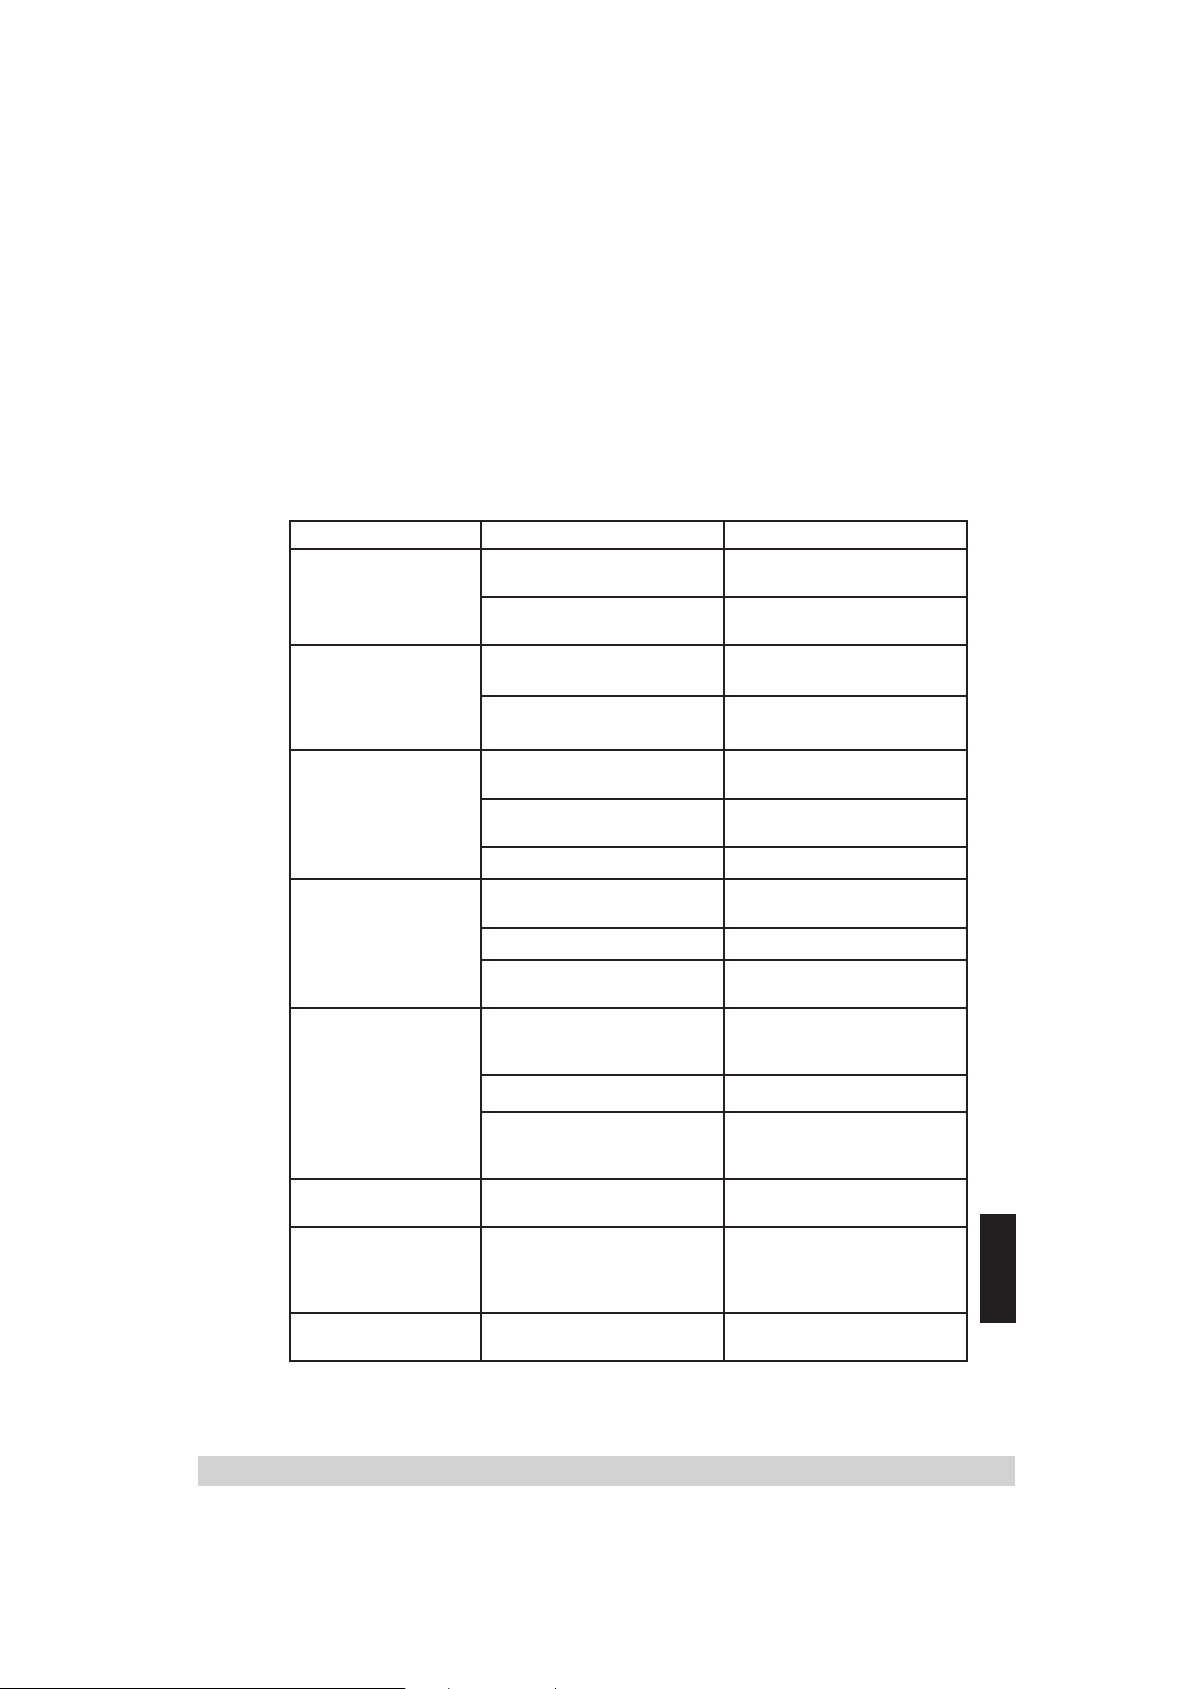
12.5 Troubleshooting
Please observe the following information first in the event of an error. If you are unable
to rectify the fault using the information given here, please contact your local dealer or
service specialist. Never under any circumstances attempt to repair the digital receiver
yourself. That would invalidate any warranty claims.
Problem Possible cause Remedy
No function,
no operation indication
No picture The Euro-AV cable is not
No sound The sound is off (muted) End muting
Mains adapter connected incorrectly
Device switched off Switch on the device with
connected correctly
Incorrect settings in the
“
TV setup” menu
Connect the mains adapter
correctly
remote control
Connect Euro-AV cable
correctly
Set the menu
Display:
“No reception”
Remote control
does not work
The time is not displayed
correctly
Interference of picture
from stations with a
frequency of approx.
12480 MHz
The device asks you to
input your PIN
The Euro-AV cable is not
connected correctly
Receiver volume is set too low Set higher volume
Satellite antenna not installed
correctly
Satellite cable damaged Replace satellite cable
Incorrect settings in the “LNB
system” menu
The batteries are inserted incorrectly
The batteries are flat Insert new batteries
The remote control is not directed at the infrared sensor of
the SAT mouse
Deviation from local time Correct the deviation (offset)
The interference may be caused
by DECT wireless telephones
near the receiver
Channel or menu are locked Input your password (PIN) or if
Subject to modifications. Technical data subject to change.
Connect Euro-AV cable
correctly
Install satellite antenna correctly
Set the menu correctly
Insert batteries correctly.
Make sure the polarity is correct.
Point the remote control at the
infrared sensor.
Incorrect SAT level selected.
Move any DECT wireless telephones away from the range
of the receiver
necessary contact your dealer
ENGLISH
- 37 -
Page 38

Subject to change. Technical data subject to change.
Alterations reserved. Technical data E. & O.E. © by GSS GmbH 13012006
 Loading...