

Page 1

CD MINI SYSTEM
CDM 700
CDM 700 page 1
Page 2
CDM 700 page 2
CLASS 1
LASER PRODUCT
©
Important notes for users in the U.K.
Mains plug
This apparatus is fitted with an approved moulded 13 Amp plug. To
change a fuse in this type of plug proceed as follows:
• Remove fuse cover and fuse.
• Fix new fuse which should be a BS1362 5 Amp, A.S.T.A. or BSI
approved type.
• Refit the fuse cover.
If the fitted plug is not suitable for your socket outlets, it should be cut
off and an appropriate plug fitted in its place.
If the mains plug contains a fuse, this should have a value of 5 Amp.
If a plug without a fuse is used, the fuse at the distribution board
should not be greater than 5 Amp.
Note:
severed plug must be disposed to avoid a possible shock
hazard should it be inserted into a 13 Amp socket elsewhere.
How to connect a plug
The wires in the mains lead are coloured with the following code:
blue = neutral (N), brown = live (L).
As these colours may not correspond with the colour markings
identifying the terminals in your plug, proceed as follows:
• Connect the blue wire to the terminal marked N or coloured black.
• Connect the brown wire to the terminal marked L or coloured red.
• Do not connect either wire to the earth terminal in the plug,
marked E (or e) or coloured green (or green and yellow).
Before replacing the plug cover, make certain that the cord grip is
clamped over the sheath of the lead – not simply over the two wires.
Copyright in the U.K.:
require consent. See Copyright Act 1956 and The Performer’s
Protection Acts 1958 to 1972.
Recording and playback of material may
NOTES
Allgemeine Hinweise für Geräte mit Laser
General instructions for laser-units
Generelle henvisninger for laserapparater
Allmänna föreskrifter för laserutrustning
Laser-laiteita koskevia huomautuksia
Vorsicht: Unsichtbare Laserstrahlung tritt
aus, wenn Deckel geöffnet und
Sicherheitsverriegelung überbrückt ist.
Nicht dem Strahl aussetzen.
Caution: Invisible laser radiation when
open and interlocks defeated. Avoid
exposure to beam.
Advarsel: Unsynlig laserstråling når
deksel åpnes. Unngå exponering for
strålen.
Advarsel: Unsynlig laserstråling ved
åbning. Undgå udsettelse for stråling.
Varning: Osynlig laserstrålning när
denna del är öppnad och spärren är
utkopplad. Betrakta ej strålen.
Varo. Avettaessa ja suojalukitus
ohitettaessa olet altiina näkymättömälle
laseräteilylle. Älä katso säteeseen.
i
Italiano
Dichiarazione di conformità ai sensi del D.M. 28.08.95, n. 548
Si dichiara che l'apparecchio illustrato nel presente libretto di istruzioni per l'uso
risponde alle prescrizioni dell'articolo 2, comma 1, del Decreto Ministeriale 28
Agosto 1995, n. 548.
Fatto a Braga il 03/08/1997
GRUNDIG AUDIO INTERNACIONAL, LDA.
Apartado 34
4701 Braga Codex – Portugal
Luokan 1
laserlaite
Klass 1 laser
apparat
Varning: Om apparaten används på
annat sätt än i denna bruksanvisning
specificerats, kan användaren utsättas
för osynlig laserstrålning, som överskrider gränsen för laserklass 1.
Varoitus. Laitteen käyttäminen muulla
kuin tässä käyttöohjeesa mainittulla
tavalla saattaa altistaa käyttäjän
turvallisuusluokan i ylittävälle näkymättömälle lasersateilylle.
Falls erforderlich
If applicable
Hvis nødvendig
Hvis det kreves
2
Page 3

Deutsch Seite
Bedienelemente und
Anschlüsse ..............................4–6
Stromversorgung ..........................6
Bedienung allgemein....................7
Tuner .........................................8
CD Spieler............................9–11
Cassettendeck .....................12–13
Technische daten .......................13
Wartung ..................................14
Allgemein.................................14
Fehlersuche...............................15
INDEX
Italiano Pagina
Controlli e
collegamenti........................40–42
Alimentazione ...........................42
Funzionamento generale .............43
Radio ......................................44
Lettore CD...........................45–47
Deck a cassette ...................48–49
Dati tecnici ...............................49
Manutenzione ...........................50
Generalità................................50
Elenco ricerca guasti ..................51
Nederlands Pagina
Bedieningstoetsen en
aansluitingen .......................76–78
Stroomvoorziening .....................78
Algemene bediening ..................79
Tuner .......................................80
CD-Speler...........................81–83
Cassettedeck.......................84–85
Technische data.........................85
Onderhoud...............................86
Algemeen.................................86
Foutzoeklijst ..............................87
CDM 700 page 3
Suomi Sivu
Säätimet ja
liitännät ..........................112–114
Käyttöjännite ...........................114
Laitteen käyttö .........................115
Viritin.....................................116
CD-Soitin ........................117–119
Kasettidekki.....................120–121
Tekniset tiedot..........................121
Hoito.....................................122
Yleistä....................................122
Tarkistusluettelo ........................123
D
GB
F
English Page
Controls and connections.......16–18
Power supply ............................18
General operation .....................19
Tuner .......................................20
CD Player...........................21–23
Cassette deck......................24–25
Technical specifications...............25
Maintenance.............................26
General ...................................26
Troubleshooting .........................27
Français Page
Contrôles et branchements .....28–30
Alimentation..............................30
Fonctionnement..........................31
Radio ......................................32
Lecteur de CD .....................33–35
Platine cassette ....................36–37
Données techniques....................37
Entretien ...................................38
Généralités...............................38
Dépistage des pannes ................39
Português Página
Controlos e ligações.............52–54
Alimentação .............................54
Funcionamento geral ..................55
Rádio ......................................56
Leitor de CD........................57–59
Deck de cassetes .................60–61
Dados técnicos..........................61
Manutenção .............................62
Geral ......................................62
Resolução de problemas .............63
Español Página
Controles y conexiones .........64–66
Alimentación.............................66
Funcionamiento general ..............67
Radio ......................................68
Lector de CD.......................69–71
Deck a casete .....................72–73
Datos técnicos...........................73
Mantenimiento ..........................74
Generalidades ..........................74
Localizacíon de averías ..............75
Dansk Side
Kontroller og tilslutninger........88–90
Forsyning..................................90
Betjening generelt ......................91
Radio ......................................92
CD-afspiller .........................93–95
Kassette-deck.......................96–97
Tekniske data ............................97
Vedligeholdelse .........................98
Generelt...................................98
Fejlfinding.................................99
Svenska Sida
Kontroller och anslutningar
Strömförjning...........................102
Handhavande allmänt ..............103
Radio ....................................104
CD-Spelaren....................105–107
Kassettspelaren ................108–109
Tekniska data ..........................109
Underhåll ...............................110
Allmänt ..................................110
Felsökning ..............................111
..100–102
I
P
E
NL
DK
S
FIN
3
Page 4
GB
RECO
RD
PLAY
REW F.FWD
STOP/EJECT
P
A
U
S
E
O
P
E
N
CDM 700
PLL SYNTHESIZER TUNER
VOLUME
CD
TUNER
TAPE
REC
MUTE
SOFT EJECT SYSTEM
LTRA ASS YSTEM
UBS
UTO STOP
A
UBS
PUSH
T
A
P
E
B
A
N
D
T
U
N
E
R
C
D
UB
S
O
N
/O
F
F
P
L
A
Y
/
P
A
U
S
E
S
T
O
P
R
E
P
E
A
T
/
S
C
A
N
P
R
O
G
R
A
M
/
T
I
M
E
2
;
9
U
P
D
O
W
N
§
3
§
3
P
O
R
T
A
B
L
E
M
I
C
R
O
S
Y
S
T
E
M
C
D
M
7
0
0
Source
BAND
ON/OFF
Stand by 6
UBS
OPEN
UP/§ / ∞/DOWN
PLAY/PAUSE 2;
STOP 9
REPEAT/SCAN
PROGRAM/TIME
MUTE 6
VOLUME
Indicators 6
p
Cassette Control
CDM 700 page 16
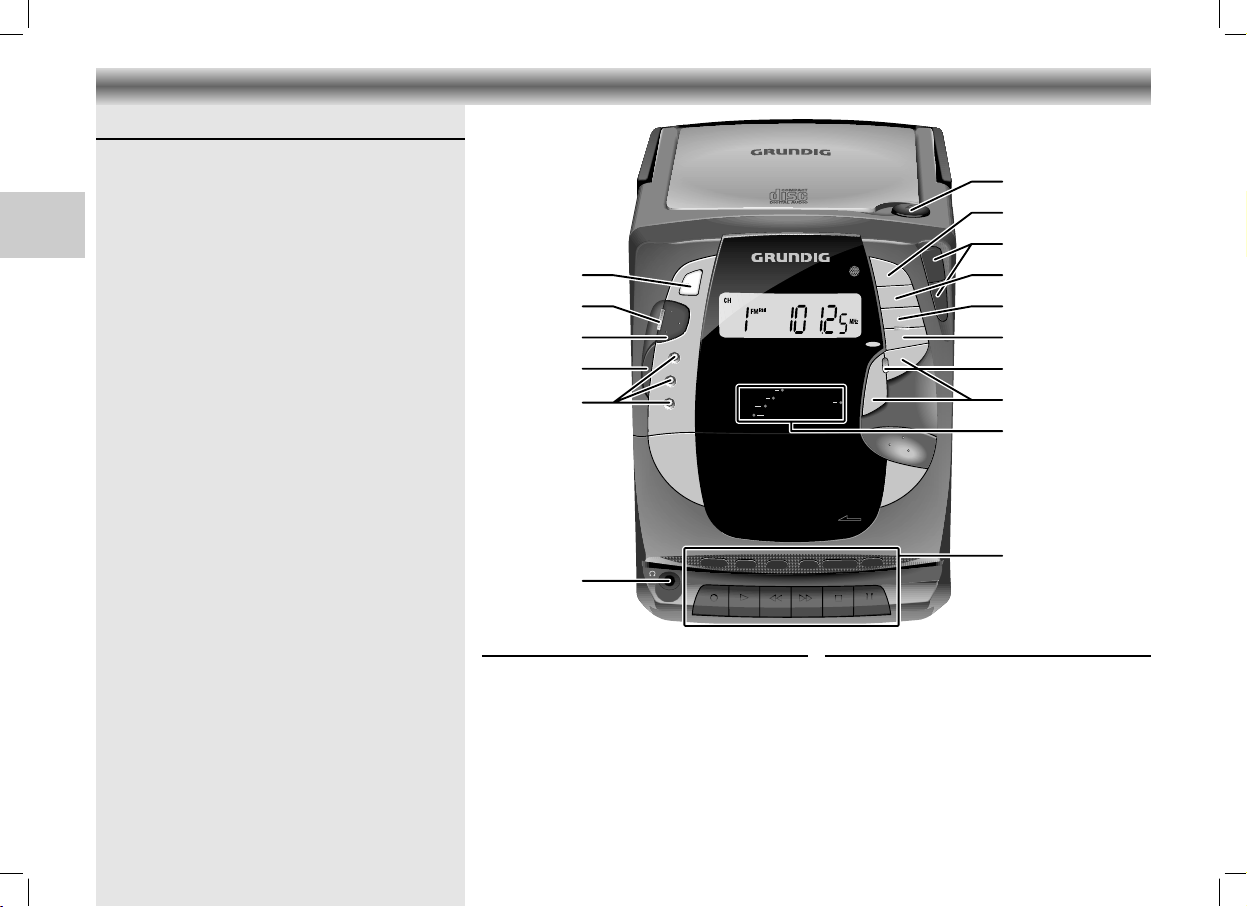
CONTROLS AND CONNECTIONS
Top and front panel
p
Source: – CD: to switch to CD mode
– TUNER: to switch to TUNER mode
– TAPE: to switch to TAPE mode
BAND – to select between FM and
ON/OFF – to switch the unit on and to
Stand by
UBS –(U
OPEN – to open the CD door
PLAY/PAUSE 2; – to start and interrupt CD playback
UP/§ / – to skip and search
∞/DOWN backward/forward (CD)
STOP 9 – to stop CD playback
REPEAT/SCAN – to repeat one/all tracks (CD)
PROGRAM/TIME
VOLUME 4/3 –to adjust the volume.
16
– connection for headphones
AM (MW) waveband
stand by mode
6 – lights up when the unit is in stand
by mode
LTRA BASS SYSTEM) to boost the
bass response
– to tune to a radio station (Tuner)
– to set the clock time
– to select the memory positions
(Tuner)
– to programme track numbers in the
memory (CD)
– to store the radio stations (Tuner)
– activates the clock setting mode
Indicators 6:
MUTE 6: lights up when the MUTE function is
activated
CD 6: lights up when CD is activated
TUNER 6: lights up when TUNER is activated
TAPE 6: lights up when TAPE is activated
REC 6: lights up when recording
UBS 6: lights up when U
activated
LTRA BASS SYSTEM is
Cassette Control
0 RECORD – to start recording
B PLAY – to start cassette playback
Q REW – fast rewind
R F.FWD – fast forward
9// STOP/EJECT
– to stop and eject the cassette
; PAUSE – to interrupt playback/
recording
Page 5
ON/OFF
R
A
N
D
O
M
IN
T
R
O
R
E
P
E
AT
/S
C
A
N
D
I
S
P
L
A
Y
SKIP
TUNING
VOLUME
MUTE
12
3
4
5
6
7
8
9
BAND
TIME
PROGRAM
PLAY
/PAUSE
+10
0
TUNERTAPE
CD
STOP
CDM 700
R
EM
O
T
E
C
O
N
T
ROL
BEAT CUT / FM MONO/STEREO: For eliminating
MHz
kHz
CH MEMORY INTRO RANDOMREPEATTRACK
AM
FM
STEREO
BEAT CUT
AB
--L-++-R--
MONO
AC INPUT SPEAKERS
possible whistle tones during AM recordings and
reduce noise caused by weak FM stereo stations.
AC INPUT: Socket for mains lead.
SPEAKERS + R - / - L +: Loudspeaker terminals.
The display indicates:
CH: indicates the radio memory channel
TRACK: indicates the CD track
MEMORY: programming or programme playback
INTRO: during the INTRO function
REPEAT: repeat all
REPEAT:
(flashing)
RANDOM: during the RANDOM function
88: track number (CD) or memory channel
FM/AM: indicates the selected waveband
88:8.85: playing time (CD), station frequency (Tuner)
MHz/kHz:
CONTROLS AND CONNECTIONS
Back panel
Display
(CD) or storing stations (Tuner)
repeat one
ST
(Tuner)
: lights up when receiving FM stereo stations
and clock time
for FM reception the frequencies are indica-
ted in MHz and for AM reception in kHz
Note:
When using battery supply, the
ON/OFF button can only be used to
switch the unit to stand by.
To switch the unit on when using
battery supply, use the ON/OFF button
on the set (see 'Switching on and off').
CDM 700 page 17
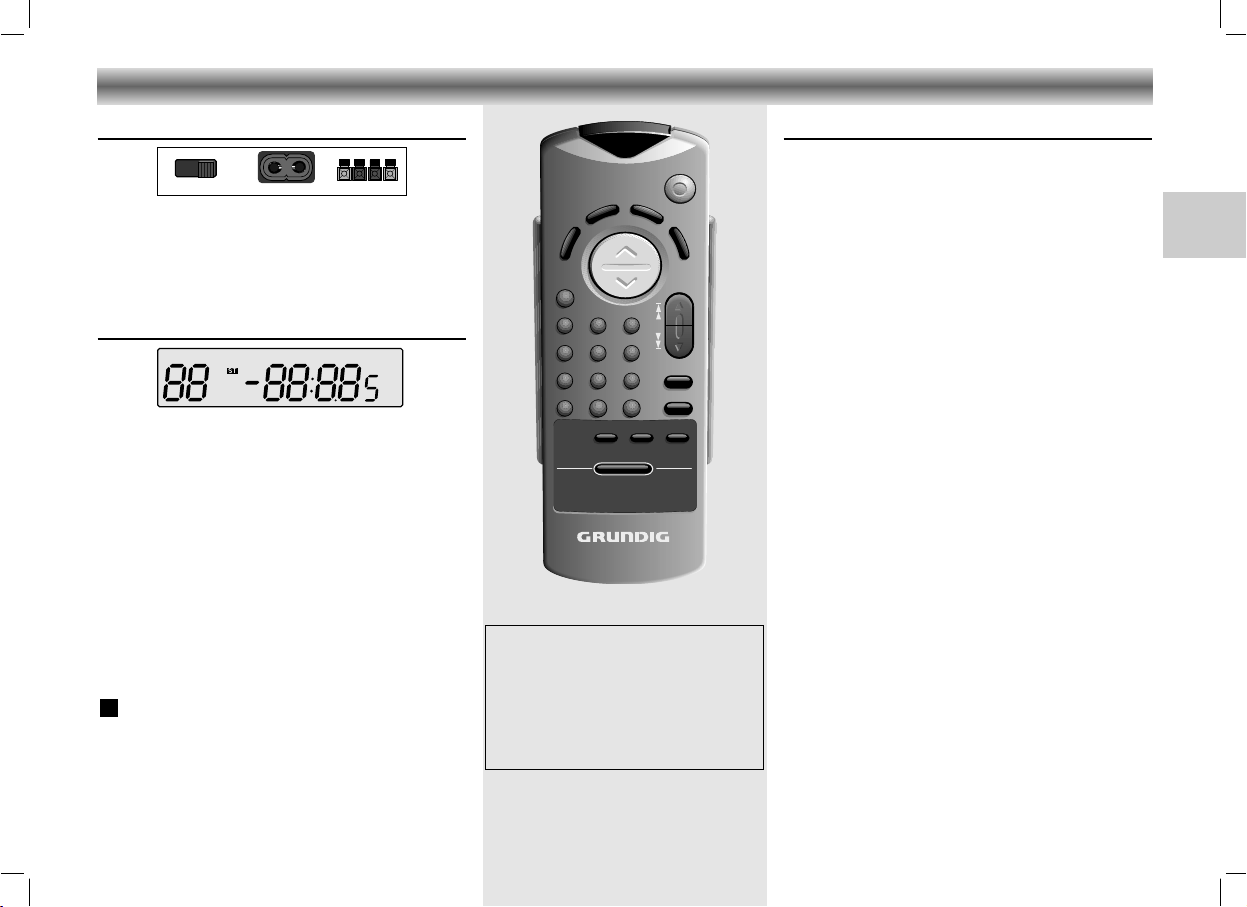
Remote control
The buttons on the remote control have the same
functions as the corresponding ones on the unit.
Extra buttons:
DISPLAY –to display the clock and change the
display mode
RANDOM –to play the titles of a CD in random
order
INTRO – to play only the first 10 seconds of
each title
MUTE –for muting the speakers
1-0 – to select CD tracks and radio channels
directly
+10 – to select numbers above nine, press this
button and then one of the 1-0 buttons
to make the number you want (e.g., to
select 12, press +10 and then 2).
Changing batteries
If the range of your infrared remote control seems to
decrease, or if certain functions can no longer be
carried out, you should replace the batteries.
Two mignon 1.5 Volt LR03, size AAA batteries are
required.
To change the batteries, open the compartment on the
back of the remote control. Ensure that the batteries are
inserted properly (note the markings in the
compartment).
GB
17
Page 6

RL
R
10 mm
L
AC INPUT
CDM 700 page 18
CONNECTIONS POWER SUPPLY
Loudspeaker terminals
For connecting the supplied loudspeakers (or others
having an impedance of 8 Ohms).
Always switch off the unit before you remove or
connect the speaker cables.
GB
• Connect the coloured (or marked) wire to the red
terminal as shown.
Speakers
• To take off and attach the loudspeakers, please see
diagrams below as indicated.
Note on Environmental
Protection
Do not throw exhausted batteries in the
household refuse.
Hand over the old batteries to your
dealer or public collecting points when
buying new ones.
Important note for users in the U.K.
When fitting a mains plug,
follow the
instructions on page 2.
Battery Supply
• Open the battery compartment (on the bottom of the
set) and insert as shown 8 batteries, type R14,
UM2 or C-cells.
• Remove the batteries if exhausted or if they will not
be used again for a long period.
– The battery supply is switched off when the set is
connected to the mains.
• To change over to battery supply, pull out the plug
from the AC INPUT socket.
Back-up batteries for preset memory
In order to keep the presets stored in the memory
during the time that the unit is switched off, it is
necessary to insert two additional batteries.
• Place these batteries size LR06, AA, alkaline type in
the battery compartment.
• These batteries should always be inserted,
regardless of the power supply (mains voltage or
batteries).
Mains supply
• Check if the mains voltage as shown on the type
plate (at the rear of the set) corresponds to your
local mains voltage. If it does not, consult your
dealer or service organisation.
Stereo headphone socket p
• You may connect stereo headphones having a
3.5 mm plug to the jack p.
– Inserting the plug will disconnect the speakers.
18
• Connect the mains lead to the AC INPUT socket and
the wall socket.
– The mains supply is switched on.
• When you insert the power supply cable plug into
the mains socket, the unit automatically switches to
stand by.
– The Stand by indicator
6 lights up.
• To disconnect the set from the mains completely,
withdraw the mains plug from the wall socket.
Page 7

GENERAL OPERATION
Switching on and off
• Press the ON/OFF button to switch the unit on.
– The Stand by indicator 6 goes out.
• To switch the unit to stand by press the ON/OFF
button again.
– Even if you switch your unit off, it remains connected
to the mains power supply.
The Stand by indicator
unit is connected to the mains power supply.
– If you want to completely disconnect the unit from
the power supply, remove the plug from the mains
socket.
Notes:
• When using mains supply, you can also use the
ON/OFF button on the remote control to switch the
unit on and off.
• When using battery supply, you can only switch the
unit on via the ON/OFF button on the set.
This is done to save battery life.
However, you can switch the unit to stand by via the
remote control.
• When using battery supply, the Stand by indicator
6 is always off and the display is not illuminated.
6 is always on when the
CDM 700 page 19
Setting the clock
The clock can be set while the unit is in any mode of
operation. If you are in TUNER or CD mode and the
time is not being displayed, press DISPLAY on the
remote control until the time is shown.
• Press PROGRAM/TIME on the unit or on the remote
control.
– The hour starts flashing.
• Set the hour with UP/§ / ∞/DOWN.
• Press PROGRAM/TIME once more.
– The minutes start flashing.
• Set the minutes with UP/§ / ∞/DOWN.
• Press PROGRAM/TIME again to store the setting.
GB
Source selection
• Select the desired source by pressing the respective
button (CD, TUNER or TAPE) on the unit or on the
remote control.
– The indicator of the selected source (CD 6,
TUNER 6 or TAPE 6) lights up.
19
Page 8

MHzFMMHz
FM
kHz
CH
AM
MHz
CH
FM
MHz
CH MEMORY
FM
CDM 700 page 20
Selecting ‘TUNER’
• Press the ON/OFF button to switch the unit on.
• Press the TUNER button on the unit or on the remote
control.
– The TUNER indicator
6 lights up.
GB
Radio aerials
–
For FM, pull out the telescopic aerial. To improve FMreception, incline and turn the aerial. Reduce its length
if the FM-signal is too strong (very close to a transmitter).
– For AM, the set is provided with a built-in aerial, so
the telescopic aerial is not needed. Direct the aerial
by turning the whole set.
Radio reception
•
Adjust the sound with the VOLUME and UBS controls.
• Select the waveband using the BAND button on the
unit or on the remote control.
• Start the automatic station search by holding the
UP/§ or ∞/DOWN button (on the unit or on the
remote control) down for one or two seconds, and
then releasing it.
– The tuner automatically searches for the first station
with sufficient signal strength.
• Repeat this step to search for other stations.
• To tune to a weak station, briefly press the UP/§ or
∞/DOWN buttons several times until the correct fre-
quency is displayed, or until reception is best.
– When 'ST' appears on the display, you are
receiving an FM stereo transmitter.
• A disturbing noise, due to a weak FM stereo signal,
can be suppressed by setting FM MONO/STEREO
to FM MONO.
– The 'ST' indication goes out and you will hear the
FM station in mono.
TUNER
Storing stations
You can store a maximum of 40 stations
(20 x FM and 20 x AM).
• Select the waveband using the BAND button.
•
Select the desired station with the UP/§/∞/DOWN
buttons on the unit or on the remote control.
• Press the PROGRAM/TIME button on the unit or on
the remote control.
– 'MEMORY' starts flashing on the display.
• While 'MEMORY' is flashing, select the channel you
wish to assign to this station by repeatedly pressing
the REPEAT/SCAN button or directly with the 1-0 /
+10 buttons on the remote control.
• Press PROGRAM/TIME to store this station.
– 'MEMORY' disappears from the display. The display
now indicates the station's assigned channel, its
frequency and waveband.
• If you assign a station to a channel that had been
previously assigned to a different station, the old
station is deleted and replaced by the new one.
Calling up a stored station
• Select the waveband using the BAND button.
• Select the desired memory channel by repeatedly
pressing the REPEAT/SCAN button or directly with
the 1-0 / +10 buttons on the remote control.
– The display indicates the selected channel, the
station frequency and waveband.
Last station memory
LAST STATION MEMORY means that the unit 'remembers'
the last station that was tuned to.
This function ensures that the station which was selec-
ted before the tuner was switched off is automatically
selected again when your tuner is switched back on.
20
Page 9

CD handling
• Use only CDs which have the symbol ʀ.
• To take the CD out of its box easily, press the centre
spindle while lifting the CD.
• Never write on a CD or attach any sticker to the
CD.
• Always hold the CD at the edge and always store it
in its box after use with the label facing up.
• To remove dust and dirt, breathe on the CD and
wipe it with a soft, lint-free cloth in a straight line
from the center towards the edge. Cleaning agents
may damage the CD.
• Do not expose the CD to rain, moisture, sand, or to
excessive heat. (E.g. from heating equipment or in
motor cars parked in the sun).
Warning
CLASS 1 LASER PRODUCT means that the laser´s construction makes it inherently safe so that the legally
prescribed maximum permissible ratiation values can
never be exceeded.
CAUTION: Using any equipment or devices other than
those described and specified in these operating
instructions, or tampering with the unit in any way, can
result in dangerous exposure to radiation.
Selecting ‘CD’
• Press the ON/OFF button to switch the unit on.
•
Press the CD button on the unit or on the remote control.
– The CD 6 indicator lights up.
– When you select CD when no disc is inserted or
when the disc is not inserted correctly, the display
will first show ‘TRACK 00 00:00‘ and afterwards
the indication no d1SC.
CD PLAYER
2
,
g
n
i
y
ia
r
p
t
s
o
u
c
A
d
1
.
e
A
in
Y
s
,
i
A
2
r
e
Y
.
,
H
o
I
E
d
R
E
3
a
th
.
W
S
E
A
u
M
Y
A
4
R
a
.
.
E
T
n
H
d
IN
5
K
e
U
.
t
A
N
i
.
B
O
O
T
H
U
d
ib
I
T
N
Y
e
'
h
N
O
v
E
U
o
W
r
N
r
O
e
W
p
s
e
g
1
r
n
i
k
r
d
r
o
o
w
c
e
d
r
e
s
d
i
r
h
t
o
f
c
o
e
r
l
a
e
t
h
n
t
e
f
r
o
r
r
o
e
g
n
n
E
w
i
P
C
o
ir
4
6
h
B
5
IE
e
1
M/
4
,
5
STEM
h
2
t
g
S
R
A
f
T
n
E
i
R
o
t
E
O
s
d
a
n
c
C
O
M
d
a
P
A
r
C
a
T
e
o
r
c
u
b
,
d
D
I
G
e
I
o
T
A
r
L
c
A
U
p
D
n
I
O
a
e
h
m
t
r
f
o
f
o
r
6
.
s
e
O
t
Y
E
p
h
7
M
.
I
D
g
C
c
O
i
i
A
N
l
r
N
'
8
T
T
.
G
l
O
b
W
l
E
(
A
H
u
T
N
e
9
A
O
N
a
.
p
r
N
A
Y
M
L
O
Y
y
O
O
U
R
S
U
1
V
0
E
R
o
L
.
ic
O
Y
C
F
O
e
E
V
U
)
E
E
U
T
1
T
I
S
1
S
.
B
O
B
O
Y
E
T
E
D
1
H
2
M
W
F
.
O
I
S
A
C
R
I
Y
A
V
M
S
N
O
E
T
Y
O
A
(
S
P
p
E
a
R
n
D
is
E
h
R
V
T
E
e
r
s
i
o
n
)
TRACK
CLASS 1
LASER PRODUCT
TRACK
TRACK
TRACK
TRACK
CDM 700 page 21
Inserting a CD
• Press OPEN to open the CD door.
I
O
I
O
I
O
I
O
I
O
I
I
O
I
O
I
O
O
I
I
O
O
I
I
O
O
I
I
O
O
I
I
I
O
I
O
O
I
I
O
O
I
O
O
I
O
I
O
O
O
O
O
I
I
I
O
O
O
I
I
O
O
O
I
I
O
O
I
O
I
O
O
I
O
I
O
• Insert the CD, printed side facing up. In addition to
I
standard 12 cm CD´s, you can also play 8 cm CD
singles without an adaptor.
• Close the cover.
GB
– The CD player scans the contents list of the CD.
After that, the total number of tracks and the total
playing time appear on the display.
Playing a CD
• Press PLAY/PAUSE 2; to start playback.
– The display shows the current track number and its
elapsed playing time.
•
Adjust the sound with the VOLUME and UBS controls.
• For brief interruptions, press PLAY/PAUSE 2;.
– The playing time indication starts flashing.
• To resume playback, press PLAY/PAUSE 2; again.
• To stop playback, press STOP 9.
– The total playing time and number of tracks will then
appear on the display.
– The CD player also goes to position STOP:
– by pressing OPEN;
– when the end of the CD is reached;
– if the batteries run down or if the power supply is
interrupted.
• To take out the CD, open the CD door by pressing
OPEN.
• Open the CD door only if the CD player is in
position STOP.
21
Page 10

REPEATTRACK
REPEATTRACK
INTROTRACK
CDM 700 page 22
SKIP UP § / ∞ DOWN
Selecting another track during play
• Press UP/§ or ∞/DOWN on the unit or on the
remote control.until the required track number
appears in the display.
– The selected track begins to play.
GB
• You can also select the desired track number directly
with the 1-0 / +10 buttons on the remote control.
Starting with a particular track
• Press UP/§ or ∞/DOWN until the required track
number appears in the display.
• Press PLAY/PAUSE 2;.
– Play starts from the selected track.
• You can also select the desired track number directly
with the 1-0 / +10 buttons on the remote control.
Searching for a passage during playback
• Hold down the UP/§ or ∞/DOWN button during
playback to find a particular passage in forward or
backward direction.
– CD play continues at a low volume.
• Release the button when you have reached the
desired passage.
Display modes
• During playback, press DISPLAY on the remote
control and the display shows you the CD´s
remaining playing time.
• Press this button again to display the actual clock
time.
• If you press this button once more, the display goes
back to showing the current track number and its
elapsed playing time.
CD PLAYER
Intro
• In STOP mode, press the INTRO button on the
remote control.
– 'INTRO' lights up on the display.
– Only the first 10 seconds of each title are played;
after the last title, the CD player stops.
• The function is deactivated by pressing STOP 9 (in
which case the CD stops) or INTRO; in this case the
remaining tracks are played back in the normal way.
• The intro function is not possible during playback of
a programme.
Repeat
Repeating the CD
• By pressing REPEAT/SCAN once, all tracks are
repeated.
– 'REPEAT' lights up; the CD will now be repeated
continuously.
Repeating a track
• By pressing REPEAT/SCAN twice, one track is
repeated.
– 'REPEAT' starts flashing; the track will now be
repeated continuously.
• To switch the repeat mode off, press REPEAT/SCAN
one more time, or press STOP 9.
• During playback of a programme, it is only possible
to repeat the whole programme, and not individual
programmed tracks.
22
Page 11

MEMORYTRACK
MEMORYTRACK
TRACK
MEMORYTRACK
RANDOMTRACK
Random
• Press the RANDOM button on the remote control.
– 'RANDOM' lights up on the display.
• Press PLAY/PAUSE 2;.
– The tracks are played in random order until all of
them have been played once.
• By pressing RANDOM during playback, random
play starts from the end of the playing track.
• The function is deactivated by pressing STOP 9 (in
which case the CD stops) or RANDOM; in this case
the remaining tracks are played in their normal order.
• The random function is not possible during playback
of a programme.
Storing a programme
By programming the player you can play up to 20
tracks in any desired order. If you exceed the
maximum of 20 tracks, the programme function will
start again from the beginning. You may store each
track more than once.
• In STOP mode, press PROGRAM/TIME on the unit
or on the remote control.
The display shows 00 P-01 and 'MEMORY' and
'TRACK' start flashing.
• While 'MEMORY' is flashing, select the first desired
track using UP/§ or ∞/DOWN (or 1-0 / +10 on
the remote control).
• Store this track by pressing PROGRAM/TIME again.
• Select and store in this way up to 20 desired titles.
Checking the programme
•
In STOP mode, press PROGRAM/TIME repeatedly.
–
The display shows in sequence all programmed track
numbers and 'MEMORY' and 'TRACK' start flashing.
CD PLAYER
CDM 700 page 23
Changing the programme
Replacing previously programmed tracks
• Press PROGRAM/TIME repeatedly until the display
shows the track you wish to replace.
• Select the track you want to enter in its place.
• Store this track by pressing PROGRAM/TIME.
Adding tracks to the programme
• Press PROGRAM/TIME repeatedly until the display
shows the first empty memory location.
• You can now add tracks to the sequence as
described above.
Playing a programme
• Press PROGRAM/TIME once to show the first track
of the programme.
• Press PLAY/PAUSE 2;.
– Play starts with the first track of the programme.
– After the last track playback stops.
– The CD's total playing time and number of tracks
appear on the display.
Note:
• Press STOP 9 to stop playback.
While playing a programme, it is possible to use UP/§
•
or ∞/DOWN to select the desired programmed
tracks. It is not possible to use the 1-0 / +10 buttons.
Erasing a programme
• To clear the programme, press the PROGRAM/TIME
button and afterwards STOP 9.
– You can only erase the programme when the player
is stopped.
• The programme is also erased:
– by opening the CD door using OPEN;
– if the batteries are exhausted or if the power supply
is interrupted in another way.
GB
23
Page 12

1
1
CDM 700 page 24
Compact cassettes
• For recording, use a NORMAL (IEC type I)
which the tabs are not broken out.
–
This deck is not suited for recording on CHROME (IEC II)
or METAL (IEC IV) cassettes.
GB
• For playback, any cassette type may be inserted.
• At the very beginning and end of the tape, no
recording will take place during the few seconds
when the leader tape passes the recorder heads.
• To prevent the accidental erasure of a recording,
keep the cassette side to be safeguarded in front of
you and break out the left tab.
Now, recording on this side is no longer possible.
• To render this safeguard ineffective, cover the hole
with a piece of adhesive tape.
• Before use, check and tighten slack tape with a
pencil to avoid jamming the deck mechanism or
snapping the tape.
• The tape of a C-120 cassette is extremely thin and
can be easily damaged. C-120
recommended for this unit.
• Do not expose the cassettes to rain, moisture, sand,
or to excessive heat. (E.g. from heating equipment
or in motor cars parked in the sun).
• Do not store cassettes near strong magnetic fields
(for example, TV sets, speakers, engines, etc.).
cassettes are not
cassette on
CASSETTE DECK
Copyright:
Recording is permissible insofar as
copyright or other rights of third parties
are not infringed.
Selecting ‘TAPE’
• Press the ON/OFF button to switch the unit on.
Press the
TAPE
•
– The TAPE 6 indicator lights up.
button on the unit or on the remote control.
Cassette playback
• Press 9// STOP/EJECT to open the cassette holder.
•
Insert a recorded
•
Adjust the sound using the VOLUME and UBS controls.
• Press B PLAY and playback will start.
• For brief interruptions, press
• To restart playback, press this button once more.
– When the end of the tape is reached the B PLAY
button is released.
• To stop, press 9// STOP/EJECT.
On pressing again, the cassette holder will open.
Winding the tape
• Press R F.FWD to search forward to the end of
the tape.
• Press Q REW to search backward to the
beginning of the tape.
cassette.
; PAUSE.
24
Page 13

CASSETTE DECK TECHNICAL DATA
Cassette recording
• Press 9// STOP/EJECT to open the cassette
holder.
• Insert the cassette.
• When monitoring during
recording, adjust the
sound using the controls
VOLUME and UBS.
These controls do not
affect the recording.
Starting and stopping the recording
• Start recording by pressing
PLAY button
– The REC 6 indicator lights up.
• When the end of the tape is reached, the
recorder buttons are released.
• To interrupt recording, press
• To continue recording, press
• Press 9// STOP/EJECT if you want to stop
recording before the end of the tape.
– The REC 6 indicator goes out.
• On pressing 9// STOP/EJECT again, the
cassette holder will open.
is automatically also pressed).
0 RECORD (the B
; PAUSE.
; PAUSE again.
Recording from the CD player
(CD synchro recording)
• Press the CD button on the unit or on the
remote control.
• It’s not necessary to start the CD player
separately: by pressing
player starts automatically.
–
If the CD player is in STOP position, recording
will start from the beginning of the CD (or from
the beginning of the programmed selection).
• To start a recording in the middle of a track,
play the CD in the normal way.
• As soon as the desired passage is reached,
pause the CD and then start recording by
pressing
0 RECORD
Recording from the radio
• Press the TUNER button on the unit or on the
remote control.
• Select the desired waveband and station (see
‘TUNER’).
• In case of FM radio recordings, set the
FM MONO/STEREO switch to the desired
position.
• If during the recording of an AM station, a
whistling sound is heard, this sound can be
suppressed by setting the BEAT CUT switch to
another position.
0 RECORD
.
the CD
CDM 700 page 25
Power Supply
Mains operation.......................230 Volt, 50/60 Hz
Battery operation ....................8 x 1.5 V (R14, UM2)
Back-up batteries for radio presets........2 x 1.5 V (AA)
Output power DIN 45324, 10% THD
Music power:...................................2 x 3500 mW
Nominal power................................2 x 2000 mW
Socket for stereo headphones: ...................3.5 mm ø
Radio section
Wavebands: ..........................FM 87.5 – 108 MHz
............................................AM 531 – 1602 kHz
Aerials:................................Telescopic aerial for FM
................................Built in ferrite rod aerial for AM
Cassette section
Cassette:.................Compact cassette to DIN 45516
Track system: .......................International quartertrack
Tape speed:......................................4.76 cm/sec.
Motor:....................................................DC motor
Frequency range: ...........................120 Hz – 8 kHz
S/N ratio, weighted .....................................42 dB
Wow and flutter:........................................... 0.3%
Automatic functions: ...Automatic recording level control
........................Automatic button release at tape end
CD section
Frequency range: ...........................61 Hz – 15 kHz
S/N ratio, weighted .....................................60 dB
Accessories
........................................................Mains Cable
...........................................................Ident Card
.................................................Instructions for Use
......................................................Remote control
Subject to technical alterations and alterations in
styling E. and O.E.
GB
25
Page 14

A A B C
X
CDM 700 page 26
MAINTENANCE GENERAL
General
• The mechanical parts of the CD player and the
cassette deck contain self-lubricating bearings and
must not be oiled or lubricated.
• A chamois leather slightly moistened with water is
sufficient for cleaning the housing.
GB
• Do not use cleaning agents as these may harm the
housing.
• Do not leave the set, batteries, CDs or cassettes for
any length of time in direct sunlight or other places
where high temperatures can occur, such as in the
vicinity of heating apparatus.
• Do not expose the set, batteries, CDs or cassettes to
humidity (e.g. dripping or splashing) or rain.
CD player maintenance
• The lens X must not be cleaned.
• The lens may cloud over if the CD player is moved
from cold to warm surroundings. The CD player will
not start. Do not clean the lens, but give the player
some time to acclimatise.
Cassette deck maintenance
To ensure a good recording and playback quality,
clean the indicated parts ABC after every 50 hours
of operation or, on average, once a month.
• Open the cassette holder using 9// STOP/EJECT.
• Use a cotton bud slightly moistened with alcohol or
a special head cleaning fluid.
•
Press B PLAY and clean the rubber pressure rollers C.
• Then press ; PAUSE and clean the capstans B and
the heads A.
• After cleaning, press 9// STOP/EJECT.
• Cleaning of the heads A can also be done by
playing a cleaning cassette through once.
26
This unit meets the CEE regulations concerning
interference radiation.
This product fulfills European directives 89/336/EEC,
73/23/EEC and 93/68/EEC.
This unit complies with the safety regulations
according to VDE 0860 / BS 415 and thus with the
international safety regulation according to IEC 65.
The type plate is located at the rear of the set
Page 15

CDM 700 page 27
TROUBLESHOOTING
If a fault occurs, first check the points listed below before taking the set for repair.
If you are unable to remedy a problem by following these hints, consult your dealer or service centre.
Before going through the check list below, first check the following points: • The power cord must be connected firmly.
WARNING:
Under no circumstances should you try to repair the set yourself, as this would invalidate the guarantee.
Problem Possible cause Remedy
General
No or poor sound. VOLUME not adjusted Adjust the VOLUME
Remote control has no The distance to the system is too large Reduce the distance
effect on the set Batteries are incorrectly inserted Insert the batteries correctly
Set not working Electrostatic discharge Switch off the set, disconnect the mains plug,
Radio
Poor radio reception Weak radio aerial signal Aim the aerial for best reception:
Cassette
Poor cassette sound quality Dust and dirt on the heads, capstan or pressure roller Clean the heads etc.. See Maintenance
Recording does not work Cassette tab(s) may be broken out
CD
The CD skips tracks CD is damaged or dirty Replace or clean the CD
Headphones are connected Disconnect headphones
Speakers are not connected or are connected wrongly Check that the speakers are connected properly.
Batteries are exhausted Insert fresh batteries
Batteries are incorrectly inserted Insert the batteries correctly
Mains lead is not securely connected Connect the mains lead properly
Batteries are exhausted Insert fresh batteries
Wrong sound source selected
Interference caused by the vicinity of electrical Keep the radio away from electrical equipment
equipment like TVs, video recorders, computers,
thermostats, fluorescent lamps (TL), engines etc.
PROGRAM or RANDOM is active Switch off PROGRAM or RANDOM play
• The speaker connection must also be firm.
Make sure that the stripped speaker wire is clamped
Select the sound source before pressing the function button
reconnect after a few seconds
FM: incline and rotate telescopic aerial
AM: rotate the entire set
Apply a piece of adhesive tape over the missing tab space
GB
27
 Loading...