

Page 1

Instruction for use of GRUNDIG 5415/551315515
Note:
Open these instructions completely and read them carefully before
using your new shaver.
Contents
1. Components
2. Safety instructions
3. Operation
4. Use; Foil shave/Long hair trimming
5. Cleaning and care
6. Changing foil and cutter block
7. Replacement parts
8. Warranty
9. Environmental protection, disposal
1) Components
Compare the drawings with the components of your shaver to make
yourself familiar with it.
1. Protective cap
2. Shaver head
3. Shaving foil
4. Cutter
5. Long hair trimmer, spring mounted
6. Release button for shaver head
7. ON/OFF switch and long hair trimmer
8. Red recharge indication (model 5515)
9. Green Charge indicator
10. Plug for charging cable
2)Safety instruction
•
Please also observe the safety instructions in the graphics on
page 2.
•
Clean the shaver under running water, but DO NOT immerses.
•
Never touch the mains appliance with wet hands when
unplugging it or plugging it in.
•
Check mains appliance and shaver regularly for mechanical
faults. Replace broken parts by original parts from your
specialist dealer, if required. Never try to repair a broken shaver
yourself.
•
Keep shaver and mains appliance out of reach of children.
•
Do not expose the shaver to temperatures below -10 C or above
+40 C for prolonged periods of time.
Page 2
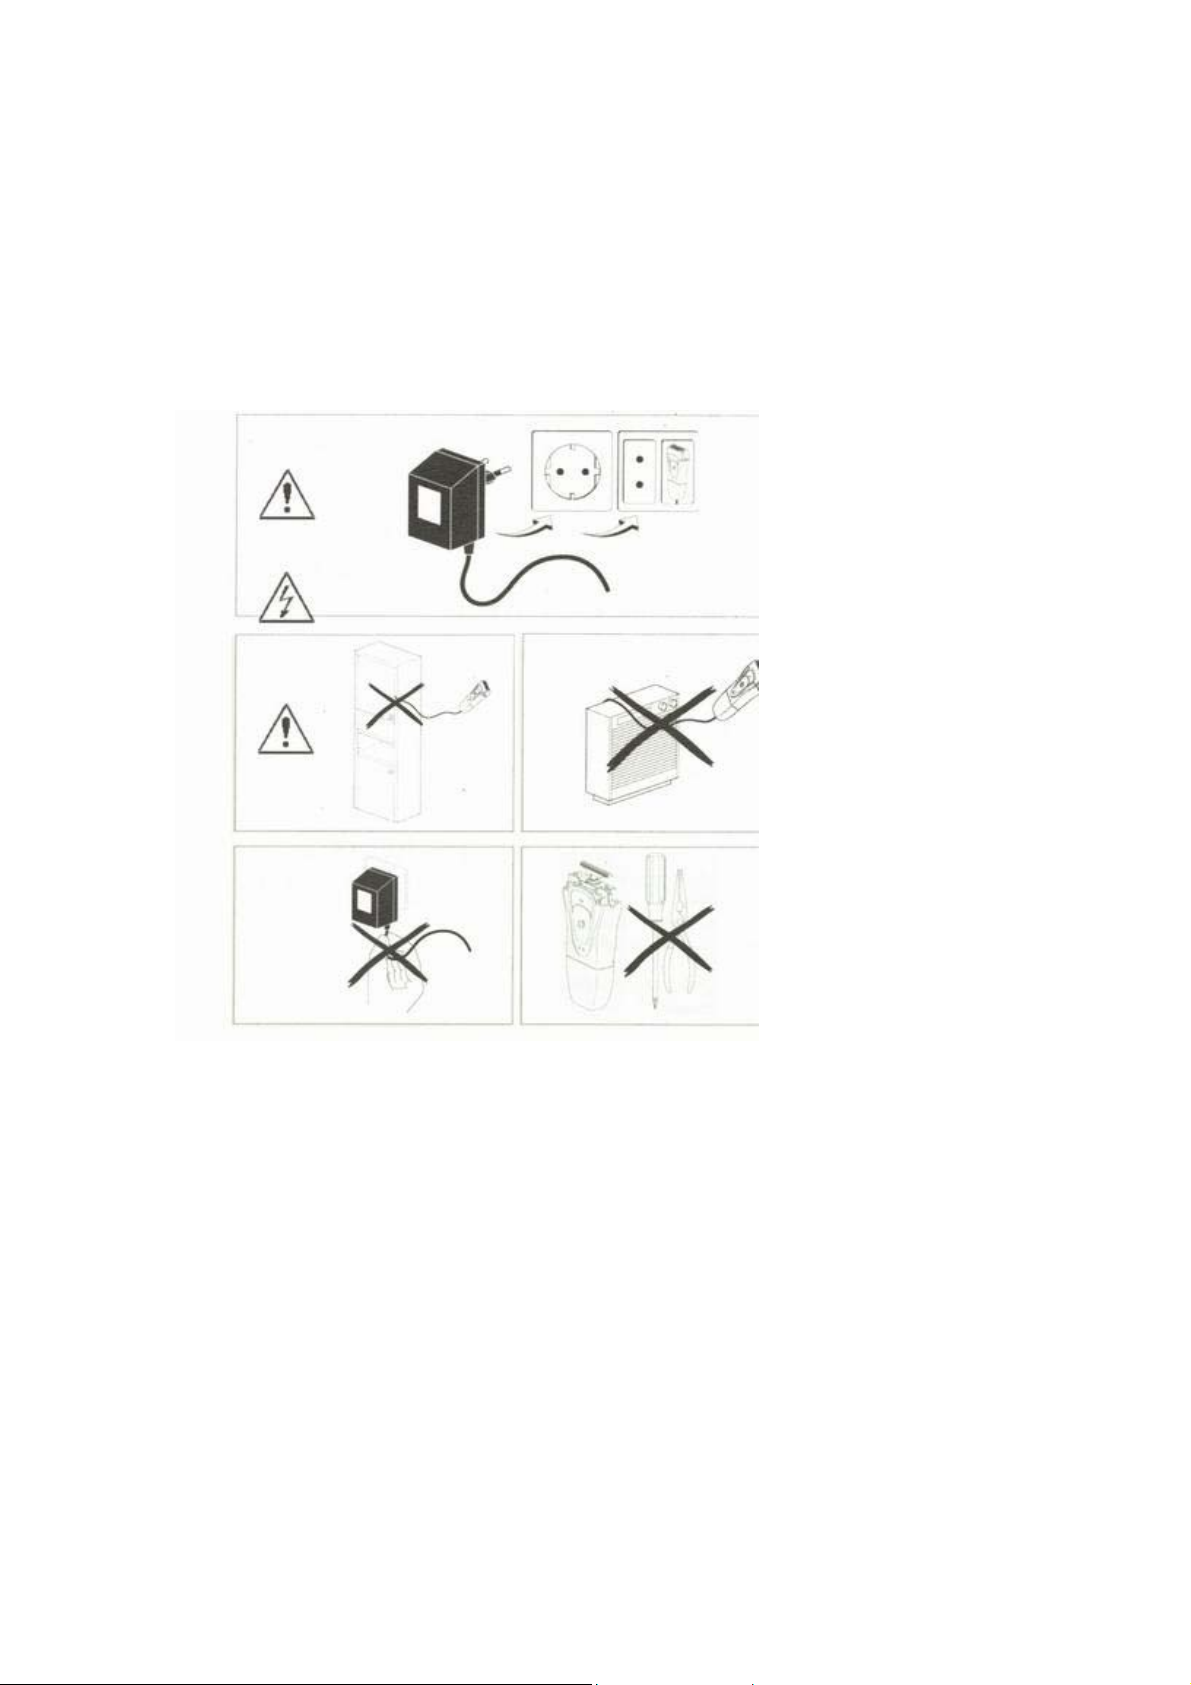
•
Empty or broken batteries MUST NOT be disposed of as
household waste. Please return empty batteries to the and / or
shop.
•
Make sure the cord is not clamped in cabinet doors or pulled
over hot surfaces
•
Hold the mains appliance casing when unplugging it.
3) Operation
The shaver (model 5513 resp. 5515) can be operated by connecting it
to the mains or with the rechargeable batteries. The model 5415 is
recharge only appliance
•
Before plugging the mains appliance in, check whether voltage
and frequency (120V~60 Hz) of your mains supply are suitable.
•
To reach optimum battery capacity, the batteries should initially
be charged for eight hours before the shaver is used for the first
time. The shaver is protected against overload, but continuous
charging is to be avoided. Recharge the battery only when the
shaver is fully discharged. To maintain optimum charge capacity,
this charging/recharging process should be repeated several
times per year. For models 5513 and 5515 a full charge is
indicated by a flashing green light. (Model 5415 - 8 hours
charging time)
Page 3

•
A full charge will give up to 45 minutes of battery operating time.
When connected to the mains, the batteries are recharged within
60 minutes.
With the 5515 model, the recharge indication 8 shows that the battery
capacity has dropped below 20 %. Do not recharge earlier to avoid the
memory effect.
4) Use
Foil shaving
For best shaving results, use the shaver on dry, clean skin.
•
Hold the shaving head at a right angle to your skin against the
direction of the beard growth. Apply only light pressure. Stretch
the skin with your free hand so the hairs stand upright. If you
are using a foil shaver for the first time, it generally takes about
two to three weeks for users to become used to foil shaving.
•
Put the protective cap back on the shaver head after shaving.
Avoid pressure on the foil, as this may cause the foil to break.
Long hair trimmer
The integrated long hair trimmer is particularly useful for trimming
beard and longer hairs. To use the long hair trimmer slide the ON/OFF
switch / Long hair trimmer upward until it clicks in position.
Page 4

5)Cleaning and care
• Press the two release buttons and pull the shaver head from the
casing (Fig. 1).
•
Rinse the shaver head, cutter block and long hair trimmer under
running, warm water (Fig. 2). Do not immerse the shaver in
water! If the shaver is always cleaned with warm water, a few
drops of sewing machine oil on the cutter block and long hair
trimmer are recommended from time to time.
•
The shaver can also be cleaned without water. Tap the shaver
head on a flat surface or blow the hairs out thoroughly. Never
use the brush for cleaning the foil, as this would damage it.
Clean the cutter block with the enclosed cleaning brush (Figs.
3a/b).
Page 5

6) Changing foil and cutter block
Shaving performance depends on the condition of foil 3 and cutter
block. Both wear gradually with use. We recommend changing
•
the foil once per year
•
the cutter block every two years.
Replacing the foil (Fig. 4)
•
Remove the shaver head just as for cleaning purposes.
•
Pull the foil out of the shaver head by holding on to the straps
(Fig. 4).
Important!
Hold the foil only at straps to prevent damage.
•
Place the new foil in the shaver head until it clicks in position.
•
Replace shaver head.
Replacing the cutter block
•
Remove the shaver head just as for cleaning purposes.
•
Hold the cutter block on both end's and lift it from its support.
•
Place the new cutter block in position.
•
Replace shaver head.
7) Replacement parts
When ordering replacement parts (shaver foil and cutter block) please
indicate the type of shaver (see rating plate). The rating plate is on
the back of the shaver.
8) Warranty
The appliance was subject to state-of-the-art in-production inspections.
Should any defect in materials and workmanship appear within 24
months from the date of purchase, it will be repaired or components
and/or the entire shaver will be replaced.
This warranty does not include:
•
Wear parts (shaver foil, cutter block, long hair trimmer)
•
Damage caused by misuse and neglect (incorrect power supply,
bends in the foil, etc.).
•
Defects that only marginally affect the functioning or value of the
shaver.
Page 6

The guarantee takes effect only when the purchase date is confirmed
by stamp and signature of the dealer. For service contact your nearest
service centre.
GRUNDIG
PO Box 2307
Menlo Park, CA 94026
(650) 361-1611 Phone
(650) 361-1724 Fax
(800) 872-2228 US Toll Free
(800) 637-1648 Canada Toll Free
9)Environmental protection, disposal
IMPORTANT!
Protect our environment!
Batteries, shaver and packaging should only be disposed off according
to local regulations.
The following parts must be separated:
•
Motor, metal parts, mains appliance
•
Plastic parts
•
Batteries, board
These parts must be taken to recycling.
Please observe national and regional disposal regulations concerning
waste separation, waste collection and secondary resource centres.
•
Take the shaver and accessories to a secondary resource centre.
Ask your municipality for the address.
Removal of batteries
•
Run the shaver until it stops.
•
Remove shaver head and cutter block.
•
Remove the two screws with a screwdriver.
•
Pull the battery frame from the casing.
•
Lift the board out of the frame.
•
Remove the two batteries from the board.
IMPORTANT! Danger
Page 7
A shaver that has been opened by you must not be reconnected to the
mains!
This shaver meets the EC directives:
89/336EEC, 73123/EEC, 93/68/EEC
Page 8

 Loading...