

Page 1

Please leave these instructions with the pump for future reference.
Redi-Flo4
Stainless Steel Submersible Pumps
for Environmental Applications
GRUNDFOS INSTRUCTIONS
US Installation and operating instructions
Page 2

1
SAFETY WARNING
Grundfos Stainless Steel Submersible Pumps
Your Grundfos Redi-Flo4 Environmental Pump is of the utmost quality. Combined with
proper installation, your Grundfos pump will give you many years of reliable service.
To ensure the proper installation of the pump, carefully read the complete manual
before attempting to install the pump.
Shipment Inspection
Examine the components carefully to make sure no damage has occurred to the
pump-end, motor, cable or control box during shipment.
This Grundfos Redi-Flo4 Environmental Pump should remain in its shipping carton until it is
ready to be installed. The carton is specially designed to protect it from damage. During
unpacking and prior to installation, make sure that the pump is not contaminated,
dropped or mishandled.
The motor is equipped with an electrical cable. Under no circumstance should the cable
be used to support the weight of the pump.
You will find a loose data plate wired to the pump. It should be securely mounted at the well
or attached to the control box.
PRE-INSTALLATION CHECKLIST
Before beginning installation, the following checks should be made. They are all
critical for the proper installation of this submersible pump.
A. Condition of the Well
If the pump is to be installed in a new well, the well should be fully developed and bailed or
blown free of cuttings and sand. Dispose of discharged materials in accordance with the
specific job site requirements. The stainless steel construction of the Redi-Flo4
Environmental Pump makes it resistant to abrasion; however, no pump, made of any
material, can forever withstand the destructive wear that occurs when constantly pumping
sandy groundwater.
Determine the maximum depth of the well, and the drawdown level at the pump’s maximum
capacity. Pump selection and setting depth should be based on this data.
The inside diameter of the well casing should be checked to ensure that it is not smaller than
the size of the pump and motor.
Page 3

2
B. Condition of the Water
Redi-Flo4 pumps are designed for pumping cold groundwater that is free of air or gases.
Decreased pump performance and life expectancy can occur if the groundwater is not cold
or contains air or gases.
C. Installation Depth
Pumping sand or well sediment can occur when the pump motor is installed lower than the
top of the well screen or within five feet of the well bottom. This can reduce the
performance and life expectancy of the pump and should be avoided.
If the pump is to be installed in a lake, containment pond, tank or large diameter well, the
water velocity passing over the motor must be sufficient to ensure proper motor cooling.
The minimum recommended water flow rates which ensure proper cooling are listed in
Table A.
D. Electrical Supply
The motor voltage, phase and frequency indicated on the motor nameplate should be
checked against the actual electrical supply.
WIRE CABLE TYPE
The wire cable used between the pump and control box or panel should be approved for
submersible pump applications. The conductor insulation should have a continuous Teflon
®
jacket with no splices and must be suitable for use with submersible pumps.
INSTALLATION
The riser pipe or hose should be properly sized and selected based on estimated
flow rates and friction-loss factors.
A back-up wrench should be used when the riser pipe is attaching a riser pipe or metallic
nipple to the pump. The pump should only be gripped by the flats on the top of the
discharge chamber. The body of the pump, cable guard or motor should not be
gripped under any circumstance.
If Steel Riser Pipe Is Used:
An approved pipe thread compound should be used on all joints. Make sure the joints are
adequately tightened in order to resist the tendency of the motor to loosen the joints when
stopping and starting.
When tightened, the first section of the riser pipe must not come in contact with
the check valve retainer in the discharge chamber of the pump.
PRE-INSTALLATION CHECKLIST
Page 4

3
After the first section of the riser pipe has been attached to the pump, the lifting cable or
elevator should be clamped to the pipe. Do not clamp the pump. When raising the pump
and riser section, be careful not to place bending stress on the pump by picking it up by the
pump-end only.
Make sure that the electrical cables are not cut or damaged in any way when the
pump is being lowered in the well.
The drop cable should be secured to the riser pipe at frequent intervals to prevent sagging,
looping or possible cable damage.
If Plastic or Flexible Riser Pipe Is Used:
Use the correct compound recommended by the pipe manufacturer or specific job
specifications. Besides making sure that joints are securely fastened, the use of a torque
arrester is recommended when using these types of pipe.
Do not connect the first plastic or flexible riser section directly to the pump.
Always attach a metallic nipple or adapter into the discharge chamber of the
pump. When tightened, the threaded end of the nipple or adapter must not come in
contact with the check valve retainer in the discharge chamber of the pump.
The drop cable should be secured to the riser pipe at frequent intervals using an approved
clip or tape to prevent sagging, looping and possible cable damage.
IMPORTANT - Plastic and flexible pipe tend to stretch under load. This stretching must be
taken into account when securing the cable to the riser pipe.
Leave enough slack between clips or taped points to allow for
this stretching. This tendency for plastic and flexible pipe to stretch
will also affect the calculation of the pump setting depth. If the depth
setting is critical, check with the manufacturer of the pipe to
determine how to compensate for pipe stretch.
When these types of pipe are used, it is recommended that a safety
cable be attached to the pump to lower and raise it. The discharge
piece of Redi-Flo4 submersibles is designed to accommodate this
cable (Figure 4).
Protect the Well from Contamination
While installing the pump, proper care should be used not to
introduce foreign objects or contaminants into the well. The well
should be finished off above grade to protect against surface water
from entering the well, causing contamination.
INSTALLATION
NOTE: Teflon® is a registered trademark of DuPont.
FIGURE 4
Page 5

ELECTRICAL
4
WARNING: To reduce the risk of electrical shock during operation of this pump
requires the provision of acceptable grounding. If the means of connection to
the supply connected box is other than grounded metal conduit, ground the
pump back to the service by connecting a copper conductor, at least the size of
the circuit supplying the pump, to the grounding screw provided within the
wiring compartment.
All electrical work should be performed by a qualified electrician in accordance
with the latest edition of the National Electrical Code, local codes and regulations.
Verification of the electrical supply should be made to ensure the voltage, phase and
frequency match that of the motor. Motor voltage, phase, frequency and full-load current
information can be found on the nameplate attached to the motor. Motor electrical data can
be found in Table C.
If voltage variations are larger than ±
10%, do not operate the pump.
Direct on-line starting is used due to the
extremely fast run-up time of the motor (0.1
second maximum), and the low moment of
inertia of the pump and motor. Direct on-line
starting current (locked rotor amp) is
between 4 and 6.5 times the full-load
current.
Engine-Driven Generators
If the Redi-Flo4 pump is going to be
operated using an engine driven generator,
we suggest the manufacturer of the
generator be contracted to ensure the
proper generator is selected and used. See
Table B for generator sizing guide.
Control Box/Panel Wiring
Single-phase motors must be connected as
indicated in the motor control box. A typical
single-phase wiring diagram using a
Grundfos control box is shown (Figure 5-A).
High Voltage Surge
Arresters
A high voltage surge arrester should be
used to protect the motor against lightning
and switching surges. The correct voltagerated surge arrester should be installed on
the supply(line) side of the control box
(Figure 5-B). The arrester must be
grounded in accordance with the
National Electric Code, local codes and regulations.
FIGURE 5-A
FIGURE 5-B
Single-Phase Wiring Diagram for
GRUNDFOS Control Boxes
Single Phase Hookup
Page 6

ELECTRICAL
Control Box and Surge Arrester Grounding
The control box shall be permanently grounded in accordance with the National Electrical
Code and local codes or regulations. The ground wire should be a bare copper conductor
at least the same size as the drop cable wire size. The ground wire should be run as short
a distance as possible and be securely fastened to a true grounding point.
True grounding points are considered to be: a grounding rod driven into the water strata,
steel well casing submerged into the water lower than the pump setting level, and steel
discharge pipes without insulating couplings. If plastic discharge pipe and well casing are
used, a properly sized bare copper wire should be connected to a stud on the motor and
run to the control panel. Do not ground to a gas supply line. Connect the grounding wire to
the ground point first and then to the terminal in the control box or panel.
Wiring Checks
Before making the final wiring connections of the drop cable to the control box terminal, it is
a good practice to check the insulation resistance to ensure that the cable is good.
Measurements for a new installation must be at least 1,000,000 ohm. Do not start the pump
if the measurement is less than this. If it is higher, finish wiring and verify that all electrical
connections are made in accordance with the wiring diagram. Check to ensure the control
box and high voltage surge arrester have been grounded.
5
START-UP
After the pump has been set into the well and the wiring connections have been
made, the following procedures should be performed:
A. Attach a temporary horizontal length of pipe with installed gate valve to the riser pipe.
B. If required, make provisions to capture discharged fluids for disposal.
C. Adjust the gate valve one-third open.
D. Start the pump and let it operate until the water runs clear of sand and silt.
E. As the water clears, slowly open the gate valve in small increments until the desired
flow rate of clear water is reached. The pump should not be operated beyond its
maximum flow rating and should not be stopped until the groundwater runs clear.
F. If the groundwater is clean and clear when the pump is first started, the valve should
still be opened until the desired flow rate is reached.
G. Disconnect the temporary piping arrangements and complete the final piping
connections.
H. Under no circumstances should the pump be operated for any prolonged
period of time with the discharge valve closed. This can result in motor damage
due to overheating. A properly sized relief valve should be installed at the well head to
prevent the pump from running against a closed valve.
I. Start the pump and test the system. Check and record the voltage and current draw
on each motor lead.
Page 7

6
OPERATION
A. The pump and system should be periodically checked for water quantity, pressure,
drawdown, periods of cycling, and operation of controls. Under no circumstances
should be the pump be operated for any prolonged periods of time with the
discharge valve closed. This can result in motor and pump damage due to
overheating. A properly sized relief valve should be installed at the well head to prevent
the pump from running against a closed valve.
B. If the pump fails to operate, or there is a loss of performance, refer to Troubleshooting,
Section 7.
TROUBLESHOOTING
The majority of problems that develop with submersible pumps are electrical, and most of
these problems can be corrected without pulling the pump from the well. The following
charts cover most of the submersible service work. As with any troubleshooting
procedure, start with the simplest solution first; always make all the above-ground checks
before pulling the pump from the well.
Usually only two instruments are needed – a combination voltmeter/ammeter, and an
ohmmeter. These are relatively inexpensive and can be obtained from most water systems
suppliers.
WHEN WORKING WITH ELECTRICAL CIRCUITS, USE CAUTION TO AVOID
ELECTRICAL SHOCK. It is recommended that rubber gloves and boots be worn
and that care is taken to have metal control boxes and motors grounded to power
supply ground or steel drop pipe or casing extending into the well. WARNING:
Submersible motors are intended for operation in a well. When not operated in a
well, failure to connect motor frame to power supply ground may result in serious
electrical shock.
Page 8

7
TROUBLESHOOTING
Preliminary Tests
SUPPLY
VOLTAGE
How to Measure
By means of a voltmeter, which has
been set to the proper scale, measure
the voltage at the control box. On singlephase units, measure between line and
neutral.
What it Means
When the motor is under load, the
voltage should be within ± 10% of the
nameplate voltage. Larger voltage
variation may cause winding damage.
Large variations in the voltage indicate
a poor electrical supply and the pump
should not be operated until these
variations have been corrected.
If the voltage constantly remains high
or low, the motor should be changed to
the correct supply voltage.
CURRENT
MEASUREMENT
How to Measure
By use of an ammeter, set on the proper
scale, measure the current on each
power lead at the control box. See the
Electrical Data, Table C, for motor amp
draw information.
Current should be measured when the
pump is operating at a constant
discharge pressure with the motor fully
loaded.
What it Means
If the amp draw exceeds the listed
service factor amps (SFA), check for
the following:
1. Loose terminals in control box or
possible cable defect. Check winding
and insulation resistances.
3. Too high or low supply voltage.
4. Motor windings are shorted.
5. Pump is damaged causing a motor
overload.
WINDING
RESISTANCE
How to Measure
Turn off power and disconnect the drop
cable leads in the control box. Using an
ohmmeter, set the scale selectors to
Rx1 for values under 10 ohms and Rx10
for values over 10 ohms.
Zero-adjust the meter and measure the
resistance between leads. Record the
values.
Motor resistance values can be found
in Electrical Data, Table C. Cable
resistance values are in Table D.
What it Means
If all the ohm values are normal, and the
cable colors correct, the windings are
not damaged. If any one ohm value is
less than normal, the motor may be
shorted. If any one ohm value is greater
than normal, there is a poor cable
connection or joint. The windings or
cable may also be open. If some of the
ohm values are greater than normal and
some less, the drop cable leads are
mixed. To verify lead colors, see
resistance values in Electrical Data,
Table C.
INSULATION
RESISTANCE
How to Measure
Turn off power and disconnect the drop
cable leads in the control box. Using an
ohm or mega ohmmeter, set the scale
selector to Rx 100K and zero-adjust the
meter.
Measure the resistance between the
lead and ground (discharge pipe or well
casing, if steel).
What it Means
For ohm values, refer to table below.
Motors of all Hp, voltage, phase and
cycle duties have the same value of
insulation resistance.
Page 9

8
TROUBLESHOOTING CHART
OHM VALUE MEGAOHM VALUE CONDITION OF MOTOR AND LEADS
Motor not yet installed:
2,000,000 (or more) 2.0 New Motor.
1,000,000 (or more) 1.0 Used motor which can be reinstalled in the well.
Motor in well (Ohm readings are for drop cable plus motor):
500,000 - 1,000,000 0.5 - 1.0 A motor in reasonably good condition.
20,000 - 500,000 0.02 - 0.5 A motor which may have been damaged by lightning or with damaged
leads. Do not pull the pump for this reason.
10,000 - 20,000 0.01 - 0.02 A motor which definitely has been damaged or with damaged cable.
The pump should be pulled and repairs made to the cable or the
motor replaced. The motor will still operate, but probably not for long.
less than 10,000 0 - 0.01 A motor which has failed or with completely destroyed cable insulation.
The pump must be pulled and the cable repaired or the motor
replaced. The motor will not run in this condition.
A. Pump Does Not Run
POSSIBLE CAUSES HOW TO CHECK HOW TO CORRECT
1. No power at pump
panel.
Check for voltage at panel. If no voltage at panel, check feeder
panel for tripped circuits.
2. Fuses are blown or
circuit breakers are
tripped.
Remove fuses and check for continuity
with ohmmeter.
Replace blown fuses or reset circuit
breaker. If new fuses blow or circuit
breaker trips, the electrical installation
and motor must be checked.
3. Defective controls. Check all safety and pressure switches
for operation. Inspect contacts in
control devices.
Replace worn or defective parts.
4. Motor and/or cable are
defective.
Turn off power. Disconnect motor leads
from control box. Measure the lead
to lead resistances with the
ohmmeter (Rx1). Measure lead to
ground values with ohmmeter
(Rx100K). Record measured values.
If open motor winding or ground is
found, remove pump and recheck
values at the surface. Repair or replace
motor or cable.
5. Defective capacitor. Turn off the power, then discharge
capacitor. Disconnect leads and
check with an ohmmeter (Rx100K).
When meter is connected, the
needle should jump forward and
slowly drift back.
If there is no needle movement,
replace the capacitor.
Page 10

9
TROUBLESHOOTING CHART
POSSIBLE CAUSES HOW TO CHECK HOW TO CORRECT
Check drawdown during pump
operation.
Lower pump if possible. If not, throttle
discharge valve and install water level
control.
2. Discharge piping or
valve leaking.
Examine system for leaks. Repair leaks.
3. Pump strainer or check
valve are clogged.
Remove pump and inspect. Clean, repair, rinse out pump and
reinstall.
4. Pump worn. Same as B.2 above. If not close to pump curve, remove
pump and inspect.
1. Draw-down is larger
than anticipated.
C. Pump Runs But at Reduced Capacity
B. Pump Runs But Does Not Deliver Water
POSSIBLE CAUSES HOW TO CHECK HOW TO CORRECT
1. Groundwater level in
well is too low or well is
collapsed.
Check well draw-down. Lower pump if possible. If not,
throttle discharge valve and install
water level control.
2. Integral pump check
valve is blocked.
Install pressure gauge, start pump,
gradually close the discharge valve and
read pressure at shut-off. After taking
reading, open valve to its previous
position. Convert PSI to feet.
(For water: PSI x 2.31 ft/PSI = ____ ft.),
and add this to the total vertical distance
from the pressure gauge to the water
level in the well while the pump is
running. Refer to the specific pump
curve for the shut-off head for that pump
model. If the measured head is close to
the curve, pump is probably OK.
If not close to the pump curve,
remove pump and inspect discharge
section. Remove blockage, repair
valve and valve seat if necessary.
Check for other damage. Rinse out
pump and reinstall.
3. Inlet strainer is
clogged.
Same as B.2 above. If not close to the pump curve,
remove pump and inspect. Clean
strainer, inspect integral check
valve for blockage, rinse out pump
and reinstall.
4. Pump is damaged. Same as B.2 above. If damaged, repair as necessary.
Rinse out pump and re-install.
D. Pump Cycles Too Much
POSSIBLE CAUSES HOW TO CHECK HOW TO CORRECT
1. Pressure switch is not
properly adjusted or is
defective.
Check pressure setting on switch
and operation. Check voltage across
closed contacts.
Re-adjust switch or replace if
defective.
2. Level control is not
properly set or is
defective.
Check setting and operation. Re-adjust setting (refer to
manufacturer data.) Replace if
defective.
3. Plugged snifter valve
or bleed orifice.
Examine valve and orifice for dirt or
corrosion.
Clean and/or replace if defective.
Page 11

10
TROUBLESHOOTING CHART
E. Fuses Blow or Circuit Breakers Trip
POSSIBLE CAUSES HOW TO CHECK HOW TO CORRECT
1. High or low voltage. Check voltage at pump panel. If not
within ± 10%, check wire size and
length of run to pump panel.
If wire size is correct, contact power
company. If not, correct and/or replace
as necessary.
2. Control box wiring and
components.
Check that control box parts match the
parts list. Check to see that wiring
matches wiring diagram. Check for
loose or broken wires or terminals.
Correct as required.
3. Defective capacitor. Turn off power and discharge capacitor.
Check using an ohmmeter (Rx100K).
When the meter is connected, the
needle should jump forward and slowly
drift back.
If no meter movement, replace the
capacitor.
4. Starting relay (Franklin
single-phase motors only).
Check resistance of relay coil with an
ohmmeter (Rx1000K). Check contacts
for wear.
Replace defective relay.
TECHNICAL DATA
Table A
Minimum Water Flow Requirements for
Submersible Pump Motors
MOTOR CASING OR SLEEVE MIN. FLOW PAST
DIAMETER I.D. IN INCHES THE MOTOR (GPM)
4” 4 1.2
5 7
6 13
7 21
8 30
NOTES:
1. A flow inducer or sleeve must be used if the
water enters the well above the motor or if
there is insufficient water flow past the motor.
2. The minimum recommended water velocity over
4” motors is 0.25 feet per second.
Table B
Guide for Engine-Driven Generators in
Submersible Pump Applications
MINIMUM KILOWATT RATING OF
GENERATOR FOR THREE-WIRE
SUBMERSIBLE PUMP MOTORS
EXTERNALLY INTERNALLY
REGULATED REGULATED
MOTOR HP GENERATOR GENERATOR
0.33 HP 1.5 KW 1.2 KW
0.50 2.0 1.5
0.75 3.0 2.0
1.0 4.0 2.5
1.5 5.0 3.0
NOTES:
1. Table is based on typical 80°C rise continuous
duty generators with 35% maximum voltage dip
during start-up of single phase motors.
2. Contact the manufacturer of the generator to
assure the unit has adequate capacity to run
the submersible motor.
3. If the generator rating is in KVA instead of
kilowatts, multiply the above ratings by 1.25 to
obtain KVA.
Page 12
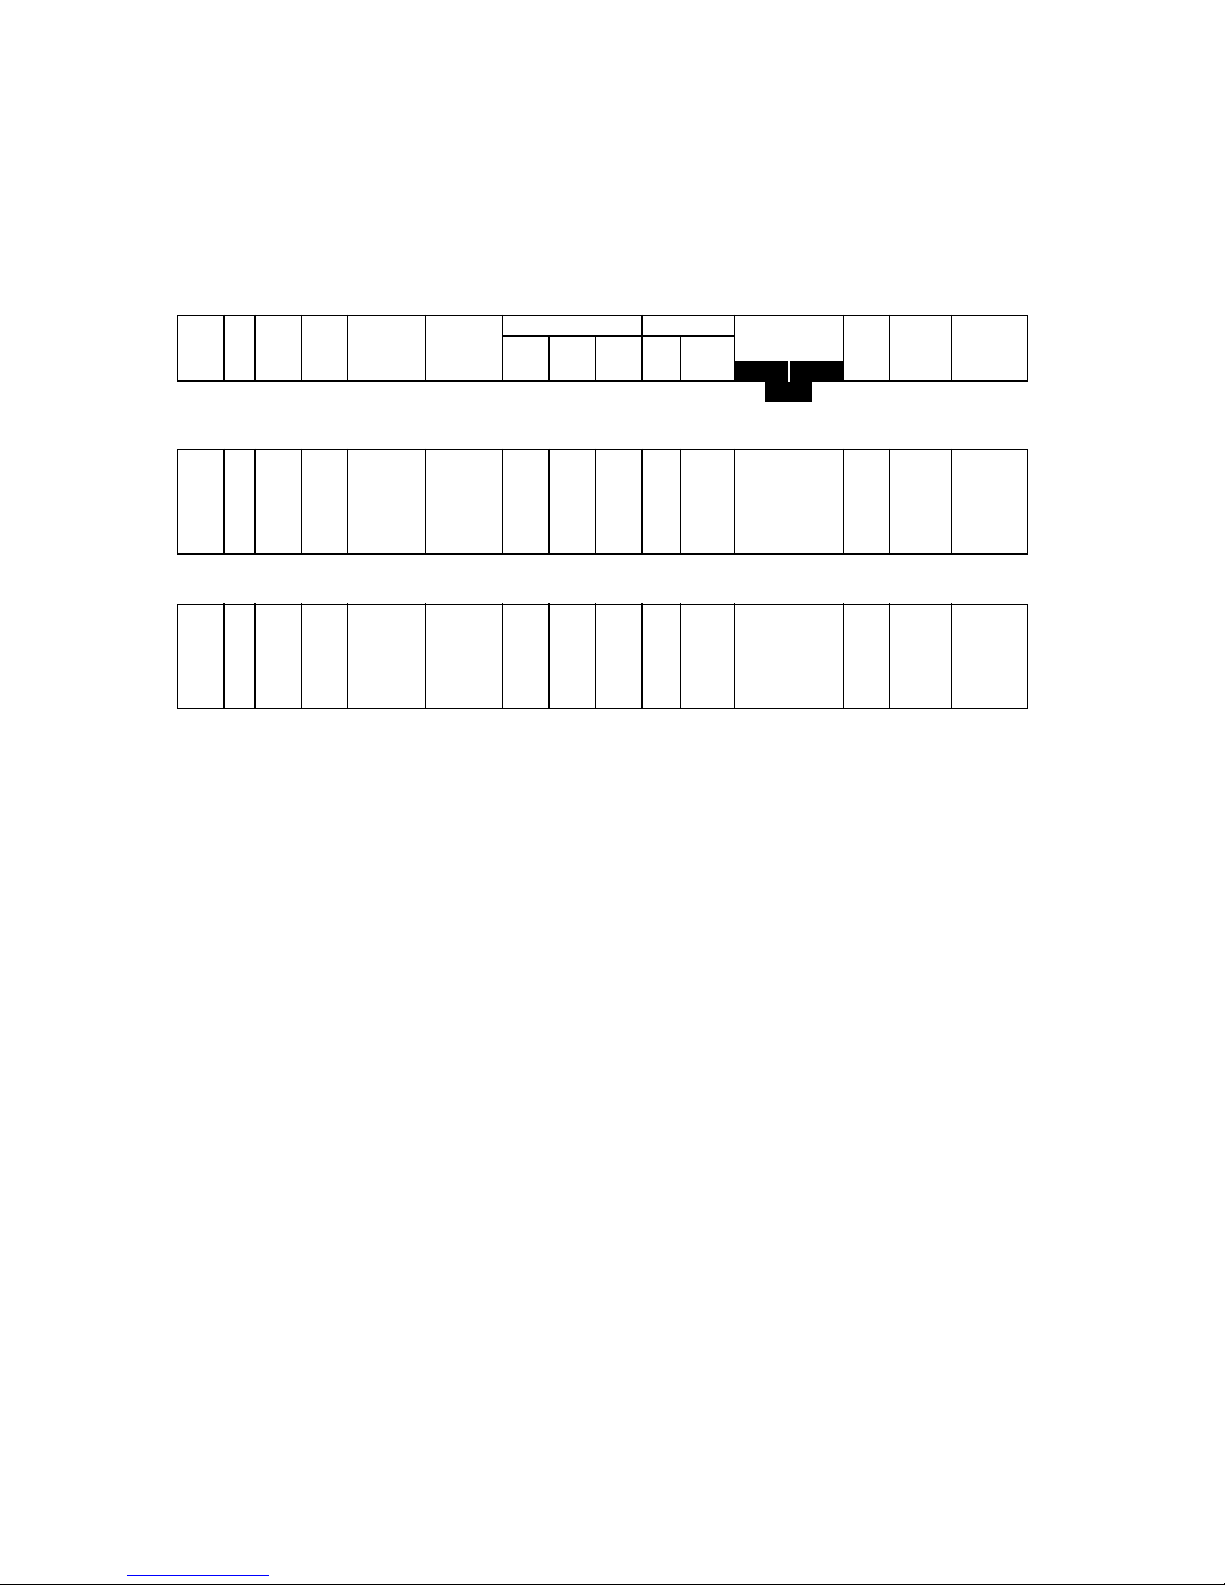
CIRC. DUAL AMPERAGE FULL LOAD KVA MAX. GRUNDFOS
SER. BRK. OR ELEMENT FULL LOCK S.F. POWER CODE THRUST PART
HP P H VOLT FACT. STD. FUSE FUSE LOAD ROTOR AMPS EFF. FACTOR ** (LBS) NO.
11
TECHNICAL DATA
Table C
Electrical Data – 60 Hz Submersible Pump Motors
GRUNDFOS MOTORS
4-Inch, Single Phase, 2-Wire Motors (control box not required)
4-Inch, Single Phase, 3-Wire Motors
1/3 1 230 1.75 15 5 3.4 25.7 4.6 59.0 77.0 6.8-8.2 S 770 79.952301
1/2 1 230 1.60 15 7 4.5 34.5 6.0 62.0 76.0 5.2-6.3 R 770 79.952302
3/4 1 230 1.50 20 9 6.9 40.5 8.4 62.0 75.0 3.2-3.8 N 770 79.952303
1 1 230 1.40 25 12 8.0 48.4 9.8 63.0 82.0 2.5-3.1 M 770 79.952304
1-1/2 1 230 1.30 35 15 10.0 62.0 13.1 64.0 85.0 1.9-2.3 L 770 79.952305
1/3 1 230 1.75 15 5 3.4 14.0 4.6 59.0 77.0 6.8-8.3 17.3-21.1 L 770 79.453301
1/2 1 230 1.60 15 7 4.5 21.5 6.0 62.0 76.0 4.7-5.7 15.8-19.6 L 770 79.453302
3/4 1 230 1.50 20 9 6.9 31.4 8.4 62.0 75.0 3.2-3.9 14-17.2 L 770 79.453303
1 1 230 1.40 25 12 8.0 38.0 9.8 63.0 82.0 2.6-3.1 10.3-12.5 K 770 79.453304
1-1/2 1 230 1.30 35 15 9.4 45.9 11.6 69.0 89.0 1.9-2.3 7.8-9.6 H 770 79.453305
LINE-TO-LINE
RESISTANCE
(OHMS)
Blk-Yel Red-Yel
Delta
FRANKLIN MOTORS
(refer to the Franklin Submersible Motors Application Maintenance Manual)
Page 13
12
TECHNICAL DATA
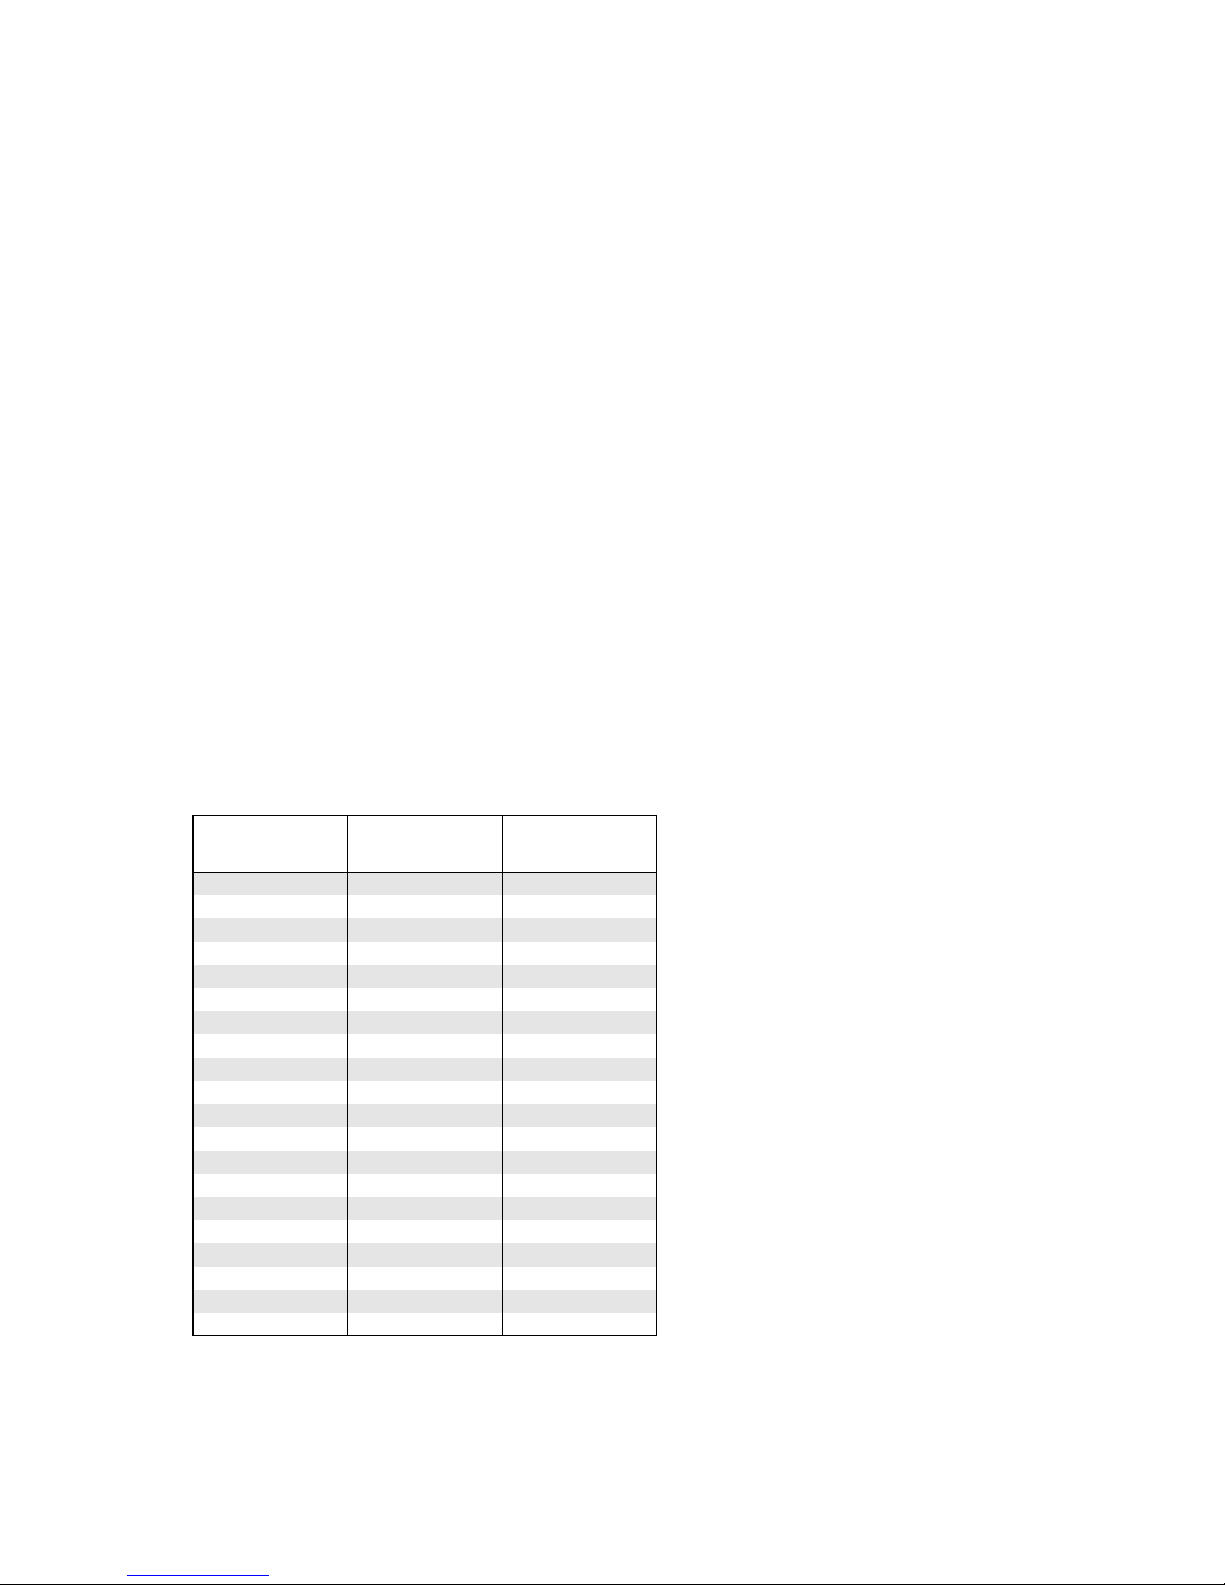
Table D
Total Resistance of Drop Cable (OHMS)
The values shown in this table are for copper conductors. Values are for the total resistance
of drop cable from the control box to the motor and back.
To determine the resistance:
1. Disconnect the drop cable leads from the control box.
2. Record the size and length of drop cable.
3. Determine the cable resistance from the table.
4. Add drop cable resistance to motor resistance. Motor resistances can be found in the
Electrical Data Chart, Table C.
5. Measure the resistance between each drop cable lead using an ohmmeter. Meter should
be set on Rx1 and zero-balanced for this measurement.
6. The measured values should be approximately equal to the calculated values.
Wire Resistances
DISTANCE FROM 12 AWG WIRE 14 AWG WIRE
CONTROL BOX TO RESISTANCE RESISTANCE
PUMP MOTOR (FT.) (OHMS) (OHMS)
10 0.03 0.05
20 0.06 0.10
30 0.10 0.15
40 0.13 0.21
50 0.16 0.26
60 0.19 0.31
70 0.23 0.36
80 0.26 0.41
90 0.29 0.46
100 0.32 0.51
110 0.36 0.57
120 0.39 0.62
130 0.42 0.67
140 0.45 0.72
150 0.49 0.77
160 0.52 0.82
170 0.55 0.87
180 0.58 0.93
190 0.62 0.98
200 0.65 1.03
Page 14

13
NOTES
Page 15

14
NOTES
Page 16

Redi-Flo4 Environmental Pumps manufactured by GRUNDFOS PUMPS CORPORATION
(GRUNDFOS) are warranted to the original user only to be free of defects in material and
workmanship for a period of 24 months from date of installation, but not more than 30 months
from date of manufacture. GRUNDFOS' liability under this warranty shall be limited to repairing
or replacing at GRUNDFOS' option, without charge, F.O.B. GRUNDFOS' factory or authorized
service station, any product of GRUNDFOS' manufacture. GRUNDFOS will not be liable for
any costs of removal, installation, transportation, or any other charges which may arise in
connection with a warranty claim. Products which are sold but not manufactured by GRUNDFOS
are subject to the warranty provided by the manufacturer of said products and not by
GRUNDFOS' warranty. GRUNDFOS will not be liable for damage or wear to products caused
by abnormal operating conditions, accident, abuse, misuse, unauthorized alteration or repair,
or if the product was not installed in accordance with GRUNDFOS' printed installation and
operating instructions.
To obtain service under this warranty, the defective product must be returned to the distributor
or dealer of GRUNDFOS' products from which it was purchased together with proof of
purchase and installation date, failure date, and supporting installation data. Unless otherwise
provided, the distributor or dealer will contact GRUNDFOS or an authorized service station
for instructions. Any defective product to be returned to GRUNDFOS or a service station
must be sent freight prepaid; documentation supporting the warranty claim and/or a Return
Material Authorization must be included if so instructed.
GRUNDFOS WILL NOT BE LIABLE FOR ANY INCIDENTAL OR CONSEQUENTIAL
DAMAGES, LOSSES, OR EXPENSES ARISING FROM INSTALLATION, USE, OR ANY
OTHER CAUSES. THERE ARE NO EXPRESS OR IMPLIED WARRANTIES, INCLUDING
MERCHANTABILITY OR FITNESS FOR A PARTICULAR PURPOSE, WHICH EXTEND
BEYOND THOSE WARRANTIES DESCRIBED OR REFERRED TO ABOVE.
Some jurisdictions do not allow the exclusion or limitation of incidental or consequential damages
and some jurisdictions do not allow limitations on how long implied warranties may last. Therefore,
the above limitations or exclusions may not apply to you. This warranty gives you specific
legal rights and you may also have other rights which vary from jurisdiction to jurisdiction.
LIMITED LIMITED
LIMITED LIMITED
LIMITED
WAWA
WAWA
WA
RRANTYRRANTY
RRANTYRRANTY
RRANTY
L-RF-IO-001 Rev. 07/03
PRINTED IN USA
Grundfos Pumps Corporation
17100 W. 118th Terrace
Olathe, Kansas 66061
Telephone: (913) 227-3400
Fax: (913) 227-3500
Grundfos Canada, Inc.
2941 Brighton Rd.
Oakville, Ontario L6H 6C9
Telephone: (905) 829-9533
Fax: (905) 829-9512
Bombas Grundfos de Mexico, S.A. de C.V.
Boulevard TLC #15, Parque Industrial Stiva Aeropuerto
C.P. 66600 Apodaca, N.L. Mexico
Telephone: 52-8-144-4000
Fax: 52-8-144-4010
www.grundfos.com
 Loading...